CONTENTSpdf.usaid.gov/pdf_docs/PA00KXG4.pdf · contents of the quick start literacy program ......
217
Transcript of CONTENTSpdf.usaid.gov/pdf_docs/PA00KXG4.pdf · contents of the quick start literacy program ......


Background note | ii
CONTENTS
ACRONYMS ......................................................................................................................................................................................................... vi
DEFINITION OF LIST OF ICONS .................................................................................................................................................................... viii
PREFACE ............................................................................................................................................................................................................... x
ACKNOWLEDGMENT ...................................................................................................................................................................................... xii
TRAINER’S GUIDE DEVELOPMENT TEAM ................................................................................................................................................ xiii
INTRODUCTION ............................................................................................................................................................................................... xvi
BACKGROUND OF EDUCATION CRISIS RESPONSE PROJECT ........................................................................................................... xvi
PURPOSE OF THE GUIDE ............................................................................................................................................................................. xviii
STRUCTURE OF THE GUIDE .......................................................................................................................................................................... xix
KEY IDEAS ......................................................................................................................................................................................................... xx
MASTER TRAINER ROLE ........................................................................................................................................................................... xxii
CONTENTS OF THE QUICK START LITERACY PROGRAM ............................................................................................................... xxiii
STRUCTURE OF SCRIPTED LESSON ...................................................................................................................................................... xxiii
INTRODUCTION TO NFE BENCHMARK ................................................................................................................................................... xxvii
THE FACILITATOR ........................................................................................................................................................................................ xxix
WHO IS A FACILITATOR? ......................................................................................................................................................................... xxix
QUALITIES OF A GOOD FACILITATOR ................................................................................................................................................. xxix
RESPONSIBILITIES OF AN EFFECTIVE LEARNING FACILITATOR .................................................................................................. xxx
PART 1 – CREATING CONDUCIVE LEARNING ENVIRONMENT............................................................................................................... 1
1. GUIDING PRINCIPLES OF LEARNER CENTERED PEDAGOGY ..................................................................................................... 2
2. CLASSROOM MANAGEMENT STRATEGIES ..................................................................................................................................... 5

Background note | iii
3. EFFECTIVE GROUP WORK ................................................................................................................................................................... 7
4. EFFECTIVE PRAISE ..................................................................................................................................................................................... 7
PART 2 - TEACHING READING, BASIC LEVEL: .......................................................................................................................................... 8
ECR TRAINER’S GUIDE FOR READING AND WRITING INSTRUCTION .............................................................................................. 9
TEACHING READING, BASIC LEVEL: OVERVIEW OF FACILITATOR TRAINING SESSIONS ....................................................... 11
EXPECTED LEARNING OUTCOMES FOR TRAINERS ............................................................................................................................ 12
IMPLEMENT THE SCRIPTED LESSONS WELL AND AS PLANNED SESSION 1: INTRODUCTION: WHAT IS READING? WHAT
IS WRITING? ................................................................................................................................................................................................... 13
SESSION 2: ORAL LANGUAGE AS THE FOUNDATION OF READING (1.5 HOURS) ........................................................................ 18
SESSION 3: INTRODUCTION TO ECR SCRIPTED LESSONS—OVERVIEW AND INITIAL PRACTICE .......................................... 23
SESSION 4: GUIDED PRACTICE WITH SCRIPTED LESSONS (PART 1) ............................................................................................... 27
SESSION 5: MODELING AND GUIDED PRACTICE WITH SCRIPTED LESSONS (PART 2) .............................................................. 29
SESSION 6: PRACTICE SESSION 2: USING DRAFT LESSON PLANS FOR NFLCS ............................................................................ 33
SESSION 7: CREATING A LANGUAGE AND PRINT RICH CLASSROOM ENVIRONMENT ............................................................ 35
PART 3: TEACHING N U M ERACY ............................................................................................................................................................... 58
NUMERACY INTRODUCTION..................................................................................................................................................................... 60
FONTS AND ICONS ....................................................................................................................................................................................... 60
FOUNDATIONS AND FUNDAMENTALS OF NUMERACY TEACHING ............................................................................................... 62
ECR’S APPROACH TO NUMERACY INSTRUCTION AND ADVICE FOR LEARNING FACILITATORS .......................................... 63
FOUNDATIONS OF MATHS INSTRUCTION AND ECR’S NUMERACY SCOPE AND SEQUENCE ................................................... 65
FUNDAMENTALS OF MATHS TEACHING AND ECR’S APPROACH TO NUMERACY TEACHING ............................................... 68
INTRODUCTION TO THE ECR NUMERACY FACILITATOR’S GUIDE – STRUCTURE, ORGANISATION & USE ........................ 71
DEMONSTRATION LESSONS: HOW TO TEACH USING THE SCRIPTED LESSON ............................................................................. 73
Background note | iv
DEMONSTRATION OF ACTIVITY PLAN (NUMERACY) ........................................................................................................................ 78
PREPARATION FOR NUMERACY SIMULATIONS ................................................................................................................................... 80
NUMERACY SIMULATION 1 – LESSON 2 (ADDITION) – 90 MINUTES ................................................................................................ 82
NUMERACY SIMULATION 2 (LESSON 9 – MULTIPLES OF NUMBERS) .............................................................................................. 84
MAKE AND TAKE - DEVELOPING INSTRUCTIONAL MATERIALS FOR NUMERACY .................................................................... 86
SIMULATION 3 (LESSON 15 – HOW LONG IS IT?) ................................................................................................................................... 90
LESSON 2: ADDITION ................................................................................................................................................................................... 92
SCRIPTED LESSON 9: HOW LONG IS IT? .................................................................................................................................................. 95
SCRIPTED LESSON 15: MULTIPLES......................................................................................................................................................... 100
LESSON OBSERVATION CHECKLIST ..................................................................................................................................................... 104
PART 4: TEACHING SOCIAL EMOTIONAL LEARNING SKILLS .......................................................................................................... 105
ECR APPROACH TO SOCIAL EMOTIONAL LEARNING ...................................................................................................................... 105
INTRODUCTION TO THE TRAINING ACTIVITY SESSION .................................................................................................................. 109
SESSION 1: CORE COMPETENCIES IN SOCIAL EMOTIONAL LEARNING....................................................................................... 112
APPENDIX 1: CHARTS WITH DEFINITIONS OF SOCIAL EMOTIONAL LEARNING AND FIVE (5) COMPETENCIES .............. 122
APPENDIX 2: PUZZLE WITH THE 5 COMPETENCIES .......................................................................................................................... 123
SESSION 2: MODELING SOCIAL AND EMOTIONAL SKILLS FOR LEARNERS ............................................................................... 124
APPENDIX 3: SESSION 2: ACTIVITY INSTRUCTIONS .......................................................................................................................... 129
APPENDIX 4: SESSION 2: STORIES FOR MODELING SOCIAL AND EMOTIONAL SKILLS ........................................................... 130
SESSION 3: OBSERVING AND UNDERSTANDING YOUR LEARNERS.............................................................................................. 134
APPENDIX 5: SESSION 3: ROLE PLAY CARDS/SCENARIOS ............................................................................................................... 142
APPENDIX 6: MODULE 1: WEEK 1: LESSON 1 ....................................................................................................................................... 145
SESSION 4: BRAINSTORMING SEL ACTIVITIES / GAMES .................................................................................................................. 149

Background note | v
SESSION 5: DEMONSTRATING SEL LESSONS ...................................................................................................................................... 154
APPENDIX 7: SESSION 6: PRESENTATION RATING SHEET ............................................................................................................... 158
APPENDIX 8: MODULE 2: WEEK 7: LESSON 1 - TOPIC: EXPRESSING HOW I FEEL ...................................................................... 159
INFUSING SEL INTO READING AND MATHEMATICS ........................................................................................................................ 164
APPENDIX 9: INFUSION: READING AND MATH LESSONS ................................................................................................................ 169
APPENDIX 10: MATH LESSON PLAN (WITHOUT SEL) ........................................................................................................................ 173
APPENDIX 11: ROLE AND RESPONSIBILITIES OF A FACILITATOR ................................................................................................ 175
APPENDIX 12: TRAINING AGENDA......................................................................................................................................................... 179
APPENDIX 13: HAUSA ALPHABET .......................................................................................................................................................... 183
APPENDIX 14: LEARNING FIRST LANGUAGE ...................................................................................................................................... 185

Background note | vi
AE Alternative Education
ANFEA Adult and Non Formal Education Agency
CSACEFA Civil Society Action Coalition on Education for All
GDSS Government Day Secondary School
FBO Faith Based Organization
FOMWAN Federation of Muslim Women Associations in Nigeria
FS Formal school
LC Learning Center
LF Learning Facilitator
MOE Ministry of Education
MTTR Multi-media Training Resource
NFE Non-Formal Education
NFLC Non-Formal Learning Center
OVC Orphans and Vulnerable Children
SEL Social and Emotional Learning
SBMC School Based Management Committee
SEMA State Emergency Management Agency
ACRONYMS
Background note | vii
SAME State Agency for Mass Education
SMoE State Ministry of Education
SUBEB State Universal Basic Education Board

Background note | viii
Assessment
Conclusion
Facilitator’s tip(s)
Group work
Individual work
Important ideas
DEFINITION OF LIST OF ICONS

Background note | ix
Introduction
On-going assessment
Paired work
Practice/review
Presentation
Social Emotional Learning
Whole class review/work

Background note | x
Education in Nigeria is in a state of transition. Numerous efforts are being made to improve the quality of education in the non-
formal sector. Yet persistently, low literacy rates threaten the possibility of meeting the MDG goals and, more importantly, threaten
the future prosperity of all Nigerians and our nation as a whole. This situation has been further exacerbated by conflicts.
The Federal Ministry of Education (FMoE) and the National Mass Education Commission (NMEC) through the State Ministry of
Education (SMoE), State Universal Basic Education Board, (SUBEB), State Agency for Mass Education (SAME)/Adult and Non
Formal Education Agency (ANFEA) and Local Government Education Authorities (LGEAs) in Adamawa, Bauchi, Gombe and
Yobe states, is working with the United States Agency for International Development (USAID) funded Education Crisis Response
(ECR) project and other partners to improve Reading, Numeracy and Social Emotional Learning (SEL) of internally displaced
children and youth in Adamawa, Bauchi, Gombe and Yobe states of the North East Nigeria .
This Trainer’s Guide is intended to be a practical and flexible training document to facilitate the teaching of core subjects in Basic
Literacy program of Non Formal Education (NFE) approach/model. It is designed to be activity-based and aid facilitation by
practitioners at basic education level. It can be adapted to specific situations depending on the needs of the facilitators. The training
duration is recommended to cover a period of nine (9) months to ensure proper understanding of the rudiments of facilitation both
in pedagogic and andragogic teaching skills. This Guide is designed to lead to effectiveness in the delivery of the enhanced NFE
Curriculum by facilitators of Non Formal Learning Centers (NFLCs).
The training Guide adopts the participatory, Learner-Centered, Problem-solving, Self-discovery and Action-oriented (LePSA)
approach for non-formal facilitation. The essence of these approaches is to ensure active teaching/ learning during classroom
practice.
We, the Managers of Education, would like to thank United States Agency for International Development (USAID) – Education
Crisis Response funded project for its efforts for providing access to quality education services for the internally displaced children,
as well as all who have assisted in the development of this manual. We applaud the work of Education Crisis Response project in
PREFACE
Background note | xi
the development and production of this Guide and its other activities to support quality teaching and learning in our Non Formal
Leaning Centers (NFLCs). We urge teachers and facilitators to use it diligently and build on the ideas suggested in their own ways
in order to raise successful learners and a better Nigeria for all of us!
Sincerely
Mrs. Dubi Charity
Chairman NFE Technical
Working Group, Adamawa State
Hajiya Yelwa Abubakar Tafawa
Balewa Chairman NFE Technical
Working Group, Bauchi State
Alhaji Zakari Kudi
Chairman NFE Technical
Working Group, Gombe State

Background note | xii
This manual was developed by a team of local consultants, international consultants, and College of Education lecturers from
Adamawa, Bauchi and Gombe States, under the coordination of Education Crisis Response (ECR). We acknowledge the important
contributions of our partners from State Ministries of Education (MoE), State Universal Basic Education Boards (SUBEB), Adult
and Non Formal Education Agencies (ANFEA), State Agencies for Mass Education (SAME), SEMA, SMOWA, Budget and
Economic Planning, State and Federal Colleges of Education, Universities, Polytechnics, National Mass Education Commission
(NMEC), Federation of Muslim Women Associations in Nigeria (FOMWAN), and the Civil Society Action Coalition on Education
For All (CSACEFA). We are indebted to the technical contributions of our colleagues, whose names appear on the Contributors’
Page.
ACKNOWLEDGMENT

Background note | xiii
Serial No Name of contributor Institution/Agency
Adamawa team
1 Umar Atiku State Ministry of Education, Yola, Adamawa state
2 Ahmed Mohammed State Universal Basic Education Board, Yola Adamawa state
3 Wajigah L. Samuel State Adult and Non Formal Education Agency, Yola , Adamawa state
4 Elishama Lakan J. Adamawa State Polytechnic, Yola.
5 Dr. O. A Olajide Federal College of Education, Yola, Adamawa state
6 Abdulhamid Muhammed Federal College of Education (FCE), Yola, Adamawa state
7 Zainab L. Ribadu Federal College of Education (FCE ) Yola, Adamawa state
8 Medugu Stephen Education Crisis Response Project, Adamawa state
9 Zainab Sindigawo Education Crisis Response Project , Adamawa state
10 Nina Weisenhorn International Rescue Committee, Technical support
11 Rena Deitz International Rescue Committee, Technical support
Bauchi team
12 Musa Lois D State Ministry of Education, Bauchi
13 Dahiru S. Lawal State Universal Basic Education Board, Bauchi
TRAINER’S GUIDE DEVELOPMENT TEAM
Background note | xiv
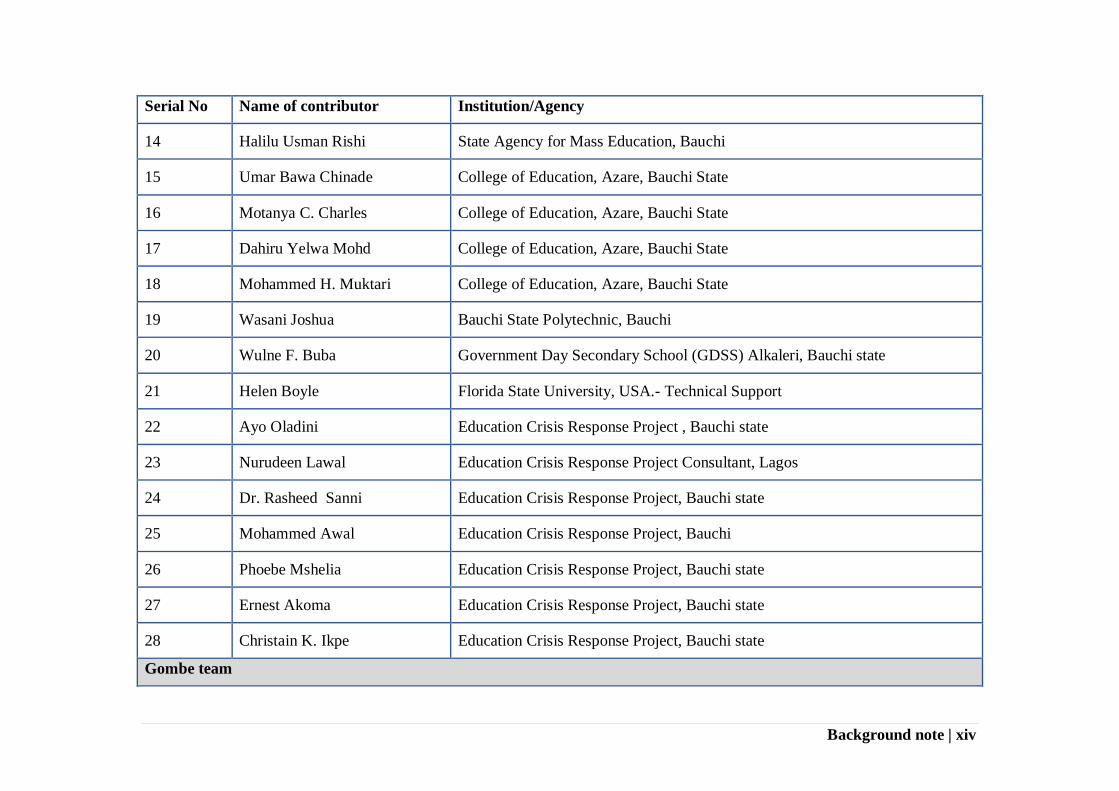
Serial No Name of contributor Institution/Agency
14 Halilu Usman Rishi State Agency for Mass Education, Bauchi
15 Umar Bawa Chinade College of Education, Azare, Bauchi State
16 Motanya C. Charles College of Education, Azare, Bauchi State
17 Dahiru Yelwa Mohd College of Education, Azare, Bauchi State
18 Mohammed H. Muktari College of Education, Azare, Bauchi State
19 Wasani Joshua Bauchi State Polytechnic, Bauchi
20 Wulne F. Buba Government Day Secondary School (GDSS) Alkaleri, Bauchi state
21 Helen Boyle Florida State University, USA.- Technical Support
22 Ayo Oladini Education Crisis Response Project , Bauchi state
23 Nurudeen Lawal Education Crisis Response Project Consultant, Lagos
24 Dr. Rasheed Sanni Education Crisis Response Project, Bauchi state
25 Mohammed Awal Education Crisis Response Project, Bauchi
26 Phoebe Mshelia Education Crisis Response Project, Bauchi state
27 Ernest Akoma Education Crisis Response Project, Bauchi state
28 Christain K. Ikpe Education Crisis Response Project, Bauchi state
Gombe team

Background note | xv
Serial No Name of contributor Institution/Agency
29 Mohammed Sadiq State Ministry of Education, Gombe
30 Larai Ibrahim State Agency for Mass Education, Gombe
31 Adamu Mamman Puma State Ministry of Women Affairs and Social Development, Gombe
32 Mohammed Lawal Gombe State Universal Basic Education Board
33 Adepoju O.A Gombe State University, Gombe
34 Fatima B. Sani Gombe State University
35 Talatu D. Waziri Federal College of Education (Technical), Gombe
36 Ibrahim Ahmed Federal College of Education, Gombe
37 Dalhatu Sulaiman Darazo Education Crisis Response Project, Gombe
38 Hassana Lazarus Education Crisis Response Project, Gombe

Background note | xvi
BACKGROUND OF EDUCATION CRISIS RESPONSE PROJECT
Funded by the United States Agency for International Development (USAID) in partnership with the Government of Nigeria (GON),
the Education Crisis Response project aims to expand access to quality, relevant, safe Non-Formal and Alternative Education (AE)
opportunities for Internally Displaced Persons (IDPs) children and youth, aged 6 -17 including children of host communities in the three
northern states of Adamawa, Bauchi and Gombe. Education Crisis Response is a three-year project, implemented under Cooperative
Agreement awarded to Creative Associates International, in consortium with two international organizations - International Rescue
Committee (IRC) and Florida State University (FSU), as well as two national Non-Governmental Organizations (NGOs) - Federation
of Muslim Women Association in Nigeria (FOMWAN) and Civil Society Action Coalition on Education For All (CSACEFA) - in
partnership with state and local governments institutions in Adamawa, Bauchi, Gombe and Yobe states.
The project is designed to address the main learning needs of IDPs and host learners affected by the crisis in north east Nigeria, through
Non-Formal Learning Centers (NFLCs), Youth Learning Centers (YLCs), and Adolescent Girls Learning Centers (AGLCs) serving
both Muslim and Christian communities. These alternative opportunities include NFE centers, formal schools and vocational skill
acquisition centers that address the immediate educational and psychosocial needs of IDP children and youth. The project also seeks
to collaborate with other implementing partners in the focal states with effective coordination in child protection related activities as
well as ensuring safe learning environments. The project will provide learning in protective centers in urban and rural areas, support
formal schools and work within host communities who have taken IDPs into their homes/where IDPs live together in settlement-type
housing.
The Education Crisis Response project will improve quality and relevant instructional practices to update and/or newly develop
teaching-learning materials for Literacy, Numeracy, Life Skills, Social Emotional Learning (SEL) competencies and psychosocial
support services in NFE and Alternative Education options. The project will recruit, train, and coach NFLC Learning Facilitators
(LFs) to provide quality instruction and ensure Technical Working Groups (TWGs) make relevant teaching-learning materials
INTRODUCTION
Background note | xvii
available. The project will also increase community engagement and support to schooling in targeted NFE and alternative education
learning center communities so that there is heightened awareness of these new and enhanced educational opportunities to improve
the value placed on education and provide IDPs and host community girls, boys and youth with a way to sustain their education.
Education Crisis Response will also work to increase state and Local Government and Civil Society support for NFE and Alternative
Education options so that they collaborate, coordinate and provide government funding and policy support to sustain and expand
Non-Formal Education.
Background note | xviii
Welcome to the Trainer guide for NFE Literacy, Numeracy and Social Emotional Learning (SEL). It was developed to help the
master trainers in the project states of Adamawa, Bauchi, Gombe and Yobe in teaching learning facilitators (LFs) in the ECR-
supported non-formal learning centers to deliver instructions in the three core subjects. Reading skills are to be taught in Hausa
which is the language of the environment. The Guide can also be adopted in other states in Nigeria other than the specified north-
east region.
The Guide is based on the national basic literacy (reading) curriculum, with focus on listening and speaking, phonics, reading and
writing. It acquaints the master trainers with the Activity Plans of the scripted lessons used in the Facilitators’ guide.
For each activity, the Trainers Guide gives methodology and strategy for impacting it to the LFs. Apart from the LFs, mentor
teachers are also trained using the Guide. It is one of the Guides developed by the project that focuses on Literacy, Numeracy, Life
skills and Social and Emotional Learning (SEL). It helps the master trainers to engage LFs with activities and methodologies.
PURPOSE OF THE GUIDE

Background note | xix
The Guide contains three subject areas - literacy, numeracy and SEL and their activity plans. Each plan specifies skills to be
developed, the time of the lesson, important ideas in the lesson and expected learning outcomes, as well as materials to prepare in
advance. Then, a step-by-step description of the lesson provides suggestions on how to organize activities that interest learners
while helping them achieve the learning outcomes of the lesson. Each Activity Plan has the following structure or parts:
An introduction to gain learners’ interest and inform them of the desired outcomes of the sessions;
Activity procedures (presentation, practice and performance) that present the content of the lesson in a lively, child-centered format
(not the usual “chalk and talk”);
Assessment activity to determine whether each learning facilitator has reached the desired outcomes;
Review or conclusion section that provides additional opportunities for Learners to practice their new knowledge and skills, and
to deepen their knowledge;
Facilitator tips to give you some additional information about the lesson or ideas for different ways to facilitate; and
Reflection section to help you reflect on the successes and challenges of the lesson, and to determine how to improve upon them
next time.
Before using this guide, be sure to review the information in the Annexes as well. These provide a rich source of teaching ideas for
teaching your learners.
STRUCTURE OF THE GUIDE

Background note | xx
Before using this guide, we would like to share some key ideas that will help you understand how the Guide works and better
prepare you to teach your learners the wonderful skill of reading:
ACTIVITY PLANS ARE ONLY EXAMPLES! This guide does not cover the entire NFE curriculum. Rather, it includes key
literacy skills from the literacy, numeracy, SEL and NFE curriculum provides you with examples of activities that can help your
learners learn in a way that interests them while achieving good results. Once you have taught a lesson from an Activity Plan, try
to think of other things you can teach using the same kinds of activities.
TEACHING IS DONE AT MANY LEVELS: The focus of this guide is literacy, numeracy and SEL in Basic literacy program.
However, many of your learners may not have mastered some of the elementary skills of reading, so this guide also contains lessons
to help them with more basic skills such as sequencing, storytelling, and phonemic awareness.
DEVELOPMENT OF CORE SKILLS: Learning to read requires the development of many language skills, from understanding
how words are made of sounds (“phonemic awareness”) to understanding the links between sounds and letters (“sound-letter
correspondence”) to knowing how to read a word we haven’t seen before (“decoding”), then finally to knowing how to understand
different kinds of texts (“comprehension skills”). By following this guide, your learners will have an opportunity to develop each
of these language skills.
LITERACY STARTS WITH KNOWLEDGE OF THE ALPHABET: Remember that we all learn to read first by knowing the
letters of the alphabet by knowing their names, what sounds they make, how they are written, and how they are organized – into
vowels and consonants. Remember to provide your Learners with a review of the alphabet – if needed, on a regular basis, by asking
them to recite it, to state the vowels, to remember the sound each letter makes, and to practice writing it. You can find a copy of the
alphabet in the Annex on page 183.
WE DO WHAT WE ARE EXPECTED TO DO. Like a traveler who has a good map, learners find their way when they know
where they are going – or where a lesson is going, and what is expected of them. This is why good facilitators organize instruction
KEY IDEAS

Background note | xxi
around outcomes: not only content (what is to be taught), but what learners are to know or be able to do at the end of instruction.
Each activity in this guide begins with a statement of learning outcomes so that you can inform your l earners of what is expected
of them. This way, they can prepare for success.
LITERACY IS NOT ENGLISH: This guide focuses not on learning English, but learning to read. This process can be used in
English, Hausa, Fulani-Fulfulde or any other language – learning to read is basically the same process in all languages. You should
therefore continue teaching your English class so that children continue learning to speak English, but use this guide to help them
learn to read and write, eventually in English.
LEARN TO DO IT BY DOING IT. As with all other skills, you learn to read by reading. This means that you need to give your
learners many opportunities to read every day. But there are many ways to read. The best reading facilitators make sure that each
of their learners has three different kinds of opportunities to read each day.
READ WITH: Reading is done with the learners. You can read with them, or they can read with one another – things like words,
sentences, stories, games, instructions, etc. Read with your learners, and have them read with each other, every day.
READ BY: Reading is done by the pupil. Each pupil should have the opportunity to read independently at least 15 minutes each
day.
READ TO: Reading is done to the learners. We all love to be read to; this love never stops. Children are no different. When we
read to them, they learn a lot, like how stories work, what words mean, how people live in other places, why Lawal was smiling the
day he won a football match. Good reading facilitators read to their learners at least 15 minutes each day.
ONE FINAL NOTE: As a facilitator, you have the power to share one of the most important and satisfying skills your learners
will ever develop – the ability to read. Of course, the skills you teach them will help them get started. But if they develop a love for
reading, they will read all the time, they will become stronger readers, and they will read for their whole lives. So don’t forget to
show them how wonderful reading is. Have fun when you read with them. Model how much fun reading can be. It’s infectious!
The more you enjoy it, the more they will enjoy it, too. And they will thank you for sharing with them such a precious gift!
Background note | xxii
MASTER TRAINER ROLE
Master trainers, you are the key to the success of this program. You will deliver a program of training to the facilitators that will
enable them to understand and implement the scripted lesson in literacy as well as numeracy and social and emotional learning
(SEL). This Master Trainer Guide contains a session-by-session, very detailed description the steps you need to follow to deliver
the facilitator training. The training program you will deliver basically mimics the training program that was delivered to you as
Master Trainers.
In the literacy component, one important distinction in the delivery of the training to the facilitators is that you might not have
access to multi-media like LCD projects. As such, you will have to improvise with the PowerPoints and handouts that were used
in your training. Hard copies of all of these materials are included in this guide for your reference.
It is important to explain to facilitators that each part of the lesson has a purpose and that they should not eliminate any of the
sessions. If they are running out of time, they can skip the review and conclusion, as they will do a review the next day in their
introduction. In the facilitator training, be sure to explain to the facilitators why we do an introduction, why we do a presentation,
why we do practice and why we do performance. Remind them that these sessions target various elements of literacy learning,
including concepts of print, phonological awareness, phonics, oral language development and vocabulary. Within each lesson,
children have the opportunity to interact with a text (read, look at) as well as write letters and words.
The central focus of the training you will deliver to the facilitators is practice! Facilitators will need to thoroughly understand how
to use the scripted lessons; this means they will need to practice with those lessons (i.e. do simulated lessons). You, as the Master
Trainer will need to model or demonstrate the implementation of a scripted literacy lesson for the facilitators and they will in turn
have to each have the chance to practice implementing a lesson. Master Trainers and facilitators must take the practice sessions
very seriously. It is not enough for the facilitators to simply read the scripted lessons. THEY MUST PRACTICE implanting a
lesson.
Background note | xxiii
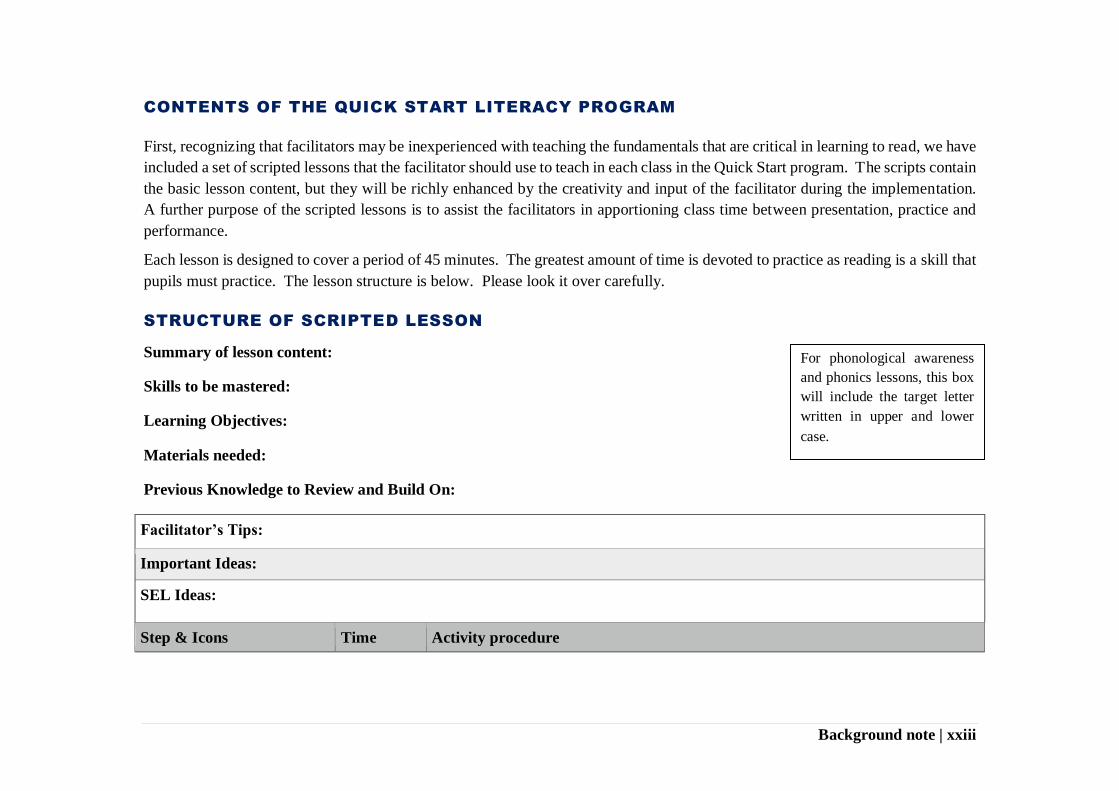
CONTENTS OF THE QUICK START LITERACY PROGRAM
First, recognizing that facilitators may be inexperienced with teaching the fundamentals that are critical in learning to read, we have
included a set of scripted lessons that the facilitator should use to teach in each class in the Quick Start program. The scripts contain
the basic lesson content, but they will be richly enhanced by the creativity and input of the facilitator during the implementation.
A further purpose of the scripted lessons is to assist the facilitators in apportioning class time between presentation, practice and
performance.
Each lesson is designed to cover a period of 45 minutes. The greatest amount of time is devoted to practice as reading is a skill that
pupils must practice. The lesson structure is below. Please look it over carefully.
STRUCTURE OF SCRIPTED LESSON
Summary of lesson content:
Skills to be mastered:
Learning Objectives:
Materials needed:
Previous Knowledge to Review and Build On:
Facilitator’s Tips:
Important Ideas:
SEL Ideas:
Step & Icons Time Activity procedure
For phonological awareness
and phonics lessons, this box
will include the target letter
written in upper and lower
case.

Background note | xxiv
Icon: greeting whole class
Icon: whole class review
5 minutes Introduction
1. Greeting and name tags.
2. Read aloud text (make sure text is on the board before class begins)
3. Review from last class (using text)
4. Use Introduce the topic of the day (using text)
Icon for presentation by
teacher
Practice Icon
SEL Icon
10 minutes
15 minutes
5 minutes
5 minutes
5 minutes
5 minutes
Presentation: Facilitator presents the lesson content.
Practice: The children have a chance to practice the lesson concept/skills with the
teacher, in small groups or pairs or individually. With the phonological awareness and
phonics lessons, the practice should have the following segments
First segment (learning the sound)
Second segment (hearing the sound in words)
Third segment (recognizing the letter in print)
SEL Message:
Performance icon 10 minutes Performance (Assessment)
Wrap up icon 5 minutes Conclusions/Review
Reflection: Teacher, write down notes for yourself on this lesson. Did you enjoy the lesson? How do you think we can improve on
it? If you make some notes, then when you teach this lesson again, you will remember what worked well and where you found some
challenges. This will help you to improve the lesson next time you teach it.
Master Trainer, as you can see, the lesson follows a basic and predictable structure. We want facilitators to follow this basic
structure. Within each activity, we encourage the facilitators to make adjustments as necessary and to note down their reflections
on what they did and what worked well and not so well during the lesson. These lessons have not been field tested and there is
room for adjustment and improvement in them. The ECR project will review the facilitator guide and structure, through feedback
from the users of the guide (pupils and facilitators) after the first cycle of the Quick Start lessons have been implemented. Each

Background note | xxv
element of the scripted lesson is discussed below so that you will thoroughly understand the facilitator guide and the scripted lessons
yourself.
Introduction: The purpose of the introduction period is fourfold:
1) Most importantly, the introduction is meant to give the pupils a chance to interact with text (their name tags and the text
of the day);
2) The introduction allows pupils some time to enrich their oral language by talking with the teacher and classmates;
3) The introduction is an opportunity to set a nice, safe and friendly atmosphere in the classroom; and,
4) The introduction contains a short review so that pupils will “warm up” and remember what they learned in the previous
class
Presentation: The presentation segment of the lesson is for the facilitator to present and explain new information to the pupils.
This DOES NOT mean that only the facilitator must talk. The presentation needs to be interactive, with the facilitator posing
questions and helping the pupil to connect this new knowledge or skill to those he or she already knows or has. This segment
should be fun and the facilitator should smile, move around the classroom, and demonstrate or model the new material so that
everyone can see her/him. While teaching letter sounds, the facilitator should enunciate clearly and model for pupils how to make
the letter sound.
Practice: The practice session of the lesson is critically important. This segment might be noisy but that is ok; in fact, it is good.
Pupils should practice speaking, writing, recognizing letters and words and identifying sounds. For some of the practice, they will
work in pairs and for some they will work individually. Pupils should stand up, gesture and move during this part of the lesson;
this will help them to stay engaged.
SEL Idea: ECR is mindful of the fact that IDP pupils have been through some traumatic experiences and wants the reading and
writing lessons to reinforce the SEL classes the pupils are taking. Certain SEL vocabulary can be used in the reading and writing
lessons to illustrate words that start with particular sounds and letters; this will build pupils’ word recognition and vocabulary.
Additionally, the SEL segment gives children extra time to build their oral language skills, since the facilitator will ask them about
their own ideas and experiences and encourage them to speak, all in a nonthreatening way.
Background note | xxvi
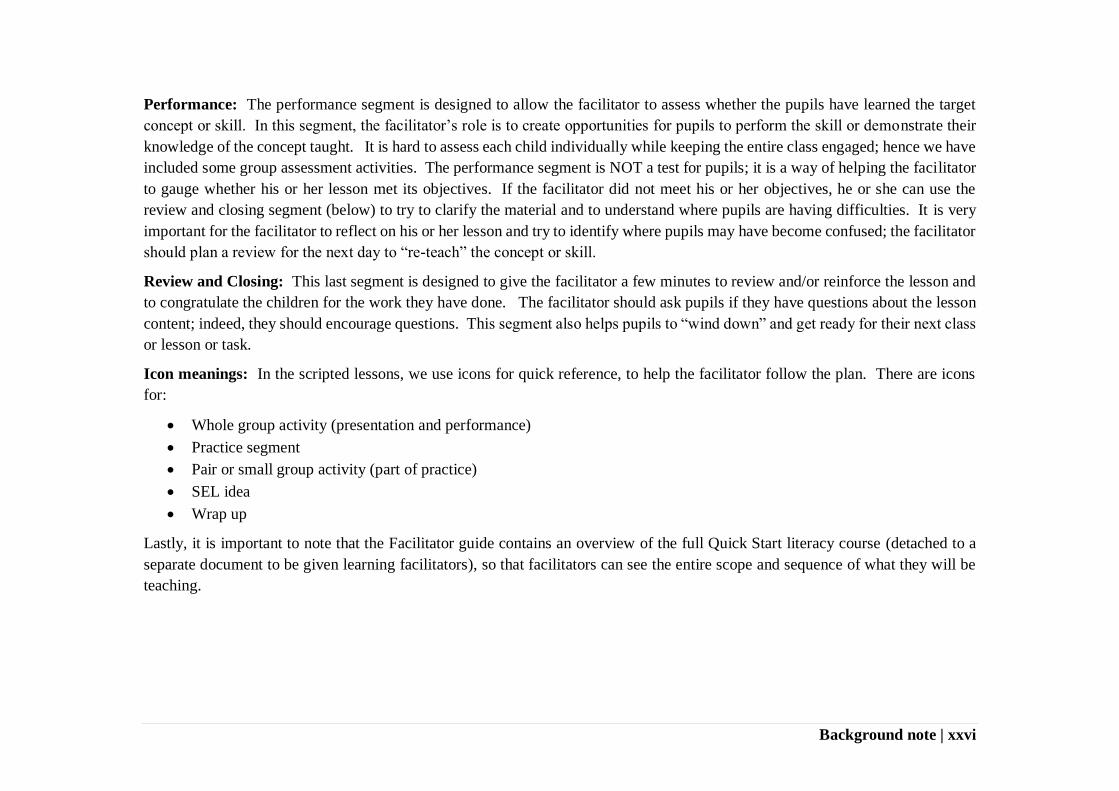
Performance: The performance segment is designed to allow the facilitator to assess whether the pupils have learned the target
concept or skill. In this segment, the facilitator’s role is to create opportunities for pupils to perform the skill or demonstrate their
knowledge of the concept taught. It is hard to assess each child individually while keeping the entire class engaged; hence we have
included some group assessment activities. The performance segment is NOT a test for pupils; it is a way of helping the facilitator
to gauge whether his or her lesson met its objectives. If the facilitator did not meet his or her objectives, he or she can use the
review and closing segment (below) to try to clarify the material and to understand where pupils are having difficulties. It is very
important for the facilitator to reflect on his or her lesson and try to identify where pupils may have become confused; the facilitator
should plan a review for the next day to “re-teach” the concept or skill.
Review and Closing: This last segment is designed to give the facilitator a few minutes to review and/or reinforce the lesson and
to congratulate the children for the work they have done. The facilitator should ask pupils if they have questions about the lesson
content; indeed, they should encourage questions. This segment also helps pupils to “wind down” and get ready for their next class
or lesson or task.
Icon meanings: In the scripted lessons, we use icons for quick reference, to help the facilitator follow the plan. There are icons
for:
Whole group activity (presentation and performance)
Practice segment
Pair or small group activity (part of practice)
SEL idea
Wrap up
Lastly, it is important to note that the Facilitator guide contains an overview of the full Quick Start literacy course (detached to a
separate document to be given learning facilitators), so that facilitators can see the entire scope and sequence of what they will be
teaching.

Background note | xxvii
Benchmark is an expected standard in a venture or activity. It is also a yardstick to measure the input, process and outcome of a
project. In this document, ‘benchmark’ is used to mean the expected level of involvement of all stakeholders and the expected
quality and quantity of inputs including the expected learning achievements.
It is considered that the NFE benchmark will be one of the indicators for assessment, whenever monitoring and evaluation is
conducted at any level of the monitoring exercise.
Items that have been benchmarked for the purpose of setting standard for the measurement of achievements are:
1. Literacy, programs, centers and methodology;
2. Facilitators, materials and equipment;
3. Curriculum, contact hours, learners-facilitators ratio and measurement of achievements;
4. Access, monitoring, evaluation and quality assurance;
5. Governance, multilingual and partnership;
6. Continuity of learning, roles of stakeholders including the International Development Partners (IDPs).
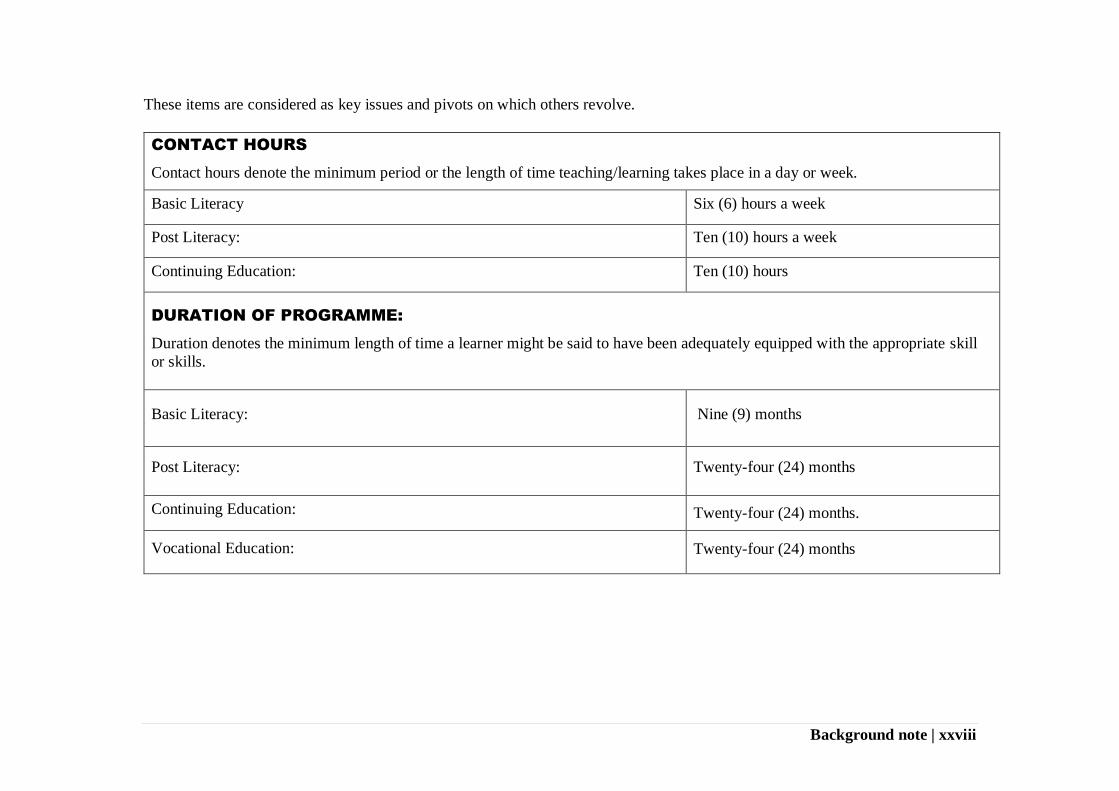
These items are considered as key issues and pivots on which others revolve.
INTRODUCTION TO NFE BENCHMARK
Background note | xxviii
These items are considered as key issues and pivots on which others revolve.
CONTACT HOURS
Contact hours denote the minimum period or the length of time teaching/learning takes place in a day or week.
Basic Literacy Six (6) hours a week
Post Literacy: Ten (10) hours a week
Continuing Education: Ten (10) hours
DURATION OF PROGRAMME:
Duration denotes the minimum length of time a learner might be said to have been adequately equipped with the appropriate skill
or skills.
Basic Literacy: Nine (9) months
Post Literacy: Twenty-four (24) months
Continuing Education: Twenty-four (24) months.
Vocational Education: Twenty-four (24) months

Background note | xxix
WHO IS A FACILITATOR?
1. The facilitator is a person who organizes and directs learning activities
2. The facilitator is directly responsible for all learning activities at the schools/centers,
3. The facilitator could be a full or part time employee in the school/center
4. The facilitator possesses the relevant qualifications to facilitate learning
QUALITIES OF A GOOD FACILITATOR
He should:
1. Have good listening and communication skills
2. Demonstrate empathy for the learners
3. Demonstrate knowledge of the subject matter
4. Possess effective teaching skills
5. Be approachable
6. Show professional attitude
7. Be a mentor and role model
THE FACILITATOR

Background note | xxx
RESPONSIBILITIES OF AN EFFECTIVE LEARNING FACILITATOR
The role of the facilitator is to skillfully assist and guide a group of learners to understand and achieve their common learning
objectives. In addition, a facilitator is charged with the following responsibilities:
1. organization of learning space to facilitate active learning,
2. lesson planning and preparation of notes,
3. delivering the lessons,
4. keep adequate record and maintain established class room management system,
5. identifying the differential needs of the learners and taking action to solve them,
6. assessing learning achievements,
7. taking part in professional development activities,
8. keeping a good relationship with parents and the community, and
9. taking part in feedback discussions with School Mentors after lesson observations.

PART 1 – CREATING CONDUCIVE LEARNING
ENVIRONMENT

Part 1 – Creating Conducive Learning Environment | 2
Learning facilitators are responsible to treat children in a respectful manner. Children need to feel a sense of belonging, happy,
self-confidence, safety and security for them to learn. The learning environment must be a child friendly environment where the
children feel excited to go to school every day. In order to create a conducive learning environment, the facilitator must apply the
following:
1. Guiding principles of learner centered pedagogy
2. Classroom Management Strategies (Giving learners meaningful classroom responsibilities, Arranging Your Classroom,
Establishing Routines, Positive Discipline – Healing Classrooms Multi-Media Training Resource (MTTR) Modules)
3. Effective Group Work (Healing Classrooms MTTR)
4. Effective Praise (Healing Classrooms MTTR and Appendix VII NEI Life Skills Facilitator’s Guide)
1. GUIDING PRINCIPLES OF LEARNER CENTERED PEDAGOGY
Purpose: To introduce the participants to the concept of learner-centered pedagogy
Objective: By the end of this session, participants should be able to:
1. Define Learner-Centered Pedagogy
2. Select methodologies for teaching which are learner-centered
3. Demonstrate learner-centered pedagogy
Materials: Flip chart, marker, prepared flipchart with the words “learner-centered pedagogy”
Time: 15 minutes (plus Healing Classrooms activities)
Step & Icons Time Activity procedure
1 minute 1. Introduce the participants to the concept of learner-centered pedagogy through a simulation.
Say:
I am going to demonstrate two very short activities. Then we will discuss the pros and cons of each,
and which you enjoyed more. Are you ready?
Part 1 – Creating Conducive Learning Environment | 3
Step & Icons Time Activity procedure
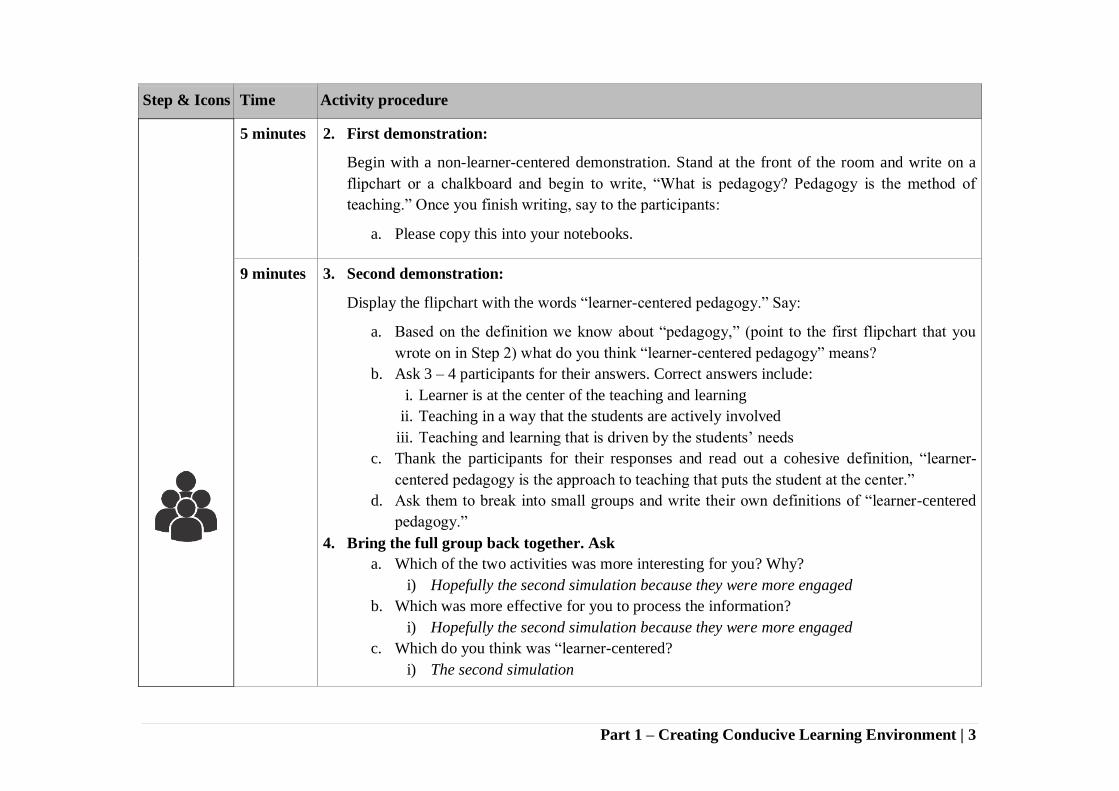
5 minutes 2. First demonstration:
Begin with a non-learner-centered demonstration. Stand at the front of the room and write on a
flipchart or a chalkboard and begin to write, “What is pedagogy? Pedagogy is the method of
teaching.” Once you finish writing, say to the participants:
a. Please copy this into your notebooks.
9 minutes 3. Second demonstration:
Display the flipchart with the words “learner-centered pedagogy.” Say:
a. Based on the definition we know about “pedagogy,” (point to the first flipchart that you
wrote on in Step 2) what do you think “learner-centered pedagogy” means?
b. Ask 3 – 4 participants for their answers. Correct answers include:
i. Learner is at the center of the teaching and learning
ii. Teaching in a way that the students are actively involved
iii. Teaching and learning that is driven by the students’ needs
c. Thank the participants for their responses and read out a cohesive definition, “learner-
centered pedagogy is the approach to teaching that puts the student at the center.”
d. Ask them to break into small groups and write their own definitions of “learner-centered
pedagogy.”
4. Bring the full group back together. Ask
a. Which of the two activities was more interesting for you? Why?
i) Hopefully the second simulation because they were more engaged
b. Which was more effective for you to process the information?
i) Hopefully the second simulation because they were more engaged
c. Which do you think was “learner-centered?
i) The second simulation

Part 1 – Creating Conducive Learning Environment | 4
Step & Icons Time Activity procedure
For the rest of the activity on learner-centered pedagogy, see pg. 134 in IRC’s Healing Classrooms
Module 6:
An Intellectually Stimulating Learning Environment; Teaching Technique 6.1: Using
Differentiated Learning Activities

Part 1 – Creating Conducive Learning Environment | 5
2. CLASSROOM MANAGEMENT STRATEGIES
A. Creating and Assigning Meaningful Classroom Tasks
For training session on Creating and Assigning Meaningful Classroom Tasks see pg. 78 in IRC’s Healing Classrooms
Module 3: Sense of Belonging; Teaching Technique 3.2: Creating and Assigning Meaningful Classroom Tasks.
B. Establishing Routines
For training session on Establishing Routines see pg. 49 in IRC’s Healing Classrooms Module 2: Sense of Control;
Teaching Technique 2.1: Establishing Routines
C. Positive Discipline
Purpose: To introduce the participants to the concept of learner-centered pedagogy
Objective: By the end of this session, participants should be able to:
1. Differentiate between discipline and punishment
2. List methods of positive discipline
Time: 30 minutes
Materials:
Flipchart
Markers
Signs saying “DISCIPLINE” and “PUNISHMENT” and “UNSURE”
Trainer’s tip: Make sure that the participants are understanding the difference between discipline and
punishment. Punishment that is not detrimental is not the same as discipline, and that should be kept
clear for participants.
Steps &
Icons Time Activity procedure
1 minute 1. Introduce the activity by telling the participants that:
a. By the end of this session, you will be familiar with the concept of positive discipline and
how to use it in your classes.

Part 1 – Creating Conducive Learning Environment | 6
Steps &
Icons Time Activity procedure
10 minutes 2. Be sure that the signs saying “DISCIPLINE” and “PUNISHMENT” and “UNSURE” are placed
in different spots around the room. Share brief definitions of “discipline” and “punishment” and
then launch into the activity. Say:
a. Punishment is a penalty imposed for improper behavior or rule-breaking. It focuses on
controlling negative behaviors.
b. Discipline is the practice of teaching an individual to follow rules and act in a positive
manner in the short and long term. It focuses on developing positive behaviors.
c. I will read out various examples. You will individually decide whether you think it is
discipline or punishment. When you have decided, you can walk over to the sign
demarcating that response. We will hear the reason for each from one person in each area.
If you are unsure, you stand in the “UNSURE” area.
d. Read the following examples. After each example ask one volunteer from each side to
explain why they selected that answer. The correct answer is in italics after each example.
i. Setting clear classroom rules [positive discipline]
ii. Sending a student to the head master [punishment]
iii. Assigning the child responsibility [positive discipline]
iv. Corporal punishment [punishment]
v. Having a student stay after class to clean the classroom [punishment]
vi. Redirecting the child’s behavior to be positive [positive discipline]
vii. Maintaining eye contact [positive discipline]
6 minutes 1. Allow the participants to sit back down. Say:
a. Think about a time when you used positive discipline.
b. How did you feel as the teacher using positive discipline?
c. How do you think it feels as the learner being disciplined in this manner?
d. What do you think the outcomes will be in your classroom when you use positive discipline?

Part 1 – Creating Conducive Learning Environment | 7
Steps &
Icons Time Activity procedure
5 minutes 1. Say to the group:
a. In small groups, brainstorm how to use positive discipline in your classrooms. After 5
minutes of brainstorming, we will come back together and each group will share one
method of positive discipline they will implement in their classrooms from the start.
b. Please split into four (4) groups and take 5 minutes to brainstorm.
5 minutes 2. After 5 minutes, bring the group back together. Ask for a volunteer to write on the flipchart.
Say:
a. Can each group share the one positive discipline strategy they will implement in their
classrooms?
b. Our volunteer will write all of the answers on the flipchart for all of us to see. You can
each use all of these strategies back in your classrooms.
3 minutes 3. After all of the groups have shared their strategies, thank the volunteer for writing. Conclude
the session by asking the following questions:
a. What is the difference between positive discipline and punishment?
b. How will you use positive discipline in your classroom?
c. How do you think positive discipline will change your classrooms?
4. Thank the participants and conclude the session.
3. EFFECTIVE GROUP WORK
For training session on Effective Group Work see pg. 110 in IRC’s Healing Classrooms Module 5: Promoting Positive
Social Relationships; Teaching Technique 5.1: Effective Group Work
4. EFFECTIVE PRAISE
For training session on Effective Praise see pg. 89 in IRC’s Healing Classrooms Module 4: Feelings of Self-worth; Teaching
Technique 4.1: Giving Praise
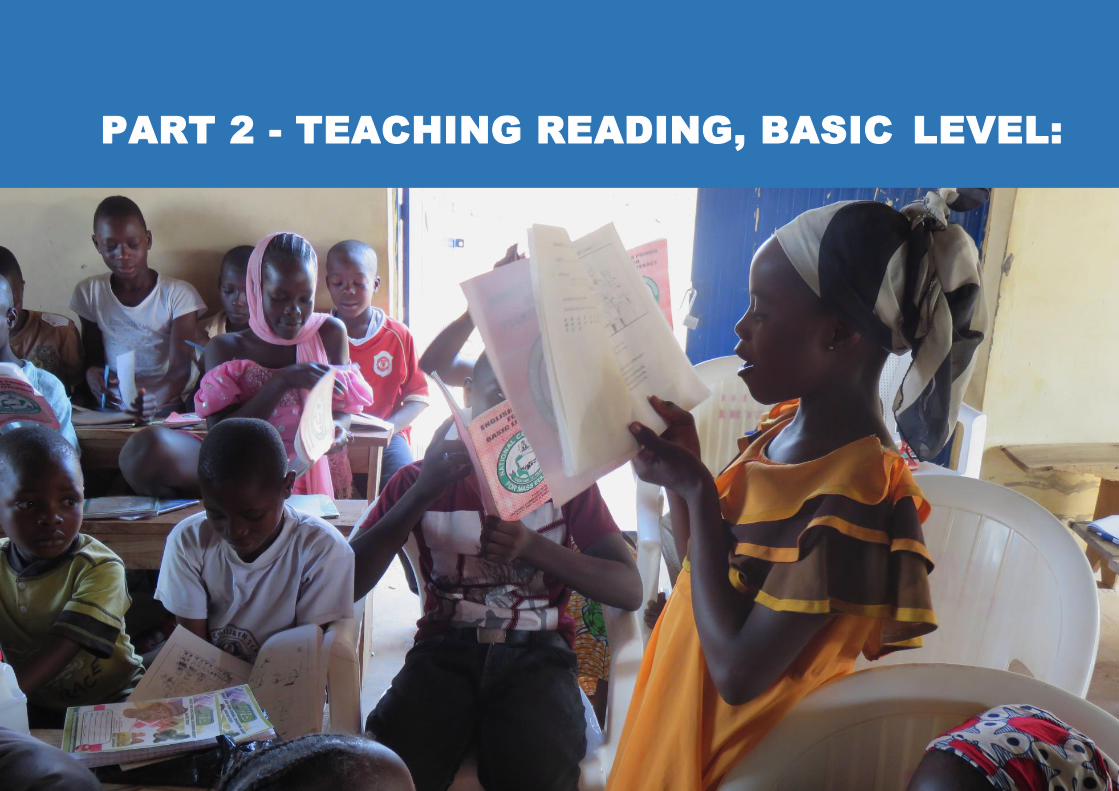
PART 2 - TEACHING READING, BASIC LEVEL:

Part 1 – Teaching Reading, Basic Level | 9
ECR TRAINER’S GUIDE FOR READING AND WRITING INSTRUCTION
Reading and writing are essential skills in today’s rapidly changing and complex world. When children face displacement in the
face of violence, civil unrest or natural disasters, it is critical that educational services resume for them as soon as possible. The
ECR project has been designed to provide rapid educational services in essential literacy and numeracy skills and knowledge as
well as a program of social and emotional learning. The SEL classes reinforce the efficacy of the literacy and numeracy training
and assist children to deal with the trauma they have experienced. Hence, SEL is a cross cutting theme within both the literacy and
numeracy training.
In this guide, we present a set of “Quick Start” reading and writing lessons to pave the way for children to enter into the public
schools as well as other existing or ongoing literacy programs. There have been many reading and writing programs developed
over the years for Hausa and we recognize that the process of putting together an effective reading and writing program can take at
least 6 months and probably more. Hence, our longer-term goal is to adapt and use existing Hausa reading and writing materials
and program, especially those developed under the RARA project.
As the modalities of this arrangement are being worked out, we have elected to begin with a Quick Start program to enable IDPs to
begin classes this summer, in hopes of segueing some of them into the formal system in the fall. This Quick Start program will
also prepare children to succeed in the modified RARA reading and writing program the project will adapt within its Non-Formal
Learning Centers (NFLCs) and to fully matriculate in the pre- and post-literacy courses organized by other entities in Nigeria.
The “Quick Start” lessons focus on the following:
Concepts of Print
Enriching Pupil Oral Language Development
Phonological and Phonemic Awareness
Phonics
Vocabulary Enrichment
Reading and writing words.
The Quick Start lessons are not exhaustive and do not constitute a full course or program on learning to read. While the lesson
content is highly weighted toward phonological awareness and phonics skills, the lesson structure used in this facilitator manual
Part 1 – Teaching Reading, Basic Level | 10
incorporates explicit time and activities that support the development of all of the component skills and knowledge of reading and
writing. Further, although the Quick Start program is not a comprehensive reading and writing program, it reflects internationally
recognized and research-based best practices including:
1. To learn to read and write, pupils must read and write. Instruction must foster hands on, authentic reading and writing
2. Classrooms must be print-rich to create reading opportunities and familiarize pupils with print.
3. Oral language is critical to learning to read and instruction must encourage pupils to speak and to listen (to the facilitator
and each other)
4. The ultimate goal for pupils is that they read for meaning; accurate decoding and fluency are especially important in reading
for understanding; hence, our Quick Start program has a heavy phonics focus, but does integrate other components such as
phonological awareness, vocabulary building and comprehension.
5. This is a Quick Start program and is not comprehensive but rather designed to provide initial or short term training for pupils
until the comprehensive program can be implemented.
6. While scripted lessons are very important tools for inexperienced facilitators, teaching is done at many levels and facilitators
must cultivate a positive and supportive environment for pupils and must interact with pupils in unscripted ways as well.
7. Parents and community members (even those who are illiterate) can encourage and support emergent readers through talking
to them, telling them stories, making sure they do homework and having their children share their lessons with them.
Parental and community support must be sought out and used.
8. The teaching or study of a language is not the same as the teaching of reading; hence ECR focuses on training trainers and
facilitators to teach reading and writing skills and knowledge, not grammar or linguistics.
9. As facilitators grow in confidence and skill, they will adjust the scripted lessons to suit their particular needs and those of
their pupils. ECR welcomes and encourages the facilitators to be creative in their lessons, as long as they teach the
appropriate content (i.e. skills of reading and writing).
10. Social and emotional learning supports pupils’ ability to learn in other subjects and the literacy classes must reinforce it.

Part 1 – Teaching Reading, Basic Level | 11
TEACHING READING, BASIC LEVEL: OVERVIEW OF FACILITATOR TRAINING SESSIONS
First, Master Trainers must read this guide thoroughly. The Master Trainers should also read the facilitators’ guide and be very
familiar with the scripted lessons.
The literacy component of the ECR facilitator training will be delivered by you, the Master Trainers, in 7 sessions totaling 15 hours.
These sessions are summarized below:
Session 1
1.5 hours
What is reading? What is writing?
Reading as a meaning-based process
Specific components of reading
Characteristics of good readers and writers
Session 2
1.5 hours
Oral language as the foundation of reading
Stages of language development
The importance of oral language
Oral traditions and the link to literacy
Session 3
2 hours
Introduction to ECR Scripted Lessons—Overview and Demonstration
Explanation of lesson structure—3 Ps, purpose of each segment, integration of a variety of
reading competencies
Establishing daily routines for direct instruction and reading and writing (practice) as well as
performance assessment
Review/Discussion of sequence of materials
Session 4
2 hours
Guided Practice with scripted lessons (part 1):
Practice/simulation of scripted lessons by facilitators
Session 5
2 hours
Guided Practice with scripted lessons (part 2): Implementing interactive text and/or book reading
in the classroom
Why should teachers use read-aloud?
Demonstration read-aloud
Part 1 – Teaching Reading, Basic Level | 12
Importance of multiple rereads of books or texts
Facilitators do simulated read-aloud
Session 6
2 hours
Practice session 2: using draft lesson plans for NFLCs
Practice/simulation of scripted lessons by facilitators
Session 7 30 minutes of
presentation and 2.5
hours of make and take
activities
Creating a language and print-rich classroom environment
Assessing the classroom environment
The importance of print
Developing the home-school connection and encouraging language rich homes
Make and Take Session:
Facilitators will make the classroom materials that they will use during the literacy classes.
EXPECTED LEARNING OUTCOMES FOR TRAINERS
At the end of Workshop 1, facilitators will be able to:
Articulate the characteristics of skilled readers and writers and the many purposes of reading and writing in everyday and
professional life
Describe the role oral language plays in reading and writing development
Articulate the implications of learning to read and write
Articulate the importance of a language and literacy rich classroom
Articulate strategies for developing oral language and print skills
Describe the plan and pattern of the Scripted Lessons
Part 1 – Teaching Reading, Basic Level | 13
IMPLEMENT THE SCRIPTED LESSONS WELL AND AS PLANNED SESSION 1:
INTRODUCTION: WHAT IS READING? WHAT IS WRITING?
This session is divided into 3 segments. You will need the following materials for this session:
Segment 1
1.1 Why Training on the Skills of Teaching Reading and Writing is Important
Segment 2
1.2 Definition in writing of each of the five components to be posted on the wall.
Segment 3
1.3.1 Characteristics of Good Readers and Writers
1.3.2 Set of PowerPoint slides on good reading and writing
1.3.3 What is Effective Reading
Segment 1: Why This Training on Teaching Reading and Writing? (15 min.)
Ask the facilitators to refer to Handout 1.11: Why is the Teaching of Reading and Writing so Important?’ Give facilitators 5-7
minutes to read it to themselves, then go over it with them, point by point. You can pose questions to them on each point and allow
1 Training Materials numbering system: The first number 1 refers to the session (i.e. sessions 1 – 7) and the second number refers to the segment within the
session for which it will be used.
Session 1
2 hours
What is reading? What is writing?
Reading as a meaning-based process
Specific components of reading
Characteristics of good readers and writers
Part 1 – Teaching Reading, Basic Level | 14
them to ask clarifying questions. The purpose of this segment is to ensure facilitators understand the importance of reading and
writing. End this activity by summarizing again the main points on why reading and writing is so critical:
The ability to read and write is the foundation of all academic success
Reading needs to be taught—most children will not learn it on their own
Many children in Nigeria are not learning to read, even though they go to school.
Internally displaced children often face difficulty accessing schooling, which puts them at greater risk of not learning to read
and write.
Children who do not learn to read by Class 3 are more very likely to drop out of school. This is called the Matthew Effect.
This means that the gap between good readers and struggling readers keeps growing wider and wider as time passes.
Most teachers have little training of how to teach reading; the same is true for non-formal learning center facilitators. This
is a problem because teaching reading is a complex process and it requires specific knowledge and skills.
Segment 2: The five components of reading/writing (45 minutes):
This activity is intended to familiarize the facilitators with the five components of reading. This will help them to understand that
the various skills of reading can be taught. Distribute Handout 1.2 and go over the definition of each of the component
skills/knowledge below.
Phonological Awareness—the ability to hear and distinguish the individual sounds in words
Phonics or alphabetic awareness—the ability to connect sounds with symbols—to understand that in alphabets, there is a
regular, predictable correspondence between sounds used in in speech and the letters that represent them
Vocabulary—the number of words a person knows in a language; high vocabulary correlates with higher reading
achievement
Fluency—the ability to read with speed and accuracy
Comprehension—the ability to gain meaning from text; to understand the meaning of text read.

Part 1 – Teaching Reading, Basic Level | 15
Tell the facilitators that pupils must have or be able to do all of these things in order to become skilled readers. Their job as
facilitators is to ensure that their pupils gain these skills and knowledge. Therefore, they need to be very familiar with these five
components of reading.
Segment 3: What is Skilled Reading and Writing? (60 min.)
Use the PowerPoint Slides 1.3 “What is Skilled Reading and Writing?”
A. Characteristics of good readers (40 minutes)
Refer to Handout 1.3.1: Characteristics of Good Readers and Writers.
Show Slide 22: and make the following points about good readers:
1. Good readers understand the alphabetic system and use it to identify printed words.
2. They also have, and use, background knowledge and strategies to obtain meaning from print.
3. They read fluently.
Elaborate by explaining the following points.
1. Alphabetic knowledge means that good readers know the letters of the alphabet and the sounds they make. So when, a student
sees Cat written on a page, s/he knows that it is read as C-a-t.
2. Background knowledge means that readers bring what they know about the world to their reading in order to comprehend.
Use Handout 1.3.3: “What is Effective Reading?” to emphasize that people bring background knowledge with them to the task
of reading.
Have one person read aloud each of the items on the handout; ask them (and the larger class) if they understood what they
read. Only by having some contextual and background knowledge could someone make sense of all of the items.
Show Slide 3: Can You Read This? Ask the teachers to take a minute and try to read what the slide says. Tell them that
they can work with the person beside them or with others around them. Give them 5 minutes. (You will probably hear
them reading the slide out loud as they figure out the words).
2 If you cannot show the slides, write the slide contents on a piece of flip chart paper or on a blackboard or white board so that everyone can see it.

Part 1 – Teaching Reading, Basic Level | 16
After a few minutes ask if some could read the first two sentences. After someone reads the sentences aloud, ask the class
how they could read this since none of the words—as spelled—exist in English. Take some explanations and then make
the point that they did not simply use their knowledge of the alphabetic and how to sound out words. They used a couple
of things—they have read many of these words many times and they used that knowledge to “figure out” the word. They
solved the puzzle by thinking about it. They also used what they know about the world. They also used their knowledge of
how English is structured or put together. Point out that after a noun in English there is often a verb—you could point out
the second sentence.
3. Fluency means that someone reads words correctly and also enough speed to support their understanding of text. Think about
sitting down to read a chapter in a book. If you read this slowly (read the following in a very slow manner):
It—was—an—important—day—for—many—of—my—neigh—bors.
The—new—school—build—ing—was---finally—open.
Continue to say something such as: “Whew! That was a lot of work. I was trying so hard to get the words right that I really
can’t remember what I read. Plus, it would take me a long, long, time to get through that chapter!”
Say to the facilitators:
“Children who learn to successfully master the three core elements. They are able to Identify Printed Words using sound spelling
connections and have a sight word repertoire. They are able to use previous knowledge, vocabulary and comprehension strategies
to read for Meaning. They read with Fluency, that is, they can identify words swiftly so that what is read is understood and reading
itself is enjoyable.”
Also say:
“Children start to develop the skills needed for reading early in life. We might think that knowing the alphabet is the first task of
learning to read. However, adults can also support children by helping them develop oral language skills and motivation to read.
We will talk more about this in our session on oral language development.”
Summarize this segment with the point that we use many things when we are a skilled reader, not just alphabetic knowledge. In
other words, decoding is absolutely necessary for reading but reading is more than decoding.
B. Characteristics of Good Writing (20 minutes)
Tell the class that in the time that is left in this session, we will look at some of the characteristics of good writing. Tell them that
reading and writing need to be taught together.

Part 1 – Teaching Reading, Basic Level | 17
Have them refer again to Handout 1.3: Characteristics of Good Readers and Writers.
Make the following points: Good writing:
Expresses ideas that are interesting and important. If the ideas are interesting, then readers want to know more about what
the writer is saying.
Follows a logical and effective organization. If the writing is organized, then readers can easily follow it.
Has a voice that is individual and appropriate. If the writing has a voice, this means that the piece of writing sounds like the
person writing it. For example, if you have a favorite author then you can pick up something they wrote and know they
wrote it—even without looking at the title page or cover.
Employs word choice that is specific and memorable. Words are not used over and over again. Words bring images to
mind.
Has a fluency of sentences, which are smooth and expressive. If a piece of writing is fluent that it is easy to read and may
even be fun to read out loud.
Contains conventions of print that are correct such as spelling and grammar. Capitalization, punctuation, spelling and
grammar are all important.
Tell the facilitators that for many us, this last characteristic (Conventions) was what was stressed when we were in school.
Conventions are important, but the other five characteristics are also important. If teachers are overly focused on conventions, it
may discourage children from putting their ideas down on paper.
Conclude by showing slide 7 from PowerPoint Slides 1.3 “What is Skilled Reading and Writing?” Tell teachers that during the
training, when we refer to Literacy we are talking about components of written language (Reading and Writing) as well as oral
language (Speaking and listening).

Part 1 – Teaching Reading, Basic Level | 18
SESSION 2: ORAL LANGUAGE AS THE FOUNDATION OF READING (1.5 HOURS)
This session is divided into 3 segments. You will need the following materials for this session:
Segment 1
2.1 PowerPoint Learning a First Language
Segment 2
2.2 PowerPoint: The Importance of Oral Language
Segment 3
nothing
Segment 1: Introduction (10 minutes)
Tell facilitators that in this next segment, we will focus on the importance of oral language as a support to learning to read. Many
facilitators overlook the importance of oral language and we want to avoid that mistake. We will discuss the definition of language
and explore the stages of language development. Use the 2.1 PowerPoint Learning a First Language to facilitate a lecture in
which you share the following key points:
Slide 1: Defining Language
Language is a complex set of systems
Each system has each its own rules. As children learn language, they master these various rule systems and their ability
to communicate effectively grow.
Session 2
1.5 hours
Oral language as the foundation of reading
Stages of language development
The importance of oral language
Oral traditions and the link to literacy
Learning to speak and read in a new language

Part 1 – Teaching Reading, Basic Level | 19
There are two components to language: receptive and expressive.
o Receptive language is the ability to listen and understand what others are saying.
o Expressive language is the knowledge and use of spoken language necessary to communicate.
Slide 2: Language vs. Speech
Language is sometimes used interchangeably with speech, but the two are different.
Language is the way the brain forms the message to be communicated. Language is about words, word endings, word
meanings, organization of words into phrases and the sounds of words.
Speech is the articulation process of language or the ability to make sounds. Where language is a brain process, speech
is more of a motor process. Speech refers to the way the mouth and throat control the pronunciation of words.
This is background information and you do not need to spend a lot of time on it. Go to slide three after spending a minute or two
on each slide above.
Slide 3: Stages of Language Development
One of the most important tasks for children in the first five years of life is the development of language. Children’s language
development tends to follow a similar pattern across languages and cultures across the entire world. Use Handout X to guide the
discussion of the stages of language development on this slide. Give teachers a few minutes to review the stages and ask for
volunteers to summarize each stage.
Discoverer (birth to 8 months)
Communicator (9 to 13 months)
1st Word User (12 to 18 months)
Combiner (18 to 24 months)
Early Sentence User (2 to 3 years)
Later Sentence User (3 to 5 years)
Explain to facilitators that nurturing the development of language from birth is very important; pupils who have strong oral language

Part 1 – Teaching Reading, Basic Level | 20
skills generally do better in reading. Parents and the community can play and important role in helping children develop oral
language. We will look at how everyone can support oral language development in the next segment.
Segment 2: Oral language development
Use the 2.2. PowerPoint: The Importance of Oral Language to facilitate a lecture in which you share the following key points:
Slide 1: Vocabulary helps in reading: Oral language is an indicator of a child’s vocabulary. The more words a child hears, the
more words this child will recognize. Even if a child is excellent at phonic decoding, he/she will not ‘recognize’ a word that is not
a part of his/her oral language.
On the other hand, if a word is already part of the child’s oral language, no matter how irregular/difficult its ‘spelling’, the child
might still be able to ‘guess’ it on the basis of its initial sound combined with the context of the sentence in which this word is used.
For example, in the sentence “I love to play c_____t” the child might look at the picture on the page and see a bat and ball, and
might confirm that the difficult word begins with c and ends with t and ‘predict’ that this word reads ‘cricket.’ But if this child had
no previous knowledge of the concept and name of this game, he would not have been able to “read” it. Therefore, children with a
richer oral language have a huge advantage in learning to read, simply because they know and recognize more words.
Slide 2: Knowledge of the structure of language helps in reading. Knowledge of how words are arranged in a sentence helps
readers make predictions about what word should come next as they are reading. For example, a child who knows the structure of
English will sense that in the sentence, “My mother is ___” the blank is probably a describing word and know that this word should
describe the noun, mother. Children will be able to generate a range of possibly correct words, even without being able to decode
it.
Knowledge of a language’s structure is acquired through speaking and listening—and it gives the reader clues of what kind of word
(noun, action, describing word, preposition etc.) should come next in a sentence.
Slide 3: Oral Language familiarizes children with language structures that they are likely to encounter in books. The more
“kinds of language” a child hears (stories, proverbs, rhymes, metaphorical language, explanations) the more likely the child is likely
to recognize and understand various “text structures” (even in other languages). A child who hears lots of stories will expect to read
about a character, a setting, some problem, how this problem is solved and the lesson learned—because this is a typical story
structure in any language! A child who has heard poems before will expect short rhyming phrases when he reads a poem.

Part 1 – Teaching Reading, Basic Level | 21
Slide 4: Oral language builds a base for reading comprehension. Children’s reading is heavily dependent on the oral language
they’ve learned at home, at school, and in the community. The more a mother talks to a child, the better prepared he/she is for
reading! The more “stories” that a child has heard, the more easily he/she will “understand” a storybook. The more rhymes children
learn at home, the better their phonemic awareness and sense of poetry.
Slide 5: Kind of oral language. (This is background information; if you are short of time you can skip this slide. At very least, go
over it quickly.) According to linguist Michael Halliday, humans use “talk” for different purposes as follows:
The first four functions deal with everyday needs—physical, social, emotional:
To express needs (E.g. I need help; I am thirsty.)
To tell others what to do (Please sit down; Do not cross the road.)
Make contact with others/ form relationships (Hi there! What is your name?)
To express feelings/ opinions/ individual identity (I don’t like that. I am a good runner.)
The next three deal with coming to terms with the larger environment around a child:
To gain knowledge by asking questions about the environment/world (E.g. why do those bugs come out at night? Why does
the moon change shape?)
To tell stories/jokes and to create an imaginary environment (E.g. who has a house too small for a guest? A turtle.)
To convey facts and information (Juba is the capital of South Sudan. The roots of a tree give it water.)
Say to the facilitators, “These last three uses of oral language (questions about the world, imaginary environment and conveying
facts) form the basic model of the kind of language children will encounter in books or more sophisticated academic purposes.”
Parents, caregivers and teachers who use oral language for these three purposes (questions, stories, information) actual help children
build an internal awareness of sophisticated text models. These children have a head-start in comprehension because they are quicker
to recognize and understand different text structures and purposes (e.g. story vs. informational text).
Slide 6: Teachers need to USE and BUILD UP children’s oral language. A child’s oral tradition includes stories from elders,
rhyming games from siblings and/or friends, poems/lullabies learned at home, proverbs, riddles, folk songs etc. These are usually
in the child’s mother tongue.
Part 1 – Teaching Reading, Basic Level | 22
In school, the child will often become part of a new oral tradition. This will often include poems, rhymes, stories etc., sometimes
in a second language (e.g. Baa baa black sheep or Twinkle Twinkle in English.) Teachers who build children’s oral traditions engage
them in telling/listening to stories, poems, information, songs, jokes, riddles etc., in all relevant languages (mother tongue, Hausa,
and English).
What does all this tell us?
1. Teachers need to USE children’s oral traditions as part of literacy instruction
2. Teachers also need to BUILD UP children’s oral language as part of literacy instruction.
Segment 3: Using and Building Children’s Oral Traditions (50 minutes)
Divide facilitators into groups of such that each group has 4-6 members. Direct each group to have the following discussion
(allowing about 30 minutes for this discussion):
1. What oral traditions do children bring to school?
Based on your experience as a teacher, what are the mother-tongues of the student population in your area?
What are some of the stories/folk lore for children, poems, lullabies, clapping games or rhymes that these children might
already know from parents, grandparents, siblings or neighborhood friends?
[Note: For example, clapping games; rhymes, or songs sung on special occasions such as a birthday or wedding. Facilitators will
know a lot more, especially ones that are relevant to their geographic region.]
2. How can teachers in school USE (extend) some of these oral traditions in school?
Think up some possibilities and create some specific examples. (E.g. staging a play, poetry recitation, story-telling by the teacher
etc.)
Think up some original possibilities and create some specific examples. (E.g. teaching poems and clapping games, by telling simple
stories in the new language, reading small books aloud in the new language, through simple games etc.) Have groups present one
example each, either of how they might use (extend) existing oral traditions or build (create) a new oral tradition in their classroom.

Part 1 – Teaching Reading, Basic Level | 23
Finally, have the groups write out on a piece of paper some of the oral traditions that could be used in the classroom (i.e. folktales,
proverbs, songs, poems, fables). Facilitators can keep these materials (after they share them) to use in their own classrooms in the
lessons and to help build a print-rich environment.
Remind the facilitators that they will be working in “resource-lean” environments and print materials will not be readily available.
Writing out poems, stories, songs and fables that are usually told orally is one way to create resources for the classroom and draw
on the oral traditions and language which are so rich in Hausa.
SESSION 3: INTRODUCTION TO ECR SCRIPTED LESSONS—OVERVIEW AND INITIAL
PRACTICE
This session has only 1 segment. You will need the following materials for this session:
Handout: Copy of Scripted lesson for the letter N or facilitator guide opened to the page with the Scripted Lesson, Letter N.
Segment 1: Reviewing and becoming acquainted with the scripted lesson for literacy.
Pass out the handout for this segment. (If the facilitators all have their facilitator guides, they can refer to scripted lesson N in the
guide.) Give the facilitators at least 10 minutes (even 15 minutes) to read the scripted lesson. The room should be very quiet as
everyone should be reading.
When everyone has finished reading, tell the facilitators that you are going to review the lesson plan structure segment by segment.
Make sure to note comments or critiques of the different segments of the lesson on the board or on a piece of paper.
Below are the steps you should follow:
Session 3
2 hours
Introduction to ECR Scripted Lessons—Overview and Demonstration
Explanation of lesson structure—3 Ps, purpose of each segment, integration of a variety of
reading competencies
Establishing daily routines for direct instruction and reading and writing (practice) as well as
performance assessment
Review/Discussion of sequence of materials

Part 1 – Teaching Reading, Basic Level | 24
A. Begin with the instructions at the top of the scripted lesson plan.
Explain to the facilitators that this section is where they will see the learning objective and the topic of the lesson. They will also
see a box with the target letter written in upper and lower case.
Tell the facilitators that they will also find a Teacher Tips box, an Important Ideas box and a SEL Idea box. Explain to them that
the teacher tip pertains to pedagogy and will give them suggestions for ensuring that pupils are engaged, for making their teaching
more active and participatory and for improving their preparation for the lesson.
The Important Idea box contains a reminder about things that are very important in learning to read and write; for example, modeling
the pronunciation of letter sounds is critical; ensuring children know all of the letter names and letter sounds, etc.
The SEL Idea box informs the facilitator what SEL idea or vocabulary word will be touched on in this lesson. The SEL segment
is an opportunity for children to further develop their oral language skills and enrich their vocabulary.
Ask for questions and comments. Note them down on the board or paper.
B. Next, explain to the facilitators that the lessons are very structured and very predictable.
Every lesson has an Introduction segment, a Presentation segment, a Practice segment and a Performance Segment, a SEL Idea
segment as well as a Review and Conclusion segment.
Hence, facilitators should be able to build a routine around them and get pupils in the habit of doing the literacy activities. Tell the
facilitators that in the beginning, they will have to show pupils how to form pairs, for example, but that if they form pairs every
day, it will become routine very soon.
Ask for questions and comments. Note them down on the board or paper.
C. Start now with the Introduction segment of the lesson.
Explain to facilitators that this is a “warm up” for the children. It will expose them to print, allow them to review the content from
the last lesson, and help them to settle down and focus.
As the trainer, model how you would implement Introduction part of the lesson for the letter B. Be sure to use the pupil name
cards (which you have prepared in advance). Tell the facilitators that they will play the role of pupils and respond as pupils would
while you implement the presentation part of the lesson. Hand out the name cards. Greet the children (facilitators). Read slowly

Part 1 – Teaching Reading, Basic Level | 25
the text on the board; have the children (facilitators) repeat it after you. Do the quick review. Ask the children (facilitators) to
remind you of what letter they learned yesterday. Point to letters that were learned the previous day or prior to that and emphasize
the letter name and sound. Point to the new letter we are going to learn today and tell them we will study the letter B today.
Ask facilitators for feedback when you are finished. Ask them if the purpose of the presentation is clear? Do they understand the
directions for implementing this part of the lesson? Remind them that they will have to do it themselves very soon!
D. Now, move to the presentation section of the lesson.
The facilitator will introduce the new topic/letter in this section of the lesson. He or she must demonstrate proper pronunciation,
show the children what the letter looks like and have the pupils pronounce it and write it. As the trainer, model how you would
implement the presentation part of the lesson for the letter B. Tell the facilitators that they will play the role of pupils and respond
as pupils would while you implement the presentation part of the lesson. Present the letter B to the children (facilitators) according
to the scripted lesson.
Ask facilitators for feedback when you are finished. Ask them if the purpose of the presentation is clear? Do they understand the
directions for implementing this part of the lesson? Remind them that they will have to do it themselves very soon!
E. Next, move to the practice segment of the lesson.
Explain to the facilitators that the practice segment is the longest and most important part of the lesson. Pupils need the opportunity
to practice using the sounds and letters they are learning. In early literacy—in particular learning alphabetic principles—pupils
need to be able to identify letter sounds and letter names, hear individual letter sounds in words, recognize letter shapes and be able
to write/copy the letter themselves. They will practice each of these areas
Follow the same procedure you used in modeling the practice segments of the lesson—i.e. follow the scripted lesson for practice.
Tell the facilitators that they will play the role of pupils and respond as pupils would while you implement the presentation part of
the lesson.
Ask facilitators for feedback when you are finished. Ask them if the purpose of the presentation is clear? Do they understand the
directions for implementing this part of the lesson? Remind them that they will have to do it themselves very soon!
F. Next, move to the performance section of the lesson.

Part 1 – Teaching Reading, Basic Level | 26
Explain that this section allows them—the facilitators—to assess whether they have been successful. It is not a test for the pupils
but a way for them to monitor whether pupils are learning. As the trainer, model how you would implement the performance part
of the lesson for the letter B. Tell the facilitators that they will play the role of pupils and respond as pupils would while you
implement the presentation part of the lesson.
Because the facilitators may have many children in their classes, they do not need to assess each child individually on all skills.
The performance segment contains a group assessment (asking children to stand if their name has the target letter sound); it also
asks individual pupils to point to the target letter in different places in the classroom. If there are pupils who are very quiet or do
not participate, you might call on them for this performance, to check on if they are learning. Finally, have all the pupils write a
row of capital Ns and small ns in their notebook. Model how facilitators should circulate and look at all the pupils as they write the
letters.
G. Review and Conclusion
The Review and Conclusion section of the lesson is to remind pupils what they learned and to wrap up the class so they can move
on to their next class. Tell the facilitators that they should always offer positive reinforcement at the end of the lesson. As the
trainer, model how you would implement Review and Conclusion part of the lesson for the letter B. Tell the facilitators that they
will play the role of pupils and respond as pupils would while you implement the presentation part of the lesson.
Ask facilitators for feedback when you are finished. Ask them if the purpose of the presentation is clear? Do they understand the
directions for implementing this part of the lesson? Remind them that they will have to do it themselves very soon!
Wrap up this session by asking for any final thoughts on the structure of the literacy lesson. Make sure they understand the different
parts of the lesson and note any concerns or suggestions they make. Thank them for their hard work and participation in this session.
Ask for 10 volunteers who will implement parts of one of the scripted lessons tomorrow. Tell them to be prepared to deliver their
lesson segment tomorrow.
Part 1 – Teaching Reading, Basic Level | 27
SESSION 4: GUIDED PRACTICE WITH SCRIPTED LESSONS (PART 1)
Session 4
3 hours Guided Practice with scripted lessons (part 1):
Practice/simulation of scripted lessons by facilitators
This session is divided into 5 segments. You will need the following materials for this session:
Segment 1 (20 minutes)
Scripted lesson C--Introduction
Segment 2 (30 minutes)
Scripted lesson C--Presentation
Segment 3 (40 minutes)
Scripted lesson C--Practice
Segment 4 (30 minutes)
Scripted lesson C--Performance
Segment 5 (15 minutes)
Scripted lesson C—Review and Conclusion
This is a long practice session so allow participants to take a break after Segment 3. For each segment, in addition to the volunteers
who will do the simulated lesson, assign the remaining facilitators to be either pupils or observers of the lesson. They can switch
roles between the segments. However, emphasize to them that the roles are IMPORTANT and they are participants in this lesson
even if they are not teaching it and they should have much to share at the end of each segment.
Introduction—2 facilitators have volunteered will each implement the Introduction. Each will have 5 minutes to deliver their
introduction. Have a group of facilitators act as pupils and have at least five others observe the lesson with you and take notes.
Use the final 10 minutes to give constructive feedback to the two volunteers who implemented the lesson segment. This feedback
should come from you the master trainer and the other facilitators.
Presentation—2 facilitators have volunteered will each implement the Presentation. Each one will have 10 minutes. Have a group
of facilitators act as pupils and have at least five others observe the lesson with you and take notes.

Part 1 – Teaching Reading, Basic Level | 28
Use the final 10 minutes of this segment to give constructive feedback to the two volunteers who implemented the lesson segment.
This feedback should come from you the master trainer and the other facilitators.
Practice—2 facilitators have volunteered will each implement the Practice. Each one will have 15 minutes. Have a group of
facilitators act as pupils and have at least five others observe the lesson with you and take notes. Use the final 10 minutes of the
segment to give constructive feedback to the two volunteers who implemented the lesson segment. This feedback should come
from you the master trainer and the other facilitators.
Performance—2 facilitators have volunteered will each implement the Performance. Each one will have 10 minutes. Make sure
the “pupils” (the other facilitators) play their proper role in the simulation. Use the remaining 10 minutes to give constructive
feedback to the two volunteers who implemented the lesson segment. This feedback should come from you the master trainer and
the other facilitators.
Review and Conclusion—2 facilitators have volunteered will each implement the Review and Conclusion. Each one will have 5
minutes. Make sure the “pupils” (the other facilitators) play their proper role in the simulation. Use the final 10 minutes to give
constructive feedback to the two volunteers who implemented the lesson segment. This feedback should come from you the master
trainer and the other facilitators.
After the 10 volunteers have implemented their lesson segment and have received feedback, you can close the session. Tell the
volunteers, pupils and observers to continue to reflect on the lesson segments they participated in, in order to discuss more tomorrow.
Part 1 – Teaching Reading, Basic Level | 29
SESSION 5: MODELING AND GUIDED PRACTICE WITH SCRIPTED LESSONS (PART 2)
Session 5
2 hours
Guided Practice with scripted lessons (part 2): Implementing interactive text and/or book reading
in the classroom
Why should teachers use read-aloud?
Demonstration read-aloud
Importance of multiple rereads of books or texts
Facilitators do simulated read-aloud
This session is divided into 3 segments. You will need the following materials for this session:
Segment 1—Information on using books and texts
5.1 PowerPoint on Reading and Discussing Books and Other Texts
Segment 2—Modeling a Read Aloud
Segment 3—Simulating a Read Aloud
Texts written on flip chart paper; stories (books, if possible) in Hausa (Annex E)
Segment 1—Information on using books and texts
Slide 1: First, let’s look at the importance of reading to young readers. Consider this quote:
“The single most important activity for building….skills essential for reading success appears to be reading aloud to students.”3
Engage the group in a discussion by asking them to react to this quote. Ask:
1. What are your thoughts about this quote? Why do you think reading aloud is so important?
2. What implications does this statement have for your teaching practices?
3 Neuman, S., Copple, C., & Bredekamp, S. (2000). Learning to Read and Write: Developmentally Appropriate Practices for Young Children. Washington,
D.C.: National Association for the Education of Young Children.

Part 1 – Teaching Reading, Basic Level | 30
Slide 2. There are many reasons to read books. First and foremost, text and book reading provide a centerpiece of language and
literacy activity in preschool and needs to be planned. Other reasons for book reading include making social-emotional connections
with students or to improve the flow of the classroom day. Book readings should certainly always be an enjoyable experience also.
Slide 3: Learning Opportunities: Other important reasons for students to hear text and books include learning:
New information about the world. Reading books exposes students to other cultures, languages, customs, and traditions. They can
learn about ideas outside of their experience (e.g., the life cycle of plants). Books provide a way for students to connect to and
extend a current curriculum topic. Or, they can lead to a new topic of study (e.g., books about butterflies). Books also help students
learn concepts like numbers and letters.
How books and print work. Text and book reading helps students learn about how books and print work, or what we will refer to
as print concepts. Important print concepts include understanding what the author and illustrator do; print is read right to left in
Urdu (vice versa for English) and top to bottom; words hold meaning and are different from pictures.
Parts of a story. As students hear stories read to them, they begin to learn about the various parts of a story such as the setting, the
feelings and motives of characters and rising action. Students learn that stories have a beginning, middle, and an end, often involve
a conflict or problem, and a resolution or ending.
Reading is enjoyable and interesting. Texts and books not only provide a wealth of information for students but are also a wonderful
source of entertainment and enjoyment. In order for students to become lifelong readers, it is crucial for them to learn that book
reading can be a pleasurable and interesting experience.
Slide 4: Learning Opportunities continued
New vocabulary. Book reading provides students with the opportunity to learn new words. Picture books are often packed with
new and exciting vocabulary words.
Phonological awareness. Many picture books skillfully use rhyme, poetry, and even nonsense words. Poems and other texts and
books provide students with the prospect of learning about the different sounds in our language in an enjoyable way which in turn
will facilitate their own language and literacy development.
Familiarity of written language sentence structure. Books, texts and stories use written language that differs from oral or spoken
language. Written language has a different sentence structure than oral language using longer sentences, more complex grammar,
and more words to express an idea.
Bring this section of the session to a close by saying that text and book reading provides many varied learning opportunities for
language and literacy development. Tell participants that sessions this week will focus on various strategies that teachers can use

Part 1 – Teaching Reading, Basic Level | 31
to bring out these learning opportunities. They will learn ways to read books to students for the first time and how to vary their
techniques during re-readings.
Demonstration: Instructor Read Aloud (15 minutes)
Tell participants that you will begin by reading a text to the group (select a short poem or song or story)). This could be written on
a text or on the board as it is very short. This is a narrative; it tells a story. This is one of many different kinds of stories to which
students need to be exposed, but it is a very important kind of book.
Explain that you will demonstrate various techniques and strategies that you would use when reading a story or poem or song (a
text) to a group of students for the first time. Ask participants to pay attention to the techniques or strategies that you use during the
reading that helped them to enjoy and understand the book.
Large Group Discussion: Debriefing of First Reading Demonstration (10 minutes)
Generate a large group discussion about the book reading demonstration. Draw out the strategies you used during the demo by
asking these questions:
o What did you notice about the way I introduced the text?
o How many times did I stop during the reading? Why?
o How did I keep your attention during the reading? Did I ask too many questions?
o How did I help you understand the story?
Note: Use this discussion to highlight the strategies that you used during the demonstration. Allow for differing opinions about the
techniques that you used. Explain that you will discuss each strategy in more depth during the remainder of the session. You will
talk about recommended ways to introduce books, and read them for the first time with students.
Lecture: Reading and Discussing Texts (15 minutes)
Tell participants that you will now discuss several of the key strategies that you demonstrated during the book reading in further
detail
Slide 5: Before the Reading: Getting Started
There are several important steps teachers can take to ensure a successful book reading experience before they even start to read
the book.

Part 1 – Teaching Reading, Basic Level | 32
Preview the text - It is crucial for teachers to read a text before it is shared with their students. They need to think about the
book and what they want students to get out of it, what parts might interest the students, and what parts might be hard for
them to understand.
Create an enjoyable, focused atmosphere - One of the many goals of teachers is to make book reading a memorable and
enjoyable experience for students. Pleasurable book reading experiences ultimately motivate students to become lifelong
readers. Teachers can develop an inviting, focused book reading atmosphere in their classrooms by getting the students
drawn in quickly.
Use a song or rhyme to help students gather and focus their attention. Then begin introducing the book. Don’t wait for
every child to be perfectly still.
Slide 6: Introduce the text.
Prepare students for listening by giving a quick introduction to the book before beginning to read. Use the following strategies:
Direct their attention to the title and pictures on the cover.
Share the title, author, and illustrator. It’s important to do this with new books but not familiar ones that have already been
read.
Ask students to guess what the story might be about. For the first reading, build students’ excitement and anticipation for
the story by asking them to guess what the story might be about or to connect the story to their own life experiences. If it’s
a second reading of a book, have the group review some of the key parts of the book.
Give the students some information about what is going to happen in the story for the first reading. A brief but enticing
introduction can help students settle in and prepare for active listening.
Shared Reading of Poem (20 minutes)
Explain that we will be simulating a shared reading of a short poem where students and teachers share the reading over four readings.
Choose a poem with an easy-to-follow rhyme scheme and rhythm. Write the poem out clearly on large paper so the entire class
can read it from their seated spots. Engage the group in reading four times:
First read the poem and point to the words as you read.
Second time, pause and invite participation (pointing as you read)
Third time, read one line and then ask participants to echo the line, continuing to point as you read (Echo Reading)
Fourth time, read together and ask a participant to point to the words as they are read (Choral Reading)
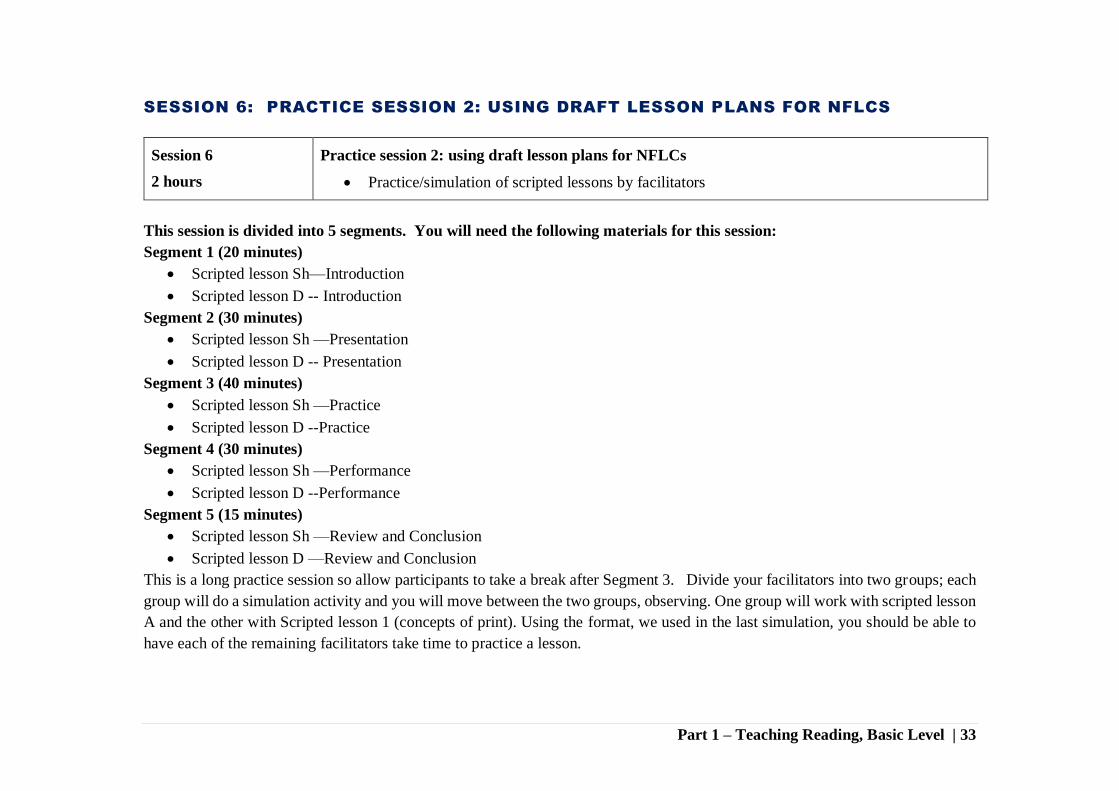
Part 1 – Teaching Reading, Basic Level | 33
SESSION 6: PRACTICE SESSION 2: USING DRAFT LESSON PLANS FOR NFLCS
Session 6
2 hours
Practice session 2: using draft lesson plans for NFLCs
Practice/simulation of scripted lessons by facilitators
This session is divided into 5 segments. You will need the following materials for this session:
Segment 1 (20 minutes)
Scripted lesson Sh—Introduction
Scripted lesson D -- Introduction
Segment 2 (30 minutes)
Scripted lesson Sh —Presentation
Scripted lesson D -- Presentation
Segment 3 (40 minutes)
Scripted lesson Sh —Practice
Scripted lesson D --Practice
Segment 4 (30 minutes)
Scripted lesson Sh —Performance
Scripted lesson D --Performance
Segment 5 (15 minutes)
Scripted lesson Sh —Review and Conclusion
Scripted lesson D —Review and Conclusion
This is a long practice session so allow participants to take a break after Segment 3. Divide your facilitators into two groups; each
group will do a simulation activity and you will move between the two groups, observing. One group will work with scripted lesson
A and the other with Scripted lesson 1 (concepts of print). Using the format, we used in the last simulation, you should be able to
have each of the remaining facilitators take time to practice a lesson.

Part 1 – Teaching Reading, Basic Level | 34
For each segment, in addition to the facilitators who will do the simulated lesson, assign the remaining facilitators to be either pupils
or observers of the lesson. They can switch roles between the segments. However, emphasize to them that the roles are
IMPORTANT and they are participants in this lesson even if they are not teaching it and they should have much to share at the end
of each segment.
Introduction—2 facilitators who volunteered will each implement the Introduction of Scripted Lesson A and Scripted lesson 1.
Each will have 5 minutes to deliver their introduction. Have a group of facilitators act as pupils and have at least five others observe
the lesson with you and take notes.
Use the final 10 minutes to give constructive feedback to the two volunteers who implemented the lesson segment. This feedback
should come from you the master trainer and the other facilitators.
Presentation—2 facilitators who volunteered will each implement the Presentation segment of Scripted Lesson A and Scripted
lesson 1. Each one will have 10 minutes. Have a group of facilitators act as pupils and have at least five others observe the lesson
with you and take notes.
Use the final 10 minutes of this segment to give constructive feedback to the two volunteers who implemented the lesson segment.
This feedback should come from you the master trainer and the other facilitators.
Practice—2 facilitators who have volunteered will each implement the Practice segment of Scripted Lesson A and Scripted lesson
1. Each one will have 15 minutes. Have a group of facilitators act as pupils and have at least five others observe the lesson with
you and take notes. Use the final 10 minutes of the segment to give constructive feedback to the two volunteers who implemented
the lesson segment. This feedback should come from you the master trainer and the other facilitators.
Performance—2 facilitators who have volunteered will each implement the Performance segment of Scripted Lesson A and
Scripted lesson 1. Each one will have 10 minutes. Make sure the “pupils” (the other facilitators) play their proper role in the
simulation. Use the remaining 10 minutes to give constructive feedback to the two volunteers who implemented the lesson segment.
This feedback should come from you the master trainer and the other facilitators.
Review and Conclusion—2 facilitators who have volunteered will each implement the Review and Conclusion segment of Scripted
lesson A and Scripted lesson 1. Each one will have 5 minutes. Make sure the “pupils” (the other facilitators) play their proper role

Part 1 – Teaching Reading, Basic Level | 35
in the simulation. Use the final 10 minutes to give constructive feedback to the two volunteers who implemented the lesson
segment. This feedback should come from you the master trainer and the other facilitators.
After the 10 volunteers have implemented their lesson segment and have received feedback, you can close the session.
SESSION 7: CREATING A LANGUAGE AND PRINT RICH CLASSROOM ENVIRONMENT
This session is divided into 2 segments. You will need the following materials for this session:
Segment 1
7.1 PowerPoint on print rich classrooms
Segment 2
Materials for Make-and-Take
Segment 1:
Use 7.1 PowerPoints (Print Rich Classrooms: Why Do We Need Them?) to deliver the following points.
Slide One: What is a Print Rich Environment?
Children who are just beginning to understand the alphabetic principle see letters and words (print) everywhere. For example, they
might recognize a letter or word on a billboard, in the newspaper or on a grocery carton. They might come to recognize certain
Session 7
30 minutes of
presentation and 2.5
hours of make and
take activities
Creating a language and print-rich classroom environment
Assessing the classroom environment
The importance of print
Developing the home-school connection and encouraging language rich homes
Make and Take Session:
Facilitators will make the classroom materials that they will use during the literacy classes.

Part 1 – Teaching Reading, Basic Level | 36
environmental words “by sight” e.g. ‘McDonalds’ or ‘Pepsi’ or ‘Habib Bank Ltd.’ Environmental print teaches early readers that
printed letters and words are used for a variety of communication purposes in our world. A print-rich environment is one in which
children interact with multiple forms of print for real, everyday purposes.
Slide Two: Why is it necessary?
When classrooms become “print rich environments,” children’s literacy gets an extra boost. Children understand the functions of
print better by looking at charts on the walls, labels and signs, rule-sheets, calendars, roll call registers, small books, wall stories
and murals, peers’ writing, the teacher’s written feedback on their work etc. They come to understand that print has many functions
in our world.
Slide Three: A Print-Rich Environment is Not Enough
Teachers can draw children’s attention to this print and track it with a finger while reading aloud, to illustrate the alphabetic
principle. Print in the classroom is powerful when it serves real functions—for example a daily duty chart or a timetable for children
to “consult.”
Write/post the following quote on the board or a chart so that it is visible to all:
“While the presence of these artifacts of literacy learning (books, computers, posters, reference texts, bulletin boards, and
word walls) is important, what teachers and students do with them is even more important.”4
Slide Four: What kinds of “print” might be used to enrich a classroom environment?
Charts that Support Literacy (e.g. Alphabet charts, Charts with labeled pictures of animals, a Color chart with names of
different colors etc.)
Word Walls (e.g. a wall display of sight words, a wall display of words that rhyme, Words displayed under the letter they
begin with, etc.)
4 Interactive Word Walls: More Than Just Reading the Writing on the Walls, Janis M. Harmon | Karen D. Wood | Wanda B. Hedrick | Jean Vintinner | Terri
Willeford, Journal of Adolescent & Adult Literacy 52(5) February 2009 doi:10.1598/JAAL.52.5.4 © 2009 International Reading Association (pp. 398–408)

Part 1 – Teaching Reading, Basic Level | 37
Displays of Original Student Work (E.g. Stories written and illustrated by students, Labeled drawings, writing their own
name etc.)
Functional print for Classroom Communication (E.g. student attendance sheet, morning message, written rules and
directions, timetable etc.)
Print Co-created by the Teacher and Students (E.g. Student’s retelling of a story recorded by a teacher and illustrated by
the child, student’s response to a teacher’s question about a story etc.)
Slide Five: A Print Rich Classroom
There is a difference between a wall-chart that supports literacy versus a chart that merely serves a decorative purpose.
There is clear value and need to display authentic student work in a classroom.
Teachers can co-create texts with their students, e.g. writing down a story that a child reads out.
Wall-charts should be at children’s physical eye level, matched to their reading level, with careful use of upper and lower
case letters etc.
A print rich classroom also needs level-appropriate books on topics of high-interest for children to read and look at (with
guidance and also independently).
Discussion (10 minutes): Many classrooms that appear to be print-rich, actually are not—because children do not actively connect
with or “own” this print. Student “voice” is almost absent from classroom walls--walls may have charts and posters created by
teachers only, often placed at an eye level too high for children and often containing words/texts that are too complicated for
beginning readers to decode.
Draw the whole class into a small discussion around the question, “If we establish a print-rich environment, how can we use it to
teach letter/alphabet knowledge?”
Segment 2:
Distribute the Make-and-Take materials and have each facilitator make:
1) An alphabet chart

Part 1 – Teaching Reading, Basic Level | 38
2) Letter cards—1 card for each letter
3) Name tags for everyone in the classroom (facilitators can wait to write on the name tags until they get the list of all their
pupils.)
4) Labels for items in the classroom
5) Pictures of things from the environment with the name of the thing under it.
6) Texts (poems, songs) written out on large sheets of paper to hang on the wall.
The facilitators should take the materials they make with them and use it in the non-formal learning centers. They must post the
charts and use the labels and put up the pictures

Part 1 – Teaching Reading, Basic Level | 39
Quick start reading lesson #22 - Consonants, letter C c.
Skills: Phonemic awareness, letter C; phonics, letter C c.
Time: 65 minutes
Learning Objectives: At the end of the lesson, learners should have mastered the sound of the letter,
pronounce its name, be able to identify it and write it, (upper and lower case).
Materials: chalk, chalkboard, phrase, song or text written on the board or a piece of paper, alphabet chart.
Previous Knowledge: letters n, a, k, m, s, t, i, r, d, f, ts, b, w, g, y, l.
Facilitator’s Tips: Facilitator, be sure to face the pupils when you speak so they can see your mouth and follow how you
make the sound. Go round so all the children can see you make the target sound. Also, remember that the practice part
of the lesson is the longest. It has three segments and will take 15 minutes.
Important Ideas: Remember to teach the letter name, the letter sound and the letter shape. Children need to know all
these things and not just one or two to become fluent readers.
SEL Ideas: When people are displaced from their home they often feel hurt or even get hurt. We want to reassure pupils
that they are safe in our learning center and that we are so happy they are here. Facilitator, use the word cutarwa (hurt)
as a word in your lesson as it starts with Have the pupils say the phrase: “Rama cuta da cuta cutarwa ce” when you
do the SEL part of the lesson.
Step & Icons Time Activity procedure
10 minutes
Introduction
1. Say good morning to the children and welcome them. Ask if everyone has taken their name
tag.
2. Ask the children what they learned in their last reading class. They should say the sound /u/.
Say a word with /u/ in it and ask them to repeat. Ask for a word from them with the same
sound /u/; have them repeat these two words in choral form.
3. Write the following morning message on the board (before class begins)
C c

Part 1 – Teaching Reading, Basic Level | 40
Step & Icons Time Activity procedure
Mamana ina kwana?
Gaisuwa ce da safe.
Ina wuni! Babana?
Gaisuwa ce da rana.
Mamana sai da safe.
Bankwana ne da dare.
Gaisuwa ce da dare.
Underline a long and a short vowel in the song and underline the letters b and c when and wherever
they appear.
Read the song on the board slowly, pointing at each word as you say it. Do this three times.
On the third time, stop at the vowel you have underlined and ask students what it is; have them
make the sound again. Continue to a word that starts with b; ask the students to make the sound
/b/. Have them repeat it several times.
Point to the letter C and tell them that we are going to learn the letter C today.
15 minutes
Presentation: Facilitator presents the new letter and involves children by repeating the
sound, the letter and having them write it.
1. Write the letter on the board: C and c. Tell the students this is the letter C c. Tell pupils
the letter name. Ask them to repeat it.
2. Point to the consonant c and ask them if they know what sound it makes. Give them an
example of the sound. Walk around the class letting the pupils see your mouth making the
/c/ sound.
3. Ask the children to write a large C and a small c in their notebook.
4. Say the sound yourself several times. Explain that the big C and the small c still make the
same sound.
Practice: The children have a chance to practice the letter sound and writing with the
teacher, in small groups, pairs or individually.

Part 1 – Teaching Reading, Basic Level | 41
Step & Icons Time Activity procedure
5 minutes
5 minutes
First segment (learning the sound)
1. Put children in pairs; one partner says the letter name and the other says the letter sound.
After a minute, have them switch roles.
2. Facilitator, walk round the classroom to listen and see if the pairs are doing well with the
sound and the letter name.
3. Pick some pairs to demonstrate after they have worked for a minute or two. Pick different
pairs from the ones you picked in the last lesson.
4. Have the students stand up and make the letter sound /C c/ 10 times while hopping on one
foot.
5. Tell them they did a great job.
Second segment (hearing the sound in words)
6. Ask pupils what other words they know that start with the same sound. (They may give
you a word from the morning message that starts with C or another word they know.) Write
all these on the board.
7. Congratulate them as hopefully they have given you some examples of words that start
with C c. If they have not, give them some examples yourself and write these on the board.
Point out the C words in the morning message as well. Some words you can use are: canji,
ci, ceto, cokali, cuna
8. Write this phrase on the board (before the class). Point to it and have pupils come forward
and underline the letter C that they see: Rama cuta da cuta cutarwa ce.
9. Tell them that the sound /c/ can occur in different places in the word. Ask them for words
where the /c/ is in the middle of the word. Write those on the board. (Examples include:
sace, dace and coci.)
10. Point to the words on the board and say them in unison with the children, emphasizing the
/c/ sound.
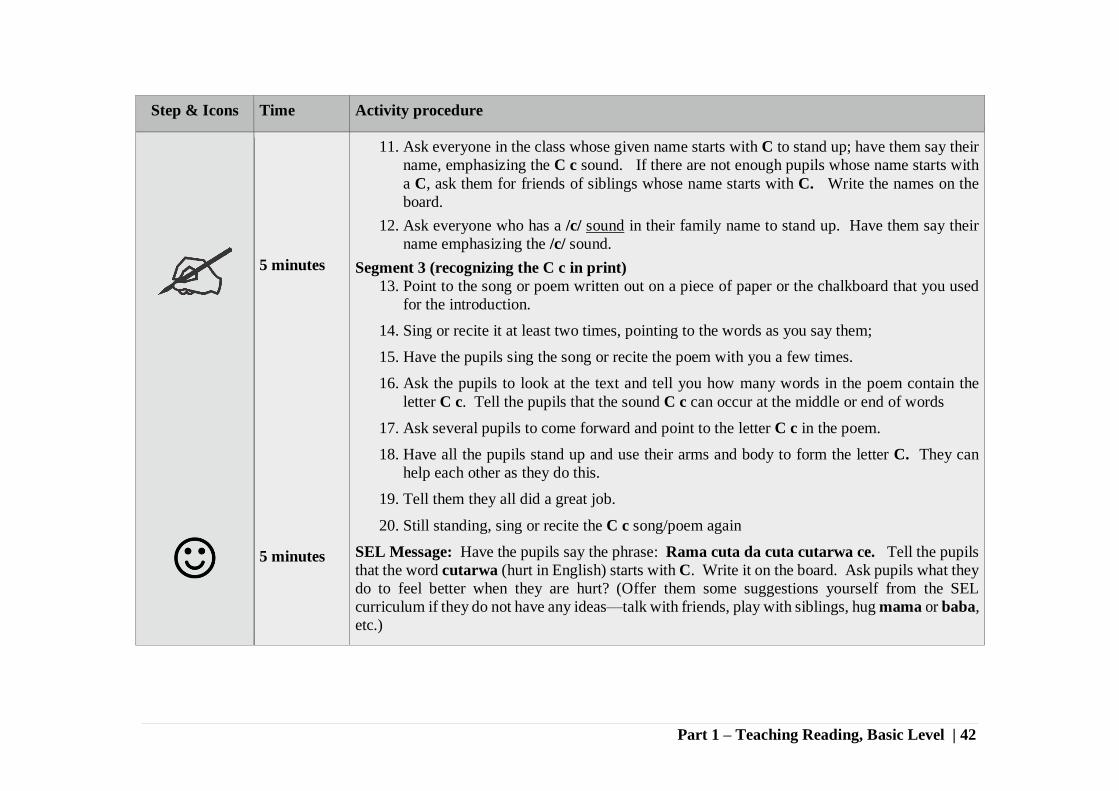
Part 1 – Teaching Reading, Basic Level | 42
Step & Icons Time Activity procedure
5 minutes
5 minutes
11. Ask everyone in the class whose given name starts with C to stand up; have them say their
name, emphasizing the C c sound. If there are not enough pupils whose name starts with
a C, ask them for friends of siblings whose name starts with C. Write the names on the
board.
12. Ask everyone who has a /c/ sound in their family name to stand up. Have them say their
name emphasizing the /c/ sound.
Segment 3 (recognizing the C c in print)
13. Point to the song or poem written out on a piece of paper or the chalkboard that you used
for the introduction.
14. Sing or recite it at least two times, pointing to the words as you say them;
15. Have the pupils sing the song or recite the poem with you a few times.
16. Ask the pupils to look at the text and tell you how many words in the poem contain the
letter C c. Tell the pupils that the sound C c can occur at the middle or end of words
17. Ask several pupils to come forward and point to the letter C c in the poem.
18. Have all the pupils stand up and use their arms and body to form the letter C. They can
help each other as they do this.
19. Tell them they all did a great job.
20. Still standing, sing or recite the C c song/poem again
SEL Message: Have the pupils say the phrase: Rama cuta da cuta cutarwa ce. Tell the pupils
that the word cutarwa (hurt in English) starts with C. Write it on the board. Ask pupils what they
do to feel better when they are hurt? (Offer them some suggestions yourself from the SEL
curriculum if they do not have any ideas—talk with friends, play with siblings, hug mama or baba,
etc.)

Part 1 – Teaching Reading, Basic Level | 43
Step & Icons Time Activity procedure
10 minutes Performance (Assessment)
1. Have everyone whose surname starts with C stand up and make a letter c using their arms.
2. Call on various children (boys and girls) to give you the sound /c/ or the letter name or
point to C c on the alphabet chart.
3. Have everyone write a line of C c in their notebook. Go round and help children as needed.
5 minutes Conclusions/Review 1. Tell children that they now know the name and the sound of the letter C c. They also know
how to write it. Tell them that many words start with the /C c/ sound and they have named
some of them.
2. Sing the /C c/ sound or chant the song one last time, pointing to the words as the pupils
sing/chant.
Reflection: Teacher, write down notes for yourself on this lesson. Did you enjoy the lesson? How do you think we can improve
on it? If you make some notes, then when you teach this lesson again, you will remember what worked well and where you found
some challenges. This will help you to improve the lesson next time you teach it.

Part 1 – Teaching Reading, Basic Level | 44
Quick start reading lesson #13 - Consonants, letter D d.
Skills: Phonemic awareness, letter D; phonics, letter D d.
Time: 65 minutes
Learning Objectives: At the end of the lesson, learners should have mastered the sound of the letter,
pronounce its name, be able to identify it and write it, (upper and lower case).
Materials: chalk, chalkboard, song or text written on the board or a piece of paper, alphabet chart.
Previous Knowledge: Concepts of print, sounds, syllables, letters n, a, k, m, s, t, i, r.
Facilitator’s Tips: Be sure to point to your alphabet chart during the lesson to get children in the habit of referring to
it.
Important Ideas: Make sure the pupils can say the letter name and the letter sound. These are not the same thing. Make
sure pupils can recognize the letter D d and write the letter D d.
SEL Ideas: The word rules in Hausa starts with the /d/ sound: dokoki. Use this as a vocabulary word for the letter D
d according to the directions below.
Step &
Icons
Time Activity procedure
10 minutes
Introduction
1. Say good morning to the children and welcome them. Ask if everyone has taken their name
tag.
2. Ask the children what they learned in their last reading class. They should say the sound /r/.
Say a word with /r/ in it and ask them to repeat. Ask for a word from them with the same sound
/r/; have them repeat these two words in choral form.
3. Write the following morning message on the board (before class begins)
Dabo yana da dawa a gona.
D d

Part 1 – Teaching Reading, Basic Level | 45
Step &
Icons
Time Activity procedure
Dada tana dafa doya.
Dudu ta dasa itace da daddare.
Delu tana daka daddawa.
Dauda yana duba littafin sa.
Underline I and R in the daily text. Read the phrase on the board slowly, pointing at each word as you
say it. Do this three times.
On the third time, stop at the letter I you have underlined and ask students what it is; have them make
the sound again. Do the same for the R.
Ask the pupils to say the passage with you. Ask them to make the sound /d/. Have them repeat it
several times.
Now, point to the letter D and tell them that we are going to learn the letter D d today.
15 minutes
5 minutes
Presentation: Facilitator presents the new letter and involves children by repeating the sound,
the letter and having them write it.
1. Write the letter on the board: D and d. Tell the students this is the letter D d. Tell pupils
the letter name. Ask them to repeat it.
2. Point to the consonant D d and ask them if they know what sound it makes. Give them an
example of the sound. Walk around the class letting the pupils see your mouth making the
/d/ sound.
3. Ask the children to write a large D and a small d in their notebook. Go around and look at
what the children write, helping those who need assistance.
4. Say the sound yourself several times. Explain that the big D and the little d still make the
same sound.
Practice: The children have a chance to practice the letter sound and writing with the teacher,
in small groups, pairs or individually.
First segment (learning the sound)
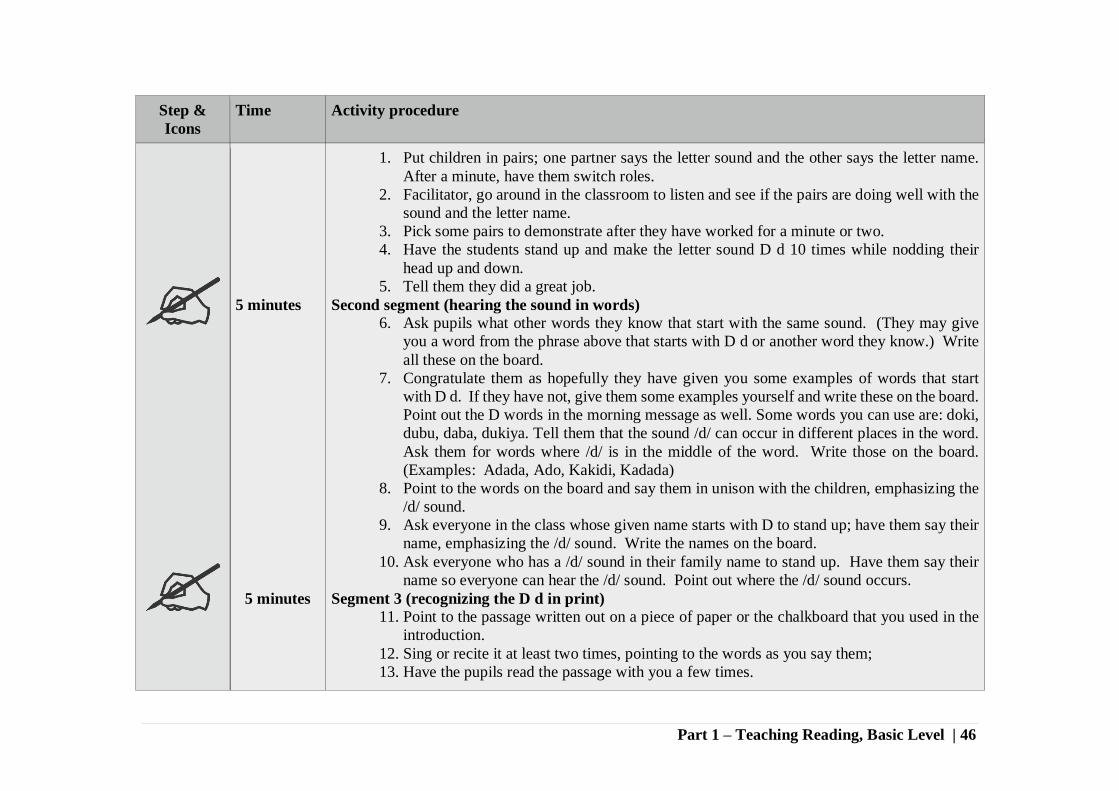
Part 1 – Teaching Reading, Basic Level | 46
Step &
Icons
Time Activity procedure
5 minutes
5 minutes
1. Put children in pairs; one partner says the letter sound and the other says the letter name.
After a minute, have them switch roles.
2. Facilitator, go around in the classroom to listen and see if the pairs are doing well with the
sound and the letter name.
3. Pick some pairs to demonstrate after they have worked for a minute or two.
4. Have the students stand up and make the letter sound D d 10 times while nodding their
head up and down.
5. Tell them they did a great job.
Second segment (hearing the sound in words)
6. Ask pupils what other words they know that start with the same sound. (They may give
you a word from the phrase above that starts with D d or another word they know.) Write
all these on the board.
7. Congratulate them as hopefully they have given you some examples of words that start
with D d. If they have not, give them some examples yourself and write these on the board.
Point out the D words in the morning message as well. Some words you can use are: doki,
dubu, daba, dukiya. Tell them that the sound /d/ can occur in different places in the word.
Ask them for words where /d/ is in the middle of the word. Write those on the board.
(Examples: Adada, Ado, Kakidi, Kadada)
8. Point to the words on the board and say them in unison with the children, emphasizing the
/d/ sound.
9. Ask everyone in the class whose given name starts with D to stand up; have them say their
name, emphasizing the /d/ sound. Write the names on the board.
10. Ask everyone who has a /d/ sound in their family name to stand up. Have them say their
name so everyone can hear the /d/ sound. Point out where the /d/ sound occurs.
Segment 3 (recognizing the D d in print)
11. Point to the passage written out on a piece of paper or the chalkboard that you used in the
introduction.
12. Sing or recite it at least two times, pointing to the words as you say them;
13. Have the pupils read the passage with you a few times.
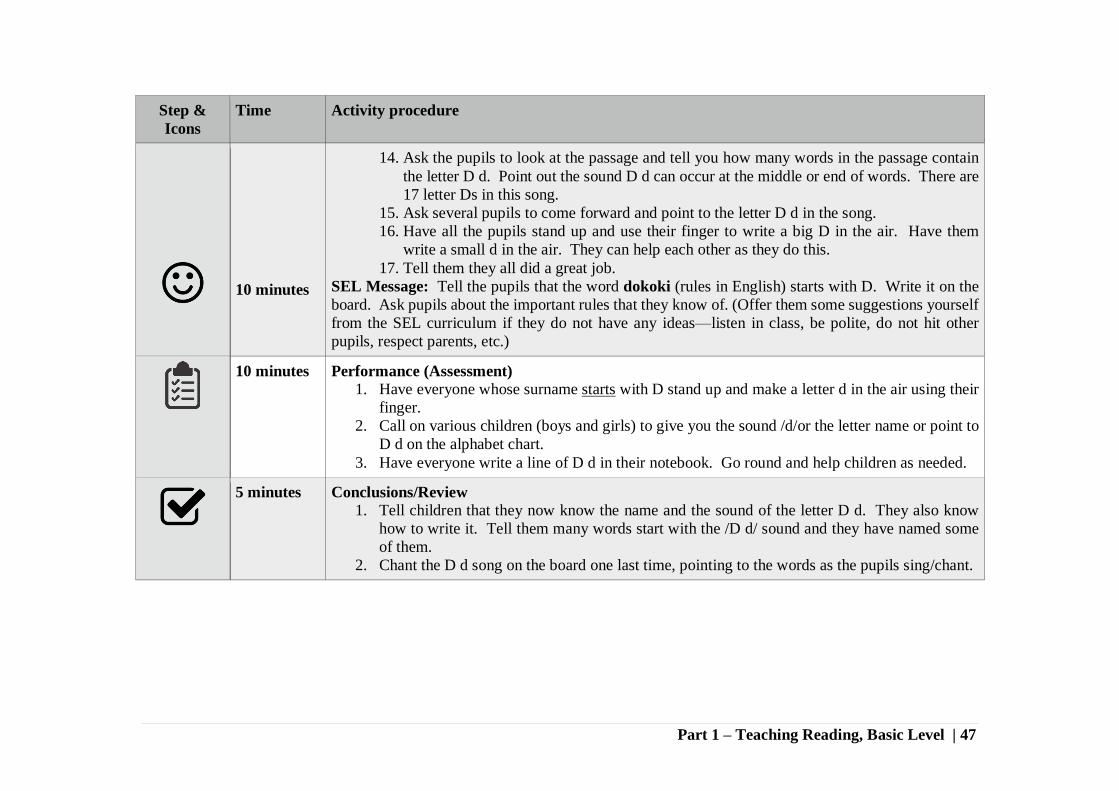
Part 1 – Teaching Reading, Basic Level | 47
Step &
Icons
Time Activity procedure
10 minutes
14. Ask the pupils to look at the passage and tell you how many words in the passage contain
the letter D d. Point out the sound D d can occur at the middle or end of words. There are
17 letter Ds in this song.
15. Ask several pupils to come forward and point to the letter D d in the song.
16. Have all the pupils stand up and use their finger to write a big D in the air. Have them
write a small d in the air. They can help each other as they do this.
17. Tell them they all did a great job.
SEL Message: Tell the pupils that the word dokoki (rules in English) starts with D. Write it on the
board. Ask pupils about the important rules that they know of. (Offer them some suggestions yourself
from the SEL curriculum if they do not have any ideas—listen in class, be polite, do not hit other
pupils, respect parents, etc.)
10 minutes Performance (Assessment)
1. Have everyone whose surname starts with D stand up and make a letter d in the air using their
finger.
2. Call on various children (boys and girls) to give you the sound /d/or the letter name or point to
D d on the alphabet chart.
3. Have everyone write a line of D d in their notebook. Go round and help children as needed.
5 minutes Conclusions/Review 1. Tell children that they now know the name and the sound of the letter D d. They also know
how to write it. Tell them many words start with the /D d/ sound and they have named some
of them.
2. Chant the D d song on the board one last time, pointing to the words as the pupils sing/chant.

Part 1 – Teaching Reading, Basic Level | 48
Step &
Icons
Time Activity procedure
Reflection: Teacher, write down notes for yourself on this lesson. Did you enjoy the lesson? How do you think we can improve on
it? If you make some notes, then when you teach this lesson again, you will remember what worked well and where you found
some challenges. This will help you to improve the lesson next time you teach it.

Part 1 – Teaching Reading, Basic Level | 49
Quick start reading lesson #9 - Consonants, letter S s
Skills: Phonemic awareness, letter S; phonics, letter S s.
Time: 65 minutes
Learning Objectives: At the end of the lesson, learners should have mastered the sound of the letter,
pronounce its name, be able to identify it and write it, (upper and lower case).
Materials: chalk, chalkboard, song or text written on the board or a piece of paper, alphabet chart.
Previous Knowledge: Concepts of print, sounds and syllables, letters n, a, k, m.
Facilitator’s Tips: It is important to learn the names of your pupils and call them by name. Since they all have name
tags, this will help you to call them by name.
Important Ideas: Point to words as you read them, either on the board, in a story book or on the word wall.
SEL Ideas: The importance of your name.
Step &
Icons
Time Activity procedure
10 minutes
Introduction
1. Say good morning to the children and welcome them. Ask if everyone has taken their name
tag.
2. Ask the children what they learned in their last reading class. They should say the sound /m/.
Say a word with /s/ in it and ask them to repeat. Ask for a word from them with the same sound
/s/; have them repeat these two words in choral form.
3. Write the following morning message on the board (before class begins):
Sani Sale ya sami sabuwar sallaya.
S s
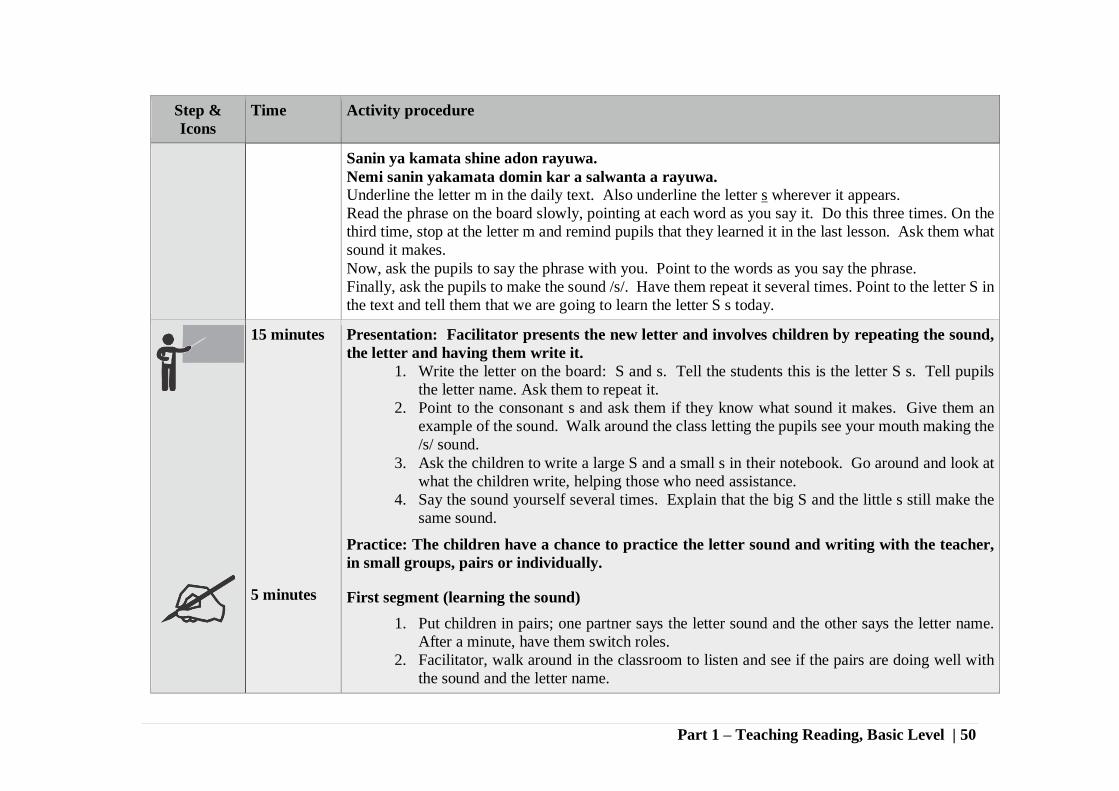
Part 1 – Teaching Reading, Basic Level | 50
Step &
Icons
Time Activity procedure
Sanin ya kamata shine adon rayuwa.
Nemi sanin yakamata domin kar a salwanta a rayuwa.
Underline the letter m in the daily text. Also underline the letter s wherever it appears.
Read the phrase on the board slowly, pointing at each word as you say it. Do this three times. On the
third time, stop at the letter m and remind pupils that they learned it in the last lesson. Ask them what
sound it makes.
Now, ask the pupils to say the phrase with you. Point to the words as you say the phrase.
Finally, ask the pupils to make the sound /s/. Have them repeat it several times. Point to the letter S in
the text and tell them that we are going to learn the letter S s today.
15 minutes
5 minutes
Presentation: Facilitator presents the new letter and involves children by repeating the sound,
the letter and having them write it.
1. Write the letter on the board: S and s. Tell the students this is the letter S s. Tell pupils
the letter name. Ask them to repeat it.
2. Point to the consonant s and ask them if they know what sound it makes. Give them an
example of the sound. Walk around the class letting the pupils see your mouth making the
/s/ sound.
3. Ask the children to write a large S and a small s in their notebook. Go around and look at
what the children write, helping those who need assistance.
4. Say the sound yourself several times. Explain that the big S and the little s still make the
same sound.
Practice: The children have a chance to practice the letter sound and writing with the teacher,
in small groups, pairs or individually.
First segment (learning the sound)
1. Put children in pairs; one partner says the letter sound and the other says the letter name.
After a minute, have them switch roles.
2. Facilitator, walk around in the classroom to listen and see if the pairs are doing well with
the sound and the letter name.

Part 1 – Teaching Reading, Basic Level | 51
Step &
Icons
Time Activity procedure
5 minutes
5 minutes
3. Pick some pairs to demonstrate after they have worked for a minute or two.
4. Have the students stand up and make the letter sound S s 10 times while hopping on their
right foot.
5. Tell them they did a great job.
Second segment (hearing the sound in words)
6. Ask pupils what other words they know that start with the same sound. (They may give
you a word from the phrase above that starts with S s or another word they know.) Write
all these on the board.
7. Congratulate them as hopefully they have given you some examples of words that start
with S s. If they have not, give them some examples yourself and write these on the board.
Point out the S words in the morning message as well. Some words you can use are: Suna,
Sakamako, Soso, Suya, Sabo.
8. Tell them that the sound /s/ can occur in different places in the word. Ask them for words
where the /s/ is in the middle of the word. Write those on the board. (Examples: Tasa,
Asusu etc.)
9. Point to the words on the board and say them in unison with the children, emphasizing
the/s/ sound.
10. Ask everyone in the class whose name starts with S to stand up; have them say their name,
emphasizing the /s/ sound. Write the names on the board.
11. Ask everyone who has a /s/sound in their family name to stand. Have them say their name
so everyone can hear the /s/ sound. Point out where the /s/ sound occurs.
Segment 3 (recognizing the S s in print)
12. Point to the phrase written out on the chalkboard that you used in the introduction.
13. Recite it at least two times, pointing to the words as you say them; ask the pupils to recite
the phrase with you.
14. Ask the pupils to look at the text and tell you how many words in the phrase contain the
letter S s. Point to the words you wrote on the board earlier that have an S s in them.
15. Go back to the chalkboard. Ask a child to come forward and underline the Ss in the words
that are up there (that you wrote earlier when the children suggested them.)

Part 1 – Teaching Reading, Basic Level | 52
Step &
Icons
Time Activity procedure
10 minutes
16. Call 6 children forward and have 3 write upper case S, 3 lower case on the board. Ask the
other children if they can copy those letters into their notebook as well.
17. Have all the pupils stand up and use their finger to write a big S in the air. Have them write
a small s in the air.
18. Tell them they all did a great job.
SEL Message: Tell the pupils that the word suna (name in English) starts with the letter s. Write the
following on the board and say it a couple of times, pointing to the words with your finger and have
the pupils repeat it with you.
Suna linzami idan ya yi kyau alheri, idan ya baci ko sharri ne
Tell the pupils that everyone has a name and it is important9 to know the names of everyone in the
classroom, so as to address them respectfully. Ask two pupils to come forward and point to the word
suna in the phrase. They should know it because it starts with S and because you pointed to it as you
read it aloud.
10 minutes Performance (Assessment)
1. Have everyone whose surname starts with S stand up and make a letter s in the air using
their finger.
2. Call on some pupils (boys and girls) to make the sound /s/, say the letter name or point to
the S on the alphabet chart.
3. Have everyone write a line of S s in their notebook. Go around and help children as needed.
5 minutes Conclusions/Review 1. Tell children that they now know the name and the sound of the letter S s. They also know
how to write it. Tell them many words start with the S s sound and they have named some
of them.
2. Chant the phrase on the board one last time, pointing to the words as the pupils sing/chant.
Reflection: Teacher, write down notes for yourself on this lesson. Did you enjoy the lesson? How do you think we can improve
on it? If you make some notes, then when you teach this lesson again, you will remember what worked well and where you found
some challenges. This will help you to improve the lesson next time you teach it.
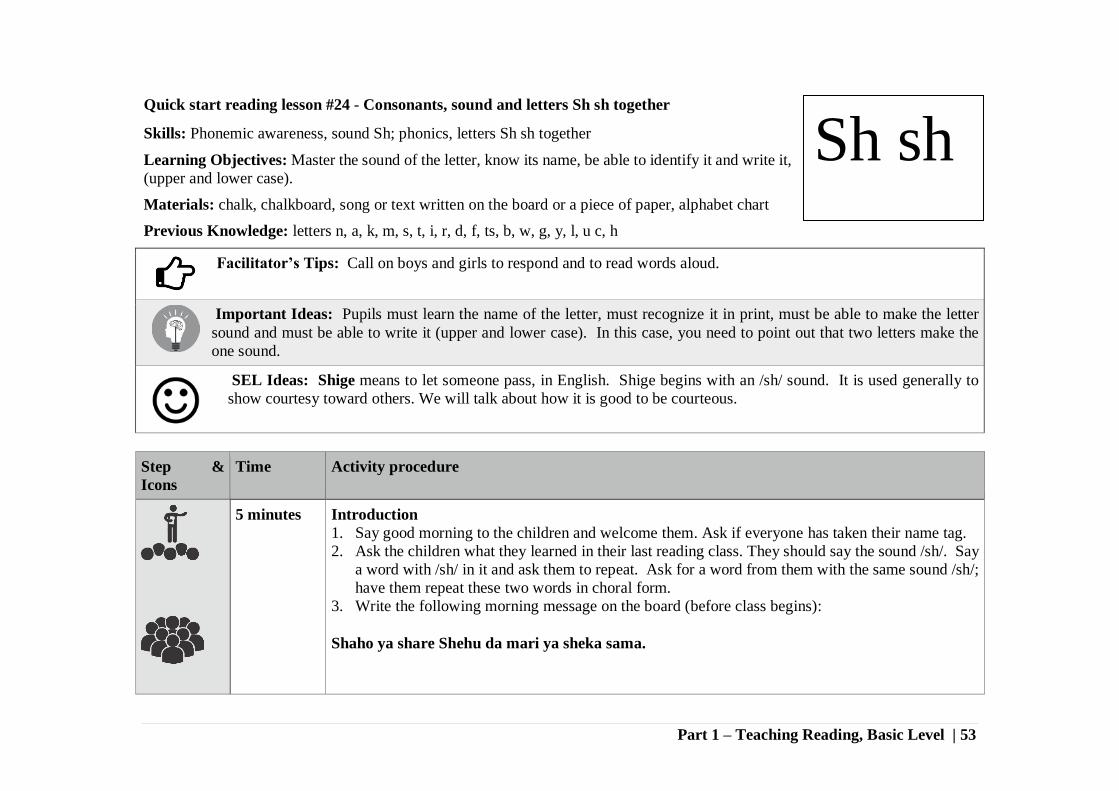
Part 1 – Teaching Reading, Basic Level | 53
Quick start reading lesson #24 - Consonants, sound and letters Sh sh together
Skills: Phonemic awareness, sound Sh; phonics, letters Sh sh together
Learning Objectives: Master the sound of the letter, know its name, be able to identify it and write it,
(upper and lower case).
Materials: chalk, chalkboard, song or text written on the board or a piece of paper, alphabet chart
Previous Knowledge: letters n, a, k, m, s, t, i, r, d, f, ts, b, w, g, y, l, u c, h
Facilitator’s Tips: Call on boys and girls to respond and to read words aloud.
Important Ideas: Pupils must learn the name of the letter, must recognize it in print, must be able to make the letter
sound and must be able to write it (upper and lower case). In this case, you need to point out that two letters make the
one sound.
SEL Ideas: Shige means to let someone pass, in English. Shige begins with an /sh/ sound. It is used generally to
show courtesy toward others. We will talk about how it is good to be courteous.
Step &
Icons
Time Activity procedure
5 minutes
Introduction
1. Say good morning to the children and welcome them. Ask if everyone has taken their name tag.
2. Ask the children what they learned in their last reading class. They should say the sound /sh/. Say
a word with /sh/ in it and ask them to repeat. Ask for a word from them with the same sound /sh/;
have them repeat these two words in choral form.
3. Write the following morning message on the board (before class begins):
Shaho ya share Shehu da mari ya sheka sama.
Sh sh

Part 1 – Teaching Reading, Basic Level | 54
Step &
Icons
Time Activity procedure
Ask the pupils if they have ever seen an eagle (shaho). Ask them if they like eagles; do they like other
birds?
Underline a long vowel and another short vowel in the sentence as well as the letter h. Also underline
the letter/diagraph sh when wherever it appears.
Read the phrase on the board slowly, pointing at each word as you say it. Do this three times. On the
third time, stop at the long vowel you have underlined and ask students what it is; have them make the
sound again. Do the same for the short vowel you have underlined and the letter H. Ask the pupils to
say the phrase with you. Point to the words as you say the phrase.
Now, ask the pupils to make the sound /sh/. Have them repeat it several times. Point to the letter and
tell them that we are going to learn the letter/diagraph h sh today.
15 minutes
5 minutes
Presentation: Facilitator presents the new letter and involves children by repeating the sound,
the letter and having them write it.
1. Write the letter on the board: Sh and k. Tell the students this is the letters Sh sh. Tell pupils
the letter name. Ask them to repeat it.
2. Point to the letters sh and ask them if they know what sound they make. Give them an example
of the sound. Walk around the class letting the pupils see your mouth making the /sh/ sound.
3. Ask the children to write a large Sh and a small sh in their notebook. Go around and look at
what the children write, helping those who need it.
4. Say the sound yourself several times. Explain that the big Sh and the small sh still make the
same sound.
Practice: The children have a chance to practice the letter sound and writing with the teacher,
in small groups or pairs or individually.
First segment (learning the sound)
5. Put children in pairs; one partner says the letter sound /sh/ and the other says the letter names
Sh. After a minute, have them switch roles.

Part 1 – Teaching Reading, Basic Level | 55
Step &
Icons
Time Activity procedure
5 minutes
5 minutes
6. Facilitator, circulate in the classroom to listen that the pairs are doing well with the sound and
the letter name.
7. Pick some pairs to demonstrate after they have worked for a minute or two.
8. Have the pupils stand up and make the letter sound Sh sh 10 times jumping on both feet.
9. Tell them they did a great job.
Second segment (hearing the sound in words)
10. Ask pupils what other words they know that start with the same sound. (They may give you a
word from the phrase above that starts with Sh sh or another word they know.) Write all these
on the board.
11. Congratulate them as hopefully they have given you some examples of words that start with
Sh sh. If they have not, give them some examples yourself and write these on the board. Point
out the Sh words in the morning message as well. Some words you can use are: Sho, Shu,
Shiga, Shiri, and others.
12. Tell them that the sound /sh/ can occur in different places in the word. Ask them for words
where the /sh/ is in the middle of the word. Write those on the board. (Examples: Nishi,
Kamasho, Asho, Bishiya, etc.)
13. Point to the words on the board and say them in unison with the children, emphasizing the /sh/
sound.
14. Ask everyone in the class whose given name starts with Sh to stand up; have them say their
name, emphasizing the /sh/ sound. Write the names on the board.
15. Ask everyone who has a /sh/ sound in their family name to stand up. Have them say their name
so everyone can hear the /sh/ sound. Point out where the /sh/ sound occurs.
Segment 3 (recognizing the Sh in print)
16. Point to the phrase written out on a piece of paper or the chalkboard that you used in the
introduction.
17. Recite it at least two times, pointing to the words as you say them;
18. Have the pupils recite the phrase with you a few times.

Part 1 – Teaching Reading, Basic Level | 56
Step &
Icons
Time Activity procedure
10 minutes
19. Ask the pupils to look at the text and tell you how many words in the phrase contain the letter
Sh sh. Point out again the sound Sh sh can occur at the middle or end of words. Point to the
words you wrote on the board earlier that have a Sh sh in them.
20. Ask several pupils to come forward and point to the letters Sh sh in one of the words on the
board.
21. Have all the pupils stand up and use their finger to write a big Sh in the air. Have them write
a small sh in the air. They can help each other as they do this.
22. Tell them they all did a great job.
SEL Message: The word shige means to let someone pass in a polite way. Ask the children if they
encounter situations where they have to be very courteous. Is it hard to be courteous?
10 minutes Performance (Assessment)
1. Have everyone whose surname starts with Sh stand up and make the letters sh in the air using
their finger.
2. Call on various children (boys and girls) to give you the sound /sh/ or the letter name or point
to Sh sh on the alphabet chart.
3. Have everyone write a line of Sh sh in their notebook. Circulate and help children as needed.
5 minutes Conclusions/Review 1. Tell children that they now know the name and the sound of the letter Sh sh. They also know
how to write it. Tell them many words start with the Sh sh sound and they have named some
of them.
2. Chant the phrase on the board one last time, pointing to the words as the pupils sing/chant.
Reflection: Teacher, write down notes for yourself on this lesson. Did you enjoy the lesson? How do you think we can improve on
it? If you make some notes, then when you teach this lesson again, you will remember what worked well and where you found some
challenges. This will help you to improve the lesson next time you teach it.

Part 1 – Teaching Reading, Basic Level | 57

Part 3 – Teaching Numeracy | 58
PART 3: TEACHING
NUMERACY

Part 3 – Teaching Numeracy | 59
SN AGENDA FOR NUMERACY SESSIONS TIME
1. Foundations of Mathematics Instruction and ECR’s Numeracy Scope and
Sequence
35 minutes
2. Fundamentals of Mathematics Teaching and ECR’s approach to numeracy
teaching
45 minutes
3. Introduction to the ECR’s Facilitator’s Guide – Structure, Organization and
Use
45 minutes
4. Demonstration Lessons 85 minutes
5. Preparation for numeracy simulations 40 minutes
6. Numeracy simulation 1 (Lesson 2 – Addition) 90 minutes
7. Numeracy simulation 2 (Lesson 9 – Multiples of Numbers) 61 minutes
8. Make and Take - Developing instructional materials for numeracy 45 minutes
9. Simulation 3 (Lesson 15 – How long is it?) 45 minutes
Total time = 8 hours 11 minutes
Part 3 – Teaching Numeracy | 60
NUMERACY INTRODUCTION
Apart from being compulsory in both formal and non-formal education curriculum in Nigeria, mathematics (or numeracy), is both
a requirement for successful living and for admission into institutions of higher learning. In spite of this importance, learners at all
levels dread mathematics (numeracy). So, efforts at improving learners' interest in learning mathematics and at development of
mathematical skill are steps in the right direction.
This Facilitator's Guide on Numeracy was developed by Education Crisis Response (ECR) Project, a project funded by the United
States Agency for International Development (USAID). ECR aims to provide access to non-formal education for internally displaced
persons (IDPs) in Adamawa, Bauchi and Gombe States. To provide quality education, ECR recognizes the need to provide training
and instructional materials to Facilitators in the non-formal learning centers NFLCs. The guides focus on three areas: reading,
numeracy and socio-emotional learning SEL.
This Guide was designed to be used by you, the NFLC Facilitator in Adamawa, Bauchi or Gombe States. The content is drawn from
an enhanced non formal education numeracy curriculum, with a focus on: Numbers and counting, Basic operations, Geometry,
Measurement and Everyday statistics. It is important to note that this guide does not include everything in the curriculum. Rather,
the plans are on selected topics of the curriculum. So, they are sample lessons that use learner-centered pedagogy and have SEL
infused. Even though the guide consists of only 16 scripted numeracy lessons, it is the hope of the authors that facilitators will use
the plans as guides in their subsequent preparation of/for lessons, using the same kinds of activities, and having SEL infused in
them.
You will notice that the Guide uses techniques in fonts and icons to help you quickly understand what you are to do at different
times during the lesson. The use of fonts and icons in the lessons is explained below:
FONTS AND ICONS
Two kinds of fonts are used:
1. Words in bold indicate what you are to say
a. Example, say: We are going to play a game called “Do you like money?”
2. Words in normal font are descriptions of activities for you to carry out, or information for you to implement
a. Example, explain to the learners that the game is a group competition, give the groups names using colors (e.g.
yellow, green, blue, etc.).

Part 3 – Teaching Numeracy | 61
Different icons are used in this guide to indicate different activities. The following are the icons used to indicate the type of activity
to be conducted:
Whole class: This icon is used to indicate a Facilitator talking to the whole class. It also will indicate a learner explaining a concept
or asking a question or making a comment and the whole class and the teacher listen to him or her or used when a discussion,
involving every member of the class is going on.
Group work: The icon indicates that learners should come to work together in groups of 3, 4, 5, or 6
Pair work: This indicates that 2 learners come to work together
Somebody is writing or drawing on the chalkboard

Part 3 – Teaching Numeracy | 62
FOUNDATIONS AND FUNDAMENTALS OF NUMERACY TEACHING
As Illustrated below, global numeracy teaching at the Basic Literacy level is focused on four main themes – Numbers and number system,
Operations and calculations, shapes, space & measures and handling information. In the Nigerian context, these were broadened into Numbers
and counting, Basic operations, Geometry, Measurement and Everyday statistics. WE can clearly see the relationships. However, since our focus
in ECR is on Basic Literacy our focus is on selected topic on each of these themes as enumerated in our enhanced Non-Formal Education
(numeracy) curriculum.
BEING
NUMERATE
OPERATIONS
AND
CALCULATIONS
SHAPES,
SPACE AND
MEASURES
HANDLING
INFORMATION
NUMBERS
(And the
Number
System)
REASONING PROBLEM SOLVING
DECISION MAKING

Part 3 – Teaching Numeracy | 63
ECR’S APPROACH TO NUMERACY INSTRUCTION AND ADVICE FOR LEARNING
FACILITATORS
The following are some key ideas we would like to present to our learning facilitators as ECR’s approach to numeracy teaching in
the learning centers:
1. The scripted lessons are sample lesson plans! As noted earlier, they are meant to guide you in the preparation of learner-
centred lessons i.e. lessons that help learners learn in ways that are interesting to them while achieving good results. Once
you have taught a lesson from an Activity Plan, try to think of other things you can teach using the same kinds of activities.
2. Doing Numeracy can be Fun: This Guide provides opportunities for teachers to begin to see that numeracy can be taught
effortlessly and be seen as a source of fun. One way by which this is done is through conscious documentation of ideas for
teaching, using local (familiar) materials and focusing on learner centeredness. Learners should be involved in fun activities
games, projects, puzzles, singing and out of the classroom activities using examples from their communities. Learners should
be supported in a non-threatening and fun way to discover contextual and conceptual understanding of numeracy concepts
with little distinction to compartmentalization of knowledge. For example, in doing addition activities we can be subtracting,
multiplying and dividing.
3. Numeracy is about knowledge of the numerals or numbers? Numerals are symbols, like the Roman Numeral X for 10
and the quantity each numeral represents is number. Remember that children learn numerals and the quantities they represent
first by counting, knowing/recognizing the numerals – by knowing their names, how they are written, and how they are
sequenced. This guide presents, in different ways, counting and recognition of the quantities the different numerals represent,
by asking them to count, predict, guess, write, etc.
4. Do what we are expected to do. Like a traveler who has a good map, learners find their way when they know where they
are going – or where a lesson is going, and what is expected of them. This is why good Facilitators organize instruction
around outcomes i.e. instructional objectives: not only content (what is to be taught), but also what learners are to know or
be able to do at the end of instruction. Each activity in this Guide begins with a statement of learning outcomes so that you
can inform your learners of what is expected of them. This way, they can prepare for success.
5. Learn to do it by doing. As with all other skills, we learn numeracy skills by doing those skills. This means that we need to
give our learners many opportunities to do mathematics – that is, to practice doing things – every day, both in and out of
school. And whenever and wherever it is possible, we need to provide opportunities for them to collaborate, so that they are
allowed to learn from one another.

Part 3 – Teaching Numeracy | 64
6. Helping learners unlearn when necessary – A need to listen to learners: Sometimes, solutions or techniques that are very
legitimate in one instance are found to be most illegitimate in other instance. This makes its necessary for facilitators to
always listen to learners’ explanation of their procedure. On many occasions, there are some sense in their thoughts and we
only get to know this only by listening to them. Even when their explanations are not inherent in some procedures that was
previously learnt, the need for teachers and facilitators to listen to learners in class cannot be over emphasized.
7. Simple to Complex: Teaching generally and particularly mathematics (numeracy) teaching proceeds from simple to
complex; known to unknown. This is the whole essence of previous knowledge. As we script out the lessons in this guide, it
should be noted that we develop each lesson from the previous knowledge that was identified. Identifying learners’ previous
knowledge is a good step in getting to expose them to the new lesson. So, as you plan your own lessons, ensure that much
related learners’ experience is/are identified and the new lesson proceeds from this previous experience of theirs.
8. Concrete-Mental-Abstract: We start teaching learners numeracy using concrete objects such as stones, beads, bottle tops,
sticks, sand, papers etc. Transition from concrete to abstract does not come easy because it involves some mental operations.
These mental operations link the concrete thinking of the learners to the new abstract thinking. Learners should progress
from counting with concrete objects, to imagining the concrete objects, to attaching quantities to them, and finally, to working
with numbers and then numerals. This process emphasizes the development of learner's ability to store, process and recall
numerical information, which is important for abstract thinking.
9. One final note: As a Facilitator, you have the power to share one of the most important and satisfying skills your learners
will ever develop – the ability to use numbers and math concepts with ease. The skills you teach them will help them get
started. But if they develop a love for mathematics, they will continue to explore mathematical properties in the world around
them every day of their lives. So don't forget to show them how wonderful math can be, and how understanding numbers
and math concepts helps us unlock many of the world's secrets, including how money is counted, how buildings are designed,
even how space travel is calculated!
Becoming proficient in math can help your pupils prepare for life in so many different areas – it is truly a key to understanding the
world! Have fun when you use these scripted lessons with your learners. Model how much fun mathematics can be. It's infectious!
The more you enjoy it, the more they will enjoy it, too. And they will thank you for sharing with them such a precious gift! As you
begin to use the lessons outlined in this guide, it is a good idea to follow them step-by-step. As you become more familiar with them,
feel free to improve and change them to fit the needs and interests of your learners. We hope you enjoy sharing these activities with
your learners.
The authors

Part 3 – Teaching Numeracy | 65
FOUNDATIONS OF MATHS INSTRUCTION AND ECR’S NUMERACY SCOPE AND
SEQUENCE
Purpose: This session is designed to discuss the themes of mathematics teaching in Nigerian schools together with global numeracy
agenda; and to show participants that the ECR’s Numeracy Scope and Sequence and the associated scripted lessons were borne out
of the national curriculum.
Skills:
Time: 35 minutes
Learning Objectives: By the end of this session, participants will be able to:
1. Identify the global elements of numeracy
2. List the themes of mathematics teaching in Nigerian primary schools
3. Recognize the similarities of both
4. Relate the ECR’s enhanced numeracy curriculum and the scope and sequence to both
Time: 35 minutes
Materials:
Flip chart paper
Markers or chalk
notepads and pens
Copies of the facilitator’s guide.
Previous Knowledge:
Trainer’s tip:
Part 3 – Teaching Numeracy | 66
Step & Icons Time Activity procedure
20 minutes
The trainer should:
1. Have participants organized into six groups by picking the numbers 1, 2, 3, 4, 5, 6
successively and having those with the same number come together to form a group
2. Ask each group to select a facilitator, a scribe and a presenter.
3. Say to the groups: Please read the section, in the facilitator’s guide, titled Foundations
and Fundamentals of Numeracy Teaching; and answer the following (Ensure these
questions are already on the black board or on a flip chart)
What are the global elements of being numerate?
What are the themes of mathematics teaching in Nigerian schools?
What similarities and differences can you identify in these two?
What are the similarities and differences between the global numeracy elements
and Nigerian math theme?
4. Ask reporters from different groups to report their group’s answers to the questions
and as they present write their points on a table on the flip chart
Say: Clearly the global numeracy elements and Nigerian math theme are more similar
than they are different
15 minutes
1. Have participants continue to work in the initial six groups
2. Refer the participants to ECR’s numeracy curriculum (scope and sequence) in
Appendix and look at the themes that it covers and consider the questions:
Are there themes that you expect to be there that are not there
Are there themes that are not well represented?
Is the sequence of presentation logical enough?
3. Ask reporters from different groups to report their group’s answers to the questions
and as they present write their points on a table on the flip chart

Part 3 – Teaching Numeracy | 67
4. Say: Given that the enhanced curriculum is intended for basic literacy level, it
could be said that the elements of global numeracy as well as the themes of
Nigerian math curriculum are adequately represented
Thank the participants and say: our responsibility is to equip the facilitators with the skills
required to teach these themes in order to expect that they will be taught to the learners
Part 3 – Teaching Numeracy | 68
FUNDAMENTALS OF MATHS TEACHING AND ECR’S APPROACH TO NUMERACY
TEACHING
Purpose: This session is designed to share with the participants some basic issues in the successful teaching of numeracy at the
non-formal level and to give participants an opportunity to appreciate the need to ask and listen to learners’ thinking that produce
the text that they produce from time to time especially when such products are wrong.
Skills:
Time: 45 minutes
Learning Objectives: By the end of this session, participants will be able to:
1. Identify with the issues in successful teaching of numeracy
2. Gain better understanding of ECR’s approach to the teaching of numeracy
3. See that learner’s texts usually (if not always) make sense to them
4. Recognize the need to listen to learners’ thinking in class
5. Appreciate that there are instances when learners need to unlearn some previously learnt materials to be able to learn
new ones
Materials: Flip chart paper, Markers or chalk, notepads and pens, copies of the facilitator’s guide.
Previous Knowledge:
Trainer’s tip:
Step &
Icons
Time Activity procedure
20 minutes
The trainer should:
1. The trainer should:
2. Say: Imagine that you are a teacher and you are one day teaching addition and a
learner say 2+3 is 23, what will they do?
3. Allow four participants to respond and ask other if they have different opinion

Part 3 – Teaching Numeracy | 69
Step &
Icons
Time Activity procedure
4. Ask the participant what they will do or how they will react to a learner who after been taught
counting numbers 1, 2, 3, … 9 and then 11, 12, 13, … 20 was heard counting eleven, twelve, thirteen,
fourteen, … nineteen, tenteen
5. Allow responses from another four different people
6. Say: Thank you. Let’s explore this further in groups present write their points on a table
on the flip chart
7. Say: Clearly the global numeracy elements and Nigerian math theme are more similar
than they are different
10 minutes The trainer should:
1. Tell participants that these ideas are very fundamental to the use of the guide as well as to effective
teaching and learning of numeracy
2. Ask participants if there are other ideas that they imagine are also fundamental to the teaching of
numeracy
3. Allow responses from 4 participants and say: we need to expose our facilitators to all of these
ideas and admonish them to use them as they teach numeracy.
4. Thank all participants
15 minutes The trainer should:
5. Have participants organized into five groups by picking the numbers 1, 2, 3, 4, 5 successively and
having those with the same number come together to form a group
6. Ask each group to select a facilitator, a scribe and a presenter.
7. Say to the groups: Please read the section, in the facilitator’s guide, titled ECR approach to
numeracy instruction particularly the important ideas contained therein; and answer
the following (Ensure these questions are already on the black board or on a flip chart)
Are there ideas you do not understand?

Part 3 – Teaching Numeracy | 70
Step &
Icons
Time Activity procedure
Have you seen any of these ideas practiced in your schools or non-formal centers you have
visited?
Do you practice these ideas in your own instruction?
Do you think these ideas can be implemented in your schools and learning centers?
Are the ideas practicable?
How can we begin/continue to use the ideas in our learning centers?
8. Ask reporters from different groups to report their group’s answers to the questions.
9. Ask reporters from different groups to report their group’s answers to the questions
The trainer should:
10. Have participants organized into six groups by picking the numbers 1, 2, 3, 4, 5, 6 successively and
having those with the same number come together to form a group
11. Ask each group to select a facilitator, a scribe and a presenter.
12. Say: In your different groups, think about and record similar errors that learners make,
the sources of the errors and how you will advise teachers to handle them in class.
13. Ask reporters from different groups to report their group’s answers to the questions.
a. Say the following facts about children’s learning to the participants:
b. Learners’ text makes sense to them
c. The answers that learners produce for numeracy problems are correct by their judgement
d. There is a reasoning behind the production of any wrong answer by a learner
e. As teachers/facilitators, those reasoning should interest us
f. We get the reasoning only be listening to the learners when they produce such answers
14. Thank participant and say to them that: To begin to help learners unlearn procedure that
work in certain instances but do not work in others`, the first step is listening to them
explain the reasoning or thinking behind their texts or answers
Part 3 – Teaching Numeracy | 71
INTRODUCTION TO THE ECR NUMERACY FACILITATOR’S GUIDE – STRUCTURE,
ORGANISATION & USE
Purpose: The purpose of this session is to familiarize the participants with the ECR Numeracy Facilitator’s Guide, both how it is
structured and organized and how it should be used – presentation of the lessons and guiding in planning other lessons.
Learning Objective: By the end of this session, participants will be able to:
1. Explain how the guide is structured
2. Prepare to teach lessons in the guide
3. Teach the lessons in the guide
4. Use the guide to plan other numeracy lessons that are not scripted in the guide
Time: 45 minutes
Materials: Copies of the Facilitator’s Guide – 1 per participant, a chart on structure and organization of the guide
Step &
Icons
Time Activity procedure
20 minutes
The trainer should:
1. Present the purpose and objectives of the session.
2. Form groups of 4 to 6 participants and ask each group to select a facilitator, reporter/recorder
and time keeper.
3. Ask participants to look carefully at the Facilitator’s Guide for a minute or two
4. Ask them to answer the following questions:
How many scripted lessons are there in the Guide?
What is the purpose of each scripted lessons?
What are the different parts of a scripted lessons?
How do you think these parts will help your pupils/learners?

Part 3 – Teaching Numeracy | 72
Step &
Icons
Time Activity procedure
5. Ask reporters from different groups to report their group’s answers to the questions on the
board.
20 minutes The Trainer should:
Again in their groups of 4 to 6, ask participants to read the section in the introduction titled structure
& organization, then answer the following questions written on the board or flip chart paper:
Is there any point you do not understand?
Do you have any guide with these points in your schools or non-formal centers? If yes, do you
use the guide? How?
If no, do you think these points in the structure are adequately explained? How would you
prepare for, and teach the lessons in the guide
Ask reporters from different groups to report their group’s answers to the questions on the board.

Part 3 – Teaching Numeracy | 73
DEMONSTRATION LESSONS: HOW TO TEACH USING THE SCRIPTED LESSON
Purpose: This session introduces participants to the correct usage of a scripted lesson plan based on its features, organization and
outcomes.
Objectives: By the end of this session, participants will be able to:
Outline the basic requirements for effective use of a scripted lesson plan.
Identify the features, parts and outcomes of a scripted lesson plan
Time: 40 minutes
Materials:
Flip chart paper
Markers or chalk
Notepads & pens
Copies of the facilitator’s guide.
Cut task 1 into slips (arranged in no particular order)
Cut task 2 into slips (arranged in no particular order)
Steps &
Icons
Time Activity procedure
20 minutes The trainer should:
1. Read the session objectives for the participants.
2. Organize participants into 3 groups and give them group names 1, 2 and 3. Tell the groups
they are to pick slips belonging to their groups from a pool of slips (all groups should carry
out this activity standing). Tell the groups that correctly complete its sets will be declared
the winner of the task.
3. Groups should select only slips relating to their groups as follows. The only clue they have
is that they belong to group 1, 2 or 3.
4. Say the first step is to find the group the task from the lot and then they can identify other
slips belonging to the group.
5. Confirm that they understand the task by asking one of the participants to repeat your
instruction.
Part 3 – Teaching Numeracy | 74
6. Spread the slips for task 1 and say start;
Group 1: Features of the scripted lesson plan.
a) Highly sequenced instruction
b) Clear and concise directions
c) Allocation of time
d) Active student participation
e) Assessment in order to practice and master new knowledge and skills
Group 2: Activity procedure of the scripted lesson plan
a) Introduction
b) Review of previous knowledge
c) Presentation
d) Practice (independent practice)
e) Performance
f) Review and reflection.
Group 3: Important outcomes of the scripted activity plan
a) Teachers spend more time on task, increasing their achievement.
b) Learners respond more frequently to questions in the class.
c) Greater amount of opportunities is available for teacher to support learners.
d) Less classroom discipline problems.
After all the slips have been selected by the groups. Ask the groups to read out what they have one
after the other starting from the group task.
Ask the other groups to confirm if they agree or disagree, in a healthy discussion. Confirm to the
class the correct option from the above list.
Declare the group with the most number of correct slips to be the winner.
Say: Well done we can all clap for ourselves!
15 minutes. The trainer should:
Organize participants to work in four groups.
Distributes the cut slips for task 2 equally between the groups.

Part 3 – Teaching Numeracy | 75
Ask each group to decide if the statement written on each of the slips distributed to them should be
conducted before, during or after the lesson (no middle options). Tell them they have only 5 min. to
do the task.
After 5 minutes ask the group to stop working.
Ask group presenters to come out to the front of the class. One after the other the group presenters
should read the statements on the slips and then say the group decision; either before, during or after
the lesson.
Ask the other groups to confirm if they agree or disagree, in a healthy discussion. Confirm to the
class the correct option from the list below (see below for answers).
Say; You have all done well!
Tips in effective use of the scripted lesson plan with answers:
1. Familiarize with the structure and understand the use of cues, icons and symbols in the
scripted activity plans. (Before)
2. Read and simulate some aspects of the lessons especially games and activities before the
lesson. (Before)
3. Always understand the lesson objectives properly. (Before)
4. Have the facilitator’s guide with you in the class. (During)
5. Discuss difficult or ambiguous steps with colleagues. (Before)
6. Don’t be a slave to the script (feel free to adapt where necessary). (Before)
7. Understand that all parts of the script are linked towards achieving the objective (s). (Before)
8. Remember to carry out on-going assessment as the lesson progresses. (During)
9. It is important to share objectives with learners at the beginning of the lesson. (During)
10. Prepare and practice the use of all instructional materials. (Before)
11. Note the teacher tips, important ideas and SEL ideas. (Before)
12. Remember to read the teacher’s/facilitator’s reflection section and note in your dairy. This
is known as reflective teaching. (After)
13. Follow the activities step by step and do not skip as you might miss critical steps. (During)
14. The introduction, conclusion/review and learners’ assessment are important as they provide
you with opportunity to attract learners’ attention and track their progress in achieving the
objectives. (During)
15. Note time allocations and adhere to them as much as possible. (Before)
Part 3 – Teaching Numeracy | 76
Task 1 (cut into slips)
1. Highly sequenced instruction
2. Clear and concise directions
3. Allocation of time
4. Active student participation
5. Assessment in order to practice and master new knowledge and skills
6. Introduction
7. Review of previous knowledge
8. Presentation
9. Practice (independent practice)
10. Performance
11. Review and reflection.
12. Teachers spend more time on task, increasing their achievement.
13. Learners respond more frequently to questions in the class.
14. Greater amount of opportunities is available for teacher to support learners.
15. Less classroom discipline problems.
16. Note that what teachers/facilitators are asked to “say are put in a bold”. (Before)
17. Know the meaning, linkages and importance of each part of the scripted lesson plan.
(Before)
18. Always spend at least an hour preparing for the lesson. (Before)
5 minutes. The trainer should:
Ask the participants which of the segments; before, during or after has more activities (Before).
Ask the participants why they think this is so?
Say: Thank you!
END

Part 3 – Teaching Numeracy | 77
16. Group 3: Important outcomes of the scripted activity plans
17. Group 2: Activity procedure of the scripted lesson plan
18. Group 1: Features of the scripted lesson plan
Task 2 (Cut into slips)
1. Familiarize with the structure and understand the use of cues, icons and symbols in the scripted activity plans.
2. Read and self-simulate some aspects of the lessons especially games and activities before the lesson.
3. Always understand the Lesson objectives properly.
4. Have the facilitator’s guide with you in the class.
5. Discuss difficult or ambiguous steps with colleagues.
6. Don’t be a slave to the script (feel free to adapt where necessary).
7. Understand that all parts of the script are linked towards achieving the objective (s).
8. Remember to carry out on-going assessment as the lesson progresses.
9. It is important to share objectives with learners at the beginning of the lesson.
10. Prepare and practice the use of all instructional materials.
11. Note the teacher tips, important ideas and SEL ideas.
12. Remember to read the facilitator’s reflection section and note in your dairy. This is known as reflective teaching.
13. Follow the activities step by step and do not skip as you might miss critical steps.
14. The introduction, conclusion/review and learners’ assessment are important as they provide you the opportunity to attract
learners’ attention and track learners’ progress in achieving the objectives.
15. Note time allocations and adhere to them as much as possible.
16. Note that what facilitators are asked to say are put in a bold.
17. Know the meaning, linkages and importance of each part of the scripted lesson plan.
Always spend at least an hour preparing for the lesson.
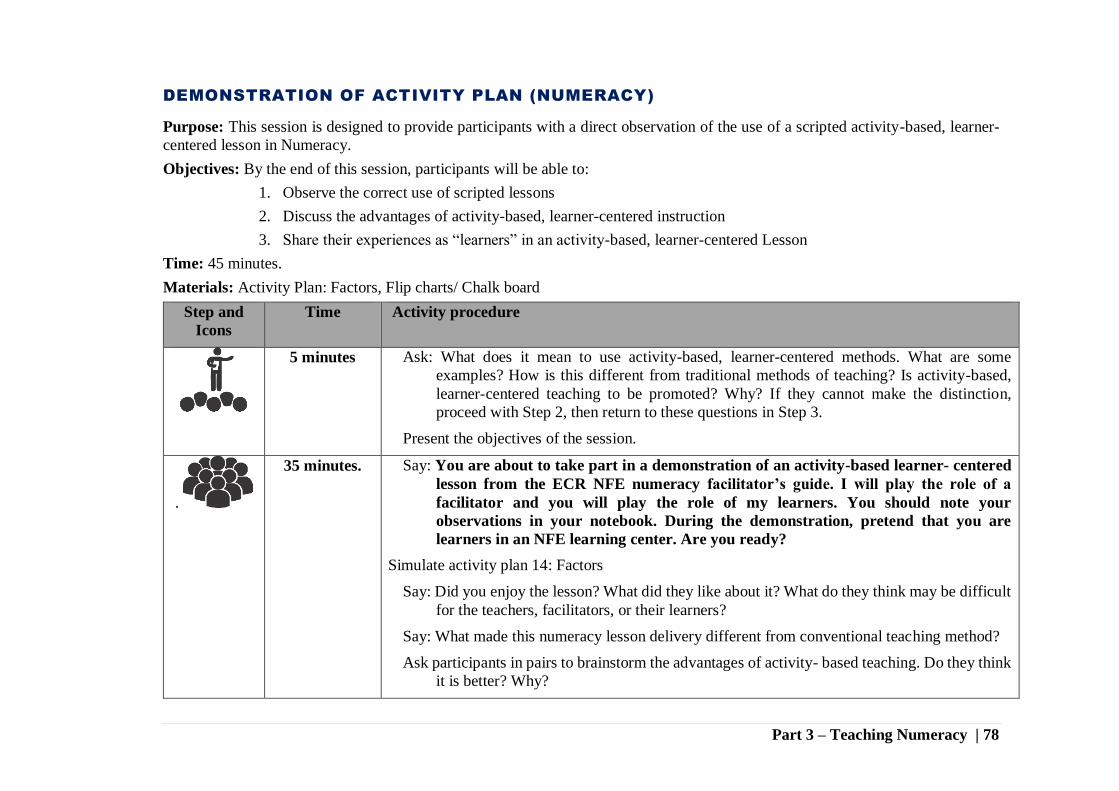
Part 3 – Teaching Numeracy | 78
DEMONSTRATION OF ACTIVITY PLAN (NUMERACY)
Purpose: This session is designed to provide participants with a direct observation of the use of a scripted activity-based, learner-
centered lesson in Numeracy.
Objectives: By the end of this session, participants will be able to:
1. Observe the correct use of scripted lessons
2. Discuss the advantages of activity-based, learner-centered instruction
3. Share their experiences as “learners” in an activity-based, learner-centered Lesson
Time: 45 minutes.
Materials: Activity Plan: Factors, Flip charts/ Chalk board
Step and
Icons
Time Activity procedure
5 minutes
Ask: What does it mean to use activity-based, learner-centered methods. What are some
examples? How is this different from traditional methods of teaching? Is activity-based,
learner-centered teaching to be promoted? Why? If they cannot make the distinction,
proceed with Step 2, then return to these questions in Step 3.
Present the objectives of the session.
.
35 minutes.
Say: You are about to take part in a demonstration of an activity-based learner- centered
lesson from the ECR NFE numeracy facilitator’s guide. I will play the role of a
facilitator and you will play the role of my learners. You should note your
observations in your notebook. During the demonstration, pretend that you are
learners in an NFE learning center. Are you ready?
Simulate activity plan 14: Factors
Say: Did you enjoy the lesson? What did they like about it? What do they think may be difficult
for the teachers, facilitators, or their learners?
Say: What made this numeracy lesson delivery different from conventional teaching method?
Ask participants in pairs to brainstorm the advantages of activity- based teaching. Do they think
it is better? Why?

Part 3 – Teaching Numeracy | 79
5 minutes Return to the objectives.
Explain that through observation – a type of continuous assessment – the trainers noted
participants‟ responses to both objectives, and noted that the participants had done very
well. They should clap for themselves.
Highlight the key issues discussed and emphasize the importance of learner-centered
approach to teaching pupils.
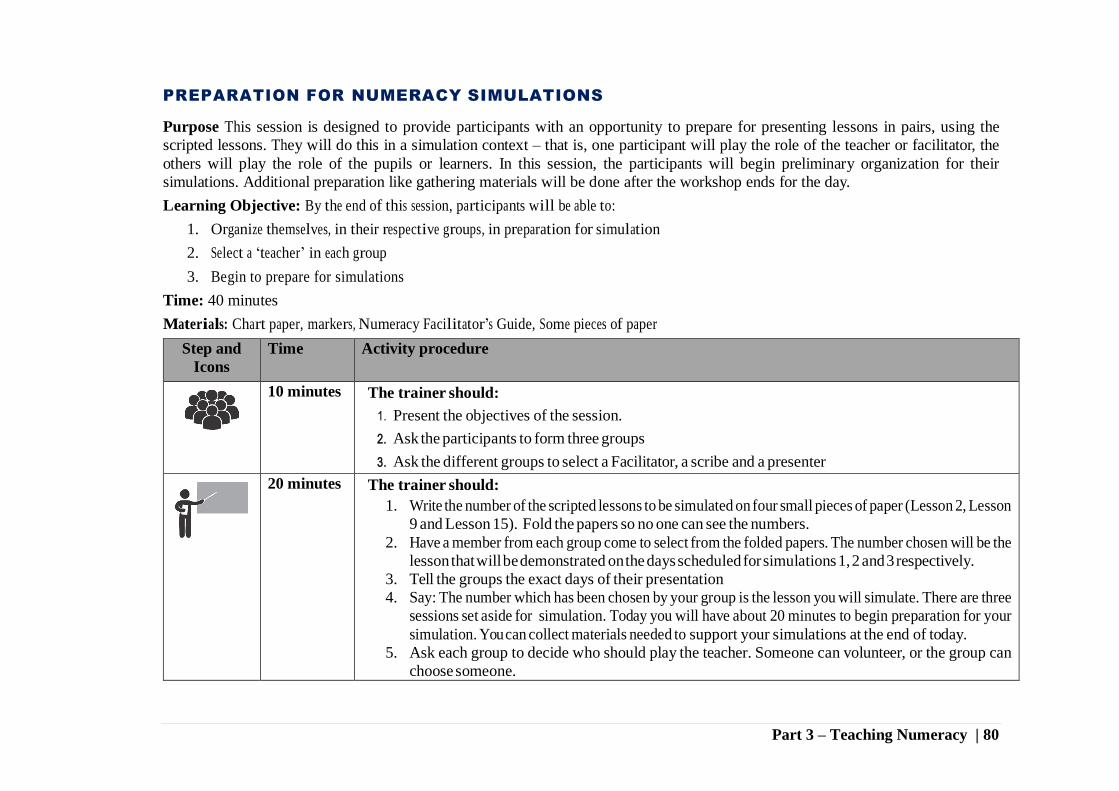
Part 3 – Teaching Numeracy | 80
PREPARATION FOR NUMERACY SIMULATIONS
Purpose This session is designed to provide participants with an opportunity to prepare for presenting lessons in pairs, using the
scripted lessons. They will do this in a simulation context – that is, one participant will play the role of the teacher or facilitator, the
others will play the role of the pupils or learners. In this session, the participants will begin preliminary organization for their
simulations. Additional preparation like gathering materials will be done after the workshop ends for the day.
Learning Objective: By the end of this session, participants will be able to:
1. Organize themselves, in their respective groups, in preparation for simulation
2. Select a ‘teacher’ in each group
3. Begin to prepare for simulations
Time: 40 minutes
Materials: Chart paper, markers, Numeracy Facilitator’s Guide, Some pieces of paper
Step and
Icons
Time Activity procedure
10 minutes The trainer should:
1. Present the objectives of the session.
2. Ask the participants to form three groups
3. Ask the different groups to select a Facilitator, a scribe and a presenter
20 minutes The trainer should:
1. Write the number of the scripted lessons to be simulated on four small pieces of paper (Lesson 2, Lesson
9 and Lesson 15). Fold the papers so no one can see the numbers.
2. Have a member from each group come to select from the folded papers. The number chosen will be the
lesson that will be demonstrated on the days scheduled for simulations 1, 2 and 3 respectively.
3. Tell the groups the exact days of their presentation
4. Say: The number which has been chosen by your group is the lesson you will simulate. There are three
sessions set aside for simulation. Today you will have about 20 minutes to begin preparation for your
simulation. You can collect materials needed to support your simulations at the end of today.
5. Ask each group to decide who should play the teacher. Someone can volunteer, or the group can
choose someone.

Part 3 – Teaching Numeracy | 81
6. Remind group members that during the simulation they will be playing pupils or learners and
should remain in their roles. Admonish that it can be challenging but that they should try and
be real learners
7. Explain that the members of each group should review their lesson script together, then discuss
the lesson and provide the teacher with ideas such as:
a. Does the lesson include an energizer to introduce the lesson? If not, what kind of energizer
can be used?
b. Are the examples provided in the appropriate for non-formal learners? If not, which other
ones should be used?
c. What problems might the teacher encounter in presenting the lesson?
d. How can the problems be addressed?
8. Ask if there are any questions about the lessons or simulations.
Say: Good work, clap for yourselves.
5 minutes The trainer should:
1. Remind those that will be facilitating the sessions to prepare adequately for the simulations the next
day by:
Going over the lesson #s 2, 9 and 15.
Preparing all the materials needed.
Making consultations with colleagues and trainers, if needed.

Part 3 – Teaching Numeracy | 82
NUMERACY SIMULATION 1 – LESSON 2 (ADDITION) – 90 MINUTES
Purpose: The purpose of this session as well as the other simulation sessions is for the participants to practice using the scripted
lessons to deliver instruction. Appointed teachers in each group will act as teacher while other participants.
Learning objectives: By the end of this session, participants will be able to:
1. Teach a scripted lesson
2. Observe a lesson and provide feedback on it.
3. Identify possible problems when presenting these Scripted lessons to their learners,
4. Think about the problems and provide possible solutions to them
Materials: Materials needed to teach Lesson 2
Step and Icons Time Activity procedure
65 minutes The trainer should:
1. Say: Yesterday we prepared for simulation. Today we will simulate Lesson 2. You have a
teacher and the rest of you will act as pupils. Please be good learners even though it can be
very difficult to do so as adults and as teachers.
2. Select 4 participants who will act as the “observation Team” and tell them that they should
record their observations as they happen during the presentation; and complete the
observation checklist at the end of the lesson. They should also refer to the Lesson 2 as
the simulation goes on.
3. Call on the teacher to simulate scripted lesson 2, while the “observation Team” observes as the
“learners” listen attentively
4. After the lesson ends, tell the participants that it is now time for feedback from you and the
observation team.
5. Nominate two reporters (a male and a female) to each record the comments that are to be made
on the lesson. Tell them that they will report back to the whole group.

Part 3 – Teaching Numeracy | 83
Step and Icons Time Activity procedure
6. To begin the feedback session, first, ask the ‘teacher’ the following questions one after the
other:
i. How do you feel the lesson went?
ii. What went well and what was difficult?
iii. What will you do differently if given another opportunity?
7. Next ask the participants who acted as learners the following:
i. Describe how felt during the lesson as learners
ii. Was the content appropriate for the basic literacy level?
iii. Were the activities interesting?
iv. How were the materials put into use?
Finally, ask the “observation Team’ to share their observations
25 minutes The trainer should:
1. Ask the nominated reporters to use the next 5 minutes to come up with a list of the
following:
What was good about the lesson?
What teachers and facilitators should keep in mind when presenting this
lesson?
Allow each group to present its lessons learnt in 2 minutes.
Thank all participants and lead them in the “atafa clap”

Part 3 – Teaching Numeracy | 84
NUMERACY SIMULATION 2 (LESSON 9 – MULTIPLES OF NUMBERS)
Purpose: The purpose of this session is to provide the participants with another opportunity to practice teaching, using the scripted
lessons. Appointed teachers in another group will act as teacher while other participants will again act as learners.
Learning objectives: By the end of this session, participants will be able to:
1. Observe another lesson and provide feedback on it.
2. Identify possible problems when presenting these scripted lessons to their facilitators OR learners,
3. Think about the problems and provide possible solutions to them
Time: 61 minutes
Materials: Materials needed to teach Lesson 9
Step & Icons Time Activity procedure
45 minutes The trainer should:
1. Say: After the session on preparation for simulation, we have had a simulation session on
Lesson 2. Now we will simulate Lesson 9. You have a teacher and the rest of you will act
as pupils. Please be good learners even though it can be very difficult to do so as adults
and as teachers.
Select 4 participants who will act as the “observation Team” and tell them that they should record their
observations as they happen during the presentation; and complete the observation checklist at the end of
the lesson. They should also refer to the Lesson 9 as the simulation goes on.
2. Call on the teacher to simulate scripted lesson 9, while the “observation Team” observes as the
“learners” listen attentively
3. After the lesson ends, tell the participants that it is now time for feedback from you and the
observation team.
4. Nominate two reporters (a male and a female) to each record the comments that are to be made on
the lesson. Tell them that they will report back to the whole group.
5. Begin the feedback by asking the ‘teacher’ the following questions one after the other:

Part 3 – Teaching Numeracy | 85
• How do you feel the lesson went?
• What went well and what was difficult?
• What will you do differently if given another opportunity?
6. Next ask the participants who acted as learners the following:
• Describe how felt during the lesson as learners
• Was the content appropriate for the basic literacy level?
• Were the activities interesting?
• How were the materials put into use?
Finally, ask the “observation Team’ to share their observations.
16 minutes The trainer should:
1. Ask the nominated reporters to use the next 5 minutes to come up with a list of the following:
What was good about the lesson?
What teachers and facilitators should keep in mind when presenting this lesson?
Allow each group to present its lessons learnt in 2 minutes.
Thank all participants and say well done to them

Part 3 – Teaching Numeracy | 86
MAKE AND TAKE - DEVELOPING INSTRUCTIONAL MATERIALS FOR NUMERACY
Purpose: The session is intended to help participants appreciate, improvise (make and take) and use appropriate instructional materials
to accompany the ECR Numeracy lessons.
Learning objectives: By the end of this session, participants will be able to:
1. List instructional materials that can easily be obtained within the community
2. Improvise and produce instructional materials using locally available materials
3. Demonstrate the handling of instructional materials while teaching
4. Discuss the importance of instructional materials in facilitating learning
Time: 45 minutes
Materials:
1. Flip chart
2. Cardboards/Old Calendar/Old Newspapers/Old A4 papers
3. Markers /Pencils
4. Ruler
5. Tapes
Step & Icons Time Activity procedure
5 minutes The trainer should:
1. Ask the participants the following questions, take response from one or two participants
and say the answer as in parentices:
What are instructional materials? (physical things that help us learn like posters,
flash cards, and real objects, charts)
Who uses instructional materials? (The teacher, learners, or both).
Why is it important to use instructional materials? (they help learners learn
better)
2. Say: In this session we will discuss how to make instructional materials, and how
to use them to make teaching activi- ty-based, interactive and fun!
3. Present the objectives of the session
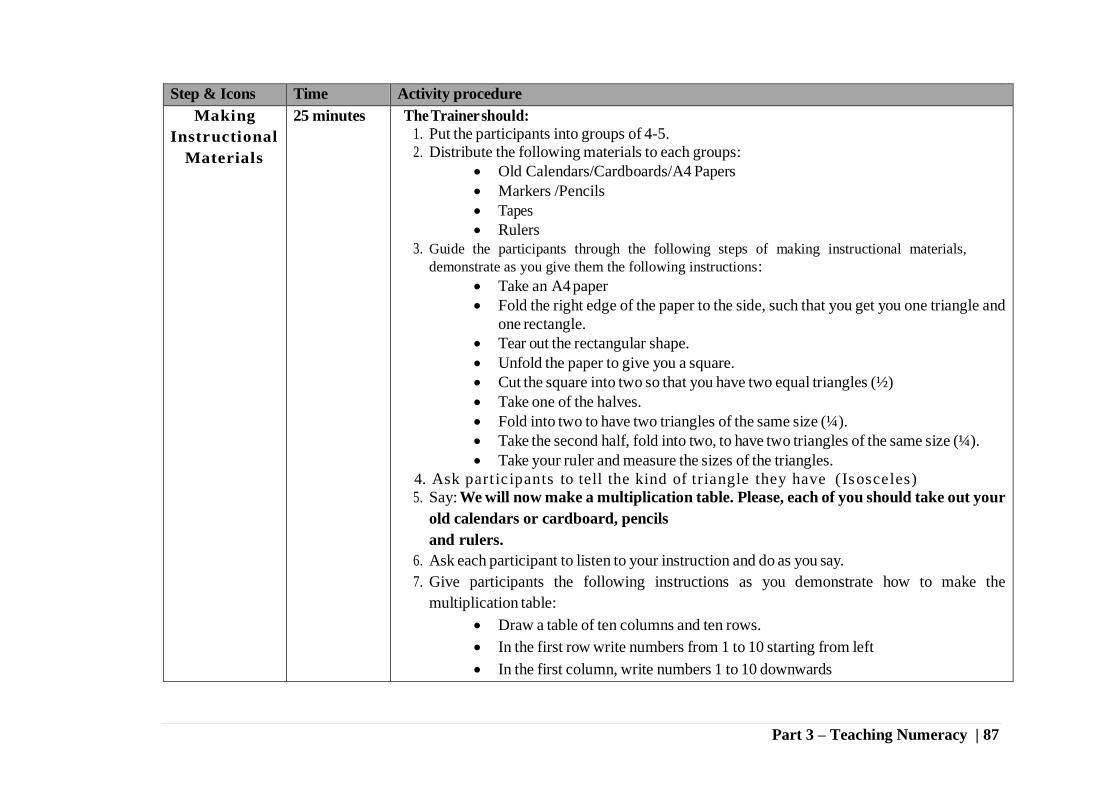
Part 3 – Teaching Numeracy | 87
Step & Icons Time Activity procedure
Making
Instructional
Materials
25 minutes The Trainer should:
1. Put the participants into groups of 4-5.
2. Distribute the following materials to each groups:
Old Calendars/Cardboards/A4 Papers
Markers /Pencils
Tapes
Rulers
3. Guide the participants through the following steps of making instructional materials,
demonstrate as you give them the following instructions:
Take an A4 paper
Fold the right edge of the paper to the side, such that you get you one triangle and
one rectangle.
Tear out the rectangular shape.
Unfold the paper to give you a square.
Cut the square into two so that you have two equal triangles (½)
Take one of the halves.
Fold into two to have two triangles of the same size (¼).
Take the second half, fold into two, to have two triangles of the same size (¼).
Take your ruler and measure the sizes of the triangles.
4. Ask part icipants to tell the kind of triangle they have ( Isosceles)
5. Say: We will now make a multiplication table. Please, each of you should take out your
old calendars or cardboard, pencils
and rulers.
6. Ask each participant to listen to your instruction and do as you say.
7. Give participants the following instructions as you demonstrate how to make the
multiplication table:
Draw a table of ten columns and ten rows.
In the first row write numbers from 1 to 10 starting from left
In the first column, write numbers 1 to 10 downwards

Part 3 – Teaching Numeracy | 88
Step & Icons Time Activity procedure
In every other cell, write the product of the first number on the row by the first
number on the column.
8. Go round and support participants as they make their multiplication table and ask participants
who have finished to help other colleagues.
1. Allow about 5 minutes, say well done, and ask participants to display their instructional
materials in any part of the class
Using
Instructional
Materials
10 minutes The Trainer should:
1. Ask participant to think of one numeracy activity that they can teach their learners with the
triangle or multiplication table they produced.
2. Ask one volunteer to demonstrate a 5 minute numeracy activity using either the triangle or
multiplication table, as the other participants act as the learners.
3. Ask participants to clap for the volunteer.
4. Lead a whole class discussion where the participants answer the following questions:
How appropriate was the size of the instructional material?
What do you think about the clarity and attractiveness of the material?
How well did the teacher use the material(s) in his or her teaching?
10 minutes The Trainer should:
1. Get 2 flip charts/cardboards and write each of the following on a flip chart/cardboard and paste
them in strategic positions in the room.
Characteristics of effective instructional materials.
Handling instructional materials.
2. Divide participants into groups of 5 by asking each participant to pick the numbers 1 to 5
successively and hand those with number 1 come together to form a group, 2 come
together to form a group, etc.
3. Ask each group to appoint a group facilitator, recorder, reporter and presenter.
4. Allow the groups 5 minutes to discuss 2 respond to each of the two points written on the flip

Part 3 – Teaching Numeracy | 89
Step & Icons Time Activity procedure
chart.
5. Gather all participants together beside each cardboard/flip chart after 5 minutes.
6. Have each group present the points they generated.
Write the points on the corresponding flip charts and thank participants for their participation
5 minutes The trainer should:
1. Ask participants the following questions:
What are 3 features of an instructional materials? (simple, clear, attractive,
appropriate for the content and level of the learners)
How can you effectively use instructional materials you produced while
teaching your learners? (display them, refer to the particular issues being
discussed on the instructional material and carefully take the learners through them as
teaching progresses, remove instructional materials after use to avoid distractions,
store it in a proper place)
What are 3 reasons why teachers need to use instructional materials while
teaching numeracy? (instructional material make learning numeracy easier and
interesting; instructional materials motivate learners; they make teaching inter- active
and participatory; they make numeracy ideas more concrete, they promote pupil-
centred teaching and learning, they make the tasks of the teacher less stressful)
2. Review the objectives of the session – were they met? How?
Ask participants to clap for themselves 6 times, they must count as they clap.

Part 3 – Teaching Numeracy | 90
SIMULATION 3 (LESSON 15 – HOW LONG IS IT?)
Purpose: The purpose of this session is to further provide the participants with yet another opportunity to practice teaching, using the
scripted lessons. A participant will again act as a teacher while other participants will again act as learners.
Learning objective: By the end of this session, participants will be able to:
1. Observe lesson 15 and provide feedback on it.
2. Identify possible problems when presenting the scripted lesson to their facilitators OR learners,
3. Think about the problems and provide possible solutions to them
Time: 45 minutes
Materials: materials needed to teach Lesson 15
Step & Icons Time Activity procedure
Simulation
Lesson 15
45 minutes The trainer should:
1. Say: We have had simulation session on Lessons 2 and 9. Now we will simulate Lesson
15. As usual we’ll have a teacher and the rest of you will act as pupils.
2. Select 4 participants who will act as the “observation Team” and tell them that they should record
their observations as they happen during the presentation; and complete the observation
checklist at the end of the lesson. They should also refer to the Lesson 15 as the simulation goes
on.
3. Call on the teacher to simulate scripted lesson 15, while the “observation Team” observes as the
others act learners
4. After the lesson ends, tell the participants that it is now time for feedback from you and the
observation team
5. Nominate two reporters (a male and a female) to each record the comments that are to be made on the
lesson. Tell them that they will report back to the whole group
6. Begin the feedback by asking the ‘teacher’ the following questions one after the other:

Part 3 – Teaching Numeracy | 91
How do you feel the lesson went?
What went well and what was difficult?
What will you do differently if given another opportunity?
7. Next ask the participants who acted as learners the following:
Describe how felt during the lesson as learners
Was the content appropriate for the basic literacy level?
Were the activities interesting?
How were the materials put into use?
Finally, ask the “observation Team’ to share their observations.
17 minutes The trainer should:
1. Ask the nominated reporters to use the next 5 minutes to come up with a list of the following:
○ What was good about the lesson?
○ What teachers and facilitators should keep in mind when presenting this lesson?
○ Allow each group to present its lessons learnt in 2 minutes.
Thank all participants and have them clap for themselves

Part 3 – Teaching Numeracy | 92
LESSON 2: ADDITION
Title: Addition of one digit numbers
Skills: Addition of numbers with sum less than 10
Time: 45 minutes
Learning Objective: At the end of the lesson, learners should be able to:
1. Recognize and use the addition sign (+)
2. Add two single-digit numbers sum less than 10
3. Add three single-digit numbers sum less than 10
4. Describe addition.
Materials:
1. Counters; (Bottle tops, bean seeds, stones)
2. Addition chart
Previous Knowledge: Learners can count numbers from 1 to 99
Facilitator’s Tips: When learners encounter addition with objects, especially object in their environments, the learning
lasts longer; so addition with real objects should be emphasized
Important Ideas: Addition of numbers using real objects
SEL Ideas:
When learners are allowed to work together in groups/pairs, their positive social skills are developed
When learners engage in high cognitive tasks, their level of perseverance in increased
On-going Assessment: As the lesson progresses, facilitators should observe how the learners are responding and ensure
that every learner is given an opportunity to construction knowledge around addition of numbers.
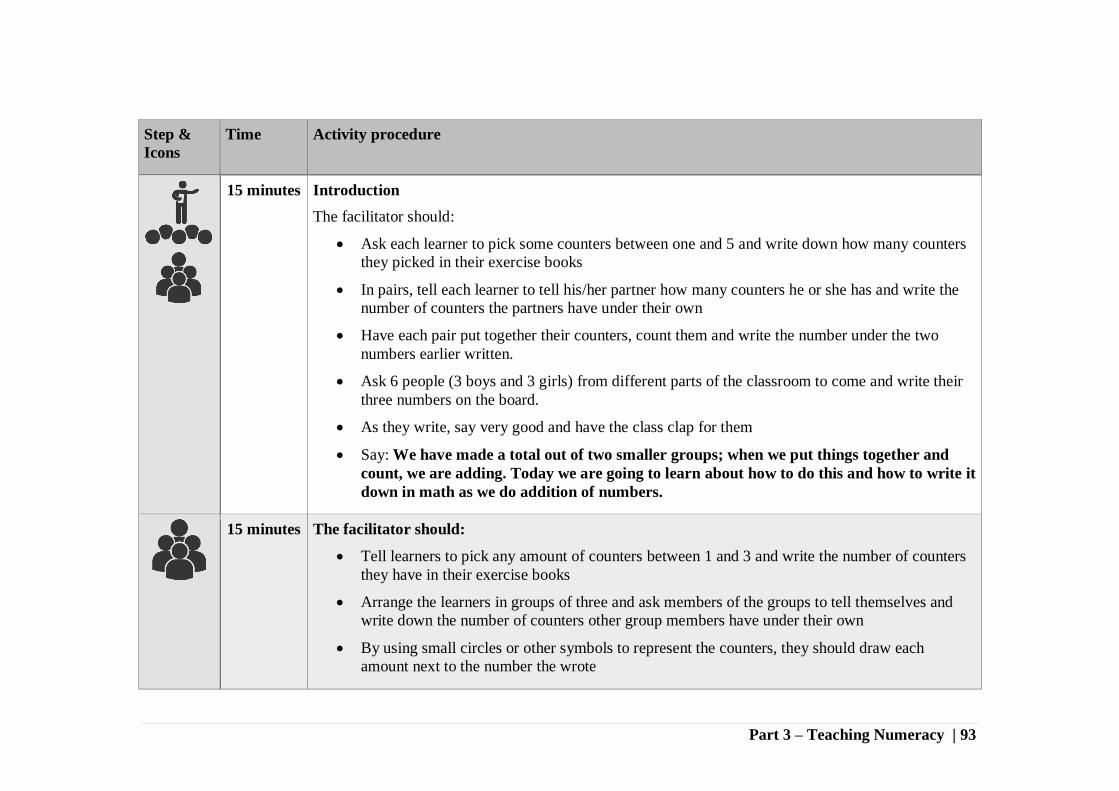
Part 3 – Teaching Numeracy | 93
Step &
Icons
Time Activity procedure
15 minutes Introduction
The facilitator should:
Ask each learner to pick some counters between one and 5 and write down how many counters
they picked in their exercise books
In pairs, tell each learner to tell his/her partner how many counters he or she has and write the
number of counters the partners have under their own
Have each pair put together their counters, count them and write the number under the two
numbers earlier written.
Ask 6 people (3 boys and 3 girls) from different parts of the classroom to come and write their
three numbers on the board.
As they write, say very good and have the class clap for them
Say: We have made a total out of two smaller groups; when we put things together and
count, we are adding. Today we are going to learn about how to do this and how to write it
down in math as we do addition of numbers.
15 minutes The facilitator should:
Tell learners to pick any amount of counters between 1 and 3 and write the number of counters
they have in their exercise books
Arrange the learners in groups of three and ask members of the groups to tell themselves and
write down the number of counters other group members have under their own
By using small circles or other symbols to represent the counters, they should draw each
amount next to the number the wrote

Part 3 – Teaching Numeracy | 94
Step &
Icons
Time Activity procedure
Ask each group to use small circles to represent all the counters in their group and count how
many counters are in the group all together
Have groups present by drawing and writing on the board group by group and say well done
after each group has presented
15 minutes The facilitator should:
Say. When two or more quantities or numbers are put together, we are doing addition.
The symbol or sign for addition is + called plus.
Tell the learners that to add 2 and 3, we say two plus three and write
2+3. Using real objects, we draw:
Put the illustration of the board
Say: To write the amount altogether, we use
another sign, =, called equals. So we can write
2+3=5. Using real objects, we draw:
Complete the illustration of the board and let the
learners say after you, two plus three equals five
Explain to learners that we can also use match sticks are drawing of
strokes instead of real objects or counters and have two strokes and three
strokes and count them together:
Say now write all the addition that we have been doing in your exercise books, using
numbers and symbols; and do the following: (1) 3 + 4 = (2) 2 + 6 =
Draw two groups of items on the board and ask learners to copy them, write the number of
items in each group then draw them together and then write their sum
2 3 5

Part 3 – Teaching Numeracy | 95
Step &
Icons
Time Activity procedure
Go round the class and observe that learners are doing the correct thing. Provide assistance
where necessary
SCRIPTED LESSON 9: HOW LONG IS IT?
Skill: Measuring lengths.
Time: 45 Minutes
Important ideas: Measurement, length and standard unit.
Learning objectives: At the end of the lesson, learners will be able to:
i. Use standard units of measuring lengths.
ii. Recognize the units of length in metric system.
iii. Measure familiar lengths using standard measures.
Previous knowledge: Learners are familiar with different length and sizes around the homes such as their slippers and shoes, they
were also introduced to measurements using non-standard units.
Materials: Meter rules/sticks – non calibrated (as many as can go round the class in groups of 3-4), calibrated meter rule (as many
as can go round the class in groups of 3-4)
Facilitator’s Tips: The facilitators should not use a meter first learners are already familiar with non-standard units like
hand span, feet, etc. The need for standardization should lead to the use of meter rule etc. and other rule required to
measure length smaller than a meter. When measuring the height of learners’ boys and girls should be in different groups.
Important Ideas: The measuring of length is the first measure to be introduced to learners. It is important for learners to
understand that though there are non-standard measures, standard measures are important for uniform measurement or
else we all measure an object differently as seen in non-standard measures.
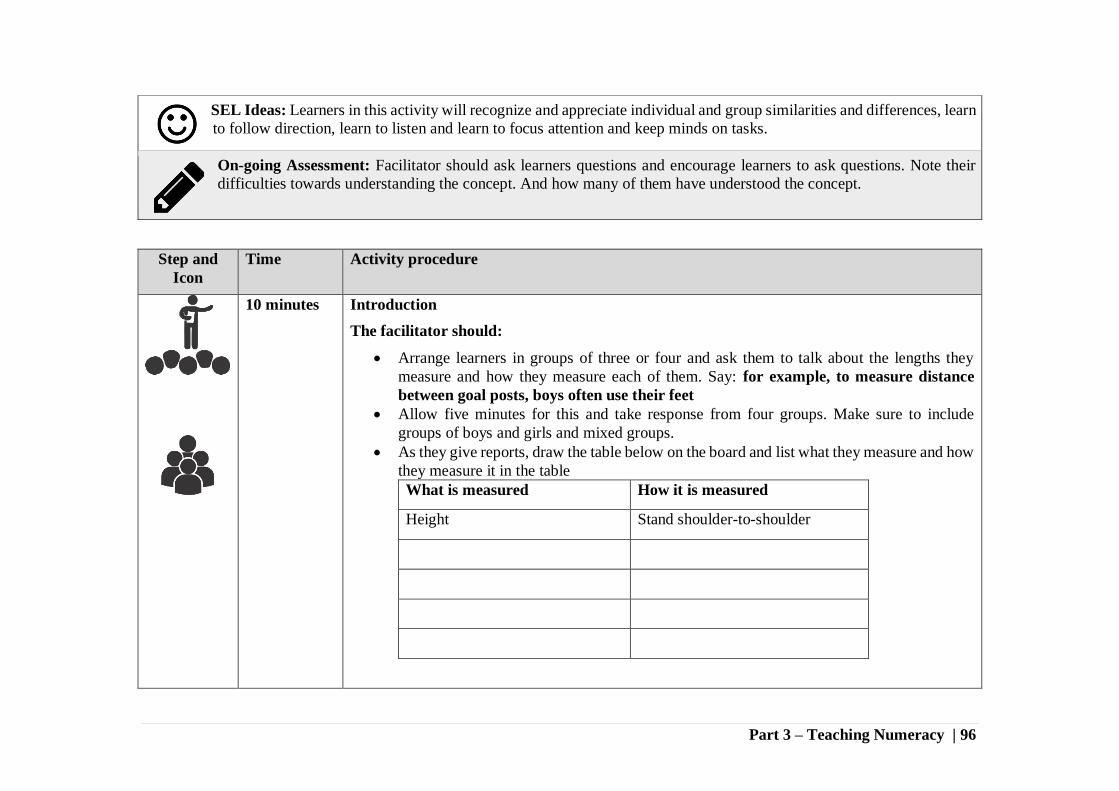
Part 3 – Teaching Numeracy | 96
SEL Ideas: Learners in this activity will recognize and appreciate individual and group similarities and differences, learn
to follow direction, learn to listen and learn to focus attention and keep minds on tasks.
On-going Assessment: Facilitator should ask learners questions and encourage learners to ask questions. Note their
difficulties towards understanding the concept. And how many of them have understood the concept.
Step and
Icon
Time Activity procedure
10 minutes
Introduction
The facilitator should:
Arrange learners in groups of three or four and ask them to talk about the lengths they
measure and how they measure each of them. Say: for example, to measure distance
between goal posts, boys often use their feet
Allow five minutes for this and take response from four groups. Make sure to include
groups of boys and girls and mixed groups.
As they give reports, draw the table below on the board and list what they measure and how
they measure it in the table
What is measured How it is measured
Height Stand shoulder-to-shoulder

Part 3 – Teaching Numeracy | 97
Step and
Icon
Time Activity procedure
Tell learners and demonstrate to them that we measure with our hands (hand span), feet,
particular rope length, match stick, etc.
Invite one boy and one girl to measure the length and breadth of a desk in the front of the
class using their hands span.
Show learners that when these methods are used to measure distances, understanding and
communicating the measurement of the different lengths is a problem. Say: this is because
what is used to measure is not standard, your hand is shorter or longer than my own;
Abu’s foot is longer or shorter than Fatimah’s
Say: Today we would learn how to be able to measure a particular length and we all
get the same answer.
5 minutes The facilitator should:
Put the learners in groups of 3 or 4 learners.
Provide the learners with unmarked meter sticks or rules.
Ask the learners to measure suitable lengths such as: the length and width of the classroom;
the height of the door; width of the windows, the height of learners, the length of a table,
various lengths in classroom and record their measurement
Go round to demonstrate the task to the groups.
Ask the learners:
Can you measure small length?
For each group, is the measurement a whole number of meters?
Lead the learners to realize that they couldn’t measure very accurately neither can they
measure small lengths.
Tell them that dividing the meter rule into smaller parts is necessary to be able to measure
these lengths accurately.
10 minutes The facilitator should:
Demonstrate on the board the use of the smaller graduations in length measurements
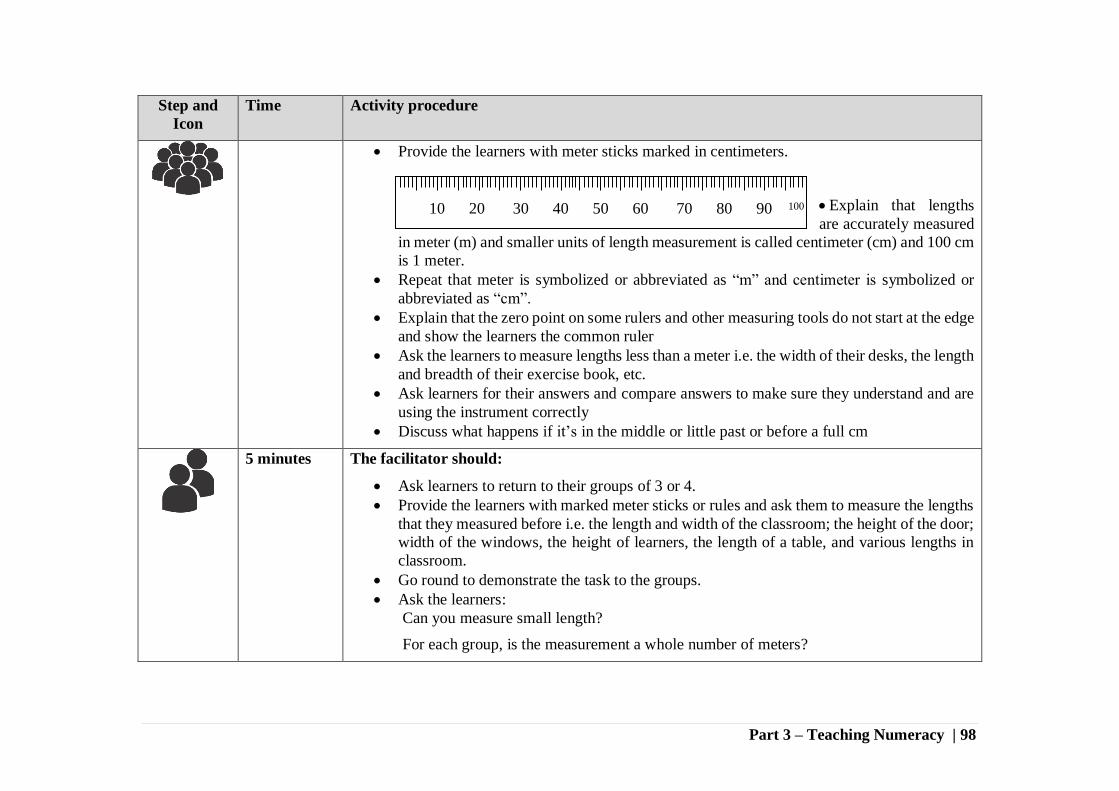
Part 3 – Teaching Numeracy | 98
Step and
Icon
Time Activity procedure
Provide the learners with meter sticks marked in centimeters.
Explain that lengths
are accurately measured
in meter (m) and smaller units of length measurement is called centimeter (cm) and 100 cm
is 1 meter.
Repeat that meter is symbolized or abbreviated as “m” and centimeter is symbolized or
abbreviated as “cm”.
Explain that the zero point on some rulers and other measuring tools do not start at the edge
and show the learners the common ruler
Ask the learners to measure lengths less than a meter i.e. the width of their desks, the length
and breadth of their exercise book, etc.
Ask learners for their answers and compare answers to make sure they understand and are
using the instrument correctly
Discuss what happens if it’s in the middle or little past or before a full cm
5 minutes The facilitator should:
Ask learners to return to their groups of 3 or 4.
Provide the learners with marked meter sticks or rules and ask them to measure the lengths
that they measured before i.e. the length and width of the classroom; the height of the door;
width of the windows, the height of learners, the length of a table, and various lengths in
classroom.
Go round to demonstrate the task to the groups.
Ask the learners:
Can you measure small length?
For each group, is the measurement a whole number of meters?
10 20 30 40 50 60 70 80 90 100
Part 3 – Teaching Numeracy | 99
Step and
Icon
Time Activity procedure
The learners realized that they could now measure very accurately and can measure small
lengths.
10 minutes Assessment
The facilitators should:
Divide learners into pairs and ask pairs to measure (ensure you go round to support the
learners):
1. The length of their arm.
2. The length of their foot.
3. Their heights
Ask 3-4 pairs of learners to share their answers with class
Say: You have all done great!
5 minutes Conclusion/Review
The facilitators should:
Explain to the learners that standard measurement allows our measurements to be uniform and we
can measure small distances more accurately.
On-going assessment of learning:
Do any of your learners need more help?
Are there learners who understand well?
Which learners can help other learners and how can you encourage that?
Part 3 – Teaching Numeracy | 100
SCRIPTED LESSON 15: MULTIPLES
Title: Multiples
Skills: Number sense, successive counting in 2s, 3s, …, identifying and recognizing multiples
Time: 45 minutes
Learning Objective: At the end of the lesson, learners should be able to:
List the multiples of 1, 2, 3, 4, 5 & 10
Materials: Counters, Multiplication chart
Previous Knowledge:
Learners can count numbers from 1 to 100
Learners can read multiplication tables
Facilitator’s Tips: The multiples of any given number is an infinite set. If a number is a multiple of a smaller number,
then that smaller number is a factor of the bigger one
Important Ideas: Multiples of numbers. A number is said to be a multiple of a (usually) smaller number if it can be
divided by the smaller number without a remainder
SEL Ideas:
Positive Social Skills: By allowing learners to work together in groups/pairs, their positive social skills are developed
Perseverance: By giving high cognitive tasks to learners and by charging learners to write as many as possible of multiples and
offering prices for those with the highest numbers
On-going Assessment: As the lesson progresses, observe how the learners are responding and ensure that every learner
participates as you build up to knowledge construction around finding the multiples of 1, 2, 3, 4, 5, 10.

Part 3 – Teaching Numeracy | 101
Step &
Icons
Time Activity procedure
10 minutes Introduction
The facilitator should:
Ask 14 learners (boys and girls) from different parts of the classroom to come to the front of the class
and stand in pairs
Ask the class how many pairs are there? Allow one boy and one girl to answer and say: there are
seven pairs of learners standing
Direct one pair to go back to their seats and ask the class how many learners have returned to their
seat?
Ask a learner who has not spoken during the lesson to answer and say very good after the mention of
two, and write 2, on the board.
Ask another pair of learners to return to their seats and ask how many learners have returned to their
seats altogether?
Invite another learner (opposite sex) who has not spoken before to answer and say well done to him or
her and say four is correct, as you write 4, next to 2, that was written earlier
Ask another pair of learners to return to their seats and ask the learners to write in their exercise book
how many learners have returned to their seats altogether?
Go round the class to see what the learners have written and invite learners from different locations in
the room to say their answers.
Say thank you as you write 6, next to 4, that was written previously
Continue this until all fourteen learners have taken their seats and the sequence 2, 4, 6, … to 14 is on
the board and in learners’ notebooks

Part 3 – Teaching Numeracy | 102
Step &
Icons
Time Activity procedure
Say: These numbers can be divided into/by two without remainders. Today we are going to learn
about multiples of numbers.
10 minutes Multiples of numbers
The facilitator should:
Tell the class that you are going to play a game between the male and the female learners using numbers.
Tell them that if there are still other learners standing, and they are going to their seats in pairs, the
game is to say how many learners altogether have gone to take their seats?
Ask a female learner to go first, then a male learner and then a female learner etc.
Continue to write as the learners produce answers and say good, very good, excellent, correct, …
Ensure that at least 6 boys and six girls contribute to the list and say both boys and girls have won.
Tell the class that all of these numbers are called the multiples of two because we started with
groups of two i.e. pairs of learners. If we have groups of three learners, then the numbers will be
multiples of three
Ask the learners, if we don’t stop, will the game ever end?
Allow a boy and a girl to respond and say: this game will never end if we do not stop it. That is why
any whole number has infinite (i.e. unending/uncountable) multiples.
15 minutes The facilitator should:
Divide learners into groups of 4 or 5 depending on the number of learners in class.
Give the numbers 4, 5, and 6 to the groups. There can be repetitions i.e. two or three groups having the
same numbers.
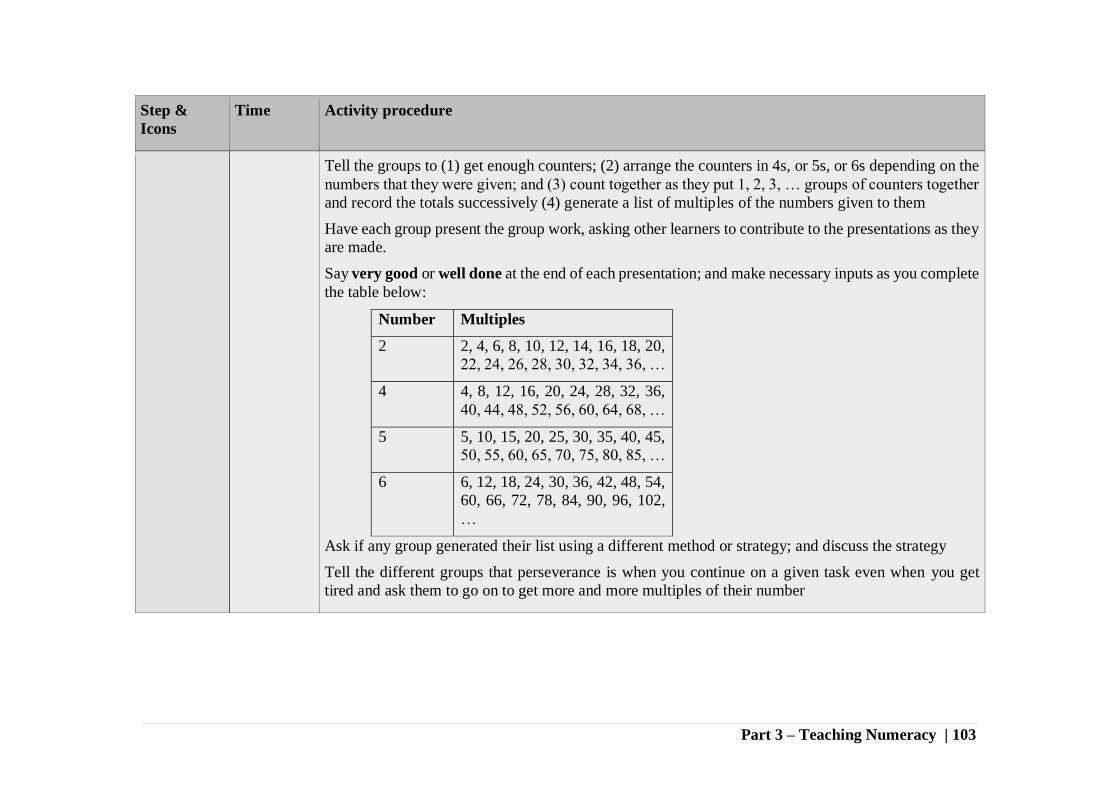
Part 3 – Teaching Numeracy | 103
Step &
Icons
Time Activity procedure
Tell the groups to (1) get enough counters; (2) arrange the counters in 4s, or 5s, or 6s depending on the
numbers that they were given; and (3) count together as they put 1, 2, 3, … groups of counters together
and record the totals successively (4) generate a list of multiples of the numbers given to them
Have each group present the group work, asking other learners to contribute to the presentations as they
are made.
Say very good or well done at the end of each presentation; and make necessary inputs as you complete
the table below:
Number Multiples
2 2, 4, 6, 8, 10, 12, 14, 16, 18, 20,
22, 24, 26, 28, 30, 32, 34, 36, …
4 4, 8, 12, 16, 20, 24, 28, 32, 36,
40, 44, 48, 52, 56, 60, 64, 68, …
5 5, 10, 15, 20, 25, 30, 35, 40, 45,
50, 55, 60, 65, 70, 75, 80, 85, …
6 6, 12, 18, 24, 30, 36, 42, 48, 54,
60, 66, 72, 78, 84, 90, 96, 102,
…
Ask if any group generated their list using a different method or strategy; and discuss the strategy
Tell the different groups that perseverance is when you continue on a given task even when you get
tired and ask them to go on to get more and more multiples of their number

Part 3 – Teaching Numeracy | 104
LESSON OBSERVATION CHECKLIST
Title of Activity Plan: ___________________________________________________
As you observe the simulation, please determine whether these elements are included in the Activity
Plan and its presentation. Tick ‘observed’ if the guideline was demonstrated in the learner-centered
lesson. Tick ‘not observed’ if it did not occur. Tick ‘not applicable’ if it not related to the lesson.
Guidelines Observed Not
Observed
Not
Applicable
Facilitator clearly states and writes lesson objectives
Activities accessed learners’ prior knowledge
Facilitator moves around the classroom
Facilitator engages all learners
Activities are clearly defined and executed
Activities are supported with the learning materials
Activities led learners to accomplish lesson objectives
Pacing of activity is appropriate for the learners
Activities are moving, engaging, challenging and
rewarding
Activities are learner-centered
Activities include various pedagogical strategies
Facilitator demonstrated good classroom management
Assessment strategies were varied
Activities infused SEL competencies
Assessment occurs along the way
Regular positive reinforcement is provided for learners
Learners were invited to contribute ideas and suggestions
about the learning process, materials, and/or activities
Learners are provided opportunity to offer feedback to
instructor without concern for retribution
Regular and ongoing feedback to learners is built in to the
learning process
General Comments: (Please provide any additional comments):

T e a c h i n g S o c i a l a n d E m o t i o n a l S k i l l s | 105
PART 4: TEACHING SOCIAL EMOTIONAL
LEARNING SKILLS

T e a c h i n g S o c i a l a n d E m o t i o n a l S k i l l s | 106
ECR APPROACH TO SOCIAL EMOTIONAL LEARNING
What is Social Emotional Learning?
Social Emotional Learning (SEL) builds the interpersonal, emotional, and cognitive skills of an individual to help them succeed in
life. It is a subject that can be taught in schools, like life-skills, that teaches the student skills they will need to learn core subjects,
to interact with others, and to achieve what they set out to do.
Why is Social Emotional Learning Important?
Social Emotional Learning (SEL) provides children and adults with the tools to succeed in life. SEL is particularly important for
children who have faced severe adversity, including poverty, displacement, and violence. Experiencing adversity can affect
children’s wellbeing and development. Social Emotional Learning has been shown to mitigate the effects of adversity, by providing
children with the tools to focus, regulate their emotional responses, interact with others and cope with stress and challenges.
What are the components of Social Emotional Learning?
The set of social and emotional skills (SES) discussed in this guide is intended to: build the mental capabilities of learners so they
can have better outcomes in school and professionally; expand the emotional understanding and capacity of learners so they build
self-awareness; improve learners’ interpersonal skills so they are able to build strong positive relationships and avoid negative
interactions; provide learners with conflict resolution tools; and increase their resilience and goal-setting behavior so they are able
to persevere through hardship toward a positive outcome. These five goals create the five competencies of SEL addressed in this
guide: Executive Function, Emotional Regulation, Positive Social Skills, Conflict Resolution Skills, and Perseverance.

T e a c h i n g S o c i a l a n d E m o t i o n a l S k i l l s | 107
Executive Function is the set of skills that help us focus our attention, remember instructions
and concepts, successfully juggle multiple tasks and plan for the short and long term future.
This set of skills helps us to filter distractions, set goals, and control impulses. [Examples:
Listening skills, ability to focus attention and follow directions, organize steps and information
in a logical manner, and use our working memory.]
Emotional Regulation is the set of skills that allows us to understand our own emotions and
manage our feelings a positive manner. It provides us with tools to predict and control our
emotions. [Examples: identifying feelings, predicting feelings, practicing emotion management
strategies such as belly-breathing, counting and taking water.]
Positive Social Skills are the skills which allow us to relate to one another in a positive way,
through understanding others’ feelings and behavior and responding in a way that promotes
positive social interaction and reduces conflict. [Examples: recognizing and accepting feelings of others, developing empathy,
understanding group dynamics.]
Conflict Resolution Skills are the skills which help us address any problems and conflicts in a positive manner as they arise. These
skills minimize the impact of conflict on the people involved, leading to a positive outcome. [Example: identifying problems,
generating solutions to conflicts, implementing conflict resolution strategies.]
Perseverance is the set of skills that allows us to push through challenges and continue to work towards a realistic goal. These skills
develop the recognition that all learning requires persistence by searching for alternative ways to reach a goal and a willingness to
ask for support to overcome challenges. [Examples: applying decision-making skills, developing goal-setting behavior, developing
a positive self-identity.]
In order to achieve these five competencies, learners must be taught a set of specific skills. These skills include: cognitive flexibility,
emotion and behavior management, understanding and accepting another person’s feelings, conflict resolution strategies, and goal-
setting behaviors. All of the skills explicitly addressed in this curriculum are included in the SEL Scope and Sequence.
Research shows that SEL is most effective when it is taught in a variety of ways, as is done in the facilitator’s guide.
Figure 1 The Five (5) Competencies of SEL
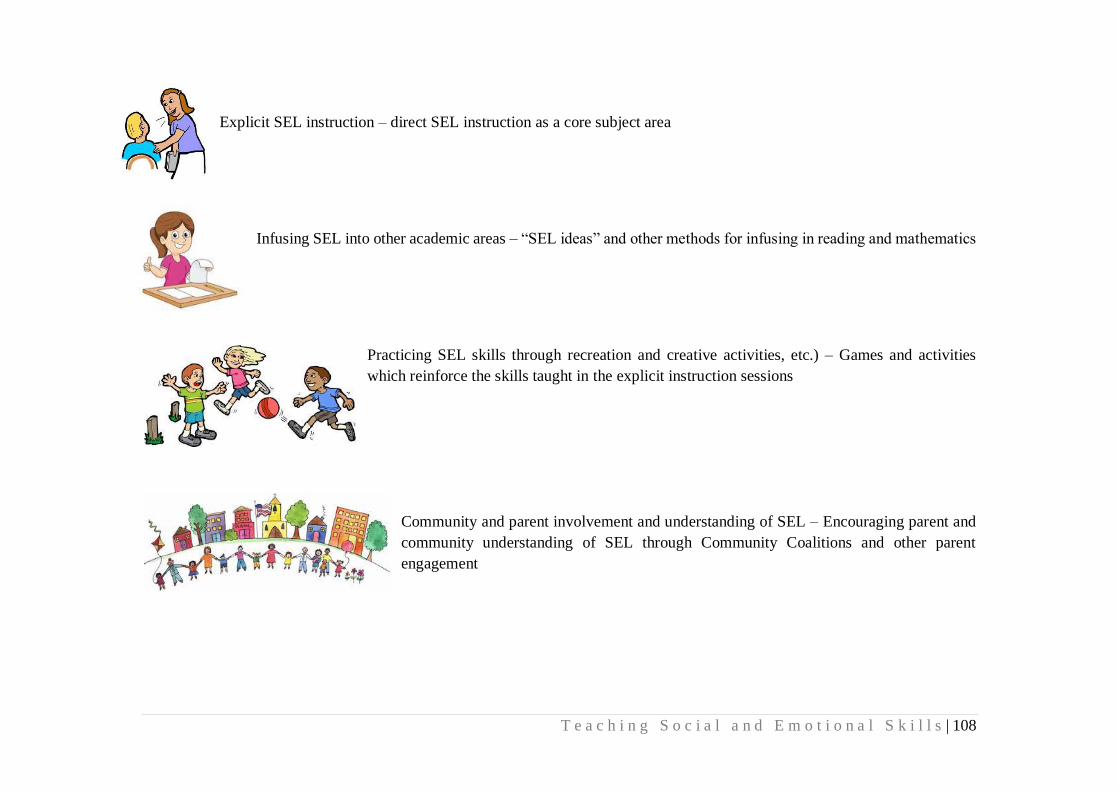
T e a c h i n g S o c i a l a n d E m o t i o n a l S k i l l s | 108
Explicit SEL instruction – direct SEL instruction as a core subject area
Infusing SEL into other academic areas – “SEL ideas” and other methods for infusing in reading and mathematics
Practicing SEL skills through recreation and creative activities, etc.) – Games and activities
which reinforce the skills taught in the explicit instruction sessions
Community and parent involvement and understanding of SEL – Encouraging parent and
community understanding of SEL through Community Coalitions and other parent
engagement

T e a c h i n g S o c i a l a n d E m o t i o n a l S k i l l s | 109
INTRODUCTION TO THE TRAINING ACTIVITY SESSION
Purpose: To introduce the participants to one another and to the training.
Objective: By the end of this session, participants should be able to:
1. Name the other participants
2. Understand the objectives of the training
3. Implement a SEL-infused introductory activity in their centers
Time: 35 minutes
Materials:
1. Paper
2. Markers
3. Tape
Trainers Tips: Make sure to be inclusive and patient during this activity. Try to use the participants’ names as much
as possible. Repeat each persons’ name 3 times after you hear it – it will help you to remember all of the names.
Step &
Icons
Time Activity procedure
1 minute 1. Invite participants to open the training with a prayer. Ask for both a Muslim and Christian
prayer.
2 minutes 2. Introduce yourself, where you are from and where you work. Say:
a. We are here to learn how to teach reading, mathematics and social emotional learning
in the non-formal learning centers where you will be facilitators.
b. By the end of this training, you should be confident in facilitating all of these subject
areas.

T e a c h i n g S o c i a l a n d E m o t i o n a l S k i l l s | 110
c. Throughout the training, we will learn new strategies for teaching. We will also
develop some materials for you to use in your classroom.
5 minutes 3. Before breaking in to the activity, have the full group do a quick introduction. Say:
a. Before we get started, let’s introduce ourselves. Can everyone share their name,
where they come from and what they do?
4. After everyone has spoken, pass around paper and colored markers / pencils for all
participants. Say:
a. I would like to begin the training by getting to know one another. It is important in
any learning environment to know our peers. This will also be important for the
learners in the centers.
b. Please take one piece of paper and some markers / pencils.
c. On the paper, draw yourself, one thing that that you are good at, and a goal you have
for this training.
10 minutes 5. Give the participants 10 minutes to draw. Walk around and make sure they understand the
instructions and are on task.
10 minutes 6. After 10 minutes, when you see that they are finished drawing, say:
a. Divide into groups based on your favorite color.
b. In your small groups, share your drawing. Share your name, talk about what you are
good at and your goal for the training.
5 minutes 7. Give the groups 5 – 10 minutes to share. After that time, facilitate a group discussion. Say:
a. Now let’s come back together as a group.
b. Let’s talk about how that felt. Ask the group:
i. How did it feel to share your drawing?
ii. How did it feel to talk about something you are good at?
iii. How did it feel to talk about your goals?
iv. How did the group dynamic change as you shared more about yourselves?

T e a c h i n g S o c i a l a n d E m o t i o n a l S k i l l s | 111
2 minutes 8. Wrap up the activity by explaining how this relates to what they will be doing throughout
the week. Say:
a. Thank you for sharing about yourself and your feelings. We will put your drawings
on display. Can one person volunteer to collect all of the drawings?
b. This is an introductory activity that you can do with your learners. It serves many
functions:
i. It gives the learners an opportunity to introduce themselves and learn about
one another.
ii. It sets the tone for discussing emotions and understanding one another.
iii. It reinforces that the center is safe space.
Trainers Note: Be sure to tape the drawings on the wall or ask 2 participants to tape the drawings on the wall at the end of the
activity.
T e a c h i n g S o c i a l a n d E m o t i o n a l S k i l l s | 112
SESSION 1: CORE COMPETENCIES IN SOCIAL EMOTIONAL LEARNING
Purpose: To introduce the participants to the ECR approach to Social Emotional Learning.
Objective: By the end of this session, participants should be able to:
1. Define Social Emotional Learning
2. Define the five (5) competencies of Social Emotional Learning
3. Create definition charts for each of the five (5) competencies of Social Emotional Learning
4. Name specific Social and Emotional Skills under each competency
Time: 130 minutes
Materials:
Signs that say “AGREE” and “DISAGREE” and “SOMETIMES”
Charts with definitions of Social Emotional Learning and five (5) competencies, including relevant pictures: Executive
Function, Emotional Regulation, Positive Social Skills, Conflict Resolution Skills, Perseverance (See Appendix 1, Page
154)
Paper
Pens
Flip charts (enough for all participants)
Markers
Tape
Handouts of: SEL Competencies and Skills; SEL Scope and Sequence (or facilitators guides)
Puzzle with the 5 competencies (divided into the number of pieces that there are participants) – see Appendix 2, Page 155)
Scissors
Large pieces of cardboard (1 per participant, to make puzzles)
Be sure to be aware of time management during this session. There are many times that the discussions can take
longer than the allotted time. Instead of going over, create a “Parking Lot” where participants can write any
unanswered questions they have at the end of the session. Additionally, be sure to constantly check in with the
understanding of the participants. If they do not understand the basic approach to SEL, the sessions later on will be
much more challenging. Finally, make sure that you have prepared the signs, charts, and puzzle in advance.

T e a c h i n g S o c i a l a n d E m o t i o n a l S k i l l s | 113
Steps &
Icons Time Activity procedure
2 minutes 1. Make sure that before you start, the AGREE sign is posted on one side of the room and
DISAGREE is on the other side of the room and SOMETIMES is in the middle.
2. Introduce the activity to the participants. Say:
a. During this session, we will begin to understand “Social Emotional Learning” and how we
will approach it in our centers.
b. By the end of the activity, you will have materials to use for teaching Social Emotional
Learning in your classroom.
c. We will discuss the various social and emotional skills that this curriculum will cover.
10 minutes 3. Invite all participants to stand up for the AGREE / DISAGREE / SOMETIMES activity. Say:
a. I am going to read a statement. If you agree with the statement, you will walk over to the
“AGREE” side. If you disagree, walk over to the “DISAGREE” side. If you agree
sometimes, but not always, you can stand in the middle near “SOMETIMES.”
b. Do you have any questions?
c. Read the following statements. After each statement ask one person on each side to give
an explanation for why they selected “AGREE,” “DISAGREE,” or “SOMETIMES.”
Make sure to call on different people each time.
i. Students learn best when they are able to sit still and listen.
1. Agree: key messages to address: ability to focus is a key skill that
individuals need to develop in order to learn.
ii. The best way to resolve a conflict is by ignoring it.
1. Disagree: key messages to address: when a conflict is ignored, it will
resurface. If it is productively addressed, it can be resolved and lead to
positive outcomes for all parties involved.
iii. When one feels angry, it is best to find a way to reduce the anger and control
behavior.
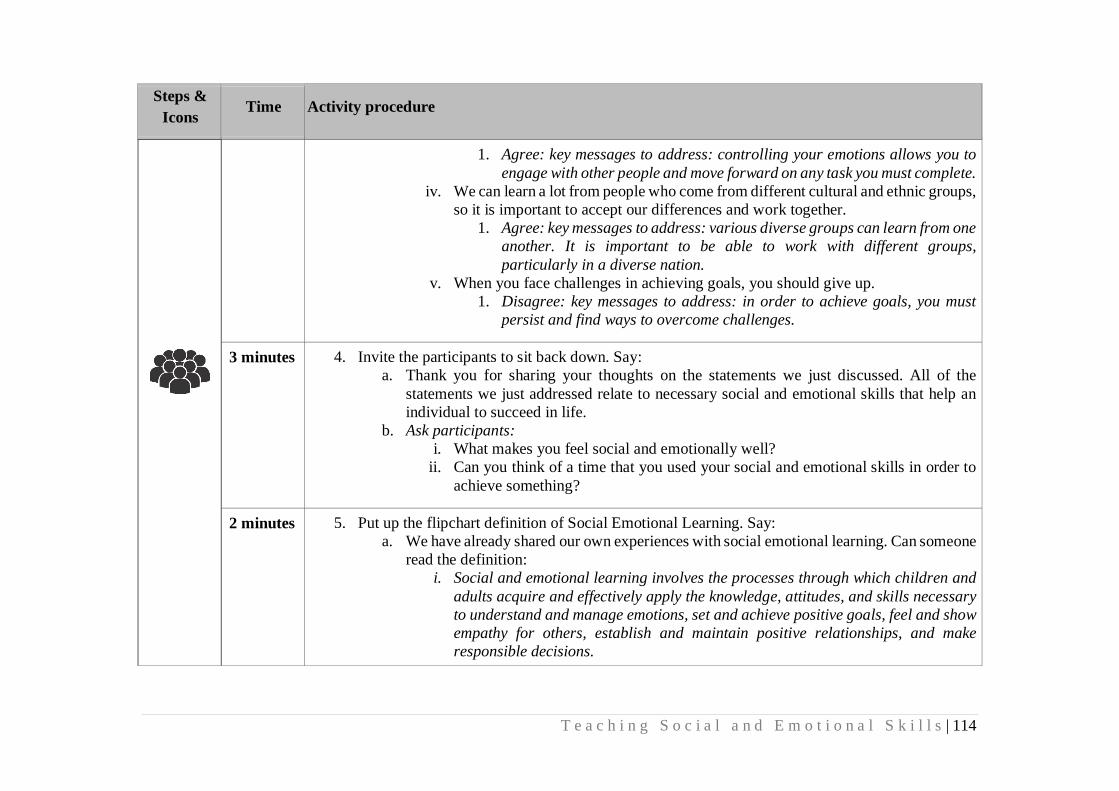
T e a c h i n g S o c i a l a n d E m o t i o n a l S k i l l s | 114
Steps &
Icons Time Activity procedure
1. Agree: key messages to address: controlling your emotions allows you to
engage with other people and move forward on any task you must complete.
iv. We can learn a lot from people who come from different cultural and ethnic groups,
so it is important to accept our differences and work together.
1. Agree: key messages to address: various diverse groups can learn from one
another. It is important to be able to work with different groups,
particularly in a diverse nation.
v. When you face challenges in achieving goals, you should give up.
1. Disagree: key messages to address: in order to achieve goals, you must
persist and find ways to overcome challenges.
3 minutes 4. Invite the participants to sit back down. Say:
a. Thank you for sharing your thoughts on the statements we just discussed. All of the
statements we just addressed relate to necessary social and emotional skills that help an
individual to succeed in life.
b. Ask participants:
i. What makes you feel social and emotionally well?
ii. Can you think of a time that you used your social and emotional skills in order to
achieve something?
2 minutes 5. Put up the flipchart definition of Social Emotional Learning. Say:
a. We have already shared our own experiences with social emotional learning. Can someone
read the definition:
i. Social and emotional learning involves the processes through which children and
adults acquire and effectively apply the knowledge, attitudes, and skills necessary
to understand and manage emotions, set and achieve positive goals, feel and show
empathy for others, establish and maintain positive relationships, and make
responsible decisions.

T e a c h i n g S o c i a l a n d E m o t i o n a l S k i l l s | 115
Steps &
Icons Time Activity procedure
b. Based on this definition, I would like you to break into four (4) groups and write up your
own definitions based on this definition, but in words that make the most sense to you.
Please write these on flipchart paper and be ready to share them with the group in 5 – 10
minutes.
13 minutes 6. Pass out flipchart paper and markers to all groups. Give them 5 – 10 minutes to develop a
definition, based on how much time you have and how quickly they come up with definitions.
When they are ready, say:
a. Can each group now present their definition to the whole group?
b. Thank all of the groups for sharing their definitions
3 minutes 7. Thank learners for their brainstorming and coming up with their definitions. Throughout this
activity, constantly check in with the participants to make sure they are understanding. Say:
a. We need to understand why social emotional learning is so important in the centers we
will be working in.
b. Why do you think this approach is important in our centers?
c. As we have discussed earlier in our introduction to the Education Crisis Response
programme, our learners will be a mix of displaced and host community children. Some
of these children have been exposed to terrible things.
d. Many children who are exposed to severe adversity (including violence, displacement and
poverty) develop negative social and emotional behaviors, in both the short and long term.
i. You can display a chart here which shows the causal effects of adversity. See
example:
e. Social emotional learning can mitigate the negative effects of adversity.
f. Ask:
i. Are there instances of severe adversity that you see among the children in your
centers and communities?
ii. Example: children who are displaced, separated from families, have seen family
members or friends kidnapped or killed.

T e a c h i n g S o c i a l a n d E m o t i o n a l S k i l l s | 116
Steps &
Icons Time Activity procedure
iii. How could some social and
emotional skills benefit these
children?
iv. Example: help them to
understand their emotions,
resolve conflicts, etc.
8. Pass out flipchart paper and markers. Say:
a. Now we will begin to make materials
that you can take back to use in your
classrooms.
b. What are some characteristics of good classroom materials?
i. Clear, colorful, useful,
c. Everyone can take one flipchart paper and share markers amongst yourself. On the
flipchart, write the definition of “Social Emotional Learning” that we agreed on.
i. You can also include any pictures that reinforce the definition. For example, you
could include a picture of children holding hands or succeeding in school, etc.
15 minutes
9. After 5 minutes, when all participants are finished with drawing their charts, bring them all back
together. Say:
a. Now that we have defined Social Emotional Learning, we have to understand the different
skill areas, or competencies that Social Emotional Learning covers.
b. Our approach to Social Emotional Learning has five (5) core competencies. They are:
i. Executive Function
ii. Emotional Regulation
iii. Positive Social Skills
iv. Conflict Resolution Skills
v. Perseverance
c. I will give you brief definitions of each of the competencies, and then we will go into small
groups to discuss teaching methods we can use to teach each competency.
T e a c h i n g S o c i a l a n d E m o t i o n a l S k i l l s | 117
Steps &
Icons Time Activity procedure
d. If participants are struggling, examples include:
i. Executive Function – memorization and fast-response card games
ii. Emotional Regulation – practice of emotion management strategies (breathing,
yoga, counting, etc.65)
iii. Positive Social Skills – role-plays with interpersonal interactions
iv. Conflict Resolution Skills – scenarios where the students decide the best approach
to conflict resolution
v. Perseverance – games with obstacles / challenges they must overcome
10. Put up the five (5) flipcharts you have prepared with each of the competencies and their
definitions. Have additional blank flip charts ready for writing on. Ask:
a. Can I have a volunteer to read the definition of “Executive Function”?
i. Thank the volunteer.
b. How can we re-phrase this in our own language?
i. When you have received an explanation that covers the full definition, write it on
a blank flip chart.
c. Go through this same process for the other four (4) competencies.
i. Executive Function - the set of skills that help us focus our attention, remember
instructions and concepts, successfully juggle multiple tasks and plan for the short
and long term future.
1. What are some examples of Executive Function?
2. [Examples: Listening skills, ability to focus attention and follow directions,
organize steps and information in a logical manner]
ii. Emotional Regulation - the set of skills that allows us to understand our own
emotions and manage our feelings a positive manner.
1. What are some examples of Emotional Regulation?
2. [Examples: identifying feelings, predicting feelings, practicing emotion
management strategies such as belly-breathing, counting and taking
water.]

T e a c h i n g S o c i a l a n d E m o t i o n a l S k i l l s | 118
Steps &
Icons Time Activity procedure
iii. Positive Social Skills - the skills which allow us to relate to one another in a
positive way, through understanding others’ feelings and behavior and responding
in a way that promotes positive social interaction and reduces conflict.
1. What are some examples of Positive Social Skills?
2. [Examples: recognizing and accepting feelings of others, developing
empathy, understanding group dynamic, making friends, maintaining
friendships.]
iv. Conflict Resolution Skills - the skills which help us address any problems and
conflicts in a positive manner as they arise.
1. What are some examples of Conflict Resolution Skills?
2. [Example: identifying problems, generating solutions to conflicts,
implementing conflict resolution strategies, responding to bullying.]
v. Perseverance - the set of skills that allows us to push through challenges and
continue to work towards a realistic goal
1. What are some examples of Perseverance?
2. [Examples: applying decision-making skills, developing goal-setting
behavior, problem-solving, developing a positive self-identity.]
20 minutes 11. Pass around flipchart paper and markers. Say:
a. Now that we have common definitions of each of our sets of skills, let us make charts that
we can bring back to our classrooms.
b. Everyone can take five (5) flipchart papers and share markers amongst yourself. On the
flipcharts, write the definition of each of the competencies that we agreed on.
c. You can also include any pictures that reinforce the definition. For example, you could
include a brain for executive function, smiley face for emotional regulation, friends for
positive social skills, someone mediating a conflict between two other people, or someone
climbing a mountain for perseverance. [Make sure that your samples include these
images].

T e a c h i n g S o c i a l a n d E m o t i o n a l S k i l l s | 119
Steps &
Icons Time Activity procedure
10 minutes 12. Once the charts are finalized, bring the group back together and hand out the list of Competencies
and Skills (or point to the correct page in the facilitator’s guide). Say:
a. I hope you have all enjoyed making your competency charts. We will have time later to
finish them if you did not finish.
b. Each competency covers a wide range of skills. On the chart I have just handed out, you
will see that there is a list of skills under each competency.
c. Take about 5 minutes and review the list of skills in your small groups from earlier today.
Come up with any questions you have, and if you cannot answer them among yourselves,
bring it back to the larger group.
13. Give the groups 5 minutes to discuss the skills. Go around and see if you can help them understand
any of the skills. While you go around, distribute one piece of the puzzle you created in advance
to each of the participants. Tell them it is very important that they hold on to it and do not misplace
it before the next activity. Say:
a. Let us come back together.
b. What questions do you have remaining about the skills?
25 minutes 14. Now you will put together the puzzle. Say:
a. You may be wondering why I handed you each a piece of a puzzle during that activity.
b. We are going to work together to build a single puzzle using the pieces that each of you
have.
c. Without any more instruction, I would like you all to get up and find a way to build the
puzzle.
7 minutes 15. Allow the participants up to ten (10) minutes to complete the puzzle. Observe as they work
together. Note any conflicts that arise and how they are handled. Note the different roles that
different individuals take. After ten minutes, stop the group. Say:
a. Please take your seats and leave the puzzle as it is.
b. If the group completed the puzzle say:
i. Great job completing the puzzle.

T e a c h i n g S o c i a l a n d E m o t i o n a l S k i l l s | 120
Steps &
Icons Time Activity procedure
ii. Can you see what the puzzle says?
c. If the group did not complete the puzzle say:
i. If you are holding a piece that is not part of the completed puzzle, please hand it to
me.
d. For both groups continue by saying:
i. As you can see, the five (5) competencies build on one another.
1. First, you need Executive Function to be able to focus and achieve any tasks
2. Then, your Emotional Regulation allows you to enjoy the activity and not
be overwhelmed by anxiety.
3. Your Positive Social Skills allow you to work as a team.
4. If any conflict arises, Conflict Resolution Skills help you to mediate it.
5. Finally, your perseverance allows you to keep trying until you succeed.
ii. Though all of the competencies build on one another, we also need skills within
each competency to complete a task.
10 minutes 16. Say:
a. In order to build this puzzle, we had to use skills from each competency in order to
succeed.
b. Can we share Executive Function skills we used? Emotional Regulation? Positive Social
Skills? Conflict Resolution Skills? Perseverance?
c. Sample answers, in order: Impulse control and focus; controlling frustration; speaking
with our peers; taking a step back and talking when issues arose; continuing to try despite
challenges.
10 minutes 17. Thank the group for their hard work. Distribute copies of the Student Learning Outcomes and
Scope and Sequence or ask them to turn to the correct page in their Facilitator’s Guides.
a. In front of you is the layout of the curriculum we will be using.
b. There are seven (7) Modules, each with a different theme.

T e a c h i n g S o c i a l a n d E m o t i o n a l S k i l l s | 121
Steps &
Icons Time Activity procedure
c. Earlier, with the puzzle, we noticed that all competencies were necessary simultaneously.
Within each Module, all five competencies should be covered. However, as with the
picture
18. After the students have 5 minutes to individually or in pairs review the Scope and Sequence, call
them back together. Ask:
a. What questions do you have regarding the Scope and Sequence?
Conclusion: After all questions have been answered, say:
a. We have developed an understanding of Social Emotional Learning today. Over the next
few days, we will continue to develop our expertise in social emotional learning.
b. Take some time to review the Scope and Sequence tomorrow, and we will be sure to have
some time to address any remaining questions in the morning.
c. Let’s all stand up and give ourselves a big round of applause for the great work we did
today.
Follow up tip: Make sure to provide time in the following day to address any remaining questions, perhaps in a plenary
discussion first thing in the morning. Also be sure to provide an additional hour for material development later in the training.

T e a c h i n g S o c i a l a n d E m o t i o n a l S k i l l s | 122
APPENDIX 1: CHARTS WITH DEFINITIONS OF SOCIAL EMOTIONAL LEARNING AND
FIVE (5) COMPETENCIES
Executive Function - the set of skills that help us focus our attention, remember instructions and concepts,
successfully juggle multiple tasks and plan for the short and long term future.
Emotional Regulation - the set of skills that allows us to understand our own emotions and manage our feelings a
positive manner.
Positive Social Skills - the skills which allow us to relate to one another in a positive way, through understanding
others’ feelings and behavior and responding in a way that promotes positive social interaction and reduces conflict.
Conflict Resolution Skills - the skills which help us address any problems and conflicts in a positive manner as
they arise.
Perseverance - the set of skills that allows us to push through challenges and continue to work towards a realistic
goal

T e a c h i n g S o c i a l a n d E m o t i o n a l S k i l l s | 123
APPENDIX 2: PUZZLE WITH THE 5 COMPETENCIES
Perseverance
Conflict Resolution
Positive Social Skills
Emotional Regulation
Executive Function

T e a c h i n g S o c i a l a n d E m o t i o n a l S k i l l s | 124
SESSION 2: MODELING SOCIAL AND EMOTIONAL SKILLS FOR LEARNERS
Purpose: To build the participants’ skills in modeling Social Emotional Learning for their learners.
Objective: By the end of this session, participants should be able to:
1. Understand the importance of modeling social and emotional skills in their
teaching
2. List phrases and language that participants will use in facilitating their
classroom management and lesson plans
3. Model social and emotional skills in their teaching
Time: 100 minutes
Materials:
Flipchart
Markers
Flipchart or PowerPoint and projector with the group discussion questions (for STEP 3 & 4) – Appendix 3 at the end of this
session
Stories printed out for participants [see Appendix 4 at the end of this session]
Paper
Pens
Trainer’s tips: Since this activity is about modeling SES, it is very important that the trainer model SEL language
and methods. Focus on being particularly patient, inclusive, and emotionally responsive in this session. If possible,
have one trainer or strong participant in each group (5 groups) to facilitate the small group discussions.
Flipchart / projected discussion instructions and questions
In your small groups:
Discuss:
1. Did the facilitator model good social and emotional skills?
2. How could the facilitator improve their modeling behavior?
Rewrite:
The sections of the story where the group has agreed the
modeling of Social and Emotional Skills could be improved.
Prepare:
To present the rewritten story as a role play to the class. Assign
each role in the story to one of your group members.

T e a c h i n g S o c i a l a n d E m o t i o n a l S k i l l s | 125
Step &
Icons Time Activity procedure
3 minutes 1. Introduce the activity to the participants. Say:
a. It is important to not only teach our learners about social and emotional skills, but also
to model for them what it looks like to use social and emotional skills in everyday life.
There is certain language and actions which reinforce the explicit SEL instruction.
10 minutes 2. Call on a few participants by name to answer the following questions. Be sure to thank each
respondent and treat them with respect. Ask participants:
a. What do you think it means to “model” social and emotional skills?
i. Example answer: demonstrating the skills we are teaching our students through
our interpersonal interactions. We control frustration with students, mediate
conflicts, show the ability to persevere and interact with others.
b. How do we model other skills in the classroom?
i. Some examples are: we model clapping phonemes; we model counting to 10; we
model following classroom rules.
c. How can we model SES in the classroom? Can we model all five (5) competencies?
3. Pull up a blank flipchart and ask a volunteer to write on the flipchart. Title the chart “SEL
language.” Say:
d. Now we are going to brainstorm some language that we can use in the classroom that
will reinforce social and emotional learning.
e. What are some words that we can use in the classroom that address each of the
competencies?
(a) Executive Function
(i) Examples: focus, listen, stay still, control, plan, remember, organize, logic, goal,
achieve
T e a c h i n g S o c i a l a n d E m o t i o n a l S k i l l s | 126
Step &
Icons Time Activity procedure
(b) Emotional Regulation
(i) Examples: “I feel,” happy, sad, frustrated, excited, “how does that make you
feel?”, emotion, hurt, express
(c) Positive Social Skills
(i) Examples: empathy, accept, similarity, difference, negative peer pressure,
communicate, tolerance, share
(d) Conflict Resolution
(i) Examples: consequences, apologize, mediate, assertive, cause, resolve,
strategies, “stop, think, act”, admit, problem-solving steps
(e) Perseverance
(i) Examples: goal, push through, overcome, confidence, improvement, decision,
accomplish, future, hope
15 minutes 4. Display the instructions and questions for the group activity. Say:
a. We will now split into five (5) groups.
b. Each group will receive a story.
c. In each story, you will see an example of a facilitator. Some will be modeling good
social and emotional skills, others are not modeling social and emotional skills and some
may be trying, but need some additional support.
d. In your small groups, discuss the questions on the flipchart / projector:
i. Did the facilitator model good social and emotional skills?
ii. How could the facilitator improve their modeling behavior?
T e a c h i n g S o c i a l a n d E m o t i o n a l S k i l l s | 127
Step &
Icons Time Activity procedure
e. In addition to your discussion, please rewrite the sections of the story where the group
has agreed the modeling of Social and Emotional Skills could be improved.
f. Finally, we will come back together as a large group and present the rewritten story as a
drama. Assign each role in the story to one of your group members.
g. Do you have any questions?
15 minutes 5. Divide the participants into 5 groups. Distribute one story from Appendix 4 per group. Each
group will have a different competency. Allow the participants to spend 15 minutes in their
groups reviewing and revising the stories. Walk around and check in periodically with each
group. Ask them follow up questions, leading them to understand how the facilitators in each
scenario could improve their skills. “What will the outcome be if the scenario stays as it is?
How could the outcome improve for the students? What competency does this scenario
address?”
6. After 15 minutes have passed, call the group back together. They will now present their stories
as dramas. Say:
a. Let’s come back together.
b. Thank you all for doing such a great job revising the stories with modeling of social and
emotional skills.
c. Let’s now share the great work we’ve done with the group. Which group would like to
share their drama displaying a teacher modeling social emotional skills first?
d. The other four (4) groups that are not acting should be watching with a critical lens.
After the dramas we will spend a few minutes discussing what elements showed
modeling social and emotional skills and which could have been improved.
T e a c h i n g S o c i a l a n d E m o t i o n a l S k i l l s | 128
Step &
Icons Time Activity procedure
60 minutes 7. After the first group has presented their drama, invite the full group to provide their input.
Repeat this step for all five groups. Allocate 10 minutes to the presentation and discussion for
each group. Say:
a. Let’s all clap for this group and their acting skills!
b. Thank you for sharing your revised story with us.
c. Let’s discuss how they showed the facilitator modeling Social and Emotional Skills:
i. Which component was this facilitator modeling?
ii. What elements of the facilitator’s response modeled Social and Emotional
Skills?
iii. Where could the facilitator have improved his/her modeling of Social and
Emotional Skills?
iv. What would be the best way for a facilitator to model his or her Social and
Emotional Skills in a similar scenario?
7 minutes 8. Conclusion: Allow the group to clap for themselves. Ask:
a. How did it feel to portray a facilitator who was modeling social and emotional skills?
b. Was it challenging to identify ways to improve the modeling of social and emotional
skills?
c. What are some words and phrases that we can use in the classroom to reinforce social
and emotional learning?
d. What are some mechanisms we can use for modeling social and emotional skills in our
classrooms?
9. Thank the participants for their great participation and close the session.
T e a c h i n g S o c i a l a n d E m o t i o n a l S k i l l s | 129
APPENDIX 3: SESSION 2: ACTIVITY INSTRUCTIONS
In your small groups:
Discuss:
1. Did the facilitator model good social and emotional skills?
2. How could the facilitator improve their modeling behavior?
Rewrite:
The sections of the story where the group has agreed the modeling of Social and Emotional Skills could be improved.
Prepare:
To present the rewritten story as a role play to the class. Assign each role in the story to one of your group members.

T e a c h i n g S o c i a l a n d E m o t i o n a l S k i l l s | 130
APPENDIX 4: SESSION 2: STORIES FOR MODELING SOCIAL AND EMOTIONAL SKILLS
1. Executive Function
Ms. Hassana is working with her class to develop classroom rules. She has broken them up into groups to each come up
with a set of rules that they will share back with the full class. When she brings the group back together, she asks them all
for the rules they came up with. Group one begins to answer with the rule, “Be kind and respect your classmates’ opinions.”
At the same time, group two calls out, “Do not talk out of turn.” She gets overwhelmed by the shouting voices and cannot
focus her attention on either group. Instead, she starts writing group one’s answer and halfway through the sentence writes
group two’s answer. As a result, she has now written the class rule, “Be kind and respect out of turn” as a class rule. By not
being able to focus her attention on one answer, she has created a class rule that does not make sense to the learners.
Key messages in answers:
i. Which component was this facilitator modeling?
Executive Function
ii. What elements of the facilitator’s response modeled Social and Emotional Skills?
She has followed the logical progression of the activity, she has demonstrated cognitive flexibility between listening and
writing.
iii. Where could the facilitator have improved his/her modeling of Social and Emotional Skills?
She could improve her attention focusing skills. While two students are calling out answers, she could focus on just one
and write them down one at a time. Alternatively, she should be using her listening and positive social skills to encourage
only one student to speak at a time.
iv. What would be the best way for a facilitator to model his or her Social and Emotional Skills in a similar scenario?
She should have asked the students to speak one at a time, and therefore been able to focus her attention on one answer at
time.
2. Emotional Regulation
T e a c h i n g S o c i a l a n d E m o t i o n a l S k i l l s | 131
Mr. Joshua has a very difficult class. There is one student who does not respect class rules and continues to call out the
answer whenever he asks a question. For the first three weeks of class he patiently asks the students to raise their hands in
order to be called on when they answer questions. During today’s class, Mr. Joshua will be reviewing simple addition. He
says to the class, “Today we will be reviewing addition. Can anyone tell me the answer to the equation I write on the board?”
He turns to write “1 + 1 = ?” on the board. Before he has finished writing, one of the students jumps up and calls out “Two!
One plus one equals two!” Mr. Joshua turns around quickly and yells, “Sit down. How many times do I have to tell you to
raise your hand before you answer? You are very rude!” The learner immediately runs out of the class crying.
Key messages in answers:
i. Which component was this facilitator modeling?
Emotional Regulation
ii. What elements of the facilitator’s response modeled Social and Emotional Skills?
He has patiently asked the students to raise their hands for the first three weeks of class.
iii. Where could the facilitator have improved his/her modeling of Social and Emotional Skills?
Instead of yelling, he should have used an emotion management strategy to control his own emotions and his response.
He could have instead told the students how he was feeling and asking them to understand and behave appropriately.
iv. What would be the best way for a facilitator to model his or her Social and Emotional Skills in a similar scenario?
He should have controlled his emotion and his behavior. He should have explained to the student his feelings and needs
and asked calmly for the student to respect his peers and the classroom rules.
3. Positive Social Skills
Ms. Fatima is teaching her class just like any other day. She is writing on the chalkboard when one of the fathers of her
students angrily barges into the class, uninvited and unexpected. She smiles at him warmly saying “hello, how are you?”
Before he responds, she turns away and goes back to her lesson with the students. She continues to ignore the father’s
presence until he yells to get her attention. She smiles and says “Oh, I forgot you were here!”
Key messages in answers:

T e a c h i n g S o c i a l a n d E m o t i o n a l S k i l l s | 132
i. Which component was this facilitator modeling?
Positive Social Skills
ii. What elements of the facilitator’s response modeled Social and Emotional Skills?
She greets the father and is kind to him.
iii. Where could the facilitator have improved his/her modeling of Social and Emotional Skills?
She should have been aware that the father was angry. Her responses should have addressed his anger. She should have
been responsive to his needs and not forgotten he was present.
iv. What would be the best way for a facilitator to model his or her Social and Emotional Skills in a similar scenario?
She should have greeted him warmly and ask if there was anything he needed. She should then have waited for his
response. If she was in the middle of a class and could not be interrupted, she should have asked him if he could kindly
wait outside for the class to finish. Overall, her largest mistake was not addressing him or his needs.
4. Conflict Resolutions Skills
Mr. Mohammed’s class is full of children who like to share their opinion. In many instances, this is very good because the
class discussions are lively. Today, they are drawing pictures of their feelings. One student is drawing sunshine and animals
and a happy family. Another student looks over at the first student’s drawing and says, “Those are not feelings. That is just
a scene.” The first says that this is how she expresses her feelings. These are all of the things that make her happy. The
second responds by saying that is stupid, and she did not understand the assignment. Then the first looks at the second’s
paper and yells that he must be stupid, because he hasn’t drawn anything. Mr. Mohammed tells them to be quiet and sit
down. He tells them to never sit next to each other again and to just keep quietly working on their drawings.
Key messages in answers:
i. Which component was this facilitator modeling?
Conflict Resolution Skills
ii. What elements of the facilitator’s response modeled Social and Emotional Skills?

T e a c h i n g S o c i a l a n d E m o t i o n a l S k i l l s | 133
He stopped the learners from fighting.
iii. Where could the facilitator have improved his/her modeling of Social and Emotional Skills?
He should have mediated the conflict, calmly facilitating a discussion between the two learners. Though it was good for
him to separate the children, ideally he would have facilitated their problem resolution in such a way that they would be
able to sit near one another in the future.
iv. What would be the best way for a facilitator to model his or her Social and Emotional Skills in a similar scenario?
He should have facilitated a conversation between the two students that would have resolved the conflict.
5. Perseverance
Ms. Zainab is working in a center with no desks, chairs, power, or learning materials. Her students sit on the floor every day
while she stands in the front of the class. She has been using an old blackboard that she found in other village and chalk that
she buys with her own money to assist in teaching the students. On Monday she returned to the center and found that the
blackboard had been taken, so she decides to let the students go for the day. Without her blackboard, she does not feel like
she can teach.
Key messages in answers:
i. Which component was this facilitator modeling?
Perseverance
ii. What elements of the facilitator’s response modeled Social and Emotional Skills?
She began teaching in a center without materials, found blackboard and chalk to continue teaching.
iii. Where could the facilitator have improved his/her modeling of Social and Emotional Skills?
She should not have sent the children home. She should have found an alternative to her usual mode of teaching.
iv. What would be the best way for a facilitator to model his or her Social and Emotional Skills in a similar scenario?
She would find a creative solution to teach without blackboard or chalk. She could use the challenge as a teaching moment
and discussed with the learners how one should continue to work towards a goal despite challenges.
T e a c h i n g S o c i a l a n d E m o t i o n a l S k i l l s | 134
SESSION 3: OBSERVING AND UNDERSTANDING YOUR LEARNERS
Purpose: To teach methods for observing and responding to learners’ needs.
Objective: By the end of this session, participants should be able to:
1. Understand the importance of observing learners
2. Understand how to respond to students’ responses to the activities
3. Demonstrate appropriate responses to learners
4. Understand how to teach a role play with learners
Time: 90 minutes
Materials:
Scenario role cards [see Appendix 5 at the end of this session]
Flip chart
Markers
Scripted lesson plans [See Appendix 6]
Trainer’s tips: Since this session is about observing and appropriately responding to your learners, it is particularly
important for you to constantly check in with the participants. You should adjust the training plan as necessary, depending
on their comprehension of the topic and participation. Be sure to ask follow up questions to ensure that participants are
understanding the correct answers and approaches.
T e a c h i n g S o c i a l a n d E m o t i o n a l S k i l l s | 135
steps &
Icons Time Activity procedure
5 minutes 1. Ask the participants to stand up and make a circle. Ask:
a. Does anyone know the song “If you’re happy and you know it”?
i. If someone does, ask them to teach it to the class.
ii. If not, teach the class. Say:
iii. Repeat after me. “If you’re happy and you know it clap your hands” and then
clap your hands two times. We repeat that twice and then sing “If you’re happy
and you know it and you really want to show it, if you’re happy and you know it
clap your hands” then clap twice again.
iv. We can insert a different action instead of “clap your hands.”
b. As a class, we will sing “If you’re happy and you know it clap your hands...” “If you’re
happy and you know it stomp your feet…”
2. Finish the song and say:
a. Nice job, you can clap for yourselves and return to your seats.
2 minutes 3. Introduce the topic for the session. Say:
a. One of the most important elements of quality social emotional learning instruction is
making sure that you are addressing the needs of your students. This means that you
need to be constantly paying attention and observing your learners.
b. Some of the activities we do in social emotional learning can bring up certain feelings
or address weaknesses that some of our students may have. Although you are not
expected to be a psychosocial counsellor, we would like to provide you with the tools
and resources to address some of the most common issues that may arise.
T e a c h i n g S o c i a l a n d E m o t i o n a l S k i l l s | 136
steps &
Icons Time Activity procedure
c. If more extreme cases arise, you should be able to address the child’s needs by bringing
the issue to the Community Coalition, the nearest hospital, or managing NGO. These
groups should be aware of the referral pathways the community has to offer.
20 minutes 4. As a group, brainstorm a few scenarios where the facilitator will need to be aware of the
students’ needs and how to respond. Say:
a. We are first going to talk through some scenarios, and then enact them so you will have
some experience actually responding to your “students’” needs.
b. I will first read the scenario, then three different options for how the teacher should
handle the situation. We will vote as a class, then discuss the reasons for the best social
and emotional response to the scenario.
c. First scenario:
Mr. Stephen’s class co-created rules in the first week. One of the rules was that they
need to raise their hands before speaking. During a lesson about listening to one another,
Ibrahim, one of the students, continuously speaks out of turn. He is interrupting other
students and not following the rule of raising his hand.
How should Mr. Stephen handle this situation?
1. Send Ibrahim to the head teacher for discipline. Then, discuss the outcome with the
head teacher. Discuss a plan of action with the head teacher, but make sure that
proper disciplinary actions are taken.
2. During a quiet time in the class, pull Ibrahim aside and talk to him about why he is
not following the rules. Explain to him that it is hurting other students in the class
when he speaks out of turn. Ask him what would help him to follow the rules and
work with him to succeed.
3. Yell at Ibrahim in front of the class that he has to be quiet and that he is being a bad
child. Tell him that he will have to clean the entire class. If he speaks out again, tell

T e a c h i n g S o c i a l a n d E m o t i o n a l S k i l l s | 137
steps &
Icons Time Activity procedure
him he will also have to clean the other classes. Tell him he is a disrespectful child
and it is not nice what he is doing.
d. Second scenario:
Ms. Hassana’s class is talking about feelings this week. She has created an interactive
lesson plan during which the children will act out scenarios that can lead to emotional
responses. John is part of a scenario where a parent beats a child. During the scenario,
John begins to cry.
How should Ms. Hassana handle this situation?
1. While the other students are occupied, Ms. Hassana should go over to John and ask
if he is okay. She should ask some questions about why he is crying. If he is getting
beaten at home, she may need to contact the head teacher to get him further help.
Encourage some of John’s friends to help him and make him feel better.
2. Ms. Hassana should tell John he should stop crying; this is just acting in class. She
should tell him to go wipe his eyes and then come back to class when he is ready.
3. Ms. Hassana should interrupt the activity and bring the class together and let them
all know that John is crying. She should ask all of the class members to think about
ways to make John stop crying. Invite each student to try a different way of making
John feel better. When they succeed, she will send the class back to finish working
on their scenarios.
e. Third scenario:
Mr. Mohammed’s class is learning about empathy this week. They are acting out
roleplays where one student is feeling something and the other must respond
appropriately. Zainab and Fatima are partners. They are acting out a situation where
Zainab is feeling sad because she lost her favorite toy. Fatima responds by saying “That
toy was stupid anyway.”

T e a c h i n g S o c i a l a n d E m o t i o n a l S k i l l s | 138
steps &
Icons Time Activity procedure
How should Mr. Mohammed handle this situation?
1. He should agree with Fatima and tell Zainab that it is okay, she only lost a stupid
toy.
2. He should ask Zainab how this makes her feel. Then ask Fatima why she thinks
Zainab feels that way. Ask Zainab how she would have preferred Fatima to respond.
Then ask them to re-do the scenario.
3. He should find an appropriate way to discipline Fatima for being rude to her
classmate. He should have her write “I am sorry” 100 times on a piece of paper and
give it to Zainab.
f. Fourth scenario:
Ms. Sarah’s class is focusing on conflict resolution behaviors this week. They are
drawing cartoons to practice the parts of the “Stop, Think, Act” method. Helen is very
excited and draws the three steps. Her main character first “Acts” by telling the other
character to “Stop” being mean. Then the main character walks to the side and “Thinks”
about what the other character has done.
How should Ms. Sarah handle this situation?
1. She should commend Helen for her very good artwork and handling the conflict
positively, since her characters have resolved the disagreement.
2. She should thank Helen for her good try and ask for an explanation of the cartoon.
After the explanation, she should kindly remind Helen that the method is “Stop,
Think, Act” and ask Helen why it is better to stop and think before acting.
3. She should tell Helen it is “Stop, Think, Act”, not “Act, Stop, Think” and her cartoon
is wrong. She should have Helen start over and draw a new cartoon in the correct
order. She should tell Helen that she should follow directions better in the future.
g. Fifth scenario:

T e a c h i n g S o c i a l a n d E m o t i o n a l S k i l l s | 139
steps &
Icons Time Activity procedure
Mr. Abdul’s class is working on setting goals this week. For the lesson, each student is
independently writing or drawing their academic and personal goals for the year. Samuel
is among the less motivated students in Mr. Abdul’s class. While other students are
drawing and writing, he is sitting without pickup up the markers. When Mr. Abdul asks
him what he is doing, Samuel responds by saying that he does not want to set goals,
because he cannot meet any goals.
How should Mr. Abdul handle this situation?
1. He should tell Samuel he has to put something down because this is a class activity.
When he is in school, Samuel has to participate, follow the rules and do what the
teacher says.
2. He should ask Samuel what he finds difficult about meeting goals. Then, he should
assist Samuel in finding a goal he would like to reach. He should help Samuel break
down the goal into smaller, achievable steps. He should encourage Samuel that he
can achieve a bigger goal if he breaks it down into small steps.
3. He should allow Samuel to sit quietly by himself. As long as he is not disrupting the
other students, it is okay for him to not participate. Since setting goals is difficult for
him, Mr. Abdul should be understanding and let him take the time for himself.
5 minutes 5. Hand out notecards that have different roles in each role play. See Appendix 5 for the roles. The
participants will act out some of the above scenarios, using scripted lesson plans. Say:
a. I have handed each of you a notecard with a number and an explanation of your role.
Each number corresponds to a role-play. Without knowing each other’s roles, we will
begin to act out scenarios. Some of you are in the role of facilitators while others are
students in the class.
b. Take a few minutes to review your role independently. Do not share your role with other
participants.
T e a c h i n g S o c i a l a n d E m o t i o n a l S k i l l s | 140
steps &
Icons Time Activity procedure
45 minutes 6. After they have reviewed their roles, begin the role-plays. Say:
a. Can those with Scenario 1 come to the front of the room? Whoever has the role of the
teacher, please begin the scenario. You have 5 minutes to act out the scenario and the
correct teacher observation of behaviors and responses. Good luck!
b. After each scenario ask the following questions to the group:
i. What was the issue the teacher had to address?
ii. What did the teacher do well?
iii. What could he/she have improved upon?
c. Say: Great job, let’s clap for the actors.
d. Go through this same process for all 5 scenarios.
13 minutes 7. Conclusion: Congratulate all of the participants on their great demonstration of their response
to common classroom scenarios in teaching social emotional learning. Say:
a. You have done a great job observing students’ behaviors and responding appropriately
in a way that furthers their social emotional learning.
b. Based on the scenario role-plays:
i. How did you feel as the teacher who had to respond to students’ behaviors and
responses?
ii. Did you find it difficult to address the needs of the learners?
iii. Did you find that you had to adapt the scripted lesson plans?
iv. What are some of the challenges you face in observing and responding to learners
in your own classes? What methods do you use in addressing their needs?
T e a c h i n g S o c i a l a n d E m o t i o n a l S k i l l s | 141
steps &
Icons Time Activity procedure
v. What additional questions do you have remaining about observing and
responding to your students’ needs in Social Emotional Learning?
c. Thank the participants for their open discussion and conclude the session.

T e a c h i n g S o c i a l a n d E m o t i o n a l S k i l l s | 142
APPENDIX 5: SESSION 3: ROLE PLAY CARDS/SCENARIOS
Scenario 1:
Key Messages: Teacher should speak to the student one-on-one and make sure s/he understands the rules. Teacher should control
his/her emotions in responding to the student. The discipline should match the offense, perhaps apologizing to each student that
s/he interrupted.
Role 1A: You are the teacher. Your class co-created rules in the first week. One of the rules was that they need to raise their hands
before speaking. Today you are running a lesson about listening to one another. You are asking the students questions about why
they think it is important to listen to one another.
Role 1B: You are one of the students in the class. You are listening attentively and participating well in the activity. Follow
instructions from your teacher. Raise your hand to answer a question. If the teacher calls on you, then you will answer.
Role 1C: You are one of the students in the class. Every time the teacher speaks, you answer immediately, without raising your
hand. When other students speak, you interrupt them every time. You know that you have the right answers, so it does not matter
what anyone else has to say. It is important to you that you prove you know the answer.
Scenario 2:
Key Messages: The teacher must address the student’s needs individually and not single him/her out in front of the whole class.
The student must be made to feel safe and validated in his or her feelings. The teacher must also find additional help for this student,
outside of the classroom.
Role 2A: You are the teacher. You are teaching the class about feelings this week. You have created an interactive lesson plan
during which the children will act out scenarios that can lead to emotional responses. You have assigned one pair to act out the
interaction between a parent and child when a parent beats a child, to demonstrate how it makes the child feel.
Role 2B: You are a student participating in the activity. Today your class is discussing feelings. You were assigned a roleplay with
a partner by the teacher. Your role is to be a parent who beats his or her child. Your partner is the child. Though you do not actually
beat your partner, you are acting out the scenario, following the instructions of your teacher.
T e a c h i n g S o c i a l a n d E m o t i o n a l S k i l l s | 143
Role 2C: You are a student participating in the activity. Today your class is discussing feelings. You were assigned a roleplay with
a partner by the teacher. Your partner is to be a parent who beats his or her child. You are the child. You begin to cry, because you
get beaten at home when you do anything wrong. You have fresh belt wounds on your back from being beaten last night.
Scenario 3:
Key Messages: The teacher must first mitigate the possible conflict between the two students. Second, the teacher must address the
feelings of the student (3B) and encourage the other student (3C) to begin to understand the feelings. Try relating the loss to
something in 3C’s life.
Role 3A: You are a teacher. Your class is learning about empathy this week. They are acting out roleplays where one student is
feeling something and the other must respond appropriately. You assign various roleplays, including one to two students where one
has lost the toy and the other should respond appropriately.
Role 3B: You are a student. In your class, you are learning about empathy today. Your teacher assigned you a roleplay in pairs. The
role you were given is to be a student who is sad that s/he has lost their toy. Your partner is supposed to respond to your feelings.
Role 3C: You are a student. In your class, you are learning about empathy today. Your teacher assigned you a roleplay in pairs. The
role your partner was given is to be a student who is sad that s/he has lost their toy. Your role is to respond appropriately. However,
you respond by saying, “That toy was stupid anyway.”
Scenario 4:
Key Messages: The teacher should go around and work with each of the students who are having trouble, individually. You should
talk through student 4B’s drawing with her/him. Perhaps s/he has a reason for drawing the cartoon in that order. Listen to her/his
reasons and try to guide her/him to realize why the correct order is “Stop, Think, Act.”
Role 4A: You are a teacher. Your class is focusing on conflict resolution behaviors this week. You have assigned them all the task
of drawing cartoons to practice the parts of the “Stop, Think, Act” method.
Role 4B: You are a student. Your class is focusing on conflict resolution behaviors this week. You have all been assigned the task
of drawing cartoons to practice the parts of the “Stop, Think, Act” method. You are very excited. You draw a cartoon where your
main character first “Acts” by telling the other character to “Stop” being mean. Then the main character walks to the side and
“Thinks” about what the other character has done.

T e a c h i n g S o c i a l a n d E m o t i o n a l S k i l l s | 144
Role 4C: You are a student. Your class is focusing on conflict resolution behaviors this week. You have all been assigned the task
of drawing cartoons to practice the parts of the “Stop, Think, Act” method. You are drawing your cartoon, but having trouble
coming up with a plan for “Act.”
Scenario 5:
Key Messages: The teacher should encourage all of the students to set goals and break them down to be achievable. While walking
around, s/he should stop at student 5C and encourage him/her to set goals. The teacher should help the student to break down the
goals into achievable smaller goals in order to make it more realistic. S/he should also help the student to develop a more positive
self-identity.
Role 5A: You are a teacher. Your class is working on setting goals this week. For the lesson, you have assigned all students to
independently write or draw their academic and personal goals for the year.
Role 5B: You are a student. Your class is working on setting goals this week. For the lesson, you have assigned all students to
independently write or draw their academic and personal goals for the year. You are not a good student. You do not feel that it is
worth your time to set goals, because you know you will not meet them. While other students are drawing and writing, you are
sitting without pickup up the markers.
Role 5C: You are a student. Your class is working on setting goals this week. For the lesson, you have assigned all students to
independently write or draw their academic and personal goals for the year. You are the top student in the class, so you are very
excited to set goals. You are writing down your top 5 goals and the strategies for achieving them.
T e a c h i n g S o c i a l a n d E m o t i o n a l S k i l l s | 145
APPENDIX 6: MODULE 1: WEEK 1: LESSON 1
Title: Getting to know one another / why we are here
Skills: Recognize and appreciate individual and group similarities and differences; begin to develop self-concept/identity
Time: 30 minutes
Learning Objective: By the end of the lesson, learners should be able to:
1. Identify and introduce themselves to their classmates by stating their names and where they come from
2. Describe oneself using several basic characteristics
3. Describe how people are similar and different
4. Name their classmates
Materials: chalk, chalkboard, pictorial chart that show people of different characters (in size, height, gender, etc.) as well as what
they do for a living – including gender non-normative jobs, pencils, paper, exercise books (for each learner)
Previous Knowledge: Learners are familiar with themselves, family and peers.
Facilitator’s Tips:
Make sure the class is as engaged as possible by keeping your energy and tone positive in order to build the learners’
self-esteem, self-confidence and respect for oneself and others.
Start the class by introducing yourself to learners, telling your name and where you come from.
Tell learners to draw themselves and how they want to be addressed.
Appreciate all drawings and contributions from students.
Explain to learners that it is very good to come to a learning center, where they can learn a lot of skills that will support them
throughout their lives.
Be sure to praise the learners for their efforts in coming to the center and reinforce that you would like to see them every day
and that you care about them.

T e a c h i n g S o c i a l a n d E m o t i o n a l S k i l l s | 146
Important Ideas:
It is important for every learner to feel s/he is special and that other learners are special as well. This can make the learners
respect themselves and others. It is also important for the teacher to positively express why we are in this center.
On -going Assessment:
Observe your learners. Are some of them shy about sharing with others? Are some learners more willing to share? Ask more
engaged learners to help others to participate by pairing them with less engaged learners.
Step &
Icons
Time Activity procedure
5 minutes Introduction
Introduce yourself to the class by saying: Good morning/afternoon. My name is… I am from…
Today we will get to know one another and discuss why we are all here together.
Ask the learners to introduce themselves one after the other to their classmates, sharing their
names and where they come from.
After all learners have finished, tell them: Very good, please clap for yourselves. I am so excited
to see all of you every day because I care a lot about you.
5 minutes Explain to learners: Each person has something different about them, as well as some things in
common.
Display a pictorial chart that shows people of different characters (in size, height, gender, etc.)
as well as what they do for a living.
Ask learners if they see any similarities in the characters. Any differences?
Explain that we all have similarities and differences.

T e a c h i n g S o c i a l a n d E m o t i o n a l S k i l l s | 147
Step &
Icons
Time Activity procedure
Say: It is good to have both similarities and differences with our classmates. We can understand
each other based on our similarities, and learn new things based on our differences.
10 minutes. Tell learners to draw themselves, including things that they want their classmates to know about
them, such as how many sisters and brothers you have or your favorite food.
Pass out one sheet of paper and pencils or markers to each student.
After 7 – 8 minutes say: Thank you all for drawing your pictures. Can we now come back
together to share them?
Ask 3 – 4 learners to describe their drawings to the class.
Say: Good work, very excellent effort and hard work.
4 minutes Ask learners to turn to the person next to them and share their drawings and compare the
similarities and differences with their partner.
Direct learners to pair off so that all are included. Walk around and encourage them to compare
and find the differences and similarities on the bases of their characteristics, abilities and
accomplishments.
Tell learners: Let us come back together now. Well done working together and cooperating, you
should clap for yourselves.
5 minutes Assessment
Ask all learners to say their names and identify the names of the students next to them.
Ask 3 -4 learners to identify their differences and similarities on the basis of their characteristics,
abilities and accomplishments.
Ask 3 – 4 learners to share why they interested in coming to class.

T e a c h i n g S o c i a l a n d E m o t i o n a l S k i l l s | 148
Step &
Icons
Time Activity procedure
Tell learners: Well done, keep it up.
1 minute Conclusions/Review
Conclude the lesson by saying: It is important to know all of your classmates by their names as
well as identify the things that makes people different or similar. We should be proud and excited
to learn new things from our classmates. Now clap for yourselves and look around our class at
all of the diverse students.
Reflection:
Were all students engaged?
Were there any students that were particularly shy or had trouble speaking out?
Did all of the students understand the language you were using in class?
If any students were particularly shy or did not understand the language, be sure to speak with them individually to make
sure they are comfortable in the class.
T e a c h i n g S o c i a l a n d E m o t i o n a l S k i l l s | 149
SESSION 4: BRAINSTORMING SEL ACTIVITIES / GAMES
Purpose: To engage the participants in brainstorming various activities and games that can be used in teaching SEL.
Objective: By the end of this session, participants should be able to:
1. Name ten (10) games / activities that can teach social and emotional skills – two (2) per competency
2. Demonstrate effective instruction of games / activities for SEL
Time: 70 minutes
Materials:
Blindfold / bandana
Flipchart
Marker
Deck of cards
Jump rope
Ball
Paper
Pens
Tape
Trainer’s tips: Encourage active participation from all participants during this session. If participants are struggling
with brainstorming games and activities, give them some clues and suggestions.

T e a c h i n g S o c i a l a n d E m o t i o n a l S k i l l s | 150
Steps &
Icons Time Activity procedure
2 minutes 1. Begin the activity with a fun game. Say:
a. We are going to play a game that requires us to trust one another and work together.
b. One volunteer will be blindfolded and placed in the center, everyone else will stand in a
circle holding hands. The goal is for the person in the middle to make it out of the circle.
The rules are that the outer circle can only answer the questions asked by the blindfolded
person in the middle. You must also keep your hands at the same level, you cannot move
them up or down. Everyone wins when the blindfolded person reaches the outside.
c. Are there any questions about the instructions?
d. Let’s all stand up and form a circle.
e. Who would like to volunteer to be blindfolded in the middle?
2. Once you have a volunteer and everyone else is standing in the middle, begin the activity.
5 minutes 3. Once the volunteer has left the circle, remove the blindfold for the volunteer. Ask:
a. How did it feel to not be able to see and to instead be guided by your peers’ instructions?
b. For the group that was guiding, how did it feel to be giving him/her instructions?
c. Did you feel that you had to change how you approached giving or receiving instructions
to be successful?
d. What skills did you have to use in order to succeed?
i. Examples: Perseverance, communication skills, trust, respecting others opinions
/ voice, patience,
4. Congratulate the group on a job well done and invite them back to their seats. Say:
e. This is just one example of an activity or game that has participants actively involved
and reinforces social and emotional skills.

T e a c h i n g S o c i a l a n d E m o t i o n a l S k i l l s | 151
Steps &
Icons Time Activity procedure
f. In our explicit social and emotional learning curriculum, we can use local games and
activities to teach the skills.
10 minutes 5. Bring out a blank flip chart and marker. Ask one volunteer to write on the flipchart – local games
and social emotional learning (SEL) skill. Say:
a. We are now going to take 10 minutes to brainstorm local games that can be used in our
social emotional learning lessons.
b. What are some traditional games that can teach social and emotional skills?
i. Examples: Ten – organization, perseverance, team work;
ii. Do-What-I-do – following directions, cognitive flexibility, motor skills;
iii. Fire on the mountain – focus, team work, goal-setting;
iv. Card games – working memory, cognitive flexibility
35 minutes 6. Say:
a. Based on the list that we have collectively brainstormed, you will now have the
opportunity to teach one of these activities to the group.
b. Divide yourselves into groups of three. Select partners that you have not previously
worked with.
c. In this group of three, select an activity that all of you are comfortable teaching.
d. Each group will have 3 – 5 minutes to teach the game.
e. As you provide instruction on the game, focus on what social and emotional outcome
you are intending. Be sure to use relevant language as you explain the game.
7. Allow groups to brainstorm for a couple of minutes and then ask for a first group to volunteer.
Allow all groups to teach their games and thank them for their teaching.

T e a c h i n g S o c i a l a n d E m o t i o n a l S k i l l s | 152
Steps &
Icons Time Activity procedure
8 minutes 8. Bring the group back together and seated. Ask:
a. How did it feel to explain the game to the group?
b. What did you find most challenging?
c. Did you find it difficult to use language that related to the social and emotional
outcomes?
d. As a participant, was there anything you noticed that made the game explanations
particularly effective for teaching social and emotional skills? Particularly ineffective?
e. How will you incorporate these games into your explicit SEL lessons?
10 minutes 9. Explain to the group the following day’s activity – creating demonstration social emotional
learning lessons. Say:
a. Tomorrow we will each have the opportunity to teach a short social emotional learning
session to one another.
b. Throughout this week, I have been demonstrating Social Emotional learning lessons.
We have built from a basic understanding of the concept to tomorrow, when we will
utilize all of the skills you have gained in:
i. Understanding all of the social emotional learning competencies
ii. Modeling social and emotional skills for learners
iii. Observing and responding to students’’ needs and adapting scripted lessons
iv. Various methods for teaching social emotional learning
c. Each participant / pair will have 5 to 10 minutes to teach a social emotional learning
activity. Make sure to include the introduction, activity and conclusion. After ten (10)
minutes, the presenter will be cut off, regardless of where you are in the lesson plan. In
a real class, when the time is up you are not able to go over.
T e a c h i n g S o c i a l a n d E m o t i o n a l S k i l l s | 153
Steps &
Icons Time Activity procedure
d. After each presentation, the rest of the participants will rate the presenter on:
i. Structure of the presentation (introduction / activity / conclusion)
ii. Modeling social and emotional skills
iii. Responding to and observing students
iv. Accurate instruction on the topic
v. Child-friendliness of the activities.
e. These will be shared with the presenter for their reflection and self-improvement – a
social emotional skill!
10. Come prepared with a sign- up sheet for the groups to select which week they will present. Say:
a. Each presenter / pair will sign up to teach a subject of their choosing. I will pass around
a sign-up sheet which has the weeks of the Scope & Sequence. One group can teach on
each topic.
b. There are sample SEL lessons [in your facilitator guide / around the room] for you to
use as inspiration. Please also think about the games we have just brainstormed that can
be used to teach your lessons!
c. While I pass around the sign-up sheet, are there any questions about tomorrow’s
demonstration lesson activity?
Follow up tip: Post the flip charts with the list of games and skills on the wall for use in the future sessions on lesson plan
development.
T e a c h i n g S o c i a l a n d E m o t i o n a l S k i l l s | 154
SESSION 5: DEMONSTRATING SEL LESSONS
Purpose: For the participants to practice demonstrating SEL lesson plans.
Objective: By the end of this session, participants should be able to:
1. Understand the components and methodologies in a successful SEL lesson
2. Demonstrate effective facilitation of a SEL lesson
Time: 150 minutes
Materials:
Flip chart
Markers
Paper
Pens
Tape
Presentation rating sheet [see Appendix 7 at the end of this session]
Sample lesson plans [See Appendix 8]
Timer
Trainer’s tips: Based on the number of participants and the amount of time you can allocate to this session, choose to have their
presentations solo or in pairs. Ideally, give the participants at least one-day notice that they will need to prepare a lesson plan. If
you are able to, the day before have the participants sign up for which week they would like to prepare a demonstration lesson plan
for.

T e a c h i n g S o c i a l a n d E m o t i o n a l S k i l l s | 155
Steps &
Icons Time Activity procedure
5 minutes 1. Say:
f. Throughout this week, I have been demonstrating Social Emotional learning lessons. We
have built from a basic understanding of the concept to today, where we will utilize all
of the skills you have gained in:
i. Understanding all of the social emotional learning competencies
ii. Modeling social and emotional skills for learners
iii. Observing and responding to students’’ needs and adapting scripted lessons
iv. Various methods for teaching social emotional learning
g. Each participant / pair will have 5 to 10 minutes to teach a social emotional learning
activity. Make sure to include the introduction, activity and conclusion. After ten (10)
minutes, the presenter will be cut off, regardless of where you are in the lesson plan. In a
real class, when the time is up you are not able to go over.
h. After each presentation, the rest of the participants will rate the presenter on:
i. Structure of the presentation (introduction / activity / conclusion)
ii. Modeling social and emotional skills
iii. Responding to and observing students
iv. Accurate instruction on the topic
v. Child-friendliness of the activities.
i. These will be shared with the presenter for their reflection and self-improvement – a
social emotional skill!

T e a c h i n g S o c i a l a n d E m o t i o n a l S k i l l s | 156
Steps &
Icons Time Activity procedure
15 minutes 2. Make sure that sample lesson plans are available for the participants, either in the facilitators
guide or printed out and put on display. Say:
j. You will now have 15 minutes (more is preferable, if there is time available in the
training schedule) to prepare your lessons.
You can find sample lesson plans in the facilitator’s guide or printed out. Please do not
follow these lesson plans directly, but you can use them as an example.
120 minutes 3. Distribute presentation rating sheets while they are preparing. After 15 minutes of preparation,
bring the group back together and begin the presentations. Ask for a volunteer to go first. Make
sure that you have a timer. Set an alert to go off after exactly 10 minutes. Say:
k. I will start the timer when you begin and an alert will go off after 10 minutes. You will
have to stop immediately.
l. While one person is presenting, everyone else in the group will be participating as a
student.
m. After each presentation, invite the group to clap for the presenter(s). Collect the
presentation rating sheet and be sure to label them to give to the presenter(s).
n. Go through this process for all presentations.
10 minutes 4. Conclusion: Thank all of the groups for their presentations. Ask:
o. How did it feel to present to the group?
p. How did it feel to be a student in the other participants’ lessons?
q. Overall, what were some things that presenters did well?
r. What were some things that could have been improved?
s. What did you learn from your peers through their modeled lesson plans?

T e a c h i n g S o c i a l a n d E m o t i o n a l S k i l l s | 157
Steps &
Icons Time Activity procedure
t. What are your major takeaways from today’s activity demonstrating social emotional
learning lessons?

T e a c h i n g S o c i a l a n d E m o t i o n a l S k i l l s | 158
APPENDIX 7: SESSION 6: PRESENTATION RATING SHEET
Name of Presenter:
Lesson Topic:
Date:
Other comments
Instructions: Please rate the presenter on the following categories on a scale of 1 – 5
[1 = Very Poor; 2 = Poor; 3 = Fair; 4 = Good; 5 = Very Good]
1 2 3 4 5 Comments
Structure of the presentation
(introduction / activity /
conclusion)
Modeling social and
emotional skills
Responding to and observing
students
Accurate instruction on the
topic
Child-friendliness of the
activities

T e a c h i n g S o c i a l a n d E m o t i o n a l S k i l l s | 159
APPENDIX 8: MODULE 2: WEEK 7: LESSON 1 - TOPIC: EXPRESSING HOW I FEEL
Skill Area: Assertiveness, feelings and emotions
Total Time: 30 minutes
Learning Objective:
By the end of the activity, learns will be able to:
1. Explain meanings of feelings and emotions
2. Identify different types of emotions
3. Express how they think and feel when they are hurt
4. Express how they think and feel when they are happy
5. Express how they feel without hurting others
Materials to prepare in advance: chalk or stick, blackboard (optional), flash cards with one feeling word: happy, lonely, scared,
bored, angry, sad, upset, surprised, strong, proud, afraid, glad, shy, worried, tired, love
Note: The day before, teacher uses this activity plan: prepare flash cars with words and sketches describing different feelings and
emotions (e.g. happy, lonely, scared, bored, angry, sad, upset, surprised, strong, proud, afraid, glad, shy, worried, tired, love, etc.)
Teacher takes the cards to the class for the lesson.
Previous knowledge: Learners have had experience of negative and positive emotions / feelings
Facilitator’s Tips:
Keep in mind throughout the lesson that some students may have had experiences with very bad emotions. Do
your best to address these emotions. If students are getting very sad, or begin to act out in class, ask them what is
happening. If they are acting out, give them an important task to do.
Important Ideas:

T e a c h i n g S o c i a l a n d E m o t i o n a l S k i l l s | 160
It is important for learners to express themselves, their feelings and their opinions in order for them to have a healthy self-esteem,
respect for oneself and for others. They ability of the learners to say how they think and feel is important to living together in any
community.
On -going Assessment: Observe your learners. How willing are they to express their thoughts and feelings politely and
honestly? Note learners that find it difficult to express their thoughts and feelings politely and encourage them to do so.
Step &
Icons
Time Activity procedure
10 minutes Introduction
Tell the learners: Today we will discuss feelings and emotions. Emotions are showing how
you feel.
Demonstrate to the learners both the positive and negative feelings and emotions (e.g.
smiling, frowning, etc.) Explain to learners if I am happy I smile, while when I frown I am
sad
Paste flash cards containing words expressing feelings (examples: happy, lonely, scared,
bored, angry, sad, upset, surprised, strong, proud, afraid, glad, shy, worried, tired, love, etc.)
on the chalkboard. If you did not make the flash cards before the lesson, simply write the
words on the blackboard.
Call on a few learners to demonstrate the different feelings (examples: happy, lonely, scared,
bored, angry, sad, upset, surprised, strong, proud, afraid, glad, shy, worried, tired, love, etc.)
one after the other.
Say: Show what it looks like to have this emotion or feeling.

T e a c h i n g S o c i a l a n d E m o t i o n a l S k i l l s | 161
Step &
Icons
Time Activity procedure
Say: For the second round, one person will demonstrate the feeling again, without telling us
what he or she is showing. The rest of the class will guess which feeling is being
demonstrated.
Say to the learners: Now we have shown how different feelings and emotions look.
10 minutes The teacher should:
Ask the learners to stand up (or form a circle) for a game.
Tell the learners: “I will pass a piece of chalk, stick (or any other object available) around
while everyone is clapping. The pupil that is holding the object when I shout ‘Stop’ will
repeat what I say and complete the sentence.
Give an example (I feel hurt when people make fun of me)
I feel angry when…
I feel sad when…
I feel happy when…
I feel excited when...
Start the game and let the class continue clapping until about five learners have formed
different sentences.
Explain to the learners: When we do not tell others how we think and feel, then our thoughts
and feelings can continue to hurt us.

T e a c h i n g S o c i a l a n d E m o t i o n a l S k i l l s | 162
Step &
Icons
Time Activity procedure
5 minutes The teacher should:
Say: We will now discuss, in pairs, how we can tell others about their feelings without
hurting someone else. For examples, we can be honest, avoid shouting and speaking politely,
using ‘Please’, “Can you”,” Will you”, etc.). e.g. ‘Aliyu, please stop shouting at me. I don’t
like it.’ ‘Kande, will you stop stepping on my toes? It is hurting me.’
Observe the class as they discuss in pairs.
Bring the class back together Praise the learners for their participation and say: Always be
nice when expressing your feelings. Use the words: please, kindly, can you…?
4 minutes Assessment
Say: I will say an emotion, and each of you will show what that emotion looks like on your
faces.
o Happy
o Scared
o Bored
o Angry
o Sad
o Surprised
o Worried
o Tired
o Love
1 minute Conclusions/Review
Say: Today you have learned how to identify emotions. We have learned about happy, lonely,
scared, bored, angry, sad, upset, surprised, strong, proud, afraid, glad, shy, worried, tired,
love.

T e a c h i n g S o c i a l a n d E m o t i o n a l S k i l l s | 163
Step &
Icons
Time Activity procedure
Reflection:
Did students correctly show emotions by the end of the class? After this class, do you hear students using “feeling” words and
statements?

T e a c h i n g S o c i a l a n d E m o t i o n a l S k i l l s | 164
INFUSING SEL INTO READING AND MATHEMATICS
Purpose: To introduce the participants to one another and to the training.
Objectives: By the end of this session, participants should be able to:
1. Understand what it means to infuse SEL into other academic areas
2. List various methods for infusing SEL
3. Write a lesson plan in mathematics or reading infused with SEL
Time: 90 minutes
Materials:
Flip chart
Marker
Printed out reading / mathematics lesson plans (Appendix 9 and 10 at the end of this session)
Pens
Trainer’s tip: Make sure that the room is set up so that the group can easily break up into four (4) groups. Throughout the activity,
ask the participants to respond back to confirm that they understand what you are presenting.
Steps &
Icons Time Activity procedure
3 minutes 1. Have your flipchart and marker ready at the beginning of the lesson. Say:
a. This session we will talk about how to infuse SEL into reading and mathematics. SEL
is most effective when it is taught explicitly, as we have been practicing, combined with
infusion into other academic areas, and reinforced in recreation activities and by the
community and parents.
b. SEL is commonly infused in reading and mathematics, as these are two of the core
subject areas.
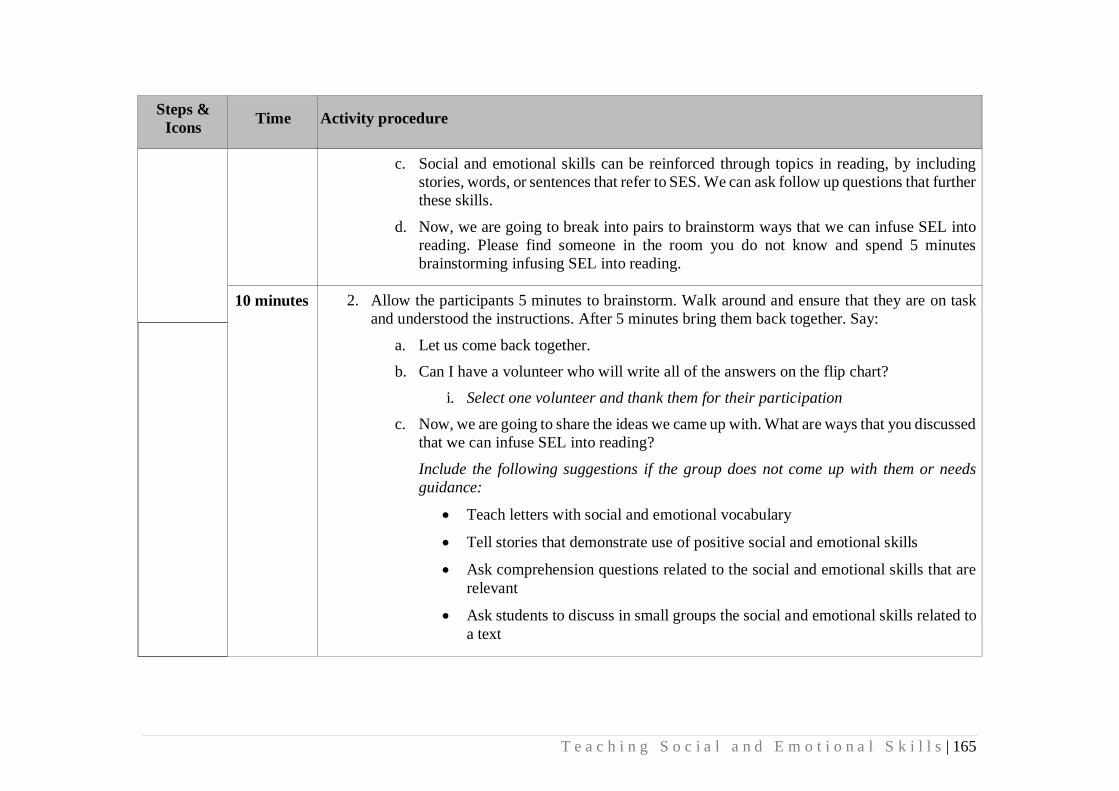
T e a c h i n g S o c i a l a n d E m o t i o n a l S k i l l s | 165
Steps &
Icons Time Activity procedure
c. Social and emotional skills can be reinforced through topics in reading, by including
stories, words, or sentences that refer to SES. We can ask follow up questions that further
these skills.
d. Now, we are going to break into pairs to brainstorm ways that we can infuse SEL into
reading. Please find someone in the room you do not know and spend 5 minutes
brainstorming infusing SEL into reading.
10 minutes
2. Allow the participants 5 minutes to brainstorm. Walk around and ensure that they are on task
and understood the instructions. After 5 minutes bring them back together. Say:
a. Let us come back together.
b. Can I have a volunteer who will write all of the answers on the flip chart?
i. Select one volunteer and thank them for their participation
c. Now, we are going to share the ideas we came up with. What are ways that you discussed
that we can infuse SEL into reading?
Include the following suggestions if the group does not come up with them or needs
guidance:
Teach letters with social and emotional vocabulary
Tell stories that demonstrate use of positive social and emotional skills
Ask comprehension questions related to the social and emotional skills that are
relevant
Ask students to discuss in small groups the social and emotional skills related to
a text
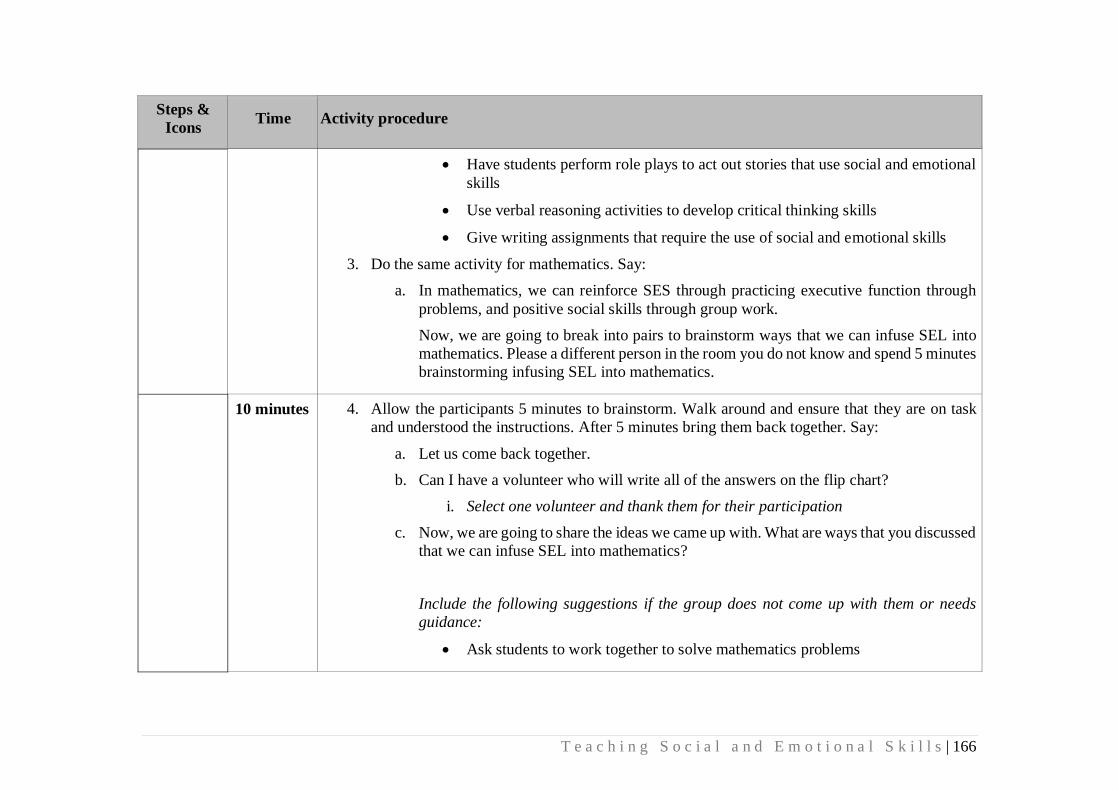
T e a c h i n g S o c i a l a n d E m o t i o n a l S k i l l s | 166
Steps &
Icons Time Activity procedure
Have students perform role plays to act out stories that use social and emotional
skills
Use verbal reasoning activities to develop critical thinking skills
Give writing assignments that require the use of social and emotional skills
3. Do the same activity for mathematics. Say:
a. In mathematics, we can reinforce SES through practicing executive function through
problems, and positive social skills through group work.
Now, we are going to break into pairs to brainstorm ways that we can infuse SEL into
mathematics. Please a different person in the room you do not know and spend 5 minutes
brainstorming infusing SEL into mathematics.
10 minutes 4. Allow the participants 5 minutes to brainstorm. Walk around and ensure that they are on task
and understood the instructions. After 5 minutes bring them back together. Say:
a. Let us come back together.
b. Can I have a volunteer who will write all of the answers on the flip chart?
i. Select one volunteer and thank them for their participation
c. Now, we are going to share the ideas we came up with. What are ways that you discussed
that we can infuse SEL into mathematics?
Include the following suggestions if the group does not come up with them or needs
guidance:
Ask students to work together to solve mathematics problems

T e a c h i n g S o c i a l a n d E m o t i o n a l S k i l l s | 167
Steps &
Icons Time Activity procedure
Ask students who have learned a mathematics skill to explain the skill to a peer
is struggling to understand
Ask students to share instructional materials
Teach students to solve word problems by breaking them down into their
component steps
Ask students to perform mental mathematics
Use every day, common situations that require social emotional skills to develop
mathematics problems
When teaching time, reinforce ideas of time management skills and respect for
others’ time
Use logic problems to develop critical thinking skills
2 minutes 5. Thank the note-taker and ask two participants to post the flip charts on the wall. Say:
a. We are now going to put the great ideas you all just brainstormed into action.
b. In small groups, we will look at reading and mathematics lessons plans. Based on our
discussion, you will find ways to infuse SEL into the facilitator’s tips, activities, and on-
going assessments of learners.
c. This may mean changing words or stories, creating new activities, or changing the
method of instruction and scripted cues for the facilitator.
d. After you have infused the lesson plan, a volunteer from each group will facilitate one
activity from the lesson plan with the group as students.
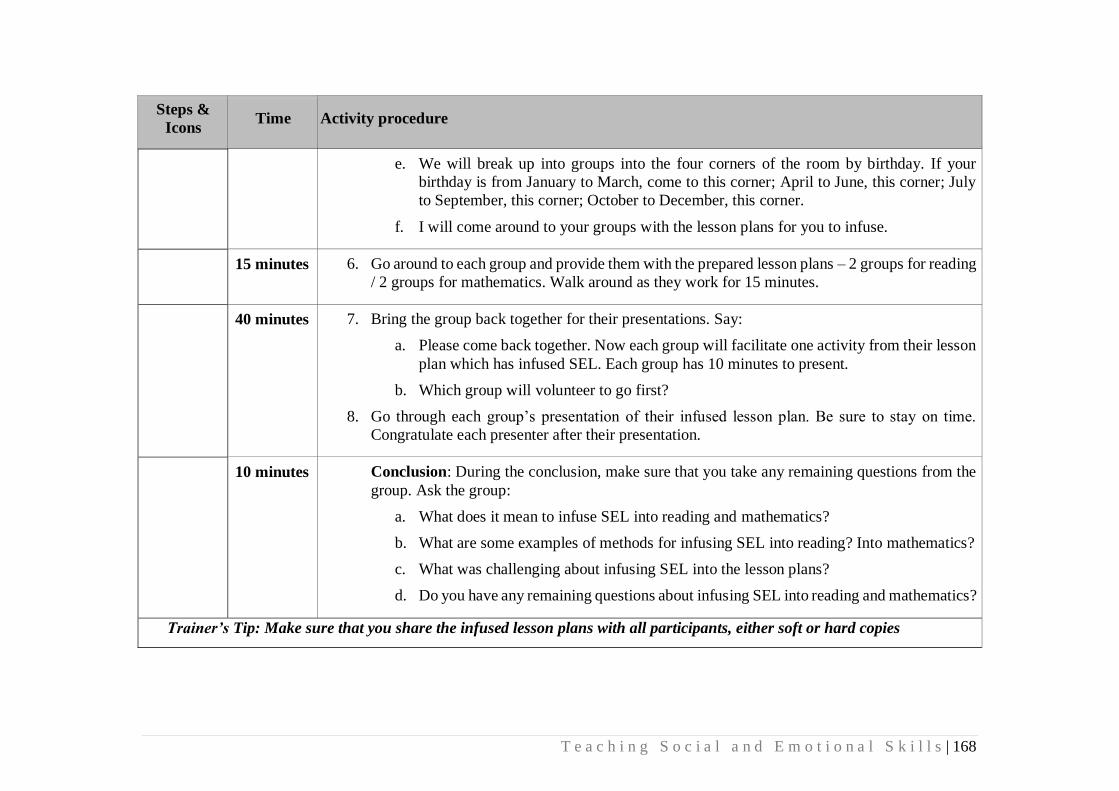
T e a c h i n g S o c i a l a n d E m o t i o n a l S k i l l s | 168
Steps &
Icons Time Activity procedure
e. We will break up into groups into the four corners of the room by birthday. If your
birthday is from January to March, come to this corner; April to June, this corner; July
to September, this corner; October to December, this corner.
f. I will come around to your groups with the lesson plans for you to infuse.
15 minutes 6. Go around to each group and provide them with the prepared lesson plans – 2 groups for reading
/ 2 groups for mathematics. Walk around as they work for 15 minutes.
40 minutes 7. Bring the group back together for their presentations. Say:
a. Please come back together. Now each group will facilitate one activity from their lesson
plan which has infused SEL. Each group has 10 minutes to present.
b. Which group will volunteer to go first?
8. Go through each group’s presentation of their infused lesson plan. Be sure to stay on time.
Congratulate each presenter after their presentation.
10 minutes Conclusion: During the conclusion, make sure that you take any remaining questions from the
group. Ask the group:
a. What does it mean to infuse SEL into reading and mathematics?
b. What are some examples of methods for infusing SEL into reading? Into mathematics?
c. What was challenging about infusing SEL into the lesson plans?
d. Do you have any remaining questions about infusing SEL into reading and mathematics?
Trainer’s Tip: Make sure that you share the infused lesson plans with all participants, either soft or hard copies

T e a c h i n g S o c i a l a n d E m o t i o n a l S k i l l s | 169
APPENDIX 9: INFUSION: READING AND MATH LESSONS
Reading Lesson Plan (without SEL)
Title: Unit X, Topic: Consonants, lesson 14, letter C c
Skills: Phonemic awareness, letter C; phonics, letter C c
Learning Objectives: Master the sound of the letter,
know its name, be able to identify it and write it, (upper and lower case).
Materials: chalk, chalkboard, song or text written on the board or a piece of paper, alphabet chart
Previous Knowledge: Vowels, B
Facilitator’s Tips: Facilitator, be sure to face the pupils when you speak so they can see your mouth and follow how
you make the sound. Circulate so all children can see you make the target sound.
Important Ideas: Remember to teach the letter name, the letter sound and the letter shape. Children need to know all
these things and not just one or two to become fluent readers.
SEL Ideas: When people are displaced from their home they often feel hurt or even get hurt. We want to reassure pupils
that they are safe in our learning center and that we are so happy they are here. Facilitator, use the word cutarwa (hurt)
as a vocabulary word in your lesson as it starts with C.
C c

T e a c h i n g S o c i a l a n d E m o t i o n a l S k i l l s | 170
Step &
Icons
Time Activity description
5 minutes
Introduction
1. Say good morning to the children and welcome them. Ask if everyone has taken their name tag.
2. Ask the children what they learned in their last reading class. They should say the sound /b/. Say a
word with /b / in it and ask them to repeat. Ask for a word from them with the same sound /b/; have
them repeat these two words in choral form.
3. Morning Meeting
Write the following morning message on the board:
Mamana ina kwana?
Gaisuwa ce da safe.
Ina wuni! Babana?
Gaisuwa ce da rana.
Mamana sai da safe.
Bankwana ne da dare.
Gaisuwa ce da dare.
Phrase in Hausa with at least 2 letter Cs and a letter B;
4. Underline a long and a short vowel in the sentence and underline the letters b and c when wherever
they appear.
5. Read the phrase on the board slowly, pointing at each word as you say it. Do this three times.
6. On the third time, stop at the vowel you have underlined and ask students what it is; have them make
the sound again. Continue to a word that starts with b; ask the students to make the sound /b/. Have
them repeat it several times.
7. Point to the letter C and tell them that we are going to learn the letter C c today.
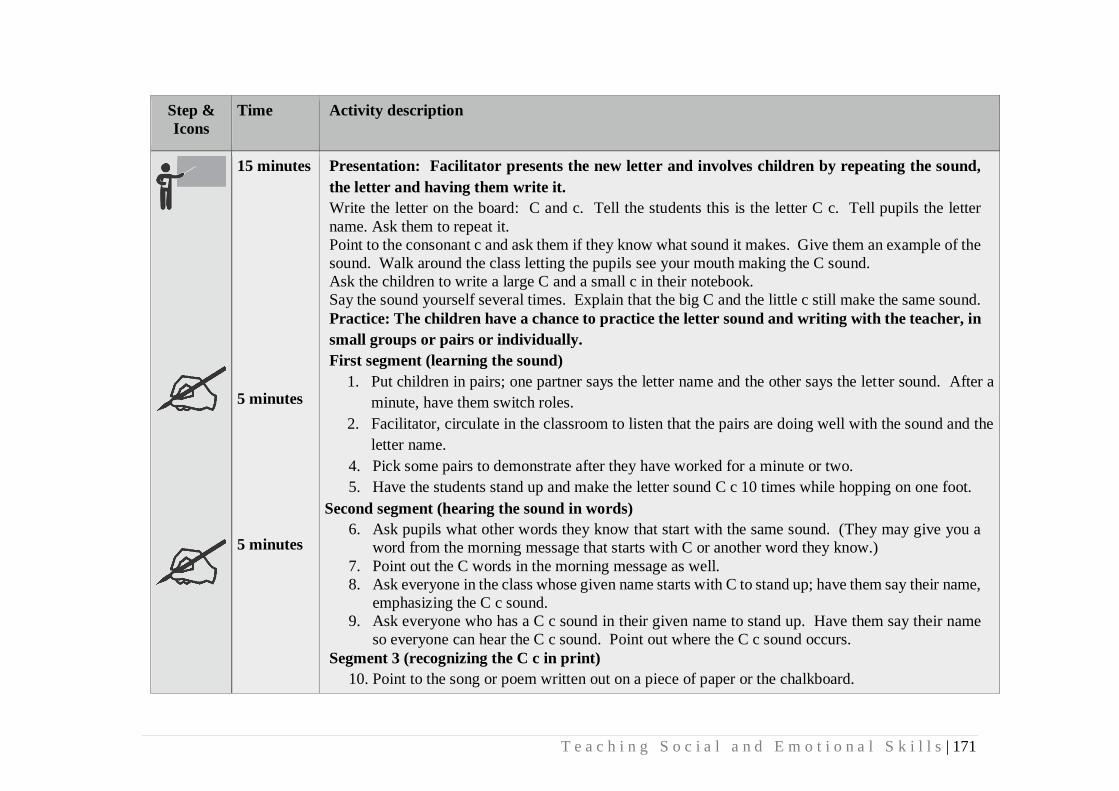
T e a c h i n g S o c i a l a n d E m o t i o n a l S k i l l s | 171
Step &
Icons
Time Activity description
15 minutes
5 minutes
5 minutes
Presentation: Facilitator presents the new letter and involves children by repeating the sound,
the letter and having them write it.
1. Write the letter on the board: C and c. Tell the students this is the letter C c. Tell pupils the letter
name. Ask them to repeat it.
2. Point to the consonant c and ask them if they know what sound it makes. Give them an example of the
sound. Walk around the class letting the pupils see your mouth making the C sound.
3. Ask the children to write a large C and a small c in their notebook.
4. Say the sound yourself several times. Explain that the big C and the little c still make the same sound.
Practice: The children have a chance to practice the letter sound and writing with the teacher, in
small groups or pairs or individually.
First segment (learning the sound)
1. Put children in pairs; one partner says the letter name and the other says the letter sound. After a
minute, have them switch roles.
2. Facilitator, circulate in the classroom to listen that the pairs are doing well with the sound and the
letter name.
4. Pick some pairs to demonstrate after they have worked for a minute or two.
5. Have the students stand up and make the letter sound C c 10 times while hopping on one foot.
Second segment (hearing the sound in words)
6. Ask pupils what other words they know that start with the same sound. (They may give you a
word from the morning message that starts with C or another word they know.)
7. Point out the C words in the morning message as well.
8. Ask everyone in the class whose given name starts with C to stand up; have them say their name,
emphasizing the C c sound.
9. Ask everyone who has a C c sound in their given name to stand up. Have them say their name
so everyone can hear the C c sound. Point out where the C c sound occurs.
Segment 3 (recognizing the C c in print)
10. Point to the song or poem written out on a piece of paper or the chalkboard.
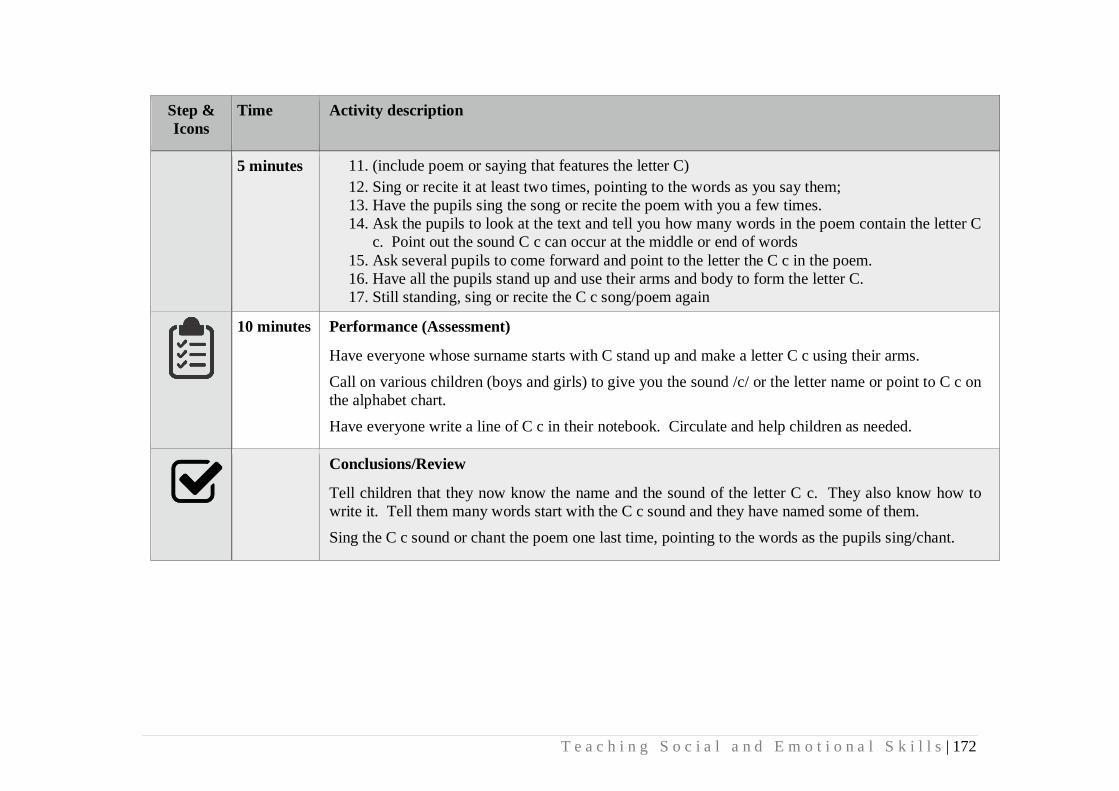
T e a c h i n g S o c i a l a n d E m o t i o n a l S k i l l s | 172
Step &
Icons
Time Activity description
5 minutes 11. (include poem or saying that features the letter C)
12. Sing or recite it at least two times, pointing to the words as you say them;
13. Have the pupils sing the song or recite the poem with you a few times.
14. Ask the pupils to look at the text and tell you how many words in the poem contain the letter C
c. Point out the sound C c can occur at the middle or end of words
15. Ask several pupils to come forward and point to the letter the C c in the poem.
16. Have all the pupils stand up and use their arms and body to form the letter C.
17. Still standing, sing or recite the C c song/poem again
10 minutes Performance (Assessment)
1. Have everyone whose surname starts with C stand up and make a letter C c using their arms.
2. Call on various children (boys and girls) to give you the sound /c/ or the letter name or point to C c on
the alphabet chart.
3. Have everyone write a line of C c in their notebook. Circulate and help children as needed.
Conclusions/Review
1. Tell children that they now know the name and the sound of the letter C c. They also know how to
write it. Tell them many words start with the C c sound and they have named some of them.
2. Sing the C c sound or chant the poem one last time, pointing to the words as the pupils sing/chant.

T e a c h i n g S o c i a l a n d E m o t i o n a l S k i l l s | 173
APPENDIX 10: MATH LESSON PLAN (WITHOUT SEL)
Topic: Time
Skills: Recognition of time of the clock.
Time: 45 minutes.
Important idea: Recognition of the unit of time eg seconds, minutes, hours, days, weeks months and years.
Previous knowledge: Learners are familiar with time as in coming to school, break time, etc. and are able to count 1-60.
Materials to prepare in advance: Big wall clock, table clocks, model clock, wrist watch
Step Time Activity description
1 10 minutes The Facilitator should:
Get a large clock with big hands without glass or plastic cover and easily measurable hands will be the
most approachable to use.
2 10 minutes The Facilitator should:
Explain the short hand is the hour hand, keeping the minute hand at 12. Move the hour hand to various
positions on the clock. Explain that any time the minutes hand is exactly over the 12, it is – O’clock,
then allow the learners to move the hour hand about until he or she is comfortable.
3 10 minutes The Facilitator should:
Explain the long hand is the minute hand, keeping the hour hand stationary move the minute hand round
to explain what each position means to your child start by covering the 5 minutes marks, once the
understand those, progress to the off numbers like 12 and 37, allow the child to move minutes hand
around and practice reading it.
4 5 minutes The Facilitator should:
Demonstrate how to read hours and manage hands together.
5 5 minutes The Facilitator should:

T e a c h i n g S o c i a l a n d E m o t i o n a l S k i l l s | 174
Allow the child to ask question this will give them him the confidence to ask questions.
5 minutes Individual assessment:
The facilitator should teach the child to draw a face of the clock; and indicate times like 10 o’clock
11:35, etc.
Assess: The facilitator goes round to give assistance to the children as the draw in the class.
Reflection: Did the learners enjoy the lesson?
How could the activity be improved?
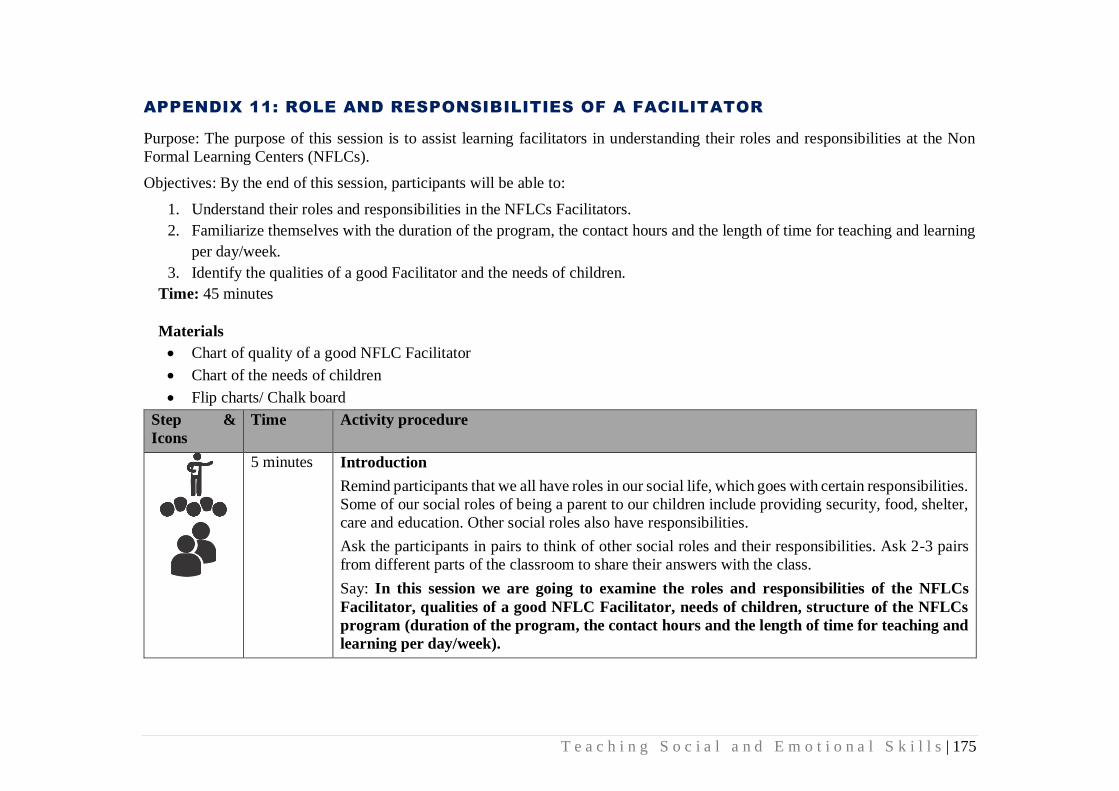
T e a c h i n g S o c i a l a n d E m o t i o n a l S k i l l s | 175
APPENDIX 11: ROLE AND RESPONSIBILITIES OF A FACILITATOR
Purpose: The purpose of this session is to assist learning facilitators in understanding their roles and responsibilities at the Non
Formal Learning Centers (NFLCs).
Objectives: By the end of this session, participants will be able to:
1. Understand their roles and responsibilities in the NFLCs Facilitators.
2. Familiarize themselves with the duration of the program, the contact hours and the length of time for teaching and learning
per day/week.
3. Identify the qualities of a good Facilitator and the needs of children.
Time: 45 minutes
Materials
Chart of quality of a good NFLC Facilitator
Chart of the needs of children
Flip charts/ Chalk board
Step &
Icons
Time Activity procedure
5 minutes Introduction
Remind participants that we all have roles in our social life, which goes with certain responsibilities.
Some of our social roles of being a parent to our children include providing security, food, shelter,
care and education. Other social roles also have responsibilities.
Ask the participants in pairs to think of other social roles and their responsibilities. Ask 2-3 pairs
from different parts of the classroom to share their answers with the class.
Say: In this session we are going to examine the roles and responsibilities of the NFLCs
Facilitator, qualities of a good NFLC Facilitator, needs of children, structure of the NFLCs
program (duration of the program, the contact hours and the length of time for teaching and
learning per day/week).

T e a c h i n g S o c i a l a n d E m o t i o n a l S k i l l s | 176
.
20 minutes The Facilitator should:
Organize participants into 4 groups tell the groups to select a facilitator, reporter and recorder.
Tell the groups to read the section of their facilitator’s guide on non-formal learning bench mark on
pages X to X and answer the following questions.
1. What in their opinion is the 3 most important responsibilities of a NFLC Facilitator?
2. What is the total duration and weekly contact hours of NFLCs?
3. What in their opinion is the most important quality of a NFLC Facilitator and why?
The groups are to spend 10 minutes on this task after which each group presents a report of the
groups task.
Say: Excellent you have all done great!
25 minutes The facilitator should:
Ask participants to remain in their groups. Each group is to brainstorm and list steps involved in
effectively carrying out the NFLC Facilitator’s responsibilities. They have 20 minutes for the task.
The responsibilities should be shared between the groups as follows:
Group 1
Organization of learning space to facilitate active learning.
Lesson planning and preparation of notes
Group 2
Lesson delivery, using guiding principles of learner centered pedagogy.
Being aware and enforcing classroom management strategies i.e. (giving learners’ meaningful
classroom responsibilities, arranging your classroom, establishing routines, positive discipline –
Healing classroom).
Group 3
Administering effective group work and praise.
Keep adequate record and maintain, establish classroom management system.
Group 4

T e a c h i n g S o c i a l a n d E m o t i o n a l S k i l l s | 177
Assessing learning achievement.
Keeping a good relationship with parents and the community.
Give the participants the example below:
Responsibility: Taking part in feedback discussion with school mentors after lesson’s observation.
Steps involved:
Keep a schedule of mentor’s visit
Deliver lesson
Keep a facilitator’s dairy for taking notes
Attend the feedback session on time
Ask questions and seek clarifications
Reflecting on feedback and steps towards improvement
After 20mins. Ask the group presenter to report. Ask other participants if there are any other points
to be added or that they disagreed with.
Say: Well done!
10 minutes
The Facilitator should:
Present the chart of qualities of a good NFLC Facilitator and the needs of children to the
participants, read it three times (explaining each). After this ask the participants to write it in their
notebooks.
Say: Each participant should develop a chart of this to be presented in the class first thing on the 4th
day of the training.
Qualities of a good facilitator
He/she should:
1. Have good listening and communication skills.
2. Demonstrate empathy for the learners.
3. Demonstrate knowledge of the subject matter.
4. Possess effective teaching skills.

T e a c h i n g S o c i a l a n d E m o t i o n a l S k i l l s | 178
5. Be approachable.
6. Show professional attitude.
7. Be a mentor / role model.
8. Accept and appreciate participant’s viewpoints.
9. Refusing to call the same participant or learner to answer question all the time.
10. Always go around the classroom to supervise learners’ work.
Needs of Children
Learning facilitators are responsible to treat children in a respectful manner because the
children need to:
a. Feel a sense of belonging.
b. Be happy.
c. Have self-confidence.
d. Have a sense of safety.
e. Be secured.
Therefore, learning environment must be child-friendly, where children feel excited to go
to school every day.
Say: Thank you!

D o c u m e n t A p p e n d i x | 179
APPENDIX 12: TRAINING AGENDA
Education Crisis Response
Reading, Numeracy and Social and Emotional Learning
Facilitators’ Training Workshop
Agenda
Time Activity
Day 1
8:00-8:30am
Introductory activity
Welcome
Ground rules and introduction
8:30-9:00am Pre-test
9:00-9:30am Purpose of training and organization
9:30-10:00am Scope and sequence for SEL
10.00 -10:30am Core competencies in SEL
10:30-11:00am Tea Break
11:00-12:30pm Foundation of numeracy instruction and ECR’s scope and sequence in numeracy.
12:30-1:00pm
Introduction to the ECR’s facilitator’s guide – structure, organization and use.
1:00- 2:00pm Lunch break and prayers
2:00-2:45pm Responsibilities of Learning Facilitators,
NFE timetable, duration and contact hours.

D o c u m e n t A p p e n d i x | 180
2.45:00-4:00pm ECR Scope and sequence for reading.
4.00 – 4.15 pm Prayer
4:15- 5:00pm Fundamentals of mathematics instruction and ECR’s approach to numeracy teaching
Day 2
8:00-8:10am Recap of day 1 activities.
8:10-10:00am What is reading? What is writing?
The first session will provide teachers with an understanding of reading as a meaning-based, language
process with a specified set of components.
Further, they will see how reading fits with language development, particularly within a multilingual
context.
10:00- 10:30am Tea Break
10:30- 12:00pm Oral language as the foundation of reading
Stages of language development
The importance of oral language
Oral traditions and the link to literacy
Learning to speak and read in a new language
12:00-1:00pm Introduction to ECR scripted lessons: overview and demonstration.
1:00- 2:00pm Lunch Break and prayers
2:00-3:00pm How to use scripted lessons effectively
3:00-4:00pm Modeling social and emotional skills for learners.
4.00 – 4.15pm Prayer
4:15- 5:00pm Preparation for simulation lesson on numeracy.

D o c u m e n t A p p e n d i x | 181
Day 3
8:00-8:10am
Recap of day 2 activities
8:10-10:10am Demonstration lesson (Numeracy)
10:10- 10:40am Tea Break
10:40- 11:30pm Numeracy simulation 1
11.30 – 1.00 pm Numeracy simulation 2
1:00- 2:00pm Lunch Break and prayers
3:30-5:00pm
Make and take -developing instructional materials for numeracy.
Day 4
8:00-8:15am Recap of day 3 activities.
8:15-10:00am Guided practice with scripted lessons (reading)- Part 1
Practice/simulation of scripted lessons by facilitators.
10:00- 10:30am Tea Break
10:30-11:30am Brainstorming on SEL activities (Games)
11:30-1:00pm
Guided practice with scripted lessons _ Part 2
Implementing interactive text and/or book reading in the classroom.
1:00- 2:00pm Lunch Break and prayers
2:00-3:00pm Make and take _developing materials for SEL
3.00 -400pm Simulation with scripted lesson for SEL 1

D o c u m e n t A p p e n d i x | 182
4.00 – 4.15pm Prayer
4:15 - 5:00pm Creating a language and print rich classroom for reading
Day 5
8:00-8:15am Recap of day 4 activities.
8:15- 9:15am SEL Infusions into reading and numeracy
9.15-10.00am SEL scenarios
10:00- 10:30am Tea Break
10:30-11:30am Guided practice with scripted lessons (reading)- Part 3
Practice/simulation of scripted lessons by facilitators.
11:30-1:00pm Numeracy Simulation 3
1:00- 2:00pm Lunch Break and prayers
2:00-3:00pm Simulation with scripted lesson for SEL 2
3.00 -3.45pm Make and take _developing materials for reading
4.00-4.15pm Post-test
Close
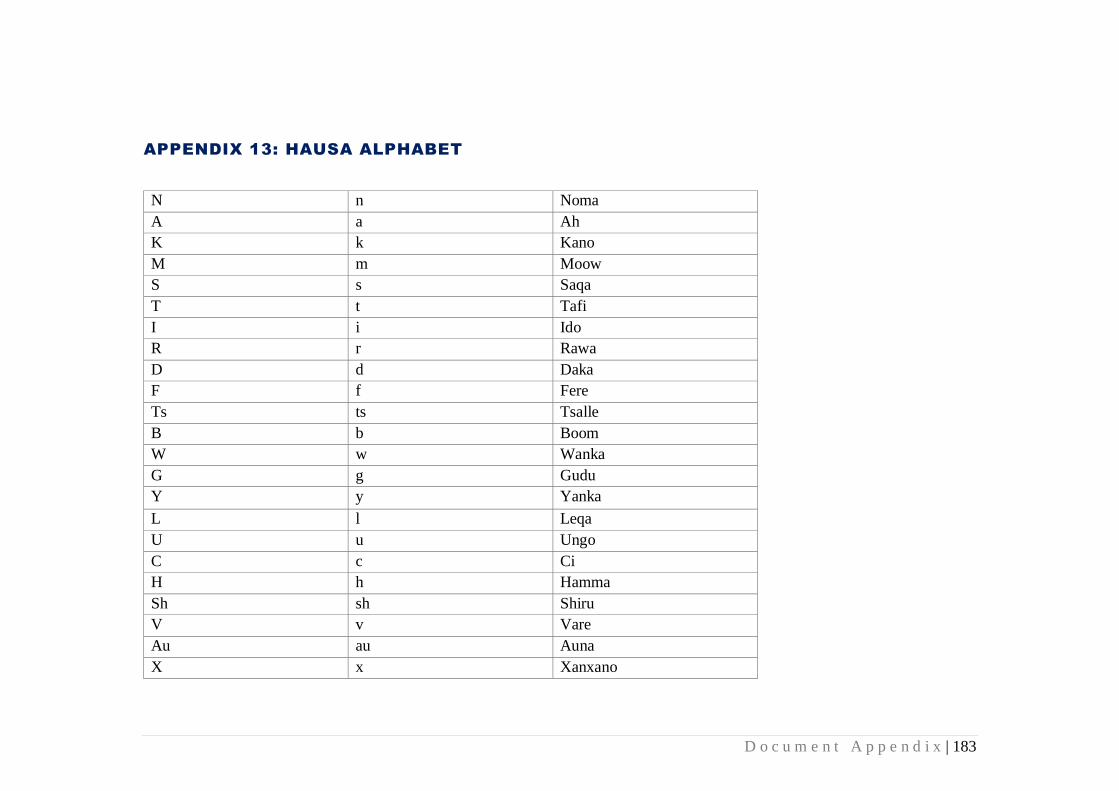
D o c u m e n t A p p e n d i x | 183
APPENDIX 13: HAUSA ALPHABET
N n Noma
A a Ah
K k Kano
M m Moow
S s Saqa
T t Tafi
I i Ido
R r Rawa
D d Daka
F f Fere
Ts ts Tsalle
B b Boom
W w Wanka
G g Gudu
Y y Yanka
L l Leqa
U u Ungo
C c Ci
H h Hamma
Sh sh Shiru
V v Vare
Au au Auna
X x Xanxano

D o c u m e n t A p p e n d i x | 184
J j Ji
E e Eeh!
Z z Zane
O o Oho!
Q q Qirga
Qy qy Qyaure
Kw kw Kwano
Ky ky Kyau
Gw gw Gwalo
Gy gy Gyada
Ai ai Kwai
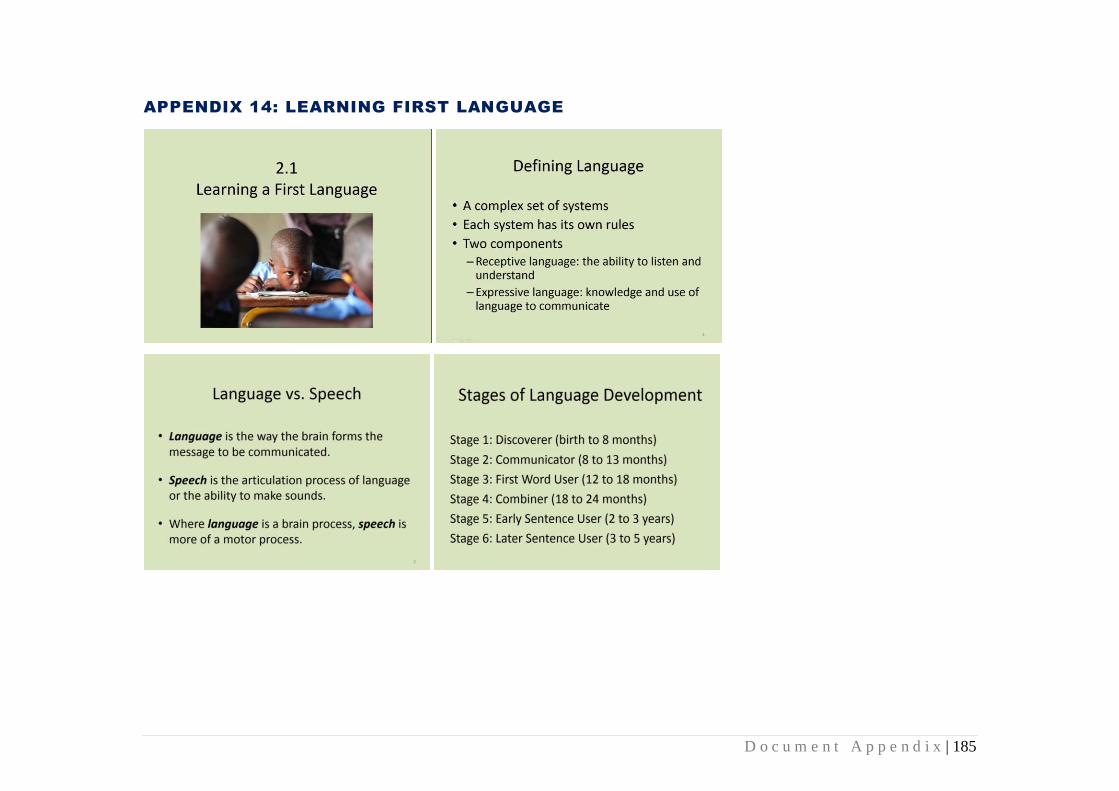
D o c u m e n t A p p e n d i x | 185
APPENDIX 14: LEARNING FIRST LANGUAGE

D o c u m e n t A p p e n d i x | 186

D o c u m e n t A p p e n d i x | 187