Not for Reproduction… · • Designed to protect both hands. The chain brake guard protects the...
32
Not for Reproduction Chainsaw Assembly and Owner’s Manual WARNING! Read this manual before operating your chainsaw
Transcript of Not for Reproduction… · • Designed to protect both hands. The chain brake guard protects the...

Not for
Reprod
uctio
n
Chainsaw Assembly and
Owner’s Manual WARNING! Read this manual before operating your chainsaw
Not for
Reprod
uctio
n
2
IMPORTANT NOTES
Please read the following
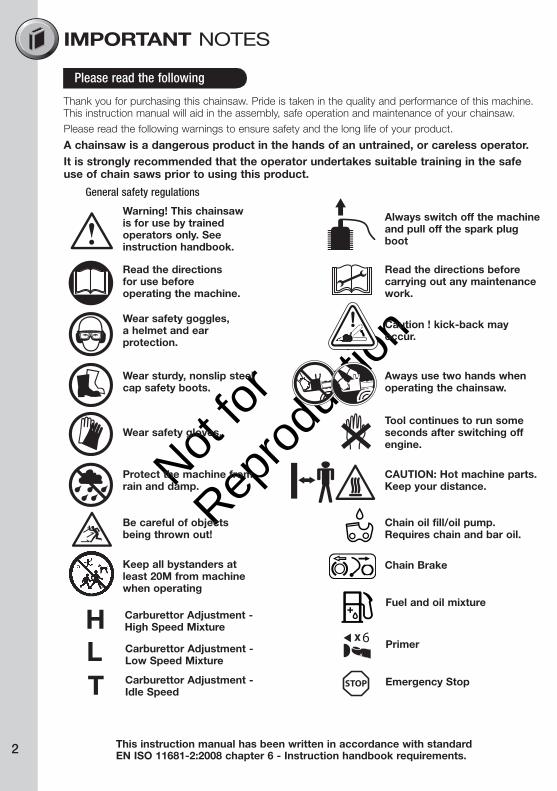
Warning! This chainsaw is for use by trained operators only. See instruction handbook.
Always switch off the machine and pull off the spark plug boot
Read the directions for use beforeoperating the machine.
Read the directions before carrying out any maintenance work.
Wear safety goggles, a helmet and ear protection.
Caution ! kick-back may occur.
Wear sturdy, nonslip steel cap safety boots.
Aways use two hands when operating the chainsaw.
Wear safety gloves.Tool continues to run some seconds after switching off engine.
Protect the machine from rain and damp.
CAUTION: Hot machine parts. Keep your distance.
Be careful of objects being thrown out!
Chain oil fill/oil pump.Requires chain and bar oil.
Keep all bystanders at least 20M from machine when operating
Chain Brake
This instruction manual has been written in accordance with standard EN ISO 11681-2:2008 chapter 6 - Instruction handbook requirements.
Thank you for purchasing this chainsaw. Pride is taken in the quality and performance of this machine. This instruction manual will aid in the assembly, safe operation and maintenance of your chainsaw.
Please read the following warnings to ensure safety and the long life of your product.
A chainsaw is a dangerous product in the hands of an untrained, or careless operator.
It is strongly recommended that the operator undertakes suitable training in the safe use of chain saws prior to using this product.
General safety regulations
Emergency Stop
Primer
H
L
T
Fuel and oil mixture
6
Carburettor Adjustment - High Speed Mixture
Carburettor Adjustment - Low Speed Mixture
Carburettor Adjustment - Idle Speed

Not for
Reprod
uctio
n
3
IMPORTANT NOTES
3
Table of Contents
Features & Definitions
Safety & Handling
Safety Features 6Personal Protective Equipment 7Safety Instructions 8Risk Management 10Develop a Professional Attitude 11Hazards 12
Assembly Procedures
Fitting Bar & Chain 12Fitting the Bar Cover 13
Operating Instructions
Before Starting 14Fuel & Oil 14Chain Lubrication 15Quick Start Guide 16Starting Techniques 17Stopping Instructions 18Cutting Techniques 18
Maintenance & Care
Air Filter 20Spark plug 20Sharpening Chain 21Bar Maintenance 23Sprocket Replacement 24Carburettor Adjustment 25Lubrication Flow Adjustment 26Storage 27Maintenance Chart 27
Troubleshooting
28
4
NOTE – WARRANTY DETAILS ARE NOT WRITTEN WITHIN THIS OPERATOR’S MANUAL. REFER TO OTHER DOCUMENTS SUPPLIED WITH THIS MACHINE FOR WARRANTY DETAILS.
THE WARRANTY DOCUMENTS MAY INCLUDE TECHNICAL SPECIFICATIONS THAT ARE SPECIFIC TO EACH MODEL THAT ARE NOT WRITTEN WITHIN THIS OPERATOR’S MANUAL.

Not for
Reprod
uctio
n
4
Feature Definitions
FEATURES DEFINITIONS
4
1 Starter handle
2 Presence control trigger+
3 Anti vibration system (not shown)+
4 Throttle trigger
5 Rear handle / Rear handle guard+
6 Choke lever
7 Air filter cover
8 Chain cover assembly
9 Chain catcher+
10 Chain tension ratchet
11 Chain brake guard+
12 Front handle
13 Muffler
14 Bar lubrication oil cap
15 Fuel cap
16 Spiked bumper
17 Guide Bar
18 Chain
19 Primer
20 ON/OFF switch+
21 Bar cover with brush+
22 Plug spanner
23 Carburettor adjustment screws
24 25
Instruction manual (Not shown)
Fuel level viewer
Do not operate the chainsaw before reading all safety, assembly & operating sections of the manual.
Machine Layout & Supplied Items
*Specification may change without notice
+Chainsaw safety feature

Not for
Reprod
uctio
n
5
Feature Definitions
FEATURES DEFINITIONS
Chainsaw Parts Description
5
22
19
11
1
12
46
15
21
20
15 2325 5 2214 9108
16 17 18
2 7 13
Not for
Reprod
uctio
n
6
Safety Instructions
Do not operate the chainsaw before reading the entire chainsaw Instruction manual.
The operator must check that all safety features are fitted correctly & in good working condition before operating the chainsaw.
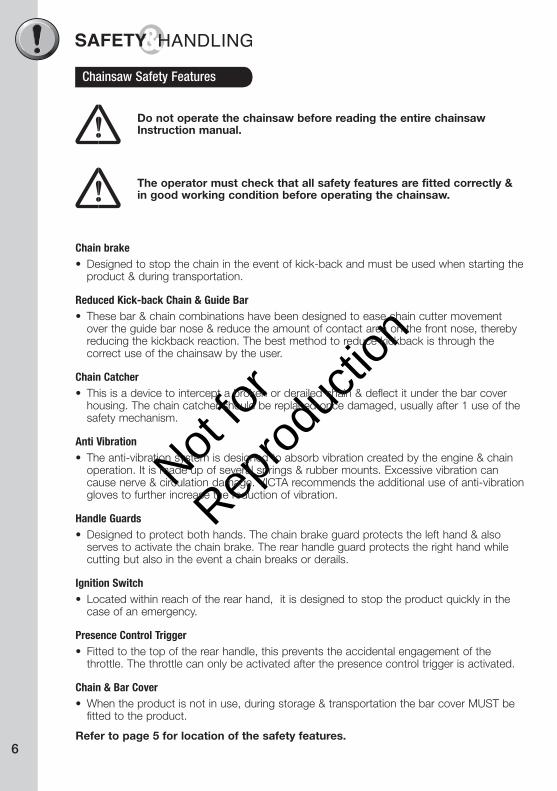
Chain brake• Designed to stop the chain in the event of kick-back and must be used when starting the
product & during transportation.
Reduced Kick-back Chain & Guide Bar• These bar & chain combinations have been designed to ease chain cutter movement
over the guide bar nose & reduce the amount of contact area on the front nose, thereby reducing the kickback reaction. The best method to reduce kickback is through the correct use of the chainsaw by the user.
Chain Catcher• This is a device to intercept a broken or derailed chain & deflect it under the bar cover
housing. The chain catcher should be replaced once damaged, usually after 1 use of the safety mechanism.
Anti Vibration• The anti-vibration system is designed to absorb vibration created by the engine & chain
operation. It is made up of several springs & rubber mounts. Excessive vibration can cause nerve & circulation damage. VICTA recommends the additional use of anti-vibration gloves to further increase the reduction of vibration.
Handle Guards• Designed to protect both hands. The chain brake guard protects the left hand & also
serves to activate the chain brake. The rear handle guard protects the right hand while cutting but also in the event a chain breaks or derails.
Ignition Switch• Located within reach of the rear hand, it is designed to stop the product quickly in the
case of an emergency.
Presence Control Trigger• Fitted to the top of the rear handle, this prevents the accidental engagement of the
throttle. The throttle can only be activated after the presence control trigger is activated.
Chain & Bar Cover• When the product is not in use, during storage & transportation the bar cover MUST be
fitted to the product.
Refer to page 5 for location of the safety features.
Chainsaw Safety Features
Not for
Reprod
uctio
n
Safety Instructions
7
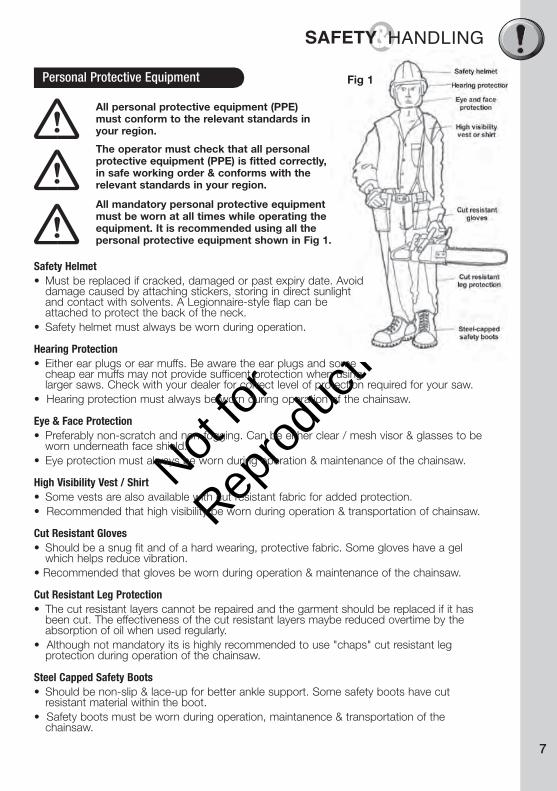
All personal protective equipment (PPE) must conform to the relevant standards in your region.
The operator must check that all personal protective equipment (PPE) is fitted correctly, in safe working order & conforms with the relevant standards in your region.
All mandatory personal protective equipmentmust be worn at all times while operating the equipment. It is recommended using all the personal protective equipment shown in Fig 1.
Personal Protective Equipment Fig 1
Safety Helmet • Must be replaced if cracked, damaged or past expiry date. Avoid damage caused by attaching stickers, storing in direct sunlight
and contact with solvents. A Legionnaire-style flap can be attached to protect the back of the neck.
• Safety helmet must always be worn during operation.
Hearing Protection
• Either ear plugs or ear muffs. Be aware the ear plugs and some cheap ear muffs may not provide sufficent protection when using larger saws. Check with your dealer for correct level of protection required for your saw.• Hearing protection must always be worn during operation of the chainsaw.
Eye & Face Protection
• Preferably non-scratch and non-fogging. Can be either clear / mesh visor & glasses to be worn underneath face shield.
• Eye protection must always be worn during operation & maintenance of the chainsaw.
High Visibility Vest / Shirt • Some vests are also available with cut resistant fabric for added protection.• Recommended that high visibility be worn during operation & transportation of chainsaw.
Cut Resistant Gloves
• Should be a snug fit and of a hard wearing, protective fabric. Some gloves have a gel which helps reduce vibration.
• Recommended that gloves be worn during operation & maintenance of the chainsaw.
Cut Resistant Leg Protection
• The cut resistant layers cannot be repaired and the garment should be replaced if it has been cut. The effectiveness of the cut resistant layers maybe reduced overtime by the absorption of oil when used regularly.
• Although not mandatory its is highly recommended to use "chaps" cut resistant leg protection during operation of the chainsaw.
Steel Capped Safety Boots
• Should be non-slip & lace-up for better ankle support. Some safety boots have cut resistant material within the boot.
• Safety boots must be worn during operation, maintanence & transportation of the chainsaw.
Not for
Reprod
uctio
n
8
Safety InstructionsSafety Instructions
Do not operate the chainsaw before reading all safety, assembly & operating sections of the manual.
Operator Safety• Always wear the necessary safety equipment, as listed on page (7), in Personal Protective
Equipment.• Do not wear loose clothing, jewellery, short pants, sandals or go barefoot. Secure hair so it is
above shoulder length.• Do not operate the unit if you are tired, ill or under the influence of alcohol, drugs or
medication.• Ensure you have a safe & professional attitude towards the chainsaw operation & the job at
hand.• Ensure adequate hazard & risk management has been performed.• If unsure of the correct chainsaw operation, do NOT operate, seek training on safe operation
of the chainsaw by a trained professional or an accredited training provider.
Unit Safety• Inspect the entire unit and cutting head before each use to ensure it is in safe working
condition.• Inspect chain & bar tension before operating the unit.• Ensure that all guards are properly attached & in safe working condition.• Do not use the unit if it is running erratically. Have it serviced promptly.• Keep handles free of oil and fuel.• Learn how to stop the engine quickly in an emergency.• Stop the engine when the unit is unattended, even for a moment.• Never allow children or unauthorised persons to operate the unit.• Do not leave the unit on dry cuttings when it is Hot, as a risk of fire is present.• Do not cover muffler or restrict airflow to muffler.
Fuel Safety• Use a container approved for fuel and a funnel to avoid spillage.• Mix and pour fuel outdoors where there are no sparks or flames.• Frequently check for fuel leaks and clean carbon deposits from the muffler at exhaust outlet.• Do not smoke or allow smoking near fuel, or near the unit, or while using the unit.• Add fuel before starting the unit.• Never remove the fuel tank cap while the engine is running or hot, allow to cool before
refuelling.• Never allow the unit to run out of fuel before refuelling as it may damage the engine.• Move at least three metres away from the fuelling site before starting the engine.• Wipe all traces of spilt fuel on the unit before starting the engine.• Change your clothes before starting the unit if fuel has been spilt on them
Not for
Reprod
uctio
n
Safety Instructions
99
Safety Instructions
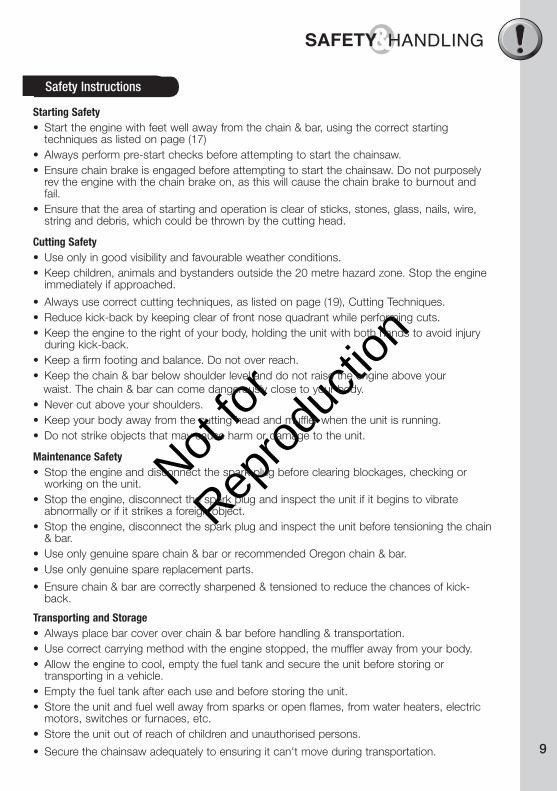
Starting Safety• Start the engine with feet well away from the chain & bar, using the correct starting
techniques as listed on page (17)• Always perform pre-start checks before attempting to start the chainsaw.• Ensure chain brake is engaged before attempting to start the chainsaw. Do not purposely
rev the engine with the chain brake on, as this will cause the chain brake to burnout and fail.
• Ensure that the area of starting and operation is clear of sticks, stones, glass, nails, wire, string and debris, which could be thrown by the cutting head.
Cutting Safety • Use only in good visibility and favourable weather conditions.• Keep children, animals and bystanders outside the 20 metre hazard zone. Stop the engine
immediately if approached.
• Always use correct cutting techniques, as listed on page (19), Cutting Techniques.• Reduce kick-back by keeping clear of front nose quadrant while performing cuts. • Keep the engine to the right of your body, holding the unit with both hands to avoid injury
during kick-back.• Keep a firm footing and balance. Do not over reach.• Keep the chain & bar below shoulder level and do not raise the engine above your waist. The chain & bar can come dangerously close to your body.• Never cut above your shoulders.• Keep your body away from the cutting head and muffler when the unit is running.• Do not strike objects that may cause harm or damage to the unit.
Maintenance Safety• Stop the engine and disconnect the spark plug before clearing blockages, checking or
working on the unit.• Stop the engine, disconnect the spark plug and inspect the unit if it begins to vibrate
abnormally or if it strikes a foreign object.• Stop the engine, disconnect the spark plug and inspect the unit before tensioning the chain
& bar.• Use only genuine spare chain & bar or recommended Oregon chain & bar.• Use only genuine spare replacement parts.
• Ensure chain & bar are correctly sharpened & tensioned to reduce the chances of kick-back.
Transporting and Storage• Always place bar cover over chain & bar before handling & transportation.• Use correct carrying method with the engine stopped, the muffler away from your body.• Allow the engine to cool, empty the fuel tank and secure the unit before storing or
transporting in a vehicle.• Empty the fuel tank after each use and before storing the unit.• Store the unit and fuel well away from sparks or open flames, from water heaters, electric
motors, switches or furnaces, etc.• Store the unit out of reach of children and unauthorised persons.
• Secure the chainsaw adequately to ensuring it can't move during transportation.

Not for
Reprod
uctio
n
1010
Risk Management
Develop a Professional Attitude
• Operating a chainsaw brings risk with it that the operator must be aware of, in order to minimize the possibility of accidents or injury. It is vital that you carry out a risk assessment before each job you intend on using a chainsaw.
• Risk management is a process of identifying hazards in the intended work environment & taking steps to eliminate or minimise the hazards to a safe, manageable level.
• There are four basic steps to risk assessment: - Step 1. Identify Hazards - Step 2. Assess Risk - Step 3. Control Risk - Step 4. Check Risk Controls
It is essential the chainsaw operator has developed a safe & professional attitude when operating, transporting & maintaining the chainsaw. To apply a safe & professional attitude towards all aspects of chainsaw use, the following should be followed:
• Forward planning & risk management
• Always putting safety first
• Work at a smooth steady pace
• Concentrate at all times
• Have a break to reduce fatigue
• Use safe, low risk techniques
• Make sure chainsaw is always well maintained
Basic Risk Assessment template
Step 1
Step 2
Step 3
Step 4
Risk Assessment
Identify Hazards
Assess Risks
Control Risks
Check Risk Controls
What is the hazard
What could happen & why
How to minimise risk - implement
Assess control measures
Not for
Reprod
uctio
n
1111
Hazards
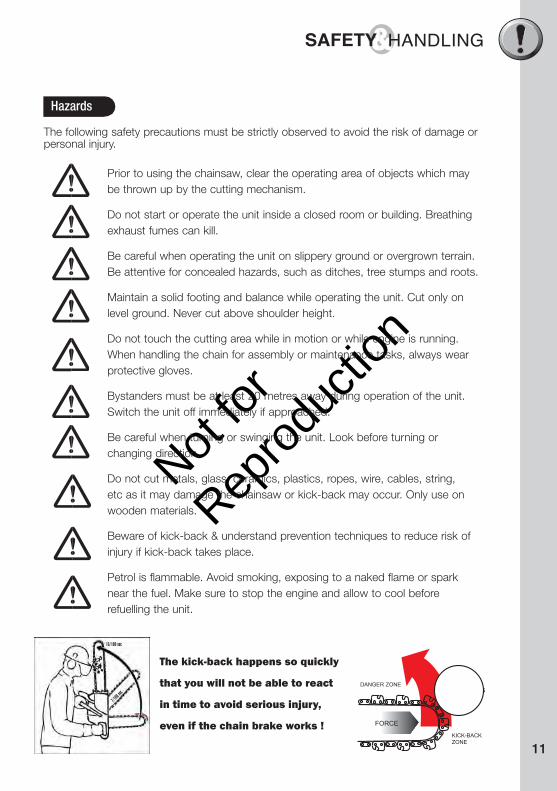
The following safety precautions must be strictly observed to avoid the risk of damage or personal injury.
Prior to using the chainsaw, clear the operating area of objects which may be thrown up by the cutting mechanism.
Do not start or operate the unit inside a closed room or building. Breathing exhaust fumes can kill.
Be careful when operating the unit on slippery ground or overgrown terrain. Be attentive for concealed hazards, such as ditches, tree stumps and roots.
Maintain a solid footing and balance while operating the unit. Cut only on level ground. Never cut above shoulder height.
Do not touch the cutting area while in motion or while engine is running. When handling the chain for assembly or maintenance tasks, always wear protective gloves.
Bystanders must be at least 20 metres away during operation of the unit. Switch the unit off immediately if approached.
Be careful when turning or swinging the unit. Look before turning or changing direction.
Do not cut metals, glass, ceramics, plastics, ropes, wire, cables, string, etc as it may damage the chainsaw or kick-back may occur. Only use on wooden materials.
Beware of kick-back & understand prevention techniques to reduce risk of injury if kick-back takes place.
Petrol is flammable. Avoid smoking, exposing to a naked flame or spark near the fuel. Make sure to stop the engine and allow to cool before refuelling the unit.
7/100
sec
15/100 sec
The kick-back happens so quickly
that you will not be able to react
in time to avoid serious injury,
even if the chain brake works !
LOGDANGER ZONE
KICK-BACKZONE
FORCE
Not for
Reprod
uctio
n
12
ASSEMBLY PROCEDURES
Fitting the Bar & Chain
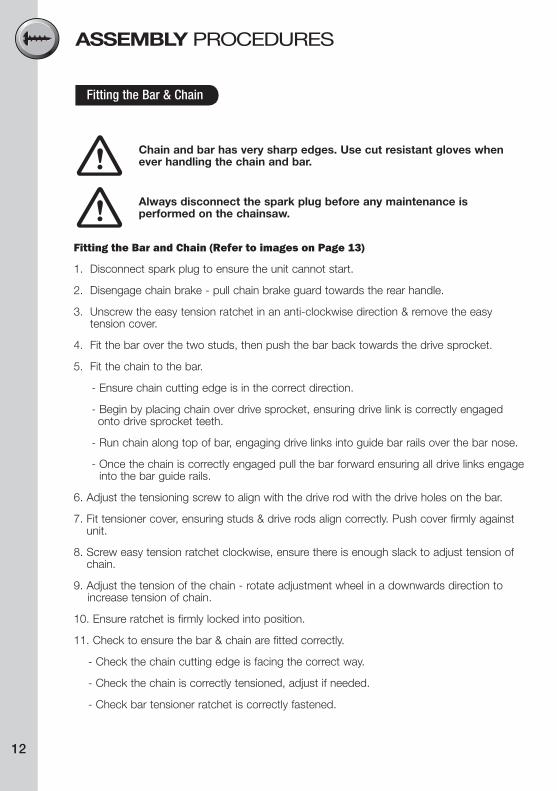
Chain and bar has very sharp edges. Use cut resistant gloves when ever handling the chain and bar.
Always disconnect the spark plug before any maintenance is performed on the chainsaw.
Fitting the Bar and Chain (Refer to images on Page 13)
1. Disconnect spark plug to ensure the unit cannot start.
2. Disengage chain brake - pull chain brake guard towards the rear handle.
3. Unscrew the easy tension ratchet in an anti-clockwise direction & remove the easy tension cover.
4. Fit the bar over the two studs, then push the bar back towards the drive sprocket.
5. Fit the chain to the bar.
- Ensure chain cutting edge is in the correct direction.
- Begin by placing chain over drive sprocket, ensuring drive link is correctly engaged onto drive sprocket teeth.
- Run chain along top of bar, engaging drive links into guide bar rails over the bar nose.
- Once the chain is correctly engaged pull the bar forward ensuring all drive links engage into the bar guide rails.
6. Adjust the tensioning screw to align with the drive rod with the drive holes on the bar.
7. Fit tensioner cover, ensuring studs & drive rods align correctly. Push cover firmly against unit.
8. Screw easy tension ratchet clockwise, ensure there is enough slack to adjust tension of chain.
9. Adjust the tension of the chain - rotate adjustment wheel in a downwards direction to increase tension of chain.
10. Ensure ratchet is firmly locked into position.
11. Check to ensure the bar & chain are fitted correctly.
- Check the chain cutting edge is facing the correct way.
- Check the chain is correctly tensioned, adjust if needed.
- Check bar tensioner ratchet is correctly fastened.

Not for
Reprod
uctio
n
13
ASSEMBLY PROCEDURES
13
Fitting the Bar & Chain
11. Perform double checks11111111111111111111111111111.. PePePererererererrrererPeerforforfororororrrrrrrrorrrm dm dmmmmmmmm ouboubbo lele leeee chechecheechecc ckscksckskskskskckskscksks
4
5
6
3
7
8
1
2
Always place bar cover over bar & chain when unit is not is use.
Chain and bar has very sharp edge's. Use cut resistant gloves when ever handling the chain and bar.
Fitting The Bar Cover
- Start at a slight angle from the front of the bar and chain.
- Slowly slide the bar cover over the front of the bar and chain.
- You may feel some resistance from the two retainer tabs, these are meant to be tight to ensure minimal rattling of bar cover during transportation.
- Once the first retainer tab is over the chain you can turn the bar cover parallel to the bar a begin to slide the cover over the bar and chain.
- Now push the bar cover firmly against the front of the engine.
Not for
Reprod
uctio
n
14
OPERATING INSTRUCTIONS
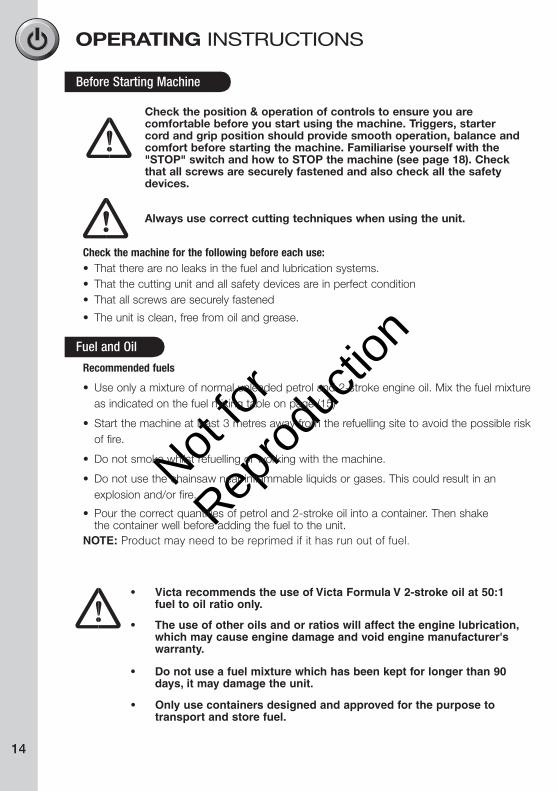
Check the position & operation of controls to ensure you are comfortable before you start using the machine. Triggers, starter cord and grip position should provide smooth operation, balance and comfort before starting the machine. Familiarise yourself with the "STOP" switch and how to STOP the machine (see page 18). Check that all screws are securely fastened and also check all the safety devices.
Always use correct cutting techniques when using the unit.
Check the machine for the following before each use:• That there are no leaks in the fuel and lubrication systems.• That the cutting unit and all safety devices are in perfect condition• That all screws are securely fastened
• The unit is clean, free from oil and grease.
Recommended fuels
• Use only a mixture of normal unleaded petrol and 2-stroke engine oil. Mix the fuel mixture as indicated on the fuel mixing table on page (15)
• Start the machine at least 3 metres away from the refuelling site to avoid the possible risk of fire.
• Do not smoke whilst refuelling or working with the machine.
• Do not use the chainsaw near inflammable liquids or gases. This could result in an explosion and/or fire.
Before Starting Machine
Fuel and Oil
NOTE: Product may need to be reprimed if it has run out of fuel.
• Pour the correct quantities of petrol and 2-stroke oil into a container. Then shake the container well before adding the fuel to the unit.
• Do not use a fuel mixture which has been kept for longer than 90 days, it may damage the unit.
• Only use containers designed and approved for the purpose to transport and store fuel.
• The use of other oils and or ratios will affect the engine lubrication, which may cause engine damage and void engine manufacturer's warranty.
• Victa recommends the use of Victa Formula V 2-stroke oil at 50:1 fuel to oil ratio only.

Not for
Reprod
uctio
n
15
OPERATING INSTRUCTIONS
Chain Lubrication
Use only a high quality chain lubrication oil.
Every time you use or refuel the chainsaw check the oil levels & add oil accordingly.
Checking the lubrication before and during cutting
Refer to page (14) for starting Instructions before checking the bar & chain lubrication flow.
- Position the bar nose over a light background (tree stump) and run the engine at half throttle.
- Make sure it throws out an increasing trace of oil.
Never operate the chainsaw without ensuring adequate lubrication is available. Operating with no lubrication could cause catastrophic failure of the unit.
Be careful not to allow the tip of the bar to contact any surface as kick back may occur.
*Note: The oil tank varies from engine to engine.
Note: Have machine serviced if oil or fuel has been put into incorrect tanks
DANGER ZONE
KICK-BACKZONE
FORCE
Fuel Mixture Table
Petrol (unleaded) 2-stroke oil
5 litre 100 ml (Only for Victa Formula V 2-stroke Oil)
Mixing procedure: 50 parts unleaded petrol to 1 part 2-stroke oil
USE Clean fresh "Regular Unleaded Fuel"Fuel with up to 10% ethanol can be used
Not for
Reprod
uctio
n
16
OPERATING INSTRUCTIONS
Quick Start Guide
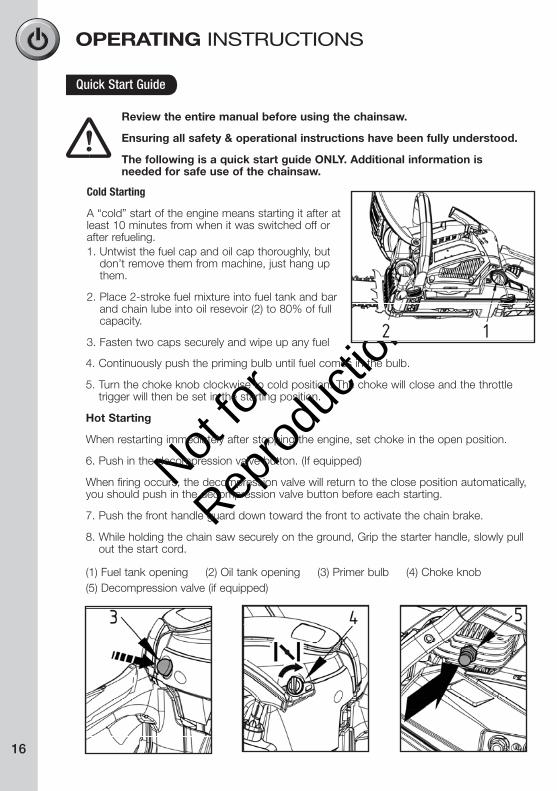
Cold Starting
A “cold” start of the engine means starting it after at least 10 minutes from when it was switched off or after refueling.1. Untwist the fuel cap and oil cap thoroughly, but
don’t remove them from machine, just hang up them.
2. Place 2-stroke fuel mixture into fuel tank and bar and chain lube into oil resevoir (2) to 80% of full capacity.
3. Fasten two caps securely and wipe up any fuel
4. Continuously push the priming bulb until fuel comes in the bulb.
5. Turn the choke knob clockwise to cold position. The choke will close and the throttle trigger will then be set in the starting position.
Hot Starting
When restarting immediately after stopping the engine, set choke in the open position.
6. Push in the decompression valve button. (If equipped)
When firing occurs, the decompression valve will return to the close position automatically, you should push in the decompression valve button before each starting.
7. Push the front handle guard down toward the front to activate the chain brake.
8. While holding the chain saw securely on the ground, Grip the starter handle, slowly pull out the start cord.
(1) Fuel tank opening (2) Oil tank opening (3) Primer bulb (4) Choke knob(5) Decompression valve (if equipped)
Review the entire manual before using the chainsaw.
Ensuring all safety & operational instructions have been fully understood.
The following is a quick start guide ONLY. Additional information is needed for safe use of the chainsaw.

Not for
Reprod
uctio
n
17
OPERATING INSTRUCTIONS
Starting Techniques
Review the instructions provided for any safety precautions that should be observed when operating the chainsaw.
Ground Start
This is the ONLY approved starting method. Other methods such as Groin Starting or "Air Drop" Starting, are not accepted and are a high risk of serious injury.
1. Place chainsaw on a flat, even, hard surface
- guide bar pointing to the left
2. Ensure the bar cover has been removed
3. Apply chain brake - push chain brake handle in the forward direction
4. Ensure iginition switch is set to ON
5. Kneel on the left knee
- Place the right foot on the bottom face of the rear handle
- Hold the front handle with left arm keeping the arm straight and locked
- Ensure back is keep straight
6. Pull starter handle with the right hand - follow starting instruction to start chainsaw
GROUND START STANCE
RIGHT FOOT POSITION
Not for
Reprod
uctio
n
18
OPERATING INSTRUCTIONS
Stopping Instructions
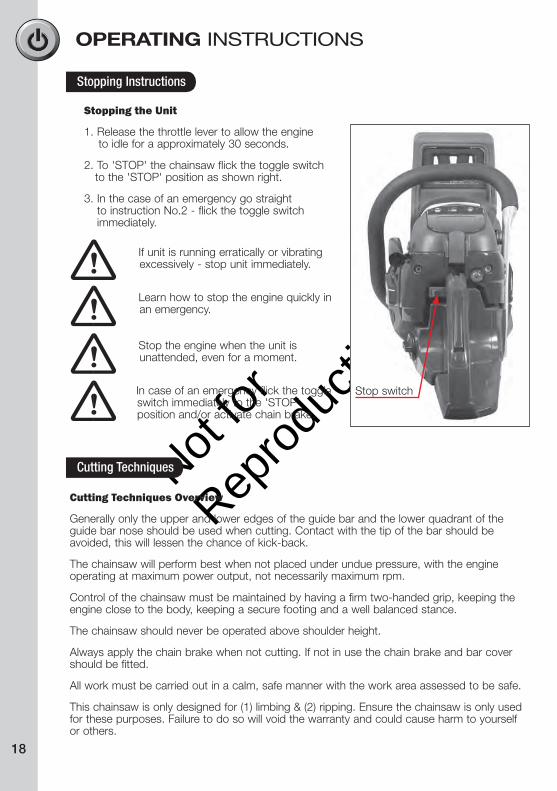
Stopping the Unit
1. Release the throttle lever to allow the engine to idle for a approximately 30 seconds.
2. To 'STOP' the chainsaw flick the toggle switch to the 'STOP' position as shown right.
3. In the case of an emergency go straight to instruction No.2 - flick the toggle switch immediately.
If unit is running erratically or vibrating excessively - stop unit immediately.
Learn how to stop the engine quickly in an emergency.
Stop the engine when the unit is unattended, even for a moment.
In case of an emergency flick the toggle switch immediately to the 'STOP' position and/or activate chain brake.
Cutting Techniques
Cutting Techniques Overview
Generally only the upper and lower edges of the guide bar and the lower quadrant of the guide bar nose should be used when cutting. Contact with the tip of the bar should be avoided, this will lessen the chance of kick-back.
The chainsaw will perform best when not placed under undue pressure, with the engine operating at maximum power output, not necessarily maximum rpm.
Control of the chainsaw must be maintained by having a firm two-handed grip, keeping the engine close to the body, keeping a secure footing and a well balanced stance.
The chainsaw should never be operated above shoulder height.
Always apply the chain brake when not cutting. If not in use the chain brake and bar cover should be fitted.
All work must be carried out in a calm, safe manner with the work area assessed to be safe.
This chainsaw is only designed for (1) limbing & (2) ripping. Ensure the chainsaw is only used for these purposes. Failure to do so will void the warranty and could cause harm to yourself or others.
Stop switch

Not for
Reprod
uctio
n
19
OPERATING INSTRUCTIONS
Cutting Techniques
Cutting Under Tension Techiques
Always make cuts in the correct sequence. Otherwise the chainsaw may be pinched and a kick back may occur.
1. First cut at the compression side, approximately 1/3 way thru or until compression is released.
2. Second cut is on the tension side, ensuring the cut is in line with the first cut or on the side away from where the material will fall or move. (Refer to the diagrams below)
Ground
Log
CUT 1
CUT 2
Ground
Log
CUT 1
CUT 2
Ground
Log
CUT 1 2 3
Ground Cutting Techniques
Always make cuts in the correct sequence. Otherwise the chainsaw may be pinched and a kick back may occur.
1. First cut is a shallow cut to create clearance for the second and third cuts to follow.
2. Second cut is approximately twice the depth of the first cut or until or just before the clearance is reduced by compression of the log.
3. Cuts are to continue progressively along the log until you have reached the bottom of the log, taking care not to allow the space to be reduced too much will result in pinching of the chainsaw. Do not make contact with the earth as it will cause significant damage to the chain, bar and sprocket.
Beware of log rolling, falling or moving unpredictably. Ensure the log is secured &/or you have a clear working area in case a quick escape is needed.
If you are unsure of how to safely use the chainsaw it is recommended you seek professional training.
Assess loads before commencing cutting.
Not for
Reprod
uctio
n
20
Air Filter
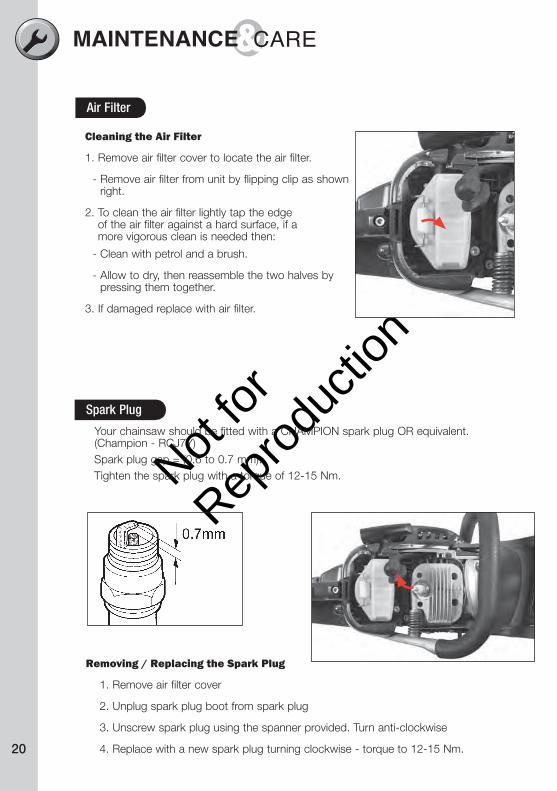
Cleaning the Air Filter
1. Remove air filter cover to locate the air filter.
- Remove air filter from unit by flipping clip as shown right.
2. To clean the air filter lightly tap the edge of the air filter against a hard surface, if a more vigorous clean is needed then:
- Clean with petrol and a brush.
- Allow to dry, then reassemble the two halves by pressing them together.
3. If damaged replace with air filter.
Spark Plug
Your chainsaw should be fitted with a CHAMPION spark plug OR equivalent. (Champion - RCJ7Y)
Spark plug gap = (0.6 to 0.7 mm). Tighten the spark plug with a torque of 12-15 Nm.
Removing / Replacing the Spark Plug
1. Remove air filter cover
2. Unplug spark plug boot from spark plug
3. Unscrew spark plug using the spanner provided. Turn anti-clockwise
4. Replace with a new spark plug turning clockwise - torque to 12-15 Nm.
Not for
Reprod
uctio
n
21
Sharpening Chain
Sharpening Essentials
It is essential that the chainsaw chain is kept sharp. A correctly sharpened chain will cut much more effectively with minimal force required.
Never use a dull or damaged chainsaw chain as this may lead to increased physical injuries, increased vibration levels, unsatisfactory cutting results and increased wear to the unit.
Sharpen frequently rather than a lot at once. The aim of sharpening the chain is to hone the edge rather then remove excessive amounts of material to create a new cutting edge.
Before sharpening the chain make sure it is well secured and there is no chance of the unit starting - remove the shark plug before performing any maintenance on the chainsaw.
It is important that the correct file size and file guide is used to sharpen the chain, failure to do so may result in increased physical injuries, increased vibration levels, unsatisfactory cutting results and increased wear to the unit.
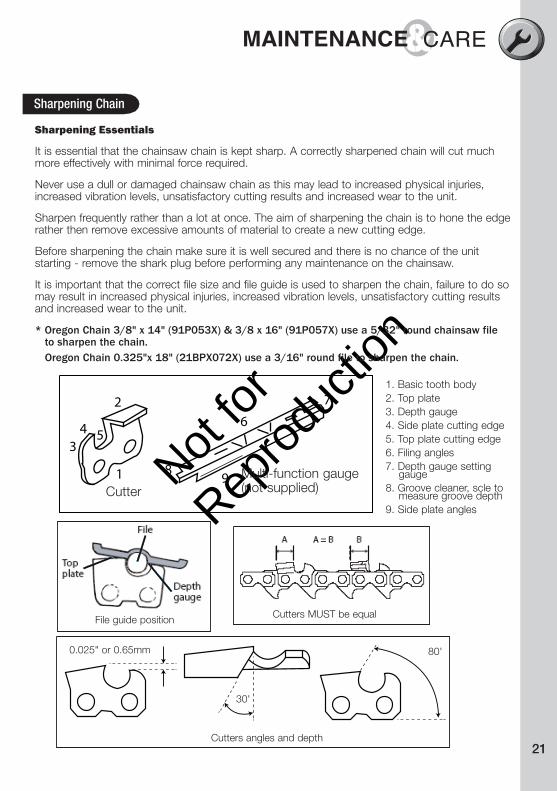
* Oregon Chain 3/8" x 14" (91P053X) & 3/8 x 16" (91P057X) use a 5/32" round chainsaw file
1. Basic tooth body2. Top plate3. Depth gauge4. Side plate cutting edge5. Top plate cutting edge6. Filing angles7. Depth gauge setting gauge8. Groove cleaner, scle to measure groove depth9. Side plate angles
Cutters angles and depth
0.025" or 0.65mm
30'
80'
File guide position
Cutters MUST be equal
1
2
34 5
6
7
8 9
to sharpen the chain.Oregon Chain 0.325"x 18" (21BPX072X) use a 3/16" round file to sharpen the chain.
Multi-function gauge(not supplied)Cutter
Not for
Reprod
uctio
n
22
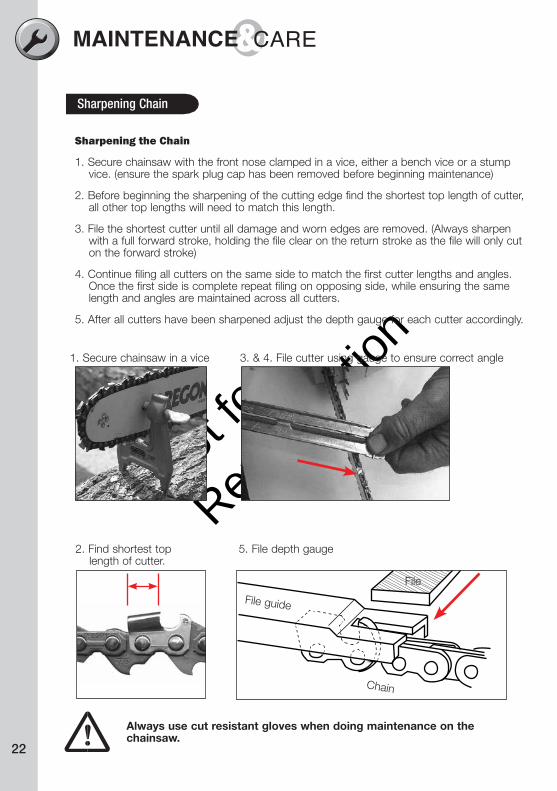
Sharpening the Chain
1. Secure chainsaw with the front nose clamped in a vice, either a bench vice or a stump vice. (ensure the spark plug cap has been removed before beginning maintenance)
2. Before beginning the sharpening of the cutting edge find the shortest top length of cutter, all other top lengths will need to match this length.
3. File the shortest cutter until all damage and worn edges are removed. (Always sharpen with a full forward stroke, holding the file clear on the return stroke as the file will only cut on the forward stroke)
4. Continue filing all cutters on the same side to match the first cutter lengths and angles. Once the first side is complete repeat filing on opposing side, while ensuring the same length and angles are maintained across all cutters.
5. After all cutters have been sharpened adjust the depth gauge for each cutter accordingly.
Sharpening Chain
1. Secure chainsaw in a vice
File
Chain
File guide
5. File depth gauge2. Find shortest top length of cutter.
3. & 4. File cutter using gauge to ensure correct angle
Always use cut resistant gloves when doing maintenance on the chainsaw.
Not for
Reprod
uctio
n
23
Bar Maintenance
Bar Maintenance Essentials
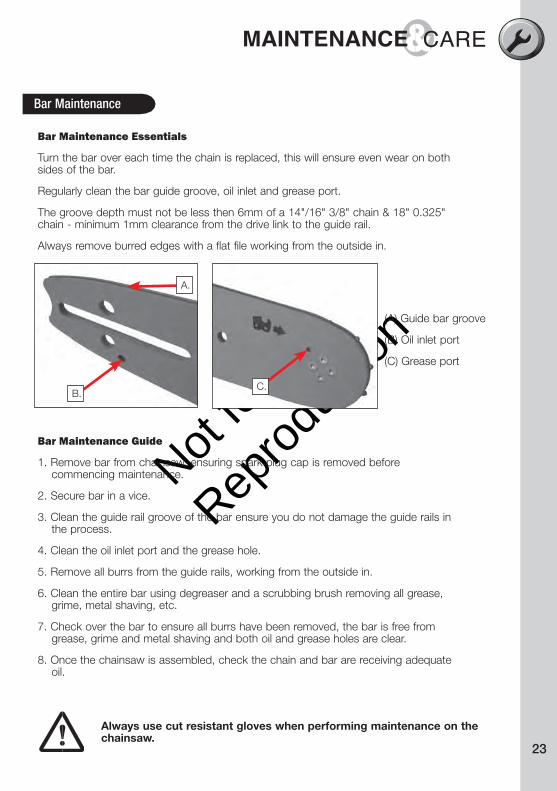
Turn the bar over each time the chain is replaced, this will ensure even wear on both sides of the bar.
Regularly clean the bar guide groove, oil inlet and grease port.
The groove depth must not be less then 6mm of a 14"/16" 3/8" chain & 18" 0.325" chain - minimum 1mm clearance from the drive link to the guide rail.
Always remove burred edges with a flat file working from the outside in.
Bar Maintenance Guide
1. Remove bar from chainsaw, ensuring spark plug cap is removed before commencing maintenance.
2. Secure bar in a vice.
3. Clean the guide rail groove of the bar ensure you do not damage the guide rails in the process.
4. Clean the oil inlet port and the grease hole.
5. Remove all burrs from the guide rails, working from the outside in.
6. Clean the entire bar using degreaser and a scrubbing brush removing all grease, grime, metal shaving, etc.
7. Check over the bar to ensure all burrs have been removed, the bar is free from grease, grime and metal shaving and both oil and grease holes are clear.
8. Once the chainsaw is assembled, check the chain and bar are receiving adequate oil.
Always use cut resistant gloves when performing maintenance on the chainsaw.
(A) Guide bar groove
(B) Oil inlet port
(C) Grease port
A.
B.C.
Not for
Reprod
uctio
n
24
Drive Sprocket
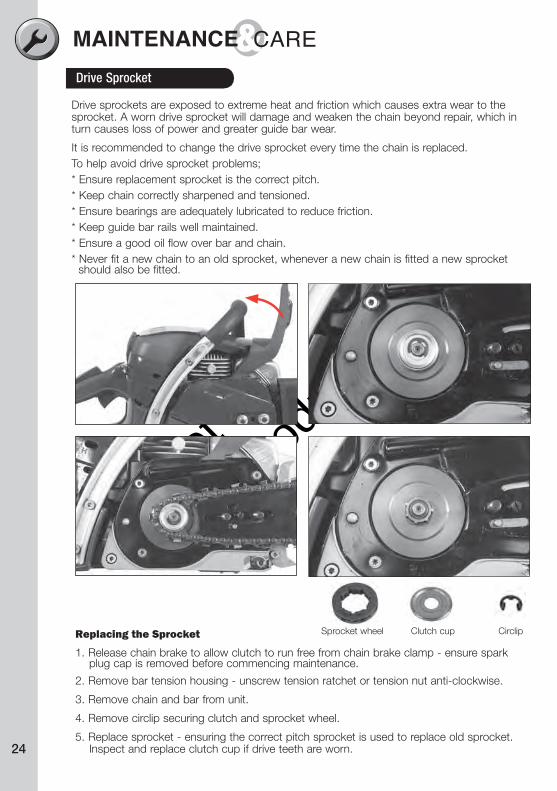
Drive sprockets are exposed to extreme heat and friction which causes extra wear to the sprocket. A worn drive sprocket will damage and weaken the chain beyond repair, which in turn causes loss of power and greater guide bar wear.
It is recommended to change the drive sprocket every time the chain is replaced.To help avoid drive sprocket problems;* Ensure replacement sprocket is the correct pitch.* Keep chain correctly sharpened and tensioned.* Ensure bearings are adequately lubricated to reduce friction.* Keep guide bar rails well maintained.* Ensure a good oil flow over bar and chain.* Never fit a new chain to an old sprocket, whenever a new chain is fitted a new sprocket should also be fitted.
Replacing the Sprocket
1. Release chain brake to allow clutch to run free from chain brake clamp - ensure spark plug cap is removed before commencing maintenance.
2. Remove bar tension housing - unscrew tension ratchet or tension nut anti-clockwise.
3. Remove chain and bar from unit.
4. Remove circlip securing clutch and sprocket wheel.
5. Replace sprocket - ensuring the correct pitch sprocket is used to replace old sprocket. Inspect and replace clutch cup if drive teeth are worn.
CirclipClutch cupSprocket wheel

Not for
Reprod
uctio
n
2525
Carburettor Adjustment
It is recommended that only a trained service technician should attempt to adjust the carburettor
Carburettor Essentials
The chainsaw carburettor has been factory adjusted for typical operation, however, this unit may require fine tuning due to operating conditions.
Before adjusting the carburettor, make sure the air filter and fuel filters are clean. Also make sure the correct fuel mixture is used. If any of these items need correcting it is recommended to correct these first and check to see if these changes resolve the issue.
The bar and chain must be attached and correctly tensioned before making any changes.
Adjusting the Carburettor
You will need a carburettor adjustment tool (not supplied)
1. Stop the chainsaw and allow the unit to cool.
2. Screw both the H needle (1) and the L needle (2) clockwise until they stop, never force the needles, they should move freely but not be loose.
3. Set each needle the correct amount of turns
- H needle (1) = 1 & 1/2 turns
- L needle (2) = 1 & 1/4 turns
4. Start the engine and allow it to warm up at 1/2 throttle position
5. At idle turn the L needle (2) slowly clockwise until the engine idle is at maximum rpm, then turn the L needle (2) 1/4 anti-clockwise.
6. Adjust the Idle adjustment screw (3) accordingly.
- Anticlockwise will reduce idle rpm
- Clockwise will increase idle rpm (chain should not move during idle, if so reduce rpm)
7. Make a test cut and adjust the H needle (1) for best cutting power, not for maximum rpm.
(1) High RPM needle
(2) Low RPM needle
(3) Idle adjustment screw
1.
2.
3.
Not for
Reprod
uctio
n
26
Maintenance ChartLubrication Flow
AdjustmentLubrication Flow Essentials
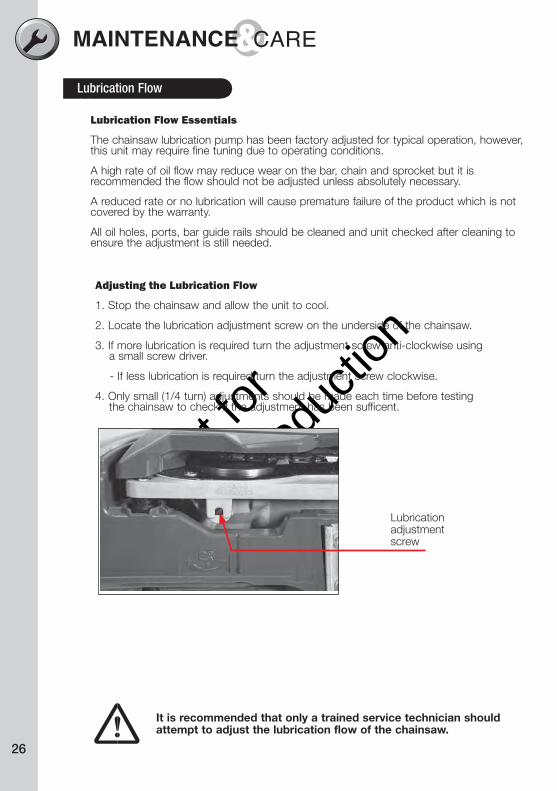
The chainsaw lubrication pump has been factory adjusted for typical operation, however, this unit may require fine tuning due to operating conditions.
A high rate of oil flow may reduce wear on the bar, chain and sprocket but it is recommended the flow should not be adjusted unless absolutely necessary.
A reduced rate or no lubrication will cause premature failure of the product which is not covered by the warranty.
All oil holes, ports, bar guide rails should be cleaned and unit checked after cleaning to ensure the adjustment is still needed.
It is recommended that only a trained service technician should attempt to adjust the lubrication flow of the chainsaw.
Adjusting the Lubrication Flow
1. Stop the chainsaw and allow the unit to cool.
2. Locate the lubrication adjustment screw on the underside of the chainsaw.
3. If more lubrication is required turn the adjustment screw anti-clockwise using a small screw driver.
- If less lubrication is required turn the adjustment screw clockwise.
4. Only small (1/4 turn) adjustments should be made each time before testing the chainsaw to check if the adjustment has been sufficent.
Lubrication adjustment screw

Not for
Reprod
uctio
n
27
Features
Requirements
Bef
ore
Use
Aft
er U
se
Ref
uelli
ng
Mon
thly
Year
ly
Dam
aged
/Wor
n
As
Req
uire
d
Chainsaw Visual Inspection • • • •
Chainsaw Clean (outer shell) • • •
Chain & Bar Tension • •
Chain & Bar Sharpen • •
Chain & Bar Replace
Chain Brake Replace
Chain Brake Housing Clean • •
Sprocket Replace
Air Filter Clean • •
Air Filter Replace •
Spark Plug Replace •
Fuel Tank Clean • • •
Fuel Filter Replace •
Oil Tank Clean • • •
Oil Filter Replace •
Carburettor Adjustment •
Lubrication Flow Adjustment •
Chain Catch Replace •
Storage
Storage Essentials
In order to keep the chainsaw in good working order during long storage periods it is essential correct storage procedures are followed.
* Drain and clean the fuel tank in a well ventilated area.
* Remove the chain, bar and tension cover to clean all these areas well using a brush and degreaser - allow the unit to dry before re-assembly.
* Spray the chain and bar with a corrosion inhibiting oil.
* Clean the air filter as described on page (20).
* Once the unit is thoroughly cleaned using a brush, cloth and degreaser, then spray with corrosion inhibiting oil re-assemble the chainsaw ready for its next use.
* Engage the chain brake.
* Place the bar cover over the chain and bar as shown on page (13).
* Store in a secure location, out of reach of children.
Maintenance Chart
Refer to the following chart for routine maintenance.

Not for
Reprod
uctio
n
28
Troubleshooting
Problem Possible Causes Remedy
fuel/oil mixture - not enough oil in the 2-stroke mixture
> Tune motor and/or use correct fuel mixture
> Replace spark plug
> Leaking fuel pump diaphram gasket allowing petrol to leak through pump impulse channelinto crankcase
> Replace gasket, if the fuel pump is warped, replace it
Motor runs well but loses power at certain angles.
>Replace mounts and springs>Replace cushions
> Depth gauge on chain is too high >Re-sharpen to correct depth
> Worn sprocket >Replace the sprocket> Chain pitch and sprocket pitch do
not match>Use only the correctly matched
chain and sprocket, replace accordingly
> Tighten accordingly
fuel/oil mixture - not enough oil in the 2-stroke mixture
> Tune motor and/or use correct fuel mixture
> Adjust tension accordingly
> Chain on back to front> Chain not correctly sharpened > Re-sharpen or replace if over-
> No fuel or old fuel in tank > Replace and refuel> Allow to purge - leave chainsaw for
10 minutes> Faulty spark plug > Replace spark plug> High tension lead damaged > Replace lead
> Adjust correctly> No compression > Refer to your dealer> Incorrect star procedure used > Refer to user manual for correct
> Replace switch> Adjust correctly
> Faulty spark plug > Replace spark plug> High tension lead damaged > Replace lead
> Replace switch
Excessive heat.
Motor starts, runs well but loses
Motor starts and runs well but will
high rpm valve valve.
Motor will not start.
Motor starts and misses.
-
Untangle fuel line or replace fuelline
TROUBLESHOOTING

Not for
Reprod
uctio
n
29
TROUBLESHOOTING
Troubleshooting
Motor starts, will not idle but runs at high rpm.
> L Needle not set correctly > Adjust correctly
> Adjust correctly
> Chain drive links jammed by pinched bar groove
> Replace bar, and chain, if damaged
> L needle or H needle not set correctly
valve
> Adjust correctly
choke valve
> Blocked exhaust port> Adjust correctly
> Jammed chain > Free chain and adjust correctly> Blocked exhaust port
> L needle or H needle not set correctly
> Adjust correctly
> Rings and/or cylinder worn > To Test: remove starter assembly, turn motor by hand clockwise and
/ cylinder - See authorised
> Worn or damaged clutch > Replace clutch> Motor idle adjustment too high > Adjust correctly> Clutch drum bearing worn > Replace clutch drum> Clutch springs broken > Replace clutch> Clutch pads broken or worn > Replace clutch> Depth gauge on chain is too high > Re-sharpen to correct depth> Badly worn sprocket > Replace sprocket
> Re-sharpen correctly> Badly stretched chain (6mm over
30mm - max)> Replace chain
> Chain pitch and sprocket pitch do not match
Irregularly
>Use only the correctly matched chain and sprocket, replace accordingly
> Guide bar rails worn unevenly > Resharpen or replace if excessive ware has taken place
> Guide bar width has worn excessively
> Replace bar
> Incorrectly set depth gauge >Re-sharpen to correct depth>Re-sharpen to correct angles
> Chain tension to loose > Adjust tension accordingly
Motor starts, idles but will not accelerate to full rpm.
Motor starts, idles and appears to run well but lacks power.
move.
wanders to one side.
(page 25)
(page 25)(page 31)
service techician
Problem Possible Causes Remedy

Not for
Reprod
uctio
n
30
NOTES

Not for
Reprod
uctio
n
31
NOTES

Not for
Reprod
uctio
n
2100 D PL JM Revised 04/07/17
2100 C JRM PB Revised & Released 03/07/2017
2100 B PL JM Revised 21/06/17
2100 A JM CN Production 09/05/17
ECR Rev Own Chk Release Date
LR02596A-D
©2017 Briggs & Stratton Australia Pty Ltd
Victa is a trademark of Briggs & Stratton Australia Pty Ltd
All rights reserved. No part of this booklet may be reproduced by any means without prior written permission. All information herein is subject to change without notice.