neu Classic uni 14-22-20 95RF FINAL - swissflex.com · Wir gratulieren zum Kauf Ihrer...
64
uni 14_95RF bridge ® uni 22_95RF bridge ® uni 20_95RF 0408130346 Bedienungsanleitung Mode d’emploi Operating instructions Gebruiksaanwijzing Modo de empleo Istruzioni d’uso 㽡昤⟆ſ uni 21_95RF
Transcript of neu Classic uni 14-22-20 95RF FINAL - swissflex.com · Wir gratulieren zum Kauf Ihrer...

uni 14_95RF bridge®
uni 22_95RF bridge®
uni 20_95RF
0408130346
Bedienungsanleitung Mode d’emploi
Operating instructions Gebruiksaanwijzing
Modo de empleo Istruzioni d’uso
uni 21_95RF

Wir gratulieren zum Kauf Ihrer Swissflex-Unterfederung. Sie haben sich für ein ausgezeichnetes Pro-dukt entschieden, das Qualitätsdenken und Know-how konsequent verbindet. Wir danken für Ihr Ver-trauen und wünschen Ihnen einen erholsamen Schlaf!
Nous vous félicitons pour l’achat de votre literie Swissflex. Vous avez fait le choix d’un produit ex-ceptionnel, qui associe qualité et savoir-faire. Nous vous remercions de la confiance que vous nous accordez et nous vous souhaitons un sommeil réparateur !
We congratulate you on the purchase of your new Swissflex slat base. You have chosen an outstanding product, which incorporates the perfect combination of quality and know-how. We would like to thank you for your confidence and trust you will have a restful night’s sleep!
Van harte gefeliciteerd met de aanschaf van uw Swissflex-lattenbodem. Daarmee hebt u gekozen voor een uitstekend product, waarin kwaliteitsbesef en knowhow onlos-makelijk met elkaar verbonden zijn. Wij danken u voor uw vertrouwen en wensen u veel verkwikkend slaapgenot toe!
Le felicitamos por la compra de su sistema de descanso. Usted ha elegido un producto excepcional, que asocia calidad y saber-hacer. Le agradecemos la confianza depositada en nosotros y le deseamos un sueño reparador.
Congratulazioni per l’acquisto della vostra rete Swissflex. Avete optato per un prodotto eccezionale che concilia perfettamente alta qualitá e know-how. Vi ringraziamo per la fiducia e vi auguriamo un sonno riposante e rigenerante.
Swissflex®
NL Van harte gefeliciteerd!
ES ¡Felicidades!
IT Congratulazioni!
FR Félicitations !
DE Herzlichen Glückwunsch!
EN Congratulations!
CN

04 | Bedienungsanleitung «Touch» DE
09 | Bedienungsanleitung «Classic»
12 | Mode d’emploi «Touch» FR
17 | Mode d’emploi «Classic»
20 | Operating instructions «Touch» EN
25 | Operating instructions «Classic»
28 | Gebruiksaanwijzing «Touch» NL
33 | Gebruiksaanwijzing «Classic»
36 | Modo de empleo «Touch» ES
41 | Modo de empleo «Classic»
44 | Istruzioni d’uso «Touch» IT
49 | Istruzioni d’uso «Classic»
52 | «Touch» CN
56 | «Classic»

4 Bedienungsanleitung DE
Funk-Fernbedienung «Touch»
1 Memoryposition 12 Memoryposition 23 Memoryposition 34 Memoryposition 45 Taschenlampe6 Alle Motoren «auf»7 Alle Motoren «ab»8 Unterflurbeleuchtung9 Antrieb Kopfbereich «auf» 10 Antrieb Kopfbereich «ab» 11 Antrieb Rückenbereich «auf» 12 Antrieb Rückenbereich «ab» 13 Antrieb Oberschenkelbereich «auf» 14 Antrieb Oberschenkelbereich «ab» 15 Antrieb Unterschenkelbereich «auf» 16 Antrieb Unterschenkelbereich «ab» 17 Synchronfunktion aktivieren / deaktivieren18 Memoryspeichertaste19 Freisteckdose ein / aus20 Tastenblockierung (Kindersicherung)21 Batteriefach (Rückseite Funk-Fernbedienung)
Im Batteriefach: Rote Teach-In-Taste22 3 x AAA-Batterie (im Lieferumfang)
Motorensteuerung
23 Synchronanschluss 24 Notbeleuchtung (intern)25 Netzteilanschluss / Anschluss externe Unterflurbeleuchtung26 Anschluss für Zusatzmotoren27 Notbeleuchtung (intern, Rückseite des Motors)
28 Schaltnetzteil
29 Batteriefach für Notabsenkung (2 x 9 V) 30 Notabsenkungstaste / Teach-In-Taste
31 Bluetooth RF-Gateway (Optional)
32 Freisteckdose (Optional)
2 3
1
5, 6
9
11
13
15
17
19
21
4
7, 8
10
12
14
16
18
20
21
22
uni 14_/22_/20_95RF «Touch»
27
2326
24
25 (2 Kabel)
31
32
29
28 30
uni 21_95RF

5DE Bedienungsanleitung
ler überprüfen. Achten Sie beim Einbau der Unterfederung darauf, dass alle Bewegungen von Kopf-, Rücken- und Fussteil nicht durch Möbelteile behindert werden.Trennen Sie unbedingt bei allen Demontage- und Montagearbei-ten an der Unterfederung oder am Bettgestell den Netzstecker vom Netz. Schliessen Sie an die Freisteckdo-se (32) keine Geräte an, die beim Einschalten über die Fernbedie-nung Personen oder Sachgut ge-fährden könnten, insbesondere keine motorbetriebenen Werkzeu-ge wie z.B. Sägen, Bohrmaschinen und dergleichen (Verletzungsge-fahr), oder keine ortsveränderli-chen Wärmegeräte (Brandgefahr).Verlegen Sie das Netzkabel von der Freisteckdose (32) zum Bett nie so, dass ev. vorhandene schar-fe Kanten oder enge Knickstellen die Leitungsisolation beschädigen. Auf keinen Fall darf die Anschluss-leitung durch den Verstellmecha-nismus geführt werden. Falls die Kabel, das Gehäuse der Steue-rung oder die Freisteckdose (32) beschädigt sind, darf das Sitzbett nicht mehr in Betrieb genommen
Komfort und GesundheitWillkommen in der Welt von Swissflex!
Ihr Swissflex uni 14_/22_/20_95RF ist ein Schweizer Qualitätsprodukt. Wenn Sie die wenigen Bedienungs- und Sicherheitshinweise beachten, wird es über Jahre hinweg zu Ihrer Zufriedenheit funktionieren. Neben vielen anderen Vorteilen bietet Ihnen Ihr uni 14_/22_/20_95RF ein ungestörtes Schlafumfeld. Alle elektrischen Leitungen die vom Netzstecker zum Bett führen befinden sich dank EcoTec in einem fast strom-losen Zustand (unter 0.5 Watt).
Sicherheitshinweise
Dieses Gerät kann von Kindern ab 8 Jahren und darüber sowie von Personen mit verringerten physi-schen, sensorischen oder men-talen Fähigkeiten oder Mangel an Erfahrung und Wissen benutzt werden, wenn sie beaufsichtigt oder bezüglich des sicheren Ge-brauchs des Gerätes unterwiesen wurden und die daraus resultie-renden Gefahren verstehen. Kinder dürfen nicht mit dem Gerät spielen. Reinigung und Benutzer-Wartung dürfen nicht von Kindern ohne Be-aufsichtigung durchgeführt wer-den. ACHTUNG! Setzen Sie den uni 14_/22_/20_95RF und das Zube-hör weder Regen, noch sonstiger Feuchtigkeit aus, um Feuergefahr und die Gefahr eines elektrischen Schlages zu vermeiden. Sollte Flüssigkeit in das Zubehör gelan-gen, trennen Sie das Netzkabel von der Steckdose und lassen Sie es von Ihrem Swissflex Fachhänd-

6 Bedienungsanleitung DE
werden. Entfernen Sie den Netz-stecker aus der Steckdose und informieren Sie Ihren Fachhänd-ler. Öffnen Sie niemals das Gehäu-se der Freisteckdose (32), an der die Kabel herausgeführt werden. Durch Eingriffe am stromführen-den Teil der Freisteckdose (32) ent-fallen jegliche Gewährleistungsan-sprüche. Gehen Sie vorsichtig mit dem uni 14_/22_/20_95RF bridge® und dem Zubehör um, zerlegen und modifizieren Sie es nicht und lassen Sie die Kinder nicht damit spielen und verhindern Sie, dass gebrechliche Personen ohne Auf-sicht das Produkt verwenden. Das Produkt darf nicht mit einem Me-dizinprodukt verwendet oder in ein Medizinprodukt eingebaut wer-den. Das Produkt darf nicht in ei-ner Umgebung verwendet werden, in der mit dem Auftreten von ent-zündlichen oder explosiven Gasen oder Dämpfen (z.B. Anästhetika) zu rechnen ist. Das Produkt darf nicht zum Heben und Senken von Lasten verwendet werden.Verwenden Sie nur Ersatzteile, die von Swissflex hergestellt oder frei-gegeben wurden. Nur diese ge-währleisten eine ausreichende Si-cherheit.Die Unterfederung darf nur mit der mitgelieferten Spannungsversor-gung genutzt werden.
Inbetriebnahme «Touch»Legen Sie die Batterien in die Funk-Fern be dienung ein
Entfernen Sie auf der Rückseite die Abdeckung vom Batteriefach (21) der Funk-Fern bedienung. Legen Sie drei AAA-Batterien (22) ein, achten Sie dabei auf die +/- Markierung. Schieben Sie die Abdeckung wieder zu. Die Reichweite der Funk-Fernbedienung ist max. 15 m.
Funk-Fern be dienung einlernen (Teach-in) (werk-seitig bereits eingelernt)
1. Batterieabdeckung auf der Rückseite der Funk-Fern bedienung entfernen.
2. Batterien einlegen / überprüfen (3 x AAA).3. Die Teach-In-Taste (30) am Schaltnetzteil aktivieren
(2 x Drücken). 4. Im Batteriefach ist oberhalb der Batterien eine klei-
ne rote Taste (21). 5. Taste drücken, eine blaue LED beginnt zu blinken.6. Die Taste solange gedrückt halten, bis die blaue
LED dauerhaft leuchtet, dann ist das Pairen abge-schlossen.
Bluetooth®
1. Laden Sie die Standard „Swissflex“ App von der ent-sprechenden Plattform für Android (Google play) oder Apple iOs (App Store).
2. Installieren Sie die Standard „Swissflex“ App auf Ih-rem Smartphone / Tablet-PC.
3. Installation / Inbetriebnahme, siehe Anleitung vom Bluetooth RF-Gateway.
Synchronfunktion (mit Synchronkabel)
Werden zwei uni 14_/22_/20_95RF mit einem Syn-chronkabel miteinander verbunden (Anschluss Buch-se (23)), wird die Synchronfunktion (17) benötigt. Durch Drücken und Halten der Taste (17), wird die Syn-chronfunktion aktiviert/deaktiviert. Beim Betätigen der Verfahrtasten (6-7) synchronisieren sich die Antriebe und fahren anschliessend in die betätigte Verfahr-richtung. Nach erfolgreicher Aktivierung leuchtet die Taste dauerhaft blau. Nach erfolgreichem Deaktivieren leuchtet die Taste weiss. Nach dem Einstecken des Synchronkabels eine Resetfahrt wie folgt durchführen:
• Die Memory-Speicher-Taste (18) 3 Sekunden drü-cken.
• Die Tasten M1-M4 leuchten erst blau, dann wieder weiss.
• Nach einigen Sekunden blinkt die Hintergrundbe-leuchtung einmal weiss auf.
• Innerhalb einer Sekunde die Taste Synchro (17) drü-cken und gedrückt halten. Die Antriebe fahren nach unten.
• Blinkt die komplette Hintergrundbeleuchtung 2 x weiss auf, kann die Taste Synchro (17) losgelassen werden.

7DE Bedienungsanleitung
Jetzt sind die internen Zählerstände der einzelnen Mo-toren auf „0“ gesetzt und die Synchronfunktion kann korrekt arbeiten.
Unterflurbeleuchtung
Durch Drücken der Taste „Unterflurbeleuchtung“ (8) wird die Unterflurbeleuchtung aktiviert. Nach 30 Mi-nuten schaltet sich diese automatisch aus, oder durch wiederholte Betätigung der Taste. Während des Betä-tigens der Taste leuchtet diese Taste (blau).
Taschenlampe
Durch Gedrückthalten der Taste „Taschenlampe“ (5) leuchtet die Taschenlampe. Beim Loslassen der Tas-te erlischt das Licht. Während des Benutzens der Ta-schenlampe leuchtet diese Taste (blau).
Tastenblockierung
Um die Tasten zu blockieren, drücken Sie die Taste „Tastenblockierung“ (20) für fünf Sekunden. Nach er-folgreichem Aktivieren der Tastenblockierung blinken (blau) alle Tasten (ausser Steckdose (19), Taschenlam-pe (5), Unterflurbeleuchtung (8) und Tastenblockie-rung (20)) zwei Mal.Bei Betätigen einer deaktivierten Taste blinken alle Tasten zwei Mal (weiss). Durch das Betätigen der Tas-te „Tastenblockierung“ (20) für fünf Sekunden wird die Blockierung deaktiviert. War dies erfolgreich, blinken alle Tasten zwei Mal (blau).
Verstellmöglichkeiten «Touch»Ab Werk sind die Schlaf- und Sitzpositionen in der Steuerung vorprogrammiert.
M1 Ermüdungsfreie Position für Lesen und Fernse-hen
M2 Erleichternde Position bei Erkältung, Atemwegs- oder Herz-Kreislauf-Beschwerden
M3 Ergonomische Position bei Rückeschmerze und Bandscheibenbeschwerden
M4 Ausstiegs- und Einstiegshilfe
Die Positionen können individuell überschrieben wer-den.
Zurücksetzen der werkseitig programmierten Me-morypositionen
Drücken Sie 3 Sekunden lang die Memoryspeicher-taste (18) - die Hintergrundbeleuchtung blinkt darauf ein Mal, dann muss innerhalb einer Sekunde die Taste Unterflurbeleuchtung (8) gedrückt werden. Als Bestä-tigung, dass die Zurücksetzung auf die Werkseinstel-lungen funktioniert hat, blinkt die komplette Beleuch-tung des RF-Touch zwei Mal.
Speichern einer Sitz- oder Liegeposition auf eine Memorytaste
1. 3 x Drücken der Memoryspeichertaste (18) inner-halb von 2 Sekunden.
2. Aufleuchten der Memorytasten (blau) (1–4).3. 1x Drücken der gewünschten Speichertaste Memo-
ryposition 1–4 (1–4) innerhalb von drei Sekunden.
Bei Programmierung einer neuen Position wird die alte automatisch überschrieben. Erfolgreiches Ab-speichern wird durch umschalten der LED Farbe (weiss) der ausgewählten Speichertaste visualisiert. Zwei Sekunden nach Loslassen der Memotaste wech-seln alle Memotasten die Farbe auf weiss.
So rufen Sie eine gespeicherte Position ab
Drücken Sie die gewünschte Speichertaste Memo-ryposition 1–4 (1–4), bis alle Liegeflächenteile die programmierte Position erreicht haben. Während der Verfahrzeit leuchtet die aktivierte Memorypositions-taste (blau).
Rückstellung in die Horizontalposition
Mit der «Alle Motoren ab» Taste (7) fahren Sie alle Lie-geflächenteile gleichzeitig in die Horizontalposition.
Pflege und Wartung «Touch» Bei Ihrem uni 14_/22_/20_95RF handelt es sich um ein hochwertiges Produkt, dass für zuverlässigen Betrieb über Jahre hinaus entwickelt wurde. Zur gelegentli-chen Reinigung von Staub empfehlen wir ein trocke-nes Tuch.
So wechseln Sie die Batterien in der Funk-Fernbe-dienung
Entfernen Sie die Abdeckung vom Batteriefach (21) auf der Rückseite der Funk-Fernbedienung. Legen Sie drei AAA-Batterien ein, achten Sie dabei auf die +/- Markierung. Schieben Sie die Abdeckung wieder zu.
So wechseln Sie die Batterien (29) am Schaltnetzteil am uni 14_/22_/20_95RF (Batterien für Notabsen-kung)
Trennen Sie die Batterien vorsichtig von den Batterie-clips. Legen Sie 2 x 9-Volt-Block-Batterien ein, achten Sie dabei auf die +/- Markierung. Die Batterien am Schaltnetzteil dienen zur Spannungsversorgung bei einem Stromausfall.
Verhalten bei Störungen «Touch»Wenn an Ihrem uni 14_/22_/20_95RF Störungen auf-treten, versuchen Sie bitte, diese anhand der fol-genden Anweisungen zu beheben. Wenn sich das Problem nicht beheben lässt, trennen Sie den uni 14_/22_/20_95RF von der Steckdose und wenden Sie sich an Ihren Swissflex Fach händler.

8 Bedienungsanleitung DE
Stromausfall in Sitzposition, Notabsenkung
Im Schaltnetzteil befinden sich zwei Blockbatterien (29), um Ihr Bett auch bei Stromausfall in die flache Schlafposition zurückzufahren:
Drücken Sie die Taste «Notabsenkung» (30) solange bis alle Liegeflächenteile in der Horizontalposition sind. Steht die Netzspannung wieder zur Verfügung, muss nach einer Wartezeit von min. 10 sec. eine „Re-setfahrt“ wie folgt durchgeführt werden:
• Die Memory-Speicher-Taste (18) 3 Sekunden drü-cken.
• Die Tasten M1-M4 leuchten erst blau, dann wieder weiss.
• Nach einige Sekunden blinkt die Hintergrundbe-leuchtung einmal weiss auf.
• Innerhalb einer Sekunde die Taste Synchro (17) drücken und gedrückt halten. Die Antriebe fahren nach unten.
• Blinkt die komplette Hintergrundbeleuchtung 2 x weiss auf, kann die Taste Synchro (17) losgelassen werden.
Jetzt sind die internen Zählerstände der einzelnen Mo-toren auf „0“ gesetzt und die abgespeicherten Memo-rypositionen werden wieder korrekt angefahren.
Durch die Notabsenkung wurden die Batterien stark entladen und müssen ausgetauscht werden.
Der uni 14_/22_/20_95RF funktioniert nicht, ob-wohl er eingeschaltet ist und alle Komponenten richtig angeschlossen sind
Trennen Sie das Netzkabel von der Steckdose. Warten Sie eine Minute und stellen Sie die Stromversorgung wieder her. Überprüfen Sie gegebenenfalls mit einer Nachttischlampe, ob die Netzspannung (240 V) ge-währleistet ist. Ist kein Strom vorhanden, überprüfen Sie die Sicherung vom Netz. Drücken Sie die «Alle Motoren ab» Taste (7), um alle Einstellungen zurückzusetzen. Da die Steuerung des uni 14_/22_/20_95RF Microprozessoren enthält, kann es durch Netzschwankungen zu Störungen kommen.
Die Funk-Fernbedienung funktioniert nicht (Die Hintergrundbeleuchtung funktioniert nicht)
Legen Sie neue Batterien ein. Entfernen Sie gegebe-nenfalls Hindernisse zwischen der Funk-Fernbedie-nung und der Motorensteuerung.
Nach einem Stromausfall wenn das System wieder Strom hat
Drücken Sie vor erneuter Inbetriebnahme des uni 14_/22_/20_95RF solange die Taste (30) auf dem Schaltnetzteil (28), bis alle Motoren nach unten gefah-ren sind und durch 2 x blinken der Notbeleuchtung am Motor bestätigt wird. (Kann 20 Sek. dauern).
Technische Daten undProblemlösungsiehe Seite 11

9DE Bedienungsanleitung
Funk-Fernbedienung «Classic»
1 Antrieb Kopfbereich «auf» 2 Antrieb Kopfbereich «ab» 3 Antrieb Rückenbereich «auf» 4 Antrieb Rückenbereich «ab» 5 Antrieb Oberschenkelbereich «auf» 6 Antrieb Oberschenkelbereich «ab» 7 Antrieb Unterschenkelbereich «auf» 8 Antrieb Unterschenkelbereich «ab» 9 Alle Motoren «auf»10 Alle Motoren «ab»11 Taschenlampe12 Batteriefach
(Rückseite Funk-Fernbedienung)13 3 x AAA-Batterie (im Lieferumfang)
1 + 2 Unterflurbeleuchtung 3 + 4 Freisteckdose an / aus 10 + 11 Synchronfunktion aktivieren /
deaktivieren
Motorensteuerung
14 Synchronanschluss 15 Notbeleuchtung (intern)16 Netzteilanschluss / Anschluss externe Unterflurbeleuchtung17 Anschluss für Zusatzmotoren18 Notbeleuchtung (intern, Rückseite des Motors)
19 Schaltnetzteil
20 Batteriefach für Notabsenkung (2 x 9 V) 21 Notabsenkungstaste / Teach-In-Taste
22 Freisteckdose (Optional)
18
1417
15
16 (2 Kabel)
22
20
19 21
1
3
5
7
9
2
4
6
8
10
11
12
12
13
uni 14_/22_/20_95RF «Classic»uni 21_95RF

10 Bedienungsanleitung DE
Inbetriebnahme «Classic»Legen Sie die Batterien in die Funk-Fern be dienung ein
Entfernen Sie auf der Rückseite die Abdeckung vom Batteriefach (12) der Funk-Fern bedienung. Legen Sie drei AAA-Batterien (13) ein, achten Sie dabei auf die +/- Markierung. Schieben Sie die Abdeckung wieder zu. Die Reichweite der Funk-Fernbedienung ist max. 15 m.
Funk-Fern be dienung einlernen (Teach-in) (werk-seitig bereits eingelernt)
1. Batterieabdeckung auf der Rückseite der Funk-Fern be dienung entfernen.
2. Batterien einlegen / überprüfen (3 x AAA).3. Die Teach-In-Taste (21) am Schaltnetzteil aktivieren
(2 x Drücken). Jetzt leuchtet die Notbeleuchtung am Motor.
4. Taste (1+2) an der Funk-Fern be dienung gleichzeitig drücken bis die Notbeleuchtung am Antrieb nicht mehr leuchtet. Dann ist das Pairen abgeschlossen.
Synchronfunktion (mit Synchronkabel)
Werden zwei uni 14_/22_/20_95RF mit einem Syn-chronkabel miteinander verbunden (Anschluss Buch-se (14)), wird die Synchronfunktion benötigt. Durch Drücken der Tasten (10+11) wird die Synchronfunktion aktiviert/deaktiviert. Beim Betätigen der Verfahrtas-ten (1-8) synchronisieren sich die Antriebe und fahren anschliessend in die betätigte Verfahrrichtung. Nach dem Einstecken des Synchronkabels eine Resetfahrt wie folgt durchführen:
Drücken Sie die Taste (21) auf dem Schaltnetzteil (19) solange, bis alle Motoren nach unten gefahren sind und durch 2 x blinken der Notbeleuchtung am Motor bestätigt wird. (Kann 20 Sek. dauern)
Jetzt sind die internen Zählerstände der einzelnen Mo-toren auf „0“ gesetzt und die Synchronfunktion kann korrekt arbeiten.
Unterflurbeleuchtung
Durch Drücken der Tasten (1+2) wird die Unterflur-beleuchtung aktiviert. Nach 30 Minuten schaltet sich diese automatisch aus, oder durch wiederholte Betä-tigung der Taste.
Taschenlampe
Durch Gedrückthalten der Taste „Taschenlampe“ (11) leuchtet die Taschenlampe. Beim Loslassen der Taste erlischt das Licht.
Verstellmöglichkeiten «Classic»Mit den Tasten (1-8) können Sie sowohl das Kopf- und
Rückenteil, wie auch das Oberschenkel- und die Fuss-teil individuell einstellen.
Rückstellung in die Horizontalposition
Mit der «Alle Motoren ab» Taste (10) fahren Sie alle Liegeflächenteile gleichzeitig in die Horizontalposition.
Pflege und Wartung «Classic»Bei Ihrem uni 14_/22_/20_95RF handelt es sich um ein hochwertiges Produkt, dass für zuverlässigen Betrieb über Jahre hinaus entwickelt wurde. Zur gelegentli-chen Reinigung von Staub empfehlen wir ein trocke-nes Tuch.
So wechseln Sie die Batterien in der Funk-Fernbe-dienung
Entfernen Sie die Abdeckung vom Batteriefach (12) auf der Rückseite der Funk-Fernbedienung. Legen Sie drei AAA-Batterien ein, achten Sie dabei auf die +/- Markierung. Schieben Sie die Abdeckung wieder zu.
So wechseln Sie die Batterien am Schaltnetzteil (19)am uni 14_/22_/20_95RF (Batterien für Notabsen-kung)
Trennen Sie die Batterien vorsichtig von den Batterie-clips. Legen Sie 2 x 9-Volt-Block-Batterien ein, achten Sie dabei auf die +/- Markierung. Die Batterien am Schaltnetzteil dienen zur Spannungsversorgung bei einem Stromausfall.
Verhalten bei Störungen «Classic»Wenn an Ihrem uni 14_/22_/20_95RF Störungen auf-treten, versuchen Sie bitte, diese anhand der fol-genden Anweisungen zu beheben. Wenn sich das Problem nicht beheben lässt, trennen Sie den uni 14_/22_/20_95RF von der Steckdose und wenden Sie sich an Ihren Swissflex Fach händler.
Stromausfall in Sitzposition, Notabsenkung
Im Schaltnetzteil (19) befinden sich zwei Blockbatte-rien, um Ihr Bett auch bei Stromausfall in die flache Schlafposition zurückzufahren:
Drücken Sie die Taste «Notabsenkung» (21) solange bis alle Liegeflächenteile in der Horizontalposition sind. Steht die Netzspannung wieder zur Verfügung, muss nach einer Wartezeit von min. 10 sec. eine „Re-setfahrt“ wie folgt durchgeführt werden:
Drücken sie die Taste (21) auf dem Schaltnetzteil (19) solange, bis alle Motoren nach unten gefahren sind und durch 2 x blinken der Notbeleuchtung am Motor bestätigt wird. (Kann 20 Sek. dauern).
Jetzt sind die internen Zählerstände der einzelnen Mo-

11DE Bedienungsanleitung
toren auf „0“ gesetzt und die Synchronfunktion kann wieder korrekt arbeiten.
Durch die Notabsenkung wurden die Batterien stark entladen und müssen ausgetauscht werden.
Der uni 14_/22_/20_95RF funktioniert nicht, ob-wohl er eingeschaltet ist und alle Komponenten richtig angeschlossen sind
Trennen Sie das Netzkabel von der Steckdose. Warten Sie eine Minute und stellen Sie die Stromversorgung wieder her. Überprüfen Sie gegebenenfalls mit einer Nachttischlampe, ob die Netzspannung (240 V) ge-währleistet ist. Ist kein Strom vorhanden, überprüfen Sie die Sicherung vom Netz. Drücken Sie die «Alle Motoren ab» (10), um alle Ein-stellungen zurückzusetzen. Da die Steuerung des uni 14_/22_/20_95RF Mikroprozessoren enthält, kann es durch Netzschwankungen zu Störungen kommen.
Die Funk-Fernbedienung funktioniert nicht (Die Hintergrundbeleuchtung funktioniert nicht)
Legen Sie neue Batterien ein. Entfernen Sie gegebe-nenfalls Hindernisse zwischen der Funk-Fernbedie-nung und der Motorensteuerung.
Nach einem Stromausfall wenn das System wieder Strom hat
Drücken Sie vor erneuter Inbetriebnahme des uni 14_/22_/20_95RF solange die Taste (21) auf dem Schaltnetzteil (19), bis alle Motoren nach unten gefah-ren sind und durch 2 x blinken der Notbeleuchtung am Motor bestätigt wird. (Kann 20 Sek. dauern).
Problem Mögliche Ursache Lösung
Handschalter oder Antriebs-system ohne Funktion.
Keine Netzspannung. Netzverbindung herstellen.
Handschalter oder Antriebssystem defekt.
Wenden Sie sich an Ihren Lieferanten / Händler.
Antriebe lassen sich plötzlich nicht mehr verfahren / bewegen.
Thermoschalter am Transformator hat möglicherweise ausgelöst oder defekt.
Das Antriebssystem ca. 20-30 Minuten in Ruhestellung belassen.
Temperatursicherung im Transforma-tor hat möglicherweise ausgelöst oder defekt.
Wenden Sie sich an Ihren Lieferanten / Händler.
Gerätesicherung hat möglicherweise ausgelöst oder defekt.
Wenden Sie sich an Ihren Lieferanten / Händler.
Keine Netzspannung. Netzverbindung herstellen.
Zuleitung (Netz und / oder Handschal-ter / Zusatzantriebe) unterbrochen.
Zuleitung überprüfen und ggf. Kontakt wiederherstel-len.
Die netzun-abhängige elektrische Rückstellfunk-tion lässt sich nicht betätigen.
Blockbatterie / Blockbatterien leer. Blockbatterie / Blockbatterien überprüfen / gegebe-nenfalls erneuern.
Blockbatterie(n) nicht angeschlossen. Blockbatterie / Blockbatterien anschliessen.
Technische Daten
Versorgungsspannung: 100–240 VoltVersorgung Funk-Fernbedienung: 3 x AAA BatterieSchaltleistung Motoren: Aussetzbetrieb AB 2 min / 18 minSchaltleistung Freisteckdose: 2000 W / 10 ASchubkraft Motoren: 2 x 6000 N / 2 x 4000 NVersorgung Notabsenkung: 2 x 9 Volt-Blockbatterie

12 Mode d’emploi FR
Télécommande à radiofréquence «Touch»
1 Position Memory 12 Position Memory 23 Position Memory 3 4 Position Memory 4 5 Lampe de poche 6 Tous les moteurs «haut» 7 Tous les moteurs «bas»8 Eclairage du sol9 Moteur partie tête «haut»10 Moteur partie tête «bas»11 Moteur partie dos «haut»12 Moteur partie dos «bas»13 Moteur partie cuisses «haut»14 Moteur partie cuisses «bas»15 Moteur partie jambes «haut»16 Moteur partie jambes «bas»17 Activer / désactiver fonction synchro18 Touche d‘enregistrement mémoire19 Marche / arrêt prise libre20 Blocage des touches (sécurité enfant)21 Compartiment à piles (au dos de la
télécommande à radiofréquence) Dans le logement des piles : touche rouge teach-in22 3 x piles AAA (dans le contenu de la livraison)
Commande moteurs
23 Raccordement câble de synchronisation24 Éclairage d‘urgence (interne)25 Raccordement adaptateur / Raccordement
de l‘éclairage du sol externe26 Raccordement pour moteurs
supplémentaires27 Éclairage d‘urgence (interne, arrière
moteur)
28 Bloc à découpage
29 Compartiment à piles descentem d‘urgence (2 x 9 V)
30 Touche de descente d‘urgence /touche teach-in
31 Bluetooth RF-Gateway (en option)
32 Prise libre (en option)
2 3
1
5, 6
9
11
13
15
17
19
21
4
7, 8
10
12
14
16
18
20
27
2326
24
25 (2 câbles)
31
32
29
28 30
uni 14_/22_/20_95RF «Touch»uni 21_95RF
21
22

13FR Mode d’emploi
Confort et santéBienvenue dans le monde de Swissflex !
Votre Swissflex uni 14_/22_/20_95RF est un pro-duit suisse de qualité. Si vous observez les quelques consignes de manipulation et de sécurité, il vous donnera entière satisfaction pendant des années. Outre de nombreux autres avantages, votre uni 14_/22_/20_95RF vous offre un environnement de sommeil exempt de perturbations. Grâce à la techno-logie EcoTec, tous les fils électriques situés entre la prise secteur et le lit sont quasiment dépourvus de courant (inférieur à 0,5 W).
Pour votre sécurité
Les enfants à partir de 8 ans et les personnes pourvues de capa-cités physiques, sensorielles ou mentales limitées ou manquant d’expérience et de connaissances peuvent utiliser cet appareil. Ils doivent cependant être surveillés ou être informés de la façon sûre d’utiliser cet appareil ainsi que des dangers qu’il représente. Les enfants ne doivent pas jouer avec l’appareil. Les enfants peuvent procéder au nettoyage et à l’en-tretien de l’appareil, mais unique-ment sous la surveillance d’un adulte. ATTENTION ! N‘exposez pas l‘uni 14_/22_/20_95RF et ses acces-soires à la pluie ni à toute autre source d‘humidité, afin d‘éviter le risque de feu et de choc électrique. Si un liquide venait à s‘infiltrer dans les accessoires, déconnec-tez le cordon secteur de la prise et faites-le vérifier par votre reven-
deur spécialisé Swissflex.Lors du montage du sommier, veil-lez à ce que tous les mouvements des parties tête, dos et pieds ne soient pas entravés par des parties de meubles. Débranchez toujours les prises de courant des fiches secteurs lors des opérations de montage et de démontage du sommier ou du bois de lit.Ne branchez aucun appareil à la prise libre (32) qui pourrait mettre en danger des personnes ou des objets, en particulier aucun ou-tillage électrique tel que scies, perceuses et autres (risque de blessures) ou chauffage électrique mobile (risques d‘incendie).Lors du placement du câble sec-teur de la prise libre (32), veillez à ce que des côtés coupants ou d’éventuels noeuds n’abîment les isolations des câblages. Le câble ne doit en aucun cas traverser le mécanisme de réglage du som-mier. Dans le cas de dommage des câbles ou de la prise libre (32), le lit-siège ne doit plus être activé. Retirez la fiche de la prise de cou-rant et contactez votre revendeur spécialisé.

14 Mode d’emploi FR
N‘ouvrez jamais le boîtier de la prise libre (32) d‘où partent les câbles. En cas d‘intervention sur les éléments conducteurs de cou-rant de la prise libre (32), tout re-cours à la garantie est exclu.Soyez prudent dans la manipula-tion de votre uni 14_/22_/20_95RF et de ses accessoires, ne le dé-montez pas, ne procédez à aucune modification. Ne laissez pas les enfants jouer avec et empêchez les personnes impotentes de les utili-ser sans surveillance.Le produit ne doit pas être utilisé avec du matériel médical ni être inséré dans une installation médi-cale. Le produit ne doit pas être uti-lisé dans un environnement sus-ceptible de contenir des vapeurs ou des gaz inflammables ou explo-sifs (p.ex. anesthésiants).Le produit ne doit pas être utili-sé pour soulever ou abaisser des charges.Utilisez uniquement des pièces dé-tachées fabriquées ou autorisées par Swissflex. Elles seules garan-tissent une sécurité suffisante.Le sommier ne doit être utilisé qu’avec l’alimentation électrique fournie.
Mise en service «Touch»Placez les piles dans la télécommande à radio-fré-quence
Au dos de la télécommande, retirez le couvercle du compartiment (21). Mettez trois piles AAA (22) en place en tenant compte des pôles +/-. Faites glisser le couvercle pour refermer le compartiment. La portée de la télécommande à radiofréquence est de 15 m. max.
Calibrage de la télécommande (teach-in) (déjà cali-brée au sortir de l‘usine)
1. Enlever le couvercle du logement des piles sur l‘ar-rière de la télécommande.
2. Insérer / vérifier les piles (3 x AAA).3. Activer la touche teach-in (30) sur le bloc à décou-
page (appuyer 2 x). 4. Dans le logement piles se trouve une petite touche
rouge, au-dessus des piles (21).5. Appuyer sur cette touche : une LED bleue com-
mence à clignoter.6. Maintenir la touche enfoncée jusqu‘à ce que la LED bleue s‘allume en continu - la synchronistion est alors effectuée.
Bluetooth®
1. Téléchargez l‘application standard «Swissflex» de-puis la plateforme appropriée pour Android (Google Play) ou Apple iOs (App Store).
2. Installez l‘application standard «Swissflex» sur votre smartphone / votre tablette.
3. Installation / Mise en service, voir le manuel du Bluetooth RF-Gateway.
Fonction synchronisation (avec câble de synchroni-sation)
Lorsque deux uni 14_/22_/20_95RF sont reliés par un câble de synchronisation (branchement sur prise (23)), il faut utiliser la fonction de synchronisation (17). Appuyez sur la touche (17) et maintenez-la enfoncée pour activer et désactiver la fonction de synchronisa-tion. Appuyez sur les touches de procédure (6-7) pour synchroniser les moteurs et les amener ensuite à la position demandée. Lorsque l‘activation est réussie, la touche reste allumée en bleu. Lorsque la désactivation est réussie, la touche s‘allume en blanc. Brancher le câble de synchronisation puis procéder à une réinitia-lisation (reset) comme suit :
• Maintenez enfoncée la touche mémoire (18) pen-dant 3 secondes.
• Les touches M1-M4 s’allument d’abord en bleu puis à nouveau en blanc.
• Après quelques secondes, le rétro-éclairage cligno-te une fois en blanc.
• Dans la seconde qui suit, appuyez sur la touche syn-
15FR Mode d’emploi
chro (17) et maintenez-la enfoncée. Les moteurs se mettent en position basse.
• Une fois que tout le rétro-éclairage a clignoté deux fois en blanc, vous pouvez relâcher la touche syn-chro (17).
Les compteurs internes des moteurs sont main-tenant remis à 0 et la fonction de synchronisation peut fonctionner normalement.
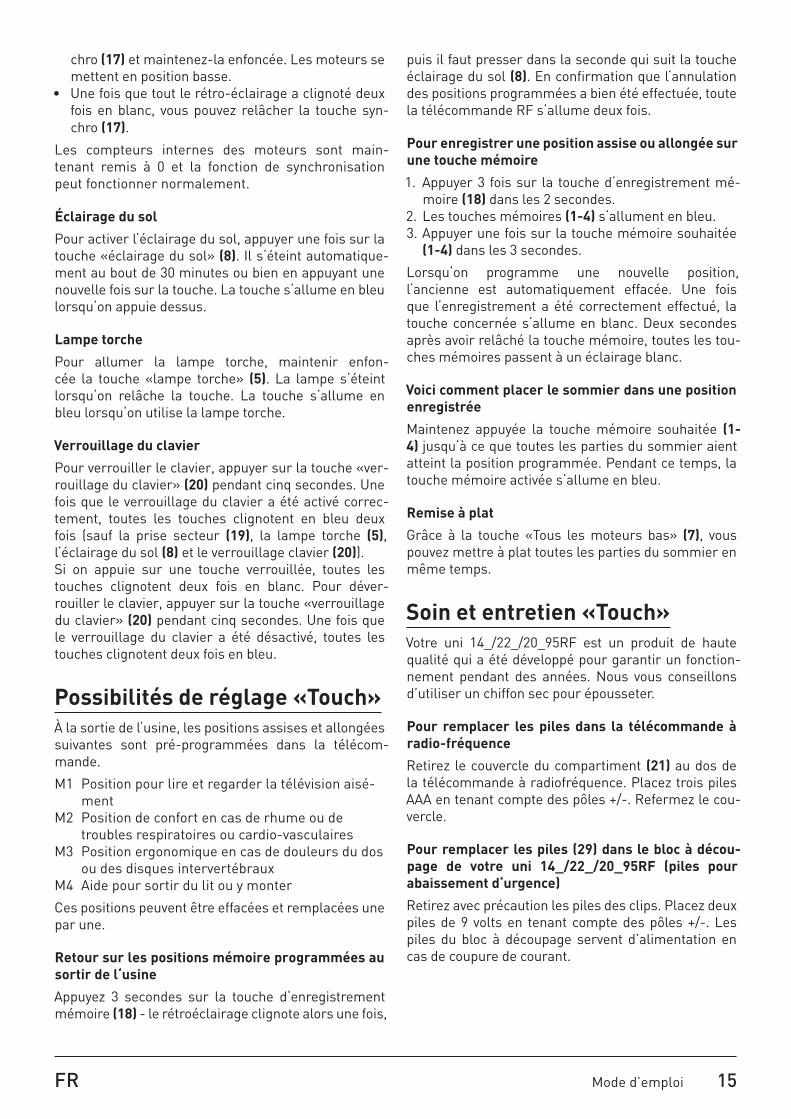
Éclairage du sol
Pour activer l‘éclairage du sol, appuyer une fois sur la touche «éclairage du sol» (8). Il s‘éteint automatique-ment au bout de 30 minutes ou bien en appuyant une nouvelle fois sur la touche. La touche s‘allume en bleu lorsqu‘on appuie dessus.
Lampe torche
Pour allumer la lampe torche, maintenir enfon-cée la touche «lampe torche» (5). La lampe s‘éteint lorsqu‘on relâche la touche. La touche s‘allume en bleu lorsqu‘on utilise la lampe torche.
Verrouillage du clavier
Pour verrouiller le clavier, appuyer sur la touche «ver-rouillage du clavier» (20) pendant cinq secondes. Une fois que le verrouillage du clavier a été activé correc-tement, toutes les touches clignotent en bleu deux fois (sauf la prise secteur (19), la lampe torche (5), l‘éclairage du sol (8) et le verrouillage clavier (20)). Si on appuie sur une touche verrouillée, toutes les touches clignotent deux fois en blanc. Pour déver-rouiller le clavier, appuyer sur la touche «verrouillage du clavier» (20) pendant cinq secondes. Une fois que le verrouillage du clavier a été désactivé, toutes les touches clignotent deux fois en bleu.
Possibilités de réglage «Touch»À la sortie de l‘usine, les positions assises et allongées suivantes sont pré-programmées dans la télécom-mande.
M1 Position pour lire et regarder la télévision aisé-ment
M2 Position de confort en cas de rhume ou de troubles respiratoires ou cardio-vasculaires
M3 Position ergonomique en cas de douleurs du dos ou des disques intervertébraux
M4 Aide pour sortir du lit ou y monter
Ces positions peuvent être effacées et remplacées une par une.
Retour sur les positions mémoire programmées au sortir de l‘usine
Appuyez 3 secondes sur la touche d‘enregistrement mémoire (18) - le rétroéclairage clignote alors une fois,
puis il faut presser dans la seconde qui suit la touche éclairage du sol (8). En confirmation que l‘annulation des positions programmées a bien été effectuée, toute la télécommande RF s‘allume deux fois.
Pour enregistrer une position assise ou allongée sur une touche mémoire
1. Appuyer 3 fois sur la touche d‘enregistrement mé-moire (18) dans les 2 secondes.
2. Les touches mémoires (1-4) s‘allument en bleu.3. Appuyer une fois sur la touche mémoire souhaitée
(1-4) dans les 3 secondes.
Lorsqu‘on programme une nouvelle position, l‘ancienne est automatiquement effacée. Une fois que l‘enregistrement a été correctement effectué, la touche concernée s‘allume en blanc. Deux secondes après avoir relâché la touche mémoire, toutes les tou-ches mémoires passent à un éclairage blanc.
Voici comment placer le sommier dans une position enregistrée
Maintenez appuyée la touche mémoire souhaitée (1-4) jusqu‘à ce que toutes les parties du sommier aient atteint la position programmée. Pendant ce temps, la touche mémoire activée s‘allume en bleu.
Remise à plat
Grâce à la touche «Tous les moteurs bas» (7), vous pouvez mettre à plat toutes les parties du sommier en même temps.
Soin et entretien «Touch»Votre uni 14_/22_/20_95RF est un produit de haute qualité qui a été développé pour garantir un fonction-nement pendant des années. Nous vous conseillons d’utiliser un chiffon sec pour épousseter.
Pour remplacer les piles dans la télécommande à radio-fréquence
Retirez le couvercle du compartiment (21) au dos de la télécommande à radiofréquence. Placez trois piles AAA en tenant compte des pôles +/-. Refermez le cou-vercle.
Pour remplacer les piles (29) dans le bloc à décou-page de votre uni 14_/22_/20_95RF (piles pour abaissement d‘urgence)
Retirez avec précaution les piles des clips. Placez deux piles de 9 volts en tenant compte des pôles +/-. Les piles du bloc à découpage servent d’alimentation en cas de coupure de courant.

16 Mode d’emploi FR
En cas de dérangement «Touch»En cas de problème avec votre uni 14_/22_/20_95RF, vous pouvez essayer de le solutionner à l’aide des re-commandations ci-après. Si vous ne pouvez résoudre le problème, débranchez votre uni 14_/22_/20_95RF bridge® et adressez-vous à votre revendeur Swissflex.
Coupure de courant lorsque le lit est en position assise, abaissement d’urgence
Deux batteries monobloc (29) se trouvent dans le bloc à découpage afin de ramener votre lit en position hori-zontale même en cas de coupure de courant :
Appuyez sur la touche « abaissement d’urgence » (30) jusqu’à ce que toutes les parties de la surface de cou-chage soient en position horizontale.Lorsque le courant est revenu, il faut attendre au moins 10 sec. et procéder à une réinitialisation de la façon suivante :
• Maintenez enfoncée la touche mémoire (18) pen-dant 3 secondes.
• Les touches M1-M4 s’allument d’abord en bleu puis à nouveau en blanc.
• Après quelques secondes, le rétro-éclairage cli-gnote une fois en blanc.
• Dans la seconde qui suit, appuyez sur la touche syn-chro (17) et maintenez-la enfoncée. Les moteurs se mettent en position basse.
• Une fois que tout le rétro-éclairage a clignoté deux fois en blanc, vous pouvez relâcher la touche syn-chro (17).
Les compteurs internes des moteurs sont mainte-nant remis à 0 et les positions mémoire enregistrées peuvent être utilisées à nouveau.
L’abaissement d’urgence décharge fortement les bat-teries, il faut donc les changer.
Votre uni 14_/22_/20_95RF ne fonctionne pas, bien qu’il soit connecté à la prise et que tous les branche-ments aient été correctement effectués
Débranchez le sommier. Attendez une minute et re-branchez-le. Vérifiez à l’aide d’une lampe de chevet si la tension d’alimentation (240 V) est assurée. S’il n’y a pas de courant, vérifiez le fusible. Appuyez sur la touche «Tous les moteurs bas» (7) pour refaire les programmations. En cas de variation d‘intensité du courant dans le réseau, des dérange-ments peuvent survenir car la télécommande du uni 14_/22_/20_95RF contient des microprocesseurs.
La télécommande à radiofréquence ne fonctionne pas (l‘éclairage de fond ne fonctionne pas)
Placer de nouvelles batteries. Eventuellement éloigner les obstacles entre la télécommande à radiofréquence et la commande moteurs.
Après une coupure d’électricité, lorsque le courant est revenu dans le système
Avant d’utiliser à nouveau le sommier uni 14_/22_/20_95RF, maintenez appuyée la touche (30) de l’alimentation à découpage (28) jusqu’à ce que tous les moteurs soient en position basse et que l‘éclairage d‘urgence du moteur clignote deux fois (cela peut du-rer jusqu‘à 20 sec).
Données techniques et résolution de problèmesvoir page 19

17FR Mode d’emploi
Télécommande à radiofréquence «Classic»
1 Moteur partie tête «haut»2 Moteur partie tête «bas» 3 Moteur partie dos «haut»4 Moteur partie dos «bas»5 Moteur partie cuisses «haut» 6 Moteur partie cuisses «bas»7 Moteur partie jambes «haut»8 Moteur partie jambes «bas» 9 Tous les moteurs «haut»10 Tous les moteurs «bas»11 Lampe de poche12 Compartiment piles (au dos de la
télécommande à radiofréquence) 13 3 x piles AAA
(dans le contenu de la livraison)
1 + 2 Eclairage du sol 3 + 4 Marche / arrêt prise libre 10 + 11 Activer / désactiver fonction
synchro
Commande moteurs
14 Raccordement câble de synchronisation 15 Éclairage d’urgence (interne)16 Raccordement adaptateur / Raccordement de l’éclairage du sol externe 17 Raccordement pour moteurs supplémen-
taires18 Éclairage d’urgence (interne, arrière
moteur)
19 Bloc à découpage
20 Compartiment à piles descente d’urgence (2 x 9 V)
21 Touche de descente d’urgence / touche teach-in
22 Prise libre (en option)
18
1417
15
16 (2 câbles)
22
20
19 21
1
3
5
7
9
2
4
6
8
10
11
12
uni 14_/22_/20_95RF «Classic»uni 21_95RF
12
13
18 Mode d’emploi FR
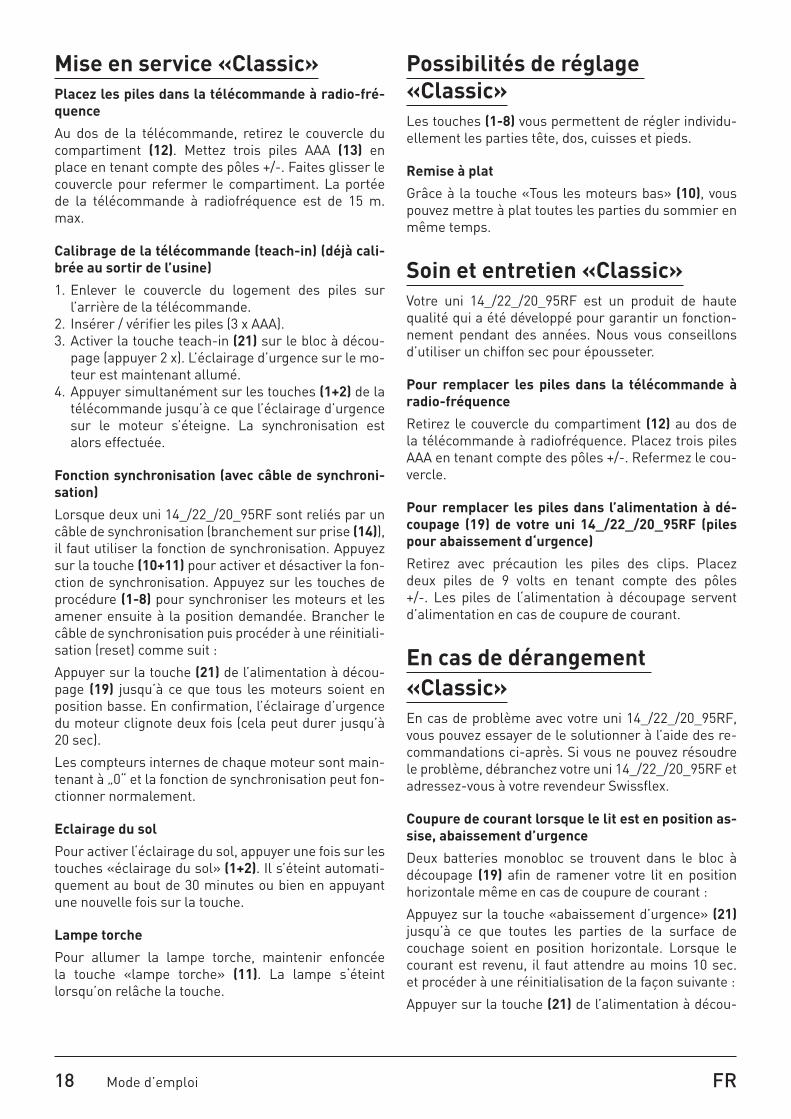
Mise en service «Classic»Placez les piles dans la télécommande à radio-fré-quence
Au dos de la télécommande, retirez le couvercle du compartiment (12). Mettez trois piles AAA (13) en place en tenant compte des pôles +/-. Faites glisser le couvercle pour refermer le compartiment. La portée de la télécommande à radiofréquence est de 15 m. max.
Calibrage de la télécommande (teach-in) (déjà cali-brée au sortir de l’usine)
1. Enlever le couvercle du logement des piles sur l’arrière de la télécommande.
2. Insérer / vérifier les piles (3 x AAA).3. Activer la touche teach-in (21) sur le bloc à décou-
page (appuyer 2 x). L’éclairage d’urgence sur le mo-teur est maintenant allumé.
4. Appuyer simultanément sur les touches (1+2) de la télécommande jusqu’à ce que l’éclairage d’urgence sur le moteur s’éteigne. La synchronisation est alors effectuée.
Fonction synchronisation (avec câble de synchroni-sation)
Lorsque deux uni 14_/22_/20_95RF sont reliés par un câble de synchronisation (branchement sur prise (14)), il faut utiliser la fonction de synchronisation. Appuyez sur la touche (10+11) pour activer et désactiver la fon-ction de synchronisation. Appuyez sur les touches de procédure (1-8) pour synchroniser les moteurs et les amener ensuite à la position demandée. Brancher le câble de synchronisation puis procéder à une réinitiali-sation (reset) comme suit :
Appuyer sur la touche (21) de l’alimentation à décou-page (19) jusqu’à ce que tous les moteurs soient en position basse. En confirmation, l’éclairage d’urgence du moteur clignote deux fois (cela peut durer jusqu’à 20 sec).
Les compteurs internes de chaque moteur sont main-tenant à „0“ et la fonction de synchronisation peut fon-ctionner normalement.
Eclairage du sol
Pour activer l‘éclairage du sol, appuyer une fois sur les touches «éclairage du sol» (1+2). Il s’éteint automati-quement au bout de 30 minutes ou bien en appuyant une nouvelle fois sur la touche.
Lampe torche
Pour allumer la lampe torche, maintenir enfoncée la touche «lampe torche» (11). La lampe s‘éteint lorsqu’on relâche la touche.
Possibilités de réglage «Classic»Les touches (1-8) vous permettent de régler individu-ellement les parties tête, dos, cuisses et pieds.
Remise à plat
Grâce à la touche «Tous les moteurs bas» (10), vous pouvez mettre à plat toutes les parties du sommier en même temps.
Soin et entretien «Classic»Votre uni 14_/22_/20_95RF est un produit de haute qualité qui a été développé pour garantir un fonction-nement pendant des années. Nous vous conseillons d’utiliser un chiffon sec pour épousseter.
Pour remplacer les piles dans la télécommande à radio-fréquence
Retirez le couvercle du compartiment (12) au dos de la télécommande à radiofréquence. Placez trois piles AAA en tenant compte des pôles +/-. Refermez le cou-vercle.
Pour remplacer les piles dans l’alimentation à dé-coupage (19) de votre uni 14_/22_/20_95RF (piles pour abaissement d‘urgence)
Retirez avec précaution les piles des clips. Placez deux piles de 9 volts en tenant compte des pôles +/-. Les piles de l‘alimentation à découpage servent d’alimentation en cas de coupure de courant.
En cas de dérangement «Classic»En cas de problème avec votre uni 14_/22_/20_95RF, vous pouvez essayer de le solutionner à l’aide des re-commandations ci-après. Si vous ne pouvez résoudre le problème, débranchez votre uni 14_/22_/20_95RF et adressez-vous à votre revendeur Swissflex.
Coupure de courant lorsque le lit est en position as-sise, abaissement d’urgence
Deux batteries monobloc se trouvent dans le bloc à découpage (19) afin de ramener votre lit en position horizontale même en cas de coupure de courant :
Appuyez sur la touche «abaissement d’urgence» (21) jusqu’à ce que toutes les parties de la surface de couchage soient en position horizontale. Lorsque le courant est revenu, il faut attendre au moins 10 sec. et procéder à une réinitialisation de la façon suivante :
Appuyer sur la touche (21) de l’alimentation à décou-

19FR Mode d’emploi
page (19) jusqu’à ce que tous les moteurs soient en position basse. En confirmation, l’éclairage d’urgence du moteur clignote deux fois (cela peut durer jusqu’à 20 sec).
Les compteurs internes de chaque moteur sont main-tenant à „0“ et la fonction de synchronisation peut à nouveau fonctionner normalement.
L’abaissement d’urgence décharge fortement les bat-teries, il faut donc les changer.
Votre uni 14_/22_/20_95RF ne fonctionne pas, bien qu’il soit connecté à la prise et que tous les branche-ments aient été correctement effectués
Débranchez le sommier. Attendez une minute et re-branchez-le. Vérifiez à l’aide d’une lampe de chevet si la tension d’alimentation (240 V) est assurée. S’il n’y a pas de courant, vérifiez le fusible. Appuyez sur la touche «Tous les moteurs bas» (10) pour refaire les programmations. En cas de variation d‘intensité du courant dans le réseau, des dérangements peuvent survenir car la télécommande du uni 14_/22_/20_95RF contient des microprocesseurs.
La télécommande à radiofréquence ne fonctionne pas (l’éclairage de fond ne fonctionne pas)
Placer de nouvelles batteries. Eventuellement éloig-ner les obstacles entre la télécommande à radiofré-quence et la commande moteurs.
Après une coupure d’électricité, lorsque le courant est revenu dans le système
Avant d’utiliser à nouveau le sommier uni 14_/22_/20_95RF, maintenez appuyée la touche (21) de l’alimentation à découpage (19) jusqu’à ce que tous les moteurs soient en position basse et que l‘éclairage d‘urgence du moteur clignote deux fois (cela peut du-rer jusqu‘à 20 sec).
Problème Cause possible Solution
Commande ou système moteur ne fonctionnent pas.
Pas de tension secteur. Raccorder le secteur.
Commande ou système moteur défectueux.
Adressez-vous à votre revendeur / fournisseur.
Les moteurs s'arrêtent brusquement de fonctionner.
Le commutateur thermique du trans-formateur s'est peut-être déclenché ou est défecteux.
Laisser le système moteur reposer pendant 20-30 minutes.
Le fusible de température dans le transformateur s'est peut-être déclen-ché ou est défectueux.
Adressez-vous à votre revendeur / fournisseur.
Le fusible appareil s'est peut-être déclenché ou est défectueux.
Adressez-vous à votre revendeur / fournisseur.
Pas de tension secteur. Raccorder le secteur.
Alimentation (secteur et/ou commande et/ou moteurs supplémentaires) interrompue.
Vérifier l'alimentation et rétablir le contact le cas échéant.
Impossible d'activer la fonction élec-trique de retour à l'horizontale (indépendante du secteur).
Pile/s déchargée/s. Vérifier ou changer la/les pile/s.
Pile/s non raccordées. Raccorder la/les piles.
Données techniques
Tension d’alimentation : 100–240 voltsAlimentation télécommande à radiofréquence : 3 x piles AAAPuissance de commutation moteurs : service discontinu cycles 2 min / 18 minPuissance de commutation prise libre : 2000 W / 10 APoussée moteurs : 2 x 6000 N / 2 x 4000 NTension remise à plat des moteurs :2 x piles monobloc 9 volts

20 Operating instructions EN
Radio remote control «Touch»
1 Memory position 12 Memory position 23 Memory position 34 Memory position 45 Pocket lamp6 All motors «up»7 All motors «down»8 Floor lighting9 Control system head section «up»10 Control system head section «down»11 Control system back section «up» 12 Control system back section «down» 13 Control system thigh section «up» 14 Control system thigh section «down» 15 Control system calf section «up»16 Control system calf section «down»17 Activating / disabling the sync function18 Memory button19 User socket on / off20 Key blocking (child safety device)21 Battery compartment (on the back of the
radio remote control) In the battery compartment: red teach-in
button22 3 x AAA-Battery (included in the delivery)
Motor control
23 Sync cable connection24 Emergency light (internal)25 Connection for mains supply unit / Con-
nection for external under-floor lighting26 Connection for auxiliary motors27 Emergency light (internal, back of the
motor)
28 Switching power supply
29 Battery compartment for emergency low-ering (2 x 9 V)
30 Emergency lowering button / teach-in but-ton
31 Bluetooth RF-Gateway (optional)
32 User socket (optionally)
2 3
1
5, 6
9
11
13
15
17
19
21
4
7, 8
10
12
14
16
18
20
31
27
2326
24
25 (2 cables)
32
29
28 30
uni 14_/22_/20_95RF «Touch»uni 21_95RF
21
22

21EN Operating instructions
Health and comfortWelcome to the world of Swissflex!
Your Swissflex uni 14_/22_/20_95RF is a Swiss qual-ity product. If you follow the simple operating and safety instructions, it will function to your complete satisfaction for many years. In addition to its many other advantages, your uni 14_/22_/20_95RF offers an undisturbed sleep environment. All electrical connections between the mains plug and the bed are virtually free of mains voltage (below 0.5 watts) thanks to EcoTec.
Safety instructions
This device can be used by chil-dren aged 8 and above and by peo-ple with reduced physical, sensory or mental capabilities or people lacking experience and knowl-edge, provided that they are su-pervised or have been instructed in the safe use of the device and understand the dangers that may arise. Children must not play with the device. Cleaning and user maintenance must not be carried out by children without supervi-sion. CAUTION! The uni 14_/22_/20_95RF and accessories must be protect-ed from rain and other moisture to prevent causing a fire hazard or the risk of electric shock. In case of spillages on an accessory, the mains cable must be disconnected from the power outlet and checked by your Swissflex stockist.When installing the slat base, en-sure that the head, back and foot sections are not obstructed by fur-
niture. Ensure that the mains supply is disconnected before any assembly or disassembly work is carried out on the slat base or the bed frame. Do not connect any devices to the user socket (32) that could en-danger persons or damage ob-jects when the socket is turned on by remote control, in particu-lar electrical tools such as saws, drills and similar (risk of injury) or portable heating devices (risk of fire).Never place the mains cable be-tween the user socket (32) and the bed in such a way that the ca-ble insulation could be damaged by sharp edges or twists. Never feed the cable through the adjust-ment mechanism. In the case of damage to cables to the control housing or to the user socket (32), do not adjust the bed to a seated position. Re-move the mains plug from the socket and inform your stockist.Never open the user socket housing (32) to which the cables are connected. If you interfere with any electrical part of the user socket (32), the guarantee

22 Operating instructions EN
entitlements will no longer apply. Handle the uni 14_/22_/20_95RF and accessories with care; do not disassemble or modify them, do not allow children to play with them and prevent frail individu-als from using the product with-out supervision.The product may not be used with a medical device or be in-stalled in a medical device.The product may not be used in an environment in which flam-mable or explosive gases or va-pours (e.g. anaesthetics) are likely to occur.The product may not be used to raise and lower loads.Only use spare parts that have been produced or approved by Swissflex. Only these parts guarantee adequate safety.The slat base may only be used with the power supply provided.
Initial setup «Touch»Place the batteries into the radio remote control
Remove the cover from the battery compartment (21) on the back of the radio remote control. Place 3 AAA-batteries (22) into the compartment, paying at-tention to the +/- markings. Close the compartment cover again. The maximum range of the radio remote control is 15 metres.
Teaching-in the radio remote control (already taught-in in the factory)
1. Remove the radio remote control‘s battery cover on the back of the device.
2. Insert / check the batteries (3 x AAA).3. Activate the teach-in button (30) on the switching
power supply (press 2 x).4. A small red button is located above the batteries in
the battery compartment (21).5. Press the button; a blue LED will start flashing.6. Hold the button down until the blue LED is permanently illuminated; this means that pairing has been completed.
Bluetooth®
1. Download the standard „Swissflex“ app from the re-levant platform for Android (Google play) or Apple iOs (App Store).
2. Install the standard „Swissflex“ app onto your Smartphone / Tablet PC.
3. Installation / Initial setup, see manual of the Blue-tooth RF-Gateway.
Synchro function (with sync cable)
When two uni 14_/22_/20_95RF are linked together with a sync cable (connection jack (23)), the synchro function (17) is required. By pressing and holding down the button (17), the synchro function is activated/de-activated. When pressing the travel button (6-7), the control systems synchronise and then move in the con-firmed direction of travel. After successful activation, the button glows blue continuously. After successful deactivation, the button appears white. After plugging in the sync cable, carry out a reset as follows:
• Press down the ‘Memory/Save’ button (18) for 3 se-conds.
• The M1-M4 buttons will first light up blue and then switch to white again.
• The LCD backlighting system will flash white once after several seconds.
• Immediately press down the synchro button (17) and keep it pressed down. The control systems po-wer down.
• If the entire backlighting system flashes white twice, you can release the synchro button (17).
The internal meter readings for the individual motors

23EN Operating instructions
have now been reset to ‘0’ and the sync function can work correctly.
Under-floor lighting
Activate the under-floor lighting by pushing the „Un-der-floor lighting“ button (8). This switches off auto-matically after 30 minutes, or if the button is pushed once again. This button is illuminated (blue) when it is pushed.
Pocket lamp
The pocket lamp is illuminated when the „Pocket lamp“ button (5) is held down. The light turns off when the button is released. This button is illuminated (blue) while the pocket lamp is in use.
Lock buttons
To lock the buttons, hold down the „Lock buttons“ but-ton (20) for five seconds. Once the button lock has been activated, all buttons (except for the mains outlet (19), the pocket lamp (5), the under-floor lighting (8) and the button lock (20)) flash (blue) twice.All buttons flash twice (white) when a disabled button is pushed. The lock is disabled by holding down the
„Lock buttons“ button (20) for five seconds. All buttons flash twice (blue) if this was successful.
Adjustment options «Touch»The sleep and sit positions have been pre-programmed in the factory.
M1 Read and watch TV without getting tired M2 Relieving position for colds, respiratory disor-
ders or cardiovascular complaintsM3 Ergonomic position for backaches and inverte-
bral disk complaintsM4 Aids for getting into and out of the bed
The positions can be overwritten individually.
Resetting the factory-programmed memory posi-tions
Hold down the memory button (18) for 3 seconds – the background lighting then flashes once, the under-floor lighting button (8) must then be pressed within a se-cond. The entire RF-Touch lighting flashes twice to confirm that the factory settings have been reset.
Saving the sitting and lying position to a memory button
1. Press the memory button (18) 3 x within 2 seconds.2. The memory button is illuminated (blue) (1–4).3. Press the desired memory button for memory posi-
tion 1–4 (1–4) 1x within three seconds.
The programming of a new position automatically overwrites an old position. A successful save is visu-
alised by a change in colour of the selected memory button LED (white). All memory buttons turn white two seconds after the memory button is released.
To call up a position stored in memory
Press the desired memory button for memory position 1–4 (1–4), until all the comfort sections have reached the programmed position. The activated memory but-ton is illuminated (blue) during the travel time.
To reset to the horizontal position
Press the “all motors down” button (7) to simultane-ously move all sections to the horizontal position.
Care and Maintenance «Touch»Your uni 14_/22_/20_95RF is a high-quality product that has been designed to serve you reliably for many years to come. For occasional cleaning and the removal of dust, we recommend the use of a dry cloth.
Changing the batteries in the radio remote control
Remove the cover from the battery compartment (21) on the back of the radio remote control. Place three AAA batteries into the compartment, paying attention to the +/- markings. Close the compartment cover again.
Changing the batteries (29) in the uni 14_/22_/20_95RF switching power supply (batter-ies for emergency lowering)
Carefully remove the batteries from the battery clips. Place two 9V block batteries in the compart-ment, paying attention to the +/- markings. The bat-teries in the switching power supply provide power in the case of a power failure.
Troubleshooting «Touch»In case of malfunctions with your uni 14_/22_/20_95RF, consult the following troubleshoo-ting tips. If the problem cannot be resolved, discon-nect the uni 14_/22_/20_95RF from the mains outlet and contact your Swissflex stockist.
Loss of power in the sitting position; emergency lowering button
The switching power supply contains two bloc batteries (29) to revert the bed to the horizontal (sleeping) po-sition in the event of a power failure while sitting up in the bed:
Hold the emergency lowering button (30) down until all sleeping surfaces are in the horizontal position. Once voltage has been restored, wait at least 10 seconds be-

24 Operating instructions EN
fore resetting the system by completing the following steps:
• Press down the ‘Memory/Save’ button (18) for 3 seconds.
• The M1-M4 buttons will first light up blue and then switch to white again.
• The LCD backlighting system will flash white once after several seconds.
• Immediately press down the synchro button (17) and keep it pressed down. The control systems power down.
• If the entire backlighting system flashes white twice, you can release the Synchro button (17).
The internal meter readings for the individual motors have now been reset to ‘0’ and the stored memory po-sitions are correct again.
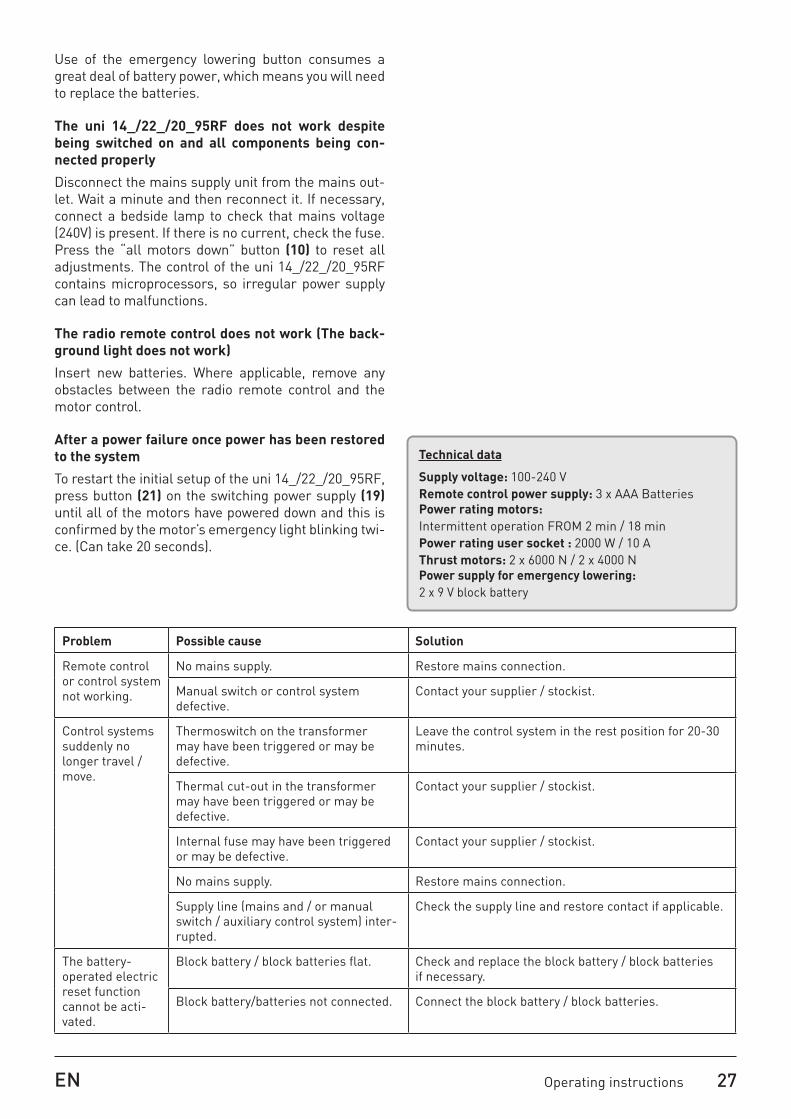
Use of the emergency lowering button consumes a great deal of battery power, which means you will need to replace the batteries.
The uni 14_/22_/20_95RF does not work despite be-ing switched on and all components being connected properly
Disconnect the mains supply unit from the mains out-let. Wait a minute and then reconnect it. If necessary, connect a bedside lamp to check that mains voltage (240 V) is present. If there is no current, check the fuse. Press the “all motors down” button (7) to reset all adjustments. The control of the uni 14_/22_/20_95RF contains microprocessors, so irregular power supply can lead to malfunctions.
Problem Possible cause Solution
Remote control or control system not working.
No mains supply. Restore mains connection.
Manual switch or control system defective.
Contact your supplier / stockist.
Control systems suddenly no longer travel / move.
Thermoswitch on the transformer may have been triggered or may be defective.
Leave the control system in the rest position for 20-30 minutes.
Thermal cut-out in the transformer may have been triggered or may be defective.
Contact your supplier / stockist.
Internal fuse may have been triggered or may be defective.
Contact your supplier / stockist.
No mains supply. Restore mains connection.
Supply line (mains and / or manual switch / auxiliary control system) inter-rupted.
Check the supply line and restore contact if applicable.
The battery-operated electric reset function cannot be acti-vated.
Block battery / block batteries flat. Check and replace the block battery / block batteries if necessary.
Block battery/batteries not connected. Connect the block battery / block batteries.
Technical data
Supply voltage: 110-240 VRemote control power supply: 3 x AAA BatteriesPower rating motors: Intermittent operation FROM 2 min / 18 minPower rating user socket : 2000 W / 10 AThrust motors: 2 x 6000 N / 2 x 4000 NPower supply for emergency lowering: 2 x 9 V block battery
The radio remote control does not work (The back-ground light does not work)
Insert new batteries. Where applicable, remove any obstacles between the radio remote control and the motor control.
After a power failure once power has been restored to the system
To restart the initial setup of the uni 14_/22_/20_95RF, press button (30) on the switching power supply (28) until all of the motors have powered down and this is confirmed by the motor’s emergency light blinking twi-ce. (Can take 20 seconds).

25EN Operating instructions
Radio remote control «Classic»
1 Control system head section «up»2 Control system head section «down»3 Control system back section «up»4 Control system back section «down»5 Control system thigh section «up» 6 Control system thigh section «down»7 Control system calf section «up»8 Control system calf section «down» 9 All motors «up»10 All motors «down»11 Pocket lamp12 Battery compartment (on the back of the
radio remote control)13 3 x AAA-Battery (included in the delivery)
1 + 2 Floor lighting 3 + 4 User socket on / off 10 + 11 Activating / disabling the sync
function
Motor control
14 Sync cable connection 15 Emergency light (internal)16 Connection for mains supply unit / Con-
nection for external under-floor lighting 17 Connection for auxiliary motors18 Emergency light (internal, back of the
motor)
19 Switching power supply
20 Battery compartment for emergency lowering (2 x 9V)
21 Emergency lowering button / teach-in button
22 User socket (optionally)
18
1417
15
16 (2 cables)
22
20
19 21
1
3
5
7
9
2
4
6
8
10
11
12
uni 14_/22_/20_95RF «Classic»uni 21_95RF
12
13

26 Operating instructions EN
Initial setup «Classic»Place the batteries into the radio remote control
Remove the cover from the battery compartment (12) on the back of the radio remote control. Place 3 AAA-batteries (13) into the compartment, paying attention to the +/- markings. Close the compartment cover again. The maximum range of the radio remote control is 15 metres.
Teaching-in the radio remote control (already taught-in in the factory)
1. Remove the radio remote control‘s battery cover on the back of the device.
2. Insert / check the batteries (3 x AAA).3. Activate the teach-in button (21) on the switching
power supply (press 2 x). Now the motor’s emer-gency light turns on.
4. Press buttons (1+2) simultaneously on the radio remote control until the motor’s emergency light turns off. This means that pairing has been com-pleted.
Synchro function (with sync cable)
When two uni 14_/22_/20_95RF are linked together with a sync cable (connection jack (14)), the synchro function is required. By pressing and holding down the button (10+11), the synchro function is activated/deactivated. When pressing the travel button (1-8), the control systems synchronise and then move in the confirmed direction of travel. After plugging in the sync cable, carry out a reset as follows:
Press button (21) on the switching power supply (19) until all of the motors have powered down and this is confirmed by the motor’s emergency light blinking twi-ce. (Can take 20 seconds)
The internal meter readings for the individual motors have now been reset to ‘0’ and the sync function can work correctly.
Under-floor lighting
Activate the under-floor lighting by pushing the „Un-der-floor lighting“ button (1+2). This switches off au-tomatically after 30 minutes, or if the button is pushed once again.
Pocket lamp
The pocket lamp is illuminated when the „Pocket lamp“ button (11) is held down. The light turns off when the button is released.
Adjustment options «Classic»Buttons (1-8) can be used to individually adjust the head and back sections as well as the thigh and foot sections.
To reset to the horizontal position
Press the “all motors down” button (10) to simultane-ously move all sections to the horizontal position.
Care and Maintenance «Classic»Your uni 14_/22_/20_95RF is a high-quality product that has been designed to serve you reliably for many years to come. For occasional cleaning and the remo-val of dust, we recommend the use of a dry cloth.
Changing the batteries in the radio remote control
Remove the cover from the battery compartment (12) on the back of the radio remote control. Place three AAA batteries into the compartment, paying attention to the +/- markings. Close the compartment cover again.
Changing the batteries in the uni 14_/22_/20_95RF switching power supply (19) (batteries for emergen-cy lowering)
Carefully remove the batteries from the battery clips. Place two 9V block batteries in the compartment, pay-ing attention to the +/- markings. The batteries in the switching power supply provide power in the case of a power failure.
Troubleshooting «Classic»In case of malfunctions with your uni 14_/22_/20_95RF, consult the following troubleshooting tips. If the problem cannot be resolved, disconnect the uni 14_/22_/20_95RF from the mains outlet and contact your Swissflex stockist.
Loss of power in the sitting position; emergency lo-wering button
The switching power supply (19) contains two bloc batteries to revert the bed to the horizontal (sleeping) position in the event of a power failure while sitting up in the bed:
Hold the emergency lowering button (21) down until all sleeping surfaces are in the horizontal position. Once voltage has been restored, wait at least 10 seconds be-fore resetting the system by completing the following steps:
Press button (21) on the switching power supply (19) until all of the motors have powered down and this is confirmed by the motor’s emergency light blinking twi-ce. (Can take 20 seconds).
The internal meter readings for the individual motors have now been reset to ‘0’ and the sync function can work correctly again.
27EN Operating instructions
Use of the emergency lowering button consumes a great deal of battery power, which means you will need to replace the batteries.
The uni 14_/22_/20_95RF does not work despite being switched on and all components being con-nected properly
Disconnect the mains supply unit from the mains out-let. Wait a minute and then reconnect it. If necessary, connect a bedside lamp to check that mains voltage (240V) is present. If there is no current, check the fuse. Press the “all motors down” button (10) to reset all adjustments. The control of the uni 14_/22_/20_95RF contains microprocessors, so irregular power supply can lead to malfunctions.
The radio remote control does not work (The back-ground light does not work)
Insert new batteries. Where applicable, remove any obstacles between the radio remote control and the motor control.
After a power failure once power has been restored to the system
To restart the initial setup of the uni 14_/22_/20_95RF, press button (21) on the switching power supply (19) until all of the motors have powered down and this is confirmed by the motor’s emergency light blinking twi-ce. (Can take 20 seconds).
Problem Possible cause Solution
Remote control or control system not working.
No mains supply. Restore mains connection.
Manual switch or control system defective.
Contact your supplier / stockist.
Control systems suddenly no longer travel / move.
Thermoswitch on the transformer may have been triggered or may be defective.
Leave the control system in the rest position for 20-30 minutes.
Thermal cut-out in the transformer may have been triggered or may be defective.
Contact your supplier / stockist.
Internal fuse may have been triggered or may be defective.
Contact your supplier / stockist.
No mains supply. Restore mains connection.
Supply line (mains and / or manual switch / auxiliary control system) inter-rupted.
Check the supply line and restore contact if applicable.
The battery-operated electric reset function cannot be acti-vated.
Block battery / block batteries flat. Check and replace the block battery / block batteries if necessary.
Block battery/batteries not connected. Connect the block battery / block batteries.
Technical data
Supply voltage: 100-240 VRemote control power supply: 3 x AAA BatteriesPower rating motors: Intermittent operation FROM 2 min / 18 minPower rating user socket : 2000 W / 10 AThrust motors: 2 x 6000 N / 2 x 4000 NPower supply for emergency lowering: 2 x 9 V block battery

28 Gebruiksaanwijzing NL
Draadloze afstandsbediening
1 Geheugenpositie 12 Geheugenpositie 23 Geheugenpositie 34 Geheugenpositie 45 Zaklamp6 Alle zones «omhoog»7 Alle zones «omlaag»8 Vloerverlichting9 Aandrijving hoofdzone «omhoog» 10 Aandrijving hoofdzone «omlaag» 11 Aandrijving rugzone «omhoog» 12 Aandrijving rugzone «omlaag» 13 Aandrijving bovenbeenzone «omhoog» 14 Aandrijving bovenbeenzone «omlaag» 15 Aandrijving onderbeenzone «omhoog» 16 Aandrijving onderbeenzone «omlaag» 17 Synchroonfunctie inschakelen / uitschakelen18 Geheugentoets19 Stopcontactenlat aan / uit20 Toetsblokkering (kinderbeveiliging)21 Batterijvak (achterkant draadloze af-
standsbediening) In het batterijvak: Rode Teach-In-toets
22 3 x AAA-batterij (bij de levering inbegre-pen)
Motorbedieningsapparaat
23 Aansluiting synchroonkabel24 Noodverlichting (intern)25 Adapteraansluiting / Aansluiting extern
vloerverlichting26 Aansluiting voor extra motoren27 Noodverlichting (intern, achterkant van de
motor)
28 Schakeladapter
29 Batterijvak voor nood-uitknop (2 x 9 V) 30 Nood-uitknop / teach-in-toets
31 Bluetooth RF-Gateway (optioneel)
32 Stopcontactenlat (optioneel)
2 3
1
5, 6
9
11
13
15
17
19
21
4
7, 8
10
12
14
16
18
20
27
2326
24
25 (2 kabels)
31
32
29
28 30
uni 14_/22_/20_95RF «Touch»uni 21_95RF
21
22
29NL Gebruiksaanwijzing
Comfort en gezondheidWelkom in de wereld van Swissflex!
Uw Swissflex uni 14_/22_/20_95RF is een Zwitsers kwaliteitsproduct waarvan u nog jarenlang plezier kunt hebben, als u een aantal elementaire bedienings- en veiligheidsaanwijzingen opvolgt. Naast tal van an-dere voordelen biedt uw uni 14_/22_/20_95RF u vooral een ongestoorde slaapomgeving. Alle snoeren van het stopcontact naar het bed zijn dankzij EcoTec bijna vrij van netspanning (onder 0,5 watt).
Veiligheidsaanwijzingen
Dit product kan worden gebruikt door kinderen van acht jaar en ou-der, en door personen met een fy-sieke, zintuiglijke of mentale be-perking of een gebrek aan ervaring en kennis, wanneer dit onder toe-zicht gebeurt of wanneer zij over een veilig gebruik van het pro-duct zijn geïnformeerd en de bij-komende gevaren begrijpen. Laat kinderen niet met het apparaat spelen. Schoonmaak- en onder-houdswerkzaamheden dienen niet zonder toezicht door kinde-ren te worden uitgevoerd. LET OP! Schakel de uni 14_/22_/20_95RF en onderdelen bij regen of andere vochtigheid uit om brandgevaar en het gevaar op een elektrische schok te voorko-men. Mocht er vloeistof op de on-derdelen terechtkomen, trek dan de stekker uit het stopcontact en laat deze door uw Swissflex-speci-aalzaak controleren.Let er tijdens het inbouwen van de
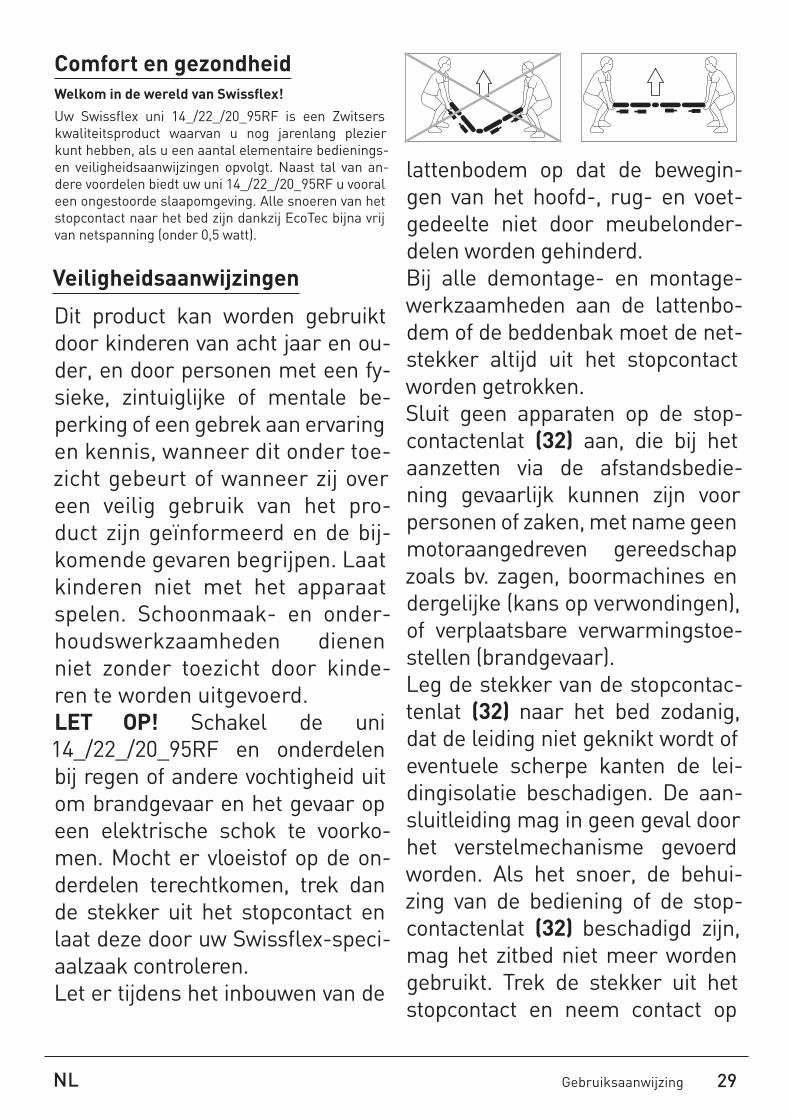
lattenbodem op dat de bewegin-gen van het hoofd-, rug- en voet-gedeelte niet door meubelonder-delen worden gehinderd.Bij alle demontage- en montage-werkzaamheden aan de lattenbo-dem of de beddenbak moet de net-stekker altijd uit het stopcontact worden getrokken. Sluit geen apparaten op de stop-contactenlat (32) aan, die bij het aanzetten via de afstandsbedie-ning gevaarlijk kunnen zijn voor personen of zaken, met name geen motoraangedreven gereedschap zoals bv. zagen, boormachines en dergelijke (kans op verwondingen), of verplaatsbare verwarmingstoe-stellen (brandgevaar).Leg de stekker van de stopcontac-tenlat (32) naar het bed zodanig, dat de leiding niet geknikt wordt of eventuele scherpe kanten de lei-dingisolatie beschadigen. De aan-sluitleiding mag in geen geval door het verstelmechanisme gevoerd worden. Als het snoer, de behui-zing van de bediening of de stop-contactenlat (32) beschadigd zijn, mag het zitbed niet meer worden gebruikt. Trek de stekker uit het stopcontact en neem contact op
30 Gebruiksaanwijzing NL
met uw Swissflex- speciaalzaak.Open nooit de behuizing van de stopcontactenlat (32) waar de ka-bels uitkomen. De garantie vervalt bij ingrepen aan het stroomvoe-rende deel van de stopcontactenlat (32).Ga voorzichtig met de uni 14_/22_/20_95RF en de onderde-len om, demonteer en wijzig niets, laat kinderen er niet mee spelen en laat personen met een beper-king het product niet zonder toe-zicht gebruiken.Het product mag niet met een me-disch product gebruikt of in een medisch product ingebouwd wor-den.Het product mag niet worden ge-bruikt in een omgeving waar brandbare of explosieve gassen of dampen (bijv. anesthetica) aanwe-zig kunnen zijn.Het product mag niet worden ge-bruikt voor het heffen en laten zak-ken van lasten.Gebruik uitsluitend door Swiss-flex gefabriceerde of goedgekeur-de vervangingsonderdelen. Alleen deze onderdelen garanderen een voldoende veiligheidsniveau.De lattenbodem dient uitsluitend in combinatie met de meegelever-de stroomvoorziening te worden gebruikt.
Ingebruikneming «Touch»Plaats de batterijen in de draadloze afstandsbedie-ning
Verwijder aan de achterkant het klepje van het batterij-vak (21) van de draadloze afstandsbediening. Plaats drie AAA-batterijen (22), let daarbij op de +/- marke-ring. Schuif het klepje weer dicht. Het bereik van de draadloze afstandsbediening is maximaal 15 meter.
Voer de Teach-In-procedure voor de draadloze af-standsbediening uit (in fabriek al uitgevoerd)
1. Verwijder het klepje van het batterijvak aan de ach-terkant van de draadloze afstandsbediening.
2. Plaats en controleer de batterijen (3 x AAA).3. Schakel de Teach-In-toets (30) op de schakeladap-
ter in (2 x drukken). 4. In het batterijvak bevindt zich boven de batterijen
een kleine rode toets (21).5. Druk de toets in, een blauw lampje begint te knip-
peren.6. Houd de toets ingedrukt tot het blauwe lampje
brandt zonder te knipperen, dan is het pairen afge-rond.
Bluetooth®
1. Download de standaard “Swissflex”-app van de website voor Android (Google Play) of Apple iOs (App Store).
2. Installeer de standaard “Swissflex”-app op uw smartphone of tablet.
3. Installatie / Ingebruikneming, zie handleiding van het Bluetooth RF-Gateway
Synchroonfunctie (met synchroonkabel)
Indien twee uni 14_/22_/20_95RF door middel van een synchroonkabel met elkaar worden verbonden (aan-sluiting connector (23)), is de synchroonfunctie (17) nodig. Door de knop (17) ingedrukt te houden, wordt de synchroonfunctie geactiveerd/gedeactiveerd. Door op de verstelknoppen (6-7) te drukken, worden de aandrijvingen gesynchroniseerd, waarna ze zich in de gewenste richting bewegen. Na succesvolle activering licht de knop blauw op en blijft branden. Na succes-volle deactivering licht de knop wit op. Koppel de syn-Koppel de syn-chroonkabel en voer als volgt een reset uit:
• Houd de geheugenknop (18) 3 seconden ingedrukt.• De knoppen M1-M4 lichten eerst blauw en vervol-
gens wit op.• Na enkele seconden knippert de achtergrondver-
lichting één keer wit.• Druk binnen één seconde op de knop synchro (17)
en houd deze ingedrukt. De motoren gaan terug naar een vlakke stand.
• Als de complete achtergrondverlichting 2 x wit knip-pert, dan kunt u de knop synchro (17) loslaten.
31NL Gebruiksaanwijzing
De interne tellerstanden van de afzonderlijke motoren staan nu op “0” en de synchroonfunctie kan correct functioneren.
Vloerverlichting
Druk op de toets “Vloerverlichting” (8) om de vloerver-lichting aan te zetten. Deze wordt na 30 minuten auto-matisch uitgeschakeld of door nogmaals op de toets te drukken. Als u de toets indrukt, licht deze blauw op.
Zaklamp
Houd de toets “Zaklamp” (5) ingedrukt om de zaklamp te laten schijnen. Als u de toets loslaat, dooft het licht. Als de zaklamp is ingeschakeld, licht deze toets blauw op.
Toetsblokkering
Houd de toets “Toetsblokkering” (20) vijf seconden ingedrukt om de toetsen te blokkeren. Als de toetsen geblokkeerd zijn knipperen alle toetsen (behalve Stop-contact (19), Zaklamp (5), Vloerverlichting (8) en Toet-senblokkering (20)) twee keer (blauw).Als u op een geblokkeerde toets drukt, knipperen alle toetsen twee keer (wit). Houd de toets “Toetsblok-kering” (20) nogmaals vijf seconden ingedrukt om de toetsen weer te deblokkeren. Als de toetsen weer zijn gedeblokkeerd knipperen alle toetsen twee keer (blauw).
Verstelmogelijkheden «Touch»De slaap- en zitstanden zijn bij aflevering voorgepro-grammeerd.
M1 Ontspannen positie voor lezen en tv-kijken M2 Verlichtende positie bij verkoudheid of klachten
met betrekking tot de luchtwegen en het hart-vaatstelsel
M3 Ergonomische positie bij rugpijn en tussenwer-velschijfklachten
M4 Uitstap- en instaphulp
U kunt de standen ook naar uw individuele voorkeur instellen.
Terugzetten van de in de fabriek geprogrammeerde geheugenposities
Houd de geheugentoets (18) drie seconden lang in-gedrukt. De achtergrondverlichting knippert dan één keer, waarna u binnen één seconde op de toets voor vloerverlichting (8) moet drukken. Als bevestiging dat het terugzetten van de fabrieksinstellingen is gelukt, knippert de verlichting van de RF-Touch twee keer.
U slaat een zit- of ligstand als volgt op onder een geheugentoets
1. Druk binnen twee seconden drie keer op de geheu-gentoets (18).
2. De geheugentoetsen lichten blauw op (1-4).3. Druk binnen drie seconden één keer op de gewens-
te geheugentoets (1-4) (1-4).
Als u een nieuwe stand programmeert, wordt de oude stand automatisch overschreven. Als de stand is ge-programmeerd, ziet u dat aan de gekozen geheugen-toets die wit oplicht. Twee seconden nadat u de geheu-gentoets loslaat, lichten alle geheugentoetsen wit op.
U kunt de opgeslagen stand als volgt weer oproepen
Druk net zolang op de toets voor de gewenste geheu-genpositie (1-4) (1-4), totdat alle ligzones hun gepro-grammeerde eindstand bereikt hebben. Tot de zones hun eindstand hebben bereikt, licht de geheugentoets blauw op.
Terug naar de horizontale stand
Met de «alle zones omlaag» toets (7) kunt u alle ligzo-nes tegelijk in de horizontale stand laten zakken.
Onderhoud «Touch»Uw uni 14_/22_/20_95RF is een hoogwaardig product dat ontwikkeld is om u jarenlang op betrouwbare wijze van dienst te zijn. Wij adviseren u het bed met een dro-ge doek af te stoffen.
U vervangt de batterijen van uw draadloze afstands-bediening als volgt
Verwijder het klepje van het batterijvak (21) aan de achterkant van de draadloze afstandsbediening. Plaats drie AAA-batterijen, let daarbij op de +/- mar-kering. Schuif het klepje weer dicht.
U vervangt de batterijen (29) van de schakeladapter van uw uni 14_/22_/20_95RF als volgt (batterijen voor nood-uitknop)
Haal de batterijen voorzichtig uit de batterijclips. Let bij het plaatsen van de twee 9 volt-blokbatterijen op de +/- markering. De batterijen in de schakeladapter zorgen voor stroom bij een stroomuitval.
Wat te doen bij storingen «Touch»Wanneer er iets mis is met uw uni 14_/22_/20_95RF, probeer dan aan de hand van de volgende instructies de storing op te lossen. Als het probleem niet is op te lossen, trek dan de stekker uit het stopcontact en neem contact op met uw Swissflex-speciaalzaak.
Stroomuitval in zitstand, nood-uitknop
In de schakeladapter bevinden zich twee blokbatte-rijen (29) om uw bed ook bij stroomuitval in de vlakke

32 Gebruiksaanwijzing NL
Probleem Mogelijke oorzaken Oplossing
Afstandsbedie-ning of aandrijf-mechanisme werkt niet.
Geen netspanning. Netspanning herstellen.
Afstandsbediening of aandrijfmecha-nisme defect.
Neem contact op met uw leverancier/distributeur.
Aandrijfme-chanisme loopt plotseling vast.
Thermoschakelaar op de transforma-tor is mogelijk uitgeschakeld of defect.
Laat het aandrijfmechanisme ca. 20-30 minuten in de ruststand staan.
De temperatuurbeveiliging in de trans-formator is mogelijk uitgeschakeld of defect.
Neem contact op met uw leverancier/distributeur.
Apparaatbeveiliging is mogelijk uitge-schakeld of defect.
Neem contact op met uw leverancier/distributeur.
Geen netspanning. Netspanning herstellen.
Stroomtoevoer (net en/of afstands-bediening/aandrijfmechanisme) onderbroken.
Toevoer controleren en indien nodig verbinding herstel-len.
De niet van netspanning afhankelijke elektrische te-rugstelfunctie werkt niet.
Blokbatterij(en) leeg. Blokbatterij(en) controleren en indien nodig vervangen.
Blokbatterij(en) niet aangesloten. Blokbatterij(en) aansluiten.
Technische gegevens
Voedingsspanning: 110–240 volt Voeding draadloze afstandsbediening: 3 x AAA-batterijSchakelvermogen motoren: Onderbrekende werking afstandsbediening 2 min / 18 minSchakelvermogen stopcontactenlat: 2000 W / 10 ASchuifkracht motoren: 2 x 6000 N / 2 x 4000 NVoeding nood-uitknop: 2 x 9 volt-blokbatterij
slaapstand te brengen:
Houd de nood-uitknop (30) net zolang ingedrukt totdat alle ligzones de horizontale stand hebben bereikt. Als er weer netspanning is, moet na een wachttijd van ten minste 10 sec. als volgt een “reset” worden uitge-voerd:
• Houd de geheugenknop (18) 3 seconden ingedrukt. • De knoppen M1-M4 lichten eerst blauw en vervol-
gens wit op.• Na enkele seconden knippert de achtergrondver-
lichting één keer wit.• Druk binnen één seconde op de knop synchro (17)
en houd deze ingedrukt. De motoren gaan terug naar een vlakke stand.
• Als de complete achtergrondverlichting 2 x witknip-pert, dan kunt u de knop Synchro (17) loslaten.
De interne tellerstanden van de afzonderlijke motoren staan nu op “0” en de opgeslagen geheugenposities worden weer correct gezet.
Het gebruik van de nood-uitknop vraagt erg veel bat-terijvermogen; ze moeten dan ook worden vervangen.
De uni 14_/22_/20_95RF werkt niet, terwijl hij aan staat en alle onderdelen goed zijn aangesloten
Trek de stekker uit het stopcontact. Wacht een paar minuten en doe daarna de stekker weer in het stop-contact. Controleer eventueel met een nachtlampje de netspanning (240 V). Als er geen stroom is, moet u de zekering controleren. Druk op de «alle zones omlaag» toets (7) om alle in-
stellingen terug te zetten. Aangezien de bediening van de uni 14_/22_/20_95RF microprocessoren bevat, kun-nen netschommelingen storingen veroorzaken.
De draadloze afstandsbediening werkt niet (de ach-tergrondverlichting werkt niet)
Vervang de batterijen. Verwijder eventuele obstakels tussen de draadloze afstandsbediening en het motor-bedieningsapparaat.
Indien het systeem weer stroom heeft na een stro-omstoring
Druk voor het opnieuw in gebruik nemen van de uni 14_/22_/20_95RF net zolang op de knop (30) van de schakeladapter (28) totdat alle zones omlaag zijn (ho-rizontale stand) en dit door 2 x knipperen van de nood-verlichting van de motor wordt bevestigd (kan 20 sec. duren).

33NL Gebruiksaanwijzing
Draadloze afstandsbediening «Classic»
1 Aandrijving hoofdzone «omhoog» 2 Aandrijving hoofdzone «omlaag» 3 Aandrijving rugzone «omhoog» 4 Aandrijving rugzone «omlaag» 5 Aandrijving bovenbeenzone «omhoog» 6 Aandrijving bovenbeenzone «omlaag» 7 Aandrijving onderbeenzone «omhoog» 8 Aandrijving onderbeenzone «omlaag» 9 Alle zones «omhoog»10 Alle zones «omlaag»11 Zaklamp12 Batterijvak (achterkant draadloze af-(achterkant draadloze af-
standsbediening)13 3 x AAA-batterij (bij de levering inbegrepen)
1 + 2 Vloerverlichting 3 + 4 Stopcontactenlat aan / uit 10 + 11 Synchroonfunctie inschakelen /
uitschakelen
Motorbedieningsapparaat
14 Aansluiting synchroonkabel 15 Noodverlichting (intern)16 Adapteraansluiting / Aansluiting extern
vloerverlichting17 Aansluiting voor extra motoren18 Noodverlichting (intern, achterkant van de motor)
19 Schakeladapter
20 Batterijvak voor nood-uitknop (2 x 9 V) 21 Nood-uitknop / teach-in-toets
22 Stopcontactenlat (optioneel)
18
1417
15
16 (2 kabels)
22
20
19 21
1
3
5
7
9
2
4
6
8
10
11
12
uni 14_/22_/20_95RF «Classic»uni 21_95RF
12
13

34 Gebruiksaanwijzing NL
Ingebruikneming «Classic»Plaats de batterijen in de draadloze afstandsbedie-ning
Verwijder aan de achterkant het klepje van het batte-rijvak (12) van de draadloze afstandsbediening. Plaats drie AAA-batterijen (13), let daarbij op de +/- marke-ring. Schuif het klepje weer dicht. Het bereik van de draadloze afstandsbediening is maximaal 15 meter.
Voer de Teach-In-procedure voor de draadloze af-standsbediening uit (in fabriek al uitgevoerd)
1. Verwijder het klepje van het batterijvak aan de ach-terkant van de draadloze afstandsbediening.
2. Plaats en controleer de batterijen (3 x AAA).3. Schakel de Teach-In-toets (21) op de schakeladap-
ter in (2 x drukken). De noodverlichting van de motor brandt nu.
4. Houd de knoppen (1+2) op de draadloze afstands-bediening ingedrukt totdat de noodverlichting van de aandrijving niet meer brandt. Dan is het pairen afgerond.
Synchroonfunctie (met synchroonkabel)
Indien twee uni 14_/22_/20_95RF door middel van een synchroonkabel met elkaar worden verbonden (aans-luiting connector (14)), is de synchroonfunctie nodig. Door de knop (10+11) ingedrukt te houden, wordt de synchroonfunctie geactiveerd/gedeactiveerd. Door op de verstelknoppen (1-8) te drukken, worden de aan-drijvingen gesynchroniseerd, waarna ze zich in de ge-wenste richting bewegen. Koppel de synchroonkabel en voer als volgt een reset uit:
Druk net zolang op de knop (21) van de schakeladapter (19) totdat alle zones omlaag zijn (horizontale stand) en dit door 2 x knipperen van de noodverlichting van de motor wordt bevestigd (kan 20 sec. duren).
De interne tellerstanden van de afzonderlijke motoren staan nu op “0” en de synchroonfunctie kan correct functioneren.
Vloerverlichting
Druk op de toets “Vloerverlichting” (1+2) om de vlo-erverlichting aan te zetten. Deze wordt na 30 minuten automatisch uitgeschakeld of door nogmaals op de toets te drukken.
Zaklamp
Houd de toets “Zaklamp” (11) ingedrukt om de za-klamp te laten schijnen. Als u de toets loslaat, dooft het licht.
Verstelmogelijkheden «Classic»Met de knoppen (1-8) kunt u het hoofd-, rug-, boven-been- en voetgedeelte afzonderlijk instellen.
Terug naar de horizontale stand
Met de «alle zones omlaag» toets (10) kunt u alle lig-zones tegelijk in de horizontale stand laten zakken.
Onderhoud «Classic»Uw uni 14_/22_/20_95RF is een hoogwaardig product dat ontwikkeld is om u jarenlang op betrouwbare wijze van dienst te zijn. Wij adviseren u het bed met een dro-ge doek af te stoffen.
U vervangt de batterijen van uw draadloze afstands-bediening als volgt
Verwijder het klepje van het batterijvak (12) aan de achterkant van de draadloze afstandsbediening. Plaats drie AAA-batterijen, let daarbij op de +/- markering. Schuif het klepje weer dicht.
U vervangt de batterijen (19) van de schakeladapter van uw uni 14_/22_/20_95RF als volgt (batterijen voor nood-uitknop)
Haal de batterijen voorzichtig uit de batterijclips. Let bij het plaatsen van de twee 9 volt-blokbatterijen op de +/- markering. De batterijen in de schakeladapter zor-gen voor stroom bij een stroomuitval.
Wat te doen bij storingen «Classic»Wanneer er iets mis is met uw uni 14_/22_/20_95RF, probeer dan aan de hand van de volgende instructies de storing op te lossen. Als het probleem niet is op te lossen, trek dan de stekker uit het stopcontact en neem contact op met uw Swissflex-speciaalzaak.
Stroomuitval in zitstand, nood-uitknop
In de schakeladapter (19) bevinden zich twee blok-batterijen om uw bed ook bij stroomuitval in de vlakke slaapstand te brengen:
Houd de nood-uitknop (21) net zolang ingedrukt totdat alle ligzones de horizontale stand hebben bereikt. Als er weer netspanning is, moet na een wachttijd van ten minste 10 sec. als volgt een “reset” worden uitgevoerd:
Druk net zolang op de knop (21) van de schakeladapter (19) totdat alle zones omlaag zijn (horizontale stand) en dit door 2 x knipperen van de noodverlichting van de motor wordt bevestigd (kan 20 sec. duren).

35NL Gebruiksaanwijzing
De interne tellerstanden van de afzonderlijke motoren staan nu op “0” en de synchroonfunctie kan weer cor-rect functioneren.
Het gebruik van de nood-uitknop vraagt erg veel bat-terijvermogen; ze moeten dan ook worden vervangen.
De uni 14_/22_/20_95RF werkt niet, terwijl hij aan staat en alle onderdelen goed zijn aangesloten
Trek de stekker uit het stopcontact. Wacht een paar minuten en doe daarna de stekker weer in het stop-contact. Controleer eventueel met een nachtlampje de netspanning (240V). Als er geen stroom is, moet u de zekering controleren. Druk op de «alle zones om-laag» toets (10) om alle instellingen terug te zetten. Aangezien de bediening van de uni 14_/22_/20_95RF microprocessoren bevat, kunnen netschommelingen storingen veroorzaken.
De draadloze afstandsbediening werkt niet (de acht-ergrondverlichting werkt niet)
Vervang de batterijen. Verwijder eventuele obstakels tussen de draadloze afstandsbediening en het motor-bedieningsapparaat.
Indien het systeem weer stroom heeft na een stro-omstoring
Druk voor het opnieuw in gebruik nemen van de uni 14_/22_/20_95RF net zolang op de knop (21) van de schakeladapter (19) totdat alle zones omlaag zijn (ho-rizontale stand) en dit door 2 x knipperen van de nood-verlichting van de motor wordt bevestigd (kan 20 sec. duren).
Probleem Mogelijke oorzaken Oplossing
Afstandsbedie-ning of aandrijf-mechanisme werkt niet.
Geen netspanning. Netspanning herstellen.
Afstandsbediening of aandrijfmecha-nisme defect.
Neem contact op met uw leverancier/distributeur.
Aandrijfme-chanisme loopt plotseling vast.
Thermoschakelaar op de transforma-tor is mogelijk uitgeschakeld of defect.
Laat het aandrijfmechanisme ca. 20-30 minuten in de ruststand staan.
De temperatuurbeveiliging in de trans-formator is mogelijk uitgeschakeld of defect.
Neem contact op met uw leverancier/distributeur.
Apparaatbeveiliging is mogelijk uitge-schakeld of defect.
Neem contact op met uw leverancier/distributeur.
Geen netspanning. Netspanning herstellen.
Stroomtoevoer (net en/of afstands-bediening/aandrijfmechanisme) onderbroken.
Toevoer controleren en indien nodig verbinding herstel-len.
De niet van netspanning afhankelijke elektrische te-rugstelfunctie werkt niet.
Blokbatterij(en) leeg. Blokbatterij(en) controleren en indien nodig vervangen.
Blokbatterij(en) niet aangesloten. Blokbatterij(en) aansluiten.
Technische gegevens
Voedingsspanning: 100–240 volt Voeding draadloze afstandsbediening: 3 x AAA-batterijSchakelvermogen motoren: Onderbrekende werking afstandsbediening 2 min / 18 minSchakelvermogen stopcontactenlat: 2000 W / 10 ASchuifkracht motoren: 2 x 6000 N / 2 x 4000 NVoeding nood-uitknop: 2 x 9 volt-blokbatterij
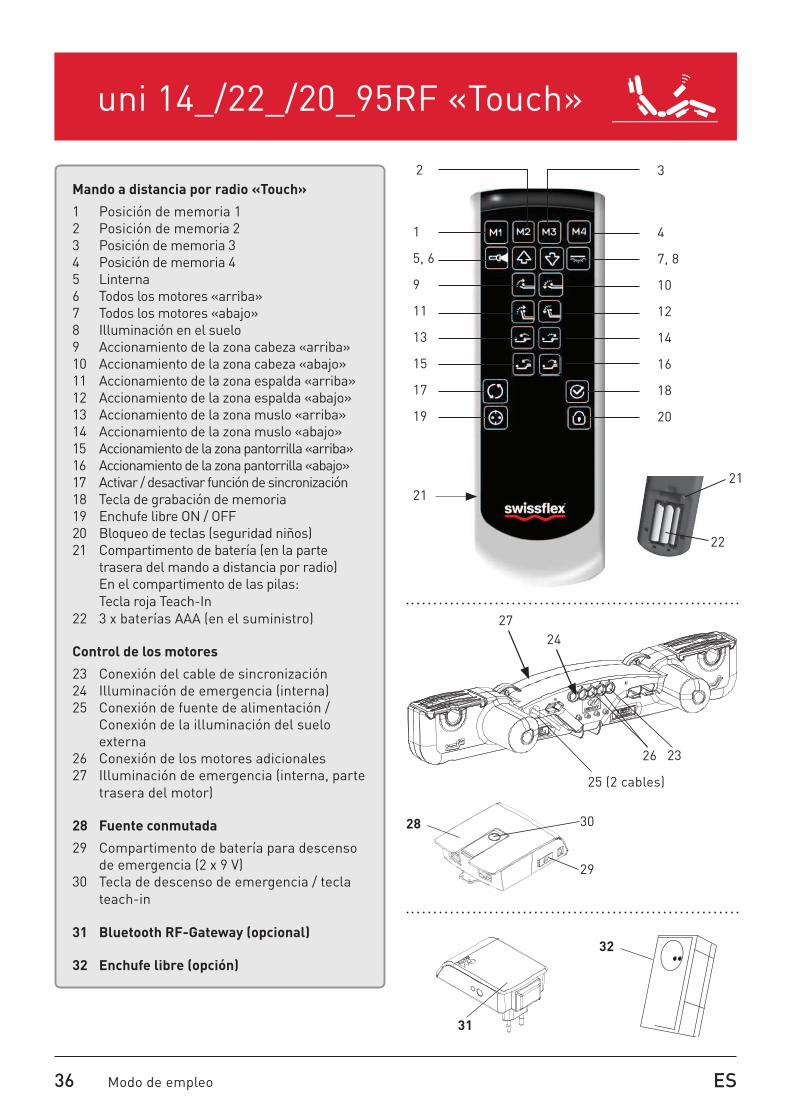
36 Modo de empleo ES
Mando a distancia por radio «Touch»
1 Posición de memoria 12 Posición de memoria 23 Posición de memoria 34 Posición de memoria 45 Linterna6 Todos los motores «arriba»7 Todos los motores «abajo»8 Illuminación en el suelo9 Accionamiento de la zona cabeza «arriba»10 Accionamiento de la zona cabeza «abajo»11 Accionamiento de la zona espalda «arriba» 12 Accionamiento de la zona espalda «abajo» 13 Accionamiento de la zona muslo «arriba» 14 Accionamiento de la zona muslo «abajo» 15 Accionamiento de la zona pantorrilla «arriba»16 Accionamiento de la zona pantorrilla «abajo»17 Activar / desactivar función de sincronización 18 Tecla de grabación de memoria19 Enchufe libre ON / OFF20 Bloqueo de teclas (seguridad niños)21 Compartimento de batería (en la parte
trasera del mando a distancia por radio) En el compartimento de las pilas: Tecla roja Teach-In22 3 x baterías AAA (en el suministro)
Control de los motores
23 Conexión del cable de sincronización24 Illuminación de emergencia (interna)25 Conexión de fuente de alimentación / Conexión de la illuminación del suelo
externa26 Conexión de los motores adicionales27 Illuminación de emergencia (interna, parte
trasera del motor)
28 Fuente conmutada
29 Compartimento de batería para descenso de emergencia (2 x 9 V)
30 Tecla de descenso de emergencia / tecla teach-in
31 Bluetooth RF-Gateway (opcional)
32 Enchufe libre (opción)
2 3
1
5, 6
9
11
13
15
17
19
21
4
7, 8
10
12
14
16
18
20
27
2326
24
25 (2 cables)
31
32
29
28 30
uni 14_/22_/20_95RF «Touch»uni 21_95RF
21
22

37ES Modo de empleo
Confort y Salud¡Bienvenido al mundo Swissflex!
Su Swissflex uni 14_/22_/20_95RF es un producto suizo de calidad. Si respeta las instrucciones de uso y seguridad, se sentirá completamente satisfecho du-rante años. Además de otras muchas ventajas, su uni 14_/22_/20_95RF le ofrece un entorno de descanso exento de perturbaciones. Gracias a EcoTec, todos los cables eléctricos que van del enchufe a la cama prác-ticamente no contienen corriente eléctrica (menos de 0,5 vatios).
Medidas de seguridad
Este aparato puede ser utilizado tanto por niños a partir de ocho años como también por personas con limitaciones físicas, dificulta-des mentales o sensoriales o sin experiencia ni conocimiento si se les supervisa o se les enseña a usar el aparato adecuadamente y entienden los riesgos que con-lleva. Los niños no deben jugar con el aparato. La limpieza y el mantenimiento que conciernen al usuario no deben llevarlos a cabo niños sin que se les supervise.¡ATENCION! No exponga la uni 14_/22_/20_95RF y sus accesorios a la lluvia ni a otras fuentes de hu-medad, con el fin de evitar riesgos de incendio y de descargas eléctri-cas. Si penetrase algún líquido en los accesorios, desconecte el ca-ble de red de la toma de corriente y pida a su distribuidor especiali-zado Swissflex que realice una ins-pección.Al montar un somier, tenga en
cuenta que todos los movimientos del cabecero, espalda y piernas no se atasquen por el contacto con los muebles.Asegúrese de que todos los en-chufes están desconectados cuan-do monte o desmonte un somier o una estructura de cama. No en-chufe ningún aparato a un enchufe libre (32) que pudiera poner en pe-ligro a personas u objetos, en par-ticular, ninguna herramienta eléc-trica como por ejemplo, sierras, taladros y otros, (riesgo de heridas) o un aparato de calefacción móvil (riesgo de incendio). No coloque el cable de alimentación del enchufe libre (32) a la cama de forma que los posibles bordes afilados o plie-gues estrechos estropeen el ais-lamiento del cableado. El cable de conexión no debe atravesar en ningún caso el mecanismo de re-gulación del somier. En caso de que se dañaran los cables, la caja del mando o el enchufe libre (32), la cama regulable dejaría de fun-cionar. Desenchufe el aparato de la red eléctrica e informe a su distri-buidor.No abra nunca el compartimento de la toma de corriente libre (32)

38 Modo de empleo ES
a la que llega el cable. En caso de intervención en los elementos con-ductores del enchufe libre (32) se invalidará toda pretensión de ga-rantía.Maneje cuidadosamente la uni 14_/22_/20_95RF y sus accesorios, no la desmonte ni la modifique ni permita que los niños jueguen con ella. Evite que las personas con un estado de salud débil utilicen el producto sin supervisión. Este pro-ducto no puede ser utilizado con un producto sanitario ni incorpo-rarse a un producto sanitario. Este producto no puede ser utilizando en un entorno donde se prevea la presencia de gases o vapores in-flamables o explosivos (por ejem-plo, anestésicos). Este producto no debe utilizarse para subir y bajar cargas. Utilice solamente piezas de recambio que hayan sido fabri-cadas o autorizadas por Swissflex. Solo dichas piezas ofrecen un gra-do de seguridad suficiente.El somier debe usarse únicamente con la fuente de alimentación su-ministrada.
Puesta en marcha «Touch»Coloque las baterías en el mando a distancia por radio
Retire la parte trasera de la tapa del compartimen-to de la batería (21) del mando a distancia por radio. Coloque tres baterías AAA (22) teniendo en cuenta la polaridad +/-. Deslice de nuevo la tapa para cerrar. El alcance del mando a distancia por radio es de un máxi-mo de 15 m.
Programación del mando a distancia por radio (Teach-In) (ya programado de fábrica)
1. Retire la tapa de la pila en la parte trasera del man-do a distancia por radio.
2. Cargue / compruebe las pilas (3 x AAA).3. Active la tecla Teach-In (30) del fuente conmutada
(presione 2 x).4. En el compartimento de las pilas hay una pequeña
tecla roja encima de las pilas (21).5. Pulse la tecla y empezará a parpadear un LED azul.6. Mantenga la tecla pulsada hasta que el LED azul se
ilumine de forma permanente. Entonces se ha com-pletado la conexión.
Bluetooth®
1. Descárguese la aplicación estándar «Swissflex» de la correspondiente plataforma para Android (Google play) o Apple iOs (App Store).
2. Instale la aplicación estándar «Swissflex» en su smartphone / tableta.
3. Instalación / Puesta en marcha, véase el manual del Bluetooth RF-Gateway.
Función de sincronización (con cable de sincronización)
Si dos uni 14_/22_/20_95RF están conectadas entre sí mediante un cable de sincronización (conexión del en-chufe (23)), es necesaria la función de sincronización (17). Al pulsar y mantener presionada la tecla (17), se activa/desactiva la función de sincronización. Al pul-sar la tecla de desplazamiento (6-7), los dispositivos de accionamiento se sincronizan y se desplazan en la dirección accionada. Cuando se ha activado correcta-mente, la tecla se ilumina permanentemente en azul. Cuando se ha desactivado correctamente, la tecla se ilumina en blanco. Después de conectar el cable de sincronización, realice un trayecto de reinicio como se indica:
• Presionar la tecla de almacenamiento en memoria (18) durante 3 segundos.
• Las teclas M1-M4 se iluminarán en color azul pri-mero y blanco después.
• Tras unos segundos se encenderá una vez la ilumi-nación de fondo en color blanco.
• Presionar y mantener pulsada antes de un segundo la tecla de sincronización (17). Los motores se po-nen en posición baja.
• Cuando la iluminación de fondo se encienda total-mente 2 veces en color blanco, se puede soltar la tecla de sincronización (17).
Ahora se han puesto a «0» los contadores de los mo-tores individuales y la función de sincronización puede funcionar correctamente.
Iluminación de la parte inferior
Presione la tecla «iluminación inferior» (8) para que se ilumine la parte inferior. Se apagará automáticamente una vez transcurridos 30 minutos o al presionar de nuevo la
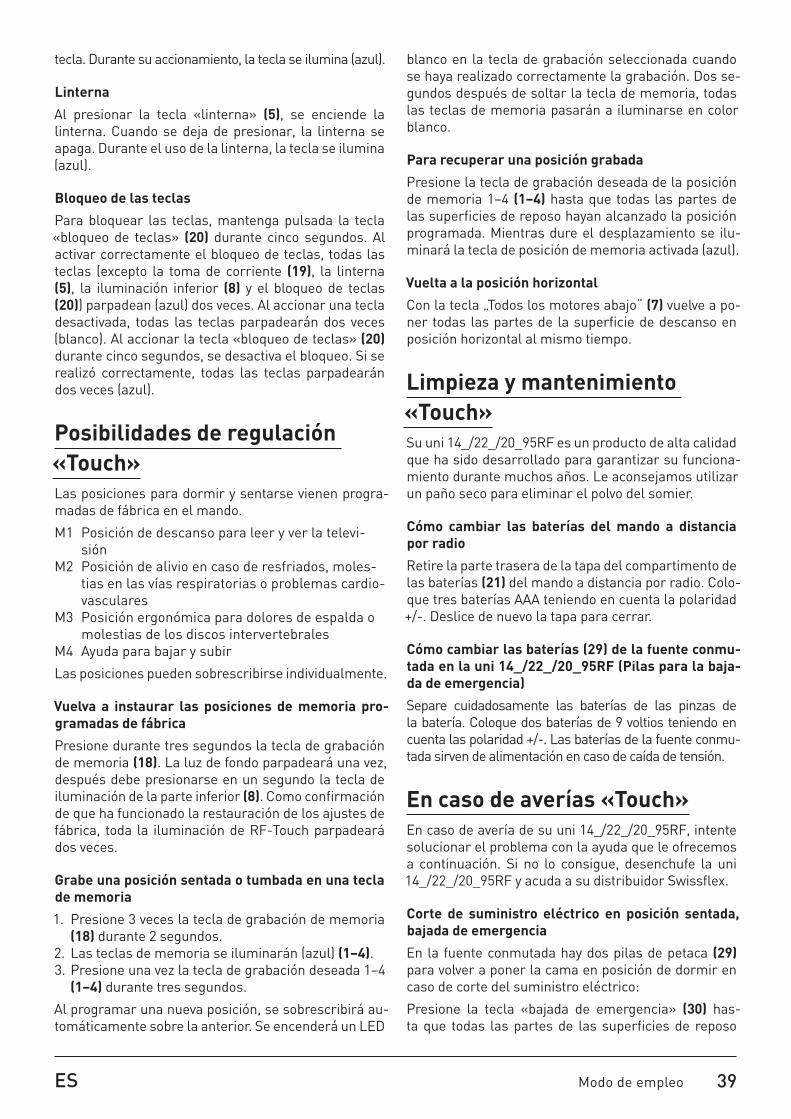
39ES Modo de empleo
tecla. Durante su accionamiento, la tecla se ilumina (azul).
Linterna
Al presionar la tecla «linterna» (5), se enciende la linterna. Cuando se deja de presionar, la linterna se apaga. Durante el uso de la linterna, la tecla se ilumina (azul).
Bloqueo de las teclas
Para bloquear las teclas, mantenga pulsada la tecla «bloqueo de teclas» (20) durante cinco segundos. Al activar correctamente el bloqueo de teclas, todas las teclas (excepto la toma de corriente (19), la linterna (5), la iluminación inferior (8) y el bloqueo de teclas (20)) parpadean (azul) dos veces. Al accionar una tecla desactivada, todas las teclas parpadearán dos veces (blanco). Al accionar la tecla «bloqueo de teclas» (20) durante cinco segundos, se desactiva el bloqueo. Si se realizó correctamente, todas las teclas parpadearán dos veces (azul).
Posibilidades de regulación «Touch»Las posiciones para dormir y sentarse vienen progra-madas de fábrica en el mando.
M1 Posición de descanso para leer y ver la televi-sión
M2 Posición de alivio en caso de resfriados, moles-tias en las vías respiratorias o problemas cardio-vasculares
M3 Posición ergonómica para dolores de espalda o molestias de los discos intervertebrales
M4 Ayuda para bajar y subir
Las posiciones pueden sobrescribirse individualmente.
Vuelva a instaurar las posiciones de memoria pro-gramadas de fábrica
Presione durante tres segundos la tecla de grabación de memoria (18). La luz de fondo parpadeará una vez, después debe presionarse en un segundo la tecla de iluminación de la parte inferior (8). Como confirmación de que ha funcionado la restauración de los ajustes de fábrica, toda la iluminación de RF-Touch parpadeará dos veces.
Grabe una posición sentada o tumbada en una tecla de memoria
1. Presione 3 veces la tecla de grabación de memoria (18) durante 2 segundos.
2. Las teclas de memoria se iluminarán (azul) (1–4).3. Presione una vez la tecla de grabación deseada 1–4
(1–4) durante tres segundos.
Al programar una nueva posición, se sobrescribirá au-tomáticamente sobre la anterior. Se encenderá un LED
blanco en la tecla de grabación seleccionada cuando se haya realizado correctamente la grabación. Dos se-gundos después de soltar la tecla de memoria, todas las teclas de memoria pasarán a iluminarse en color blanco.
Para recuperar una posición grabada
Presione la tecla de grabación deseada de la posición de memoria 1–4 (1–4) hasta que todas las partes de las superficies de reposo hayan alcanzado la posición programada. Mientras dure el desplazamiento se ilu-minará la tecla de posición de memoria activada (azul).
Vuelta a la posición horizontal
Con la tecla „Todos los motores abajo“ (7) vuelve a po-ner todas las partes de la superficie de descanso en posición horizontal al mismo tiempo.
Limpieza y mantenimiento «Touch»Su uni 14_/22_/20_95RF es un producto de alta calidad que ha sido desarrollado para garantizar su funciona-miento durante muchos años. Le aconsejamos utilizar un paño seco para eliminar el polvo del somier.
Cómo cambiar las baterías del mando a distancia por radio
Retire la parte trasera de la tapa del compartimento de las baterías (21) del mando a distancia por radio. Colo-que tres baterías AAA teniendo en cuenta la polaridad +/-. Deslice de nuevo la tapa para cerrar.
Cómo cambiar las baterías (29) de la fuente conmu-tada en la uni 14_/22_/20_95RF (Pilas para la baja-da de emergencia)
Separe cuidadosamente las baterías de las pinzas de la batería. Coloque dos baterías de 9 voltios teniendo en cuenta las polaridad +/-. Las baterías de la fuente conmu-tada sirven de alimentación en caso de caída de tensión.
En caso de averías «Touch»En caso de avería de su uni 14_/22_/20_95RF, intente solucionar el problema con la ayuda que le ofrecemos a continuación. Si no lo consigue, desenchufe la uni 14_/22_/20_95RF y acuda a su distribuidor Swissflex.
Corte de suministro eléctrico en posición sentada, bajada de emergencia
En la fuente conmutada hay dos pilas de petaca (29) para volver a poner la cama en posición de dormir en caso de corte del suministro eléctrico:
Presione la tecla «bajada de emergencia» (30) has-ta que todas las partes de las superficies de reposo

40 Modo de empleo ES
Problema Posible causa Solución
No funciona el interruptor ma-nual o el sistema de accionamien-to.
No hay tensión de suministro de red. Establecer la conexión a la red.
El funcionamiento del interruptor manual o el sistema de accionamiento es defectuoso.
Consulte a su proveedor/vendedor.
Los dispositivos de accionamien-to han dejado de desplazarse / moverse repenti-namente.
Posiblemente se ha disparado el disyuntor térmico del transformador o bien está defectuoso.
El sistema de accionamiento debe mantenerse en reposo durante 20-30 minutos.
Posiblemente se ha disparado el protector térmico del transformador o bien está defectuoso.
Consulte a su proveedor / vendedor.
Posiblemente se ha disparado el fusible o está defectuoso.
Consulte a su proveedor / vendedor.
No hay tensión de suministro de red. Establecer la conexión a la red.
Se ha interrumpido la alimentación (red y/o interruptor manual/ dispositivo accionador adicional).
Supervisar la alimentación y restablecer el contacto, en caso necesario.
No se puede ac-cionar la función de restauración eléctrica fuera de la red.
Pila(s) de bloque vacía(s). Comprobar la(s) pila(s) de bloque y cambiarla(s) si es necesario.
La(s) pila(s) de bloque no está(n) conectada(s).
Conectar la(s) pila(s) de bloque.
Datos técnicos
Tensión de alimentación: 110–240 voltiosTensión del mando a distancia por radio: 3 x baterías AAAPotencia de conmutación de los motores: servico intermitente AB 2 min / 18 minEnchufe de conmutación: 2000 W / 10 AFuerza de empuje de los motores:2 x 6000 N / 2 x 4000 NTensión del descenso de emergencia: 2 x baterías de 9 voltios
estén en posición horizontal. Una vez restablecido el suministro eléctrico, tras un tiempo de espera de al menos 10 seg., se debe realizar un «reinicio» del si-guiente modo:
• Presionar la tecla de almacenamiento en memoria (18) durante 3 segundos. • Las teclas M1-M4 se iluminarán en color azul primero y blanco después.• Tras unos segundos se encenderá una vez la iluminación de fondo en color blanco.• Presionar y mantener pulsada antes de un segundo la tecla de sincronización (17).• Cuando la iluminación de fondo se encienda totalmente 2 veces en color blanco, se puede soltar la tecla de sincronización (17).
Ahora se han puesto a «0» los contadores de los mo-tores individuales y las posiciones de memoria alma-cenadas se pueden volver a accionar correctamente.
La bajada de emergencia provoca que las pilas se des-carguen excesivamente y deberán cambiarse.
La uni 14_/22_/20_95RF no funciona aunque está encendida y todos los componentes están correcta-mente conectados
Desenchufe el cable de alimentación. Espere un mi-nuto y vuelva a enchufarlo a la corriente. Compruebe si fuera necesario con una lámpara nocturna si la ten-sión eléctrica (240 V) es correcta. Si no hay corriente, compruebe los fusibles. Presione la tecla “Todos los motores abajo“ (7) para
volver a establecer todos los ajustes. Como el control de la uni 14_/22_/20_95RF incluye microprocesadores, pueden producirse averías en caso de fluctuaciones eléctricas.
El mando a distancia no funciona (La iluminación de fondo no funciona)
Ponga baterías nuevas. Aleje, si fuera necesario, los obstáculos entre el mando a distancia por radio y el control del motor.
Después de una caída de tensión, cuando el sistema vuelve a recibir corriente
Antes de volver a poner en marcha el uni 14_/22_/20_95RF, presione el botón (30) en la fuente conmutada (28) hasta que todos los motores hayan descendido y se confirme mediante 2 parpadeos del alumbrado de emergencia del motor. (Puede durar 20 segundos).
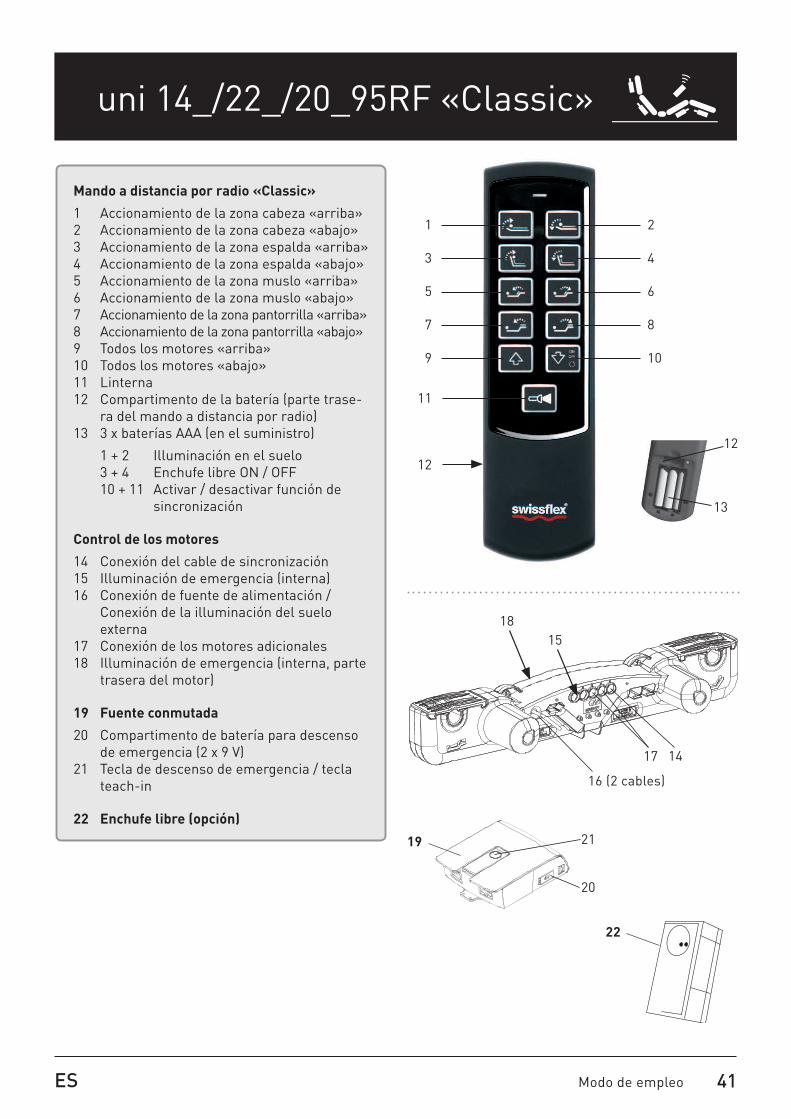
41ES Modo de empleo
Mando a distancia por radio «Classic»
1 Accionamiento de la zona cabeza «arriba» 2 Accionamiento de la zona cabeza «abajo» 3 Accionamiento de la zona espalda «arriba» 4 Accionamiento de la zona espalda «abajo» 5 Accionamiento de la zona muslo «arriba» 6 Accionamiento de la zona muslo «abajo» 7 Accionamiento de la zona pantorrilla «arriba»8 Accionamiento de la zona pantorrilla «abajo» 9 Todos los motores «arriba»10 Todos los motores «abajo»11 Linterna12 Compartimento de la batería (parte trase-
ra del mando a distancia por radio)13 3 x baterías AAA (en el suministro)
1 + 2 Illuminación en el suelo 3 + 4 Enchufe libre ON / OFF 10 + 11 Activar / desactivar función de
sincronización
Control de los motores
14 Conexión del cable de sincronización15 Illuminación de emergencia (interna)16 Conexión de fuente de alimentación /
Conexión de la illuminación del suelo externa
17 Conexión de los motores adicionales18 Illuminación de emergencia (interna, parte
trasera del motor)
19 Fuente conmutada
20 Compartimento de batería para descenso de emergencia (2 x 9 V)
21 Tecla de descenso de emergencia / tecla teach-in
22 Enchufe libre (opción)
18
1417
15
16 (2 cables)
22
20
19 21
1
3
5
7
9
2
4
6
8
10
11
12
uni 14_/22_/20_95RF «Classic»uni 21_95RF
12
13

42 Modo de empleo ES
Puesta en marcha «Classic»Coloque las baterías en el mando a distancia por radio
Retire la parte trasera de la tapa del compartimen-to de la batería (12) del mando a distancia por radio. Coloque tres baterías AAA (13) teniendo en cuenta la polaridad +/-. Deslice de nuevo la tapa para cerrar. El alcance del mando a distancia por radio es de un má-ximo de 15 m.
Programación del mando a distancia por radio (Teach-In) (ya programado de fábrica)
1. Retire la tapa de la pila en la parte trasera del man-do a distancia por radio.
2. Cargue / compruebe las pilas (3 x AAA).3. Active la tecla Teach-In (21) del fuente conmutada
(presione 2 x). Ahora se enciende el alumbrado de emergencia del motor.
4. Presione al mismo tiempo el botón (1+2) en el mando a distancia por radio hasta que se apague el alumbrado de emergencia. Entonces se ha com-pletado la conexión.
Función de sincronización (con cable de sincroniza-ción)
Si dos uni 14_/22_/20_95RF están conectadas entre sí mediante un cable de sincronización (conexión del en-chufe (14)), es necesaria la función de sincronización. Al pulsar y mantener presionada las teclas (10+11), se activa/desactiva la función de sincronización. Al pul-sar la tecla de desplazamiento (1-8), los dispositivos de accionamiento se sincronizan y se desplazan en la dirección accionada. Después de conectar el cable de sincronización, realice un trayecto de reinicio como se indica:
Presione el botón (21) en la fuente conmutada (19) hasta que todos los motores hayan descendido y se confirme mediante 2 parpadeos del alumbrado de emergencia del motor. (Puede durar 20 segundos).
Ahora los contadores internos de cada motor están a „0” y la función de sincronización puede funcionar correctamente.
Iluminación de la parte inferior
Presione las teclas «iluminación inferior» (1+2) para que se ilumine la parte inferior. Se apagará automáti-camente una vez transcurridos 30 minutos o al presio-nar de nuevo la tecla.
Linterna
Al presionar la tecla «linterna» (11), se enciende la linterna. Cuando se deja de presionar, la linterna se apaga.
Posibilidades de regulación «Classic»Con los botones (1-8) puede configurar de forma indi-vidualizada el reposacabezas, el respaldo y la zona de los muslos y los pies.
Vuelta a la posición horizontal
Con la tecla „Todos los motores abajo“ (10) vuelve a poner todas las partes de la superficie de descanso en posición horizontal al mismo tiempo.
Limpieza y mantenimiento «Classic»Su uni 14_/22_/20_95RF es un producto de alta calidad que ha sido desarrollado para garantizar su funciona-miento durante muchos años. Le aconsejamos utilizar un paño seco para eliminar el polvo del somier.
Cómo cambiar las baterías del mando a distancia por radio
Retire la parte trasera de la tapa del compartimento de las baterías (12) del mando a distancia por radio. Coloque tres baterías AAA teniendo en cuenta la pola-ridad +/-. Deslice de nuevo la tapa para cerrar.
Cómo cambiar las baterías de la fuente conmutada (19) en la uni 14_/22_/20_95RF (Pilas para la bajada de emergencia)
Separe cuidadosamente las baterías de las pinzas de la batería. Coloque dos baterías de 9 voltios teniendo en cuenta las polaridad +/-. Las baterías de la fuente conmutada sirven de alimentación en caso de caída de tensión.
En caso de averías «Classic»En caso de avería de su uni 14_/22_/20_95RF, intente solucionar el problema con la ayuda que le ofrecemos a continuación. Si no lo consigue, desenchufe la uni 14_/22_/20_95RF y acuda a su distribuidor Swissflex.
Corte de suministro eléctrico en posición sentada, bajada de emergencia
En la fuente conmutada (19) hay dos pilas de petaca para volver a poner la cama en posición de dormir en caso de corte del suministro eléctrico:
Presione la tecla «bajada de emergencia» (21) has-ta que todas las partes de las superficies de reposo estén en posición horizontal. Una vez restablecido el suministro eléctrico, tras un tiempo de espera de al menos 10 seg., se debe realizar un «reinicio» del si-guiente modo:

43ES Modo de empleo
Presione el botón (21) en la fuente conmutada (19) hasta que todos los motores hayan descendido y se confirme mediante 2 parpadeos del alumbrado de emergencia del motor. (Puede durar 20 segundos).
Ahora los contadores internos de cada motor están a „0” y la función de sincronización puede volver a funci-onar correctamente.
La bajada de emergencia provoca que las pilas se de-scarguen excesivamente y deberán cambiarse.
La uni 14_/22_/20_95RF no funciona aunque está encendida y todos los componentes están correcta-mente conectados
Desenchufe el cable de alimentación. Espere un mi-nuto y vuelva a enchufarlo a la corriente. Compruebe si fuera necesario con una lámpara nocturna si la ten-sión eléctrica (240V) es correcta. Si no hay corriente, compruebe los fusibles. Presione la tecla “Todos los motores abajo“ (10) para volver a establecer todos los ajustes. Como el control de la uni 14_/22_/20_95RF in-cluye microprocesadores, pueden producirse averías en caso de fluctuaciones eléctricas.
El mando a distancia no funciona (La iluminación de fondo no funciona)
Ponga baterías nuevas. Aleje, si fuera necesario, los obstáculos entre el mando a distancia por radio y el control del motor.
Después de una caída de tensión, cuando el sistema vuelve a recibir corriente
Antes de volver a poner en marcha el uni 14_/22_/20_95RF, presione el botón (21) en la fuen-te conmutada (19) hasta que todos los motores hayan descendido y se confirme mediante 2 parpadeos del alumbrado de emergencia del motor. (Puede durar 20 segundos).
Problema Posible causa Solución
No funciona el interruptor ma-nual o el sistema de accionamien-to.
No hay tensión de suministro de red. Establecer la conexión a la red.
El funcionamiento del interruptor manual o el sistema de accionamiento es defectuoso.
Consulte a su proveedor/vendedor.
Los dispositivos de accionamien-to han dejado de desplazarse / moverse repenti-namente.
Posiblemente se ha disparado el disyuntor térmico del transformador o bien está defectuoso.
El sistema de accionamiento debe mantenerse en reposo durante 20-30 minutos.
Posiblemente se ha disparado el protector térmico del transformador o bien está defectuoso.
Consulte a su proveedor / vendedor.
Posiblemente se ha disparado el fusible o está defectuoso.
Consulte a su proveedor / vendedor.
No hay tensión de suministro de red. Establecer la conexión a la red.
Se ha interrumpido la alimentación (red y/o interruptor manual/ dispositivo accionador adicional).
Supervisar la alimentación y restablecer el contacto, en caso necesario.
No se puede ac-cionar la función de restauración eléctrica fuera de la red.
Pila(s) de bloque vacía(s). Comprobar la(s) pila(s) de bloque y cambiarla(s) si es necesario.
La(s) pila(s) de bloque no está(n) conectada(s).
Conectar la(s) pila(s) de bloque.
Datos técnicos
Tensión de alimentación: 100–240 voltiosTensión del mando a distancia por radio: 3 x baterías AAAPotencia de conmutación de los motores: servico intermitente AB 2 min / 18 minEnchufe de conmutación: 2000 W / 10 AFuerza de empuje de los motores:2 x 6000 N / 2 x 4000 NTensión del descenso de emergencia: 2 x baterías de 9 voltios

44 Istruzioni d’uso IT
Radiotelecomando «Touch»
1 Posizione Memory 12 Posizione Memory 23 Posizione Memory 34 Posizione Memory 45 Pila tascabile6 Tutti i motori «su»7 Tutti i motori «giù»8 Illuminazione da pavimento9 Azionamento zona testiera «su» 10 Azionamento zona testiera «giù» 11 Azionamento zona dorsale «su» 12 Azionamento zona dorsale «giù» 13 Azionamento zona femorale «su» 14 Azionamento zona femorale «giù» 15 Azionamento zona polpacci «su» 16 Azionamento zona polpacci «giù» 17 Attivare/disattivare la funzione di sincronizzazione 18 Tasto Memorizza19 Presa di corrente libera ON / OFF20 Blocco tasti (sicura per bambini)21 Coperchio del vano batterie (parte posteriore radiotelecomando) Nel vano batterie: tasto rosso Teach-In22 3 batterie AAA (in dotazione)
Sistema di comando
23 Collegamento del cavo di sincronizzazione24 Illuminazione d‘emergenza (interna)25 Collegamento trasformatore / Collega-
mento illuminazione pavimento esterna26 Collegamento per motori supplementari27 Illuminazione d‘emergenza (interna, retro
del motore)
28 Alimentatore a commutazione
29 Vano batterie per abbassamento di emer-genza (2 x 9 V)
30 Tasto per abbassamento di emergenza / tasto teach-in
31 Bluetooth RF-Gateway (opzionale)
32 Presa di corrente libera (facoltativo)
2 3
1
5, 6
9
11
13
15
17
19
21
4
7, 8
10
12
14
16
18
20
27
2326
24
25 (2 cavi)
31
32
29
28 30
uni 14_/22_/20_95RF «Touch»uni 21_95RF
21
22

45IT Istruzioni d’uso
Comfort e saluteBenvenuti nel mondo di Swissflex!
La vostra uni 14_/22_/20_95RF Swissflex è un prodot-to svizzero di qualità. È sufficiente attenersi alle poche istruzioni d‘utilizzo e di sicurezza per garantirne un funzionamento perfetto per molti anni. Oltre a innu-merevoli altri vantaggi, la vostra uni 14_/22_/20_95RF vi assicura un sonno indisturbato. Tutti i collegamenti elettrici dall’alimentatore al letto si trovano in quasi totale assenza di corrente (meno di 0,5 W) grazie alla tecnologia EcoTec.
Consigli di sicurezza
Questo dispositivo può essere uti-lizzato da bambini a partire dagli 8 anni di età e da persone con ri-dotte capacità fisiche, sensoriali o mentali o mancanza di esperienza e conoscenza, purché sotto la sor-veglianza di adulti o a condizione che siano stati addestrati ad un utilizzo sicuro del dispositivo e che comprendano i pericoli che ne de-rivano. Non far giocare i bambini con l‘apparecchio. Le operazioni di pulizia e manutenzione non do-vranno in alcun caso essere effet-tuate da bambini senza la sorve-glianza di adulti. ATTENZIONE! Non esporre uni 14_/22_/20_95RF e i relativi acces-sori alla pioggia o ad altre forme di umidità per evitare il pericolo di in-cendi e di scosse elettriche. Qua-lora un liquido dovesse penetrare all’interno degli accessori, scolle-gare il cavo di alimentazione dal-la presa elettrica e farlo controlla-re da un rivenditore specializzato Swissflex.
Nell‘inserimento della rete accer-tatevi che tutti i movimenti dell‘e-lemento testiera, di quello dorsale e della zona degli arti inferiori non vengano ostacolati da elementi del mobilio e che posizione e mobili-tà dei cavi non siano pregiudicate. Ricordare di staccare le spine dal-la presa di corrente prima di effet-tuare qualsiasi operazione di mon-taggio e smontaggio del letto e del relativo supporto. Non allacciate alla presa di corrente libera (32) alcun apparecchio che all‘accen-sione tramite telecomando potreb-be mettere in pericolo persone o cose, in particolare nessun utensi-le a motore, quali ad es. seghe, tra-pani e simili (pericolo di ferite) né alcun apparecchio di riscaldamen-to che potrebbe modificare la tem-peratura (pericolo d‘incendio).I cavi che collegano la presa di cor-rente libera (32) al dispositivo di comando non devono essere po-sati in modo che eventuali spigoli taglienti o pieghe troppo strette ne danneggino l’isolamento. In nessun caso i cavi devono essere fatti passare attraverso il meccani-smo di regolazione. In caso di dan-neggiamento dei cavi o della presa

46 Istruzioni d’uso IT
di corrente libera (32), il letto-pol-trona non deve essere più azionato. Staccate la corrente e informate il vostro rivenditore. Non aprire mai il corpo della presa (32) dalla qua-le partono i cavi. Qualsiasi modifi-ca della parte della presa di cor-rente libera (32) che trasmette la corrente invalida immediatamente tutte le garanzie del prodotto. Trat-tare uni 14_/22_/20_95RF e i rela-tivi accessori con cautela, non mo-dificarli, non lasciare che i bambini ci giochino ed evitare che persone troppo deboli utilizzino il prodotto senza sorveglianza. Il prodotto non deve essere impie-gato in combinazione con prodotti medici o integrato al loro interno. Il prodotto non deve essere impie-gato in ambienti nei quali possano prodursi gas o vapori infiammabi-li o esplosivi (ad es. anestetici). Il prodotto non deve essere impiega-to per sollevare e abbassare pesi. Utilizzare solo pezzi di ricambio prodotti o autorizzati da Swissflex: solo questi garantiscono una suffi-ciente sicurezza.La rete può essere utilizzata sol-tanto con l‘alimentatore fornito in dotazione.
Messa in funzione «Touch»Inserite la batteria nel radiotelecomando
Estraete lo sportellino sul retro del vano batteria (21) del radiotelecomando sfilandolo con una leggera
pressione. Inserite la 3 batterie AAA (22) facendo at-tenzione alla disposizione dei poli +/-. Riposizionate lo sportellino. La portata massima del radiotelecomando è 15 m.
Associazione del radiotelecomando (Teach-In) (già realizzata di fabbrica)
1. Rimuovere la copertura del vano batterie sul retro del radiotelecomando.
2. Inserire / verificare le batterie (3 x AAA).3. Premere il tasto Teach-In (30) sul alimentatore a
commutazione (premere 2 x). 4. Nel vano batterie, sopra a queste ultime è presente
un piccolo tasto rosso (21).5. Premere il tasto fino a quando il LED comincia a
lampeggiare.6. Tenere premuto il tasto fino a quando il LED blu è
acceso fisso; a quel punto il processo di associazio-ne è concluso.
Bluetooth®
1. Scaricare l’app standard “Swissflex” dall’apposita piattaforma per Android (Google play) o Apple iOs (App Store).
2. Installare l’app standard “Swissflex” sul proprio smartphone / tablet.
3. Installazione / Messa in funzione, vedi il manuale del Bluetooth RF-Gateway.
Funzione di sincronizzazione (con il cavo di sincro-nizzazione)
Quando si collegano due uni 14_/22_/20_95RF con un cavo di sincronizzazione (connettore (23)), è indispen-sabile attivare la funzione di sincronizzazione (17). Per attivare/disattivare la funzione di sincronizzazione, premere e tenere premuto il pulsante (17). Premendo il pulsante di regolazione (6-7), i dispositivi si sincro-nizzano e si muovono successivamente nella direzione scelta. Ad attivazione avvenuta, il pulsante si illumina di blu e resta acceso. A disattivazione avvenuta, il pul-sante si illumina di bianco. Dopo aver collegato il cavo di sincronizzazione, effettuare il ripristino nel modo seguente:
• Tenere premuto il pulsante di memorizzazione (18) per 3 secondi.
• I pulsanti M1-M4 si illuminano solo di blu, poi nuo-vamente di bianco.
• Dopo alcuni secondi, la retroilluminazione lampeg-gia di bianco ancora una volta.
• Premere il pulsante di sincronizzazione (17) entro un secondo e mantenerlo premuto. I motori scen-dono giù.
• Se l’intera retroilluminazione lampeggia di bianco due volte, il pulsante di sincronizzazione (17) può essere rilasciato.
Ora i valori del contatore interno dei singoli motori in-

47IT Istruzioni d’uso
dividuali saranno azzerati e la funzione di sincronizza-zione è in grado di funzionare correttamente.
Illuminazione del pavimento
Premendo il tasto (8) viene attivata la funzione di “Il-luminazione del pavimento”. Quest’ultima si spegne automaticamente dopo 30 minuti oppure quando viene premuto nuovamente il tasto corrispondente. Mentre viene premuto il tasto si accende (blu).
Torcia elettrica
Tenendo premuto il tasto (5) si accende la “Torcia elet-trica”. Rilasciando il tasto la luce si spegne. Durante l’uso della torcia il tasto rimane acceso (blu).
Blocco tasti
Per bloccare i tasti, premere per 5 secondi il tasto “Blocco tasti” (20). Dopo aver correttamente attivato il blocco tasti, tutti i tasti (tranne quello della presa elettrica (19) “Torcia elettrica” (5), “Illuminazione del pavimento” (8) e “Blocco tasti” (20)) lampeggiano 2 volte (blu).Se si preme uno dei tasti disattivati, tutti i tasti lam-peggiano 2 volte (bianco). Premendo il tasto “Blocco tasti” (20) per 5 secondi il blocco viene disattivato. Se la procedura va a buon fine, tutti i tasti lampeggiano 2 volte (blu).
Possibilità di regolazione «Touch»Di fabbrica le posizioni di sonno e di seduta sono pre-programmate nel sistema di comando.
M1 Posizione anti-affaticamento per leggere e guardare la televisione
M2 Posizione benessere in caso di raffreddamen-to, disturbi alle vie respiratorie o al sistema cardiocircolatorio
M3 Posizione ergonomica in caso di mal di schie-na e dolori ai dischi intervertebrali
M4 Posizione agevolata per salire e scendere dal letto
Le posizioni possono essere sovrascritte in maniera-personalizzata.
Ripristino delle posizioni predefinite
Premere per 3 secondi il tasto Memorizza (18); la retroilluminazione lampeggia una volta, dopodiché occorre premere il tasto Illuminazione del pavimento (8) entro 1 secondo. A conferma del corretto ripristino delle impostazioni predefinite tutte le luci di RF-Touch si accendono 2 volte.
Memorizzazione di una posizione di seduta o di son-no su un tasto Memory
1. Premere 3 volte il tasto Memorizza (18) entro 2 se-condi.
2. I tasti Memory (1-4) si accendono (blu).3. Premere una volta il tasto Memory desiderato (1-4)
entro 3 secondi.
Quando si programma una nuova posizione, la pre-cedente impostazione viene automaticamente so-vrascritta. La corretta memorizzazione è segnalata dalla variazione del colore (bianco) del LED del tasto Memory selezionato. 2 secondi dopo il rilascio del ta-sto Memory in questione tutti i tasti Memory diventano bianchi.
Come selezionare una posizione memorizzata
Premere il tasto Memory (1-4) relativo alla regolazio-ne desiderata, fino a quando tutte le zone di appoggio hanno raggiunto la posizione programmata. Durante lo spostamento, il tasto Memory attivato si accende (blu).
Riposizionamento in posizione distesa
Con il tasto Tutti i motori «giù» raggiungete la posi-zione distesa azionando tutte le zone di riposo (7) in posizione orizzontale.
Cura e manutenzione «Touch»L‘ uni 14_/22_/20_95RF è un prodotto di alta qualità. Nella sua progettazione è stata dedicata particolare attenzione a garantire un funzionamento che non ri-chiede manutenzione per anni. Per spolverare even-tualmente la rete si consiglia l’impiego di un panno asciutto.
Come cambiare le batterie nel radiotelecomando
Estraete lo sportellino del vano batteria (21) presen-te sul retro del radiotelecomando, sfilandolo con una leggera pressione. Staccate con prudenza le batterie dall’attacco a clip. Inserite 3 batterie AAA facendo at-tenzione alla polarità. Riposizionate lo sportellino.
Come cambiare le batterie (29) al alimentatore a commutazione dell’uni 14_/22_/20_95RF (Batterie per l’abbassamento di emergenza)
Staccate con prudenza le batterie dall’attacco a clip. Inserite 2 batterie a blocco da 9 V, facendo attenzione alla polarità. Le batterie del alimentatore a commuta-zione servono per l’alimentazione di tensione in caso di interruzione di corrente.

48 Istruzioni d’uso IT
Diagnostica problemi «Touch»In caso di comparsa di guasti all’uni 14_/22_/20_95RF, cercate di eliminarli in base alle seguenti indicazioni. Qualora non fosse possibile risolvere il problema, stac-cate l’uni 14_/22_/20_95RF dalla presa e rivolgetevi al vostro rivenditore Swissflex.
Interruzione di corrente in posizione di seduta, ab-bassamento di emergenza
All’interno dell’alimentatore a commutazione sono alloggiate due batterie da 9 V (29) che consentono di riportare il letto in posizione orizzontale in caso di in-terruzione della corrente elettrica:
Tenere premuto il pulsante per l’abbassamento di emergenza (30) finché tutte le zone di riposo non vengono a trovarsi in posizione orizzontale. Dopo la riattivazione dell’alimentazione di rete, attendere 10 secondi ed effettuare un „reset“ nel modo descritto di seguito:
• Tenere premuto il pulsante di memorizzazione (18) per 3 secondi.
• I pulsanti M1-M4 si illuminano solo di blu, poi nuo-vamente di bianco.
• Dopo alcuni secondi, la retroilluminazione lampeg-gia di bianco ancora una volta.
• Premere il pulsante di sincronizzazione (17) entro un secondo e mantenerlo premuto. I motori scen-dono giù.
• Se l’intera retroilluminazione lampeggia di bianco due volte, il pulsante di sincronizzazione (17) può essere rilasciato.
Ora i valori del contatore interno dei singoli motori individuali saranno azzerati e le posizioni di memoria salvate riprenderanno a funzionare regolarmente.
Poiché la procedura di abbassamento di emergenza comporta un notevole scaricamento delle batterie, queste dovranno essere sostituite.
L’uni 14_/22_/20_95RF non funziona, nonostante sia accesa e tutti i componenti siano collegati cor-rettamente
Staccate l’alimentatore dalla presa. Aspettate un mi-nuto e ripristinate l’alimentazione elettrica. Eventual-mente controllate con una lampada da comodino la presenza della tensione di alimentazione (240 V). Se non c’è corrente, controllate le valvole della rete. Premete il tasto Tutti i motori «giù» (7) per elimina-re tutte le impostazioni. Poiché il comando dell‘uni 14_/22_/20_95RF contiene microprocessori, le oscilla-zioni di corrente possono causare disturbi.
Il radiotelecomando non funziona (La retroillumina-zione non funziona)
Inserite una batteria nuova. Rimuovete gli eventuali ostacoli tra il radiotelecomando e sistema di comando.
Dopo aver ripristinato l‘alimentazione del sistema a seguito di un‘interruzione di corrente
Per riavviare la configurazione iniziale del pon-te uni 14_/22_/20_95RF, premere il tasto (30) dell‘alimentatore a commutazione (28) fino all‘avvenuto spegnimento di tutti i motori, confermato dalla spia di emergenza del motore che lampeggia due volte. (Può durare fino a 20 secondi)
Dati tecnici e risoluzione di problemivedere a pagina 51

49IT Istruzioni d’uso
Radiotelecomando «Classic»
1 Azionamento zona testiera «su» 2 Azionamento zona testiera «giù» 3 Azionamento zona dorsale «su» 4 Azionamento zona dorsale «giù» 5 Azionamento zona femorale «su» 6 Azionamento zona femorale «giù» 7 Azionamento zona polpacci «su» 8 Azionamento zona polpacci «giù» 9 Tutti i motori «su»10 Tutti i motori «giù»11 Pila tascabile12 Vano batterie (parte posteriore del radiote-
lecomando)13 3 batterie AAA (in dotazione)
1 + 2 Illuminazione da pavimento 3 + 4 Presa di corrente libera ON / OFF 10 + 11 Attivare/disattivare la funzione di
sincronizzazione
Sistema di comando
14 Collegamento del cavo di sincronizzazione15 Illuminazione d‘emergenza (interna)16 Collegamento trasformatore / Collega-
mento illuminazione pavimento esterna17 Collegamento per motori supplementari18 Illuminazione d‘emergenza (interna, retro
del motore)
19 Alimentatore a commutazione
20 Vano batterie per abbassamento di emer-genza (2 x 9 V)
21 Tasto per abbassamento di emergenza / tasto teach-in
22 Presa di corrente libera (facoltativo)
18
1417
15
16 (2 cavi)
22
20
19 21
1
3
5
7
9
2
4
6
8
10
11
12
uni 14_/22_/20_95RF «Classic»uni 21_95RF
12
13

50 Istruzioni d’uso IT
Messa in funzione «Classic»Inserite la batteria nel radiotelecomando
Estraete lo sportellino sul retro del vano batteria (12) del radiotelecomando sfilandolo con una leggera pressione. Inserite la 3 batterie AAA (13) facendo at-tenzione alla disposizione dei poli +/-. Riposizionate lo sportellino. La portata massima del radiotelecomando è 15 m.
Associazione del radiotelecomando (Teach-In) (già realizzata di fabbrica)
1. Rimuovere la copertura del vano batterie sul retro del radiotelecomando.
2. Inserire / verificare le batterie (3 x AAA).3. Premere il tasto Teach-In (21) sul alimentatore a
commutazione (premere 2 x). Ora la spia di emer-genza del motore è accesa.
4. Premere contemporaneamente i pulsanti (1 + 2) del radiotelecomando finché la spia di emergenza del motore non si spegne; a quel punto il processo di associazione è concluso.
Funzione di sincronizzazione (con il cavo di sincro-nizzazione)
Quando si collegano due uni 14_/22_/20_95RF con un cavo di sincronizzazione (connettore (14)), è indis-pensabile attivare la funzione di sincronizzazione. Per attivare/disattivare la funzione di sincronizzazione, premere e tenere premuto il pulsante (10+11). Pre-mendo il pulsante di regolazione (1-8), i dispositivi si sincronizzano e si muovono successivamente nella direzione scelta. Dopo aver collegato il cavo di sincro-nizzazione, effettuare il ripristino nel modo seguente:
Premere il pulsante (21) dell’alimentatore a commuta-zione (19) fino all’avvenuto spegnimento di tutti i moto-ri, confermato dalla spia di emergenza del motore che lampeggia due volte. (Può durare fino a 20 secondi)
I valori del contatore interno per i singoli motori vengo-no azzerati e la funzione di sincronizzazione è in grado di funzionare correttamente.
Illuminazione del pavimento
Premendo il tasto (1+2) viene attivata la funzione di “Illuminazione del pavimento”. Quest’ultima si spegne automaticamente dopo 30 minuti oppure quando viene premuto nuovamente il tasto corrispondente.
Torcia elettrica
Tenendo premuto il tasto (11) si accende la “Torcia elettrica”. Rilasciando il tasto la luce si spegne.
Possibilità di regolazione «Classic»I pulsanti (1-8) possono essere utilizzati per regolare singolarmente la testiera e la spalliera così come le aree per le cosce e i piedi.
Riposizionamento in posizione distesa
Con il tasto Tutti i motori «giù» (10) raggiungete la posizione distesa azionando tutte le zone di riposo in posizione orizzontale.
Cura e manutenzione «Classic»L‘ uni 14_/22_/20_95RF è un prodotto di alta qualità. Nella sua progettazione è stata dedicata particolare attenzione a garantire un funzionamento che non ri-chiede manutenzione per anni. Per spolverare even-tualmente la rete si consiglia l’impiego di un panno asciutto.
Come cambiare le batterie nel radiotelecomando
Estraete lo sportellino del vano batteria (12) presen-te sul retro del radiotelecomando. Inserite 3 batterie AAA facendo attenzione alla polarità. Riposizionate lo sportellino.
Come cambiare le batterie (19) al alimentatore a commutazione dell’uni 14_/22_/20_95RF (Batterie per l’abbassamento di emergenza)
Staccate con prudenza le batterie dall’attacco a clip. Inserite 2 batterie a blocco da 9 V, facendo attenzione alla polarità. Le batterie del alimentatore a commuta-zione servono per l’alimentazione di tensione in caso di interruzione di corrente.
Diagnostica problemi «Classic»In caso di comparsa di guasti all’uni 14_/22_/20_95RF, cercate di eliminarli in base alle seguenti indicazioni. Qualora non fosse possibile risolvere il problema, stac-cate l’uni 14_/22_/20_95RF dalla presa e rivolgetevi al vostro rivenditore Swissflex.
Interruzione di corrente in posizione di seduta, ab-bassamento di emergenza
All’interno dell’alimentatore a commutazione (19) sono alloggiate due batterie da 9 V che consentono di riportare il letto in posizione orizzontale in caso di in-terruzione della corrente elettrica:
Tenere premuto il pulsante per l’abbassamento di emergenza (21) finché tutte le zone di riposo non vengono a trovarsi in posizione orizzontale. Dopo la riattivazione dell’alimentazione di rete, attendere 10

51IT Istruzioni d’uso
secondi ed effettuare un „reset“ nel modo descritto di seguito:
Premere il pulsante (21) dell’alimentatore a commuta-zione (19) fino all’avvenuto spegnimento di tutti i moto-ri, confermato dalla spia di emergenza del motore che lampeggia due volte. (Può durare fino a 20 secondi)
I valori del contatore interno per i singoli motori vengo-no azzerati e la funzione di sincronizzazione riprende a funzionare correttamente.
Poiché la procedura di abbassamento di emergenza comporta un notevole scaricamento delle batterie, queste dovranno essere sostituite.
L’uni 14_/22_/20_95RF non funziona, nonostante sia accesa e tutti i componenti siano collegati cor-rettamente
Staccate l’alimentatore dalla presa. Aspettate un mi-nuto e ripristinate l’alimentazione elettrica. Eventu-almente controllate con una lampada da comodino la presenza della tensione di alimentazione (240V). Se non c’è corrente, controllate le valvole della rete. Premete il tasto Tutti i motori «giù» (10) per elimi-nare tutte le impostazioni. Poiché il comando dell’uni 14_/22_/20_95RF contiene microprocessori, le oscilla-zioni di corrente possono causare disturbi.
Il radiotelecomando non funziona (La retroillumina-zione non funziona)
Inserite una batteria nuova. Rimuovete gli eventuali ostacoli tra il radiotelecomando e sistema di comando
Dopo aver ripristinato l‘alimentazione del sistema a seguito di un‘interruzione di corrente
Per riavviare la configurazione iniziale del pon-te uni 14_/22_/20_95RF, premere il tasto (21) dell‘alimentatore a commutazione (19) fino all‘avvenuto spegnimento di tutti i motori, confermato dalla spia di emergenza del motore che lampeggia due volte. (Può durare fino a 20 secondi)
Problema Possibile causa Soluzione
Telecomando o sistema di azionamento non funzionante.
Tensione di rete assente. Realizzare il collegamento alla rete elettrica.
Telecomando o sistema di azionamento guasto.
Rivolgersi al proprio fornitore/rivenditore.
Improvvisamente non è più pos-sibile regolare/muovere gli azionamenti.
È possibile che l’interruttore termico del trasformatore sia scattato o sia guasto.
Lasciare riposare il sistema di azionamento per circa 20-30 minuti.
È possibile che il fusibile termico del trasformatore sia scattato o sia guasto.
Rivolgersi al proprio fornitore/rivenditore.
È possibile che il fusibile sia scattato o sia guasto.
Rivolgersi al proprio fornitore/rivenditore.
Tensione di rete assente. Realizzare il collegamento alla rete elettrica.
Linea di alimentazione (rete e/o teleco-mando / azionamenti supplementari) interrotta.
Controllare la linea di alimentazione e ripristinare se necessario il contatto.
La funzione di ripristino in as-senza di tensione di rete non può essere azionata.
Blocco/blocchi batterie scarico/sca-richi.
Controllare il blocco / i blocchi batterie e sostituirli se necessario.
Blocco/blocchi batterie non collegato/i. Collegare il blocco/ i blocchi batterie.
Dati tecnici
Tensione d’alimentazione: 100–240 Volt Tensione d’alimentazione trasmettitore:3 batterie AAA Potenza commutazione motori:Servizio intermittente 2 min / 18 minPotenza commutazione presa libera: 2000 W / 10 ASpinta motori: 2 x 6000 N / 2 x 4000 NAlimentazione abbassamento d’emergenza:2 x 9 batterie 9 V

52 CN
«Touch»
1 1
2 2
3 3
4 4
5
6
7
8
9
10
11
12
13
14
15
16
17
18
19
20
21
22 3 × AAA
23
24
25
26
27
28
29
2 × 9 V
30
31
32
2 3
1
5, 6
9
11
13
15
17
19
21
4
7, 8
10
12
14
16
18
20
31
27
2326
24
25 ( )
32
29
28 30
uni 14_/22_/20_95RF «Touch»
uni 21_95RF
21
22

53CN
Swissflex®
Swissflex® uni 14_/22_/20_95RF
uni 14_/22_/20_95RF
EcoTec
0.5
8
uni 14_/22_/20_95RF
Swissflex®
(32)
(32)
(32)
(32)
(32)
uni 14_/22_/20_95RF
Swissflex®
Swissflex®

54 CN
«Touch»
(21) 3 AAA
(22)
15
1.
2. 3×AAA
3. (30) 2
4. (21)
5. LED
6. LED
1. Google play
App Store
Swissflex
2. Swissflex
3.
uni 14_/22_/20_95RF
(23) (17)
(17)
(6-7)
• (18) 3
• M1-M4
• LCD
• (17)
•
(17)
“0”
(8) 30
(5)
(20) 5
(19) (5)
(8) (20)
(20) 5
«Touch»
M1
M2
M3
M4
(18) 3
(8)
1. 2 (18) 3
2. (1-4)
3. 3
(1-4)
LED
2
(1-4)

55CN
(7)
«Touch»uni 14_/22_/20_95RF
(21) 3
AAA
uni 14_/22_/20_95RF
(29)
2 9V
«Touch»uni 14_/22_/20_95RF
uni
14_/22_/20_95RF
Swissflex®
2 (29)
(30)
10
• (18) 3
• M1-M4
• LCD
• (17)
•
(17)
“0”
uni 14_/22_/20_95RF
240 V
(7)
uni 14_/22_/20_95RF
uni 14_/22_/20_95RF
(28) (30)
20

56 CN
20-30
100–240 V
3 × AAA
2 18
2000 W / 10 A
2 x 6000 N / 2 x 4000 N
2 × 9 V
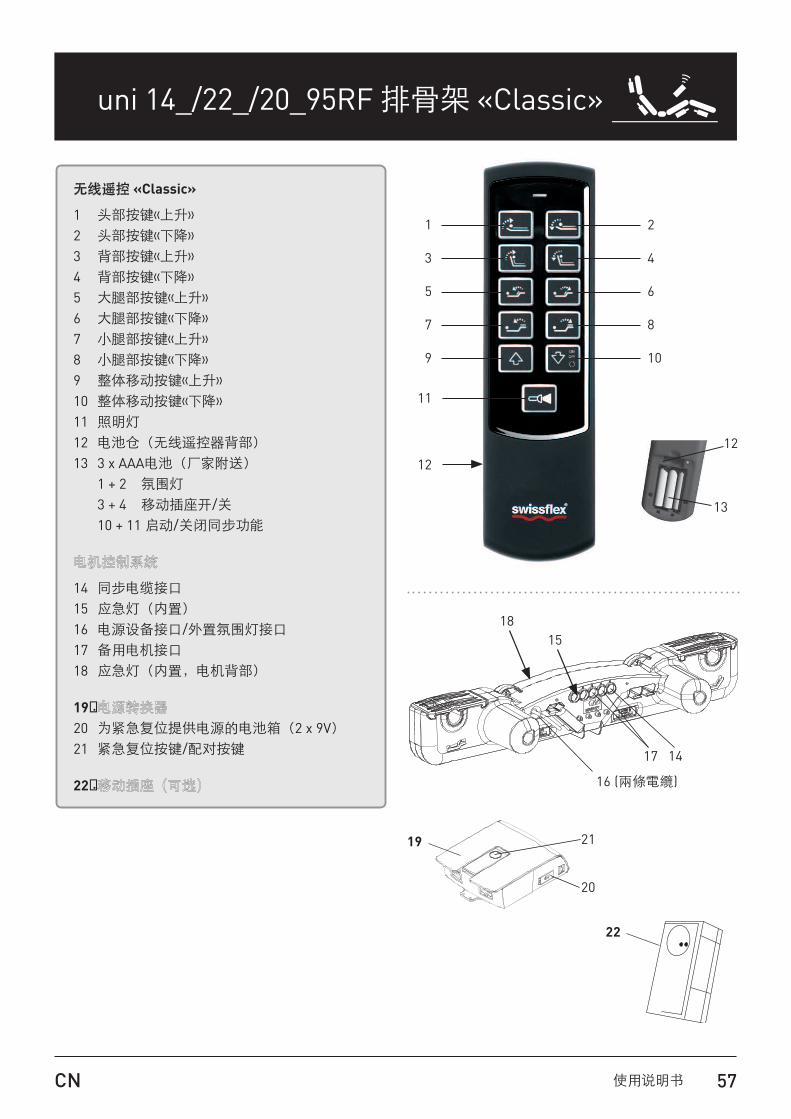
57CN
«Classic»
1
2
3
4
5
6
7
8
9
10
11
12
13 3 x AAA
1 + 2
3 + 4
10 + 11
14
15
16
17
18
19
20 2 x 9V
21
22
18
1417
15
16 ( )
22
20
19 21
1
3
5
7
9
2
4
6
8
10
11
12
uni 14_/22_/20_95RF «Classic»
uni 21_95RF
12
13

58 CN
«Classic»
(12) 3 AAA
(13)
15
1.
2. 3 x AAA
3. (21)
4. (1+2)
uni 14_/22_/20_95RF
(14)
(10+11)
(1-8)
(19) (21)
20
0
(1+2) 30
(11)
«Classic»(1-8)
(10)
«Classic»uni 14_/22_/20_95RF
(12) 3 AAA
uni 14_/22_/20_95RF (19)
2 9V
«Classic» uni 14_/22_/20_95RF
uni
14_/22_/20_95RF
Swissflex®
(19)
2
(21)
10
(19) (21)
20
0
uni
14_/22_/20_95RF
240V
(10)
uni 14_/22_/20_95RF
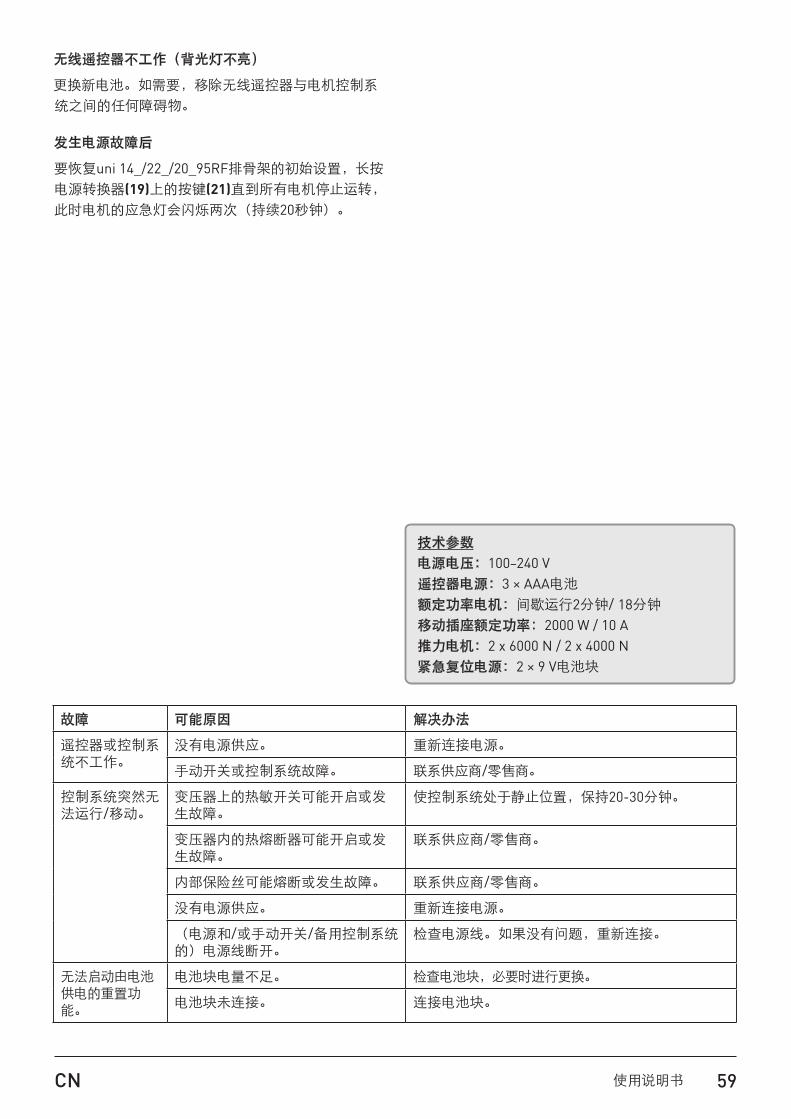
59CN
uni 14_/22_/20_95RF
(19) (21)
20
20-30
100–240 V
3 × AAA
2 18
2000 W / 10 A
2 x 6000 N / 2 x 4000 N
2 × 9 V


Recticel Bedding (Schweiz) AGBettenweg 12, CH-6233 Büron
www.swissflex.com 05. 2
016