MOVEit Central 9.0 Installation Guide MOVEit Central 9.0 Installation Guide 9.0 ; Licenses ; The...
57
9.0 MOVEit Central 9.0 Installation Guide
Transcript of MOVEit Central 9.0 Installation Guide MOVEit Central 9.0 Installation Guide 9.0 ; Licenses ; The...

9.0
MOVEit Central 9.0 Installation Guide

Copyright
©1991-2016 Ipswitch, Inc. All rights reserved.
This document, as well as the software described in it, is furnished under license and may be used or copied only in accordance with the terms of such license. Except as permitted by such license, no part of this publication may be reproduced, photocopied, stored on a retrieval system, or transmitted, in any form or by any means, electronic, mechanical, recording, or otherwise, without the express prior written consent of Ipswitch, Inc.
The content of this document is furnished for informational use only, is subject to change without notice, and should not be construed as a commitment by Ipswitch, Inc. While every effort has been made to assure the accuracy of the information contained herein, Ipswitch, Inc. assumes no responsibility for errors or omissions. Ipswitch, Inc., also assumes no liability for damages resulting from the use of the information contained in this document.
WS_FTP, the WS_FTP logos, Ipswitch, and the Ipswitch logo, MOVEit and the MOVEit logo, MessageWay and the MessageWay logo are trademarks of Ipswitch, Inc. Other products and their brands or company names, are or may be trademarks or registered trademarks, and are the property of their respective companies.
This document was published on Tuesday, February 09, 2016 at 11:25.

i
Contents
Overview 3
The MOVEit Central Installation Program ............................................................................................ 4
Requirements ....................................................................................................................................... 5
Database Considerations ........................................................................................................... 6
Update Notes ....................................................................................................................................... 7
Install MOVEit Central 9
Welcome ............................................................................................................................................ 10
License Agreement ............................................................................................................................. 11
License ................................................................................................................................................ 12
Setup Options ..................................................................................................................................... 13
Credentials ............................................................................................................................... 14
Database Type ......................................................................................................................... 16
Folders ..................................................................................................................................... 19
Tamper Detection Key ............................................................................................................. 20
Certificate Dialog ..................................................................................................................... 21

ii Contents
Email Options ..................................................................................................................................... 22
Finish .................................................................................................................................................. 23
Update MOVEit Central 26
Welcome ............................................................................................................................................ 26
License ................................................................................................................................................ 27
Ready to Update ................................................................................................................................ 29
Update Complete ............................................................................................................................... 30
Repair MOVEit Central 31
Modify MOVEit Central 33
Uninstall MOVEit Central 36
Install MOVEit Central Web Admin 38
Supported Features in Web Admin .................................................................................................... 39
Install or Update Web Admin ............................................................................................................. 40
Repair or Remove Web Admin ........................................................................................................... 47
Connect to MOVEit Central with Web Admin .................................................................................... 52
Index 55

3
To install MOVEit Central, run the setup program. Install MOVEit Central on a server-class machine. Other applications and/or services can be run on the same machine. For more information, see Requirements (on page 5).
To configure MOVEit Central:
Install MOVEit Central Admin on the same machine as the MOVEit Central server, or on an administrator’s machine.
You can configure MOVEit Central remotely using MOVEit Central Web Admin. For more information, see Install MOVEit Central Web Admin (on page 38).
Note: Some features are available only in the Central Admin Console. For more information, see Supported Features in Web Admin (on page 39).
During installation, you can choose either MySQL or Microsoft SQL Server as a database engine.
Overview

4 MOVEit Central 9.0 Installation Guide 9.0
The MOVEit Central Installation Program The MOVEit Central installation program installs, upgrades, repairs, or uninstalls MOVEit Central software.
IMPORTANT: With version 8.1 and subsequent versions, MOVEit Central and MOVEit Central Admin use separate installation programs.
New installations: Install MOVEit Central, and then install MOVEit Central Admin (the Admin Console, also known as VBAdmin) either on the server where you installed MOVEit Central or on a remote system.
Existing installations: If MOVEit Central and MOVEit Central Admin are already installed, an update installation to MOVEit Central uninstalls the existing MOVEit Central Admin from the Central server. You must install MOVEit Central Admin separately.
NOTE: Version 9.0 includes MOVEit Central Web Admin. For more information, see Installing MOVEit Central Web Admin (on page 38). You can run the MOVEit Central Web Admin and the Admin Console concurrently.
The following installation options are available.
Installation Option Does this:
Install (on page 9) Detects that MOVEit Central software is not on the system. Installs MOVEit Central software.
Update (on page 26) Detects that an older version of MOVEit Central software is present. Installs new versions of MOVEit Central components and applications. Implements database changes/conversions.
Repair (on page 31) Reinstalls all components that were originally installed with the identical version of MOVEit Central.
Modify (on page 33)
This option is available only if the installation program detects that the most recent version of MOVEit Central is present.
Adds or removes various MOVEit Central components and applications. Might perform database changes/conversions.
Uninstall/Remove (on page 36)
This option is available if the installation program detects that the most recent version of MOVEit Central is present.
Uninstall/Remove is also available from the Windows Control Panel > Add/Remove Programs.
Before you perform an update or repair option, back up your critical files. For more information, see MOVEit Central User's Guide in the section Central Service - Backup - Disaster Recovery (http://docs.ipswitch.com/moveit/central81/help/admin/en/index.htm#27426.htm).

Overview 5
Requirements Hardware: A server with a 2 GHz processor 1 GB RAM 80 GB SATA or SAS hard drive 100/1000 MB Ethernet interface (for TCP/IP traffic). A faster processor, faster hard drives and more memory are recommended for busy sites.
NOTE: MOVEit Central does not need to be the only application or service running on this machine.
Operating system (one of the following): Windows Server 2008 R2 (64-bit English and German) Windows Server 2012 R2 Windows Server 2012 Support for virtual servers running on VMware ESX (64-bit) and Microsoft Hyper-V 1.0 (64-bit)
NOTE: We recommend that you do not run MOVEit Central Admin (VBAdmin) on Windows Server 2012 R2, because of instability related to the VB run-time. MOVEit Central server is fully supported on Windows Server 2012 R2, but MOVEit Central Admin should be run on a separate system.
Database (one of the following): MySQL (5.5.47) (included in the MOVEit Central installation) Microsoft SQL Server 2008 R2 Enterprise/Standard (Not Data Center) Microsoft SQL Server 2012 Enterprise/Standard Microsoft SQL Server 2014 Enterprise/Standard
.NET Framework versions required: MOVEit Central requires .NET 4.5 for the AS2 and PGP modules. The MOVEit Central installer detects whether .NET 4.5 is present, and can install .NET using the .NET web install. This requires the server to have internet access. If the server does not have internet access, you must install .NET by other means before you run the MOVEit Central installation program.
Remote administration of MOVEit Central with MOVEit Central Admin (VBAdmin): Use the MOVEit Central Admin (VBAdmin) installation program to set up the client on each of
your remote desktops. In addition to the operating systems shown above, you can also install MOVEit Central Admin on Windows 7 Professional/Enterprise, and Windows 8.
Server certificate: If you plan to use MOVEit Central Admin remotely, a server certificate is recommended though not required. The MOVEit Central installation package automatically installs a self-signed certificate for this purpose. If you want to use your own SSL certificate instead, you must install it (usually though the Microsoft "Certificates" Management Console), select it with the MOVEit Central Configuration utility, and restart the MOVEit Central service.

6 MOVEit Central 9.0 Installation Guide 9.0
Web Admin requirements: Server requirements for Web Admin are the same as the requirements for MOVEit Central server.
See above. Web Admin can be installed on the same server as the MOVEit Central server, or on a separate server that can communicate with the MOVEit Central server.
Supported browsers for Web Admin: Chrome (Windows only); Mozilla Firefox (Windows, Mac, and Red Hat Linux); Internet Explorer 11 (Windows only); Safari (Mac only)
Optional: Supported Antivirus Engine When Symantec AntiVirus, McAfee VirusScan, or Trend Micro OfficeScan detect a virus, MOVEit Central takes action to delete or ignore the infected files and log the appropriate message. Installing one of these antivirus packages is recommended if you want MOVEit Central to use its free, integrated antivirus feature.
Database Considerations MySQL Database If you want to use MySQL as your database engine, it is strongly recommended that you do not install MOVEit Central software on a computer that already has a copy of MySQL running.
On computers where MySQL does not exist, the MOVEit Central installation program installs its own copy of MySQL.
However, if MySQL already resides on the computer, it is difficult for the MOVEit Central installation program to detect MySQL installations that use non-standard service names or port numbers. Additionally, an arbitrary pre-installed copy of MySQL might be a version that is not compatible with MOVEit Central.
Microsoft SQL Server Database If you choose SQL Server as your database engine, you must install your own copy of the database engine prior to installing MOVEit Central.
For information about installing MOVEit Central in failover mode, see Failover (Enterprise Only) in the "Central Service" chapter of the MOVEit Central User's Guide.

Overview 7
Update Notes You can use the same setup program to upgrade MOVEit Central as you would use to install a new copy of the software. Update any remotely-installed MOVEit Central Admin clients soon after updating MOVEit Central.
Note: If you are currently running Version 7.x or earlier, you must first upgrade to Version 8.0.
Before you update, make sure that no tasks are about to run just before you apply the upgrade. There are two ways to accomplish this:
Use the MOVEit Central Admin Disable Scheduler command to turn off the scheduler so no new tasks can be started. (Check the Status tab for remaining running tasks.) The update shuts down the MOVEit Central service before installing the new software. This lets you look at the MOVEit Central system (for example, look at Reports of the last completed tasks) before performing the upgrade.
Use the MOVEit Central Admin Shut Down Service command to automatically shut down the service after all currently running tasks have completed. Doing so means that the update does not need to shut down the MOVEit Central service before applying the new software. This eliminates the chance that new tasks (or the scheduler) could be started by another operator.
When moving MOVEit Central from one server to another: If you copy MOVEit Central configuration files or database files from a different server that was running an older version of MOVEit Central than is installed on the new server, you might need to rerun the installer to convert the files to a newer format. To do this, run the installer again and choose the Repair option. If the installer is for a newer version of Central than is already installed, this step is not needed, because the update procedure automatically converts the files.
Windows Firewall: If the Windows Firewall is running, the setup program creates an exception for MOVEit Central, so it can listen for TCP connections. This is required to support connections from MOVEit Central Admin, as well as for active mode FTP data transfers. If Failover is enabled in your license, the setup program also enables file and print sharing to permit manual synchronization in a failover configuration. If you are using a software firewall other than Windows Firewall, you might need to manually create an exception for the programs MICentral.exe and MIAS2.exe.
64-bit version: MOVEit Central 9.0 is installed as a 64-bit version. Support for 64-bit Windows provides increased performance for task processing.
MOVEit Central 9.0 also introduces a 64-bit Central API.
The MOVEit DMZ API does not have 64-bit support. If you have custom scripts that use the 32-bit MOVEit Central API or the MOVEit DMZ API, you can run the installation program again and use the Modify option to switch to the 32-bit version of MOVEit Central. For more information, see Modify MOVEit Central (on page 33).

8 MOVEit Central 9.0 Installation Guide 9.0
Licenses The update to MOVEit Version 9.0 products requires that you have a license file. License keys from previous versions will no longer work.
License Files: To get a new license file, follow the steps in this KB article (http://ipswitchft.force.com/kb/articles/FAQ/How-do-I-obtain-a-license-file-for-an-upgrade-to-MOVEit-Central-8-1-or-higher). If you need further assistance, contact Ipswitch MOVEit Support (http://www.ipswitchft.com/support).
NOTE: Before you update, back up your existing license file. If you need to roll back the installation, you will be required to re-apply your old license file. To locate your existing license file, follow the steps in this Knowledge Base article (http://ipswitchft.force.com/kb/articles/FAQ/How-do-I-locate-my-current-MOVEit-Cental-license-file-or-serial-number).
Updating from MOVEit Central versions
If you are updating from: Do this:
MOVEit Central 8.0 or later Upgrade directly to MOVEit Central 9.0
MOVEit Central 7.x or earlier First, update to version 8.0, and then update to version 9.0
Licensees Licensees who are licensed for one or more of the MOVEit products can upgrade, at no additional cost, under their prepaid maintenance coverage. Copies of the version 9.0 products will be placed on the Ipswitch MOVEit Customer Portal (https://ipswitchft.secure.force.com/cp/) and email notifications will be sent to the designated technical contacts at select licensees. For all customers, we recommend that you:
Download a new license file Download the MOVEit Central 9.0 application
If you need further assistance with license issues, contact Ipswitch MOVEit Support (http://www.ipswitchft.com/support).
Onsite Evaluators Evaluators who are doing an onsite evaluation of one or more of the above MOVEit products can upgrade to version 9.0, at no additional cost, after it is commercially released. Copies of version 9.0 will be placed on the Ipswitch Customer Portal (https://ipswitchft.secure.force.com/cp/), and email notifications sent, so that onsite evaluators can log in, download, and install the software. If a new evaluation license is needed in order to evaluate version 9.0, onsite evaluators can request a license from their Ipswitch sales representative.

9
Use this procedure if you are installing MOVEit Central for the first time.
If you have already installed an earlier version of MOVEit Central, follow the instructions at Update MOVEit Central (on page 26).
Prerequisites: Meet the System Requirements (on page 5), Obtain a License file.
MOVEit Central requires a license file to install and operate. To obtain a license file, contact Ipswitch MOVEit Support (http://www.ipswitchft.com/support).
Back up your critical files (repair, modify options). For more information, see MOVEit Central User's Guide in the section Central Service - Backup - Disaster Recovery (http://docs.ipswitch.com/moveit/central81/help/admin/en/index.htm#27426.htm).
Install MOVEit Central

10 MOVEit Central 9.0 Installation Guide 9.0
Welcome 1 Run the setup program. The Welcome screen appears.
2 If you have previously partially completed this installation, the screen includes the option to Use
parameters from MOVEit_Central.INI. Check this option to auto-fill all fields using your previous entries.
3 Click Next.

Install MOVEit Central 11
License Agreement 1 Read the license agreement.
2 Select I accept the terms of the license agreement. 3 Click Next.

12 MOVEit Central 9.0 Installation Guide 9.0
License 1 MOVEit Central requires a license file to install and operate. License keys from previous versions will
no longer work. To get a new license file, follow the steps in this KB article (http://ipswitchft.force.com/kb/articles/FAQ/How-do-I-obtain-a-license-file-for-an-upgrade-to-MOVEit-Central-8-1-or-higher). If you need further assistance, contact Ipswitch MOVEit Support (http://www.ipswitchft.com/support).
2 Click Browse and select the license file. 3 Click Next.

Install MOVEit Central 13
Setup Options 1 Depending on your needs and familiarity with the product, you can perform an express or custom
installation.
2 Select one of the following options: Express Setup - Select this option if you are setting up an evaluation server or want to install
MOVEit Central quickly. Express setup uses the following values:
• Application folder: C:\Program Files\MOVEit
• Database engine: MySQL
• Service: Run as user "micsvc"
• Credentials: Auto-generated
• Certificate: Create new test certificate If you selected Express Setup, click Next and then go to Email Options (on page 22). Custom Setup - Select this option to customize all options.

14 MOVEit Central 9.0 Installation Guide 9.0
• Disable selection of existing users (faster) - This option affects the Credentials screen. Normally,
the installation prefills drop-down boxes with the names of all users on your local system and domain, in case you want to use an existing user for credentials purposes. However, on some systems, querying the domain controller can be very time-consuming. If this computer is a member of a domain with many users or if the connection to the domain controller is slow, choose this option so that the installer does not present you with a list of all users.
If you selected Custom Setup, click Next and then go to Credentials (on page 14).
Credentials MOVEit Central uses several sets of credentials to control access to its configuration and administration.
1 Select a user to administer MOVEit Central remotely and a user to run the MOVEit Central service: Administer MOVEit Central Remotely As:
• New User - Creates a new remote user. A suggested user name and password appear. You can change these if required. Optionally click Suggest to generate a new password, or enter a specific password in the third box.
• Existing User - Lets you select an existing user. Enter that user's password. This option is not available if you disabled selection of existing users in Setup Options (on page 13).
"MOVEit Central" Service Will Run As:

Install MOVEit Central 15
• New Admin - Creates a new user for Central to run under. A suggested Admin name and
password appear. You can change these if required. Optionally click Suggest to have the program generate a new password, or enter a specific password in the third box.
• Existing Admin - Lets you select an existing user for Central to run under. Enter that user's password in the box provided. This option is not available if you disabled the selection of existing users in Setup Options (on page 13).
Note: If MOVEit Central cannot locate the correct credentials, you are prompted to provide them.
2 Click Next.

16 MOVEit Central 9.0 Installation Guide 9.0
Database Type MOVEit Central can use either a MySQL or a Microsoft SQL Server database.
1 Choose the database engine for MOVEit Central to use: MySQL - a small-footprint database engine that MOVEit Central will install and administer. See My
SQL below. Microsoft SQL Server - If you select this option, you must have an already-installed instance of SQL
Server, and provide the following information:
• Server name - The hostname or IP address of the server. If the server using a non-standard port, add a command and the port number after the hostname.
• Instance (if needed) - This is typically blank. 2 Click Next, and then go to the appropriate database below for further instructions.

Install MOVEit Central 17
My SQL If you selected MySQL as your database engine, following dialog box appears.
1 Provide the follwing information: Database Administrator - The superuser account for MOVEit Central. The database administrator is
always root. Click Suggest to have the install suggest a password, or enter a password in the box provided.
Database User - The standard account for MOVEit Central. Enter the database username. Click Suggest to have the install suggest a password, or enter a password in the box provided.
2 Click Next, and then go to Folders (on page 19).

18 MOVEit Central 9.0 Installation Guide 9.0
Microsoft SQL Server If you selected Microsoft SQL Server as your database engine, the following dialog box appears:
1 Enter the following information: Credentials to be used during the install - Provide the credentials to access the existing instance of
Microsoft SQL Server. Select an authentication type to use during installation:
• Use Windows Authentication during install - The currently logged-on user will be used. There must be a corresponding user with the same password on the Windows server running SQL Server, and this user must be authorized in SQL Server.
• Use SQL Server Authentication during install - Specify an existing SQL Server username and password.
Database to create - You must specify the name of the database to create. In most cases you can accept the default.
Credentials to be used by MOVEit Central - Select an authentication type to be used by MOVEit Central:

Install MOVEit Central 19
• Use Windows Authentication - The user under which the service runs will be used. A
corresponding user with the same password must exist on the Windows server that is running SQL Server, and this user must be authorized in SQL Server.
• Use SQL Server Authentication - Specify an SQL Server username and password to create. 2 Click Next, and then go to Folders (on page 19).
Folders MOVEit Central installs its application files and set up its database in folders you specify here.
1 Enter the following: Application Folder - Enter the folder path, or click Browse to locate the folder. Recommended:
Locate the MOVEit Central application where you normally install applications. Some configuration and log files are also kept here, but the total size is typically less than 100 MB.
Cache Folder - Enter the folder path, or click Browse to locate the folder. The Cache folder requires more space; therefore install it on your largest available local or SAN drive.
Database Folder (MySQL installations only). Use the default location C:\MySQL or Browse to select a different location for the database.
2 Click Next.

20 MOVEit Central 9.0 Installation Guide 9.0
Tamper Detection Key MOVEit Central uses the following key to protect audit information in the database, so you can detect whether unauthorized changes have been made to the audit tables.
1 Tamper Key - Enter an arbitrary string or click Suggest to have the installation program suggest a
random key.
Important: If you are installing a failover pair, you must use the same tamper detection key on both machines.
2 Click Next.

Install MOVEit Central 21
Certificate Dialog An SSL certificate allows MOVEit Central to encrypt its communications with remote copies of MOVEit Central Admin.
1 Select one of the following options to either create a self-signed (test) certificate, or select an existing
SSL certificate: Create New Certificate - The installation will generate, install, and assign an untrusted self-signed
certificate good for 3,000 days. Use Existing Certificate - Select an existing SSL certificate from the list.
Note: If you purchased failover and want to install it, MOVEit Central must first be successfully installed on each node. For more information on Ipswitch Failover, see Ipswitch Failover 9.0 Online Content http://ipswitchft.force.com/kb/articles/FAQ/Ipswitch-Failover-9-0-Online-Content.
2 Click Next.
22 MOVEit Central 9.0 Installation Guide 9.0
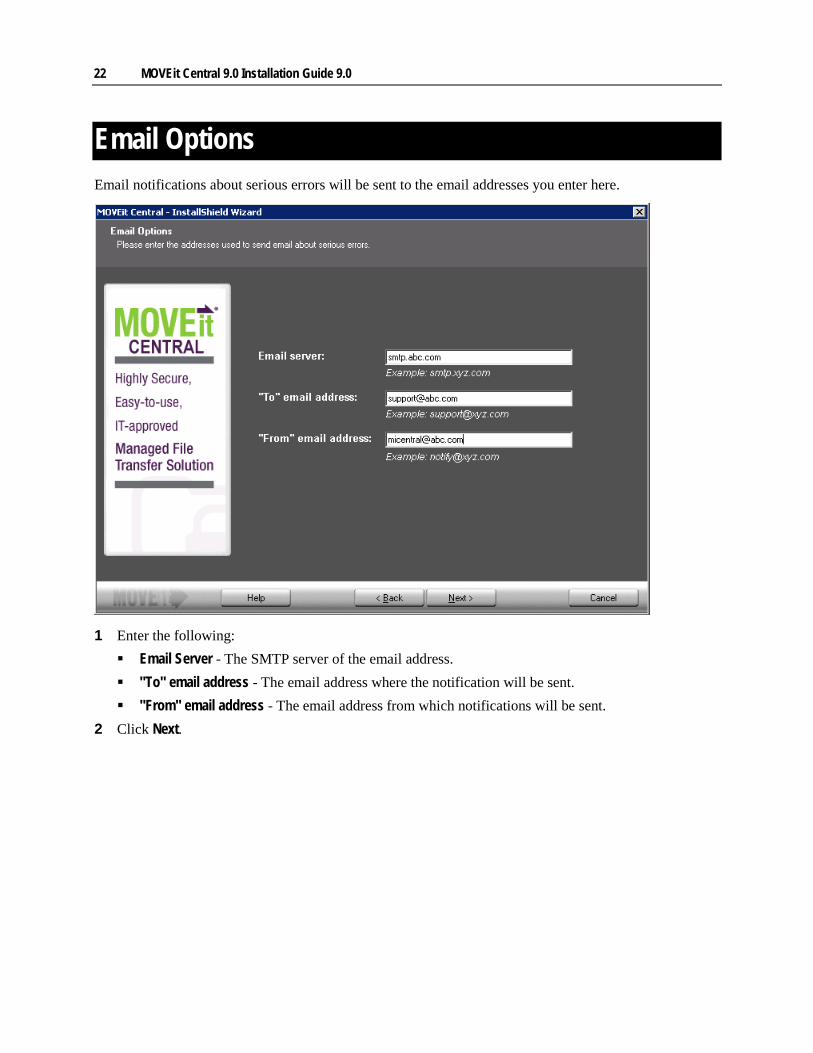
Email Options Email notifications about serious errors will be sent to the email addresses you enter here.
1 Enter the following: Email Server - The SMTP server of the email address. "To" email address - The email address where the notification will be sent. "From" email address - The email address from which notifications will be sent.
2 Click Next.

Install MOVEit Central 23
Finish MOVEit Central is ready to install.
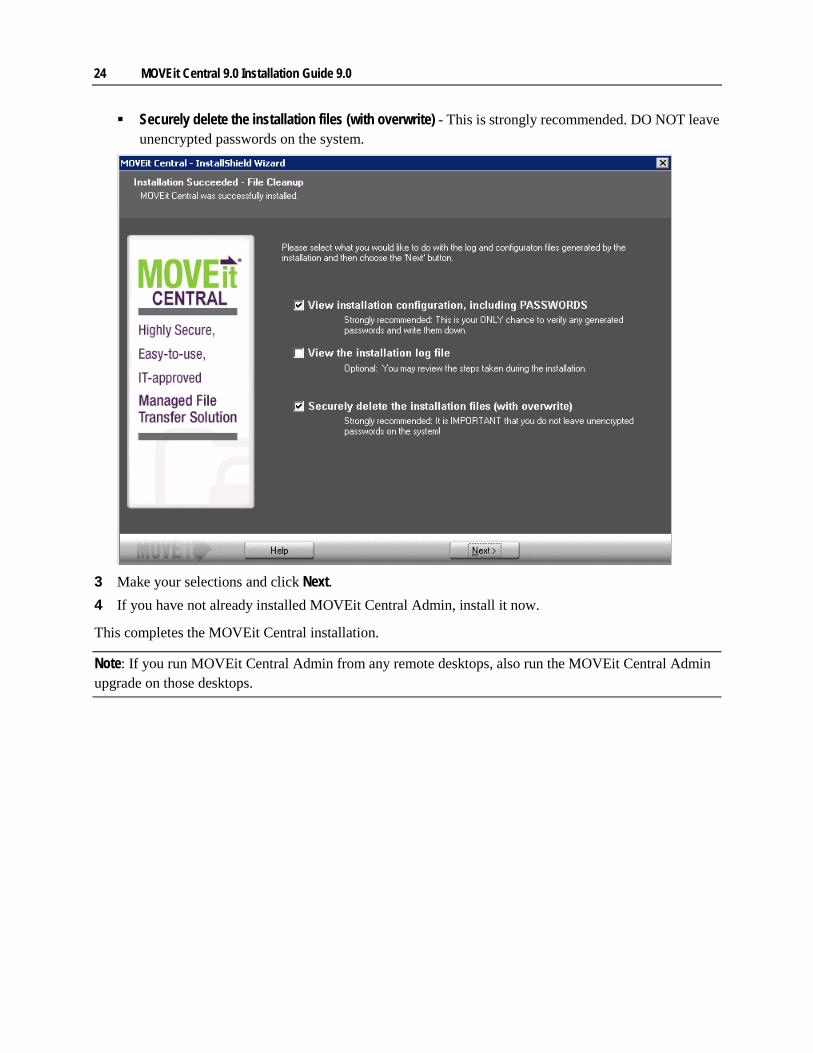
1 Click Next to install MOVEit Central. 2 After installation completes, you can perform additional tasks: View installation configuration, including PASSWORDS - This is strongly recommended. This is your
ONLY chance to verify any generated passwords and write them down. View the installation log file - You can review the steps taken during the installation.
24 MOVEit Central 9.0 Installation Guide 9.0
Securely delete the installation files (with overwrite) - This is strongly recommended. DO NOT leave
unencrypted passwords on the system.
3 Make your selections and click Next. 4 If you have not already installed MOVEit Central Admin, install it now.
This completes the MOVEit Central installation.
Note: If you run MOVEit Central Admin from any remote desktops, also run the MOVEit Central Admin upgrade on those desktops.

Install MOVEit Central 25
Failed Installation If an installation fails, the Installation Failed!!! dialog box apears:
1 Select one or more of the following: Securely upload Installation files to Ipswitch - Uploads install files and log information to Ipswitch
for further debugging. View Installation log View Installation configuration - Displays all the installation configuration options, including
passwords. Delete installation log and configuration files - This is strongly recommended. It is IMPORTANT
that you do not leave unencrypted passwords on the system. 2 Click Finish. Your partial installation is removed. However, your installation settings have been saved.
If you re-run this installation, fields will be pre-filled with your last values.

26
Use this procedure to update the MOVEit Central software to a newer version.
Note: In some situations, the installation process can appear to be stuck for many minutes on 'Updating runtime libraries." This appears to be caused by background Windows processes that run after Windows updates are downloaded and installed, but before the machine has been rebooted to finish Windows update installation. If you encounter this issue, your options are: be patient, end the installation through Task Manager and reboot, or (carefully) lower the priorities of the Windows update tasks through Task Manager.
Welcome 1 Run the installer. The Update Welcome screen opens.
2 Click Next, then go to License (on page 27).
Update MOVEit Central

Update MOVEit Central 27
License 1 MOVEit Central requires a license file to install and operate. License keys from previous versions will
no longer work. To get a new license file, follow the steps in this KB article (http://ipswitchft.force.com/kb/articles/FAQ/How-do-I-obtain-a-license-file-for-an-upgrade-to-MOVEit-Central-8-1-or-higher). If you need further assistance, contact Ipswitch MOVEit Support (http://www.ipswitchft.com/support).

28 MOVEit Central 9.0 Installation Guide 9.0
2 Click Browse and select the license file. If your license file already exists, as it would for an update, the following screen opens, showing the current license:
3 Click Next, then go to Ready to Update (on page 29).

Update MOVEit Central 29
Ready to Update The Ready to Update screen opens.
1 Click Next, then go to Update Complete (on page 30).

30 MOVEit Central 9.0 Installation Guide 9.0
Update Complete The Update Complete screen opens.
1 Select the Securely delete the installation files (with overwrite) checkbox- This is strongly
recommended. DO NOT LEAVE UNENCRYPTED PASSWORDS ON THE SYSTEM. 2 Click Finish. 3 If you have not already installed MOVEit Central Admin, do so now. If you run MOVEit Central
Admin from any remote desktops, you must also the MOVEit Central Admin update on those desktops.
This completes the MOVEit Central installation.
31
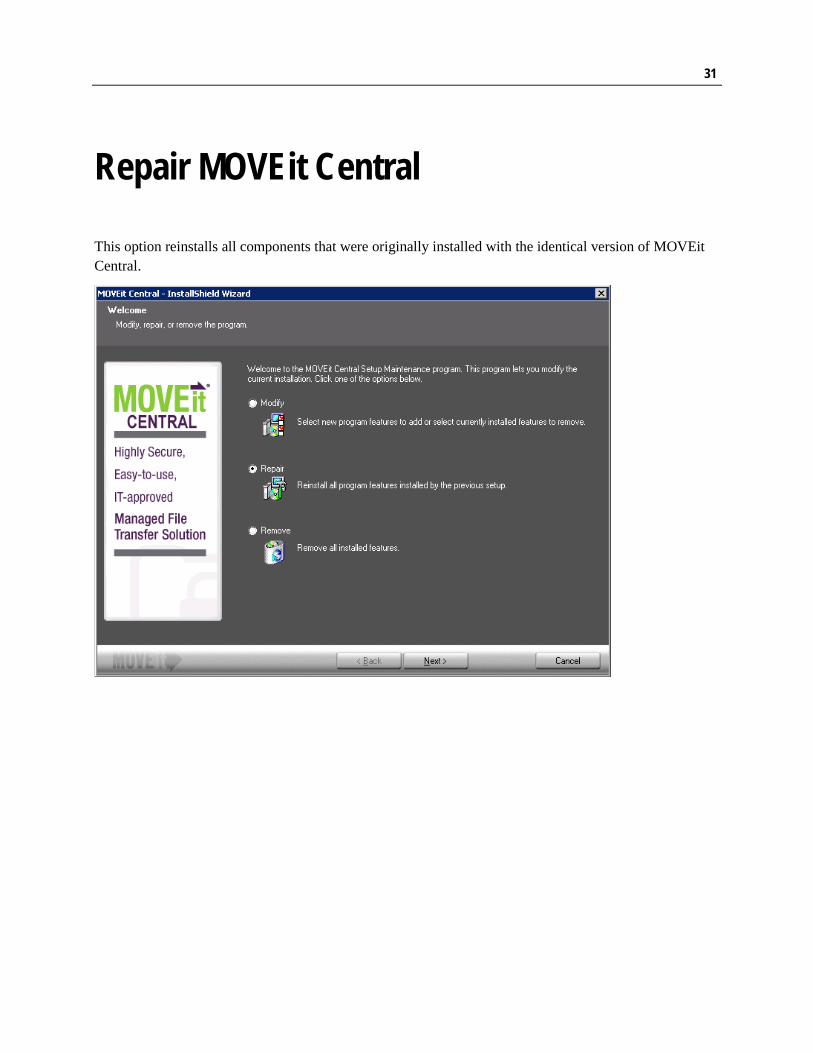
This option reinstalls all components that were originally installed with the identical version of MOVEit Central.
Repair MOVEit Central

32 MOVEit Central 9.0 Installation Guide 9.0
1 Select Repair and click Next.
2 Click Finish.

33
This option installs/removes MOVEit Central components.
Modify MOVEit Central

34 MOVEit Central 9.0 Installation Guide 9.0
1 Select Modify and click Next. The Selected Features screen appears. Select the features to install and clear the selection for the features to uninstall.
Common Features: Features that are common to both the 64-bit and 32-bit versions. In most cases,
select this option. The features that are not part of the Common Features are those that are different depending on whether the 64-bit or 32-bit version in installed. Non-common features include: the MOVEit Central server, the configuration program, the DLLs that they use, and the ODBC driver.
MySQL: In most cases, select this option.
Note: You can run only one of the following versions of MOVEit Central. The default installer installs the 64-bit version. To switch to the 32-bit version, select that check box and clear the check box for the 64-bit version.
32-bit MOVEit Central: Select this option to switch to the 32-bit version of MOVEit Central. 64-bit MOVEit Central: MOVEit Central is installed as a 64-bit version. Support for 64-bit Windows
provides increased performance for task processing.

Modify MOVEit Central 35
2 Click Next.
3 Click Finish.

36
This option completely removes MOVEit Central from the system.
1 Select Remove, then click Next.
2 Click Yes to confirm the removal.
Uninstall MOVEit Central

Uninstall MOVEit Central 37
3 If MOVEit Central uses the MySQL database, you are prompted to specify whether to remove the MySQL database that was installed with MOVEit Central. Click Yes to remove MySQL or No to keep it.
4 Click Finish.

38
Prerequisite: Install MOVEit Central (on page 9).
You can install MOVEit Central Web Admin on the same server or a different server as MOVEit Central. If you install it on a different server, it must be able to connect to the MOVEit Central server.
The Web Admin installer installs an Apache Tomcat web server and a Java web application to support the JavaScript-based Web Admin. The Java web application connects to MOVEit Central using the same TCP ports as MOVEit Central Central Admin Console (VBAdmin).
This program installs or updates the software. It also provides maintenance options to repair the software.
NOTE: The MOVEit Central server supports concurrent connections from MOVEit Central Web Admin and the Admin Console.
Install MOVEit Central Web Admin

Install MOVEit Central Web Admin 39
Supported Features in Web Admin MOVEit Central Web Admin is a web browser interface to MOVEit Central. It has a subset of the functions that are available in the Central Admin Console (VBAdmin). Subsequent releases will include additional functionality until the Web Admin becomes a complete replacement for Central Admin.
Functions Implemented in MOVEit Central 9.0 Web Admin
Hosts Tasks Task Groups Sync Tasks Advanced Tasks Scripts Commands Settings Task filtering Task Status Non-Admin User Permissions Context-sensitive Help
Features and Functions Not Implemented in MOVEit Central 9.0 Web Admin.
Use the Admin Console for these features and functions:
Task Run History and Reporting Debug Log Partial Task Import Permissions Configuration
You can install MOVEit Central Web Admin on the same server or a different server as MOVEit Central. If you install it on a different server, it must be able to connect to the MOVEit Central server.
The Web Admin installer installs an Apache Tomcat web server and a Java web application to support the JavaScript-based Web Admin. The Java web application connects to MOVEit Central using the same TCP ports as MOVEit Central Central Admin Console (VBAdmin).

40 MOVEit Central 9.0 Installation Guide 9.0
Install or Update Web Admin 1 Run the installer. The Update Welcome screen appears.

Install MOVEit Central Web Admin 41
2 Click Next. The License Agreement screen appears.
3 Accept the license agreement and click Next. The Destination Folder screen appears.
Note: You can also print the license agreement.

42 MOVEit Central 9.0 Installation Guide 9.0
4 Accept the default location or click Change and browse to a different location, Click Next.. The
Configure Tomcat screen appears.

Install MOVEit Central Web Admin 43
5 To accept the defaults listed to connect to the Tomcat server for MOVEit Central Web Admin, click Next. – or – To change the defaults, proceed as follows and click Next. a) To point to some other location than the default listed, check the box Specify the IP address or
hostname for MOVEit Central, and type the appropriate information. Specify multiple MOVEit servers with a comma-separated list.
b) To change the default HTTP port from 80, type the new port number in the HTTP Connector Port box.
c) To change the default HTTPS port from 443, type the new port number in the HTTPS Connector Port box.
The Change Service Log On Account? screen appears.
6 To accept the defaults to log on with the local system account, click Next.
– or –
44 MOVEit Central 9.0 Installation Guide 9.0
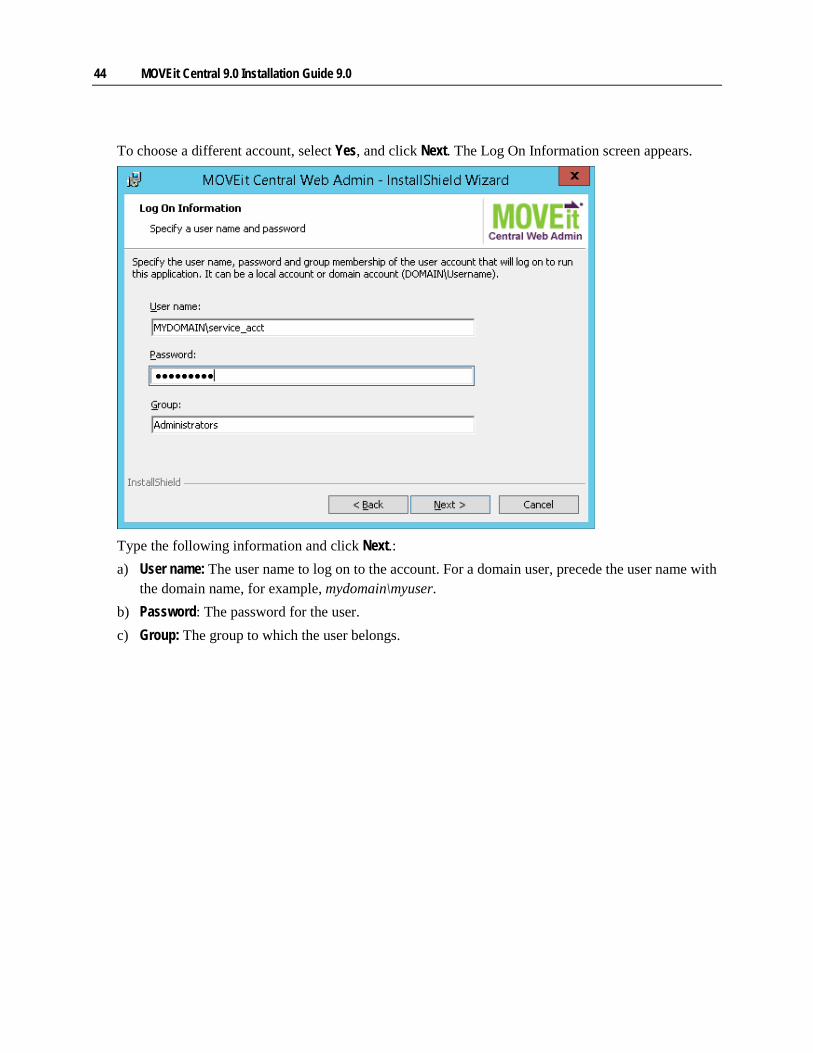
To choose a different account, select Yes, and click Next. The Log On Information screen appears.
Type the following information and click Next.: a) User name: The user name to log on to the account. For a domain user, precede the user name with
the domain name, for example, mydomain\myuser. b) Password: The password for the user. c) Group: The group to which the user belongs.

Install MOVEit Central Web Admin 45
The Ready to Install the Program screen appears.
7 Click Next. The progress screen appears.

46 MOVEit Central 9.0 Installation Guide 9.0
8 When the installation finishes, information about the process appears. Upon successful completion, the screen shows the link that the Tomcat server uses to connect to MOVEit Central Web Admin.
9 Optionally select Show the Windows Installer log. Cick Finish.
Install MOVEit Central Web Admin 47
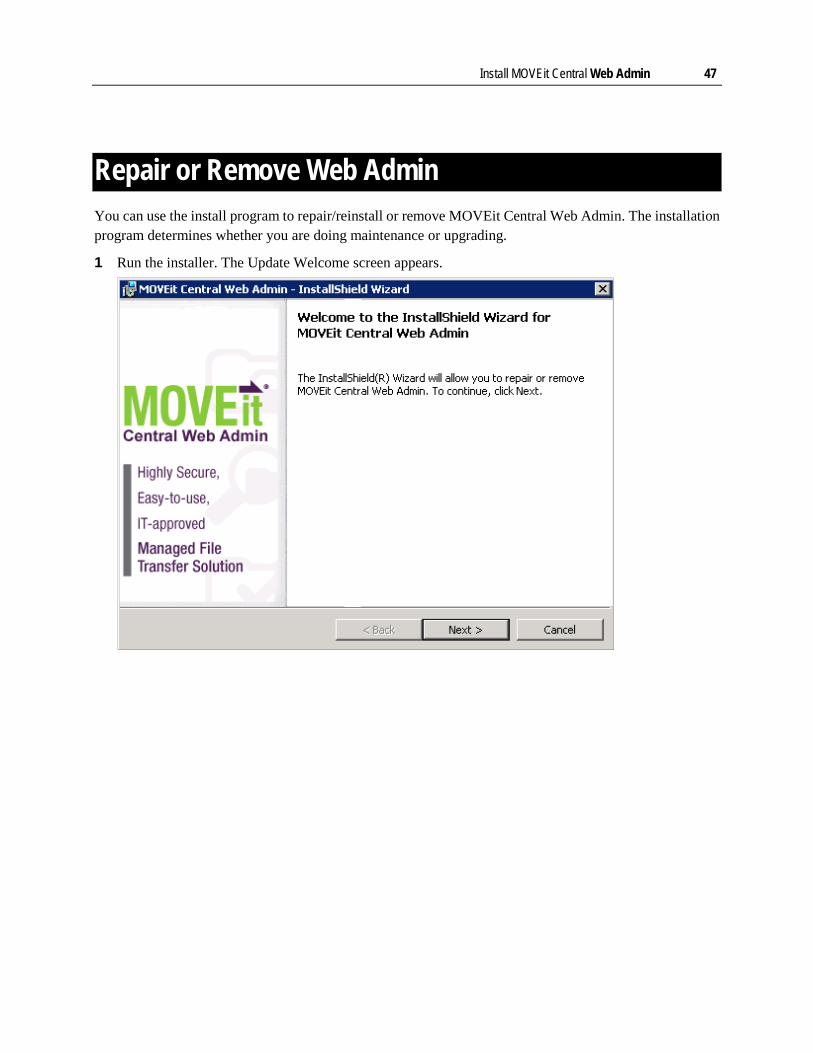
Repair or Remove Web Admin You can use the install program to repair/reinstall or remove MOVEit Central Web Admin. The installation program determines whether you are doing maintenance or upgrading.
1 Run the installer. The Update Welcome screen appears.

48 MOVEit Central 9.0 Installation Guide 9.0
2 Click Next. The Program Maintenance screen appears.

Install MOVEit Central Web Admin 49
3 To fix missing or corrupt files, shortcuts or registry entries, select Repair and click Next. This process reinstalls the software. The Ready to Repair the Program screen appears.
a) Click Install.

50 MOVEit Central 9.0 Installation Guide 9.0
b) When the process completes, a screen appears with information about the process.
c) Click Finish to close the install program. – or –

Install MOVEit Central Web Admin 51
4 To uninstall MOVEit Central Web Admin, select Remove, and click Next. The Remove the Program screen appears.
a) Review your selection. Click Remove to continue.
If you do not want to uninstall at this time, click Cancel to leave you system unchanged.

52 MOVEit Central 9.0 Installation Guide 9.0
b) When the process completes, a screen appears with information about the process.
c) Click Finish to close the install program.
Connect to MOVEit Central with Web Admin To connect to MOVEit Central, you must have both of the following:
The location to access the MOVEit Central Web Admin Your MOVEit Central administrator ID and password.
1 From a supported browser, (on page 5) type the location where MOVEit Central Web Admin is installed. For example: http://URL or system name:8080/webadmin/login
2 At the login page, type your administrative user and password, and click Log In:

Install MOVEit Central Web Admin 53
3 The MOVEit Central Web Admin opens.


55
C
Certificate Dialog • 21
Connect to MOVEit Central with Web Admin • 52
Credentials • 15
D
Database Considerations • 6
Database Type • 16
E
Email Options • 14, 22
F
Finish • 23
Folders • 18, 19
I Install MOVEit Central • 4, 10, 38
Install MOVEit Central Web Admin • 3, 4, 38
Install or Update Web Admin • 40
L
License • 13, 26, 27
License Agreement • 12
M
Modify MOVEit Central • 4, 7, 33
O
Overview • 3
R
Ready to Update • 28, 29
Repair MOVEit Central • 4, 31
Repair or Remove Web Admin • 47
Requirements • 3, 5, 10, 52
S
Setup Options • 14, 16
Supported Features in Web Admin • 3, 39
T
Tamper Detection Key • 20
The MOVEit Central Installation Program • 4
U
Uninstall MOVEit Central • 4, 36
Update Complete • 29, 30
Update MOVEit Central • 4, 10, 26
Update Notes • 7
W
Welcome • 11, 26
Index


![Winning with MoveIt! - Robot Operating System · 3 Robotics Institute Contents Getting started with the Amazon Picking Challenge (APC) [1] Team Delft APC motion module with MoveIt!](https://static.fdocuments.net/doc/165x107/5afb339a7f8b9a2d5d8f45ef/winning-with-moveit-robot-operating-system-robotics-institute-contents-getting.jpg)