ml - Sony-the center speaker cord to the CENTER SPEAKER terminals-the surround speaker cords to the...
64
8Z-AR4-903-01 9901 15Ac~-y43 ml ml T For assistance and information call toll free I-800-BUY-AIWA (United States and Puerto Rico)
Transcript of ml - Sony-the center speaker cord to the CENTER SPEAKER terminals-the surround speaker cords to the...

8Z-AR4-903-019901 15Ac~-y43
mlml
T
For assistance and information
call toll free I-800-BUY-AIWA(United States and Puerto Rico)

/ 7 \ IR’SKER%Y”CKI/’ ! \
“CAUTION:TO REDUCE THE RISK OFELECTRIC SHOCK,
DO NOT REMOVE COVER (OR BACK).NO USER-SERVICEABLE PARTS INSIDE.
REFER SERVICING TO QUALIFIED
SERVICE PERSONNEL.”
Owner’s recordFor your convenience, record the model number and serialnumber (you will find them on the rear of your unit) in the spaceprovided below. Please refer to them when you contact yourAiwa dealer in case of difficulty.
Model No. Serial No. (Lot No.)
AV-D35
PRECAUTIONS
Read the Operating Instructions carefully and completely beforeoperating the unit. Be sure to keep the Operating Instructionsfor future reference. All warnings and cautions in the OperatingInstructions and on the unit should be strictly followed, as wellas the safety suggestions below.
Installation1
2
34
5
6
7
Water and moisture — Do not use this unit near water, suchas near a bathtub, washbowl, swimming pool, or the like.Heat — Do not use this unit near heat sources, includingheating vents, stoves, or other appliances that generate heat.It also should not be placed in temperatures less than 5°C(41“F) or higher than 35°C (95”F).Mounting surface — Place the unit on a flat, even surface.Ventilation — The unit should be situated with adequatespace around it so that proper heat ventilation is assured.Allow 10 cm (4 in.) clearance from the rear and the top of theunit, and 5 cm (2 in.) from each side.- Do not place the unit on a bed, rug, or similar surface that
may block the ventilation openings.- Do not install the unit in a bookcase, cabinet, or airtight
rack where ventilation may be impeded.Objects and liquid entry — Take care that objects or liquidsdo not get inside the unit through the ventilation openings.Carts and stands — When placed ormounted on a stand or cart, the unitshould be moved with care.Quick stops, excessive force, anduneven surfaces may cause the unit or m 3A&~cart to overturn or fall.Wall or ceiling mounting — The unit should not be mountedon a wall or ceiling, unless specified in the OperatingInstructions.
Electric Power1
2
3
4
5
Power sources — Connect this unit only to power sourcesspecified in the Operating Instructions, and as marked onthe unit.Polarization — As a safety feature, some units are equippedwith polarized AC power plugs which can only be insertedone way into a power outlet. If it is difficult or impossible toinsert the AC power plug into an outlet, turn the plug overand try again. If it is not still inserted easily into the outlet,please call a qualified service technician to service or replacethe outlet. To avoid defeating the safety feature of thepolarized plug, do not force it into a power outlet.AC power cord- When disconnecting the AC power cord, pull it out by the
AC power plug. Do not pull the cord itself.- Never handle the AC power plug with wet hands, as this
could result in fire or shock.- Power cords should be firmly secured to avoid being
severely bent, pinched, or walked upon. Pay particularattention to the cord from the unit to the power socket.
- Avoid overloading AC power plugs and extension cordsbeyond their capacity, as this could result in fire or shock.
Extension cord — To help prevent electric shock, do notuse a polarized AC power plug with an extension cord,receptacle, or other outlet unless the polarized plug can becompletely inserted to prevent exposure of the blades of theplug.When not in use — Unplug the AC power cord from the ACpower outlet if the unit will not be used for several months ormore. When the cord is plugged in, a small amount of currentcontinues to flow to the unit, even when the power is turnedoff.
1 ENGLISH

Outdoor Antenna1 Power lines — When connecting an outdoor antenna, make
sure it is located away from power lines.2 Outdoor antenna grounding — Be sure the antenna system
is properly grounded to provide protection against unexpectedvoltage surges or static electricity build-up. Article 810 of the
National Electrical Code, ANS1/NFPA70, provides informationon proper grounding of the mast, supporting structure, andthe lead-in wire to the antenna discharge unit, as well as thesize of the grounding unit, connection to grounding terminals,and requirements for grounding terminals themselves.
AntennaGroundingAccordingto the NationalElectricalCode
)
(NEC ART 250 PART H)
NEC-NATIONALELECTRICALCODE
MaintenanceClean the unit only as recommended in the OperatingInstructions.
Darnaqe Requirinq ServiceHave the unit serviced by a qualified service technician if:- The AC power cord or plug has been damaged- Foreign objects or liquid have gotten inside the unit- The unit has been exposed to rain or water- The unit does not seem to operate normally- The unit exhibits a marked change in performance- The unit has been dropped, or the cabinet has been damagedDO NOT ATTEMPT TO SERVICE THE UNIT YOURSELF.
Check your unit and accessories
AV-D35 Stereo receiver Remote control
FM antenna AM antenna
Operating Instructions, etc.
TABLE OF CONTENTS
PRECAUTIONS ............................................................. ...... 1
PREPARATIONS
CONNECTIONS++;
.................................................................. .BEFORE OPERATION .........................................................i'
SOUND
CUSTOM AUDI() ADJUSTMENT ....................... .............. 8ELECTRONIC GRAPHIC EQUALIZER ............. ............... $)DSP SURROUNID ............................................... .............. 10
BASIC OPERATIONS —— .
SELECTION OF AUDIO/VIDEO SOURCE ........ .............. IllRECORDING AIN AUDIO SOURCE ................... ............... 12!
RADIO RECEPTION ——-
MANUALTUNING ............................................................. 13PRESETTING STATIONS ................................................. 14
DOLBY SURROUND
SELECTING DC)LBY PRO LOGIC ................................... 15ADJUSTING SPEAKER LEVEL BALANCE ...................... 16
TIMER
SETTING THE CLOCK ................>..................................... 17SETTING THE SLEEP TIMER .......................................... 17
mGENERAL
CARE AND MAINTENANCE ............................................. 1[3SPECIFICATIONS ............................................................. 1[3TROUBLESHOOTING GUIDE .......................................... 1!3PARTS INDEX .....................................m.............................2{)
ENGLISH 2

CONNECTIONS CONNECTING EQUIPMENT
Jacks and plugs of the connecting cord are color-coded asfollows:
Before connecting the AC cordRed jacks and plugs : For the right channel of audio signals
The rated voltage of your unit shown on the rear panel is 120 V White jacks and plugs: For the left channel of audio signals
AC. Check that the rated voltage matches your local voltage.Yellow jacks and plugs: For video signals.
IMPORTANT mConnect the speakers, antennas, and all other external Insert the plugs fully into the jacks. Loose connections may
equipment first. Then connect the AC cord at the end. produce a humming sound or other noise interference.
“ Be sure to connect the VIDEO OUT terminal of a DVD playerdirectly to a TV set, not through this unit. Otherwise, the picturenoise may appear when playing the DVDScopy protected.
F
o0
‘2 Input sound through the 5.1 INPUT terminals cannot beo
@Onnan o ~ ~ ~
recorded. When recording the sound from the DVD player,Do 0@@Zm30 “
connect the AUDIO OUT (DOWN MIXING) terminals of theDVD player to the VIDEO l/DVD/MD AUDIO IN terminals ofthe unit. vlrxo 3
*3When connecting a monaural video, use a stereo-mono, ...\ ..,$~,,.’ ,,”’.,,
Camcorderconnecting cord (not supplied).
\ ... ‘. .../ ‘y;!,/IL)E] N L-#,JD10ii.<
I I I [ to SUB-WOOFER OUT(DVD) 11111
II to SURROUND OUT[n\ln\ I 1111 II I I “~mI
r !- v u) J
‘1111 Ill
L to OUTPUTto CENTER OUT(DVD)
J
1111 Ill Turntable
iDK2ableTV*3_l IVldao 2 or
II L_ Tape deckto LINE OUT
to LINE IN lu]~lula ~~
-
3 ENGLISH

@)Surround speakers
—
CONNECTING SPEAKERS @ Front speakers
Speaker terminalsConnect front speakers (system A and/or B), a center speaker,surround speakers and sub woofer to the corresponding speakerterminals on the unit:- the front speaker cords to the FRONT SPEAKERS terminals- the center speaker cord to the CENTER SPEAKER terminals- the surround speaker cords to the SURROUND SPEAKERS
terminals.- for more powerful bass, the sub woofer (with a built-in amplifier)
cord to the SUPER WOOFER d iack
Lift up the terminal flap,insert the speaker cord leadinto the terminal slot, thenclose the flap. (Checkthat thecord is connected securely.
Surround speakers
Speaker impedanceFor all speakers, use speakers of 8 ohms or more.
Connecting + to +, – to – terminalsTo get the proper sound effect, the speaker terminals on the unitand the speaker should be connected with proper polarity; the +terminal on the unit should be connected to the + terminal onthe speaker (and – to -).
EEiza● Be sure to connect the speaker cords correctly as shown in
the illustration on the right column. Improper connections cancause short circuits in the SPEAKER(S) terminals.
● Do not leave objects generating magnetism near the speakers.
—
7 r“
~.Sub woofer
.
~.Center speaker
ENGLISH ‘$

POSITIONING THE SPEAKERS
Position the speakers to make the most of the Dolby DigitalSurround (5.1 CH), Dolby Pro Logic or DSP effect.
@ Front speakers
@ Center speakerPosition in the center of the two front speakers. In addition,position on or below the TV set, if connecting a TV set to theunit.
@ Surround speakersPlace the surround speakers directly to the side of or slightlybehind the listening area. Align them horizontally, about 1meter (3.2 feet) above ear height.
@ Sub wooferPlace the sub woofer in any place between the two frontspeakers.
Sound from the surround speakers or center speaker dependson the setting of the DSP, Dolby Pro Logic and 5.1 CH function.
CONNECTING THE SUPPLIED ANTENNAS @
Connect the FM antenna to the FM 75 Q terminals and the AMantenna to the AM LOOP terminals,
-=+4
To stand the AM loop antenna on a surfaceFix the claw to the slot as shown in the illustration.
To position the antennasFM feeder antenna:Extend this antenna horizontally in a T shape and fix its ends tothe wall.AM loop antenna:Position for the best reception.
● Do not bring the FM antenna near metal objects or curtain rails.● Do not bring the AM antenna near other external equipment,
the unit itself, the AC power cord or speaker cords, as noisewill be picked up.
● Do not unwind the AM loop antenna wire.
CONNECTING AN OUTDOOR ANTENNA
For better FM reception, use of an outdoor antenna isrecommended. Connect the outdoor antenna to the FM 75 Clterminals.
5 ENGLISH

ABOIJTTHEREMOTE CONTROL
inserting batteriesDetach the battery cover on the rear of the remote control andinsert two R6 (size AA) batteries.
R6(AA)
When to replace the batteriesThe maximum operational distance between the remote controland the sensor on the unit should be approximately 5 meters(16 feet). When this distance decreases, replace the batterieswith new ones.
Using the remote controlThe instructions in this manual refer mainly to the buttons on themain unit. Buttons on the remote control with the same namesas those on the main unit can be used as well.The SET button functions in the same way as the ENTER buttonon the main unit.
● If the unit is not going to be used for an extended period oftime, remove the batteries to prevent possible electrolyteleakage.
● The remote control may not operate correctly when:- The line of sight between the remote control and the remote
sensor in the display window is exposed to intense light, suchas direct sunlight.
- Other remote controls are used nearby (those of television,etc.)
POWER ECONOMIZING (ECO) MOIDE
1 3 2.3
l— LJ
L POWER &3TANDBY/ON indicator
Setting this unit to the ECO mode reduces power consumptionas below.Initial setting of the ECO mode is ON.● When the current time is set, the clock display disaploears
immediately.● While the power is off, all the display lights turn off, anc~only
the POWER &3TANDBY/ON indicator lights in red.
To cancel the ECO mode1
23
Press the ECO button to display ECO MODE while the unit isturned on.Within 4 seconds, press the ENTER button.Within 4 seconds, turn the MULTI JOG to select ECO OFF,The mode will be automatically set after 4 seconds. It willalso be set if the ENTER button is pressed within 4 secondsafter step 3.
ENGL.ISH 6

BEFORE OPERATION
POWER TAPE MONITOR
I I Function indicators
PHONES I FRONT SPEAKERA,B I ENTER
ECO MULTI JOG
To turn the unit on
Press the POWER button.Operation is possible after four seconds. When the POWERbutton is pressed to turn on, the VOL (volume) level or functionname is displayed one after the other.The selected function indicator lights up in red and the others ingreen.
To change the brightness level of the display12
3
Press ECO so that “ECO MODE” is displayed.Within 4 seconds, turn the MULTI JOG to display DIM MODE,and then press the ENTER button within 4 seconds.Within 4 seconds. turn the MULTI JOG to select the dimmermode as below.The mode will be automatically set after 4 seconds. It willalso be set if the ENTER button is pressed within 4 secondsafter step 3.
DIM OFF *DIMMER 1- DIMMER 2- DIMMER 3
DIM-OFF:DIMMER1:
DIMMER 2:
DIMMER 3:
The normal display.The illumination of the display is dimmer thanusual.The illumination of the display is dimmer thanDIMMER 1.The illumination of the display is dimmer thanDIMMER 2. The function indicators light off.
To select the front speaker systemTo use speaker system A: Set the FRONT SPEAKERS A buttonto wON.To use speaker system B: Set the FRONT SPEAKERS B buttonto wON.To use both speaker systems: Set both the buttons to s ON.Set the button(s) to IOFF to turn off the speaker system(s).
As the front speaker systems A and B are connected in series:- The sound will be slightly decreased when using both speaker
systems- No sound can be heard if the FRONT SPEAKERS A and B
buttons are set to *ON when only one speaker system isconnected
Using the headphonesConnect headphones to the PHONES jack with a standard stereoplug (06.3 mm, 1/4 inch). Be sure to set the FRONT SPEAKERSA and B buttons to l.OFF. Otherwise sound is output from thespeakers.
mThe 5.1 CH function, Dolby Pro Logic or DSP system isautomatically canceled when the headphones are plugged in.
To turn the unit off, press the POWER button.
7 ENGLISH

CUSTOM AUDIO ADJUSTMENT
VOL
VOWME CONTROL
Turn the VOLUME control on the unit, or press the VOL buttonson the remote control.The volume level is shown on the display for four seconds. It canbe adjusted between Oand MAX (50). It flashes when being setover the level 44.The volume level remains memorized even after the power isturned off. However, if the power is turned off when the volumeis set to more than 21, it is automatically set to 20 the next timethe power is turned on.
To adjust the Ieft/right balance of the front speakersPress the BALANCE button to display “L/R OdB. Then pressthe DOWN or UP button repeatedly within four seconds.Note that the front speakers balance of the 5.1 CH and DolbyPro Logic modes is also changed,
(cancel)
mLow-frequency sound may be distorted when the T-BASS systemis used for a disc or tape in which low-frequency sound isoriginally emphasized. In this case, cancel the T-BASS system.
SOUND ADJUSTMENT DURING RECORDING
The output volume and tone of the speakers or headphones maybe freely varied without affecting the level of the recording.
To mute the sound temporarilyPress the MUTING button (–20 dB).‘(MUTE ON” appears on the display for four seconds. Whilemuting the sound, the selected function indicator flashes. Pressthe MUTING button again to restore the sound.
ENGL.ISH 8

ELECTRONIC GRAPHICE(IUALIZER
GEQ
This unit provides the following five different equalization modes.
ROCK: Powerful sound emphasizing treble and bassPOP: More presence in the vocals and midrangeJAZZ: Accented lower frequencies for jazz-type musicCLASSIC: Enriched sound with heavy bass and fine trebleBGM: Calm tone with suppressed bass and treble
Press the GEQ (Graphic Equalizer) button, and turn theMULTI JOG until the desired equalization mode is displayed.The GEQ modes are displayed cyclically as follows.
rROCK— PoP— JAZZ — CLASSIC— BGM
1L-..._M4 —M3— M2— Ml ~
L------- Manual mode -------;
The selected mode name is displayed for four seconds, and the➤ indicator appears on the left side of the selected mode name.
Selected mode
To cancel the selected modePress the GEQ button again. “GEQ OFF” appears on the display.
To select with the remote controlPress the GEQ button repeatedly until the desired equalizationmode is displayed.Five preset modes, the manual modes Ml to M4 and “GEQ OFFcan be selected.
SETTING NEW EQUALIZATION CURVES
Up to 4 equalization curves can be stored as the manual modesMl to M4.
1
2
3
4
5
6
7
1 3,6
2 1,5,7
Press the GEQ button and press the ENTER
button within 4 seconds.
Press the DOWN or UP button to select afrequency.The level indicator of the selected frequency flashes.
Turn the MULTI JOG to adjust the level of theselected frequency.
Repeat steps 2 and 3 to make the desiredequalization curve.In steps 2 and 3, the unit returns to normal mode when nooperation is made for about 8 seconds.
Within 8 seconds, press the ENTER button.“GEQ Ml” appears on the display.
Turn the MULTI JOG to select a preset numberfrom Ml to M4.
Press the ENTER button.The equalization curve is stored.The selected preset number and the equalization curve aredisplayed for a few seconds for each.
To adjust the GEQ curve temporarilyFollow the steps from 1 to 4 above. The adjusted GEQ curvestill remains before changing or canceling the GEQ mode.
To select the manual preset curvePress the GEQ button, and turn the MULTI JOG until the desiredmanual preset number is displayed.
● The GEQ system is automatically canceled:- when the Dolby Pro Logic is turned on- when the 5.1 CH function is selected
● The GEQ system cannot be turned on while the 5.ICHfunction is selected.
9 ENGLISH

DSPSURROUND
DSP MULTIJOG
DOW”N,UP
DSP
MANUALSELECT
The DSP (Digital Signal Processor) surround circuits can recreatethe effect of sounds reflected from walls or ceilings, to obtain thesound presence of real environments. There are four modes withmatching graphic equalization modes. Equalization modes areselected automatically and can also be selected or turned off tosuit your preference.
Press the DSP button, and turn the MULTI JOG untilthe desired DSP mode is displayed.The selected mode name is displayed for four seconds, and theindicators P appears on the left sides of the selected DSP nameand matching GEQ mode name.
Selected pSP mode
Matching GEQ mode
To cancel the selected modePress the DSP button again. “DSP OFF” appears on the display.Even if canceling the selected DSP mode, the matching orselected GEQ mode still remains.
To select with the remote controlPress the DSP butiton repeatedly until the desired [)SP mode isdisplayed.Four DSP modes and “DSP OFF can be selected.
To adjust the volume and balance of the! surroumdspeakersPress the MANUAI- SELEC-r button on the remote control twiceor three times, while the DSP system is turned on, lo display “S-R OdB” (for right surround speaker) or “S-L OdB (for left surroundspeaker). Then press the DOWN or UP button repeatedly withinfour seconds.Note that the surround speakers volume and balance of tlhe 5.1CH and Dolby Pro Logic modes are also changed.
● The DSP system is automatically canceled:- when the Dolby Pro Logic is turned on- when the 5.1 CH function is selected
● The DSP system cannot be turned on:- while the 5.1 Cl-l functiorl is selected- while headphones are plugged in
When the music source is monauralSelect LIVE to obtain a simulated stereo effect. When DANCE,HALL or ARENA is selected, no sound will be heard from thesurround speakers.
,ENGL/!5H II O

SELECTION OF AUDIO/VIDEOSOURCE
1
2
3
FUNCTION Function indicators ENTER
DOWN~UP I MULTI JOGVIDEO 1/5.1CH/BAND
Select the program source.Turn the FUNCTION selector or press the TAPE MONITORbutton. The selected function indicator flashes in red.
I Radio I TUNER IRecord I PHONO
Compact disc I CD
I Television, etc. I AUX I
Video VIDEO l/DVD/MD,VIDEO 2/LD/TV, VIDEO 3
LD or Cable TV VIDEO 21
MD or DVD VIDEO l/DVD/MD
To select a function on the remote controlPress the desired function button directly.
The function to be selected (except PHONO) depend on theequipment connected to the input terminals on the rear panelof the unit.
When using a turntable with a built-in equalizer amplifier, setthe switch of the equalizer amplifier to off. Seethe instructionsof the turntable for further information.
Start the selected program source.
Adjust the sound.
About the video source to the monitor orTV
Selected video source
VI: VIDEO1 , V2: VI DE02, V3: VIDE03
To select the video source
1 Select one of the functions except TUNER.2 Press the ENTER button to display VIDEO 1.3 Turn the MULTI JOG to select VIDEO 2 or VIDEO 3.
To change a displayed name for the VIDEO1 and VIDEO 2
When the VIDEO 1 is selected, VIDEO 1 is displayed initially. Itcan be changed to DVD or MD.Press the VIDEO l/5.1 CH/BAND button while pressing theENTER button.To use the 5.1 CH function, press the VIDEO 1/5.1 CH/BANDbutton. The function name will change to “5.1 ch IN” and thesource connected to the 5.1 INPUT terminals is selected.To resume, press the button again so that the selected functionname is displayed.
The displayed name for VIDEO 2 button can be changed toVIDEO 2, LD orT~ while the VIDEO 2 function is selected, pressthe VIDEO 1/5.1 CH/BAND button while pressing the ENTERbutton.
To adjust the sound level of the connectedsource
The input sensitivity level of each function (except the TUNERfunction) can be adjusted.When the sound level of the connected source is higher or lowerthan that of the TUNER, adjust it as follows.
1 Select the function to be adjusted.Turn the MULTI JOG accordingly and play the source,
2 Press the UP or DOWN button repeatedly.
The level can be adjusted between -6dB (MIN) and +8dB (MAX)in 2dB steps. Adjust the level so that the sound is output at thesame level as the TUNER.
● The input sensitivity level of the TUNER function cannot beadjusted.
● That of the TAPE MONITOR cannot be adjusted either.Even if the TAPE MONITOR is selected and the TAPEMONITOR indicator turns red, pressing the UP or DOWN buttonwill change the level of the function displayed on the window.
The selected video source is indicated on the display and thevideo signal through the MONITOR VIDEO OUT jack is outputon the TV.
:1 ENGLISH

TO PLAY A DVD RECORDED IN DOLBYDIGITAL SURROUND
This receiver has the 5.1 INPUT connectors supporting DolbyDigital decoder with the 5.1 ch output terminals. When a DVDplayer that contains a Dolby Digital decoder is connected to thereceiver, you can enjoy theater-quality audio right in your homewhen playing discs recorded in Dolby Digital Surround.
1 Turn the FUNCTION selector to select the VIDEOl/DVD/MD function.
3 Start playing the DVD recorded in Dolby DigitalSurround.
EEma* The 5.1 CH function is automatically canceled and the VIDEO
1, DVD or MD function is selected:- when the Dolby Pro Logic is turned on- when headphones are plugged in
● The 5.1 CH function cannot be selected while headphones areplugged in.
RECORDING AN AUDIO SOURCE——.1 ENTER
1
2
3
TAPE MC)NITOR MULTIJOG
Select the program source to be recolrded.Turn the FUNCTION selector.
Set the tape deck or MD recorder to the recordingmode.
Start the selected program source.
To monitor recorded sound during recording (when thleconnected tape deck is a three-head systemk)Press the TAPE MONITOR button. “TAPE ON” appears on thedisplay for four seconds, and then the source name selected instep 1 comes back on. To cancel the tape monitor, press it againso that “TAPE OFF” appears.
m● Any sound control system has no effect on recording (see page
8).c Input sound through the 5.1 INPUT terminals cannot be
recorded. When recording the sound from the DVD player,connect the AUDIO OUT (DOWN MIXING) terminals of the DVDplayer to the VIDEO l/DVD/MD AUDIO IN terminids of the unit,
● When recording sources by the MD recorder ccmnectecl to theVIDEO l/DVD/MD AUDIO OUT terminals, first press theENTER button tc)display VIDEO 1, and turn the MULTI ,JOGtoselect VIDEO 2 or VIDEO 3. Then select the source (W or \/3should be displayed).Recording cannot be done while the V1 indication is displayedon the window.
● Input sound from the tape deck connected to the TAF’EMONITOR IN terminals cannot be recorded.

MANUAL TUNING
MONOTUNER
1
2
L—”——i I L--Al
1 u<......>Turn the FUNCTION selector to select theTUNERfunction, and press the VIDEO 1/5.1 CH/BANDbutton repeatedly to select the desired band.
~
The display changes to frequency indications after indicatingband and video source (V1, V2 or V3) for two seconds.
Press the UP or DOWN button to select a station.Each time the button is pressed, the frequency changes.When a station is received, “TUNE is displayed for twoseconds. During FM stereo reception, 11{~11]is displayed.
To search for a station quickly (Auto Search)Keep the UP or DOWN button pressed until the tuner starlssearching for a station. After tuning in to a station, the searchstops.To stop the Auto Search manually, press the UP or DOWN button.● The Auto Search may not stop at stations with very weak
signals.
When an FM stereo broadcast contains noisePress the MONO TUNER button on the remote control so that“MONO appears on the display.Noise is reduced, although reception is monaural.
MONO
To restore stereo reception, press the button so that “STEREOappears.
To change the AM tuning intervalThe default setting of the AM tuning interval is 10 kHz/step. Ifyou use this unit in an area where the frequency allocationsystem is 9 kHz/step, change the tuning interval.Hold down the VIDEO 1/5. 1CH/BAND button and press thePOWER button.To reset the interval, repeat this procedure.
13 ENGLISH

PRESETTING STATIONS
Numberedbuttons
TUNERBAND
U,.......The unit can store a total of 32 preset stations. When a station isstored, a preset number is assigned to the station. Use the presetnumber to tune in to a preset station directly.
1
2
3
Turn the FUNCTION selector to select theTUNERfunction, and press the VIDEO 1/5.1 CH/BANDbutton repeatedly to select the desired band.Then press the UP or DOWN button to select astation.
Press the ENTER button to store the station.A preset number assigned to the station, beginning from 1 inconsecutive order for each band, is displayed for two seconds.
Repeat steps 1 and 2.No more stati&s will be stored if a total of 32 stations havealready been stored for all the bands.
PRESET NUMBER TUNING
1 Turn the FUNCTION selector to select theTUNE[? ;function, and press the VIDEO 1/5.1 CHIBAN[)button repeatedly to select a band.
.
2 Turn the MUILTI JOGI to select a presel number.
To clear a preset stationSelect the preset number of the station to be cleared. Then, pressthe ENTER button, and press the ENTER button again withinfour seconds.The preset numbers of ail other stations in the band with highf?rnumbers are decrx?ased by one.
When using the remote controlPress the TUNER BAND button to select a band, then press thenumbered buttons to select a preset number.Example:To select preset number 25, press 2 and 5.To select preset number 7, press Oand 7.
When the AM tuning interval is changed, all preset stations arecleared. The preset stations have to be set again.
ENGLISH14

This unit is equipped with the Dolby Pro Logic decoder and alsosupports the Dolby Digital decoder with the 5.1 ch outputterminals.The unit and the center and surround speakers (standard) assurefull-scale home theater sound. When playing back discs or videosoftware that have been recorded in Dolby Pro Logic or DolbyDigital Surround, astonishingly realistic sound surrounds thelistener to create a new level of audio/visual entertainment.Independent control of the five channels allows the listener toenjoy the same type of sound reproduction experienced in movietheaters. Voices are reproduced in the front and center soundfield, while ambient sounds like cars and crowds are reproducedon all sides of the listener for an incredibly lifelike audio/videoexperience. Please read the following carefully to “tune” thesystem’s output to match the characteristics of your listeningspace.
Check the following:● Before enjoying the DOLBY SURROUND sound, adjust the
proper balance of the speaker sound levels (see page 16).● Make sure the speakers are properly connected and positioned
(see pages 3,4 and 5).● Make sure the TV set and video unit are properly connected
(see page 3).● Make sure the disc and video tape, etc., support Dolby Pro
Logic or Dolby Digital Surround.
SELECTING DOLBY PRO LOGIC
The optimal Dolby Pro Logic mode depends on the type andplacement of the speakers. It is recommended that the optionalA]wa speakers should be used for all channels, for example, theSX-R1 700 for surround speakers, the SX-C1 700 for a centerspeaker and the SX-AV1 700 for front speakers. Check yourcurrent type and placement of the speakers and select therecommended Dolby Pro Logic mode accordingly.
The recommended mode
Center speaker
Larger-size Smaller-size No speaker
Surround speaker DOLBYPRO DOLBYPRO PHANTOM(Rear speaker) LOGIC-WIDE LOGIC-NORMAL
No surround 3 STEREO- 3 STEREO- .
speaker WIDE NORMAL
TO SELECT A DOLBY PRO LOGIC MODE
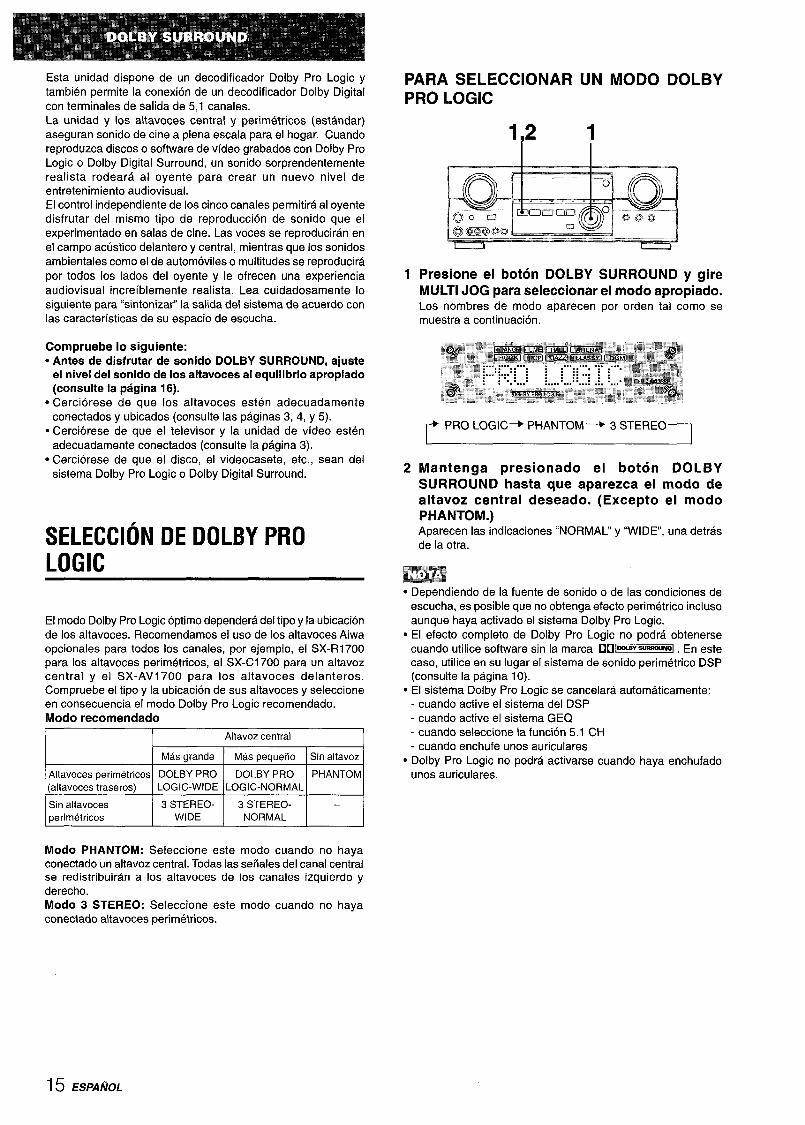
1.2 1
1 Press the DOLBY SURROUND button, and turnthe MULTI JOG to select the appropriate mode.The mode names are displayed in the order as shown below,
rPRO LOGIC -PHANTOM -3 STEREO1
1 1
2 Press the DOLBY SURROUND button again andhold it down until the center speaker mode to beselected appears. (Except the PHANTOM mode.)“NORMAL” and “WIDE” appear one after the other.
wDepending on the sound source or listening condition, surroundeffect may not be obtained even when the Dolby Pro Logic isset to on.
● The full Dolby Pro Logic effect cannot be obtained when usingthe software without 110[~ SIJWIIJ@mark. In this case, usethe DSP surround system instead (see page 10).
● The Dolby Pro Logic system is automatically canceled:- when the DSP system is turned on- when the GEQ system is turned on- when the 5.1 CH function is selected- when headphones are plugged in
● The Dolby Pro Logic cannot be set to on while headphonesare plugged in.
PHANTOM mode: Select this mode when the center speaker isnot connected. All center channel signals are redistributed tothe left and right channel speakers.3 STEREO mode: Select this mode when the surround speakersare not connected.
i 5 ENGLISH

ADJUSTING SPEAKER LEVELBALANCE
1
The unit is equipped with a built-in test signal generator called anoise sequencer for easy balance adjustment of all five channels.The sequencer outputs a noise signal that “travels” from channelto channel, enabling the simple adjustment of sound level toachieve the same apparent loudness, at your listening position,from each channel.
1
2
Select the Dolby Pro Logic mode according toyour current type and placement of the speakers.(See page 15.)
Press the MANUAL SELECT button on the remotecontrol and hold it down for about two secondsuntil “L’ of “L/R OdB” starts to flash.
A noise signal is sent to each channel in turn as follows:
DOLBY PRO LOGIC NORMAL or WIDE mode
+====7+
CEN OdB(Center speaker) II
L/R OdB(Right front speaker)* I
4S-R ~dB (Right surround speaker)* 2
+S-L OdB(Left surround speaker)* 2 I
DOILBY PRO LOGIC PHANTOM mode
~L/ROdB*i -F L/R OdW1l
i-. S-L 0dB’2~ S-R OdB*2~
3 STEREO NORMAL or WIDE mode
~ L/R 0cii3=+ CEN OcfB+ LIR OdB’11*I
*2
l“ or “R” flashes to indicate one of the front speakers from whichthe noise signal is output.The noise signal is output from the L and R surround speakers atthe same time.
3
4
Adjust the sound level of the center and surroundspeakers.while ~,CEN~~~~[-, .>-V or “S-R” flashes in the display, press theUP or DOWN button on the remote control so that the soundlevel of the center or surround speakers matches that of thefront speakers,
The balance of the front speakers can be adjusted as wf?llwhile “L/R” is displayed.
Press the MANUAL SELECT button again to stopthe noise signal.
When adjusting the speakers level balance of the Dolby PIroLogic, those of the DSP and 5.1 CH modes are also changed.
About the channelsThe left and right speakers create the stereo effect,The center spealker helps achieve precise sound positioningover a broad sound field.The rear-mounted surround speakers enhance the “depth” ofthe sound field.
To change the surround speakers delay time of the DolbyPro Logic modeThe surround speakers reproduce sounds a split second afterthe front speakers. The delay is initially set to 20 ms(milliseconds).To change this standard delay time, press the MANUAL SELECTbutton on the remote control repeatedly so that “TlME20mS” isdisplayed. Then, press the UP or DOWN button. Each time oneof the buttons is pressed, the delay time changes as shownbelow.
To adjust the speakers level balance while listening itothe source (Dollby Pro Logic and 5.1 CH rnoldes)
The speakers level balance can be changed after adjusting itwith the noise sequencer, The balance can be changedwhenever the Dolby Pro Logic system is turned on or the 5.1CH function is selected.
1
2
3
Play a disc or video software recorded in Dolby Pro Logic orDolby Digital Surround,Press the MANUAL SELECT button on the n?mote controlrepeatedly so that “UR, “CEN”, “S-L”, “S-R” or “S-W” (lorsub woofer in 5.1 CH mode) appears on the display.Press the UP cwDOWN button while the speaker name to Ibeadjusted is displayed.
ENGLISH16

SETTING THE CLOCK SETTING THE SLEEP TIMER
2131
VIDEO 1/5:1CH/BAND
CLOCK
When the AC cord is connected for the first time, the clock onthe display flashes.Set the time as follows while the power is off.
1
2
3
Press the ENTER button.The display becomes a little brighter
Turn the MULTI JOG to designate the hour andthe minute.The time advances by turning it to right, and decreases byturning it to left.
Press the ENTER button.The clock starts from 00 second.
mWhen the clock is set for the first time after purchaseEverything on the display will clear.This is because the power economizing mode of the unit isactivated, and is not a malfunction.The power economizing mode can be canceled. See page 6 fordetails.
To correct the current timePress the POWER button to turn the unit off. Press the ENTERbutton and carry out steps 1 to 5 above.
To display the current timePress the CLOCK button on the remote control. The clock isdisplayed for 4 seconds.
To switch to the 24-hour standardPress the VIDEO 1/5.1 CH/BAND button while the current timeis displayed.Repeat the same procedure to restore the 12-hour standard.
The receiver can be automatically turned off at a specified time.
Use the remote control.
1
2
Press the SLEEP button.
Press the UP or DOWN button within fourseconds to specify the time until the power isturned off.Each time the button is pressed, the time changes between 5and 240 minutes in 5-minute steps.
Specified time
The time can also be selected by the MULTI JOG on the mainunit.
To check the time remaining until the power is turned offPress the SLEEP button once. The remaining time is displayedfor four seconds.
To cancel the sleep timerPress the SLEEP button twice so that “SLEEPoFF on the displayappears.
If the clock display flashes while the power is offThis is caused by a power interruption. The current time needsto be reset.If power is interrupted for more than approximately 24 hours, allsettings stored in memory after purchase need to be reset.
17 ENGLISH

CARE AND MAINTENANCE SPECIFICATIONS
Occasional care and maintenance of the unit is needed tooptimize the performance of your unit.
To clean the cabinetUse a soft dry cloth.If the surfaces are extremely dirty, use a soft cloth lightlymoistened with mild detergent solution. Do not use strongsolvents, such as alcohol, benzine or thinner as these coulddamage the finish of the unit.
FM tuner’ sectionTuning range 87.5 MHz to 108 MHzUsable sensitivity 13.2 dBf
(IHF)Antenna terminals, 75 ohms (unbalanced)
AM tuner sectionTuning range 530 kt+z to 1710 kHz (10 kHz step), 531
kHz to 1602 kHz (9 kHz step)Usable sensitivity 350 @//mAntenna Loop antenna
Amplifier sectionPower output [Stereo Mode]
Front100 watts per channel, Min. IRMS at 8ohms, from 40 Hz to 20 kl-lz, with nomore than 0.90/. Total HarmonicDistortion[Dolby Pro Logic or 5.1 Cl+ Mode]Front60 watts per channel, Min. RMS at 8ohms, from 40 Hz to 20 kHz, with nomore than ().9Y0 Total HarmcmicDistortionRear (Surround)60 watts per channel, Min. RiMS at 8ohms, 1 kHz, with no more tlhan 0.9%Total Harmonic DistortionCenter60 watts, Min. RM.S at 8 ohms, 1 kHz,with no more than 0.9?4. Total HarmonicDistortion
Total harmonic 0.08 % (40 W, 1 kHz, 8 ohms, Front)distortion
Inputs AUDIO INPHONO: 2,5 mV, adjustable (47 kohms)CD, VIDEO l/DVD/MD, VIDEO 2/LD/TV, VIDEO 3:250 mV, adjustable (47kohms)TAPE MONITOR: 350 mV (47kohms)AUX: 200 mV, adjustable (47 kohms)5.1 INPUT
FRONT, CENTER: 400 mV,adjustable (47 kohms)SURROUND: 400 mV, adjustable(47 kohms)SUB-WOOFER: 400 mV, adjustable(47 kohms)
VIDEO IN: 1 Vp-p (75 ohms)
ENGLISH 18

outputs AUDIO OUT (REC OUT): 200 mV (1kohm)VIDEO OUT (MONITOR): 1 Vp-p (75ohms)SUPER WOOFER: 1.2VFRONT SPEAKERS IMP: 8L2(front speakers A and B): acceptsspeakers of 8 ohms or more.SURROUND SPEAKERS IMP: 8Q(surround speakers): acceptsspeakers of 8 ohms or moreCENTER SPEAKER IMP: 8Q: acceptsa speaker of 8 ohms or more.PHONES (stereo jack): acceptsheadphones of 32 ohms or more
Muting -20 dB
GeneralPower requirements 120 V AC, 60 HzPower consumption 125 WDimensions 430 x 155 x 351 mm
(W XHXD) (17 x 6’/8 x 137/8 in.)Weight 10 kg (22 lb 1 OZ.)
Specifications and external appearance are subject to changewithout notice.
DOLBY PRO LOGICManufactured under license from Dolby Laboratories LicensingCorporation.“DOLBY” the double-D symbol ❑O and “PRO LOGIC aretrademarks of Dolby Laboratories Licensing Corporation.
TROUBLESHOOTING GUIDE
If the unit fails to perform as described in these OperatingInstructions, check the following guide.
GENERALThere is no sound.● Is the AC cord connected properly?● Is there an incorrect connection? (+ page 3)● There may be a short circuit in the speaker terminals.
+ Disconnect the AC cord, then correct the speakerconnections.
● Was an incorrect function button pressed?● Was the TAPE MONITOR button pressed?c Are the FRONT SPEAKERS A and B buttons set correctly?
(+ page 6)Sound is emitted from one speaker oniy.● is the BALANCE set appropriateiy?● is the other speaker disconnected?Sound is heard at a very iow volume.● Has the MUTi NG button been pressed?An erroneous display or a malfunction occurs.
+ Reset the unit as stated below.
TUNER SECTIONThere is constant, wave-like static.● Is the antenna connected properly? (+ page 5)● Is the FM signai weak?
+ Connect an outdoor antenna.The reception contains noise interference or the sound isdistorted.● is the system picking up externai noise or multipath distortion?
+ Change the orientation of the antenna.+ Move the unit away from other electrical appliances.
To resetIf an unusual condition in the dispiay window or malfunctionoccurs, reset the unit as foiiows.1 Press the POWER button to turn off the power.2 Press the POWER button whiie pressing the ENTER button.
Everything stored in memory after purchase is canceied.if the power cannot be turned off in step 1 because of amalfunction, reset by disconnecting the AC cord and carry outstep 2.
19 ENGLISH

PARTS INDEX
Instructions about each part on the unit or remote control areindicated on the pages listed below.
(in alphabetical order)PartsAUXBALANCECDCLOCKDOLBY SURROUNDDOWNDSPECOENTERFRONT SPEAKERS A, BGEQMANUAL SELECT (TEST)MONO TUNERMULTI JOGMULTI SELECTORMUTINGPHONESPHONOPOWERSETSLEEFITAPE MONITORT-BASSTUNER BANDUPVIDEO 1/5.1 CH/BANDVIDEO l/DVD/MDVIDEO 2/LD/TVVIDEO 3VOLUME , VOL(V, A)
Pages11811171510,11, 13, 14, 16, 17106, 76,7, 11, 12, 14, 177910, 16136, 7,9-12, 14, 15, 1711-1487117, 13, 176177,11,12811,1410,11,13,14,16,1711,13, 14, 171111118
ENGLISH :?~

“PRECAUCION:PARA REDUCIR EL RIESGO
DE QUE SE PRODUZCAN SACUDIDASELECTRICAS, NO QUITE LA CUBIERTA
(O PANEL POSTERIOR).EN EL INTERIOR NO HAY PIEZAS QUE
DEBA REPARAR EL USUARIO.SOLICITE LAS REPARACIONES AL
PERSONAL DE SERVICIO CAPACITADO.”
Anotacion del propletarioPara su conveniencia, anote et ntimero de modelo y el numerode serie (Ios encontrara en el panel trasero de su aparato) en elespacio suministrado mas abajo. Mencionelos cuando se pongaen contacto con su concesionario Aiwa en caso de tenerdificultades.
N.” de modelo N.” de serie (N.” de Iote)
AV-D35
1 ESPANOL
PRECAUCIONES
Antes de utiiizar la unidad, lea cuidadosa y completamente estemanual instrucciones. Guarde el manual de instrucciones parafuturas referencias. Todos Ios avisos y precauciones del manualde instrucciones y de la unidad deberan seguirse estrictamente,as[ como Ias sugerencias de seguridad indicadas a continuation.
Instalacion1
2
3
4
5
6
7
Agua y humedad — No utilice nunca esta unidad cerca delagua, como al Iado de una bafiera, un Iavabo, una piscina,etc.Calor — No utilice esta unidad cerca de fuentes termicas,como salidas de calefaccion, estufas, ni demas aparatos quegeneren calor.Tampoco debera someterse a temperatures inferiors a 5°C(41 “F) ni superiors a 35°C (95”F).Superficie de montaje — Coloque la unidad sobre unasupetficie plana y nivelada.Ventilation — La unidad debera colocarse donde tengaespacio suficiente a su alrededor para asegurar su ventiiacionadecuada. Deje un espacio Iibre de 10 cm en la parte posteriory superior de la unidad, y de 5 cm a cada Iado.- No la coloque sobre una cama, una alfombra, ni nada similar
que pueda bloquear Ias aberturas de ventilation.- No la instale en una Iibreria, un armario, ni un bastidor
cerrado, donde la ventilation podria ser deficient.Entrada de objetos y Kquidos — Tenga cuidado de que enel interior de la unidad no entren objetos pequehos ni Kquidosa traves de Ias aberturas de ventilation.Carritos y estantes — Cuando hayacolocado o montado la unidad sobre unestante o un carrito, debera moverlacon cuidado.Las paradas repentinas, la fuerza @!l
“3excesiva. o Ias su~erficies desiauales a-
podrian causar el kelco o la ca~da de la unidad o el carrito.Montaie en una Dared o en el techo — La unidad no deberamontake en unk pared ni en ei techo, a menos que seespecifique en el manual de instrucciones.
Eneraia electrica1
2
3
4
5
Fuentes de alimentacion — Conecte esta unidad solamentea Ias fuentes de alimentacion especificadas en el manual deinstrucciones, y como esta marcado en la unidad.Polarization — Como medida de seguridad, algunasunidades van equipados con enchufes de alimentacion deCA que solo pueden insertarse en el tomacorriente de unamanera. Si results dificil o imposible introducer el enchufe deCA en un tomacorriente, debera darle la vueita e intentarlode nuevo, Si aun no se inserta facilmente en el tomacorriente,acuda a un tecnico especializado para que repare o sustituyael tomacorriente. Para no desaprovechar la seguridad queofrece el enchufe polarizado, no 10fuerce para insertarlo enun tomacorriente.Cable de alimentacion de CA- Para desconectar el cable de alimentacion, tire del enchufe
de CA. No tire del propio cable.- No tome nunca el cable de alimentacion de CA con Ias
manes htimedas, ya que esto podria resultar en incendioso descargas electrical.
- Los cables de alimentaGi6n deben estar firmemente sujetospara evitar que se doblen, se pincen demasiado o se pisen.Preste especial atencion al cable que conecta la unidad altomacorriente.
- Evite sobrecargar Ios tomacorrientes y Ios cablesprolongadores por encima de su capacidad, ya que estopodria resultar en incendios o descargas electrical.
Cable prolongador — Para prevenir Ias descargas electrical,no utilice un enchufe de alimentacion de CA polarizado conun cable prolongador, receptaculo u otro tomacorriente amenos que et enchufe polarizado pueda insertarse porcompleto para evitar que Ias ciavijas queden expuestas.Periodos sin utilization — Cuando no vaya a utilizar la unidaddurante varies meses, desenchufe el cable de alimentacionde CA del tomacorriente. Cuando el cable de alimentacion esteenchufado, circulara una pequerla corriente por la unidad,incluso aunque la alimentacion de la misma este desconectada.

Antena exterior1 Cables electricos — Al conectar una antena exterior,
asegtirese de mantenerla alejada de Ios cables electricos.2 Puesta a tierra de la antena exterior — Asegurese de que
el sistema de antena esta correctamente desconectado atierra para protegerlo de sobretensiones inesperadas oacumulaciones de electricidad estatica. El Artfculo 810 delCodigo Electrico National (NEC), ANS1/NFPA70, proporcionainformation sobre la adecuada puesta a tierra del mastil, laestructura de soporte y el hilo de entrada a la unidad dedescarga de la antena, asf como el tamaiio de la unidad depuesta a tierra, la conexion a Ios terminals de puesta a tierray 10srequisites relatives a 10spropios terminals.
Puesta a tierra de antenas segun el Cr5digo Electrlco National
)
ELECTRICA (ART. 250 PARTE H
NEC. CODIGO ELECTRICO NACIONAI.DEL NEC)
ManltenimientoLimpie la unidad solamente como se recomienda en el manualde instrucciones.
DaFios que requieren reparationHaga que la unidad sea revisada por un tecnico de serviciocualificado si:- Se ha dafiado el cable de alimentacion o el enchufe de CA.- En el interior de la unidad han entrado objetos o Iiquidos.- La unidad ha estado expuesta a la Iluvia o al agua.- La unidad parece no funcionar normalmente.- La unidad presenta un cambio notable en su rendimiento.- La unidad ha ca{do, o se ha da fiado su caja.NCI INTENTE REPARAR USTED MISMO LA UNIDAD.
Connpruebe su unidad y accesorios
Receptor estereo AV-D35 Controlador remoto
Antena de FM Antena de AM
Manual de instrucciones, etc
iNDICE
PRECAUCIONES ......... ..................i .............. .............. .. 1
PREPARATIVES
CONEXIONES ..............................m.............................. ....... 3ANTES DE LA OPERACION ............................................ 7
SONIDO
AJUSTE DEL SONIDO A SU GUSTO ............. ................... 8ECUALIZADOIR GRAFICO ELECTRONIC .. ................... 9SONIDO PERllMkTRICCI DEL PROCESADOFI DE
SENAL DIGITAL ........m.................................................. 110
OPERACIONE!S BASICAS
SELECCION DE UNA FUENTE DE AUDIO/ViDEO ........’11GRABACION DE UNA FUENTE DE AUDIO .................... ’12
ESCUCHA DE LA RADIO ———SINTONIA MANUAL ..m......................m................s.............. “13MEMORIZAC16N DE EMISORAS .................................... “14
DOLBY SURROUND
SELECCION DE DOLBY PRO LOGIC ............................. “15AJUSTE DEL EQUILIBRIA DEL NIVEL
ENTRE ALTAVOCES ....................m............................... ’16
TEMPORIZADOR
PUESTA EN HIORA DEL RELOJ ..................................... ’17PROGRAMACION DEL TEMPORIZADOR
CRONODESCONECTADOR ................................. ...... ’17
GENERALIDAIDES•l
CUIDADOSY MANTENIMIENTO .............................. ....... ’18ESPECIFICACIONES .............m............................................ 18GUiA PARA LA SOLUCION DE PROBLEMA!3 ........ ...... 19iNDICE DE LAS PARTES ..m..............m.........m......m.......m........2o
ESPAINOL 2

CONEXIONES CONEXION DE EQUIPOS
Antes de conectar et cable de alimentacion de CALa tension nominal de su unidad indicada en el panel posteriorde su unidad es de 120 V CA. Compruebe si esta tension coincidecon la de la red local.
IMPORTANTEConecte primero Ios altavoces, Ias antenas, y todos Ios demasequipos externos. Despues conecte el cable de alimentacion de
Las clavijas de Ios cables conectores y Ias tomas estancodificadas en color de la forma siguiente:Clavijas y tomas rojas: Para el canal derecho de serlales deaudioClavijas y tomas blancas: Para el canal izquierdo de sehales deaudioClavijas y tomas amarillas: Para sehales de video
Inserte Ias clavijas de Ios cables conectores firmemente en Iastomas. Las conexiones flojas podrian producir zumbidos u otras
CA. interferencias de ruido,
“1 Cerciorese de conectar el terminal VIDEO OUT del reproductor dediscos DVD directamente al televisor, no a traves de la unidad. Encaso contrario, puede aparecer ruido de imagen al reproducer discosDVD protegidos contra copia.
“2 El sonido de entrada a traves de Ios terminals 5.1 INPUT no podragrabarse. Cuando desee grabar sonido de un reproductor de discosDVD, conecte Ios terminals AUDIO OUT (DOWN MIXING) delreproductor de discos DVD a Ios terminals VIDEO l/DVD/MD AUDIOIN de la unidad.
‘3 Para conectar a un equipo de video monoaural, utilice un cable conectorde estereo-monoaural (no suministrado).
Reproductor de discos DVD o videograbadora1/ reproductor de minidiscoa*3
I I
Televisor
,7. B=
a AUDIO IN (VldeograbadoraIkeorodoc forde minidiscos)- Jr
\
a AUDIO OUT’2a VIDEO OUT
\ (Videograbadora 1)“
a QI lR-\A/nnEFR nl IT >..
~=e..-- !-,.-v,
1 1 1 {(Videodisc digital) .
= Ia VIDEO IN (Wdeograbadora1)
aAuD’OOu~
Ill d] I
II11111 I rmm I
I
I I 1....a hilUN I
OUTReproductor dediscos compactos
~disco ~H(Videcdigital) -Jllllll Ill I I ~–l
Ia SURROUND OUT I Hll HI I ~~ .[,,,!_l_-J,____l:-,._,\ I
~ I I Ill 1 a OUTPUTa CENTER OUT (Videodiscdigital) J
n I I[ ~
(Videograbadora 2)
a VIDEO IN (Videograbadorai
mDeck de casetes
3 ESPAfiOL

CONIEXION DE LOS ALTAVOCES @) Altavoces delanieros—.
Terminates para altavocesConecte Ios altavoces delanteros (sistema A y/o B), un altavozcentral, y altavoces perimetricos y altavoz de subgraves a Iosterminals para altavoces correspondientes de la unidad.- Ios cables de Ios altavoces delanteros a Ios terminals FRONT
SPEAKERS- el cable del altavoz central a Ios terminals CENTER SPEAKER- Ios cables de Ios altavoces perimetricos a Ios terminates
SURROUND SPEAKERS- para obtener graves mas potentes, el cable del altavoz de
subgraves (con amplificador incorporado) a la toma SUPERWOOl:ER 4.
Impedtmcia de Ios altavocesPara todos Ios altavoces, utilice altavoces de 8 ohmios o mas.
Conexion de Ios terminals + a +, y - a -Para obtener el efecto acktico apropiado, [OSterminals de launidad y de Ios altavoces deberan conectarse con la polaridadapropiada: Ios terminals + de la unidad deberan conectarse aIos terminals+ de Ios altavoces (y – a –).
mi● Cerci6rese de conectar correctamente Ios cables de Ios
altavoces como se muestra en la columns de la derecha. Laconexion inapropiada podr~a causar cortocircuitos en Iosterminals SPEAKER(S).
● No coloque objetos que generen magnetism cerca de Iosaltavoces,
Levante la Iengtieta delterminal, inswte elconductor del cable delaltavoz en el orificio delterminal, y despues cierrela Iengueta. Compruebe siet conductor ha quedadoconectado con seguridad.
~-%
Altavoces perimetricos
‘L\
Altavoz de subglraves Altavoz central

UBICACION DE LOS ALTAVOCES
Coloque Ios altavoces de forma que obtenga el maximo efectodel sistema Dolby Digital Surround (5.1 CH), Dolby Pro Logic, oefecto del DSP.
@ Altavoces delanteros@ Altavoz central
Coloquelo en el centro de Ios dos altavoces delanteros.Ademas, si ha conectado un televisor a la unidad, coloque elaltavoz sobre o debajo del mismo.
@ Altavoces perimetricosColoquelos directamente a Ios Iados del area de escucha oIigeramente detras de ells. Alineelos horizontalmente, aaproximadamente 1 metro sobre la altura de Ios oidos.
@ Altavoz de subgravesColoque el altavoz de subgraves entre Ios dos altavocesdelanteros.
El sonido procedente de Ios altavoces perimetricos o del altavozcentral dependera del ajuste del DSP, de Dolby Pro Logic, y dela funcion 5.1 CH.
I @ @ @@I
CONEXION DE LAS ANTENASSUMINISTRADAS @
Conecte la antena de FM a Ios terminals FM 75 Cl y la antenade AM a Ios terminals AM LOOP.
Antena de FM
Ill Antena de AM
Para colocar la antena de cuadro de AM sobre unasuperficieFije la ufia en la ranura como se muestra en la ilustracion.
Ubicacion de Ias antenasAntena unipolar de FM:Extienda esta antena en sentido horizontal con forma de T y fijesus extremes a la pared.Antena de cuadro de AM:Position para la mejor recepcion,
● No acerque la antena de FM a objetos metalicos ni a rieles decortinas.
● No acerque la antena de AM a otros equipos externos, la propiaunidad, el cable de alimentacion de CA, ni Ios cables de Iosaltavoces, porque podria captar ruido.
● No desbobine la antena de cuadro de AM,
CONEXION DE UNA ANTENA EXTERIOR
Para conseguir la mejor recepcion de FM, se recomienda lautilization de una antena exterior. Conecte la antena exterior aIos terminals FM 75 fl.
5 ESPANOL

SOB13E EL CONTROLADOR REMOTO
lnsercir5n de Ias piiasQuite la tapa del compartimiento de Ias pilas de la parte posteriordel controlador remoto e inserte dos pilas R6 (AA).
MODO DE AHORRO DE
-l_.l__
ENERGhl, (ECO)
9
5!_____–
U Indicador POWER (!) STANDBY/ONR6(AA)
Si aiusta esta unidad en el modo ECO, el consumo de energia
Cuandlo reemplazar Ias pilasLa distancia maxima de operation entre el controlador remoto yel sensor de la unidad debera ser de aproximadamente 5 metros.Cuando esta distancia se reduzca, reemplace Ias pilas por otrasnuevas.
Utilization del controlador remotoLas instrucciones de este manual se refieren principalmente aIos botones de la unidad principal. Los botones del controladorremoto con Ios mismos nombres que Ios de la unidad principaltambien podran utilizarse.
* Cuando no vaya a utilizar la unidad durante mucho tiempo,extraigale Ias pilas para evitar la posible fuga de su electrolito.
● Es posible que el controlador remoto no funcione correctamentecuando:- La l(nea de vision entre el controlador remoto y el sensor de
control remoto del interior del visuaiizador este expuesta auna Iuz intensa como, por ejemplo, la Iuz solar directs.
- Est6n utilizandose cerca otros controladores remotos (de untelevisor, etc.).
se reducira tal corno se indica a continuation.El ajuste initial del modo ECO es ON.● Si la hors actual esta ajustada, la indication de reloj desalparece
inmediatamente,* Mientras la alimentacion se encuentra desccmectada, se
apagan todos Ic)s indicadores Iuminosos y solo permaneceiluminado en color rojo el indicador POWER (!) STANDEIY/ON.
Para cancelar ell modo ECO1 Presione el boton ECO para mostrar ECO MODE mientras la
unidad se encuentra encendida.2 Dentro de 4 segundos, presione el boton ENTER.3 Dentro de 4 segundos, gire MULTI JOG para seleccionar ECO
OFF.El modo se ajustara de forma automatic despues de 4segundos. Tambien se ajustara si el boton ENTER se presionaen un plazo de 4 segundos despues del paso :3.
ESPAIfiOL 6

ANTES DE LA OPERACION
POWER TAPE MONITOR
Indicadores de funcion
PHONES I FRONT SPEAKERA,B I ENTER
ECO MULTI JOG
Para conectar la alimentacion de la unidad
Presione el boton POWER.La operation sera posible despues de cuatro segundos. Cuandose presiona el boton POWER para encender la unidad, semuestra el nivel de volumen (VOL) o el nombre de funcion, unodetras del otro.El indicador de la funcion seleccionada se ilumina en color rojoy Ios demas indicadores se iluminan en verde.
Para cambiar el nivel de brillo del visualizador12
3
Presione ECO para que aparezca “ECO MODE.Dentro de 4 segundos, gire MULTI JOG para mostrar DIMMODE y presione el boton ENTER en un plazo de 4 segundos.Dentro de 4 segundos, gire MULTI JOG para seleccionar elmodo de atenuador, tat como se muestra a continuation.El modo se ajustara de forma automatic despues de 4segundos. Tambien se ajustara si el boton ENTER se presionadentro de 4 segundos despues del paso 3.
DIM OFF =DIMMER 1- DIMMER 2- DIMMER 3
DIM-OFF:DIMMER 1:
DIMMER 2:
DIMMER 3:
El visualizador normal.La iluminacion del visualizador es mas tenueque 10habitual.La iluminacion del visualizador es mas tenueque con DIMMER 1.La iluminacion dei visualizador es mas tenueque con DIMMER 2. Los indicadores de funcionse apagan.
Seleccion del sistema de altavoces delanteros
Para utilizar el sistema de altavoces A: Ponga el boton FRONTSPEAKERS A en =ON.Para utilizar el sistema de altavoces B: Ponga el boton FRONTSPEAKERS Ben =ON.Para utilizar ambos sistemas de altavoces: Ponga ambos botonesen =ON.Para desconectar uno de Ios sistemas (o ambos sistemas) dealtavoces, ponga el boton (o Ios botones) en IOFF.
Como Ios sistemas de altavoces delanteros A y B estanconectados en serie:
- El sonido se reducira Iigeramente al utilizar ambos sistemasde altavoces.
- Nose oira sonido si Ios botones FRONT SPEAKERS A y Bestan en -ON cuando solamente haya conectado un sistemade altavoces.
Utilization de auricularesConecte Ios auriculares con clavija estereo estandar (6,3 mmde dia.) en la toma PHONES. Cerciorese de que Ios botonesFRONT SPEAKERS A y B esten en IOFF. De 10contrario, elsonido saldria a traves de Ios altavoces.
Cuando enchufe Ios auriculares, se cancelara automaticamentela funcion 5.1 CH, Dolby Pro Logic, o el sistema del DSP.
Para desconectar la alimentacion de la unidad, presioneel boton POWER.
7 ESPANOL

AWSTE DEL SONIDO A SUGUSTO
DOWN,UP VOLUME
I MUTE IBALANCE
VOL
T-BASS
CONTROL DEL VOLUMEN
Gire el control VOLUME de la unidad o presione Ios botonesVOL del controlador remoto.
El nivel del volumen se mostrara en el visualizador durante cuatrosegundos. Este nivel podra ajustarse entre O y MAX (50).Parpadea si se ajusta por encima del nivel 44.El nivel del volumen permanecera memorizado incluso despuesde haber desconectado la alimentacion. Sin embargo, sidesconecta la aiimentacion cuando et nivel del volumen esteajustado a mas de 21, la proxima vez que vuelva a conectarlase ajustara automaticamente a 20.
Para ajustar el equilibria entre Ios altavoces delanteros
izquierdolderecho
Presione el boton BALANCE para hater que se visualice “L/ROdB”. [)espues presione repetidamente DOWN o UP antes decuatro segundos.Tenga en cuenta que el equilibria entre Ios aitavoces delanterospara Ios modos 5.1 CH y Dolby Pro Logic tambien cambiara.
Para .sHenciar temporalmente el sonidoPresione el boton MUTING (–20 dB).En el visualizador aparecera “MUTE ON” durante cuatrosegundos. Mientras el sonido este silenciado, el indicador defuncion seleccionado parpadeara. Para restablecer el sonido,vuelva a presionar el boton MUTING.
SISTEMA SIJPER T-BASS
El sistema T-BASS realza el realismo del sonido de bajafrecuencia.Presione el boton T-BASS.Cada vez que presione el boton, el nivel cambim%.Seleccione a su gusto uno de Ios tres niveles o Iii position ciecancelacion.
1L,
L..= ——•:+::+~:,+J
wmEmN Iamimi(cancelacion)
El sonido de baja flrecuencia puede distorsionarse cuando utiliceel sistema T-BASS con un disco o un casete cuyo sonido clebaja frecuencia haya sido acentuado originalmente. En este case,cancele el sistema T-BASS.
AJUSTE DEIL SONIDO DURANTE LAGRABACION
El volumen y el tono de salida de Ios altavoces o de Iclsauricu[ares podran variarse Iibremente sin que se vea afectacloel nivel de grabacion.
ES/JA/ibL{3

ECUALIZADOR GRAFICOELECTRONIC
GEQ
Esta unidad dispone de Ios cinco modos de ecualizacionsiguientes.
ROCK: Acentua el sonido de graves y agudos.POP: Ofrece mas presencia a Ias votes y a la gama media.JAZZ: Acentua Ias frecuencias bajas para musics de tipo jazz.CLASSIC: Ofrece sonido rico con graves profundos y agudos
delicados.BGM: Ofrece tono calmado con graves y agudos suprimidos.
Presione el bot6n GEQ (ecualizador grafico) y gire MULTIJOG hasta que aparezca el modo de ecualizacion quedesee.Los modos GEQ se muestran de forma ciclica, de la siguienteforma.
r ROCK— PoP— JAZZ — CLASSIC — BGM
1L.---w —M3— M2— Ml ~
,------- Modomanual -------:
El nombre del modo seleccionado se muestra durante cuatrosegundos y el indicador F aparece a la izquierda del nombrede modo seleccionado.
Modo seleccionado
Para cancelar el modo seleccionadoPresione el boton GEQ de nuevo. En el visualizador aparecera“GEQ OFF.
Para seleccionar con el controlador remotoPresione repetidamente el boton GEQ hasta que se visualice elmodo de ecualizacion deseado.Es posible seleccionar cinco modos preajustados, Ios modosmanuales Ml a M4 y “GEQ OFF.
AJUSTE DE NUEVAS CURVAS DEECUALIZACION
Es posible almacenar hasta 4 curvas de ecualizacion como Iosmodos manuales Ml a M4.
1
2
3
4
5
6
7
1 3,6
2 1,5,7
Presione el boton GEQ y presione el botonENTER dentro de 4 segundos.
Presione el boton DOWN o UP para seleccionaruna frecuencia.Parpadea el indicador de nivel de la frecuencia seleccionada.
Gire MULTI JOG para ajustar el nivel de lafrecuencia seleccionada.
Repita Ios pasos 2 y 3 para crear la curva deecualizacion que desee.En Ios pasos 2 y 3, la unidad vuelve al modo normal si noserealiza ninguna operation durante aproximadamente 8segundos.
Dentro de 8 segundos, presione el boton ENTER.Aparece “GEQ Ml” en el visualizador.
Gire MULTI JOG para seleccionar un ntimeropreajustado de Ml a M4.
Presione el boton ENTER.La curva de ecualizacion se almacena.El numero preajustado seleccionado y la curva deecualizacion se muestran durante unos segundos cada uno.
Para ajustar temporalmente la curva de ecualizaciongraficaSiga 10spasos 1 a 4 anteriores.La curva GEQ ajustada se conserva antes de cambiar o cancelarel modo de ecualizacion grafica (GEQ).
Para seleccionar la curva preajustada manualmentePresione el boton GEQ y gire MULTI JOG hasta que aparezcael numero preajustado que desee.
● El sistema GEQ se cancela automaticamente si:- Activa Dolby Pro Logic- Selecciona la funcion 5.1 CH
● El sistema GEQ no puede activarse mientras se encuentraseleccionada la funcion 5.1 CH.
9 ESPAfiOL

SONIDO PERIMETRICO DELPROCESADOR DE SENAL DIGITAL
DSP MULTIJOG
DOWN,UP
DSP
MANUALSELECT
Los circuitos de sonido perimetrico del procesador de sefialdigital (DSP) pueden recrear el efecto de sonidos reflejados enparedes o techos, para ofrecer la presencia de sonido deambientes reales. Existen cuatro modos correspondientes a Iosmodos de ecualizacion grafica. Los modos de ecualizacion seseleccionaran automaticamente, y tambien podra seleccionar odesactivarlos a su gusto.
Presione el boton DSP y gire MULTI JOG hasta queaparezca el modo DSP que desee.El nolmbre de modo seleccionado aparece durante cuatrosegundos y Ios indicadores ➤aparecen a la izquierda del nombreDSP seleccionado y el nombre de modo GEQ correspondiente.
Modo del DSP seleccionado
Modo GEQ correspondiente
Para cancelar el modo seleccionadoPresione el botorl DSP de nuevo. En el visualizador aparecera“DSP OFF. Incluso aunque haya cancelado el rnodo del D!>P
seleccionado, e! modo del GEQ adecuado o seleccionadopermanecera en el visualizador.
Para seleccionar con et controlador remotolPresione repetidamente el boton DSP hasta que se visualice elmodo del DSP deseado. I
Es posible seleccionar cuatro modos del DSP y “DSP CIFF.
Para ajustar el volumen y el equiiibrio de Ios altavocesperimetricosPresione et boton MANUAL SELECT del controlaclor remoto doso tres veces mientras el sistema DSP se encuantra activadopara mostrar “S-Fl OdB (para el altavoz perimetrllco derecho) o“S-L OdB (para el altavoz perimetrico izquierdo). Acontinuaci6n,presione el botor] DOWN o UP varias veces dentro de cuatrosegundos.Tenga presente que tambi6n cambian el volumen y equilibria deIos altavoces perimetricos de Ios modos 5.1 CH y Dolby F)roLogic.
m● El sistema del [)SP se cancelara autornaticamente:
- cuando active el modo Dolby Pro Logic- Cuando seleccione la funcion 5.1 CH
● El sistema DSP no podr~ activarse:- cuando haya seleccionado la funcion 5.1 CH- cuando haya enchufado unos auriculares
Cuando la fuente de musics sea monoauralSeleccione LIVE para obtener un efecto estereo simulado. Siselecciona DANCE, HALL o ARENA no oira sonido a traves de10saltavoces perimetricos.
,ESPAfiOL 10

SELECCION DE UNA FUENTE DE Para seleccionar la fuente de video
AUDIO/ViDEO 1 Seleccione una de Ias funciones (excepto TUNER).2 Presione el boton ENTER para mostrar VIDEO1.3 Gire MULTI JOG para seleccionar VIDEO 20 VIDEO 3.
FUNCTION Indicadores de funcion ENTERPara cambiar el nombre visualizado parael VIDEO 1 y el VIDEO 2
Si VIDEO 1 se encuentra seleccionado, VIDEO 1 se muestrainicialmente. Es posible cambiar a DVD o MD.Presione el boton VIDEO 1/5.1 CH/BAND mientras presiona elboton ENTER.Para utilizar la funcion 5.1 CH, presione el boton VIDEO 1/5.1CH/BAND. El nombre de funcion cambiara a “5.1 ch IN” y seseleccionara la fuente conectada a Ios terminals 5.1 INPUT.Para continuar, presione el boton de nuevo para que se muestreel nombre de la funcion seleccionada.
DOWN;UP I MULTI JOGVIDEO 1/5. CH/BAND
Seleccione la fuente de programas.Gire el selector FUNCTION o presione et boton TAPEMONITOR. El indicador de funcion seleccionado parpadeaen color rojo.
1
El nombre mostrado para el boton VIDEO 2 puede cambiarse aVIDEO 2, LD o TV. Con la funcion VIDEO 2 seleccionada,presione el boton VIDEO 1/5.1 CH/BAND mientras presiona elboton ENTER.
Para ajustar el nivel del sonido de la fuenteconectada
I Radio I TUNER I
Discos analogicos PHONO
Discos compactos CD
Television, etc. AUX
El nivel de sensibilidad de entrada de cada funcirh (excepto lafuncion TUNER) podra ajustarse.Cuando el nivel del sonido de la fuente conectada sea superioro inferior al de TUNER, ajustelo de la forma siguiente.Videocasetes VIDEO lIDVDIMD,
VIDEO 2/LDiTV, VIDEO 3
Discos laser o programas de VIDEO 2cablevision
Minidiscos o videodiscs VIDEO l/DVD/MDdiaitaies
1 Seleccione la funcion que desee ajustar.Gire MULTI JOG hasta la position apropiada y reproduzcala fuente.
IPara seleccionar una funcion en ei controlador remotoPresione el boton de funcion deseado directamente.
2 Presione repetidamente el boton UP oDOWN.
La funcion seleccionada (excepto PHONO) dependera delequipo conectado a Ios terminals de entrada del panelposterior de la unidad.
Cuando utilice un giradiscos con amplificador incorporado,desconecte la alimentacion del amplificador ecualizador. Paramas information, consulte et manual de instrucciones delgiradiscos.
El nivel podra ajustarse entre –6 dB (MIN) y +8 dB (MAX) enpasos de 2 dB. Ajuste el nivel de forma que el sonido salga conel mismo nivel que el de TUNER.
2
3
Ponga en reproduction la fuente de programasseleccionada.
● El nivel de sensibilidad de entrada de la funcion TUNER nopodra ajustarse.
● Tampoco podra ajustarse el de TAPE MONITOR.Aunque haya seleccionado TAPE MONITOR y et indicadorTAPEMONITOR se haya vuelto rojo, al presionar el boton UP o DOWN,el nivel de la funcion indicada en el visualizador cambiara.
Ajuste el sonido,
Sobre la fuente de vfdeo para el monitor oel televisor
Fuente de video seleccionada
Vi: VIDEO 1, V2: VIDEO 2, V3: VIDEO 3
f-a fuente de v[deo seleccionada se indicara en el visualizador,y la sefial de video aplicada a la toma MONITOR VIDEO OUTsaldra al televisor.
1 I ESPANOL

PAF?A REPRODUCER UN VIDEODISCOIDIGITAL GRABADO CON SONIDO DOLBYDIGITAL SURROUND
lEste receptor posee conectores 5.1 INPUT para poder conectarun decodificador Dolby Digital con terminals de salida 5.1 CH.Cuancfo haya conectado un reproductor de discos DVD quecontenga decodificador Dolby Digital al receptor, podra disfrutarde sonido con la calidad de una sala de tine en su hogar cuandoreproduzca discos grabados en el modo Dolby Digital Surround.
T Gire el selector FUNCTION para seleccionar la
funcion VIDEO1/DVD/MD.
2 Presione el boton VIDEO1/5.l CH/BAND.
En el visualizador aparecera “5.1 CH”, y como fuente seseleccionara el reproductor de discos DVD conectado a [OSterminals 5.1 INPUT.
3 Inicie la reproduction del disco DVD grabado conscmido Dolby Digital Surround.
mn0 La funcion 5.1 CH se cancelara y se selecionara la funcion
VIDEOI, DVD O MD:- cuando active et modo Dolby Pro Logic- cuando enchufe unos auriculares
~,La funcion 5.1 CH no podra seleccionarse cuando haya
enchufado unos auriculares.
GRABACION DE UNA FUENTE DEAUDIO
1
2
3
1 ENTER
TAPE M“ONITOR MUL+IJOG
Selections! la fuente de programaa que deseegrabar.Gire el selector FUNCTION.
Ponga el deck de casetes o el grabador deminidiscos en el modo de grabacid’).
Ponga en reproduction la fuente de’ proglramiasseleccionada.
Para escuchar el sonido grabado durante la grabaci6n(cuando el deck de casetes conectado posee un sisternade tres cabezas)Presione el boton TAPE MONITOR. En el visualiz,ador aparecera“TAPE ON” durante cuatro segundos, y despues volvera aaparecer el nombre de la fuente seleccionada en el pascj 1. Paracancelar la escucha, vuelva a presionar el boton para queaparezca “TAPE OFF.
EE%?3● Ningun sistema de control del sonido tendr% efeclto en la
grabacion (consulte la pagina 8). ❑● El sonido de entrada a traves de Ios terminals 5.1 INPUT no
podra grabarse. Para grabar el sonido procedente de unreproductor de discos DVD, conecte Ios terminals AUDIO CLfT(DOWN MIXING) de dicho reproductor a Ios terminals VIDEOl/DVD/MD AUDIO IN de la unidad.
● Para grabar fuentes mediante el grabador de minidiscosconectado a Ios terminals VIDEO l/DVD/M[) AUDIO OUT,presione primero el boton ENTER para mostlrar VIDEO 1 ygire MULTI JOG para seleccionar VIDEO .20 VIDEO 3. Acontinuation, seleccione la fuente (deberia aparecer V2 o \/3).La grabacion no podra realizarse mientras este visualizandosela indication Vt.
● El sonido procedente del deck de casetes ccmectado a Iosterminals TAPE MONITOR IN no podra graba.rse.
IW=’AfiiCM 12

SINTONIZACION MANUAL
1
2
Para cambiar Ios intervals de sintonizacion de AMEl ajuste por defecto del intervalo de sintonizacion de AM esde 10 kHz/paso. Si utiliza esta unidad en una zona donde e!sistema de asignacion de frecuencias es de 9 kHzfpaso,cambie el intervalo de sintonizacion.m R:R Mantenga presionado el boton VIDEO 1/5.1 CH/BAND y
1 u
Gire el selector FUNCTION para seleccionarfuncion TUNER y presione el boton VIDEO5.1 CH/BAND varias veces para seleccionarbanda que desee.
~
la11la
El visualizador cambia a Ias indicaciones de frecuenciadespues de mostrar la banda y la fuente de video (Vl, V2 oV3) durante dos segundos.
Presione el boton UP o DOWN para seleccionaruna emisora.Cada vez que presione el boton, la frecuencia cambiara.Cuando se recibe una emisora, aparece “TUNE durante dossegundos. Durante la recepcion de estereo FM, aparece(l(@J)]
Para buscar una emisora rapidamente (Btisquedaautomatic)Mantenga presionado el boton UP o DOWN hasta que elsintonizador comience a buscar una emisora. Despues desintonizar una emisora, la btisqueda se detiene.Para detener la Busqueda automatic de forma manual, presioneel boton UP o DOWN.● Es posible que la Busqueda automatic no se detenga en Ias
emisoras con seilales rnuy debiles.
Si la emision de FM estereo contiene ruidoPresione et boton MONO TUNER del controlador remotoque aparezca “MONO en el visualizador.El ruido se reducira, aunque la recepcion sera monaural.
MONO
Para restablecer la recepcion estereo, presione el botonque aparezca “STEREO.
para
para
1presione el boton POWER.Para reajustar el intervalo, repita este procedimiento
13 ESPAiiOL

MEMORIZATION DE EMISORAS
1 2
1 MULTI JOG
La unidad podra almacenar un total de 32 emisorasmemorizadas. Cuando se almacena una emisora, se Ie asignaun ntimero de memorization. Utilice el numero de memorizationpara sintonizar directamente una emisora memorizada.
1
2
3
Gire el selector FUNCTION para seleccionar lafuncion TUNER y presione repetidamente elboton VIDEO 1/5.1 CH/BAND para seleccionar labanda que desee. A continuation, presione elboton UP o DOWN para seleccionar una emisora.
Presione el boton ENTER para almacenar laemisora.Se mostrara durante dos segundos el numero demlemorizacion asignado a la emisora, en orden consecutivecomenzando por el 1 para cada banda.
Repita 10s pasos 1 y 2.No se almacenaran mas emisoras si ya se ha almacenadoun total de 32 emisoras para todas Ias bandas.
SINTONIZACION DE NUMEROSMEMORIZADOS
1 Gire el sellector FUNCTION para se!leccitmar lafuncion TUNER y presione repetidamente! elboton VIDEO 1/5.1 CH/BAND para seleccionar unabanda.
2 Gire MULTI JOG para seleccionar un numero dememorization.
Para borrar una emiscwa memorizadaSeleccione el nfimero de memorization de la emisora qlJe deseeborrar. A continuation, presione et boton ENTER y vuelva apresionarlo dentro de cuatro segundos.Se reducen en uno Ios nfimeros de memorization de itodas Iasdemas emisoras de la banda que tengan numeros mas altos.
Al utilizar el ccrntrolador remotoPresione el bot6n TUNER BAND para seleccionlar una banda y,a continuation, presione Ios botones numericos para seleccilmarun numero de memorization.Ejemplo:Para seleccionar el numero de memorization 2!5, pre:sione 2 y5.Para seleccionar et ntimero de memorization 7, presicme Oy 7.
Cuando se cambia el intervalo de sintonizacion de AM, se borrantodas Ias emisoras memorizadas. Dichas emisoras deberanmemorizarse de nuevo.
ESPANO1. 14
Esta unidad dispone de un decodificador Dolby Pro Logic ytambien permite la conexion de un decodificador Dolby Digitalcon terminals de salida de 5,1 canales.La unidad y Ios altavoces central y perimetricos (estandar)aseguran sonido de tine a plena escala para el hogar. Cuandoreproduzca discos o software de video grabados con Dolby ProLogic o Dolby Digital Surround, un sonido sorprendentementerealista rodeara al oyente para crear un nuevo nivel deentretenimiento audiovisual.El control independiente de Ios cinco canaies permitira al oyentedisfrutar del mismo tipo de reproduction de sonido que elexperimentado en salas de tine. Las votes se reproduciran enel campo acustico delantero y central, mientras que 10Ssonidosambientales como el de automobiles o multitudes se reproducirapor todos Ios Iados del oyente y Ie ofrecen una experienciaaudiovisual increfblemente realista. Lea cuidadosamente 10siguiente para “sintonizar” la salida del sistema de acuerdo conIas caracteristicas de su espacio de escucha.
Compruebe 10 siguiente:● Antes de disfrutar de sonido DOLBY SURROUND, ajuste
el nivel dei sonido de Ios altavoces al equilibria apropiado(consulte la pagina 16).
● Cerciorese de que Ios altavoces esten adecuadamenteconectados y ubicados (consulte Ias paginas 3, 4, y 5).
● Cerciorese de que el televisor y la unidad de video estenadecuadamente conectados (consuite la pagina 3).
● Cerciorese de que et disco, el videocasete, etc., scan delsistema Dolby Pro Logic o Dolby Digital Surround.
SELECCION DE DOLBY PROLOGIC
El modo Dolby Pro Logic optimo dependera del tipo y la ubicacionde Ios altavoces. Recomendamos ei uso de Ios altavoces Aiwaopcionales para todos Ios canales, por ejemplo, el SX-R1 700
para 10s altavoces perimetricos, el SX-CI 700 para un altavozcentral y el SX-AV1 700 para Ios altavoces delanteros.Compruebe el tipo y la ubicacion de sus altavoces y seleccioneen consecuencia el modo Dolby Pro Logic recomendado.Modo recomendado
Altavozcentral
Mas grande Mas pequeiio Sin altavoz
Altavoces perimetricos DOLBYPRO DOLBYPRO PHANTOM(altavocestraseros) LOGIC-WIDE LOGIC-NORMAL
Sin altavoces 3 STEREO- 3 STEREO- –perimetricos WIDE NORMAL
PARA SELECCIONAR UN MODO DOLBYPRO LOGIC
1.2 1
1
2
Presione el boton DOLBY SURROUND Y gireMULTI JOG para seleccionar el modo apropi;do.Los nombres de modo aparecen por orden tal como semuestra a continuation.
PRO LOGIC+ PHANTOM + 3 STEREO
Mantenga presionado el boton DOLBYSURROUND ‘hasta que aparezca el modo dealtavoz central deseado. (Excepto el modoPHANTOM.)Aparecen Ias indicaciones “NORMAL” y “WIDE, una detrasde la otra.
● Dependiendo de la fuente de sonido o de Ias condiciones deescucha, es posible que no obtenga efecto perimetrico inclusoaunque haya activado el sistema Dolby Pro Logic.
s El efecto completo de Dolby Pro Logic no podra obtenersecuando utilice software sin la marca DtllMIBVSURROU@@.En estecase, utilice en su Iugar el sistema de sonido perimetrico DSP(consulte la pagina 10).
● El sistema Dolby Pro Logic se cancelara automaticamente:- cuando active el sistema del DSP- cuando active el sistema GEQ- cuando seleccione la funcion 5.1 CH- cuando enchufe unos auriculares
● Dolby Pro Logic no podra activarse cuando haya enchufadounos auriculares.
Modo PHANTOM: Seleccione este modo cuando no hayaconectado un altavoz central. Todas Ias serlales del canal centralse redistribuiran a Ios altavoces de Ios canales izquierdo yderecho.Modo 3 STEREO: Seleccione este modo cuando no hayaconectado altavoces perimetricos.
15 ESPAfiOL

AJUSTE DEL EQUILIBRIA DELNIVEL ENTRE ALTAVOCES
1
Esta unidad dispone de un generador de seiial de pruebaincorporado denominado secuenciador de ruido para facilitar elajuste del equilibria de Ios cinco canales.El secuenciador da salida a una serial de ruido que ‘Viaja” decanal a canal para permitir el ajuste sencillo del nivel del sonidoa fin cle obtener la misma sonoridad aparente desde cada canalen su position de escucha.
-1
2
●1
,:
Seleccione el modo Dolby Pro Logic de acuerdoccm el tipo y la ubicacion de sus altavoces.(Consulte la pagina 15.)
Presione el boton MANUAL SELECT delccmtrolador remoto y mantengalo presionadodllrante unos dos segundos hasta que comiencea parpadear “L” de “L/R OdB”.
A cada canal se enviara una sefial de ruido de la formasiguiente:
Motto DOLBY PRO LOGIC NORMAL O WIDE
+UR OdB(Altavoz delantero izquierdo~’
+CEN OdB(Altavoz central)
L/R OdB(Altavoz delantero derecho )*1
S-F\ OdB(Altavoz perimetrico derecho)’ 2
+S-L OdB(Altavoz perimetrico izquierdo )*2
Modo DOLBY PRO LOGIC PHANTOM
E+UROdB*l+ UROdW1
– S-L 0dB*2~ S-R 0dB*2J
Modo 3 STEREO NORMAL O WIDE
~UROdB*l+ CEN OdB+ UR OdB’l1
“L” o “R parpadeara para indicar uno de Ios altavoces delanterosa traves del que sale sefial de ruido.La setial de ruido sale a traves de Ios altavoces perimetricosizquierdo (L) y derecho (R) al mismo tiempo.
3
4
Ajuste el nivel del sonido de Ios altavoces (centraly perimetricos.Mientras este parpadeando “CEN”, “S-L”, o “S-R” en elvisualizador, presione el bot6n UP o DOWN del controladorremoto de forma que el nivel del sonido de Ios altavoces centralo perimetricos coincida, con el de Ios altavoces delanlferos.
El equilibria de Ios altavoces delanteros tambien podraajustarse mientras estb visuaiizandose “UR.
Para ~arar la seiial de ruido, vuelva a pre!sionarel bo~on MANUAL SELECT.
mCuandoajusteel equilibriadelnivelde Iosaltavocespara DolbyPro Logic, tambien cambiara el de Ios modos D!SP y 5,1 Ct{.
Information sobre Ios canalesLos altavoces izquierdo y derecho crean el efecto estereo.El altavoz central ayuda a ubicar con precision el sonido en uncampo ac(rstico amplio.Los altavoces perimetricos montados atras rei~lzan la“profundidad del campo acustico.
Para cambiar el tiempo de retardo de IIOS altavocesperimetricos cuando utilice el modo Dolby Pro LogicLos altavoces perimetricos reproduce sonidos una fraccion desegundo despur% de Ios altavoces delanteros. Este retardo estaajustado inicialmente a 20 ms (milisegundos).Para cambiar el tiempo de retardo est~ndar, presionerepetidamente el boton MANUAL SELECT del controladcrrremoto hasta que se visualice “TlME20ms”. 13e$pues Ipresioneel boton UP o DOWN. Cada vez que presione uno de Ios botones,el tiempo de retardo carnbiara como se indica a continuacitin.
~15ms++20rns+30ms
Para ajustar el equilibria del nivel de Ios altavoces cuandoescuche una fuente (modos Dolby Pro Logic y 5.1 CIH)El equilibria del nivel de Ios altavoces podra camlbiarse despuesde haberlo ajustado con el secuenciador de ruido. El equilibriapodra cambiarse cuando active et sistema Dollby Pro Logic ocuando seleccione la funcion 5.1 CH.
1
2
3
Ponga en reproduction un disco o software de video grabadocon Dolby Pro Logic o Dolby Digital Surrounci.Presione repetidamente el boton MANUAL SELIECT delcontrolador remoto hasta que en el visualizador alparezca“L/R”, “CEN”, “S-L”, O “S-R”.Presione el boton UP c)DOWN mientras este visualizandoseel nombre del altavoz que desee ajustar.
ESPAtiiOL 16

PUESTA EN HORA DEL RELOJ
VIDEO 1/5.1CH/BAND
CLOCK
Cuando conecte por primera vez el cable de alimentacion deCA, la indication dei reloj parpadeara.Ajuste la hors de la forma siguiente con la alimentaciondesconectada.
1
2
3
Presione el boton ENTER.La IuminosidaddelvisualizadoraumentaraIigeramente.
Gire MULTI JOG para designar la hors y Iosminutes.El tiempo avanza al girar a la derecha y retrocede al girar a laizquierda,
Presione el boton ENTER.El reloj comienza desde el segundo 00,
Al ajustar el reloj por primers vez despues de adquirir launidadEl contenido del visualizador se borrara.Esto se debe a que el modo de ahorro de energfa de la unidadesta activado. No se trata de un fallo de funcionamiento.El modo de ahorro de energia se puede cancelar. Consulte Iosdetalles en la pagina 6.
Para corregir la hors actualPresione el boton POWER para desconectar la alimentacion dela unidad. Presione el boton ENTER y realice Ios pasos 1 a 5anteriores.
Para hater que se visualice la hors actualPresione el boton CLOCK del controlador remoto. El reloj sevisualizara durante 4 segundos.
Para cambiar al modo de 24 horasPresione el boton VIDEO l/5.1 CH/BAND mientras estevisualizandose la hors actual.Para volver al modo de 12 horas, repita el mismo procedimiento.
Si la indication del reloj parpadea mientras laalimentacion este desconectadaEsto se debera a una interruption del suministro electrico.Tendra que volver a poner en hors el reloj.Si el suministro electrico se interrumpe durante mas de 24 horas,todos [OSajustes almacenados en la memoria despues de haberadquirido la unidad tendran que volver a memorizarse.
17 ESPAfiOL
PROGRAMACIONDELTEMPORIZADORCRONODESCONECTADOR
La alimentacion de la unidad se puede desconectarautomaticamente despues del tiempo especificado.
LRilice el controlador remoto.
1 Presione el boton SLEEP.
2 Presione el boton UP o DOWN antes de cuatrosegundos para especificar el tiempo hasta quese desconecte la alimentacion.Cada vez que presione el boton, el tiempo cambiara entre 5y 240 minutes en pasos de 5 minutes.
Tiempo especificado
Tambien es posible seleccionar la hors con MULTI JOG en launidad principal.
Para comprobar el tiempo restante hasta que sedesconecte la alimentacionPresione una vez el boton SLEEP. El tiempo restante sevisualizara durante cuatro segundos.
Para cancelar el temporizador cronodesconectadorPresione dos veces el boton SLEEP para que “SLEEPoFFdesaparezcadelvisualizador.

CUIDADOS Y MANTENIMIENTO ESPECIFICACIONES
El mantenimiento y el cuidado ocasionales de la unidad serannecesarios para sacar el maximo partido de ells.
Para Iimpiar el exteriorUtilice un pafio suave y seco.Si la superficie esta extremadamente sucia, utilice un pafioIigeramente humedecido en una solution poco concentrada dedetergence. No utilice disolventes fuertes, como alcohol, bencina,o diluidor de pintura ya que podr[a dahar el acabado de la unidad.
Seccion del sintonizador de FMGama de sintonia 87,5 a 108 MHzSensibilidad util 13,2 dBfTerminals de antena 75 ohmios (desequilibra,dos)
Seccion del sintonizador de AMGama de sintonia 530 a 1710 kHz (pasos de 10 kHz)
531 a 1602 kHz (pasos de 9 klHz)Sensibilidad util 350 pV/mAntena Antena de cuadro
Seccion del amplificadorSalida de potencia
Distortion armonicatotal
Entradas
[Modo estereo]Altavoces deianteros100 vatios por canal, M [n. RM:S a 8ohmios, de 40 Hz a 20 kHz, con unadistortion arm6nica total inferior al~,g~o
[lModo Dolby Pro Logic 05.1 CH]IAltavoces delanteros60 vatios por canal, Min. RMS a 8ohmios, de 40 Hz a 20 kHz, con unadistortion armonica total inferior al~,9%Altavoces traseros (perirnetricos)60 vatios por canal, Min. RMS a 8c)hmios, 1 kHz, con una distortionarmonica total inferior al 0,9°AlAltavoz central
60 vatios, Min. RMS a 8 ohmios, 1kHz, con una distorsiort armonicatotal inferior al 0,970[1,08 9(. (40 W, 1 kHz, 8 ohms,Altavoces delanteros)AUDIO IN
PHONO: 2,5 mV, ajustable (47kiloohmios)CD, VIDEO l/DVD/lMD, VliDEO2/ LDI TV, VIDEO 3; 250 nlV,ajustable (47 kiloohmios)TAPE MONITOR: 350 mV (47kiloohmios)AUX: 200 mV, ajustable (4.7kiloohmios)5.1 INPUT
FRONT, CENTER: 4001mV,ajustable (47 kiloohmicts)SURROUND: 400 mV,ajustable (47 kiloohrnics)SUB-WOOFER: 400 mV,ajustable (47 kohmios)
VIDEO IN: 1 Vp-p (75 ohmios)
Esmkx 18

Salidas AUDIO OUT (REC OUT): 200 mV (1kohmio)VIDEO OUT (MONITOR): 1 Vp-p (75ohmios)SUPER WOOFER: 1,2 VFRONT SPEAKERS IMP: 8Ll(altavoces delanteros A y B): aceptaaltavoces de 8 ohmios o mas.SURROUND SPEAKERS IMP: 8Q(altavoces perimetricos): aceptaaftavoces de 8 ohmios o masCENTER SPEAKER IMP: 8Q: aceptaun altavoz de 8 ohmios o mas.PHONES (toma estereo): aceptaauriculares de 32 ohmios o mas
Silenciamiento –20 dB
GeneralesAlimentacion 120 V CA, 60 HzConsumo 125 WDimensioned 430 x 155 x 351 mm
(An x Al x Prf)Peso 10 kg (22 lb 1 OZ.)
Las especificaciones y el aspecto externo estan sujetos acambio sin previo aviso.
DOLBY PRO LOGICFabricado con licencia de Dolby Laboratories LicensingCorporation.“DOLBY”, ei simbolo de la D doble UU y “PRO LOGICmarcas de Dolby Laboratories Licensing Corporation.
son
GU[A PARA LA SOLUCION DEPROBLEMAS
Si la unidad no funciona como se describe en este Manual deinstrucciones, compruebe la guia siguiente.
SECCION GENERALNo hay sonido.● LEsta adecuadamente conectado el cable de CA?● LHay alguna conexion incorrect? (+ pagina 3)● Es posible que Ios t-erminales de Ios altavoces esten
cortocircuitados.- Desconecte el cable de CA y corrija [as conexiones de [OS
altavoces.● LHa presionado un boton de funcion incOrreCfO?● LHa presionado el boton TAPE MONITOR?. LHa ajustado correctamente IOSbotones FRONT SPEAKERS
A y B? (+ pagina 6)El sonido solamente se emite a traves de un altavoz.. ~EstA adecuadamente ajustado BALANCE?$ LEst~ desconectado el otro aitavoz?
El sonido se oye con un volumen muy bajo.. LHa presionado el boton MUTING?La visualization es erronea o se produjo un malfuncionamiento.
+ Reponga la unidad tal como se describe mas adelante.
SECCION DEL SINTONIZADORHay estaticos constants en forma de onda. ~Est~ adecuadamente conectada la antena? (+ p~gina 5)● &s d~bi[ la Sefial de FM?
+ Conecte una antena exterior.La recepcion contiene interferencias de ruido o el sonidose oye distorsionado.. LEst~ el sistema captando ruido externo o distortion de
multiples trayectorias?~ Cambie la orientation de la antena.A Aleje la unidad de otros aparatos electricos.
RepositionSi hay alguna condicion anormal en el visualizador o se produceun mal funcionamiento, reponga la unidad de la siguiente forma.1 Presione el boton POWER para desconectar la alimentacion.2 Presione el boton POWER mientras presiona e] boton ENTER.
Todos Ios ajustes almacenados en la memoria despues dehaber adquirido la unidad se borraran.
Si no puede desconectar la alimentacion en el paso 1 debido aalgun mal funcionamiento, reponga la unidad desconectando elcable de CA y realice el paso 2.
19 ESPAiiOL

iiNDICE DE COMPONENTES
Las instrucciones relativas a cada component de la unidad odel ccmtrolador remoto se encuentran en Ias paginas que seindican a continuation.
(en orden alfabetico)ComponentsAUXBALANCECDCLOCKDOLBY SURROUNDDOWNDSPEcoENTERFRONT SPEAKERS A, BGEQMAN[JAL SELECT (TEST)MONO TUNERMULTI JOGMULTI SELECTORMUTINGPHONESPHONOPOWERSETSLEEPTAPE MONITORT-BASSTUNER BANDUPVIDEIO 1/5.1 CH/BANDVIDEO l/DVD/MDVIDEIO 2/LD/TVVIDEIO 3VOLLJME , VOL(V, A)
Paginas11811171510, 11,13,14,16, 17106, 76,7, 11, 12, 14, 177910,16136,7,9-12,14, 15, 1711-1487117,13,176177,11,12811,1410, 11, 13, 14, 16, 1711,13,14,171111118
ESPAibL 20

PRECAUTIONS
“AITENTION:POUR REDUIRE LE RISQUEDE CHOC ELECTRIQUE, NE PAS ENLEVER
LE COUVERCLE (N1 LE DOS).CET APPAREIL NE CONTIENT PAS DE
PIECES REPARABLES PAR L’UTILISATEUR.POUR TOUTE REPARATION, S’ADRESSER
A UNE PERSONNE QUALIFIED.”
6tre installe au mur ou au plafond.
Electricity
Lisez attentivement et completement Ie mode d’emploi avantd’utiliser I’ampli-tuner et conservez-le pour toute reference future.Respectez tous Ies avertissements et consignes mentionnesclans Ie mode d’emploi, ainsi que Ies conseils concernant lasecurite.
Installation1
2
3
4
5
6
7
Eau et humidite — Ne pas utiliser I’ampli-tuner pres d’unpoint cf’eau, comme une baignoire, un Iavabo, une piscine ouautre endroit similaire:Chaleur — Ne pas utiliser l’ampli-tuner pres d’une sourcede chaleur, comme une sortie d’air chaud, un chauffage, ouautre appareil produisant de la chaleur. II ne doit pas nonplus @treexpose a des temperatures inferieures a 5°C (41“F)ou superieures a 35°C (95”F).Installation — Installez I’ampli-tuner sur une surface plane,de niveau.Ventilation — Laissez un espace suffisant tout autour del’ampli-tuner pour garantir une bonne ventilation, soit environ10 cm (4 PO.)a I’arriere et au-dessus de I’ampli-tuner et 5 cm(2 PO.)sur Ies deux cdtes.- Ne pas poser I’ampli-tuner sur un lit, une couverture ou
toute autre surface similaire qui pourrait bloquer Ies orificesde ventilation.
- Ne pas installer I’ampli-tuner clans une etagere, un placardou un meuble ou la ventilation est insuffisante.
Objets et Iiquide — Veillez a ce qu’aucun objet ni Iiquide nepenetre clans Ies orifices de ventilation de I’ampli-tuner.Chariots et supports — Quand vousinstallez I’ampli-tuner sur un support ouun chariot, deplacez-les Ientement.A cause d’arr~ts subits, de movementsbrusques et de surfaces inegales,I’ampli-tuner ou Ie chariot peuvent 6tre m >A&arenverses.Fixation au mur ou au plafond — L’ampli-tuner ne doit pas
Releve du proprietairePour plus de commodite, rioter Ie numero de modele et Ie numerode serie (Ies numeros se trouvent au dos de I’appareil) clans Iescases ci-dessous. Priere de mentioner ces numeros quand oncontacte un distributeur Aiwa en cas de difficult.
N“ de modele No de serie (N” de lot)
AV-D35
1 FRAN~AIS
1
2
3
4
5
Sources d’alimentation — Raccordez I’ampli-tunerseulement a la source d’alimentation specifiee clans Ie moded’emploi et indiquee sur I’ampli-tuner proprement alit.Polarisation — Par mesure de securite, certains appareilssent equipes d’une fiche d’alimentation secteur polarisee quine peut ~tre introduite que clans un sens clans la prise murale.S’il s’avere difficile ou impossible d’introduire la fiched’alimentation clans la prise secteur, retournez la fiche etreessayez. Si vous ne parvenez toujours pas a I’enficheraisement, demandez a un technician d’entretien de reparerou de remplacer la prise murale. Ne tentez pas de dejouer lasecurite de cette fiche polarisee en forgant la fiche clans uneprise non appropriee.Cordon d’alimentation secteur- Quand vous debranchez Ie cordon d’alimentation secteur,
tirez sur la fiche et non pas sur Ie cordon.- Ne jamais toucher la fiche secteur avec des mains humides
afin d’eviter [es risques d’incendie ou d’electrocution.- Les cordons d’alimentation doivent etre Tixes COrK?CtWIWIN
pour eviter qu’ils ne soient plies, coinces ou pietines. Faitesparticulierement attention au cordon reliant I’ampli-tuner ala prise secteur.
- Evitez de surcharge Ies fiches et cordons de prolongationau-dela de Ieur capacite afin d’eviter tout risque d’incendieou d’electrocution.
Prolongateur — Pour eviter Ies decharges electriques,n’utilisez pas de fiche d’alimentation polarisee avec unprolongateur, une prise ou autre si la fiche d’alimentationpolarisee ne peut &re introduite completement de maniere aeviter d’exposer Ies lames de la fiche.Quand I’ampli-tuner est inutilise — Debranchez la fichesecteur de la prise dalimentation secteur si vous n’utilisezpas I’ampli-tuner pendant plusieurs mois. Quand Ie cordonest branche, une petite quantite d’electricity circule clansI’ampli-tuner m6me s’il a ete mis hors tension.

&-Jenne exterieure1 Li9tnes electriques -Lorsque vousraccordez uneantenne
exterieure, assurez-vous qu’elle ne se trouve pas a proximitede Iignes electriques.
2 Mice a la terre de I’antenne exterieure — Veillez a ce queIe systeme d’antenne soit correctement mis a la terre de faqona offrir une protection contre toute cr%te de tensionimprevisible ou contre I’accumulation d’electricity statique.L’article 810 du code national electrique, ANSVNFPA70, fournitdes information sur la mise a la terre adequate du mat, de lastructure portante et du fil de terre vers une unite de dechargede I’antenne, la section des conducteurs de mise a la terre,I’emplacement de I’unite de decharge de I’antenne, Ierac:cordement aux electrodes de mise a la terre et Iesspecifications des bornes de mise a la terre.
Mbse a la terre de I’antenne con formement au code national electrique
t)
A
— ~~ TERRE (ART, 250, SECTION H
NEC)
CODE NATIONAL ELECTRIQUE (NEC)
EntretienNettoyez I’ampli-tuner comme indique clans Ie mode d’emploi.
Wmrnages exigeant I’intervention d’unjgwOJessionnelFaites reparer I’ampli-tuner par un professionnel clans Ies cassuivants:- Le cordon ou la prise secteur a t%+endommage- Des objets ou du Iiquide ont penetre clans I’ampli-tuner- L’ampli-tuner a ete expose a la pluie ou a I’eau- L’ampli-tuner ne semble pas fonctionner correctement- Les Iperformances de I’ampli-tuner ne sent plus Ies m6mes- L’ampli-tuner est tombe ou Ie coffret a ete endommageNE PAS ESSAYER DE REPARER SOI-MEME LE RECEPTEUR.
Verifiez votre appareil et Ies accessoires
Antenne FM Antenne AM
Mode d’emploi, etc.
TABLE DES MATIERES
PRECAUTIONS ................................................................ . 1
PREPARATIFS
RAccoRDEMENTs .........................................................!l..3AVANT DE COMMENCER ............................................... . 7
SON
REGLAGE PERSONNEL DU SON .................................. . 8EGALISEUR GRAPHIQUE ELECTFtONIQUE ..................9PROCESSEIJR D' AMBIANCE ......................................... 10
OPERATIONS DE BASE
SELECTION D’UNE SOURCE AUDIO OU VIDEO .........11ENREGISTREMENT D’UNE SOURCE AUDIO .................12
RECEPTION RADIO
ACCORD MANUEL .......................................................... 13PREREGLAGE DES STATIONS ........................................14
DOLBY SURROUND
SELECTION DU DOLBY PRO LOGIC ............................ 15REGLAGE DIE LA BALANCE DU NIVEAU DES
ENcEINTEs .................................................m..........m.....l6
MINUTERIE
REGLAGE DIE L’HORLOGE ............................................ f17REGLAGE DIE LA MINIUTERIE D’AFtRET .......................37
GENERALITIES
SOIN ET ENTRETIEN ...................................................... $8SPECIFICATIONS ........................m................................... 18EN CAS DE PANNE ......................................................... 19NOMENCLATURE ............................................................ 20 H
FRAIU~AIS 2

RACCORDEMENTS RACCORDEMENT DETOUTL’EQUIPEMENTLes prises et Ies fiches des cordons de liaison sontcodees
Avantderaccorder Iecordonsecteur couleurdelafagon suivante:
La tension nominale de l’ampli-tuner indiquee surlepanneau Prises etfiches rouges: Canal droitdessignaux audio
arriereestde 120 V.Verifiezsielle correspond ala tensionlocaie. Prises etfiches blanches: Canal gauchedes signauxaudioPrises etfichesjaunes: Signauxvid60
IMPORTANTRaccordez lesenceintes, Iesantennesetles autresaDDareils ~. .en premier. Raccordez lecordonsecteur endernier. Inserez Ies fiches a fond clans Ies prises. Des connexions
relachees peuvent produire un bourdonnement ou d’autresinterferences.
*1Veillez a raccorder la prise VIDEO OUT du Iecteur DVDdirectement a un televiseur, et non pas par I’ampli-tunerSinon, des parasites risquent d’apparattre clans I’imagependant la lecture de DVD proteges contre la copie.
*2 Le son fourni aux prises 5.1 INPUT ne peut pas &re enregistre.Lors de I’enregistrement du son d’un Iecteur DVD, raccordezIes prises AUDIO OUT (DOWN MIXING) du Iecteur DVD auxprises VIDEO l/DVD/MD AUDIO IN de cet appareil.
‘3 Pour Ie raccordement d’un appareil video monophonique,utilisez un cordon de liaison stereo-mono (non fourni).
Lecteur DVD ou maanetoscope llLecteur MD*3Televiseur
(Magm+toscope l/Lecteur MC
11~& VIDEO IN (Magnetoscope I
\
a SUB-WOOFER OU”
+ .i
rJFRCJIW
I$J,,-’.
.. ,,
/ .,
,,j -
‘RONTJT(LecteurID)
.ecteur DVD)
F
a CENTER OUT(Lecteur DVD)
a AUDIO OUTMagnetoscope 2 ou IecteurLD/Television cilblee*3
n I 1%3 II ~ lF--
(Magnetoscope 2)
\a VIDEO IN (Magnetoscope
a AUDIO (
7
Tourne-disque
Platine a cassette
FRAN~AIS

@et @ sur I’illustration correspondent aux details suivants.
RACCORDEMENT DES ENCEINTES @ Enceintes avant—.=
Elornes d’enceinteRaccordez Ies enceintes avant (systemes A et/ou B), uneenceinte centrale, des enceintes surround et un caisson de graveaux prises correspondantes de I’ampli-tuner:- Ies cordons d’enceintes avant aux bornes FRONT SPEAKERS- Ie cordon d’enceinte centrale aux bornes CENTER SPEAKER- Ies cordons d’enceintes surround aux bornes SURROUND
SPEAKERS.- Ie cordon du caisson de grave (amplifie) a la prise SUPER
WOOFER d pour obtenir un son grave omnipresent.
Imp&dance des enceintesPour toutes Ies enceintes, utilisez des enceintes 8 ohms.
Raccordement des bornes + a + et - a –Pour obtenir I’effet sonore adequat, Ies bornes d’enceintes deI’ampli-tuner et des enceintes doivent 6tre raccordeescorrectement: Ies bornes + de I’ampli-tuner doivent &re relieesaux bornes + des enceintes (et – a –).
* Veillez a raccorder correctement Ies cordons comme indiquesur I’illustration de droite. Des connexions inadequate peuventcauser des courts-circuits au niveau des bornes SPEAKER(S).
e Ne pas Iaisser de sources de magnetism pres des enceintes.
Relevez Ie poussoir de laborne, insbrez Ie cordond’enceinte clans I’orifice,puis refermez Ie poussoir.Verifiez si Ie cordon est
c-Enceintes surround
~~ ———-’-------
Caisson de grave Enceinte centrale
FRAIV~AM 4.

POSITIONNEMENT DES ENCEINTES
Positionnez Ies enceintes de maniere a obtenir Ies meilleurs effetsDolby Digital Surround (5.1 CH), Dolby Pro Logic ou DSP.
@ Enceintes avant@ Enceinte centrale
Installez I’enceinte centrale entre Ies deux enceintes avant etsur ou sous Ie televiseur, si I’ampli-tuner est raccorde a unteleviseur.
@ Enceintes surroundlnstallez Ies enceintes surround directement sur Ies c6tes ouIegerement en retrait de la position d’ecoute. Alignez-leshorizontalement a environ 1 m (3,2 pieds) au-dessus duniveau des oreilles.
@ Caisson de graveInstaliez Ie caisson de grave quelque part entre Ies deuxenceintes avant.
~.
Le son des enceintes surround ou de I’enceinte centrale dependdu reglage de la fonction DSP, Dolby Pro Logic et 5.1 CH.
@ @ @@
~ FRAN~AIS
———
RACCORDEMENT DES ANTENNESFOURNIES @
Raccordez I’antenne FM a la borne FM 75 Q et I’antenne AM auxbornes AM LOOP.
Antenne FM
Ill Antenne AM
P
Pour Roser I’antenne cadre AM sur une surFaceInsere> la saillie clans la rainure comme indique sur I’ilustration.
Pour positioner Ies antennesAntenne FM unipolaire:Deployez cette antenne horizontalement en forme de T et fixez-en Ies extremities au mur.Antenne cadre AM:Position pour la meilleure qualite de reception.
● Ne pas approcher I’antenne FM d’objets metalliques ou detringles de rideaux.
● Ne pas approcher I’antenne AM d’autres appareils, de l’ampli-tuner, du cordon secteur ou des cordons d’enceintes, car ellepourrait capter du bruit.
● Ne pas derouler [e fil de I’antenne cadre AM.
RACCORDEMENT D’UNE ANTENNEEXTERIEURE
L’utilisation d’un antenne exterieure est recommandee pourune meilleure rfkeption FM. FkiGGOrdeZ I’antenne exterieure a
la borne FM 75 Q.

APROPOS DE LATELECOMMANDE
Mise en place des pilesEnlevez Ie couvercle du Iogement des piles au dos de latelecornmande et inserez deux piles R6 (format AA).
R6(AA)
Ftemplacernent des pilesLa portee maxi male de la telecommande, c’est-a-dire la distanceentre la telecommande et Ie capteur de I’ampli-tuner, devrait ~trede 5 metres (16 pieds). Quand la portee est reduite, remplacezIes piles par des neuves.
Utilisation de la telecommandeLes instructions de ce mode d’emploi indiquent la piupart dutemps Ies touches de I’appareil. Les touches de la telecommandeayant Ie m6me nom que celles de I’appareil peuvent tout aussibien @treutilisees.Les fonctions de la touche SET sent Ies m6mes que celles de latouche ENTER de I’appareil.
c Si VCMSprevoyez de ne pas utiliser I’ampli-tuner pendant unecertaine periode, enlevez Ies piles de la telecommande poureviter toute fuite de I’electrolyte des piles.
* La t61ecommande risque de ne pas fonctionner correctement
MODE D’ECONOMIE D’ENERGIE
1 3 2,3
(ECIO)
3)0Activez I’ampli-tuner en mode ECO pour reduire la consornmationd’electricity comme indique ci-dessous.Le reglage par defaut du mode ECO est ON.● Lorsque I’heure a ete reglee, I’affichage de !’horloge dlisparalt
irnmediatement.● Lorsque I’ampli-tuner est mis hors tension, tous Ies temoins
s’eteignent et seul I’indicateur POWER (!) STANDBY/ONs’allume en rouge.
Pour desactiver Ie mode ECO1
23
Appuyez sur la touche ECO pour afficher ECO MODE almsque I’ampli-tuner est sews tension.En I’espace de 4 secondes, appuyez sur la touche ENTER.En I’espace de 4 secondes, toumez MULTI JOG pourselectionner ECO OFF.Le mode se R?gleautomatiquement au bout dle 4 secondes.II se regle egalement suvous appuyez sur la touche ENTERclans un delai de 4 secondes apres I’etape 3.
quand:- La Iigne de vue entre la telecommande et Ie capteur de
teldcommande clans I’afficheur est exposee a une Iumiereintense, par exemple la Iumiere directe du soleil.
- D’autres telecommandes sent utilisees a proximite(telecommande de televiseur, par ex.).
FRAN~A/S 6
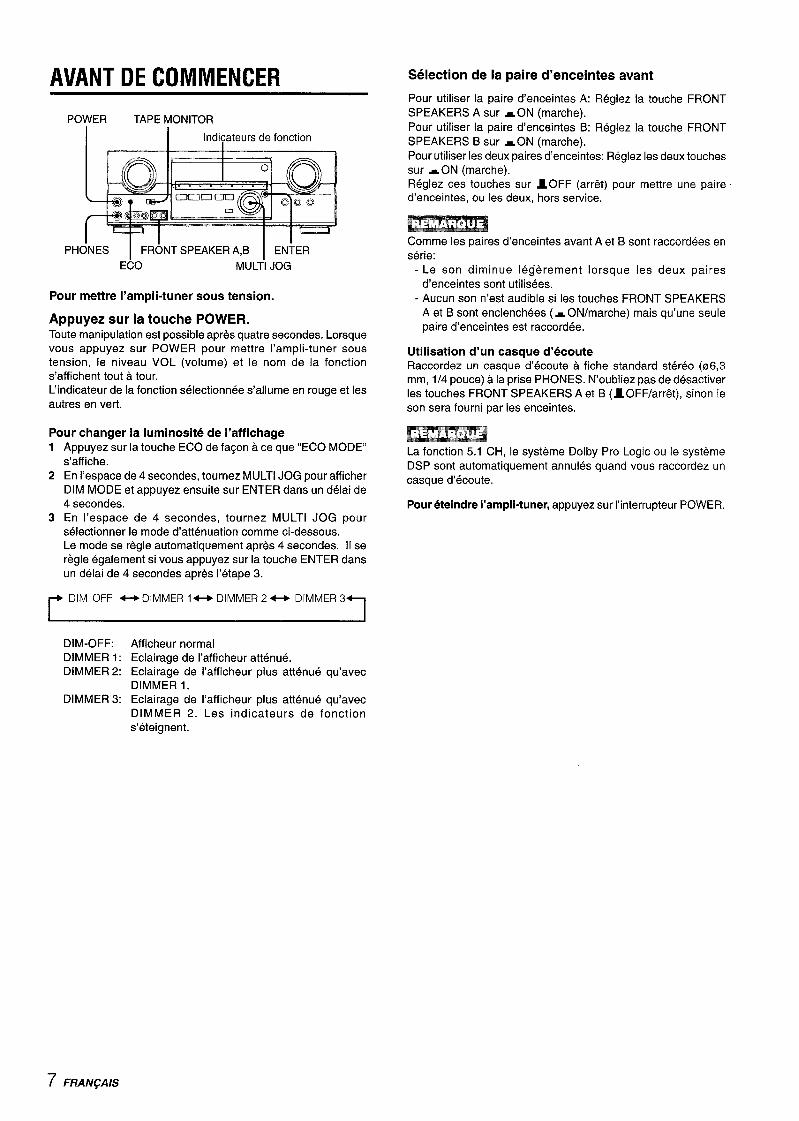
AVANT DE COMMENCER
POWER TAPE MONITOR
Indicateurs de fonction
PHONES I FRONT SPEAKERA,B I ENiER
ECO MULTI JOG
Pour mettre I’ampii-tuner sous tension.
Appuyez sur la touche POWER.Toute manipulation est possible apres quatre secondes. Lorsquevous appuyez sur POWER pour mettre I’ampli-tuner soustension, Ie niveau VOL (volume) et Ie nom de la fonctions’affichent tout a tour.L’indicateur de la fonction selectionnee s’allume en rouge et Iesautres en vert.
Pour changer la Iuminosite de I’affichage1
2
3
Appuyez;ur la touche ECO de fagon a ce-que “ECO MODEs’affiche.En I’espace de 4 secondes, tournez MULTI JOG pour afficherDIM MODE et appuyez ensuite sur ENTER clans un delai de4 secondes.En I’espace de 4 secondes, tournez MULTI JOG Pourselectionner Ie mode d’attenuation comme ci-dessous.Le mode se regle automatiquement apres 4 secondes. II seregle egalement si vous appuyez sur la touche ENTER clansun delai de 4 secondes apres I’etape 3.
DIM OFF 4-F DIMMER 1- DIMMER 2- DIMMER 3
DIM-OFF:DIMMER1:DIMMER 2:
DIMMER 3:
Afficheur normalEclairage de I’afficheur attenue.Eclairage de I’afficheur plus attenue qu’avecDIMMER 1.Eclairage de I’afficheur plus attenue qu’avecDIMMER 2. Les indicateurs de fonctions’eteignent.
Selection de la paire d’enceintes avant
Pour utiliser la paire d’enceintes A: Reglez la touche FRONTSPEAKERS A sur ~ ON (marche).Pour utiliser la paire d’enceintes B: Reglez la touche FRONTSPEAKERS B sur wON (marche).Pour utiliser Ies deux paires d’enceintes: Reglez Ies deux touchessur -ON (marche).Reglez ces touches sur ~OFF (arri5t) pour mettre une paired’enceintes, ou Ies deux, hors service.
Comme Ies paires d’enceintes avant A et B sent raccordees enserie:
- Le son diminue Iegerement Iorsque Ies deux pairesd’enceintes sent utilisees.
- Aucun son n’est audible si Ies touches FRONT SPEAKERSA et B sent enclenchees (~ ON/marche) mais qu’une seulepaire d’enceintes est raccordee.
Utilisation d’un casque d’ecouteRaccordez un casque d’ecoute a fiche standard stereo (06,3mm, 1/4 pouce) a la prise PHONES. N’oubliez pas de desactiverIes touches FRONT SPEAKERS A et B (lOFF/arriX), sinon [eson sera fourni par [es enceintes.
La fonction 5.1 CH, Ie systeme Dolby Pro Logic ou Ie systemeDSP sent automatiquement annules quand vous raccordez uncasque d’ecoute.
Pour eteindre I’ampli-tuner, appuyez sur I’interrupteur POWER.
7 FRAPl~AIS

I%EGLAGE PERSONNEL DU SON SYSTEME SUPER T-BASS
DOWN,UP VOLUME.~
BALANCE
REGLAGE DE VOLUME
Tournez la commande de volume (VOLUME) sur I’amplificateurou appuyez sur Ies touches VOL de la telecommande.Le niveau du volume est indique sur I’afficheur pendant quatreseconcles. II peut ~tre ajuste entre Oet MAX (50). IIclignote quandil est r4gle au-dela du niveau 44.Le niveau du volume reste memorise a la mise hors tension deI’ampli-tuner, mais s’il est regle au-dessus du niveau 21 il seraautomatiquernent regle au niveau 20 la prochaine fois que vousmettrez I’ampli-tuner sous tension.
Pour ajuster la balance gauche/droite des enceintes avantAppuyez sur la touche BALANCE pour afficher “L/R OdB”.Appuyez ensuite de fa$on repetee sur la touche DOWN ou UPen I’eslpace de quatre secondes.La balance des enceintes avant clans Ies modes 5.1 CH et DolbyPro Logic change aussi.
Pour couper provisoirement Ie sonAppuyez sur la touche MUTING (-20 dB),“MUTE ON” appara~t sur I’afficheur pendant quatre secondes.Gkrand Ie son est coupe, I’indicateur de fonction selectionneclignote. Appuyez une nouvelle fois sur la touche MUTING pourretablir Ie son.
Le systeme T-BASS sert a renforcer Ie realisme des Ibasses
frequencies.Appuyez sur la touche T-lBASS.A chaque pression, Ie niveau change. Selectionnez un des troisniveaux, ou la position d’annulation si vous preferez.
L = J•:+::+~,+.Iam Bmim mm ti
(annulation)
Le son des basses frequencies peut presenter de la distortionquand Ie systeme T-BASS est utilise avec un disque ou ullecassette sur Iesquels [es graves sent amplifies d’origirw. Dansce cas, mettez Ie systeme “T-BASS hors service,
REGLAGE DU SOIN PENDANTL’ENREGISTREMENT
Vous pouvez varier a volonte Ie volume de sortie et Ie timbredes enceintes ou du casque d’ecoute saris changer Ie niveaud’enregistrement.
FRAN~AIS 8

EGALISEUR GRAPHIQUEELECTRONIQUE
— L——.—J
GEQ
L’ampli-tuner presente Ies cinq modes d’egalisation suivants.
ROCK: Son puissant avec accentuation des aigus et des gravesPOP: Presence amelioree des voix et des mediumsJAZZ: Accentuation des basses frequencies pour la musique de
type jazzCLASSIC: Son plus riche avec des graves Iourds et des aigus
finsBGM: Son calme avec graves et aigus supprimes
Appuyez sur la touche GEQ (egaliseur graphique) ettournez MULTI JOG jusqu’a ce que Ie mode d’egalisationVOUIU s’affiche.Les modes GEQ s’affichent de maniere cyclique comme ci-apres.
~ ROCK— PoP— JAZZ — CLASSIC — BGM7
L- y4— M3— M2— Ml J
I------- Mode manuel -------~
La designation du mode selectionne s’affiche pendant quatresecondes et I’indicateur F apparalt a la gauche de la designationdu mode selectionne.
Mode selectionne
Pour annuler Ie mode selectionneAppuyez a nouveau sur la touche GE(2. “GEQ OFF apparaitsur I’afficheur.
Pour selectionner ie mode avec la telecommandeAppuyez de fagon repetee sur la touche GEQ jusqu’a ce que Iemode d’egalisation souhaite apparaisse.Cinq modes preregles, Ies modes manuels Ml a M4 et “GEQOFF peuvent @treselectionnes.
REGLAGE DE NOUVELLES COURBESD’EGALISATION
Vous pouvez memoriser jusqu’a 4 courbes d’egalisation commemodes manuels Ml a M4.
1
2
3
4
5
6
7
1 3,6
2 1,5,7
Appuyez sur la touche GEQ et appuyez ensuitesur ENTER clans un delai de 4 secondes.
Appuyez sur la touche DOWN ou UP pourselectionner une frequence.L’indicateur de niveau de la frequence selectionnee se met aclignoter.
Tournez MULTI JOG pour ajuster Ie niveau de lafrequence selectionnee.
Repetez [es etapes 2 et 3 pour creer la courbed’egaiisation voulue.Aux etapes 2 et 3, I’appareil revient en mode normale siaucune operation n’est executee clans un delai d’environ 8secondes.
Dans un delai de 8 secondes, appuyez sur latouche ENTER.“GEQ Ml” apparaR clans I’afficheur.
Tournez MULTI JOG pour selectionner un numeropreregle entre Ml et M4.
Appuyez sur la touche ENTER.La ;ou;be d’egalisation est memorisee.Le numero preregle selectionne et la courbe d’egalisations’affichent chacun quelques secondes.
Pour ajuster temporairement la courbe GEQExecutez Ies etapes 1 a 4 ci-dessus.La courbe GEQ ajustee reste activee jusqu’a ce que vouschangiez ou que vous annuliez Ie mode GEQ.
Pour selectionner une courbe prereglee manuellementAppuyez sur la touche GEQ et tournez MULTI JOG jusqu’a ceque Ie numero preregle selectionne apparaisse.
● Le systeme GEQ est automatiquement desactive:- Lorsque Ie Dolby Pro Logic est active- Lorsque la fonction 5.1 CH est selectionnee
● Le systeme GEQ ne peut 6tre active Iorsque la fonction 5.1CH est selectionnee.
9 FRANGAIS

PR[)CESSEUR D’AMBIANCE
DSP MULTIJOG
DOWN,UP
DSP
MANUALSELECT
Les circuits du processeur d’ambiance (DSP) peuvent recreerI’effet de sons reflechis par Ies murs et Ies plafonds, pour simulerla presence d’un environnement particulier. II y a quatre modesd’ambiance avec Ies modes d’egalisation correspondents. Lesmodes d’egalisation sent automatiquement selectionnes etpeuvent 6tre actives ou desactives selon vos goOts.
Appuyez sur la touche DSP et tournez MULTI JOGjusquta ce que Ie mode DSP VOUIU s’affiche.La designation du mode selectionne s’affiche pendant quatresecondes et Ies indicateurs F apparaissent a la gauche de ladesignation DSP selectionnee et de la designation du mode GEQcorrespondent.
Mode DSP selectionne
Mode GEQ correspondent
Pour annuler Ie mode s61ectionneAppuyez sur la touche DSP. “DSP OFF” apparatt $ur I’afficheur.Meme si vous annulez Ie mode DSP selectionne, Ie mode GEQcorrespondent ou selectiorme reste actif.
Pour selectionner Ie mode avec la tt51ecomnnandeAppuyez de fa~on repetee sur la touche DSP jusqu’a ce que Iemode DSP souhaite soit affiche.Ckratre modes DSP et “DSIP OFF peuvent 6tre sdectionnes,
Pour ajuster k volume et la balance de:s enceintessurroundAppuyez deux ou trois fois sur la touche MANUAL SELE=CTdela telecommande alors que Ie systeme DSP est active de rnanierea afficher “S-R OdB (pour I’enceinte surround droite) cxr “S-LOdB (pour I’enceinte surround gauche). Puis, appuyez pllJsieursfois de suite sur la touche DOWN ou UP clans un delai de quatresecondes.Attention que Ie volume et la balance des enceintes SLltTOUIDd
des modes 5.1 CH et Dolby Pro Logic sent egalement chang~s.
● Le systeme DSP est autamatiquement annulb qluand:- Ie Dolby Pro Logic est active- la fonction 5.1 CH est s61ectionnee
● Le systeme DSP ne peut pas ??treactive quand:- la fonction 5.1 CH est s$lectionnee- un casque d’ecoute est branche
Quand la source de musique est monophoniqueSelectionnez LIVE pour simuler un effet stereo. Quand vousselectionnez DANCE, HALL ou ARENA, aucun son n’est fournipar Ies enceintes surround.
F/?AN@ll/S II O

SELECTION D’UNE SOURCEAUDIO OU VIDEO
FUNCTION Indicateurs de fonction ENTER
1
2
3
A
DOWN:UP I MULTI JOGVIDEO 1/5.1CH/BAND
Selectionnez la source de programme.Tournez Ie selecteur FUNCTION ou appuyez sur la toucheTAPE MONITOR. ”L’indicateur de la fonction selectionneeclignote en rouge.
la radio TUNER
un disque analogique PHONO
un disque compact CD
I la television, etc. I AUX I
I une cassette video VIDEO l/DVD/MD,VIDEO 2/LD/TV, VIDEO 3
I un LD ou la television c~blee I VIDEO 2 I
un MD ou DVD I VIDEO l/DVD/MD
Pour selectionner une fonction sur la telecommandeAppuyez directement sur la touche de fonction voulue.
La fonction a selectionner (excepte PHONO) depend deI’appareil raccorde aux bornes d’entree du panneau arrierede I’ampli-tuner.
Quand vous utilisez un tourne-disque avec amplificateuregaliseur integre, reglez I’interrupteur de I’amplificateuregaliseur sur arr&. Reportez-vous au mode d’emploi de laplatine tourne-disque pour Ies details.
Demarrez la source de programme selectionnee.
Reglez Ie son.
propos de la source video fournie aumoniteur ou televiseur
Source video selectionnee
Vi: VIDEO 1, V2: VIDEO 2, V3: VIDEO 3
Pour selectionner la source video
1 Selectionnez I’une des fonctions a I’exception de TUNER.2 Appuyez sur la touche ENTER pour afficher VIDEO 1.3 Tournez MULTI JOG pour selectionner VIDEO 2 ou VIDEO 3.
Pour changer Ie nom affiche pour la VIDEO1 et la VIDEO 2
Lorsque VIDEO 1 est selectionne, VIDEO 1 appara~tnormalement. Vous pouvez Ie changer par DVD ou MD.Appuyez sur la touche VIDEO 1/5.1CH/BAND tout en maintenantla touche ENTER enfoncee.Pour exploiter la fonction 5.1 CH, appuyez sur la touche VIDEO1/5.1 CH/BAND. Le nom de la fonction passe a “5.1 ch IN” et lasource raccordee aux bornes 5.1 INPUT est selectionnee.Pour reprendre, appuyez a nouveau sur la touche de fa~on a ceque Ie nom de la fonction apparaisse.
Le nom affiche pour la touche VIDEO 2 peut i%rechange en VIDEO2, LD ou TV; Iorsque la fonction VIDEO 2 est selectionnee,appuyez sur la touche VIDEO 1/5.1CH/BAND tout en maintenantla touche ENTER enfoncee.
Pour ajuster Ie niveau sonore de la sourceraccordee
Le niveau de sensibility d’entree de chaque fonction (excepte la
fonction TUNER) peut &re ajuste.Quand Ie niveau de la source sonore raccordee est plus haut oubas que celui de la radio, ajustez-le de la fa~on suivante.
1
2
Selectionnez la fonction dent Ie niveau doit ~treajuste.Tournez MULTI JOG sur la position correspondante etdemarrez la lecture de la source.
Appuyez de faqon repetee sur la touche UP ouDO-WN.
Le niveau peut Qtre ajuste entre -6dB (MIN) et +8dB (MAX) parpas de 2dB. Ajustez Ie niveau de sorte que Ie son soit au m~meniveau que celui de la radio.
● Le niveau de sensibility d’entree de la fonction TUNER ne peutpas 6tre ajuste.
● Le niveau de TAPE MONITOR ne peut pas non plus &re ajuste.M6me si TAPE MONITOR est selectionne et l’indicateur TAPEMONITOR eclair6 en rouge, une pression sur la tout-he UP ou
DOWN changera Ie niveau de la fonction indiquee sur I’afficheur,
La source video selectionnee est indiquee sur I’afficheur et Iesignal video transmis par la prise MONITOR VIDEO OUTappara!t sur Ie televiseur.

POUR REPRODUIRE UN DVD ENREGISTREAVEC LE SYSTEME DOLBY DIGITALSURROUND
Cet ampli-tuner a des prises 5.1 INPUT permettant de raccorderun decsdeur Dolby Digital equipe de prises de sortie 5,1 canaux.Si vous raccordez un Iecteur DVD contenant un decodeur DolbyDigital a I’ampli-tuner, vous obtiendrez un veritable soncinematographique Iorsque vous reproduirez des disquesenr’egistres en Dolby Digital Surround.
1
2
3
Tokrrnez Ie selecteur FUNCTION pourselectionner la fonction VIDEO l/DVD/MD.
Aplpuyez sur la touche VIDEO 1/5.1 CH/BAND.
“5.1 CH” apparaft sur I’afficheur et Ie Iecteur DVD raccordeaux prises 5.1 INPUT est selectionne comme source.
Delmarrez la lecture du DVD raccorde au DolbyDigital Surround.
● La fonction 5.1 CH est automatiquement annulee et IafonctionVIDEO 1, DVD ou MD selectionrke quand:- Ie Dolby Pro Logic est active- un casque d’ecoute est branche
● La fonction 5.1 CH ne peut pas &re selectionnee quand uncasque est branche.
ENREGISTREMENT D’UNESOURCE AUDIO
1
2
3
1 ENTER
TAPE MONITOR MULTIJOG
Selectionnez la source de programme quli dc)ittNre enregistree.Tournez Ie selecteur FUNCTION.
Mettez la platine a cassette OUI I’enrtxgistreur MDen mode d’enregisitrement.
Demarrez la source de programme sdectionnee.
Pour contr61er k son erwegistre pendant I’enregistremerd(quand la platine a cassette raccordee a trois We!s)Appuyez sur la touche TAPE MONITOR. “TAPE ON” apparaltsur I’afficheurpendant quatlresecondes, puis Ie nom de la sourceselectionnee a I’etape 1 r6apparaTt. Pour cesser de conlr61er Ieson, appuyez une nouvelle fois sur la touche pour que “TAPEOFF apparaisse.
● Aucun systeme de contrdle du son n’agit sur I’enregistrement(voir page 8).
● Le son fourni aux prises 5.1 INPUT ne peut pas 6tre enregistlre,Pour I’enregistrement du son d’un Iecteur DVD, raccordez Iesprises AUDIO OUT (DOWN MIXING) du Iecteur IX/l) au:<prisesVIDEO l/DVD/MD AUDI() IN de I’ampli-tuner.
● Lors de I’enregistrement d’une source avec l’enregistreur MDraccorde aux prises VIDEO l/DVD/MD AUDIO OUT, alppuyez
d’abord sur la touche ENTER pour afficher VIDEO 1 et tournezensuite MULTI JOG pour selectionner VIDEO 2 ou VIDEO 3.Selectionnez ensuite la source (V2 ou V3 doit s’afficher).L’enregistrement ne peut pas &re effectue quand I’inclinationVI est affiche,
● Le son fourni par la platine a cassette raccord6e aux prisesTAPE MONITOR IN ne peut pas atre enregistre.
F\?AN@lS 12

ACCORD MANUEL
R—MONO~Do
ao TUNER000
1 2000.0000
Hu:Iioa,0900130no
:,,.,>
;U
1
2
Tournez Ie selecteur FUNCTION pourselectionner la fonction TUNER et appuyezplusieurs fois de suite sur VIDEO 1/5.1 CH/BANDpour selectionner la bande voulue.
~FM~AMl
L’afficheur passe a I’indication de la frequence apres avoirindique la bande et la source video (VI, V2 ou V3) pendantdeux secondes.
Appuyez sur la touche UP ou DOWN pourseiectionner une station.Chaque fois que vous appuyez sur cette touche, la frequencechange.Lorsqu’une station est captee, ‘TUNE” s’affiche pendant deuxsecondes. En tours de reception stereo FM, 1110111s’affiche.
Pour rechercher une station rapidement (rechercheautomatique)Maintenez la touche UP ou DOWN enfoncee jusqu’a ce que Ietuner entame la recherche d’une station. La recherche s’arr~tedes que I’accord s’est fait sur une station.Pour arr6ter manuellement la fonction de recherche automatique,appuyez sur la touche UP ou DOWN.● II est possible que la recherche automatique ne s’arr6te pas
sur Ies stations emettant avec de tres faibles signaux.
Quand une emission stereo FM est parasiteeAppuyez sur la touche MONO TUNER de la telecommande defagon a ce que “MONO apparaisse clans I’afficheur.Les parasites sent reduits, mais la reception est monophonique.
I
Pour changer I’intervalle d’accord Ah!Le reglage par defaut de I’intervalle d’accord AM est de 10kHz/increment. Si vous utilisez cet ampli-tuner clans une zonegeographique ou Ie systeme deallocation des frequenciesconnalt un systeme a 9 kHz/increment, changez I’intervalled’accord.Maintenez la touche VIDEO l/5.1 CH/BAND enfoncee etappuyez ensuite sur la touche POWER.Pour restaurer I’intewalle, repetez cette procedure.
Pour restaurer la reception stereo, appuyez sur la touche defa~on ace que “STEREO apparaisse.
13 FRANQA/S

PREREGLAGE DES STATIONS
I MULTI JOG
Touchesnumeriques
TUNERBAND
L’appareil peut memoriser un total de 32 stations prereglees.Lorsqu’une station est memorisee, un numero de prereglageest assigne a cette station. Utilisez Ie numero de prereglage pouraccorder directement une station prereglee.
1
2
3
Tournez Ie selecteur FUNCTION pourselectionner la fonction TUNER et appuyezplusieurs fois de suite sur la touche VIDEO 1/5.1 CH/BAND pour selectionner la bande desiree.Appuyez ensuite sur la touche UP ou DOWN pourselectionner une station.
Appuyez sur la touche ENTER pour memoriserla station.Un numero de prereglage assigne ala station, commengantpar 1 clans I’ordre croissant pour chaque bande s’affichependant deux secondes.
Fiepetez Ies etapes 1 et 2.VOLSne pouvez plus memoriser de stations si 32 stations autotal ont deja ete memorisees pour toutes Ies bandes.
ACCORD D’UN NUMERO PIREREGLE
1 Tournez Ie selecteur FUNCTION pourselectionner la fcmction TUNER et appuyez
plusieurs fois de suite sur la touctw VIDIEO 1/5.1 CH/BAND pour selectionner une bande,,
2 Tournez MULTI JOG pour selectionner un numeropreregle.
Pour supprimer une station prereg16eSelectionnez Ie numero de la station prereglee a supprimer.Appuyez ensuite sur la touche ENTER, puis appuyez a nouveausur ENTER clans un delai de quatre secondes.Le numero de toutes Ies autres stations preregk$es suivantesclans cette bande diminuent d’une unite.
Avec la telecommandeAppuyez sur la touche TUNER BAND pour s~lectionnler unebande et appuyez ensuite sur Ies touches numeriques pclurselectionner un numero de prereglage.Exemple:Pour selectionner Ie numero 25, appuyez sur 2 et,sur 5.Pour selectionner Ie numero 7, appuyez sur Oet aur 7.
Si vous avez change I’intervalle d’accord AM, toutes Ies stationsprereglees sent effacees. Recommence la procedure deprereglage des stations.
FIRAN(YUS ‘! 4

Cet appareil est equipe d’un decodeur Dolby Pro Logic etsupporte aussi un decodeur Dolby Digital equipe de prises desortie 5,1 CH.L’ampli-tuner combine aux enceintes surround et a I’enceintecentrale (standard) assurent un veritable son cinematographique.Ala lecture de disques ou cassettes video enregistres avec Iesysteme Dolby Pro Logic ou Dolby Digital Surround, un sonextr~mement realiste enveloppe I’auditeur et tree undivertissement audiovisual inedit.Le reglage independent des cinq canaux permet a I’auditeur debeneficier d’un son tel que I’on peut en faire Inexperience aucinema. Les voix sent reproduites par Ie champ sonore avant etcentral, tandis que I’ambiance, par exemple bruits de voituresou de la foule, enveloppe I’auditeur de toute part et recree uneatmosphere incroyablement realiste. Veuillez Iire attentivementce qui suit pour “accorder” la sortie de la cha~ne en fonction descaracteristiques de votre sane d’ecoute.
Verifiez Ies points suivants:● Pour profiter pleinement du son DOLBY SURROUND,
ajustez correctement Ie niveau sonore des enceintes (voirpage 16).
● Assurez-vous que Ies enceintes ont ete raccordees et installerscorrectement (voir pages 3,4 et 5).
● Assurez-vous que Ie televiseur et I’appareilvideo sent raccordescorrectement (voir page 3).
c Assurez-vous que Ie disque ou la cassette video, etc. sentenregistres avec Ie systeme Dolby Pro Logic ou Dolby DigitalSurround.
SELECTION DU DOLBY PROLOGIC
Le mode Dolby Pro Logic optimal depend du type et deI’emplacement des enceintes. Nous conseilions I’utilisationd’enceintes Aiwa en option pour tous [es canaux, par exempledes enceintes surround SX-RI 700, une enceinte centrale SX-C1700 et des enceintes avant SX-AVI 700. Verifiez Ie type etI’emplacement actuel de vos enceintes et selectionnez Ie modeDolby Pro Logic conseille en consequence.
Mode conseille
Enceintecentrale
GrandedimensionPetite dimension Sarisenceinte
Enceintessurround DOLBYPRO DOLBYPRO PHANTOM(enceintes arriere) LOGIC-WIDE LOGIC-NORMAL
Saris enceintes 3 STEREO- 3 STEREO- —surround WIDE NORMAL
POUR SELECTIONNER UN MODE DOLBYPRO LOGIC
1
2
Appuyez sur la touche DOLBY SURROUND ettournez MULTI JOG pour selectionner Ie modeapproprie.Le nom des modes apparait clans l’ordre indique ci-dessous.
~ PRO LOGIC +PHANTOM -3 STEREO~
Appuyez une nouvelle fois sur la touche DOLBYSURROUND et tenez la touche enfoncee jusqu’ace que Ie mode d’enceinte centrale que vowvoulez selectionner apparaisse. (Excepte Ie modePHANTOM.)“NORMAL” et “WIDE” apparaissent tout a tour.
● SeIon la source sonore ou Ies conditions d’ecoute, vousn’obtiendrez peut-?+tre pas d’effet surround bien que Ie DolbyPro Logic ait ete active.
● L’effet Dolby Pro Logic complet ne peut pas 6tre obtenu avecIes Iogiciels ne portant pas Ie logo ❑Ul_eURRW~l. Dans cecas, utilisez Ie systeme surround DSP (voir page 10).
● Le systeme Dolby Pro Logic est automatiquement annulequand:- Ie systeme DSP est active- Iorsque Ie systeme GEQ est active- la fonction 5.1 CH est selectionnee- un casque d’ecoute est branche
● Le systeme Dolby Pro Logic ne peut pas &re active quand uncasque d’ecoute est branche.
Mode PHANTOM: Selectionnez ce mode si vous ne raccordezpas d’enceinte centrale. Les signaux du canal central sentredistributes sur Ies enceintes avant gauche et droite.Mode 3 STEREO: Selectionnez ce mode si vous ne raccordezpas d’enceintes surround.
15 FRAN~AIS

REGiLAGE DE LA BALANCE DUNIVIEAU DES ENCEINTES
1
f
L’ampli-tuner integre un generateur de signaux de test appelesequencer de bruit pour faciliter Ie reglage de la balance descinq canaux.Le sequencer fournit un signal qui passe d’un canal a I’autre,permettant ainsi d’effectuer simplement un reglage du niveausonore pour obtenir Ie m~me niveau apparent pour chaque canala la position d’ecoute.
1
2
*1
*2
Selectionnez Ie mode Dolby Pro Logic en fonctiondu type et de I’emplacement actuel de vosenceintes (voir page 15).
Malntenez la touche MANUAL SELECT de late16commande enfoncee pendant environ deuxsecondes jusqu’a ce que “L” de “L/R OdB” semeitte a clignoter.
Un signal est envoye a chaque canal clans I’ordre suivant:
Mode DOLBY PRO LOGIC NORMAL ou WIDE
+UR OdB(Enceinte avant gauche)”
&CEN OdB(Enceinte centrale)
+L/R OdB(Enceinte avant droite)’1
S-R OdB(Enceinte surround droite)’2
S-L OdB(Enceinte surround gauche)* 2I
Mocle DOLBY PRO LOGIC PHANTOM
L+ L/R OdB*l --F UR OdB*l
- S-L 0dB*2~ S-R 0dB*2J
Mode 3 STEREO NORMAL ou WIDE
~UROdBtl+ CEN OdB+ L/R OdB*’1
3
4
Ajustez Ie niveau .sonore de I’enceinte centraleet des enceintes surround.Quand “CEN”, “S-L” ou “S-R clignote sur l’afficheur, appuylazsur la touche UP ou DOWN pour que Ie niveau sonore deI’enceinte centrale ou des enceintes surround correspond Acelui des enceintes avant.
La balance des enceintes avant peut &re egak?ment ajust6equand “L/R” est affiche.
Appuyez une nouvelle fois sur la touchle MAINUALSELECT pour arr&er Ie signal.
~Lorsque vous ajustez la balance des enceintes Ipour Ie DolloyPro Logic, celle des modes DSP et 5.1 CH change egalement.
A propos des canauxLes enceintes gauche et cfroite creent I’effet stereo.L’enceinte centrale permet d’obtenir un positionnernent plIusprecis du son sur un large champ sonore.
Les enceintes surround arriere augmentent la “profondeur”duchamp sonore.
Pour changer Ie temps de retard des enceintes surroundIorsque Ie mode Dolby I%o Logic est utilis6Les enceintes surround reproduisent Ie son une fraci,ion deseconde apres Ies enceintes avant. Le retard est initialementregle sur 20 ms (milliseconds).Pour changer Ie temps de retard standard, appuyez de! fagonrepetee sur la touche MANUAL SELECT pour que “TlME20ms”soit affiche. Appuyez ensuite sur la touche UP ou DOWN. Achaque pression sur une de ces touches, Ie ternps de retardchange comme suit.
~15ms+--20rns-30 ins-l
Pour ajuster la balance des enceintes pendant l’6couted’une source (modes Dolby Pro Logic et !5.1 Cl-i)La balance des enceintes peut 6tre changee une fois qu’elie aete reglee avec Ie sequencer de bruit. La balalnce peut 6trechangee quand Ie systeme Dolby Pro Logic eslt activ~ ou lafonction 5.1 CH selectionn6e,
1
2
3
Reproduisez un disque ou une cassette video enregistre avacIe Dolby Pro Logic ou Dolby Digital Surround.Appuyez de fagon repetee sur la touche MANUAL SELECTpour que “UR”, “CEN, “S-L.”ou “S-R apparaisse sur I’affichelw.Appuyez sur la touche UP ou DOWN pendant que Ie nom deI’enceinte que vous voullez regler est affiche.
“L” ou “R” clignote pour indiquer I’enceinte avant d’ou sort Ie signalde test.Le sllgnal de test est fourni en m6me temps par Ies enceintessurrcwnd gauche et droite.
FI?~AN(MIS 16

REGLAGEDEL’HORLOGE
213I
VIDEO 1/5:1CH/BAND
CLOCK
Quand Ie cordonsecteur est raccordeau secteur pour la premierefois, I’horloge clignote sur I’afficheur.Reglez-la de la faqon suivante quand I’ampii-tunarest eteint.
1 Appuyez sur la touche SET.La fen&re d’affichage devient Iegerement plus claire.
2 Tournez MULTI JOG pour designer I’heure et Iesminutes.L’heure avarice Iorsque vous tournez vers la droite et diminueIorsque vous tournez vers la gauche.
3 Appuyez sur la touche ENTER.L’horloge demarre a partir de 00 seconde.
Lors du premier reglage de l’horloge apres I’achatToutes Ies indications de la feni%re d’affichage disparaissent.La raison en est que Ie mode d’economie d’energie de I’appareilest active; il ne s’agit pas d’un dysfonctionnement.Le mode d’economie d’energie peut ~tre annule. Pour plus dedetails, voir page 6.
Pour remettre I’horloge a I’heureAppuyez sur I’interrupteur POWER pour mettre I’ampli-tuner horstension. Appuyez sur la touche ENTER et effectuez Iesoperations 1 a 5 ci-dessus.
Pour afficher I’heure actuelleAppuyez sur la touche CLOCK de la telecommande. L’heure estaffichee pendant 4 secondes.
Pour passer au standard de 24 heuresAppuyez sur I’interrupteur VIDEO 1/5.1 CH/BAND pendant queI’heure est affichee.Repetez la m~me operation pour retablir [e standard de 12heures.
3EGLAGE DE LA IVIINUTERIEI’ARRET
1
2
uL’ampli-tuner peut i??treautomatiquement mis hors tension a uneheure precise.
Pour ce regiage, utilisez la telecommande.
1
2
Appuyez sur la touche SLEEP.
En I’espace de quatre secondes, designez Ietemps de fonctionnement de I’ampli-tuner enappuyant sur la touche UP ou DOWN.A chaque pression sur la touche, Ie temps change parincrements de 5 minutes de 5 a 240 minutes.
Ternps designe
Vous pouvez egalement regler I’heure a I’aide de MULTI JOGsur I’appareil principal.
Pour verifier Ie temps restant jusqu’a la mise hors tensionAppuyez une fois sur la touche SLEEP. Le temps restant estaffiche pendant quatre secondes.
Pour arr~ter la minuterieAppuyez deux fois sur la touche SLEEP pour que “SLEEPoFFdisparaisse de I’afficheur.
Si I’affichage de I’heure clignote quand I’ampli-tuner esthors tensionII y a eu une interruption de courant. L’horloge doit &re remise aI’heure.Si I’alimentation est interrompue pendant plus de 24 heures,tous Ies reglages memorises apres I’achat doivent 6tre denouveau effectues.
17 FRAN~A/S

SOIN ET ENTRETIEN
Urr enttetien occasionnel de I’ampli-tuner est indispensable pourgarantir des performances optimales.
Pour nettoyer Ie coffretUtilisez un chiffon doux et sec.Si la surface est extr~mement sale, utilisez un chiffon Iegerementimpregne d’une solution detergence neutre. Ne pas utiliser desolvants puissants, tels que de I’alcool, de la benzine et dudiluant, car ils pourraient ablmer la finition.
SPECI FICATIONS
Section Tuner FMPlage d’accord 87,5 MHz a 108 MHzSensibility utilizable 13,2 dBf
(IHF)Bornes d’antenne 75 ohms (asymetrique)
Section tuner AMPlage d’accord 530 kHz a 1710 kHz
(intervalle de 10 kHz)531 kHz a 1602 kHz(intervalle de 9 kHz)
Sensibility utilizable 350 pV/mAntenne Antenne cadre
Section AmplificateurPuissance de sortie
Distortion harmoniquetotale
Entrees
[Mlode stereo]Avant100 watts par canal, Min RMS a 8ohms, 40 Hz a 20 kHz, pas plus de0,!37. de distortion harmonique totalle
[Dolby Pro Logic ou mode 5.11CHIAvant60 watts par canal, Min. IRMS a 8
ohms, 40 Hz a 20 kHz, pas plus de0,9% de distortion harmonique tOtde
Arriere (Surround)60 watts par canal, Min. RMS a 8ohms, 1 kHz, pas plus de 0,9% dedistortion harmonique tcltaleCentre6CIwatts, Min. RMS a 8 c~hms,11kHz,pas plus de 0,9% de distortionharmonique totale0,08 ‘Y. (40 W, 1 kHz, 8 c~hms,Enceintes avant)AIJDIO IN
PHONO: 2,5 mV, reglable (47kohms)CD, VIDEO l/DVD/MD, VIDEO .2/LDfTV, VIDEO 3: 25CImV, r4glaMe(47 kohms)TAPE MONITOR: 350 mV (47kohms)AUX: 200 mV, reglable (47 Ikohms)5.1 INPUT
FRONT, CENTERI: 400 rnVreglable (47 kohms)SURROUND: 4001mV reglable(47 kohms)SUB-WOOFER: 400 mV,reglable (47 kohms)
VIDEO IN: 1 Vc-c (75 ohms)
F/?A/V&ll/S 118

Sorties
Coupure du son
GeneralitiesAlimentationConsummationDimensions
(Lx HxP)Poids
AUDIO OUT (REC OUT): 200 mV (1kohm)VIDEO OUT (MONITOR): 1 Vp-p (75ohms)SUPER WOOFER: 1,2 VFRONT SPEAKERS IMP: 8Q (haut-parleurs avant A et B): acceptent desenceintes de 8 ohms ou plus.SURROUND SPEAKERS IMP: 8Q(enceintes surround): acceptent desenceintes de 8 ohms ou plusCENTER SPEAKER IMP: 8!2accepte une enceinte de 8 ohms ouplus.PHONES (prise stereo): accepte uncasque d’ecoute de 32 ohms ou plus-20 dB
120 V CA, 60 Hz125W430 x 155 x 351 mm(17 x 6’18 x 13’/8 po)10 kg (22 lb 1 OZ.)
Les specifications et I’apparence exterieure sent sujettes amodifications saris preavis.
DOLBY PRO LOGICFabrique sous Iicence de Dolby Laboratories LicensingCorporation.“DOLBY, Ie symbole au double D ❑U et “PRO LOGIC sent desmarques commerciaies de Dolby Laboratories LicensingCorporation.
GUIDE DE DEPANNAGE
Si I’appareil ne fonctionne pas comme decrit clans Ie presentmode d’emploi, verifiez Ies points suivants.
GENERALITIESII n’y a pas de son.● Le cordon secteur est-il raccorde correctement?● Y a-t-ii un raccordement incorrect? (+ page 3)● Y a-t-ii un court-circuit au niveau des bornes d’enceintes?
+ Debranchez Ie cordon secteur et corrigez Ie raccordementdes enceintes.
● Avez-vous appuye sur une touche de fonction incorrect?● Avez-vous appuye sur la touche TAPE MONITOR?. Les touches FRONT SPEAKERS A et B sent-elles
correctement reglees? (+ page 6)Une seule enceinte diffuse des sons.● La balance est-elle reglee correctement?● L’autre enceinte est-elle deconnectee?Le volume sonore est considerablement reduit.● Avez-vous appuye sur la touche MUTING?Affichage errone ou dysfonctionnement.
+ Reinitialisez I’appareil comme indique ci-dessous.
SECTION TUNERParasites electrostatiques ondulatoires permanents● L’antenne est-elle correctement raccordee? (~ page 5)● Le signal FM est-i[ faible?
~ Raccordez une antenne exterieure.Le signal de reception comporte des interferences ou Ie sonest distordu.● Le systeme ne capte-t-il pas des parasites exterieurs ou y a-t-
il des interferences a plusieurs voies?~ Changez I’orientation de I’antenne.~ Eloignez I’appareil d’autres systemes eiectriques.
Pour reinitialiser I’ampli-tunerSi I’afficheur ou Ie fonctionnement n’est pas normal, rainitialisezI’appareil en procedant comme suit.1 Appuyez sur la touche POWER pour mettre Ie systeme hors
tension.2 Appuyez sur la touche POWER tout en maintenant la touche
ENTER enfoncee. Toutes Ies donnees que vous avezprogrammers sent effacees.
Si Ie systeme ne peut &re mis hors tension a I’etape 1 en raisond’un dysfonctionnement, reinitialisez-le en deconnectant Iecordon secteur et executez I’etape 2.
19 FRAN~AIS

INDIEX DES COMPOSANTS
Les instructions relatives a chaque composant de I’ampli-tunerou de la telecommande sent precisees aux pages indiquees.
(en ordre alphabetique)CompoeantALIMENTATIONAUXBALANCEBANDE DE FREQUENCEBAS (DOWN)CASQLIE D’ECOUTECDCOUPUREDOLBY SURROUNDDSPEGOENTERENCEINTES AVANT A, BEXTINCTIONGE(2HAUT (UP)HORLC)GEMONITEUR DE BANDEMULTI \JOGMULTISELECTEURPHONC)REGLER
Page7, 13, 1711811, 1410, 11, 13, 14, 16, 17711815106, 76,7,11, 12, 14, 17717910, 11, 13, 14,16,17177,11,126,7, 9-12, 14, 15, 1711-14116
SELECTION MANUELLE (TEST)10, 16
T-BASS 8TUNER MONO 13VIDEO 1/5.1 CH/BAND 11,13,14,17VIDEO l/DVD/MD 11VIDEO 2/LD/TV 11VIDEO 3 11VOLUME, VOL(V, A) 8
H?ANQAIS 20


AIWA CO.,LTD.For assistance and information C~// kl// he I-8(70+UY-AW.. (United States and Puerto Rco)
Printed in Malaysia
![Home Theater Speaker Systems SERVICE MANUAL - …users.atw.hu/bazsielektron/Hang Box/JBL SCS180[1].6... · amplifier’s center, left and right surround-speaker ... IMPORTANT: Do](https://static.fdocuments.net/doc/165x107/5aee33a87f8b9aa17b8c016d/home-theater-speaker-systems-service-manual-usersatwhubazsielektronhang.jpg)