
migrate_user.pdf
196
www.netiq.com/documentation PlateSpin ® Migrate 11.1 User Guide September 22, 2014
Transcript of migrate_user.pdf

PlateSpin® Migrate 11.1User Guide
September 22, 2014
www.netiq.com/documentation

Legal Notice
THIS DOCUMENT AND THE SOFTWARE DESCRIBED IN THIS DOCUMENT ARE FURNISHED UNDER AND ARE SUBJECT TO THE TERMS OF A LICENSE AGREEMENT OR A NON-DISCLOSURE AGREEMENT. EXCEPT AS EXPRESSLY SET FORTH IN SUCH LICENSE AGREEMENT OR NON-DISCLOSURE AGREEMENT, NETIQ CORPORATION PROVIDES THIS DOCUMENT AND THE SOFTWARE DESCRIBED IN THIS DOCUMENT "AS IS" WITHOUT WARRANTY OF ANY KIND, EITHER EXPRESS OR IMPLIED, INCLUDING, BUT NOT LIMITED TO, THE IMPLIED WARRANTIES OF MERCHANTABILITY OR FITNESS FOR A PARTICULAR PURPOSE. SOME STATES DO NOT ALLOW DISCLAIMERS OF EXPRESS OR IMPLIED WARRANTIES IN CERTAIN TRANSACTIONS; THEREFORE, THIS STATEMENT MAY NOT APPLY TO YOU.
For purposes of clarity, any module, adapter or other similar material ("Module") is licensed under the terms and conditions of the End User License Agreement for the applicable version of the NetIQ product or software to which it relates or interoperates with, and by accessing, copying or using a Module you agree to be bound by such terms. If you do not agree to the terms of the End User License Agreement you are not authorized to use, access or copy a Module and you must destroy all copies of the Module and contact NetIQ for further instructions.
This document and the software described in this document may not be lent, sold, or given away without the prior written permission of NetIQ Corporation, except as otherwise permitted by law. Except as expressly set forth in such license agreement or non-disclosure agreement, no part of this document or the software described in this document may be reproduced, stored in a retrieval system, or transmitted in any form or by any means, electronic, mechanical, or otherwise, without the prior written consent of NetIQ Corporation. Some companies, names, and data in this document are used for illustration purposes and may not represent real companies, individuals, or data.
This document could include technical inaccuracies or typographical errors. Changes are periodically made to the information herein. These changes may be incorporated in new editions of this document. NetIQ Corporation may make improvements in or changes to the software described in this document at any time.
U.S. Government Restricted Rights: If the software and documentation are being acquired by or on behalf of the U.S. Government or by a U.S. Government prime contractor or subcontractor (at any tier), in accordance with 48 C.F.R. 227.7202-4 (for Department of Defense (DOD) acquisitions) and 48 C.F.R. 2.101 and 12.212 (for non-DOD acquisitions), the government’s rights in the software and documentation, including its rights to use, modify, reproduce, release, perform, display or disclose the software or documentation, will be subject in all respects to the commercial license rights and restrictions provided in the license agreement.
© 2014 NetIQ Corporation and its affiliates. All Rights Reserved.
For information about NetIQ trademarks, see https://www.netiq.com/company/legal/.
License Grant
Licenses for PlateSpin Migrate 11.0 cannot be used for prior versions of PlateSpin Migrate.
Third-Party Software
Please refer to the PlateSpin Third-Party License Usage and Copyright (https://www.netiq.com/documentation/platespin_licensing/platespin_licensing_qs/data/platespin_licensing_qs.html) page for information about third party software used in PlateSpin Migrate.

Contents
About NetIQ Corporation 7About This Guide 9
1 PlateSpin Migrate Feature Overview 11
1.1 About Workload Portability . . . . . . . . . . . . . . . . . . . . . . . . . . . . . . . . . . . . . . . . . . . . . . . . . . . . . . . . . 111.1.1 Business Applications for PlateSpin Migrate . . . . . . . . . . . . . . . . . . . . . . . . . . . . . . . . . . . . 121.1.2 Workload Migration Tasks . . . . . . . . . . . . . . . . . . . . . . . . . . . . . . . . . . . . . . . . . . . . . . . . . . 13
1.2 Supported Configurations . . . . . . . . . . . . . . . . . . . . . . . . . . . . . . . . . . . . . . . . . . . . . . . . . . . . . . . . . 131.2.1 Supported Source Workloads . . . . . . . . . . . . . . . . . . . . . . . . . . . . . . . . . . . . . . . . . . . . . . . 131.2.2 Supported Target Virtualization Platforms . . . . . . . . . . . . . . . . . . . . . . . . . . . . . . . . . . . . . . 16
1.3 Supported Transfer Methods . . . . . . . . . . . . . . . . . . . . . . . . . . . . . . . . . . . . . . . . . . . . . . . . . . . . . . . 171.3.1 File-Level Transfer (Live) . . . . . . . . . . . . . . . . . . . . . . . . . . . . . . . . . . . . . . . . . . . . . . . . . . . 171.3.2 Block-Level Transfer (Live) . . . . . . . . . . . . . . . . . . . . . . . . . . . . . . . . . . . . . . . . . . . . . . . . . 171.3.3 Offline Transfer with Temporary Boot Environment. . . . . . . . . . . . . . . . . . . . . . . . . . . . . . . 18
1.4 Security and Privacy . . . . . . . . . . . . . . . . . . . . . . . . . . . . . . . . . . . . . . . . . . . . . . . . . . . . . . . . . . . . . 181.4.1 Security of Workload Data in Transmission. . . . . . . . . . . . . . . . . . . . . . . . . . . . . . . . . . . . . 181.4.2 Security of Client-Server Communications . . . . . . . . . . . . . . . . . . . . . . . . . . . . . . . . . . . . . 181.4.3 Security of Credentials. . . . . . . . . . . . . . . . . . . . . . . . . . . . . . . . . . . . . . . . . . . . . . . . . . . . . 181.4.4 User Authorization and Authentication . . . . . . . . . . . . . . . . . . . . . . . . . . . . . . . . . . . . . . . . 19
1.5 Performance. . . . . . . . . . . . . . . . . . . . . . . . . . . . . . . . . . . . . . . . . . . . . . . . . . . . . . . . . . . . . . . . . . . . 191.5.1 About Product Performance Characteristics . . . . . . . . . . . . . . . . . . . . . . . . . . . . . . . . . . . . 191.5.2 Data Compression . . . . . . . . . . . . . . . . . . . . . . . . . . . . . . . . . . . . . . . . . . . . . . . . . . . . . . . . 201.5.3 Bandwidth Throttling . . . . . . . . . . . . . . . . . . . . . . . . . . . . . . . . . . . . . . . . . . . . . . . . . . . . . . 201.5.4 Scalability. . . . . . . . . . . . . . . . . . . . . . . . . . . . . . . . . . . . . . . . . . . . . . . . . . . . . . . . . . . . . . . 20
2 Post-Installation Configuration 21
2.1 PlateSpin Migrate Product Licensing . . . . . . . . . . . . . . . . . . . . . . . . . . . . . . . . . . . . . . . . . . . . . . . . . 212.1.1 Activating Your Product License . . . . . . . . . . . . . . . . . . . . . . . . . . . . . . . . . . . . . . . . . . . . . 212.1.2 How Licensing Works . . . . . . . . . . . . . . . . . . . . . . . . . . . . . . . . . . . . . . . . . . . . . . . . . . . . . 232.1.3 Using the License Manager . . . . . . . . . . . . . . . . . . . . . . . . . . . . . . . . . . . . . . . . . . . . . . . . . 242.1.4 License Splitting. . . . . . . . . . . . . . . . . . . . . . . . . . . . . . . . . . . . . . . . . . . . . . . . . . . . . . . . . . 25
2.2 Setting Up User Authorization and Authentication . . . . . . . . . . . . . . . . . . . . . . . . . . . . . . . . . . . . . . . 252.2.1 PlateSpin Migrate Roles . . . . . . . . . . . . . . . . . . . . . . . . . . . . . . . . . . . . . . . . . . . . . . . . . . . 262.2.2 Assigning PlateSpin Migrate Roles to Windows Users . . . . . . . . . . . . . . . . . . . . . . . . . . . . 272.2.3 Setting Up PlateSpin Migrate Multitenancy on VMware . . . . . . . . . . . . . . . . . . . . . . . . . . . 272.2.4 Setting Up User Activity Logging . . . . . . . . . . . . . . . . . . . . . . . . . . . . . . . . . . . . . . . . . . . . . 32
2.3 Access and Communication Requirements across your Migration Network . . . . . . . . . . . . . . . . . . . 332.3.1 Requirements for Discovery . . . . . . . . . . . . . . . . . . . . . . . . . . . . . . . . . . . . . . . . . . . . . . . . 332.3.2 Requirements for Migration . . . . . . . . . . . . . . . . . . . . . . . . . . . . . . . . . . . . . . . . . . . . . . . . . 342.3.3 Migrations Across Public and Private Networks through NAT. . . . . . . . . . . . . . . . . . . . . . . 35
2.4 Configuring PlateSpin Migrate Default Options . . . . . . . . . . . . . . . . . . . . . . . . . . . . . . . . . . . . . . . . . 362.4.1 Configuring Application Defaults (Tools > Options) . . . . . . . . . . . . . . . . . . . . . . . . . . . . . . . 372.4.2 Configuring PlateSpin Server Behavior through Configuration Parameters . . . . . . . . . . . . 43
3 Getting Started with PlateSpin Migrate 47
3.1 Connecting to a PlateSpin Server . . . . . . . . . . . . . . . . . . . . . . . . . . . . . . . . . . . . . . . . . . . . . . . . . . . 473.2 About the PlateSpin Migrate Client User Interface. . . . . . . . . . . . . . . . . . . . . . . . . . . . . . . . . . . . . . . 48
3.2.1 Servers View . . . . . . . . . . . . . . . . . . . . . . . . . . . . . . . . . . . . . . . . . . . . . . . . . . . . . . . . . . . . 49
Contents 3

4 Plat
3.2.2 Jobs View . . . . . . . . . . . . . . . . . . . . . . . . . . . . . . . . . . . . . . . . . . . . . . . . . . . . . . . . . . . . . . 533.2.3 Tasks Pane . . . . . . . . . . . . . . . . . . . . . . . . . . . . . . . . . . . . . . . . . . . . . . . . . . . . . . . . . . . . . 533.2.4 Status Bar . . . . . . . . . . . . . . . . . . . . . . . . . . . . . . . . . . . . . . . . . . . . . . . . . . . . . . . . . . . . . . 54
3.3 Discovering Source Workloads and Migration Targets . . . . . . . . . . . . . . . . . . . . . . . . . . . . . . . . . . . 543.3.1 Pre-populating the Servers View with Windows Computers in the Network . . . . . . . . . . . . 543.3.2 Discovering the Details of Source Workloads and Targets . . . . . . . . . . . . . . . . . . . . . . . . . 553.3.3 Discovering All Machines in a Windows Domain. . . . . . . . . . . . . . . . . . . . . . . . . . . . . . . . . 563.3.4 Refreshing Machine Details . . . . . . . . . . . . . . . . . . . . . . . . . . . . . . . . . . . . . . . . . . . . . . . . . 563.3.5 Resetting the Mechanism Used to Authenticate Access to ESX Hosts. . . . . . . . . . . . . . . . 563.3.6 Discovering Target Physical Machines . . . . . . . . . . . . . . . . . . . . . . . . . . . . . . . . . . . . . . . . 573.3.7 Discovering, Registering and Preparing a VM for a Server Sync Job . . . . . . . . . . . . . . . . . 593.3.8 Discovery Guidelines for Machine Types and Credentials . . . . . . . . . . . . . . . . . . . . . . . . . 59
3.4 Analyzing Machines with PlateSpin Analyzer . . . . . . . . . . . . . . . . . . . . . . . . . . . . . . . . . . . . . . . . . . 603.5 Working with Device Drivers . . . . . . . . . . . . . . . . . . . . . . . . . . . . . . . . . . . . . . . . . . . . . . . . . . . . . . . 62
3.5.1 Packaging Device Drivers for Windows Systems . . . . . . . . . . . . . . . . . . . . . . . . . . . . . . . . 623.5.2 Packaging Device Drivers for Linux Systems . . . . . . . . . . . . . . . . . . . . . . . . . . . . . . . . . . . 623.5.3 Uploading Drivers to the PlateSpin Migrate Device Driver Database . . . . . . . . . . . . . . . . . 633.5.4 Using the Plug and Play (PnP) ID Translator Feature . . . . . . . . . . . . . . . . . . . . . . . . . . . . . 65
3.6 Managing Custom Actions . . . . . . . . . . . . . . . . . . . . . . . . . . . . . . . . . . . . . . . . . . . . . . . . . . . . . . . . . 693.6.1 Managing Post-migration Actions (Windows and Linux) . . . . . . . . . . . . . . . . . . . . . . . . . . . 703.6.2 Freeze and Thaw Scripting Capabilities (Linux Block-Level Migrations) . . . . . . . . . . . . . . . 71
3.7 Setting Up, Executing, and Managing Jobs . . . . . . . . . . . . . . . . . . . . . . . . . . . . . . . . . . . . . . . . . . . . 723.7.1 Setting Up a Migration Job (Wizard vs. Advanced) . . . . . . . . . . . . . . . . . . . . . . . . . . . . . . . 723.7.2 Pre-migration Job Validation . . . . . . . . . . . . . . . . . . . . . . . . . . . . . . . . . . . . . . . . . . . . . . . . 763.7.3 Saving Migration Jobs . . . . . . . . . . . . . . . . . . . . . . . . . . . . . . . . . . . . . . . . . . . . . . . . . . . . . 763.7.4 Starting a Saved Migration Job in the Jobs View . . . . . . . . . . . . . . . . . . . . . . . . . . . . . . . . 763.7.5 Changing the Start Time of a Scheduled Migration Job . . . . . . . . . . . . . . . . . . . . . . . . . . . 773.7.6 Viewing the Parameters of a Completed or In-Progress Migration Job. . . . . . . . . . . . . . . . 773.7.7 Canceling an In-Progress Job . . . . . . . . . . . . . . . . . . . . . . . . . . . . . . . . . . . . . . . . . . . . . . . 773.7.8 Controlling the State of Source Workloads in the Jobs View . . . . . . . . . . . . . . . . . . . . . . . 773.7.9 Generating Job Reports. . . . . . . . . . . . . . . . . . . . . . . . . . . . . . . . . . . . . . . . . . . . . . . . . . . . 773.7.10 Job Diagnostics . . . . . . . . . . . . . . . . . . . . . . . . . . . . . . . . . . . . . . . . . . . . . . . . . . . . . . . . . . 78
4 Workload Portability with Peer-to-Peer Workload Migrations 79
4.1 Migrating a Workload to a VM Host (P2V, V2V) . . . . . . . . . . . . . . . . . . . . . . . . . . . . . . . . . . . . . . . . 794.2 Converting a Workload to a Physical Machine (P2P, V2P) . . . . . . . . . . . . . . . . . . . . . . . . . . . . . . . . 80
4.2.1 Best Practices (X2P) . . . . . . . . . . . . . . . . . . . . . . . . . . . . . . . . . . . . . . . . . . . . . . . . . . . . . . 814.3 Synchronizing Workloads with Server Sync. . . . . . . . . . . . . . . . . . . . . . . . . . . . . . . . . . . . . . . . . . . . 82
4.3.1 Server Sync to a Virtual Target . . . . . . . . . . . . . . . . . . . . . . . . . . . . . . . . . . . . . . . . . . . . . . 824.3.2 Server Sync to a Physical Target . . . . . . . . . . . . . . . . . . . . . . . . . . . . . . . . . . . . . . . . . . . . 85
4.4 Semi-Automated Workload Virtualization Using the X2P Workflow. . . . . . . . . . . . . . . . . . . . . . . . . . 864.4.1 Migrating a Workload to Microsoft Hyper-V . . . . . . . . . . . . . . . . . . . . . . . . . . . . . . . . . . . . . 864.4.2 Migrating a Workload to Citrix XenServer . . . . . . . . . . . . . . . . . . . . . . . . . . . . . . . . . . . . . . 894.4.3 Migrating a Workload to the SLES 11 SP3 Xen Hypervisor . . . . . . . . . . . . . . . . . . . . . . . . 91
4.5 Migrating Windows Clusters. . . . . . . . . . . . . . . . . . . . . . . . . . . . . . . . . . . . . . . . . . . . . . . . . . . . . . . . 93
5 Windows Workload Portability with a PlateSpin Image 95
5.1 About PlateSpin Images. . . . . . . . . . . . . . . . . . . . . . . . . . . . . . . . . . . . . . . . . . . . . . . . . . . . . . . . . . . 955.2 Designating a PlateSpin Image Server . . . . . . . . . . . . . . . . . . . . . . . . . . . . . . . . . . . . . . . . . . . . . . . 955.3 Capturing a Workload to a PlateSpin Image . . . . . . . . . . . . . . . . . . . . . . . . . . . . . . . . . . . . . . . . . . . 975.4 Deploying a PlateSpin Image. . . . . . . . . . . . . . . . . . . . . . . . . . . . . . . . . . . . . . . . . . . . . . . . . . . . . . . 995.5 Managing PlateSpin Images . . . . . . . . . . . . . . . . . . . . . . . . . . . . . . . . . . . . . . . . . . . . . . . . . . . . . . 100
5.5.1 Moving Images from One PlateSpin Image Server to Another . . . . . . . . . . . . . . . . . . . . . 1005.5.2 Automating Image Operations . . . . . . . . . . . . . . . . . . . . . . . . . . . . . . . . . . . . . . . . . . . . . . 1005.5.3 Browsing and Extracting Image Files . . . . . . . . . . . . . . . . . . . . . . . . . . . . . . . . . . . . . . . . 101
eSpin Migrate 11.1 User Guide

6 Essentials of Workload Migration Jobs 105
6.1 Selecting a License Key for a Migration Job . . . . . . . . . . . . . . . . . . . . . . . . . . . . . . . . . . . . . . . . . . 1056.2 Configuring Automatic E-Mail Alerts of Job Status and Progress . . . . . . . . . . . . . . . . . . . . . . . . . . 1066.3 Specifying Replication Options . . . . . . . . . . . . . . . . . . . . . . . . . . . . . . . . . . . . . . . . . . . . . . . . . . . . 1076.4 Specifying End States for Source and Target Workloads . . . . . . . . . . . . . . . . . . . . . . . . . . . . . . . . 1086.5 Specifying Network Options . . . . . . . . . . . . . . . . . . . . . . . . . . . . . . . . . . . . . . . . . . . . . . . . . . . . . . . 1096.6 Specifying Credentials to Access Sources and Targets . . . . . . . . . . . . . . . . . . . . . . . . . . . . . . . . . 1106.7 Managing a Workload’s Network Identity . . . . . . . . . . . . . . . . . . . . . . . . . . . . . . . . . . . . . . . . . . . . . 111
6.7.1 Managing the Identity of Windows Workloads. . . . . . . . . . . . . . . . . . . . . . . . . . . . . . . . . . 1126.7.2 Managing the Network Identity of Linux Workloads. . . . . . . . . . . . . . . . . . . . . . . . . . . . . . 113
6.8 Job Scheduling. . . . . . . . . . . . . . . . . . . . . . . . . . . . . . . . . . . . . . . . . . . . . . . . . . . . . . . . . . . . . . . . . 1136.9 Setting Up Migration Networking . . . . . . . . . . . . . . . . . . . . . . . . . . . . . . . . . . . . . . . . . . . . . . . . . . . 114
6.9.1 Temporary (Take Control) Network Settings . . . . . . . . . . . . . . . . . . . . . . . . . . . . . . . . . . . 1146.9.2 Target Post-migration Networking . . . . . . . . . . . . . . . . . . . . . . . . . . . . . . . . . . . . . . . . . . . 1176.9.3 TCP/IP and Advanced Network Settings . . . . . . . . . . . . . . . . . . . . . . . . . . . . . . . . . . . . . . 119
6.10 Configuring Target Virtual Machines . . . . . . . . . . . . . . . . . . . . . . . . . . . . . . . . . . . . . . . . . . . . . . . . 1216.10.1 Virtualization Platform-Specific and Advanced VM Configuration Options . . . . . . . . . . . . 122
6.11 Handling Operating System Services and Applications . . . . . . . . . . . . . . . . . . . . . . . . . . . . . . . . . . 1286.11.1 Handling the Startup Mode of Services (Windows Targets) . . . . . . . . . . . . . . . . . . . . . . . 1296.11.2 Handling Source Workload Services or Daemons During Live Transfer (Windows
and Linux) . . . . . . . . . . . . . . . . . . . . . . . . . . . . . . . . . . . . . . . . . . . . . . . . . . . . . . . . . . . . . 1306.11.3 Viewing Windows System Files Selected for Replacement During a Migration . . . . . . . . 1316.11.4 Handling the Run Level of Daemons (Linux Targets) . . . . . . . . . . . . . . . . . . . . . . . . . . . . 1326.11.5 Handling Virtualization Enhancement Software. . . . . . . . . . . . . . . . . . . . . . . . . . . . . . . . . 132
6.12 Handling a Workload’s Storage Media and Volumes. . . . . . . . . . . . . . . . . . . . . . . . . . . . . . . . . . . . 1336.12.1 Windows Storage Layout and Volume Configuration (Wizard Mode) . . . . . . . . . . . . . . . . 1356.12.2 Storage Layout and Volume Configuration (Advanced Mode) . . . . . . . . . . . . . . . . . . . . . 1386.12.3 Volume Configuration in Server Sync . . . . . . . . . . . . . . . . . . . . . . . . . . . . . . . . . . . . . . . . 1456.12.4 Handling Volumes and Image Files in X2I (Imaging) Migrations . . . . . . . . . . . . . . . . . . . . 146
6.13 Including a Custom Post-migration Action in a Migration Job . . . . . . . . . . . . . . . . . . . . . . . . . . . . . 148
A Linux Distributions Supported by Migrate 151
A.1 Analyzing Your Linux Workload . . . . . . . . . . . . . . . . . . . . . . . . . . . . . . . . . . . . . . . . . . . . . . . . . . . . 151A.1.1 Determining the Release String. . . . . . . . . . . . . . . . . . . . . . . . . . . . . . . . . . . . . . . . . . . . . 151A.1.2 Determining the Architecture . . . . . . . . . . . . . . . . . . . . . . . . . . . . . . . . . . . . . . . . . . . . . . . 151
A.2 Pre-compiled “blkwatch” Driver Support (Linux Distros) . . . . . . . . . . . . . . . . . . . . . . . . . . . . . . . . . 152
B Using the PlateSpin Migrate Command Line Interface 163
B.1 Where Is the Tool Located? . . . . . . . . . . . . . . . . . . . . . . . . . . . . . . . . . . . . . . . . . . . . . . . . . . . . . . . 163B.2 Before You Use the Tool . . . . . . . . . . . . . . . . . . . . . . . . . . . . . . . . . . . . . . . . . . . . . . . . . . . . . . . . . 163
B.2.1 Pre-configuring the Migrate Server Values for CLI . . . . . . . . . . . . . . . . . . . . . . . . . . . . . . 164B.2.2 Becoming Familiar with the Commands . . . . . . . . . . . . . . . . . . . . . . . . . . . . . . . . . . . . . . 164
B.3 Configurable .ini Files (Jobs) You Can Use with the Tool . . . . . . . . . . . . . . . . . . . . . . . . . . . . . . . . 166B.3.1 Conversion Jobs . . . . . . . . . . . . . . . . . . . . . . . . . . . . . . . . . . . . . . . . . . . . . . . . . . . . . . . . 166B.3.2 ServerSync Jobs . . . . . . . . . . . . . . . . . . . . . . . . . . . . . . . . . . . . . . . . . . . . . . . . . . . . . . . . 171B.3.3 Imaging Jobs . . . . . . . . . . . . . . . . . . . . . . . . . . . . . . . . . . . . . . . . . . . . . . . . . . . . . . . . . . . 174
C Frequently Asked Questions 183
D Troubleshooting PlateSpin Migrate 185
D.1 Discovery . . . . . . . . . . . . . . . . . . . . . . . . . . . . . . . . . . . . . . . . . . . . . . . . . . . . . . . . . . . . . . . . . . . . . 185D.2 Peer-to-Peer Migrations (Windows) . . . . . . . . . . . . . . . . . . . . . . . . . . . . . . . . . . . . . . . . . . . . . . . . . 186
Contents 5

6 Plat
D.3 Using Images . . . . . . . . . . . . . . . . . . . . . . . . . . . . . . . . . . . . . . . . . . . . . . . . . . . . . . . . . . . . . . . . . . 187D.4 Post-migration Cleanup of Source Workloads . . . . . . . . . . . . . . . . . . . . . . . . . . . . . . . . . . . . . . . . . 188
D.4.1 Cleaning Up Windows Workloads . . . . . . . . . . . . . . . . . . . . . . . . . . . . . . . . . . . . . . . . . . . 188D.4.2 Cleaning Up Linux Workloads . . . . . . . . . . . . . . . . . . . . . . . . . . . . . . . . . . . . . . . . . . . . . . 189
D.5 Shrinking the PlateSpin Migrate Databases. . . . . . . . . . . . . . . . . . . . . . . . . . . . . . . . . . . . . . . . . . . 190
E Reference of Tables 191
Glossary 193
eSpin Migrate 11.1 User Guide
About NetIQ Corporation
NetIQ, an Attachmate business, is a global leader in systems and security management. With more than 12,000 customers in over 60 countries, NetIQ solutions maximize technology investments and enable IT process improvements to achieve measurable cost savings. The company’s portfolio includes award-winning management products for IT Process Automation, Systems Management, Security Management, Configuration Audit and Control, Enterprise Administration, and Unified Communications Management. For more information, please visit www.netiq.com.
Contacting Sales SupportFor questions about products, pricing, and capabilities, please contact your local partner. If you cannot contact your partner, please contact our Sales Support team.
Contacting Technical SupportFor specific product issues, please contact our Technical Support team.
Contacting Documentation SupportOur goal is to provide documentation that meets your needs. If you have suggestions for improvements, click comment on this topic at the bottom of any page in the HTML versions of the documentation posted at www.netiq.com/documentation. You can also email [email protected]. We value your input and look forward to hearing from you.
Worldwide: www.netiq.com/about_netiq/officelocations.asp
United States and Canada: 888-323-6768
Email: [email protected]
Web Site: www.netiq.com
Worldwide: +1-416-203-4799
North America: +1-800 -858-4000
Email: [email protected]
Web Site: www.netiq.com/support
About NetIQ Corporation 7

Contacting the Online User CommunityQmunity, the NetIQ online community, is a collaborative network connecting you to your peers and NetIQ experts. By providing more immediate information, useful links to helpful resources, and access to NetIQ experts, Qmunity helps ensure you are mastering the knowledge you need to realize the full potential of IT investments upon which you rely. For more information, please visit http://community.netiq.com.
8 PlateSpin Migrate 11.1 User Guide

About This Guide
This guide provides information about using PlateSpin Migrate version 11.1.
Chapter 1, “PlateSpin Migrate Feature Overview,” on page 11 Chapter 2, “Post-Installation Configuration,” on page 21 Chapter 3, “Getting Started with PlateSpin Migrate,” on page 47 Chapter 4, “Workload Portability with Peer-to-Peer Workload Migrations,” on page 79 Chapter 5, “Windows Workload Portability with a PlateSpin Image,” on page 95 Chapter 6, “Essentials of Workload Migration Jobs,” on page 105 Appendix A, “Linux Distributions Supported by Migrate,” on page 151 Appendix B, “Using the PlateSpin Migrate Command Line Interface,” on page 163 Appendix C, “Frequently Asked Questions,” on page 183 Appendix D, “Troubleshooting PlateSpin Migrate,” on page 185 Appendix E, “Reference of Tables,” on page 191 “Glossary” on page 193
Audience
This guide is intended for IT staff, such as data center administrators and operators, who use PlateSpin Migrate in their ongoing workload migration projects.
Additional Documentation
This guide is part of the PlateSpin Migrate documentation set. For a complete list of publications supporting this release, visit the PlateSpin Migrate 11.1 Online Documentation Web Site (http://www.netiq.com/documentation/platespin_migrate_11).
Documentation Updates
The most recent version of this guide can be found at the PlateSpin Migrate 11.1 Online Documentation Web Site (http://www.netiq.com/documentation/platespin_migrate_11).
About This Guide 9

10 PlateSpin Migrate 11.1 User Guide

1 1PlateSpin Migrate Feature Overview
PlateSpin Migrate enables you to migrate heterogeneous workloads (operating systems along with their applications and data) across x86 server and desktop infrastructure in the data center, decoupling a workload’s hardware from software.
Section 1.1, “About Workload Portability,” on page 11 Section 1.2, “Supported Configurations,” on page 13 Section 1.3, “Supported Transfer Methods,” on page 17 Section 1.4, “Security and Privacy,” on page 18 Section 1.5, “Performance,” on page 19
1.1 About Workload PortabilityPlateSpin Migrate automates the migration of workloads among three infrastructures: physical, virtual machine, and volume imaging.
Section 1.1.1, “Business Applications for PlateSpin Migrate,” on page 12 Section 1.1.2, “Workload Migration Tasks,” on page 13
Figure 1-1 Workload Portability
PlateSpin Migrate Feature Overview 11

Table 1-1 Workload Portability Operations
PlateSpin Migrate supports multiple workload types and virtualization platforms. Imaging is supported for workloads with Microsoft Windows operating systems. For a more detailed list of supported workloads and infrastructures, see “Supported Configurations” on page 13.
1.1.1 Business Applications for PlateSpin Migrate
PlateSpin Migrate is designed to be used for the following scenarios:
Consolidation. Automating large-scale migrations of physical machines to virtual machines, accelerating consolidation projects, and reducing administrative effort and errors.
Migration. Moving fully configured workloads from old hardware to new hardware without rebuilding the entire software stack.
Test Lab Deployment. Consolidating test lab workloads by running multiple virtual machines on a single VM host, quickly deploying virtual test lab environments with ease, and replicating an entire production environment in matter of hours or days.
Maintenance and Support Agreement Integrity. De-virtualizing workloads along with the applications installed on them and moving them back to physical machines over the network so that the support agreements can remain valid.
Machine Provisioning. Easily capturing an entire library of hardware-independent PlateSpin Images and deploying them to new infrastructures over the network without manually configuring the hardware, drivers, and so on.
Continuous Workload Optimization. Moving workloads to and from any geographical location, onto any platform, in any direction. Workloads can be virtualized or de-virtualized during ongoing and continuous optimization of resources.
Category of Operation Migration Infrastructures
Workload Portability: Peer-to-peer Physical to Virtual (P2V)
Virtual to Virtual (V2V)
Virtual to Physical (V2P)
Physical to Physical (P2P)
Workload Portability: Imaging Physical to Image (P2I)
Virtual to Image (V2I)
Image to Virtual (I2V)
Image to Physical (I2P)
12 PlateSpin Migrate 11.1 User Guide

1.1.2 Workload Migration Tasks
PlateSpin Migrate enables you to define, save, schedule, execute, and monitor the following migration tasks.
Table 1-2 PlateSpin Migrate Workload Migration Tasks
1.2 Supported Configurations Section 1.2.1, “Supported Source Workloads,” on page 13 Section 1.2.2, “Supported Target Virtualization Platforms,” on page 16
1.2.1 Supported Source Workloads
PlateSpin Migrate supports the following operating system families:
Microsoft Windows, including Windows 2008 R2 Clusters Linux
The following topics provide more details:
“Supported Microsoft Windows Workloads” on page 13 “Supported Linux Workloads” on page 15
NOTE: Not all workloads are supported on all target VM platforms. For details, see KB Article 7012976 (https://www.netiq.com/support/kb/doc.php?id=7012976).
Supported Microsoft Windows Workloads
For the Windows platform, PlateSpin Migrate supports the following portability features:
Workload portability: Peer-to-peer migrations (P2V, V2V, V2P, P2P).
Task Description
Copy Workload Results in a virtual or physical duplicate of a selected physical or virtual workload, except that the new workload is assigned a new network identity. Use this migration task when you intend to keep the source workload operational.
Move Workload Results in an exact virtual or physical duplicate of a selected physical or virtual workload. Use this migration task when you intend to retire or repurpose the original infrastructure.
Server Sync Synchronizes a virtual or physical workload with another virtual or physical workload without transferring the entire source volume data over the network.
Capture Image Creates an image of a physical or virtual workload as a single entity, in PlateSpin Image format.
Deploy Image Converts a PlateSpin Image into a booted or bootable workload on a physical or virtual machine.
PlateSpin Migrate Feature Overview 13

Peer-to-peer workload synchronization with Server Sync (P2V, V2V, P2P, V2P). Workload imaging with PlateSpin Images (X2I, I2X), with full or partial support for several
third-party backup and archiving applications.
Table 1-3 Supported Microsoft Windows Workloads
NOTE: Only NTFS files systems are supported.
PlateSpin Migrate supports the following localized versions of source Windows workloads:
English French German Japanese Chinese (traditional and simplified)
Workload Firmware (UEFI and BIOS) Support: PlateSpin Migrate mirrors the Microsoft support of UEFI or BIOS-based Windows workloads. It transfers workloads (both File and Block-based transfers are supported) from source to target while enforcing the supported firmware for the respective source and target operating systems. When any migration between UEFI and BIOS systems are initiated, Migrate analyzes the transition and alerts you about its validity.
NOTE: If you are migrating UEFI-based workload onto vSphere target container and you want to continue using the same firmware boot mode, you need to target a vSphere 5.0 container or newer.
The following are examples of Migrate behavior when doing conversion between UEFI and BIOS-based systems:
When transferring a UEFI-based workload to a VMware vSphere 4.x container (which does not support UEFI), Migrate transitions the workload’s UEFI firmware to BIOS firmware.
Operating System Remarks
Windows Server 2012, 2012 R2
Windows 8, 8.1
Windows 7
Windows XP SP1 and later
Windows 2000 Server SP4 with Update Rollup 1
Windows Server 2003 SP1 and later
Windows Server 2008 R2 Including domain controller (DC) systems and Small Business Server (SBS) editions
Windows Server 2008
Windows Vista, Business/Enterprise/Ultimate, SP1 and later
Windows Server 2008 R2 Cluster See Section 4.5, “Migrating Windows Clusters,” on page 93.
14 PlateSpin Migrate 11.1 User Guide
If you attempt to migrate a Windows 2003 workload on to a UEFI-based physical machine, Migrate analyzes the choice and notifies you that it is not valid (that is, the firmware transition from BIOS to UEFI is not supported – Windows 2003 does not support the UEFI boot mode).
When migrating a UEFI-based source on a BIOS-based target, Migrate converts the UEFI system’s boot disks, which were GPT, to MBR disks. When migrating BIOS workload on a UEFI-based target, Migrate converts the BIOS system's boot disks, which are MBR, to GPT disks.
Supported Linux Workloads
For the Linux platform, PlateSpin Migrate the following portability features:
Live peer-to-peer and Offline workload portability support (P2P, P2V, V2P, V2V), including workload synchronization with Server Sync.
Support for EXT2, EXT3, EXT4, REISERFS, and NSS (OES 2 workloads) Linux file systems.
IMPORTANT: The following are not supported in Linux workloads:
Workload imaging. UEFI-based workloads.
Some of the supported Linux versions require that you compile the PlateSpin blkwatch module for your specific kernel. Those workloads are called out explicitly.
Table 1-4 Supported Linux Workloads
NOTE
Linux-based source workloads must be running a Secure Shell (SSH) server.
Distribution Remarks
Red Hat Enterprise Linux (RHEL) AS/ES/WS 4, 5, 6, 6.1, 6.2
RHEL 5.6-5.10, 6.3, 6.4, 6.5 You must compile the PlateSpin blkwatch module before discovering these workloads.
See KB Article 7005873 (https://www.netiq.com/support/kb/doc.php?id=7005873).
SUSE Linux Enterprise Server (SLES) 9, 10, 11 (SP1, SP2, SP3)
The SLES 11 SP2 (32-bit) with kernel 3.0.13-0.27-pae is not supported. The kernel for this version of SLES must be upgraded to 3.0.51-0.7.9-pae so that conversion works.
Novell Open Enterprise Server (OES) 11, OES 11 SP1 and SP2
OES 2 (SP2 and SP3)
Oracle Enterprise Linux (OEL) Same level of support as that for workloads running RHEL.
Workloads using the Unbreakable Enterprise Kernel are not supported.
Red Hat Linux 8 32-bit systems only
PlateSpin Migrate Feature Overview 15

Live transfer is supported for these Linux workloads: RHEL 4, 5, 6.x SLES 9, 10, 11
Migration of encrypted volumes is not supported.
1.2.2 Supported Target Virtualization Platforms
The following is a list of supported virtualization platforms. For more details on supported configurations, as well as the most up-to-date list, see KB Article 7012976 (https://www.netiq.com/support/kb/doc.php?id=7012976).
Table 1-5 Supported Target Virtualization Platforms
Platform Notes
VMware vCenter 4.1, including Updates 1, 2, 3
VMware vCenter 5.0, including Update 1, Update2, and UPdate 3
VMware vCenter 5.1, including Update 1 and Update 2
VMware vCenter 5.5, including Update 1
VMware ESX 4.1, 4.1 Update 1, 4.1 Update 2, 4.1 Update 3
VMware ESXi 4.1, 4.1 Update 1, 4.1 Update 2, 4.1 Update 3, 5.0, 5.0 Update 1, Update 2 and Update 3, 5.1, 5.1 Update 1 and Update 2, ESXi 5.5, 5.5 Update 1
All ESXi versions must have a paid license; migration is unsupported with these systems if they are operating with a free license.
Microsoft Windows Server 2012 Hyper-V, Microsoft Windows Server 2012 R2 Hyper-V
.
Citrix XenServer 6, 6.1 Supported through Semi-Automated Workload Virtualization Using the X2P Workflow.
Microsoft Windows Server 2008 R2 Hyper-V Supported through Semi-Automated Workload Virtualization Using the X2P Workflow.
SUSE Linux Enterprise Server (SLES) 11 SP3 XEN, SLES 11 SP3 KVM
Fully virtualized guests are supported.
Supported through Semi-Automated Workload Virtualization Using the X2P Workflow.
Redhat Enterprise Linux (RHEL) 6.4 KVM
16 PlateSpin Migrate 11.1 User Guide

1.3 Supported Transfer MethodsDepending on the selected workload and the migration type, PlateSpin Migrate enables you to select different methods for transferring workload data from the source to the target.
For information on how to select a transfer method, see “Specifying Replication Options” on page 107.
Section 1.3.1, “File-Level Transfer (Live),” on page 17 Section 1.3.2, “Block-Level Transfer (Live),” on page 17 Section 1.3.3, “Offline Transfer with Temporary Boot Environment,” on page 18
1.3.1 File-Level Transfer (Live)
The File-Based Live Transfer method, available for Windows workloads, copies data and replicates changes at the file level.
To ensure data consistency, this method leverages the Microsoft Volume Shadow Copy Service (VSS) if available. Many enterprise apps are integrated with VSS; for those which are not, PlateSpin Migrate provides the capability to briefly pause services while the VSS snapshot is captured, to ensure that the data of those applications is captured in a consistent state.
If VSS unavailable (for example, in workloads running Windows Server 2003 with no service packs or Windows Server 2000), PlateSpin Migrate monitors source volumes for changes while transferring data. When the initial transfer is complete, migrate re-sends any files that have changed. If the rate of file system changes is consistently high, data transfer is stopped and a job progress warning is shown.
You can configure your migration job to stop high-transaction services, such as Microsoft SQL Server or Microsoft Exchange Server, during the transfer (see “Handling Source Workload Services or Daemons During Live Transfer (Windows and Linux)” on page 130). This has two benefits:
It ensures that the databases of these applications are transferred in a more consistent state. It reduces the rate of file system changes so that PlateSpin Migrate is able to keep up with them
and complete the transfer.
This method might be appropriate for moderately active systems and it provides you with the capability to resize your volumes on the target workload.
1.3.2 Block-Level Transfer (Live)
The Block-Based Live Transfer method, available for both Windows and Linux workloads, enables PlateSpin Migrate to transfer data at the block level, providing an exact copy of the source workload.
For Windows workloads, PlateSpin Migrate leverages the Microsoft Volume Snapshot Service (VSS) (Windows 2003 SP1 and later) with applications and services that support VSS.
For Linux workloads, PlateSpin Migrate leverages the LVM snapshot feature, if it is available on the host. If the feature is unavailable, PlateSpin Migrate uses its own block-level data transfer mechanism. For live block-level migration of Linux workloads with customized kernels, you might have to rebuild the PlateSpin blkwatch module included in your PlateSpin Migrate distribution. See KB Article 7005873 (https://www.netiq.com/support/kb/doc.php?id=7005873).
The Block-Based Live Transfer method is the preferred data transfer method for both Windows and Linux workloads.
PlateSpin Migrate Feature Overview 17

1.3.3 Offline Transfer with Temporary Boot Environment
This method enables PlateSpin Migrate to boot your source machine into a temporary pre-execution environment and transfer the data while the source is offline.
The pre-execution environment underlying the Offline transfer method makes use of a Linux Ramdisk, which contains a minimal set of system files, drivers, and executables, sufficient for an initial, temporary boot. To ensure that the source operating system properly loads and operates in the temporary pre-execution environment, PlateSpin Migrate temporarily modifies its boot files and restores them to their original state after the pre-execution environment has successfully loaded.
The Ramdisk is also used to temporarily boot target physical machines in X2P migrations, as well as to boot taget VMs in semi-automated migrations.
See also, Section 3.3.6, “Discovering Target Physical Machines,” on page 57, and “Semi-Automated Workload Virtualization Using the X2P Workflow” on page 86.
1.4 Security and PrivacyPlateSpin Migrate provides several features to help you safeguard your data and increase security.
Section 1.4.1, “Security of Workload Data in Transmission,” on page 18 Section 1.4.2, “Security of Client-Server Communications,” on page 18 Section 1.4.3, “Security of Credentials,” on page 18 Section 1.4.4, “User Authorization and Authentication,” on page 19
1.4.1 Security of Workload Data in Transmission
To make the transfer of your workload data more secure, you can configure your migration jobs to encrypt the data in transit to the target. When encryption is enabled, over-the-network data transfer from the source to the target is encrypted by using AES (Advanced Encryption Standard).
You can configure your PlateSpin Server to use a data encryption algorithm that is compliant with FIPS (Federal Information Processing Standards, Publication 140-2). If compliance with FIPS is required, it must be set up on your system prior to the PlateSpin Server installation. See “Enabling Support for FIPS-Compliant Data Encryption Algorithms (Optional)” in your Installation Guide.
For information on how to enable file encryption for a migration job, see “Specifying Replication Options” on page 107.
1.4.2 Security of Client-Server Communications
Data transmission between the PlateSpin Server and the PlateSpin Migrate Client can be configured to use either HTTP (default) or HTTPS (Secure Hypertext Transfer Protocol). To secure data transmission between the client and the server, enable SSL on your PlateSpin Server host and use HTTPS when specifying the server URL. See “Connecting to a PlateSpin Server” on page 47.
1.4.3 Security of Credentials
Credentials that you use to access sources and targets in workload migration jobs are:
Cached, encrypted, and securely stored by the PlateSpin Migrate Client, by using operating system APIs.
18 PlateSpin Migrate 11.1 User Guide

Stored in the PlateSpin Migrate database and are therefore covered by the same security safeguards that you have in place for PlateSpin Server hosts.
Included within diagnostics, which are accessible to accredited users. You should ensure workload migration projects are handled by authorized staff.
1.4.4 User Authorization and Authentication
PlateSpin Migrate provides a role-based user authorization and authentication mechanism. See Section 2.2, “Setting Up User Authorization and Authentication,” on page 25.
NOTE: If you have installed a PlateSpin Migrate Server localized for one language and a PlateSpin Migrate Client localized for a different language, do not use authorization credentials that include any language-specific characters. Using such characters in the login credentials causes miscommunication between the client and the server: the credentials are rejected as invalid.
1.5 Performance Section 1.5.1, “About Product Performance Characteristics,” on page 19 Section 1.5.2, “Data Compression,” on page 20 Section 1.5.3, “Bandwidth Throttling,” on page 20 Section 1.5.4, “Scalability,” on page 20
1.5.1 About Product Performance Characteristics
The performance characteristics of your PlateSpin Migrate product depend on a number of factors, including:
Hardware and software profiles of your source and target Hardware and software profiles of your PlateSpin Server host The specifics of your network bandwidth, configuration, and conditions The number of your source workloads’ volumes and their sizes File density (number of files per unit of capacity) on your source workloads’ volumes Source I/O levels (how busy your workloads are) The number of concurrent migrations and the number and type of the targets Whether data encryption is enabled or disabled Whether data compression is enabled or disabled
For planning large-scale workload migrations, you should perform a test migration of an average workload and use the result as a benchmark, fine-tuning your metrics regularly throughout the project. In addition to the data transfer process, also consider the other phases that a migration job goes through, as applicable to your project:
Preparation and network setup Source workload and target machine discovery Target configuration
PlateSpin Migrate Feature Overview 19

1.5.2 Data Compression
If necessary, PlateSpin Migrate can compress the workload data before transferring it over the network. This enables you to reduce the overall amount of data transferred during a workload migration job.
Compression ratios depend on the type of files on a source workload’s volumes, and might vary from approximately 0.9 (100MB of data compressed to 90 MB) to approximately 0.5 (100MB compressed to 50MB).
NOTE: Data compression utilizes the source workload’s processor power.
Data Compression can be configured per migration job. You can also specify a default compression value to be applied globally (see “Default Job Values” on page 40).
1.5.3 Bandwidth Throttling
PlateSpin Migrate enables you to control the amount of available bandwidth consumed by direct source-to-target communication over the course of a workload migration; you can specify a throughput rate for each migration job. This provides a way to prevent migration traffic from congesting your production network and reduces the overall load of your PlateSpin Server.
Bandwidth throttling is a parameter of a workload migration job’s configuration properties. See “Specifying Network Options” on page 109.
1.5.4 Scalability
You can set up multiple workload migrations and run them simultaneously. Scalability testing performed with VMware ESX hosts suggests the following benchmark recommendations:
Multiple migrations to a single VM server: no more than 20 Multiple migrations against multiple VM servers (ESX): no more than 30
20 PlateSpin Migrate 11.1 User Guide

2 2Post-Installation Configuration
This section provides information on typical, usually one-time configuration tasks following product installation. For installation information, see your Installation Guide.
Section 2.1, “PlateSpin Migrate Product Licensing,” on page 21 Section 2.2, “Setting Up User Authorization and Authentication,” on page 25 Section 2.3, “Access and Communication Requirements across your Migration Network,” on
page 33 Section 2.4, “Configuring PlateSpin Migrate Default Options,” on page 36
2.1 PlateSpin Migrate Product LicensingThis section provides information about licensing and activating your PlateSpin Migrate product, as well as managing your license keys.
Section 2.1.1, “Activating Your Product License,” on page 21 Section 2.1.2, “How Licensing Works,” on page 23 Section 2.1.3, “Using the License Manager,” on page 24 Section 2.1.4, “License Splitting,” on page 25
2.1.1 Activating Your Product License
For product licensing, you must have a license activation code. If you do not have a license activation code, request one through the Customer Center Web site (https://www.netiq.com/center/). A license activation code will be e-mailed to you.
When you launch the PlateSpin Migrate Client for the first time after installation, the License Activation Wizard opens and prompts you to activate your product license.
Post-Installation Configuration 21

Figure 2-1 License Activation Wizard
You have two options for activating your product license: online or offline.
“Online Activation” on page 22 “Offline Activation” on page 22
Online Activation
Online activation requires that your PlateSpin Migrate Client have Internet access.
NOTE: HTTP proxies might cause failures during online activation. If you are using an HTTP proxy server and are having problems with online activation, try the offline activation method.
1 In the License Wizard, select the Online Activation option and click Next.2 Enter the e-mail address that you provided when placing your order, and the activation code
you received.The PlateSpin Migrate Client obtains the required license over the Internet and activates the product.
Offline Activation
For offline activation, you obtain a license key over the Internet by using a machine that has Internet access.
1 In the License Wizard, select the Offline Activation option and click Next.The Activate License dialog box is displayed:
22 PlateSpin Migrate 11.1 User Guide

2 Save your hardware ID for use in the next steps.3 Use a computer with Internet access to obtain a license key through the Web-based license
activation utility (http://www.platespin.com/productactivation/ActivateOrder.aspx).To obtain a license key, you must have a Novell account. If you are an existing PlateSpin customer and you don’t have a Novell account, you must first create one. Use your existing PlateSpin username (a valid e-mail address registered with PlateSpin) as input for your Novell account username.
4 Save your new license key in a location accessible to your PlateSpin Migrate Client.5 In the License Wizard, type the full path to, or browse to and select, the PlateSpin Migrate
license file, then click Next. The product is activated based on the selected license.
2.1.2 How Licensing Works
PlateSpin Migrate licenses are sold on a per-workload basis. A license entitles you to an unlimited number of migrations on a specific number of workloads. With every migration, a workload unit of the license is assigned to either the source or the target. The machine that has the workload unit assigned to it can subsequently be migrated an unlimited number of times. Each time a workload is assigned, the Workloads remaining number is decremented.
The following is a summary of workload assignment behavior by portability task.
Table 2-1 PlateSpin Migrate Workload License Assignment by Migration Type
Task Workload Assignment Behavior
Copy Workload A workload license remains with the source.
Move Workload A workload license is transferred from the source to the target.
Server Sync Not applicable
Capture Image A workload license is assigned to the source and remains with it
Deploy Image Not applicable
Post-Installation Configuration 23

2.1.3 Using the License Manager
Use the License Manager to manage product licensing, add and delete license keys, generate licensing reports, view activation codes, and reset workload licensing. If you have multiple license keys and you want to select a specific, non-default license key for a particular migration job, see Section 6.1, “Selecting a License Key for a Migration Job,” on page 105.
“Managing Available License Keys” on page 24 “Managing Workload Designations” on page 25
To access the License Manager, in your PlateSpin Migrate Client, click Tools > License Manager.
Managing Available License Keys
You can manage available license keys on the License Manager’s Available License Keys tab (in your PlateSpin Migrate Client, click Tools > License Manager > Available License Keys).
Figure 2-2 Available License Keys
The tab displays the license name (Module) along with its expiry date and entitlements. These depend on the license type. The Number of Servers column indicates the number of machines you can discover. This is generally the same as the number of machines that you can migrate. Use the buttons at the bottom for related license management tasks:
Table 2-2 License Manager Command Buttons
Command Description
Add Adds licenses.
Delete Deletes expired licenses.
View Activation Code(s) Select a license and click this button to see the activation code and the date it was activated.
Generate Licensing Report Creates a *.psl file that is used by Technical Support to troubleshoot licensing issues.
24 PlateSpin Migrate 11.1 User Guide

Managing Workload Designations
You can manage workload licensing on the License Manager’s Workload Designations tab (in your PlateSpin Migrate Client, click Tools > License Manager > Workload Designations).
The tab lists workloads with assigned licenses. In the PlateSpin Migrate Client Servers view, each of these servers has a key icon adjacent to it.
You can reset workload licensing so that a license is no longer assigned to a particular machine. For example, you might want to do this when decommissioning servers that are already in the inventory of the PlateSpin Server.
To reset workload licensing:
1 On the License Manager’s Workload Designations tab, select the required workload and click Transfer Selected Workload.The Transfer License dialog box is displayed.
2 Use the displayed Workload Transfer Request string to obtain a workload transfer code from the License Entitlement Web portal (http://www.platespin.com/entitlementmgr/). Log in with credentials associated with your purchase order.You must have a Novell account. If you are an existing PlateSpin customer and you don’t have a Novell account, you must first create one. Use your existing PlateSpin username (a valid e-mail address registered with PlateSpin) as input for your Novell account username.
3 Return to the License Manager and specify the newly obtained transfer code. Click Next.PlateSpin Migrate resets the selected workload.
2.1.4 License Splitting
A license entitles you to one instance of PlateSpin Migrate per workload. Depending on the license you purchased, you can split a license either on a per-migration or a per-workload basis.
You can only split a license that has not yet been activated. For example, you can split a per-workload license of 1000 workloads into one license covering 400 workloads and another covering 600 workloads. You can split a per-migration license for 3000 migrations into one license for 1200 migrations and one license for 1800 migrations.
For assistance with multi-license scenarios, especially if you are uncertain how to utilize licenses across your network environment, see KB Article 7920876 (https://www.netiq.com/support/kb/doc.php?id=7920876).
2.2 Setting Up User Authorization and AuthenticationPlateSpin Migrate’s user authorization and authentication mechanism is based on user roles, and controls application access and operations that users can perform. The mechanism is based on Integrated Windows Authentication (IWA) and its interaction with Internet Information Services (IIS).
NOTE: If you have installed a PlateSpin Migrate Server localized for one language and a PlateSpin Migrate Client localized for a different language, do not use authorization credentials that include any language-specific characters. Using such characters in the login credentials causes miscommunication between the client and the server: the credentials are rejected as invalid.
Post-Installation Configuration 25

PlateSpin Migrate’s user auditing functionality is provided through the capability to log user actions (see “Setting Up User Activity Logging” on page 32).
Section 2.2.1, “PlateSpin Migrate Roles,” on page 26 Section 2.2.2, “Assigning PlateSpin Migrate Roles to Windows Users,” on page 27 Section 2.2.3, “Setting Up PlateSpin Migrate Multitenancy on VMware,” on page 27 Section 2.2.4, “Setting Up User Activity Logging,” on page 32
2.2.1 PlateSpin Migrate Roles
A PlateSpin Migrate role is a collection of PlateSpin Migrate privileges that entitle a particular user to perform specific actions. During installation, the PlateSpin Migrate installation program creates three local Windows groups on the PlateSpin Server host: PlateSpin Migrate Administrators, PlateSpin Migrate Power Users, and PlateSpin Migrate Operators. These groups map directly to the three PlateSpin Migrate roles that control user authorization and authentication:
PlateSpin Administrators: Have unlimited access to all features and functions of the application. A local administrator is implicitly part of this group.
PlateSpin Power Users: Have access to most features and functions of the application with some limitations, such as restrictions in the capability to modify system settings related to licensing and security.
PlateSpin Operators: Have access to a limited subset of system features and functions, sufficient to maintain day-to-day operation.
When a user attempts to connect to a PlateSpin Server, the credentials provided through the PlateSpin Migrate Client are validated by IIS. If the user is not a member of one of the PlateSpin Migrate roles, connection is refused. If the user is a local administrator on the PlateSpin Server host, that account is implicitly regarded as a PlateSpin Migrate Administrator.
The following table lists permissions for each role.
Table 2-3 PlateSpin Migrate Roles and Permission Details
Role Details Administrators Power Users
Operators
Licensing: Add, delete licenses; transfer workload licenses yes no no
Machines: Discover, undiscover yes yes no
Machines: Delete virtual machines yes yes no
Machines: View, refresh, export yes yes yes
Machines: Import yes yes no
Machines: Export yes yes yes
PlateSpin Migrate Networks: Add, delete yes no no
Jobs: Create new job yes yes no
Jobs: View, abort, change start time yes yes yes
Imaging: View, start synchronization in existing contracts yes yes yes
Imaging: Consolidate increments, apply increments to base, delete increments, install/delete image servers
yes yes no
26 PlateSpin Migrate 11.1 User Guide

2.2.2 Assigning PlateSpin Migrate Roles to Windows Users
To allow specific Windows domain or local users to carry out specific PlateSpin Migrate operations according to designated role, add the required Windows domain or user account to the applicable Windows local group (PlateSpin Administrators, PlateSpin Power Users, or PlateSpin Operators) on the PlateSpin Server host. For more information, see your Windows documentation.
2.2.3 Setting Up PlateSpin Migrate Multitenancy on VMware
PlateSpin Migrate includes unique user roles (and a tool for creating them in a VMware datacenter) that make it possible non-administrative VMware users (or “enabled users”) to perform Migrate lifecycle operations in the VMware environment. These roles makes it possible for you, as a service provider, to segment your VMware cluster to allow multitenancy: where multiple Migrate containers are instantiated in your datacenter to accommodate Migrate customers or “tenants” who want to keep their data and evidence of their existence separate from and inaccessible to other customers who also use your datacenter.
This section includes the following information:
“Using Tools to Define VMware Roles” on page 27 “Assigning Roles In vCenter” on page 29
Using Tools to Define VMware Roles
PlateSpin Migrate requires certain privileges to access and perform tasks in the VMware Infrastructure (that is, VMware “containers”), making the Migrate workflow and functionality possible in that environment. Because there are many of these required privileges, NetIQ has created a file that defines the minimum required privileges and aggregates them respectively into three VMware custom roles:
PlateSpin Virtual Machine Manager PlateSpin Infrastructure Manager PlateSpin User
Block-Based Transfer Components: Install, upgrade, remove yes yes no
Device Drivers: View yes yes yes
Device Drivers: Upload, delete yes yes no
PlateSpin Server access: View Web services, download client software
yes yes yes
PlateSpin Server settings: Edit settings that control user activity logging and SMTP notifications
yes no no
PlateSpin Server settings: Edit all server settings except those that control user activity logging and SMTP notifications
yes yes no
Run Diagnostics: Generate detailed diagnostic reports on jobs. yes yes yes
Post-conversion Actions: Add, update, delete yes yes no
Role Details Administrators Power Users
Operators
Post-Installation Configuration 27

This definition file, PlateSpinRole.xml, is included in the PlateSpin Migrate Server installation. An accompanying executable, PlateSpin.VMwareRoleTool.exe,accesses the file to enable the creation of these custom PlateSpin roles in a target vCenter environment.
This section includes the following information:
“Basic Command Line Syntax” on page 28 “Additional Command Line Parameters and Flags” on page 28 “Tool Usage Example” on page 28 “(Option) Manually Defining the PlateSpin Roles in vCenter” on page 29
Basic Command Line Syntax
From the location where the role tool was installed, run the tool from the command line, using this basic syntax:
PlateSpin.VMwareRoleTool.exe /host=[host name/IP] /user=[user name] /role=[the role definition file name and location] /create
NOTE: By default, the role definition file is located in the same folder with the role definition tool.
Additional Command Line Parameters and Flags
Apply the following parameters as needed when you use PlateSpin.VMwareRoleTool.exe to create or update roles in vCenter:
Tool Usage Example
Usage: PlateSpin.VMwareRoleTool.exe /host=houston_sales /user=pedrom /role=PlateSpinRole.xml /create
Resulting Actions:
1. The role definition tool runs on the houston_sales vCenter server, which has an administrator with the user name pedrom.
2. In the absence of the /password parameter, the tool prompts for the user password, which you enter.
3. The tool accesses the role definition file, PlateSpinRole.xml, which is located in the same directory as the tool executable (there was no need to further define its path).
/create (mandatory) Creates the roles defined by the /role parameter
/get_all_prvileges Display all server-defined privileges
Optional Flags
/interactive Run the tool with interactive options that allow you to choose to create individual roles, check role compatibility, or list all compatible roles.
/password=[password] Provide the VMware password (bypasses the password prompt)
/verbose Display detailed information
28 PlateSpin Migrate 11.1 User Guide
4. The tool locates the definition file and is instructed (/create) to create the roles defined in the contents of that file in the vCenter environment.
5. The tool accesses the definition file and creates the new roles (including the appropriate minimum privileges for defined, limited access) inside vCenter.The new custom roles are to be assigned to users later in vCenter.
(Option) Manually Defining the PlateSpin Roles in vCenter
You use the vCenter client to manually create and assign the PlateSpin custom roles. This requires creating the roles with the enumerated privileges as defined in PlateSpinRole.xml. When you create manually, there is no restriction on the name of the role. The only restriction is that the role names you create as equivalents to those in the definition file have all of the appropriate minimum privileges from the definition file.
For more information about how to create custom roles in vCenter, see Managing VMWare VirtualCenter Roles and Permissions (http://www.vmware.com/pdf/vi3_vc_roles.pdf) in the VMware Technical Resource Center.
Assigning Roles In vCenter
As you set up a multitenancy environment, you need to provision a single Migrate server per customer or “tenant.” You assign this Migrate server an enabled user with special Migrate VMware roles. This enabled user creates the Migrate container. As service provider, you maintain this user’s credentials and do not disclose them to your tenant customer.
The following table lists the roles you need to define for the enabled user. It also includes more information about the purpose of the role:
vCenter Container for Role Assignment
Role Assignment Specifics
Propagate Instructions
More Information
Root of vCenter inventory tree.
Assign the enabled user the PlateSpin Infrastructure Manager (or equivalent) role.
For security reasons, define the permission as non-propagating.
This role is needed to monitor tasks being performed by the Migrate software and to end any stale VMware sessions.
All datacenter objects where the enabled user needs access
Assign the enabled user the PlateSpin Infrastructure Manager (or equivalent) role.
For security reasons, define the permission as non-propagating.
This role is needed to allow access to the datacenter’s datastores for file upload/download.
Define the permission as non-propagating.
Each cluster to be added to Migrate as a container, and each host contained in the cluster
Assign the enabled user the PlateSpin Infrastructure Manager (or equivalent) role.
Propagation is at the discretion of the VMware administrator.
To assign to a host, propagate the permission from the cluster object or create an additional permission on each cluster host.
If the role is assigned on the cluster object and is propagated, no further changes are necessary when you add a new host to the cluster. However, propagating this permission has security implications.
Post-Installation Configuration 29

The following table shows the role you can assign to the customer or tenant user.
Each Resource Pool where the enabled user needs access.
Assign the enabled user the PlateSpin Virtual Machine Manager (or equivalent) role.
Propagation is at the discretion of the VMware administrator.
Although you can assign access to any number of Resource Pools in any location in the tree, you must assign the enabled user this role on at least one Resource Pool.
Each VM folder where the enabled user needs access
Assign the enabled user the PlateSpin Virtual Machine Manager (or equivalent) role.
Propagation is at the discretion of the VMware administrator.
Although you can assign access to any number of VM Folders in any location in the tree, you must assign the enabled user this role on at least one folder.
Each Network where the enabled user needs access.
Distributed Virtual Networks with a dvSwitch and a dvPortgroup
Assign the enabled user the PlateSpin Virtual Machine Manager (or equivalent) role.
Propagation is at the discretion of the VMware administrator.
Although you can assign access to any number of networks in any location in the tree, you must assign the enabled user this role on at least one folder.
To assign the correct role to the dvSwitch, propagate the role on the Datacenter (resulting in an additional object receiving the role) or place the dvSwitch in a folder and assign the role on that folder.
For a standard portgroup to be listed as an available network in the Migrate UI, create a definition for it on every host in the cluster.
Each Datastore and Datastore Cluster where the enabled user needs access
Assign the enabled user the PlateSpin Virtual Machine Manager (or equivalent) role.
Propagation is at the discretion of the VMware administrator.
The enabled user must have been assigned this role on at least one Datastore or Datastore Cluster.
For Datastore Clusters, the permission must be propagated to the contained datastores. Not providing access to an individual member of the cluster causes both prepare and full replications to fail
vCenter Container for Role Assignment
Role Assignment Specifics
Propagate Instructions
More Information
30 PlateSpin Migrate 11.1 User Guide

The figure below illustrates a Virtual Infrastructure in the vCenter console. The objects labeled in blue are assigned the Infrastructure Manager role. The objects labeled in green are assigned the Virtual Machine Manager role. The tree does not show VM folders, Networks and Datastores. Those objects are assigned the PlateSpin Virtual Machine Manager role.
Figure 2-3 Roles assigned in vCenter
vCenter Container for Role Assignment
Role Assignment Specifics
Propagate Instructions More Information
Each resource pool(s) and folder(s) where the customer's VMs will be created.
Assign the tenant user the PlateSpin User (or equivalent) role.
Propagation is at the discretion of the VMware administrator.
This tenant is a member of the PlateSpin Administrators group on the PlateSpin Migrate server and is also on the vCenter server.
If the tenant will be granted the ability to change the resources used by the VM (that is, networks, ISO images, and so forth), grant this user the necessary permissions on those resources. For example, if want to you allow the customer to change the network where their VM is attached, this user should be assigned the Read-only role (or better) on all of the networks being made accessible to the customer.
Post-Installation Configuration 31

Security Implications of Assigning VMware Roles
PlateSpin software uses an enabled user only to perform protection lifecycle operations. From your perspective as a service provider, an end user never has access to the enabled user’s credentials and is unable to access the same set of VMware resources. In an environment where multiple Migrate servers are configured to use the same vCenter environment, Migrate prevents possibilities for cross-client access. The major security implications include:
With the PlateSpin Infrastructure Manager role assigned to the vCenter object, every enabled user can see (but not affect) the tasks performed by every other user.
Because there is no way to set permissions on datastore folders/subfolders, all enabled users with permissions on a datastore have access to all other enabled users’ disks stored on that datastore.
With the PlateSpin Infrastructure Manager role assigned to the cluster object, every enabled user is able to turn off/on HA or DRS on the entire cluster
With the PlateSpin User role assigned at the storage cluster object, every enabled user is able to turn off/on SDRS for the entire cluster
Setting the PlateSpin Infrastructure Manager Role on the DRS Cluster object and propagating this role allows the enabled user to see all VMs placed in the default resource pool and/or default VM folder. Also, propagation requires the administrator to explicitly set the enabled user to have a “no-access” role on every resource pool/VM folder that he or she should not have access to.
Setting the PlateSpin Infrastructure Manager Role on the vCenter object allows the enabled user to end sessions of any other user connected to the vCenter.
NOTE: Remember, in these scenarios, different enabled users are actually different instances of the PlateSpin software.
2.2.4 Setting Up User Activity Logging
By default, PlateSpin Migrate records all user activities in a log file, PlateSpin.UserActivityLogging.log, located on your PlateSpin Server host, in the following directory:
..\PlateSpin Migrate Server\logs.
The format of an individual log entry is:
date|Category|description|user|details1|details2
The Category element describes the functional area applicable to a particular action, such as Security, Inventory (discovery operations), LicenseManagement, or Migration (workload portability operations).
Elements details1 and details2 depend on the Category and provide additional information if applicable.
Below is an example of a log entry recording the login action of a user with the domain account MyDomain\John.Smith.
2008-09-02 14:14:47|Security|User logged in|MyDomain\John.Smith
When the size of a log file reaches a specified value, it is rolled over to a new file with a sequential number appended to the name:
32 PlateSpin Migrate 11.1 User Guide

PlateSpin.UserActivityLogging.log.1PlateSpin.UserActivityLogging.log.2PlateSpin.UserActivityLogging.log.3
When the number of log files reaches a specified value, the system starts overwriting the oldest file each time a rollover is performed.
To enable or disable user activity logging, and to specify log file size and rollover options:
1 In the PlateSpin Migrate Client, click Tools > Options.2 Click the Logging tab.3 Specify the required options, then click OK.
2.3 Access and Communication Requirements across your Migration NetworkThis section provides information about setting up user authorization and authentication, configuring your network environment, and managing your product’s default settings and behavior.
Section 2.3.1, “Requirements for Discovery,” on page 33 Section 2.3.2, “Requirements for Migration,” on page 34 Section 2.3.3, “Migrations Across Public and Private Networks through NAT,” on page 35
2.3.1 Requirements for Discovery
The following table lists software, network, and firewall requirements that systems in your environment must meet for the discovery and inventory process. For information about the actual discovery procedures, see Section 3.3, “Discovering Source Workloads and Migration Targets,” on page 54.
Table 2-4 Network Communication Prerequisites for Discovery Operations
System Prerequisites
All workloads Ping (ICMP echo request and response) support
All Windows sources and Hyper-V hosts
Microsoft .NET Framework version 3.5 SP1
Credentials with local or domain admin privileges
Post-Installation Configuration 33

2.3.2 Requirements for Migration
The following table lists firewall requirements that systems in your environment must meet for problem-free operation during workload migration jobs.
Windows Vista
Windows 7
Windows 8, 8.1
Windows Server 2008
Windows Server 2008 R2
Windows Server 2012
Windows Server 2012 R2
Windows Server 2012 with Hyper-V
Windows Server 2012 R2 with Hyper-V
1. Built-in Administrator or a domain account credentials (mere membership in the local Administrators group is insufficient). On Vista, the account must be enabled (it is disabled by default).
2. The Windows Firewall configured to allow File and Printer Sharing. Use one of these options:
Option 1, using Windows Firewall: Use the basic Windows Firewall Control Panel item (firewall.cpl) and select File and printer Sharing in the list of exceptions.
- OR -
Option 2, using Firewall with Advanced Security: Use the Windows Firewall with Advanced Security utility (wf.msc) with the following Inbound Rules enabled and set to Allow:
File and Printer Sharing (Echo Request - ICMPv4In)
File and Printer Sharing (Echo Request - ICMPv6In)
File and Printer Sharing (NB-Datagram-In)
File and Printer Sharing (NB-Name-In)
File and Printer Sharing (NB-Session-In)
File and Printer Sharing (SMB-In)
File and Printer Sharing (Spooler Service - RPC)
File and Printer Sharing (Spooler Service - RPC-EPMAP)
3. (Conditional) If the volumes are encrypted with the BitLocker disk encryption feature, they must be unlocked.
All Linux sources
Citrix Xen Server
Secure Shell (SSH) server
Open port 22 (TCP)
Root-level access. For information on using an account other than root, see KB Article 7920711 (https://www.netiq.com/support/kb/doc.php?id=7920711).
Custom SSH ports are supported; specify the port number during discovery: <hostname | IP_address>:port_number.
VMware ESX/ESXi Servers
VMware account with an Administrator role
VMware Web services API and file management API (HTTPS / port 443 TCP)
VMware vCenter Servers The user with access must be assigned the appropriate roles and permissions. Refer to the pertinent release of VMware documentation for more information.
System Prerequisites
34 PlateSpin Migrate 11.1 User Guide

Table 2-5 Network Communication Prerequisites for Workload Portability
2.3.3 Migrations Across Public and Private Networks through NAT
In some cases, a source, a target, or PlateSpin Migrate itself, might be located in an internal (private) network behind a network address translator (NAT) device, unable to communicate with its counterpart during migration.
PlateSpin Migrate enables you to address this issue, depending on which of the following hosts is located behind the NAT device:
PlateSpin Server: n your server’s PlateSpin Server Configuration tool, record the additional IP addresses assigned to that host:
1. From any Web browser, open the https://Your_PlateSpin_Server/platespinconfiguration/tool.
2. Locate the AlternateServerAddresses server parameter, click Edit, then add additional IP addresses, delimited by a a semicolon (;), for example:
204.50.186.147;204.50.186.148
System Open Port (Default) Remarks
PlateSpin Server hosts Either TCP 80 or TCP 443 TCP
Port 80 (TCP) is required for HTTP communication among the PlateSpin Server, sources, and targets.
Port 443 (TCP) is required for HTTPS communication (if SSL is used) between the PlateSpin Server and the source or target machines.
All source workloads except those in image deployment jobs.
TCP 3725 Required for targets to initiate communication during file-level data transfer, except for I2X jobs, during which this port needs to be open on the migration target only. For Server Sync jobs, this port is required for both sources and targets.
All targets TCP 3725 Required for:File-based Server Sync / Image Sync
File-level Server Sync
Image synchronization jobs
All Windows sources and targets
NetBIOS 137 - 139 Required for NetBIOS communications.
All sources SMB (TCP 139, 445 and UDP 137, 138)
Required for communication and file-level data transfer during offline migration.
All Linux sources
Citrix Xen Server
TCP 22 Required for communication during offline migration.
PlateSpin Server hosts;
All Windows sources
TCP 135/445 For DCOM/RPC communication between PlateSpin Server and a source for taking control of and rebooting the workload through WMI.
NOTE: WMI (RPC/DCOM) can use TCP ports 135 and 445 as well as random/dynamically assigned ports above 1024.
Post-Installation Configuration 35

Source: As part of that specific migration job, record the additional IP addresses assigned to that workload. See “Specifying Network Options” on page 109.
Target: When you are attempting to discover a target, such as VMware ESX, specify the public (or external) IP address in the discovery parameters.
2.4 Configuring PlateSpin Migrate Default OptionsDefault options control PlateSpin Migrate’s global settings and its default behavior. Configure the default options following installation or to reflect changes in your environment.
Section 2.4.1, “Configuring Application Defaults (Tools > Options),” on page 37 Section 2.4.2, “Configuring PlateSpin Server Behavior through Configuration Parameters,” on
page 43
36 PlateSpin Migrate 11.1 User Guide

2.4.1 Configuring Application Defaults (Tools > Options)
General Options
Use this tab to restore default settings, clear saved credentials, and to specify the locations of executable files for external applications you can launch from within the PlateSpin Migrate Client user interface. To access this dialog box in the PlateSpin Migrate Client, click Tools > Options.
Restore Defaults: When this option is selected, PlateSpin Migrate resets the job configuration method (launches the Actions dialog box after a drag-and-drop) and resumes checking for software updates on the Client startup.
Clear Saved Credentials: Removes stored usernames and passwords for source and target machines.
External Application Settings: Use the adjacent Browse buttons to locate application executables.
Restore Defaults: Resets the paths to their defaults.
Post-Installation Configuration 37

Notification Service
Use this tab to specify Simple Mail Transfer Protocol (SMTP) server settings for event and job progress notifications. To access this dialog box in the PlateSpin Migrate Client, click Tools > Options.
You can also configure migration progress notifications on a per-migration basis. See Section 6.2, “Configuring Automatic E-Mail Alerts of Job Status and Progress,” on page 106.
SMTP Server Settings: Specify your SMTP server’s IP address, port, and a reply address for e-mail event and progress notifications.
SMTP Account Credentials: Provide valid credentials if your SMTP server requires authentication.
38 PlateSpin Migrate 11.1 User Guide

User Activity Logging
Use this tab to specify options related to user activity logging. See “Setting Up User Activity Logging” on page 32.
To access this dialog box in the PlateSpin Migrate Client, click Tools > Options.
Enable Logging: When this option is selected, PlateSpin Migrate logs all user activities.
Maximum file size before rollover (MB): When the size of a log file reaches the specified value, it is rolled over to a new file with a sequential number appended to the name.
Maximum number of files for rollover: When the number of log files reaches the specified value, the system starts overwriting the oldest file each time a rollover is performed.
Post-Installation Configuration 39

Default Job Values
Use this tab to specify default migration job values specific to the target virtualization platform. To access this dialog box in the PlateSpin Migrate Client, click Tools > Options.
Target Container Name and Path Details: These variables control naming conventions for target paths and containers. Expand a variable set and click a variable to edit its value.
Job Conversion Defaults: Use this area to set defaults that affect all migration jobs. You can overwrite these defaults when configuring actual migration jobs.
Encrypt File Transfer: See Security and Privacy.
Install VMware Tools for ESX/XenServer Tools: See Handling Virtualization Enhancement Software.
Compress Images with NTFS Compression: See Capturing a Workload to a PlateSpin Image. Unrelated to data compression for over-the-network transfer.
Virtual Disk Sizing Mode: (ESX only) Fixed—space is pre-allocated for the virtual disk; Dynamic—the virtual disk is assigned a minimum amount of space, which grows when needed.
Compression Level: See Data Compression.
Reset: Restores default job values.
Update Defaults from Server: Click to retrieve defaults from the PlateSpin Server if available.
40 PlateSpin Migrate 11.1 User Guide

Source Service Defaults
Use this tab to select Windows services daemons to stop on the source workload during a Live Transfer migration. See Handling Source Workload Services or Daemons During Live Transfer (Windows and Linux).
To access this dialog box in the PlateSpin Migrate Client, click Tools > Options.
Stop Services during Transfer section: Lists services that are stopped by default. To stop a service during data transfer that uses a specific transfer method by default, select the corresponding check box. A deselected check box means the service remains active during Live Transfer.
All Services section: Lists unique services on all discovered machines. Click Add to add a selected service from the lower section to the upper section and set it to stop during the migration.
Update Defaults from Server: Retrieves defaults from PlateSpin Server.
Post-Installation Configuration 41

Target Service Defaults
Use this tab to select Windows services whose mode on the target is to be different from that of the source. See Handling the Startup Mode of Services (Windows Targets).
To access this dialog box in the PlateSpin Migrate Client, click Tools > Options.
Configure Services section: Lists services and their target startup modes. Select the Restore After Conversion check box to use the selected mode during the migration. The service is then restored to match the source after the migration is complete and the target machine is ready to run.
All Services section: Lists unique services on all discovered machines. Click Add to add a service to the upper section. Use the Mode drop-down list to select the service state for the target. This is set during the configuration step of the job.
Remove: Removes a service.
Reset: Clears the upper section. The modes of all services in the target will match those on the source.
42 PlateSpin Migrate 11.1 User Guide

2.4.2 Configuring PlateSpin Server Behavior through Configuration Parameters
Some aspects of your PlateSpin Server’s behavior are controlled by configuration parameters that you set on a configuration Web page residing your PlateSpin Server host (https://Your_PlateSpin_Server/platespinconfiguration/).
Under normal circumstances you should not need to modify these settings unless you are advised to do so by PlateSpin Support. This section provides a number of common use cases along with information on the required procedure.
Use the following procedure for changing and applying any configuration parameters:
1 From any Web browser, open the https://Your_PlateSpin_Server/platespinconfiguration/tool.
2 Locate the required server parameter and change its value.3 Save and your settings and exit the page.
No reboot or restart of services is required after the change is made in the configuration tool.
The following topics provide information on specific situations, in which you might need to change product behavior using an XML configuration value.
“Increasing the Size Limit on Post-migration Actions Uploaded to the PlateSpin Server” on page 43
“Optimizing Data Transfer over WAN Connections (Windows)” on page 44 “Other Use Cases for Making Modifications in the Web Config Tool (Advanced)” on page 44
Increasing the Size Limit on Post-migration Actions Uploaded to the PlateSpin Server
By default, PlateSpin Migrate sets a 64 MB upload limit for each individual post-migration action, including its dependencies. See Managing Custom Actions.
You can increase this limit by modifying the configuration setting on the PlateSpin Server’Web configuration tool.
IMPORTANT: Decreasing the default size limit might have a negative impact on the stability of your PlateSpin Server.
1 From any Web browser, open https://Your_PlateSpin_Server/platespinconfiguration/.2 Locate and edit the setting that defines the value of the httpRuntime element’s
maxRequestLength attribute:maxRequestLength=8192
3 Replace the existing value with the required new value in kilobytes. For example, to increase the size to 16 MB, replace 8192 with 16384:maxRequestLength=16384
4 Save and your settings and exit the page.
Post-Installation Configuration 43

Optimizing Data Transfer over WAN Connections (Windows)
When doing Windows migrations, you can fine-tune your over-the-network data transfer for optimum performance in your specific environment. For example, you might need to control the number of your TCP connections or impose a packet-level compression threshold.
This functionality is supported for migration jobs that use the following data transfer methods:
File-level Block-level with Microsoft Volume Shadow Copy Service (VSS)
Fine-tuning is done by modifying configuration parameters that the system reads from settings you make in a configuration tool residing on your PlateSpin Server host.
The following table lists the configuration parameters with two sets of values: the defaults and the values recommended for optimum operation in a high-latency WAN environment.
NOTE: If these values are modified, replication times on high-speed networks, such as Gigabit Ethernet, might be negatively impacted. Before modifying any of these parameters, consider consulting PlateSpin Support first.
Table 2-6 Parameters for Fine-Tuning File-Level Data Transfer Performance
Other Use Cases for Making Modifications in the Web Config Tool (Advanced)
Below is a list of configuration values that might address various environmental or functional issues. Do not use them unless you are advised to do so by PlateSpin Support.
Parameter Default Value For High-Latency WANs
fileTransferMinCompressionLimit
Specifies the packet-level compression threshold in bytes.
0
(disabled)
max 65536 (64 KB)
fileTransferCompressionThreadsCount
Controls the number of threads used for packet-level data compression. Ignored if compression is disabled.
Because the compression is CPU-bound, this setting might have a performance impact during Live Transfer.
2 n/a
fileTransferSendReceiveBufferSize
TCP window size setting for file transfer connections; controls the number of bytes sent without TCP acknowledgement.
When the value is set to 0, the default TCP window size is used (8 KB). For custom sizes, specify the size in bytes.
Use the following formula to determine the proper value:
((LINK_SPEED(Mbps)/8)*DELAY(sec))*1000*1000
For example, for a 100 Mbps link with 10 ms latency, the proper buffer size would be:
(100/8)*0.01 * 1000 * 1000 = 125000 bytes
0 (8192 bytes) max 5242880 (5 MB)
44 PlateSpin Migrate 11.1 User Guide

Table 2-7 List of Common Use Cases for changing settings in the Web configuration tool
Issue or Use Case Value Shown in the Config Tool Remarks
Discovery/Inventory issues
<add key="UseServiceForCommonInventory" value="true" /><add key="UseServiceForMigrateInventory" value="false" /><add key="EarliestWindowsVersionForCommonInventory" value="5.2" />
Target boot issues related to drivers
<add key="TargetMachineRegistryCleanupLevel" value="None" />
Controller installation issues on sources (mainly due to environmental restrains)
<add key="InstallControllerUsingService" value="true" /><add key="RunControllerUnderSameCredsAsRemoteAccess" value="false" />
Issues related to database size growth
<add key="PowerConvertDBSizeLimitInBytes" value="4294967296" /><add key="PlateSpinDBCleanupThresholdPercent" value="80" /><add key="OFXDBCleanupThresholdInBytes" value="4294967296" />
Post-Installation Configuration 45

46 PlateSpin Migrate 11.1 User Guide

3 3Getting Started with PlateSpin Migrate
This section introduces the features of the PlateSpin Migrate product and how you use the PlateSpin Migrate Client to carry out workload migration and management tasks.
The PlateSpin Migrate Client connects to a specified PlateSpin Server and provides access to information in the PlateSpin Server database.
Most of your interaction with the server takes place through the client, including the discovery of source workloads and targets; setting up, executing, and monitoring jobs; managing license keys; and configuring the default behavior of the server.
Section 3.1, “Connecting to a PlateSpin Server,” on page 47 Section 3.2, “About the PlateSpin Migrate Client User Interface,” on page 48 Section 3.3, “Discovering Source Workloads and Migration Targets,” on page 54 Section 3.4, “Analyzing Machines with PlateSpin Analyzer,” on page 60 Section 3.5, “Working with Device Drivers,” on page 62 Section 3.6, “Managing Custom Actions,” on page 69 Section 3.7, “Setting Up, Executing, and Managing Jobs,” on page 72
3.1 Connecting to a PlateSpin ServerEvery time you start the PlateSpin Migrate Client, it performs the following actions:
Performs authentication of the specified user account with the PlateSpin Server.
See Section 2.2, “Setting Up User Authorization and Authentication,” on page 25. Connects to a specified PlateSpin Server. Loads a specified PlateSpin Migrate Network, a collection of discovered source workloads and
targets that you work with at one time.
You specify your connection credentials, the PlateSpin Server instance, and the required PlateSpin Migrate Network in the PlateSpin Server settings.
1 In the PlateSpin Migrate Client, click Tools > PlateSpin Server Settings.orDouble-click one of the following three areas in PlateSpin Migrate Client’s status bar at the bottom: Server, Network, or User.
Getting Started with PlateSpin Migrate 47

The PlateSpin Server Settings dialog box opens.
2 Specify the required PlateSpin Server URL, user, and network parameters as required:
3 When you have finished, click OK.
3.2 About the PlateSpin Migrate Client User InterfaceThe PlateSpin Migrate Client window consists of the following elements:
Menu bar: Reflects the current view and provides command groups for accessing program features and operations.
Toolbar: Reflects the current view and provides visual shortcuts to program features and operations.
Current view: The main work area of the interface; lists either machines (when in Servers view mode), or jobs (when in Jobs view mode).
Interface Element Description
Server URL Type the PlateSpin Server URL in the following format:
http://server_host/platespinmigrate
(If SSL is enabled on the PlateSpin Server host, replace http in the URL with https).
Connect As To connect to a PlateSpin Server, you must have administrative access to the PlateSpin Server host or be a member of one of the PlateSpin Migrate roles. See Section 2.2, “Setting Up User Authorization and Authentication,” on page 25.
Networks To familiarize yourself with PlateSpin Migrate features, use the Sample Environment network. To work with actual source workloads and targets, use the Default network or create your own.
To add a network, type the name, then click Add.
To remove a network, select it, then click Delete.
48 PlateSpin Migrate 11.1 User Guide

Panes: Vertically aligned at the left side of the window, panes facilitate the selection of the current view (View pane) or a migration job (Tasks pane). A Details pane reflects the current view and provides summary information about an item selected in the current view.
Status bar: At the bottom of the PlateSpin Migrate Client window, the status bar displays the PlateSpin Server that the client is currently connected to, the PlateSpin Migrate Network you are currently working with, the name and role of the current user logged in, and the status of the Automatic Network Discovery feature.
For additional information, see the following sections.
Section 3.2.1, “Servers View,” on page 49 Section 3.2.2, “Jobs View,” on page 53 Section 3.2.3, “Tasks Pane,” on page 53 Section 3.2.4, “Status Bar,” on page 54
3.2.1 Servers View
The Servers view is the main visual interface to your discovered source workloads and targets. Its main area consists of two split panes that you can customize to suit your needs.
Figure 3-1 PlateSpin Migrate Client‘s Servers View
The hierarchical display of items in the Servers view reflects the organization of items on their respective platforms; for example: VMs are shown nested beneath their VM hosts, and PlateSpin Images are beneath their image servers.
In addition, the Group By bar enables you to group machines by affiliation to a domain or to a vCenter Server (for VMware ESX server systems). See “Organizing the Servers View” on page 50.
Getting Started with PlateSpin Migrate 49

NOTE: The Servers view hierarchy does not reflect advanced VM resource management hierarchies and structures, such as membership in resource pools or affiliation with ESX Distributed Resource Scheduler (DRS) clusters. You can view such information in an item’s properties. See “Viewing the Properties of Source Workloads and Targets” on page 51.
“Organizing the Servers View” on page 50 “Viewing the Properties of Source Workloads and Targets” on page 51 “List of Machine-Specific Icons in the Servers View” on page 52
Organizing the Servers View
You can filter source workloads and targets based on operating system, domain, name, and type by using the Group By and Show drop-down menus. You can use the Group By drop-down menu to group the items in the Servers view by:
Domain affiliation Hostname Affiliation to a VMware vCenter Server
To further control the scope of items shown in either pane of the view, you can also use the Show drop-down menu to filter machines by workload type; for example, Windows 2000, Red Hat Linux, and so on, as shown in the figure below:
50 PlateSpin Migrate 11.1 User Guide

Figure 3-2 Servers View Options for Sorting Items by Type
Viewing the Properties of Source Workloads and Targets
In the Servers view, you can access the essential properties of your discovered source workloads and targets by right-clicking an item and selecting Properties.
For each machine, the system provides information about the selected system’s:
Hardware, operating system, and network profile Volumes, partitions, and disk usage Programs and services
A virtual machine’s properties provide information related to the machine’s environment on its corresponding virtualization platform, including information about the host, and the amount of allocated memory and processing power.
The properties for virtual machine hosts provide information specific to the selected system. For example, you can view what virtual machines are running on a selected VMware ESX server, what virtual network adapters are in use, and what resource pools are configured on them.
VMware ESX servers that are assigned to a Distributed Resource Scheduler (DRS) cluster provide information about the name of the cluster and the DRS automation level (full, manual, or partially automated). The properties for VMware ESX servers that are part of VMware vCenter platforms also indicate this.
Getting Started with PlateSpin Migrate 51

The following figure shows the properties of a discovered VMware ESX Server.
Figure 3-3 VMware ESX Server-Specific Information in the System’s Properties
List of Machine-Specific Icons in the Servers View
Discovered source workloads and targets are associated with unique icons to help identify the type of workload or workload host.
Table 3-1 Machine-Specific Icons in the Servers View
Physical machine
Physical machine in pre-execution environment for offline migration
Physical machine with workload license
Virtual machine server
Virtual machine
Virtual machine with workload license
Undiscovered virtual machine
Virtual machine - Server Sync target
52 PlateSpin Migrate 11.1 User Guide

3.2.2 Jobs View
The Jobs view displays all jobs, such as discovery, migration, and image capture, organized into two tabs:
Jobs: All jobs submitted for execution. Saved Jobs: All saved jobs not yet submitted for execution. See Section 3.7.4, “Starting a Saved
Migration Job in the Jobs View,” on page 76.
Figure 3-4 PlateSpin Migrate Client‘s Jobs View
You can limit the scope of jobs displayed in the view. Use the Job Type and Jobs Status menus to specify filters for the view:
Job Type: To view discovery, migration, or all other job types. Job Status: To view failed, currently running, and completed jobs.
3.2.3 Tasks Pane
The Tasks pane of the PlateSpin Migrate Client window contains most essential migration actions. Clicking a task opens the Action window, which you can use to select the migration source, target, and setup method. See Section 3.7.1, “Setting Up a Migration Job (Wizard vs. Advanced),” on page 72.
Virtual machine - Server Sync target with workload license
PlateSpin Image Server
PlateSpin Image
Getting Started with PlateSpin Migrate 53

3.2.4 Status Bar
The status bar of the PlateSpin Migrate Client window displays information about:
The PlateSpin Server that you are currently connected to. The PlateSpin Migrate Network that you are currently working with. The User that you are logged in as, and the PlateSpin Migrate role assigned to your user account. The status of the Automatic Network Discovery feature.
Figure 3-5 Status Bar of the PlateSpin Migrate Client Window
Double-clicking any of the first three status items opens the PlateSpin Server Settings window. See “Connecting to a PlateSpin Server” on page 47.
Double-clicking the Network Discovery status item turns Automatic Windows Network Discovery on or off. See “Discovering, Registering and Preparing a VM for a Server Sync Job” on page 59.
3.3 Discovering Source Workloads and Migration TargetsFor any migration job, you must have a discovered source and a discovered target. A discovery operation populates the PlateSpin Migrate database with detailed inventory information about a machine. This information provides the data necessary to determine the machine’s use and to properly configure a migration job.
Section 3.3.1, “Pre-populating the Servers View with Windows Computers in the Network,” on page 54
Section 3.3.2, “Discovering the Details of Source Workloads and Targets,” on page 55 Section 3.3.3, “Discovering All Machines in a Windows Domain,” on page 56 Section 3.3.4, “Refreshing Machine Details,” on page 56 Section 3.3.5, “Resetting the Mechanism Used to Authenticate Access to ESX Hosts,” on page 56 Section 3.3.6, “Discovering Target Physical Machines,” on page 57 Section 3.3.7, “Discovering, Registering and Preparing a VM for a Server Sync Job,” on page 59 Section 3.3.8, “Discovery Guidelines for Machine Types and Credentials,” on page 59
3.3.1 Pre-populating the Servers View with Windows Computers in the Network
PlateSpin Migrate’s Network Discovery feature automatically populates PlateSpin Migrate Client with a list of Windows physical and virtual machines that are online. Unlike a full discovery, Network discovery creates a list of machines but does not retrieve detailed inventory information about each one, which is required for workload portability jobs.
The Network Discovery feature is necessary to discover all machines of a Windows domain in a single job. See “Discovering All Machines in a Windows Domain” on page 56.
PlateSpin Migrate uses the standard Windows network browser function for the auto-discovery feature. Because Linux workloads and virtual machine servers do not advertise to the Windows network browser, they are not auto-discovered.
54 PlateSpin Migrate 11.1 User Guide

The Network Discovery feature is enabled by default. To disable the feature or toggle between its enabled/disabled modes, double-click Network Discovery in the bottom right corner of the PlateSpin Migrate Client window.
3.3.2 Discovering the Details of Source Workloads and Targets
You can discover:
An individual physical machine An individual virtual machine An individual virtual machine server Multiple virtual machine servers All VMware ESX hosts affiliated with a VMware vCenter Server Hyper-V hosts Multiple machines
Before starting discovery operations, make sure PlateSpin Server can communicate with your source workloads and targets. See Section 2.3.1, “Requirements for Discovery,” on page 33.
1 On the PlateSpin Migrate toolbar, click Discover Details.or In the Servers view, right-click in a blank area, then select Discover Details.
2 In the Discover Details dialog box, type the hostname or IP address of the source or target. To discover multiple machines, specify multiple hostnames or IP addresses separated by semicolons. If the target is behind a NAT device, specify its public (external) IP address. See “Migrations Across Public and Private Networks through NAT” on page 35.
3 Select the machine type and provide administrator credentials for the machine you are discovering. See “Discovery Guidelines for Machine Types and Credentials” on page 59.Discovering hosts with Xen Hypervisor systems results in these systems being registered as PlateSpin Migrate source workloads (as opposed to VM host targets). For information about using these platforms as workload portability targets, see “Semi-Automated Workload Virtualization Using the X2P Workflow” on page 86.
Getting Started with PlateSpin Migrate 55

4 (Optional) If you want to store these credentials for use during future jobs, enable the Save (Encrypted Locally) option.
5 Click Discover and wait for the process to complete.6 (Optional) If you want to monitor the progress of the job, switch to the Jobs view.
3.3.3 Discovering All Machines in a Windows Domain
1 Enable the automatic Network Discovery feature. See “Pre-populating the Servers View with Windows Computers in the Network” on page 54.
2 In PlateSpin Migrate Client, expand the domain listing containing the machines to be discovered.
3 Right-click the domain name, then select Discover All Servers.4 Specify domain-level administrator credentials.5 Click Discover and wait for the process to complete.6 (Optional) If you want to monitor the progress of the job, switch to the Jobs view.
3.3.4 Refreshing Machine Details
You should routinely refresh your source workloads and targets before setting up a migration job.
To refresh a source or a target machine:
1 In the Servers view, right-click the required item, then select Refresh Details.
2 Specify the credentials appropriate for the system being refreshed, then click Refresh.PlateSpin Migrate starts a discovery job, which you can monitor in the Jobs view.
3.3.5 Resetting the Mechanism Used to Authenticate Access to ESX Hosts
If you discover ESX hosts through a vCenter Server, all subsequent communications with these VM hosts take place through the vCenter Server.
You can reset this access mechanism to Direct to ESX or back to Via vCenter:
1 Refresh the required ESX host. See “Refreshing Machine Details” on page 56.The system prompts you to select an access type:
56 PlateSpin Migrate 11.1 User Guide

2 Select the required option, then click Refresh.PlateSpin Migrate rediscovers the required ESX host by using the specified access mechanism, which it uses for all subsequent communications with that host.
3.3.6 Discovering Target Physical Machines
To discover a physical target and inventory its hardware components, you must boot the target machine with the PlateSpin boot ISO image on a CD or other media, from which your target can be booted. A similar process is used to migrate workloads to virtualization platforms that use the semi-automated virtualization process, whereby a target virtual machine on a virtual machine host is regarded as a physical target (see “Semi-Automated Workload Virtualization Using the X2P Workflow” on page 86).
“Downloading the PlateSpin Boot ISO Images” on page 57 “Injecting Additional Device Drivers into the Boot ISO Images” on page 58 “Registering Physical Targets Using the PlateSpin Boot ISO Image” on page 58 “Performing an Unattended Registration of a Target Physical Machine” on page 59
Downloading the PlateSpin Boot ISO Images
You can download the PlateSpin boot ISO image (bootofx.x2p.iso) from the PlateSpin Migrate area of NetIQ Downloads (https://dl.netiq.com/index.jsp) by doing a search with the following parameters:
Product or Technology: PlateSpin Migrate Select Version: 11.1 Date Range: All Dates
IMPORTANT: The .iso file is compressed in PhysicalTarget.zip at the download site.
Getting Started with PlateSpin Migrate 57
Injecting Additional Device Drivers into the Boot ISO Images
The PlateSpin boot ISO image contains a large library of device drivers sufficient to boot most common targets. However, occasionally you might want to use your own, such as lesser-known, vendor-specific or custom-developed drivers.
To inject drivers into the PlateSpin boot ISO image:
1 Download and extract the PlateSpin boot ISO images from NetIQ Downloads. See Downloading the PlateSpin Boot ISO Images.
2 Obtain or compile the required *.ko driver files.
IMPORTANT: Make sure the drivers are valid for the kernel included with the ISO file (3.0.93-0.8-default for 64-bit, 3.0.93-0.8-pae for 32-bit) and are appropriate for the target architecture.
3 Mount the ISO image in any Linux machine (root credentials required). Use the following command syntax:mount –o loop <path-to-ISO> <mount_point>
4 Copy the rebuildiso.sh script, located in the /tools subdirectory of the mounted ISO file, into a temporary working directory.
5 Create another working directory for the required driver files and save them in that directory.6 In the directory where you saved the rebuildiso.sh script, run the following command as root:
./rebuildiso.sh –i <ISO_file> -d <driver_dir> -m i586|x86_64On completion, the ISO file is updated with the additional drivers.
7 Unmount the ISO file (execute the command unmount <mount_point>).
Registering Physical Targets Using the PlateSpin Boot ISO Image
Complete these steps to register your target with PlateSpin Server when you are using an unmodified boot ISO image. If you want to inject additional device drivers into the image (Linux workloads only), first complete the steps in Injecting Additional Device Drivers into the Boot ISO Images (page 58).
To boot the target physical machine and register it with the PlateSpin Migrate Server:
1 Burn the PlateSpin boot ISO image on a CD or save it to the required media, from which your target can boot.
2 Boot the target machine from the ISO image.3 (Conditional) For 64-bit systems, at the initial boot prompt, type the following:
ps64
Press Enter.4 When prompted, enter the PlateSpin Server URL, using the following format:
http://<hostname | IP_address>/platespinmigrateReplace <hostname | IP_address> with the hostname or the IP address of your PlateSpin Server host.
5 Enter your credentials for the PlateSpin Server.
58 PlateSpin Migrate 11.1 User Guide

6 Specify a static IP address or indicate that the machine should dynamically obtain an IP address from a DHCP server.
7 Enter a name for the target host and specify an existing PlateSpin Migrate Network to work with.
After a few moments, PlateSpin Migrate displays the physical target in the Servers view.
Performing an Unattended Registration of a Target Physical Machine
PlateSpin Migrate provides a mechanism for automating a target physical machine’s registration with the PlateSpin Server. This involves updating the boot ISO image with specific registration information before booting the target.
For details, see KB Article 7013485 (https://www.netiq.com/support/kb/doc.php?id=7013485).
3.3.7 Discovering, Registering and Preparing a VM for a Server Sync Job
If you want to synchronize two workloads, and if your synchronization target is a virtual machine, you must discover and register an appropriate virtual machine first. For information about the Server Sync feature, see “Synchronizing Workloads with Server Sync” on page 82.
1 On your virtual machine host, create a virtual machine with the desired specifications and install the operating system that matches the intended source workload, including the exact service pack.
2 Discover the virtual machine host or refresh its details.3 In the Servers view, right-click the newly created virtual machine underneath the virtual
machine server, then select Prepare for synchronization.4 Specify administrator credentials for the virtual machine server.5 (Optional) If you want to store these credentials for use during future jobs, enable the Save
(Encrypted Locally) option.6 (Optional) To configure the temporary (Take Control) network settings, such as choosing which
virtual network to use from those available on the virtual machine server and configuring TCP/IP settings, click Configure, then configure the network settings as required.
7 Click Prepare and wait for the job to complete.
On completion, the Servers view lists a new Server Sync target underneath the VM host:
3.3.8 Discovery Guidelines for Machine Types and Credentials
The following are guidelines for machine type selection, credential format, and syntax for discovery parameters.
Getting Started with PlateSpin Migrate 59

Table 3-2 Guidelines for Discovery Parameters
3.4 Analyzing Machines with PlateSpin AnalyzerBefore you begin any large-scale migration projects, you should identify potential migration problems and correct them beforehand. Use the PlateSpin Analyzer utility to determine whether discovered machines are suitable for migration jobs.
NOTE: PlateSpin Analyzer currently supports only Windows workloads.
To Discover Machine Type Selection
Credentials Remarks
All Windows workloads
PlateSpin Image Servers
Windows Local or domain admin credentials.
For the username, use this format:
For domain member machines: authority\principal
For workgroup member machines: hostname\principal
All Linux workloads
Linux Root-level username and password
Non-root accounts must be properly configured to use sudo. See KB Article 7920711 (https://www.netiq.com/support/kb/doc.php?id=7920711).
VMware ESX hosts
VMware ESX ESX account with admin role
OR
Windows domain credentials (versions 4 and 4.1 only)
VMware ESX hosts affiliated with a VMware vCenter Server
VMware vCenter
VMware vCenter Web service credentials (username and password)
OR
Windows domain credentials (versions 4 and 4.1 only)
All subsequent communications with ESX hosts take place through the vCenter Server. To reset the access mechanism to Direct to ESX or back to Via vCenter, refresh the details of the required ESX host and select the required option. See “Resetting the Mechanism Used to Authenticate Access to ESX Hosts” on page 56.
Hyper-V hosts Windows Local or domain admin credentials.
For the username, use this format:
For domain member machines: authority\principal
For workgroup member machines: hostname\principal
Citrix XenServer VM hosts
Citrix XenServer
username root along with the associated password
XenServer hosts currently do not support multiple root-level user accounts
60 PlateSpin Migrate 11.1 User Guide

To open PlateSpin Analyzer:
1 On the Tools menu, click Analyze Servers.The PlateSpin Analyzer window opens.
2 Select the required PlateSpin Migrate Network and the required machines to analyze.3 (Optional) To reduce the analysis time, limit the scope of machines to a specific language.4 (Optional) To analyze machines in the inventory of a different PlateSpin Server, click Connect,
then specify the required PlateSpin Server URL and valid credentials.5 Click Analyze.
Depending on the number of discovered machines you select, the analysis might take a few seconds to several minutes.
Analyzed servers are listed in the left pane. Select a server to view test results in the right pane. Test results can be any combination of the following:
Table 3-3 Status Messages in PlateSpin Analyzer Test Results
The Summary tab provides a listing of the number of machines analyzed and not checked, as well as those that passed the test, failed the test, or were assigned a warning status.
The Test Results tab provides the following information:
Table 3-4 PlateSpin Analyzer Test Results Tab
The Properties tab provides detailed information about a selected machine.
Result Description
Passed The machine passed the PlateSpin Analyzer tests.
Warning One or more tests returned warnings for the machine, indicating potential migration issues. Click the hostname to see the details.
Failed One or more tests failed for this machine. Click the hostname to see the details and obtain more information.
Section Details
System Test Validates that the machine fulfills PlateSpin Migrate’s minimum hardware and operating system requirements.
Take Control Hardware Support Checks for source hardware compatibility for offline migration.
Target Hardware Support Checks hardware compatibility for use as a target physical machine.
Software Test Checks for applications that must be shut down for Live Transfer, and databases that should be shut down during Live Transfer to guarantee transactional integrity.
Incompatible Application Test Verifies that applications known to interfere with the migration process are not installed on the system. These applications are stored in the Incompatible Application Database. To add, delete, or edit entries in this database, select Incompatible Application from the Tools menu.
Getting Started with PlateSpin Migrate 61

For more information about using PlateSpin Analyzer and understanding the results, see KB Article 7920478 (https://www.netiq.com/support/kb/doc.php?id=7920478).
3.5 Working with Device DriversPlateSpin Migrate ships with a library of device drivers, and during migration jobs it automatically installs the appropriate ones for the target. To determine if the required drivers are available, use PlateSpin Analyzer. See “Analyzing Machines with PlateSpin Analyzer” on page 60.
If PlateSpin Analyzer encounters missing or incompatible drivers, or if you require specific drivers for your target infrastructure, you might need to add (upload) drivers to the PlateSpin Migrate driver database.
In addition,
Section 3.5.1, “Packaging Device Drivers for Windows Systems,” on page 62 Section 3.5.2, “Packaging Device Drivers for Linux Systems,” on page 62 Section 3.5.3, “Uploading Drivers to the PlateSpin Migrate Device Driver Database,” on page 63 Section 3.5.4, “Using the Plug and Play (PnP) ID Translator Feature,” on page 65
3.5.1 Packaging Device Drivers for Windows Systems
To package your Windows device drivers for uploading to the PlateSpin Migrate driver database:
1 Prepare all interdependent driver files (*.sys, *.inf, *.dll, etc.) for your target infrastructure and device. If you have obtained manufacturer-specific drivers as a .zip archive or an executable, extract them first.
2 Save the driver files in separate folders, with a discrete folder per device.
The drivers are now ready for upload. See Section 3.5.3, “Uploading Drivers to the PlateSpin Migrate Device Driver Database,” on page 63.
NOTE: For problem-free operation of your migration job and the target workload, upload only digitally signed drivers for:
All 64-bit Windows systems 32-bit versions of Windows Vista and Windows Server 2008, and Windows 7 systems
3.5.2 Packaging Device Drivers for Linux Systems
To package your Linux device drivers for uploading to the PlateSpin Migrate driver database, you can use a custom utility included in your Linux ISO boot image.
1 On a Linux workstation, create a directory for your device driver files. All the drivers in the directory must be for the same kernel and architecture.
2 Download the boot image and mount it.For example, assuming that the ISO has been copied under the /root directory, issue these commands:
# mkdir /mnt/ps# mount -o loop /root/bootofx.x2p.iso /mnt/ps
62 PlateSpin Migrate 11.1 User Guide

3 From the /tools subdirectory of the mounted ISO image, copy the packageModules.tar.gz archive into a another working directory and extract it.For example, with the .gz file is inside your current working directory, issue this command:
tar -xvzf packageModules.tar.gz
4 Enter the working directory and execute the following command:./PackageModules.sh –d <path_to_driver_dir> -o <package name>Replace <path_to_driver_dir> with the actual path to the directory where you saved you driver files, and <package name> with the actual package name, using the following format: Drivername-driverversion-dist-kernelversion-arch.pkgFor example, bnx2x-1.48.107-RHEL4-2.6.9-11.EL-i686.pkg
The package is now ready for upload. See .Section 3.5.3, “Uploading Drivers to the PlateSpin Migrate Device Driver Database,” on page 63
3.5.3 Uploading Drivers to the PlateSpin Migrate Device Driver Database
Use the PlateSpin Driver Manager to upload device drivers to the driver database.
NOTE: On upload, PlateSpin Migrate does not validate drivers against selected operating system types or their bit specifications; make sure that you only upload drivers that are appropriate for your target infrastructure.
“Device Driver Upload Procedure (Windows)” on page 63 “Device Driver Upload Procedure (Linux)” on page 64
Device Driver Upload Procedure (Windows)
1 Obtain and prepare the required device drivers. See Packaging Device Drivers for Windows Systems.
2 Click Tools > Manage Device Drivers and select the Windows Drivers tab:
Getting Started with PlateSpin Migrate 63

3 Click Upload Drivers, browse to the folder that contains the required driver files, and select applicable OS type, language, and hardware manufacturer options.
For most X2P migrations, select Standard as the Hardware Manufacturer option, unless your drivers are designed specifically for any of the target environments listed.
4 Click Upload and confirm your selections when prompted.The system uploads the selected drivers to the driver database.
Device Driver Upload Procedure (Linux)
1 Obtain and prepare the required device drivers. See Packaging Device Drivers for Linux Systems.
2 Click Tools > Manage Device Drivers and select the Linux Drivers tab:
3 Click Upload Drivers, browse to the folder that contains the required driver package (*.pkg), and click Upload All Drivers.The system uploads the selected drivers to the driver database.
64 PlateSpin Migrate 11.1 User Guide

3.5.4 Using the Plug and Play (PnP) ID Translator Feature
“Plug and Play” (PnP) refers to Windows operating system functionality that supports connectivity, configuration, and management with native plug and play devices. In Windows, the feature facilitates discovery of PnP compliant hardware devices attached to a PnP compliant bus. PnP compliant devices are assigned a set of Device Identification Strings by their manufacturer. These strings are programmed into the device when it is built. These strings are fundamental to how PnP works: they are part of the Windows' information source used to match the device with a suitable driver.
When the PlateSpin Server discovers workloads and their available hardware, the discovery includes these PnP IDs and the storage of that data as part of the workload’s details. PlateSpin uses the IDs to determine which, if any, drivers need to be injected during a conversion operation. The PlateSpin Server maintains a database of PnP IDs for the associated drivers of each of the supported operating systems. Because Windows and Linux use different formats for PnP IDs, a Windows workload discovered by the Migrate Linux RAM disk contains Linux-style PnP IDs.
These IDs are formatted consistently, so PlateSpin can apply a standard transformation to each of them to determine its corresponding Windows PnP ID. The translation occurs automatically within the PlateSpin product. The feature lets you or a support technician add, edit or remove custom PnP mappings.
Follow these steps to use the PnP ID Translation feature:
1 Launch the PlateSpin Driver Manager tool and connect to the PlateSpin Server.2 In the Driver Manager tool, select the PNP ID Translation tab to open the PNP ID Translation
list, which includes the currently known custom PnP ID mappings.
3 On the list page, click Add to display the Create PNP ID Mapping dialog box.
Getting Started with PlateSpin Migrate 65

4 In the Linux PNP ID field, add a Linux PnP ID.4a (Conditional) If you know it, type the Linux PnP ID you want to use.
or4b (Conditional) Select an ID from a previously discovered workload:
4b1 Adjacent to the Linux PnP ID field, click Select to open the Select Linux PnP ID dialog box.
4b2 On the dialog box, click Select Machine to display a list of the machines previously discovered by the PlateSpin Linux RAM disk.
4b3 Highlight one of the devices in the list, then click Select to populate the list in the Select Linux PnP ID dialog box.
66 PlateSpin Migrate 11.1 User Guide

4b4 Select a device on the list, then click OK to apply the standard transformation to the PnP ID and display it in the Create PnP ID Mapping dialog box.
5 In the Windows PNP ID field, add a Windows PnP ID:5a (Conditional) If you know it, type the Windows PnP ID you want to use.
or5b (Conditional) Adjacent to the Windows PNP ID field, click Select to open a mapping tool
that presents three methods for helping you map a the Windows PnP ID: Under the Driver File tab, browse to and select a Windows driver file (that is, a file
with the *.inf extension), select the desired PnP ID, then click Modify.
Getting Started with PlateSpin Migrate 67

Under the Driver Database tab, browse to and select the existing driver database, select the correct PnP ID, then select Modify.
Under the Select Machine tab, click Select Machine, then, from the list of Windows machines discovered using live discovery, select a machine, click OK to display its devices, select the desired PnP ID, then click Modify.
IMPORTANT: Selecting a Windows PnP ID that does not have an associated driver package installed might result in a failure at conversion time.
6 In the Create PnP Id Mapping dialog box, confirm that the correct Linux PnP ID and the correct Windows PnP are selected, then click OK to display the PNP ID Translation page of the PlateSpin Driver Manager.
68 PlateSpin Migrate 11.1 User Guide

7 (Optional) To modify or remove the mapping in the PNP ID Translation list, select the mapping pattern, then click Remove or Modify, depending on the operation you want to perform. Remove simply deletes the mapping (after displaying a confirmation dialog box). To modify,7a Click Modify to open the Create PNP id Mapping dialog box.7b Repeat Step 5 on page 67 to modify the Windows PnP ID.
NOTE: You cannot select or modify the Linux PnP ID.
3.6 Managing Custom ActionsPlateSpin Migrate provides you with the capability to automatically execute custom actions, such as batch files and scripts.
Section 3.6.1, “Managing Post-migration Actions (Windows and Linux),” on page 70 Section 3.6.2, “Freeze and Thaw Scripting Capabilities (Linux Block-Level Migrations),” on
page 71
Getting Started with PlateSpin Migrate 69

3.6.1 Managing Post-migration Actions (Windows and Linux)
To automate specific post-migration tasks on your target, you can include a custom action, such as a batch file, a shell script, or a program executable, in your migration job. At the end of the migration process, PlateSpin Migrate uploads the specified action, along with its dependencies, to the target and executes it.
Custom post-migration actions are supported for the following job types:
One-time Server Sync Peer-to-peer workload migration
For the capability to select a post-migration action to run as part of a migration job, you must first save the action and its dependencies in a dedicated directory and add it to the PlateSpin Server’s library. The maximum size of the directory must not exceed 64 MB. For information about raising this limit, see “Increasing the Size Limit on Post-migration Actions Uploaded to the PlateSpin Server” on page 43.
Use the following procedure for adding a post-migration action to the PlateSpin Server’s library of custom actions.
1 Create the action, test it on a sample workload, and save it together with its dependencies in a directory that the PlateSpin Server can access.Take special care when developing post-migration actions for Linux workloads, which allow different characters in file names and support different ACL (Access Control List) permissions. For Linux operating systems, amalgamate the action’s directory structure into a single file. See KB Article 7970214 (https://www.netiq.com/support/kb/doc.php?id=7970214).
2 In the PlateSpin Migrate Client, click Tools > Manage Actions.3 Click Add.
4 In the Add Action window, type a name for your custom action, select the target operating system type, then browse to and select the directory that contains the required action with its dependencies.
70 PlateSpin Migrate 11.1 User Guide

PlateSpin Migrate populates the list with the contents of the selected folder.5 In the File Name column, select the required executable, then click Set.6 In the Default Options section, specify any required command line arguments and an execution
timeout, then click OK.PlateSpin Migrate packages and uploads the library.
The action is now available for selection in migration jobs. See “Including a Custom Post-migration Action in a Migration Job” on page 148.
3.6.2 Freeze and Thaw Scripting Capabilities (Linux Block-Level Migrations)
PlateSpin Migrate provides an additional means of control over your Linux block-level migration process — the freeze and thaw shell scripts.
These scripts are executed during Linux workload migrations, at the beginning and end of block-level data transfer sessions. Specifically, they interject in the migration process in the following fashion:
1. First pass of all volumes without snapshots: Regular (non-LVM) volumes LVM without enough space to take a snapshot
2. Freeze script3. Take snapshots4. Second pass of all non-snapshot volumes5. Thaw script6. Transfer volume snapshots
You can use this capability to complement the automated daemon control feature provided through the user interface (see “Handling Source Workload Services or Daemons During Live Transfer (Windows and Linux)” on page 130.
For example, you might want to use this feature to cause an application to flush its data to disk so that the workload remains in a more consistent state during a Live Transfer migration.
To use the feature, do the following before setting up your migration job:
1 Create the following files: platespin.freeze.sh— to contain the freeze shell script logic platespin.thaw.sh— to contain the thaw shell script logic platespin.conf. A text file defining any required arguments, along with a timeout value.
The required format for the contents of the platespin.conf file is:[ServiceControl]
(optional) FreezeArguments=<arguments>(optional) ThawArguments=<arguments>(optional) TimeOut=<timeout>Replace <arguments> with the required command arguments, separated by a space, and <timeout> with a timeout value in seconds. If unspecified, the default timeout is used (60 seconds).
Getting Started with PlateSpin Migrate 71

2 Save the scripts, along with the .conf file, on your Linux source workload, in the following directory:/etc/platespin/
3.7 Setting Up, Executing, and Managing JobsMost discovery and portability operations are defined, executed, and monitored as PlateSpin Migrate jobs.
Section 3.7.1, “Setting Up a Migration Job (Wizard vs. Advanced),” on page 72 Section 3.7.2, “Pre-migration Job Validation,” on page 76 Section 3.7.3, “Saving Migration Jobs,” on page 76 Section 3.7.4, “Starting a Saved Migration Job in the Jobs View,” on page 76 Section 3.7.5, “Changing the Start Time of a Scheduled Migration Job,” on page 77 Section 3.7.6, “Viewing the Parameters of a Completed or In-Progress Migration Job,” on page 77 Section 3.7.7, “Canceling an In-Progress Job,” on page 77 Section 3.7.8, “Controlling the State of Source Workloads in the Jobs View,” on page 77 Section 3.7.9, “Generating Job Reports,” on page 77 Section 3.7.10, “Job Diagnostics,” on page 78
3.7.1 Setting Up a Migration Job (Wizard vs. Advanced)
You can set up a migration job and specify the job configuration parameters in one of the following two modes:
Advanced mode (Windows and Linux): Uses the Conversion Job window, which provides access to job configuration parameters.
Wizard mode (Windows only): Provides a convenient subset of the Advanced method and interactively captures only the essential parameters of a migration job.
The following sections provide more information:
“Differences Between the Advanced and Wizard Job Configuration Modes” on page 72 “Starting a Migration Job” on page 74
Differences Between the Advanced and Wizard Job Configuration Modes
The Advanced (Windows and Linux) and Wizard (Windows only) job configuration modes differ in the extent of available configuration options.
In Wizard mode, PlateSpin Migrate provides a convenient subset of the Advanced method, interactively captures the essential parameters of a migration job, itemizes settings specified in previous wizard pages, and provides a summary at the end.
72 PlateSpin Migrate 11.1 User Guide

Figure 3-6 Job Configuration Window in Wizard (Windows only) Mode
In Advanced mode, PlateSpin Migrate provides access to enhanced job configuration options and advanced settings for some aspects of a migration job. In Advanced mode, you access settings for an aspect of a migration job by clicking links that are grouped in categories. To hide or show category details, click the category bar.
Getting Started with PlateSpin Migrate 73

Figure 3-7 Job Configuration Window in Advanced Mode
You can access the following enhanced job configuration options in Advanced mode, but cannot access them in Wizard mode:
Specifying a non-default license for a migration job.
See “Selecting a License Key for a Migration Job” on page 105. Enabling automatic job progress and status notifications.
See “Configuring Automatic E-Mail Alerts of Job Status and Progress” on page 106. Job scheduling options.
See “Job Scheduling” on page 113. Advanced options for target virtual machine configuration.
See “Virtualization Platform-Specific and Advanced VM Configuration Options” on page 122. Saving the job for on-demand execution at a later time.
See “Saving Migration Jobs” on page 76.
Starting a Migration Job
To start setting up a migration job and select either the Advanced or the Wizard method:
1 Open the Action window by using one of the following methods: Drag a discovered source and drop it on a discovered target. Click a task in the Tasks pane.
74 PlateSpin Migrate 11.1 User Guide

Click the New Job toolbar. In the Jobs view, right-click a source and select a command from the context menu.
Available commands depend on the type of source.The Action window opens:
The Source and Target panes display workloads and targets applicable to the selected type of a migration job. The Full Transfer and Server Sync options are enabled under the following circumstances: The system detects an existing operating system on the target The operating system profile of the target matches that of the source workload
See “Synchronizing Workloads with Server Sync” on page 82.2 Check validation messages at the bottom of the window.3 To start configuring your migration job in either Wizard (Windows only) or Advanced mode,
click Start Wizard or click Advanced.4 (Optional) For convenience, to avoid displaying the Action window on drag-and-drop, select
Don’t show on drag and drop before proceeding. Subsequent drag-and-drops bypass the Action window and directly open a Conversion Job window in Advanced mode.To restore the job migration startup behavior, restore application defaults. See “General Options” on page 37.
Getting Started with PlateSpin Migrate 75

3.7.2 Pre-migration Job Validation
When starting a migration job, PlateSpin Migrate validates the job type, the source, the target, and the selected parameters, and might generate errors and warnings.
In a default PlateSpin Migrate configuration, validation messages display at the bottom of the Action window. See Step 1.
If you have configured PlateSpin Migrate to bypass the Action window on drag-and-drop, errors and warnings are displayed in a separate window:
Figure 3-8 Migration Validation Window
To force this window to open only on errors, select the Show me only when validation errors occur option.
3.7.3 Saving Migration Jobs
When you start a migration job in Advanced mode, you have additional options for saving the job and executing it at a later time.
After all options have been configured for the job, click the arrow at the right side of the Save button, then select a command from the drop-down list:
3.7.4 Starting a Saved Migration Job in the Jobs View
1 In the PlateSpin Migrate Client’s Jobs view, click the Saved Jobs tab and locate the required saved job.
2 Right-click the job and select Start.PlateSpin Migrate starts the migration job.
Error markers show configurations that you need to change before the migration job can start.
Warning markers alert you to settings that should be confirmed prior to starting the migration.
76 PlateSpin Migrate 11.1 User Guide

3.7.5 Changing the Start Time of a Scheduled Migration Job
1 In the PlateSpin Migrate Client’s Jobs view, locate the required scheduled job.2 Right-click the job and select Change Start Time.
The Change Job Start Time dialog box opens.
3 Specify the required new start date and time, then click OK.PlateSpin Migrate reschedules the job and executes it at the specified time.
3.7.6 Viewing the Parameters of a Completed or In-Progress Migration Job
1 In the PlateSpin Migrate Client’s Jobs view, locate the required job.2 Right-click the job and select View.
PlateSpin Migrate opens the job configuration window in Advanced mode and displays the job’s configuration parameters in read-only mode.
3.7.7 Canceling an In-Progress Job
1 In the PlateSpin Migrate Client’s Jobs view, locate the required job.2 Right-click the job and select Abort.
3.7.8 Controlling the State of Source Workloads in the Jobs View
You can restart or shut down your source workload in the Jobs view, unless it in an active migration job.
1 In the PlateSpin Migrate Client’s Jobs view, locate the required job.2 Right-click the job and select Restart Source or Shutdown Source as applicable.
To automate the startup state of source and target workloads, specify the required post-migration state in your migration job. See “Specifying Replication Options” on page 107.
3.7.9 Generating Job Reports
You can generate detailed reports of running and completed jobs. A report records the tasks performed during the job.
To generate a job report:
1 In the PlateSpin Migrate Client’s Jobs view, locate the required job.2 Right-click the job and select Report.
Getting Started with PlateSpin Migrate 77

A Web browser window displays the requested report.
3.7.10 Job Diagnostics
PlateSpin Migrate provides a tool that can produce a diagnostics report for any running or completed job.
To view a diagnostics report:
1 In the PlateSpin Migrate Client Jobs view, right-click the required job and select Run Diagnostics.The diagnostics report is displayed in a browser window. This process might take a few moments.
The diagnostics report lists several statistics:
All the operations involved in the job. Click any operation to view its XML representation. The status of each operation. The controller that ran the operation. Click the controller to view its XML representation, or click
Logs to view its event log.
In addition, the report contains links to:
The XML representations of the source machine, original target machine, and the target VM host.
The root operation for the job, as well as a variety of logs and reports.
Diagnostics reports can be sent directly to technical support by following the instructions provided on the report.
78 PlateSpin Migrate 11.1 User Guide

4 4Workload Portability with Peer-to-Peer Workload Migrations
Peer-to-peer refers to workload portability operations that result in a booted or bootable workload on physical hardware or a virtual machine. P2P, P2V, V2V, and V2V migrations are all peer-to-peer.
This section provides information about peer-to-peer workload portability jobs and best practices.
Section 4.1, “Migrating a Workload to a VM Host (P2V, V2V),” on page 79 Section 4.2, “Converting a Workload to a Physical Machine (P2P, V2P),” on page 80 Section 4.3, “Synchronizing Workloads with Server Sync,” on page 82 Section 4.4, “Semi-Automated Workload Virtualization Using the X2P Workflow,” on page 86 Section 4.5, “Migrating Windows Clusters,” on page 93
4.1 Migrating a Workload to a VM Host (P2V, V2V)To initiate a peer-to-peer workload virtualization migration job:
1 Discover or refresh your source workload and your target VM host. See “Discovering Source Workloads and Migration Targets” on page 54.
2 Start a migration job. See “Setting Up a Migration Job (Wizard vs. Advanced)” on page 72.
3 Configure the required parameters of the job. See “Essentials of Workload Migration Jobs” on page 105.
4 Run the job.
Workload Portability with Peer-to-Peer Workload Migrations 79

Figure 4-1 Peer-to-Peer Migration Job Window (P2V in Advanced Mode)
4.2 Converting a Workload to a Physical Machine (P2P, V2P)To initiate a peer-to-peer workload migration to a physical machine:
1 Discover your source workload. See “Discovering Source Workloads and Migration Targets” on page 54.
2 Discover and register your target physical machine with PlateSpin Migrate. See “Discovering Target Physical Machines” on page 57.
80 PlateSpin Migrate 11.1 User Guide

3 (Recommended) Use PlateSpin Analyzer to ensure that: Your source operating system and hardware are supported by PlateSpin Migrate. PlateSpin Migrate’s X2P device driver library contains device drivers that your target
requires for the operating system being ported.See “Analyzing Machines with PlateSpin Analyzer” on page 60.
4 (Conditional) If drivers for the physical target are missing, upload the required drivers to the PlateSpin Migrate’s X2P device driver library. See “Working with Device Drivers” on page 62.
5 Start a migration job. See “Setting Up a Migration Job (Wizard vs. Advanced)” on page 72.
6 Configure the required parameters of the job. See “Essentials of Workload Migration Jobs” on page 105.
7 Run the job.
Figure 4-2 Peer-to-Peer Conversion Job Window (V2P in Advanced Mode)
4.2.1 Best Practices (X2P)
When you are migrating a workload from one vendor to a target hardware infrastructure from another vendor (for example, from HP to Dell), or if your source is a virtual machine, make sure that you disable vendor-specific or VM-specific services during the transfer. For example, the HP Insight service and the VMware Tools service.
Workload Portability with Peer-to-Peer Workload Migrations 81

See “Handling Operating System Services and Applications” on page 128. When you are using the Offline transfer method for P2P and V2P migrations, make sure that you
select the appropriate Full Duplex speed that matches your network Full Duplex mode. See “Setting Up Migration Networking” on page 114.
Ensure that vendor partitions are not being copied from the source. See “Handling a Workload’s Storage Media and Volumes” on page 133.
4.3 Synchronizing Workloads with Server SyncThe Server Sync feature enables you to reduce the scope of data that is transferred from your source to your target to just data that is different between a source and a target, effectively synchronizing their volume contents.
For example, when setting up a job for a workload portability operation, you can choose to update an existing physical or virtual machine to match the state of your source workload without transferring volume data in its entirety. PlateSpin Migrate compares the target physical or virtual workload with the selected source and transfers only data that is different between the two, overwriting files on the target with those on the source workload.
Server Sync is useful in situations where the size of volume data or network conditions are prohibitive for a direct source-to-target virtualization over the network.
Section 4.3.1, “Server Sync to a Virtual Target,” on page 82 Section 4.3.2, “Server Sync to a Physical Target,” on page 85
4.3.1 Server Sync to a Virtual Target
1 Discover your source workload. See “Discovering Source Workloads and Migration Targets” on page 54.
2 Create a target virtual machine by using one of the following methods: Do an initial migration of your workload to a virtual machine. See “Migrating a Workload
to a VM Host (P2V, V2V)” on page 79.- OR -
Using your virtualization platform’s native interface, manually install a virtual machine with the same operating system profile as that of your source.
NOTE: When you are creating a virtual target for Server Sync, you should also manually install the appropriate virtualization enhancement tools, such as VMware Tools or XenServer Tools.
- OR - (Windows only) Capture your workload to a PlateSpin Image, and deploy it to a virtual
machine on your virtualization platform. See “Capturing a Workload to a PlateSpin Image” on page 97 and “Deploying a PlateSpin Image” on page 99.
3 (Conditional; Hyper-V changes to Hyper-V 2008 R2 only) Because the Server Sync option is disabled for a Hyper-V VM, it is necessary to use the following steps, as documented in KB 7010748 (https://www.netiq.com/support/kb/doc.php?id=7010748):
82 PlateSpin Migrate 11.1 User Guide

NOTE: Hyper-V 2012 and Hyper-V 2012 R2 automatic server sync is available.
3a After booting the target VM with the LRD ISO ((bootofx.x2p.iso) wait for the Migrate Server URL prompt, Then press Alt+F7 to launch the debug console.
3b From the debug console, run the following command to determine which devices are /, /boot and swap:fdisk -l
3c Using the information obtained from the debug console, mount the appropriate devices as under:
mount /dev/%root device% / mount /dev/%boot device% /boot
3d Press Alt+F1 to switch to the server command line.3e At the command line, provide the required information at each individual prompt:
PlateSpin Server: Use the following format:http://server_host/platespinmigrateReplace server_host with the actual PlateSpin Server host’s name or IP address.
Credentials (User Name/Password): Enter the name of an admin-level user on the PlateSpin Server host, including the domain or machine name. For example: domain\username, or localhost\Administrator. Provide a valid password for the specified user.
Network Card: Select the network card that is active, then either enter a temporary static IP address for this card or press the Enter key to use a DHCP server.
Temporary hostname: Provide a temporary VM name for PlateSpin Migrate Client to use to list the newly registered VM. The workload’s target hostname you select in the migration job overwrites this name.
SSL encryption: If your PlateSpin Migrate is installed on a host with SSL encryption enabled, enter Yes. If not, enter No.
PlateSpin Migrate Network: Unless you have defined your own PlateSpin Migrate Network in PlateSpin Migrate Client, press the Enter key. If you are working with a non-default PlateSpin Migrate Network, type its name, then press the Enter key.A controller on your target virtual machine communicates with PlateSpin Server and registers the virtual machine as a physical target for a migration job.
4 In the Servers view, drag your source workload and drop it on the required target (Server Sync target or discovered physical machine under control).The system validates the selected source and target and, if it detects matching operating systems on them, provides you with two Transfer Scope options, Full Migration and Server Sync:
Workload Portability with Peer-to-Peer Workload Migrations 83

5 Select the Server Sync option, then click Advanced (you can only set up a Server Sync job in Advanced mode).A Server Sync job configuration window opens in Advanced mode:
84 PlateSpin Migrate 11.1 User Guide

6 In the job configuration window, specify the parameters of the job as dictated by the purpose of the operation, address any warnings and errors, and make sure that you map the required volumes on the source to those on the target (see “Volume Configuration in Server Sync” on page 145).When you have finished, click Start.PlateSpin Migrate starts the job and lists it in the Jobs view.
4.3.2 Server Sync to a Physical Target
1 Discover your source workload. See “Discovering Source Workloads and Migration Targets” on page 54.
2 Discover your physical target by using the appropriate boot ISO boot image. See “Discovering Target Physical Machines” on page 57.
3 In the Servers view, drag your source workload and drop it on the required target (Server Sync target or discovered physical machine under control).The system validates the selected source and target and, if it detects matching operating systems on them, it provides you with two Transfer Scope options, Full Migration and Server Sync, similar to the Server Sync to a Virtual Target scenario (see Step 4).
Workload Portability with Peer-to-Peer Workload Migrations 85

4 Select the Server Sync option, then click Advanced (you can only set up a Server Sync job in Advanced mode).A Server Sync job configuration window opens in Advanced mode:
5 In the job configuration window, specify the parameters of the job as dictated by the purpose of the operation, address any warnings and errors, and make sure that you map the required volumes on the source to those on the target.
6 When you have finished, click Start.PlateSpin Migrate starts the job and lists it in the Jobs view.
4.4 Semi-Automated Workload Virtualization Using the X2P WorkflowSemi-automated refers to the process of workload virtualization in which a workload's target infrastructure is a virtual machine that PlateSpin Migrate regards as a physical machine. This applies to the following virtualization platforms:
Windows Server 2008 R2 Hyper-V Citrix XenServer 6.1 SUSE Linux Enterprise Server (SUSE) 11 SP3 Xen (fully virtualized guest)
To migrate a workload to one of these platforms:
1 Use the native interface of the required virtualization platform to create a virtual machine whose operating system profile matches that of your source workload.
2 Begin booting the newly created virtual machine by using the appropriate PlateSpin boot ISO image, load the appropriate driver, if needed, then continue the boot process.This discovers and registers the target virtual machine as a PlateSpin Migrate physical machine target. This is similar to the process described in “Discovering Target Physical Machines” on page 57. However, instead of burning the ISO image to a CD to boot physical hardware, you save the image on the VM host and use it to boot the target VM.
3 Use the PlateSpin Migrate Client to create and execute an X2P migration job.4 Upon completion of the migration job, install virtualization enhancement software specific to the
target virtualization platform.
The following topics provide additional notes about migrating workloads to the specific virtualization platform involved.
Section 4.4.1, “Migrating a Workload to Microsoft Hyper-V,” on page 86 Section 4.4.2, “Migrating a Workload to Citrix XenServer,” on page 89 Section 4.4.3, “Migrating a Workload to the SLES 11 SP3 Xen Hypervisor,” on page 91
4.4.1 Migrating a Workload to Microsoft Hyper-V
You can use Microsoft Hyper-V as the target virtualization platform in a semi-automated workload virtualization.
NOTE: Hyper-V 2012 and Hyper-V 2012 R2 automatic workload virtualization is also available.
86 PlateSpin Migrate 11.1 User Guide

Prerequisites:
Your source workload is supported by PlateSpin Migrate and Hyper-V.
See “Supported Target Virtualization Platforms” on page 16.
Additional information:
Microsoft Hyper-V Getting Started Guide (http://technet.microsoft.com/en-us/library/cc732470.aspx)
Virtualization with Hyper-V (http://www.microsoft.com/windowsserver2008/en/us/hyperv.aspx)
This section includes the following topics:
“Downloading and Saving the Boot ISO Image (Hyper-V)” on page 87 “Creating and Configuring the Target Virtual Machine (Hyper-V)” on page 87 “Registering the Virtual Machine with PlateSpin Server (Hyper-V)” on page 88 “Migrating Your Source Workload to the Target Virtual Machine (Hyper-V)” on page 88 “Post-Migration Steps (Hyper-V)” on page 89
Downloading and Saving the Boot ISO Image (Hyper-V)
1 Download the appropriate boot ISO image for your workload. 2 (Optional) If you want to perform an unattended registration of your target, update the ISO
image with the required registration parameters. See KB Article 7920832 (https://www.netiq.com/support/kb/doc.php?id=7920832).
3 Save the ISO image in a location that Hyper-V server can access. For example: c:\temp.This ensures that the boot ISO image is available to the target VM as a bootable CD-ROM image.
Creating and Configuring the Target Virtual Machine (Hyper-V)
1 Use the Hyper-V Manager’s New Virtual Machine Wizard to create a new virtual machine with the following settings: Name and Location: Specify a name for your new target and accept the default location. Assign Memory: Assign at least 384 MB of RAM to the VM. Connect Virtual Hard Disk: Ensure that the virtual disk size is equal to or greater than the
system disk of your source workload. Installation Options: Configure the VM to boot from an ISO image file, and point the
wizard to the downloaded boot ISO image. Summary: Configure the VM to not start upon creation (deselect the Start the virtual
machine after it is created option).2 After creating the VM, remove the default NIC and replace it with a generic one, called Legacy
Network Adapter.This is required because the New Virtual Machine Wizard creates a NIC of a custom Microsoft type, which is currently unsupported by PlateSpin Migrate.
3 Connect the newly added NIC (Legacy Network Adapter) to the external virtual network.
Workload Portability with Peer-to-Peer Workload Migrations 87

Registering the Virtual Machine with PlateSpin Server (Hyper-V)
Complete these steps to register your target with PlateSpin Server when you are using an unmodified boot ISO image.
1 At the command line in the Hyper-V Virtual Machine Connection Console, provide the required information at each individual prompt: PlateSpin Server: Use the following format:
http://server_host/platespinmigrateReplace server_host with the actual PlateSpin Server host’s name or IP address.
Credentials (User Name/Password): Enter the name of an admin-level user on the PlateSpin Server host, including the domain or machine name. For example: domain\username, or localhost\Administrator. Provide a valid password for the specified user.
Network Card: Select the network card that is active, then either enter a temporary static IP address for this card or press the Enter key to use a DHCP server.
Temporary hostname: Provide a temporary VM name for PlateSpin Migrate Client to use to list the newly registered VM. The workload’s target hostname you select in the migration job overwrites this name.
SSL encryption: If your PlateSpin Migrate is installed on a host with SSL encryption enabled, enter Yes. If not, enter No.
PlateSpin Migrate Network: Unless you have defined your own PlateSpin Migrate Network in PlateSpin Migrate Client, press the Enter key. If you are working with a non-default PlateSpin Migrate Network, type its name, then press the Enter key.A controller on your target virtual machine communicates with PlateSpin Server and registers the virtual machine as a physical target for a migration job.
NOTE: If registration fails with an authorization error, you might need to synchronize the clocks of the source and the target, modify the LAN Manager Authentication Level on the target, or both. See Table D-1, “Common Issues and Solutions Related to Discovery Operations,” on page 185.
Migrating Your Source Workload to the Target Virtual Machine (Hyper-V)
1 Use PlateSpin Migrate Client to start an X2P migration job with your source workload being the job’s migration source and the target being the new VM on Hyper-V. See “Converting a Workload to a Physical Machine (P2P, V2P)” on page 80.
2 Monitor the migration job in PlateSpin Migrate Client‘s Jobs view. When the job reaches the Configure Target Machine step, the virtual machine’s console returns to the boot prompt of the boot ISO image.
3 Shut down the virtual machine and reconfigure it to boot from disk rather than from the boot image.
4 Power on the virtual machine.The migration job resumes, reboots the target, and completes the workload configuration.
88 PlateSpin Migrate 11.1 User Guide
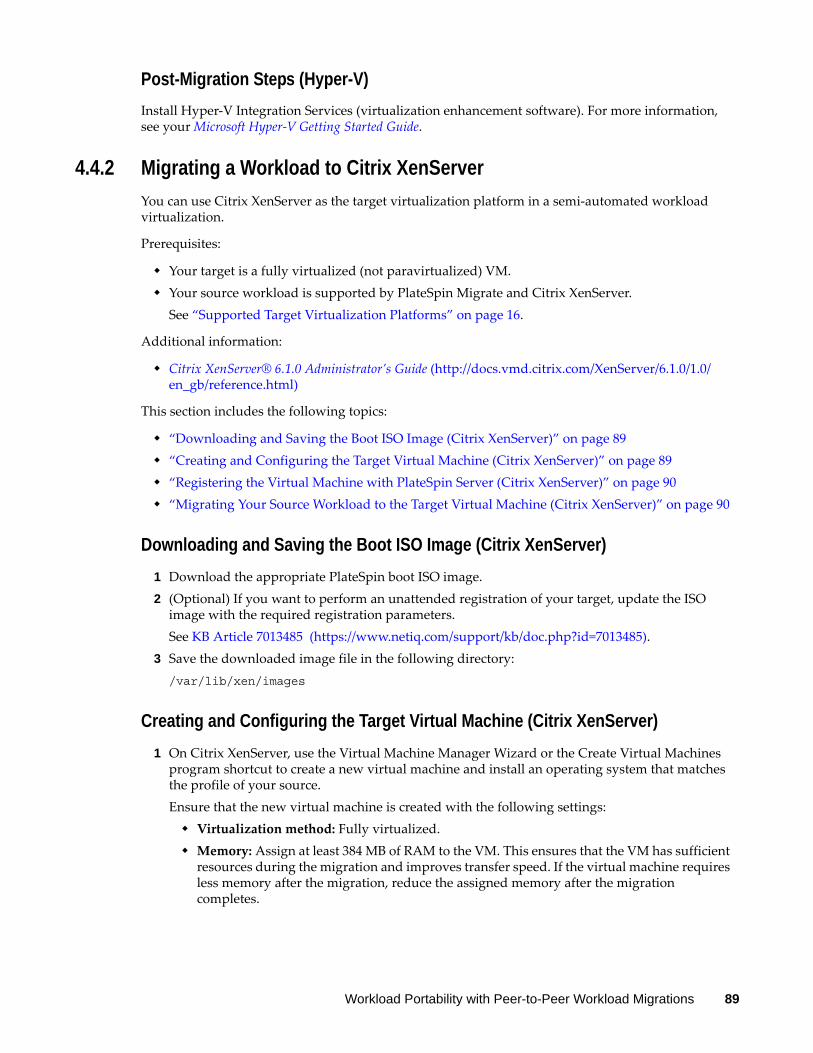
Post-Migration Steps (Hyper-V)
Install Hyper-V Integration Services (virtualization enhancement software). For more information, see your Microsoft Hyper-V Getting Started Guide.
4.4.2 Migrating a Workload to Citrix XenServer
You can use Citrix XenServer as the target virtualization platform in a semi-automated workload virtualization.
Prerequisites:
Your target is a fully virtualized (not paravirtualized) VM. Your source workload is supported by PlateSpin Migrate and Citrix XenServer.
See “Supported Target Virtualization Platforms” on page 16.
Additional information:
Citrix XenServer® 6.1.0 Administrator’s Guide (http://docs.vmd.citrix.com/XenServer/6.1.0/1.0/en_gb/reference.html)
This section includes the following topics:
“Downloading and Saving the Boot ISO Image (Citrix XenServer)” on page 89 “Creating and Configuring the Target Virtual Machine (Citrix XenServer)” on page 89 “Registering the Virtual Machine with PlateSpin Server (Citrix XenServer)” on page 90 “Migrating Your Source Workload to the Target Virtual Machine (Citrix XenServer)” on page 90
Downloading and Saving the Boot ISO Image (Citrix XenServer)
1 Download the appropriate PlateSpin boot ISO image. 2 (Optional) If you want to perform an unattended registration of your target, update the ISO
image with the required registration parameters. See KB Article 7013485 (https://www.netiq.com/support/kb/doc.php?id=7013485).
3 Save the downloaded image file in the following directory:/var/lib/xen/images
Creating and Configuring the Target Virtual Machine (Citrix XenServer)
1 On Citrix XenServer, use the Virtual Machine Manager Wizard or the Create Virtual Machines program shortcut to create a new virtual machine and install an operating system that matches the profile of your source. Ensure that the new virtual machine is created with the following settings: Virtualization method: Fully virtualized. Memory: Assign at least 384 MB of RAM to the VM. This ensures that the VM has sufficient
resources during the migration and improves transfer speed. If the virtual machine requires less memory after the migration, reduce the assigned memory after the migration completes.
Workload Portability with Peer-to-Peer Workload Migrations 89

Disks: Assign one or more disks, depending on the requirements of your source workload. The storage can be either a raw SAN LUN or a virtual disk. Also, create a Virtual CD-ROM assigned to the downloaded boot ISO image.
Operating System: Must match the operating system profile of your source workload.2 Ensure that the VM is configured to restart on reboot by exporting the VM’s settings from the
xend database to a text file and making sure that the on_reboot parameter is set to restart. If not, shut down the VM, update the settings, and reimport them into the xend database.For detailed instructions, see the XenServer 6.1.0 Virtual Machine User's Guide (http://support.citrix.com/article/CTX134587).
3 From the Virtual Machine Manager, launch the virtual machine console and monitor the boot process.When the virtual machine completes the boot process, it prompts you for parameters that control the registration of the machine and its profile with PlateSpin Migrate. If you are using the unattended registration process, the required parameters are read from an answer file.
Registering the Virtual Machine with PlateSpin Server (Citrix XenServer)
Complete these steps to register your target with PlateSpin Server when you are using an unmodified boot ISO image.
1 At the command line, provide the required information at each individual prompt: PlateSpin Server: Use the following format:
http://server_host/platespinmigrateReplace server_host with the actual PlateSpin Server host’s name or IP address.
Credentials (User Name/Password): Enter the name of an admin-level user on the PlateSpin Server host, including the domain or machine name. For example: domain\username, or localhost\Administrator. Provide a valid password for the specified user.
Network Card: Select the network card that is active, then either enter a temporary static IP address for this card or press the Enter key to use a DHCP server.
Temporary hostname: Provide a temporary VM name for PlateSpin Migrate Client to use to list the newly registered VM. The workload’s target hostname you select in the migration job overwrites this name.
SSL encryption: If your PlateSpin Migrate is installed on a host with SSL encryption enabled, enter Yes. If not, enter No.
PlateSpin Migrate Network: Unless you have defined your own PlateSpin Migrate Network in PlateSpin Migrate Client, press the Enter key. If you are working with a non-default PlateSpin Migrate Network, type its name, then press the Enter key.A controller on your target virtual machine communicates with PlateSpin Server and registers the virtual machine as a physical target for a migration job.
Migrating Your Source Workload to the Target Virtual Machine (Citrix XenServer)
1 Use PlateSpin Migrate Client to start an X2P migration job with your source workload being the job’s migration source and the target being the new VM on the Citrix XenServer hypervisor. See “Converting a Workload to a Physical Machine (P2P, V2P)” on page 80.
2 Monitor the migration job in the PlateSpin Migrate Client‘s Jobs view.
90 PlateSpin Migrate 11.1 User Guide

When the job reaches the Configure Target Machine step, the virtual machine’s console returns to the boot prompt of the boot ISO image.
3 Shut down the virtual machine, reconfigure it to boot from disk rather than from the boot image, and deselect the VS Tools Installed option.
4 Power on the virtual machine.The migration job resumes, reboots the target, and completes the workload configuration.
4.4.3 Migrating a Workload to the SLES 11 SP3 Xen Hypervisor
You can use the Xen Hypervisor on SLES as the target virtualization platform in a semi-automated workload virtualization.
Prerequisites:
Your source workload is supported by PlateSpin Migrate and the Xen hypervisor.
See “Supported Target Virtualization Platforms” on page 16.
Additional information:
SUSE Linux Enterprise Server 11 SP3 Virtualization with Xen (https://www.suse.com/documentation/sles11/singlehtml/book_xen/book_xen.html)
This section includes the following topics:
“Downloading and Saving the Boot ISO Image (Xen on SLES)” on page 91 “Creating and Configuring the Target Virtual Machine (Xen on SLES)” on page 91 “Registering the Virtual Machine with PlateSpin Server (Xen on SLES)” on page 92 “Migrating Your Source Workload to the Target Virtual Machine (Xen on SLES)” on page 93 “Post-Migration Steps (Xen on SLES)” on page 93
Downloading and Saving the Boot ISO Image (Xen on SLES)
1 Download the appropriate boot ISO image for your workload. See “Downloading the PlateSpin Boot ISO Images” on page 57.
2 (Optional) If you want to perform an unattended registration of your target, update the ISO image with the required registration parameters. See KB Article 7920832 (https://www.netiq.com/support/kb/doc.php?id=7920832).
3 Save the downloaded image file in the following directory:/var/lib/xen/images
Creating and Configuring the Target Virtual Machine (Xen on SLES)
1 On SLES 11, use the Virtual Machine Manager Wizard or the Create Virtual Machines program shortcut to create a new virtual machine and install an operating system that matches the profile of your source. Ensure that the new virtual machine is created with the following settings: Virtualization method: Fully virtualized.
Workload Portability with Peer-to-Peer Workload Migrations 91

Memory: Assign at least 384 MB of RAM to the VM. This ensures that the VM has sufficient resources during the migration and improves transfer speed. If the virtual machine requires less memory after the migration, reduce the assigned memory after the migration completes.
Disks: Assign one or more disks, depending on the requirements of your source workload. The storage can be either a raw SAN LUN or a virtual disk. Also, create a Virtual CD-ROM assigned to the downloaded boot ISO image.
Operating System: Must match the operating system profile of your source workload.2 Ensure that the VM is configured to restart on reboot by exporting the VM’s settings from the
xend database to a text file and making sure that the on_reboot parameter is set to restart. If not, shut down the VM, update the settings, and reimport them into the xend database.For detailed instructions, see your SLES 11 documentation (https://www.suse.com/documentation/sles11/).
3 From the Virtual Machine Manager, launch the virtual machine console and monitor the boot process.When the virtual machine completes the boot process, it prompts you for parameters that control the registration of the machine and its profile with PlateSpin Migrate. If you are using the unattended registration process, the required parameters are read from an answer file.
Registering the Virtual Machine with PlateSpin Server (Xen on SLES)
Complete these steps to register your target with PlateSpin Server when you are using an unmodified boot ISO image. For information on how to modify the image for an unattended registration process, see KB Article 7920832 (https://www.netiq.com/support/kb/doc.php?id=7920832).
1 At the command line, provide the required information at each individual prompt: PlateSpin Server: Use the following format:
http://server_host/platespinmigrateReplace server_host with the actual PlateSpin Server host’s name or IP address.
Credentials (User Name/Password): Enter the name of an admin-level user on the PlateSpin Server host, including the domain or machine name. For example: domain\username, or localhost\Administrator. Provide a valid password for the specified user.
Network Card: Select the network card that is active, then either enter a temporary static IP address for this card or press the Enter key to use a DHCP server.
Temporary hostname: Provide a temporary VM name for PlateSpin Migrate Client to use to list the newly registered VM. The workload’s target hostname you select in the migration job overwrites this name.
SSL encryption: If your PlateSpin Migrate is installed on a host with SSL encryption enabled, enter Yes. If not, enter No.
PlateSpin Migrate Network: Unless you have defined your own PlateSpin Migrate Network in PlateSpin Migrate Client, press they Enter key. If you are working with a non-default PlateSpin Migrate Network, type its name, then press the Enter key.A controller on your target virtual machine communicates with PlateSpin Server and registers the virtual machine as a physical target for a migration job.
92 PlateSpin Migrate 11.1 User Guide

Migrating Your Source Workload to the Target Virtual Machine (Xen on SLES)
1 Use PlateSpin Migrate Client to start an X2P migration job with your source workload being the job’s migration source and the target being the new VM on the Xen hypervisor. See “Converting a Workload to a Physical Machine (P2P, V2P)” on page 80.
2 Monitor the migration job in the PlateSpin Migrate Client‘s Jobs view. When the job reaches the Configure Target Machine step, the virtual machine’s console returns to the boot prompt of the boot ISO image.
3 Shut down the virtual machine, reconfigure it to boot from disk rather than from the boot image, and deselect the VS Tools Installed option.
4 Power on the virtual machine.The migration job resumes, reboots the target, and completes the workload configuration.
Post-Migration Steps (Xen on SLES)
Install SUSE Drivers for Xen (virtualization enhancement software). For more information, see the following online document:
SUSE Linux Enterprise Server 11 SP3 Virtualization with Xen (https://www.suse.com/documentation/sles11/singlehtml/book_xen/book_xen.html)
4.5 Migrating Windows ClustersYou can migrate a Microsoft Windows cluster’s business services. PlateSpin Migrate supports single-active-node versions of the following clustering technologies:
Windows 2008 Server-based Microsoft Failover Cluster (Node and Disk Majority and No Majority: Disk Only models)
You can use a Move job to migrate the essential services of a cluster that results in a functional single-node cluster in a virtual machine.
The scope of support for cluster migrations in the current release is subject to the following conditions:
All shared disks belong to the active node. The source workload of the migration must be the active node—the node that currently owns
the quorum resource of the cluster. To discover a cluster, specify the IP address of one of the cluster’s resource groups.
A cluster’s quorum resource must be collocated with the cluster’s resource group (service) being protected.
For a successful X2P or Server Sync operation, target disks must have discrete SCSI controllers to separate the cluster’s shared disks from disks that host system volumes of individual nodes.
To be able to function, the migrated single-cluster virtual machine requires access to a domain controller with the same parameters as the original domain controller. To address this requirement, consider either leaving the original domain controller online or simultaneously migrating it as well.
File based transfer is not supported for protecting Microsoft Windows clusters.
Workload Portability with Peer-to-Peer Workload Migrations 93

The workflow of migrating a Windows cluster is similar to that of migrating a standalone server:
1 Discover the active node, specifying the cluster IP address and cluster admin credentials.2 In the Servers view, use drag-and-drop to start a migration job, then configure the job’s
parameters.3 (Conditional: successful migration) If the migration job completes successfully, perform a Server
Sync operation on the active node.
NOTE: If the active node in the cluster fails over before you can perform a Server Sync operation, perform a full migration using the new active node, and then perform a Server Sync on this new node.
4 (Conditional: failover prior to migration) If a cluster failover occurs prior to the completion of file transfer, the migration job aborts. If this happens, refresh the source and retry the migration job.
NOTE: If you select Shut down for the source’s post-migration end state, a shutdown of all source nodes of the cluster results.
94 PlateSpin Migrate 11.1 User Guide

5 5Windows Workload Portability with a PlateSpin Image
This section provides information about using the PlateSpin Image volume archiving feature (Windows only).
Section 5.1, “About PlateSpin Images,” on page 95 Section 5.2, “Designating a PlateSpin Image Server,” on page 95 Section 5.3, “Capturing a Workload to a PlateSpin Image,” on page 97 Section 5.4, “Deploying a PlateSpin Image,” on page 99 Section 5.5, “Managing PlateSpin Images,” on page 100
5.1 About PlateSpin ImagesOne of PlateSpin Migrate’s three fundamental workload infrastructures, a PlateSpin Image is an image of a supported Windows workload consisting of volume data along with configuration specifics of the source server’s hardware, operating system, and network identity.
Image configurations are maintained in an XML (config.xml) file with each image having one or more sets of associated volume data.
PlateSpin Images and the image server’s config.xml configuration file are stored on the designated PlateSpin Image Server host in the following directory:
..\Program Files\PlateSpin Image Server
In addition to volume data directly captured during an X2I migration, PlateSpin Migrate supports existing or raw volume data.
Like peer-to-peer migrations, image deployment allows for key workload configuration options, such as those for managing the workload’s disk layout, volume sizes, network identity, and domain or workgroup affiliation.
5.2 Designating a PlateSpin Image ServerTo work with PlateSpin Images, you must first designate a machine as an image server by installing the PlateSpin Image Server software on it. You can install a PlateSpin Image Server instance either on a dedicated host or on your PlateSpin Server host. For information about storing PlateSpin PlateSpin Images on a NAS (Network Attached Storage) device or a remote share, see KB Article 7921021 (https://www.netiq.com/support/kb/doc.php?id=7921021).
NOTE: Although collocation of the PlateSpin Server with a PlateSpin Image Server instance on the same host is supported, the recommended setup is to install a PlateSpin Image Server on a dedicated host, which simplifies troubleshooting related to imaging functionality.
Windows Workload Portability with a PlateSpin Image 95

Dedicated PlateSpin Image Server hosts must meet the following requirements:
Table 5-1 PlateSpin Image Server Host Requirements
To designate a machine as a PlateSpin Image Server:
1 Discover the system you plan to designate as a PlateSpin Image Server.2 In the Servers view, right-click the discovered server and select Install Image Server.
3 Provide administrator credentials for the selected host and specify the desired directory for image files.
4 Click Install.PlateSpin Migrate installs a controller on the selected host and configures it to run as a PlateSpin Image Server. On completion, the Servers view lists a new PlateSpin Image Server item:
Requirement Details
Operating System Any of the following:
Microsoft Windows Server 2008 R2
Microsoft Windows Server 2008
Microsoft Windows Vista
Microsoft Windows Server 2003
Microsoft Windows 2000
Disk Space Minimum 100 MB for basic controller software.
Additional space requirements depend on the number and size of workload images that you intend to store on a given image server.
Software Microsoft .NET Framework 3.5 SP1
(Windows Server 2008 and Vista systems only) Remote Registry service enabled
96 PlateSpin Migrate 11.1 User Guide

5.3 Capturing a Workload to a PlateSpin ImageUse this procedure to capture a physical or virtual workload as a PlateSpin Image.
1 Discover, or refresh the details of, your source workload and your PlateSpin Image Server. 2 Start a new Capture Image job by using one of the following methods:
In the Servers view, right-click the source workload, then select Capture Image. In the Action window, select the source workload and the target image server.
In the Tasks pane, click Capture Image. In the Action window, select the source workload and the target image server.
In the Servers view, drag the source workload and drop it on the image server. If you configured PlateSpin Migrate to bypass the Action window on drag-and-drop, the Create Image dialog box prompts you to specify whether you want to create a new image or use existing volume data.
3 Select Create Image, then click OK.
Windows Workload Portability with a PlateSpin Image 97

4 Specify the required settings for the migration job by clicking the links in each category: Job Configuration: Specify the required transfer method and operational continuity
settings for your source and target (General), scheduling options (Schedule), source and target credentials (Credentials), job status and progress notification options, temporary network settings (Take Control), and the required license key to use (License Key).
Image Configuration: Specify the image name, the path to the location where the you want the image to be stored, and whether or not to use NTFS compression (under Image Configuration, click General).
98 PlateSpin Migrate 11.1 User Guide

Operating System and Application Configuration: If you selected the Live Transfer method, specify how you want PlateSpin Migrate to handle operating system and application services on your source (Live Transfer Services).
Drive Configuration: Select the volumes that you want PlateSpin Migrate to include in the image and specify the path for the package file (under Drive Configuration, click Volumes).
5.4 Deploying a PlateSpin ImageUse this procedure to deploy a PlateSpin Image on a supported physical machine or virtualization platform.
1 Drag and drop the required PlateSpin Image to a discovered target physical machine or VM host.
Windows Workload Portability with a PlateSpin Image 99

2 Specify the required settings for the migration job by clicking the links in each category.Migration jobs are auto-configured to create the target machine with the same settings as the source server. Depending on the objectives of the migration, you can: Modify the Network Identification settings to configure the hostname and domain/
workgroup registration of the target machine. Modify the Guest NIC settings to configure the TCP/IP properties for the network adapters
on the target machine. Modify the Drive Configuration settings to select the volumes to copy during the
migration.3 If the intended target is a virtual machine, specify the required virtual machine parameters and
select the options you require, such as memory allocation, or automatic installation of VMware Tools or VMAdditions.
4 Review and address errors and warnings.5 Click Start to deploy the image.
5.5 Managing PlateSpin Images Section 5.5.1, “Moving Images from One PlateSpin Image Server to Another,” on page 100 Section 5.5.2, “Automating Image Operations,” on page 100 Section 5.5.3, “Browsing and Extracting Image Files,” on page 101
5.5.1 Moving Images from One PlateSpin Image Server to Another
1 Copy the image directory from the old PlateSpin Image Server host’s file system to a location on the new PlateSpin Image Server host.
2 Update the new PlateSpin Image Server’s config.xml file to identify the path to and the name of the image that was moved from the old PlateSpin Image Server.
3 Refresh the new image server’s details in the PlateSpin Migrate Client’s Servers view.
For more information, see KB Article 7920189 (https://www.netiq.com/support/kb/doc.php?id=7920189).
5.5.2 Automating Image Operations
You can use the ImageOperations command line utility, included with PlateSpin Migrate, to automate several tasks related to images, such as regularly moving multiple base images, along with related increments, between PlateSpin Image Servers.
The utility provides the capability to automate the following operations:
Register: Associate an image or image increments with a specified image server. Unregister: Disassociate a registered image from a specified image server. Gather: Assemble a package of a PlateSpin Image and its volumes into a specified subdirectory.
To use the ImageOperations command line utility:
1 On your PlateSpin Image Server host, open a command interpreter (cmd.exe) and change the current directory to ..\Program Files\PlateSpin Image Server\ImageOperations.
2 Type ImageOperations followed by the required command and parameters, then press Enter.
100 PlateSpin Migrate 11.1 User Guide

For command syntax and usage details, type ImageOperations, then press Enter.3 When you have finished, refresh the image server’s details in the Servers view.
5.5.3 Browsing and Extracting Image Files
During a disaster recovery effort or a business continuity exercise you can selectively restore files in your production server’s file system, using backup versions of those files that are stored in PlateSpin Images.
To do this, you can use the PlateSpin Image Browser utility, which enables you to browse, search, sort, and extract files from different sources:
An image file A specific image increment file
You can work with both base images and image increments by loading different files:
A base image’s corresponding binary file (volume-x.pkg) or text configuration file (image_name.xml).
An image increment’s binary (image_increment.pkg) file. You cannot use an increment’s text configuration file (image_increment_name.xml).
The utility enables you to work with image files in a Windows Explorer-like environment. A command line version enables you to extract files at the command line.
“Starting the Image Browser and Loading Image Files” on page 101 “Sorting and Searching Items in the Image Browser Interface” on page 102 “Extracting Items” on page 102 “Browsing and Extracting Image Files at the Command Line” on page 103
Starting the Image Browser and Loading Image Files
1 Start the ImageBrowser program (ImageBrowser.exe), located in one of the following directories: On your PlateSpin Server host:
..\PlateSpin Migrate Server\bin\ImageOperations
On your PlateSpin Image Server host:..\Program Files\PlateSpin Image Server\ImageOperations
The utility starts and displays the Open dialog box. At any time after the program’s initial startup, you can load an image file by clicking File > Open.
2 In the Open dialog box, select the file type, navigate to and select the required image or image increment file, then click OK.The utility loads the required file and displays its contents in a two-pane interface.
Windows Workload Portability with a PlateSpin Image 101

Depending on the size of the image, it might take a few seconds to several minutes for the utility to load the required file.
Sorting and Searching Items in the Image Browser Interface
You can sort the contents of a selected directory by name, size, type, date last modified, and by file attribute. To sort items in a selected view, click the corresponding bar at the top of the right pane.
You can search for a specific directory name or file name. You can use alphanumeric text, wildcards, and regular expressions. Regular expression search patterns that you specify must adhere to the Microsoft .NET Framework regular expression syntax requirements. See the Microsoft .NET Framework Regular Expressions page on MSDN (http://msdn.microsoft.com/en-us/library/hs600312.aspx).
To search for an item:
1 Load the required image or image increment. See “Starting the Image Browser and Loading Image Files” on page 101.
2 In the left pane, select a volume or a subdirectory.3 On the Actions menu, click Search.
Alternately, you can right-click the required volume or subdirectory in the left pane and click Search in the context menu.The Image Browser Search window opens.
4 Specify the name of the file you are searching. If you are using a regular expression, select the corresponding option.
5 Click Search.The results are shown in the right pane.
Extracting Items
1 Load the required image or image increment. See “Starting the Image Browser and Loading Image Files” on page 101.
2 Locate and select the required file or directory.You can select multiple files and directories in the right pane.
3 On the Actions menu, click Extract.Alternately, you can right-click the required item and click Extract in the context menu.The Browse for Folder dialog box opens.
102 PlateSpin Migrate 11.1 User Guide

4 Browse to the required destination, then click OK.The selected items are extracted to the specified destination.
NOTE: Files that you choose to overwrite are deleted if you interrupt the extraction process.
Browsing and Extracting Image Files at the Command Line
To browse and extract files from images and image increments at the command line, you can use the ImageBrowser.Console utility.
To start the utility:
1 On your PlateSpin Image Server host, open a command interpreter (cmd.exe) and change the current directory to ..\Program Files\PlateSpin Image Server\ImageOperations.
2 At the command prompt, type ImageBrowser.Console, then press Enter.For command syntax and usage details, type ImageBrowser.Console /help, then press Enter.
Windows Workload Portability with a PlateSpin Image 103

104 PlateSpin Migrate 11.1 User Guide

6 6Essentials of Workload Migration Jobs
This section provides information about configuring the key aspects of a workload migration job using the PlateSpin Migrate Client.
Where applicable, differences between the Advanced and Wizard modes are noted. See “Setting Up, Executing, and Managing Jobs” on page 72.
Section 6.1, “Selecting a License Key for a Migration Job,” on page 105 Section 6.2, “Configuring Automatic E-Mail Alerts of Job Status and Progress,” on page 106 Section 6.3, “Specifying Replication Options,” on page 107 Section 6.4, “Specifying End States for Source and Target Workloads,” on page 108 Section 6.5, “Specifying Network Options,” on page 109 Section 6.6, “Specifying Credentials to Access Sources and Targets,” on page 110 Section 6.7, “Managing a Workload’s Network Identity,” on page 111 Section 6.8, “Job Scheduling,” on page 113 Section 6.9, “Setting Up Migration Networking,” on page 114 Section 6.10, “Configuring Target Virtual Machines,” on page 121 Section 6.11, “Handling Operating System Services and Applications,” on page 128 Section 6.12, “Handling a Workload’s Storage Media and Volumes,” on page 133 Section 6.13, “Including a Custom Post-migration Action in a Migration Job,” on page 148
6.1 Selecting a License Key for a Migration JobBy default, PlateSpin Migrate automatically selects the best license key for a particular migration job. If you have multiple license keys, you can select a specific license key to apply to a particular migration job. For information about product licensing and license key management, see Section 2.1, “PlateSpin Migrate Product Licensing,” on page 21.
To view or modify the license key selected for a migration job:
In Advanced mode: In the Migration Job window, under the Job Configuration section, click License Key.
Essentials of Workload Migration Jobs 105

In Wizard mode (Windows only): Not available.
To manually choose a different key, deselect the Automatically select the best license key during the migration check box and choose the required license key from the drop-down list.
Certain licenses cannot be selected if they are invalid for the current migration. Licenses can be invalid for reasons such as:
There are no remaining migrations for the license. The license does not allow X2V migrations and the current migration is a P2V. The license does not support live transfer migrations and the current migration is marked for
live transfer.
The selected license key is displayed on the License Key tab and the description is updated accordingly.
6.2 Configuring Automatic E-Mail Alerts of Job Status and ProgressYou can set up a migration job to automatically send e-mail notifications about status and progress to a specified address:
Job events: Job status messages Completed, Recoverable Error, and Failed. Job progress: Detailed job progress messages at configurable intervals.
You can specify SMTP server and e-mail account details either during the migration job or globally. See “Notification Service” on page 38.
To configure automatic e-mail notifications:
In Advanced mode: In the Migration Job window, under the Job Configuration section, click Alerts.
106 PlateSpin Migrate 11.1 User Guide
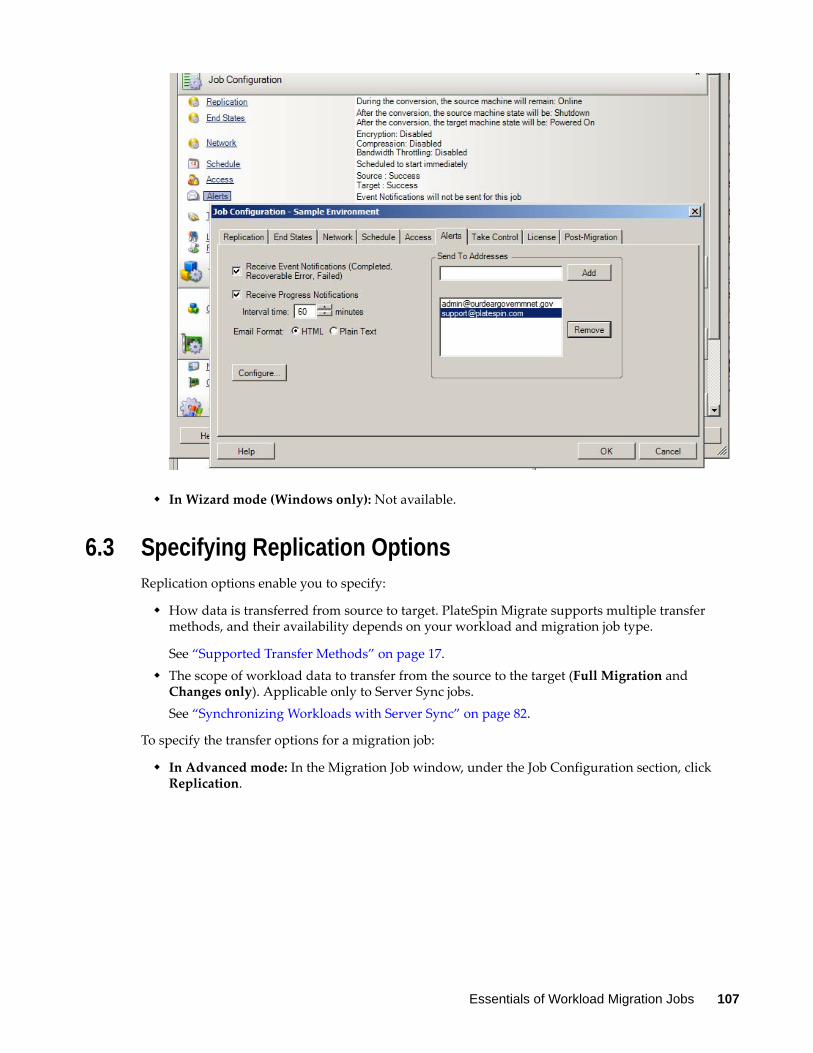
In Wizard mode (Windows only): Not available.
6.3 Specifying Replication OptionsReplication options enable you to specify:
How data is transferred from source to target. PlateSpin Migrate supports multiple transfer methods, and their availability depends on your workload and migration job type.
See “Supported Transfer Methods” on page 17. The scope of workload data to transfer from the source to the target (Full Migration and
Changes only). Applicable only to Server Sync jobs. See “Synchronizing Workloads with Server Sync” on page 82.
To specify the transfer options for a migration job:
In Advanced mode: In the Migration Job window, under the Job Configuration section, click Replication.
Essentials of Workload Migration Jobs 107
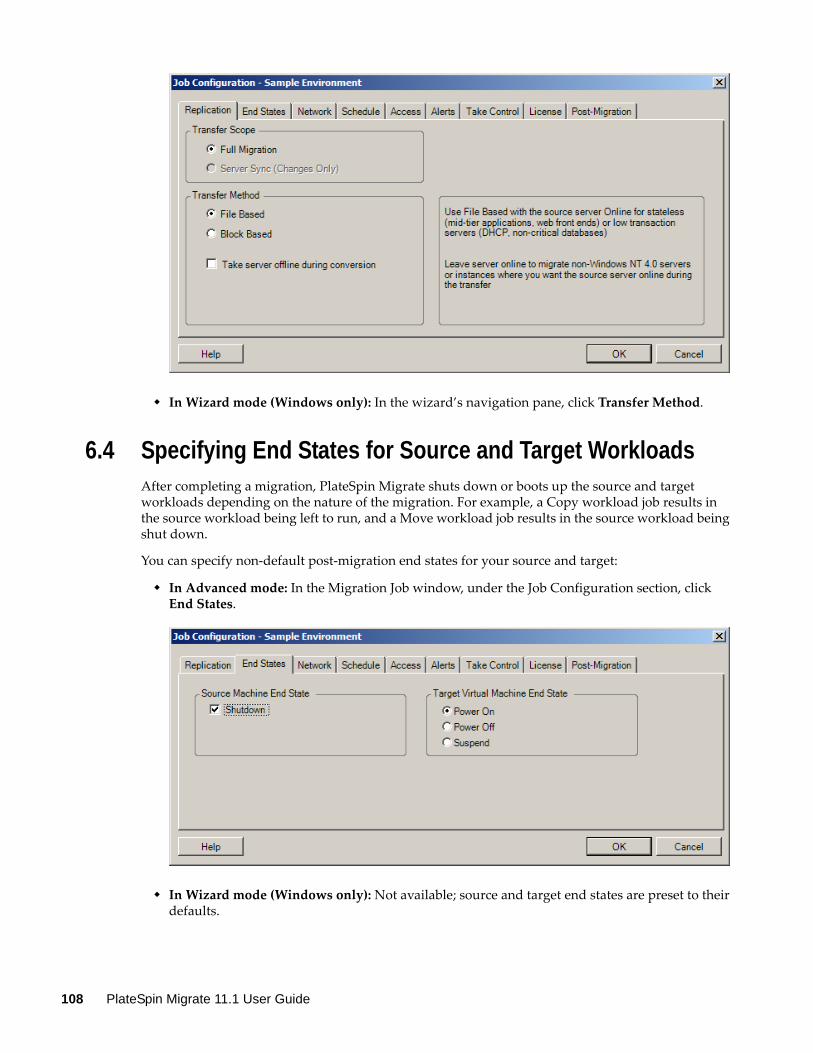
In Wizard mode (Windows only): In the wizard’s navigation pane, click Transfer Method.
6.4 Specifying End States for Source and Target WorkloadsAfter completing a migration, PlateSpin Migrate shuts down or boots up the source and target workloads depending on the nature of the migration. For example, a Copy workload job results in the source workload being left to run, and a Move workload job results in the source workload being shut down.
You can specify non-default post-migration end states for your source and target:
In Advanced mode: In the Migration Job window, under the Job Configuration section, click End States.
In Wizard mode (Windows only): Not available; source and target end states are preset to their defaults.
108 PlateSpin Migrate 11.1 User Guide

6.5 Specifying Network OptionsNetwork options are settings for security, performance, and connectivity, and enable you to specify:
Whether you want the system to compress workload data that is being transferred over the network.
See “Data Compression” on page 20.
Fast consumes the least CPU resources on the source but yields a lower compression ratio, Maximum consumes the most, but yields a higher compression ratio. Optimal, the middle ground, is the recommended option.
Whether to encrypt the data transferred from source to target. See “Security and Privacy” on page 18.
Whether you want to apply bandwidth throttling for the current migration job. See “Bandwidth Throttling” on page 20.To throttle this job’s bandwidth to a specified rate, select the Enable Bandwidth Throttling option, specify the required maximum value in Mbps, and optionally a time period during which to enforce the throttling. If specified, the from and to time values are based on the source workload’s system time.If no time interval is defined, bandwidth is throttled to the specified rate at all times by default. If time interval is defined and the migration job executes outside this interval, data is transferred at full speed.
Additional IP addresses for source workloads to enable communication in environments that use network address translation (NAT). For information on how to specify additional IP addresses for your PlateSpin Server, see “Migrations Across Public and Private Networks through NAT” on page 35.
To specify network options:
In Advanced mode: In the Migration Job window, under the Job Configuration section, click Network.
In Wizard mode (Windows only): Not available.
Essentials of Workload Migration Jobs 109

6.6 Specifying Credentials to Access Sources and TargetsFor a migration job to execute properly, you must provide valid credentials for your source and target.
Table 6-1 Source and Target Credentials
When setting up a migration job, you can validate the provided credentials and save them for future migration jobs that use the same source and target.
To specify source and target credentials:
In Advanced mode: In the Migration Job window, under the Job Configuration section, click Access.
Credentials Windows Linux
User Name Account username with local or domain-level administrative privileges. Use this format:
For domain member machines: authority\principal
For workgroup member machines: hostname\principal
Root or root-level username.
Password Valid password for the specified username. Valid password for the specified username.
110 PlateSpin Migrate 11.1 User Guide

In Wizard mode (Windows only): In the wizard’s navigation pane, click Credentials.
6.7 Managing a Workload’s Network IdentityPlateSpin Migrate enables you to manage the network identity and domain registration of your migration target workload and specify related preferences as part of a migration job. By default, a job is configured to preserve a source workload’s network identity and domain registration. You can modify the default configuration to suit the objectives of your migration job.
Proper configuration of migration target’s network identity is especially important when you are migrating a workload to a different domain, planning to take it off a domain, or if you intend to change the hostname of a workload while it is in the domain.
To configure a target workload’s network identity options:
In Advanced mode: In the Migration Job window, under the Network Configuration section, click Network Identification.
In Wizard mode (Windows only): In the wizard’s navigation pane, click Host Name.
Essentials of Workload Migration Jobs 111

Configuration options vary depending on whether the target machine is Windows or Linux.
Section 6.7.1, “Managing the Identity of Windows Workloads,” on page 112 Section 6.7.2, “Managing the Network Identity of Linux Workloads,” on page 113
6.7.1 Managing the Identity of Windows Workloads
Use these settings to configure the network identity of your target Windows workload (in either Wizard or Advanced mode).
Host Name: Specify the desired hostname for the target machine.
Generate New SID: When this option is selected, the target workload is assigned a new System Identifier (SID). Credentials are required only for Windows 2008 and Vista systems, and must be the credentials for the local (embedded) Administrator account. If this account has been locally renamed on the source, provide the new name. If this account is disabled on Vista (default), enable it first.
Member of (Domain / Workgroup): Select the required option and type the name of the domain or workgroup that you want the target machine to join.
Preserve Source Server’s Domain Registration: Preserves domain registration and ensures that the source server domain registration remains intact during migration. If you disable this option, the source machine’s domain account is transferred to the target machine. The source server still appears to be on the domain, but does not have a valid connection.
Domain Credentials: If the target machine is to be part of a domain, specify valid credentials that have permission to add servers to the domain.
112 PlateSpin Migrate 11.1 User Guide

6.7.2 Managing the Network Identity of Linux Workloads
Use these settings to configure the network identity of your target Linux workload (in either Wizard or Advanced mode) and DNS server addresses as required (Advanced mode).
6.8 Job SchedulingScheduling options enable you to specify whether the migration job is to run immediately or on a specific date and a specific time. For information on other options that PlateSpin Migrate provides for saving and executing jobs, see “Setting Up, Executing, and Managing Jobs” on page 72
To access scheduling options of a migration job:
In Advanced mode: In the Migration Job window, under the Job Configuration section, click Schedule.
In Wizard mode (Windows only): In the wizard’s navigation pane, click Schedule.
Network Identification tab: Specify the desired hostname for the target server.
DNS tab: Use the Add, Edit, and Remove buttons to manage DNS server entries for the new virtual machine.
Essentials of Workload Migration Jobs 113

6.9 Setting Up Migration NetworkingFor each workload portability job, you must properly configure workload networking so that source workloads and targets can communicate with each other and the PlateSpin Server during the migration process, and that the network configuration of a target workload is in line with its end state.
Section 6.9.1, “Temporary (Take Control) Network Settings,” on page 114 Section 6.9.2, “Target Post-migration Networking,” on page 117 Section 6.9.3, “TCP/IP and Advanced Network Settings,” on page 119
Temporary Networking: Also called Take Control Network Settings; they apply to source and target workloads booted into a temporary pre-execution environment. See “Offline Transfer with Temporary Boot Environment” on page 18.
6.9.1 Temporary (Take Control) Network Settings
Temporary (Take Control) Network Settings control how source workloads, targets, and the PlateSpin Server communicate among each other during the migration. If required, you can manually specify a temporary network address to your source and target, or configure them to use a DHCP-assigned IP address during the migration.
During Windows and Linux workload migrations, the Temporary Network Settings control the PlateSpin Server’s communication with the source and target workloads that are booted into a temporary pre-execution environment. See “Offline Transfer with Temporary Boot Environment” on page 18.
To configure Temporary (Take Control) network settings:
In Advanced mode: In the Migration Job window, under the Job Configuration section, click Take Control. To access network interface mapping and TCP/IP settings, click Configure in the source and target areas as applicable.
114 PlateSpin Migrate 11.1 User Guide

In Wizard mode (Windows only): In the wizard’s navigation pane, click Networking. In the Source Take Control or Target Take Control row, in either Temp IP or Map To drop-down menu, select Configure. To quickly select DHCP without opening configuration options, select DHCP.
Configuration options for the Temporary networking vary and depend on whether the network interface is virtual or physical, and whether it is connecting a Windows or a Linux workload.
“Temporary (Take Control) Network Settings: Physical Network Interfaces” on page 116 “Temporary (Take Control) Network Settings: Virtual Network Interfaces” on page 117
Target Take Control network settings are only used during an Offline migration process. On completion, target network settings are read from settings you specify for Target Post-Migration Networking. See “Target Post-migration Networking” on page 117.
Essentials of Workload Migration Jobs 115

Temporary (Take Control) Network Settings: Physical Network Interfaces
These settings apply only to source physical machines. For target physical machines, Temporary (Take Control) network settings are configured during the boot process that uses the boot ISO image. See “Discovering Target Physical Machines” on page 57.
Connect using: If multiple network adapters are present, select the adapter that can communicate with both the PlateSpin Server and the target.
Duplex setting: Use the drop-down list to select network card duplexing. It must match the duplex setting for the switch to which the network interface is connected. When the source is connected to switch ports that are set to 100 Mbit full duplex and cannot be changed to auto negotiation, select Force NIC to Full Duplex.
TCP/IP Settings tab: Click the tab to access TCP/IP and advanced network settings. See “TCP/IP and Advanced Network Settings” on page 119.
116 PlateSpin Migrate 11.1 User Guide

Temporary (Take Control) Network Settings: Virtual Network Interfaces
These settings apply to both source and target Take Control network settings.
6.9.2 Target Post-migration Networking
Target post-migration network settings defined in a migration job control the network configuration of a target after the migration is complete. This applies to both physical and virtual network interfaces.
During workload migration, the target workload’s post-migration network settings are configured while the workload is booted into a pre-execution environment.
To configure target post-migration network settings:
In Advanced mode: In the Migration Job window, under the Network Configuration section, click Guest NIC (for target virtual machines) or Network Connection (for target physical machines).
In Wizard mode (Windows only): In the wizard’s navigation pane, click Networking. In the Configure Target Network Adapters section, in either New IP or Map To drop-down menu, select Configure. To quickly select DHCP without opening configuration options, select DHCP.
Map to Virtual Network: From the drop-down list, select the virtual switch or network to use for communication during an Offline migration. If multiple virtual network adapters are present, select the adapter that can communicate with both the PlateSpin Server and the source machine. This network can differ from the network on which the target virtual machine will run after the migration.
TCP/IP Settings tab: Click the tab to access TCP/IP and advanced network settings. See “TCP/IP and Advanced Network Settings” on page 119.
Essentials of Workload Migration Jobs 117

Configuration options for the target post-migration network settings vary and depend on whether the network interface is virtual or physical, and whether it is connecting a Windows or a Linux workload.
“Post-Migration Networking for Physical Network Interfaces (Windows and Linux)” on page 118
“Post-Migration Networking for Virtual Network Interfaces (Windows and Linux)” on page 119
Post-Migration Networking for Physical Network Interfaces (Windows and Linux)
Use these settings to configure the post-migration network settings of a workload being migrated to physical hardware.
Connect using: If multiple network adapters are present, select the adapter that can communicate with the PlateSpin Server.
TCP/IP Settings tab: Click the tab to access TCP/IP and advanced network settings. See “TCP/IP and Advanced Network Settings” on page 119.
118 PlateSpin Migrate 11.1 User Guide

Post-Migration Networking for Virtual Network Interfaces (Windows and Linux)
By default, PlateSpin Migrate configures a migration job to create a virtual NIC for each NIC found on the source. For post-migration connectivity, ensure that the target virtual NIC is mapped to the appropriate virtual network on the target virtualization platform.
6.9.3 TCP/IP and Advanced Network Settings
PlateSpin Migrate provides a standard network configuration interface to both source and target network settings, and for both Temporary and target post-migration networking. Configuration settings vary slightly, depending on the operating system.
“TCP/IP and Advanced Network Settings (Windows)” on page 120 “TCP/IP and Advanced Network Settings (Linux)” on page 120
Include in Conversion: When this options is selected, PlateSpin Migrate creates a virtual NIC for a source NIC.
Map to Virtual Adapter: Select the virtual network that will be used on the target VM. Choose a virtual network that allows the target VM to communicate with the server.
Start connected: Enable this option to connect the virtual network interface when starting the target machine.
TCP/IP Settings tab: Click the tab to access TCP/IP and advanced network settings. See “TCP/IP and Advanced Network Settings” on page 119.
Essentials of Workload Migration Jobs 119

TCP/IP and Advanced Network Settings (Windows)
The following are standard TCP/IP and advanced network settings for Windows workloads:
TCP/IP and Advanced Network Settings (Linux)
The following are standard TCP/IP and advanced network settings for Linux workloads:
Obtain an IP address automatically: When this option is selected, the workload uses an IP address automatically assigned by a DHCP server during the migration process.
Use the following IP address: Select this option to specify a static IP address.
Use the following DNS server addresses: If required, specify preferred and alternative DNS server addresses.
Advanced: Click this button to access advanced TCP/IP configuration settings, then specify or edit default gateway, DNS server, and WINS server information as required.
120 PlateSpin Migrate 11.1 User Guide

6.10 Configuring Target Virtual MachinesFor jobs that involve workload virtualization, PlateSpin Migrate provides a mechanism for specifying target VM configuration options, such as providing a target VM name and a configuration file path, selecting a datastore to use, and allocating virtual memory, in accordance with the features and capabilities of the selected virtualization platform.
If you have resource pools configured on your target virtualization platform, you can select a resource pool for your VM to be assigned to.
NOTE: If your target VMware ESX server is part of a fully automated Distributed Resource Scheduler (DRS) cluster (a cluster with its VM migration automation level set to Fully Automated), the newly created target VM’s automation level is changed to Partially Automated for the duration of the migration. This means that your target VM might power up on a different ESX server from the one initially selected, but migration is prevented from automatic execution.
To specify target VM configuration options:
In Advanced mode: In the Migration Job window, in the Virtual Machine Configuration section, click General.
In Wizard mode (Windows only): In the wizard’s navigation pane, click Host Name.
Obtain an IP address automatically: When this option is selected, the workload uses an IP address automatically assigned by a DHCP server during the migration process.
Use the following IP address: Select this option to specify a static IP address.
Advanced: Click this button to access DNS configuration settings, then specify preferred and alternate DNS server addresses as required. You can also indicate whether you want DNS addresses copied to the resolv.conf file located in your target’s /etc directory.
Essentials of Workload Migration Jobs 121

In Wizard mode, PlateSpin Migrate prompts only for basic virtual machine configuration options. For configuring advanced virtual machine options, such as those related to resource pools and CPU scheduling, switch to the Advanced mode.
6.10.1 Virtualization Platform-Specific and Advanced VM Configuration Options
In Advanced mode, PlateSpin Migrate displays target virtual machine configuration options specific to the selected target and provides access to more advanced configuration options.
“Virtual Machine Configuration: VMware ESXi 5” on page 123 “Virtual Machine Configuration: VMware ESX 4.1” on page 124 “Virtual Machine Configuration: Hyper-V” on page 126 “Virtual Machine Configuration: Citrix XenServer” on page 128
VM Name: Specify a display name for the new virtual machine.
Configuration File Path: Specify the path to the target virtual machine’s configuration file.
Datastore: Select the required virtual machine’s datastore.
Resources: Specify the amount of virtual RAM and the number of CPUs to be assigned to the virtual machine.
122 PlateSpin Migrate 11.1 User Guide

Virtual Machine Configuration: VMware ESXi 5
The following are configuration options specific to VMware vSphere 5 (applicable to all VMs under the containing resource pool).
Name: Specify the display name for the new virtual machine.
CPU Resources
Shares: CPU shares for this virtual machine with respect to the parent’s total. Peer VMs share resources according to their relative share values bounded by the Reservation and Limit. Select Low, Normal, or High, which specify share values respectively in a 1:2:4 ratio. Select Custom to give each virtual machine a specific number of shares, which express a proportional weight.
Reservation: Guaranteed CPU allocation for this VM.
Expandable Reservation: Select this option to specify that more than the specified reservation is allocated if resources are available in a parent.
Limit: Upper limit for this virtual machine’s CPU allocation.
Unlimited: Select this option to specify no upper limit.
Memory Resources: (these are similar to CPU resource settings, but apply to memory resources)
Essentials of Workload Migration Jobs 123

Virtual Machine Configuration: VMware ESX 4.1
The following are configuration options specific to VMware ESX systems prior to vSphere 5. To access settings that control resource pools, the number of CPUs, and CPU scheduling affinity, click Advanced.
Virtual Machine Name: Specify the display name for the new virtual machine.
Datastore: Select the datastore where you want to create the *.vmx file.
Configuration File Path: Specify a name and the directory path for the virtual machine’s *.vmx configuration file.
Virtual Machine Memory Allocation: Specify a value for the amount of virtual RAM to be assigned to the virtual machine.
Install VMware Tools: Enable this option to install VMware tools during the migration process (recommended).
SCSI Drives: Select either BusLogic or LSIlogic (the recommended option).
Advanced: Click this button to view or modify advanced VM configuration settings.
124 PlateSpin Migrate 11.1 User Guide

Resource Pool: If required, assign your target VM to a resource pool. When no resource pool is specified, the VM is assigned to the root resource pool.
Number of CPUs: Select the required number of CPUs to assign to the target VM. For example, you can convert a single-processor workload to a multi-processor VM, or a multi-processor workload to a single-processor VM.
CPU Scheduling Affinity: Represents which ESX Server processors the virtual machine can run on (if your ESX Server is a multiprocessor system). Specify the required processor or select Default (recommended).
For details, see your VMware documentation.
Essentials of Workload Migration Jobs 125

Virtual Machine Configuration: Hyper-V
The following are configuration options specific to Hyper-V 2012 systems.
Virtual Machine Name: Specify the display name for the new virtual machine.
Datastore: Select the datastore where you want to create the *.vmx file.
Configuration File Path: Specify a name and the directory path for the virtual machine’s *.vmx configuration file.
Virtual Machine Memory Allocation: Specify a value for the amount of virtual RAM to be assigned to the virtual machine.
Install Integration Services: Enable this option to install integration services during the migration process (recommended).
SCSI Drives: Select either BusLogic or LSIlogic (the recommended option).
Advanced: Click this button to view or modify advanced VM configuration settings.
126 PlateSpin Migrate 11.1 User Guide

Number of CPUs: Select the required number of CPUs to assign to the target VM. For example, you can convert a single-processor workload to a multi-processor VM, or a multi-processor workload to a single-processor VM.
NOTE: For Generation 1, you can create four legacy network cards and eight synthetic network cards (if integration service is enabled). For Generation 2, you can create eight 8 synthetic network cards.
CPU Scheduling Affinity: Represents which Hyper-V Server processors the virtual machine can run on (if your Hyper-V Server is a multiprocessor system). Specify the required processor or select Default (recommended).
For details, see your Hyper-V documentation.
Essentials of Workload Migration Jobs 127

Virtual Machine Configuration: Citrix XenServer
The following are configuration options specific to Citrix XenServer.
6.11 Handling Operating System Services and ApplicationsPlateSpin Migrate provides a mechanism for migration jobs to handle Windows services (including special features for those services related to Microsoft SQL Server and Microsoft Exchange Server software), Linux daemons, and virtualization enhancements (such as VMware Tools). In addition, when Windows HAL or kernel file replacements are required, you can view which ones were selected for update during a migration job.
Section 6.11.1, “Handling the Startup Mode of Services (Windows Targets),” on page 129 Section 6.11.2, “Handling Source Workload Services or Daemons During Live Transfer
(Windows and Linux),” on page 130 Section 6.11.3, “Viewing Windows System Files Selected for Replacement During a Migration,”
on page 131 Section 6.11.4, “Handling the Run Level of Daemons (Linux Targets),” on page 132 Section 6.11.5, “Handling Virtualization Enhancement Software,” on page 132
Virtual Machine Name: Specify the display name for the new virtual machine.
Number of CPUs: Select the number of CPUs to assign to the target VM. For example, you can convert a single-processor workload to a multi-processor VM, or a multi-processor workload to a single-processor VM.
Virtual Machine Memory Allocation: Specify a value for the amount of virtual RAM to be assigned to the virtual machine.
Install XenServer Tools: Enable this option to install XenServer Tools during the migration process (recommended).
128 PlateSpin Migrate 11.1 User Guide

6.11.1 Handling the Startup Mode of Services (Windows Targets)
You can configure a job to modify the startup mode of selected Windows services after the migration is complete. For example, if you don’t need a certain Windows service to continue running on a virtualized workload, you can configure your job to set that service’s target startup type to Disabled.
If you require a service to start upon another service’s request, set the startup type of the required service to Manual.
You can also configure the job to restore a service’s original startup type after the migration is complete. For example, you might require a virus scanner to be disabled during the migration, but its startup type to be restored after the migration completes.
TIP: You can globally configure your startup mode preferences for selected Windows services in PlateSpin Server default options. See “Target Service Defaults” on page 42.
To configure the post-migration startup mode of Windows services:
In Advanced mode: In the Migration Job window, under the Operating System and Application Configuration section, click Windows Services (Target), then click an item in the Start Mode column.
In Wizard mode (Windows only): In the wizard’s navigation pane, click Services, then click an item in the Target Mode column.
Essentials of Workload Migration Jobs 129

6.11.2 Handling Source Workload Services or Daemons During Live Transfer (Windows and Linux)
For Live Transfer jobs, PlateSpin Migrate provides a mechanism to stop selected services or daemons during the migration. This ensures that data on your source is captured in a consistent state.
If your source workload is running Microsoft SQL Server or Microsoft Exchange Server software, you can configure your migration job to automatically copy the database files of these servers. If you do not require the migration to include the volume containing the databases, consider not stopping these services.
If your source workload includes I/O-intensive application services that might inhibit the ability of the file transfer process to keep up with the changes, consider stopping them during a Live Transfer migration.
After the completion of the migration, services that you select to stop during a Live Transfer migration are automatically restarted on the source, unless you explicitly configure your migration job to power off the source on completion.
For Linux systems, consder using the custom freeze and thaw scripting capability. See “Freeze and Thaw Scripting Capabilities (Linux Block-Level Migrations)” on page 71.
TIP: You can globally configure your preferences for stopping selected Windows services during VSS File-based or VSS Block-based Live Transfer. See “Source Service Defaults” on page 41.
To specify which services or daemons you want the system to stop during Live Transfer:
In Advanced mode: In the Migration Job window, under the Operating System and Application Configuration section, click Live Transfer Services/Daemons (Source). To indicate that you want SQL Server and Exchange Server database files copied during the migration, click Advanced (applicable to Windows systems only).
In Wizard mode (Windows only): Not available.
130 PlateSpin Migrate 11.1 User Guide

6.11.3 Viewing Windows System Files Selected for Replacement During a Migration
When converting Windows workloads with system files (such as a HAL or kernel files) that are incompatible with the target infrastructure, PlateSpin Migrate uses an appropriate file from its library and saves a backup copy of the source file (*.bak) on the target, in the same system directory.
You can view the HAL or kernel files that PlateSpin Migrate identifies as those requiring replacement:
In Advanced mode: In the Migration Job window, under the Operating System and Application Configuration section, click System Files.
In Wizard mode (Windows only): Not available.
The following warnings might display at the bottom of the dialog box:
If warnings appear on the screen, click More Help (only available if warnings exist) to learn more.
See also the following KB Article 7920815 (https://www.netiq.com/support/kb/doc.php?id=7920815) (FAQ: Understanding the System Files Information screen).
Driver Cache is empty Indicates that you might need to place the necessary files into the local driver cache on the source Windows server (..\Windows\Driver Cache).
The driver cache contains a higher version
PlateSpin Migrate has a partial match with its matrix but the driver cache contains a later version of one or more system files than the one that PlateSpin Migrate will use.
File <filename> will be replaced with lower version
PlateSpin Migrate has not found a match for the system files in its matrix. It will replace the system files with a version that is earlier than the ones that were discovered as the source machine's original system files.
File <filename> will be replaced with higher version
PlateSpin Migrate has not found a match for the system files in its matrix. It will replace the system files with a version that is later than the ones that were discovered as the source machine's original system files.
Essentials of Workload Migration Jobs 131

6.11.4 Handling the Run Level of Daemons (Linux Targets)
You can configure a job to modify the run level of selected Linux daemons after the migration is complete. Use the following numeric values:
To configure the post-migration run level of Linux daemons:
In Advanced mode: In the Migration Job window, under the Operating System and Application Configuration section, click Linux Daemons (Target), then click an item in the Run Level column.
In Wizard mode (Windows only): Not available.
6.11.5 Handling Virtualization Enhancement Software
For V2X migrations, PlateSpin Migrate provides a mechanism to automatically uninstall virtualization enhancement software, such as VMware Tools.
When converting a workload on a VMware platform that has an earlier version of VMware Tools installed, PlateSpin Migrate identifies the presence of obsolete software and adds a VMware Tools Cleanup step in the migration job.
You must provide administrator credentials to uninstall VMware Tools. The credentials provided must match the admin-level user account that was logged in during the installation of VMware Tools.
When the earlier version is uninstalled, PlateSpin Migrate proceeds with the installation of the new version of VMware Tools.
0 Shutdown
1 Single-user mode
2 Unused (user-defined)
3 Full multi user-mode (no GUI)
4 Unused (user-defined)
5 Full multi-user mode with display manager (GUI)
6 Reboot
132 PlateSpin Migrate 11.1 User Guide

NOTE: If you are downgrading a virtual machine that has VMware Tools installed, or if you are converting a virtual machine to another VMware target that has an older version of VMware Tools, the installation of VMware Tools during the configuration of the target will fail.
To configure a job to remove or replace VMware Tools during the migration:
In Advanced mode: In the Migration Job window, under the Operating System and Application Configuration section, click Clean up VMware Tools.
In Wizard mode (Windows only): In the wizard’s navigation pane, click VM Tools.
Depending on the target, PlateSpin Migrate identifies existing instances of VMware Tools and prompts to either replace or remove them, as applicable:
For non-VMware targets: The job configuration interface prompts you to uninstall VMware Tools. Provide the same admin-level credentials used to install the software. If the credentials are unknown, VMware Tools remains on the target machine after migration.
For VMware targets: The job configuration interface prompts you to replace VMware Tools. Provide the same admin-level credentials used to install the obsolete version of VMware Tools. If the credentials are unknown, install the new version of VMware Tools manually after the migration completes.
6.12 Handling a Workload’s Storage Media and VolumesPlateSpin Migrate provides mechanisms for configuring your migration job to handle your workload volumes and their physical or virtual layout in the target infrastructure.
Essentials of Workload Migration Jobs 133

Workload Virtualization (X2V)
When virtualizing a workload, you can select which volumes you want included on the target and manage their free space sizes. You can also control how physical disk arrangement on your source is propagated on the peer virtual machine according to the target virtualization platform’s storage media configuration and virtual disk handling features and capabilities.
Workload Deployment to Physical Hardware
When you are migrating workloads to physical hardware, you can select which source volumes to include and size, and which target disks to repartition and populate.
RAID Storage
PlateSpin Migrate supports RAID (Redundant Array of Independent Disks) storage, which it treats like any other storage hardware. As long as the associated storage controller driver is present, PlateSpin Migrate successfully completes the migration. PlateSpin Migrate does not support software implementations of RAID.
SAN Storage
PlateSpin Migrate supports SAN storage. As long as the driver for the associated host bus adapter (HBA) is present, PlateSpin Migrate successfully completes the migration. PlateSpin Migrate treats SAN LUNs like any other disk with logical volumes.
NAS
PlateSpin Migrate supports Network Attached Storage (NAS) systems. PlateSpin Migrate treats NAS like any other disk with logical volumes.
Windows Dynamic Disks
PlateSpin Migrate supports Windows dynamic disks, including mirrored, spanned, and RAID 5 configurations.
PlateSpin Migrate treats dynamic disks like it treats any other logical volume. When you are converting workloads that have dynamic disks, the disks on the target workload are created as basic disks, which you can use to remove unnecessary or obsolete dynamic disk configurations. After the migration, you can upgrade the required disks on your targets from basic to dynamic disks.
Linux Logical Volumes
PlateSpin Migrate supports logical volumes of Linux workloads. If Logical Volume Manager (LVM) is installed on your Linux source, you can use several LVM1 and LVM2 features to better manage your target workload’s volume layout and organization.
You can set up your workload migration job to:
Re-create logical volumes of the source on the target, or create logical volumes on the target even if the source is not using LVM.
Create new volume groups on the target that are not on the source, or omit volume groups from the target that are present on the source.
134 PlateSpin Migrate 11.1 User Guide

Rename volume groups on the target. Distribute volumes to different volume groups and disks.
NOTE: PlateSpin Migrate does not support:
Copying LVM snapshots and LVM mirrors. You can create LVM snapshots and mirrored logical volumes on the target after the migration completes.
Migration of Linux workloads with encrypted volumes.
Storage layout and volume configuration settings depend on the job configuration mode (Advanced or Wizard), migration type, target virtualization platform, and source operating system.
OES 2: NSS File Systems and EVMS
PlateSpin Migrate supports NSS file systems of OES 2 workloads along with EVMS volume layout features. You can:
Preserve source EVMS layouts on your target workload Create, delete EVMS volumes, and manage EVMS volume layouts Copy NSS pools from your source to the target Make use of NSS snapshots for consistent copying of your source volumes.
The following topics provide additional information:
Section 6.12.1, “Windows Storage Layout and Volume Configuration (Wizard Mode),” on page 135
Section 6.12.2, “Storage Layout and Volume Configuration (Advanced Mode),” on page 138 Section 6.12.3, “Volume Configuration in Server Sync,” on page 145 Section 6.12.4, “Handling Volumes and Image Files in X2I (Imaging) Migrations,” on page 146
6.12.1 Windows Storage Layout and Volume Configuration (Wizard Mode)
“Storage Layout Configuration: Windows X2V (Wizard Mode)” on page 135 “Volume Configuration: Windows X2V, X2P (Wizard Mode)” on page 137
Storage Layout Configuration: Windows X2V (Wizard Mode)
Use this Migration Wizard page to specify a disk mapping scheme during Windows workload virtualization operations.
In the wizard’s navigation pane, click Disks.
Essentials of Workload Migration Jobs 135

Storage Layout section: Displays information in a tree format according to the options selected.
Disk Mapping options: These options control how the source disk arrangement is propagated on the target. Select the option that best suits your migration. To add a virtual disk, select Custom, then click Add Virtual Disk in the Details section.
Details section: Displays information applicable to the selected item in the Storage Layout tree.
You can rearrange disks by dragging and dropping.
To add a virtual disk, select a storage item in the upper section, and in the Details section click Add Virtual Disk.
To view the path and name of a virtual disk and datastore it is assigned to, select the virtual disk.
136 PlateSpin Migrate 11.1 User Guide

Volume Configuration: Windows X2V, X2P (Wizard Mode)
Use this Migration Wizard page to select volumes to include in the migration and to adjust the volume size on the target.
In the wizard’s navigation pane, click Volumes.
Adjust Volume Free Size: Use one of the options to specify the volume free size. Custom lets you enter a free space value in the Details area.
Select volumes to include in the conversion: Select the volumes to be converted. System or boot volumes must be selected.
Details: View information about the selected volume. You can modify free space and total size values.
Essentials of Workload Migration Jobs 137

6.12.2 Storage Layout and Volume Configuration (Advanced Mode)
When you are working in Advanced mode, the Peer-to-Peer Conversion job window provides access to a single configuration interface that combines the wizard’s Volumes and Disks screens.
To access drive configuration options in Advanced mode:
In the Migration Job window, under the Drive Configuration section, click Hard Drives.
Settings vary depending on the target system.
“Windows X2P Drive Configuration (Advanced Mode)” on page 138 “Linux Drive and LVM Volume Configuration (Advanced Mode)” on page 139 “Target VM-Specific P2V/V2V Drive Configuration (Advanced Mode)” on page 142
Windows X2P Drive Configuration (Advanced Mode)
Use these settings to select the volumes to copy during the migration:
138 PlateSpin Migrate 11.1 User Guide

Linux Drive and LVM Volume Configuration (Advanced Mode)
Use these settings to select the volumes and non-volume source spaces to copy and size during the migration. If LVM is installed on the source, a Volume Group tab provides you with corresponding options.
“Handling Linux Disks and Volume Groups” on page 139 “Linux Drive and LVM Volume Configuration (Settings Tab)” on page 140 “Linux Drive and LVM Volume Configuration (Volume Groups Tab)” on page 141 “Linux (OES 2) Drive and Volume Configuration (EVMS Volumes tab)” on page 142
Handling Linux Disks and Volume Groups
The PlateSpin Migrate Client provides you with Linux-specific user interface elements that provide you with options to properly handle your Linux storage.
Note the following sequence of steps that you must take for properly configuring and mapping newly-added disks and volume groups.
1 After adding a new disk, go to the Volume Groups tab and map the required volume group name by selecting the Include option.See Linux Drive and LVM Volume Configuration (Volume Groups Tab).
2 Specify Size in Allocation for Volume Group Box3 For each added disk, specify the required size in the corresponding Allocation for Volume
Group field.After the system focus shifts away from the field, the size of the newly-added disk is updated dynamically.
Copy: Select the volumes to be copied during the migration.
New Free Space: To resize the volume during the migration, specify the desired amount of free space. PlateSpin Migrate automatically adjusts New Size.
New Size: To resize the volume during the migration, specify the desired size. PlateSpin Migrate automatically adjusts New Free Space.
To Disk: Select which hard drive the volume will be copied to on the physical target machine.
Preserve Partitions: Click this column to determine if an existing vendor partition should remain intact during the migration. If the partitions are not selected, PlateSpin Migrate permanently removes the partitions from the server.
Essentials of Workload Migration Jobs 139
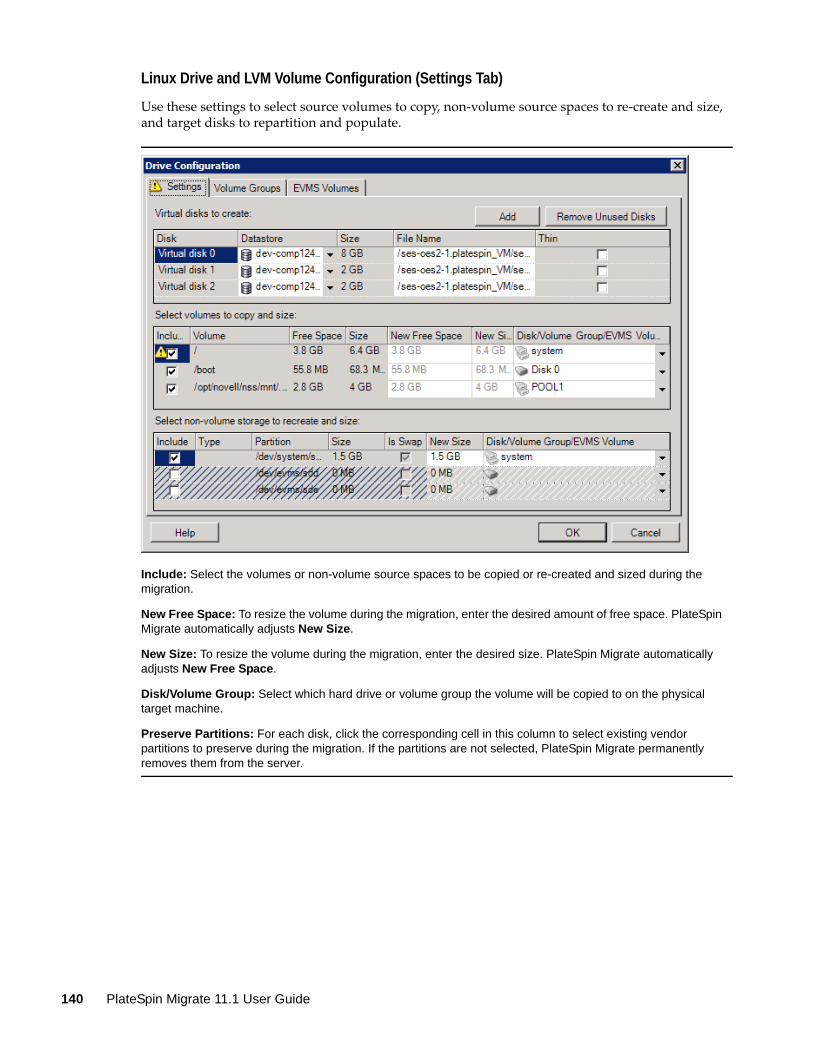
Linux Drive and LVM Volume Configuration (Settings Tab)
Use these settings to select source volumes to copy, non-volume source spaces to re-create and size, and target disks to repartition and populate.
Include: Select the volumes or non-volume source spaces to be copied or re-created and sized during the migration.
New Free Space: To resize the volume during the migration, enter the desired amount of free space. PlateSpin Migrate automatically adjusts New Size.
New Size: To resize the volume during the migration, enter the desired size. PlateSpin Migrate automatically adjusts New Free Space.
Disk/Volume Group: Select which hard drive or volume group the volume will be copied to on the physical target machine.
Preserve Partitions: For each disk, click the corresponding cell in this column to select existing vendor partitions to preserve during the migration. If the partitions are not selected, PlateSpin Migrate permanently removes them from the server.
140 PlateSpin Migrate 11.1 User Guide

Linux Drive and LVM Volume Configuration (Volume Groups Tab)
Use these settings to manage volume groups.
Add Volume Group: Creates a volume group on the target machine that is not present on the source machine.
Rename Volume Group: Renames a volume group that is being copied from the source to the target.
Delete Volume Group: Deletes a volume group so that it is not created on the target machine. The volumes assigned to the volume group can be reassigned to other locations by using the Settings tab (by default, they are assigned to disk).
Allocation for Volume Group: To allocate space on disks to a volume group, select the volume group, then select the disks to include in it. Specify the amount of space to be allocated to it on each included disk.
Essentials of Workload Migration Jobs 141

Linux (OES 2) Drive and Volume Configuration (EVMS Volumes tab)
Use these settings to manage EVMS volumes (OES 2 workloads with NSS file systems).
Target VM-Specific P2V/V2V Drive Configuration (Advanced Mode)
When you configure a peer-to-peer virtualization job in Advanced mode, the job configuration window provides access to settings specific to the target virtualization platform.
This section includes the following information:
“Drive Configuration: VMware ESX” on page 143 “Drive Configuration: Hyper-V” on page 144
(Left Section)
EVMS Volume Name: Displays a list of EVMS volumes found on the source.
Add EVMS volume and Remove EVMS Volume buttons: Click to create or delete EVMS volumes.
(Right Section)
Include: Select this option to include the indicated volume in the migration.
Allocation for EVMS Volume: To allocate space, select a volume, then select the disks to include in it. Specify the amount of space to be allocated to it on each included disk.
NOTE:
Selecting multiple disks for a single EVMS volume is possible only for volumes with NSS pools.
The source and target EVMS volumes must be equal in size.
142 PlateSpin Migrate 11.1 User Guide

Drive Configuration: VMware ESX
The following are drive configuration settings specific to VMware ESX:
Datastore: Select the datastore volume on the ESX server where you want to place the vmdk files.
Copy: Select the volumes to be copied during the migration.
New Free Space: To resize the volume during the migration, specify the desired amount of free space. PlateSpin Migrate automatically adjusts New Size.
New Size: To resize the volume during the migration, specify the desired size. PlateSpin Migrate automatically adjusts New Free Space.
Disk/Volume Group: Assign the volume to a disk or, if LVM is enabled, to a volume group. The volume will be copied to this disk or volume group on the target machine.
Create: Select any non-volume disk partitions that should be created on the target machine (for example, a Linux swap partition).
New Size: To resize the non-volume partition during the migration, specify the desired size.
Essentials of Workload Migration Jobs 143

Drive Configuration: Hyper-V
The following are drive configuration settings specific to Hyper-V:
Datastore: Select the datastore volume on the Hyper-V server where you want to place the .vhd and .vhdx files.
Disk Type: A Generation 1 disk containing the System/Boot volume should be on an IDE disk. (You can create a maximum of three IDE disks.)
NOTE: For a Generation 1 disk, the values of second and third disk are chained. For example, if you select the third disk (from the top of the Disk Type list) as IDE, the second disk autoselects as IDE. If you select the second disk as a SCSI then the third disk autoselects to SCSI.
Copy?: Select the volumes to be copied during the migration.
New Free Space: To resize the volume during the migration, specify the desired amount of free space. PlateSpin Migrate automatically adjusts New Size.
New Size: To resize the volume during the migration, specify the desired size. PlateSpin Migrate automatically adjusts New Free Space.
To Disk: Assign the volume to a disk or, if LVM is enabled, to a volume group. The volume is copied to this disk or volume group on the target machine.
Create ?: Select any non-volume disk partitions that should be created on the target machine (for example, a Linux swap partition).
New Size: To resize the non-volume partition during the migration, specify the desired size.
144 PlateSpin Migrate 11.1 User Guide

6.12.3 Volume Configuration in Server Sync
When you are using Server Sync to synchronize two Windows or Linux workloads, PlateSpin Migrate provides you with the capability to specify the required mapping between source volumes and existing volumes on the target. See “Synchronizing Workloads with Server Sync” on page 82.
To access volume configuration options in a Server Sync job:
In Advanced mode: In the Migration Job window, under the Drive Configuration section, click Volume Mapping (for Windows machines) or Drives and Volumes (Linux machines).
In Wizard mode (Windows only): Not available.
The following topics provide information about Server Sync volume configuration options specific to Windows and Linux workloads.
“Server Sync Volume Configuration (Windows)” on page 145 “Server Sync Volume Configuration (Linux)” on page 146
Server Sync Volume Configuration (Windows)
A Server Sync job for Windows workloads provides detailed drive and volume information for both the source and the target, and enebles you to specify the required mapping.
Mapped To: Map each volume on the source to an existing volume on the target.
Essentials of Workload Migration Jobs 145

Server Sync Volume Configuration (Linux)
A Server Sync job for Linux workloads provides detailed mount point and volume information for both the source and the target, and enebles you to specify the required mapping.
6.12.4 Handling Volumes and Image Files in X2I (Imaging) Migrations
When capturing a PlateSpin Image or importing volumes into a PlateSpin Image, PlateSpin Migrate provides a mechanism for including required volumes in an image, and specifying volume data mapping and image configuration options.
“Target Volume Configuration: Windows X2I (Wizard Mode)” on page 147 “Image Configuration: Windows X2I (Wizard Mode)” on page 148
Mapped To: Map each volume on the source to an existing volume on the target.
146 PlateSpin Migrate 11.1 User Guide

Target Volume Configuration: Windows X2I (Wizard Mode)
When you are setting up a Capture Image or job in wizard mode, use this page to select volumes to include in the image and to specify paths to existing volume data.
For each volume selected for the image, specify the path to the corresponding image data.
For a Capture Image job, specify the path to the image package file (*.pkg).
To repackage the image, click Advanced in the Volume Data Mapping area and select Repackage in the Properties dialog box. Specify a path for the new image file, or use the default path.
Essentials of Workload Migration Jobs 147

Image Configuration: Windows X2I (Wizard Mode)
When you are setting up a Capture Image job in wizard mode, use this page to specify the image name and the path where it is stored.
6.13 Including a Custom Post-migration Action in a Migration JobYou can set up your migration job to execute a custom action on your target. You must define and save your custom actions and their dependencies in advance. See “Managing Custom Actions” on page 69.
NOTE: Post-migration actions are supported for peer-to-peer and one-time Server Sync migrations only.
When you are setting up a migration job, select the required action, any required command line parameters, and a timeout as required. You must also provide valid credentials for the target workload. If the target workload credentials are unknown, you can use the credentials of the source workload.
To specify a custom post-migration action for your migration job:
In Advanced mode: In the Migration Job window, under the Virtual Machine Configuration section, click Post Conversion.
In Wizard mode (Windows only): In the wizard’s navigation pane, click Post Conversion.
Image Name: Type a name for the workload image or accept the default.
Configuration file path: Type the full path to the image’s XML configuration file or accept the default.
148 PlateSpin Migrate 11.1 User Guide

Select Action: From the drop-down list, select a custom action previously saved in your library of post-migration actions.
Execution Parameters: Specify any required command line parameters for the action. If required, specify a timeout.
Credentials: Provide administrator credentials for the target. If they are the same as those for the source, and if they have been saved, select Use Source Credentials.
Essentials of Workload Migration Jobs 149

150 PlateSpin Migrate 11.1 User Guide

A ALinux Distributions Supported by Migrate
PlateSpin Migrate software includes pre-compiled versions of the blkwatch driver for many non-debug Linux distributions (32-bit and 64-bit). This section includes the following information:
Section A.1, “Analyzing Your Linux Workload,” on page 151 Section A.2, “Pre-compiled “blkwatch” Driver Support (Linux Distros),” on page 152
A.1 Analyzing Your Linux WorkloadPrior to determining whether PlateSpin Migrate has a blkwatch driver for your distribution, you need to learn more about the kernel of your Linux workload so that you can use it as a search term against the list of supported distributions. This section includes the following information:
Section A.1.1, “Determining the Release String,” on page 151 Section A.1.2, “Determining the Architecture,” on page 151
A.1.1 Determining the Release String
You can determine the release string of the kernel of your Linux workload by running the following command at the workload’s Linux terminal:
uname -r
For example, if you run uname -r, you might see the following output:
3.0.76-0.11-default
If you search the list of distributions, you see there are two entries that match this string:
SLES11SP3-GA-3.0.76-0.11-default-x86
SLES11SP3-GA-3.0.76-0.11-default-x86_64
The search results indicate that the product has drivers for both 32-bit (x86) and 64-bit (x86_64) architectures.
A.1.2 Determining the Architecture
You can determine the architecture of your Linux workload by running the following command at the workload’s Linux terminal:
uname -m
For example, if you run uname -m, you might see the following output:
Linux Distributions Supported by Migrate 151

x86_64
With this information, you can determine that the workload has 64-bit architecture.
A.2 Pre-compiled “blkwatch” Driver Support (Linux Distros)Following is a list of non-debug Linux distributions for which Migrate has a blkwatch driver. You can search the list to determine if the release string and architecture of your Linux workload kernel matches a supported distribution in the list. If you find your release string and architecture, PlateSpin Migrate has a pre-compiled version the blkwatch driver.
If your search is unsuccessful, you can create a custom blkwatch driver by following the steps found in the Knowledgebase Article KB 7005873.
List Item Syntax
Each item in the list is formatted using the following syntax:
<Distro>-<Patch>-<Kernel_Release_String>-<Kernel_Architecture>
So, for a SLES 9 SP1 distribution with a kernel release string of 2.6.5-7.139-bigsmp for 32-bit (x86) architecture, the item is listed in a format like this:
SLES9-SP1-2.6.5-7.139-bigsmp-x86
List of Distributions
RHEL4-GA-2.6.9-5.EL-x86
RHEL4-GA-2.6.9-5.EL-x86_64
RHEL4-GA-2.6.9-5.ELhugemem-x86
RHEL4-GA-2.6.9-5.ELsmp-x86
RHEL4-GA-2.6.9-5.ELsmp-x86_64
RHEL4-U1-2.6.9-11.EL-x86
RHEL4-U1-2.6.9-11.EL-x86_64
RHEL4-U1-2.6.9-11.ELhugemem-x86
RHEL4-U1-2.6.9-11.ELsmp-x86
RHEL4-U1-2.6.9-11.ELsmp-x86_64
RHEL4-U2-2.6.9-22.EL-x86
RHEL4-U2-2.6.9-22.EL-x86_64
RHEL4-U2-2.6.9-22.ELhugemem-x86
RHEL4-U2-2.6.9-22.ELsmp-x86
RHEL4-U2-2.6.9-22.ELsmp-x86_64
RHEL4-U3-2.6.9-34.EL-x86
RHEL4-U3-2.6.9-34.EL-x86_64
RHEL4-U3-2.6.9-34.ELhugemem-x86
RHEL4-U3-2.6.9-34.ELlargesmp-x86_64
RHEL4-U3-2.6.9-34.ELsmp-x86
RHEL4-U3-2.6.9-34.ELsmp-x86_64
RHEL4-U4-2.6.9-42.EL-x86
RHEL4-U4-2.6.9-42.EL-x86_64
152 PlateSpin Migrate 11.1 User Guide

RHEL4-U4-2.6.9-42.ELhugemem-x86
RHEL4-U4-2.6.9-42.ELlargesmp-x86_64
RHEL4-U4-2.6.9-42.ELsmp-x86
RHEL4-U4-2.6.9-42.ELsmp-x86_64
RHEL4-U5-2.6.9-55.EL-x86
RHEL4-U5-2.6.9-55.EL-x86_64
RHEL4-U5-2.6.9-55.ELhugemem-x86
RHEL4-U5-2.6.9-55.ELlargesmp-x86_64
RHEL4-U5-2.6.9-55.ELsmp-x86
RHEL4-U5-2.6.9-55.ELsmp-x86_64
RHEL4-U6-2.6.9-67.EL-x86
RHEL4-U6-2.6.9-67.EL-x86_64
RHEL4-U6-2.6.9-67.ELhugemem-x86
RHEL4-U6-2.6.9-67.ELlargesmp-x86_64
RHEL4-U6-2.6.9-67.ELsmp-x86
RHEL4-U6-2.6.9-67.ELsmp-x86_64
RHEL4-U7-2.6.9-78.EL-x86
RHEL4-U7-2.6.9-78.EL-x86_64
RHEL4-U7-2.6.9-78.ELhugemem-x86
RHEL4-U7-2.6.9-78.ELlargesmp-x86_64
RHEL4-U7-2.6.9-78.ELsmp-x86
RHEL4-U7-2.6.9-78.ELsmp-x86_64
RHEL4-U8-2.6.9-89.EL-x86
RHEL4-U8-2.6.9-89.EL-x86_64
RHEL4-U8-2.6.9-89.ELhugemem-x86
RHEL4-U8-2.6.9-89.ELlargesmp-x86_64
RHEL4-U8-2.6.9-89.ELsmp-x86
RHEL4-U8-2.6.9-89.ELsmp-x86_64
RHEL4-U9-2.6.9-100.EL-x86
RHEL4-U9-2.6.9-100.EL-x86_64
RHEL4-U9-2.6.9-100.ELhugemem-x86
RHEL4-U9-2.6.9-100.ELlargesmp-x86_64
RHEL4-U9-2.6.9-100.ELsmp-x86
RHEL4-U9-2.6.9-100.ELsmp-x86_64
RHEL5-GA-2.6.18-8.el5-x86
RHEL5-GA-2.6.18-8.el5-x86_64
RHEL5-GA-2.6.18-8.el5PAE-x86
RHEL5-U1-2.6.18-53.el5-x86
RHEL5-U1-2.6.18-53.el5-x86_64
RHEL5-U1-2.6.18-53.el5PAE-x86
RHEL5-U10-2.6.18-371.el5-x86
RHEL5-U10-2.6.18-371.el5-x86_64
RHEL5-U10-2.6.18-371.el5PAE-x86
RHEL5-U2-2.6.18-92.el5-x86
RHEL5-U2-2.6.18-92.el5-x86_64
RHEL5-U2-2.6.18-92.el5PAE-x86
RHEL5-U3-2.6.18-128.el5-x86
Linux Distributions Supported by Migrate 153
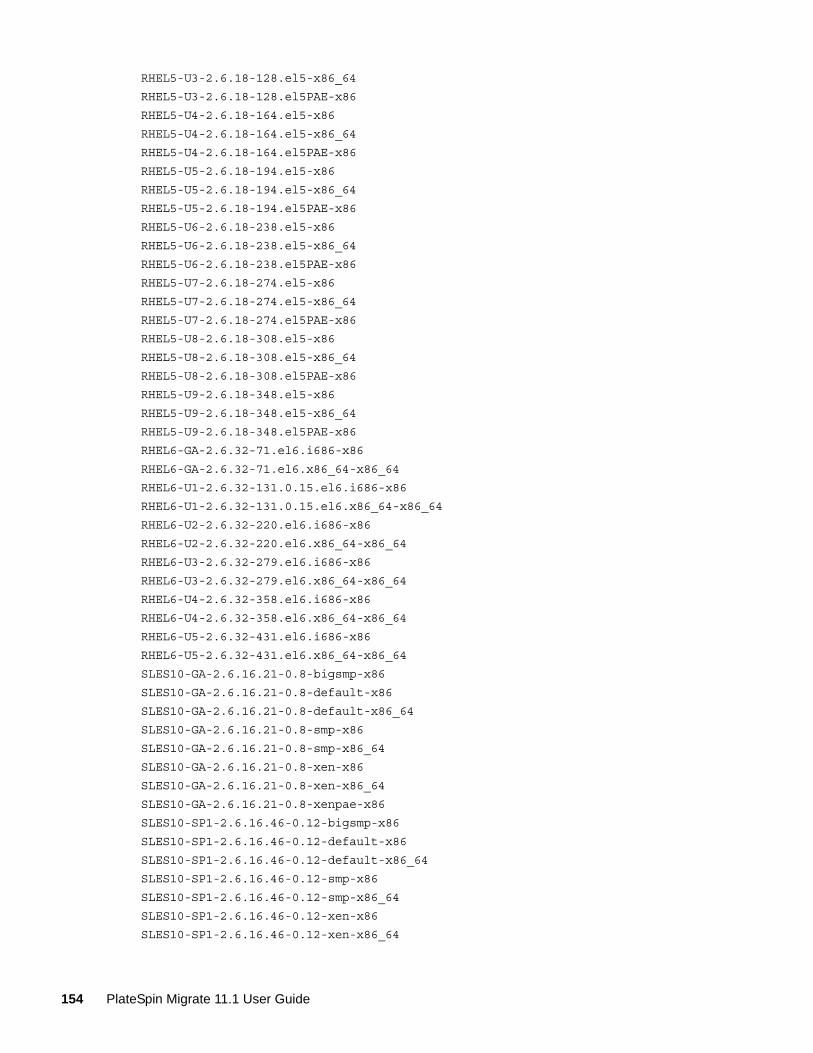
RHEL5-U3-2.6.18-128.el5-x86_64
RHEL5-U3-2.6.18-128.el5PAE-x86
RHEL5-U4-2.6.18-164.el5-x86
RHEL5-U4-2.6.18-164.el5-x86_64
RHEL5-U4-2.6.18-164.el5PAE-x86
RHEL5-U5-2.6.18-194.el5-x86
RHEL5-U5-2.6.18-194.el5-x86_64
RHEL5-U5-2.6.18-194.el5PAE-x86
RHEL5-U6-2.6.18-238.el5-x86
RHEL5-U6-2.6.18-238.el5-x86_64
RHEL5-U6-2.6.18-238.el5PAE-x86
RHEL5-U7-2.6.18-274.el5-x86
RHEL5-U7-2.6.18-274.el5-x86_64
RHEL5-U7-2.6.18-274.el5PAE-x86
RHEL5-U8-2.6.18-308.el5-x86
RHEL5-U8-2.6.18-308.el5-x86_64
RHEL5-U8-2.6.18-308.el5PAE-x86
RHEL5-U9-2.6.18-348.el5-x86
RHEL5-U9-2.6.18-348.el5-x86_64
RHEL5-U9-2.6.18-348.el5PAE-x86
RHEL6-GA-2.6.32-71.el6.i686-x86
RHEL6-GA-2.6.32-71.el6.x86_64-x86_64
RHEL6-U1-2.6.32-131.0.15.el6.i686-x86
RHEL6-U1-2.6.32-131.0.15.el6.x86_64-x86_64
RHEL6-U2-2.6.32-220.el6.i686-x86
RHEL6-U2-2.6.32-220.el6.x86_64-x86_64
RHEL6-U3-2.6.32-279.el6.i686-x86
RHEL6-U3-2.6.32-279.el6.x86_64-x86_64
RHEL6-U4-2.6.32-358.el6.i686-x86
RHEL6-U4-2.6.32-358.el6.x86_64-x86_64
RHEL6-U5-2.6.32-431.el6.i686-x86
RHEL6-U5-2.6.32-431.el6.x86_64-x86_64
SLES10-GA-2.6.16.21-0.8-bigsmp-x86
SLES10-GA-2.6.16.21-0.8-default-x86
SLES10-GA-2.6.16.21-0.8-default-x86_64
SLES10-GA-2.6.16.21-0.8-smp-x86
SLES10-GA-2.6.16.21-0.8-smp-x86_64
SLES10-GA-2.6.16.21-0.8-xen-x86
SLES10-GA-2.6.16.21-0.8-xen-x86_64
SLES10-GA-2.6.16.21-0.8-xenpae-x86
SLES10-SP1-2.6.16.46-0.12-bigsmp-x86
SLES10-SP1-2.6.16.46-0.12-default-x86
SLES10-SP1-2.6.16.46-0.12-default-x86_64
SLES10-SP1-2.6.16.46-0.12-smp-x86
SLES10-SP1-2.6.16.46-0.12-smp-x86_64
SLES10-SP1-2.6.16.46-0.12-xen-x86
SLES10-SP1-2.6.16.46-0.12-xen-x86_64
154 PlateSpin Migrate 11.1 User Guide

SLES10-SP1-2.6.16.46-0.12-xenpae-x86
SLES10-SP2-2.6.16.60-0.21-bigsmp-x86
SLES10-SP2-2.6.16.60-0.21-default-x86
SLES10-SP2-2.6.16.60-0.21-default-x86_64
SLES10-SP2-2.6.16.60-0.21-smp-x86
SLES10-SP2-2.6.16.60-0.21-smp-x86_64
SLES10-SP2-2.6.16.60-0.21-xen-x86
SLES10-SP2-2.6.16.60-0.21-xen-x86_64
SLES10-SP2-2.6.16.60-0.21-xenpae-x86
SLES10-SP2_LTSS_U2-2.6.16.60-0.42.54.1-bigsmp-x86
SLES10-SP2_LTSS_U2-2.6.16.60-0.42.54.1-default-x86
SLES10-SP2_LTSS_U2-2.6.16.60-0.42.54.1-default-x86_64
SLES10-SP2_LTSS_U2-2.6.16.60-0.42.54.1-smp-x86
SLES10-SP2_LTSS_U2-2.6.16.60-0.42.54.1-smp-x86_64
SLES10-SP2_LTSS_U2-2.6.16.60-0.42.54.1-xen-x86
SLES10-SP2_LTSS_U2-2.6.16.60-0.42.54.1-xen-x86_64
SLES10-SP2_LTSS_U2-2.6.16.60-0.42.54.1-xenpae-x86
SLES10-SP3-2.6.16.60-0.54.5-bigsmp-x86
SLES10-SP3-2.6.16.60-0.54.5-default-x86
SLES10-SP3-2.6.16.60-0.54.5-default-x86_64
SLES10-SP3-2.6.16.60-0.54.5-smp-x86
SLES10-SP3-2.6.16.60-0.54.5-smp-x86_64
SLES10-SP3-2.6.16.60-0.54.5-xen-x86
SLES10-SP3-2.6.16.60-0.54.5-xen-x86_64
SLES10-SP3-2.6.16.60-0.54.5-xenpae-x86
SLES10-SP3_LTSS_U1-2.6.16.60-0.113.1-bigsmp-x86
SLES10-SP3_LTSS_U1-2.6.16.60-0.113.1-default-x86
SLES10-SP3_LTSS_U1-2.6.16.60-0.113.1-default-x86_64
SLES10-SP3_LTSS_U1-2.6.16.60-0.113.1-smp-x86
SLES10-SP3_LTSS_U1-2.6.16.60-0.113.1-smp-x86_64
SLES10-SP3_LTSS_U1-2.6.16.60-0.113.1-xen-x86
SLES10-SP3_LTSS_U1-2.6.16.60-0.113.1-xen-x86_64
SLES10-SP3_LTSS_U1-2.6.16.60-0.113.1-xenpae-x86
SLES10-SP3_LTSS_U2-2.6.16.60-0.123.1-bigsmp-x86
SLES10-SP3_LTSS_U2-2.6.16.60-0.123.1-default-x86
SLES10-SP3_LTSS_U2-2.6.16.60-0.123.1-default-x86_64
SLES10-SP3_LTSS_U2-2.6.16.60-0.123.1-smp-x86
SLES10-SP3_LTSS_U2-2.6.16.60-0.123.1-smp-x86_64
SLES10-SP3_LTSS_U2-2.6.16.60-0.123.1-xen-x86
SLES10-SP3_LTSS_U2-2.6.16.60-0.123.1-xen-x86_64
SLES10-SP3_LTSS_U2-2.6.16.60-0.123.1-xenpae-x86
SLES10-SP4-2.6.16.60-0.85.1-bigsmp-x86
SLES10-SP4-2.6.16.60-0.85.1-default-x86
SLES10-SP4-2.6.16.60-0.85.1-default-x86_64
SLES10-SP4-2.6.16.60-0.85.1-smp-x86
SLES10-SP4-2.6.16.60-0.85.1-smp-x86_64
SLES10-SP4-2.6.16.60-0.85.1-xen-x86
Linux Distributions Supported by Migrate 155

SLES10-SP4-2.6.16.60-0.85.1-xen-x86_64
SLES10-SP4-2.6.16.60-0.85.1-xenpae-x86
SLES10-SP4_LTSS_U1-2.6.16.60-0.105.1-bigsmp-x86
SLES10-SP4_LTSS_U1-2.6.16.60-0.105.1-default-x86
SLES10-SP4_LTSS_U1-2.6.16.60-0.105.1-default-x86_64
SLES10-SP4_LTSS_U1-2.6.16.60-0.105.1-smp-x86
SLES10-SP4_LTSS_U1-2.6.16.60-0.105.1-smp-x86_64
SLES10-SP4_LTSS_U1-2.6.16.60-0.105.1-xen-x86
SLES10-SP4_LTSS_U1-2.6.16.60-0.105.1-xen-x86_64
SLES10-SP4_LTSS_U1-2.6.16.60-0.105.1-xenpae-x86
SLES10-SP4_LTSS_U2-2.6.16.60-0.107.1-bigsmp-x86
SLES10-SP4_LTSS_U2-2.6.16.60-0.107.1-default-x86
SLES10-SP4_LTSS_U2-2.6.16.60-0.107.1-default-x86_64
SLES10-SP4_LTSS_U2-2.6.16.60-0.107.1-smp-x86
SLES10-SP4_LTSS_U2-2.6.16.60-0.107.1-smp-x86_64
SLES10-SP4_LTSS_U2-2.6.16.60-0.107.1-xen-x86
SLES10-SP4_LTSS_U2-2.6.16.60-0.107.1-xen-x86_64
SLES10-SP4_LTSS_U2-2.6.16.60-0.107.1-xenpae-x86
SLES10-SP4_U4-2.6.16.60-0.93.1-bigsmp-x86
SLES10-SP4_U4-2.6.16.60-0.93.1-default-x86
SLES10-SP4_U4-2.6.16.60-0.93.1-default-x86_64
SLES10-SP4_U4-2.6.16.60-0.93.1-smp-x86
SLES10-SP4_U4-2.6.16.60-0.93.1-smp-x86_64
SLES10-SP4_U4-2.6.16.60-0.93.1-xen-x86
SLES10-SP4_U4-2.6.16.60-0.93.1-xen-x86_64
SLES10-SP4_U4-2.6.16.60-0.93.1-xenpae-x86
SLES10-SP4_U5-2.6.16.60-0.97.1-bigsmp-x86
SLES10-SP4_U5-2.6.16.60-0.97.1-default-x86
SLES10-SP4_U5-2.6.16.60-0.97.1-default-x86_64
SLES10-SP4_U5-2.6.16.60-0.97.1-smp-x86
SLES10-SP4_U5-2.6.16.60-0.97.1-smp-x86_64
SLES10-SP4_U5-2.6.16.60-0.97.1-xen-x86
SLES10-SP4_U5-2.6.16.60-0.97.1-xen-x86_64
SLES10-SP4_U5-2.6.16.60-0.97.1-xenpae-x86
SLES10-SP4_U6-2.6.16.60-0.99.1-bigsmp-x86
SLES10-SP4_U6-2.6.16.60-0.99.1-default-x86
SLES10-SP4_U6-2.6.16.60-0.99.1-default-x86_64
SLES10-SP4_U6-2.6.16.60-0.99.1-smp-x86
SLES10-SP4_U6-2.6.16.60-0.99.1-smp-x86_64
SLES10-SP4_U6-2.6.16.60-0.99.1-xen-x86
SLES10-SP4_U6-2.6.16.60-0.99.1-xen-x86_64
SLES10-SP4_U6-2.6.16.60-0.99.1-xenpae-x86
SLES10-SP4_U7-2.6.16.60-0.101.1-bigsmp-x86
SLES10-SP4_U7-2.6.16.60-0.101.1-default-x86
SLES10-SP4_U7-2.6.16.60-0.101.1-default-x86_64
SLES10-SP4_U7-2.6.16.60-0.101.1-smp-x86
SLES10-SP4_U7-2.6.16.60-0.101.1-smp-x86_64
156 PlateSpin Migrate 11.1 User Guide

SLES10-SP4_U7-2.6.16.60-0.101.1-xen-x86
SLES10-SP4_U7-2.6.16.60-0.101.1-xen-x86_64
SLES10-SP4_U7-2.6.16.60-0.101.1-xenpae-x86
SLES10-SP4_U8-2.6.16.60-0.103.1-bigsmp-x86
SLES10-SP4_U8-2.6.16.60-0.103.1-default-x86
SLES10-SP4_U8-2.6.16.60-0.103.1-default-x86_64
SLES10-SP4_U8-2.6.16.60-0.103.1-smp-x86
SLES10-SP4_U8-2.6.16.60-0.103.1-smp-x86_64
SLES10-SP4_U8-2.6.16.60-0.103.1-xen-x86
SLES10-SP4_U8-2.6.16.60-0.103.1-xen-x86_64
SLES10-SP4_U8-2.6.16.60-0.103.1-xenpae-x86
SLES11-GA-2.6.27.19-5-default-x86
SLES11-GA-2.6.27.19-5-default-x86_64
SLES11-GA-2.6.27.19-5-pae-x86
SLES11-SP1-2.6.32.12-0.6-default-x86
SLES11-SP1-2.6.32.12-0.6-default-x86_64
SLES11-SP1-2.6.32.12-0.6-pae-x86
SLES11-SP1_LTSS_U1-2.6.32.59-0.9-default-x86
SLES11-SP1_LTSS_U1-2.6.32.59-0.9-default-x86_64
SLES11-SP1_LTSS_U1-2.6.32.59-0.9-pae-x86
SLES11-SP1_LTSS_U2-2.6.32.59-0.13-default-x86
SLES11-SP1_LTSS_U2-2.6.32.59-0.13-default-x86_64
SLES11-SP1_LTSS_U2-2.6.32.59-0.13-pae-x86
SLES11-SP1_U14-2.6.32.54-0.3-default-x86
SLES11-SP1_U14-2.6.32.54-0.3-default-x86_64
SLES11-SP1_U14-2.6.32.54-0.3-pae-x86
SLES11-SP1_U15-2.6.32.59-0.3-default-x86
SLES11-SP1_U15-2.6.32.59-0.3-default-x86_64
SLES11-SP1_U15-2.6.32.59-0.3-pae-x86
SLES11-SP1_U16-2.6.32.59-0.7-default-x86
SLES11-SP1_U16-2.6.32.59-0.7-default-x86_64
SLES11-SP1_U16-2.6.32.59-0.7-pae-x86
SLES11SP2-GA-3.0.13-0.27-default-x86
SLES11SP2-GA-3.0.13-0.27-default-x86_64
SLES11SP2-GA-3.0.13-0.27-pae-x86
SLES11SP2-GA-3.0.13-0.27-xen-x86
SLES11SP2-GA-3.0.13-0.27-xen-x86_64
SLES11SP2-LTSS_U1-3.0.101-0.7.19-default-x86
SLES11SP2-LTSS_U1-3.0.101-0.7.19-default-x86_64
SLES11SP2-LTSS_U1-3.0.101-0.7.19-pae-x86
SLES11SP2-LTSS_U1-3.0.101-0.7.19-xen-x86
SLES11SP2-LTSS_U1-3.0.101-0.7.19-xen-x86_64
SLES11SP2-LTSS_U2-3.0.101-0.7.21-default-x86
SLES11SP2-LTSS_U2-3.0.101-0.7.21-default-x86_64
SLES11SP2-LTSS_U2-3.0.101-0.7.21-pae-x86
SLES11SP2-LTSS_U2-3.0.101-0.7.21-xen-x86
SLES11SP2-LTSS_U2-3.0.101-0.7.21-xen-x86_64
Linux Distributions Supported by Migrate 157

SLES11SP2-U1-3.0.26-0.7-default-x86
SLES11SP2-U1-3.0.26-0.7-default-x86_64
SLES11SP2-U1-3.0.26-0.7-pae-x86
SLES11SP2-U1-3.0.26-0.7-xen-x86
SLES11SP2-U1-3.0.26-0.7-xen-x86_64
SLES11SP2-U10-3.0.74-0.6.8-default-x86
SLES11SP2-U10-3.0.74-0.6.8-default-x86_64
SLES11SP2-U10-3.0.74-0.6.8-pae-x86
SLES11SP2-U10-3.0.74-0.6.8-xen-x86
SLES11SP2-U10-3.0.74-0.6.8-xen-x86_64
SLES11SP2-U11-3.0.74-0.6.10-default-x86
SLES11SP2-U11-3.0.74-0.6.10-default-x86_64
SLES11SP2-U11-3.0.74-0.6.10-pae-x86
SLES11SP2-U11-3.0.74-0.6.10-xen-x86
SLES11SP2-U11-3.0.74-0.6.10-xen-x86_64
SLES11SP2-U12-3.0.80-0.5-default-x86
SLES11SP2-U12-3.0.80-0.5-default-x86_64
SLES11SP2-U12-3.0.80-0.5-pae-x86
SLES11SP2-U12-3.0.80-0.5-xen-x86
SLES11SP2-U12-3.0.80-0.5-xen-x86_64
SLES11SP2-U13-3.0.80-0.7-default-x86
SLES11SP2-U13-3.0.80-0.7-default-x86_64
SLES11SP2-U13-3.0.80-0.7-pae-x86
SLES11SP2-U13-3.0.80-0.7-xen-x86
SLES11SP2-U13-3.0.80-0.7-xen-x86_64
SLES11SP2-U14-3.0.93-0.5-default-x86
SLES11SP2-U14-3.0.93-0.5-default-x86_64
SLES11SP2-U14-3.0.93-0.5-pae-x86
SLES11SP2-U14-3.0.93-0.5-xen-x86
SLES11SP2-U14-3.0.93-0.5-xen-x86_64
SLES11SP2-U15-3.0.101-0.5-default-x86
SLES11SP2-U15-3.0.101-0.5-default-x86_64
SLES11SP2-U15-3.0.101-0.5-pae-x86
SLES11SP2-U15-3.0.101-0.5-xen-x86
SLES11SP2-U15-3.0.101-0.5-xen-x86_64
SLES11SP2-U16-3.0.101-0.7.15-default-x86
SLES11SP2-U16-3.0.101-0.7.15-default-x86_64
SLES11SP2-U16-3.0.101-0.7.15-pae-x86
SLES11SP2-U16-3.0.101-0.7.15-xen-x86
SLES11SP2-U16-3.0.101-0.7.15-xen-x86_64
SLES11SP2-U17-3.0.101-0.7.17-default-x86
SLES11SP2-U17-3.0.101-0.7.17-default-x86_64
SLES11SP2-U17-3.0.101-0.7.17-pae-x86
SLES11SP2-U17-3.0.101-0.7.17-xen-x86
SLES11SP2-U17-3.0.101-0.7.17-xen-x86_64
SLES11SP2-U2-3.0.31-0.9-default-x86
SLES11SP2-U2-3.0.31-0.9-default-x86_64
158 PlateSpin Migrate 11.1 User Guide

SLES11SP2-U2-3.0.31-0.9-pae-x86
SLES11SP2-U2-3.0.31-0.9-xen-x86
SLES11SP2-U2-3.0.31-0.9-xen-x86_64
SLES11SP2-U3-3.0.34-0.7-default-x86
SLES11SP2-U3-3.0.34-0.7-default-x86_64
SLES11SP2-U3-3.0.34-0.7-pae-x86
SLES11SP2-U3-3.0.34-0.7-xen-x86
SLES11SP2-U3-3.0.34-0.7-xen-x86_64
SLES11SP2-U4-3.0.38-0.5-default-x86
SLES11SP2-U4-3.0.38-0.5-default-x86_64
SLES11SP2-U4-3.0.38-0.5-pae-x86
SLES11SP2-U4-3.0.38-0.5-xen-x86
SLES11SP2-U4-3.0.38-0.5-xen-x86_64
SLES11SP2-U5-3.0.42-0.7-default-x86
SLES11SP2-U5-3.0.42-0.7-default-x86_64
SLES11SP2-U5-3.0.42-0.7-pae-x86
SLES11SP2-U5-3.0.42-0.7-xen-x86
SLES11SP2-U5-3.0.42-0.7-xen-x86_64
SLES11SP2-U6-3.0.51-0.7.9-default-x86
SLES11SP2-U6-3.0.51-0.7.9-default-x86_64
SLES11SP2-U6-3.0.51-0.7.9-pae-x86
SLES11SP2-U6-3.0.51-0.7.9-xen-x86
SLES11SP2-U6-3.0.51-0.7.9-xen-x86_64
SLES11SP2-U7-3.0.58-0.6.2-default-x86
SLES11SP2-U7-3.0.58-0.6.2-default-x86_64
SLES11SP2-U7-3.0.58-0.6.2-pae-x86
SLES11SP2-U7-3.0.58-0.6.2-xen-x86
SLES11SP2-U7-3.0.58-0.6.2-xen-x86_64
SLES11SP2-U8-3.0.58-0.6.6-default-x86
SLES11SP2-U8-3.0.58-0.6.6-default-x86_64
SLES11SP2-U8-3.0.58-0.6.6-pae-x86
SLES11SP2-U8-3.0.58-0.6.6-xen-x86
SLES11SP2-U8-3.0.58-0.6.6-xen-x86_64
SLES11SP2-U9-3.0.74-0.6.6-default-x86
SLES11SP2-U9-3.0.74-0.6.6-default-x86_64
SLES11SP2-U9-3.0.74-0.6.6-pae-x86
SLES11SP2-U9-3.0.74-0.6.6-xen-x86
SLES11SP2-U9-3.0.74-0.6.6-xen-x86_64
SLES11SP3-GA-3.0.76-0.11-default-x86
SLES11SP3-GA-3.0.76-0.11-default-x86_64
SLES11SP3-GA-3.0.76-0.11-pae-x86
SLES11SP3-GA-3.0.76-0.11-xen-x86
SLES11SP3-GA-3.0.76-0.11-xen-x86_64
SLES11SP3-U1-3.0.82-0.7-default-x86
SLES11SP3-U1-3.0.82-0.7-default-x86_64
SLES11SP3-U1-3.0.82-0.7-pae-x86
SLES11SP3-U1-3.0.82-0.7-xen-x86
Linux Distributions Supported by Migrate 159

SLES11SP3-U1-3.0.82-0.7-xen-x86_64
SLES11SP3-U2-3.0.93-0.8-default-x86
SLES11SP3-U2-3.0.93-0.8-default-x86_64
SLES11SP3-U2-3.0.93-0.8-pae-x86
SLES11SP3-U2-3.0.93-0.8-xen-x86
SLES11SP3-U2-3.0.93-0.8-xen-x86_64
SLES11SP3-U3-3.0.101-0.8-default-x86
SLES11SP3-U3-3.0.101-0.8-default-x86_64
SLES11SP3-U3-3.0.101-0.8-pae-x86
SLES11SP3-U3-3.0.101-0.8-xen-x86
SLES11SP3-U3-3.0.101-0.8-xen-x86_64
SLES11SP3-U4-3.0.101-0.15-default-x86
SLES11SP3-U4-3.0.101-0.15-default-x86_64
SLES11SP3-U4-3.0.101-0.15-pae-x86
SLES11SP3-U4-3.0.101-0.15-xen-x86
SLES11SP3-U4-3.0.101-0.15-xen-x86_64
SLES11SP3-U5-3.0.101-0.21-default-x86
SLES11SP3-U5-3.0.101-0.21-default-x86_64
SLES11SP3-U5-3.0.101-0.21-pae-x86
SLES11SP3-U5-3.0.101-0.21-xen-x86
SLES11SP3-U5-3.0.101-0.21-xen-x86_64
SLES11SP3-U6-3.0.101-0.29-default-x86
SLES11SP3-U6-3.0.101-0.29-default-x86_64
SLES11SP3-U6-3.0.101-0.29-pae-x86
SLES11SP3-U6-3.0.101-0.29-xen-x86
SLES11SP3-U6-3.0.101-0.29-xen-x86_64
SLES11SP3-U7-3.0.101-0.31-default-x86
SLES11SP3-U7-3.0.101-0.31-default-x86_64
SLES11SP3-U7-3.0.101-0.31-pae-x86
SLES11SP3-U7-3.0.101-0.31-xen-x86
SLES11SP3-U7-3.0.101-0.31-xen-x86_64
SLES11SP3-U8-3.0.101-0.35-default-x86
SLES11SP3-U8-3.0.101-0.35-default-x86_64
SLES11SP3-U8-3.0.101-0.35-pae-x86
SLES11SP3-U8-3.0.101-0.35-xen-x86
SLES11SP3-U8-3.0.101-0.35-xen-x86_64
SLES9-GA-2.6.5-7.97-bigsmp-x86
SLES9-GA-2.6.5-7.97-default-x86
SLES9-GA-2.6.5-7.97-default-x86_64
SLES9-GA-2.6.5-7.97-smp-x86
SLES9-GA-2.6.5-7.97-smp-x86_64
SLES9-SP1-2.6.5-7.139-bigsmp-x86
SLES9-SP1-2.6.5-7.139-default-x86
SLES9-SP1-2.6.5-7.139-default-x86_64
SLES9-SP1-2.6.5-7.139-smp-x86
SLES9-SP1-2.6.5-7.139-smp-x86_64
SLES9-SP2-2.6.5-7.191-bigsmp-x86
160 PlateSpin Migrate 11.1 User Guide

SLES9-SP2-2.6.5-7.191-default-x86
SLES9-SP2-2.6.5-7.191-default-x86_64
SLES9-SP2-2.6.5-7.191-smp-x86
SLES9-SP2-2.6.5-7.191-smp-x86_64
SLES9-SP3-2.6.5-7.244-bigsmp-x86
SLES9-SP3-2.6.5-7.244-default-x86
SLES9-SP3-2.6.5-7.244-default-x86_64
SLES9-SP3-2.6.5-7.244-smp-x86
SLES9-SP3-2.6.5-7.244-smp-x86_64
SLES9-SP4-2.6.5-7.308-bigsmp-x86
SLES9-SP4-2.6.5-7.308-default-x86
SLES9-SP4-2.6.5-7.308-default-x86_64
SLES9-SP4-2.6.5-7.308-smp-x86
SLES9-SP4-2.6.5-7.308-smp-x86_64
Linux Distributions Supported by Migrate 161

162 PlateSpin Migrate 11.1 User Guide

B BUsing the PlateSpin Migrate Command Line Interface
The PlateSpin Migrate Client installation includes a command line interface (CLI) tool to help you perform common migrations tasks. Conversion jobs using .ini files is supported onto VMware target only. Using this tool, you can
Discover and subsequently refresh a host or target server to populate the Migrate Server with server information.
Migrate (also known as "convert") heterogeneous workloads across x86 server and desktop infrastructure in the data center.
Prepare the target host for its new workload and then, after a conversion, synchronize the host and the target.
Install an image server, capture an image, deploy an image, or incrementally migrate an image. Check the status of a job as it is running, and if necessary, abort it.
This section includes information that can help you use the CLI effectively. The content includes:
Section B.1, “Where Is the Tool Located?,” on page 163 Section B.2, “Before You Use the Tool,” on page 163 Section B.3, “Configurable .ini Files (Jobs) You Can Use with the Tool,” on page 166
B.1 Where Is the Tool Located?The CLI tool, PlateSpin.Migrate.Console.exe, is installed with the PlateSpin Migrate Client at the following location:
32-bit host: C:\Program Files\PlateSpin Migrate Client\CommandLine\PlateSpin.Migrate.Console.exe
64-bit host: C:\Program Files(x86)\PlateSpin Migrate Client\CommandLine\PlateSpin.Migrate.Console.exe
B.2 Before You Use the ToolThis section includes the following information:
Section B.2.1, “Pre-configuring the Migrate Server Values for CLI,” on page 164 Section B.2.2, “Becoming Familiar with the Commands,” on page 164
Using the PlateSpin Migrate Command Line Interface 163

B.2.1 Pre-configuring the Migrate Server Values for CLI
Before you begin using the command line utility, you need to make sure that the Migrate Server is properly configured. You can check the configuration in the PlateSpin.Migrate.Console.config file, located in the same path as the command line utility. After the Migrate installation, this .config file should already be populated with values:
<?xml version="1.0" encoding="utf-8 ?>"<configuration> <appSettings> <add key="migrateServerURL" value="http://localhost/PlateSpinMigrate/"/> <add key="psuser" value="administrator"/> <add key="pspassword" value="password"/> </appSettings></configuration>
The tool uses these values as it executes commands. You need to reconcile the values in the file with the settings for the Migrate Server with which you want to connect.
B.2.2 Becoming Familiar with the Commands
You can display the commands supported in the tool by running it with the Help option or with the ? option from the command prompt, like this:
C:\Program Files\PlateSpin Migrate Client>CommandLine\PlateSpin.Migrate.Console.exe Help
The tool displays a matrix that includes information similar to what is included in the following table:
Table B-1 Commands available from the Migrate CLI tool
When you run any of these commands, you must include its required parameter(s) in the command line. You can also include some optional parameters, when needed. To display a list of these parameters at the command prompt, run the command without any parameter. For example, if you run the discover command without parameters, like this:
Command Description
run Runs a configured .ini file as a scheduled job. When the you add the /wait=no parameter and the job starts to run, its Job ID is displayed in the interface.
query Runs a query on the job (when you specify a Job ID) to display its current status.
discover Runs an operation that inventories the details of a supported workload or target computer in preparation for a migration or “conversion” job.
refresh Refreshes a discovered server.
unDiscover Undiscovers a server.
prepareForSync Prepares the server for the Server Sync operation. Run this command (with applicable parameters) prior to running the ServerSync job (that is, ServerSync-xxx.ini).
imageserver Performs imaging operations on a workload (that is, install server, uninstall server, update tools) on a server.
abort Aborts a scheduled job.
164 PlateSpin Migrate 11.1 User Guide

C:\Program Files\PlateSpin Migrate Client>CommandLine\PlateSpin.Migrate.Console.exe discover
the command line interface displays these following:
[discover] discovers a serverRequired Parameters: /machineAddress= machine address to discover /userName= the username to use /password= the password to use /type= typle like windows, hyper_v, linux,vmware_esx,vmware_vcenter,citrix_xenserver, kvm_server Optional Parameters: /network= network name to connect to /address= server address to connect to /psuser= Username used for accessing PlateSpin Migrate server as user different from the one logged on this computer /pspassword= Password used for accessing Platespin Migrate server for the user different from the one logged on this computer /wait= wait for completion of job [yes,no] /clusterName= clustername to be discovered /verbose= verbose mode for output [on,off] /output= the output file /format= the ouptput format to display in [text,html,xml] /sslcertificatewarnings= Whether to Ignore or Enforce SSL Certificate Warnings [Ignore| Enforce]
NOTE: You should become familiar with the different CLI commands and their respective required and optional parameters.
Command Line Syntax
If you were to run the discover command (which is also a job), you would use a syntax similar to this example, at the command prompt:
C:\Program Files\PlateSpin Migrate Client>CommandLine\PlateSpin.Migrate.Console.exe discover /machineaddress=10.10.8.100 /username=administrator /password=password /type=windows /wait=no
Note that all required parameters and one optional parameter are included in this example.
When the discover command (job) starts, the CLI tool displays its job ID, similar to this example:
8be8d306-7665-4869-9795-a9dbb3ce1471
You can leverage this ID to learn the status of the job, just by using the query command, like this:
C:\Program Files\PlateSpin Migrate Client>CommandLine\PlateSpin.Migrate.Console.exe query /id=8be8d306-7665-4869-9795-a9dbb3ce1471
The query command yields a status report that includes all of the details of the job. This is the same kind of information you might see from the Migrate Client Jobs view.
Using the PlateSpin Migrate Command Line Interface 165

B.3 Configurable .ini Files (Jobs) You Can Use with the ToolWhen you install the PlateSpin Migrate Client, the installation creates a separate directory for a number of preconfigured jobs (actually, .ini files) that can do the following:
Workload conversion (that is, a migration operation) Server Sync Imaging capture and deployment of image target
You execute a job by using the run command at the command line. The values in the files are the optional parameters that run along with the job. Each of these functions has a “default” .ini file version that runs with basic settings, and one or more “platform-specific” .ini file(s) that run with custom settings:
Conversion-Default.ini
Conversion-Windows.ini (customized) Conversion-Linux.ini (customized) ServerSync-Default.ini
ServerSync-Windows.ini (customized) ServerSync-Linux.ini (customized) CaptureImage-Default.ini
CaptureImage.ini (customized) DeployImage-Default.ini
DeployImage.ini (customized) IncrementalImaging-Default.ini
IncrementalImaging.ini (customized)
This section includes more details about these jobs in the following subsections:
Section B.3.1, “Conversion Jobs,” on page 166 Section B.3.2, “ServerSync Jobs,” on page 171 Section B.3.3, “Imaging Jobs,” on page 174
B.3.1 Conversion Jobs
The CLI tool supports converting Windows and Linux workloads (source) to vCenter/ESX servers (target). There are two types of .ini files, one for a basic job configuration, and one for custom configurations. While the job is running you can abort the job or check its status.
Before you start a conversion job, make sure you run the discover command on the source computer and then on the target container. The following is example syntax for running the discover command:
discover /machineaddress=10.10.10.10 /username=administrator /password=anything@123 /type=vmware_vcenter
NOTE: Conversions do not support creating new disks and volumes or mapping.
166 PlateSpin Migrate 11.1 User Guide

The tables in this section are named by the respective conversion jobs .ini files they represent. The table contents include the file section names within the .ini and the available settings you can configure according to your conversion needs:
Table B-2, “Details of Conversion-Default.ini,” on page 167 Table B-3, “Details of Conversion-Windows.ini,” on page 168 Table B-4, “Conversion-Linux.ini: Differences in Setting Details of the [Transfer] section,” on
page 170
Conversion-Default.ini
Table B-2 Details of Conversion-Default.ini
File Sections and Default Settings
Comment
[Type]
Conversion=X2V {required} This value must be used for every conversion.
[JobConfig]
Default=true
[Source]
Address= {required} Specify an IP address for the source workload.
UserName= {required} Specify a username credential for the source workload.
Password= {required} Specify a password credential for the source workload.
TakeControl=static/dhcp {conditional} Use this value only if the source is WINXP, Win2k3, Windows 2000. Otherwise, it is not required.
TakeControlAddress=
SubnetMask=
DefaultGateway=
DNS=
[TargetContainer]
Address= {required} Specify the username for the target container. If ESX is discovered via VCenter, specify the vCenter username.
UserName= {required} Specify the username for the target container. If ESX is discovered via VCenter, specify the vCenter username.
Password= {required} Specify the password credential for the target container. If ESX is discovered via VCenter, specify the vCenter password.
[NewMachine]
DisplayName= {required} Specify the name you want to display in vCenter or ESX console
HostName= {required}
Using the PlateSpin Migrate Command Line Interface 167

Conversion-Windows.ini
Table B-3 Details of Conversion-Windows.ini
File Sections and Default Settings Comment
[Type]
Conversion=X2V {required} This value must be used for every conversion.
[JobConfig]
Default=false
[Transfer]
TransferType=VSSFileBased/VSSblockBased/FileBased
Possible settings shown. If the Windows source machine support VSS snapshotting, use the VSS… settings, if it doesn’t support VSS, use the Filebased setting.
LiveTransferEnabled=true/false Possible settings shown. This setting is dependent on the TransferType setting. If that setting is Filebased and you want to perform an offline conversion, this setting must be set to false.
[Source]
Address= {required} Specify an IP address for the source workload.
UserName= {required} Specify a username credential for the source workload.
Password= {required} Specify a password credential for the source workload.
EndState=ShutDown/Donothing/Reboot Possible settings shown.
TakeControl=static/dhcp {conditional} Use this value only if the source is WINXP, Win2k3, Windows 2000. Otherwise, it is not required.
TakeControlAddress=
SubnetMask=
DefaultGateway=
DNS=
[TargetContainer]
Address= {required} Specify the IP address for the target container (that is, the ESX address or the vCenter address). If ESX is discovered via VCenter, specify the ESX IP.
UserName= {required} Specify the username for the target container. If ESX is discovered via VCenter, specify the vCenter username.
168 PlateSpin Migrate 11.1 User Guide
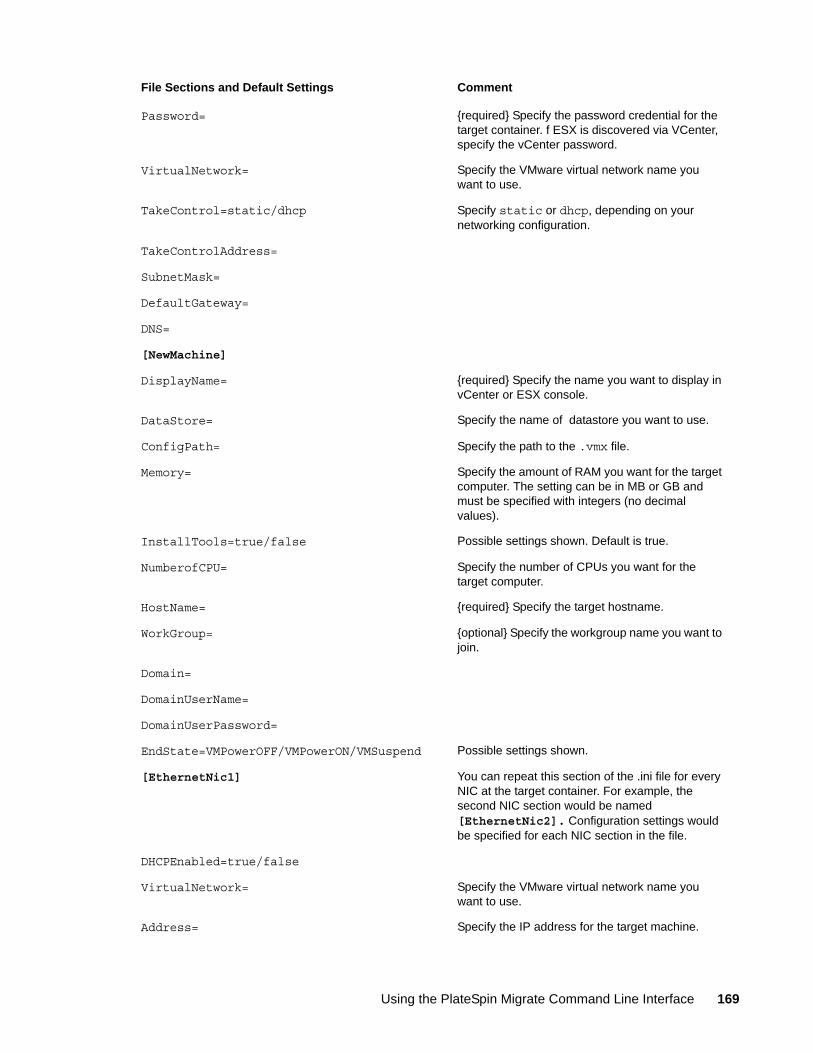
Password= {required} Specify the password credential for the target container. f ESX is discovered via VCenter, specify the vCenter password.
VirtualNetwork= Specify the VMware virtual network name you want to use.
TakeControl=static/dhcp Specify static or dhcp, depending on your networking configuration.
TakeControlAddress=
SubnetMask=
DefaultGateway=
DNS=
[NewMachine]
DisplayName= {required} Specify the name you want to display in vCenter or ESX console.
DataStore= Specify the name of datastore you want to use.
ConfigPath= Specify the path to the .vmx file.
Memory= Specify the amount of RAM you want for the target computer. The setting can be in MB or GB and must be specified with integers (no decimal values).
InstallTools=true/false Possible settings shown. Default is true.
NumberofCPU= Specify the number of CPUs you want for the target computer.
HostName= {required} Specify the target hostname.
WorkGroup= {optional} Specify the workgroup name you want to join.
Domain=
DomainUserName=
DomainUserPassword=
EndState=VMPowerOFF/VMPowerON/VMSuspend Possible settings shown.
[EthernetNic1] You can repeat this section of the .ini file for every NIC at the target container. For example, the second NIC section would be named [EthernetNic2]. Configuration settings would be specified for each NIC section in the file.
DHCPEnabled=true/false
VirtualNetwork= Specify the VMware virtual network name you want to use.
Address= Specify the IP address for the target machine.
File Sections and Default Settings Comment
Using the PlateSpin Migrate Command Line Interface 169

Conversion-Linux.ini
The sections in the Conversion-Windows.ini and in the Conversion-Linux.ini file are identical, except for the settings in [Transfer] section, along with the settings for workgroup and domain configuration. The differences for the Linux source job are shown in the following table.
Table B-4 Conversion-Linux.ini: Differences in Setting Details of the [Transfer] section
SubnetMask=
DefaultGateway=
DNS=
[DriveGeneral] If you have multiple disks at the source, you can specify them here. You can specify as many disks as there are at the source.
DataStore1=
Disk1=
DataStore2=
Disk2=
[Volume1] You can repeat this section of the .ini file for every volume at the target container. For example, the second volume section would be named [Volume2]. Configuration settings would be specified for each volume section in the file.
VolumeToCopy= Specify the volume to copy to the target.
MapTo= Specify the disk to map.
File Sections and Default Settings (differences only) Comment
[Transfer]
TransferType=BlockBased/FileBased Possible settings shown. Linux does not support VSS.
LiveTransferEnabled=true/false Possible settings shown. This setting is dependent on the TransferType setting. If that setting is Filebased and you want to perform an offline conversion, this setting must be set to false.
File Sections and Default Settings Comment
170 PlateSpin Migrate 11.1 User Guide

B.3.2 ServerSync Jobs
The CLI tool supports jobs that prepare a server for synchronization and also the ServerSync operation itself. The prepareForSync CLI command (also a job) prepares the server for the Server Sync operation. Run this command (with applicable parameters) prior to running the ServerSync job (that is, ServerSync-xxx.ini).
The Server Sync operation as run in the CLI tool supports both Windows and Linux workloads on the ESX/vCenter targets. There are two types of .ini files, one for a basic job configuration, and one for custom configurations. While the job is running you can abort the job or check its status. If you specify the required settings, it will start the job. Then, when it runs, the job populates the other values with default settings.
The tables in this section are named by the respective serversync jobs .ini files they represent. The table contents include the file section names within the .ini and the available settings you can configure according to your conversion needs:
Table B-5, “Details of ServerSync-Default.ini,” on page 171 Table B-6, “Details of ServerSync-Windows.ini,” on page 172 Table B-7, “ServerSync-Linux.ini: Differences in Setting Details of the [Transfer] section,” on
page 174
ServerSync-Default.ini
Table B-5 Details of ServerSync-Default.ini
File Sections and Default Settings Comment
[Type]
Conversion=X2EV {required} This value must be used for every Server Sync operation.
[JobConfig]
Default=true
[Source]
Address= {required} Specify an IP address for the source workload.
UserName= {required} Specify a username credential for the source workload.
Password= {required} Specify a password credential for the source workload.
TakeControl=static/dhcp {conditional} Use this value only if the source is WINXP, Win2k3, Windows 2000. Otherwise, it is not required.
TakeControlAddress=
SubnetMask=
DefaultGateway=
DNS=
Using the PlateSpin Migrate Command Line Interface 171

ServerSync-Windows.ini
Table B-6 Details of ServerSync-Windows.ini
[TargetContainer]
Address= {required} Specify the IP address for the target container (that is, the ESX address or the vCenter address). If ESX is discovered via VCenter, specify the ESX IP.
UserName= {required} Specify the username for the target container. If ESX is discovered via VCenter, specify the vCenter username.
HostName= {required} Specify the password credential for the target container. If ESX is discovered via VCenter, specify the vCenter password.
[ExistingTargetMachine]
DisplayName= {required}
HostName= {required}
File Sections and Default Settings Comment
[Type]
Conversion=X2EV {required} This value must be used for every Server Sync operation.
[JobConfig]
Default=false
[Transfer]
TransferType=VSSFileBased/VSSblockBased/FileBased
Possible settings shown. If the Windows source machine support VSS snapshotting, use the VSS… settings, if it doesn’t support VSS, use the Filebased setting.
LiveTransferEnabled=true/false Possible settings shown. This setting is dependent on the TransferType setting. If that setting is Filebased and you want to perform an offline conversion, this setting must be set to false.
[Source]
Address= {required} Specify an IP address for the source workload.
UserName= {required} Specify a username credential for the source workload.
Password= {required} Specify a password credential for the source workload.
File Sections and Default Settings Comment
172 PlateSpin Migrate 11.1 User Guide

EndState=ShutDown/Donothing/Reboot Possible settings shown.
TakeControl=static/dhcp {conditional} Use this value only if the source is WINXP, Win2k3, Windows 2000. Otherwise, it is not required.
TakeControlAddress=
SubnetMask=
DefaultGateway=
DNS=
[TargetContainer]
Address= {required} Specify the IP address for the target container (that is, the ESX address or the vCenter address). If ESX is discovered via VCenter, specify the ESX IP.
UserName= {required} Specify the username for the target container. If ESX is discovered via VCenter, specify the vCenter username.
Password= {required} Specify the password credential for the target container. If ESX is discovered via VCenter, specify the vCenter password.
VirtualNetwork= Specify the VMware virtual network name you want to use.
TakeControl=static/dhcp Specify static or dhcp depending on your networking configuration.
TakeControlAddress=
SubnetMask=
DefaultGateway=
DNS=
[ExistingTargetMachine]
DisplayName= {required} Specify the name you want to display in vCenter or ESX console.
HostName= .
InstallTools=true/false .
WorkGroup= Specify the workgroup name if you want to join workgroup.
Domain= .
DomainUserName= .
DomainUserPassword= .
EndState=VMPowerOFF/VMPowerON/VMSuspend Possible settings shown.
File Sections and Default Settings Comment
Using the PlateSpin Migrate Command Line Interface 173

ServerSync-Linux.ini
The sections in the ServerSync-Windows.ini and in the ServerSync-Linux.ini file are identical, except for the settings in [Transfer] section, along with the settings for the workgroup and domain configuration. The differences for the Linux source job are shown in the following table.
Table B-7 ServerSync-Linux.ini: Differences in Setting Details of the [Transfer] section
B.3.3 Imaging Jobs
The CLI tool supports several imaging operations (for example, install, uninstall, and update tools) through its imageserver command. Before you start an imageserver job, make sure you run the discover command on the source computer and then on the target container.
In addition to the imageserver job, the CLI tool supports imaging Windows workloads (source) to vCenter/ESX servers (target). There are two types of imaging .ini files, one for a basic job configuration, and one for custom configurations. While the job is running you can abort the job or check its status.
The tables in this section are named by the respective imaging jobs .ini files they represent. The table contents include the file section names within the .ini and the available settings you can configure according to your conversion needs:
Table B-8, “Details of CaptureImage-Default.ini,” on page 175
[EthernetNic1] You can repeat this section of the .ini file for every NIC at the target container. For example, the second NIC section would be named [EthernetNic2]. Configuration settings would be specified for each NIC section in the file.
DHCPEnabled=true/false
VirtualNetwork= Specify the VMware virtual network name you want to use.
Address= Specify the IP address for the target machine.
SubnetMask=
DefaultGateway=
DNS=
File Sections and Default Settings (differences only) Comment
[Transfer]
TransferType=BlockBased/FileBased Possible settings shown. Linux does not support VSS.
LiveTransferEnabled=true/false Possible settings shown. This setting is dependent on the TransferType setting. If that setting is Filebased and you want to perform an offline conversion, this setting must be set to false.
File Sections and Default Settings Comment
174 PlateSpin Migrate 11.1 User Guide

Table B-9, “Details of CaptureImage.ini,” on page 175 Table B-10, “Details of DeployImage-Default.ini,” on page 177 Table B-11, “Details of DeployImage.ini,” on page 178 Table B-12, “Details of IncrementalImaging-Default.ini,” on page 179 Table B-13, “Details of IncrementalImaging.ini,” on page 180
CaptureImage-Default.ini
Table B-8 Details of CaptureImage-Default.ini
CaptureImage.ini
Table B-9 Details of CaptureImage.ini
File Sections and Default Settings
Comment
[Type]
Conversion=X2I {required} This value must be used for every image capture.
[JobConfig]
Default=true
[Source]
Address= {required} Specify an IP address for the source workload.
UserName= {required} Specify a username credential for the source workload.
Password= {required} Specify a password credential for the source workload.
TakeControl=static/dhcp {conditional} Use this value only if the source is WINXP, Win2k3, Windows 2000. Otherwise, it is not required.
TakeControlAddress=
SubnetMask=
DefaultGateway=
[ImageConfiguration]
ImageDisplayName= {required} Specify the display name of the image in the image server.
[TargetContainer]
Address= {required} Specify IP address for target machine.
UserName= {required} Specify target username.
Password= {required} Specify a password credential for the target machine.
File Sections and Default Settings Comment
[Type]
Using the PlateSpin Migrate Command Line Interface 175

Conversion=X2I {required} This value must be used for every image capture.
[JobConfig]
Default=false
[Transfer]
TransferType=VSSFileBased/FileBased Possible settings are shown. If the Windows source machine support VSS snapshotting, use the VSSFileBased setting, if it doesn’t support VSS, use the Filebased setting.
LiveTransferEnabled=true/false Possible settings shown. This setting is dependent on the TransferType setting. If that setting is Filebased and you want to perform an offline conversion, this setting must be set to false.
[Source]
Address= {required} Specify an IP address for the source workload.
UserName= {required} Specify a username credential for the source workload.
Password= {required} Specify a password credential for the source workload.
EndState=ShutDown/Donothing/Reboot Possible settings are shown.
TakeControl=static/dhcp {conditional} Use this value only if the source is WINXP, Win2k3, Windows 2000. Otherwise, it is not required.
TakeControlAddress=
SubnetMask=
DefaultGateway=
DNS=
[ImageConfiguration]
ImageDisplayName= Specify a name that you want to appear in the Image Server.
CompresionEnabled=true/false Specify whether or not to use NTFS file compression. Default is false.
[TargetContainer]
Address= {required} Specify the IP address for the target container (Windows Image Server).
UserName= {required} Specify the username for the target container.
Password= {required} Specify the password credential for the target container.
File Sections and Default Settings Comment
176 PlateSpin Migrate 11.1 User Guide

DeployImage-Default.ini
Table B-10 Details of DeployImage-Default.ini
[Volume1]
VolumeToCopy= Specify the name of the volume you want to capture.
MapTo= Specify the path where you want to create the package file for the volume.
File Sections and Default Settings Comment
[Type]
Conversion=I2V {required} This value must be used for every image deployment.
[JobConfig]
Default=true
[Source]
Address= {required} Specify an IP address for the image container.
UserName= {required} Specify a username credential for the image container.
Password= {required} Specify a password credential for the image container.
ImageDisplayName= Specify the name of the image that you want to deploy.
[TargetContainer]
Address= {required} Specify the IP address for the target container (that is, the ESX address or the vCenter address). If ESX is discovered via VCenter, specify the ESX IP.
UserName= {required} Specify the username for the target container. If ESX is discovered via VCenter, specify the vCenter username.
Password= {required} Specify the password credential for the target container. If ESX is discovered via VCenter, specify the vCenter password.
[NewMachine]
DisplayName= {required} Specify the name you want to display in the target container.
HostName= Specify the target hostname.
File Sections and Default Settings Comment
Using the PlateSpin Migrate Command Line Interface 177

DeployImage.ini
Table B-11 Details of DeployImage.ini
File Sections and Default Settings Comment
[Type]
Conversion=I2V {required} This value must be used for every image deployment.
[JobConfig]
Default=false
[Source]
Address= {required} Specify an IP address for the image container.
UserName= {required} Specify a username credential for the image container.
Password= {required} Specify a password credential for the image container.
ImageDisplayName= Specify a name for the image that you want to deploy.
[TargetContainer]
Address= {required} Specify the IP address for the target container (that is, the ESX address or the vCenter address). If ESX is discovered via VCenter, specify the ESX IP.
UserName= {required} Specify the username for the target container. If ESX is discovered via VCenter, specify the vCenter username
Password= {required} Specify the password credential for the target container. If ESX is discovered via VCenter, specify the vCenter password
TakeControl=static/dhcp Specify static or dhcp,depending on your networking configuration.
VirtualNetwork=
TakeControlAddress=
SubnetMask=
DefaultGateway=
[NewMachine]
DisplayName= {required} Specify the name you want to display in target container.
DataStore= Specify the name of datastore you want to use.
ConfigPath= Specify the path to the .vmx file.
178 PlateSpin Migrate 11.1 User Guide

IncrementalImaging-Default.ini
Table B-12 Details of IncrementalImaging-Default.ini
Memory= Specify the amount of RAM you want for the target computer in MB or GB.
WorkGroup= Specify the name of the workgroup you want to join.
InstallTools=true/false Possible settings shown. Default is true.
NumberofCPU= Specify the number of CPUs you want for the target computer.
Memory= .Specify the amount of RAM you want for the target computer.
Domain=
DomainUserName=
DomainUserPassword=
HostName=
EndState=VMPowerOFF/VMPowerON/VMSuspend Possible settings shown.
[EthernetNic1] If you have two (or more) NICs at the target, you can specify them and their configurations
DHCPEnabled=true/false
VirtualNetwork= Specify the VMware virtual network name you want to use
Address=
SubnetMask=
DefaultGateway=
DNS=
[DriveGeneral] If you have multiple disks at the source, you specify them here (create more if needed). The .ini file shows examples of two disks being specified. You can specify as many disks as there are at the source.
DataStore1= Specify the name of the datastore.
Disk1= Specify the name of the disk and its location.
DataStore2= Specify the name of the datastore.
Disk2= Specify the name of the disk and its location.
File Sections and Default Settings Comment
[Type]
File Sections and Default Settings Comment
Using the PlateSpin Migrate Command Line Interface 179

IncrementalImaging.ini
Table B-13 Details of IncrementalImaging.ini
Conversion=X2EI {“Existing Image”: required} Every incremental image capture uses this setting.
[JobConfig]
Default=true
[Source]
Address= {required} Specify an IP address for the source workload.
UserName= {required} Specify a username credential for the source workload.
Password= {required} Specify a password credential for the source workload.
TakeControl=static/dhcp {conditional} Use this value only if the source is WINXP, Win2k3, Windows 2000. Otherwise, it is not required.
TakeControlAddress=
SubnetMask=
DefaultGateway=
ImageDisplayName= Specify an image name that already exists in the image server.
[TargetContainer]
Address= {required} Specify an IP address for the image.
UserName= {required} Specify a username for the image.
Password= {required} Specify a password credential for the image server.
File Sections and Default Settings Comment
[Type]
Conversion=X2EI {“Existing Image: required} Every incremental image capture uses this setting.
[JobConfig]
Default=false
[Transfer]
LiveTransferEnabled=true/false Possible settings shown. This setting is dependent on the TransferType setting. If that setting is Filebased and you want to perform an offline conversion, this setting must be set to false.
File Sections and Default Settings Comment
180 PlateSpin Migrate 11.1 User Guide

[Source]
Address= {required} Specify an IP address for the source workload.
UserName= {required} Specify a username credential for the source workload.
Password= {required} Specify a password credential for the source workload.
TakeControl=static/dhcp {conditional} Use this value only if the source is WINXP, Win2k3, Windows 2000. Otherwise, it is not required.
TakeControlAddress=
SubnetMask=
DefaultGateway=
EndState=ShutDown/Donothing/Reboot Possible settings shown.
ImageDisplayName= Specify an image name that already exits in image server.
[TargetContainer]
Address= {required} Specify the IP address for the image server.
UserName= {required} Specify the username for the image server.
Password= {required} Specify a password for the image server.
File Sections and Default Settings Comment
Using the PlateSpin Migrate Command Line Interface 181

182 PlateSpin Migrate 11.1 User Guide

C CFrequently Asked Questions
This section provides answers to frequently asked questions.
What are the performance and scalability characteristics of my PlateSpin Migrate product?
Your PlateSpin Migrate product’s overall performance, including data transfer speeds and scalability, depend on a variety of factors in your specific environment. See “Performance” on page 19.
How secure is my PlateSpin Migrate product?
PlateSpin Migrate provides several features to help you safeguard your data and increase security. See “Security and Privacy” on page 18.
Does PlateSpin Migrate support my workload’s data storage technology?
PlateSpin Migrate products support a number of data storage and management technologies, including Windows dynamic disks, Linux logical volumes, RAID (Redundant Array of Independent Disks) systems, and SAN (Storage Area Network) systems.
Can I use custom SSH ports to communicate with my workloads?
Yes. See “Discovering the Details of Source Workloads and Targets” on page 55.
Can multiple migrations run simultaneously?
Yes. See “Performance” on page 19.
Frequently Asked Questions 183

184 PlateSpin Migrate 11.1 User Guide

D DTroubleshooting PlateSpin Migrate
This section provides a series of topics about troubleshooting PlateSpin Migrate.
Section D.1, “Discovery,” on page 185 Section D.2, “Peer-to-Peer Migrations (Windows),” on page 186 Section D.3, “Using Images,” on page 187 Section D.4, “Post-migration Cleanup of Source Workloads,” on page 188 Section D.5, “Shrinking the PlateSpin Migrate Databases,” on page 190
D.1 Discovery
Table D-1 Common Issues and Solutions Related to Discovery Operations
Problems or Messages Solutions
"Application has generated an error" during registration of physical server
This error occurs if the physical server is unable to contact the PlateSpin Server. A common cause is incorrect information entered during the registration process. To restart the registration process, enter RegisterMachine.bat. Ping to confirm basic connectivity with the PlateSpin Server.
My physical server has completed the registration process, but is not seen in PlateSpin Migrate Client
The full registration process can take some time to complete. After the second command prompt window has closed on the physical server, wait a few minutes before clicking the Refresh button in PlateSpin Migrate Client.
Problems discovering source and target servers
KB Article 7920291 (https://www.netiq.com/support/kb/doc.php?id=7920291) contains troubleshooting checklists for discovering the following:
Linux servers and VMware ESX Servers
Windows-based source and target servers
The article also has instructions for troubleshooting WMI connections and checking if DCOM is enabled.
"Package <…> Not Found" during discovery of existing Windows servers
Check for IIS configuration and network settings.
Troubleshooting PlateSpin Migrate 185

Related KB Articles:
D.2 Peer-to-Peer Migrations (Windows)
Table D-2 Common Issues and Solutions Related to Peer-to-Peer Migrations (Windows)
Could not find file "\\{servername}\admin$\{randomID}.xml"
This error might occur on Windows Server 2000 or 2003 hosts.
In some cases, either of these troubleshooting steps addresses the issue:
Ensure that the Admin$ share on the PlateSpin Server host is accessible. If not, enable it and try the discovery again.
- OR -
1. From any Web browser, open https://Your_PlateSpin_Server/platespinconfiguration. 2. Locate and edit the ForceMachineDiscoveryUsingService entry and change it to true. 3. Save the value and retry the discovery.
ID Description
7920339 (https://www.netiq.com/support/kb/doc.php?id=7920339)
ERRMSG: Discovery fails with "The request failed with HTTP status 407" message
7920862 (https://www.netiq.com/support/kb/doc.php?id=7920862)
ERRMSG: Recoverable Error: ControllerConnectionBroken during discovery
7920291 (https://www.netiq.com/support/kb/doc.php?id=7920291)
ERRMSG: Server details discovery problems
Problems or Messages Solutions
Problems or Messages Solutions
One of the following errors displays during offline migration:
Waiting for Controller to start (Failed)
Controller Connection Not Established
Controller Connection Broken
Unable to start the Heartbeat Service
This indicates one of the following problems:
The network settings for the temporary IP addresses under Job Configuration > Advanced might not be configured properly.
There was a possible network outage that prevented the source/target machine from communicating with the PlateSpin Server.
The source/target machine was not able to fully boot into the pre-execution environment.
To diagnose the exact cause of failure, check the state of the system where the controller failed to start. Commands such as ipconfig and ping are available to verify basic network connectivity.
File transfer hangs at 1% or progresses at a slow pace
By default, a link type of AUTO is used on the source server during a migration. If the source server is connected to a switch port that is forced to 100/FULL, the Force Full Duplex option must be enabled when configuring the migration. If this option is set incorrectly, a duplex mismatch occurs on the network.
186 PlateSpin Migrate 11.1 User Guide

Related KB Articles:
D.3 Using Images
Table D-3 Common Issues and Solutions Related to PlateSpin Images
Unable to determine suitable boot partition
When converting existing source servers, the boot volume must pass the following checks:
It must be on a basic disk
It must have 175 MB of free space
It must be a primary partition
If any of these are not true for the system volume, the migration fails while attempting to take control of the source server.
Job remains in a Scheduled state for a long period and then changes to Recoverable error (all sub-steps display NotStarted status)
There is a problem with the Operations Framework Controller on the PlateSpin Server. Use the Windows services plug-in to confirm that the Controller is running. See KB Article 7920862 (https://www.netiq.com/support/kb/doc.php?id=7920862) for other troubleshooting instructions.
Troubleshooting failures at the Configuring Operating System stage (also applicable to Configure Target Machine or Configuring Virtual Machine migration steps)
Generally, failures during the configuration step indicate that a time-out occurred when attempting to configure the target physical or virtual machine. Although the migration job appears to have failed, the overall migration is probably successful and the configuration service running on the target will likely continue its operations.
KB Article 7920327 (https://www.netiq.com/support/kb/doc.php?id=7920327) contains a detailed troubleshooting checklist and lists information required if technical support is necessary.
Live Transfer is unavailable Either an unsupported file system or operating system exists on the server.
ID Description
7920862 (https://www.netiq.com/support/kb/doc.php?id=7920862)
ERRMSG: PlateSpin Migrate Job remains at a "Scheduled" or "Recoverable Error" state
7920810 (https://www.netiq.com/support/kb/doc.php?id=7920810)
INFO: Restore job stalls - "The configuration service in the target machine..."
2790341 (https://www.netiq.com/support/kb/doc.php?id=7920341)
INFO: What ports does PlateSpin Migrate use during discovery, migration and file transfer?
Problems or Messages Solutions
Problems or Messages Solutions
Cannot see PlateSpin Images on PlateSpin Image Server
If the Servers view is configured to group servers by machine, discovered image servers cannot be expanded. To display the images, reconfigure the Servers View so the servers are grouped by domain instead of machine.
Troubleshooting PlateSpin Migrate 187

Related KB Articles:
D.4 Post-migration Cleanup of Source WorkloadsSource workloads might occasionally need a post-migration cleanup. For example, you might need to clean up a source workload of all PlateSpin software components after an unsuccessful migration.
Section D.4.1, “Cleaning Up Windows Workloads,” on page 188 Section D.4.2, “Cleaning Up Linux Workloads,” on page 189
D.4.1 Cleaning Up Windows Workloads
The following are instructions for cleaning up Windows workloads by component and use case.
Failed to mount image. The volume does not contain a recognized file system
This error message might appear when you are importing or deploying volume data while installing a PlateSpin Image Server on Windows 2003. To resolve the error, use the Windows services plug-in on the PlateSpin Image Server. Modify the logon properties for the PlateSpin Migrate Operations Management Controller service to use an account with local administrative privileges. Restart the service after making this change.
Security descriptors are not intact on deployed server when you are using volume data from a Symantec Ghost image
When you are creating a PlateSpin Image using raw volume data that was extracted from a Ghost Image, the security descriptors are not preserved on the VM. This is because the extracted files inherit permissions of their parent folder.
ID Description
7920879 (https://www.netiq.com/support/kb/doc.php?id=7920879)
ERRMSG: The file cannot be accessed by the system
Problems or Messages Solutions
Component Use Case Removal Instructions
File-based Transfer Component
All Migrations At root level for each volume migrated, remove all files named PlateSpinCatalog*.dat
Workload discovery software
All migrations 1. In the Servers view, undiscover the source (right-click, then select Undiscover).
2. In the source workload’s Windows directory:
Remove all files named machinediscovery*.
Remove the subdirectory named platespin.
188 PlateSpin Migrate 11.1 User Guide

D.4.2 Cleaning Up Linux Workloads
The following are instructions for cleaning up Linux workloads by component and use case.
Controller software All migrations 1. In the Servers view, undiscover the source (right-click, then select Undiscover).
2. Open a command prompt and change the current directory to:
\Program Files\platespin* (32-bit systems)
\Program Files (x86)\platespin (64-bit systems)
3. Run the following command:
ofxcontroller.exe /uninstall
4. Remove the platespin* directory
Component Use Case Removal Instructions
Component Use Case Removal Instructions
Controller software Offline migrations In the source workload’s file system, under /boot, remove the ofx directory with its contents.
All live migrations Kill these processes:
pkill -9 ofxcontrollerd
pkill -9 ofxjobexec
remove the OFX controller rpm package:
rpm -e ofxcontrollerd
In the source workload’s file system, remove the /usr/lib/ofx directory with its contents.
Troubleshooting PlateSpin Migrate 189

D.5 Shrinking the PlateSpin Migrate DatabasesWhen the PlateSpin Migrate databases (OFX and PortabilitySuite) reach a predetermined capacity, cleanup on those databases occurs at regular intervals. If there is a need to further regulate the size or content of those databases, Migrate provides a utility (PlateSpin.DBCleanup.exe) to further clean up and shrink those databases. KB Article 7006458 (https://www.netiq.com/support/kb/doc.php?id=7006458) explains the location of the tool and the options available for it, should you decide to use it for offline database operations.
Block-level data transfer software
All block-level migrations
1. Check if the driver is active:
lsmod | grep blkwatch
If the driver is still loaded in memory, the result should contain a line, similar to the following:
blkwatch_7616 70924 0
2. (Conditional) If the driver is still loaded, remove it from memory:
rmmod blkwatch_7616
3. Remove the driver from the boot sequence:
blkconfig -u
4. Remove the driver files by deleting the following directory with its contents:
/lib/modules/[Kernel_Version]/Platespin
5. Delete the following file:
/etc/blkwatch.conf
LVM snapshots Block-level migrations using LVM snapshots
1. In the Jobs view, generate a Job Report for the failed job, then note the name of the snapshot.
2. Remove the snapshot device by using the following command:
lvremove snapshot_name
Component Use Case Removal Instructions
190 PlateSpin Migrate 11.1 User Guide

E EReference of Tables
This section provides a list of links to important tables used throughout the documentation accompanying PlateSpin Migrate version 11.1.
Table
Table 1-1, “Workload Portability Operations,” on page 12
Table 1-2, “PlateSpin Migrate Workload Migration Tasks,” on page 13
Table 1-3, “Supported Microsoft Windows Workloads,” on page 14
Table 1-4, “Supported Linux Workloads,” on page 15
Table 1-5, “Supported Target Virtualization Platforms,” on page 16
Table 2-1, “PlateSpin Migrate Workload License Assignment by Migration Type,” on page 23
Table 2-2, “License Manager Command Buttons,” on page 24
Table 2-3, “PlateSpin Migrate Roles and Permission Details,” on page 26
Table 2-4, “Network Communication Prerequisites for Discovery Operations,” on page 33
Table 2-5, “Network Communication Prerequisites for Workload Portability,” on page 35
Table 2-6, “Parameters for Fine-Tuning File-Level Data Transfer Performance,” on page 44
Table 2-7, “List of Common Use Cases for changing settings in the Web configuration tool,” on page 45
Table 3-1, “Machine-Specific Icons in the Servers View,” on page 52
Table 3-2, “Guidelines for Discovery Parameters,” on page 60
Table 3-3, “Status Messages in PlateSpin Analyzer Test Results,” on page 61
Table 3-4, “PlateSpin Analyzer Test Results Tab,” on page 61
Table 5-1, “PlateSpin Image Server Host Requirements,” on page 96
Table 6-1, “Source and Target Credentials,” on page 110
Table D-1, “Common Issues and Solutions Related to Discovery Operations,” on page 185
Table D-2, “Common Issues and Solutions Related to Peer-to-Peer Migrations (Windows),” on page 186
Table D-3, “Common Issues and Solutions Related to PlateSpin Images,” on page 187
Reference of Tables 191

192 PlateSpin Migrate 11.1 User Guide

Glossary
Auto-Discovery. See Network Discovery.
Block-Based Transfer Component. A PlateSpin Migrate software component, dynamically installed on source workloads to facilitate volume data transfer at the block level. Compare with VSS Block-based Transfer Component; see also File-based Transfer Component.
Capture Image. A PlateSpin Migrate job that captures an image of a workload in PlateSpin Image format with an optional synchronization schedule for updating incremental changes. See also Deploy Image.
Controller. See OFX Controller.
Conversion. Any workload portability operation irrespective of target infrastructure or business purpose (workload-hardware decoupling, virtualization, or volume synchronization). Used interchangeably with the term Migration throughout product collateral, the user interface, error messages, and logs.
Copy. A PlateSpin Migrate peer-to-peer migration job that creates a duplicate of a workload, with a new network identity, on a physical or virtual machine. Compare with Move.
Deploy Image. A PlateSpin Migrate job that converts a PlateSpin Image to a bootable workload on physical hardware or on a virtual machine. See also Capture Image.
Discover. See Discover Details.
Discover Details. A PlateSpin Migrate job that inventories the details of a supported workload or target machine in preparation for a migration operation. Compare with Network Discovery.
File-based Transfer Component. A PlateSpin Migrate software component, dynamically installed on a source workload to facilitate volume data transfer at the file level. See also Block-Based Transfer Component, VSS Block-based Transfer Component.
PlateSpin Image. (Formerly PlateSpin Flexible Image) One of PlateSpin Migrate’s three fundamental workload infrastructures along with physical machines and virtualization platforms. A PlateSpin Image is a static stored copy of the state of a physical or virtual machine (including volume data and the configuration details of the workload’s hardware profile, operating system, and network identity), captured at a specific point in time. To make a PlateSpin Image bootable, you convert it to a workload on physical hardware or a virtualization platform. See also Capture Image, Deploy Image, and Import Image.
PlateSpin Image Server. A machine on which you have installed the PlateSpin Image Server software. See PlateSpin Image.
I2P. Image-to-physical. A workload portability operation in which the source is a workload’s PlateSpin Image and the target is a bootable workload on physical hardware.
I2V. Image-to-virtual. A workload portability operation in which the source is a workload’s PlateSpin Image and the target is a bootable workload on a virtualization platform.
I2X. Image-to-anything. A workload portability operation in which the source is a workload’s PlateSpin Image and the target is a bootable workload either on physical hardware or on a virtualization platform.
Glossary 193

Image. See PlateSpin Image.
Image server. See PlateSpin Image Server.
Import Image. A PlateSpin Migrate job that creates a PlateSpin Image by using either raw volume data or third-party volume archives.
Job. A collection of the essential parameters of a workload portability, discovery, removal (undiscovery), or related operation that you define, save, schedule, execute, and monitor in the PlateSpin Migrate Client.
Migration. Any peer-to-peer workload portability operation in which a physical or virtual workload is copied or moved into another physical or virtual infrastructure.
Move. A PlateSpin Migrate peer-to-peer workload migration task that moves a workload to a physical or virtual machine. Compare with Copy.
Network Discovery. A PlateSpin Migrate feature, based on standard Windows network browsing functionality, that automatically populates the PlateSpin Migrate Client’s Servers view with the names of Windows machines in the neighborhood. Compare with Discover Details.
OFX Controller. Operations Framework Controller. Software component that PlateSpin Migrate installs on source and target machines to enable them to communicate with PlateSpin Server and with each other.
Offline Migration. A type of migration, during which the source is shut down and booted into a temporary pre-execution environment to enable communication among the source, the target, and the PlateSpin Server.
P2I. Physical-to-image. A workload portability operation in which the source is a physical machine and the target is the workload’s PlateSpin Image.
P2P. Physical-to-physical. A peer-to-peer workload portability operation in which the source is a physical machine and the target is another physical machine on different hardware.
P2V. Physical-to-virtual. A peer-to-peer workload portability operation in which the source is a physical machine and the target is virtual machine.
P2X. Physical-to-anything. A workload portability operation in which the source is a physical machine and the target is another physical machine (P2P migration), a virtual machine (P2V migration), or a PlateSpin Image (P2I migration).
Peer-to-Peer. A workload portability operation in which both the source and the target are bootable workloads, either physical or virtual (as opposed to operations in which either the source or the target is a static PlateSpin Image). P2P, P2V, V2V, and V2P are all peer-to-peer portability operations; I2X and X2I are not.
PlateSpin Migrate Client. The client application you use to interact with the PlateSpin Server, discover source workloads and targets; set up, execute, and monitor jobs; manage license keys; and configure the default behavior of the server.
PlateSpin Migrate Network. A named collection of discovered workloads and target machines you work with at any given time. A parameter of all discovery jobs.
PlateSpin Server. The remote runtime execution engine underlying the PlateSpin Migrate product.
194 PlateSpin Migrate 11.1 User Guide

Prepare for Synchronization. A step in workload synchronization operations where the target is a virtual machine in a Server Sync job. It automates the configuration and preliminary booting of the target virtual machine, and registers it as a valid Server Sync target in the PlateSpin Migrate Client’s user interface. See Server Sync.
Raw Volume Data. A directory of files that constitute a volume suitable for a PlateSpin Image.
Role. One of the three kinds of Windows local user groups that define PlateSpin Migrate users with specific access permissions: PlateSpin Migrate Administrator, PlateSpin Migrate Power User, and PlateSpin Migrate Operator.
Semi-Automated Virtualization. A workload virtualization operation in which a workload's target infrastructure is a virtual machine that is treated by PlateSpin Migrate as a physical machine. Applies to target virtualization platforms for which PlateSpin Migrate provides limited workload portability automation. Compare with X2P.
Server. See PlateSpin Server.
Server Sync. A workload portability operation that synchronizes the state of a physical or virtual workload (Windows or Linux) with the state of another physical or virtual workload of the same OS profile.
Source. The origin, or the infrastructure of the origin, of a workload portability operation (such as a physical machine, a virtual machine, or a PlateSpin Image). Compare with Target.
Take Control. 1. See Offline Migration
2. The temporary pre-execution environment into which a Windows or Linux workload is booted during offline migration.
Target. The outcome, or the infrastructure of the outcome, of a workload portability operation (such as a physical machine, a virtual machine, or a PlateSpin Image). Compare with Source.
Undiscover. A PlateSpin Migrate job that discards information about a workload from its inventory and removes any controllers installed. See also Discover Details.
V2I. Virtual-to-image. A workload portability operation in which the source is a virtual machine and the target is a PlateSpin Image.
V2P. Virtual-to-physical. A peer-to-peer workload portability operation in which the source is a virtual machine and the target is a physical machine.
V2V. Virtual-to-virtual. A workload portability operation in which both the source and the target are virtual machines on similar or different virtualization platforms.
V2X. Virtual-to-anything. A workload portability operation in which the source is a virtual machine and the target is another virtual machine, a physical machine, or a workload’s PlateSpin Image.
VSS Block-based Transfer Component. A PlateSpin Migrate software component, dynamically installed on Windows source workloads to facilitate volume data transfer at the block level by using the Microsoft Volume Snapshot Service (VSS). See also Block-Based Transfer Component, File-based Transfer Component.
Workload. Any physical or virtual instance of a supported operating system, along with its applications and data.
X2I. Anything-to-image. A workload portability operation in which the target is a workload’s PlateSpin Image and the source is a physical machine or a virtual machine.
Glossary 195

X2P. Anything-to-physical. A workload portability operation in which the target is a physical machine and the source is another physical machine, a virtual machine, or a workload’s PlateSpin Image.
X2V. Anything-to-virtual. A workload portability operation in which the target is a virtual machine and the source is another virtual machine, a physical machine, or a workload’s PlateSpin Image.
196 PlateSpin Migrate 11.1 User Guide


