Microsoft SharePoint 2010 (Custom Guide) - co.berks.pa.us Training Docs... · County of Berks 5...
107
County of Berks Microsoft ® S S h h a a r r e e P P o o i i n n t t F F o o u u n n d d a a t t i i o o n n 2 2 0 0 1 1 0 0
Transcript of Microsoft SharePoint 2010 (Custom Guide) - co.berks.pa.us Training Docs... · County of Berks 5...

County of Berks
Microsoft®
SShhaarreePPooiinntt FFoouunnddaattiioonn 22001100

2 © 2011 CustomGuide, Inc.
© 2011 by CustomGuide, Inc. 3387 Brownlow Avenue; St. Louis Park, MN 55426
This material is copyrighted and all rights are reserved by CustomGuide, Inc. No part of this publication may be reproduced, transmitted, transcribed, stored in a retrieval system, or translated into any language or computer language, in any form or by any means, electronic, mechanical, magnetic, optical, chemical, manual, or otherwise, without the prior written permission of CustomGuide, Inc.
We make a sincere effort to ensure the accuracy of the material described herein; however, CustomGuide makes no warranty, expressed or implied, with respect to the quality, correctness, reliability, accuracy, or freedom from error of this document or the products it describes. Data used in examples and sample data files are intended to be fictional. Any resemblance to real persons or companies is entirely coincidental.
The names of software products referred to in this manual are claimed as trademarks of their respective companies. CustomGuide is a registered trademark of CustomGuide, Inc.
County of Berks 3
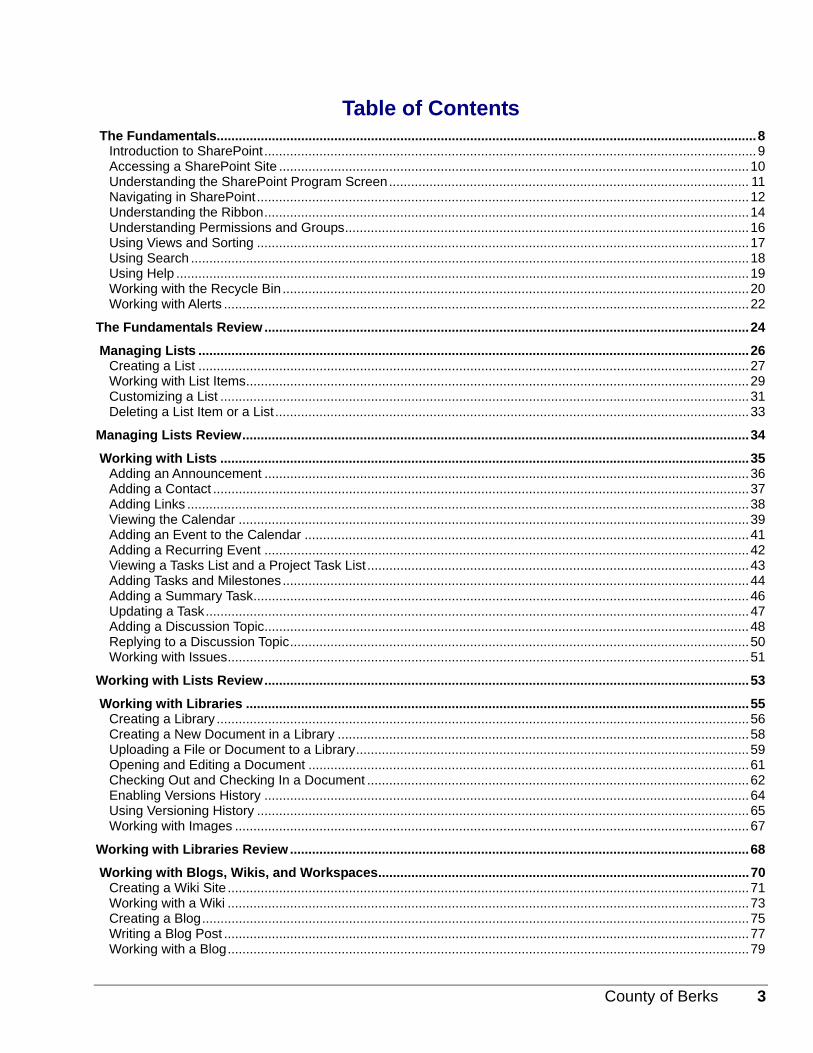
Table of Contents The Fundamentals................................................................................................................................................... 8
Introduction to SharePoint ...................................................................................................................................... 9 Accessing a SharePoint Site ................................................................................................................................ 10 Understanding the SharePoint Program Screen .................................................................................................. 11 Navigating in SharePoint ...................................................................................................................................... 12 Understanding the Ribbon .................................................................................................................................... 14 Understanding Permissions and Groups .............................................................................................................. 16 Using Views and Sorting ...................................................................................................................................... 17 Using Search ........................................................................................................................................................ 18 Using Help ............................................................................................................................................................ 19 Working with the Recycle Bin ............................................................................................................................... 20 Working with Alerts ............................................................................................................................................... 22
The Fundamentals Review .................................................................................................................................... 24
Managing Lists ...................................................................................................................................................... 26 Creating a List ...................................................................................................................................................... 27 Working with List Items ......................................................................................................................................... 29 Customizing a List ................................................................................................................................................ 31 Deleting a List Item or a List ................................................................................................................................. 33
Managing Lists Review .......................................................................................................................................... 34
Working with Lists ................................................................................................................................................ 35 Adding an Announcement .................................................................................................................................... 36 Adding a Contact .................................................................................................................................................. 37 Adding Links ......................................................................................................................................................... 38 Viewing the Calendar ........................................................................................................................................... 39 Adding an Event to the Calendar ......................................................................................................................... 41 Adding a Recurring Event .................................................................................................................................... 42 Viewing a Tasks List and a Project Task List ........................................................................................................ 43 Adding Tasks and Milestones ............................................................................................................................... 44 Adding a Summary Task ....................................................................................................................................... 46 Updating a Task .................................................................................................................................................... 47 Adding a Discussion Topic .................................................................................................................................... 48 Replying to a Discussion Topic ............................................................................................................................. 50 Working with Issues .............................................................................................................................................. 51
Working with Lists Review .................................................................................................................................... 53
Working with Libraries ......................................................................................................................................... 55 Creating a Library ................................................................................................................................................. 56 Creating a New Document in a Library ................................................................................................................ 58 Uploading a File or Document to a Library ........................................................................................................... 59 Opening and Editing a Document ........................................................................................................................ 61 Checking Out and Checking In a Document ........................................................................................................ 62 Enabling Versions History .................................................................................................................................... 64 Using Versioning History ...................................................................................................................................... 65 Working with Images ............................................................................................................................................ 67
Working with Libraries Review ............................................................................................................................. 68
Working with Blogs, Wikis, and Workspaces ..................................................................................................... 70 Creating a Wiki Site .............................................................................................................................................. 71 Working with a Wiki .............................................................................................................................................. 73 Creating a Blog ..................................................................................................................................................... 75 Writing a Blog Post ............................................................................................................................................... 77 Working with a Blog .............................................................................................................................................. 79

4 © 2011 CustomGuide, Inc.
Creating a Document Workspace ......................................................................................................................... 81 Creating a Meeting Workspace ............................................................................................................................ 83 Linking an Event to a Meeting Workspace ........................................................................................................... 85
Working with Blogs, Wikis, and Workspaces Review ........................................................................................ 86
Using SharePoint with Office ............................................................................................................................... 88 Synchronizing Lists and Libraries with Outlook .................................................................................................... 89 Creating a Meeting Workspace from Outlook ...................................................................................................... 91 Saving a File to a SharePoint Library ................................................................................................................... 93 Export Lists and Libraries to Excel ....................................................................................................................... 94
Using SharePoint with Office Review .................................................................................................................. 95
Managing Sites ...................................................................................................................................................... 96 Working with Site Settings .................................................................................................................................... 97 Customizing Site Appearance and Navigation ..................................................................................................... 99 Working with Groups .......................................................................................................................................... 101 Adding a User to a Group ................................................................................................................................... 103 Working with Web Parts ..................................................................................................................................... 105
Managing Sites Review ....................................................................................................................................... 107

County of Berks 5
IInnttrroodduucciinngg CCuussttoommGGuuiiddee CCoouurrsseewwaarree Thank you for choosing CustomGuide courseware as the solution to your training needs. A proven leader in the computer training industry, CustomGuide has been the key to successful training for thousands of students and instructors across the globe.
This manual is designed for computer users of all experience levels. Novice users can use it to learn skills such as formatting text, while advanced users can use it to create their own templates.
All this information is quickly accessible. Lessons are broken down into basic step-by-step instructions that answer “how-to” questions in minutes. You can print a complete 300-page training manual or a single page of instructions.
Here’s how a CustomGuide manual is organized:
Chapters Each manual is divided into several chapters. Aren't sure if you're ready for a chapter? Look at the table of contents that appears at the beginning of each chapter. It will tell you the name of each lesson and subtopic included in the chapter.
Lessons Each chapter contains lessons on related topics. Each lesson explains a new skill or topic and contains an exercise and exercise file to give you hands-on-experience. These skills can also be practiced using CustomGuide Online Learning.
Review A review is included at the end of the manual. Use these quiz questions and answers to assess how much you've learned.
What People Are Saying
“I have saved hundreds of hours of design time by just picking and choosing what I want from the courseware.”
— Stephanie Zimmerman Lancaster County Library
“We have been able to customize our training sessions on all Microsoft Office products, at all levels. The ROI of these guides is great.”
— Dawn Calvin Las Virgenes Municipal Water District
“All in all, the friendliest, most open and easy to understand tutorial of its type that I’ve ever seen.”
— W. Boudville Amazon.com
“…curriculum that is of high quality, student friendly, and adaptable to the audience.”
— Sherrill Wayland St. Charles Community College
“…a nice training option for almost any need. Their complete Microsoft Office package is by far the best deal on the market.”
— Technical Assistance Program Purdue University
“Any instructor teaching classes on Windows or Microsoft Office will definitely want to give serious consideration to this important collection of titles that will definitely fit well into their classroom learning.”
— Dale Farris Golden Triangle PC Club
“The materials are exceptional – I am so excited about using them! Thanks to you and your team for doing this wonderful work!”
— Shannon Coleman Learning Post Ltd.

6 © 2011 CustomGuide, Inc.
How It Works
1. Open Microsoft Word Our customizable courseware is provided as simple-to-use, editable Microsoft Word documents—if you can use Microsoft Word you can create your own training materials in minutes!
2. Select Your Topics Select the content you need from our award-winning courseware library. You can even mix and match topics between titles, such as Microsoft Outlook and Microsoft Word.
3. Customize Arrange topics in the order you want—the courseware automatically updates to reflect your changes. Add your organization’s name and logo for a professional “in-house” look.
4. Print and Distribute Print as many copies as you need at your site, without paying any per-unit royalties or maintaining physical inventories. You can print single-page handouts, a group of related lessons, or a complete manual. It’s fast, convenient, and very affordable.
5. Teach and Learn You’ll love having your own customized training materials, and your users will appreciate the colorful illustrations, down-to-earth writing style, and the convenience of having a reference guide that they can use in or out of the classroom.
3rd Generation Courseware: What’s New?
CustomGuide is pleased to introduce 3rd generation courseware. Completely redesigned from years of customer feedback, 3rd generation courseware features a streamlined design that is easier to customize and use as a reference tool. Take a look at the table below for more information regarding these features.
Streamlined design Featuring a professional-looking, easy-to-read design, 3rd generation courseware appeals to instructors, students and individual users alike.
Exercise Notes A new Exercise Notes section appears at the top of each lesson. Rather than practicing the topic step by step through the lesson as in 2nd generation courseware, the topic can be practiced using the exercise file and exercise described here.
Table of Contents In addition to the Table of Contents found at the beginning of each courseware title, 3rd generation courseware includes a Table of Contents at the beginning of each chapter, making it even easier to locate the lessons you need.
Smart Quizzes The Quiz section, located at the back of the book, automatically updates itself when the manual is customized. For example, if you remove a lesson regarding cutting and pasting text, there will be no questions in the Quiz section that relate to cutting and pasting text.
Easier customization The design of 3rd generation is simplified, which makes it easier to customize. All you have to do is click and drag or copy and paste, or press the <Delete> key to remove a lesson, and voila; you’re done!
Use as a reference tool 3rd generation courseware breaks tasks down into basic step-by-step instructions and can be used as a virtual help desk, answering “how-to” questions in minutes.

County of Berks 7
Courseware Features
Lessons are presented on one or two pages, so you can follow along without wondering when a lesson ends and a new one begins.
Each lesson includes a hands-on exercise and practice file so users can practice the topic of the lesson.
Clear step-by-step instructions answer “how-to” questions. Anything you need to click appears like this.
Tips let you know more information about a specific step or topic as a whole.
Whenever there is more than one way to do something, the most common method is presented in the numbered step, while the alternate methods appear beneath.
Tables provide summaries of the terms, toolbar buttons, and options covered in the lesson.
The table of contents, index, tables, figures, and quiz questions automatically update to reflect any changes you make to the courseware.
Icons and pictures show you what to look for as you follow the instructions.
Working with Shapes and Pictures
Exercise
Exercise File: AmericanHistory7-3.docx
Exercise: Select the header row containing the month labels, the Income row, the Total Exp. Row, and the Net Inc. row (use the Ctrl key to select multiple rows). Create a 2-D Clustered Column chart.
© 2007 CustomGuide, Inc. 102
Whenever you insert a graphic into a document, it is inserted inline with text by default. This means that the text in the document moves in order to accommodate the graphic. This lesson will show you how to adjust text wrapping and how to use the grid to position objects.
Positioning Pictures
1. Double-click the object whose text wrapping you wish to adjust.
2. Click the Text Wrapping button in the Arrange group.
3. Select a text wrapping style from the list.
The Format contextual tab appears on the Ribbon.
Horizontal and vertical gridlines appear on the page.
Tip: Gridlines do NOT appear in the printed document.
Tips
If you want to use a graphic with other graphics or objects, they must be on a drawing canvas. See the lesson on Inserting Shapes for more information.
Adjust text wrapping
To adjust how text reacts to the objects in your documents, change the object’s text wrapping.
A list of text wrapping styles appears. Take a look at the Text Wrapping Styles table for a description of each style.
The text wrapping style is applied to the image.
Other Ways to Adjust Text Wrapping: Right-click the image, point to Text Wrapping in the contextual menu, and select an option from the submenu.
Other Ways to Display the Grid: Press <Shift> + <F9>, or click the Format contextual tab on the Ribbon, click the Align button in theArrange group, and select View Gridlines from the list.
1. Click the View tab on the Ribbon.
2. Click the Gridlines check box in the Show/Hide group.
To display/hide the grid
Just like the graph paper you used to use in geometry class, the grid consists of horizontal and vertical lines that help you draw and position objects.
Table 7-2: Text Wrapping Styles
In Line with Text
This places the object at the insertion point in a line of text in the document. The object remains on the same layer as the text.
Square Wraps text around all sides of the square bounding box for the selected object.
Tight Wraps text tightly around the edges of the actual image (instead of wrapping around the object’s bounding box).
Behind Text
This removes text wrapping and puts the object behind text in a document The object floats on its own layer.
In Front of Text
This removes text wrapping and puts the object in front of text in a document. The object floats on its own layer.
Top and Bottom
Wraps text around the top and bottom of the object, leaving the area to the right and left of the object clear.
Through Similar to the Tight style, this style wraps text throughout the image.
Figure 7-3: A document with the grid displayed.
8 © 2011 CustomGuide, Inc.
TThhee FFuunnddaammeennttaallss
Introduction to SharePoint ................................. 9
Accessing a SharePoint Site ............................ 10
Understanding the SharePoint Program Screen ............................................................................. 11
Navigating in SharePoint .................................. 12
Understanding the Ribbon ............................... 14 Tabs ......................................................... 14 Groups ..................................................... 14 Buttons ..................................................... 15
Understanding Permissions and Groups ........ 16
Using Views and Sorting .................................. 17 Change a view ......................................... 17 Sort items ................................................. 17
Using Search ...................................................... 18 Search in SharePoint ............................... 18 Change the search scope ........................ 18
Using Help .......................................................... 19 Search for help ........................................ 19 Browse for help ........................................ 19
Working with the Recycle Bin .......................... 20 Restore an object ..................................... 20 Delete an object permanently .................. 20
Working with Alerts ........................................... 22 Receive alerts for an item or document ... 22 Receive alerts for a list or library ............. 23 Remove an alert ...................................... 23
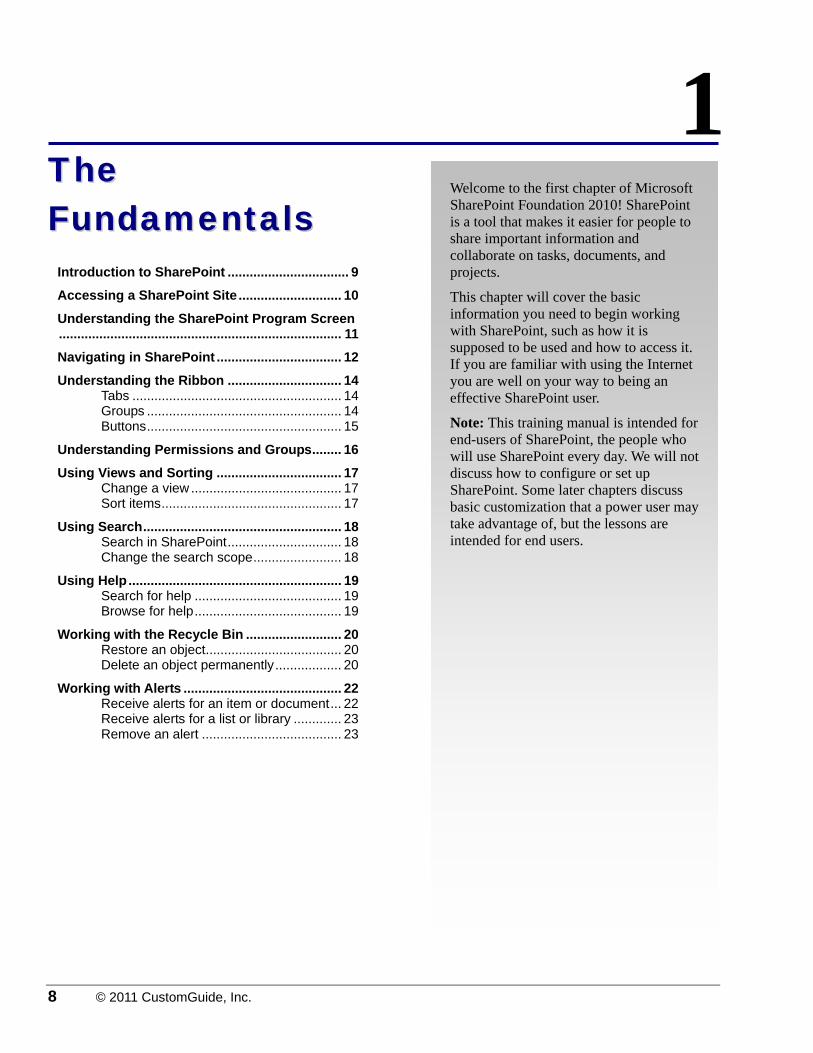
Welcome to the first chapter of Microsoft SharePoint Foundation 2010! SharePoint is a tool that makes it easier for people to share important information and collaborate on tasks, documents, and projects.
This chapter will cover the basic information you need to begin working with SharePoint, such as how it is supposed to be used and how to access it. If you are familiar with using the Internet you are well on your way to being an effective SharePoint user.
Note: This training manual is intended for end-users of SharePoint, the people who will use SharePoint every day. We will not discuss how to configure or set up SharePoint. Some later chapters discuss basic customization that a power user may take advantage of, but the lessons are intended for end users.
1

County of Berks 9
Introduction to SharePoint SharePoint is a Web-based program that acts as a hub for sharing and storing information, and collaborating within an organization. This centralized platform gives everyone access to the same information, makes collaborative tasks easier, and helps you manage deadlines and projects. When it is used to its potential, people will find that SharePoint makes it much easier to collaborate and communicate with others.
The first table, Common Uses for SharePoint, lists a few of the ways SharePoint helps you work with others in your organization.
The second table, Things You Will Use In SharePoint, describes the features that you will likely use most often.
Table 1-1: Common Uses for SharePoint
Collaborate on Documents
With Document Workspaces, SharePoint makes group collaboration on the creation of a document possible by providing a central location where multiple users can contribute to the document at the same time.
Store Documents Centrally
Documents and files are easy to find and organize when SharePoint’s libraries are used. SharePoint can also make documents available outside of an organization's network.
Share Information It is much easier for users to find and share information when it is stored in a central location. No going back through e-mail messages or other forms of communication to find something out. Places for announcements and shared calendars facilitate communication, as do tools such as blogs and wikis.
Table 1-2: Things You Will Use in SharePoint
Lists Lists are used to organize and store many different things in a SharePoint site and are almost always displayed in the Quick Launch bar. All of these items are stored in lists: announcements, contacts, links, calendar, tasks, project tasks, and issue tracking.
Libraries Libraries are used to store and share files and they provide features specifically for the types of files stored in the library. For example, the picture library provides image-specific features like a slide show and thumbnails. All of these are types of libraries: Document, Form, Picture, and Wiki Page.
Discussion Boards A place for newsgroup-style discussions. Post topics and follow the discussion thread through replies to the post and other replies.
Sites and Workspaces Sites may be added as subsites to the current site. The sites are added using a template, so they are easy to put into working order. There are three sets of sites: Collaboration, Content, and Meetings.
Tips
The lessons in this course are written for SharePoint Foundation 2010. However, many of the lessons can also be applied to SharePoint Server 2010.
Exercise
• Exercise File: None required.
• Exercise: Identify how SharePoint can be a useful and effective tool in your organization.
Figure 1-1: A SharePoint site.
The Fundamentals

10 © 2011 CustomGuide, Inc.
Accessing a SharePoint Site SharePoint Foundation is a Web-based service that uses sites to facilitate communication and collaboration. You are given permission to access the sites that are relevant to you. For example, you might have access to sites created for your organization and your department or team, but not to sites that belong to another department or team.
Before you can begin using SharePoint, an administrator or site owner must give you access to the site. You should receive an e-mail the site’s URL and other information necessary to access the site.
1. Open your Web browser and open the link you have been given for the SharePoint site.
When you go to the link, you will be prompted for your user name and password.
2. Enter your user name and password and press <Enter>.
The Home page of the SharePoint site appears.
The site that appears depends on the link you have been given. SharePoint is a collection of sites, so you may have been given a link to the Home site or a link to a team site, such as a site for your department.
Exercise
• Exercise File: None required.
• Exercise: Open the SharePoint site link you have been given and enter your user name and password information to access the site.
Figure 1-2: Logging in to a SharePoint site.
The Fundamentals

County of Berks 11
Understanding the SharePoint Program Screen The SharePoint Foundation 2010 program screen may seem confusing and overwhelming at first. This lesson will help you become familiar with the SharePoint 2010 program screen as well as the new user interface.
Site Actions menu: Includes commands to work with items, lists, and objects on the site. The options in the list and the list's availability depend on the permissions level assigned to the account.
Help button: Click the Help button to search SharePoint Foundation's Help files.
Navigate Up button: Click this button to navigate back to the Home page from any SharePoint subsite.
Web Part: View and work with items on the page through customizable Web Parts.
Edit button: Click here to view the current page in Edit mode. When the page is in Edit mode, this becomes the Save button.
Quick Launch bar: Navigate between items in the site through the Quick Launch bar.
Ribbon: The tabs on the Ribbon give you access to the commands and settings for any page in SharePoint. The tabs and buttons on the Ribbon and the Ribbon's availability depend on the permission level assigned to the account.
Top link bar: Click a link on the top link bar to view a subsite.
Search box: Enter a search term here to perform the search in the site collection.
Breadcrumb navigation: Displays the navigation path of the current page. Click a link earlier in the path to open the page.
User menu: Click here to view options that manage your account, such as editing the user profile and signing out.
Exercise
• Exercise File: None required.
• Exercise: Understand and experiment with the different parts of the SharePoint site.
The Fundamentals
This diagram displays the Home page of a team site. Team sites are the most common ways to work with SharePoint sites.

12 © 2011 CustomGuide, Inc.
Navigating in SharePoint Navigating in SharePoint is a lot like browsing pages on the Web. This lesson will introduce the tools used to navigate within a SharePoint site.
Quick Launch
The Quick Launch appears along the left side of the page. It organizes links to pages of the site in sections. For example, lists in the site are shown under the Lists section heading.
The Quick Launch can be customized by users with the proper permission rights. For example, the site owner can choose if they want to include a new site in the Quick Launch of the parent site (the site under which the new site is created). Because the Quick Launch is customizable, all lists and libraries for the site do not always appear in the Quick Launch.
Top link bar
The top link bar appears across the top of pages on a site. Each tab in the top link bar represents another site, such as a blog or a workspace. The items and sites that appear in the top link bar depend on how the subsite is set up when it is created.
Navigate Up button
The Navigate Up button is new in SharePoint 2010, and it supplements breadcrumb navigation by allowing you to navigate back up to the main Home page of a SharePoint site. You can navigate even from a SharePoint site's subsites. Click the Navigate Up button to see the path you took to a site or subsite and click any link in the list to navigate back to a page.
Tips
The Navigate Up button is available no matter what tab of the Ribbon is active.
Breadcrumb navigation
As its name implies, this navigation tool displays the path you’ve taken to the current page. Each “breadcrumb” is a site or page that sits above the current page in the site hierarchy. The breadcrumbs lead you back to the Home page from the page you are on. For example, if you are in the Tasks list, you can navigate back to the Home page of the using breadcrumb navigation.
Tips
Breadcrumb navigation appears on every page in SharePoint. If you cannot see the breadcrumb navigation for the page you are on, click the Browse tab on the Ribbon.
Exercise
• Exercise File: None required.
• Exercise: Understand how to use all the navigation items in a SharePoint site.
Figure 1-3: Navigation items on a team site.
Figure 1-4: Click the Navigate Up button to return to a SharePoint site Home page.
The Fundamentals
Breadcrumb navigation
Top link bar
Site Content
Quick Launch
Navigate Up button
County of Berks 13
All Site Content
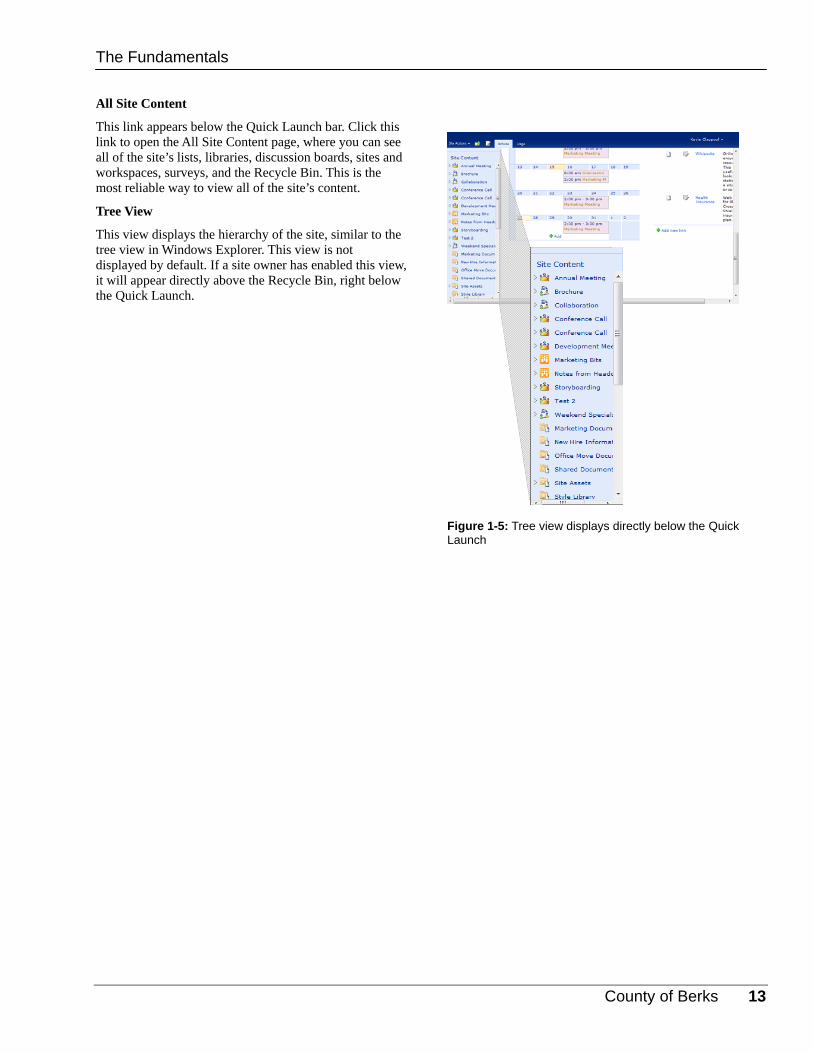
This link appears below the Quick Launch bar. Click this link to open the All Site Content page, where you can see all of the site’s lists, libraries, discussion boards, sites and workspaces, surveys, and the Recycle Bin. This is the most reliable way to view all of the site’s content.
Tree View
This view displays the hierarchy of the site, similar to the tree view in Windows Explorer. This view is not displayed by default. If a site owner has enabled this view, it will appear directly above the Recycle Bin, right below the Quick Launch.
Figure 1-5: Tree view displays directly below the Quick Launch
The Fundamentals
14 © 2011 CustomGuide, Inc.
Understanding the Ribbon Microsoft introduced the Ribbon in Office 2007, but it's only now coming to SharePoint Foundation 2010. The Ribbon replaces menus and toolbars found in previous versions of SharePoint. The Ribbon keeps commands visible while you work instead of hiding them under menus or toolbars.
There are three elements to the Ribbon: tabs, groups, and buttons. Unlike other Microsoft Office programs, the tabs, groups, and buttons in SharePoint are contextual. They change depending on your permission level and the page you are viewing.
Tabs
Commands are organized into tabs on the Ribbon. Each tab contains a different set of commands. The tabs that appear on a page change depending on the page being viewed. For example, when you are viewing a Picture Library, the Browse, Items, and List tabs appear on the Ribbon. When you view a Wiki, the Browse and Page tabs appear on the Ribbon.
Each page with a Ribbon always has a Browse tab. Click the Browse tab to return to read-only mode and view breadcrumb navigation.
Groups
The commands found on each tab are organized into groups of related commands. For example, the New group contains commands used for adding items or files to a page. Groups are also contextual, so the commands that appear in the New group for a Document Library are different than the commands that appear in the New group for a list.
Tips
Based on the size of the browser window, SharePoint changes the appearance and layout of the commands within the groups.
Exercise
• Exercise File: None required.
• Exercise: Click each tab on the Ribbon to view its commands.
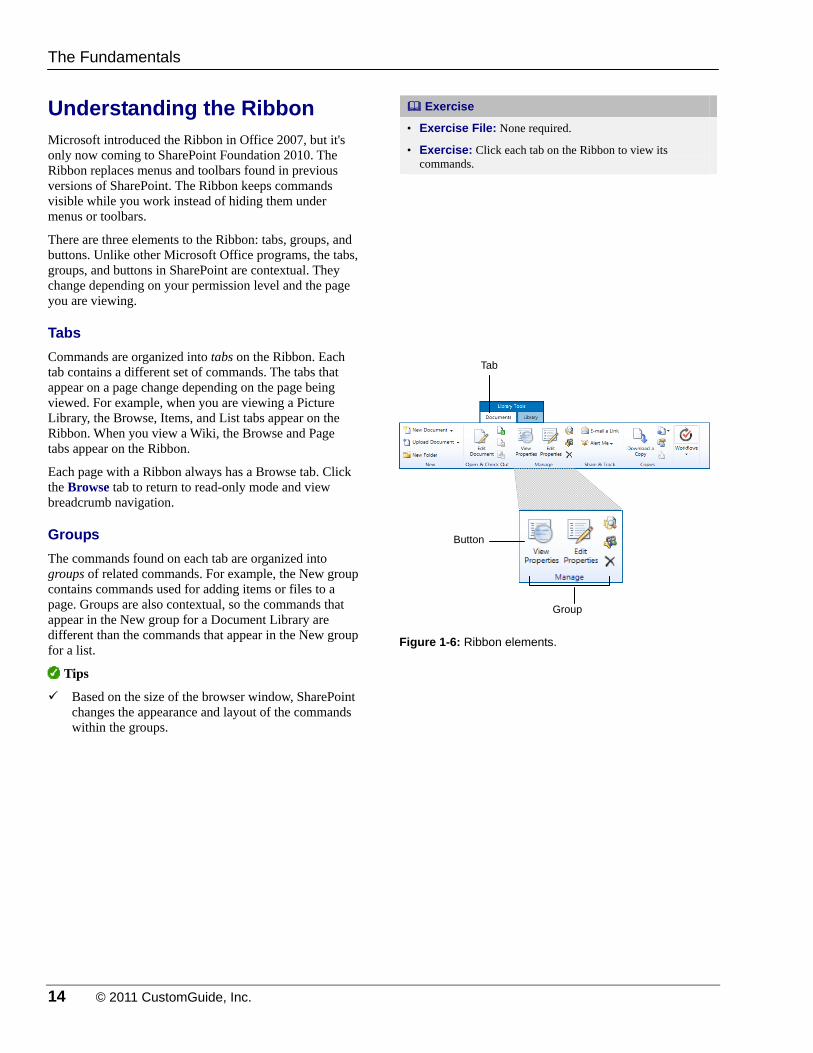
Figure 1-6: Ribbon elements.
The Fundamentals
Tab
Group
Button

County of Berks 15
Buttons
One way to issue a command is by clicking its button on the Ribbon. Buttons are the smallest element of the Ribbon and change color when clicked. Both the page type and your permission level determine what buttons you see on the Ribbon. There are two reasons buttons appear greyed out on the Ribbon:
You do not have permission to access that particular SharePoint command.
You have not selected an item in the list.
Tips
If your organization is upgrading from a previous version of SharePoint, your system administrator may opt to turn off the Ribbon functionality.
Figure 1-7: Permission levels determine buttons that appear on the Ribbon
The Fundamentals
A user with Full Control Permissions…
And a user with Read permission. Notice the greyed out buttons in the Manage Views group.
16 © 2011 CustomGuide, Inc.
Understanding Permissions and Groups Anyone who has access to a SharePoint site is assigned a permission level and/or group. The permission level limits the amount of control the user has in the site, and these permission levels are assigned to groups.
Understand that you may have different permissions in different sites, depending on how the site has been set up by the site owner. For example, you might have Contribute permissions in your team site, but only Read permissions in another department’s site.
The table below lists the permissions available by default in SharePoint and explains the amount of control that users have with each permission level.
Tips
Permission levels can be customized by site owners and administrators (Exception: Full Control and Limited Access levels cannot be changed).
Exercise
• Exercise File: None required.
• Exercise: Understand how permissions and groups affect your accessibility to items in a site.
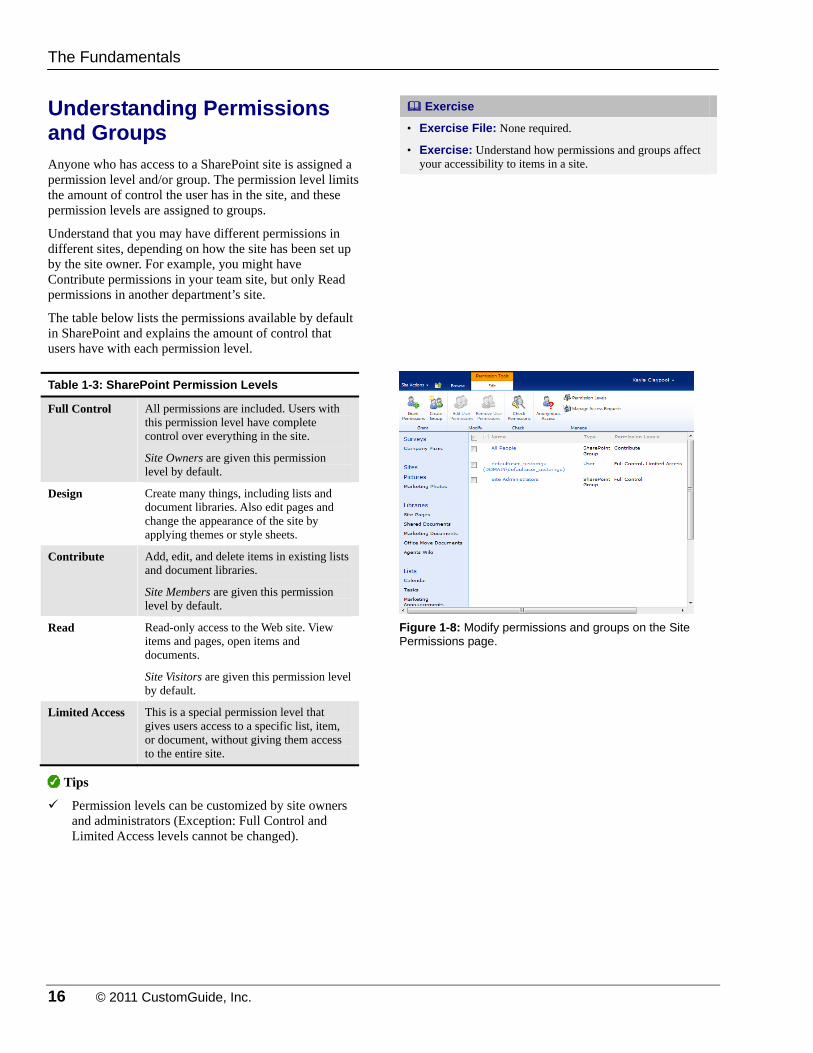
Table 1-3: SharePoint Permission Levels
Full Control All permissions are included. Users with this permission level have complete control over everything in the site.
Site Owners are given this permission level by default.
Design Create many things, including lists and document libraries. Also edit pages and change the appearance of the site by applying themes or style sheets.
Contribute Add, edit, and delete items in existing lists and document libraries.
Site Members are given this permission level by default.
Read Read-only access to the Web site. View items and pages, open items and documents.
Site Visitors are given this permission level by default.
Limited Access This is a special permission level that gives users access to a specific list, item, or document, without giving them access to the entire site.
Figure 1-8: Modify permissions and groups on the Site Permissions page.
The Fundamentals

County of Berks 17
Using Views and Sorting You can change how items and files are displayed in lists and libraries by changing the view that is used. You can also sort the items by a column in a view.
Change a view
The views that are available depend on the type of items being displayed. For example, surveys have different views than document libraries.
1. Click the name of a list or library in the Quick Launch bar.
The list or library appears in its default view.
2. Click the List or Library tab on the Ribbon.
Commands specific to the list or library appear on the Ribbon.
3. Click the Current View list arrow in the Manage Views group and select the view you want to use.
The list or library displays in the selected view.
Sort items
You can sort items in a view to find and analyze the information you want quickly.
1. Point at the name of the column by which you want to sort the view.
The column is highlighted.
2. Click the column list arrow and select Ascending or Descending.
The items are displayed using the selected view.
Other Ways to Sort Items: Click the name of a column to toggle sorting by that column.
Exercise
• Exercise File: None required.
• Exercise: Open a list or library and change its view.
Change how items are sorted using the columns in the view.
Return the view and sorting to the original state.
Figure 1-9: Views in a Tasks list.
Figure 1-10: Sorting items in a tasks list.
The Fundamentals
18 © 2011 CustomGuide, Inc.
Using Search The Search feature is one of the powerful functions of SharePoint Foundation 2010. Searches can be performed in one specific area or across an entire collection of sites.
Search in SharePoint
Start at the top site in SharePoint to search the entire site and its subsites. You can refine your search later.
1. Click in the Search box at the top of the page.
2. Type the search word or term and press <Enter>.
The results of the search appear on the screen.
Change the search scope
You can change the scope of the search to yield more specific search results. For example, if a list is open, you can ask SharePoint to search only in that list.
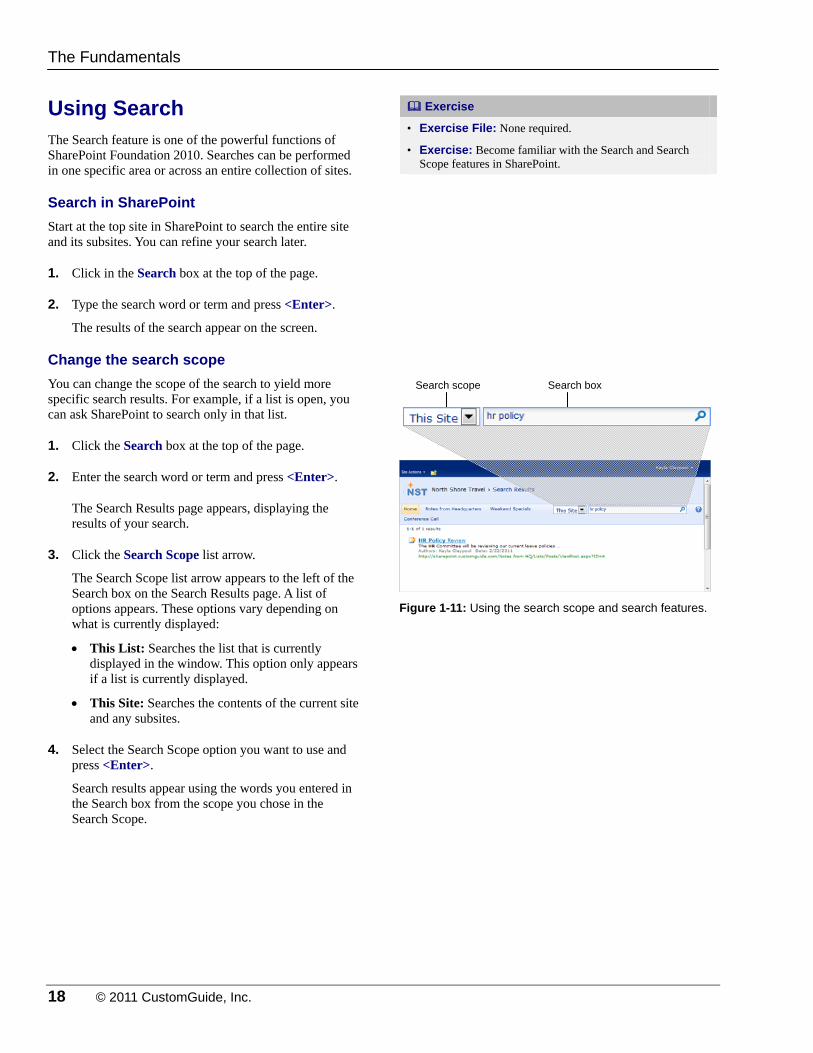
1. Click the Search box at the top of the page.
2. Enter the search word or term and press <Enter>.
The Search Results page appears, displaying the results of your search.
3. Click the Search Scope list arrow.
The Search Scope list arrow appears to the left of the Search box on the Search Results page. A list of options appears. These options vary depending on what is currently displayed:
This List: Searches the list that is currently displayed in the window. This option only appears if a list is currently displayed.
This Site: Searches the contents of the current site and any subsites.
4. Select the Search Scope option you want to use and press <Enter>.
Search results appear using the words you entered in the Search box from the scope you chose in the Search Scope.
Exercise
• Exercise File: None required.
• Exercise: Become familiar with the Search and Search Scope features in SharePoint.
Figure 1-11: Using the search scope and search features.
The Fundamentals
Search box Search scope
County of Berks 19
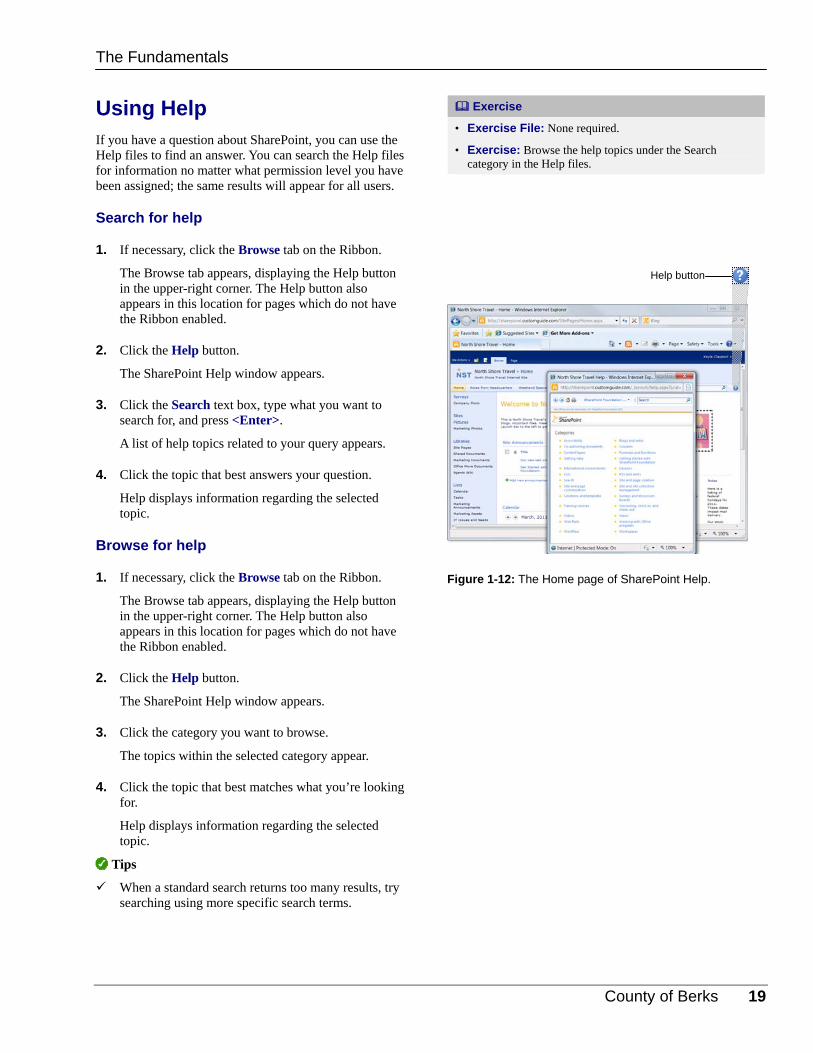
Using Help If you have a question about SharePoint, you can use the Help files to find an answer. You can search the Help files for information no matter what permission level you have been assigned; the same results will appear for all users.
Search for help
1. If necessary, click the Browse tab on the Ribbon.
The Browse tab appears, displaying the Help button in the upper-right corner. The Help button also appears in this location for pages which do not have the Ribbon enabled.
2. Click the Help button.
The SharePoint Help window appears.
3. Click the Search text box, type what you want to search for, and press <Enter>.
A list of help topics related to your query appears.
4. Click the topic that best answers your question.
Help displays information regarding the selected topic.
Browse for help
1. If necessary, click the Browse tab on the Ribbon.
The Browse tab appears, displaying the Help button in the upper-right corner. The Help button also appears in this location for pages which do not have the Ribbon enabled.
2. Click the Help button.
The SharePoint Help window appears.
3. Click the category you want to browse.
The topics within the selected category appear.
4. Click the topic that best matches what you’re looking for.
Help displays information regarding the selected topic.
Tips
When a standard search returns too many results, try searching using more specific search terms.
Exercise
• Exercise File: None required.
• Exercise: Browse the help topics under the Search category in the Help files.
Figure 1-12: The Home page of SharePoint Help.
The Fundamentals
Help button

20 © 2011 CustomGuide, Inc.
Working with the Recycle Bin Just like a wastebasket stores trash, the Recycle Bin stores all of the items you have deleted. You can delete files, lists, and objects, and they will be moved to the Recycle Bin for a set period of time before being permanently deleted.
Tips
Site administrators can schedule how often a site's Recycle Bin should empty. Contact your SharePoint site administrator to confirm how often objects in the Recycle Bin are permanently deleted.
Restore an object
If you’ve deleted an item, list, or file and find that deleting that object was a mistake, you may be able to retrieve it from the Recycle Bin.
1. Click the Recycle Bin link underneath the Quick Launch bar.
The objects that are stored in the Recycle Bin are displayed.
Tip: The Recycle Bin shows only items that you have deleted unless you are a site collection administrator.
2. Click the check box next to each object that you want to restore.
The object is selected.
3. Click the Restore Selection button on the taskbar to return the item to the site.
A dialog box appears, asking if you want to restore the object.
4. Click OK.
The object is restored to the location where it was saved before it was deleted.
Delete an object permanently
Objects are permanently deleted after a set period of time, but you can delete an object before that period expires. This is a useful function if you need to delete something immediately.
1. Click the Recycle Bin link underneath the Quick Launch bar.
The objects that are stored in the Recycle Bin are displayed.
Exercise
• Exercise File: None required.
• Exercise: Open the Recycle Bin and understand how items can be restored from the Recycle Bin.
Figure 1-13: Deleted items are stored in the Recycle Bin for a set period of time before they are permanently deleted.
The Fundamentals
Click to restore an object
Click to permanently delete an object

County of Berks 21
2. Click the check box next to each object that you want to delete permanently.
The object is selected.
3. Click the Delete Selection button on the taskbar.
A dialog box appears, asking if you want to delete the object.
4. Click OK.
The item is removed from the Recycle Bin and cannot be recovered.
Tip: When you delete a file, all versions of the file are also deleted. When you delete a library, all files in the library are deleted.
The Fundamentals
22 © 2011 CustomGuide, Inc.
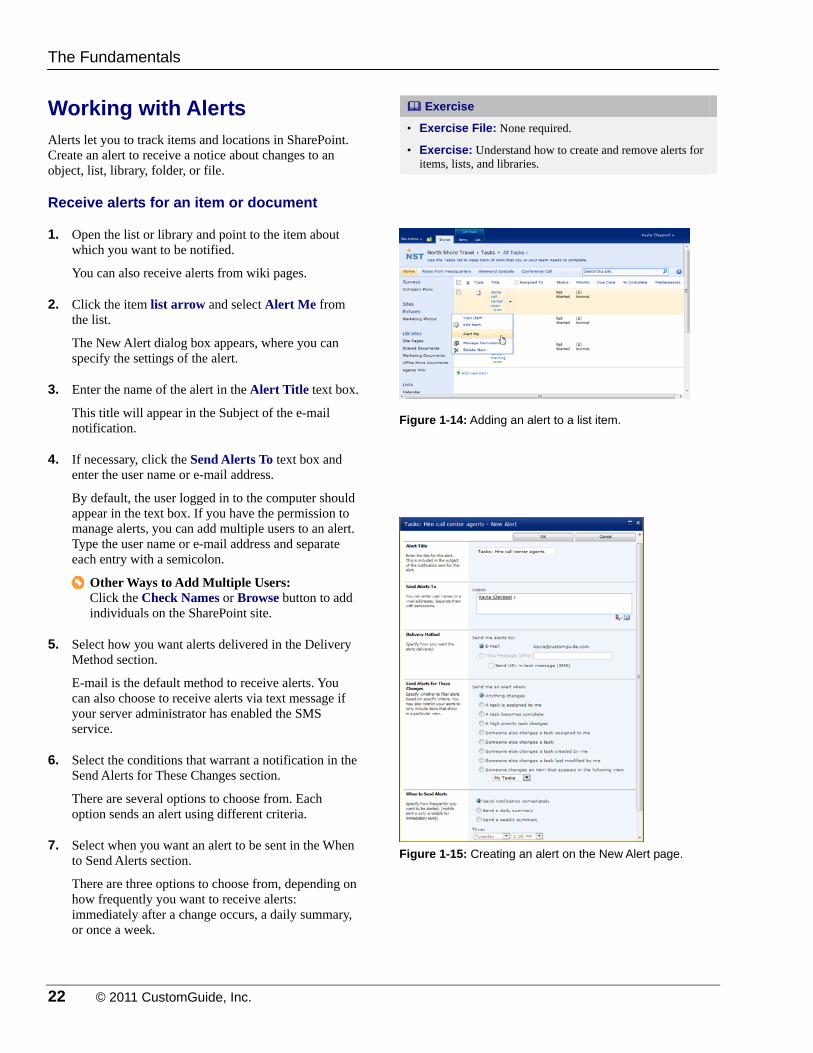
Working with Alerts Alerts let you to track items and locations in SharePoint. Create an alert to receive a notice about changes to an object, list, library, folder, or file.
Receive alerts for an item or document
1. Open the list or library and point to the item about which you want to be notified.
You can also receive alerts from wiki pages.
2. Click the item list arrow and select Alert Me from the list.
The New Alert dialog box appears, where you can specify the settings of the alert.
3. Enter the name of the alert in the Alert Title text box.
This title will appear in the Subject of the e-mail notification.
4. If necessary, click the Send Alerts To text box and enter the user name or e-mail address.
By default, the user logged in to the computer should appear in the text box. If you have the permission to manage alerts, you can add multiple users to an alert. Type the user name or e-mail address and separate each entry with a semicolon.
Other Ways to Add Multiple Users: Click the Check Names or Browse button to add individuals on the SharePoint site.
5. Select how you want alerts delivered in the Delivery Method section.
E-mail is the default method to receive alerts. You can also choose to receive alerts via text message if your server administrator has enabled the SMS service.
6. Select the conditions that warrant a notification in the Send Alerts for These Changes section.
There are several options to choose from. Each option sends an alert using different criteria.
7. Select when you want an alert to be sent in the When to Send Alerts section.
There are three options to choose from, depending on how frequently you want to receive alerts: immediately after a change occurs, a daily summary, or once a week.
Exercise
• Exercise File: None required.
• Exercise: Understand how to create and remove alerts for items, lists, and libraries.
Figure 1-14: Adding an alert to a list item.
Figure 1-15: Creating an alert on the New Alert page.
The Fundamentals
County of Berks 23
8. Click OK.
The alert is created.
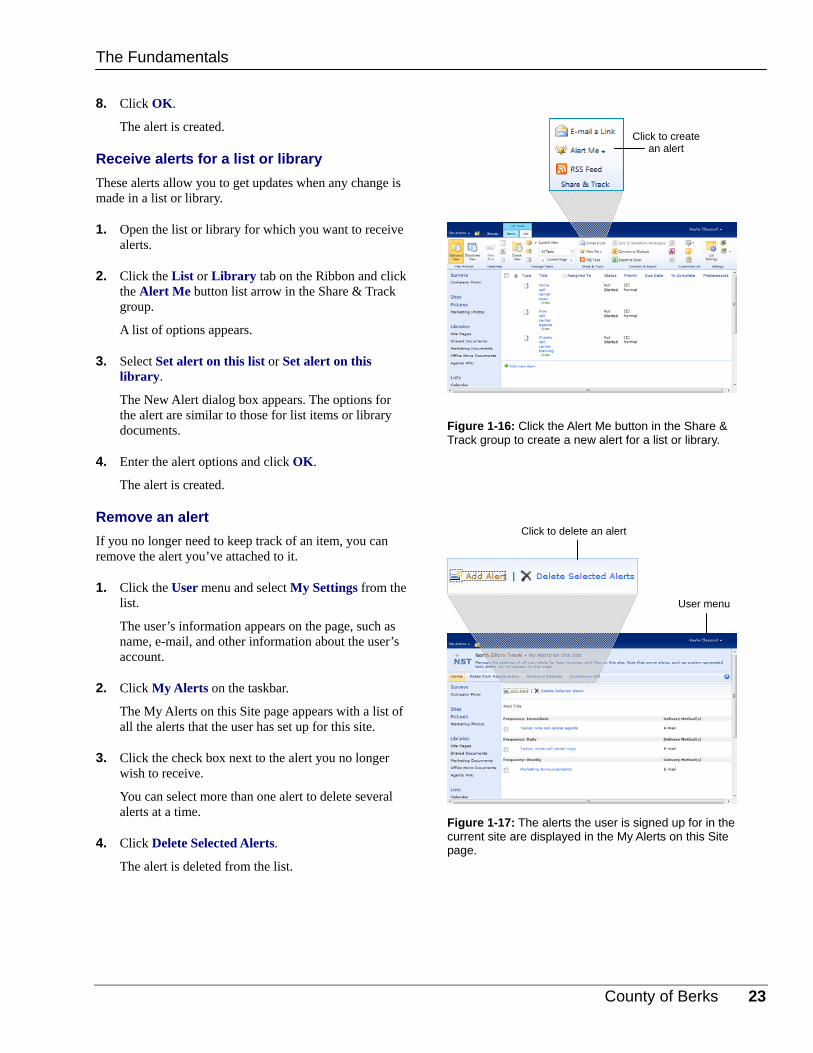
Receive alerts for a list or library
These alerts allow you to get updates when any change is made in a list or library.
1. Open the list or library for which you want to receive alerts.
2. Click the List or Library tab on the Ribbon and click the Alert Me button list arrow in the Share & Track group.
A list of options appears.
3. Select Set alert on this list or Set alert on this library.
The New Alert dialog box appears. The options for the alert are similar to those for list items or library documents.
4. Enter the alert options and click OK.
The alert is created.
Remove an alert
If you no longer need to keep track of an item, you can remove the alert you’ve attached to it.
1. Click the User menu and select My Settings from the list.
The user’s information appears on the page, such as name, e-mail, and other information about the user’s account.
2. Click My Alerts on the taskbar.
The My Alerts on this Site page appears with a list of all the alerts that the user has set up for this site.
3. Click the check box next to the alert you no longer wish to receive.
You can select more than one alert to delete several alerts at a time.
4. Click Delete Selected Alerts.
The alert is deleted from the list.
Figure 1-16: Click the Alert Me button in the Share & Track group to create a new alert for a list or library.
Figure 1-17: The alerts the user is signed up for in the current site are displayed in the My Alerts on this Site page.
The Fundamentals
Click to create an alert
User menu
Click to delete an alert

24 © 2011 CustomGuide, Inc.
TThhee FFuunnddaammeennttaallss RReevviieeww
Quiz Questions
1. What is SharePoint? A. A hub for sharing and storing information and working together within an organization. B. A program that lets you create forms to share with others in your organization. C. A hub for phone message services in an organization. D. An e-mail application.
2. You must be given permission to access a SharePoint site. (True or False?)
3. Which of these is NOT part of a SharePoint site screen? A. Quick Launch bar B. Navigation Pane C. Top link bar D. Breadcrumb navigation
4. The View All Site Content link is the only way to view all the lists, libraries, and sites and in a site. (True or False?)
5. The Ribbon appears with the same tabs, groups, and buttons on each page in SharePoint. (True or False?)
6. What is the difference between permission levels and groups? A. There is no difference; they are the same thing. B. Permission levels can be changed, while groups cannot be changed. C. There are more default groups than permission levels. D. Users are assigned to groups, and groups are granted a certain permission level by the site administrator.
7. The same views are used in all the lists and libraries in SharePoint. (True or False?)
8. Searches are confined to the contents of the current site. (True or False?)
9. Help automatically filters help inquiries according to a user’s permission level on a given site. (True or False?)
10. Objects in the Recycle Bin are never permanently deleted. (True or False?)
11. Which of these items is not available for alert notification? A. Documents and Items B. Recycle Bin C. Lists and Libraries D. Discussion Boards
County of Berks 25
Quiz Answers 1. A. SharePoint is a hub for sharing and storing information and working together within an organization.
2. True. In order to access a SharePoint site you must be given permission by the individual(s) managing the site.
3. B. There is no Navigation Pane in SharePoint.
4. True. The View All Site Content link displays everything in the site.
5. False. The Ribbon is contextual, so the tabs, groups, and buttons that appear depend on the page being viewed.
6. D. Users are assigned to groups, and groups are granted a certain permission level by the site administrator.
7. False. Many of the lists and libraries have the same default views, but others have views not available elsewhere in SharePoint.
8. False. Users can control which sites and areas are searched using the Search Scope control.
9. False. Help topics include topics for site administrators and site visitors. Search results are not filtered to meet the specific needs of a user.
10. D. False. Objects are stored in a for a set period of time. After that they are permanently deleted.
11. B. You cannot receive an alert for changes made to the Recycle Bin.

26 © 2011 CustomGuide, Inc.
MMaannaaggiinngg LLiissttss Creating a List .................................................... 27
Working with List Items .................................... 29 Add a list item .......................................... 29 Edit a list item .......................................... 29
Customizing a List ............................................. 31 Create a list view ..................................... 31 Add a list column ..................................... 32
Deleting a List Item or a List ............................. 33 Delete a list item ...................................... 33 Delete a list .............................................. 33
Lists facilitate a large part of the content on a SharePoint site. They are used to store and organize communication and collaboration information, such as calendars and events, tasks, announcements, and contacts.
This chapter provides a general overview of how to manage lists: how to create and customize lists and work with the items stored in lists.
22
County of Berks 27
Creating a List Lists are used to organize, store, and work with items that are concerned more with the communication and tracking aspect of a SharePoint site.
Item is the general term for objects that are created and saved in a list. Some of the more specific types of items include links, announcements, contacts, events, and tasks.
Tips
You can only create lists if you have the correct site permissions.
1. Open the site where you want to create the list.
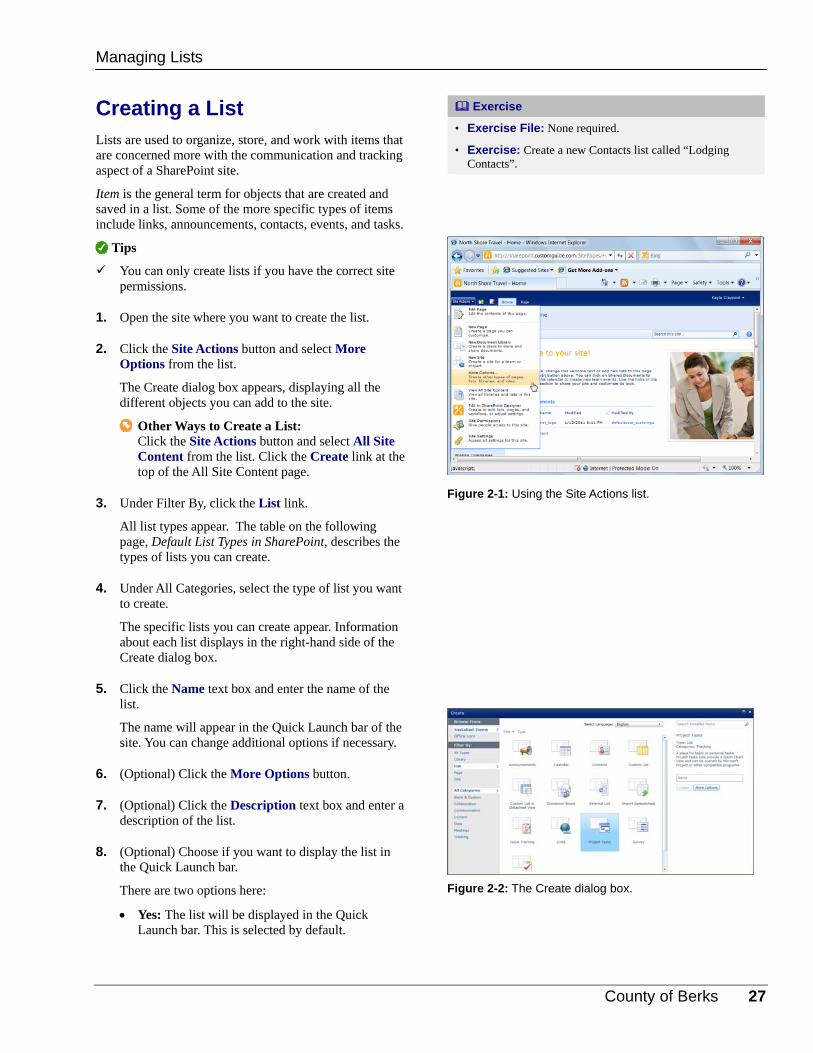
2. Click the Site Actions button and select More Options from the list.
The Create dialog box appears, displaying all the different objects you can add to the site.
Other Ways to Create a List: Click the Site Actions button and select All Site Content from the list. Click the Create link at the top of the All Site Content page.
3. Under Filter By, click the List link.
All list types appear. The table on the following page, Default List Types in SharePoint, describes the types of lists you can create.
4. Under All Categories, select the type of list you want to create.
The specific lists you can create appear. Information about each list displays in the right-hand side of the Create dialog box.
5. Click the Name text box and enter the name of the list.
The name will appear in the Quick Launch bar of the site. You can change additional options if necessary.
6. (Optional) Click the More Options button.
7. (Optional) Click the Description text box and enter a description of the list.
8. (Optional) Choose if you want to display the list in the Quick Launch bar.
There are two options here:
Yes: The list will be displayed in the Quick Launch bar. This is selected by default.
Exercise
• Exercise File: None required.
• Exercise: Create a new Contacts list called “Lodging Contacts”.
Figure 2-1: Using the Site Actions list.
Figure 2-2: The Create dialog box.
Managing Lists

28 © 2011 CustomGuide, Inc.
No: The list will not be displayed in the Quick Launch bar, and users will have to find the list through alternate navigation methods. Only use this for lists that you don’t want to make known to others or that won’t be used very often.
When the list settings are ready, create the list.
9. Click Create.
The list is created and appears open on the screen.
Table 2-1: Default List Types in SharePoint
Blank and Custom Custom List: Create your own type of list by specifying the types of columns included.
Custom List in Datasheet View: Presents the list in datasheet format. Specify the types of columns included, and use the list with Excel.
Import Spreadsheet: Import a spreadsheet you want to use as a list in SharePoint. The list will have the same columns and content as the spreadsheet.
Communication Announcements: Stores announcements that are added to share small bits of information. By default, an announcements list is created in every team site. This list appears on every home page.
Contacts: Stores information about contacts with whom your team regularly works. Also share contacts with compatible programs, such as Outlook. (Also found under Tracking)
Discussion Board: Bring your discussions online with this newsgroup-style format. Includes features for managing discussions and approving posts.
Links: Create a list for resources and information you want to share with team members. (Also found under Content)
Content Links: Create a list for resources and information you want to share with team members. (Also found under Communication)
Data External List: Create a list using an external content type and connect with other software and network resources.
Survey: Gather information from other people by asking them to fill out a survey. Includes tools to tally results, and create survey questions and answers.
Tracking Calendar: Share plans and events, such as meetings and deadlines, with team members in a single location. Events can also be shared with Outlook calendars.
Contacts: Stores information about contacts that your team regularly works with. Also share contacts with compatible programs, such as Outlook. (Also found under Tracking)
Issue Tracking: Use this type of list to track a set of related issues and problems. Includes tools to manage issues until they are resolved.
Project Tasks: The same as a Task list, but also displays the tasks with progress bars in Gantt view.
Tasks: Track a list of to-do chores that the team needs to work on together. Includes features for updating and tracking the status of the tasks.
Managing Lists

County of Berks 29
Working with List Items Lists are great tools for tracking tasks and communicating information. Lists are also very easy to edit.
Add a list item
The information required for an item changes depending on the type of list in which the item will be created.
Tips
You can only create items if you have the correct permissions to do so in the site.
1. Open the list in which you want to add an item.
The list opens in Standard view.
2. Click the Add New Item link at the bottom of the list.
The New Item dialog box appears.
Tip: Many of the types of items you can create in a list are covered in more detail in the “Working with Lists” chapter.
3. Enter information about the item.
You can fill in as much or as little information as you want, as long as the required fields are completed.
4. Click the Save button on the Ribbon.
The item is displayed in the list. An icon appears next to the item, indicating that the item is new.
Tip: You can add multiple items to a list using the Datasheet view format. To open Datasheet view, click the List tab on the Ribbon and click the Datasheet View button in the View Format group. Enter new items as rows and fill in information as you would in a spreadsheet.
Edit a list item
Once an item is created, it can easily be edited to change or add information.
1. Open the list in which the list item that you want edit is stored.
The list opens in Standard view.
2. Select the item that you want to edit and click the Items tab on the Ribbon.
The Items tab appears on the Ribbon.
Exercise
• Exercise File: Lodging Contacts list
• Exercise: Add a new contact for Tony Hilleran and include his e-mail address: [email protected].
Edit the Tony Hilleran contact to include “North Shore Travel” as the Company and “Regional Manager” as the Job Title.
Figure 2-3: Creating a new contact item.
Managing Lists
30 © 2011 CustomGuide, Inc.
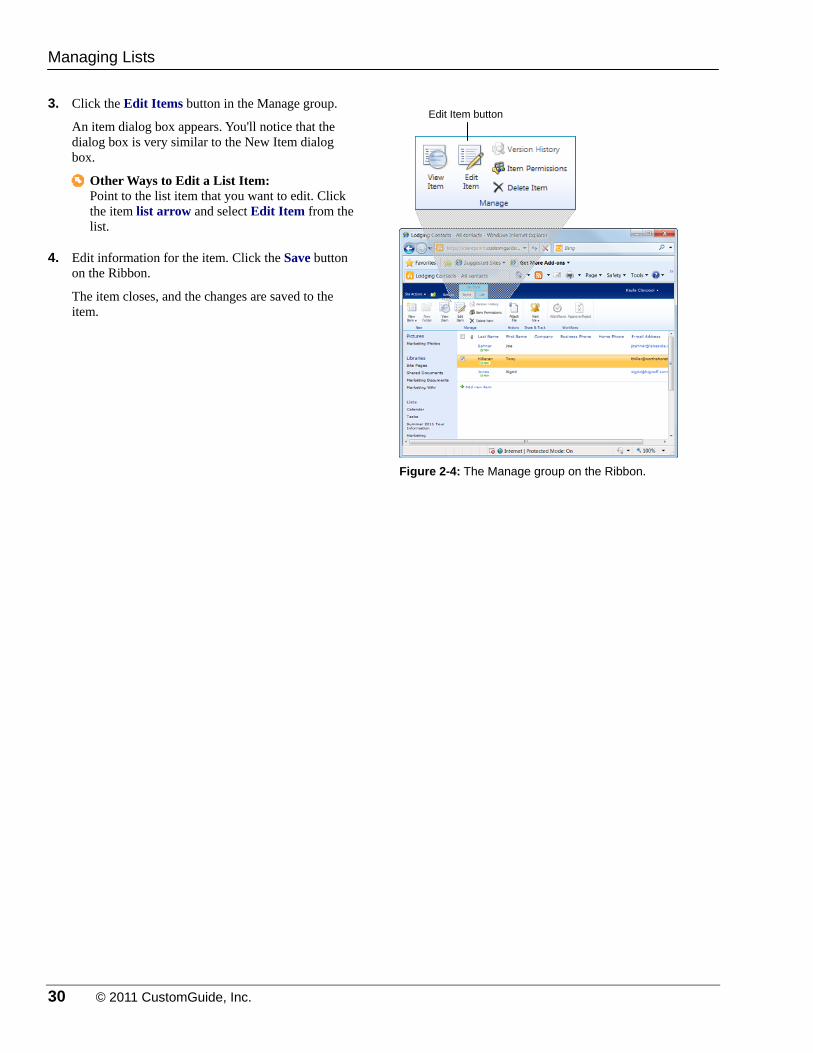
3. Click the Edit Items button in the Manage group.
An item dialog box appears. You'll notice that the dialog box is very similar to the New Item dialog box.
Other Ways to Edit a List Item: Point to the list item that you want to edit. Click the item list arrow and select Edit Item from the list.
4. Edit information for the item. Click the Save button on the Ribbon.
The item closes, and the changes are saved to the item.
Figure 2-4: The Manage group on the Ribbon.
Managing Lists
Edit Item button

County of Berks 31
Customizing a List SharePoint includes two default view formats for lists: Standard view, which lets you view a list as a Web page, and Database view, which lets you view a list in a spreadsheet. You can further customize lists by creating a new view with different columns. You can also create a new column to display specific information.
Create a list view
A custom view lets you arrange the items in a list so that you can access the information you need quickly.
1. Open the list in which you want to create a new view.
The list opens in Standard view.
2. Click the List tab on the Ribbon and click the Create View button in the Manage Views group.
The Create View page appears. You can base the new view on a view format or a view that already exists in the list.
Tip: To modify an existing view, open the list in the view you want to modify, click the List tab on the Ribbon, and click the Modify View button in the Manage Views group.
3. Select the view format or existing view on which you would like to base the new view.
The Create View page appears.
4. Enter a name for the view in the View Name text box.
5. Specify the options you want to include in the view.
Options will be selected according to the settings for the settings.
6. Click OK.
The list is displayed using the new view.
Tip: To switch to another view, click the List tab on the Ribbon, click the Change View list arrow, and select the view that you want to use.
Exercise
• Exercise File: Lodging Contacts list
• Exercise: Create a new view based on the “All contacts” view. Specify these options for the view: Name: Title and Company Columns: Last Name, First Name, Company, Job Title Add a new column to the list. Use this information for the new column: Column name: Birth Date Column type: Date and Time Uncheck “Add to default view” check box.
Figure 2-5: The new Title and Company view created in the Lodging Contacts list.
Managing Lists

32 © 2011 CustomGuide, Inc.
Add a list column
Lists are created with a default number of columns, depending on the type of list that is created. Adding a column allows you to store more information about items in a list.
1. Open the list to which you want to add a column.
The list opens in Standard view.
2. Click the List tab on the Ribbon and click the Create Column button in the Manage Views group.
The Create Column dialog box appears. Here you can specify the information you want the column to store.
3. Enter the name of the column in the Column name text box and select the type of data the column will contain.
After entering the name and column data type, you can enter a description and set default settings for the column.
4. (Optional) Specify additional column settings in the Additional Column Settings section.
When the column specifications are set, create the column.
5. Click OK.
The column is added as the rightmost column in the default list view.
Tip: Uncheck the Add to default view check box to keep the new column out of the default view for the list.
Tip: If a column does not appear in a view, modify the view and add the column to the view.
Figure 2-6: The new column, Birth Date, is added to the bottom of the item list.
Managing Lists

County of Berks 33
Deleting a List Item or a List Removing items and lists that are no longer relevant keeps your SharePoint site updated and accurate.
Delete a list item
If you no longer need an item, delete it.
1. Point at the item you want to delete.
A list arrow appears next to the item name.
2. Click the list arrow and select Delete Item from the list.
A message appears asking you to confirm the deletion.
3. Click OK to confirm the action.
The item is deleted.
Tips
You can archive or move items that may be useful in the future, such as contacts, announcements, or links, instead of deleting them. Only delete items that are redundant, inaccurate, or irrelevant.
Delete a list
You can also delete an entire list and its items.
1. Open the list you want to delete.
The list opens in Standard view.
2. Click the List tab on the Ribbon and click the List Settings button in the List group.
The List Settings page appears.
3. Click the Delete this list link under the Permissions and Management column.
A message appears asking you to confirm the deletion.
4. Click OK to confirm the action.
The list no longer is stored in the site, and it is removed from the Quick Launch bar.
Tips
Deleting a list also deletes all of the items on a list.
By default, lists and list items are moved to the Recycle Bin when they are deleted. They are stored there for a set period of time and are then permanently deleted.
Exercise
• Exercise File: Tony Hilleran contact and the Lodging Contacts list
• Exercise: Delete the Tony Hilleran contact.
Delete the Lodging Contacts list.
Figure 2-7: Deleting an item from a list.
Figure 2-8: Deleting a list from a site.
Managing Lists

34 © 2011 CustomGuide, Inc.
MMaannaaggiinngg LLiissttss RReevviieeww
Quiz Questions
12. What are some common types of lists? A. Links B. Announcements C. Tasks D. All of the above.
13. Anyone can add an item to a list on a SharePoint site. (True or False?)
14. Which of the following are ways to customize a list? (Select all that apply.) A. Add items to a list. B. Create a new list view. C. Add a column to a list. D. Delete a list.
15. Which of the following is true? Deleted lists and list items are stored in the Recycle Bin for a set period of time. B. Deleting a list also deletes the items stored in the list. C. Neither of these statements is true. D. Both these statements are true.
Quiz Answers 12. D. Links, Announcements, and Tasks are all common types of lists.
13. False. Only users with the correct permissions can create items on a site
14. B and C. Creating a new view and adding a column are ways to customize a list.
15. D. Both of these statements are true: deleted lists and items are stored in the Recycle Bin for a set period of time and list items are deleted with a list.
County of Berks 35
WWoorrkkiinngg wwiitthh LLiissttss
Adding an Announcement ................................ 36
Adding a Contact ............................................... 37
Adding Links ...................................................... 38
Viewing the Calendar ........................................ 39 Change the amount of time displayed ..... 39 Navigate the calendar .............................. 39 Change views .......................................... 40
Adding an Event to the Calendar ..................... 41
Adding a Recurring Event ................................ 42
Viewing a Tasks List and a Project Tasks List 43
Adding Tasks and Milestones .......................... 44 Create a task ........................................... 44 Create a milestone................................... 45
Adding a Summary Task ................................... 46
Updating a Task ................................................. 47
Adding a Discussion Topic ............................... 48 View a discussion topic ............................ 48 Add a discussion topic ............................. 48
Replying to a Discussion Topic ....................... 50
Working with Issues .......................................... 51 Add an issue ............................................ 51 Edit an issue ............................................ 52
Lists are used to manage shared information and communication in a team site. Many of the most popular and useful tasks are done in lists.
This chapter provides a solid basis for some of the most basic tasks that can be done in SharePoint, such as adding announcements and events to lists on a team site. In some cases, users may not even need to know more than what’s in this chapter.
33
36 © 2011 CustomGuide, Inc.
Adding an Announcement Announcements are a great way to communicate small bits of information to other site members.
1. Open the Announcements list to which you want to add an announcement.
Announcements are stored in a list.
Tip: You can display the Announcements list on any site page by adding the Announcements web part.
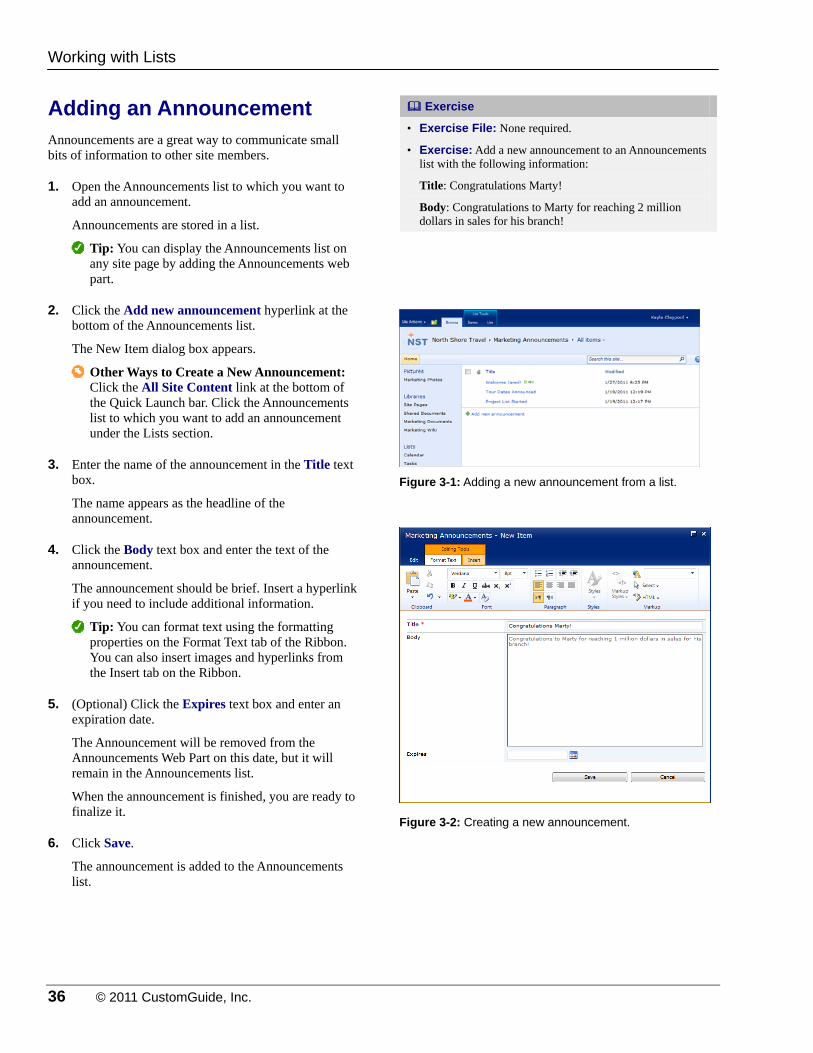
2. Click the Add new announcement hyperlink at the bottom of the Announcements list.
The New Item dialog box appears.
Other Ways to Create a New Announcement: Click the All Site Content link at the bottom of the Quick Launch bar. Click the Announcements list to which you want to add an announcement under the Lists section.
3. Enter the name of the announcement in the Title text box.
The name appears as the headline of the announcement.
4. Click the Body text box and enter the text of the announcement.
The announcement should be brief. Insert a hyperlink if you need to include additional information.
Tip: You can format text using the formatting properties on the Format Text tab of the Ribbon. You can also insert images and hyperlinks from the Insert tab on the Ribbon.
5. (Optional) Click the Expires text box and enter an expiration date.
The Announcement will be removed from the Announcements Web Part on this date, but it will remain in the Announcements list.
When the announcement is finished, you are ready to finalize it.
6. Click Save.
The announcement is added to the Announcements list.
Exercise
• Exercise File: None required.
• Exercise: Add a new announcement to an Announcements list with the following information:
Title: Congratulations Marty!
Body: Congratulations to Marty for reaching 2 million dollars in sales for his branch!
Figure 3-1: Adding a new announcement from a list.
Figure 3-2: Creating a new announcement.
Working with Lists
County of Berks 37
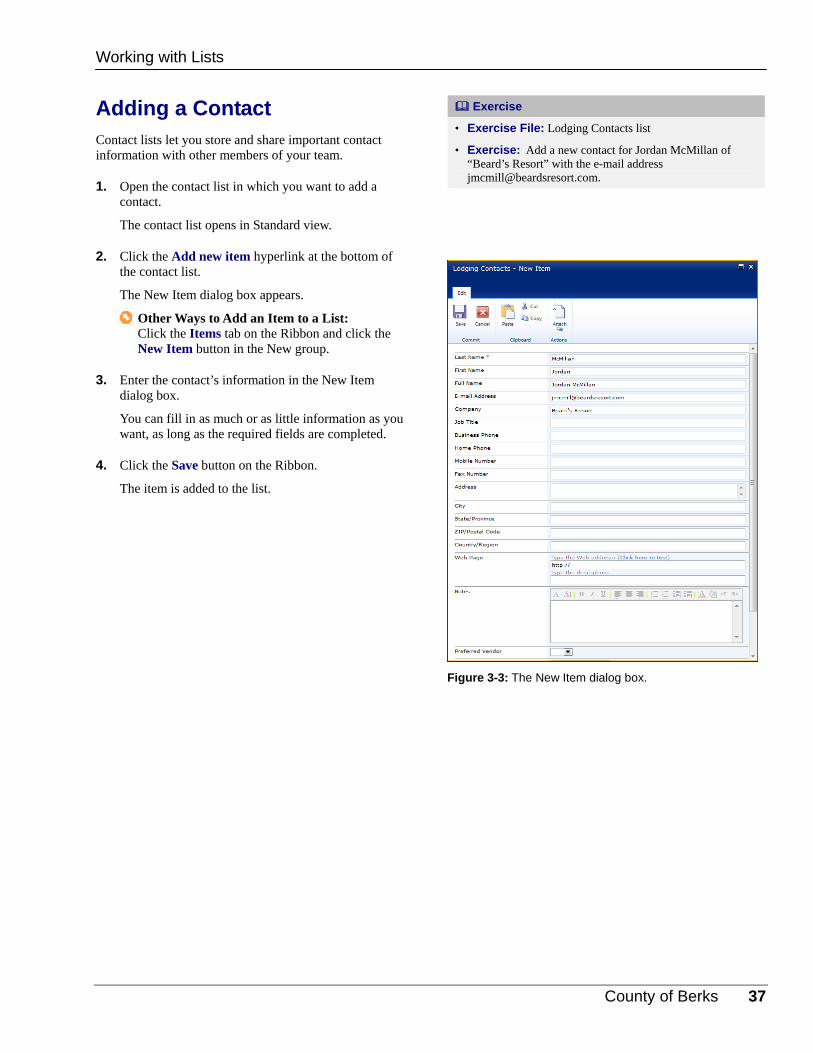
Adding a Contact Contact lists let you store and share important contact information with other members of your team.
1. Open the contact list in which you want to add a contact.
The contact list opens in Standard view.
2. Click the Add new item hyperlink at the bottom of the contact list.
The New Item dialog box appears.
Other Ways to Add an Item to a List: Click the Items tab on the Ribbon and click the New Item button in the New group.
3. Enter the contact’s information in the New Item dialog box.
You can fill in as much or as little information as you want, as long as the required fields are completed.
4. Click the Save button on the Ribbon.
The item is added to the list.
Exercise
• Exercise File: Lodging Contacts list
• Exercise: Add a new contact for Jordan McMillan of “Beard’s Resort” with the e-mail address [email protected].
Figure 3-3: The New Item dialog box.
Working with Lists
38 © 2011 CustomGuide, Inc.
Adding Links Links are a great way to share Internet resources with other site members. Links make Web pages outside of SharePoint available in a central location.
Tips
You can display a Links list on any site page by adding the Links Web Part.
1. Click the Site Actions button and select View All Site Content from the list.
The All Site Content page appears.
2. Click the name of the Links list to which you want to add a link under the Lists section.
The Links list appears.
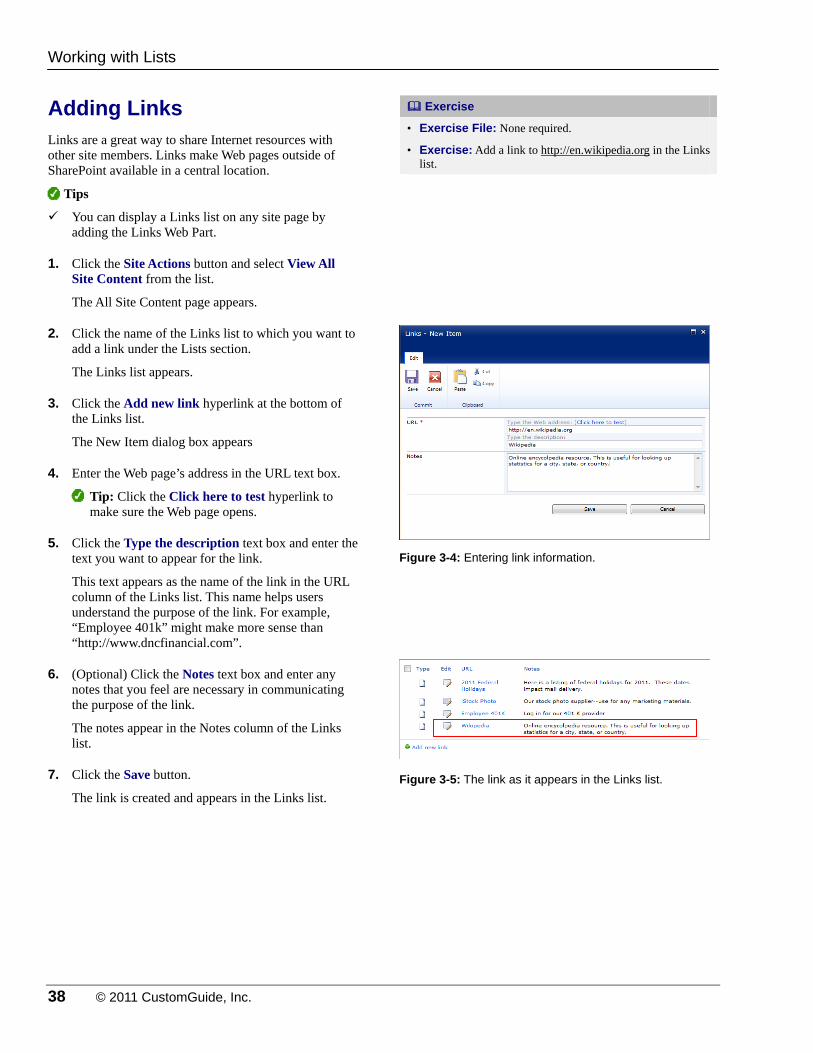
3. Click the Add new link hyperlink at the bottom of the Links list.
The New Item dialog box appears
4. Enter the Web page’s address in the URL text box.
Tip: Click the Click here to test hyperlink to make sure the Web page opens.
5. Click the Type the description text box and enter the text you want to appear for the link.
This text appears as the name of the link in the URL column of the Links list. This name helps users understand the purpose of the link. For example, “Employee 401k” might make more sense than “http://www.dncfinancial.com”.
6. (Optional) Click the Notes text box and enter any notes that you feel are necessary in communicating the purpose of the link.
The notes appear in the Notes column of the Links list.
7. Click the Save button.
The link is created and appears in the Links list.
Exercise
• Exercise File: None required.
• Exercise: Add a link to http://en.wikipedia.org in the Links list.
Figure 3-4: Entering link information.
Figure 3-5: The link as it appears in the Links list.
Working with Lists

County of Berks 39
Viewing the Calendar The calendar keeps site members connected and informed about upcoming events such as meetings or conferences.
Change the amount of time displayed
There are three ways to display the events in the default Calendar view: Day, Week, and Month scope.
1. Click Calendar in the Quick Launch bar.
The calendar opens in Calendar view, a graphic representation of the calendar.
2. Click the Calendar tab on the Ribbon.
There are three ways to display the calendar:
Day: Day scope gives you an hour-by-hour breakdown of the schedule for the selected day.
Week: Displays the full seven-day week.
Month: Month scope is the default view in the Calendar. Month scope shows the schedule for the entire month.
3. Click the appropriate button in the Scope group.
The calendar displays events accordingly.
Navigate the calendar
The calendar displays the current day, week, or month depending on the scope you have selected. Use the Date Navigator to view any date, either in the past or in the future.
1. Click Calendar in the Quick Launch bar.
The calendar appears. The Date Navigator appears at the top of the Quick Launch bar. The dates that appear depend on the scope that is selected.
Day or Week scope: The Date Navigator displays the current month.
Month scope: The Date Navigator displays the current year.
2. If necessary, click the Calendar tab on the Ribbon and change the scope of the calendar.
The Date Navigator changes. You can move through the calendar in the Date Navigator by clicking the Previous and Next buttons.
Exercise
• Exercise File: None required.
• Exercise: Open the calendar on a team site. View the calendar in Day, Week, and Month scope.
Figure 3-6: Click the appropriate button in the scope group to change the amount of time displayed in the calendar.
Figure 3-7: Use the Date Navigator to view past and future dates and events.
Working with Lists
Date Navigator
Previous Next
40 © 2011 CustomGuide, Inc.
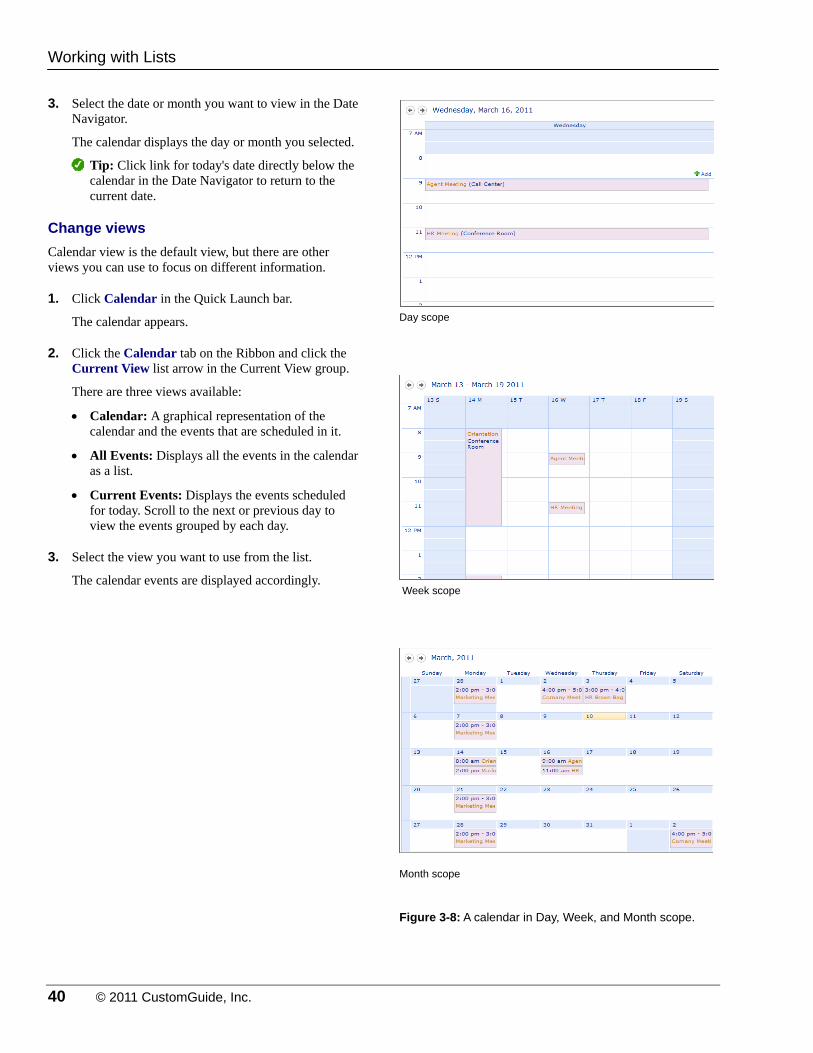
3. Select the date or month you want to view in the Date Navigator.
The calendar displays the day or month you selected.
Tip: Click link for today's date directly below the calendar in the Date Navigator to return to the current date.
Change views
Calendar view is the default view, but there are other views you can use to focus on different information.
1. Click Calendar in the Quick Launch bar.
The calendar appears.
2. Click the Calendar tab on the Ribbon and click the Current View list arrow in the Current View group.
There are three views available:
Calendar: A graphical representation of the calendar and the events that are scheduled in it.
All Events: Displays all the events in the calendar as a list.
Current Events: Displays the events scheduled for today. Scroll to the next or previous day to view the events grouped by each day.
3. Select the view you want to use from the list.
The calendar events are displayed accordingly.
Figure 3-8: A calendar in Day, Week, and Month scope.
Day scope
Week scope
Month scope
Working with Lists
County of Berks 41
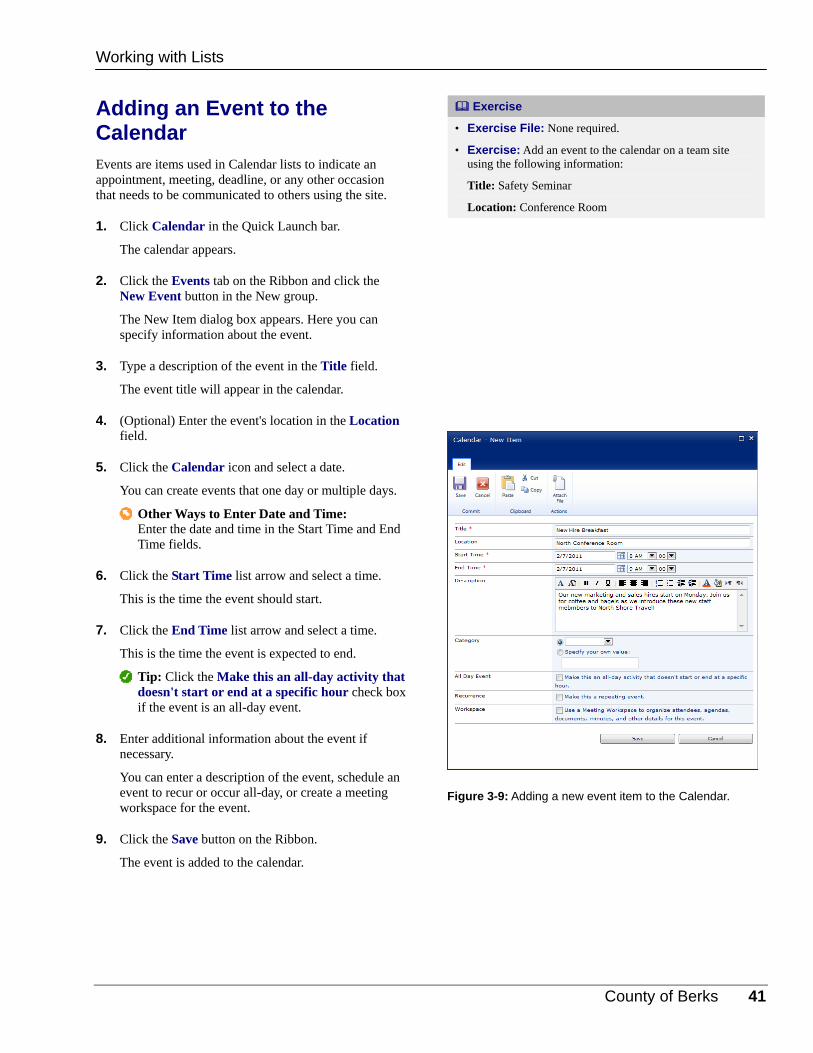
Adding an Event to the Calendar Events are items used in Calendar lists to indicate an appointment, meeting, deadline, or any other occasion that needs to be communicated to others using the site.
1. Click Calendar in the Quick Launch bar.
The calendar appears.
2. Click the Events tab on the Ribbon and click the New Event button in the New group.
The New Item dialog box appears. Here you can specify information about the event.
3. Type a description of the event in the Title field.
The event title will appear in the calendar.
4. (Optional) Enter the event's location in the Location field.
5. Click the Calendar icon and select a date.
You can create events that one day or multiple days.
Other Ways to Enter Date and Time: Enter the date and time in the Start Time and End Time fields.
6. Click the Start Time list arrow and select a time.
This is the time the event should start.
7. Click the End Time list arrow and select a time.
This is the time the event is expected to end.
Tip: Click the Make this an all-day activity that doesn't start or end at a specific hour check box if the event is an all-day event.
8. Enter additional information about the event if necessary.
You can enter a description of the event, schedule an event to recur or occur all-day, or create a meeting workspace for the event.
9. Click the Save button on the Ribbon.
The event is added to the calendar.
Exercise
• Exercise File: None required.
• Exercise: Add an event to the calendar on a team site using the following information:
Title: Safety Seminar
Location: Conference Room
Figure 3-9: Adding a new event item to the Calendar.
Working with Lists

42 © 2011 CustomGuide, Inc.
Adding a Recurring Event A recurring event is one that occurs on a regular basis. When you create a recurring event, a new event is automatically created for the schedule that you set for the recurrence. For example, if you know that your department has a meeting at 9 a.m. every Friday, you could create a recurring event for this meeting.
1. Click Calendar in the Quick Launch bar.
The calendar appears in Calendar view.
2. Click the Events tab on the Ribbon and click the New Event button in the New group.
The New Item dialog box appears.
3. Type a description of the event in the Title field and enter information about the event.
See the table on the right, Event Fields, for more information about the fields in the New Item dialog box.
By default, an event is set to occur once. You must specify that the event is a recurring event.
4. Click the Make this a repeating event check box.
Options for how the event should recur appear. Here you must specify the time of the event, how often the event should recur (for example, every Friday), and the start and end date of the recurrence.
5. Select the options for recurrence.
You can save the event when you are finished editing it.
6. Click the Save button on the Ribbon.
The event is added to the calendar.
Exercise
• Exercise File: None required.
• Exercise: Add a recurring event for a Department meeting at 9 a.m. every Friday for the next five weeks.
Figure 3-10: Creating a recurring event in the calendar.
Table 3-1: Event Fields
Title* The name is displayed in the calendar, so it should be something short and easy to identify.
Location Where the event is to take place.
Start Time* The date and time the event is set to begin.
End Time* The date and time the event is set to end
Description Include a brief description of what the event is for or what will happen.
All Day Event
Select this option if the event lasts the duration of the date selected and has no specific start or end time. Birthdays, vacations, and trade shows are examples of all day events.
Recurrence Select this option if the event will occur on a regular basis. When selected, options appear to let you set the recurrence schedule.
Workspace If you have the proper site permission, you can create a meeting workspace for an event.
* indicates a required field
Working with Lists

County of Berks 43
Viewing a Tasks List and a Project Task List Tasks lists and project tasks lists help you organize the things that people need to do. Although both lists track individual tasks, a project tasks list is better for tracking tasks that are part of a project.
There are several different views you can use with these lists. Knowing how to use list views can help you plan a project.
1. Open a tasks list or a project tasks list.
A project tasks list opens in Project Tasks view, while a tasks list opens in All Tasks view.
2. Click the List tab on the Ribbon.
The table below, Tasks List and Project Tasks List Views, describes each of the views available.
3. Click the Current View list arrow in the Manage Views group and select the view that you want to use.
Tips
The only difference between a tasks list and a project task list is that a project task list includes a Gantt chart.
Table 3-2: Tasks List and Project Tasks List Views
Project Tasks (Project Tasks list only)
This is the default view for project tasks lists. A bar chart, or Gantt chart, presents a graphic representation of the tasks in the right pane of the view. The same tasks are listed in left pane view.
This is the only view that displays the tasks in a Gantt chart, and it is available only in a project tasks list.
All Tasks Displays all tasks in the list, regardless of their status.
My Tasks Displays only tasks that have been assigned to you.
Due Today Displays only tasks that are due on the current day.
Active Tasks Displays all tasks that do not have “Completed” as the task status; in other words, all tasks that are currently being worked on.
By Assigned To Displays all tasks in the list and groups them by the people to whom each task is assigned.
By My Groups
(Task list only)
Displays all tasks in the list and groups them by the group to which each task is assigned.
Exercise
• Exercise File: A tasks list and a project task list.
• Exercise: View a task list and a project task list: compare the two types of lists.
Figure 3-11: A project tasks list in All Tasks view.
Figure 3-12: A project tasks list in Project Tasks view.
Working with Lists

44 © 2011 CustomGuide, Inc.
Adding Tasks and Milestones Tasks are specific jobs and activities that can be assigned to individuals. Tasks can be updated and tracked as work on the task progresses.
Create a task
1. Open the tasks list or project tasks list where you want to add the task.
There are two types of lists where you can work with tasks:
Tasks: Records and stores tasks in a list format.
Project Tasks: Records and stores tasks in a graphic (Gantt chart view) and list format. Use this list to see a representation of how tasks work together on the page.
2. Click the Items tab on the Ribbon and click the New Item button in the New group.
The New Item dialog box appears.
Other Ways to Create a Task: Click the New Item button in the New group and select Task.
3. Click the Title text box and enter a name for the task.
The name should be short and easy to identify.
4. (Optional) Select a task from the Predecessors list and click the Add button.
If another task must be completed before the task you are creating can begin, select the other task as a predecessor task. For example, "Compile mailing list" might be a predecessor task to "Send fliers".
5. (Optional) Click the Priority list arrow and select an option from the list.
The priority level helps users know how to prioritize the tasks that they are working on.
6. (Optional) Click the Assigned to text box and enter the name of the individual to whom you want to assign the task.
The individual should be a member of the team site in which you are working.
Tip: Click the Check Names or Browse buttons to enter names included in the team site.
Exercise
• Exercise File: A tasks list and a project tasks list.
• Exercise: Add a three-day task named “Create marketing letter” in the tasks list.
Add a five-day task named “Train new employee” to the project tasks list.
Add a milestone that marks the beginning of a new healthcare plan to the project tasks list.
Figure 3-13: The New Item dialog box.
Working with Lists

County of Berks 45
7. (Optional) Click the Description area and enter a brief description of the task.
The description might include instructions on how the task should be done or other notes that will help an individual complete the task.
8. Click the Start Date text box and enter the date on which the task should start.
Tip: Click the Calendar button to select a date in calendar format.
9. Click the End Date text box and enter the date on which the task should be complete.
10. Click Save.
The task is added to the Tasks or Project Tasks list.
Create a milestone
A milestone marks an important point in a project. For example, it might mark the completion of several related tasks or the halfway point in the project’s duration.
A milestone is not an activity to be completed. It does not have a status, task duration, or priority. Insert a milestone whenever you need to mark a specific point in a project.
1. Open the project tasks list in which you want to create the milestone.
2. Click the Items tab on the Ribbon and click the New Item button in the New group.
The New Item dialog box appears.
3. Click the Title text box and enter a name for the task.
The name should be short and easy to identify.
4. (Optional) Click the Description area and enter a brief description of the milestone.
The description might include information on what the milestone represents.
5. Enter the date which the milestone marks in the Start Date text box and in the End Date text box.
The same date should appear in both text box.
Tip: Click the Calendar button to select a date in calendar format.
6. Click Save.
The milestone is created. If the milestone is created in a project tasks list, the milestone appears as a blue diamond in the Gantt chart.
Figure 3-14: A milestone is simply a task with the same date in the Start Date and End Date fields.
Figure 3-15: The project task list shown with tasks. Note the milestone, indicated by a blue diamond.
Working with Lists

46 © 2011 CustomGuide, Inc.
Adding a Summary Task When you are planning a project, you'll see some tasks are actually collections of other tasks. For example, the task of creating a brochure might include finding photos, designing the brochure, writing copy, and proofreading. You can use summary tasks to group tasks within a project.
Tips
The summary task will appear as a hyperlink in a project tasks list. Click the hyperlink to view all the tasks in the summary task.
1. Open the project tasks list in which you want to create the summary task.
2. Click the Items tab on the Ribbon and click the New Item button list arrow in the New group.
A list of options appears.
3. Select Summary Task from the list.
The New Item dialog box appears.
4. Enter the information necessary to create the summary task.
Entering information for a summary task is exactly the same as entering information for a regular task.
5. Click Save.
The summary task is added to the task list as a hyperlink. The summary task also displays in the Gantt chart as a black bar.
Tip: Click the summary task hyperlink to open the summary task in a new project tasks list. You can add tasks that fall within that summary task to the new task list.
Exercise
• Exercise File: None required.
• Exercise: Add a summary task named “Training” to the project tasks list.
Figure 3-16: Add a new summary task in the New Item dialog box.
Figure 3-17: A summary task appears as a hyperlink in the project tasks list and a black bar in the Gantt chart.
Working with Lists
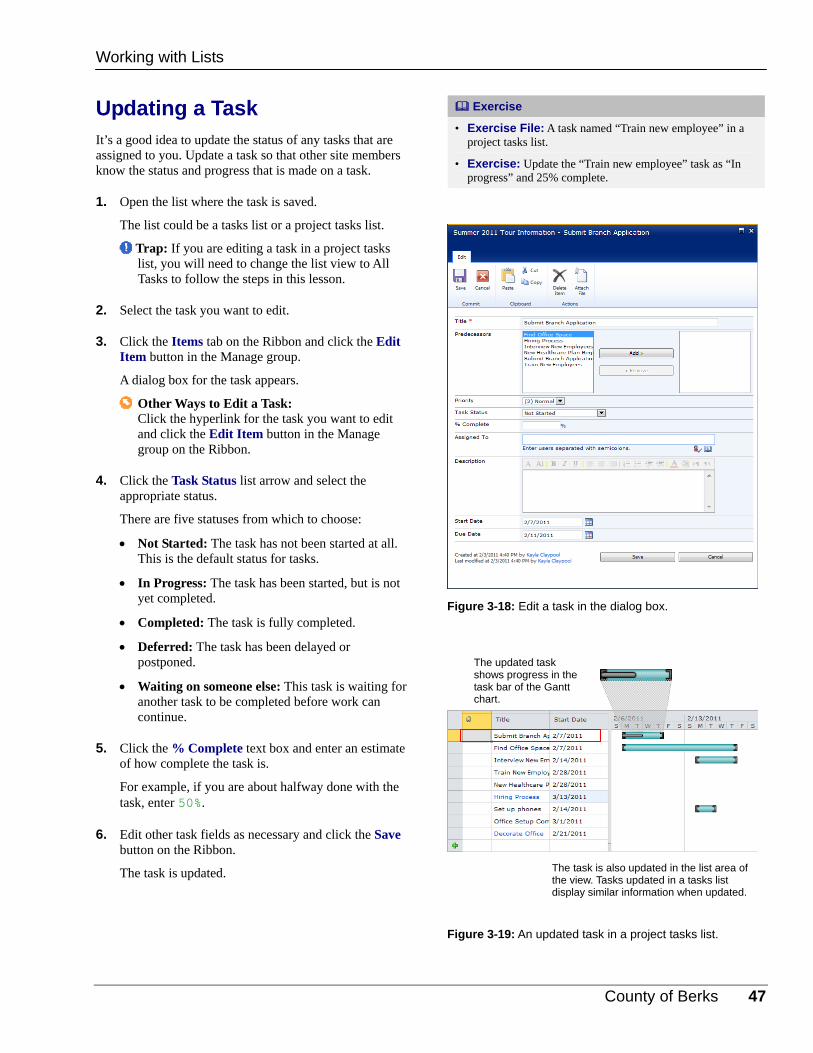
County of Berks 47
Updating a Task It’s a good idea to update the status of any tasks that are assigned to you. Update a task so that other site members know the status and progress that is made on a task.
1. Open the list where the task is saved.
The list could be a tasks list or a project tasks list.
Trap: If you are editing a task in a project tasks list, you will need to change the list view to All Tasks to follow the steps in this lesson.
2. Select the task you want to edit.
3. Click the Items tab on the Ribbon and click the Edit Item button in the Manage group.
A dialog box for the task appears.
Other Ways to Edit a Task: Click the hyperlink for the task you want to edit and click the Edit Item button in the Manage group on the Ribbon.
4. Click the Task Status list arrow and select the appropriate status.
There are five statuses from which to choose:
Not Started: The task has not been started at all. This is the default status for tasks.
In Progress: The task has been started, but is not yet completed.
Completed: The task is fully completed.
Deferred: The task has been delayed or postponed.
Waiting on someone else: This task is waiting for another task to be completed before work can continue.
5. Click the % Complete text box and enter an estimate of how complete the task is.
For example, if you are about halfway done with the task, enter 50%.
6. Edit other task fields as necessary and click the Save button on the Ribbon.
The task is updated.
Exercise
• Exercise File: A task named “Train new employee” in a project tasks list.
• Exercise: Update the “Train new employee” task as “In progress” and 25% complete.
Figure 3-18: Edit a task in the dialog box.
Figure 3-19: An updated task in a project tasks list.
Working with Lists
The updated task shows progress in the task bar of the Gantt chart.
The task is also updated in the list area of the view. Tasks updated in a tasks list display similar information when updated.

48 © 2011 CustomGuide, Inc.
Adding a Discussion Topic A discussion board is a location where people can express their views and ideas in an online forum. The style is similar to a newsgroup, so that individuals can respond to posts and create their own discussion topics.
View a discussion topic
You can check on a discussion topic and its posts to follow conversations on the discussion board.
1. Click the name of the discussion board you want to view under the Discussions section of the Quick Launch bar.
All the topics that are currently started appear on the discussion board.
Other Ways to Open a Discussion Board: Click the Site Actions button and select View All Site Content from the list. Click the name of the discussion board you want to view under the Discussion Boards section.
2. Click the name of a discussion topic.
The original discussion topic post appears at the top of the page and replies to the topic appear below it.
Add a discussion topic
If you want to talk about something that is not related to an existing discussion topic or reply, you can always start a new discussion.
1. Click the name of the discussion board in which you want to create a new discussion under the Discussions section of the Quick Launch bar.
All the current topics appear on the discussion board.
2. Click the Add new discussion link at the bottom of the list.
The New Item dialog box appears.
Other Ways to Add a Discussion Topic: Click the Items tab on the Ribbon and click the New Item button in the New group.
3. Enter the name of the discussion topic in the Subject text box.
The name will appear listed in the discussion board with other topics.
Exercise
• Exercise File: A discussion board list.
• Exercise: Add a new discussion board topic called “Cardboard recycling” and this question: “Would we use this enough to justify the cost?”
Figure 3-20: A discussion board with one discussion topic.
Figure 3-21: Adding a discussion topic.
Working with Lists
County of Berks 49
4. Click the Body section and enter the discussion topic.
Make sure the topic is an open-ended question that can prompt discussion.
5. Click Save.
The discussion topic is listed in the discussion board.
Working with Lists

50 © 2011 CustomGuide, Inc.
Replying to a Discussion Topic If you have something you want to say about a topic that has been posted, you can reply to the topic and contribute to the discussion.
1. Go to the discussion board and click the name of the discussion topic.
The original discussion topic appears at the top of the page. Any replies to the topic appear below it, in the order that the replies were posted, with the name of the author.
Tip: You can reply to the discussion topic or to another reply.
2. Click Reply next to the item to which you want to reply.
The New Item dialog box appears. You can enter your response in the Body area, along with any other posts and replies that have been made in the discussion.
Tip: This sequence of discussion topic and replies is called a string.
3. Enter your reply to the topic or reply.
Users can follow your contribution to the discussion best if your reply is attached to the most relevant item in the discussion, whether it’s the discussion topic or another user’s reply.
4. Click Save.
The reply is added to the bottom of the page.
Exercise
• Exercise File: A discussion topic called “Cardboard recycling” or any other discussion topic.
• Exercise: Reply to a discussion topic in a discussion board.
Figure 3-22: Replying to a discussion topic.
Figure 3-23: A discussion topic with a reply.
Working with Lists

County of Berks 51
Working with Issues An issue tracking list lets you track the progress of and communication about an issue until its resolution.
Add an issue
You can document important information in an issue, such as who owns the issue, if there are any related issues, and the date by which the issue should be resolved.
1. Open the issue tracking list in which you want to add the issue.
The issue tracking list opens in Standard view.
2. Click the Add new item link.
The New Item dialog box appears.
Other Ways to Add a New Item: Click the Items tab on the Ribbon and click the New Item button in the New group.
3. Enter a name for the issue in the Title text box.
The name should be short and easy to identify because it will appear in the issue tracking list.
4. (Optional) Click the Assigned to text box and enter the person responsible for the issue.
You can assign an issue to a member of the team site in which you are working.
Tip: Click the Check Names or Browse buttons to enter names included in the team site.
5. (Optional) Click the Priority list arrow and select an option from the list.
The priority level helps users know how to prioritize the issues to which they are assigned.
6. (Optional) Click the Description area and enter a brief description of the issue.
The description might include information about the issue. For example, you can ask users to describe any error messages they see or any actions they took prior to an error.
7. (Optional) Select an issue from the Related Issues area and click the Add button.
Linking issues makes it easier to track and resolve related issues.
Exercise
• Exercise File: None required.
• Exercise: Add an issue with the following information:
Subject: Office Equipment
Description: The equipment we ordered has not arrived. Someone needs to contact the supplier and get an ETA.
Figure 3-24: An issue tracking list
Figure 3-25: The New Item dialog box.
Working with Lists

52 © 2011 CustomGuide, Inc.
8. (Optional) Click the Due Date text box and enter a date.
This is the date by which the issue should be resolved.
9. Click the Save button.
The issue is added to the issue tracking list.
Edit an issue
One important purpose of an issue tracking list is to track how an issue progresses. Edit issues as necessary to keep all communication in one location.
1. Open the issue tracking list where the issue is saved.
The issue tracking list opens in Standard view.
2. Select the issue you want to edit.
3. Click the Items tab on the Ribbon and click the Edit Item button in the Manage group.
The dialog box for the issue appears.
Other Ways to Edit an Issue: Click the hyperlink for the issue you want to edit and click the Edit Item button in the Manage group on the Ribbon.
4. Click the Issue Status list arrow and select the appropriate status.
There are three statuses from which to choose:
Active: The issue is active and currently unresolved.
Resolved: The issue has been addressed and resolved.
Closed: The issue has not been resolved, but it has been addressed.
5. Click the Comments area and enter any information about the issue.
Site members working on an issue can add comments to an issue, keeping all their communication in one issue.
6. Edit other issue fields as necessary and click the Save button.
The issue is updated.
Figure 3-26: Use the Comments area in the New Item dialog box to describe progress on the issue.
Working with Lists

County of Berks 53
WWoorrkkiinngg wwiitthh LLiissttss RReevviieeww
Quiz Questions
16. Announcements are displayed on the home page of a team site by default. (True or False?)
17. Contacts are only available for users who add the contacts to a list in SharePoint. (True or False?)
18. Which of these is not an example of a link that could be added to a team site? A. A link to the organization’s 401k program. B. A link to an online resource that is frequently used by team members. C. An e-mail address for an organization that users correspond with frequently. D. A link to an organization that users correspond with frequently.
19. Which of the following is not a scope available in SharePoint calendars? A. Month B. Work Week C. Week D. Day
20. Events are items that indicate an appointment or meeting on a SharePoint calendar. (True or False?)
21. Which of these is not a way to control a recurring event? A. The frequency of the event (Daily, Weekly, Monthly, Yearly) B. The number of times the recurring event will occur C. The rotating location of the event D. The start date of the first recurring event
22. Tasks lists and project task lists are the same. (True or False?)
23. How do you create a milestone? B. Enter the same start date and due date for the task. C. Create the new task and click the Milestone check box in the New Item dialog box. D. You can only create milestones in the Project application.
24. When you click a summary task in a project task list, a summary task dialog box appears. (True or False?)
25. Tasks in tasks lists and project tasks lists can be updated to show the progress made on a task. (True or False?)
26. Which of these options most accurately describes a discussion board? A. A bulletin board on which employees can post requests in an organization. B. A place where tasks and contacts can be stored for others to access. C. A list of posts and other entries that provide information on a topic. D. An online forum where users can discuss a topic.
54 © 2011 CustomGuide, Inc.
27. Contribute to a discussion on a discussion board by replying to the topic. (True or False?)
28. Which of these statuses is NOT an issue status? A. Active B. In Progress C. Resolved D. Closed
Quiz Answers 16. False. You must add the Announcements list web part to a home page if you want to display announcements.
17. False. Contacts are available for all users that have access to the site in which the list is saved.
18. C. E-mail addresses should be used in contact items, not link items.
19. B. Work Week is not a default SharePoint scope.
20. True. Events are the calendar list items that indicate an appointment or meeting on a SharePoint calendar.
21. Recurring events don’t allow you to create a rotating pattern for the location of the events. The recurring series must all use the same location.
22. False. Project tasks are better for long-term projects in which the tasks all contribute to the completion of a larger project.
23. B. To create a milestone, create a new task and enter the same start date and due date for the task.
24. False. When you click a summary task in a project task list, the summary project task list appears.
25. True. Task progress can be updated in both types of lists.
26. D. A discussion board is an online forum where users can discuss a topic.
27. True. Reply to a discussion topic to contribute to the conversation.
28. B. In Progress is not an issue status.

County of Berks 55
WWoorrkkiinngg wwiitthh LLiibbrraarriieess
Creating a Library .............................................. 56
Creating a New Document in a Library ........... 58
Uploading a File or Document to a Library ..... 59 Upload a single document ....................... 59 Upload multiple documents ..................... 60
Opening and Editing a Document .................... 61 Open a document .................................... 61 Edit a document ....................................... 61
Checking Out and Checking In a Document ... 62 Check out a document ............................. 62 Check in a document ............................... 62
Enabling Versions History ................................ 64
Using Versioning History .................................. 65 Add a version ........................................... 65 View version history ................................. 66
Working with Images ......................................... 67
A library stores related files that team members can share with one another. For example, a library could store all of the press releases the public relations team writes in a year.
Libraries are also an easy way for a team or department to update and manage files in a central location. For example, all members of a writing department can make updates and changes to a document. Information about the updates is also recorded in the library.
Any type of file can be saved in a library, including documents, spreadsheets, presentations, pictures and forms.
44
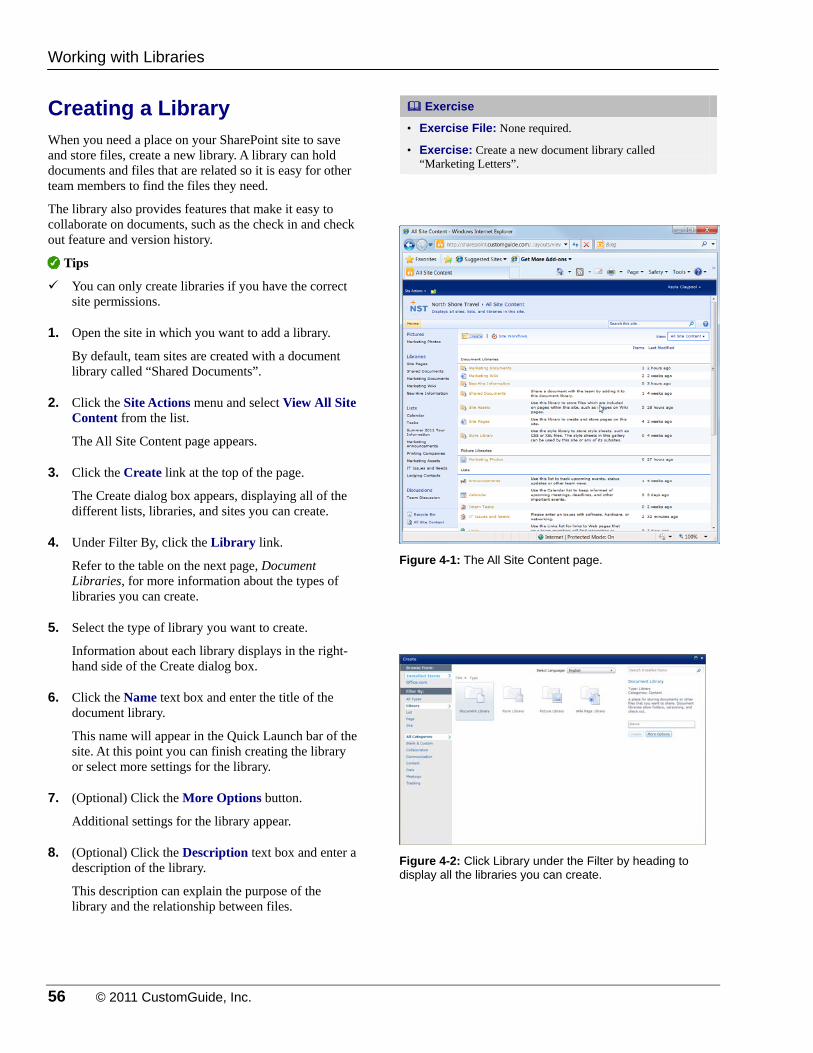
56 © 2011 CustomGuide, Inc.
Creating a Library When you need a place on your SharePoint site to save and store files, create a new library. A library can hold documents and files that are related so it is easy for other team members to find the files they need.
The library also provides features that make it easy to collaborate on documents, such as the check in and check out feature and version history.
Tips
You can only create libraries if you have the correct site permissions.
1. Open the site in which you want to add a library.
By default, team sites are created with a document library called “Shared Documents”.
2. Click the Site Actions menu and select View All Site Content from the list.
The All Site Content page appears.
3. Click the Create link at the top of the page.
The Create dialog box appears, displaying all of the different lists, libraries, and sites you can create.
4. Under Filter By, click the Library link.
Refer to the table on the next page, Document Libraries, for more information about the types of libraries you can create.
5. Select the type of library you want to create.
Information about each library displays in the right-hand side of the Create dialog box.
6. Click the Name text box and enter the title of the document library.
This name will appear in the Quick Launch bar of the site. At this point you can finish creating the library or select more settings for the library.
7. (Optional) Click the More Options button.
Additional settings for the library appear.
8. (Optional) Click the Description text box and enter a description of the library.
This description can explain the purpose of the library and the relationship between files.
Exercise
• Exercise File: None required.
• Exercise: Create a new document library called “Marketing Letters”.
Figure 4-1: The All Site Content page.
Figure 4-2: Click Library under the Filter by heading to display all the libraries you can create.
Working with Libraries
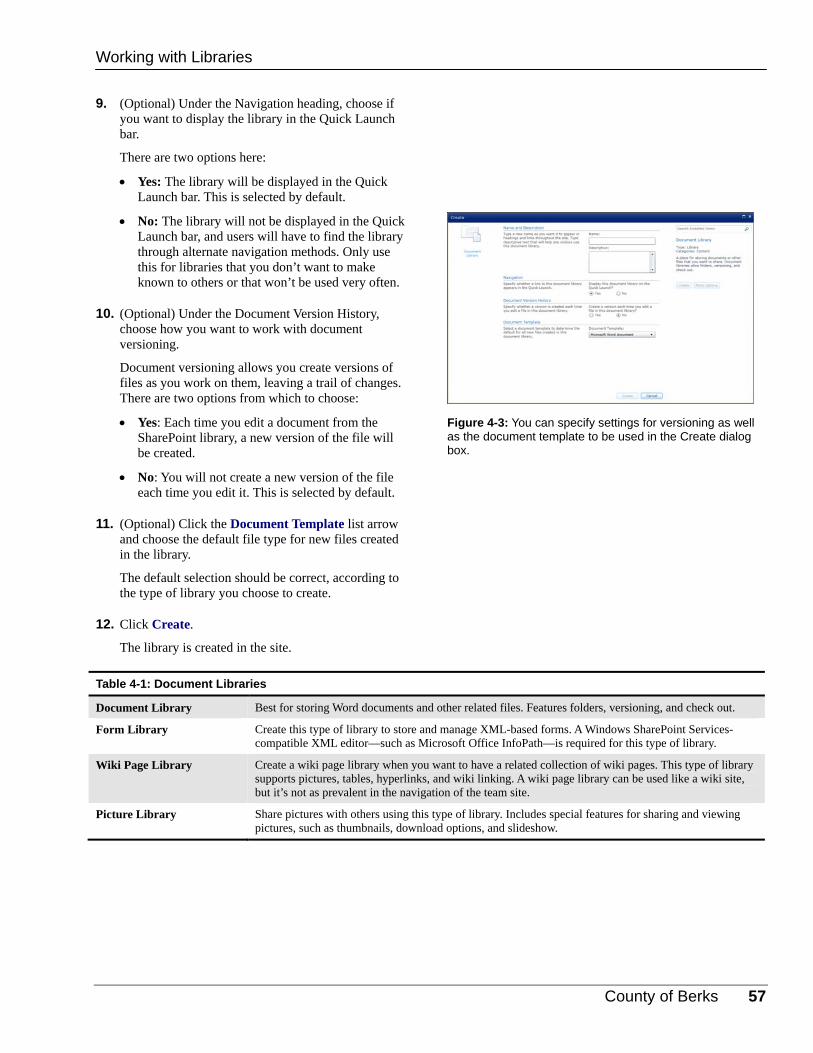
County of Berks 57
9. (Optional) Under the Navigation heading, choose if you want to display the library in the Quick Launch bar.
There are two options here:
Yes: The library will be displayed in the Quick Launch bar. This is selected by default.
No: The library will not be displayed in the Quick Launch bar, and users will have to find the library through alternate navigation methods. Only use this for libraries that you don’t want to make known to others or that won’t be used very often.
10. (Optional) Under the Document Version History, choose how you want to work with document versioning.
Document versioning allows you create versions of files as you work on them, leaving a trail of changes. There are two options from which to choose:
Yes: Each time you edit a document from the SharePoint library, a new version of the file will be created.
No: You will not create a new version of the file each time you edit it. This is selected by default.
11. (Optional) Click the Document Template list arrow and choose the default file type for new files created in the library.
The default selection should be correct, according to the type of library you choose to create.
12. Click Create.
The library is created in the site.
Table 4-1: Document Libraries
Document Library Best for storing Word documents and other related files. Features folders, versioning, and check out.
Form Library Create this type of library to store and manage XML-based forms. A Windows SharePoint Services-compatible XML editor—such as Microsoft Office InfoPath—is required for this type of library.
Wiki Page Library Create a wiki page library when you want to have a related collection of wiki pages. This type of library supports pictures, tables, hyperlinks, and wiki linking. A wiki page library can be used like a wiki site, but it’s not as prevalent in the navigation of the team site.
Picture Library Share pictures with others using this type of library. Includes special features for sharing and viewing pictures, such as thumbnails, download options, and slideshow.
Figure 4-3: You can specify settings for versioning as well as the document template to be used in the Create dialog box.
Working with Libraries

58 © 2011 CustomGuide, Inc.
Creating a New Document in a Library One way to add items to a document library is to create new items in the library. These items can then be opened and edited by other team members.
1. Open the library in which you want to create a new document.
Most libraries will be included in the Quick Launch.
2. Click the Documents tab on the Ribbon and click the New Document button in the New group.
A dialog box may appear, asking if you trust the source of the file.
Tip: Click the New Folder button in the New group to create a new folder in the library. Folders allow users to organize documents into further subcategories.
3. Click OK. If prompted, enter the password for your SharePoint account.
The dialog box closes, and SharePoint prepares to open the new file on your computer. For example, if creating a new document, a new document would open in Word.
Tip: Each library has a default template it uses to create a file. The type of document you create depends on the default template the library uses.
4. Work with content of the file as you would normally.
When you are finished working with the file, save and close it.
5. Press <Ctrl> + <S>.
The Save As dialog box appears. Notice that the save location is on the SharePoint server, not your computer.
6. Enter the file name in the File name text box.
7. Click Save and close the file.
The document or file closes. To open the file again, open it from the document library in which it was created.
Exercise
• Exercise File: Marketing Letters document library
• Exercise: Create a new document called “Quarterly Report” in the document library.
Figure 4-4: The Save As dialog box.
Working with Libraries
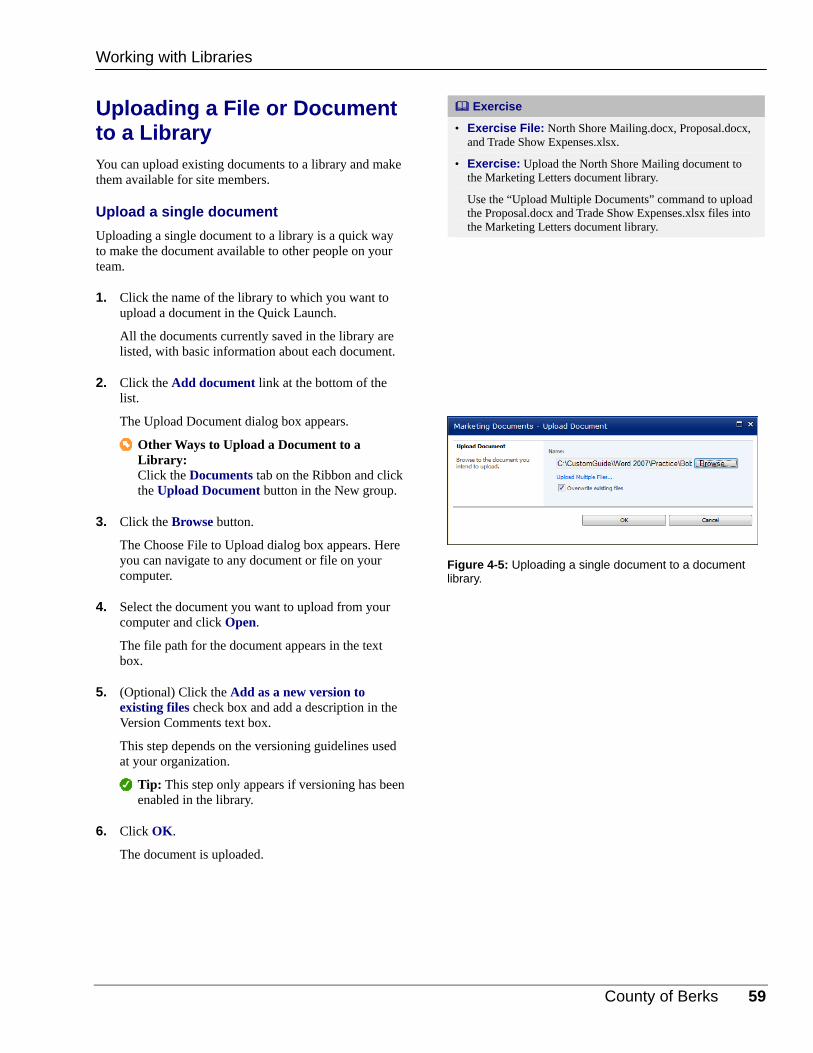
County of Berks 59
Uploading a File or Document to a Library You can upload existing documents to a library and make them available for site members.
Upload a single document
Uploading a single document to a library is a quick way to make the document available to other people on your team.
1. Click the name of the library to which you want to upload a document in the Quick Launch.
All the documents currently saved in the library are listed, with basic information about each document.
2. Click the Add document link at the bottom of the list.
The Upload Document dialog box appears.
Other Ways to Upload a Document to a Library: Click the Documents tab on the Ribbon and click the Upload Document button in the New group.
3. Click the Browse button.
The Choose File to Upload dialog box appears. Here you can navigate to any document or file on your computer.
4. Select the document you want to upload from your computer and click Open.
The file path for the document appears in the text box.
5. (Optional) Click the Add as a new version to existing files check box and add a description in the Version Comments text box.
This step depends on the versioning guidelines used at your organization.
Tip: This step only appears if versioning has been enabled in the library.
6. Click OK.
The document is uploaded.
Exercise
• Exercise File: North Shore Mailing.docx, Proposal.docx, and Trade Show Expenses.xlsx.
• Exercise: Upload the North Shore Mailing document to the Marketing Letters document library.
Use the “Upload Multiple Documents” command to upload the Proposal.docx and Trade Show Expenses.xlsx files into the Marketing Letters document library.
Figure 4-5: Uploading a single document to a document library.
Working with Libraries

60 © 2011 CustomGuide, Inc.
Upload multiple documents
If you have multiple documents to upload, you don't have to add them one at a time. Follow these steps to upload several documents at once.
1. Click the name of the library to which you want to upload a document in the Quick Launch.
All the documents currently saved in the library are listed, with basic information about each document.
2. Click the Documents tab on the Ribbon and click the Upload Document button list arrow in the New group.
A list of options appears.
3. Select Upload Multiple Documents.
The Upload Multiple Documents dialog box appears. Click and drag the files and folders that you want to upload to SharePoint here.
4. Open Windows Explorer and navigate to the file or folder you want to upload.
5. Click the file or folder you want to upload and drag it to the Drag Files and Folders area of the Upload Multiple Documents dialog box.
Tip: Press and hold the <Ctrl> key to select multiple files.
6. Click OK.
Depending on the size of the upload and your connection speed, it could take several minutes for all your files to upload.
7. Click Done.
The documents are uploaded.
Tip: Before uploading the selected documents, click the Add as a new version to existing files check box to add the files as new versions.
Tips
You can only upload files to libraries if you have permission to do so. If the Upload button is not available, then you have not been given permission to add documents to the library.
Figure 4-6: Click and drag multiple documents to upload them to a library.
Working with Libraries

County of Berks 61
Opening and Editing a Document Document libraries make it easy to open and access documents.
Open a document
Open a document to view it.
1. Open the library where the document is saved.
2. Click the name of the document.
The Open Document dialog box appears, asking how you would like to open the file.
Tip: You may also be asked to enter your user name and password to open the document.
3. If necessary, select Read Only or Edit and click OK.
The document appears on your desktop in the program for which it is compatible.
Edit a document
If you have the right set of permissions, you can edit a document saved in a document library.
1. Open the document you want to edit.
If you do not have permission to edit a document, it will open as read-only.
Other Ways to Edit a Document: Select the document you want to edit, click the Documents tab on the Ribbon, and click the Edit Document button in the Open & Check Out group.
2. If necessary, click the Enable Editing or the Edit Document button beneath the Ribbon.
The document is no longer in read-only mode.
3. Edit the document as you would normally.
4. Save and close the document when you are finished.
The document is changed, and its changes are available for other users.
Tips
Libraries may require users to check out documents, in which case simply opening a document would not be possible.
Exercise
• Exercise File: Proposal.docx
• Exercise: Open the Proposal document and change the date on the first page to today’s date.
Figure 4-7: Choose how you want to open the document.
Figure 4-8: A SharePoint document open for editing in Word.
Working with Libraries
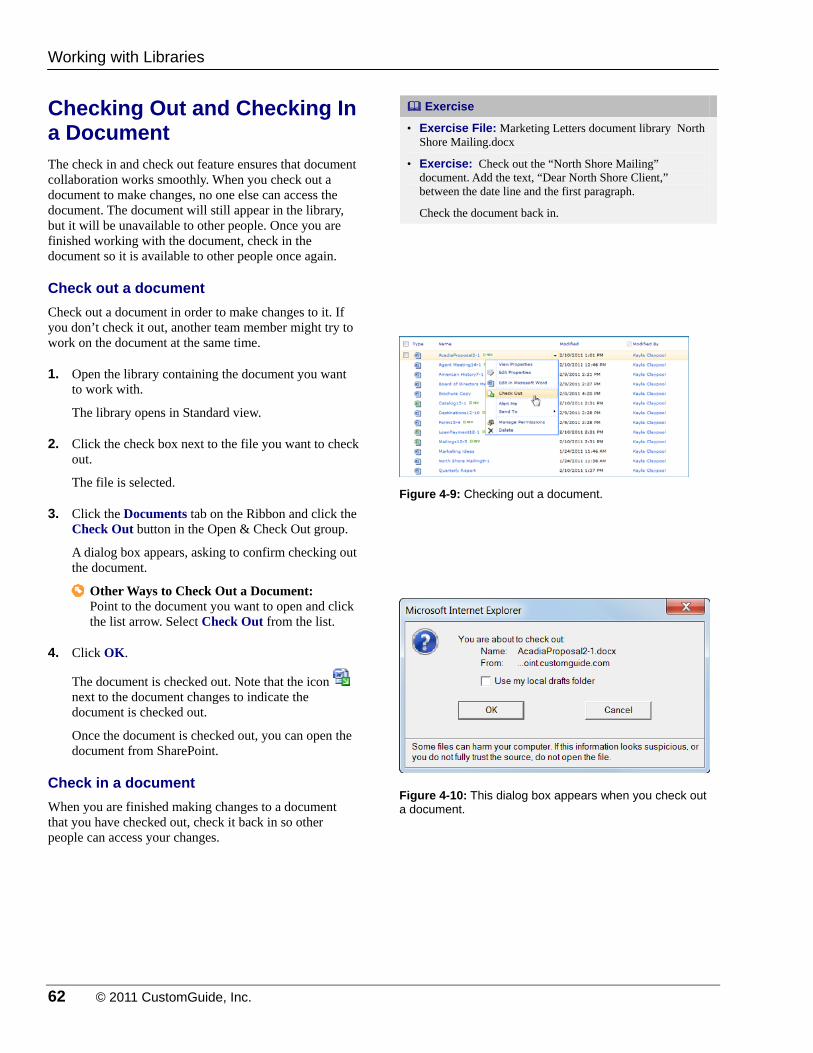
62 © 2011 CustomGuide, Inc.
Checking Out and Checking In a Document The check in and check out feature ensures that document collaboration works smoothly. When you check out a document to make changes, no one else can access the document. The document will still appear in the library, but it will be unavailable to other people. Once you are finished working with the document, check in the document so it is available to other people once again.
Check out a document
Check out a document in order to make changes to it. If you don’t check it out, another team member might try to work on the document at the same time.
1. Open the library containing the document you want to work with.
The library opens in Standard view.
2. Click the check box next to the file you want to check out.
The file is selected.
3. Click the Documents tab on the Ribbon and click the Check Out button in the Open & Check Out group.
A dialog box appears, asking to confirm checking out the document.
Other Ways to Check Out a Document: Point to the document you want to open and click the list arrow. Select Check Out from the list.
4. Click OK.
The document is checked out. Note that the icon next to the document changes to indicate the document is checked out.
Once the document is checked out, you can open the document from SharePoint.
Check in a document
When you are finished making changes to a document that you have checked out, check it back in so other people can access your changes.
Exercise
• Exercise File: Marketing Letters document library North Shore Mailing.docx
• Exercise: Check out the “North Shore Mailing” document. Add the text, “Dear North Shore Client,” between the date line and the first paragraph.
Check the document back in.
Figure 4-9: Checking out a document.
Figure 4-10: This dialog box appears when you check out a document.
Working with Libraries
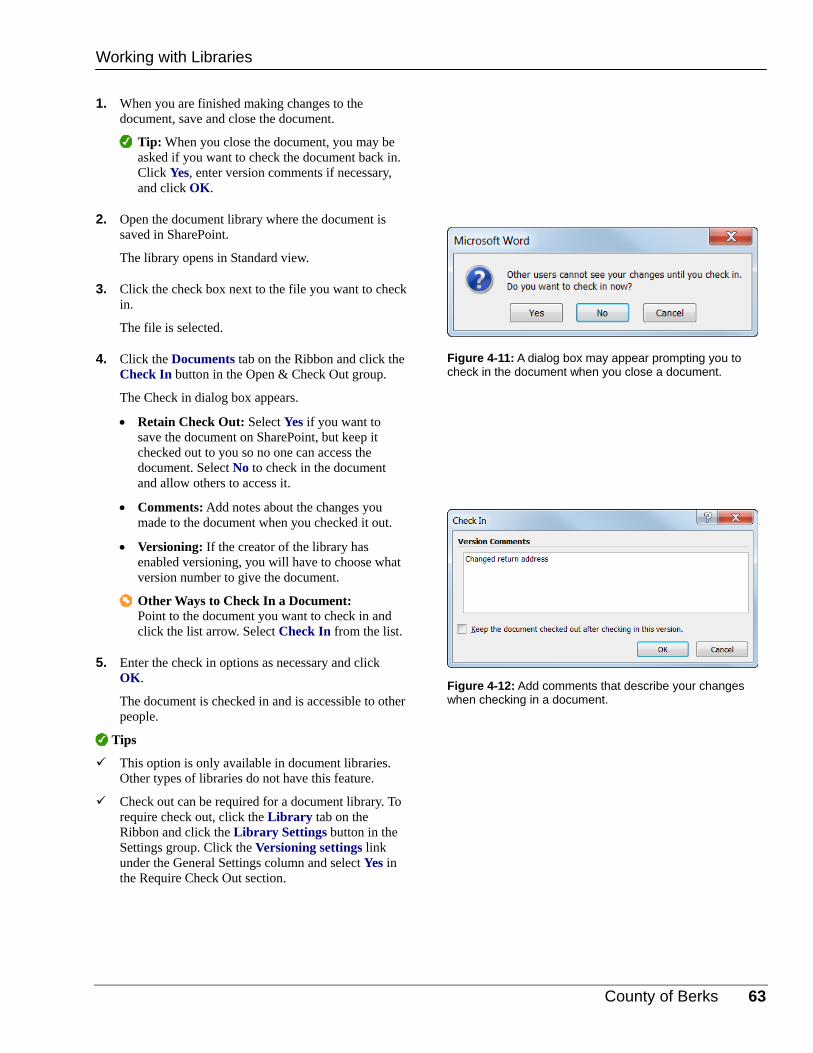
County of Berks 63
1. When you are finished making changes to the document, save and close the document.
Tip: When you close the document, you may be asked if you want to check the document back in. Click Yes, enter version comments if necessary, and click OK.
2. Open the document library where the document is saved in SharePoint.
The library opens in Standard view.
3. Click the check box next to the file you want to check in.
The file is selected.
4. Click the Documents tab on the Ribbon and click the Check In button in the Open & Check Out group.
The Check in dialog box appears.
Retain Check Out: Select Yes if you want to save the document on SharePoint, but keep it checked out to you so no one can access the document. Select No to check in the document and allow others to access it.
Comments: Add notes about the changes you made to the document when you checked it out.
Versioning: If the creator of the library has enabled versioning, you will have to choose what version number to give the document.
Other Ways to Check In a Document: Point to the document you want to check in and click the list arrow. Select Check In from the list.
5. Enter the check in options as necessary and click OK.
The document is checked in and is accessible to other people.
Tips
This option is only available in document libraries. Other types of libraries do not have this feature.
Check out can be required for a document library. To require check out, click the Library tab on the Ribbon and click the Library Settings button in the Settings group. Click the Versioning settings link under the General Settings column and select Yes in the Require Check Out section.
Figure 4-11: A dialog box may appear prompting you to check in the document when you close a document.
Figure 4-12: Add comments that describe your changes when checking in a document.
Working with Libraries

64 © 2011 CustomGuide, Inc.
Enabling Versions History Versioning is a library feature that tracks revisions to documents. This is a helpful way to record the changes a document has undergone over time. Document libraries must have versions enabled in order to record versions of the documents saved in the library.
1. Open the library in which you want to enable versioning.
The library opens in Standard view.
2. Click the Library tab on the Ribbon and click the Library Settings button in the Settings group.
The Document Library Settings page appears.
3. Click the Versioning settings link under the General settings column.
The Versioning Settings page appears. This page provides a set of controls for the library.
4. In the Document Version History section, select the version scheme you want to use.
There are two ways to track versions:
Create major versions: An example of a major version is an added section or chapter in a document. Choose this option if there aren’t many people who will be editing documents.
Create major and minor (draft) versions: This option can create a more meaningful version history. For example, changes such as spelling errors or drafts are considered minor versions, while major changes indicate new sections or chapters.
5. (Optional) Choose the number of versions to retain.
These two options prevent the library from being too cluttered. However, you may also lose important versions if you limit the number of versions that are saved.
6. Click OK.
Versioning is enabled in the library.
Tips
Lists can also have versioning enabled in them.
Exercise
• Exercise File: Marketing Letters library
• Exercise: Enable versioning in the Marketing Letters library.
Figure 4-13: Versioning Settings for a document library.
Working with Libraries

County of Berks 65
Using Versioning History After you have enabled versioning, you can use this information to manage content. Versioning lets users add new versions of documents and review previous versions of files as needed.
Add a version
When minor versioning is enabled, users can add major versions of documents whenever necessary.
1. Open the library in which you want to save a new document version.
The library opens in Standard view.
2. Click the check box next to the document you want to publish
The document is selected.
3. Click the Documents tab on the Ribbon and click the Publish button in the Workflows group.
The Publish Major Version dialog box appears.
Other Ways to Publish a Major Version: Point to the document to which you want to add a new version and click the list arrow. Select Publish a Major Version from the list.
4. Enter text describing the version in the Comments text box. Click OK.
The version is added, and it is now the primary document available in the library.
Other Ways to Add a Version: Once versioning is enabled in a library, any change to the document is automatically saved as a new version of the document. Or, check out the document, make changes, and specify version information when checking the document back in.
Tips
Version information is required when a document is checked in, so new versions are automatically published at check in.
When versioning is turned on, versions of documents are automatically tracked and saved. You do not need to publish a version or check out the document to save a version.
Exercise
• Exercise File: Marketing Letters library and North Shore Mailing.docx
• Exercise: Open the “North Shore Mailing” document and make changes. Publish the document as a major version.
View the version history of the “North Shore Mailing” document.
Figure 4-14: Publishing a version of a document in SharePoint.
Working with Libraries
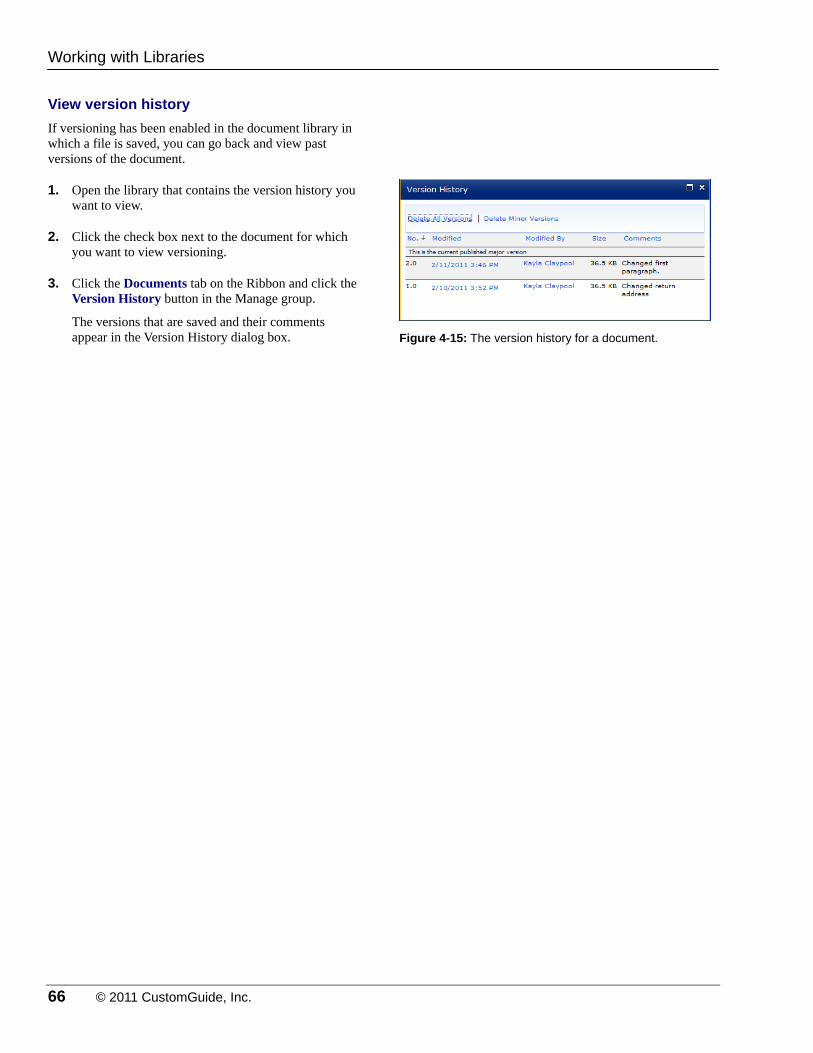
66 © 2011 CustomGuide, Inc.
View version history
If versioning has been enabled in the document library in which a file is saved, you can go back and view past versions of the document.
1. Open the library that contains the version history you want to view.
2. Click the check box next to the document for which you want to view versioning.
3. Click the Documents tab on the Ribbon and click the Version History button in the Manage group.
The versions that are saved and their comments appear in the Version History dialog box. Figure 4-15: The version history for a document.
Working with Libraries

County of Berks 67
Working with Images Upload an image from your computer to a picture library in order to share the image with other members of the site.
1. Open the picture library to which you want to add the image.
Picture libraries are listed under the Pictures section of the Quick Launch bar.
2. Click the Upload button on the taskbar.
The Select Picture dialog box appears. Now just identify the picture that you want to upload.
3. Click the Browse button.
The Choose File to Upload dialog box appears.
Tip: You can upload multiple images to a Pictures library. Click the Upload button list arrow on the taskbar and select Upload Multiple Pictures. Or, click the Upload Multiple Files link in the Select Picture dialog box.
4. Navigate to the location of the image and select the image. Click Open.
The file path of the image appears in the Name text box.
5. Click OK.
The image is uploaded. Another dialog box appears where you can add more information about the image.
6. Verify the name of the image in the Name text box.
The name will appear as the name of the item in the picture library. The name should be HTML friendly, so do not use any spaces in the name.
7. (Optional) Complete the remaining options.
The remaining options aren’t necessary, but the images will be more useful if more information is attached to them. For example, keywords make the picture easier to search for, and a description helps distinguish the image from similar images in the library.
8. Click Save.
The image appears in the picture library.
Exercise
• Exercise File: nst_logo.jpg and a picture library
• Exercise: Upload the nst_logo.jpg to the picture library.
Figure 4-16: Uploading a picture to a picture library.
Figure 4-17: Entering information about the uploaded picture.
Working with Libraries

68 © 2011 CustomGuide, Inc.
WWoorrkkiinngg wwiitthh LLiibbrraarriieess RReevviieeww
Quiz Questions
29. Which of these is not a type of library you can create in SharePoint? A. Web Page B. Wiki Page C. Document D. Slide
30. You can only upload items to add them to a library. (True or False?)
31. Documents can only be uploaded to a library one at a time. (True or False?)
32. You can open a document saved in a library to view or edit it. (True or False?)
33. When a document is checked out, other users cannot open or view the document. (True or False?)
34. What is the difference between a major and a minor version? A. A major draft indicates major changes in the document content, and a minor draft indicates small changes. B. A major draft includes changes made by a site owner, while a minor draft includes changes made by a site visitor. C. A major draft includes changes made to new documents, while a minor draft includes changes made to old documents. D. The draft is automatically assigned according to the number of changes made.
35. You can publish a major version of a document in any library, even if versioning is not enabled. (True or False?)
36. You cannot change the name of an image once you've uploaded it. (True or False?)
Quiz Answers 29. A. Web page is not a type of library you can create in SharePoint; Wiki Page, and Document are types of libraries that
can be created.
30. False. You can create new items in a library.
31. False. Several documents can be uploaded to a library at a time using the Upload Multiple Documents dialog box.
32. True. Open a document to view or edit the document.

County of Berks 69
33. True. A document is not available for viewing or editing when it is checked out. It must be checked in again to be available for other users.
34. A. A major draft indicates major changes in the document content such as a new paragraph, and a minor draft indicates small changes such as a typo correction.
35. False. You can only publish a new version of a document in a library in which versioning has been enabled.
36. False. You can change the name so it appears as something that makes sense in the Pictures library.

70 © 2011 CustomGuide, Inc.
WWoorrkkiinngg wwiitthh BBllooggss,, WWiikkiiss,, aanndd WWoorrkkssppaacceess
Creating a Wiki Site ........................................... 71 Create a wiki site ..................................... 71 View a wiki page ...................................... 72
Working with a Wiki ........................................... 73 Add a wiki page ....................................... 73 Edit a wiki page ........................................ 74
Creating a Blog .................................................. 75
Writing a Blog Post............................................ 77 Write a blog post ...................................... 77 Approve or reject a post .......................... 78
Working with a Blog .......................................... 79 Read a blog ............................................. 79 Comment on a post ................................. 79 Subscribe to a blog RSS feed ................. 80
Creating a Document Workspace .................... 81
Creating a Meeting Workspace ........................ 83
Linking an Event to a Meeting Workspace ...... 85
This chapter covers the main collaboration subsites that can be added to a team site: blogs, wikis and workspaces. These sites have their own pages and organization, and are a great way to complement the objects and features available in a team site.
We’ll discuss the basics, such as how to create each site, settings that are available, and how to add to and work with each site.
55

County of Berks 71
Creating a Wiki Site A wiki is a collaborative way to build knowledge. Users can share their collective expertise to create a more complete resource than if one person provided all the information. Users can also critique and edit entries created by others to ensure that the information is accurate.
Some excellent uses for a wiki include gathering knowledge and data, creating an instruction guide for new employees, and brainstorming ideas and designs.
Tips
Wikiwiki is a Hawaiian word that means “quick.”
Create a wiki site
1. Open the site in which you want to include the wiki.
2. Click the Site Actions menu and select More Options from the list.
The Create dialog box appears.
3. Select Wiki Page Library.
Information about the wiki page library appears on the right side of the Create dialog box.
4. Click the Name text box and enter a name for the wiki site.
This text will appear in the Quick Launch bar, so the name should be short and easy to identify.
5. (Optional) Click the More Options button.
Additional settings for the wiki site appear.
6. (Optional) Click the Description text box and enter a description of the wiki.
This description can explain the purpose of the wiki and what kind of information should be documented in it.
Exercise
• Exercise File: None required.
• Exercise: Create a new wiki site called “Agents Wiki”.
Figure 5-1: Creating a new wiki site.
Working with Blogs, Wikis, and Workspaces

72 © 2011 CustomGuide, Inc.
7. (Optional) Under the Navigation heading, choose if you want to display the wiki in the Quick Launch bar.
There are two options here:
Yes: The wiki will be displayed in the Quick Launch bar. This is selected by default.
No: The wiki will not be displayed in the Quick Launch bar, and users will have to find the library through alternate navigation methods. Only use this for wikis that you don’t want to make known to others or that won’t be used very often.
8. Click Create.
View a wiki page
Find the wiki page you want to view or contribute to on the wiki site.
1. Click the wiki you want to open in the Quick Launch bar.
The wiki appears with the Home page displayed.
Other Ways to View a Wiki: Click the All Site Content link in the Quick Launch bar or click the Site Actions button and select View All Site Content. Click the wiki you want to open under the Document Libraries heading.
.
Figure 5-2: Wikis are listed under the Libraries heading in the Quick Launch bar.
Working with Blogs, Wikis, and Workspaces

County of Berks 73
Working with a Wiki Once a wiki site has been created, users can add new pages and links to pages within the site.
Add a wiki page
If there is a topic that needs to be addressed, or you feel you need to contribute information or add an idea, you can add a new wiki page to the site.
The process for adding a new page includes first creating a link to the page and then clicking that link to create the new page.
1. Open the page to which you want to link the new page.
2. Click the Page tab on the Ribbon and click the Edit button in the Edit group.
You can change the text of the page, including adding links to new wiki pages.
3. Enter the name of the new page enclosed in double brackets.
For example, type [[Help]] to create a link to a page named Help.
There are two options for adding a wiki page:
Link to a previously created page: As you type, a list of previously created pages appears. You can select one of these pages and link the wiki page to the previously created content.
Link to a blank wiki page: You can also create a blank wiki page using the text as a placeholder. When you have typed the text, it will link to a blank wiki page.
Tip: To give the new page a name that is different from the name of the link, type the page name|link name. For example, [[Help|Using Help]] to create a link named “Using Help” to a page named “Help.”
4. Click the Save & Close button in the Edit group on the Ribbon.
The wiki page is created.
5. Click the link to the page you just created.
The New Page dialog box appears. Here you can indicate if you want to create a new page from the link placeholder you previously entered.
Exercise
• Exercise File: Agents Wiki site
• Exercise: Add a new wiki page called “Hostel guidelines”.
Add a link on the Hostel guidelines page to a page called “Hostel directory”.
Figure 5-3: Links to previously created wiki pages appear when you type your wiki page.
Figure 5-4: The New Page dialog box.
Figure 5-5: A wiki page after it is created. Note the link for a new wiki page, marked by a dashed underline.
Working with Blogs, Wikis, and Workspaces
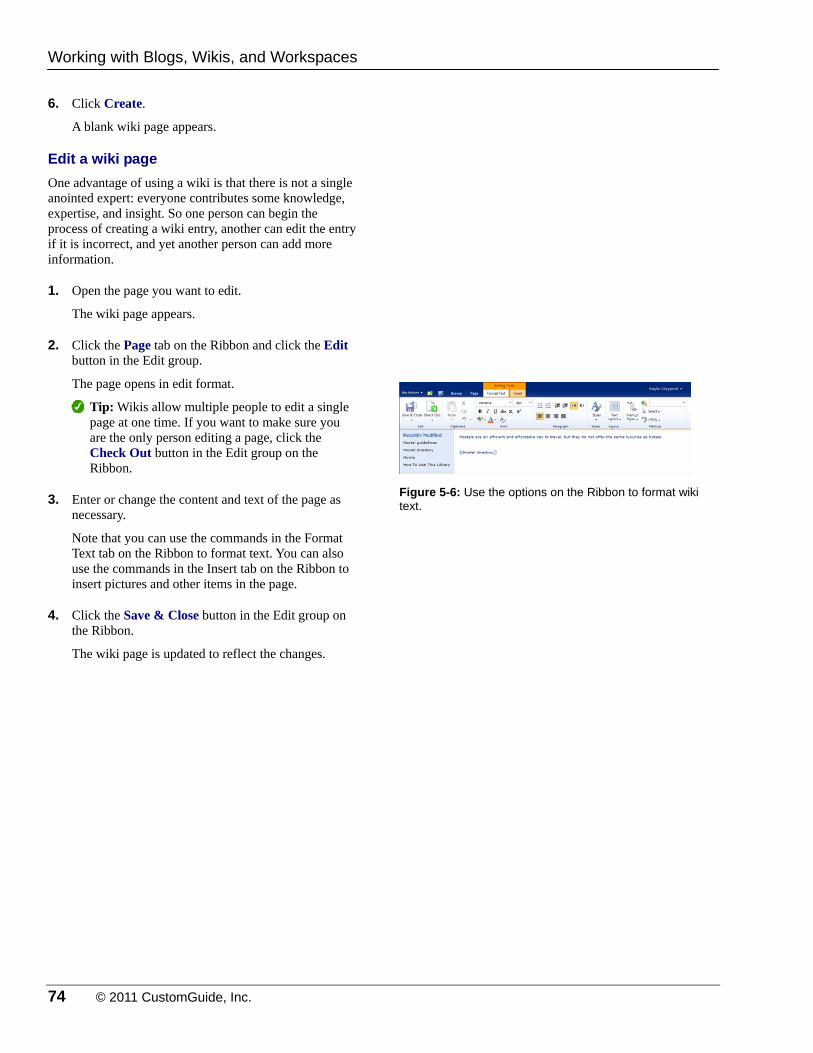
74 © 2011 CustomGuide, Inc.
6. Click Create.
A blank wiki page appears.
Edit a wiki page
One advantage of using a wiki is that there is not a single anointed expert: everyone contributes some knowledge, expertise, and insight. So one person can begin the process of creating a wiki entry, another can edit the entry if it is incorrect, and yet another person can add more information.
1. Open the page you want to edit.
The wiki page appears.
2. Click the Page tab on the Ribbon and click the Edit button in the Edit group.
The page opens in edit format.
Tip: Wikis allow multiple people to edit a single page at one time. If you want to make sure you are the only person editing a page, click the Check Out button in the Edit group on the Ribbon.
3. Enter or change the content and text of the page as necessary.
Note that you can use the commands in the Format Text tab on the Ribbon to format text. You can also use the commands in the Insert tab on the Ribbon to insert pictures and other items in the page.
4. Click the Save & Close button in the Edit group on the Ribbon.
The wiki page is updated to reflect the changes.
Figure 5-6: Use the options on the Ribbon to format wiki text.
Working with Blogs, Wikis, and Workspaces

County of Berks 75
Creating a Blog A blog is a great way to share information. Generally, a blog is written by someone who can provide valuable insight and information on a topic, such as the manager of a department or the leader for a development team. Blogs can be used by these individuals as an informal way to pass on important information, such as why a certain policy has changed, or specific tips and tricks to watch out for when rolling out a new product.
Tips
The word “blog” is short for “web log”.
1. Open the site in which you want to include the blog.
2. Click the Site Actions button and select New Site.
The Create dialog box opens.
3. Select Blog.
Information about the blog appears on the right side of the dialog box.
4. Click the Title text box and enter a name for the blog site.
The title should be short and easy to identify.
5. Click the URL name text box and add the URL name of the site.
Users can navigate to this URL to access the site directly.
6. (Optional) Click the More Options button.
7. Select the permissions you want to use under the Permissions section.
Select who can access the blog:
Use unique permissions: This option lets you choose who can access the blog and what level of access each individual is assigned.
Use same permissions as parent site: This is the default option, and the easiest option. Use this if you want people to access this site as they do the parent site, or the site under which the blog site is being created. If you choose this option, permissions can only be changed along with the permissions of the parent site.
Exercise
• Exercise File: None required.
• Exercise: Create a new blog called “Notes from Headquarters”.
Figure 5-7: Creating a new blog site.
Working with Blogs, Wikis, and Workspaces

76 © 2011 CustomGuide, Inc.
8. (Optional) Under the Navigation heading, choose if you want to display the library in the Quick Launch bar.
Select one of these options:
Yes: The blog will be displayed in the Quick Launch bar.
No: The blog will not be displayed in the Quick Launch bar, and users will have to find the blog by alternate navigation methods. This is selected by default.
9. (Optional) Under the Navigation heading, choose whether to display this site on the top link bar of the parent site.
There are two options here:
Yes: The blog will be displayed in the top link bar. This is selected by default.
No: The blog will not be displayed in the top link bar, and users will have to find the blog through alternate navigation methods.
10. (Optional) Under the Navigation Inheritance section, choose how the top link bar will look.
This determines how the site will look for members:
Yes: The top link bar that is displayed in the blog site is the same as the top link bar that appears in the parent site.
No: Only the tab for the blog site and any its subsites will appear in the top link bar. This is selected by default.
11. Click Create.
The site is created.
Figure 5-8: More options for creating a blog.
Figure 5-9: A new blog site.
Working with Blogs, Wikis, and Workspaces
Use these links to work with the blog content.
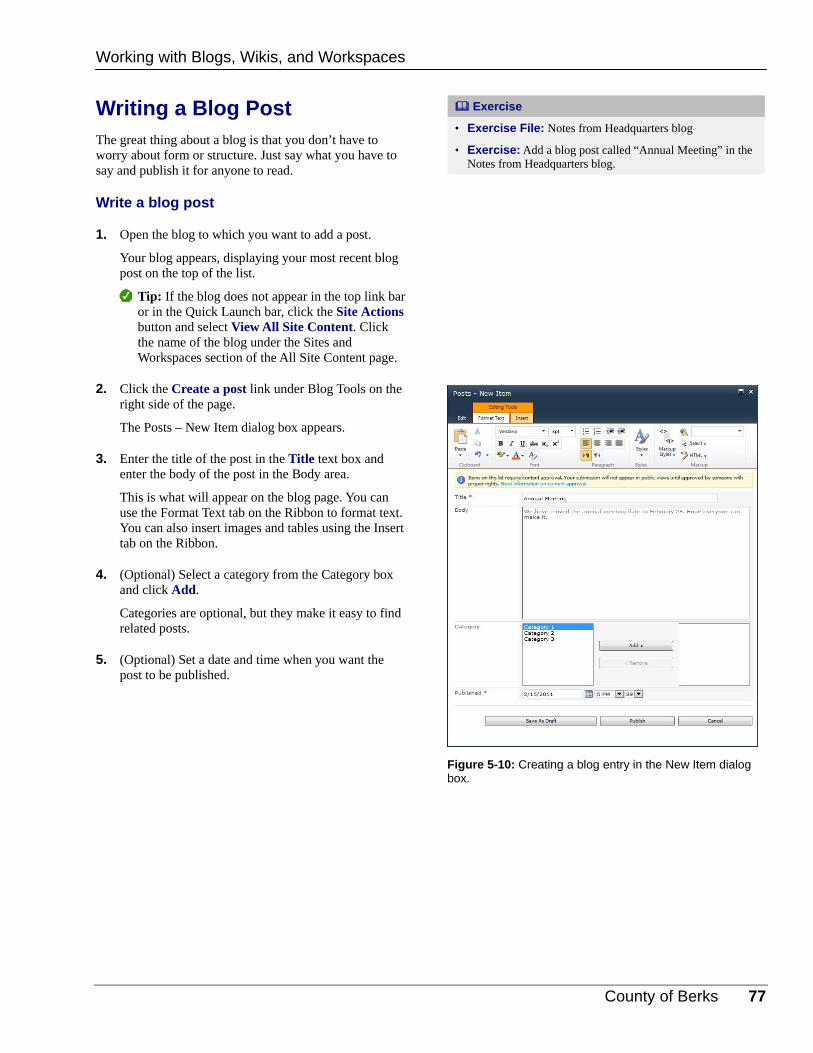
County of Berks 77
Writing a Blog Post The great thing about a blog is that you don’t have to worry about form or structure. Just say what you have to say and publish it for anyone to read.
Write a blog post
1. Open the blog to which you want to add a post.
Your blog appears, displaying your most recent blog post on the top of the list.
Tip: If the blog does not appear in the top link bar or in the Quick Launch bar, click the Site Actions button and select View All Site Content. Click the name of the blog under the Sites and Workspaces section of the All Site Content page.
2. Click the Create a post link under Blog Tools on the right side of the page.
The Posts – New Item dialog box appears.
3. Enter the title of the post in the Title text box and enter the body of the post in the Body area.
This is what will appear on the blog page. You can use the Format Text tab on the Ribbon to format text. You can also insert images and tables using the Insert tab on the Ribbon.
4. (Optional) Select a category from the Category box and click Add.
Categories are optional, but they make it easy to find related posts.
5. (Optional) Set a date and time when you want the post to be published.
Exercise
• Exercise File: Notes from Headquarters blog
• Exercise: Add a blog post called “Annual Meeting” in the Notes from Headquarters blog.
Figure 5-10: Creating a blog entry in the New Item dialog box.
Working with Blogs, Wikis, and Workspaces
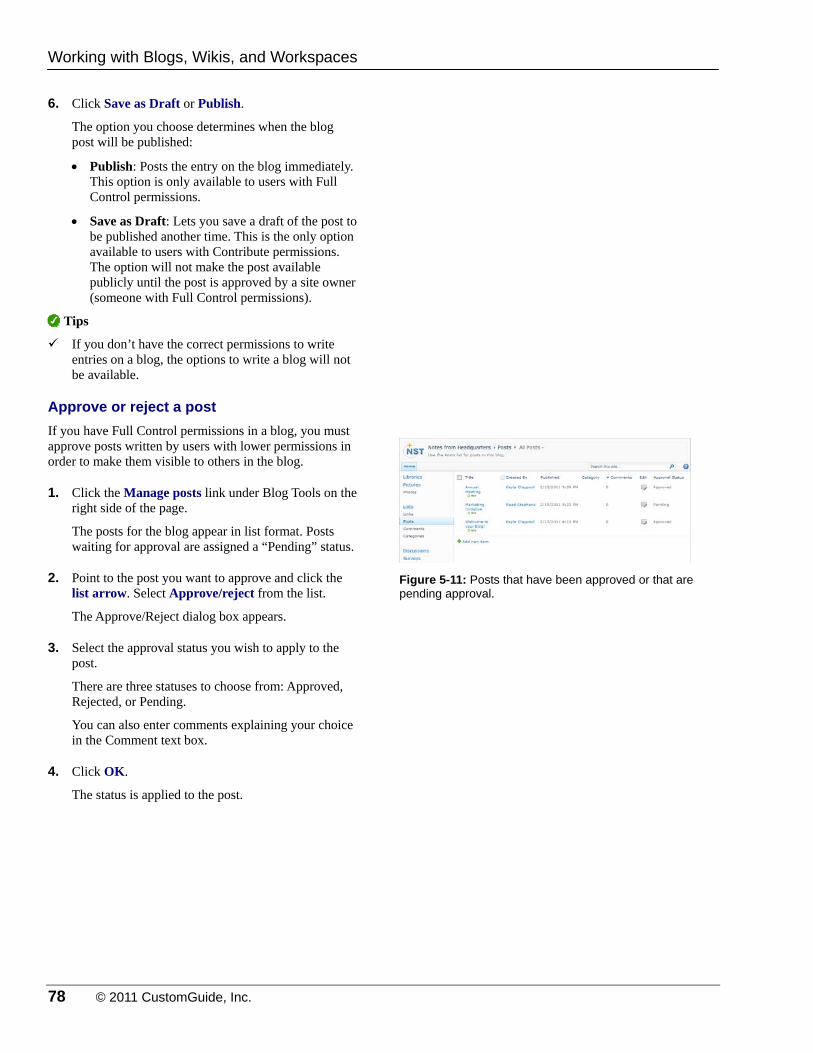
78 © 2011 CustomGuide, Inc.
6. Click Save as Draft or Publish.
The option you choose determines when the blog post will be published:
Publish: Posts the entry on the blog immediately. This option is only available to users with Full Control permissions.
Save as Draft: Lets you save a draft of the post to be published another time. This is the only option available to users with Contribute permissions. The option will not make the post available publicly until the post is approved by a site owner (someone with Full Control permissions).
Tips
If you don’t have the correct permissions to write entries on a blog, the options to write a blog will not be available.
Approve or reject a post
If you have Full Control permissions in a blog, you must approve posts written by users with lower permissions in order to make them visible to others in the blog.
1. Click the Manage posts link under Blog Tools on the right side of the page.
The posts for the blog appear in list format. Posts waiting for approval are assigned a “Pending” status.
2. Point to the post you want to approve and click the list arrow. Select Approve/reject from the list.
The Approve/Reject dialog box appears.
3. Select the approval status you wish to apply to the post.
There are three statuses to choose from: Approved, Rejected, or Pending.
You can also enter comments explaining your choice in the Comment text box.
4. Click OK.
The status is applied to the post.
Figure 5-11: Posts that have been approved or that are pending approval.
Working with Blogs, Wikis, and Workspaces

County of Berks 79
Working with a Blog A blog is a single Web page that displays entries that have been posted to the blog. Blog entries are posted reverse chronologically, which means the newest entries are displayed at the top of the page.
Read a blog
To read a blog, all you have to do is find the blog site in SharePoint. Since blogs are usually subsites of team sites in SharePoint, they are often listed on the top link bar.
1. Navigate to the site where the blog is created and click the blog name tab on the top link bar.
The blog page appears with the most recent entry at the top of the page. Note that the date the entry was published appears at the top of the entry.
Other information about the post, including who wrote the post, the category, and the number of comments to the post appear along the bottom of the entry.
Other Ways to Find a Blog: Click the Site Actions button and select View All Site Content. Click the name of the blog under the Sites and Workspaces section. Or, click the name of the blog which you wish to view under Sites in the Quick Launch bar.
2. Scroll down the page to view earlier posts.
The posts are listed from most recent to earliest.
Comment on a post
Another advantage to blogs is that anyone can respond to an entry. This is a great way for blog readers to give feedback to the blogger (the author of the blogs) or to ask a question about a blog entry.
1. Click the Comment(s) link underneath the blog post to which you want to respond.
The page displays the blog entry, comments made to the post, and an area to add comments.
2. Under Add Comment, enter the title of the comment in the Title text box and enter the comment text in the Body text box.
Note that you cannot add any formatting or objects to comments.
Exercise
• Exercise File: Notes from Headquarters blog
• Exercise: Add a comment to a blog entry.
Figure 5-12: Blog entries are posted in reverse chronological order.
Figure 5-13: Posting a comment to a blog entry.
Working with Blogs, Wikis, and Workspaces
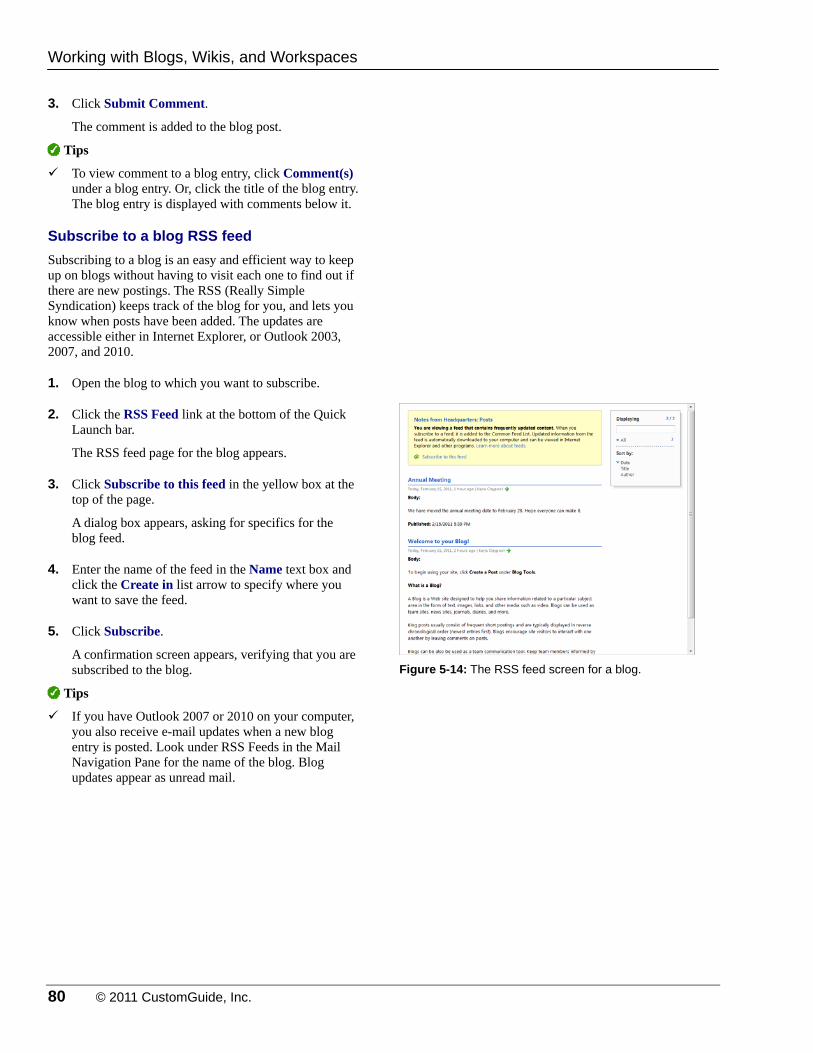
80 © 2011 CustomGuide, Inc.
3. Click Submit Comment.
The comment is added to the blog post.
Tips
To view comment to a blog entry, click Comment(s) under a blog entry. Or, click the title of the blog entry. The blog entry is displayed with comments below it.
Subscribe to a blog RSS feed
Subscribing to a blog is an easy and efficient way to keep up on blogs without having to visit each one to find out if there are new postings. The RSS (Really Simple Syndication) keeps track of the blog for you, and lets you know when posts have been added. The updates are accessible either in Internet Explorer, or Outlook 2003, 2007, and 2010.
1. Open the blog to which you want to subscribe.
2. Click the RSS Feed link at the bottom of the Quick Launch bar.
The RSS feed page for the blog appears.
3. Click Subscribe to this feed in the yellow box at the top of the page.
A dialog box appears, asking for specifics for the blog feed.
4. Enter the name of the feed in the Name text box and click the Create in list arrow to specify where you want to save the feed.
5. Click Subscribe.
A confirmation screen appears, verifying that you are subscribed to the blog.
Tips
If you have Outlook 2007 or 2010 on your computer, you also receive e-mail updates when a new blog entry is posted. Look under RSS Feeds in the Mail Navigation Pane for the name of the blog. Blog updates appear as unread mail.
Figure 5-14: The RSS feed screen for a blog.
Working with Blogs, Wikis, and Workspaces

County of Berks 81
Creating a Document Workspace A document workspace is a collection of tools and resources that allows team members to collaborate on the creation of a document. If you have permission to create new sites, you can create a document workspace in SharePoint.
1. Click the Site Actions button and select New Site.
The Create dialog box appears.
2. Click Document Workspace.
Information about the document workspace appears on the right side of the dialog box.
3. Click the Title text box and enter a title for the workspace.
4. Click the URL name text box and enter the URL for the document workspace.
Users can navigate to this URL to access the site directly. Also, follow the naming convention for Web sites: do not include spaces, caps, or extraneous symbols.
5. (Optional) Click the More Options button.
6. (Optional) Click the Description text box and enter a description for the document workspace.
7. (Optional) Choose the permissions you want to assign to the document workspace.
Select who can access the document workspace:
Use unique permissions: This option lets you choose who can access the document workspace and what level of access each individual is assigned.
Use same permissions as parent site: This is the default option. Use this if you want all the same people to access this site as they do the parent site, or the site under which the document workspace is being created.
If you choose this option, permissions can only be changed along with the permissions of the parent site.
Exercise
• Exercise File: None required.
• Exercise: Create a document workspace called “Weekend Specials”.
Figure 5-15: Creating a new document workspace.
Figure 5-16: More options for creating a document workspace.
Working with Blogs, Wikis, and Workspaces

82 © 2011 CustomGuide, Inc.
8. (Optional) Under the Navigation heading, choose if you want to display the document workspace in the Quick Launch bar.
Select one of these options:
Yes: The document workspace will be displayed in the Quick Launch bar.
No: The document workspace will not be displayed in the Quick Launch bar, and users will have to find the site by alternate navigation methods. This is selected by default.
9. (Optional) Under the Navigation heading, choose whether to display this site on the top link bar of the parent site.
There are two options here:
Yes: The document workspace will be displayed in the top link bar. This is selected by default.
No: The document workspace will not be displayed in the top link bar, and users will have to find the library through alternate navigation methods.
10. Choose how the top link bar will look in the Navigation Inheritance section.
This determines how the site will look for members:
Yes: The top link bar that is displayed in the document workspace site is the same as the top link bar that appears in the parent site. This is the easiest choice for navigation.
No: Only the tab for the document workspace and any its subsites will appear in the Link bar.
11. Click Create.
The document workspace is created. If you chose to have unique permissions, a screen appears to set the permissions of the workspace.
The table to the right, Document Workspace Components, lists all the components unique to a document workspace.
Other Ways to Create a Document Workspace: Point to the document that is currently in a document library. Click the list arrow and select Send To Create Document Workspace from the list. Click OK. Creating a workspace using this method inherits default settings, such as name and URL, permissions, and navigation settings.
Figure 5-17: The Home page for a new document workspace site.
Table 5-1: Document Workspace Components
Document Library
Just like any other document library, this is where documents in the workspace are stored. The Shared Documents area on the Home page of the workspace is linked to this library, which is created by default. You may add document libraries as necessary.
Task List Make a list of tasks required to complete the document and assign them to members of the workspace. Members can also update the status and progress of tasks so other members are aware of the project status.
Links Make outside and additional resources quickly accessible by adding them as links on the Home page of the workspace.
Members Specify who may access the workspace here.
Announcements Communicate information about the project to other members of the workspace.
Working with Blogs, Wikis, and Workspaces

County of Berks 83
Creating a Meeting Workspace A meeting workspace makes all the information needed for a meeting available in one location, such as documents, tasks, and the meeting agenda. Meeting attendees find the necessary information in one place, instead of searching multiple lists and libraries.
1. Open the site where you want to add the meeting workspace.
A meeting workspace will appear as a subsite of the current site.
2. Click the Site Actions button and select New Site.
The Create dialog box appears.
3. Select the meeting workspace template which you would like to create.
There are five meeting workspace templates from which to choose. See the table on the next page, Meeting Workspace Templates, for more information about these templates.
4. Click the Title text box and enter a title for the meeting workspace.
The title should be short and easy to identify.
5. Click the URL name text box and enter the URL name you want to use for the meeting workspace.
Users can navigate to this URL to access the site directly.
6. (Optional) Click the More Options button.
Additional settings for the meeting workspace appear.
7. (Optional) Click the Description text box and enter a description for the document workspace.
This description can explain what kinds of documents and information should be uploaded into the meeting workspace.
Exercise
• Exercise File: None required.
• Exercise: Create a meeting workspace called “Conference Call”.
Figure 5-18: Choose which template you want to use in the Create dialog box.
Figure 5-19: Click More Options to select additional settings.
Working with Blogs, Wikis, and Workspaces

84 © 2011 CustomGuide, Inc.
8. (Optional) Choose the permissions you want to assign to the site.
Select who can access the meeting workspace:
Use unique permissions: This option lets you choose who can access the meeting workspace and what level of access each individual is assigned.
Use same permissions as parent site: This is the default option. Use this if you want all the same people to access this site as they do the parent site, or the site under which the meeting workspace is being created.
If you choose this option, permissions can only be changed along with the permissions of the parent site.
9. (Optional) Under the Navigation heading, choose if you want to display the library in the Quick Launch bar.
Select one of these options:
Yes: The meeting workspace will be displayed in the Quick Launch bar.
No: The meeting workspace will not be displayed in the Quick Launch bar, and users will have to find the site by alternate navigation methods. This is selected by default.
10. (Optional) Under the Navigation heading, choose whether to display this site on the top link bar of the parent site.
There are two options here:
Yes: The meeting workspace will be displayed in the top link bar. This is selected by default.
No: The meeting workspace will not be displayed in the top link bar, and users will have to find the site through alternate navigation methods.
11. Choose how the top link bar will look in the Navigation Inheritance section.
Yes: The top link bar that is displayed in the meeting workspace site is the same as the top link bar that appears in the parent site. This is the easiest choice for navigation.
No: Only the tab for the document workspace and any its subsites will appear in the top link bar.
12. Click Create.
The meeting workspace appears.
Table 5-2: Meeting Workspace Templates
Basic Meeting Workspace
This can be used for a majority of meeting workspace sites. It is geared for planning, organizing, and summarizing a meeting. Includes lists for the agenda, meeting attendees, and documents.
Blank Meeting Workspace
This is a blank slate that you can customize to include all the elements you need to plan and organize the meeting.
Decision Meeting Workspace
This focuses on meetings that track status or make decisions. Includes lists for tasks and documents, as well as lists that store decisions that have been made in the meeting.
Social Meeting Workspace
Plan social occasions in one location rather than through e-mail after e-mail. Includes a discussion board and lists for attendees, an area to store pictures, a list of things to bring, and a set of directions to the meeting location.
Multipage Meeting Workspace
This is just like the Basic Meeting Workspace template, with two blank pages for customization included.
Figure 5-20: Creating a new meeting workspace.
Working with Blogs, Wikis, and Workspaces
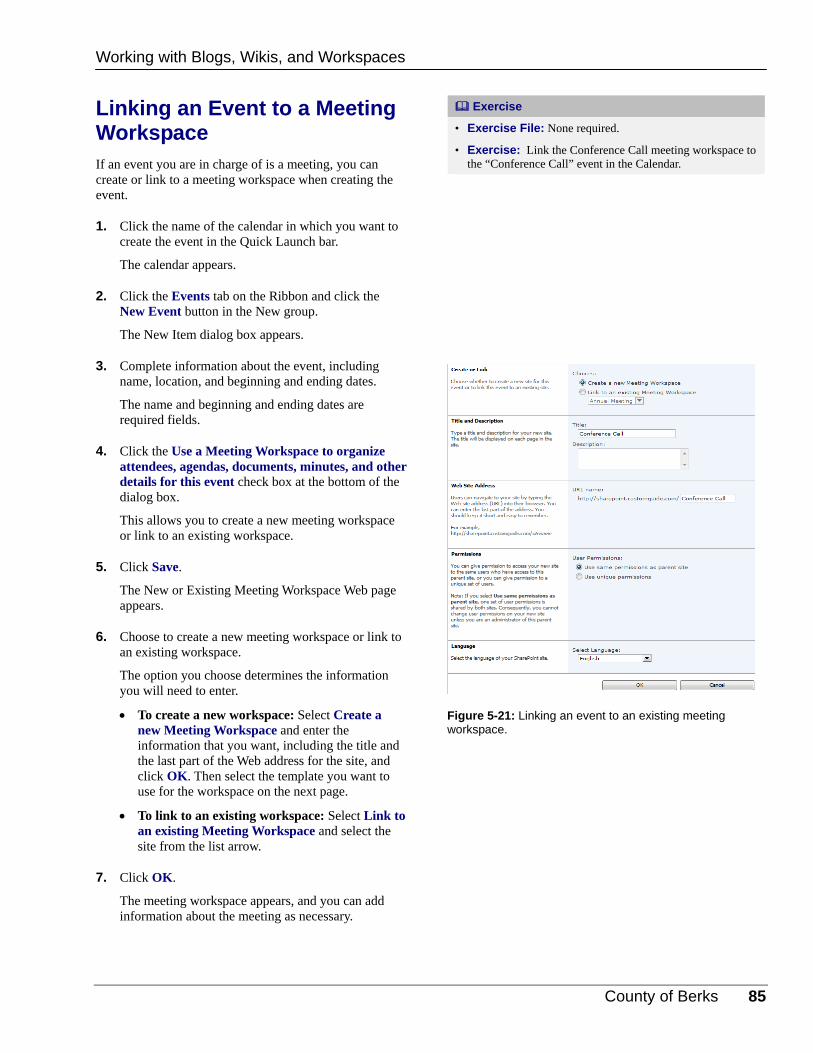
County of Berks 85
Linking an Event to a Meeting Workspace If an event you are in charge of is a meeting, you can create or link to a meeting workspace when creating the event.
1. Click the name of the calendar in which you want to create the event in the Quick Launch bar.
The calendar appears.
2. Click the Events tab on the Ribbon and click the New Event button in the New group.
The New Item dialog box appears.
3. Complete information about the event, including name, location, and beginning and ending dates.
The name and beginning and ending dates are required fields.
4. Click the Use a Meeting Workspace to organize attendees, agendas, documents, minutes, and other details for this event check box at the bottom of the dialog box.
This allows you to create a new meeting workspace or link to an existing workspace.
5. Click Save.
The New or Existing Meeting Workspace Web page appears.
6. Choose to create a new meeting workspace or link to an existing workspace.
The option you choose determines the information you will need to enter.
To create a new workspace: Select Create a new Meeting Workspace and enter the information that you want, including the title and the last part of the Web address for the site, and click OK. Then select the template you want to use for the workspace on the next page.
To link to an existing workspace: Select Link to an existing Meeting Workspace and select the site from the list arrow.
7. Click OK.
The meeting workspace appears, and you can add information about the meeting as necessary.
Exercise
• Exercise File: None required.
• Exercise: Link the Conference Call meeting workspace to the “Conference Call” event in the Calendar.
Figure 5-21: Linking an event to an existing meeting workspace.
Working with Blogs, Wikis, and Workspaces

86 © 2011 CustomGuide, Inc.
WWoorrkkiinngg wwiitthh BBllooggss,, WWiikkiiss,, aanndd WWoorrkkssppaacceess RReevviieeww
Quiz Questions
37. Where does ‘wiki’ come from? A. Wiki comes from the Hawaiian word ‘wikiwiki,’ which means ‘quick.’ B. Wiki is an acronym for the phrase, Working for Insight, Knowledge and Intelligence. C. Wiki is a Polynesian word for ‘light’. D. Wiki is short for ‘wireless kiack,’ an Internet add-on for laptops.
38. Wikis are a collaborative information gathering tool that can be used to create: A. An online encyclopedia B. A resource for new employees C. A forum for brainstorming D. All of these.
39. Which of these best defines a blog? A. A blog is a collaborative way to create an online encyclopedia. B. A blog is a social networking tool. C. A blog is a collection of entries created by an individual to share information with others in an informal style. D. A blog is a place to store documents in SharePoint.
40. If a blog post doesn’t immediately appear in a blog, it may be waiting for approval. (True or False?)
41. Blog posts are listed chronologically, meaning the most recent posts appear at the bottom of the page. (True or False?)
42. A document workspace is: A. A list for storing documents on a site. B. A forum for brainstorming ideas for a document. C. An online application for creating new documents. D. A site that allows colleagues to work together on a document.
43. A meeting workspace is a place to store the information and materials meeting attendees need. (True or False?)
44. If you are creating an event, you cannot link it to a meeting workspace. (True or False?)
Quiz Answers 37. A. Wiki comes from the Hawaiian word ‘wikiwiki,’ which means ‘quick.’

County of Berks 87
38. D. Wikis can be used to create: an online encyclopedia; a resource for new employees; and as a forum for brainstorming ideas.
39. C. A blog is a collection of entries created by an individual to share information with others in an informal style.
40. True. If a blog entry doesn’t appear on the blog, it may be waiting for approval by someone with proper rights.
41. False. Blog posts are listed reverse chronologically, meaning the most recent posts appear at the top of the page.
42. D. A document workspace is a site that allows colleagues to work together on a document.
43. True. A meeting workspace makes everything meeting attendees need available in one place.
44. False. You can link an event to a meeting workspace.

88 © 2011 CustomGuide, Inc.
UUssiinngg SShhaarreePPooiinntt wwiitthh OOffffiiccee
Synchronizing Lists and Libraries with Outlook ............................................................................. 89
Synchronize lists with Outlook ................. 89 Copy events, tasks, and contacts between Outlook and SharePoint lists ................... 89 Synchronize document libraries with Outlook .................................................... 90
Creating a Meeting Workspace from Outlook. 91
Saving a File to a SharePoint Library .............. 93
Export Lists and Libraries to Excel ................. 94
Microsoft Office SharePoint Server 2010 is equipped with tools that make it a perfect complement to other programs in the Office 2010 suite. For example, its integration with Word makes it easy for multiple people to share and edit a document; synchronization with Outlook makes it easy to share events and contacts.
66

County of Berks 89
Synchronizing Lists and Libraries with Outlook You don’t always have to log in to a SharePoint site to check on the status of a list or library. Instead, connect the list or library to Outlook.
Synchronize lists with Outlook
1. In SharePoint, open the list you want to synchronize with Outlook.
Calendars, task lists, and contacts lists are probably the most common types of lists to synchronize.
2. Click the List tab on the Ribbon and click the Connect to Outlook button in the Connect & Export group.
A Microsoft Outlook dialog box appears, asking to verify that you want to connect the list to Outlook.
Trap: If you are synchronizing a calendar with Outlook, click the Calendar tab on the Ribbon and click the Connect to Outlook button in the Connect & Export group.
Tip: Depending on your security settings, additional dialog boxes may appear to allow SharePoint access to Outlook.
3. Click Yes.
The connection takes a few moments to establish. When the connection is made, the SharePoint list appears in Outlook. Any changes made to the list are synchronized.
Tip: Notice that the SharePoint list appears as a new list in the Navigation Pane of Outlook. You can switch back and forth between your default Outlook and SharePoint lists by selecting the list you want to view in the Outlook Navigation Pane.
Copy events, tasks, and contacts between Outlook and SharePoint lists
You can copy items between connected SharePoint lists and Outlook. Both SharePoint and Outlook are updated accordingly.
1. In Outlook, open the list from which you want to copy an item.
The list can be either a list that’s been connected to a SharePoint site or a list created in Outlook.
Exercise
• Exercise File: Calendar, New Hires Start event
• Exercise: Synchronize the SharePoint Calendar with Outlook.
Copy the “New Hires Start” event from the SharePoint calendar into the Outlook calendar.
Figure 6-1: The Microsoft Outlook dialog box.
Figure 6-2: When synchronized, the list appears in Outlook. In this example, the SharePoint calendar appears to the right of the Outlook calendar.
Using SharePoint with Office

90 © 2011 CustomGuide, Inc.
2. Click and drag the item from the list to the name of the list you want to copy the item to in the Navigation Pane.
Tip: When copying events, you can view both calendars at once so that events are copied to the correct dates. Click Calendar in the Navigation Pane. In the Navigation Pane, click the check box next to the two calendars you want to view – the SharePoint calendar and your calendar. When both calendars are displayed, click and drag events from one calendar to the other.
Synchronize document libraries with Outlook
You can also access documents in a SharePoint document library through Outlook. When a document library is synchronized, its documents are available in Outlook. Changes to documents in SharePoint are also updated in Outlook, as long as Outlook is online.
1. In SharePoint, open the document library you want to synchronize with Outlook.
2. Click the Library tab on the Ribbon and click the Connect to Outlook button in the Connect & Export group.
A Microsoft Outlook dialog box appears, asking to verify that you want to connect the document library to Outlook.
Tip: Depending on your security settings, additional dialog boxes may appear to allow SharePoint access to Outlook.
3. Click Yes.
The connection takes a few moments to establish. When the connection is made, the document library appears in Outlook.
4. Expand the SharePoint Lists folder and select the document library.
The documents saved in the library appear. The documents are synchronized with SharePoint with Send/Receive.
Figure 6-3: The Microsoft Outlook dialog box.
Using SharePoint with Office

County of Berks 91
Creating a Meeting Workspace from Outlook Creating a meeting workspace with a meeting request in Outlook is a great way to plan a meeting. The meeting request lets attendees add the meeting to their Outlook calendars, while also providing a link to the SharePoint meeting workspace site where all the documents and information needed for the meeting are saved.
1. Open Outlook and click Calendar in the Navigation Pane.
The Outlook Calendar appears.
2. Click the Home tab on the Ribbon and click the New Meeting button in the New group.
The new meeting request window appears.
Other Ways to Create a New Meeting Request: Press <Ctrl> + <Shift> + <Q>.
3. Enter meeting information in the meeting request window.
The attendees should appear in the To text box, and other meeting details such as subject, location, and start and end time should be included in the meeting request.
4. Click the Meeting Workspace button on the Quick Access Toolbar.
The Meeting Workspace task pane appears. Now enter information about the meeting workspace.
Trap: You may need to add the Meeting Workspace button to the Quick Access Toolbar or to the Ribbon. Click the File tab on the Ribbon and select Options. Click the Customize Ribbon or Quick Access Toolbar tabs. Follow the steps to add the button to either the Ribbon or the Quick Access Toolbar.
Exercise
• Exercise File: None required.
• Exercise: Create a meeting workspace called “Development Meeting”.
Figure 6-4: New meeting request window. The Meeting Workspace task pane appears when the Meeting Workspace button is clicked.
Using SharePoint with Office
Meeting Workspace button
Meeting Workspace task pane

92 © 2011 CustomGuide, Inc.
5. Enter meeting workspace settings into the Meeting Workspace task pane.
You may have to work differently with the settings, depending on how you are setting up the workspace:
To set up a new workspace: If this is the first time you are linking a meeting request to a meeting workspace, you need to create a meeting workspace. Click the Create button in the Meeting Workspace task pane. Enter the location where the workspace will be created in the Select a location text box: click the list arrow and select Other from the list. Enter the URL where you want to add the workspace. Then select the template language and type under the Select a workspace section. Click OK.
To use previous settings: The settings used previously— location on the SharePoint site and the template to be used— automatically appear in the task pane. To use these settings, click the Create button. To use different settings, click the Change settings link and choose the options you want to use to create the workspace. Click OK when you are finished.
Link to an existing workspace: You can also link a meeting request to a meeting workspace that already exists. Click the You can also link to an existing workspace link. Click the Select the workspace list arrow and select a meeting workspace from the list. Click OK, and then click Link to link the meeting request to the workspace.
After a few moments, the meeting workspace is created.
Tip: Click the Go to workspace link in the Meeting Workspace task pane to view the workspace.
6. Click Link or Create.
The meeting request message is also updated with a link and information about the meeting workspace.
7. Complete the meeting request and click Send.
The meeting request is sent to meeting attendees, with information about the meeting workspace attached to the meeting.
Figure 6-5: The Meeting Workspace link added to the Outlook meeting request.
Figure 6-6: The meeting workspace created in SharePoint.
Using SharePoint with Office

County of Berks 93
Saving a File to a SharePoint Library If you are working in an Office program, such as Excel or Word, it's easy to save files to a SharePoint library. In fact, you can upload the file directly from the program in which you are working.
1. Open the file you want to save to SharePoint.
You can save your document to SharePoint at any point during your editing.
2. Click the File tab on the Ribbon and select Save & Send.
Options for saving the file appear.
3. Under Save & Send, click Save to SharePoint.
Available SharePoint libraries are displayed.
Tip: If you do not see the library to which you want to save the file, click Browse for a location.
4. Select the SharePoint library to which you want to save the file and click Save As.
The Save As dialog box appears.
Tip: If this is the first time you are saving a file to a SharePoint library, the Windows Security dialog box appears. You need to enter your SharePoint user name and password before you can save the file to the SharePoint library.
5. Enter the name of the file in the File name text box and click Save.
The file is uploaded to SharePoint.
Exercise
• Exercise File: Management.docx
• Exercise: Create a document called "Management Agenda".
Upload "Management Agenda" document to the Shared Documents library.
Figure 6-7: Saving a document to a SharePoint library in Word.
Using SharePoint with Office
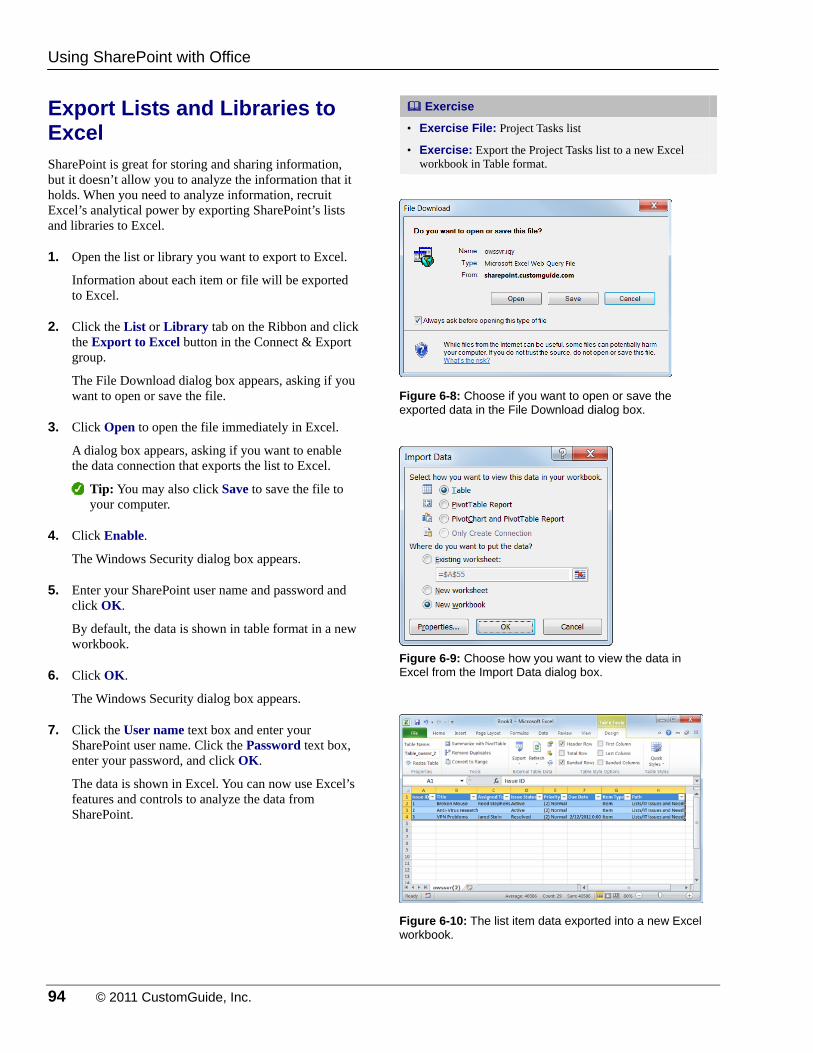
94 © 2011 CustomGuide, Inc.
Export Lists and Libraries to Excel SharePoint is great for storing and sharing information, but it doesn’t allow you to analyze the information that it holds. When you need to analyze information, recruit Excel’s analytical power by exporting SharePoint’s lists and libraries to Excel.
1. Open the list or library you want to export to Excel.
Information about each item or file will be exported to Excel.
2. Click the List or Library tab on the Ribbon and click the Export to Excel button in the Connect & Export group.
The File Download dialog box appears, asking if you want to open or save the file.
3. Click Open to open the file immediately in Excel.
A dialog box appears, asking if you want to enable the data connection that exports the list to Excel.
Tip: You may also click Save to save the file to your computer.
4. Click Enable.
The Windows Security dialog box appears.
5. Enter your SharePoint user name and password and click OK.
By default, the data is shown in table format in a new workbook.
6. Click OK.
The Windows Security dialog box appears.
7. Click the User name text box and enter your SharePoint user name. Click the Password text box, enter your password, and click OK.
The data is shown in Excel. You can now use Excel’s features and controls to analyze the data from SharePoint.
Exercise
• Exercise File: Project Tasks list
• Exercise: Export the Project Tasks list to a new Excel workbook in Table format.
Figure 6-8: Choose if you want to open or save the exported data in the File Download dialog box.
Figure 6-9: Choose how you want to view the data in Excel from the Import Data dialog box.
Figure 6-10: The list item data exported into a new Excel workbook.
Using SharePoint with Office

County of Berks 95
UUssiinngg SShhaarreePPooiinntt wwiitthh OOffffiiccee RReevviieeww
Quiz Questions
45. Changes to list items and documents that are made from Outlook are not updated in SharePoint lists and libraries. (True or False?)
46. Which of the following is true? A. Create a new meeting workspace by entering the SharePoint URL where the workspace will be created, and choosing language and template settings. B. Link an existing meeting workspace to an Outlook meeting request. C. Use the previous settings to create a new meeting workspace. D. All of the above.
47. You cannot save a file to a SharePoint library without visiting the SharePoint site. (True or False?)
48. What kind of list information is exported to Excel? A. Content from items in the list. B. Data about each item in the list. C. You can only export data to Access databases, not Excel. D. Settings used for the list.
Quiz Answers 45. False. Changes that are made to items and documents from lists and libraries in Outlook are updated in SharePoint.
The updates happen with the Send/Receive command in Outlook.
46. D. All of these are ways to work with meeting workspaces in Outlook meeting requests.
47. False. You can upload a file to a SharePoint site from the program window.
48. B. When you export a list to Excel, you can analyze data from each item in the list.

96 © 2011 CustomGuide, Inc.
MMaannaaggiinngg SSiitteess Working with Site Settings ............................... 97
Customizing Site Appearance and Navigation99 Customize a site theme ........................... 99 Customize site navigation ........................ 99
Adding a User to a Group ............................... 103
Working with Groups ...................................... 101 Create a new group ............................... 101 Change group settings........................... 101 Delete a group ....................................... 102
Working with Web Parts .................................. 105 Edit a page ............................................. 105 Add Web Parts to pages ........................ 106
Sites settings can be customized and changed once they are created. This chapter covers some common site settings, such as site appearance.
It also covers more advanced settings, such as assigning permissions to site users and using Web Parts.
Note: Only Site Owners (Full Control permissions) can make the site changes discussed in these lessons.
77

County of Berks 97
Working with Site Settings Each site can be customized and changed after it is created. Whether you need to change who can access the site, how the site looks, or what colors appear on the site, all of these options can be found under Site Settings. You can even delete a site if necessary.
1. Click the Site Actions menu and select Site Settings.
The Site Settings page appears.
2. Click the setting you wish to change.
A form appears in which you can change the setting options.
3. Change the setting options as necessary.
Refer to the table below, Site Settings, for more information about each setting.
4. Click OK.
The site changes to reflect the new site settings.
Table 7-1: Site Settings
Users and Permissions
People and groups This setting controls who can access the site. Add and remove users from the groups available in the site. There are three default groups: Site Owners (full control permissions: users can approve content; add and remove items, lists, and subsites; customize pages and sites and more); Site Members (contribute permissions: users can view, add, update and delete list and library items); and Site Visitors (read permissions: users can view items but they cannot make any changes to the site).
Site permissions Control the permission levels granted to groups and create new groups.
Look and Feel
Title, description, and icon Change the title for the Web site. The title appears in the site tab on the top link bar and in breadcrumb navigation. Add a description to appear at the top of the site page. Change the default logo to one of your choosing. Change the URL used to navigate to the site.
Quick Launch Manage list and library links and headings that appear in the Quick Launch bar.
Top link bar Manage links to site pages that appear in the top link bar.
Tree view Control the left panel of the site: choose if you want to enable the Quick Launch and/or Tree view for the site.
Site theme Change the colors and fonts used to display the site content. Subsites and individually themed pages are not affected by the site theme.
Galleries
Site columns Manage or create the columns that are available in lists in the site.
Site content types Control the content types for the site and subsites. Content types include types of items available in lists and document content types.
Web parts A place to store and retrieve Web Parts.
Exercise
• Exercise File: None required.
• Exercise: Understand how site settings can be used to control a site in SharePoint.
Figure 7-1: The Site Settings page.
Managing Sites

98 © 2011 CustomGuide, Inc.
Table 7-1: Site Settings
List templates Add a template to this gallery to use it when creating a list.
Master pages Upload and store master pages here. Master pages are used as templates for sites and pages.
Themes Manage or create site themes.
Solutions Control and manage user-generated content, such as user-generated site templates.
Site Actions
Manage site features Control which features are available on a site.
Save site as template Use the design of the current team site home page to create a template. This template can then be used to create new Web sites.
Site Web Analytics reports View who is accessing the site and how the site is being used. (The site administrator must enable services to make this feature available.)
Reset to site definition This feature wipes the slate clean for a page or an entire site. Any changes you have made to the page (added text, modified Web Parts, etc.) are removed, so the page or site appears as it did when it was first created. This action cannot be undone, and there are no backup copies.
Delete this site Use this setting to delete the site and its subsites. This action cannot be undone, and the site is not saved in the Recycle Bin.
Site Administration
Regional settings Specify site settings so they are consistent with your region, such as location, time zone, and time format.
Language settings Specify the default language as well as any alternate languages the site should support.
Site libraries and lists Customize the design of lists, libraries, discussion boards, and surveys on the site.
User alerts Manage the alerts for users on the site. Users can manage their own sites, but site owners can also manage the alerts for all users in the site with this setting.
RSS Enable or disable RSS feeds for the site.
Search and offline availability
Choose whether the site should appear in search results. (Users without permission to view the site won’t be able to view the site either way.) Also specify if offline users should be able to download items from the site.
Sites and workspaces Displays the subsites and workspaces the current user can access for the site. New sites can also be created from this setting.
Workflow Settings Create and manage any workflows for the site. Also edit workflow settings for the site.
Managing Sites

County of Berks 99
Customizing Site Appearance and Navigation As a site owner, you can control the way a site looks (its colors and themes) and how it feels (how people navigate in the site).
Tips
You need the correct permissions to change these items in a site. You need to need to be either a member of the Site Owner group (with Full Control permission level) or part of a group with the Design permission level.
Customize site theme
Make your site stand out from others by applying a different site theme. A site theme determines the colors and fonts used throughout the site. You can do this to match the mood or attitude of your team to your team’s site, or to match your company’s or site’s logo.
1. Click the Site Actions menu and select Site Settings from the list.
The Site Settings page appears.
2. Click the Site theme link under the Look and Feel column.
A preview of the current site theme is displayed next to a list of other themes that can be used.
3. Select a site theme from the list.
A preview of the colors and fonts that will be used on the site appears.
4. Click Apply to apply the theme to the site.
The theme is applied to the site. Its subsites are not changed.
Customize site navigation
You can control the site navigation by customizing the top link bar and the Quick Launch bar.
1. Click the Site Actions menu and select Site Settings from the list.
The Site Settings page appears.
2. Click the Top link bar or Quick launch link under the Look and Feel column.
The Quick Launch or Top Link Bar page appears, depending on what you selected.
Exercise
• Exercise File: A SharePoint site.
• Exercise: Change the site theme to Classic.
Figure 7-2: Changing the site theme.
Managing Sites
A preview of how the selected theme will appear on the site
Click Apply to apply the selected theme

100 © 2011 CustomGuide, Inc.
3. Select the option(s) you want to use to control navigation and click OK.
The table below, Navigation Settings, explains the options available on both of these settings pages.
Table 7-2: Navigation Settings
Quick launch
New Navigation Link
Click this setting to add a link to a page on the Quick Launch. Enter the Web address of the page and the text that will appear for the link name. Also choose the heading you want the link to appear under.
New Heading Add a new heading in the Quick Launch. Include the Web address and text you want to appear in the heading.
Change Order Change the order of headings and links underneath each heading in the Quick Launch.
Top link bar
New Navigation Link
Click this setting to add a tab with a link to a page or site on the top link bar. Enter the Web address of the page and the text that will appear in the tab for the link.
Change Order Use this setting to change the order in which links on the top link bar appear.
Figure 7-3: Changing navigation settings for the Quick Launch.
Managing Sites

County of Berks 101
Working with Groups In most cases, the three default groups that are created with a site—Owners, Members, and Visitors—are all that are needed for managing the users that have access to the site. But you can also create new groups and change the settings for existing groups. This lesson discusses some of the most common ways to work with site groups.
Create a new group
Site owners can add new groups for managing users on a site.
1. Click the Site Actions menu and select Site Settings.
The Site Settings page appears.
2. Click People and groups under the Users and Permissions column.
The default security group appears.
3. Click Groups in the Quick Launch bar.
A list of all site groups appears.
4. Click the New button list arrow on the taskbar and select New Group.
The Create Group page appears.
5. Enter the group settings.
See the table to the right, Group Settings, for more information about the settings available on this page.
6. Click Create.
The group is created with the selected settings.
Change group settings
You can change the settings for an existing group.
1. Click the Site Actions button and select Site Settings.
The Site Settings page appears.
2. Click People and groups under the Users and Permissions column.
The site groups are listed in the Quick Launch bar.
Exercise
• Exercise File: None required.
• Exercise: Create a new site group called “Manager” with the Design permission level.
Figure 7-4: The Create Group page.
Table 7-3: Group Settings
Name and About Me Description
This information identifies the group.
Owner Designate the group or user that can change the group, such as by adding users or deleting the group. The owner can either be an entire group or a single user.
Group Settings
Choose who can view members of the group (Group Members or Everyone) and who has permission to add or remove members from the group (Group Owners or Group Members).
Membership Requests
Choose whether you want to allow users to request to join or leave the group. If requests are accepted, choose how to handle requests.
Managing Sites

102 © 2011 CustomGuide, Inc.
3. Click the name of the group you want to change in the Quick Launch bar.
The users that have been added to the group are listed.
Tip: Click the More link under Groups in the Quick Launch bar to view a list of all groups.
4. Click the Settings button list arrow on the taskbar and select Group Settings from the list.
The Change Group Settings page appears.
Trap: You can only change settings of groups that list you as the owner.
5. Change the group settings as necessary.
See the table on the previous page, Group Settings, for more information about the group settings available.
6. Click OK.
The changes are applied to the group.
Delete a group
1. Click the Site Actions button and select Site Settings.
The Site Settings page appears.
2. Click People and groups under the Users and Permissions column.
The default security group appears.
3. Click Groups on the Quick Launch bar.
A list of all site groups appears.
4. Click the Edit button next to the group which you want to delete.
The Change Group Settings page appears.
5. Click the Delete button.
A dialog box appears, confirming that you want to delete the group.
6. Click OK.
The group is deleted.
Figure 7-5: The Change Group Settings page.
Managing Sites
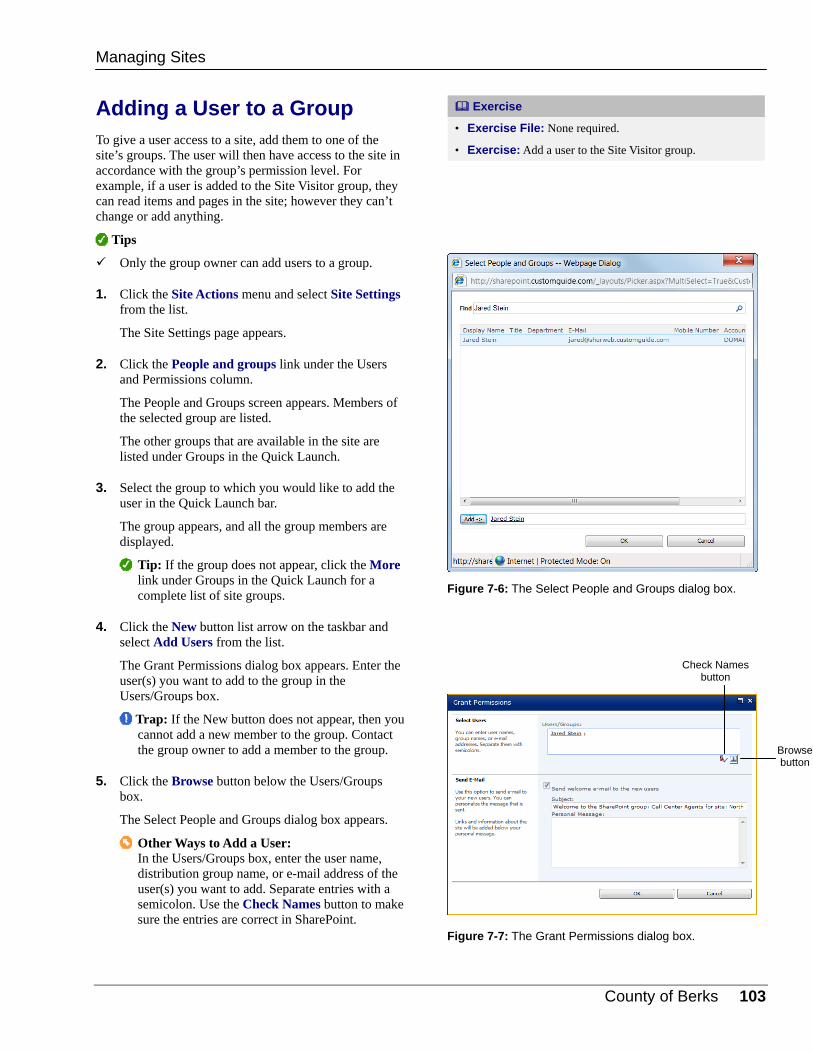
County of Berks 103
Adding a User to a Group To give a user access to a site, add them to one of the site’s groups. The user will then have access to the site in accordance with the group’s permission level. For example, if a user is added to the Site Visitor group, they can read items and pages in the site; however they can’t change or add anything.
Tips
Only the group owner can add users to a group.
1. Click the Site Actions menu and select Site Settings from the list.
The Site Settings page appears.
2. Click the People and groups link under the Users and Permissions column.
The People and Groups screen appears. Members of the selected group are listed.
The other groups that are available in the site are listed under Groups in the Quick Launch.
3. Select the group to which you would like to add the user in the Quick Launch bar.
The group appears, and all the group members are displayed.
Tip: If the group does not appear, click the More link under Groups in the Quick Launch for a complete list of site groups.
4. Click the New button list arrow on the taskbar and select Add Users from the list.
The Grant Permissions dialog box appears. Enter the user(s) you want to add to the group in the Users/Groups box.
Trap: If the New button does not appear, then you cannot add a new member to the group. Contact the group owner to add a member to the group.
5. Click the Browse button below the Users/Groups box.
The Select People and Groups dialog box appears.
Other Ways to Add a User: In the Users/Groups box, enter the user name, distribution group name, or e-mail address of the user(s) you want to add. Separate entries with a semicolon. Use the Check Names button to make sure the entries are correct in SharePoint.
Exercise
• Exercise File: None required.
• Exercise: Add a user to the Site Visitor group.
Figure 7-6: The Select People and Groups dialog box.
Figure 7-7: The Grant Permissions dialog box.
Managing Sites
Check Names button
Browse button

104 © 2011 CustomGuide, Inc.
6. Enter the user’s name in the Find text box and press <Enter>.
Users that match the name appear in the dialog box.
7. Select the user to add to the list and click Add.
You can add as many users as necessary.
8. Click OK when you are finished adding users.
The user(s) appear in the Users/Groups box of the Grant Permissions dialog box.
9. Verify the Send E-Mail settings to the user(s).
SharePoint will send a welcome e-mail to the users, including links to the site and other information. Uncheck this option if you do not want the users to receive the e-mail.
10. Click OK.
The users are added to the group.
Tips
Adding users to groups is recommended because the groups can give users in the group access to other sites.
To remove a user from a group, view the group and click the check box next to the user’s name. Click the Actions button list arrow on the taskbar and select Remove Users from a Group from the list.
Figure 7-8: The users included in the Call Center Agents group.
Managing Sites

County of Berks 105
Working with Web Parts Web Parts are an easy way to customize and work with pages in SharePoint. Web Parts are like built-in pieces of SharePoint pages that you can piece together to make a SharePoint page. You can create pages from Web Parts and change how Web Parts work in an existing page.
Edit a page
Site owners can change how pages look by modifying and editing the Web Parts that make up the page.
1. Open the page you want to change.
2. Click the Site Actions menu and select Edit Page from the list.
The page appears in Edit mode. Any Web Parts that are used in the page are visible here.
Other Ways to Edit a Page: Click the Page tab on the Ribbon and click the Edit button in the Edit group.
3. Click the check box next to the Web Part you want to edit.
The Web Part is selected.
4. Click the Options tab on the Ribbon under Web Part Tools and click the Web Part Properties button in the Properties group.
A task pane appears along the right side of the page with options for modifying the Web Part. The options that are available in the task pane change depending on the Web Part being edited.
5. Change the Web Part settings as necessary and click OK.
The task pane closes, and the changes are previewed in Edit mode.
6. When you are finished editing the page, click the Page tab on the Ribbon and click the Save & Close button in the Edit group.
The page is displayed with the changes made to the Web Part.
Exercise
• Exercise File: nst_logo.jpg
• Exercise: Add the Calendar Web Part to the Home page.
Figure 7-9: Modifying a calendar Web Part.
Managing Sites

106 © 2011 CustomGuide, Inc.
Add Web Parts to pages
You can add information to a page by adding more Web Parts. This is most effective in pages that already use Web Parts.
1. Open the page to which you want to add a Web Part.
2. Click the Site Actions menu and select Edit Page from the list.
The page appears in Edit mode.
Other Ways to Edit a Page: Click the Page tab on the Ribbon and click the Edit button in the Edit group.
3. Click the Insert tab on the Ribbon and click the Web Part button in the Web Parts group.
A list of Web Parts appears below the Ribbon. There are several categories of Web Part from which to choose.
4. Select the type of Web Part you want to add under the Categories column.
Now you can select the specific Web Part you want to add.
5. Select the Web Part you want to add to the page under the Web Parts column and click Add.
A preview of the Web Part is added to the page. You can now edit the Web Part to change how it appears, if necessary.
6. When you are finished editing the page, click the Page button on the Ribbon and click the Save & Close button in the Edit group.
The Web Part(s) are added to the page.
Figure 7-10: There are several types of Web Parts from which to choose.
Managing Sites
Select the specific Web Part you want to add
Select the category of Web Part you want to view
Click Add to add the Web Part
County of Berks 107
MMaannaaggiinngg SSiitteess RReevviieeww
Quiz Questions
49. Which of these settings are not available on the Site Settings page? A. Home page logo B. Title, description, and icon C. People and groups D. Delete this site
50. The site theme changes the colors used in the site. (True or False?)
51. What are the three default site groups? A. Managers, Users, Visitors B. Owners, Managers, Guests C. Owners, Members, Visitors D. Administrators, Members, and Guests
52. Who can access a SharePoint site? A. Anyone that is part of the organization’s e-mail system. B. Users that go to the site and register for an account. C. The organization’s managers and stakeholders. D. Users that have been added to the site’s groups.
53. You can change the appearance of a page by modifying its Web Parts. (True or False?)
Quiz Answers 49. A. Home page logo is not a site setting.
50. True. The site theme changes the colors that are used in the site.
51. C. Owners, Members, and Visitors are the three default site groups.
52. D. Users who have been added to a site’s groups have permission to view the site.
53. True. You can change the appearance of a page by modifying its Web Parts.