
mehditest
32
12 Creating Multimedia Presentations Adobe PDF is the perfect format for delivery of multimedia presentations. Whether you use PDF to deliver a presentation, or you distribute it across your entire organization, PDF is the complete solution for delivering interactive content, including movies and sounds.
-
Upload
bile-hashi -
Category
Documents
-
view
213 -
download
1
description
test för att se
Transcript of mehditest

12 Creating Multimedia Presentations
Adobe PDF is the perfect format for delivery of multimedia presentations. Whether you use PDF to deliver a presentation, or you distribute it across your entire organization, PDF is the complete solution for delivering interactive content, including movies and sounds.

382Creating Multimedia PresentationsLESSON 12
In this lesson, you will learn how to do the following:
•Add and embed movies and animations into PDF files.
•Add and embed sounds into PDF documents.
•Control movies and sounds through buttons and page actions.
•Control transitions and timing of presentations using Full Screen mode.
This lesson involves multimedia content that can be shared across multiple computer platforms, and uses several cross-platform formats for the sound and movie files. To view the animated .swf files included in this lesson, your computer needs to have the free Flash player installed; it is available at www.macromedia.com. To view the movie files used in this lesson, your computer needs to have the free QuickTime player installed. This Windows and Macintosh movie player is available at www.apple.com/quicktime.
You may see a Manage Trust for Multimedia Content window displayed at some point during this lesson. This allows you to verify whether you wish to allow multimedia content within a document to play. If this window is displayed, choose the Play multimedia content and add this document to my list of trusted documents option, and then click the Play button.
Getting startedIn this lesson, you’ll work on a multimedia tour of the Freedom Trail, a National Park that consists of a collection of historic locations in Boston, Massachusetts. The tour visits eight locations, and each location has its own separate page to which you will add a multimedia element, such as a sound or movie file. You will control the sounds, movies, and animations using buttons and page actions. You will also add navigational buttons for viewers to use to easily move through the document, as it will be presented in the full screen viewing mode, which hides the menus and palettes.
1 Start Adobe Acrobat 7.0 Professional.
2 To see what the finished file looks like, navigate to the ACR_CIB\Lesson12 folder and open the file Freedom_Trail_end.pdf. Your menu bars will be hidden when you open this file because it includes instructions to open in Full Screen mode. Use the navigational buttons in the document to move through each page. Notice the buttons, sounds, movies, and animations in the document.

ADOBE ACROBAT 7.0 PROFESSIONAL 383Classroom in a Book
3 When you have finished examining the completed PDF file, choose Ctrl+L (Windows) or Command+L (Mac OS) to return to a view that shows all your menus. You can keep this file open for reference while you work on the exercise, or you can close the file by choosing File > Close.
You can also use the Esc key to leave the full screen mode, but this option can be disabled in the Full Screen section of Acrobat’s Preferences.
4 Choose File > Open and choose the file Freedom_Trail_start.pdf in the ACR_CIB\Lesson12 folder.
Adding an interactive animation If the Advanced Editing toolbar is not open, open it now via View > Toolbars > Advanced Editing. You will use this toolbar to add movies, animations, and sounds to your PDF presentation.
1 If necessary, navigate to page 1. Choose the Movie tool ( ) from the Advanced Editing toolbar.

384Creating Multimedia PresentationsLESSON 12
The Movie tool and the Sound tool ( ) share the same position on the Advanced Editing toolbar. If the Sound tool is visible, click the arrow to the right of the Sound tool and choose the Movie tool ( ) from the menu that appears. To see both tools at the same time, choose Expand This Button, which adds both tools to the Advanced Editing toolbar, so they are both visible at the same time.
2 Using the Movie tool, click and drag a rectangle that completely encloses the tan box on the upper left side of the first page. This box has been placed for you to use as a guide. After you release the mouse, the Add Movie window appears.
3 In the Add Movie window, select the Acrobat 6 and Later Compatible Media radio button. Click the Browse button (Windows) or Choose button (Mac OS) and choose the file named opening_animation.swf that is located in the movies folder in the ACR_CIB\Lesson12 folder. Click the Select button.
After selecting the file, choose the following options in the Add Movie Window:
•Deselect Snap to content proportions.
•Select Embed content in document.
•Select Retrieve poster from movie.
Now click OK. The animated movie file appears in the box you created with the Movie tool.

ADOBE ACROBAT 7.0 PROFESSIONAL 385Classroom in a Book
Note: When selecting movies or animations on a Windows computer, it may be necessary to select “Most Common Formats” from the Files of Type drop-down menu. When browsing for the files to input, this allows Acrobat to display most movie and sound formats.
4 If necessary, change the position of the movie file by clicking and holding the mouse on the center of the movie file, and then dragging it to the desired location. To adjust the dimensions of the movie file proportionally, Shift-click the handles in the corner of the movie file and drag toward the center of the movie to reduce the size, or away from the center to enlarge the size.
Always use the Shift key when resizing a movie or animation file to ensure that it remains proportional. Clicking and dragging without the Shift key may cause the movie or animation to become distorted.
5 Choose the Hand tool ( ) from the Basic toolbar and move the cursor over the animated map. The cursor changes to a pointing finger ( ) to indicate that the content is interactive. Click on the center of the Flash animation. The animated map will play. This file also includes audio. If you cannot hear the audio, you may need to adjust the sound controls on your computer.

386Creating Multimedia PresentationsLESSON 12
Note: When clicking on your movie file to play it, a window named Manage Trust for Multimedia Content may appear. If this window appears, select the second option Play the multimedia content and add this document to my list of trusted documents. This behavior is a feature of the Acrobat 7.0 Professional Trust Manager. See “Setting Trust Manager Preferences” in the Complete Acrobat 7.0 Help.
To stop an animated movie file, an action must be created that specifically tells Acrobat to stop the playback. Without an action stopping the playback, the file will continue to play, even after navigating to another page. It is advisable to always create an action that allows a user to stop a movie, animation, or sound file. This is described in Adding an action to stop the animation later in this lesson.
Adding a button1 Choose the Button tool ( ) from the Advanced Editing toolbar. Move your cursor to the upper left corner of the box that is positioned below and to the left of the animated map. Click and drag from the upper left corner of the box to the lower right corner. The Button Properties window opens after you release the mouse.
2 In the Button Properties window, choose the General tab and enter the button name StartIntroduction. The button name is used by Acrobat to identify this button. The name is not visible to users and does not appear on the button itself.
3 Click on the Options tab in the Button Properties window and enter the Label name ofStartIntroduction. The label name appears on the face of the button and is the text that is visible to the viewer.
4 Click the Actions tab in the Button Properties window. For the Select Trigger option, keep the default selection of Mouse Up. This indicates that when the mouse is clicked and released, the action will occur. For the Select Action option, choose Play Media (Acrobat 6 and Later Compatible) and then click the Add button. The Play Media (Acrobat 6 and Later Compatible) window will open.

ADOBE ACROBAT 7.0 PROFESSIONAL 387Classroom in a Book
5 In the Play Media (Acrobat 6 and Later Compatible) window, leave the Operation to Perform option set to Play. In the Associated Annotation section of the window, choose Annotation from opening_animation.swf, which is listed under Page 1. Click OK in the Play Media (Acrobat 6 and Later Compatible) window and then click the Close button in the Button Properties window.
6 Choose the Hand tool ( ) and test your button by clicking the Start Introduction button.
Adding an action to stop the animation1 Choose the Button tool ( ). Move your cursor to the upper left corner of the box that is positioned to the right of the Start Introduction button you created in the previous step. Click and drag from the upper left corner of the box to the lower right corner. The Button Properties window opens after you release the mouse. Choose the General tab and name the button StopIntroduction. For Tooltip, enter Clicktostopmovie. The tooltip appears when a user positions their cursor over the button.

388Creating Multimedia PresentationsLESSON 12
2 Choose the Options tab in the Button Properties window. In the Label field type the words StopIntroduction.
3 Choose the Actions tab in the Button Properties window, and keep the Select Trigger option as Mouse Up. Choose Play Media (Acrobat 6 and Later Compatible) from the Select Action options and click Add. The Play Media (Acrobat 6 and Later Compatible) window opens.
Even though you are selecting Play Media as the action, this action is also used any time you want to start, stop, pause, resume, or restart a movie, sound, or animation.
4 In the Play Media (Acrobat 6 and Later Compatible) window, choose Stop from the Operation to Perform list and in the Associated Annotation portion of the window, choose Annotation from opening_animation.swf, which is listed under Page 1. Click OK and then click the Close button in the Button Properties Window.

ADOBE ACROBAT 7.0 PROFESSIONAL 389Classroom in a Book
5 Choose the Hand tool ( ) and click the Start Introduction button. After the animation starts to play, click the Stop Introduction button to stop the animation. In this exercise you have used the Stop and Start actions. Acrobat 7.0 Professional also includes actions for pausing and resuming the play of sounds and movies.
If the Stop or Start Introduction buttons do not provide the desired results, you can edit their actions by choosing the Button tool ( ) and double-clicking either button and choosing the Actions tab, then selecting the action to be changed and clicking the Edit button. You may need to edit the action if the Stop Introduction button does not actually stop the media from playing. Because the default Play Media action is to play rather than stop a media element, you may accidentally set the Stop Introduction action to Play rather than Stop.
Adding a Show/hide fieldForm fields, such as buttons, can be set to appear only when they are needed. For example, you can have a form field that only appears if a certain checkbox or button is selected, or when the mouse is in a certain location. In this exercise, you will use two overlapping images that have been placed in the PDF as buttons. One of the two images appears when you click a button, and disappears when you click a second button.
1 Navigate to page two. Select the Zoom In tool ( ). Click and drag a box around both the map, and the buttons below the map, so that both are visible in the document window.

390Creating Multimedia PresentationsLESSON 12
The red circle on the map with the number 1 in its center will be made to appear and disappear based upon which button is selected. You will start by making the circle hidden by default, and then require the viewer to click the Show Location button for the circle to appear.
2 Choose the Button tool ( ) and move the cursor over the map, notice that it is labeled boston common location. Red handles around the corners appear when you move your cursor over this field, indicating that it will be selected if you click. Double-click on the boston common location button field to open the Button Properties window.
3 In the Button Properties window, choose the General tab and select Hidden from the Form Field drop-down menu. Click the Close button.
4 Select the Hand tool ( ). The red circle showing the location of the Boston Common along the trail is now hidden from view.
5 From the Advanced Editing toolbar, choose the Select Object tool ( ). Use this tool to edit all types of form fields, including buttons. Double-click the Show Location button. The Button Properties window appears.
6 In the Button Properties window, choose the Actions tab. For Select Action choose Show/Hide a field. Leave the Select Trigger set to Mouse Up and click the Add button.

ADOBE ACROBAT 7.0 PROFESSIONAL 391Classroom in a Book
7 In the Show/Hide Field window, choose the Show radio button on the right side of the window. From the list of fields, choose boston common location and click OK to close the Show/Hide Field window, then click Close to close the Button Properties window.
8 Choose the Hand tool and click on the Show Location button. The red circle appears on the trail map, showing the location of the Boston Common.
9 Choose the Select Object tool ( ) and double-click the Hide Location button, which is located immediately to the right of the Show Location button.
10 In the Button Properties window, choose the Actions tab. Leave the Select Trigger set to Mouse Up. For Select Action, click the menu and choose Show/Hide a field. Click the Add button. The Show/Hide Field window appears.
11 In the Show/Hide Field window, choose the Hide radio button on the right side of the window. Choose boston common location from the list of available form fields, and click OK. Click Close to close the Button Properties window.

392Creating Multimedia PresentationsLESSON 12
12 Choose the Hand tool and alternate between selecting the Show Location and Hide Location button.
If the buttons do not work as expected, use the Select Object tool and right-click (Windows) or Ctrl-click (Mac OS) the Show Location or Hide Location button and choose Properties. Confirm that the actions applied to the buttons under the Actions tab are correct.
Adding a movie clip and controlling it with buttons1 Choose View > Fit Page or click the Fit Page button ( ).
2 If necessary, open the Advanced Editing toolbar by choosing View > Toolbars > Advanced Editing.
3 Choose the Movie tool ( ) from the Advanced Editing toolbar. Both the Sound tool ( ) and the Movie tool are located in the same position in the toolbar. To change from the Sound tool to the Movie tool, click on the Sound tool and select the Movie tool from the menu that appears.
4 Using the Movie tool, click and drag to create a frame in the empty space on the page, immediately to the right of the Play Multimedia and Stop Multimedia buttons. After you have created the frame, the Add Movie window appears.
Note: You may see a dialog box informing you that Acrobat is initializing the authoring system.

ADOBE ACROBAT 7.0 PROFESSIONAL 393Classroom in a Book
5 In the Add Movie window, choose the Acrobat 6 and Later Compatible Media radio button and click the Browse button (Windows) or Choose button (Mac OS) to select the movie file. Navigate to the ACR_CIB\Lesson12 folder and choose Boston_Common.mov from the movies folder. Click the Select button, then click the OK button to close the Add Movie window. The movie is added to your page.
6 If necessary, move the file by clicking and dragging it so that it is positioned to the right of the Play and Stop buttons, and above the navigational buttons. The movie file should not be positioned on top of any other content.
7 Choose the Hand tool ( ) and move the cursor over the movie. The cursor changes to a pointing finger ( ) to indicate that the content is interactive. Click on the center of the movie file and the movie will play.

394Creating Multimedia PresentationsLESSON 12
8 Choose the Select Object tool and double-click on the Play Multimedia button positioned to the left of the movie. Click the Actions tab and from the Select Action pull-down menu, choose Play Media (Acrobat 6 and Later Compatible). Leave the Select Trigger set at Mouse Up and click the Add button. The Play Media (Acrobat 6 and Later Compatible) window opens.
9 In the Play Media window, choose Annotation from Boston_Common.mov from the list of Associated Annotations and leave the Operation to Perform option set to Play. Click OK, then click Close to shut the Button Properties window.
You can test your first button if you wish. However, we will also be adding a stop action to the second button so users can have the option of stopping the movie.
10 Double-click the Stop Multimedia button and choose the Actions tab in the Button Properties window that appears. Keep the default Select Trigger set to Mouse Up. From the Select Action pull-down menu, choose Play Media (Acrobat 6 and Later Compatible) and then click the Add button. The Play Media (Acrobat 6 and Later Compatible) window opens.

ADOBE ACROBAT 7.0 PROFESSIONAL 395Classroom in a Book
11 In the Play Media (Acrobat 6 and Later Compatible) window, select Stop from the Operation to Perform options, choose Annotation from Boston_Common.mov from the list of Associated Annotations, and click OK. Click the Close button to close the Button Properties window.
12 Choose the Hand tool ( ) and click the Play Multimedia and Stop Multimedia buttons to start and stop the movie.
Adding, aligning, and duplicating navigational buttons
1 Click the Next Page button in the lower right corner of the document. Note that the button has an action that takes you to another page. Return to page 2.
2 Choose the Button tool ( ) from the Advanced Editing toolbar. Click and drag a square that is approximately the same size as the other two buttons, to the left of the Next Page button.

396Creating Multimedia PresentationsLESSON 12
When you finish drawing the frame for the button, the Button Properties window opens. Click the General tab, and enter the name for the button as PreviousPage.
3 In the Button Properties window, click the Appearance tab. Click the Fill color swatch and choose No Color from the available colors. This sets the fill color of the button to be transparent.
4 Click the Options tab, and in the Layout menu choose Icon Only. This causes Acrobat to display an imported picture as the face of the button.
5 For the Behavior option, choose Push. Three separate options appear in the State portion of the window after choosing Push for the Behavior options: Up, Down, and Rollover.
6 If it’s not already selected, click the Up state and then click the Choose Icon button to select a graphic that will be positioned on the button as it is up. In the Choose Icon window that appears, click the Browse button and navigate to the buttons folder in the ACR_CIB\Lesson12 folder and choose previous_page.pdf to use as the button, then click Select. A preview of the button appears in the Choose Icon window. Click OK to confirm the selection of this graphic.

ADOBE ACROBAT 7.0 PROFESSIONAL 397Classroom in a Book
7 Choose the Rollover state and click the Choose Icon button to select a graphic that will appear on the button as the mouse rolls over. In the Choose Icon window that appears, click the Browse button and, if necessary, navigate to the buttons folder in the ACR_CIB\Lesson12 folder. Choose previous_page_rollover.pdf then click Select. A preview of the button appears in the Choose Icon window. Click OK to confirm the selection of this graphic.
8 Click on the Actions tab to assign an action to this button. Choose Execute a menu item from the Select Action menu. Note that the menu choices may extend both above and below the menu selection, so you may need to scroll up in the menu to locate the Execute a menu item choice. Leave the Select Trigger option set to Mouse Up and click the Add button.
Windows: The Menu Item Selection window appears. In the Menu Item Selection window, choose View > Go To > Previous Page, then click OK. Click Close to close the Button Properties window.
MacOS: From the menu at the top of the window choose View > Go To > Previous Page, then click OK. Click Close to close the Button Properties window.
9 Select the Hand tool and click on the Previous Page button you created in the previous steps. After you have completed testing the button, return to page 2.

398Creating Multimedia PresentationsLESSON 12
Adding a first page button 1 Choose the Button tool ( ) from the Advanced Editing toolbar. Click and drag a square to the left of the Previous Page button that is approximately the same size as the other buttons. When you finish drawing the frame for the button, the Button Properties window opens. Click the General tab and enter the name for the button as FirstPage.
2 In the Button Properties window, click the Appearance tab. Click the Fill Color swatch and choose No Color from the available colors. This sets the background color of the button to be transparent.
3 Click the Options tab, and in the Layout menu choose Icon Only.
4 For the Behavior option choose Push. Note that three separate options appear in the State portion of the window after choosing Push for the Behavior options: Up, Down, and Rollover.
5 Click the Up state and then click Choose Icon to select a graphic that will be positioned on the button by default. In the Choose Icon window that appears, click the Browse button, and navigate to the buttons folder in the ACR_CIB\Lesson12 folder, and choose first_page.pdf, then click Select. A preview of the button appears in the Choose Icon window. Click OK to confirm the selection of this graphic.
6 Choose the Rollover state and click Choose Icon to select a graphic that will be positioned on the button as the mouse rolls over it. In the Choose Icon window that appears, click the Browse button, and navigate to the buttons folder in the ACR_CIB\Lesson12 folder, and choose first_page_rollover.pdf to use as the button and click Select. A preview of the button appears in the Choose Icon window. Click OK to confirm the selection of this graphic.

ADOBE ACROBAT 7.0 PROFESSIONAL 399Classroom in a Book
7 Click on the Actions tab to assign an action to this button. Choose Execute a menu item from the Select Action menu. Note that the menu choices may extend both above and below the menu selection, so you may need to scroll up in the menu to locate this choice. Leave the Select Trigger option set to Mouse Up and click the Add button. The Menu Item Selection window appears.
In the Menu Item Selection window, choose View > Go To > First Page (Windows) or from the menu, select View > Go To > First Page (Mac OS), then click OK.
8 Click Close in the Buttons Property Window.
9 Choose the Hand tool ( ). Click on the buttons you have created to change from one page to another.
400Creating Multimedia PresentationsLESSON 12
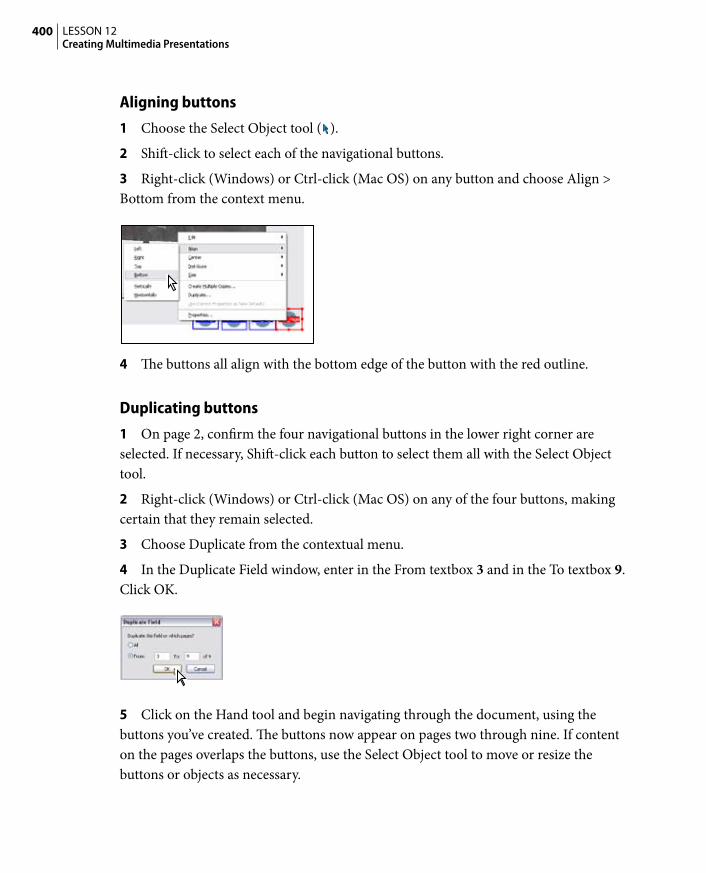
Aligning buttons1 Choose the Select Object tool ( ).
2 Shift-click to select each of the navigational buttons.
3 Right-click (Windows) or Ctrl-click (Mac OS) on any button and choose Align > Bottom from the context menu.
4 The buttons all align with the bottom edge of the button with the red outline.
Duplicating buttons1 On page 2, confirm the four navigational buttons in the lower right corner are selected. If necessary, Shift-click each button to select them all with the Select Object tool.
2 Right-click (Windows) or Ctrl-click (Mac OS) on any of the four buttons, making certain that they remain selected.
3 Choose Duplicate from the contextual menu.
4 In the Duplicate Field window, enter in the From textbox 3 and in the To textbox 9. Click OK.
5 Click on the Hand tool and begin navigating through the document, using the buttons you’ve created. The buttons now appear on pages two through nine. If content on the pages overlaps the buttons, use the Select Object tool to move or resize the buttons or objects as necessary.

ADOBE ACROBAT 7.0 PROFESSIONAL 401Classroom in a Book
Adding a sound file and adding two actions to one button1 Navigate to page 3. If the Advanced Editing toolbar is not currently visible, choose View > Toolbars > Advanced Editing.
2 Select the Sound tool ( ) and draw a small square at the bottom of the page on the white area near the edge. The size and exact location are not critically important, as the box will be hidden from view.
Remember that both the Sound tool ( ) and the Movie tool ( ) are located in the same position in the toolbar. To change from the Movie tool to the Sound tool, you may need to click on the arrow to the right of the Movie tool and select the Sound tool from the menu that appears. To make both tools visible at the same time, click on the arrow next to either tool and choose Expand this Button from the menu that appears.
3 In the Add Sound window, choose the Acrobat 6 (and Later) Compatible Media option. Click the Browse button to identify the location of the sound file that you are adding to the presentation. Navigate to the sound file Statehouse_audioclip.wav in the audio folder in the ACR_CIB\Lesson12 folder, and click Select to choose this file.
Click the Embed content in document checkbox, and then click OK to close the Add Sound window.
4 Double-click the frame that was created in the previous step. Note that the frame containing the sound includes a border.
5 In the Multimedia Properties window, click the Appearance tab and choose Invisible Rectangle from the Border Type drop-down menu. This removes the black border around the perimeter of the frame containing the sound, making the sound border invisible on the PDF page. Click the Close button to close the Multimedia Properties window.

402Creating Multimedia PresentationsLESSON 12
Adding multiple actions to one buttonBecause the sound and movie files are added to this page separately, you will add two actions to a single button to cause both the sound and the movie to play at the same time.
1 Choose the Select Object tool ( ) and double-click the Play Multimedia button. The Button Properties window appears.
2 Click on the Actions tab. For Select Trigger, keep the default setting of Mouse Up and for Select Action, choose Play Media (Acrobat 6 and Later Compatible). Click the Add button.
3 In the Play Media (Acrobat 6 and Later Compatible) window, choose Play as the Operation to Perform. Choose Annotation from Statehouse_audioclip.wav from the list of Associated Annotations and click OK.
Do not close the Button Properties window, as you will add another action for this button. The second action will also be a Play Media (Acrobat 6 and Later Compatible) action, and will also occur when the mouse is clicked and released, so do not change these settings.
4 Click the Add button and choose Annotation from Statehouse.mov from the list of Associated Annotations in the Play Media (Acrobat 6 and Later Compatible) window. Click OK and then click the Close button in the Button Properties window.

ADOBE ACROBAT 7.0 PROFESSIONAL 403Classroom in a Book
5 Choose the Hand tool and click the Play Multimedia button to play both the sound clip and movie clip simultaneously.
Creating page actions to control multimedia clips In the previous section, you controlled both sound and movie elements through a button action. You can also use other methods for starting or stopping a sound or movie file. Here you will create an action to cause a movie to play when a page is opened. When the page closes, you will have the movie stop playing.
When you play either sound or movie files in Acrobat, they continue to play until the file has reached its end or an action tells it to stop. For example, if you start playing the movie files on page 3, and then move to a different page before the movie is complete, it will continue playing even after you move to the other page.
1 Open the Pages panel by clicking the Pages tab on the left side of the screen, or choose View > Navigation Tabs > Pages.
2 In the Pages panel, right-click (Windows) or Ctrl-click (Mac OS) the page 3 thumbnail. From the context menu that appears, choose Page Properties.

404Creating Multimedia PresentationsLESSON 12
3 Click on the Actions tab in the Page Properties window. For Select Trigger, choose Page Close and for Select Action choose Play Media (Acrobat 6 and Later Compatible), then click the Add button. The Play Media (Acrobat 6 and Later Compatible) window appears.
4 In the Play Media window, choose Stop from the Operation to Perform menu and then choose Annotation from Statehouse.mov from the list of Associated Annotations. After making these selections, click OK. This action stops the movie from playing whenever the page is closed.
5 In the Page Properties window, for Select Trigger, choose Page Close and for Select Action, choose Play Media (Acrobat 6 and Later Compatible) and then click Add. Choose Stop for the Operation to Perform and choose Annotation from Statehouse_audioclip.wav as the sound file that will be affected by this action. Click OK, and then click Close to close the Page Properties window.
6 Choose the Hand tool ( ) and click the Play Multimedia button. As the multimedia clips are playing, click on the next page button. Both the sound and movie files stop playing after you navigate to another page of the document.

ADOBE ACROBAT 7.0 PROFESSIONAL 405Classroom in a Book
Creating page actions to start multimedia clips Just as you created a page action that stopped movie and sound files, you can also create a page action which plays a multimedia clip when a page is opened.
1 Navigate to page four. A movie file has already been placed on the page for you.
2 Open the Pages panel by clicking its tab on the left side of the screen or choosing View > Navigation Tabs > Pages and Right-click (Windows) or Ctrl-click (Mac OS) on the page thumbnail representing page four. Choose Page Properties from the context menu. The Page Properties window appears.
3 Click on the Actions tab and set the Select Trigger option to Page Open. Choose Play Media (Acrobat 6 and Later Compatible) and then click the Add button. The Play Media (Acrobat 6 and Later Compatible) window opens. Choose Play as the Operation to Perform. From the Associated Annotations list, choose Annotation from Granary.mov and click OK, then click Close to close the Page Properties window.
4 Choose the Hand tool ( ). Using either the navigational buttons in this document or the previous page button, navigate to page 3, then return to page 4 to see the movie clip start playing automatically.
406Creating Multimedia PresentationsLESSON 12
Opening a movie clip in a floating window1 Navigate to page five. This page already includes a movie file along with a button to play the movie. This movie plays in the default location, in its current frame located on the document page. You will change the movie so that it plays in a separate window.
2 Choose the Select Object tool ( ) and double-click the movie frame. In the Multimedia Properties window that opens, choose the Settings tab. Select Rendition from Old _South.mov from the list of renditions, then click the Edit Rendition button.
Note: You may need to scroll to locate this object.
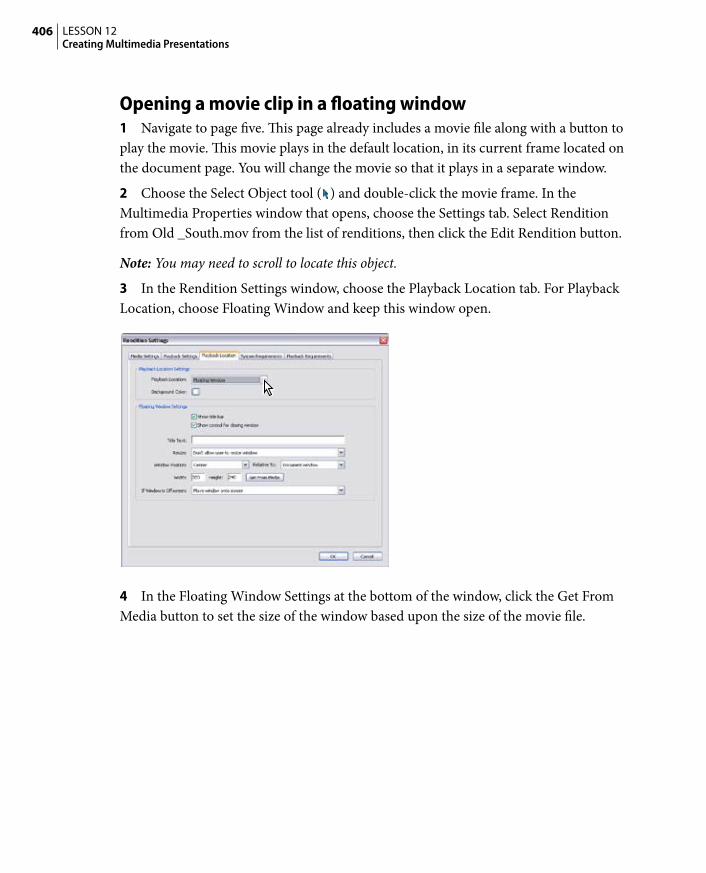
3 In the Rendition Settings window, choose the Playback Location tab. For Playback Location, choose Floating Window and keep this window open.
4 In the Floating Window Settings at the bottom of the window, click the Get From Media button to set the size of the window based upon the size of the movie file.

ADOBE ACROBAT 7.0 PROFESSIONAL 407Classroom in a Book
5 Choose the Playback Settings tab and select the Show Player Controls option. This allows viewers to pause, rewind, and adjust the sound volume of the movie file as it plays in the floating window. Click OK to close the Renditions Settings window.
6 Click the Close button to close the Multimedia Properties window.
7 Choose the Hand tool ( ) and click the Play Multimedia button to see the movie play in a separate window.

408Creating Multimedia PresentationsLESSON 12
Creating a full screen presentation with transitionsYou will now view your PDF document without all the tools and menus by using the Full Screen viewing mode. You will also create transitions that vary how the screen changes from one page to the next.
1 Open the Pages panel. Shift-click to select both page 1 and page 2. Right-click (Windows) or Ctrl-click (Mac OS) on the thumbnail of either page. Choose Set Page Transitions from the context menu that appears.
2 In the Set Transitions window, choose Fade from the Effect options. Check the Auto Flip checkbox, and choose 10 Seconds from the After drop-down menu. In the Page Range portion of this window, confirm that the option Pages selected in Pages panel is selected, and then click OK.
These choices will cause page 1 to fade into page 2 whenever the document is viewed using the Full Screen mode. Also, if the first page is not changed manually, it will automatically move to the next page after 10 seconds.
3 In the Pages panel, right-click on the page thumbnail for page 3. From the context menu, choose Set Page Transitions and from the Effect options, choose Random Transition. In the Page Range portion of the window, choose Pages Range and enter from 3 to 9. Click OK after entering these settings.

ADOBE ACROBAT 7.0 PROFESSIONAL 409Classroom in a Book
4 Navigate to the first page of the document. To view the presentation using the Full Screen mode, choose Window > Full Screen View. Wait 10 seconds to test the automatic transition, or click the Next Page button to view the Fade effect as the page transitions from page 1 to page 2. To exit Full Screen viewing mode, use the Esc (Escape) Key on the upper left corner of your keyboard, or press Ctrl+L (Windows) or Command+L (Mac OS).
Note: You can also switch to the Full Screen mode by clicking the Full Screen Icon located in the bottom left corner of the document window.
5 To set the entire document to always open in the Full Screen viewing mode, choose File > Document Properties and select the Initial View tab. In the Window Options portion of this window, select Open in Full Screen mode and then click OK.
6 Choose File > Save. Close the document, and then reopen it. The file now opens directly in the Full Screen mode.

410Creating Multimedia PresentationsLESSON 12
On your own1 On pages 6-9, add the following items. Additional multimedia files are located in the ACR_CIB\Lesson12 folder.
• Sound files for each page.
• Play buttons for the movie and sound clips on each page.
• Show/hide buttons for the map on each page.
2 Explore the full screen preferences by choosing Edit > Preferences (Windows) or Acrobat > Preferences (Mac OS) and selecting Full Screen.
• You can override the page transitions so that they use those set in the Preferences, and not those set in the file.
• If you do not want to use the Escape key to leave the Full Screen mode, deselect Escape key exits.
• Choose Loop after last page to have the file return to the first page after viewing the last page in a file.
3 Change the movie rendition settings to have the movie files play in their own window. Try having the movie files play both with and without a visible controller.

ADOBE ACROBAT 7.0 PROFESSIONAL 411Classroom in a Book
Review questions1 Why would you convert an existing presentation to Adobe PDF? Why would you create a new multimedia presentation using the Sound and Movie tools of Adobe Acrobat 7.0 Professional?
2 Are you able to automatically start playing sound and movie files, and how would this be useful?
3 How can you make a form field, such as a button, invisible? If so, why would you do this?
Review answers1 As a universally accepted file format, Adobe PDF files are not limited by the software on the recipient’s computer or the fonts used when creating a file. Typical presentation software files require the recipients to have the presentation software on their computer, along with the same fonts used when the file was created. Presentations delivered as an Adobe PDF can be viewed by users on many computer systems—including Palm, Windows, Macintosh, and various forms of Unix.
2 Movie and sound files can start playing based upon a number of actions. These can include a page being opened or closed, or the mouse being moved to a certain location on the page. You can even have sounds or movies play because the viewer has moved his or her cursor to a certain form field. These automatic actions are helpful for delivering presentations with minimal effort on the part of the viewer.
3 Set a Button Field’s properties to Hidden to keep it from displaying or printing.Buttons and form fields can be made visible or invisible for both on-screen and printing purposes. This can be useful if you want a button to be visible on screen, but not print. For multimedia purposes, you can have buttons that are not visible until a certain action occurs. Clicking on a portion of the document can cause a graphic or text to appear on the page.


