McMaster Service-Based eHealth Integration …ehealth/cas/MacSeie/Documents_files...1. Overview...
55
McMaster Service-Based eHealth Integration Environment (MACSeie) Installation Guide July 24, 2009 Richard Lyn [email protected] Jianwei Yang [email protected]
Transcript of McMaster Service-Based eHealth Integration …ehealth/cas/MacSeie/Documents_files...1. Overview...
McMaster Service-Based eHealth Integration Environment
(MACSeie) Installation Guide
July 24, 2009
Richard Lyn
[email protected] Jianwei Yang

Document Revision History
Rev. Level Date Description Important 2009/07/24 Initial Version
Reference Documents
Document # Description
1. Overview...............................................................................................................4
1.1 Purpose .........................................................................................................4
1.2 How to Use This Document...........................................................................4
1.3 Assumptions ..................................................................................................4
2. System Requirements ..........................................................................................6
2.1 Hardware Requirements................................................................................6
2.2 Operating System Requirements ..................................................................6
2.3 Software Requirements .................................................................................6
2.4 Web Browser Requirements..........................................................................7
3. Installation and Configuration ...............................................................................8
3.1 Java Development Kit (JDK) .........................................................................8
3.2 Apache Tomcat .............................................................................................9
3.3 Eclipse .........................................................................................................12
3.4 MySQL.........................................................................................................35
3.5 Axis2............................................................................................................49
3.6 Testing MACSeie.........................................................................................55
1. Overview
1.11.1 PurposePurpose
McMaster Service-Based eHealth Integration Environment (MacSeie) allows interoperability between two health care systems. The first system is a clinical decision support system from the COMPETE III Group known as Vascular Tracker (VT). VT uses algorithms that use the patient’s medical history, current medications, allergies, and vascular risk to generate messages which contain specific targets as well as recommendations. For health care providers and patients VT indentifies which vascular risk factors are on target and which ones require additional attention. The health care providers use the recommendations to help in the treatment of patients with diabetes, hypertension, dyslipidemia, and cardiovascular disease. The second legacy system is an electronic medical record (EMR). This EMR system contains the medical information of patients who are currently rehabilitating from cardiovascular disease. These patients require a method to keep track of their cardiovascular risk factors to ensure that the risk factors are on target, and if not, alert the physician so that action can be taken. EMR and VT systems are web-based therefore are accessible through a web browser. This manual provides the requirements and installation instructions for MacSeie 1.0 on the Microsoft Windows operating system.
1.21.2 How to Use This DocumentHow to Use This Document
In this document, the first part gives the system requirements for running MacSeie. This includes the software and hardware prerequisites. The second part describes the steps to install and configure all necessary software to run MacSeie.
1.31.3 AssumptionsAssumptions
In addition to the instructions outlined in this manual, it is assumed that anyone installing MacSeie should have working knowledge and/or experience with:
• General installation of software on the target platform
• Proficient use of Microsoft Windows operating system
• Using and configuring the Eclipse development environment
• Installing and using Eclipse plug-ins
• Administration of relational database management system (MySQL)
• Administration of Tomcat web application server
• Development with the Java programming language
• Development and knowledge of web services
2. System Requirements
System requirements for MacSeie 1.0 are separated into several groups:
• Hardware Requirements
• Operating System Requirements
• Software Requirements
• Web Browser Requirements
2.12.1 Hardware RequirementsHardware Requirements
The hardware used for MacSeie 1.0 should meet the following minimum requirements:
• Pentium 233-Megahertz (MHz) or equivalent processor or faster (300 MHz is recommended)
• At least 64 megabytes (MB) of RAM (128 MB is recommended)
• 512 MB hard disk space, including 200 MB for Eclipse 3.X plus space for MacSeie 1.0
2.22.2 Operating System RequirementsOperating System Requirements
MacSeie 1.0 has been tested and is supported on the following operating system platforms.
• All Win32 Platforms. (Tested on Windows XP SP2 and Windows Vista)
2.32.3 Software Software RequirementsRequirements
To install MacSeie 1.0, the following products are necessary:
• Eclipse 3.1 or higher
• Latest version of Sysdeo Tomcat Launcher Plugin
• Latest version of SUN Java Development Kit (JDK)
• Latest version of MySQL Community Server
• Latest version of MySQL Connector/J (JDBC) for MySQL
• Apache Tomcat 5.5
• Latest version of Apache Axis2
2.42.4 Web Browser RequirementsWeb Browser Requirements
All functions and views of MacSeie 1.0 use a standard Web browser. Any browser used in MacSeie 1.0 must support JavaScript 1.2 and scripting must not be disabled. Presently there are three tested and supported web browsers:
• Microsoft Internet Explorer 5.5 or greater
• Firefox Browser 2.007 or greater
• Apple Safari 3.2.3 or greater
3. Installation and Configuration
3.13.1 Java Development Kit (JDK)Java Development Kit (JDK)
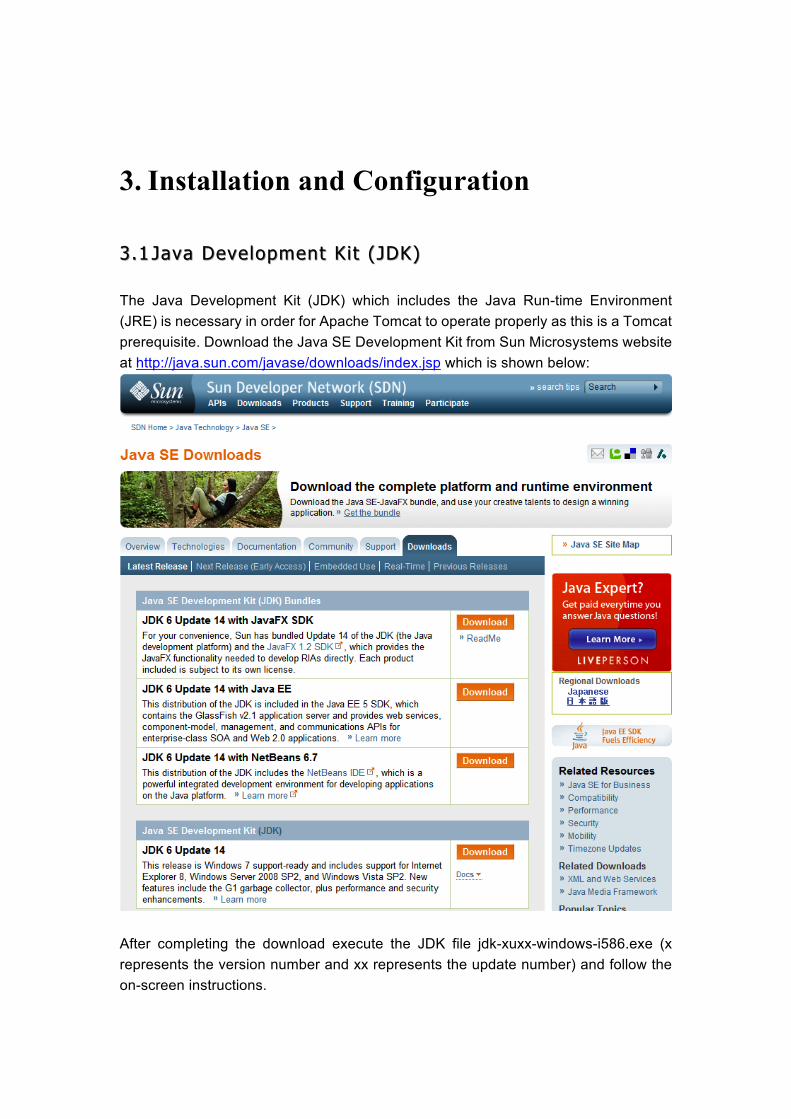
The Java Development Kit (JDK) which includes the Java Run-time Environment (JRE) is necessary in order for Apache Tomcat to operate properly as this is a Tomcat prerequisite. Download the Java SE Development Kit from Sun Microsystems website at http://java.sun.com/javase/downloads/index.jsp which is shown below:
After completing the download execute the JDK file jdk-xuxx-windows-i586.exe (x represents the version number and xx represents the update number) and follow the on-screen instructions.
3.23.2 Apache TomcatApache Tomcat
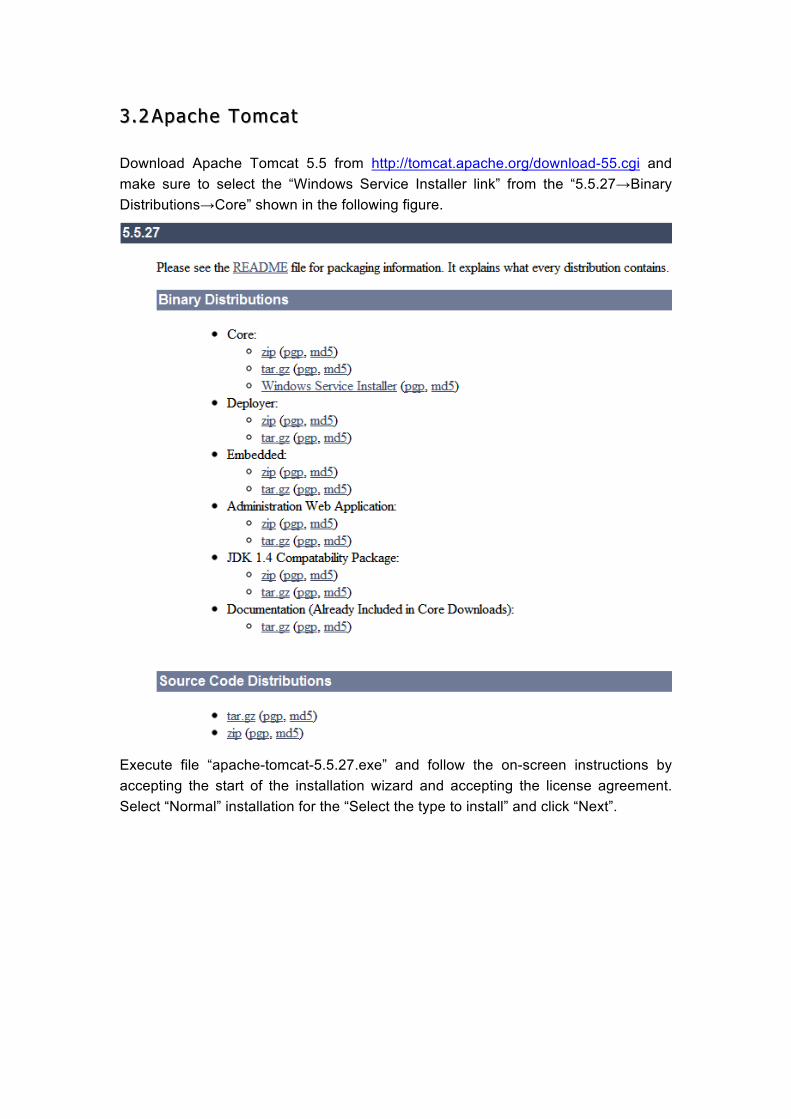
Download Apache Tomcat 5.5 from http://tomcat.apache.org/download-55.cgi and make sure to select the “Windows Service Installer link” from the “5.5.27→Binary Distributions→Core” shown in the following figure.
Execute file “apache-tomcat-5.5.27.exe” and follow the on-screen instructions by accepting the start of the installation wizard and accepting the license agreement. Select “Normal” installation for the “Select the type to install” and click “Next”.
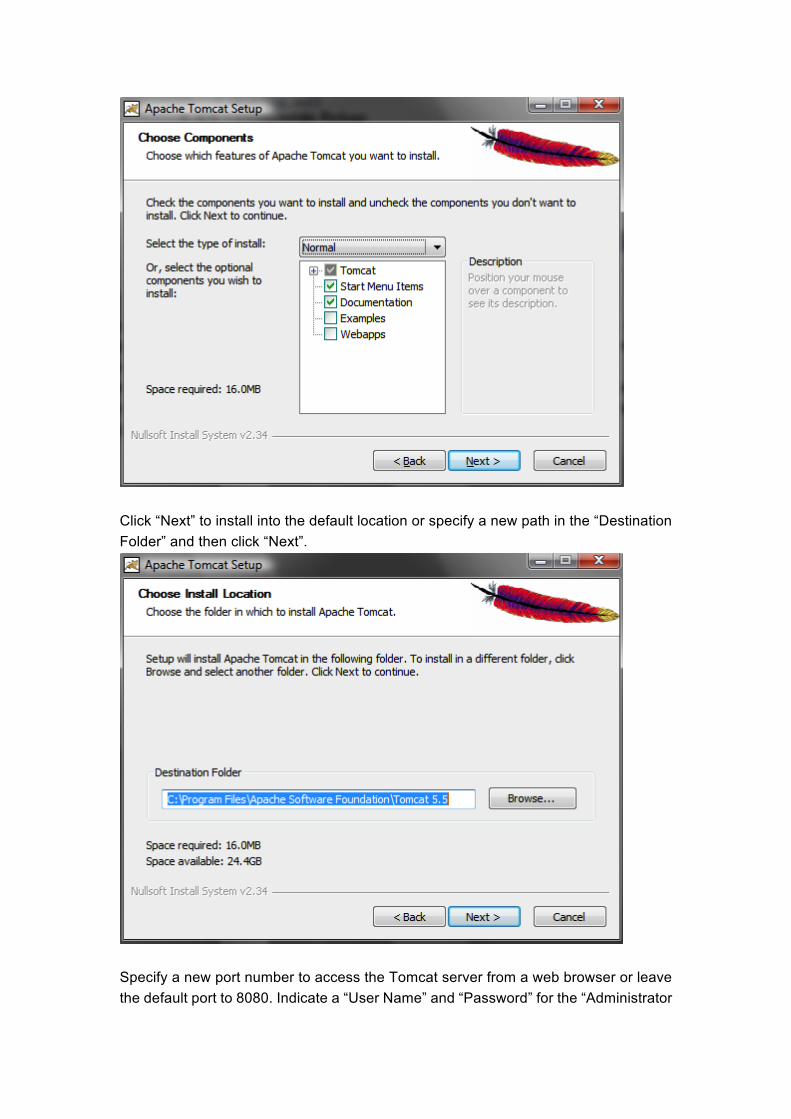
Click “Next” to install into the default location or specify a new path in the “Destination Folder” and then click “Next”.
Specify a new port number to access the Tomcat server from a web browser or leave the default port to 8080. Indicate a “User Name” and “Password” for the “Administrator
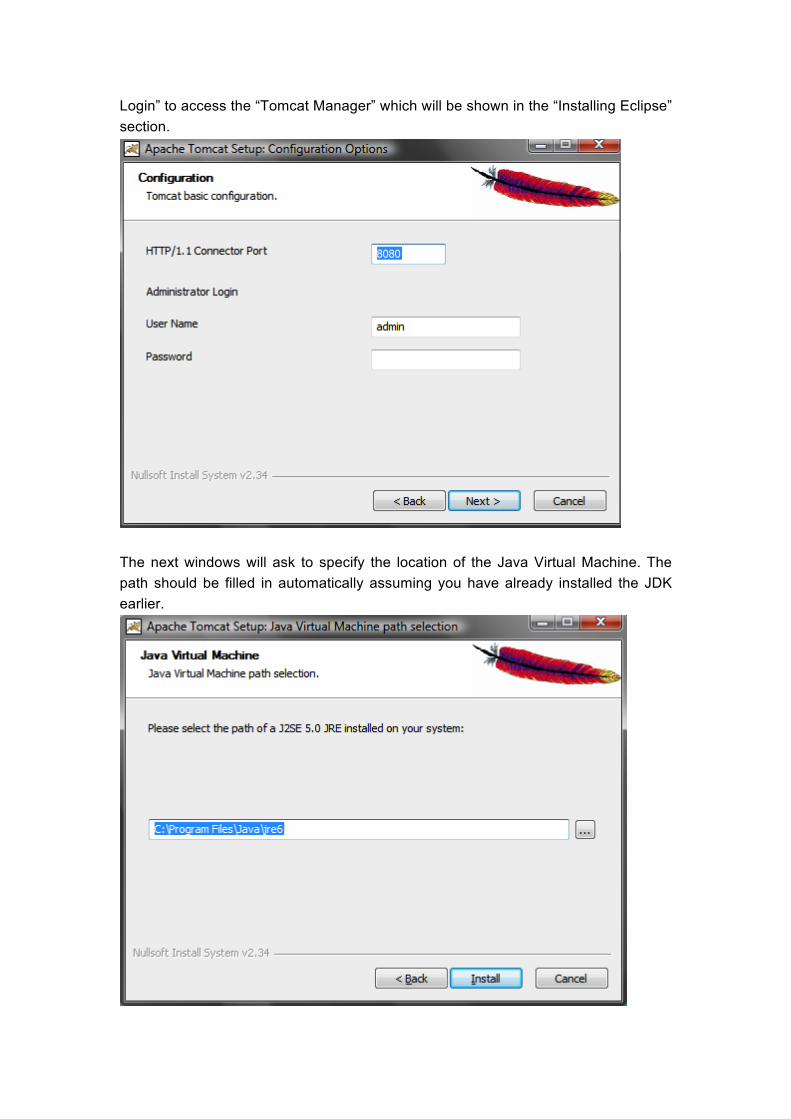
Login” to access the “Tomcat Manager” which will be shown in the “Installing Eclipse” section.
The next windows will ask to specify the location of the Java Virtual Machine. The path should be filled in automatically assuming you have already installed the JDK earlier.
Now click “Next” and wait for the installation to complete. When this is finished uncheck the boxes to “View the Readme” unless you wish to view it and “Start Tomcat Server” as the Tomcat server will be tested through Eclipse (Section 3.3) with the Sysdeo plug-in to confirm that the plug-in and Tomcat server are both working correctly.
3.33.3 EclipseEclipse
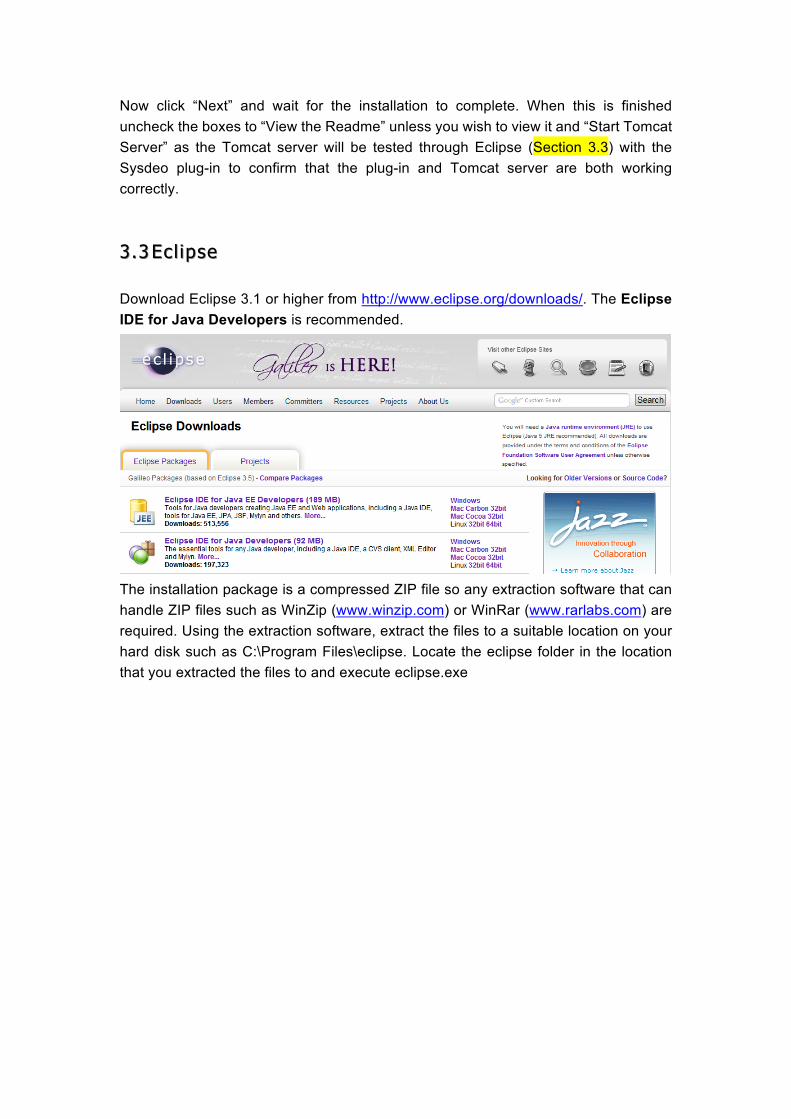
Download Eclipse 3.1 or higher from http://www.eclipse.org/downloads/. The Eclipse IDE for Java Developers is recommended.
The installation package is a compressed ZIP file so any extraction software that can handle ZIP files such as WinZip (www.winzip.com) or WinRar (www.rarlabs.com) are required. Using the extraction software, extract the files to a suitable location on your hard disk such as C:\Program Files\eclipse. Locate the eclipse folder in the location that you extracted the files to and execute eclipse.exe

When you execute Eclipse for the first time you must select a workspace where all your saved projects will be stored. Check “Use this as the default and do not ask again” checkbox in order to make this the default location and not receive any more notifications.
Now the Sysdeo Tomcat Eclipse plug-in will be installed to make it easy to enable/disable the Tomcat server from within eclipse. The installation of the plug-in does not differ from other Eclipse plug-ins: After downloading the plug-in from http://marketplace.eclipse.org/content/sysdeo-tomcat-launcher-plugin or search for the plug-in from the eclipse website. Unzip and place the “com.sysdeo.eclipse.tomcat_x.x.x” (where x.x.x represents the version number) folder into the Eclipse's "plug-ins" directory, and start Eclipse. Verify that the plug-in has
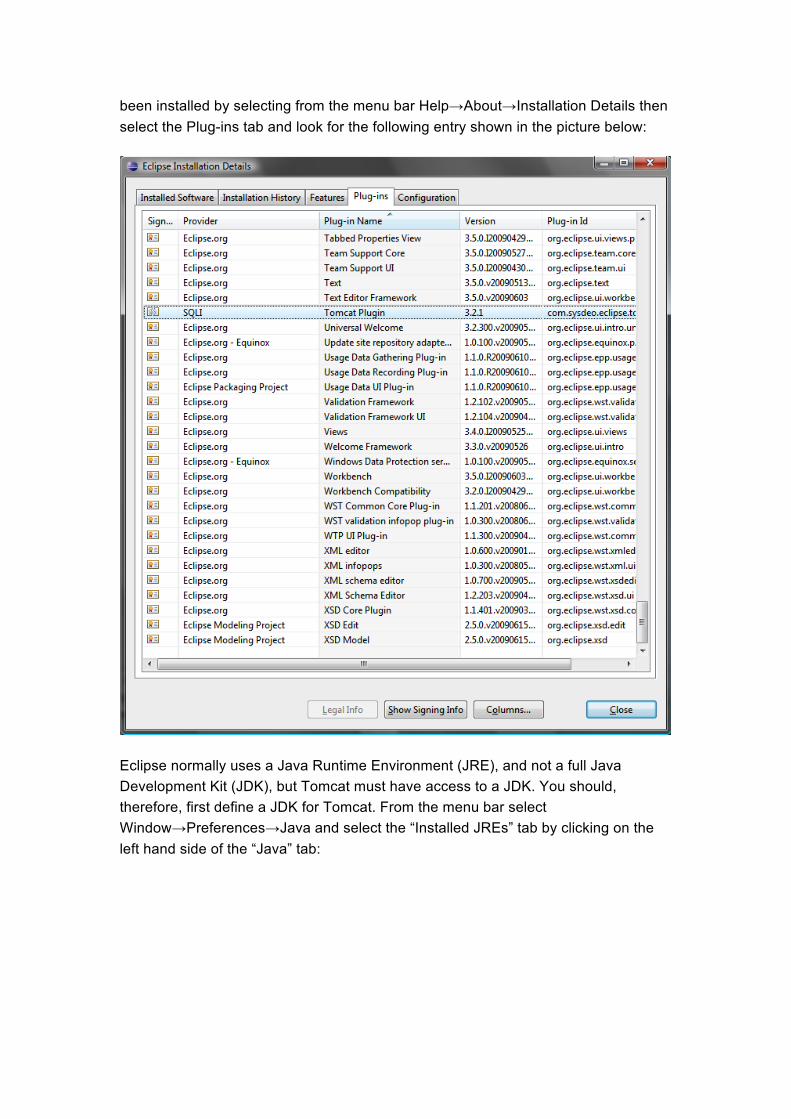
been installed by selecting from the menu bar Help→About→Installation Details then select the Plug-ins tab and look for the following entry shown in the picture below:
Eclipse normally uses a Java Runtime Environment (JRE), and not a full Java Development Kit (JDK), but Tomcat must have access to a JDK. You should, therefore, first define a JDK for Tomcat. From the menu bar select Window→Preferences→Java and select the “Installed JREs” tab by clicking on the left hand side of the “Java” tab:
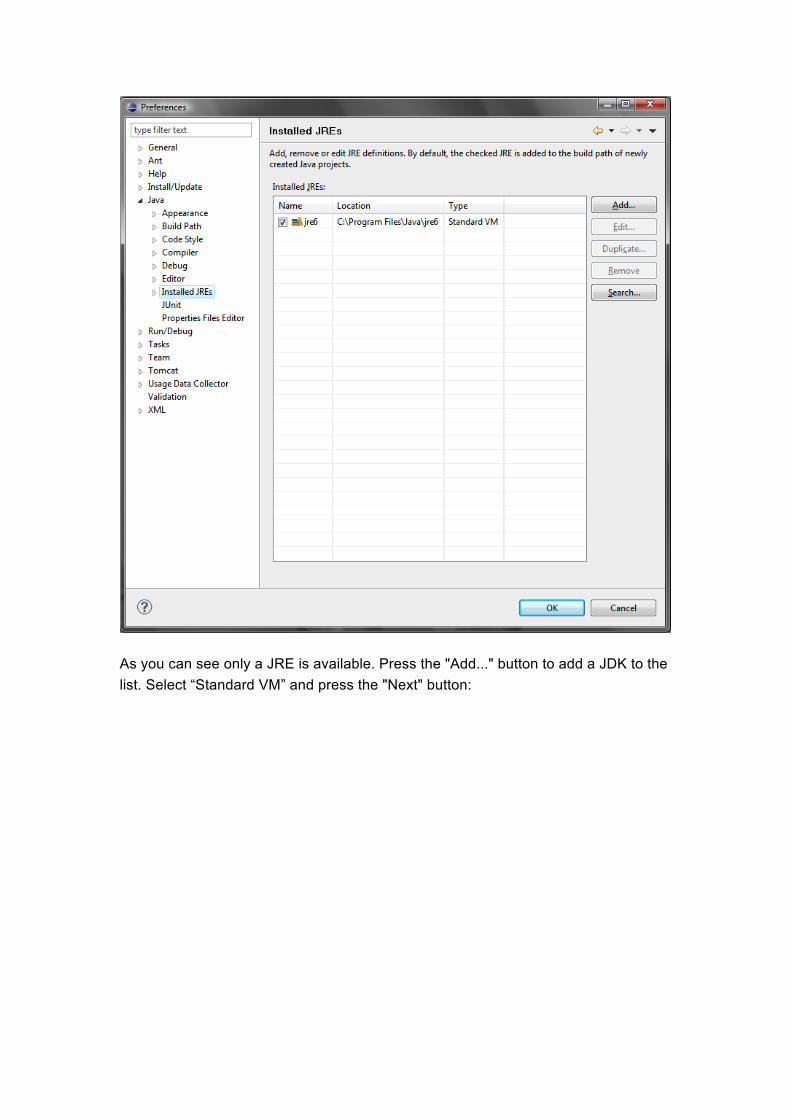
As you can see only a JRE is available. Press the "Add..." button to add a JDK to the list. Select “Standard VM” and press the "Next" button:
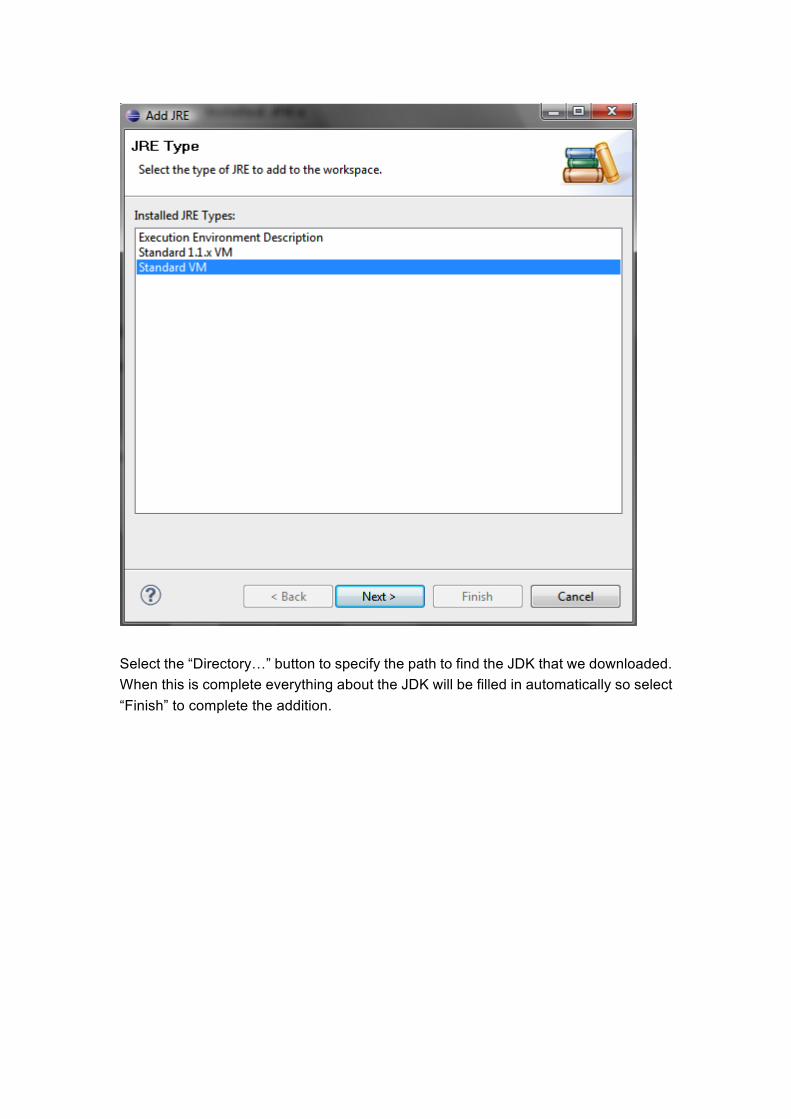
Select the “Directory…” button to specify the path to find the JDK that we downloaded. When this is complete everything about the JDK will be filled in automatically so select “Finish” to complete the addition.
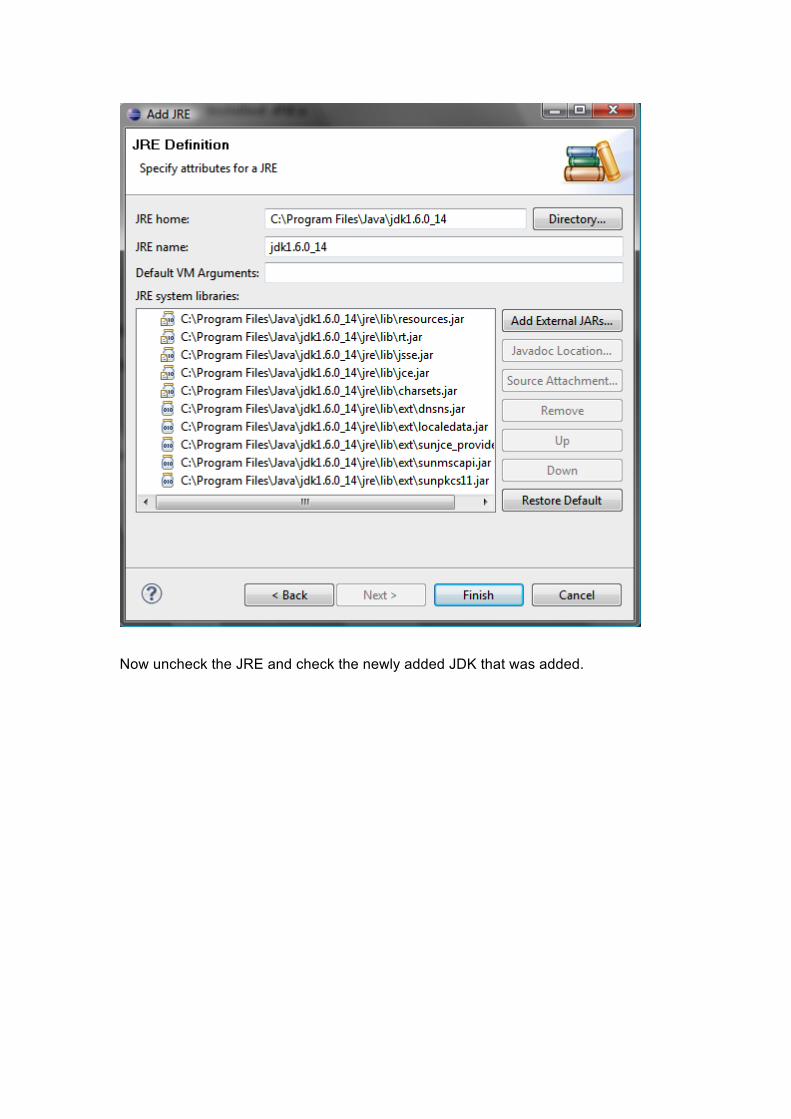
Now uncheck the JRE and check the newly added JDK that was added.

Select “OK” and restart Eclipse to confirm the changes.
You should now tell the plug-in where your Tomcat system is located. From the menu bar select Window→Preferences→Tomcat and select
• Tomcat version number to be “Version 5.x” • Tomcat home (this automatically sets the configuration file) to be “Directory
path where you installed Tomcat\Apache Software Foundation\Tomcat 5.5” or if you used the default path provided by Tomcat then the path would be “C:\Progam Files\Tomcat\Apache Software Foundation\Tomcat 5.5”
Now select “Apply” to confirm the changes.
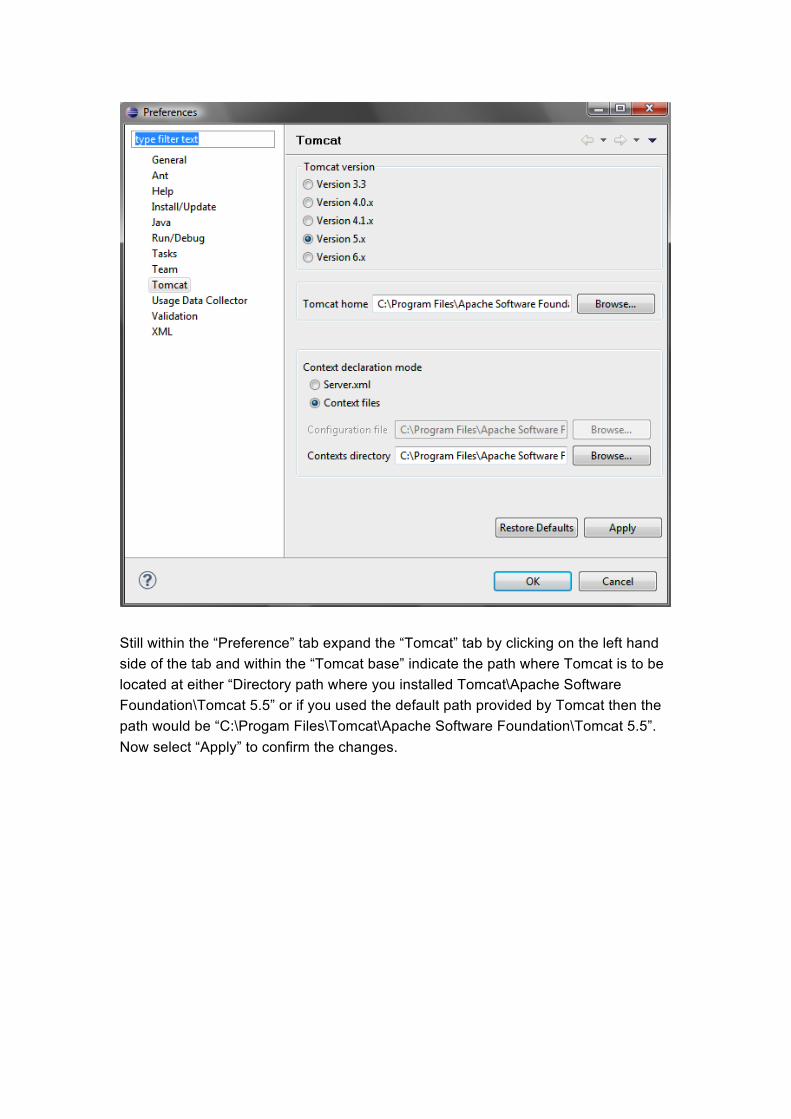
Still within the “Preference” tab expand the “Tomcat” tab by clicking on the left hand side of the tab and within the “Tomcat base” indicate the path where Tomcat is to be located at either “Directory path where you installed Tomcat\Apache Software Foundation\Tomcat 5.5” or if you used the default path provided by Tomcat then the path would be “C:\Progam Files\Tomcat\Apache Software Foundation\Tomcat 5.5”. Now select “Apply” to confirm the changes.
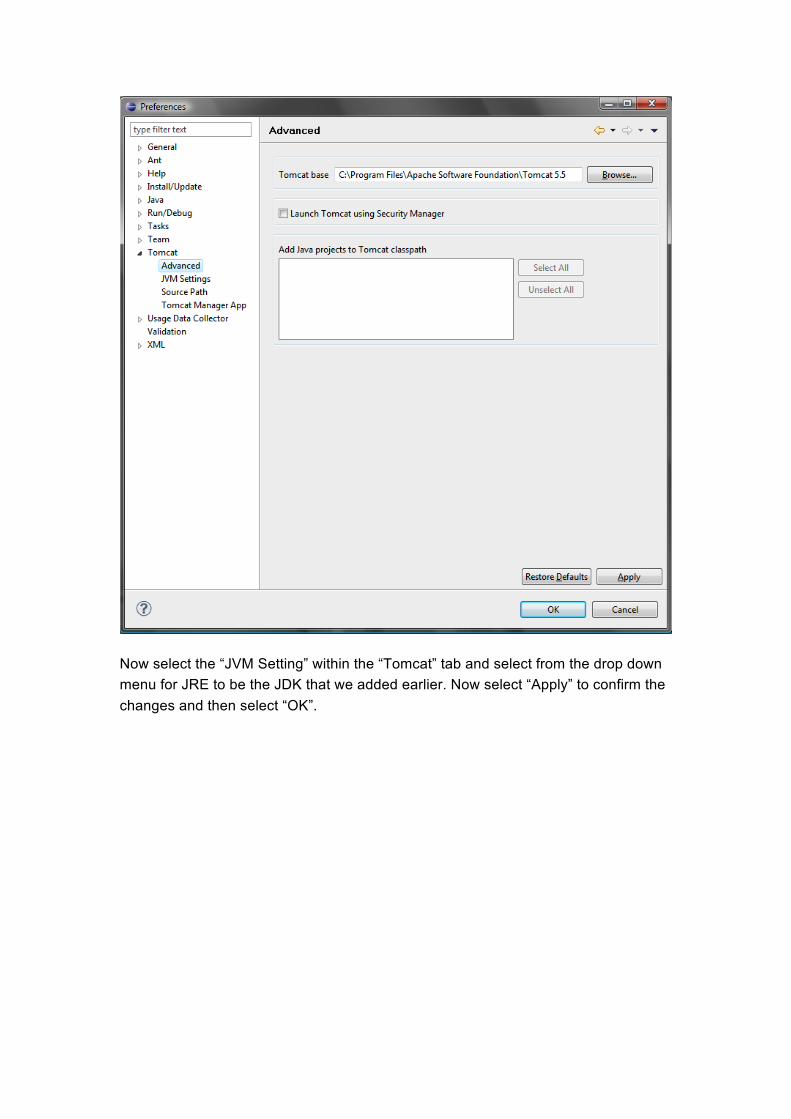
Now select the “JVM Setting” within the “Tomcat” tab and select from the drop down menu for JRE to be the JDK that we added earlier. Now select “Apply” to confirm the changes and then select “OK”.
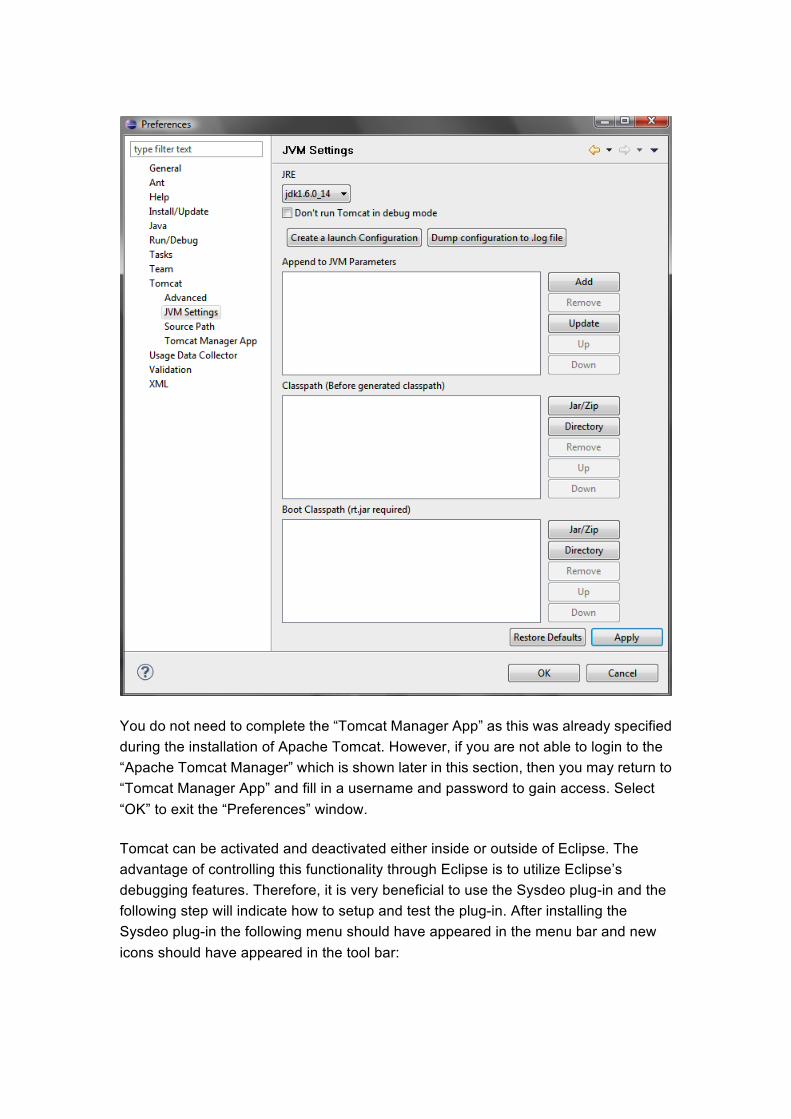
You do not need to complete the “Tomcat Manager App” as this was already specified during the installation of Apache Tomcat. However, if you are not able to login to the “Apache Tomcat Manager” which is shown later in this section, then you may return to “Tomcat Manager App” and fill in a username and password to gain access. Select “OK” to exit the “Preferences” window.
Tomcat can be activated and deactivated either inside or outside of Eclipse. The advantage of controlling this functionality through Eclipse is to utilize Eclipse’s debugging features. Therefore, it is very beneficial to use the Sysdeo plug-in and the following step will indicate how to setup and test the plug-in. After installing the Sysdeo plug-in the following menu should have appeared in the menu bar and new icons should have appeared in the tool bar:
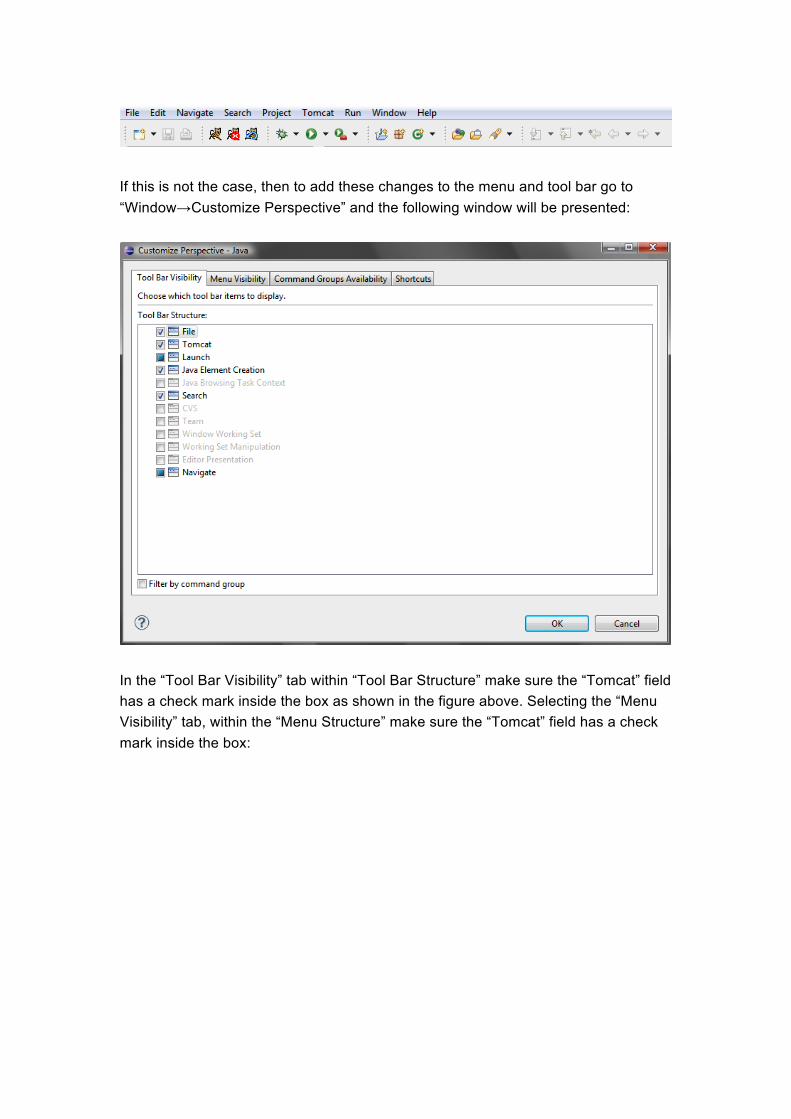
If this is not the case, then to add these changes to the menu and tool bar go to “Window→Customize Perspective” and the following window will be presented:
In the “Tool Bar Visibility” tab within “Tool Bar Structure” make sure the “Tomcat” field has a check mark inside the box as shown in the figure above. Selecting the “Menu Visibility” tab, within the “Menu Structure” make sure the “Tomcat” field has a check mark inside the box:
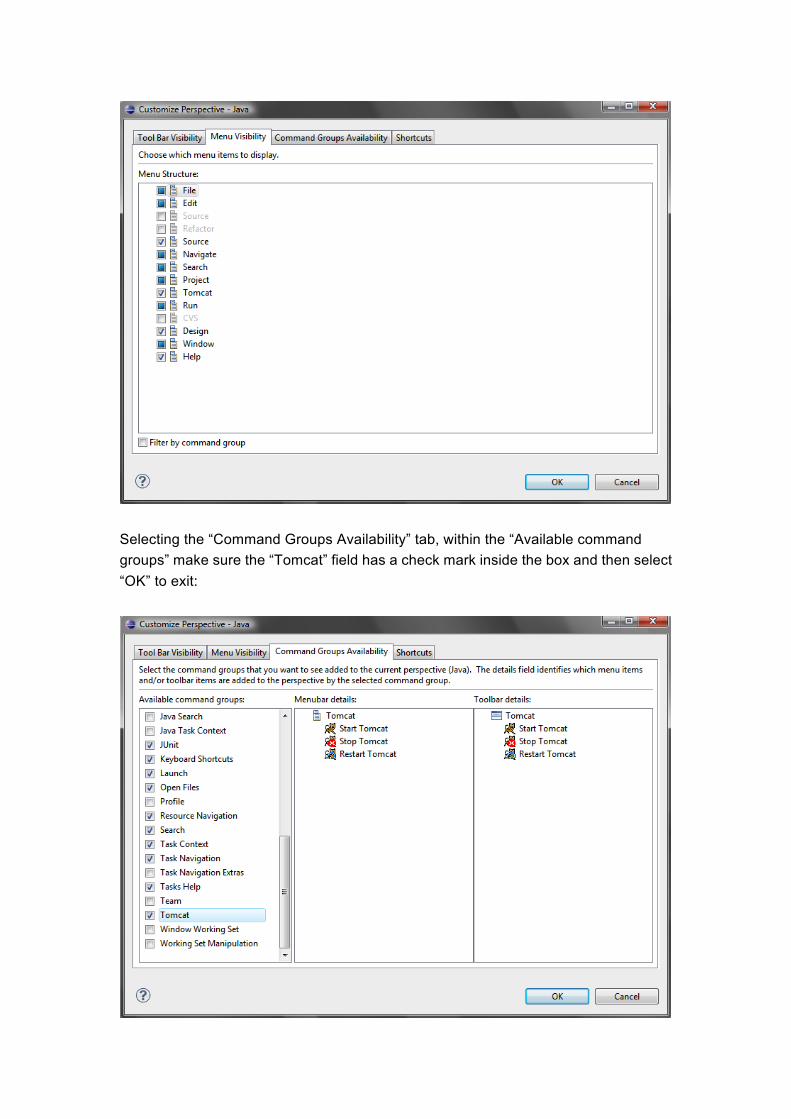
Selecting the “Command Groups Availability” tab, within the “Available command groups” make sure the “Tomcat” field has a check mark inside the box and then select “OK” to exit:

Now it is time to test the Sysdeo plug-in and verify that Tomcat can be enabled and disable through Eclipse. To enable Tomcat, select the following icon from the “Tool Bar”:
This will cause an output in the “Console” tab indicating that Tomcat is operational:
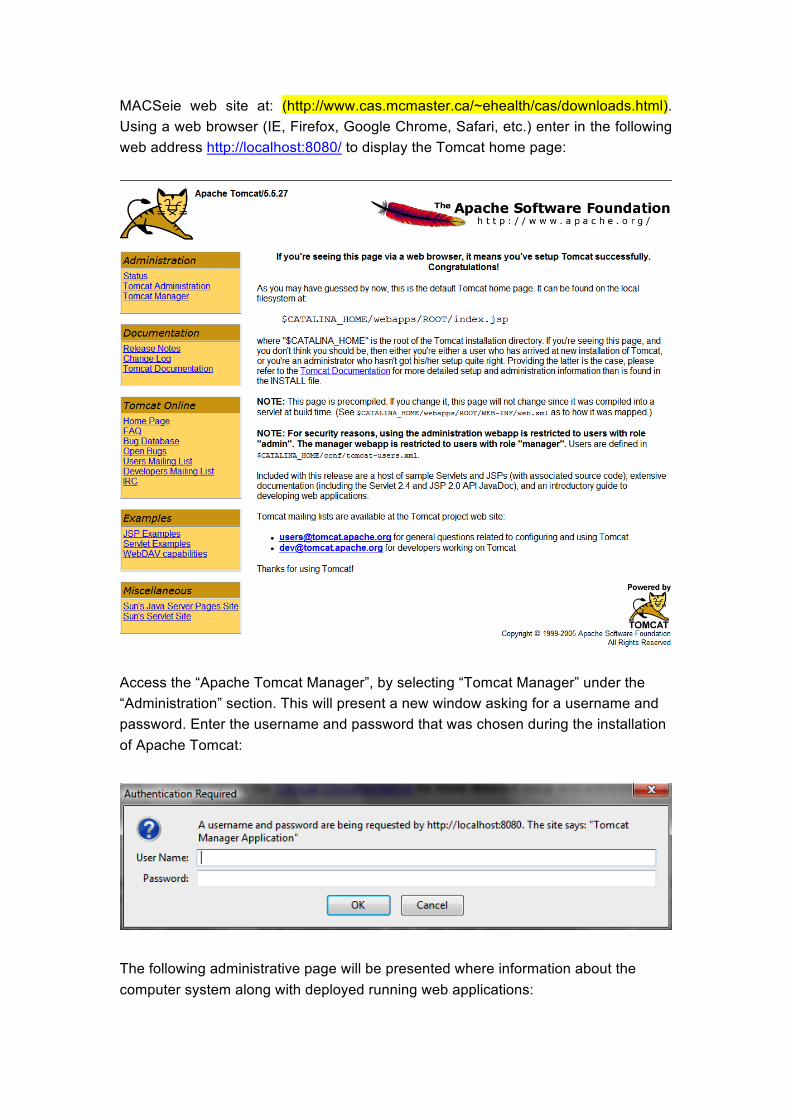
To confirm this is true, using a web browser (IE, Firefox, Google Chrome, Safari, etc.) enter in the following web address http://localhost:8080/. The following web page should be presented which indicates that Tomcat is now running:

To access “Apache Tomcat Manager”, under “Administration” select “Tomcat Manager”. This will present a new window asking for a username and password. Enter the username and password that was chosen during the installation of Apache Tomcat:
The following administrative page will be presented where information about the computer system along with deployed running web applications:

To stop Tomcat, select the following icon from the “Tool Bar”:
Output will be shown in the “Console” of Eclipse similar to starting Tomcat to indicate that Tomcat has shutdown.
To restart Tomcat, select the following icon from the “Tool Bar”:
Output will be shown in the “Console” of Eclipse similar to starting Tomcat to indicate that Tomcat has restarted.
The procedure outlined here for the EMR source can be repeated for the VT and UDDI source. Download the source for the EMR WAR file (emr.war) from the
MACSeie web site at: (http://www.cas.mcmaster.ca/~ehealth/cas/downloads.html). Using a web browser (IE, Firefox, Google Chrome, Safari, etc.) enter in the following web address http://localhost:8080/ to display the Tomcat home page:
Access the “Apache Tomcat Manager”, by selecting “Tomcat Manager” under the “Administration” section. This will present a new window asking for a username and password. Enter the username and password that was chosen during the installation of Apache Tomcat:
The following administrative page will be presented where information about the computer system along with deployed running web applications:
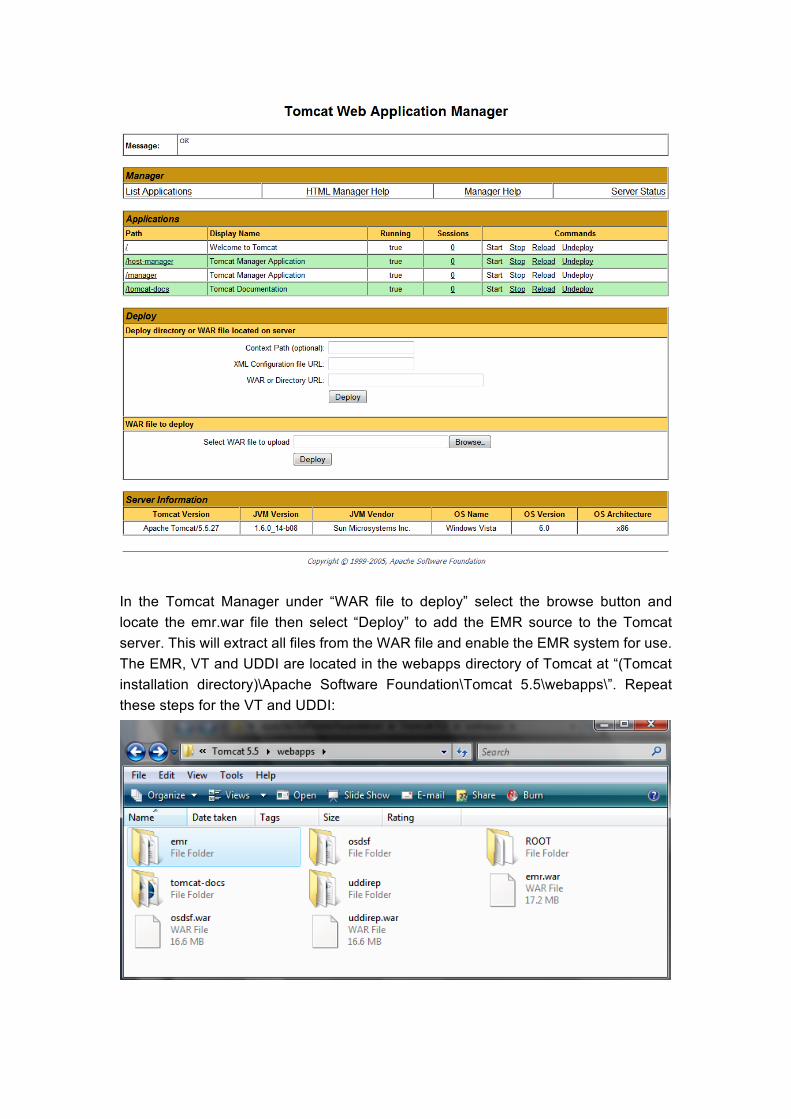
In the Tomcat Manager under “WAR file to deploy” select the browse button and locate the emr.war file then select “Deploy” to add the EMR source to the Tomcat server. This will extract all files from the WAR file and enable the EMR system for use. The EMR, VT and UDDI are located in the webapps directory of Tomcat at “(Tomcat installation directory)\Apache Software Foundation\Tomcat 5.5\webapps\”. Repeat these steps for the VT and UDDI:
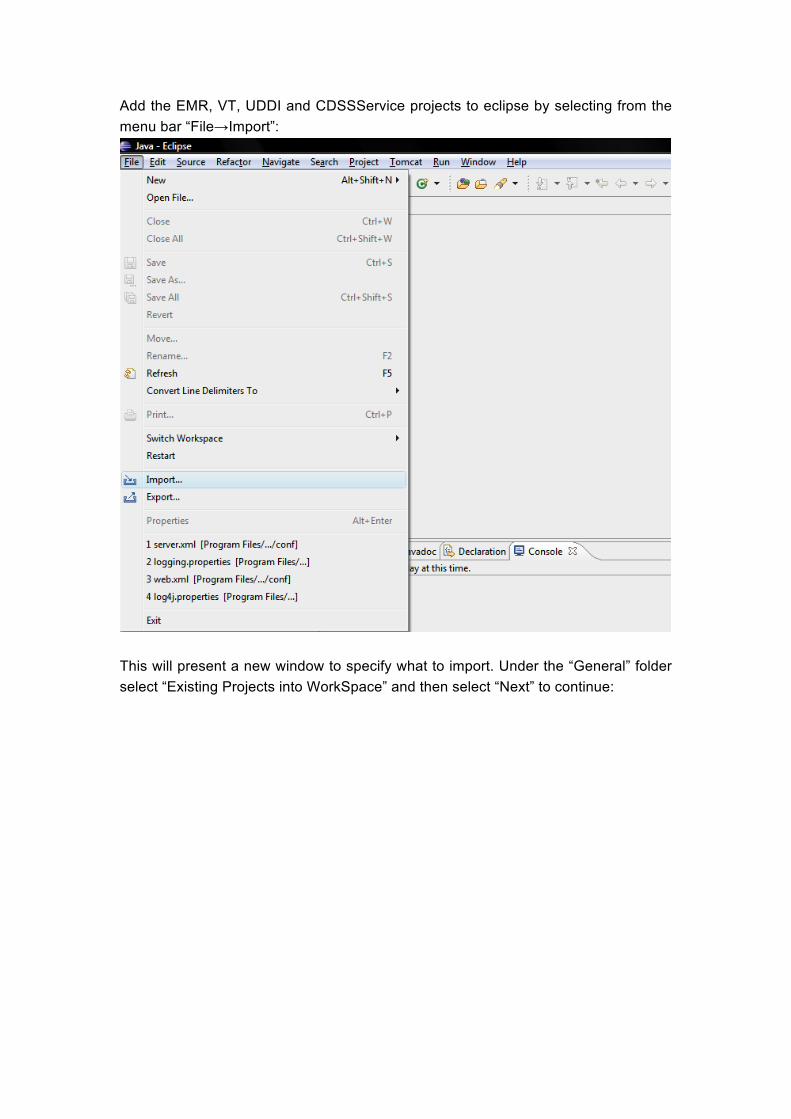
Add the EMR, VT, UDDI and CDSSService projects to eclipse by selecting from the menu bar “File→Import”:
This will present a new window to specify what to import. Under the “General” folder select “Existing Projects into WorkSpace” and then select “Next” to continue:
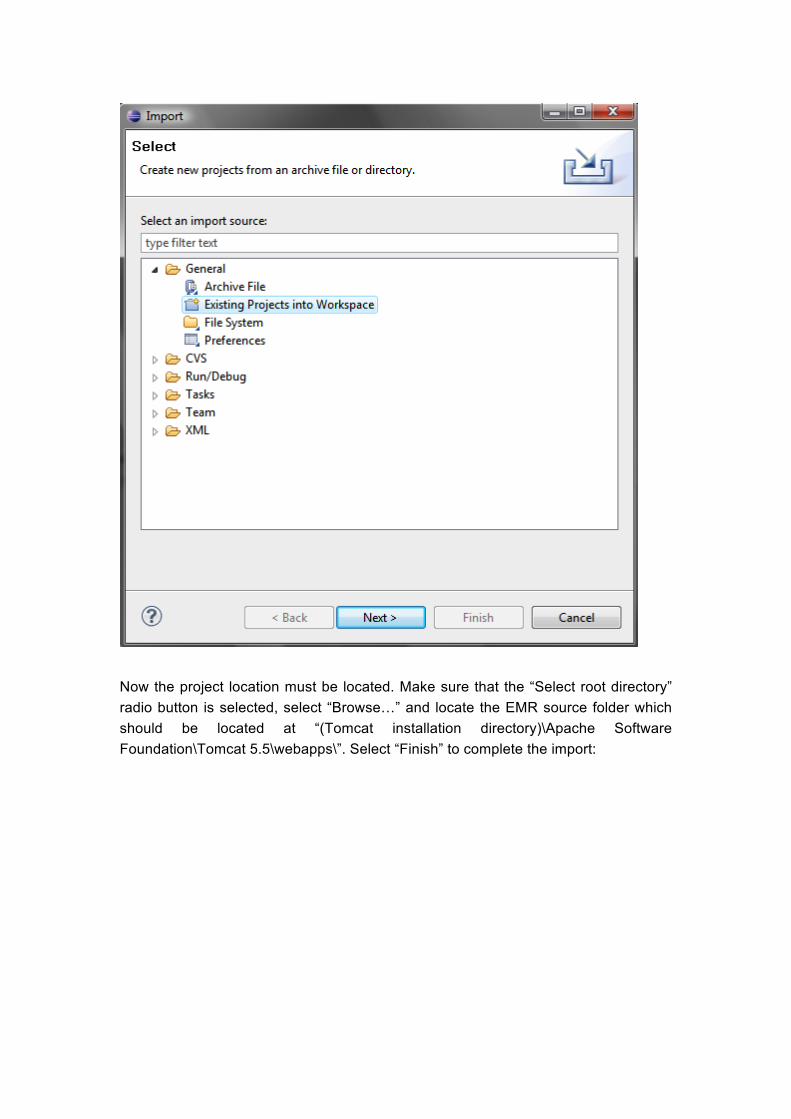
Now the project location must be located. Make sure that the “Select root directory” radio button is selected, select “Browse…” and locate the EMR source folder which should be located at “(Tomcat installation directory)\Apache Software Foundation\Tomcat 5.5\webapps\”. Select “Finish” to complete the import:
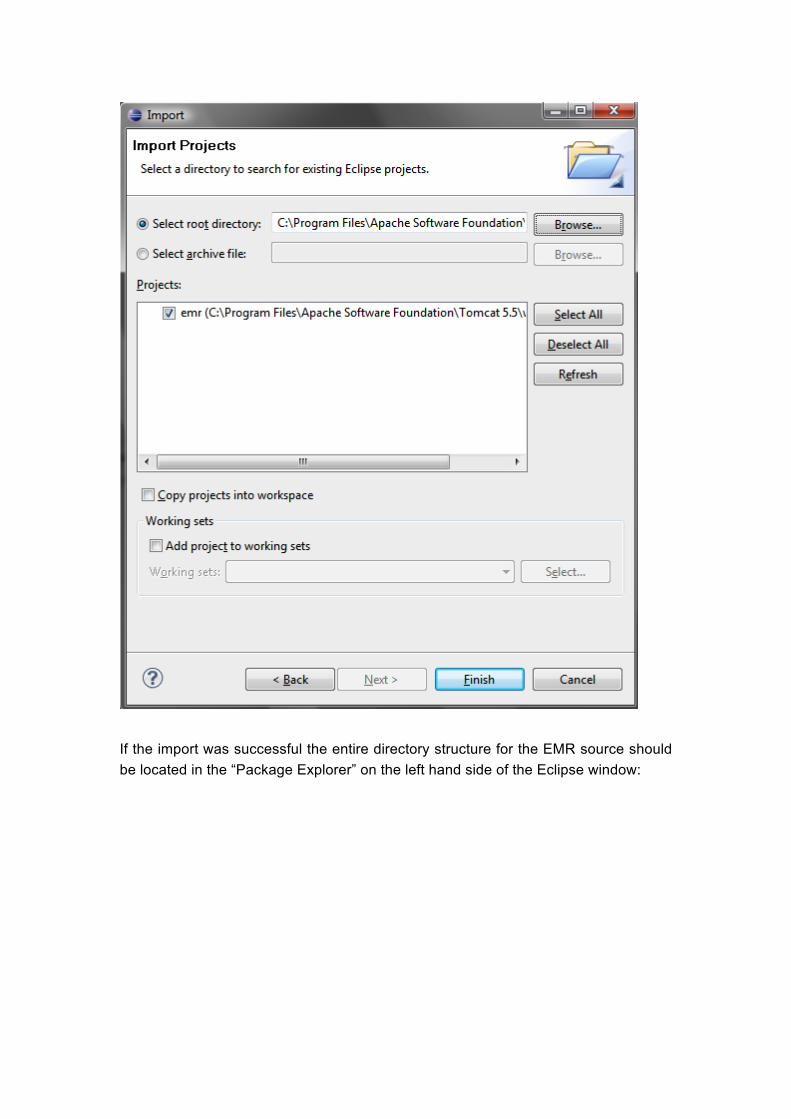
If the import was successful the entire directory structure for the EMR source should be located in the “Package Explorer” on the left hand side of the Eclipse window:

Verify that all necessary libraries are located by selecting the EMR project in the “Package Explorer” and pressing the right mouse button. Then under “Build Path” select “Configure Build Path…”:
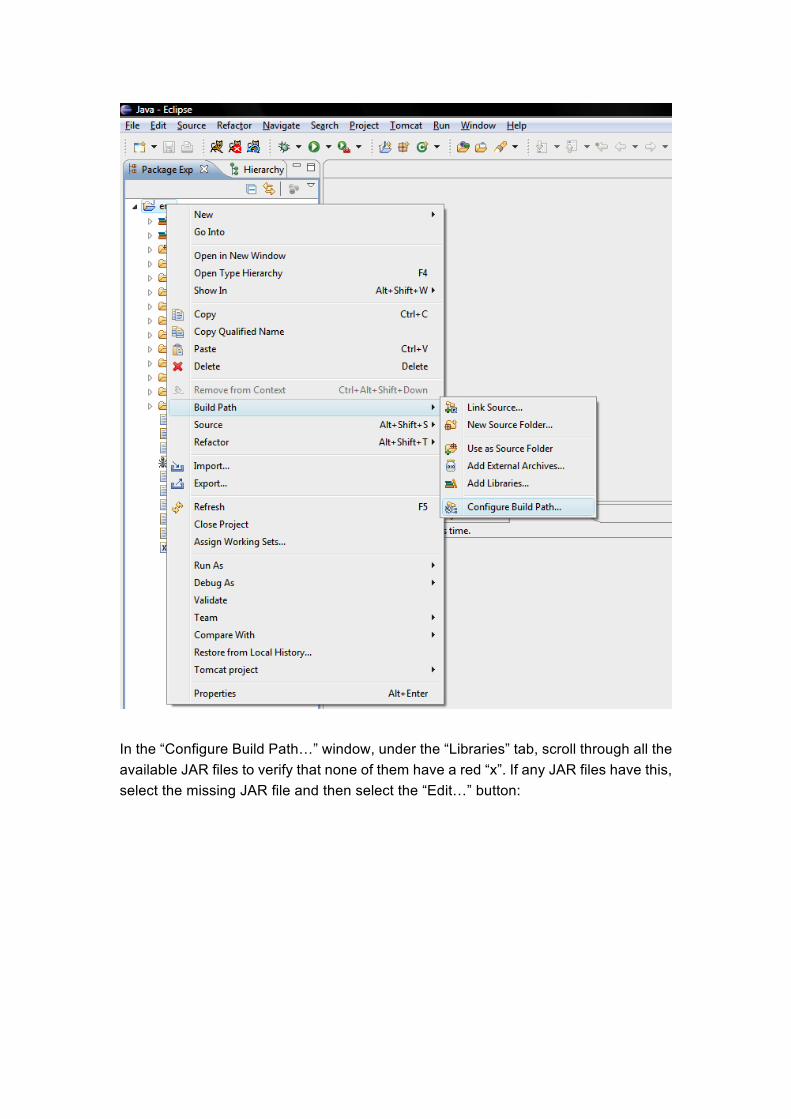
In the “Configure Build Path…” window, under the “Libraries” tab, scroll through all the available JAR files to verify that none of them have a red “x”. If any JAR files have this, select the missing JAR file and then select the “Edit…” button:
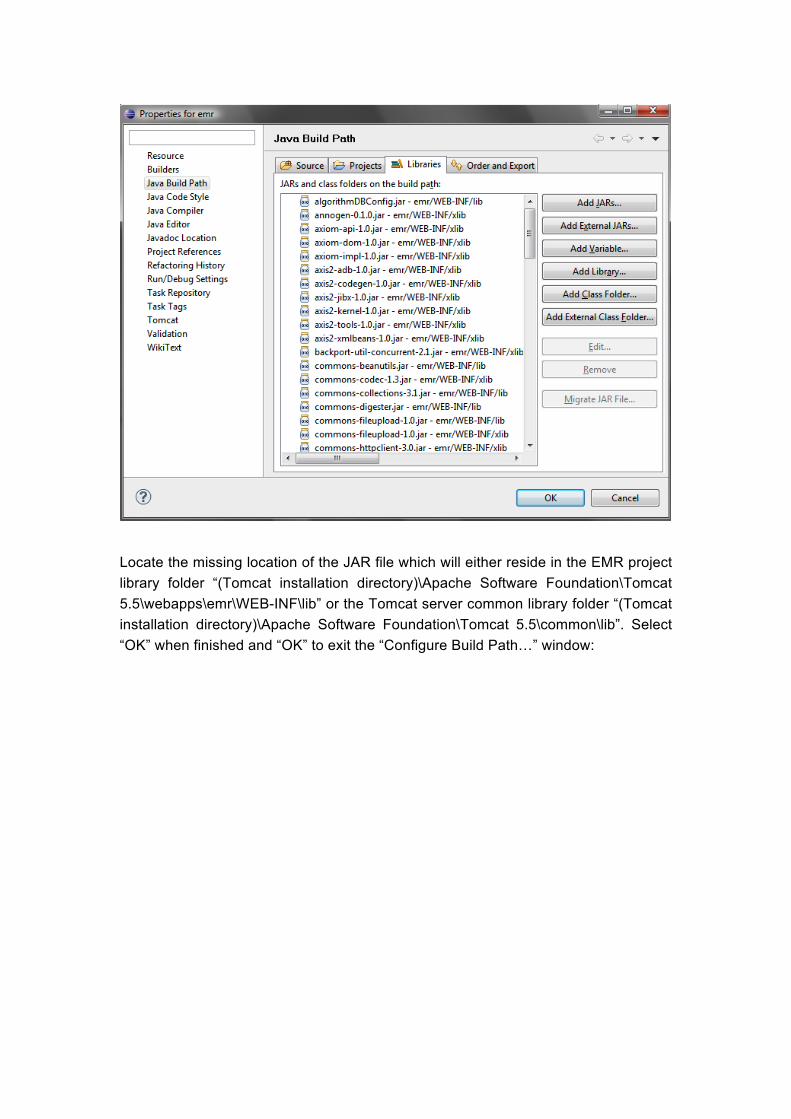
Locate the missing location of the JAR file which will either reside in the EMR project library folder “(Tomcat installation directory)\Apache Software Foundation\Tomcat 5.5\webapps\emr\WEB-INF\lib” or the Tomcat server common library folder “(Tomcat installation directory)\Apache Software Foundation\Tomcat 5.5\common\lib”. Select “OK” when finished and “OK” to exit the “Configure Build Path…” window:
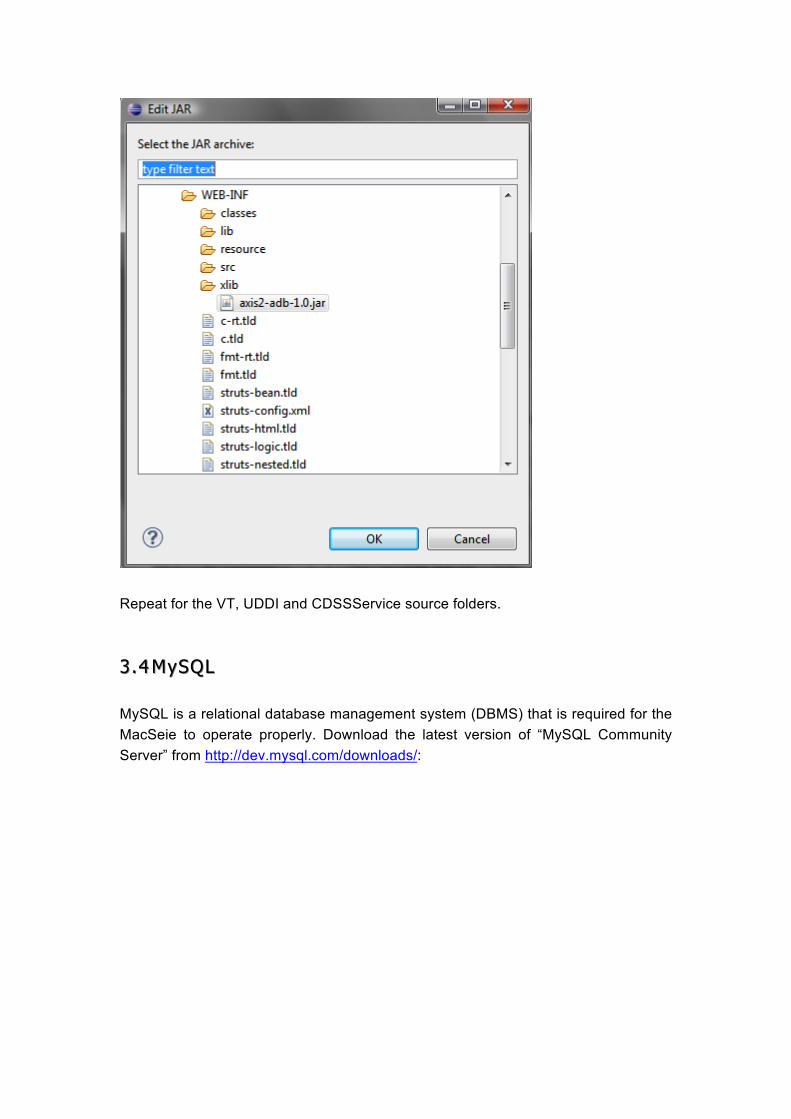
Repeat for the VT, UDDI and CDSSService source folders.
3.43.4 MySQLMySQL
MySQL is a relational database management system (DBMS) that is required for the MacSeie to operate properly. Download the latest version of “MySQL Community Server” from http://dev.mysql.com/downloads/:

Make sure to select the “Windows” platform and download the “Windows MSI Installer (x86)” as this will provide a wizard to make installation easier:
Execute file “mysql-x.x.xx-win32.msi” (x represents the version number) and follow the on-screen instructions by accepting the start of the installation wizard by selecting “Next”:
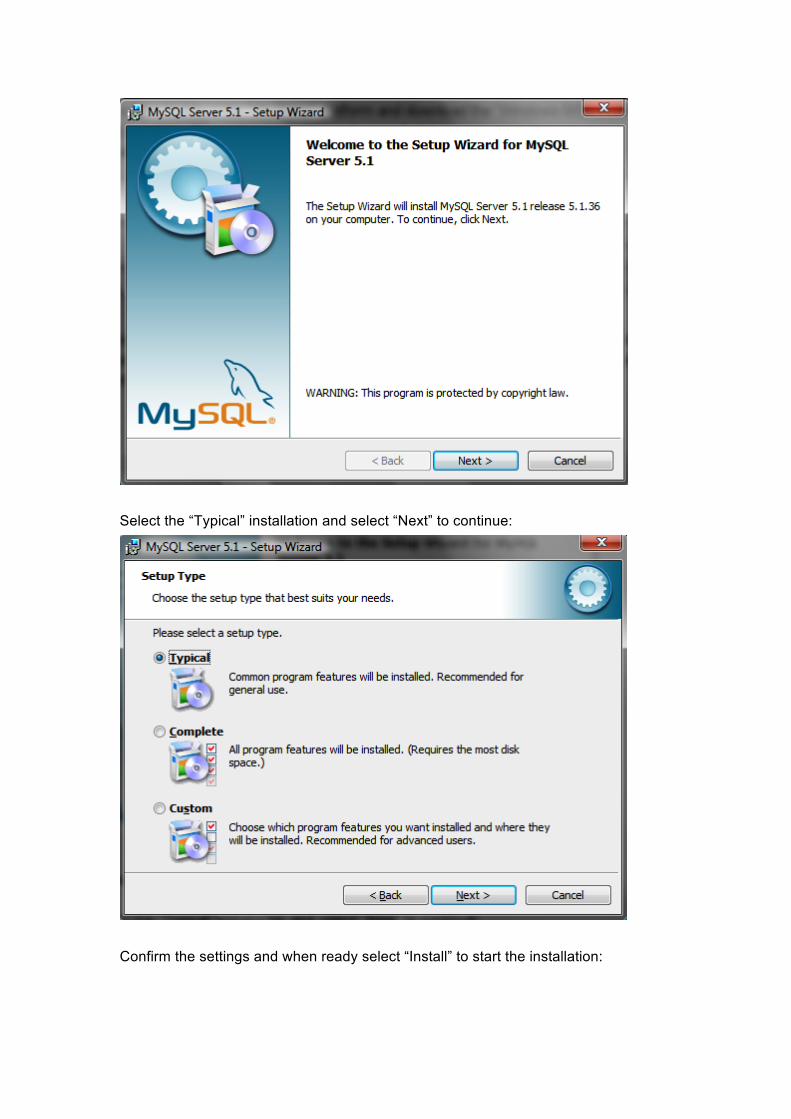
Select the “Typical” installation and select “Next” to continue:
Confirm the settings and when ready select “Install” to start the installation:
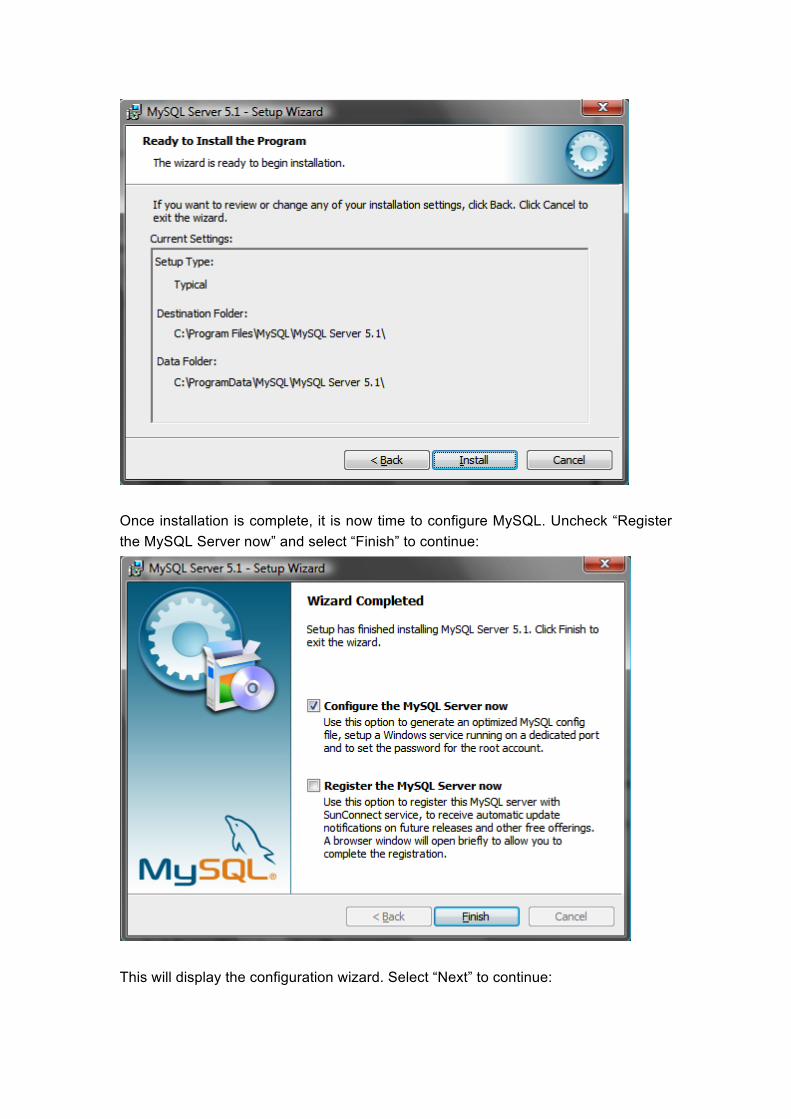
Once installation is complete, it is now time to configure MySQL. Uncheck “Register the MySQL Server now” and select “Finish” to continue:
This will display the configuration wizard. Select “Next” to continue:
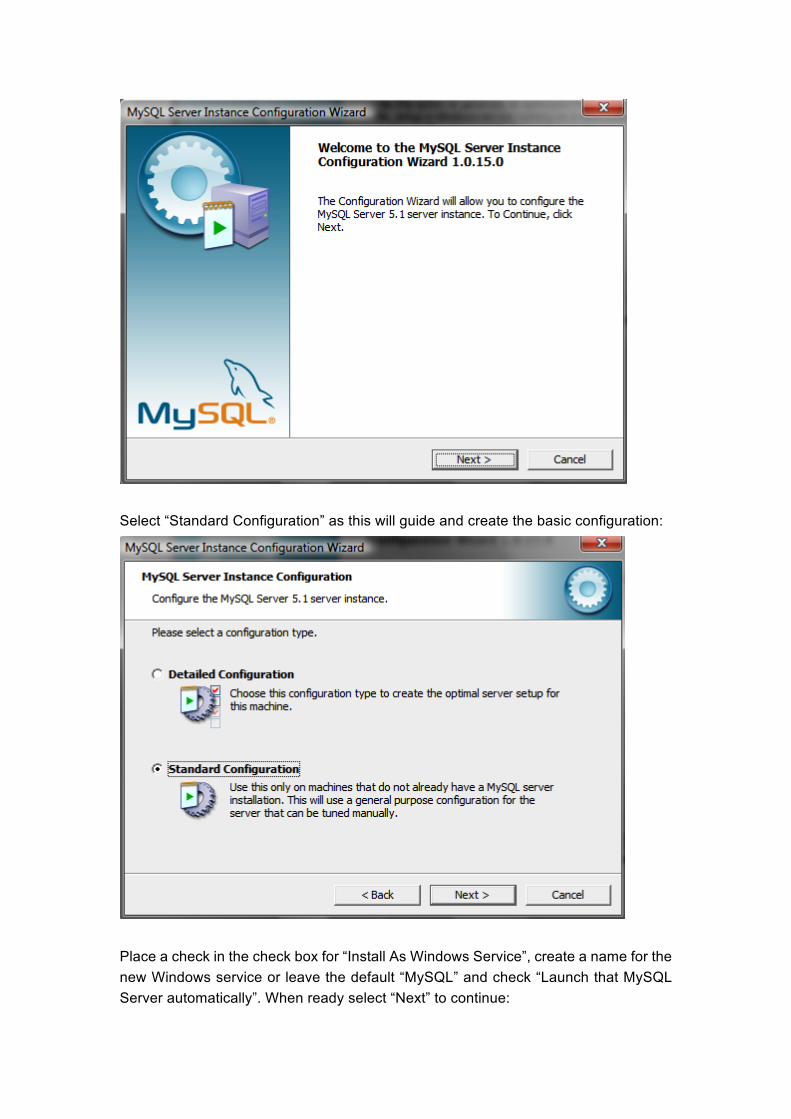
Select “Standard Configuration” as this will guide and create the basic configuration:
Place a check in the check box for “Install As Windows Service”, create a name for the new Windows service or leave the default “MySQL” and check “Launch that MySQL Server automatically”. When ready select “Next” to continue:
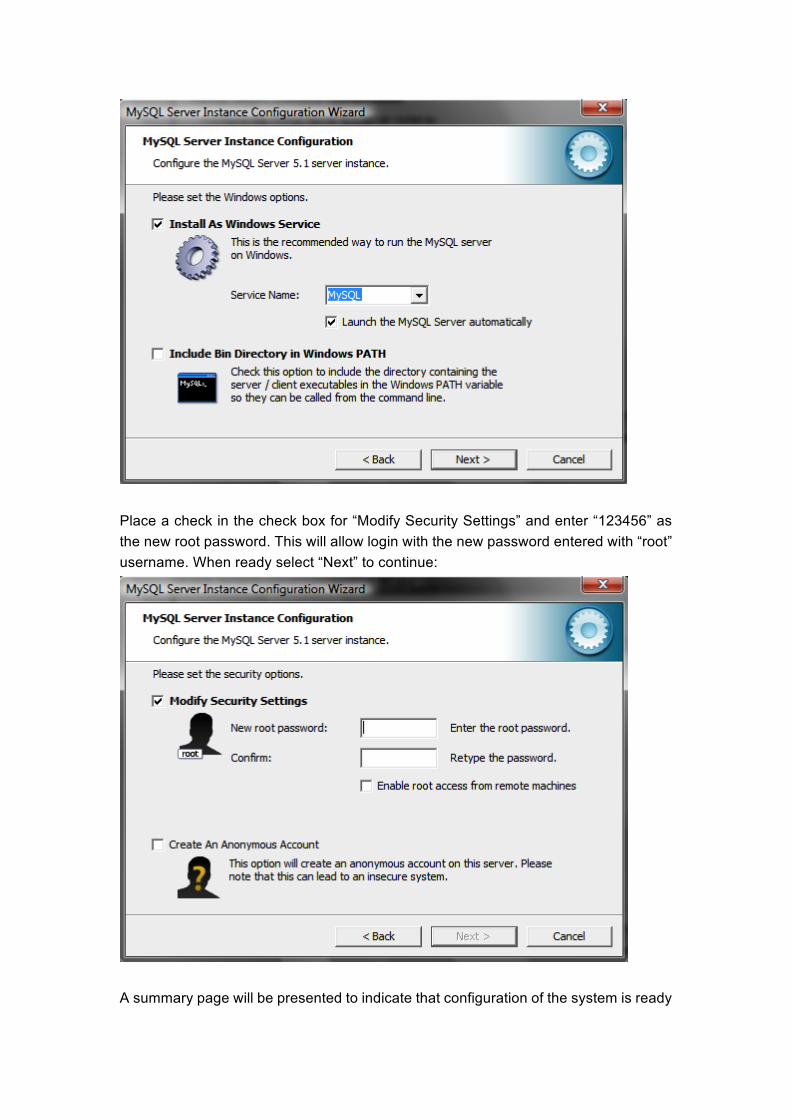
Place a check in the check box for “Modify Security Settings” and enter “123456” as the new root password. This will allow login with the new password entered with “root” username. When ready select “Next” to continue:
A summary page will be presented to indicate that configuration of the system is ready

to start. When ready select “Execute” to continue:
When configuration is complete select “Finish” to exit.
Now download the latest MySQL GUI Tools for Windows from http://dev.mysql.com/downloads/gui-tools/ which include:
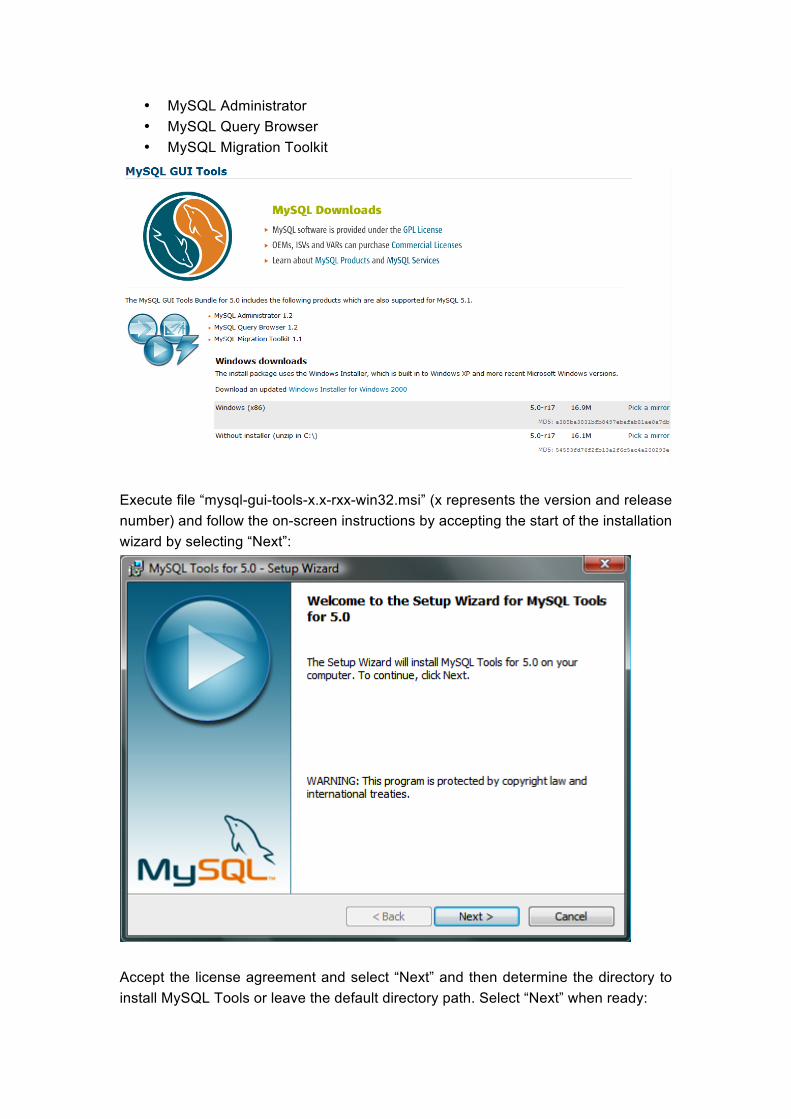
• MySQL Administrator • MySQL Query Browser • MySQL Migration Toolkit
Execute file “mysql-gui-tools-x.x-rxx-win32.msi” (x represents the version and release number) and follow the on-screen instructions by accepting the start of the installation wizard by selecting “Next”:
Accept the license agreement and select “Next” and then determine the directory to install MySQL Tools or leave the default directory path. Select “Next” when ready:
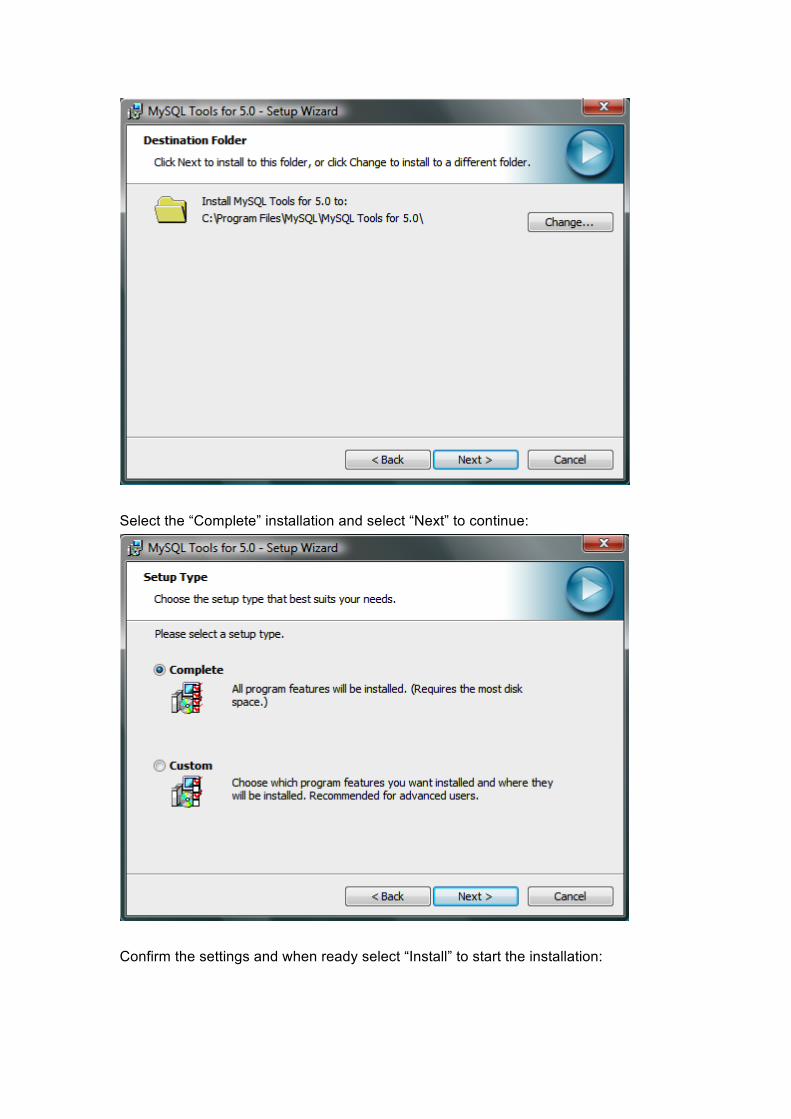
Select the “Complete” installation and select “Next” to continue:
Confirm the settings and when ready select “Install” to start the installation:
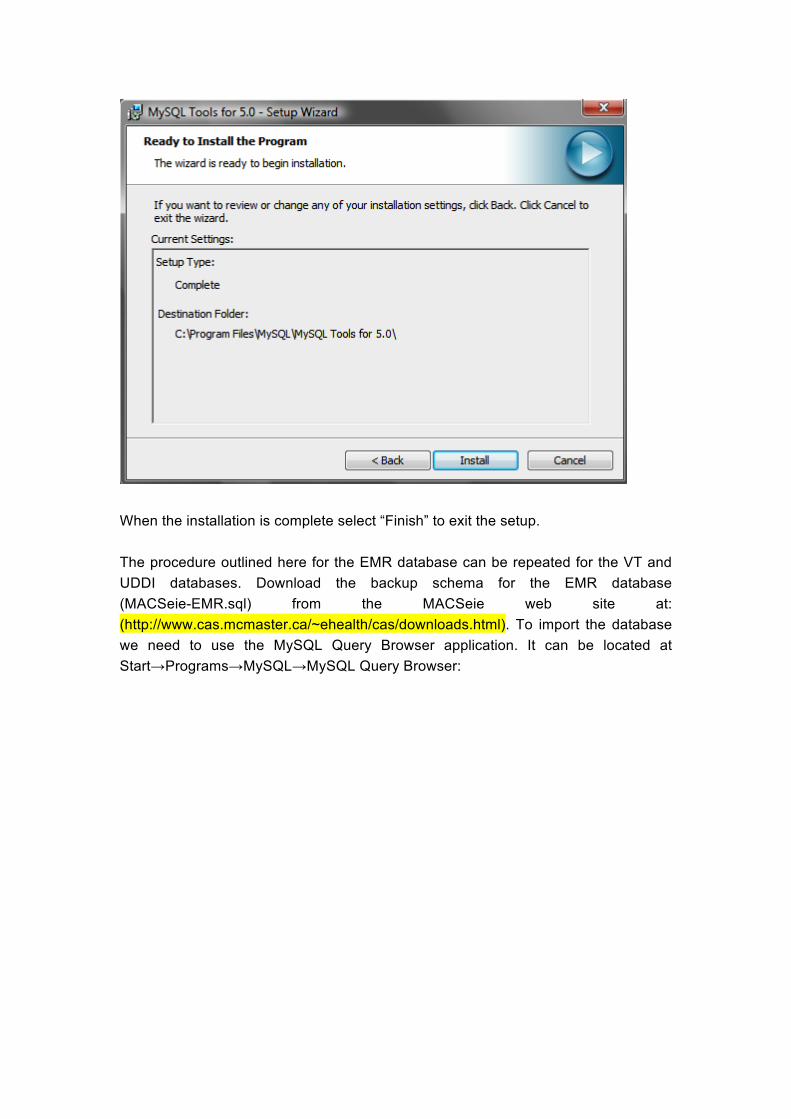
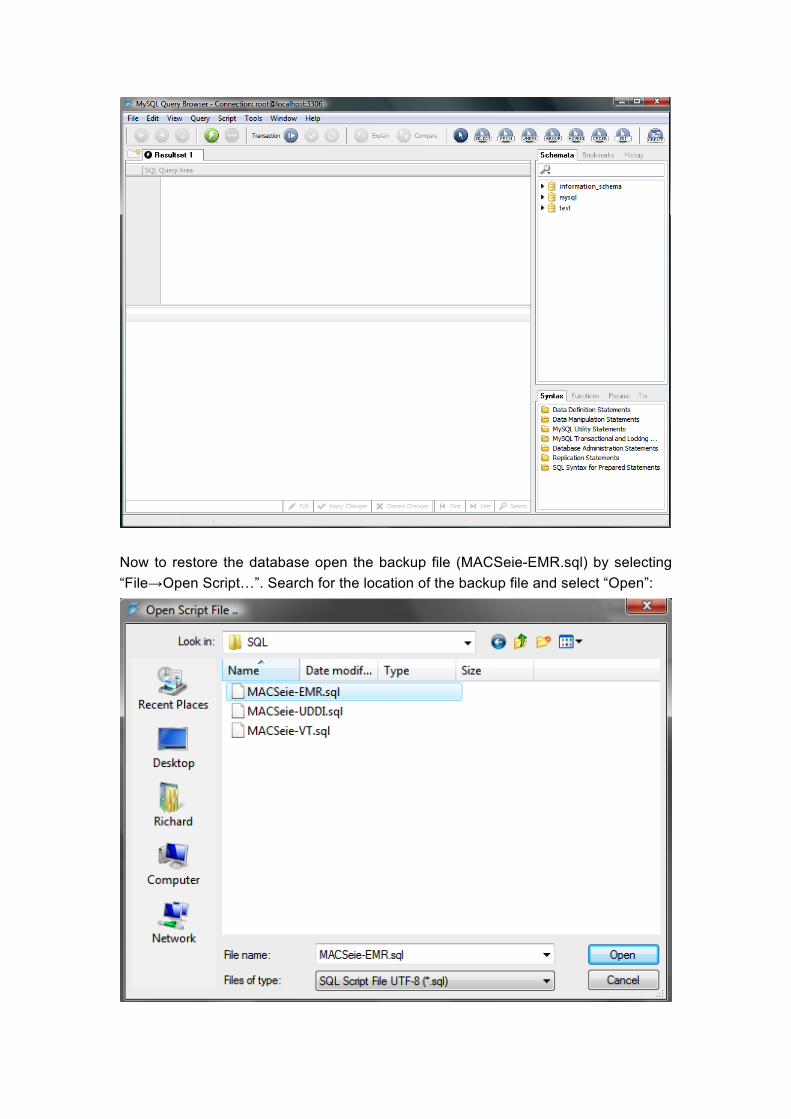
When the installation is complete select “Finish” to exit the setup. The procedure outlined here for the EMR database can be repeated for the VT and UDDI databases. Download the backup schema for the EMR database (MACSeie-EMR.sql) from the MACSeie web site at: (http://www.cas.mcmaster.ca/~ehealth/cas/downloads.html). To import the database we need to use the MySQL Query Browser application. It can be located at Start→Programs→MySQL→MySQL Query Browser:
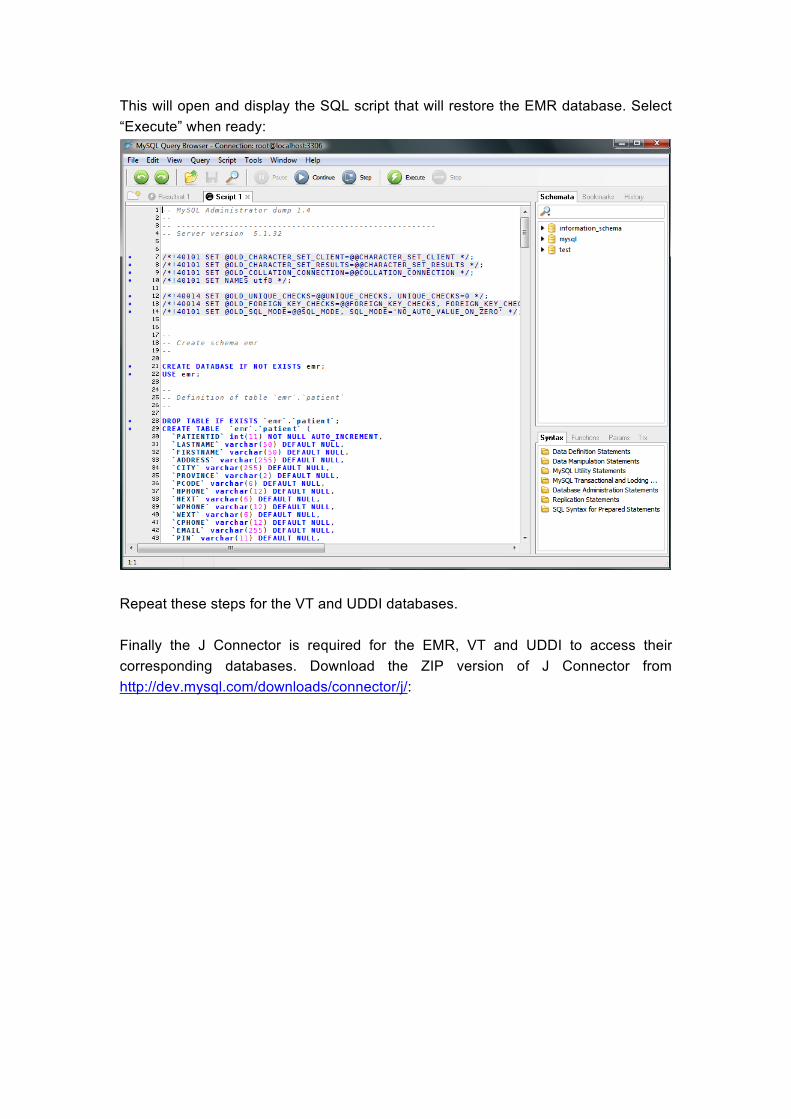
Now to restore the database open the backup file (MACSeie-EMR.sql) by selecting “File→Open Script…”. Search for the location of the backup file and select “Open”:
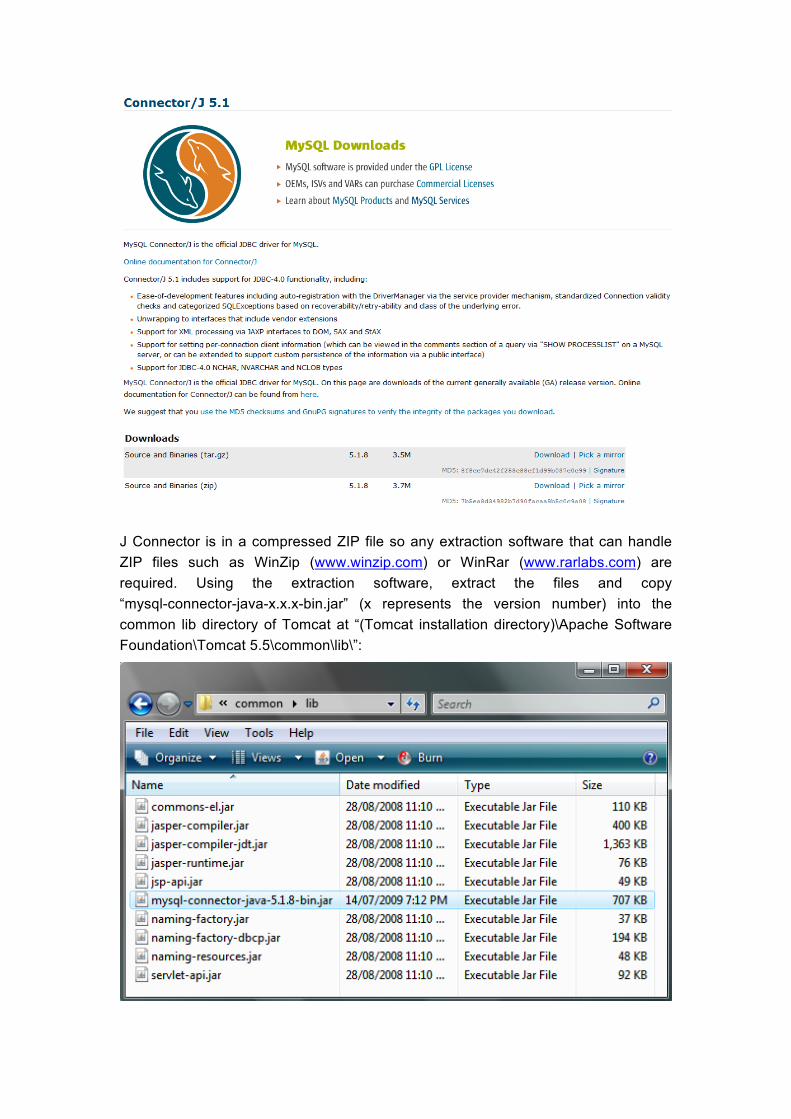
This will open and display the SQL script that will restore the EMR database. Select “Execute” when ready:
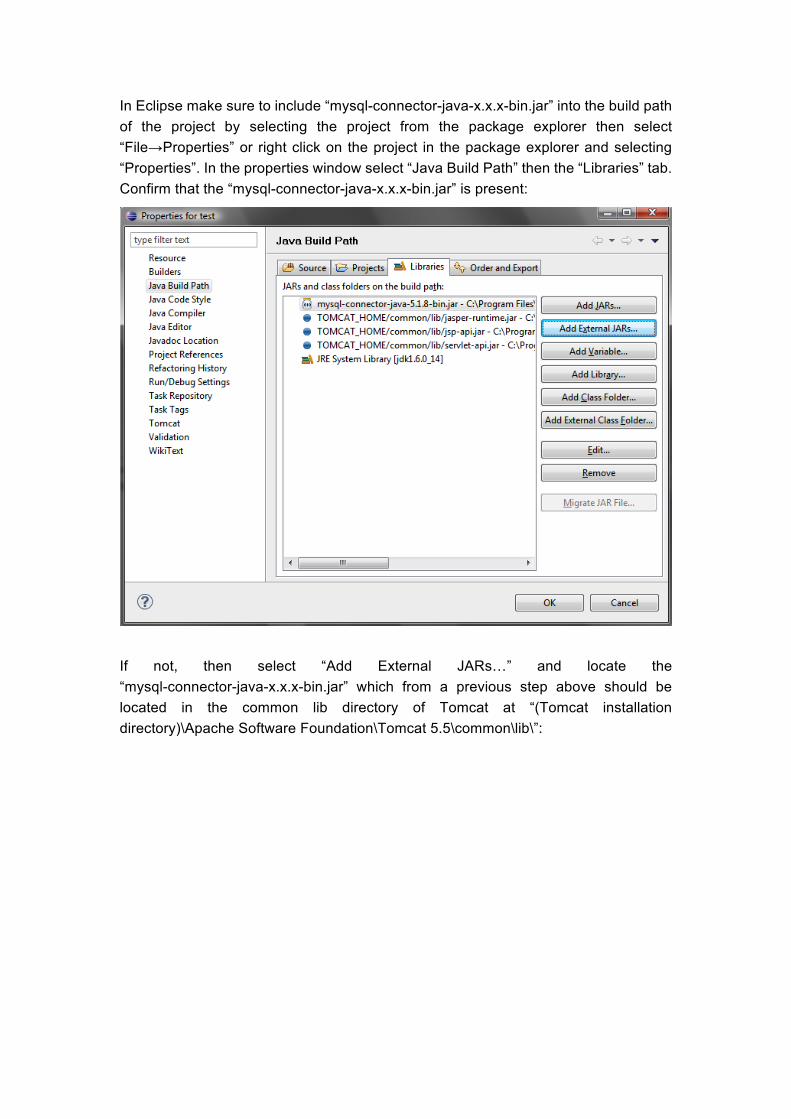
Repeat these steps for the VT and UDDI databases. Finally the J Connector is required for the EMR, VT and UDDI to access their corresponding databases. Download the ZIP version of J Connector from http://dev.mysql.com/downloads/connector/j/:
J Connector is in a compressed ZIP file so any extraction software that can handle ZIP files such as WinZip (www.winzip.com) or WinRar (www.rarlabs.com) are required. Using the extraction software, extract the files and copy “mysql-connector-java-x.x.x-bin.jar” (x represents the version number) into the common lib directory of Tomcat at “(Tomcat installation directory)\Apache Software Foundation\Tomcat 5.5\common\lib\”:
In Eclipse make sure to include “mysql-connector-java-x.x.x-bin.jar” into the build path of the project by selecting the project from the package explorer then select “File→Properties” or right click on the project in the package explorer and selecting “Properties”. In the properties window select “Java Build Path” then the “Libraries” tab. Confirm that the “mysql-connector-java-x.x.x-bin.jar” is present:
If not, then select “Add External JARs…” and locate the “mysql-connector-java-x.x.x-bin.jar” which from a previous step above should be located in the common lib directory of Tomcat at “(Tomcat installation directory)\Apache Software Foundation\Tomcat 5.5\common\lib\”:
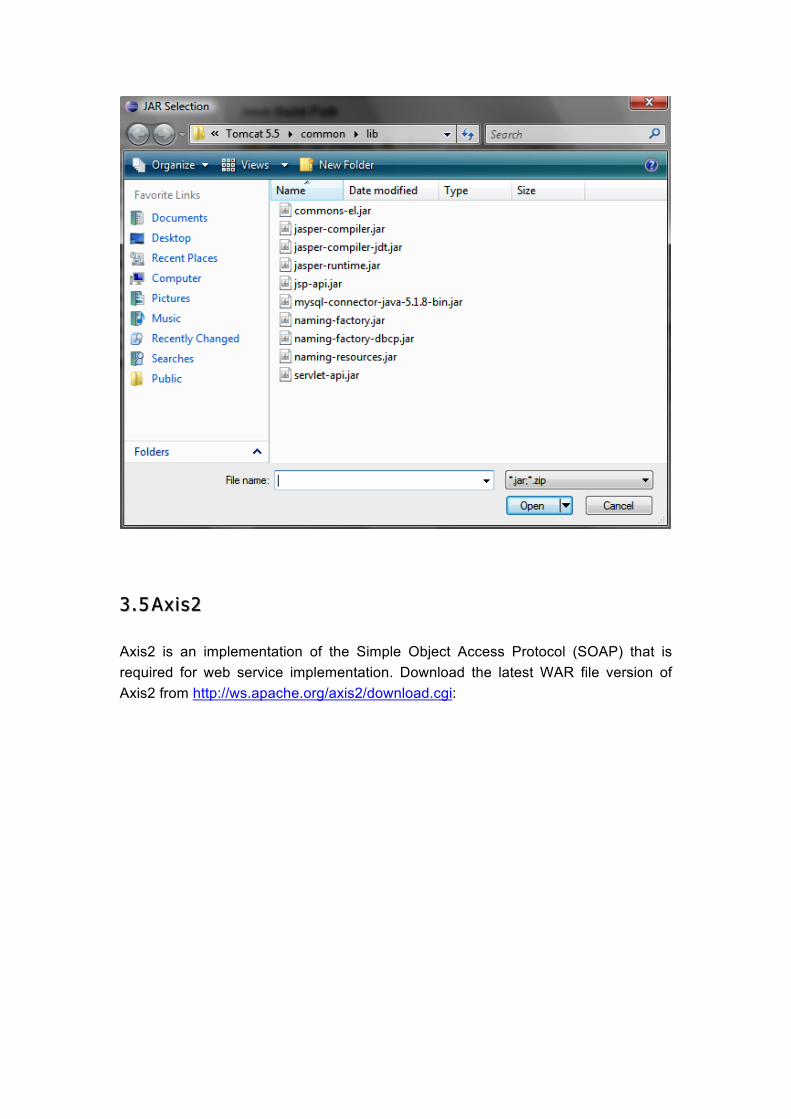
3.53.5 Axis2Axis2
Axis2 is an implementation of the Simple Object Access Protocol (SOAP) that is required for web service implementation. Download the latest WAR file version of Axis2 from http://ws.apache.org/axis2/download.cgi:
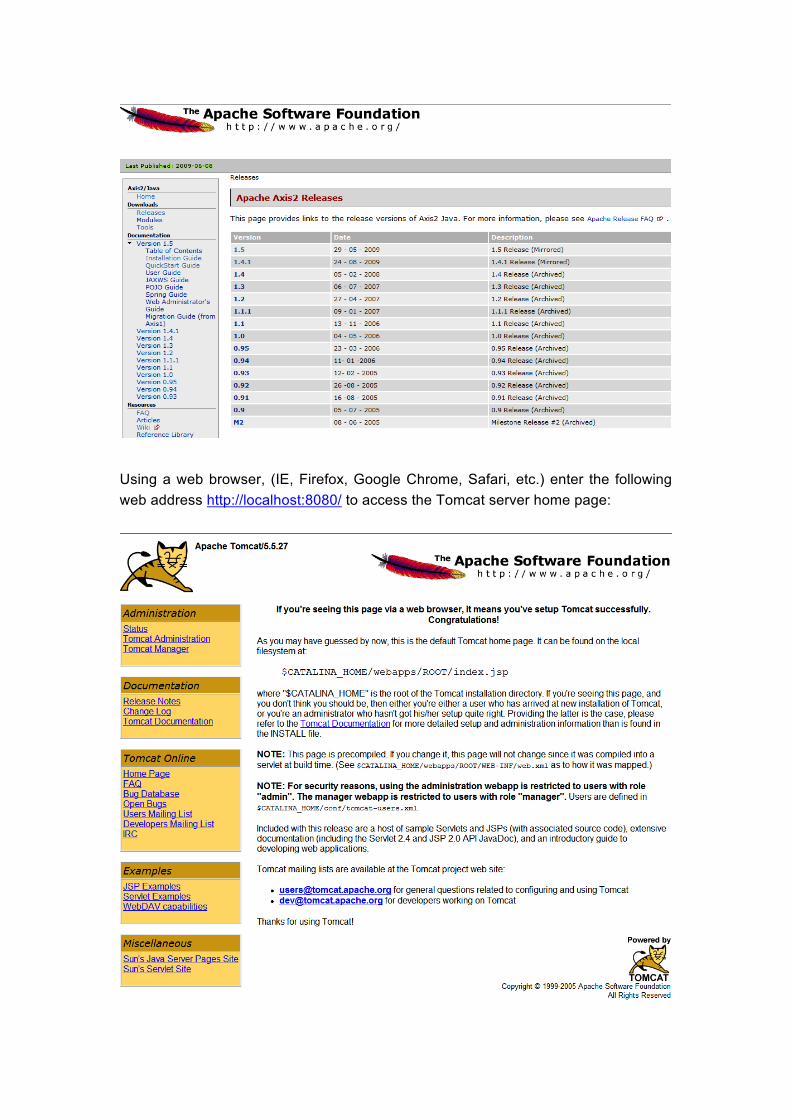
Using a web browser, (IE, Firefox, Google Chrome, Safari, etc.) enter the following web address http://localhost:8080/ to access the Tomcat server home page:

Under “Administration” select “Tomcat Manager”. This will present a new window asking for a username and password. Enter the username and password that was chosen during the installation of Apache Tomcat:
The following administrative page will be presented where information about the server along with deployed running web applications:
In the Tomcat Manager under “WAR file to deploy” select the browse button and locate the axis2.war file then select “Deploy” to add Axis2 to the Tomcat server. This will extract all files from the WAR file and enable Axis2 for use. Axis2 is located in the webapps directory of Tomcat at “(Tomcat installation directory)\Apache Software Foundation\Tomcat 5.5\webapps\”:
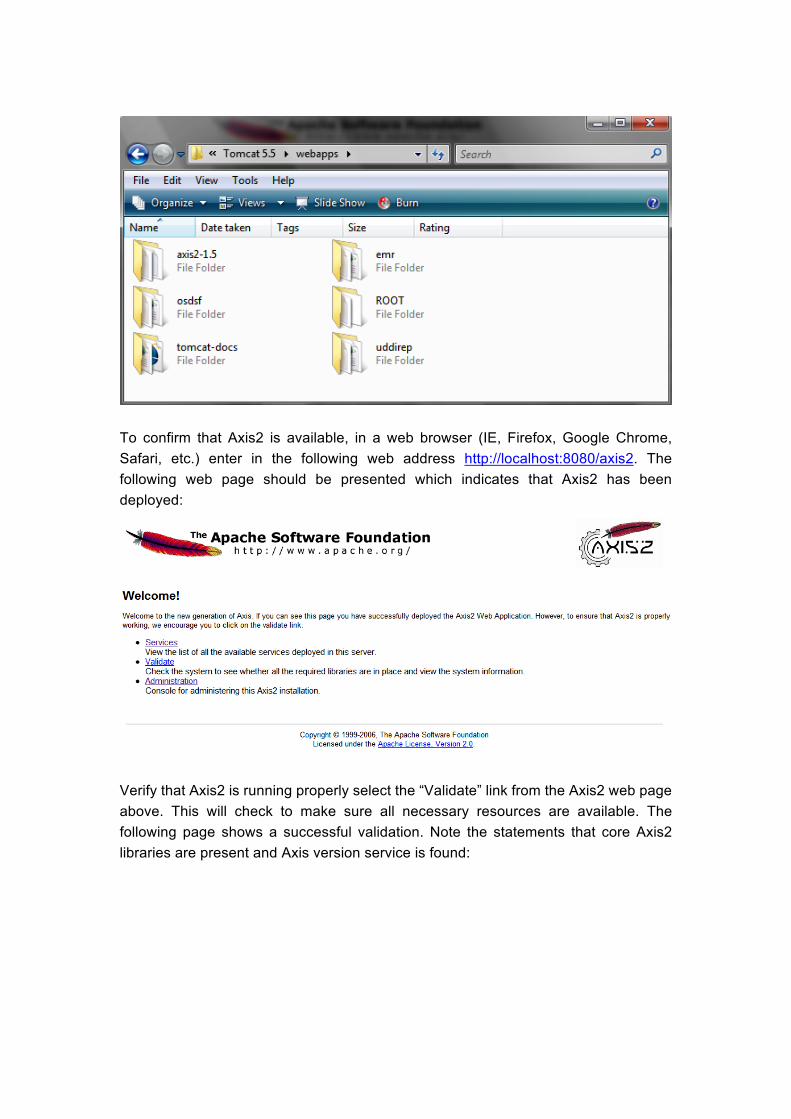
To confirm that Axis2 is available, in a web browser (IE, Firefox, Google Chrome, Safari, etc.) enter in the following web address http://localhost:8080/axis2. The following web page should be presented which indicates that Axis2 has been deployed:
Verify that Axis2 is running properly select the “Validate” link from the Axis2 web page above. This will check to make sure all necessary resources are available. The following page shows a successful validation. Note the statements that core Axis2 libraries are present and Axis version service is found:
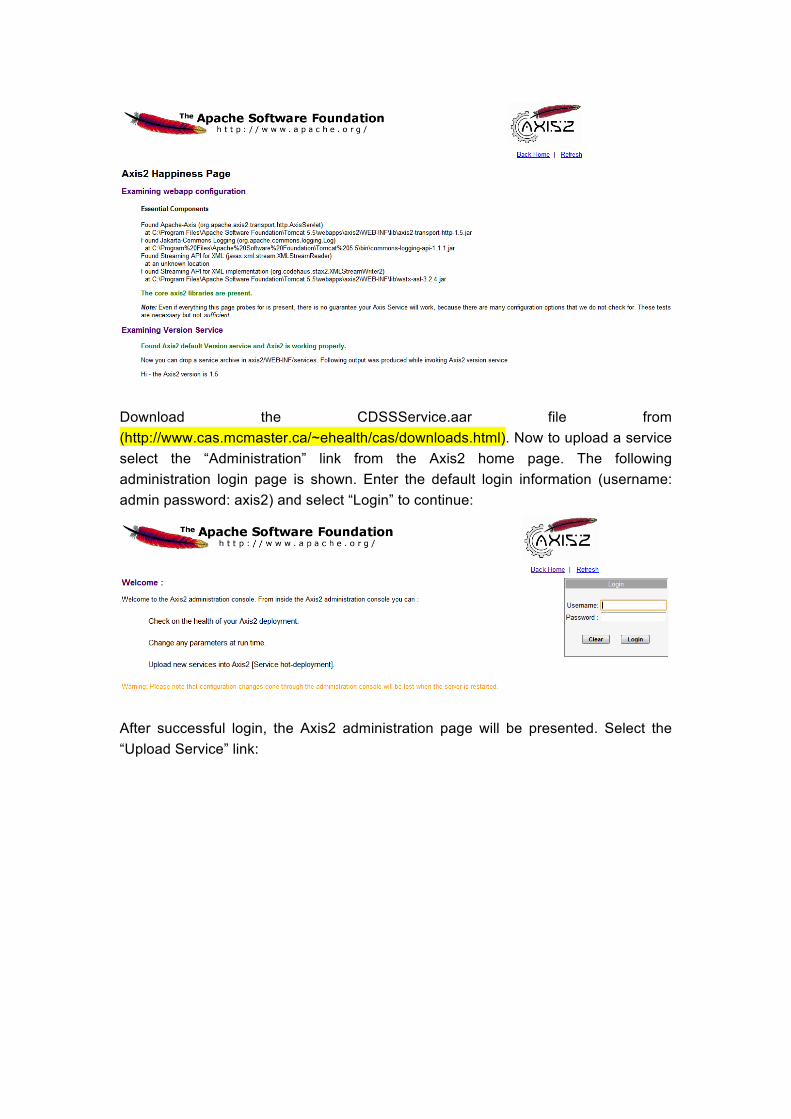
Download the CDSSService.aar file from (http://www.cas.mcmaster.ca/~ehealth/cas/downloads.html). Now to upload a service select the “Administration” link from the Axis2 home page. The following administration login page is shown. Enter the default login information (username: admin password: axis2) and select “Login” to continue:
After successful login, the Axis2 administration page will be presented. Select the “Upload Service” link:

The following service upload page will be shown. Select “Choose File” and browse to the location of CDSSService.arr. When finished select “Upload”:
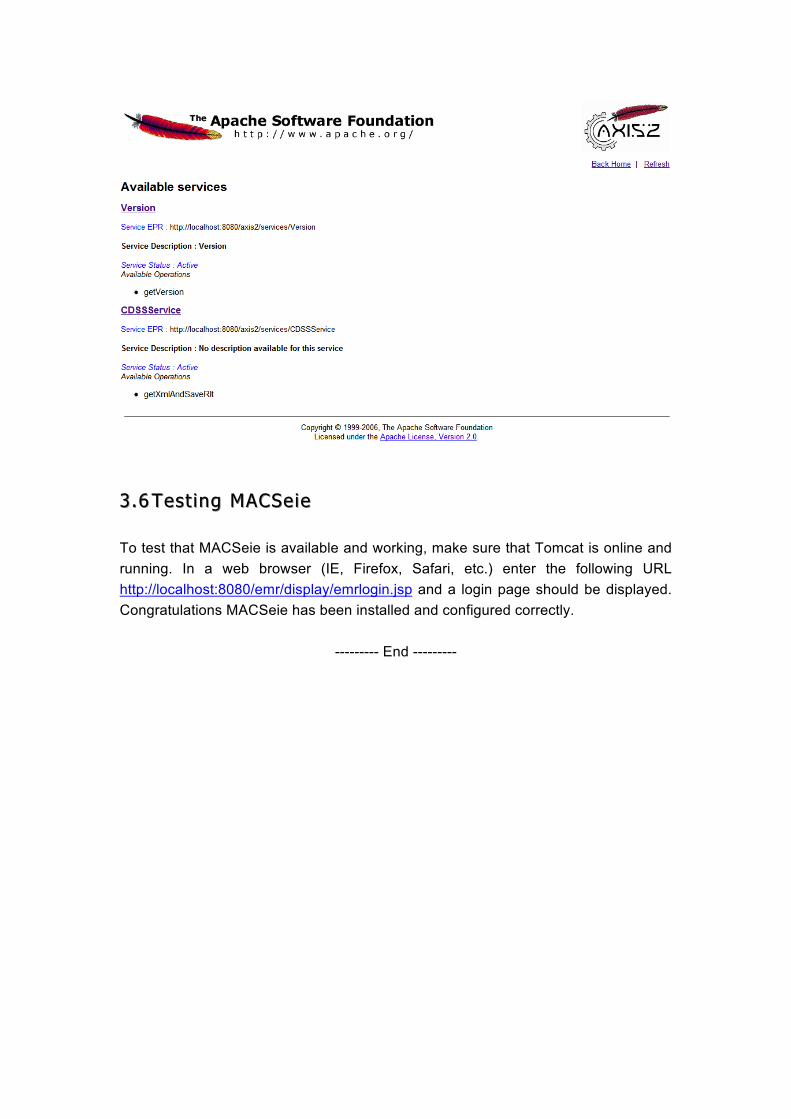
Notification of the new service will be shown. To verify that the new service has been uploaded successfully, from the Axis2 home page select “Services”. This will show all services that are available and running. Verify that the “CDSSService” service is present and active:
3.63.6 TestingTesting MACSeie MACSeie
To test that MACSeie is available and working, make sure that Tomcat is online and running. In a web browser (IE, Firefox, Safari, etc.) enter the following URL http://localhost:8080/emr/display/emrlogin.jsp and a login page should be displayed. Congratulations MACSeie has been installed and configured correctly.
--------- End ---------