MasterTemplate 14 Release Notes - The Office Standard for ...€¦ · ArchiCAD MasterTemplate 14...
23
ArchiCAD MasterTemplate 14 Release Notes Last Revision: September 6, 2010 Welcome to the latest version of the ArchiCAD MasterTemplate. The new update provides full compatibility with ArchiCAD 14, and also contains new features and revisions based on feedback and suggestions from users as well as our own discoveries and innovations. This document explains the new features, and outlines strategies for users upgrading from earlier versions of MasterTemplate. We suggest you read through these Release Notes to see what's new, and then decide how you want to transition your own version of AMT. At the end of this document, various approaches will be discussed for how to integrate the new version of AMT with your previously customized template. Please report anything requiring cleanup in an email to [email protected] . We hope you enjoy the new features of AMT 14. Thanks again for the opportunity to work with you! Eric Bobrow Bobrow Consulting Group CONTENTS Summary of Changes to AMT 14 Initial Download and Setup New Features in ArchiCAD MasterTemplate 14 • Sun Studies • Material Matrix and Sample Sheet • Tip Worksheet UPGRADE GUIDE Options for Integrating MasterTemplate 14 with Your Existing Template 1. How to Integrate Previous Customization into MasterTemplate 14 2. Integrating the New MasterTemplate 14 Features into Your Highly Customized MasterTemplate 12.1 or 13 File 3. Migrating from MasterTemplate 12 or earlier 4. Technical Note on Library Management for Advanced Users
-
Upload
trannguyet -
Category
Documents
-
view
221 -
download
3
Transcript of MasterTemplate 14 Release Notes - The Office Standard for ...€¦ · ArchiCAD MasterTemplate 14...

ArchiCAD MasterTemplate 14 Release Notes
Last Revision: September 6, 2010 Welcome to the latest version of the ArchiCAD MasterTemplate. The new update provides full compatibility with ArchiCAD 14, and also contains new features and revisions based on feedback and suggestions from users as well as our own discoveries and innovations.
This document explains the new features, and outlines strategies for users upgrading from earlier versions of MasterTemplate.
We suggest you read through these Release Notes to see what's new, and then decide how you want to transition your own version of AMT. At the end of this document, various approaches will be discussed for how to integrate the new version of AMT with your previously customized template. Please report anything requiring cleanup in an email to [email protected]. We hope you enjoy the new features of AMT 14. Thanks again for the opportunity to work with you! Eric Bobrow Bobrow Consulting Group
CONTENTS Summary of Changes to AMT 14 Initial Download and Setup New Features in ArchiCAD MasterTemplate 14
• Sun Studies • Material Matrix and Sample Sheet • Tip Worksheet
UPGRADE GUIDE
Options for Integrating MasterTemplate 14 with Your Existing Template
1. How to Integrate Previous Customization into MasterTemplate 14 2. Integrating the New MasterTemplate 14 Features into Your Highly Customized
MasterTemplate 12.1 or 13 File 3. Migrating from MasterTemplate 12 or earlier 4. Technical Note on Library Management for Advanced Users

Summary of Changes to AMT 14 1) The AMT Legends were revised for compatibility with ArchiCAD Library 14. This involved replacing a
small number of AC13 parts with their new equivalents in AC14. (Most of the existing parts found their corresponding item in the AC14 Library without assistance.) In addition, the labels for the Legend elements in the Quick Rooms and Parts Matrices were updated to refer to AC14 names.
2) MasterTemplate Library items were embedded into the Legends PLN files. In AC13, embedding the same custom parts into multiple hotlinks, or in a PLN as well as a hotlink file caused issues, but in AC14, this works without any problems.
a) For the USA template there is no need to load a separate AMT library. We provide one (in the AMT Supplemental Files folder) for those who prefer to load it separately.
b) For the INT template, we embed some parts into the Legends, but continue to load a linked library (MasterTemplate 14 INT LIBRARY, located in the same folder as the template file). The reason for this is that we load many USA library parts for use in the Detailer Legend; Graphisoft advises that embedding a large number of parts may cause performance issues. The Detailer parts may be removed or embedded by the user if desired; a technical note will be posted on the AMT website with instructions.
3) To simplify the structure of the template, some of the explanatory worksheets were moved from the main template file to the AMT Legends file. To refer to them, simply open AMT Legends 14 and refer to the Worksheets in the View Map. In addition, some Plan-based Views for the Interactive Legends were removed, since they are not needed for routine access to the Legends, which is done through Worksheet Views. One new View was created in the Plan subfolder for the Quick Rooms to facilitate copying entire rooms into the project.
4) New 3D Views were created for Shadow Studies. These are top-down views with shadows turned on. Two of them take advantage of the new feature in ArchiCAD 14 for shadows in OpenGL; one is set for 9 am March 21, the other for 3 pm (the user will need to set the location and north position correctly for these to work properly). A third View uses the Internal Engine with shading and shadows turned on; this can be used for copying shadows and pasting them into a plan drawing. These three views have been placed onto layout sheets in the Presentation drawings subset.
5) A new GDL object (AMT Material Matrix) was programmed to facilitate creating a sheet showing samples of all materials defined in the project. This object is placed in the AMT Legends 14 PLN file on the upper story, and is not normally referenced in the Legends. However, views of this Material Matrix have been placed onto Layouts in the Legends PLN and may be printed from there. Users may get new material sample sheets using this object after adding more materials to the project; instructions are included in this document for such use.
6) A new worksheet TIP-01 has been added for compiling tips and reference materials for quick access while working in a project. These can be placed as text blocks, images or a combination. An excellent tip from ArchiCAD-Talk that explains how wall skin priorities work is included as an example. (More tips and reference materials can be added by the user for general use, or inside a particular project, either in the same worksheet or in additional worksheets.)
7) Minor corrections / updates:
a) All site plan worksheet Views have been set to 1/8” = 1’-0” (or 1:100) rather than 1/4” = 1’-0” (1:50). This affects the following worksheets:
• PLN-01 SITE SURVEY | DWG • PLN-02 SITE PLAN | DWG • PLN-03 SITE DEMO PLAN • PLN-04 GRADING - DRAINAGE PLAN • PLN-05 UTILITY PLAN
as well as the following Layout Sheets:
SMALL PROJECT SET:

• A.06 SITE/ROOF PLAN / SURVEY & DETAILS
(LARGE PROJECT SET) A-2 SITE ITEMS & PLAN subset: • A-2.01 SITE PLAN • A-2.02 SITE SURVEY (TOPO & BOUNDARY) • A-2.03 SITE DEMOLITION PLAN • A-2.04 GRADING / DRAINAGE PLAN • A-2.05 UTILITY PLAN
b) Most pre-defined 3D OpenGL views for the 3D window have been redefined to use Sun Shadows, a new feature in ArchiCAD 14 that enhances the model image. In addition, views for the 3D window and for Photorendering have had their zoom adjusted to show the entire sample building.
c) A new Layout sheet has been added to the Small Project Set for DEMOLITION PLANS. It can be used or discarded as needed for each project.
d) Publisher Sets have been adjusted to correspond better with the Layout Book. Some items have been renamed and/or re-organized.
e) Favorites have been saved for all the Marker tools (Sections, Elevations, Worksheets, Details, Interior Elevations) and for the Drawing tool. The font has been set to standard Arial in the default settings for all markers.
f) The Master Specifications.doc file now is inside the MasterTemplate Linked Files folder, rather than the MasterTemplate Library folder. The Word document has been updated to refer to the new placement. The general notes start on Layout sheet A.02 GENERAL NOTES & SPECIFICATIONS in the small project set or A1.02 in the larger project set.
g) The T-R TRASH | RECYCLING | TEMP STORAGE Layout Subset has been refreshed. These layouts contain reference materials that may be printed out or viewed onscreen, including: • Interactive Legends – the entire set, intended for printing and study. • Object Inventory – a list of all objects in the template or any project, with layers assignments
– useful for double-checking that elements are on the proper layer. • Drawing List – a list of all Drawings in the template or in any project, with attribute settings –
useful for checking the layer combinations, scale and other settings. • View List – a printable reference guide to all views defined in the template, or in any project.
h) In the International MasterTemplate, in response to user requests, several additional Master Layouts were created for A3, A4 and A5 size sheets. In addition, a version of the A2 Master was added for placing Details in a grid system.

Initial Download and Setup The AMT download zip file expands into the following files:
• MasterTemplate 14 (USA / INT) TEMPLATE.tpl • MasterTemplate Linked Files folder:
o AMT Layout Master Company Logo.jpg o AMT Legends (USA / INT) 14.pln o AMT Office Favorites (USA / INT).pln o AMT Project Favorites (USA / INT).pln o Master Specifications.doc o Master Specifications.pdf
• MasterTemplate 14 INT LIBRARY (International version only) • AMT Supplemental Files folder:
o AMT Work Environment folder o Library folder for optional use:
MasterTemplate 14 USA LIBRARY, or MasterTemplate 14 INT LIBRARY (EMBEDDED)
o MasterTemplate NEW PROJECT FOLDER • MasterTemplate 14 Release Notes.pdf (this file)
The MasterTemplate 14 INT LIBRARY folder is loaded as a Linked Library folder by the template file (see explanation in item 2b above). It is placed at the top level, right next to the MasterTemplate 14 INT TEMPLATE.tpl file to make it easier to locate, since it. The libraries in the AMT Supplemental Files folder, the MasterTemplate 14 USA LIBRARY or the MasterTemplate 14 INT LIBRARY (EMBEDDED), do not normally need to be loaded in the Library Manger since the contents are embedded into the Legend files. However, for advanced users, these folders are provided as an alternative option. To install AMT 14, download the zip file to your workstation, then unzip to a convenient location into a new folder. We recommend placing this into your ArchiCAD Office Standards folder; a good place for this is in the Jobs folder on your hard drive or on the office server. AMT 14 file uses three Hotlinked Modules (HLM): one refers to the AMT LEGENDS 14.pln (the main “kit of parts”), a second to the AMT Office Favorites.pln, and a third to the Project Favorites.pln. When you open up the TEMPLATE you'll get a message saying that these three Hotlinks are missing, since everything is now on a new workstation. You should ignore this message and continue; you’ll clean it up after you finish opening the file. You will also get a warning about missing PDFs - these are referenced in the Layout Book and used for the specifications and general notes pages. As with all previous versions of AMT, it’s simplest to resolve this warning message right away by using the Read From… button and choosing the MasterTemplate 14 Linked Files folder. ArchiCAD will search within that folder, and find the PDF files and relink them. Later, when you save the TEMPLATE, all of this will be remembered, so you won't have to deal with them again (unless you move the files or decide to change the references). After you finish opening up the TEMPLATE file, go to the Hotlink Manager (File menu > External Content > Hotlink Manager) and relink the Hotlink references to the file locations on your hard drive or network. Highlight each one of the files in the list, one by one, and use the Relink…from file button, then navigate to the MasterTemplate Linked Files folder and select the appropriate file (NOTE: if you can’t “see” listed any files inside the MasterTemplate Linked Files folder, change the file type from MOD to PLN from the popup menu). Repeat for the other hotlinks, then click OK to proceed with updating the links.

New Features in ArchiCAD MasterTemplate 14
SUN STUDIES
Several new Views were created for use in Sun Studies:
The first two of these views take advantage of the new ArchiCAD 14 feature that allows shadows to be cast in the OpenGL-based 3D Window. The third one is set to use the Internal Engine (rather than OpenGL), which facilitates copying shadows to paste into a Presentation Site Plan (see additional explanation below).
The timing for the shadows is set to March 21 at 9 am and at 3 pm, but this can be adjusted as desired using the View menu > 3D View Mode > 3D Projection Settings command:
After clicking More Sun… you’ll get a dialog box for setting the intensity of the sun and ambient light (to make shadows more distinct or less pronounced), as well as the location, date and time:

TIP: Set Project North in the Options menu > Project Preferences > Levels and Project North. This setting will be remembered for all views.
After adjusting the Sun parameters as desired, you may create a new View, or redefine and/or rename the existing View:

The Sun Studies are placed onto Sheets A9.04 and A9.05:
These Sun Study views will update automatically as the project model develops.
The third view in the Sun Studies group is set to use the Internal Engine. This is determined by the View menu > 3D View Mode > 3D Window Settings:

With this mode of viewing set for the 3D Window, it is possible to use the Marquee to copy part or all of the shadows to paste into Presentation Site Plans. While viewing the model in 3D, select the Marquee tool, and make sure to choose the simple rectangle geometry option:
Draw a marquee around the entire plan, or an excerpt, then select Edit menu > Copy (or CMD/CTRL-C). In the Copy dialog box, choose Polygons for the Shadows. (You may experiment with the popup menu for copying 3D Hatching such as roof tiles, decking lines, etc. if you wish.)

Return to the floor plan, using the PRESENTATION DOCUMENT VIEW > PRESENT PLANS > PRESENTATION SITE PLAN View, and Paste the graphics. They will precisely fit into the plan document in the proper position. Note that the shadows (in the image below, these comprise both the grey and green areas) are standard Fill elements, which means that you can edit them as desired for legibility.
TIP: You will need to reassign these shadow fills to the proper layer, rather than leaving them on the ArchiCAD Layer. To make this simplest, you can use the following trick to select all of the fills that are pasted during this operation:
1) Paste the shadows as instructed above. 2) Undo the paste. The fills will disappear. 3) Redo the paste (Edit menu > Redo). The fills will reappear and remain selected (with
handles), and can then be reassigned to an appropriate layer, such as U | PRESENTATION | SITE.UNIQ.
NOTE: After invoking this 3D View, the next time you open the 3D Window the style will remain (Internal Engine with Shadows), which may take longer to refresh than the standard OpenGL viewing style. You can manually reset this in the View menu > 3D View Mode > 3D Window Settings, or simply activate one of the other standard 3D Views in the View Map (which is set for OpenGL).

MATERIAL MATRIX AND SAMPLE SHEET
A new object was created that allows the creation of a sheet of samples for all materials in a project, or just a selected subset of them.
In the AMT Legends.PLN, you’ll see a set of Views and Layouts that show this object in use:
The plan view of this object shows the grid of materials with basic coloring, while the 3D view shows the full material texture:

We have placed views of all the standard materials in MasterTemplate onto several Layouts in this file. You can view them onscreen or print them out if you wish:

The library part has some basic settings that allow you to select the grid sizing and spacing, as well as which materials to include:
The index numbers refer to the Material indexes, which you can see in the Options menu > Element Attributes > Materials. In the matrix that is placed in the AMT Legends file, the start index is 1 (meaning it starts from the beginning of the list) and the end index is 200, which goes beyond the end of the list of materials.
If you add new materials to your project, or to your template, you can create a material matrix with index numbers that start after the last “standard” material and run through the largest index number. That way you’ll get a sample sheet to view or print that shows only the new materials.

TIP WORKSHEET
A new worksheet TIP-01 has been added for compiling tips and reference materials for quick access while working in a project. These can be placed as text blocks, images or a combination.
An excellent tip from ArchiCAD-Talk explaining how wall skin priorities work is included as an example:
More tips and reference materials can be added into the office MasterTemplate for general use, either in the same worksheet or in additional worksheets. One can also add reference materials directly into a project file.

UPGRADE GUIDE:
Integrating MasterTemplate 14 with Your Existing Template There are two basic approaches for integrating the new version of the ArchiCAD MasterTemplate with customized templates created on earlier versions.
1) Start over with the new ArchiCAD MasterTemplate 14, and customize it again. This approach is ideal for users who have not done much customization to MasterTemplate.
2) Add the new components of AMT 14 to your existing template. This is best for experienced users who have done a lot of customization that they don't want to repeat.
3) If you are upgrading from a version earlier than AMT 12.1 (e.g. AMT 12, 1.1 or 1.0), the choices are similar, however option 2 becomes more complex because many features were added to the file structure in AMT 12.1.
TIP: For options 2 or 3, always save a copy of your existing (older) template before creating your new version. That way, you’ll have it available if for any reason you need to refer to it, or need to work in an earlier version of ArchiCAD.

1) UPGRADE GUIDE:
How to Integrate Previous Customization into MasterTemplate 14
If you only modified the standard MasterTemplate a small amount, then it may be best to start over with the new AMT 14 and rework it again to suit your needs. The simplest way to copy and reuse what you changed in AMT is to open up two sessions of ArchiCAD 14.
In one session, open the standard MasterTemplate 14 TEMPLATE.tpl file. We suggest you immediately save this under a new name specific to your office, so that you don't overwrite the standard base version of the template in case you need to access it again. Choose the option to Save As an ArchiCAD Template (TPL format) so that the file will be usable as a Template file rather than as a PLN project file. We’ll call this your New MasterTemplate.
In the other session of ArchiCAD 14, open your own custom template, the reworked version of an earlier MasterTemplate TEMPLATE.tpl file. We suggest you do a Save As for this template (which you have just opened up in ArchiCAD 14, perhaps for the first time). Use a new name so you won’t risk overwriting what you were using for a previous version of ArchiCAD. We’ll call this your Custom MasterTemplate. You can save this as either a TPL or PLN file, since we’ll only be using this as a source reference for copying information, then discarding it.
Layout Masters
You most likely have adjusted some or all of the Layout Masters. In your Custom MasterTemplate, go to the Layout Book and open up the Masters folder, then double-click on the first Master that you have customized to open it up. Activate the Arrow tool (if it's not already) and Select All (CTRL-A or CMD-A), then Copy to the Clipboard. Switch to your New MasterTemplate (the other session of ArchiCAD) and find the same Layout Master; Select All and Delete the contents; then Paste in the contents that you Copied from the Custom MasterTemplate file.
Repeat this for each Layout Master that has been customized. If you deleted any Layout Masters in your Custom MasterTemplate in order to shorten your Master list, you may want to delete the corresponding ones in your New MasterTemplate.
Schedules
If you have added or customized Schedules in your Custom MasterTemplate, you can save these as XML files that can be imported into your New MasterTemplate. Double-click one of the entries in the Project Map > Schedules > Element list. Click the Scheme Settings… button and review the Schemes listed, and highlight one that is new or revised. Click the Export… button to save as an XML file; choose a folder to store it that you'll be able to locate easily, and give it an appropriate name. Repeat the Export action for each schedule in the list you want to transfer.
Switch to your New MasterTemplate file, and open up one of the Schedules, then click the Scheme Settings… button. Click the Import… button and locate the folder in which you saved the XML files. Choose the first one and Import it. Repeat for each one in the folder.
You may find you have redundant schedules: ones from AMT 14 with the same names as those you imported from your Custom MasterTemplate file. Review each pair of schedules that has duplicate names and figure out which one is "yours", and then use the Delete button to get rid of the other.
On each Layout with a Schedule that refers to one that you have deleted and replaced, select the Schedule and right-click, then choose Link Drawing To. Choose the option at the top for "an internal View" then select the appropriate Schedule from the SCHEDULES (CLONE) folder.

Element Attributes (Materials, Fills, Composites / Wall Types, etc.)
If there are any Attributes you have added, such as Materials, Fills, Composites / Wall Types, etc., you can use Attribute Manager to transfer them.
In your New MasterTemplate, open the Options menu > Element Attributes > Attribute Manager. Then on the right side of the Attribute Manager dialog box, click the Open… button and browse for your Custom MasterTemplate.
You will be able to select Materials, Fills, Wall Types, etc. from the right side file (your previous template), and Append them to the left side (the New MasterTemplate file you are customizing). Do not use the Overwrite button unless you know exactly what this means and feel that it is appropriate.
Other Customization
There are many ways to customize MasterTemplate. If you choose to follow this method (transferring your custom elements manually from your old Custom MasterTemplate to the New MasterTemplate file), you will have to go through your Custom MasterTemplate manually and copy each element or area that you've modified, then go back to the New MasterTemplate file and paste them in.
Remember that you do not have to get this "perfect" in one session. You should retain the old Template file in case you need to access it later. You can always go back and get something you missed.
When you are done (for now), be sure to save your file as a TPL (if you haven’t already). Then to test it, choose File menu > New and select Use a Template, then Browse… for New MasterTemplate TPL file. You should then get an untitled copy of the new template, and see all of your modifications in this untitled PLN file. The next time you create a new project file, this template TPL file will be the default in the popup, so you won’t have to browse to select it.

2) UPGRADE GUIDE:
Integrating the New MasterTemplate 14 Features into Your Highly Customized MasterTemplate 12.1 or 13 File
If you are an experienced user and have done a lot of customization to MasterTemplate, you may prefer to add to your existing template some or all of the new features of AMT 14. That way you can choose exactly what you wish to add or change.
We suggest you review the new features outlined in these Release Notes carefully to understand what has been added or modified in AMT 14. Open up the standard AMT 14 Template and study it, and see how all the new things work. Then choose what you want to add to your own template, and use methods similar to the previous section to transfer what you wish.
As with any project file, to move your Custom MasterTemplate forward, you may simply open it in ArchiCAD 14 and save it. This will now be an ArchiCAD 14 file. We suggest you save it with a new name or in a new folder, to avoid overwriting the earlier template file in case you need to do any work in your earlier version of ArchiCAD.
Initially, this New MasterTemplate will reference the ArchiCAD 13 Library. You will need to use Library Manager to switch it to use the ArchiCAD 14 Library, plus (at least temporarily) the ArchiCAD Migration Libraries folder (which you’ll find in the AC14 folder). To get a “clean” template, you’ll need to switch out all parts in your template or Legend that refer to legacy libraries. In MasterTemplate, the references to library parts are primarily found in the Interactive Legends.
Interactive Legends
The Interactive Legends from earlier versions of AMT used the ArchiCAD Libraries current at the time. It is not generally a good idea to migrate templates forward with references to these legacy library parts, since it requires loading both the ArchiCAD 14 Library and Migration Libraries for every project. It’s better to update the Legend to use only the 14 Library plus specific custom parts you wish to use (which includes AMT-supplied parts as well as any of your own).
To resolve this issue in your Custom MasterTemplate, you may:
• Switch the Interactive Legends to use the new AMT 14 Interactive Legends based on the ArchiCAD 14 Library, or
• Selectively bring in whatever parts of the new Legends you find useful.
If you haven’t customized the Legends, simply relink the Hotlinked Module for the Legends in your template to use the AMT 14 version. Open the File menu > External Content > Hotlink Manager, then select AMT Legends USA 13 (or 12.1).pln from the list, click Relink, and browse for the new version of the file. You may need to switch the popup menu for file type to PLN file in order to see and select the AMT Legends USA 14.pln file.
If you have customized the Legends, then you’ll need to copy and paste between your Custom Legend and the New Legend. Open up the AMT 14 LEGEND file and copy whichever parts you wish to use. Paste them into your own version of the Legends, and rearrange the Legend group positions as desired.
For every part in your custom Legend file that is based on a legacy library, you should switch it to use the new library. Select it and in the Object (or Window or Door) Settings dialog, navigate to the corresponding part in the AC 14 Library, and click to switch to that part. Adjust the parameter values to get it the way you prefer.

If you wish, you may use parameter transfer: hold down Option-Command or ALT-Control to get the syringe, and then click with the syringe to switch to the new part while transferring the values of all corresponding parameters. Verify that your part looks correct in both the 2D and 3D previews, and then click OK. Repeat for every part referencing a legacy library.
Once you have cleaned up all references to legacy libraries, return to Library Manager and remove the Migration Library. If the Library Loading report shows missing library parts and you see the special dots indicating missing parts on your floor plan, make a note of what you need to fix then reload the Migration Library and swap these legacy parts for current ones. Check it again, and repeat until you have a clean Legend that uses only the AC14 Library and has no missing library parts.
TIP: In ArchiCAD 14, library management has been improved, and you may accomplish migration of legacy parts (the task in the preceding paragraph) a little more simply than before. Instead of removing the Migration Library from the list to test if there are any remaining parts to migrate, you may highlight that library in the list then click on the little “i" [information] button below. You’ll get a new dialog box that shows which parts from that library are actively placed into the current file. Then you can use Find and Select to locate them, and replace them with equivalents from the ArchiCAD 14 Library (or you may embed them into the file).
If you have an Office Favorites HLM module separate from the main Legend PLN file (as introduced in AMT 12.1), you will need to open that up and update it to use the ArchiCAD 14 Library instead of an earlier ArchiCAD Library. To open the Office Favorites file, you may select it in the File menu > External Content > Hotlink Manager, then click Open in Separate ArchiCAD. Follow the same process as above. If you wish, load the MasterTemplate 14 USA LIBRARY and embed its active parts into the file.
If you have a Project Favorites HLM module, be sure to check it for legacy parts, then save a version in ArchiCAD 14 format. OPTIONAL: embed the library parts to make this file self-contained.
For simplicity, put all your Hotlink Modules (the LEGEND as well as Office Favorites and Project Favorites) into the same folder as your Custom MasterTemplate for ArchiCAD 14, or into a subfolder of Linked Files.
AMT Library
The AMT library has been partially updated, and the parts that are actively in use are now embedded into the Legend PLN files. Library management will be simplest if you update your Hotlinked Module references in the File menu > External Content > Hotlink Manager to use the new Legend files. Then the AMT library parts will automatically be loaded directly from the Hotlink files.
After updating the Hotlinks, for the USA version you may remove the reference to the old AMT Library, since it is not necessary.
However, in the International version, for access to parts in the Detailer Legend, you will still need to load a linked library. In Library Manager, replace the earlier MasterTemplate Library reference and use the MasterTemplate 14 INT LIBRARY folder (located next to the template file).
Note for advanced users: If you prefer to load the MasterTemplate Library as a linked folder, please see the technical note on library management at the end of this document.

3) UPGRADE GUIDE:
Migrating from MasterTemplate 12 or earlier
The Interactive Legend was substantially expanded in MasterTemplate 12.1. If you are upgrading from a version of MasterTemplate prior to AMT 12.1 (AMT 12, 1.1 or 1.0), it is simplest to use AMT 14 and repeat your customization (see section 1 above).
However, if you did a lot of customization, you may choose to add selective parts of the new Legend system. Follow the general guidelines in section 2 above. However, since many enhancements were made to the file structure and the Legend layout in AMT 12.1, there are additional steps if you wish to take full advantage of all the innovations in the current MasterTemplate.
The following notes are adapted from the AMT 12.1 Release Notes, and explain how to add in the new features introduced in AMT 12.1 to your version of the Legends and the template itself.
Interactive Legend Expansion and Reconfiguration
The Legend file itself was substantially expanded in AMT 12.1 with the addition of Quick Rooms (room arrangements that may either be studied or copied into your project to speed up preliminary design layouts) and Matrixes (groups of related objects). In AMT 12.1 and later, these new sections of the Legend are also referenced in saved 3D Views and 3D Documents.
You may replace your own Interactive Legend file with the new one in AMT 14 (see notes in step 1 above). Alternatively, you may copy and paste parts of the current Legend into your own version, or the reverse (adding in your components into the AMT 14 Legend). Be sure to rework your Legend to use the current Library (see step 2 above) as part of the update process.
Legend Placement on Ground Floor
If you want to use the concept of 3D Views and 3D Documents with your custom Legend, we suggest you move the Legend from the -1 Story to the Ground Floor. This will reduce the story-offset issue when using the eye-dropper on Legend elements in 3D (see the explanation in the section on 3D Views and 3D Documents in the AMT 12.1 Release Notes). You may either Cut the Legends from the -1 Story and then Paste them onto the Ground Floor, or delete them from the lower story and place them fresh on the Ground Floor.
If you move the Legends from one story to another, you will need to recreate the Views of the Legend in the View Map that refer to the different sections of the Legend. This is because each View, once created, is linked to a specific source location (in this case, the floor plan story) which cannot be changed. Zoom in on each area of the Legend in its new location (story), and select the Save Current View option from the bottom of the View Map, then name the View appropriately.
Legend Worksheet
To use the new Worksheet access for the Legend, simply create a new Independent Worksheet. You don't have to draw anything in it. Open this worksheet, and then right-click on the View that refers to the Interactive Legend from the Plan, and choose Show as Trace Reference. Then in the Trace and Reference palette, choose the option to show the Reference in Original Color.
In this worksheet, to quickly jump to specific areas of the referenced Legend, go to each area of the Legend then use the Zoom popup in the bottom left area of the worksheet window (the small triangle next to the percentage zoom value), then choose Save Current Zoom… and name it based on the Legend section name. Repeat for each zoom you wish to record - perhaps one overall zoom and as many as 20 individual ones to point to each Legend area.

Create at least one View in the View Map to reference the Worksheet with the *PRELIMINARY DESIGN layer combination, and click the checkbox to Ignore Zoom when opening the view. This will bring up the Legend Worksheet to the last zoomed position.
You may create multiple zoomed Views in the View Map for the Worksheet itself, as we did in AMT 12.1 and 13, but this is not actually necessary. You may simply open the Worksheet from the View created in the previous paragraph, and use the Zoom popup to gain quick access when a different part of the Legend is needed.
You may also open the Worksheet from the Project Map, or using Go To Last Worksheet from the context menu, Toolbar popup, or keyboard shortcut. This will bring up the Legend without altering the active Layer Combination (as would happen when you double-click a View).
Legend Views - 3D
To create the saved 3D Views of the Legend, activate one of the original (or recreated) Views that goes to the Legend on the Plan (not the worksheet version). Then draw a marquee around a section of the Legend, and choose Show Selection/Marquee in 3D. That should give you a 3D view of the Legend grouping you chose. Orbit around until you get an angle you like. Save as a new View in the View Map, and repeat for each Legend area that you wish to access. Make sure you use an appropriate Layer Combination when creating the 3D Views.
You can create your own 3D Documents for these 3D Views of the Legend groupings as well. Once you have a 3D View that you wish to use, simply right-click in empty space and choose the Capture Window for 3D Document… command. Give it an appropriate name, and it will show up in the Project Map as a new 3D Document. You'll need to do one additional step: save the view of the 3D Document in the View Map (as usual, clicking the Save Current View button from the bottom of the View Map).
Office Favorites and Project Favorites
In the Template itself (as opposed to the Legend file), you may choose to add the Office Favorites and Project Favorites modules to the Legend area. These concepts were introduced in AMT 12.1, and may simplify your future customization of AMT by focusing it on files that are separate from the main Legend file.
In AMT 12.1 and later, blank areas are included in the main Legend file, and these are used for placement of the Office Favorites and Project Favorites. All three are placed into the Template file itself. The idea is that:
• The main Legend PLN is updated rarely (perhaps only when we release a new version of MasterTemplate).
• The Office Favorites MOD may be periodically updated or expanded, and always show the latest version for all projects.
• The Project Favorites MOD file (if used) is copied and separately maintained for each actual project file.
Element Attributes
When you paste in the new Legend either as a whole, or just the Quick Rooms and Parts Matrixes, the new Composite Wall Types, Materials, Fills and Layers are brought into the file automatically. You won't need to use Attribute Manager to import them.
These should also become available in your Template file when the Legend HLM is updated in the Hotlink Manager.

The Layer Combinations for *PRELIMINARY DESIGN as well as the plan for SMALL SCALE drawings will not come in during this process. To add or rework layer combinations, you will need to create or adjust them manually. Also, please review the layer combinations in AMT 13 for updates related to DEMO layers and DEMO layer combinations, and rework your template if you wish. Other minor adjustments may be needed to reconcile the handful of new layers we added.
This process of integration does not need to be done all in one session. You may bring in some of the new features of AMT 12.1, 13 and 14 into your existing template, then return later to pick up others that you missed or have decided to include.
AMT Library
The AMT library has been partially updated, and the parts that are actively in use are now embedded into the Legend PLN files. Library management will be simplest if you update your Hotlinked Module references in the File menu > External Content > Hotlink Manager to use the new Legend files. Then the AMT library parts will automatically be loaded directly from the Hotlink files.
After updating the Hotlinks, for the USA version you may remove the reference to the old AMT Library, since it is not necessary.
However, in the International version, for access to parts in the Detailer Legend, you will still need to load a linked library. In Library Manager, replace the earlier MasterTemplate Library reference and use the MasterTemplate 14 INT LIBRARY folder (located next to the template file).
Note for advanced users: If you prefer to load the MasterTemplate Library as a linked folder, please see the technical note on library management at the end of this document.
4) UPGRADE GUIDE:
Technical Note on Library Management for Advanced Users
If you prefer to load the current MasterTemplate 14 LIBRARY folder as a Linked Library, you’ll find it in the MasterTemplate Supplemental Files folder:
• USA template: MasterTemplate 14 USA LIBRARY • INT template: MasterTemplate 14 INT LIBRARY (EMBEDDED)
For the International version, to have access to the Detailer Legend parts, you’ll also need to load the main MasterTemplate 14 INT LIBRARY folder, located at the top level, next to the template itself.
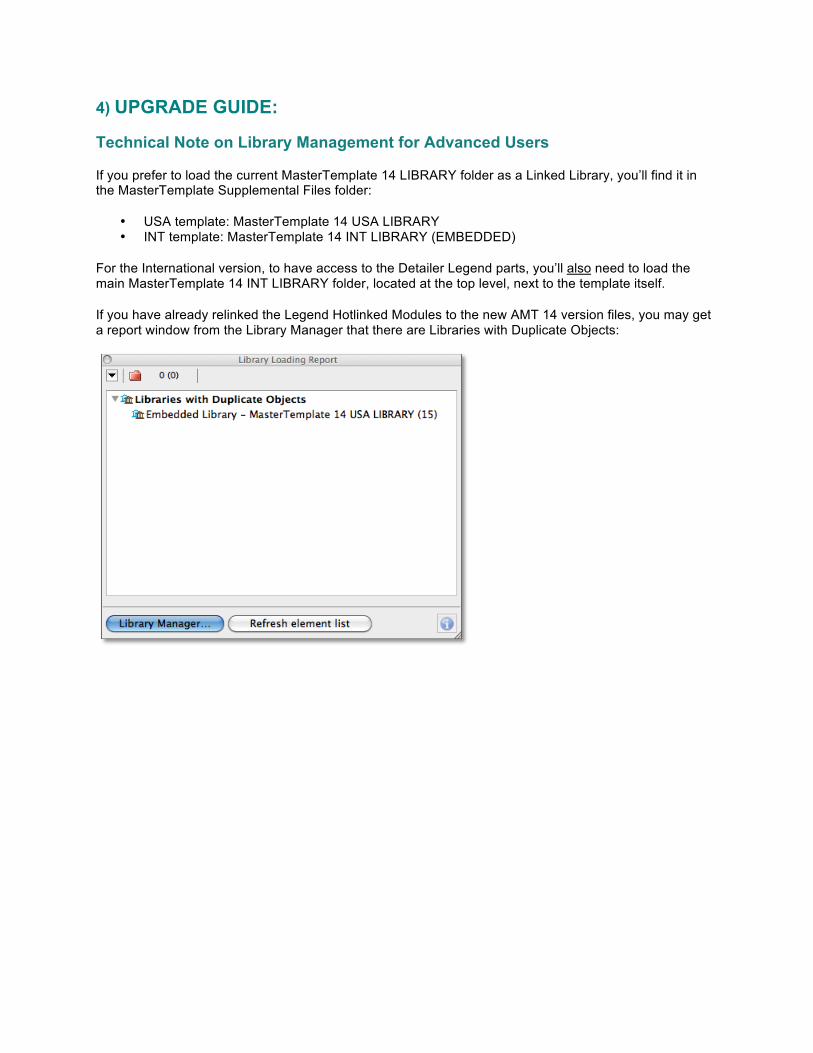
If you have already relinked the Legend Hotlinked Modules to the new AMT 14 version files, you may get a report window from the Library Manager that there are Libraries with Duplicate Objects:

To clean this up, simply embed the active parts (as we do in AMT 14): click the Library Manager button, then highlight the MasterTemplate 14 (USA or INT) Library folder and click the icon button to “Embed Placed Objects of Selected Library”:
After clicking, this dialog will come up, and you should check the box to embed textures and zone stamps: