Manual for IA: Users’ guide
111
Last updated 11 December 2018 Manual for IA: Users’ guide
Transcript of Manual for IA: Users’ guide

Last updated 11 December
2018
Manual for IA:
Users’ guide

Page 2 of 111
Contents
1. Introduction ...................................................................................................................................... 6
1.1 References................................................................................................................................... 6
1.2 Terms and explanations .............................................................................................................. 6
2. General information ......................................................................................................................... 8
2.1 Login ............................................................................................................................................ 8
2.1.1 Login issues ........................................................................................................................... 8
2.1.1.1 Why can’t I log in although I got a new password? ........................................................ 8
2.1.2 Create a desktop shortcut for easier login ............................................................................. 8
2.2 Main page .................................................................................................................................... 9
2.3 Charts on the main page ........................................................................................................... 10
2.3.1 Functionalities of the charts ................................................................................................. 10
2.3.1.1 Why does the number in the chart not correspond with the number of occurrences in
the list? 10
2.3.2 Work environment occurrences chart .................................................................................. 11
2.3.3 Occurrence status chart ...................................................................................................... 11
2.3.4 Action chart .......................................................................................................................... 11
2.3.5 Risks identified through risk management chart ................................................................. 11
2.4 User settings .............................................................................................................................. 12
2.4.1 Hiding personal records ....................................................................................................... 12
2.4.2 Using high contrast .............................................................................................................. 12
2.4.3 Displaying your user information ......................................................................................... 12
2.4.4 Changing your password ..................................................................................................... 12
2.4.4.1 Password requirements ................................................................................................ 13
2.4.5 Choosing in which language IA should be displayed .......................................................... 13
2.4.6 Setting subscriptions ........................................................................................................... 13
2.4.7 Registering a substitute ....................................................................................................... 14
2.4.8 Changing color and contrast ................................................................................................ 14
2.4.9 Displaying your responsibility and functions ........................................................................ 15
2.4.10 Displaying your logs ............................................................................................................ 15
2.4.11 Contacting your administrator .............................................................................................. 16
2.5 The “Help” button (Information portal) ....................................................................................... 16
2.6 Handle several companies within a group of companies .......................................................... 17
3. Occurrences .................................................................................................................................. 18
3.1 General information about occurrences .................................................................................... 18
3.1.1 Occurrence unit and employment unit ................................................................................. 18
3.1.2 Occurrence manager ........................................................................................................... 18

Page 3 of 111
3.1.3 Unit responsible ................................................................................................................... 18
3.1.4 Occurrence types................................................................................................................. 19
3.1.5 Occurrence status................................................................................................................ 20
3.1.6 Searching for occurrences in the occurrence list ................................................................ 21
3.1.6.1 Selection criteria in the occurrence list ......................................................................... 21
3.1.6.2 Information displayed in the occurrence list .................................................................. 25
3.1.6.3 Why can’t I find my occurrence in the list? ................................................................... 25
3.1.7 Opening occurrences .......................................................................................................... 26
3.1.8 Deleting occurrences ........................................................................................................... 26
3.1.9 Flagging occurrences .......................................................................................................... 26
3.1.10 Printing occurrences ............................................................................................................ 27
3.1.11 Attachments ......................................................................................................................... 27
3.1.11.1 Adding an attachment to an occurrence ....................................................................... 27
3.1.11.2 Removing an attachment from an occurrence .............................................................. 28
3.1.12 Log tab: Change log, access log and notes ........................................................................ 28
3.1.13 E-mails about occurrences .................................................................................................. 30
3.1.13.1 E-mail log ...................................................................................................................... 30
3.1.13.2 Default settings for e-mails about occurrences ............................................................ 31
3.1.13.3 Send e-mails about occurrences manually ................................................................... 32
3.2 IA’s process for occurrences ..................................................................................................... 34
3.2.1 Reporting an occurrence ..................................................................................................... 34
3.2.1.1 Creating a copy of an occurrence ................................................................................. 36
3.2.2 Reporting an occurrence using the IA app .......................................................................... 37
3.2.2.1 Installing the app and logging in ................................................................................... 37
3.2.2.2 Reporting an occurrence with the app .......................................................................... 37
3.2.2.3 Following an occurrence that has been reported via the app ....................................... 38
3.2.2.4 Copying an occurrence that has been reported via the app ......................................... 38
3.2.2.5 Deleting an occurrence from the app ............................................................................ 38
3.2.3 Troubles when reporting occurrences ................................................................................. 38
3.2.3.1 Why is no occurrence manager selected?.................................................................... 38
3.2.3.2 Can I select a different occurrence manager? .............................................................. 39
3.2.3.3 Reporting via app: Why is the error message ”Alternatives missing” displayed when I
tap on Type of divergence? ........................................................................................................ 39
3.2.4 Confirming and completing occurrences ............................................................................. 40
3.2.5 Reporting occurrences to external parts ............................................................................. 40
3.2.5.1 Sending an electronic claim notification to external parts ............................................. 41
3.2.5.2 Sending an electronic claim notification to the Swedish Social Insurance Agency
(Försäkringskassan) ................................................................................................................... 41
Page 4 of 111
3.2.5.3 Sending an electronic claim notification to AFA Insurance’s Work Injury Insurance (TFA
or TFA-KL) .................................................................................................................................. 42
3.2.5.4 Sending an electronic claim notification to the Swedish Work Environment Authority
(Arbetsmiljöverket) ...................................................................................................................... 43
3.2.5.5 Sending electronic claim notification to the National Electrical Safety Board
(Elsäkerhetsverket) ..................................................................................................................... 43
3.2.6 Risk assessment and risk matrix ......................................................................................... 44
3.2.7 Relating occurrences to each other or to risk managements .............................................. 45
3.2.8 Investigating occurrences .................................................................................................... 46
3.2.9 Adding actions ..................................................................................................................... 48
3.2.10 Following up occurrences .................................................................................................... 49
3.2.11 OHS representative follow-up .............................................................................................. 49
4. Risk management .......................................................................................................................... 50
4.1 General information about risk management ............................................................................ 50
4.1.1 Risk management types ...................................................................................................... 50
4.1.2 Templates for risk management .......................................................................................... 50
4.1.3 Responsible for risk management ....................................................................................... 50
4.1.4 Occurrence unit, employment unit and unit responsible ..................................................... 50
4.1.5 Searching for risk managements in the risk management list ............................................. 51
4.1.5.1 Selection criteria in the risk management list ............................................................... 52
4.1.5.2 Information displayed in the risk management list ........................................................ 55
4.1.5.3 Why can’t I find my risk management in the list? ......................................................... 57
4.1.6 Opening a risk management ............................................................................................... 57
4.1.7 Deleting a risk management ................................................................................................ 57
4.1.8 Printing risk management templates ................................................................................... 58
4.1.9 Attachments ......................................................................................................................... 58
4.1.9.1 Adding an attachment to a risk management ............................................................... 59
4.1.9.2 Removing an attachment from a risk management ...................................................... 59
4.1.10 Log tab: Change log and access log ................................................................................... 60
4.1.11 E-mails about risk managements ........................................................................................ 60
4.1.11.1 E-mail log ...................................................................................................................... 60
4.1.11.2 Default settings for e-mails about risk managements ................................................... 61
4.1.11.3 Send e-mails about risk managements manually ......................................................... 62
4.2 IA’s process for risk managements ........................................................................................... 63
4.2.1 Planning a risk management ............................................................................................... 63
4.2.2 Creating a copy of a risk management ................................................................................ 65
4.2.3 Performing a risk management ........................................................................................... 67
4.2.4 Performing a risk management without a template (on the web) ........................................ 67
4.2.5 Performing a risk management with a template without checkpoints (on the web) ............ 68

Page 5 of 111
4.2.6 Performing a risk management with checkpoints (on the web) ........................................... 70
4.2.7 Performing a risk management using the IA app ................................................................ 73
4.2.7.1 Installing the app and logging in ................................................................................... 73
4.2.7.2 Using a checklist ........................................................................................................... 73
4.2.7.3 Displaying a sent checklist in the app ........................................................................... 74
4.2.8 Following up a risk management ......................................................................................... 74
4.2.9 Links between risk managements and occurrences ........................................................... 74
5. Action plan ..................................................................................................................................... 76
5.1 Searching for information in the action plan .............................................................................. 76
5.1.1 Selection criteria in the action plan ...................................................................................... 77
5.1.2 Information displayed in the action plan .............................................................................. 87
5.1.3 Why can’t I find the information I’m looking for in the list? .................................................. 89
6. Reports .......................................................................................................................................... 90
6.1 Overview .................................................................................................................................... 90
6.1.1 Content in the Overview report ............................................................................................ 91
6.2 Per unit ....................................................................................................................................... 92
6.3 Injured body parts ...................................................................................................................... 94
6.4 Occurrences per month ............................................................................................................. 95
6.5 Template report ......................................................................................................................... 96
6.6 Risk rating .................................................................................................................................. 96
6.7 Sector statistics (PIA, MIA, GRIA AND ENIA) ........................................................................... 99
6.7.1 Registering sector statistics ................................................................................................. 99
6.7.2 Creating a sector report ....................................................................................................... 99
7. Analysis ....................................................................................................................................... 100
7.1 Searching for occurrences in the Analysis function ................................................................. 100
7.1.1 Selection criteria in the Analysis function .......................................................................... 102
7.2 Exporting data .......................................................................................................................... 108
7.3 More information about the Analysis function .......................................................................... 109
7.3.1 Contact other organizations ............................................................................................... 109
7.3.2 Sectors that share information ........................................................................................... 109
8. Tips and tricks .............................................................................................................................. 110
8.1 See the occurrence managers or units that have overdue occurrences ................................. 110
8.2 Calculating the time for handling occurrences......................................................................... 110
8.3 Create your own charts ............................................................................................................ 111
Page 6 of 111
1. Introduction
This document describes how to use IA to handle occurrences and risk managements, create reports
and do analyses. The target group for this document is all users of IA.
Which of the described functions that are available for you, is determined by your local IA
administrator.
1.1 References
In the information portal (Help button) you can find manuals, films and other documents about IA. For
information about how to search for documents in the information portal, see section 2.5 The “Help”
button (Information portal) in this document.
For users that are administrators of IA, there is also a manual that describes how to configure IA:
Manual for IA – Administrators' guide.
1.2 Terms and explanations
In the table, terms that are essential to IA and will reoccur in this manual, are explained:
Term Explanation
Occurrences Occurrences are central to health and safety management in IA. Every occupational health and safety incident is reported as an occurrence and follows a specific process. In that way, IA ensures that each incident is systematically managed.
Occurrence types The incidents reported in IA are classified by the means of different occurrence types, depending on what has happened.
Organization chart Is used to indicate where occurrences happened and where persons are employed. In the organization chart chart, departments and locations are called units. By means of these units, you will get detailed statistics, and the correct manager will automatically become responsible for occurrences that happened in his/her department.
Occurrence unit When you report an occurrence, you have to specify the unit or location where the occurrence took place. This is called the Occurrence unit.
Employment unit When you report an occurrence, you also have to specify the unit at which you, or the injured person, are employed. This is called the Employment unit.
Lists In order to be able to compare occurrences reported in IA within your group of companies the occurrences are classified by means of selection lists. Swedish companies can also compare their occurrences with the whole sector.
Roles Roles in IA mean pre-defined permissions for users. A role is limited to certain units and certain types of occurrences.
Occurrence manager To ensure that every occupational health and safety incident is systematically managed, every occurrence is assigned to a person. This
Page 7 of 111
Term Explanation
person is called Occurrence manager.
Who is selected as occurrence manager is determined by the settings that your local IA administrator has made.
Risk management IA also supports the proactive health and safety management by means of the Risk management function. This function offers checklists for health and safety inspections, risk analyses, and audits, among others.
Risk management types
There are several types of risk management that can be performed in IA.
Risk management templates
When you perform risk management, you often follow a step-by-step checklist. However, you do not use a checklist for some types of risk management (e.g. risk analyses). Therefore your local IA administrator can create different types of risk management templates in IA.
Responsible for risk management
For each risk management a person is selected as responsible for it. Who is selected as responsible is determined by the settings that your local IA administrator has made.
Page 8 of 111
2. General information
2.1 Login
There are different ways to log in to IA. Your local IA administrator decides which of them are available
for you.
If you want to report an occurrence and do not have a personal account, you click on a link on
your intranet and will be logged in without having to specify username or password.
If you have a personal account, you go instead to https://ia.afaforsakring.se. Enter your
username and your password and click on Log in. When you log in for the first time, you are
requested to change your password.
If your organization uses Single Sign-On for login to IA, you always log in via a link, regardless
of which type of user account you have. You will be logged in with your appropriate
permissions without having to specify username or password.
2.1.1 Login issues
If you enter the wrong password five times, your account will be locked. If this has happened, or if you
have forgotten your password or username, click on the link at the bottom of the login panel. This will
open a new page where you can request your username or a new password. There you will also find a
form to contact your local IA administrator.
If you have forgotten your password, click on Forgotten password? Enter your username and click
on Send. You will receive an e-mail with a temporary password. Use this password together with your
username to log in to IA. As soon as you have logged in you have to change this password.
If you have forgotten your username, click on Forgotten username? Enter your e-mail address and
click on Send. You will receive an e-mail with your username.
However, the function to request your username or a new password implies that your local IA
administrator has added your e-mail address to your user account in IA. If you do not get any e-mail,
please contact your local IA administrator.
2.1.1.1 Why can’t I log in although I got a new password?
If you received a new password and still get an error message when you try to log in, you may have stored your previous password in your browser. In this case, you must remove all passwords stored in your browser before you can log in to IA with the new password.
If you use the desktop shortcut (as described in the next section), you have to delete the shortcut and create a new one after you changed your password.
2.1.2 Create a desktop shortcut for easier login
If you install a desktop shortcut, you no longer need to go to IA’s login page to log in. Simply click on
the shortcut instead.
1. Go to your computers desktop and right-click on it.
2. In the menu that opens, select New and Shortcut.
3. A dialog window opens where you enter the shortcut to IA in the Type the location of the
item field.
Page 9 of 111
4. Paste the link
https://ia.afaforsakring.se/Authentication?userid=[Enter_username]&userpwd=[Enter_passwor
d] and replace [Enter username] with your username and [Enter password] with your
password. Make sure to remove the square brackets.
5. Click on Next.
6. Enter a label for the link, for example IA.
7. Click on Finish.
8. The shortcut is placed on your desktop.
2.2 Main page
As soon as you log in, you see IA’s main page.1 If you want to get to the main page from a different
page in IA, just click on the logotype on the left hand side in the menu bar.
The main page shows a dashboard with different charts that give an overview of occupational health
and safety work in your company. The charts vary according to your role in IA. Section 2.3.1
describes the functionalities of the charts, and sections 2.3.2 to 2.3.5 describe the data that is shown
in the charts.
If you do not want to display the charts, you can click on the grey arrow to the left of them. This will
close the charts, and move the My IA table and the News panel upwards. This setting is saved in
cookies; therefore the main page will be displayed in the same way the next time you log in to IA.
At the bottom of the page the My IA table is shown for all users that have a responsibility for
occurrences, actions, investigations, follow-ups or risk managements. Other users will see an image
instead of the My IA table.
The dates shown in the table depend on your function. If you are the occurrence manager, you can
see when the occurrence took place, and if you are responsible for a risk management, you can see
when the risk management should be carried out. If you are the investigator, action owner or
responsible for the follow-up, you can see when the investigation, the actions or the follow-up are due
to be completed. If the due date has passed, you see an exclamation mark next to the status icon.
You can sort the list by clicking on a column headline and you can open an occurrence or risk
management by clicking on it in the list.
News panel
In the lower right corner of the main page you see the News panel. Here you can find news that AFA
Insurance, your company or other companies have published. Also flagged occurrences are shown in
the news panel.2 To read the news click on the heading News or click on a news item that interests
you.
1 If you are using the Reporting account, you will not see the main page. Instead, you will directly see the page where you report a new occurrence.
2 For more information about how to flag occurrences, see section 3.1.9 Flagging occurrences.
Note:
The desktop shortcut will not update automatically when you change your username or password.
Instead, you have to delete the shortcut and create a new one each time you change one of these.
Page 10 of 111
Menu bar and settings bar
On top of the main page and all other pages, the menu bar – which gives you access to all functions in
IA – and a bar with checkboxes and icons is located. Find out more about these checkboxes and icons
in section 2.4 User settings.
2.3 Charts on the main page
2.3.1 Functionalities of the charts
The explanations in the charts are clickable. If you click on a year or a status, the columns for this year
or status will disappear and only the other columns will be visible.
The columns include occurrences and risk managements with restricted access. The chart about
Work environment occurrences includes own staff only, no contractors or customers.
If you are occurrence manager or OHS representative, you can in every chart click on the icon to
change to a chart that shows your responsibility. To get back to the chart that shows the whole
company you can click on the icon. This function is not available for users with other roles.
As some of the charts are interactive, you can click on a column and access the list of occurrences or
risk managements on which the numbers in the column are based. Sometimes, the number of
occurrences displayed in the list can be less than the number that is shown in the chart. Find out more
about this in the section below.
If you have few occurrences in one category, the column for this category may not be shown.
However, you will see the correct number in the explanation field and can click on the number to
access the list of those occurrences and risk managements.
2.3.1.1 Why does the number in the chart not correspond with the number of
occurrences in the list?
If the number in the chart and the number of occurrences in the list do not correspond, this can be due to the following reasons:
Permissions for units: On the main page you see statistics for all units in your organization, but the list displays only occurrences and risk managements for those units you are authorized to see.
Permissions for multiple units on the same organizational level: The responsibilities for occurrence managers and OHS representatives can apply to multiple units on the same organizational level. In the list only one of these units can be displayed at each time.
Permissions for occurrence and employment units: The responsibilities for occurrence managers and OHS representatives can apply to both occurrence and employment units. In the list occurrence units are displayed by default. To see employment units you have to select this unit type beneath the heading Selection.
Permissions for occurrence types: In the Work environment occurrences chart statistics for accidents, near misses and risk observations are displayed, and in the Occurrence status chart statistics for all occurrence types are displayed. In the list only those occurrence types are displayed, that you are authorized to see.
Restricted access: Occurrences and risk managements that have restricted access are included in the numbers on the main page. In the list they are displayed only if you are authorized to see them.

Page 11 of 111
2.3.2 Work environment occurrences chart
This chart shows all work environment occurrences, except for work-related illnesses and commuting
accidents, which have happened in your company this year and the year before. It only shows
occurrences in which own staff was injured.
Users with the Occurrence manager, Manager or Manager 3 roles can click on the icon to
change to a chart that shows all occurrences for which they are responsible. This chart shows all
occurrence types that they are authorized to, not just work environment occurrences. However, work-
related illnesses and commuting accidents are not shown.
Users with the OHS representative role can click on the icon to change to a chart that shows
occurrences, near misses and risk observations for which they are contacted OHS representative.
2.3.3 Occurrence status chart
The chart shows the status of all occurrences in your organization. Even work-related illnesses and
commuting accidents are included. Investigations, actions and follow-ups that are overdue are shown
in orange color.
Users with the Occurrence manager, Manager or Manager 3 roles can click on the icon to
change to a chart that shows the status of all occurrences for which they are responsible.
Users with the OHS representative role can click on the icon to change to a chart that shows the
status of all occurrences for which they are contacted OHS representative.
2.3.4 Action chart
This chart shows all actions from occurrences and risk managements in your organization. The chart
shows both actions that are in progress and actions that have been completed this year. Actions that
are overdue are shown in orange color.
Users with the Occurrence manager, Manager or Manager 3 roles can click on the icon to
change to a chart that shows the actions of all occurrences and risk managements for which they are
responsible.
Users with the OHS representative role can click on the icon to change to a chart that shows the
actions of all occurrences for which they are contacted OHS representative.
2.3.5 Risks identified through risk management chart
This chart shows all risks that have been identified through risk managements in your organization.
Each risk management row with at least one action counts as one (1) risk and each action that is not
connected to a risk management row, counts as one (1) risk, too. Risk rows that have at least one
action that is overdue are shown in orange color.
Users with the Occurrence manager, Manager or Manager 3 roles can click on the icon to
change to a chart that shows identified risks in all risk managements they are responsible for.
Users with the OHS representative role can click on the icon to change to a chart that shows
identified risks in all risk managements they are participating in.
Page 12 of 111
2.4 User settings
On top of the page you will find a bar with checkboxes and icons to make personal settings. The
different settings are described in the sections below.
2.4.1 Hiding personal records
When you do not want to display personal records in IA, for example if you are showing IA to other
persons, you can select the checkbox for Hide personal records. This setting hides all personal data
in the occurrence list and in the occurrences that you choose to open. In the occurrence list, all
occurrences of the type work-related illness and all occurrences with restricted access are hidden,
too. Furthermore, the Log tab is hidden in both occurrences and risk managements. If you have the
Data protection administrator role, the GDPR tab in the menu bar is hidden, too.
Please remember that the checkbox will not become deselected when you log out. It will still be
selected the next time you log in to IA.
2.4.2 Using high contrast
If you need sharper colors and contrasts, you can select the checkbox for High contrast. The setting
is saved in cookies and IA is displayed the same way the next time you log in from the same
computer.
You can edit the background colors and the contrast by clicking on the icon in the upper right
corner. Find out more about this in section 2.4.8 Changing color and contrast.
2.4.3 Displaying your user information
You can display your user information by clicking on the icon for user settings in the upper right
corner. This opens the tabs with your user information and your settings. There are four different tabs:
(1) The More settings tab: On this tab you can see in which language IA is displayed, if you are
external or internal contact, which subscriptions you have, if you have a substitute and which
settings you have for colors and contrast. You can change these settings, except for the
external or internal contact that only can be changed by your local IA administrator. Find out
more about these settings in sections 2.4.5 to 2.4.8.
(2) The User credentials tab: On this tab you can see your user information and your credentials,
but your password is never displayed in clear text. You can change your password by
following the steps described in the next section. You cannot change the rest of the
information; this can only be done by your local IA administrator.
(3) The Role and responsibility areas tab: Here you can see which roles you have in IA and for
which units and occurrence types the roles apply. This information can only be edited by your
local IA administrator.
(4) The Information about the user tab: On this tab you can see your responsibilities for
occurrences and risk managements in IA, as well as different logs. Find out more about these
in sections 2.4.9 and 2.4.10.
2.4.4 Changing your password
You can change your password when you are logged in to IA by following these steps:
Page 13 of 111
1. Click on the user settings icon in the upper right corner. The More settings tab is opened.
2. Click on the User credentials tab.
3. Remove the asterisks in the Password field and enter a new password.
4. Click on Save. The password will no longer be displayed in clear text.
As a safety precaution, you will get an e-mail when you change the password. If you receive this e-
mail, although you did not change your password yourself, please contact your IA administrator
immediately.
2.4.4.1 Password requirements
Your password must contain at least 8 characters, including at least one upper case letter, one lower
case letter and one non-alphabetic character (numbers or special characters). It cannot be the same
as your username or one of your 10 previous passwords.
If your company uses the advanced password rules, your password must contain at least 8 characters
if you are a regular user and at least 15 characters if you are an administrator. As for the basic
password rules, your password must include at least one upper case letter, one lower case letter and
one non-alphabetic character (numbers or special characters). It cannot be the same as your
username or one of your 10 previous passwords.
A password in IA is valid for six months, then you will be requested to change it.
2.4.5 Choosing in which language IA should be displayed
Follow these steps, if you want to change in which language IA is displayed:
1. Click on the user settings icon in the upper right corner. The More settings tab is opened.
2. Go to the More user settings panel. Click on the arrow next to the heading if the panel is minimized.
3. Select the language you want to use and click on Save.
2.4.6 Setting subscriptions
By means of subscriptions, you can choose which occurrences you wish to be informed about via e-
mail. These settings apply for all units and occurrence types that you are authorized to see. The
different fields are handled separately; that means it is not the combination of the different fields that
determines if you get an e-mail. In fact, you get an e-mail as soon as one of the criteria is fulfilled.
1. Click on the user settings icon in the upper right corner. The More settings tab is opened.
2. Go to the Subscriptions panel. Click on the arrow next to the heading if the panel is
minimized.
3. Set the criteria for when you want to get e-mail:
If you want to get e-mail about Fire3 or Flagged occurrences, select the appropriate
checkbox.
If your company uses risk assessment you can select to get e-mail if the Risk level
specified in the occurrence is low, moderate or high.
3 The criterion Fire is only displayed if your sector uses the Fire module.
Page 14 of 111
The other criteria are displayed as selection list, where you can choose one or more
alternatives. If you want to remove an alternative, you can click on the cross next to it.
4. Click on Save.
If you are an administrator, you can set subscriptions both for yourself and for other users.
2.4.7 Registering a substitute
If you are unable to use IA for a while, for example when you are on vacation or on parental leave, you can select a person who undertakes your permissions during that period. This person is called a Substitute. During the specified period, the substitute has the same rights as you. You can still log in to IA, but will not automatically be chosen as responsible for occurrences, investigations, actions, follow-ups or risk managements. However, you can still be chosen manually in the drop-down lists.
When the period has passed, the rights are removed from the substitute, but his/her name is still displayed in the log of the occurrences that he/she has managed.
Follow these steps to register a substitute:
1. Click on the user settings icon in the upper right corner. The More settings tab is opened.
2. Go to the Substitute panel. The Substitutes panel will only be displayed if you have
permission to register your own substitutes, which is determined by your local IA
administrator. Click on the arrow next to the heading if the panel is minimized.
3. Enter the period.
4. Select the person that should substitute you in the By column.
5. Click on the Save button next to the substitute’s name.
6. Now click on the Save button to the right of the page.
Saved periods are shown in a list in the Substitutes panel. Update a period by clicking on the Edit
button and remove it by clicking on Delete.
Substitution periods that have passed are removed from the list.
If you are an administrator, you can register substitutes for other users.
2.4.8 Changing color and contrast
You can change the background color and the contrast, both for how the system is displayed when
you have and have not selected High contrast.
1. Click on the user settings icon in the upper right corner. The More settings tab is opened.
2. Go to the Color and contrast panel. Click on the arrow next to the heading if the panel is
minimized.
3. Click in the System background and Page background fields and drag the controls to your
desired settings. The page will adjust directly to your settings to give you a preview, but they
will not take effect unless you save. The normal mode is displayed when you have not
Note:
This service does not stop subscriptions that you receive due to your functions in IA. This means
that if you are the occurrence manager for a unit, you will still receive e-mails for all occurrences
that you are responsible for.
.

Page 15 of 111
selected the checkbox for High contrast, and the contrast mode is displayed when you have
selected it.
If you want to retrieve the default settings, click on Default settings normal mode or Default
settings contrast mode.
4. Click on Save.
If you are an administrator, you can change the color settings for other users.
2.4.9 Displaying your responsibility and functions
If you are responsible for occurrences and risk managements, you can see this in the My IA table on
the main page. But you can also see a summary of your responsibility and your functions on the user
settings pages.
Follow these steps:
1. Click on the user settings icon in the upper right corner. The More settings tab is opened.
2. Click on the Information about the user tab and go to the Responsibility/Function panel.
Click on the arrow next to the heading if the panel is minimized.
3. Now you can see in how many occurrences and risk managements you have a responsibility
or function. Click on a number to access the list of occurrences or risk managements on which
the numbers are based.
If you are an administrator, you can see the summary of responsibility and functions both for yourself
and for other users.
2.4.10 Displaying your logs
You can display a log of your system access, a log of changes to your authorizations and a log of the
occurrences and risk managements that you have read.
Follow these steps:
1. Click on the user settings icon in the upper right corner. The More settings tab is opened.
2. Click on the Information about the user tab.
3. Go to the panel for the log that you want to display. Click on the arrow next to the heading if
the panel is minimized.
4. Enter perhaps a period and click on View. The list displays by default 50 results. To see more
results, increase the number in the Show field.
5. You can display the following logs:
System access log: This log displays when you logged in to IA and if the login was successful. If your organization uses Single Sign-On (SSO) to log in to IA, the log displays if the login was done via SSO.
Authorization changelog: This log displays if your authorizations have been changed, in which way and by whom.
Occurrence and risk management access log: This log displays which occurrences and risk managements you have opened. Only those occurrences where you have seen personal data are listed. It is specified in the list if you have seen the injured person’s or the reporting person’s name and on which page in IA you have seen this information.
If you are an administrator, you can see the logs both for yourself and for other users.

Page 16 of 111
2.4.11 Contacting your administrator
You can directly from IA send a question to the person who administrates IA in your company. To do
so, follow the steps below:
1. Click on the envelope icon that is shown in the upper right corner between the icons for your
settings and log out.
2. The contact form opens, showing (on the left hand side) a list of people who are the internal
contacts for IA in your company.
3. Select the checkbox for each person to whom you want to send an e-mail. If you cannot see a
checkbox next to someone’s name, this means that no e-mail address has been registered in
IA for this person and it is therefore not possible to send an e-mail to this person.
4. If you are sending the message from a reporting account, you have to specify your name and
contact details.
5. Write your question in the E-mail message field on the right hand side.
6. Click on Send.
2.5 The “Help” button (Information portal)
The information portal contains material about IA and about the systematic improvement of
occupational health and safety in general. The material includes e-learning, documents, videos,
websites and images and is provided by AFA Insurance, the local IA administrator in your company
and other companies that use IA. The documents that are available for you to view will depend on your
level of authorization.
1. Click on the Help button on the menu bar to access the information portal. You can also
access it directly from different functions in IA (e.g. Investigation) by clicking on the icon.
2. The information portal opens in a separate window and the document you view is displayed
inside this window. Click on the title of a document to view it in a separate window. If you
accessed the information portal from a specific function in IA, only the documents about this
function are displayed beneath the heading Library and the search tag is shown in the search
field.
Figure 1: Information portal

Page 17 of 111
3. Beneath the heading My documents you can find documents that you need often. These
documents are always shown. You do not have to search for them.
4. To search for a document, enter a search tag in the search field and click on the magnifying
glass. IA searches through document titles, descriptions and search tags. IA searches for the
exact term you enter. If you enter several words, you will only get hits if exactly this term is
found in a document title, description or search tag.
5. To see all documents, delete the search term and click on the magnifying glass.
6. If you want to search in the document that is displayed inside the window, hold down the Ctrl
key and press F to open a search field in the document.
7. Click on the icon to adjust the settings for which documents are displayed in the Library
and how they are sorted. The checkbox for AFA Insurance has to be selected if you want to
see documents that AFA Insurance has created.
Select the checkbox for Other organizations if you want to see documents that other IA
users have created and shared.
If you are an administrator, you can select the checkbox for Documents for all functions to
see and edit documents that only are displayed for other types of users.
Your settings are saved so that the library will be displayed in the same way the next time you
open the information portal.
8. If you think a document is very good, you can like it by clicking on the thumbs up icon in the
upper right corner.
9. Close the window to leave the information portal or minimize it to keep it in the background
while you use IA.
2.6 Handle several companies within a group of companies
If you are authorized to handle units in several companies within your group, you need to select which
company you want to look at presently. This is done in the drop-down list Company that you will find
in the upper right corner on most of the pages in IA. IA displays information for the selected company.
Your selection is saved and applies also if you go to another page or tab in the system. You can, of
course, change the company you selected at any time.
Your latest selection is saved in cookies so that the same company is preselected the next time you
log in to IA.

Page 18 of 111
3. Occurrences
3.1 General information about occurrences
Occurrences are central to health and safety management in IA. Every occupational health and safety
incident is reported as an occurrence and follows a specific process. In that way, IA ensures that each
occurrence is systematically managed.
This chapter first gives general information about occurrences and then explains the various
improvement process stages in IA. These include registration of an occurrence, investigation,
undertaking of risk-eliminating actions and follow-up.
3.1.1 Occurrence unit and employment unit
When you report an occurrence in IA, you have to specify the place or the department where the
occurrence took place. This place or department is called the Occurrence unit. You also have to
specify the unit at which the injured person, or the person reporting it, is employed. This is called the
Employment unit.
3.1.2 Occurrence manager
Every occurrence is assigned to a person. That person is the Occurrence manager and is
responsible for the occurrence. This ensures that every occupational health and safety incident is
systematically managed. By default, IA selects the responsible for the employment unit as occurrence
manager. However, your local IA administrator can have set that some types of occurrences are
directed to the responsible for the occurrence unit.
It is possible to change the occurrence manager during the improvement process, for example if
somebody else should take care of the occurrence or if the occurrence manager has left your
company.
The occurrence manager receives an e-mail as soon as an occurrence has been reported, provided
your local IA administrator has not changed the settings for e-mail notifications.
3.1.3 Unit responsible
When you search for occurrences in the occurrence list, you can select occurrence or employment unit
as search criteria. However, you can also select Unit responsible in the Selection panel. When you
select a unit responsible IA displays all occurrences by occurrence managers that are employed in
that unit.
However, to search for Unit responsible works only if your local IA administrator has entered
employment units for the users.

Page 19 of 111
3.1.4 Occurrence types
Several types of health and safety incidents can be reported in IA. Your company determines which of
the following occurrence types you can use.
Occurrence type Description
Risk observation You observe the risk for something to happen. It is desired to report risks and thus prevent accidents.
Near miss Something has happened, but nobody has been injured.
Accident Something has happened, and at least one person was injured. It does not matter how small the injury is. Threats, violence and robbery also count as accidents.
Commuting accident
An accident that happens on your way to or from work.
Work-related illness An injury or illness that is caused by long-time exposure to risk factors at work such as repetitive or forceful movements, vibrating tools, harmful substances or a mentally stressful work environment. You can also report psychosocial occurrences as work-related illness.
Environment Your company determines what is included in this occurrence type. This can for example be different types of emissions.
Quality Your company determines what is included in this occurrence type. This can for example be incorrect deliveries, contaminated products, deficiencies in services or products or process disturbances.
Property/Security Your company determines what is included in this occurrence type. This can for example be damages to buildings, burglary, theft or hacker attacks.
Improvement proposal Use this occurrence type to submit improvement proposals.
Other divergence Your company determines what is included in this occurrence type. This can for example be audit deficiencies or occurrences that do not fit into one of the other categories.
Safety observation A method based on behavior based safety. You observe each other’s behavior and classify it either as “save” or as “unsafe”.
Page 20 of 111
3.1.5 Occurrence status
The status and status icons are intended to quickly indicate to you what stage of the improvement
process an occurrence is at. An occurrence can have one of the following statuses:
REPORTED The occurrence was reported through a reporting account or an
app-user account and has to be confirmed by the occurrence manager. Other companies in your sector are not able to view occurrences with this status.
REGISTRATION IN PROGRESS
The occurrence has been confirmed by the occurrence manager or it has been reported by a user with a personal account.
INVESTIGATION IN PROGRESS
The occurrence investigation is in progress and is not marked as completed. If the expected completion date has passed, an orange exclamation mark appears next to the status icon.
INVESTIGATION COMPLETED
The investigation is completed, but the occurrence has no proposed actions. This status has the same icon as the status Action in progress.
ACTION IN PROGRESS
The investigation is completed and the occurrence contains actions that are not marked as completed. If the expected completion date for an action has passed, an orange exclamation mark appears next to the status icon.
FOLLOW-UP IN PROGRESS
The investigation and all actions are marked as completed, but the occurrence has not yet been followed up.
COMPLETED (NOT APPROVED)
The person responsible for the follow-up has indicated that the actions were ineffective.
If your company uses the OHS representative follow-up function, this status means that the OHS representative has not yet followed up the occurrence or he/she has selected the checkbox for No beneath the label Ok.
This status has the same icon as the status Follow-up in progress.
COMPLETED The person responsible for the follow-up has carried out the follow-up and indicated that the actions were effective.
If your company uses the OHS representative follow-up function, the OHS representative must have selected the checkbox for Yes beneath the label Ok before an occurrence can attain this status.
An occurrence can attain this status even if the checkbox for No actions is selected.
OVERDUE The exclamation mark shows that the status is overdue, i.e. the
investigation, the actions and/or the follow-up have not been performed on time. IA uses the estimated completion date that you have entered, to determine if a status is overdue.
Page 21 of 111
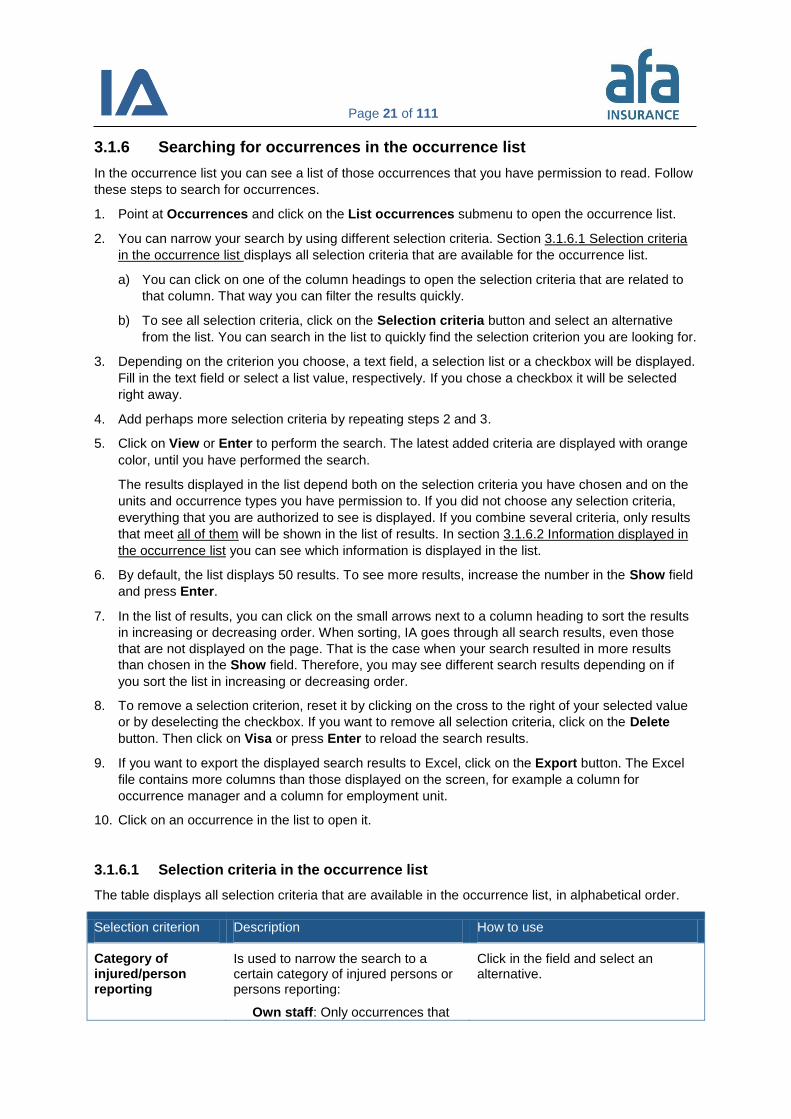
3.1.6 Searching for occurrences in the occurrence list
In the occurrence list you can see a list of those occurrences that you have permission to read. Follow
these steps to search for occurrences.
1. Point at Occurrences and click on the List occurrences submenu to open the occurrence list.
2. You can narrow your search by using different selection criteria. Section 3.1.6.1 Selection criteria
in the occurrence list displays all selection criteria that are available for the occurrence list.
a) You can click on one of the column headings to open the selection criteria that are related to
that column. That way you can filter the results quickly.
b) To see all selection criteria, click on the Selection criteria button and select an alternative
from the list. You can search in the list to quickly find the selection criterion you are looking for.
3. Depending on the criterion you choose, a text field, a selection list or a checkbox will be displayed.
Fill in the text field or select a list value, respectively. If you chose a checkbox it will be selected
right away.
4. Add perhaps more selection criteria by repeating steps 2 and 3.
5. Click on View or Enter to perform the search. The latest added criteria are displayed with orange
color, until you have performed the search.
The results displayed in the list depend both on the selection criteria you have chosen and on the
units and occurrence types you have permission to. If you did not choose any selection criteria,
everything that you are authorized to see is displayed. If you combine several criteria, only results
that meet all of them will be shown in the list of results. In section 3.1.6.2 Information displayed in
the occurrence list you can see which information is displayed in the list.
6. By default, the list displays 50 results. To see more results, increase the number in the Show field
and press Enter.
7. In the list of results, you can click on the small arrows next to a column heading to sort the results
in increasing or decreasing order. When sorting, IA goes through all search results, even those
that are not displayed on the page. That is the case when your search resulted in more results
than chosen in the Show field. Therefore, you may see different search results depending on if
you sort the list in increasing or decreasing order.
8. To remove a selection criterion, reset it by clicking on the cross to the right of your selected value
or by deselecting the checkbox. If you want to remove all selection criteria, click on the Delete
button. Then click on Visa or press Enter to reload the search results.
9. If you want to export the displayed search results to Excel, click on the Export button. The Excel
file contains more columns than those displayed on the screen, for example a column for
occurrence manager and a column for employment unit.
10. Click on an occurrence in the list to open it.
3.1.6.1 Selection criteria in the occurrence list
The table displays all selection criteria that are available in the occurrence list, in alphabetical order.
Selection criterion Description How to use
Category of injured/person reporting
Is used to narrow the search to a certain category of injured persons or persons reporting:
Own staff: Only occurrences that
Click in the field and select an alternative.
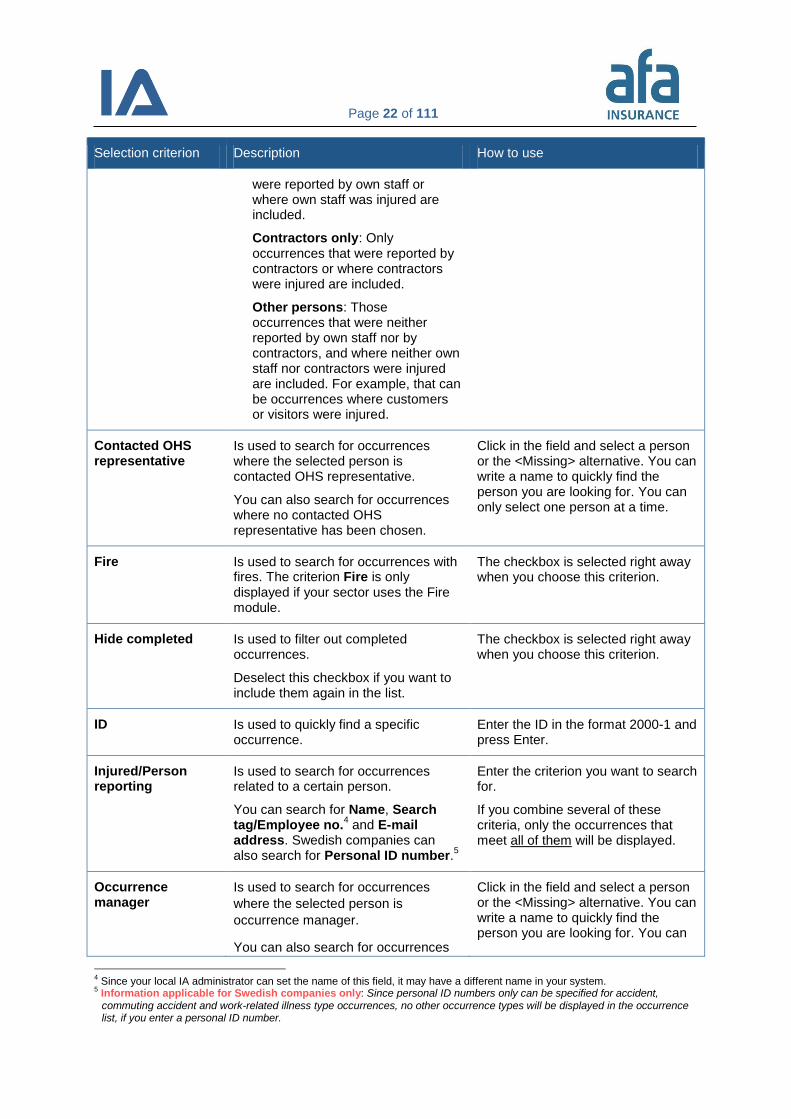
Page 22 of 111
Selection criterion Description How to use
were reported by own staff or where own staff was injured are included.
Contractors only: Only occurrences that were reported by contractors or where contractors were injured are included.
Other persons: Those occurrences that were neither reported by own staff nor by contractors, and where neither own staff nor contractors were injured are included. For example, that can be occurrences where customers or visitors were injured.
Contacted OHS representative
Is used to search for occurrences where the selected person is contacted OHS representative.
You can also search for occurrences where no contacted OHS representative has been chosen.
Click in the field and select a person or the <Missing> alternative. You can write a name to quickly find the person you are looking for. You can only select one person at a time.
Fire Is used to search for occurrences with fires. The criterion Fire is only displayed if your sector uses the Fire module.
The checkbox is selected right away when you choose this criterion.
Hide completed Is used to filter out completed occurrences.
Deselect this checkbox if you want to include them again in the list.
The checkbox is selected right away when you choose this criterion.
ID Is used to quickly find a specific occurrence.
Enter the ID in the format 2000-1 and press Enter.
Injured/Person reporting
Is used to search for occurrences related to a certain person.
You can search for Name, Search tag/Employee no.
4 and E-mail
address. Swedish companies can also search for Personal ID number.
5
Enter the criterion you want to search for.
If you combine several of these criteria, only the occurrences that meet all of them will be displayed.
Occurrence manager
Is used to search for occurrences
where the selected person is
occurrence manager.
You can also search for occurrences
Click in the field and select a person or the <Missing> alternative. You can write a name to quickly find the person you are looking for. You can
4 Since your local IA administrator can set the name of this field, it may have a different name in your system.
5 Information applicable for Swedish companies only: Since personal ID numbers only can be specified for accident, commuting accident and work-related illness type occurrences, no other occurrence types will be displayed in the occurrence list, if you enter a personal ID number.

Page 23 of 111
Selection criterion Description How to use
where no occurrence manager has
been chosen.
only select one person at a time.
Occurrence type Determines the types of occurrences
that are included in the search. All that
you are authorized to see, are
preselected.
Click in the field and select one or more alternatives.
Period Is used to search for all occurrences that happened or have been reported during the selected period. Use the Period type criterion to specify if you want to search for occurrence period or registration period.
Click in the fields and select a start and end date.
Enter just an end date if you want to search for all occurrences until that date.
Enter just a start date if you want to search for all occurrences from that date on.
Period type Is used to specify if you want to search for occurrence period or registration period. Is combined with the Period criterion.
Click in the field and select an alternative.
Restricted access Is used if you only want to view occurrences that have restricted access.
The checkbox is selected right away when you choose this criterion.
Risk assessment If your company uses the risk assessment module you can search for occurrences with a risk value (i.e. the product of probability and consequence) that is less than, equal to or greater than the number you enter (from 0 to 25). If your company uses the simplified risk assessment module, you can search for the three risk values red, yellow and green. In both cases you can choose to search for risk values before or after actions have been carried out. Find out more about the risk assessment module in section 3.2.6 Risk assessment and risk matrix.
If you are using the advanced risk assessment module, click in the list, select an alternative and enter a number.
If you are using the simplified risk assessment module, click in the list and select a risk value.
If you want to search for the risk after actions, select the checkbox for after actions.
Search tag / Employee number
Since your local IA administrator can set the name of this field, it may have a different name in your system.
Is used to search for a search tag or an employee number that you have specified in the occurrences.
Enter a search tag/employee number.
Sick leave Is used to search for occurrences that have caused sick leave or that have
Click in the field and select an alternative.
Page 24 of 111
Selection criterion Description How to use
not caused sick leave. Is only applicable for accident, commuting accident and work-related illness type occurrences.
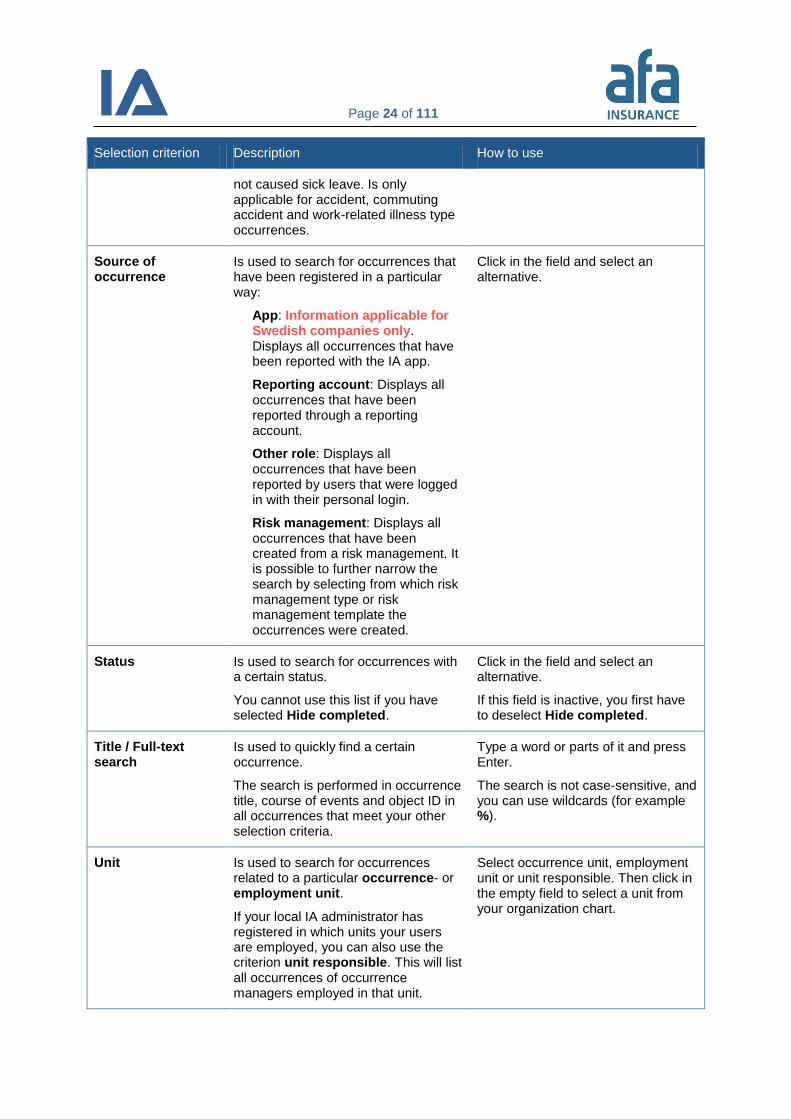
Source of occurrence
Is used to search for occurrences that have been registered in a particular way:
App: Information applicable for Swedish companies only. Displays all occurrences that have been reported with the IA app.
Reporting account: Displays all occurrences that have been reported through a reporting account.
Other role: Displays all occurrences that have been reported by users that were logged in with their personal login.
Risk management: Displays all occurrences that have been created from a risk management. It is possible to further narrow the search by selecting from which risk management type or risk management template the occurrences were created.
Click in the field and select an alternative.
Status Is used to search for occurrences with a certain status.
You cannot use this list if you have selected Hide completed.
Click in the field and select an alternative.
If this field is inactive, you first have to deselect Hide completed.
Title / Full-text search
Is used to quickly find a certain occurrence.
The search is performed in occurrence title, course of events and object ID in all occurrences that meet your other selection criteria.
Type a word or parts of it and press Enter.
The search is not case-sensitive, and you can use wildcards (for example %).
Unit Is used to search for occurrences related to a particular occurrence- or employment unit.
If your local IA administrator has registered in which units your users are employed, you can also use the criterion unit responsible. This will list all occurrences of occurrence managers employed in that unit.
Select occurrence unit, employment unit or unit responsible. Then click in the empty field to select a unit from your organization chart.

Page 25 of 111
3.1.6.2 Information displayed in the occurrence list
The table shows all columns that are displayed in the occurrence list:
Column Description
ID Displays the ID of the occurrence. When you point at it, the title of the occurrence and the course of events are displayed as a tooltip.
Date Displays the date when the occurrence happened.
Status Displays which status an occurrence has. You can read more about the different statuses in section 3.1.5 Occurrence status.
Title Displays the title of the occurrence. When you point at the title, the course of events is displayed as a tooltip.
Injured/Person reporting
In this column you will see the name of the injured if the occurrence is an accident, commuting accident or work-related illness. For all other types of occurrences, the name of the person reporting the occurrence is displayed. The symbol (*) next to a name indicates that the person is not an employee.
If you have selected Hide personal records on top of the page, no names are displayed in the column Injured/Person reporting.
Unit Shows the unit where the occurrence happened. Even if you have selected an employment unit for the Unit criterion, this column displays the occurrence units for the occurrences that match your selection criteria.
Type Displays the type of each occurrence. An (S) next to the occurrence type indicates that it is an occurrence with sick leave.
Displays the number of completed actions and the total number of actions.
Displays how many attachments an occurrence has.
Displays how many notes an occurrence has.
Displays the number of occurrences and/or risk managements that the occurrence is related to.
Click on that icon to open a PDF file of the occurrence.
3.1.6.3 Why can’t I find my occurrence in the list?
If you cannot find a particular occurrence in the list, this can be due to the following reasons:
Only 50 results are displayed by default. To see all results you have to change the number in the Show field.
If the occurrence has the status Completed, you have to deselect the checkbox for Hide completed to be able to see it in the list.
Page 26 of 111
If you do not have permission for the occurrence type or the unit where the occurrence was registered, you cannot see the occurrence.
If you have permission to the employment unit, but not the occurrence unit that is selected in the occurrence, you have to select Employment unit in the Selection panel to display the occurrence.
If the occurrence has Restricted access you can see it only if you have a function in the occurrence or are a super user.
If you have selected the checkbox for Hide personal records, you cannot see work-related illness type occurrences.
If you have access to multiple companies within your group of companies you have to select the correct company in the Company list.
If someone has deleted the occurrence, you cannot find it in the list and it is not possible to restore it.
Which occurrences are visible for the Reporting account, is decided by your local IA administrator. He/she can decide that the reporting account only can be used to report but not to read occurrences.
3.1.7 Opening occurrences
Click on an occurrence in the occurrence list to open it. You can also open occurrences, for which you
have a function, directly from My IA on the main page.
3.1.8 Deleting occurrences
If you are authorized to delete occurrences, the Delete button will be visible when you have opened
an occurrence. If the occurrence has the status Completed or Completed (not approved), you have
to click on the Investigation or Actions & Follow-up tabs to see the Delete button.
3.1.9 Flagging occurrences
It is possible to flag occurrences that are of particular interest to your company, group of companies or
whole sector. A flagged occurrence is marked with a red border in the news stream. If you are
authorized to flag occurrences, you will see the Flag button when you open an occurrence that does
not have the status Reported.
1. Click on Flag if you want to highlight an occurrence.
2. The news function opens.
3. IA suggests the occurrence title as news title. Change it if you are not satisfied with it.
4. Write a description.
Note:
It is not possible to restore a deleted occurrence!
When you click on Delete, all information about the occurrence will be irrevocably deleted, even
the information registered in the Investigation, Actions & Follow-up and Log tabs.
Page 27 of 111
5. Decide if the flagged occurrence should be visible within your company, your group of
companies or to the whole sector.
6. Click on Save. The flagged occurrence is shown in the news panel.
When someone clicks on the flagged occurrence in the news stream, your description and the View
occurrence button is shown. Clicking on View occurrence opens the occurrence in the Analysis
function. To distinguish flagged occurrences in the Analysis function, they are marked with a red
border.
If you want to unflag the occurrence, click on the News heading in the news stream. Then click on the
edit icon to the right of the flagged occurrence. The news function opens and you can edit your
description or remove the flag.
3.1.10 Printing occurrences
You can print an occurrence directly from the list of occurrences by clicking on the PDF icon to the
right of the occurrence. When you have opened an occurrence you can print it by clicking on the
Create PDF button at the bottom of the page.
In both cases a PDF file opens, that contains a compilation of the occurrence and the images that
were added to the occurrence.
You can save or print the PDF file.
3.1.11 Attachments
You can add pictures, sketches and other kinds of documentation to each occurrence to make the
description more complete and accurate. Whether an occurrence has attachments, is displayed in the
column with the paperclip icon in the occurrence list. Thumbnails of the attachments are displayed in
the occurrence itself and in the Analysis function.
3.1.11.1 Adding an attachment to an occurrence
1. Open the occurrence and click on the Attachments button. The button is displayed on the
Occurrence, Investigation and Actions & Follow-up tabs and moves as you scroll down the
page.
2. The attachment module opens.
3. Click on the Browse button. If the occurrence has the status Completed or Completed (not
approved), the browse button will not be displayed since it is not possible to add attachments
in that case.
4. The file explorer on your computer opens and lets you choose the file you want to add. Select
the file and click on Open or double-click on the file.
5. You are now back in the attachment module and can add a Description of the file.
6. Specify the attachment’s properties by selecting:
Note:
When you click on Delete in the news function, you will not delete the occurrence itself. You will
only remove the flag that you have added to the occurrence.

Page 28 of 111
if the attachment contains information/photo that can identify a person
if the attachment should be displayed for your reporting account
if the attachment should be displayed for other organizations (in the Analysis function)
If you selected Contains information/photo that can identify a person, you cannot select
that this attachment should be displayed for your reporting account or other organizations.
7. Click on Add.
8. Repeat steps 3 to 7 if you want to add more attachments.
9. All the documents attached to an occurrence are shown in a table in the attachment module.
The icons in the table indicate the properties of each attachment. You can click on an
attachment in the table if you want to change its properties.
10. Click on the cross in the upper right corner to close the attachment module. The attachments
are shown as miniatures above the occurrence.
3.1.11.2 Removing an attachment from an occurrence
1. Open the occurrence and click on the Attachments button. The button is displayed on the
Occurrence, Investigation and Actions & Follow-up tabs and moves as you scroll down the
page.
2. Click on the trash can icon next to the attachment you want to remove.
3. Click on the cross in the upper right corner to close the attachment module.
3.1.12 Log tab: Change log, access log and notes
The Log tab is about the occurrence that you are currently viewing. It contains the e-mail log (as
described in the next section), a change log for the occurrence, a log of who has accessed the
occurrence and a function that allows you to add notes to the occurrence. The Log tab is displayed as
soon as you save the occurrence, but only if you are authorized to view it. Even if you are authorized
to read the log, it will be hidden if you have selected the checkbox for Hide personal records.
The Change log lists all changes relating to the occurrence, except for changes to personal data. The
entries are in chronological order with the most recent at the top. Click on a column heading to sort the
list. It is possible to search the change log by entering criteria and clicking on View.
In the Access log panel you can see a list of users who have opened the occurrence and seen
personal data. The list shows if they have seen the injured person’s or the reporting person’s name. It
also shows on which page in IA they have seen this information. Only pages containing personal data
are documented in the access log.
The Notes function can be used to note information that is related to the occurrence, but which cannot
or must not be registered in the Occurrence tab. The notes can only be read by users within your
Note:
An attachment cannot be larger than 20 MB.
IA supports the following file types: gif, jpg, bmp, doc, docx, xls, xlsx, ppt, pptx, pdf, htm, html,
png, tif, 3g2, 3gp, asf, avi, mov, mp4, mpg, wmv och zip.
Page 29 of 111
company. However, it is possible to make private notes that only you can read. You can add an
unlimited number of notes.
The icon next to the occurrence status indicates that the occurrence has notes that are not private.
You can also see this in the column on the occurrence list.
Follow these steps to create a note:
1. Open the occurrence and click on the Log tab.
2. Scroll down to the Notes panel.
3. Click on the New note button.
4. Write your note in the text field.
5. If the note is for you alone, select the checkbox for Private note.
6. Click on the disk icon to save.

Page 30 of 111
3.1.13 E-mails about occurrences
To ensure that no occurrences are overlooked, IA sends an e-mail to all persons who have some kind
of responsibility for an occurrence, for example, the occurrence manager, the OHS representative and
the investigator.
The e-mail contains a link that takes you directly to the occurrence, if you are logged in to IA. If you are
the person reporting the occurrence, your e-mail will not contain a link due to technical reasons. This
applies regardless if you used the reporting account or the app-account.
3.1.13.1 E-mail log
If you want to check who has received an e-mail about a particular occurrence, open the occurrence
and click on the Log tab. The Log tab appears as soon as you have saved the occurrence. In the E-
mail log panel everybody who has received an e-mail about the occurrence is listed.
The log contains the following columns:
Date: Shows the date when the e-mail was sent. If there is no date, the e-mail was not sent,
for example if there is no e-mail address registered for the user. However, IA will display a
date even if the e-mail was sent to a misspelled e-mail address.
User: The name of the user whom the e-mail was sent to. If you hover over the name you can
see the e-mail address that the e-mail was sent to.
Reason for e-mail: The action that triggered the e-mail, for example creating a new
occurrence or selecting a step in the occurrence as completed:
o New/edited occurrence: Indicates that e-mails where sent because somebody
created a new occurrence or made a change to an existing occurrence (like choosing
an investigator or adding an action to an occurrence).
o Reminder investigation: Indicates that a reminder about an investigation has been
sent. When the reminder is sent depends on the e-mail settings that your local IA
administrator has made.
o Reminder action: Indicates that a reminder about an action has been sent. When the
reminder is sent depends on the e-mail settings that your local IA administrator has
made.
o Reminder follow-up: Indicates that a reminder about a follow-up has been sent.
When the reminder is sent depends on the e-mail settings that your local IA
administrator has made.
o Investigation completed: Indicates that e-mails were sent because the investigation
was marked as completed.
o Action completed: Indicates that e-mails were sent because an action was marked
as completed.
Note:
When you change from one responsible person to another one, for example, when you change
the occurrence manager, an e-mail is sent to the new responsible as soon as you save the
occurrence. However, no notification is sent to the previous responsible to inform that he/she no
longer is responsible.
Page 31 of 111
o Approved by OHS representative: Indicates that the OHS representative has done
his/her follow-up and selected Yes beneath the heading OK.
o Not approved by OHS representative: Indicates that the OHS representative has
done his/her follow-up and selected No beneath the heading OK.
o Occurrence completed: Indicates that e-mails where sent because the occurrence
has reached the status Completed.
o Manually sent: Indicates that e-mails were sent manually.
Recipient is: The reason why an e-mail is sent to the user, for example if he/she has a
function in the occurrence or has chosen to subscribe to certain occurrences. Several reasons
may be true for one user. In this case all reasons are listed in the column. If you hover over
the column, you can see more information, for example which subscriptions the user has that
apply to this occurrence.
3.1.13.2 Default settings for e-mails about occurrences
In the table below you can see the default settings for when e-mails about occurrences are sent and to
whom. However, your local IA administrator may have changed these settings. The table applies for all
types of occurrences.
E-mails marked with red text are sent by night. E-mails marked with black text are sent directly when
the occurrence is saved.
Type of user The person reporting an occurrence (via Reporting account, personal login or App-user account
1)
Occurrence manager
2)
Contacted OHS representative
3)
Investigator4) Action
owner5)
Manager and notifyee in the same occurrence or employment unit
Manager and notifyee higher up in the organization
Type of e-mail
New occurrence x x x x x
Information to the chosen investigator
x
Information to the chosen action owner
x
Reminder about investigation
x6) x
6) x
6) x
6)
Investigation completed
x x x
Reminder about action
x6) x
6) x
6) x
6)
Action completed x x x
Reminder about follow-up (also applies to follow-up by OHS representative)
x6) x
6) x
6)

Page 32 of 111
Type of user The person reporting an occurrence (via Reporting account, personal login or App-user account
1)
Occurrence manager
2)
Contacted OHS representative
3)
Investigator4) Action
owner5)
Manager and notifyee in the same occurrence or employment unit
Manager and notifyee higher up in the organization
Type of e-mail
Approved/Not approved by OHS representative
x x x
Occurrence completed
x x x
1) E-mails to the injured or the person reporting are only sent if he/she enters an e-mail address
when reporting the occurrence. The app-user receives only an e-mail when the occurrence is
registered and when it is completed. He/she does not receive any e-mails about
investigations, actions or follow-ups.
2) This applies only to the occurrence manager that the occurrence has been assigned to. For
persons that are possible occurrence managers in the occurrence and employment unit where
the occurrence happened, the settings in the column Manager and notifyee in the same
occurrence or employment unit apply.
3) This applies only to the OHS representative that has been chosen as the Contacted OHS
representative in the occurrence. For persons that are possible OHS representatives in the
occurrence and employment unit where the occurrence happened, the settings in the column
Manager and notifyee in the same occurrence or employment unit apply.
4) This applies only to the person that has been selected as investigator in the occurrence. For
persons that are possible investigators in the occurrence and employment unit where the
occurrence happened, the settings in the column Manager and notifyee in the same
occurrence or employment unit apply.
5) This applies only to the persons that have been selected as action owners in the occurrence.
For persons that are possible action owners in the occurrence and employment unit where the
occurrence happened, the settings in the column Manager and notifyee in the same
occurrence or employment unit apply.
6) When the reminder is sent, depends on the settings that your local IA administrator has made.
The reminder is only sent once. If you move the estimated date of completion forward, no
more reminder will be sent if it already has been sent.
3.1.13.3 Send e-mails about occurrences manually
It is possible to send e-mails about occurrences manually, for example to inform further persons in
your organization about what has happened.
Follow these steps to send an e-mail manually:
1. Open the occurrence and click on the Log tab. The Log tab appears as soon as you have
saved the occurrence.
2. Click on the New e-mail button in the E-mail log panel.
3. The e-mail module opens.

Page 33 of 111
4. On top you can see a list of e-mail recipients. On the left hand side you see all users in your
organization that have an e-mail address registered in IA. On the right hand side you see all
users that have already got e-mail about the occurrence.
Add additional recipients by selecting their names on the left hand side and clicking on the
green button with arrows. Remove recipients by selecting them on the right hand side and
clicking on the orange button with arrows.
5. You can change the E-mail subject if necessary.
6. Beneath the heading E-mail message a preview of the message is displayed. When the e-
mail is sent, it will be adjusted to include the recipient’s function. The message will always
contain your name so that the recipient knows who sent this message from IA.
7. You can add information in the Intro field.
8. Click on Send.
If you want to send an e-mail only to the person who was injured or reported the occurrence, you can
click on the envelope icon next to the e-mail address in the Reported by or Injured person panel.
The envelope icon appears as soon as you have entered an e-mail address in the E-mail field. When
you click on the envelope icon an empty e-mail opens.
Figure 2: E-mail link
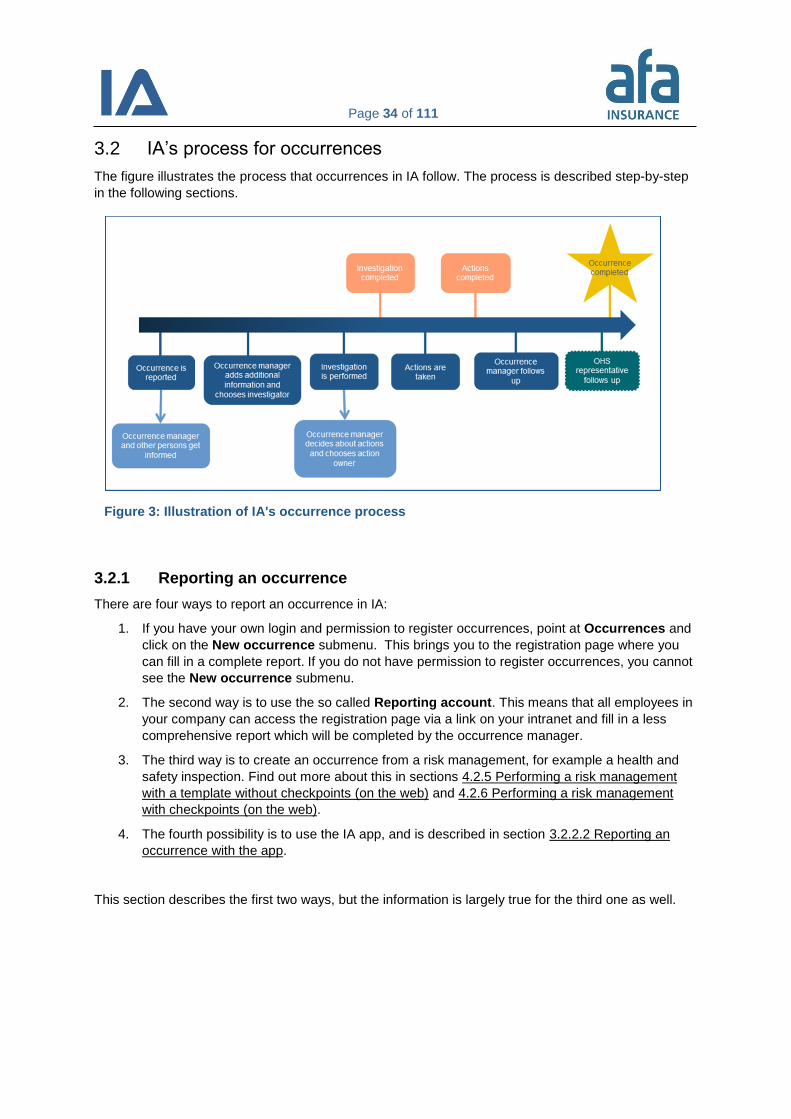
Page 34 of 111
3.2 IA’s process for occurrences
The figure illustrates the process that occurrences in IA follow. The process is described step-by-step
in the following sections.
3.2.1 Reporting an occurrence
There are four ways to report an occurrence in IA:
1. If you have your own login and permission to register occurrences, point at Occurrences and
click on the New occurrence submenu. This brings you to the registration page where you
can fill in a complete report. If you do not have permission to register occurrences, you cannot
see the New occurrence submenu.
2. The second way is to use the so called Reporting account. This means that all employees in
your company can access the registration page via a link on your intranet and fill in a less
comprehensive report which will be completed by the occurrence manager.
3. The third way is to create an occurrence from a risk management, for example a health and
safety inspection. Find out more about this in sections 4.2.5 Performing a risk management
with a template without checkpoints (on the web) and 4.2.6 Performing a risk management
with checkpoints (on the web).
4. The fourth possibility is to use the IA app, and is described in section 3.2.2.2 Reporting an
occurrence with the app.
This section describes the first two ways, but the information is largely true for the third one as well.
Figure 3: Illustration of IA's occurrence process

Page 35 of 111
Whichever of the first two ways you choose, the following fields will appear:
1. Fill in when the occurrence took place.
2. Click on the Where? field to open the organization chart. Choose the unit where the
occurrence took place. If the coordinates are not added automatically, you can add the exact
geographic position using Google Maps:
(1) Click on the globe icon to the right of Where?
(2) Click on the magnifying glass to the right of the coordinate fields Lat(N) and Long(O).
(3) Google Maps opens in a new window. If you cannot see the map but a pop-up with
the information Only secure content is displayed click on Display all content.
(4) If the map does not show the correct position, enter the city and address in the search
field and click on Search.
(5) Drag the marker to the correct position.
(6) Click on Use these coordinates. Google Maps closes and the coordinates are
inserted in Lat(N) and Long(O).
3. Specify which type of occurrence you want to report in What? Your company determines
which types of occurrences you can select.
4. As soon as you have completed these fields, more panels will open. The fields displayed
depend on the selected occurrence type and on whether you are using the reporting account
or a personal account.
5. When you report a work injury (accident, commuting accident or work-related illness), you
have to provide more information about the injured person and the physical consequences of
the injury. Information applicable for Swedish companies only: This information is
automatically inserted into the claim notification forms to the Swedish Social Insurance
Agency (Försäkringskassan) and AFA Insurance’s Work Injury Insurance (TFA or TFA-KL).
6. Enter the personal data. Information applicable for Swedish companies only: If you have
protected identity, replace the last four digits in your personal ID number by -0000 or enter
19121212-1212 instead of your personal ID number.
7. Provide your e-mail address, if you want to be informed about the processing of your
occurrence via e-mail.
8. Select the Employment unit by clicking in the field. The units that are available for you to
select will depend on your level of authorization. This means that the organization chart may
look different to the one you saw when you selected the occurrence unit in the Where? field.
9. Write a title for your occurrence in Occurrence title.
10. Describe the occurrence in detail in Course of events.
Figure 4: Registration
Page 36 of 111
11. Categorize the occurrence using the lists:
Operating situation or Type of operation
Activity or Work step
Location, Place or Stage/Phase
Reason for injury or Injury risk
Object involved, Object/person involved or Machine/Tool/Substance6
Object ID
Users in your company and other companies can search all details that you register in these
lists using the Analysis function. In order to make the occurrences comparable, the same lists
are used by all companies within your sector.
12. If you have contacted an OHS representative, select his/her name in the list Contacted OHS
representative. Otherwise, leave this field blank.
13. If the occurrence was an accident, a commuting accident or a work-related illness you have to
specify its consequence. The details that you register in the Consequence panel will be
shown in the Analysis function as well as in the reports Overview, Occurrences per month and
Injured body parts. For more information about this, see chapters 6 Reports and 7 Analysis.
14. Click on the Attachments button if you want to add attachments, for example, pictures of the
scene of the accident.
15. If the occurrence contains information that is so sensitive that only persons who have a
function in the occurrence should have access to it, i.e. the occurrence manager, the
contacted OHS representative, the chosen investigator and the chosen action owner(s), you
should select the checkbox for Restricted access.
16. When you have completed all the fields, click on Send – if you are using the reporting account
– or Save. If you try to send or save an occurrence without filling in all the mandatory fields, an
error message will be displayed.
17. Information about the occurrence is sent by e-mail to those responsible in your company.
3.2.1.1 Creating a copy of an occurrence
The Save a copy button will appear at the bottom of the page as soon as you have saved an
occurrence.7 You can click on this button to create several occurrences with similar information, for
example, if several persons were injured in the same accident or if an occurrence resulted in injury to
a person and a threat to the environment.
The new occurrence is saved as soon as you press the button. This is indicated by a green
occurrence ID. However, you may change the information in the new occurrence if you wish and then
save it again.
6 Since several objects can be involved in an occurrence, it is possible to select more than one option in this selection list. You can click in the list several times or hold down the Ctrl key to select multiple alternatives.
7 This does not apply if you are using the reporting account.
Note:
The names of the persons involved must not be entered in Occurrence title and Course
of events, as other companies have access to the information in these fields via
Analysis.

Page 37 of 111
3.2.2 Reporting an occurrence using the IA app
Your company determines whether you can use the IA app or not. The app allows a simplified
registration of occurrences and is available for IOS, Android and Windows Phone. It has an offline
mode, which means that you can fill in an occurrence without being connected to the internet. As soon
as you retrieve internet connection the occurrence is sent to IA automatically.
3.2.2.1 Installing the app and logging in
1. Download the app from Google Play, Appstore or Windows Store. In Google Play and
Appstore you can search for AFA Försäkring to find the app. In Windows Store you can
search for IA.
2. Click on the link, that you received from your administrator, to log in to the app. You can also
log in with the app-user account’s username and password. Note that these are not the same
username and password that you use to sign in to the web version of IA.
3. Enter your name, e-mail address, employment unit and type of employment. This information
is saved in the app so that you do not have to provide it each time you report an occurrence.
4. If you are going to report occurrences to several companies, click on Add account and enter
the user information for the next app-user account.
5. Tap on Done to save your settings.
3.2.2.2 Reporting an occurrence with the app
1. Tap the edit icon in the upper right corner and select New occurrence from the list, except if
you want to report a safety observation. In this case, select New safety observation from the
list.
2. If you are using several app-user accounts, select beneath Send to to which organization you
want to report the occurrence. The selected organization is indicated by a blue check mark.
3. Tap on What? and select the type of occurrence you want to report. Your company
determines which types of occurrences you can select.
4. Tap on Where (Unit)? to select where the occurrence has happened. If you have used the
app before, the latest chosen unit is preselected. Tap on its name, if you want to select a
different unit.
5. Tap on the map at the top of the page, if you want to change the location. When you have
opened the map, you can alter between map view and satellite view.
6. If you are reporting an accident where somebody else was injured, change the name in the
Injured person field.
7. Tap the camera icon if you want to take pictures and add them to the occurrence.
8. Tap on When? to change time or place.
9. Describe what happened below the heading Course of events.
10. If you want to enter the reason for injury, your opinion on the cause and your proposal for
actions, tap Cause and action. Tap on Back when you have filled in this information.
11. Tap on Send at the bottom of the page.
Page 38 of 111
3.2.2.3 Following an occurrence that has been reported via the app
You can follow those occurrences, which you reported via the IA app, in the History list in the app.
There you can see the IDs that your occurrences got in IA, as well as which status they currently have.
You can click on an occurrence in the list to open it and look at the information that you have reported.
3.2.2.4 Copying an occurrence that has been reported via the app
If you are using several app-user accounts, you can send one occurrence to several organizations.
This is useful if you work as a contractor for several organizations that use IA.
Follow these steps to send an occurrence to several organizations:
1. Go to the History list in the app.
2. Tap on the occurrence that you want to send to several organizations.
3. Scroll down and click on the Copy button.
4. Select beneath Send to to which organization you want to send the copy. You cannot send a
copy to the organization that already got the occurrence.
5. Edit the information about the occurrence if necessary.
6. Tap on Send at the bottom of the page.
3.2.2.5 Deleting an occurrence from the app
You can remove an occurrence, which you reported via the app, from the History list in the app if
necessary.
1. Go to the History list in the app.
2. Tap on the occurrence that you want to delete.
3. Scroll down and click on the Delete button.
3.2.3 Troubles when reporting occurrences
3.2.3.1 Why is no occurrence manager selected?
This means that there is no user that has an occurrence manager authorization for the occurrence or employment unit that are selected in the occurrence. Your local IA administrator has to create at least one user that can become occurrence manager in the particular occurrence or employment unit or one of the units above them.
Note:
Note that the occurrence will be deleted from the app only, not from IA!

Page 39 of 111
3.2.3.2 Can I select a different occurrence manager?
If the occurrence has been assigned to the wrong occurrence manager, you can manually change the Occurrence manager, as well as the Occurrence unit (Where?) and/or the Employment unit. You can only change to units that you yourself are authorized to. If you are logged in to the reporting account, you cannot select or change the occurrence manager.
3.2.3.3 Reporting via app: Why is the error message ”Alternatives missing”
displayed when I tap on Type of divergence?
Most likely, you did not select an occurrence type under the heading Where?
However, this can also be due to the fact that your local IA administrator has not yet chosen any types of divergence for the particular occurrence type.
Page 40 of 111
3.2.4 Confirming and completing occurrences
If an occurrence is reported through a reporting account, the occurrence manager has to confirm the
information. Users with other roles, who have permission to edit occurrences in the particular
occurrence or employment unit, can also complete the occurrence information. However, only the
occurrence manager (and the super user) can view all personal data.
1. Open the occurrence. The Occurrence tab is active.
2. Add the missing information.
3. Change the text in Occurrence title and Course of events if it contains personal data.
4. Click on Attachments to add pictures, sketches and other documents about the occurrence.
5. Click on Save. The occurrence’s status changes to Registration in progress.
6. If you are the occurrence manager, open the Investigation tab and register the person who
should investigate the occurrence.
7. Select the person in the Investigator field. The persons listed have permission to investigate
occurrences in either the occurrence unit or the employment unit.
8. In the Other investigator field, you can type the name of an investigator who is not an IA
user, for example, the distributor of the machine that caused the injury. However, you have to
inform this person manually about his/her responsibility. This is not done by IA.
9. IA automatically enters an Estimated completion date for the investigation. You can change
the date manually, if necessary.
10. Click on Save. The status of the occurrence changes to Investigation in progress.
3.2.5 Reporting occurrences to external parts
As an occurrence manager you are responsible for reporting an occurrence to all authorities who have
to be informed about it. At your service you have the Claims tab in each occurrence, where all links to
online claim notifications are brought together. There you can find all links that your local IA
administrator has created. The Claims tab appears as soon as you have saved the occurrence.
Swedish companies can also find the links to the claim notifications of the Swedish Social Insurance
Agency (Försäkringskassan), AFA Insurance’s Work Injury Insurance (TFA), the Swedish Work
Environment Authority (Arbetsmiljöverket) and the National Electrical Safety Board (Elsäkerhetsverket)
on this tab.
Information applicable for Swedish companies only!
Your local IA administrator can give all employees the possibility to submit a claim to AFA Insurance’s
Work Injury Insurance (TFA) electronically via the reporting account. The employees can also fill in the
claim notification form of the Swedish Social Insurance Agency (Försäkringskassan). However, they
cannot send it. This has to be done by a user that is authorized to send applications to the Swedish
Social Insurance Agency.
The reporting account does not have the Claims tab. Instead, it has checkboxes (at the bottom of the
page) that have to be selected before clicking on Send. This will open the forms and send the report to
IA, simultaneously:
Figure 5: Link to claim notifications from the reporting account

Page 41 of 111
3.2.5.1 Sending an electronic claim notification to external parts
Your local IA administrator can create links to different online claim notifications that are relevant for
your work. For example, this can be claim notifications to the police, to municipal or to regional
authorities.
1. To make a claim notification, click on the Claims tab when you have completed and saved the
occurrence and scroll down to the Claim on external parts panel.
2. Select the application you want to make in the list beneath the heading External part.
3. Click on the Open claim notification button to open the form.
4. Fill in the form and send it.
5. Go back to IA and select the checkbox for Claim sent. You can also add a comment.
6. Click on Save.
3.2.5.2 Sending an electronic claim notification to the Swedish Social Insurance
Agency (Försäkringskassan)
Information applicable for Swedish companies only!
If an employee suffers from a work injury (accident, commuting accident or work-related illness) you
have to report this to the Swedish Social Insurance Agency (Försäkringskassan). Follow these steps
to report the work injury electronically:
1. Click on the Claims tab as soon as you have completed and saved the occurrence.
2. Then click on the e-claim FK button beneath the heading Claim on Försäkringskassan (FK). If
you do not have permission to register claims on the Swedish Social Insurance Agency
(Försäkringskassan), you cannot see the e-claim FK button. Neither will it be displayed if you
have selected the checkbox Hide personal records.
3. A pop-up window with the form that is similar to the page anmalarbetsskada.se opens and the
matching information is transferred there. To the left you see the claim notification fields and to
the right you can always see the information from IA. The claim notification is in Swedish only.
4. Examine the information that has been filled in automatically and add the information that is
missing.
5. You can use the buttons at the bottom of the page to clear the form and transfer the
information from IA again. You can also save a copy of the application, if you or someone else
will edit it later.
6. Select the checkboxes for the persons who have participated in the application. If and which
checkboxes you can select depends on your permissions.
7. When the application is completed, click on the Granska och skicka till FK button. When you
click on this button a copy of the application is saved.
8. A preview opens to give you the possibility to examine the information once more before you
send it to Försäkringskassan.
9. Click on Skicka till FK when you are satisfied with the claim notification. You can only send it
once.
10. When you have sent the application, a receipt from the Swedish Social Insurance Agency
(Försäkringskassan) opens in a pop-up window. The receipt is a PDF file.

Page 42 of 111
11. In IA you can see checkboxes that display how the handling of the application proceeds. You
cannot select or deselect the checkboxes manually.
3.2.5.3 Sending an electronic claim notification to AFA Insurance’s Work Injury
Insurance (TFA or TFA-KL)
Information applicable for Swedish companies only!
For all work injuries (accident, commuting accident or work-related illness) reported in IA you can send
an online claim notification to AFA Insurance’s Work Injury Insurance (TFA or TFA-KL) directly from
IA. Your company determines which users can send a report to TFA or TFA-KL.
1. Click on the Claims tab as soon as you have completed and saved the occurrence.
2. Then click on the e-claim TFA button beneath the heading Claim on AFA Insurance (TFA). If
you do not have permission to register claims on AFA Insurance, you cannot see the e-claim
TFA button. Neither will it be displayed if you have selected the checkbox Hide personal
records.
3. AFA Insurance’s online claim notification opens and the matching information is transferred
there. The claim notification is in Swedish only.
4. Control the information that is already filled in and add the information that is not available in
IA, for example specifications about visits to the doctor or hospital.
5. Examine your claim notification and then click on Skicka anmälan.
6. The injured person will receive a confirmation letter containing all the information that was
entered in the claim notification.
7. If the injured person has a Swedish electronic ID verification he/she can log in to AFA
Insurance’s customer website at www.afaforsakring.se at any time and add information about
the costs he/she has incurred as a result of the injury. It is also possible to send this
information without an electronic ID verification at www.afaforsakring.se/om-afa-
forsakring/kontakta-oss/skicka-in-dokument/kompletteringsformular.
8. AFA Insurance contacts your company to confirm the employment details of the injured
person.
Note:
This receipt is only displayed once. However, you can save it or print it.
Note:
The names of the persons who have to select the checkboxes for Employer participated, OHS
representative participated or The injured participated are not given in IA. For that reason IA
does not send any e-mail notifications about this responsibility. Neither is it displayed in the My
IA table on the start page. Therefore, it is important that you check the submenu FK/TFA claims
in the action plan regularly, to avoid that applications are left behind. For more information
about the action plan, see chapter 5.
Page 43 of 111
9. In IA you can see a checkbox that displays if the online claim notification has been sent to
AFA Insurance. Beneath the checkbox you can see when the claim notification was sent and
by whom. It is possible to select the checkbox manually if the claim notification was not sent
via IA.
10. Click on Save.
3.2.5.4 Sending an electronic claim notification to the Swedish Work Environment
Authority (Arbetsmiljöverket)
Information applicable for Swedish companies only!
Serious accidents and serious near misses have to be reported to Arbetsmiljöverket. You can find the
link to Arbetsmiljöverket’s electronic claim notification in the module Claim on external parts. Which
users that are able to see the link to the application is decided in your company.
1. Click on the Claims tab as soon as you have completed and saved the occurrence and scroll
down to the Claim on external parts panel.
2. Select Arbetsmiljöverket in the list beneath the External part heading.
3. Click on the Open claim notification button to open the form.
4. Fill in the form and send it.
5. Go back to IA and select the checkbox for Claim sent. You can also add a comment.
6. Click on Save.
3.2.5.5 Sending electronic claim notification to the National Electrical Safety Board
(Elsäkerhetsverket)
Information applicable for Swedish companies only!
Electrical accidents and near misses have to be reported to Elsäkerhetsverket. You can find the link to
Elsäkerhetsverket’s electronic claim notification in the module Claim on external parts. Which users
that are able to see the link to the application is decided in your company.
1. Click on the Claims tab as soon as you have completed and saved the occurrence and scroll
down to the Claim on external parts panel.
2. Select Elsäkerhetsverket in the list beneath the heading External part.
3. Click on the Open claim notification button to open the form.
4. Fill in the form and send it.
5. Go back to IA and select the checkbox for Claim sent. You can also add a comment.
6. Click on Save.
Note:
If you have made an electronic claim notification to Försäkringskassan according to the
instructions in section 3.2.5.2 Sending an electronic claim notification to the Swedish
Social Insurance Agency (Försäkringskassan), you do not have to perform step 2 on the
page anmalarbetsskada.se (https://anmalarbetsskada.se/P2/AllvarligOlyckastegett/).

Page 44 of 111
3.2.6 Risk assessment and risk matrix
If your organization has chosen to use the risk assessment module, the risk assessment before action
is shown in the Investigation tab and the risk assessment after action is shown in the Actions &
Follow-up tab.
If you use the advanced risk assessment model you assess the risk by estimating the probability of
an occurrence happening again and the consequences that would have. You can set values from 1 to
5 for probability and consequence. IA calculates the risk value as the product of these two.
If your company uses the basic risk assessment model you rate if the risk is low, moderate or high.
Regardless of which risk assessment model you use, the risk assessment is done together with the
investigation and after the actions have been carried out. That makes it possible to estimate if the
actions had effect and the possibility that the occurrence happens again actually has decreased.
Figure 6: Advanced risk assesment model
Figure 7: Basic risk assessment model
Page 45 of 111
3.2.7 Relating occurrences to each other or to risk managements
Sometimes it can be necessary to relate occurrences to each other, for example:
when you have an accident with several injured persons
when you have similar occurrences and want to make the investigation and actions in only
one of them
when you have an occurrence that is both an accident and an environmental incident
when you want to relate an occurrence to a risk management
If you want to show that occurrences are related to each other, you can use the Relate occurrence
panel on the Investigation tab.
1. Open the occurrence and click on the Investigation tab.
2. Click on the Relate occurrence button in the Investigation panel to open the panel where
you can relate the occurrence to other occurrences and risk managements.
3. Select if you want to relate the occurrence to an occurrence or to a risk management.
4. Enter the ID of the occurrence or risk management in the With ID field and click on the
magnifying glass. The selected occurrence’s or risk management’s title is displayed at the
bottom of the panel.
5. When you relate the occurrence to another occurrence, you can select the checkbox for
Select if occurrence x is the origin to this occurrence, if the occurrence that you chose is
the principal occurrence. Original occurrence/principal occurrence means the occurrence
where you will enter the investigation and actions. It is optional to specify an original
occurrence.
6. When you relate the occurrence to a risk management that contains checkpoints, you can
select to which Checkpoint you want to relate the occurrence. We recommend selecting a
checkpoint, since the link to the occurrence will be displayed in the selected checkpoint in the
risk management.
7. You can enter a comment.
8. Click on the floppy disk icon to save the relation.
9. Repeat steps 3 to 8 if you want to relate the occurrence to multiple occurrences or risk
managements.
All relations are displayed in a list in the Relate occurrence panel. Even occurrences that are copies
of other occurrences, and occurrences that have been created from risk managements are displayed
in the list.
You can click on an occurrence or risk management in the list to open it.
The number of occurrences and risk managements an occurrence is related to is also displayed in the
occurrence list, in the column with the icon.
Page 46 of 111
3.2.8 Investigating occurrences
The reason for the occurrence has to be investigated after it has been reported and confirmed. The
investigation panel consists of three modules: Investigation, Barriers and Causes. Your company
determines which modules that are displayed for you.
If you are responsible for the investigation you follow these steps:
1. Open the occurrence and click on the Investigation tab.
2. If the person who reported the occurrence has given his/her opinion on the cause, this will be
displayed at the head of the Investigation panel. This information is meant to provide input to
the investigation.
3. IA suggests the occurrence title as title for the investigation. Change the Title if you are not
satisfied with it.
4. In the Investigator field your name is displayed. If you are not supposed to be the
investigator, you can select someone else from the list. The list displays all persons that are
authorized to be investigators in the occurrence or employment unit that are selected in the
occurrence.
In the Other investigator field, you can type the name of an investigator who is not an IA
user, for example, the distributor of the machine that caused the injury. However, you have to
inform this person manually about his/her responsibility. This is not done by IA.
It is always the person chosen in the Investigator field who is responsible for carrying out the
investigation.
5. Enter the persons that participated in the investigation In the Participants field.
6. The Estimated completion date field shows when the investigation is expected to be
completed. IA uses this date to calculate when to send reminders about the investigation. If
the investigation is not completed by this date the occurrence is given the status Overdue.
This is displayed with orange color in the Investigation in progress chart on the main page
and with an orange exclamation mark in My IA, the occurrence list, the action plan and next to
the status icon in the occurrence.
7. Use the text box Investigation to write down why the occurrence happened. Depending on
your company settings, you can use the 5? button, the barrier analysis and/or the cause
analysis as an aid to your investigation.
a. The 5? button opens a pop-up window, where you will be asked a question and the
answer to that question becomes the next question. This is repeated until you get to the
root of the problem. When you click on Finish, your questions and answers appear in
the textbox Investigation. It is only possible to answer a maximum of 5 questions, but
you can use the 5? button several times. If you want to, you can add free text in the
textbox even though you have used 5?.
b. In the Barrier analysis you examine the physical and organizational barriers that exist to
prevent, stop or reduce the consequences of occurrences, for example protective
covers, protective clothing or written instructions. You analyze which barriers that
worked, failed or are missing. The barriers are classified with O for organizational and T
for technological barriers.
(1) Select a Barrier by clicking in the selection list.
(2) Then select if it is a Working, Failing or Missing barrier. If a barrier exists, but
has not been used, it is classified as failing barrier.
(3) Add a Description to specify what you mean.

Page 47 of 111
(4) Click on the plus sign next to Barrier to add multiple barriers.
(5) Click on the wrench icon to add an action to a barrier. You will be relocated to
the Actions & Follow-up tab, where the barrier and your description
automatically are filled in in the Action field. Go back to the Investigation tab
when you are finished creating the action.
(6) Click on the paperclip icon to add an attachment to the barrier.
c. In the Cause analysis you analyze the occurrence’s main cause and the causes
contributing to it. The causes are classified with H for human, O for organizational and T
for technological causes.
(1) Select a Cause by clicking in the selection list.
(2) Then select if it is a Main cause or a Contributing cause.
(3) Add a Description to specify what you mean.
(4) Click on the plus sign next to Cause to add multiple causes.
(5) Click on the wrench icon to add an action to a cause. You will be relocated to
the Actions & Follow-up tab, where the cause and your description
automatically are filled in in the Action field. Go back to the Investigation tab
when you are finished creating the action.
(6) Click on the paperclip icon to add an attachment to the cause.
8. To get even more input for your investigation, you can study similar occurrences within your
company or group of companies, by clicking on the Show similar occurrences button. This
opens the Analysis function and all occurrences that have been categorized with the same
alternatives in the lists Operating situation or Type of operation, Activity or Work step,
Location, Place or Stage/Phase, etc. are displayed.
At least two alternatives must have been selected in the particular occurrence to use this
function. If you have selected several list alternatives, only occurrences that contain all of
them will be shown in the search results in the Analysis function. Click on the blue
Occurrence button (next to Contact information) to get back to your occurrence.
9. If you want to relate the occurrence to one or more other occurrences or risk managements,
click on the Relate occurrence button. Find out more about this function in the previous
section.
10. Click on Attachments to add pictures, sketches and other documents about the occurrence.
11. Select the checkbox for Completed when the investigation is completed. IA automatically
enters today’s date as the Date of completion and changes the occurrence’s status to
Action in progress. You can change the Date of completion manually if necessary.
12. Click on Save.
If the occurrence does not have to be investigated, select the checkbox for No investigation and
explain your decision in the textbox that opens.
Note:
The names of the persons involved must not be entered in Title and Investigation as well
as in the Descriptions of barriers and causes, as other companies have access to this
information via the Analysis function.
Page 48 of 111
3.2.9 Adding actions
Based on the investigation you can decide which actions should be taken. An occurrence can have
any number of actions.
1. Open the occurrence and click on the Actions & Follow-up tab. One action is already open to
make it easier for you to fill it in.
2. If the person who reported the occurrence has provided suggestions for actions or reported
actions that have been taken, this will be displayed at the head of the Actions panel. This
information is meant to provide input to the actions.
3. Enter a Title for the action.
4. Write what should be done in the textbox Action.
5. Select the person to implement the action from those listed in Action owner. The list displays
all persons that are authorized to be action owners in the occurrence or employment unit that
are selected in the occurrence.
In the Other action owner field, you can type the name of an action owner who is not an IA
user, for example, the distributor of the machine that caused the injury.
It is always the person chosen in the Action owner field who is responsible for carrying out
the actions.
6. IA automatically enters an Estimated completion date for the action. You can change the
date manually, if necessary. IA uses this date to calculate when to send reminders about the
action. If the action is not completed by this date the occurrence is given the status Overdue.
This is displayed with orange color in the Action in progress chart on the main page and with
an orange exclamation mark in My IA, the occurrence list, the action plan and next to the
status icon in the occurrence.
7. Enter perhaps a Work order number.
8. Enter perhaps one of the five Action steps: Elimination, Substitution, Engineer controls,
Signage/warnings and/or administrative controls and Personal protective equipment.
9. Click on Attachments to add pictures, sketches and other documents about the occurrence.
10. Click on Save.
To add more actions to the occurrence, click on the New action button and repeat steps 3 to 11.
When an action has been completed, you have to select the checkbox for Completed. IA
automatically enters today’s date as date of completion. You can change the date manually, if
necessary. As soon as all actions have been marked as completed, the status of the occurrence
changes to Follow-up in progress.
If no actions have to be taken, select the checkbox for No actions and explain your decision in the
textbox that opens.
Note:
The names of the persons involved must not be entered in Title and Action, as other
companies have access to this information via the Analysis function.
Page 49 of 111
3.2.10 Following up occurrences
Once all actions have been implemented, they should be followed up to establish whether they
achieved the desired results. The date for the follow-up is set automatically when the last action is
marked as completed. It is set a month ahead, but you can enter a different date. If the follow-up is not
completed by this date the occurrence is given the status Overdue. This is displayed with orange color
in the Follow-up in progress chart on the main page and with an orange exclamation mark in My IA,
the occurrence list, and next to the status icon in the occurrence.
IA suggests the occurrence manager as responsible for the follow-up. It is possible to choose a
different user to be responsible for the follow-up, as long as this user has the role of Occurrence
manager, Manager or Manager 3 in the occurrence or employment unit or one of the units above
them.
Follow these steps to follow-up an occurrence:
1. Open the occurrence and click on the Actions & Follow-up tab.
2. If your organization has chosen to use the risk matrix, you can make a Risk assessment
after actions.
3. Indicate whether the actions achieved the desired results by marking the checkbox for Yes or
No below the heading Actions have had effect.
4. You can add a comment to the follow-up.
5. Select the checkbox for Completed when you have finished and save. If your company uses
the OHS representative follow-up function, the occurrence is given the status Completed
(not approved), otherwise it is given the status Completed and a star appears. If the actions
have not achieved the desired results the occurrence is also given the status Completed (not
approved).
As soon as you have selected the checkbox for Completed the fields in the occurrence are
locked and can no longer be edited. If you need to edit an occurrence that has the status
Completed, you have to deselect the checkbox for Completed first.
You cannot follow-up the occurrence before the investigation and all actions are marked as completed.
If they are not completed, information about this will be displayed at the head of the Follow-up panel
and the checkbox for Completed will be disabled.
3.2.11 OHS representative follow-up
If your company has determined that the OHS representative should follow-up occurrences,
accidents, near misses, risk observations and work-related illnesses will not become completed
unless they have been followed up by both the occurrence manager and the OHS representative.
If you have been selected as the Contacted OHS representative, you will receive an e-mail
notification when it is time to follow up the occurrence.
1. Check how the occurrence has been handled.
2. Click on the Actions & Follow-up tab.
3. If it has been handled well, select the checkbox for Yes below the heading Ok. If it has not
been handled well, select the checkbox for No.
4. You can add a comment to the OHS representative follow-up.
5. Click on Save. If the occurrence has been handled well, the status changes to Completed
and a star appears. If it has not been handled well the status changes to Completed (not
approved).

Page 50 of 111
4. Risk management
4.1 General information about risk management
IA supports proactive occupational health and safety management by providing checklists for different
types of risk management, such as risk analyses or safety rounds, in the Risk management function.
Your company determines whether you are authorized to read and create risk managements.
4.1.1 Risk management types
Several types of risk managements can be processed in IA. Your company determines which types
you can use.
Audit
Coordination
Development
Emergency drills
Environmental inspection
Environmental risk assessment
Fire safety inspection
Health and safety inspection
Improvement audit
Inspection
Personal risk analysis for app
Project/Action plan
Review of safety rules and risk assessments
Risk analysis
RM inspection
Safety group meeting
Safety inspection
Safety moment
SBO
Working environment audit
Working environment inspection
Working environment inventory
Other
4.1.2 Templates for risk management
When you perform risk management, you often follow a step-by-step checklist. Your local IA
administrator can create different types of risk management templates in IA. However, it is also
possible to perform risk managements in IA without a checklist.
4.1.3 Responsible for risk management
A person is designated to be responsible for each risk management. Only users with an Occurrence
manager, Manager and Manger 3 role can be responsible for risk managements and only if their role
is applicable to the particular unit or a unit above it.
4.1.4 Occurrence unit, employment unit and unit responsible
When you search for risk managements in the list, you can select occurrence unit, employment unit or
unit responsible as search criteria. Occurrence unit and Employment unit refer to the unit where the
risk management is performed. Unit responsible lists all risk managements by responsible persons
that are employed in that unit. However, to search for Unit responsible works only if your local IA
administrator has registered employment units for the users.

Page 51 of 111
4.1.5 Searching for risk managements in the risk management list
In the risk management list you can see a list of those risk managements that are planned or
completed and that you have permission to read. You can also search for risk management rows.
1. Point at Risk management and click on the List risk management or List risk management
rows submenu.
2. You can narrow your search by using different selection criteria. Which submenu you chose,
determines which selection criteria you can use. Section 4.1.5.1 Selection criteria in the risk
management list displays all selection criteria that are available for the two submenus.
a) You can click on one of the column headings to open the selection criteria that are
related to that column. That way you can filter the results quickly.
b) To see all selection criteria, click on the Selection criteria button and select an
alternative from the list. You can search in the list to quickly find the selection criterion
you are looking for.
3. Depending on the criterion you choose, a text field, a selection list or a checkbox will be
displayed. Fill in the text field or select a list value, respectively. If you chose a checkbox it will
be selected right away.
4. Add perhaps more selection criteria by repeating steps 2 and 3.
5. Click on View or Enter to perform the search. The latest added criteria are displayed with
orange color, until you have performed the search.
The results displayed in the list depend both on the selection criteria you have chosen and on
the units and occurrence types you have permission to. If you did not choose any selection
criteria, everything that you are authorized to see is displayed. If you combine several criteria,
only results that meet all of them will be shown in the list of results. In section 4.1.5.2
Information displayed in the risk management list you can see which information is displayed
in the list.
6. By default, the list displays 50 results. To see more results, increase the number in the Show
field and press Enter.
7. In the list of results, you can click on the small arrows next to a column heading to sort the
results in increasing or decreasing order. When sorting, IA goes through all search results,
even those that are not displayed on the page. That is the case when your search resulted in
more results than chosen in the Show field. Therefore, you may see different search results
depending on if you sort the list in increasing or decreasing order.
8. To remove a selection criterion, reset it by clicking on the cross to the right of your selected
value or by deselecting the checkbox. If you want to remove all selection criteria, click on the
Delete button. Then click on Visa or press Enter to reload the search results.
9. If you want to export the displayed search results to Excel, click on the Export button.
10. If you switch to a different submenu beneath Risk management or Action plan, the criteria
you selected will apply to the new submenu as well (if they are available for this submenu).
11. Click on a risk management in the list to open it. You can click in the Type column to get to
the Planning tab of this risk management. Click in any of the other columns to get to the
Performance tab of the risk management.

Page 52 of 111
4.1.5.1 Selection criteria in the risk management list
The table displays all selection criteria that are available for the different submenus beneath Risk
management, in alphabetical order. In the Available for column you can see which criteria are
available for which submenu.
Selection criterion
Description How to use Available for
Hide completed
Is used to filter out completed risk managements. Risk managements that have been performed but where actions and follow-up are not completed will still be displayed in the list.
Deselect this checkbox if you want to include completed risk managements again in the list.
The checkbox is selected right away when you choose this criterion.
List risk managements
ID Is used to quickly find a specific risk management or all of its rows.
Enter the ID in the format 2000-1 and press Enter.
List risk managements and List risk management rows
Mine only For Risk managements: Is used if you only want to view the risk managements where you are responsible, participant or responsible for follow-up.
For Risk management rows: Is used if you only want to view the risk managements where you are responsible, participant, action owner or responsible for follow-up.
The checkbox is selected right away when you choose this criterion.
List risk managements and List risk management rows
Include N/A Is used to include risk management rows that have been indicated as not applicable (N/A).
The checkbox is selected right away when you choose this criterion.
List risk management rows
Object Is used to search for the Object that the risk management applies to.
Type a word or parts of it and press Enter.
The search is not case-sensitive, and you can use wildcards (for example %).
List risk managements and List risk management rows
Period Is used to search for risk managements that have been performed or are planned to be performed during the selected period.
Click in the fields and select a start and end date.
Enter just an end date if you want to search for all risk managements until that date.
List risk managements and List risk management rows
Page 53 of 111
Selection criterion
Description How to use Available for
Enter just a start date if you want to search for all risk managements from that date on.
Person responsible
Is used to search for risk managements or rows from risk managements that the selected person is responsible for.
You can also search for risk managements or rows from risk managements where no responsible has been chosen.
Click in the field and select a person or the <Missing> alternative. You can write a name to quickly find the person you are looking for. You can only select one person at a time.
List risk managements and List risk management rows
Restricted access only
Is used if you only want to view risk managements or rows from risk managements that have restricted access.
The checkbox is selected right away when you choose this criterion.
List risk managements and List risk management rows
Risk assessment completed
Is used to search for risk management rows where you have done a risk assessment.
Click in the field and select an alternative.
List risk management rows
Risk interval Is used to search for risk management rows with a certain risk value. Applies if your organization uses the advanced risk assessment model. Is displayed only after you have made a selection for the Risk assessment completed criterion.
Enter an interval between 0 and 25 and press Enter. Then select an alternative for Risk assessment.
List risk management rows
Risk level Is used to search for risk management rows with a certain risk level. Applies if your organization uses the basic risk assessment model. Is displayed only after you have made a selection for the Risk assessment completed criterion.
Click in the field and select an alternative.
List risk management rows
Risk management type
Determines the types of risk managements that are included in the search.
Click in the field and select one or more alternatives.
List risk managements and List risk management rows
Row / Full-text search
Is used to find a certain risk management row quickly.
The search is performed in all text fields of the risk management rows
Type a word or parts of it and press Enter.
The search is not case-sensitive, and you can
List risk management rows
Page 54 of 111
Selection criterion
Description How to use Available for
that that meet your other selection criteria.
use wildcards (for example %).
Row number Is used to search for rows with a specific number.
Type a number and press Enter.
List risk management rows
Source Is used to search for risk managements that have been created in a particular way:
Only App: Displays the risk managements that have been created with the IA-app.
Without App: Displays the risk managements that have not been created with the app.
Click in the field and select an alternative.
List risk managements and List risk management rows
Status Is used to search for risk managements or rows from risk managements with a certain status.
Click in the field and select an alternative.
List risk managements and List risk management rows
Template Is used to search for risk managements or rows from risk managements that have been created with a certain template.
Click in the field and select one or more alternatives.
If you want to search for a template that is filed or in editing mode, you can select the checkbox for Include all templates. The templates that are filed or in editing mode are marked with (*) in the selection list.
List risk managements and List risk management rows
Title / Full-text search
Is used to find a certain risk management quickly.
The search is performed in title, description and object of the risk managements, but not in title and description of the used templates. The search is performed in all risk managements that meet your other selection criteria.
Type a word or parts of it and press Enter.
The search is not case-sensitive, and you can use wildcards (for example %).
List risk managements
Unit Is used to search for risk managements or rows from risk managements from a particular
Select occurrence unit, employment unit or unit responsible. Then click in the empty field to
List risk managements and List risk management

Page 55 of 111
Selection criterion
Description How to use Available for
occurrence- or employment unit.
If your local IA administrator has registered in which units your users are employed, you can also use the criterion unit responsible. This lists all risk managements or rows from risk managements where the responsible is employed in the selected unit.
select a unit from your organization chart.
rows
Yes/No Is used to search for risk management rows whose answer has the selected value.
Click in the field and select an alternative.
List risk management rows
4.1.5.2 Information displayed in the risk management list
The table shows all columns that are displayed for the different submenus beneath Risk management
in alphabetical order. In the Available for column you can see which columns are available for which
submenu.
Column Description Available for
Date Displays the date when the risk management has been performed or is planned to be performed.
List risk managements and List risk management rows
ID Displays the ID of the risk management.
If you selected List risk managements, the template that was used for the risk management is displayed if you point at the ID.
If you selected List risk management rows, the number of the row is indicated after the colon.
List risk managements and List risk management rows
Person responsible
Displays the person responsible for the risk management.
List risk managements
Status Displays the status of the risk management. A blue check mark indicates that the risk management has been performed but not yet followed up. A star indicates that the risk management is followed up and completed.
List risk managements and List risk management rows
Title If you selected List risk managements, the title of the risk management is displayed in this column.
If you selected List risk management rows, the text contained in the first text field of the particular row and the section heading belonging to this row are displayed.
List risk managements and List risk management rows
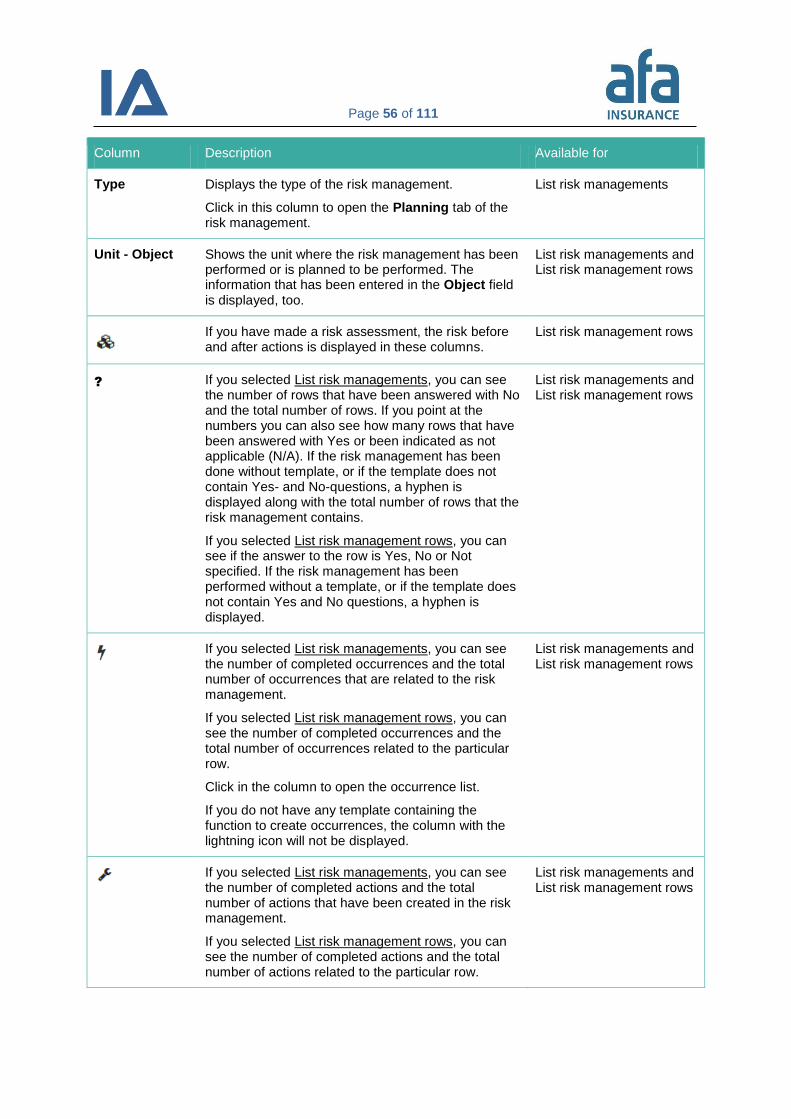
Page 56 of 111
Column Description Available for
Type Displays the type of the risk management.
Click in this column to open the Planning tab of the risk management.
List risk managements
Unit - Object Shows the unit where the risk management has been performed or is planned to be performed. The information that has been entered in the Object field is displayed, too.
List risk managements and List risk management rows
If you have made a risk assessment, the risk before and after actions is displayed in these columns.
List risk management rows
? If you selected List risk managements, you can see the number of rows that have been answered with No and the total number of rows. If you point at the numbers you can also see how many rows that have been answered with Yes or been indicated as not applicable (N/A). If the risk management has been done without template, or if the template does not contain Yes- and No-questions, a hyphen is displayed along with the total number of rows that the risk management contains.
If you selected List risk management rows, you can see if the answer to the row is Yes, No or Not specified. If the risk management has been performed without a template, or if the template does not contain Yes and No questions, a hyphen is displayed.
List risk managements and List risk management rows
If you selected List risk managements, you can see the number of completed occurrences and the total number of occurrences that are related to the risk management.
If you selected List risk management rows, you can see the number of completed occurrences and the total number of occurrences related to the particular row.
Click in the column to open the occurrence list.
If you do not have any template containing the function to create occurrences, the column with the lightning icon will not be displayed.
List risk managements and List risk management rows
If you selected List risk managements, you can see the number of completed actions and the total number of actions that have been created in the risk management.
If you selected List risk management rows, you can see the number of completed actions and the total number of actions related to the particular row.
List risk managements and List risk management rows

Page 57 of 111
Column Description Available for
If you selected List risk managements, you can see how many attachments a risk management has.
If you selected List risk management rows, you can see the number of attachments that are linked to the particular row.
List risk managements and List risk management rows
Click on that icon to open a PDF file of the risk management.
List risk managements
4.1.5.3 Why can’t I find my risk management in the list?
If you cannot find a particular risk management in the list, this can be due to the following reasons:
Only 50 results are displayed by default. To see all results you have to change the number in the field Show.
If the risk management has the status Completed, you have to deselect the checkbox for Hide completed to be able to see it in the list.
If you do not have permission for the unit where the risk management was registered, you cannot see it.
If the risk management has Restricted access you can see it only if you have a function in the risk management or are a super user.
If you have access to multiple companies within your group of companies you have to select the correct company in the Company list.
If someone has deleted the risk management, you cannot find it in the list and it is not possible to restore it.
4.1.6 Opening a risk management
Click on a risk management or risk management row in the list to get to the Performance tab of the
risk management. If you selected the Risk managements submenu, you can click in the Type column
to get to the Planning tab of this risk management.
4.1.7 Deleting a risk management
Open a risk management and click on the Planning tab. If you are authorized to delete risk
managements, you will see the Delete button at the bottom of the page.
Note:
It is not possible to restore a deleted risk management!
When you click on Delete, the risk management will be irrevocably deleted, including the
information registered in the Planning, Performance, Follow-Up, E-mail and Log tabs.
Page 58 of 111
4.1.8 Printing risk management templates
You may have different reasons for printing a risk management template, for example, if it has to be
filled in manually or if a completed template has to be signed by the parties involved. Therefore, there
is a print dialog box in IA where you can adjust some of the print settings. All print-outs are opened as
PDF files and you print them from Adobe Reader. You can also save them to your computer.
Except for a compilation of the risk management the PDF also includes the images that have been
added to the risk management.
Follow these steps to print a risk management:
1. When you have opened a risk management you can print it by clicking on the Create PDF
button. You can also print a risk management directly from the list of risk managements by
clicking on the PDF icon to the right of the risk management. Furthermore, you can print an
empty template by choosing the template as Selection criteria and clicking on the PDF icon
that appears next to the Template selection list.8
2. IA’s print dialog box opens.
3. Change the row height if necessary:
When you print a risk management that is not marked as completed, the row height is
preset to 150 pixels. This setting optimizes the printed output for filling manually.
However, it is possible to change the row height.
When you print a completed risk management, the checkbox for Set row height
automatically (slimmed) is preselected. This optimizes the printed output to be large
enough for the content. However, it is possible to change the row height by
deselecting the checkbox for Set row height automatically (slimmed). The
checkbox for Include signatures is also preselected in this case.
4. If the printed template has to be signed, you can select the checkbox for Include signatures.
You can also change the titles for the signatures. When you print a completed risk
management, the checkbox for Include signatures is also preselected. You can deselect it if
you do not want to include signatures.
5. If your template contains risk assessment and you want to have the risk matrix and its
definitions included in your print, select the checkbox for Include definitions for risk
assessment (applicable only if the template contains risk assessment).
6. Click on Create PDF when you are done with your settings.
7. As soon as the file has been created, you can choose to save or open it.
8. When you choose Open, the risk management template is opened in Adobe Reader. Click on
the print icon or on File and Print to print the template.
9. A print dialog box opens where you can change the settings for your printer. When you are
satisfied with the settings, click on OK to start printing.
4.1.9 Attachments
You can add pictures, sketches and other kinds of documentation to each risk management to make
the description more complete and accurate. Whether a risk management has attachments, is
displayed in the column with the paperclip icon in the risk management list. Thumbnails of the
attachments are displayed in the risk management.
8 The PDF icon is not displayed when you have selected multiple templates or when you have selected a filed template.

Page 59 of 111
4.1.9.1 Adding an attachment to a risk management
1. Open the risk management and click on the Attachments button to add an attachment that is
relevant for the whole risk management. The button is displayed on the Planning,
Performance and Follow-up tabs and moves as you scroll down the page. If you want to add
an attachment to a certain checkpoint you can also click on the paperclip icon next to this
checkpoint (when you have opened the Performance tab).
2. The attachment module opens.
3. Click on the Browse button. If the risk management has the status Completed, the browse
button will not be displayed since it is not possible to add attachments in that case.
4. The file explorer on your computer opens and lets you choose the file you want to add. Select
the file and click on Open or double-click on the file.
5. You are now back in the attachment module and can add a Description of the file.
6. Specify the attachment’s properties by selecting:
if the attachment contains information/photo that can identify a person
if the attachment should be displayed for your reporting account
If you selected Contains information/photo that can identify a person, you cannot select
that this attachment should be displayed for your reporting account.
7. If you did not use the paperclip icon but the Attachments button, you can still link the
attachment to a certain checkpoint in the template by choosing it in the Checkpoint list. And if
you want to regret this step, you can click on the empty row at the head of this selection list to
empty the Checkpoint field. This will link the attachment to the template as a whole instead.
8. Click on Add.
9. Repeat steps 3 to 8 if you want to add more attachments.
10. All the documents attached to a risk management are shown in a table in the attachment
module. The icons in the table indicate the properties of each attachment. In the table you also
can see to which checkpoints an attachment is linked. If no information is shown in the
Checkpoint column the attachment is linked to the template as a whole. You can click on an
attachment in the table if you want to change its properties.
11. Click on the cross in the upper right corner to close the attachment module. Thumbnails of the
attachments linked to the whole risk management are shown in the panel that displays
information about the risk management. Thumbnails of the attachments linked to certain
checkpoints are displayed next to the row that they belong to.
4.1.9.2 Removing an attachment from a risk management
1. Open the risk management and click on the Attachments button. The button is displayed on
the Planning, Performance and Follow-up tabs and moves as you scroll down the page.
Note:
An attachment cannot be larger than 20 MB.
IA supports the following file types: gif, jpg, bmp, doc, docx, xls, xlsx, ppt, pptx, pdf, htm, html,
png, tif, 3g2, 3gp, asf, avi, mov, mp4, mpg, wmv och zip.

Page 60 of 111
2. Click on the trash can icon next to the attachment you want to remove.
3. Click on the cross in the upper right corner to close the attachment module.
4.1.10 Log tab: Change log and access log
The Log tab is about the risk management that you are currently viewing. It contains a change log for
the risk management and a log of who has accessed the risk management. The Log tab is displayed
as soon as you save a risk management, but only if you are authorized to read it. Even if you are
authorized to read the log, it will be hidden if you have selected the checkbox for Hide personal
records.
The Change log lists all changes relating to the risk management. The entries are in chronological
order with the most recent at the top. Click on a column heading to sort the list. It is possible to search
the change log by entering criteria and clicking on View.
In the Access log panel you can see a list of users who have opened the risk management.
4.1.11 E-mails about risk managements
To ensure that no risk managements are overlooked, IA sends an e-mail to all participants and to all
persons who have some kind of responsibility for a risk management. The information is sent as a
calendar appointment or a regular e-mail, depending on the settings that your local IA administrator
has made. The calendar appointment function works with Outlook and Lotus Notes, but only if the
person that planned the risk management entered the time for when the risk management should be
performed. Otherwise, the information is sent as a regular e-mail message.
4.1.11.1 E-mail log
If you want to check who has received an e-mail about a particular risk management, open the risk
management and click on the E-mail tab. The E-mail tab appears as soon as you have saved the risk
management. In the E-mail log panel everybody who has received an e-mail about the risk
management is listed.
The log contains the following columns:
Date: Shows the date when the e-mail was sent. If there is no date, the e-mail was not sent,
for example if there is no e-mail address registered for the user. However, IA will display a
date even if the e-mail was sent to a misspelled e-mail address.
User: The name of the user whom the e-mail was sent to. If you hover over the name you can
see the e-mail address that the e-mail was sent to.
Reason for e-mail: The action that triggered the e-mail, for example creating a new risk
management:
Note:
When you change from one responsible person to another one, an e-mail is sent to the new
responsible as soon as you save the risk management. However, no notification is sent to the
previous responsible to inform that he/she no longer is responsible.
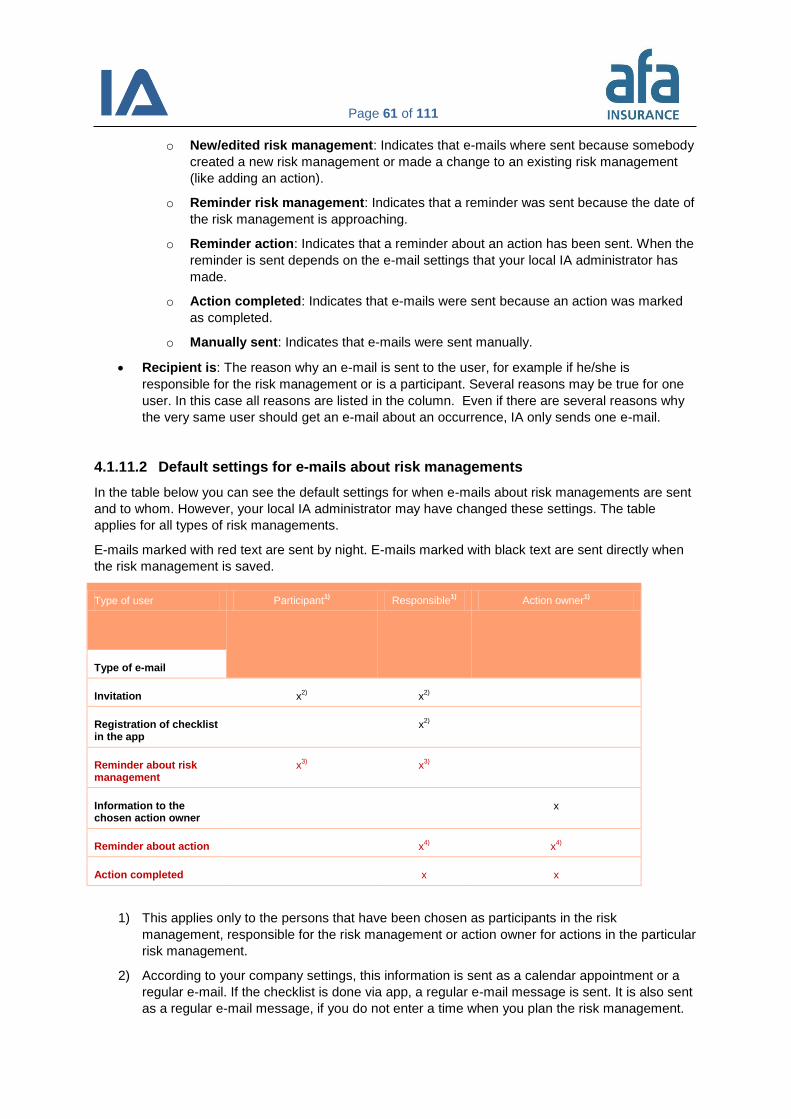
Page 61 of 111
o New/edited risk management: Indicates that e-mails where sent because somebody
created a new risk management or made a change to an existing risk management
(like adding an action).
o Reminder risk management: Indicates that a reminder was sent because the date of
the risk management is approaching.
o Reminder action: Indicates that a reminder about an action has been sent. When the
reminder is sent depends on the e-mail settings that your local IA administrator has
made.
o Action completed: Indicates that e-mails were sent because an action was marked
as completed.
o Manually sent: Indicates that e-mails were sent manually.
Recipient is: The reason why an e-mail is sent to the user, for example if he/she is
responsible for the risk management or is a participant. Several reasons may be true for one
user. In this case all reasons are listed in the column. Even if there are several reasons why
the very same user should get an e-mail about an occurrence, IA only sends one e-mail.
4.1.11.2 Default settings for e-mails about risk managements
In the table below you can see the default settings for when e-mails about risk managements are sent
and to whom. However, your local IA administrator may have changed these settings. The table
applies for all types of risk managements.
E-mails marked with red text are sent by night. E-mails marked with black text are sent directly when
the risk management is saved.
Type of user Participant1) Responsible
1) Action owner
1)
Type of e-mail
Invitation x2) x
2)
Registration of checklist in the app
x2)
Reminder about risk management
x3) x
3)
Information to the chosen action owner
x
Reminder about action x4) x
4)
Action completed x x
1) This applies only to the persons that have been chosen as participants in the risk
management, responsible for the risk management or action owner for actions in the particular
risk management.
2) According to your company settings, this information is sent as a calendar appointment or a
regular e-mail. If the checklist is done via app, a regular e-mail message is sent. It is also sent
as a regular e-mail message, if you do not enter a time when you plan the risk management.

Page 62 of 111
3) When the reminder is sent depends on the settings that your local IA administrator has made.
The reminder is only sent once. If you move the date of the risk management forward, no
more reminder will be sent if it already has been sent.
4) When the reminder is sent depends on the settings that your local IA administrator has made.
The reminder is only sent once. If you move the estimated date of completion forward, no
more reminder will be sent if it already has been sent.
4.1.11.3 Send e-mails about risk managements manually
It is possible to send e-mails about risk managements manually, for example to inform further persons
in your organization.
Follow these steps to send an e-mail manually:
1. Open the risk management and click on the E-mail tab. The E-mail tab appears as soon as
you have saved the risk management.
2. Click on the New e-mail button in the E-mail log panel.
3. The e-mail module opens.
4. On top you can see a list of e-mail recipients. On the left hand side you see all users in your
organization that have an e-mail address registered in IA. On the right hand side you see all
users that have already got e-mail about the risk management.
Add additional recipients by selecting their names on the left hand side and clicking on the
green button with arrows. Remove recipients by selecting them on the right hand side and
clicking on the orange button with arrows.
5. You can change the E-mail subject if necessary.
6. Beneath the heading E-mail message a preview of the message is displayed. When the e-
mail is sent, it will be adjusted to include the recipient’s function. The message will always
contain your name so that the recipient knows who sent this message from IA.
7. You can add information in the Intro field.
8. Click on Send.
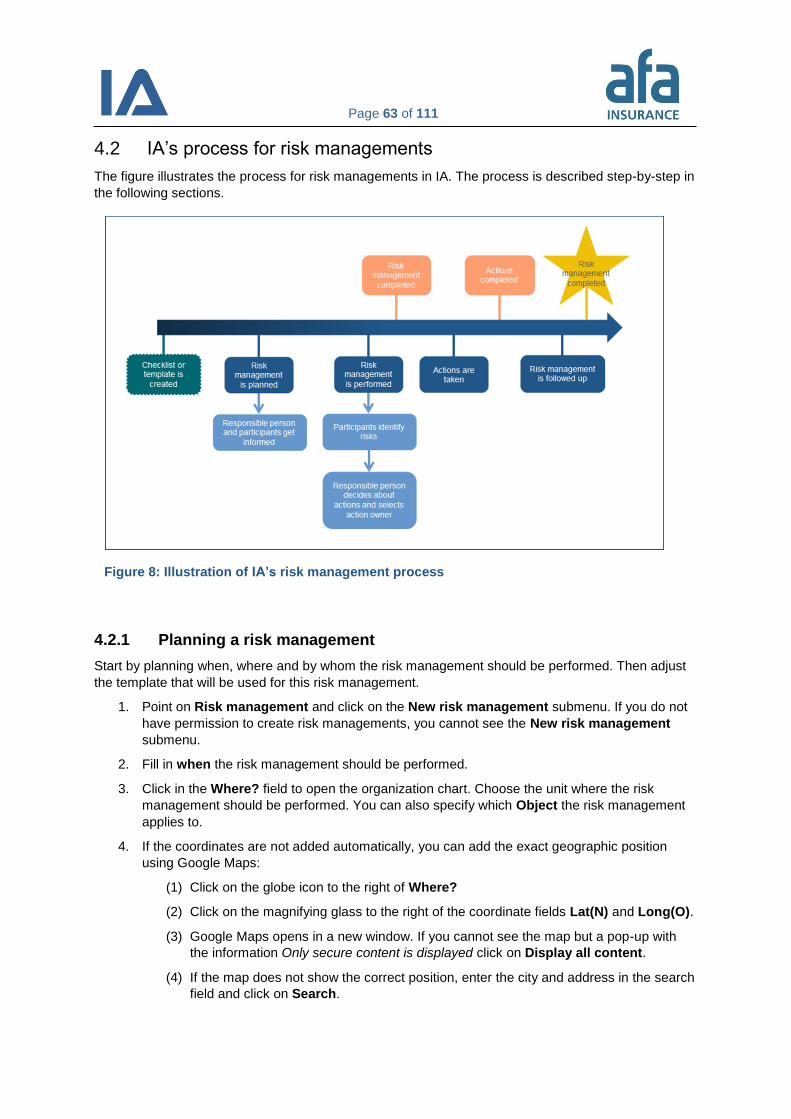
Page 63 of 111
4.2 IA’s process for risk managements
The figure illustrates the process for risk managements in IA. The process is described step-by-step in
the following sections.
4.2.1 Planning a risk management
Start by planning when, where and by whom the risk management should be performed. Then adjust
the template that will be used for this risk management.
1. Point on Risk management and click on the New risk management submenu. If you do not
have permission to create risk managements, you cannot see the New risk management
submenu.
2. Fill in when the risk management should be performed.
3. Click in the Where? field to open the organization chart. Choose the unit where the risk
management should be performed. You can also specify which Object the risk management
applies to.
4. If the coordinates are not added automatically, you can add the exact geographic position
using Google Maps:
(1) Click on the globe icon to the right of Where?
(2) Click on the magnifying glass to the right of the coordinate fields Lat(N) and Long(O).
(3) Google Maps opens in a new window. If you cannot see the map but a pop-up with
the information Only secure content is displayed click on Display all content.
(4) If the map does not show the correct position, enter the city and address in the search
field and click on Search.
Figure 8: Illustration of IA’s risk management process

Page 64 of 111
(5) Drag the marker to the correct position.
(6) Click on Use these coordinates. Google Maps closes and the coordinates are
inserted in Lat(N) and Long(O).
5. Specify the type of the risk management in What?
6. Once you have filled in these fields, more panels will open.
7. Enter a Title and a Description. This information will be included in the e-mail to the
participants and when you print the risk management.
8. Select the persons that should participate in the risk management. Users with Occurrence
manager, Manager, Manager 3 and OHS representative roles in the unit where the risk
management is performed are automatically added as participants. If you want to add more
persons, select them from Select participants. This lists all users who are authorized to
participate in risk managements in the chosen unit.
To select multiple options in different places in the list: hold down the Ctrl key and select one at a time.
To select multiple options in a row: hold down the Shift key and select first and last options.
Click on the green button with arrows to move them to the Participants list on the right hand
side.
9. To remove a participant, mark his/her name in the Participants list on the right hand side and
click on the orange button with arrows.
10. In the Other participants field, you can type the names of persons who are not IA users.
These persons are not informed by IA. Instead, you must inform these persons manually, for
example by forwarding the e-mail or calendar appointment that you yourself got from IA.
11. The responsible and all participants, except for those you registered in Other participants,
are automatically informed about the risk management. According to your company settings,
this information is either sent as a calendar appointment or as a regular e-mail. The calendar
appointment function works with Outlook and Lotus Notes, but only if the person that planned
the risk management entered the time for when the risk management should be performed.
Otherwise, the information is sent as a regular e-mail message. Information about the risk
management is also shown on the responsible’s and the participants’ main page in the My IA
table.
12. If you already know which template you want to use, select one from Select template.
Otherwise, you can leave this field empty and select a template when you perform the risk
management. If you do not want to use a template, leave the field empty.
13. If you create a new risk management of the same type, in the same unit, for the same object
and with the same template as before, IA checks if there are incomplete actions in the prior
risk management. If there are, you will be asked if you want to copy them to the new risk
management.
14. When you have completed all fields, click on Save. If you want to edit the template you can
click on Save and open template instead. If you are not using a template and want to create
actions directly click on Add actions without template.
Note:
You cannot change the template once you have saved the risk management.
Page 65 of 111
15. Once you have saved the risk management, you can add pictures, sketches and other
documents by clicking on the Attachments button.
16. If the risk management contains information that is so sensitive that only persons who have a
function in it should have access to it, i.e. the responsible person, the participants and the
chosen action owner(s), you should select the checkbox for Restricted access.
17. If you want to create several risk managements with similar information but different dates you
can use the Save a copy button. Find out more about this in the next section.
4.2.2 Creating a copy of a risk management
When you have planned and saved a risk management, the Save a copy button is displayed at the
bottom of the page. By means of that button you can create several risk managements with similar
information, for example if you want to plan this year’s health and safety inspections in advance. You
can copy planned, ongoing as well as completed risk managements. However, you cannot copy a risk
management if its template is filed.
Follow these steps to copy a risk management:
1. Open the risk management and click on the Planning or Follow-up tab if it is not already
open.
2. Click on Save a copy. If the template has been filed by your local IA administrator the Save a
copy button will not be displayed since it is not possible to copy the risk management in that
case.
3. A box, where you can make settings for the copy, opens. You can choose to copy the risk
management with Empty template or Template with given values:
Empty template means that the copied template will not contain any answers or
actions. It will still contain all questions/checkpoints as well as other functionality that
is a part of this template.
Template with given values means that you copy the template including all answers
that have been entered in the risk management that you replicate. If you select
Template with given values and the risk management contains actions, you have to
decide if you want to copy All actions, Not completed actions or No actions. If you
choose to copy the actions this does not affect the actions in the risk management
that you replicate. Therefore they will not be marked as completed in it.
4. Click on Save a copy in the copy settings box.
5. A new risk management is created with the information that you have chosen. However, you
may change the information in it, if you wish, and then save it again.
Note:
Do not copy the actions, if you want them to be marked as completed in the
replicated risk management. There is a specific function to do that. This function
will be displayed as soon as you have copied the risk management and moved
the date forward.
If you copy the actions and then use this function, the new risk management will
contain duplicates of all the uncompleted actions.
Page 66 of 111
6. If you postpone the date of the new risk management (without changing risk management
type, unit, object and template) and save, IA will ask you if you want to copy the uncompleted
actions to the new risk management and mark them as completed in the previous one. Select
the checkbox, which is displayed in the Template panel, if you want to do so. Then click on
Save again.

Page 67 of 111
4.2.3 Performing a risk management
When it is time to perform a planned risk management, you open it in IA. Planned risk managements
can only be opened in the web version of IA, not in the IA app. The way in which you perform the risk
management will vary, depending on whether you are using a template and whether the template
contains checkpoints or not. You can read about the different ways to perform a risk management on
the web in the following three sections.
If you want to perform a risk management with the app instead, see section 4.2.7 Performing a risk
management using the IA app.
4.2.4 Performing a risk management without a template (on the web)
Follow these steps to perform a risk management without a template:
1. Open the risk management by clicking on it in the risk management list or directly in My IA.
Click on the Performance tab if it is not already open.
2. In the first panel you can see information about the risk management, including its title, when
and in which unit it will be performed, the responsible and the participants. You can also see
the status of the risk management.
3. In the next panel you create the actions. If some of the actions already are completed, you can
hide them by selecting the checkbox for Hide completed actions next to the heading Show.
Create new actions by following these steps:
(1) Click on New action.
(2) Enter a Title and describe the action in the Action field.
(3) Select the person to implement the action from those listed in Action owner. The list
displays all persons that are authorized to be action owners in the unit where the risk
management is performed.
(4) If you want to enter an action owner who is not an IA user, type his/her name in the
empty field below Action owner. Please note that you have to inform this person
manually about his/her responsibility. This is not done by IA.
(5) It is always the person chosen in the Action owner field who is responsible for
carrying out the action.
(6) Enter perhaps a Work order number.
(7) Enter perhaps one of the five Action steps: Elimination, Substitution, Engineer
controls, Signage/warnings and/or administrative controls and Personal protective
equipment.
(8) Beneath the heading Type of action you decide whether the action should be
performed instantly, or planned to be done in the future. IA sets today’s date as
estimated completion date for instant actions, and the date a month ahead for
planned actions.
(9) You can change the estimated completion date manually by clicking in the date field
beneath the heading Date. IA uses this date to calculate when to send reminders
about the action. If the action is not completed by this date it is given the status
Overdue. This is displayed with an orange exclamation mark in My IA and in the
action plan.
(10) Select the checkbox for Completed if the action is done.
Page 68 of 111
4. Click on the Attachments button to add pictures, sketches and other documents relevant to
the risk management. To simplify the handling of long risk managements, the Attachments
button moves as you scroll down the page.
5. Click on Save. To simplify the handling of long risk managements, the Save button moves as
you scroll down the page.
6. When the risk management is completed, select the checkbox for Completed in the
Performance panel, and save. Now the risk management is no longer displayed in the My IA
list of the participants and the responsible. However, all actions not marked as completed are
still displayed in each action owner’s My IA.
4.2.5 Performing a risk management with a template without checkpoints
(on the web)
If you are using a template without checkpoints, you create a new row and/or a new action for each
risk you identify. A template without checkpoints may contain headings, text fields, risk assessment
and cause analysis (5?). You may also have the possibility to create occurrences from the items that
you add and decide with items are not applicable.
1. Open the risk management by clicking on it in the risk management list or directly in My IA.
Click on the Performance tab if it is not already open.
2. In the first panel you can see information about the risk management, including its title, when
and in which unit it will be performed, the responsible and the participants. You can also see
the status of the risk management.
In the next panel you see the template and information about the template. If the template
contains risk assessment the risk assessment model is displayed in a separate panel. If the
template contains a reference to relevant documentation, this reference will be displayed next
to the heading Linked document. Click on the arrow next to the title of the template if the
heading Linked document is not displayed.
Beneath the link the Description of or instruction for the template is displayed. Read this
information before you start creating rows.
3. Decide how you want to view the page by using the selection criteria next to the heading
Show.
4. If you identified a new item or risk, create a new row following these steps:
(1) Click on New row. If your template contains sections or headings you can add a new
row at the bottom of each section by clicking on the arrow next to the section or
heading.
(2) Fill in all the fields that open. If the template contains automatic numbering, IA will
number all rows that you add.
If the template does not contain automatic numbering, you have to number all rows by
yourself. Please note, that the rows will not be sorted according to your numbering.
(3) Perform risk assessment and cause analysis (5?) if they are included in the template.
(4) If the template contains the possibility to create actions linked to a row, click on the
wrench icon next to the row. Actions created using this icon are placed directly
beneath the row to which they belong.
You can also create actions by using the New action button. Actions created with this
button are placed at the bottom of the page. Whichever of the two ways you choose,
you follow the steps in number 6. to fill in the actions.
Page 69 of 111
(5) If the template contains the possibility to create occurrences linked to a row, click on
the lightning icon. Follow the steps in number 5. to fill in the occurrence.
5. Follow these steps to create an occurrence linked to a row:
(1) Click on the lightning icon next to a row to create an occurrence. If you cannot see
the lightning icon, the template does not contain this function. In that case you can
create actions instead of occurrences.
(2) The occurrence opens and is saved directly. If IA cannot fill in the occurrence and/or
employment unit automatically, the organization chart is shown to give you the
possibility to choose the units before the occurrence is opened.
The following fields are automatically filled in by IA:
The date of the risk management is entered in the When? field.
If the unit where the risk management is performed is a possible occurrence
unit, it is entered in the Where? field.
The occurrence type that your local IA administrator preselected for the risk
management template is entered in the What? field.
If your local IA administrator has registered in which unit you are employed, or
if the unit where the risk management is performed is a possible employment
unit, it is entered in the Employment unit field.
Your name is entered in the Name field.
If your e-mail address is registered in IA, it is entered in the E-mail field.
The Occurrence title is chosen from one of the row’s text fields. The text from
the rightmost text field is chosen primarily. If this field is empty the one left of it
is chosen, and so on.
The text from all of the row’s text fields is entered in the Course of events
field, except for the information from the Reference9 column.
If the risk management template contains the Injury risk or Divergence type
fields the information from these fields is entered in the corresponding fields in
the occurrence.
(3) Adjust the information in these fields if necessary, and fill in the other fields in the
occurrence.
(4) If you already know which actions you need to perform, click on the Actions &
Follow-up tab and add them.
(5) Save the occurrence again when you have added all information.
(6) To get back to your risk management, go to the Investigation tab and click on the risk
management in the Relate occurrence panel. The occurrence ID is automatically
entered in the row from which the occurrence was created.
6. Create actions by following these steps:
(1) Click on New action. If the template contains the function to link actions to rows, you
can click on the wrench icon next to a row to create a new action.
(2) Enter a Title and describe the action in the Action field.
9 If the template contains the Reference column and the title of this column are decided upon by your local IA administrator.
Page 70 of 111
(3) Select the person to implement the action from those listed in Action owner. The list
displays all persons that are authorized to be action owners in the unit where the risk
management is performed.
If you want to enter an action owner who is not an IA user, type his/her name in the
empty field below Action owner. Please note that you have to inform this person
manually about his/her responsibility. This is not done by IA.
It is always the person chosen in the Action owner field who is responsible for
carrying out the action.
(4) Enter perhaps a Work order number.
(5) Enter perhaps one of the five Action steps: Elimination, Substitution, Engineer
controls, Signage/warnings and/or administrative controls and Personal protective
equipment.
(6) Beneath the heading Type of action you decide whether the action should be
performed instantly, or planned to be done in the future. IA sets today’s date as
estimated completion date for instant actions, and the date a month ahead for planned
actions.
(7) You can change the estimated completion date manually by clicking in the date field
beneath the heading Date. IA uses this date to calculate when to send reminders
about the action. If the action is not completed by this date it is given the status
Overdue. This is displayed with an orange exclamation mark in My IA and in the
action plan.
(8) Select the checkbox for Completed if the action is done.
7. Click on the Attachments button to add pictures, sketches and other documents relevant to
the risk management. To simplify the handling of long risk managements the Attachments
button moves as you scroll down the page.
You can also add attachments to each row you have created by clicking on the paperclip
icon next to it.
8. Click on Save. To simplify the handling of long risk managements the Save button moves as
you scroll down the page.
9. When the risk management is completed, select the checkbox for Completed in the
Performance panel, and save. Now the risk management is no longer displayed in the My IA
list of the participants and the responsible. However, all actions not marked as completed are
still displayed in each action owner’s My IA.
4.2.6 Performing a risk management with checkpoints (on the web)
If you are using a template with checkpoints or questions, follow them item by item and fill in all fields:
1. Open the risk management by clicking on it in the risk management list or directly in My IA.
Click on the Performance tab if it is not already open.
2. In the first panel you can see information about the risk management, including its title, when
and in which unit it will be performed, the responsible and the participants. You can also see
the status of the risk management.
In the next panel you see the template and information about the template. If the template
contains risk assessment the risk assessment model is displayed in a separate panel. If the
template contains a reference to relevant documentation, this reference will be displayed next
Page 71 of 111
to the heading Linked document. Click on the link to open the material. Click on the arrow
next to the title of the template if the heading Linked document is not displayed.
Beneath the link the Description of or instruction for the template is displayed. Read this
information before you start filling in the template.
3. Decide how you want to view the page by using the selection criteria next to the heading
Show.
4. Follow the template item by item:
(1) Answer the question and/or write a comment.
(2) Perform risk assessment and cause analysis (5?) if they are included in the template.
(3) If you identified an item that is not included in the template, click on New row. If your
template contains sections or headings you can add a new row at the bottom of each
section by clicking on the arrow next to the section or heading.
(4) If the template contains the possibility to create actions linked to a row, click on the
wrench icon next to the row. Actions created using this icon are placed directly
beneath the row to which they belong.
You can also create actions by using the New action button. Actions created with this
button are placed at the bottom of the page. Whichever of the two ways you choose,
you follow the steps in number 6. to fill in the actions.
(5) If the template contains the possibility to create occurrences linked to a row, click on
the lightning icon. Follow the steps in number 5. to fill in the occurrence.
5. Follow these steps to create an occurrence linked to a row:
(1) Click on the lightning icon next to a row to create an occurrence. If you cannot see
the lightning icon, the template does not contain this function. In that case you can
create actions instead of occurrences.
(2) The occurrence opens and is saved directly. If IA cannot fill in the occurrence and/or
employment unit automatically, the organization chart is shown to give you the
possibility to choose the units before the occurrence is opened.
The following fields are automatically filled in by IA:
The date of the risk management is entered in the When? field.
If the unit where the risk management is performed is a possible occurrence
unit, it is entered in the Where? field.
The occurrence type that your local IA administrator preselected for the risk
management template is entered in the What? field.
If your local IA administrator has registered in which unit you are employed, or
if the unit where the risk management is performed is a possible employment
unit, it is entered in the Employment unit field.
Your name is entered in the Name field.
If your e-mail address is registered in IA, it is entered in the E-mail field.
The Occurrence title is chosen from one of the row’s text fields. The text from
the rightmost text field is chosen primarily. If this field is empty the one left of it
is chosen, and so on.
Page 72 of 111
The text from all of the row’s text fields is entered in the Course of events
field, except for the information from the Reference10
column.
If the risk management template contains the Injury risk or Divergence type
fields the information from these fields is entered in the corresponding fields in
the occurrence.
(3) Adjust the information in these fields if necessary, and fill in the other fields in the
occurrence.
(4) If you already know which actions you need to perform, click on the Actions &
Follow-up tab and add them.
(5) Save the occurrence again when you have added all information.
(6) To get back to your risk management, go to the Investigation tab and click on the risk
management in the Relate occurrence panel. The occurrence ID is automatically
entered in the row from which the occurrence was created.
6. Create actions by following these steps:
(1) Click on New action. If the template contains the function to link actions to rows, you
can click on the wrench icon next to a row to create a new action.
(2) Enter a Title and describe the action in the Action field.
(3) Select the person to implement the action from those listed in Action owner. The list
displays all persons that are authorized to be action owners in the unit where the risk
management is performed.
If you want to enter an action owner who is not an IA user, type his/her name in the
empty field below Action owner. Please note that you have to inform this person
manually about his/her responsibility. This is not done by IA.
It is always the person chosen in the Action owner field who is responsible for
carrying out the action.
(4) Enter perhaps a Work order number.
(5) Enter perhaps one of the five Action steps: Elimination, Substitution, Engineer
controls, Signage/warnings and/or administrative controls and Personal protective
equipment.
(6) Beneath the heading Type of action you decide whether the action should be
performed instantly, or planned to be done in the future. IA sets today’s date as
estimated completion date for instant actions, and the date a month ahead for planned
actions.
(7) You can change the estimated completion date manually by clicking in the date field
beneath the heading Date. IA uses this date to calculate when to send reminders
about the action. If the action is not completed by this date it is given the status
Overdue. This is displayed with an orange exclamation mark in My IA and in the
action plan.
(8) Select the checkbox for Completed if the action is done.
7. Click on the Attachments button to add pictures, sketches and other documents relevant to
the risk management. To simplify the handling of long risk managements the Attachments
button moves as you scroll down the page.
10
If the template contains the Reference column and the title of this column are decided upon by your local IA administrator.

Page 73 of 111
You can also add attachments to each row you have created by clicking on the paperclip
icon next to it.
8. Click on Save. To simplify the handling of long risk managements the Save button moves as
you scroll down the page.
9. When the risk management is completed, select the checkbox for Completed in the
Performance panel, and save. Now the risk management is no longer displayed in the My IA
list of the participants and the responsible. However, all actions not marked as completed are
still displayed in each action owner’s My IA.
4.2.7 Performing a risk management using the IA app
Your company determines whether you can use the IA app or not. The app makes it possible to carry
out risk managements by means of checklists and is available for IOS, Android and Windows Phone. It
has an offline mode, which means that you can fill in a checklist without being connected to the
internet. As soon as you retrieve internet connection the checklist is sent to IA automatically.
4.2.7.1 Installing the app and logging in
1. Download the app from Google Play, Appstore or Windows Store. In Google Play and
Appstore you can search for AFA Försäkring to find the app. In Windows Store you can
search for IA.
2. Click on the link, that you received from your administrator, to log in to the app. You can also
log in with the app-user account’s username and password. Note that these are not the same
username and password that you use to sign in to the web version of IA.
3. Enter your name, e-mail address, employment unit and type of employment. This information
is saved in the app so that you do not have to provide it each time you send a checklist.
4. If you are going to send checklists to several companies, click on Add account and enter the
user information for the next app-user account.
5. Tap on Done to save your settings.
4.2.7.2 Using a checklist
1. Tap the edit icon in the upper right corner and select New checklist from the list.
2. If you are using several app-user accounts, select beneath Send to to which organization you
want to send the checklist. The selected organization is indicated by a blue check mark.
3. Tap on Checklist and select the checklist you want to use. If you have used the app before,
the latest checklist is preselected. Tap on the title of the checklist if you want to select a
different one. Your company determines which checklists you can select.
4. Tap on Where (Unit)? to select where you want to perform the checklist. If you have used the
app before, the latest chosen unit is preselected. Tap on its name, if you want to select a
different unit.
5. Tap on the map at the top of the page, if you want to change the location. When you have
opened the map, you can alter between map view and satellite view.
6. Tap the camera icon if you want to take pictures and add them to the checklist.
7. Specify which Object the checklist applies to.
Page 74 of 111
8. Fill in the checklist by answering the questions. You can answer Yes, No or N/A to each
question, where N/A means Not applicable. You can add a comment or pictures to each
question by clicking on the camera and speech bubble icon. Tap on Back when you have
filled in this information.
9. Tap on Send at the bottom of the page, when you have completed the checklist.
4.2.7.3 Displaying a sent checklist in the app
You can see those checklists, which you reported via the IA app, in the History list in the app. There
you can see the IDs that your checklists got in IA, as well as which status they currently have. You can
click on a checklist in the list to open it and look at the information that you have sent.
4.2.8 Following up a risk management
When the risk management is performed and all actions are completed, you can follow up the risk
management by following these steps:
1. Open the risk management and click on the Follow-up tab.
The following criteria must be met before you can follow up the risk management:
If the risk management contains questions, all of them must have been answered by
Yes, No or N/A (Not applicable).
If the risk management contains actions, all of them must have been selected as
Completed.
This is true whether the risk management is done with or without a template. At the top of the
Follow-up panel you can see how many rows out of the total number of rows, and how many
actions out of the total number of actions, that are completed. If the template contains risk
assessment, you can also see for how many rows the risk assessment is done before and
after actions.
2. Select your name in the Responsible for follow-up list. The list displays all persons that are
authorized to be responsible for follow-up in the unit where the risk management is performed.
3. Select the checkbox for Completed. IA automatically enters today’s date as Date completed.
You can change the date manually.
4. You can add a comment to the follow-up.
5. Click on Save. The risk management is given the status Completed and a star appears. The
fields in the risk managements are locked and can no longer be edited. If you need to edit a
risk management that has the status Completed, you have to deselect the checkbox for
Completed first.
In the risk management list the completed risk managements are displayed with a star in the Date
column. If you see a blue check mark, the risk management has been performed but is not yet
completed. That is true if you, for example, have performed a health and safety inspection but not
carried out all actions that were identified during the inspection.
4.2.9 Links between risk managements and occurrences
As described in sections 4.2.5 Performing a risk management with a template without checkpoints (on
the web) and 4.2.6 Performing a risk management with checkpoints (on the web), it is possible to

Page 75 of 111
create occurrences from a risk management. It is also possible to relate existing occurrences to a risk
management, as described in section 3.2.7 Relating occurrences to each other or to risk
managements. If there are occurrences related to a risk management, you can see this in the column
with the lightning icon in the risk management list. Click in this column to be transferred to the
occurrence list and see a list of all occurrences that were created from this specific risk management.
If you also want to see the occurrences that were not created from the risk management, but are
related to it, select All in the Source of occurrence field.

Page 76 of 111
5. Action plan
Here you can find all actions, investigations, follow-ups and risk assessments that have to be done in
your company and that you have permission to read. Swedish companies can also find a list of claims
sent to the Swedish Social Insurance Agency (Försäkringskassan) and AFA Insurance’s Work Injury
Insurance (TFA) in the action plan.
5.1 Searching for information in the action plan
Follow these steps to search for information in the action plan:
1. Point at Action plan and click on one of the following submenus:
a) Investigations: Displays all investigations that you are authorized to see and that
match your selection criteria.
b) Actions: Displays all actions – both from occurrences and risk managements – that
you are authorized to see and that match your selection criteria.
c) Risk assessments: Displays all risk assessments – both from occurrences and risk
managements – that you are authorized to see and that match your selection criteria.
Please note that the list does not display occurrences and risk managements where
risk assessment has been done only after actions.
d) Follow-ups: Displays all follow-ups – both from occurrences and risk managements –
that you are authorized to see and that match your selection criteria.
e) FK/TFA claims: Information applicable for Swedish companies only! Displays all
accidents, commuting accidents and work-related illnesses that you are authorized to
see and that match your selection criteria. Is used to check for which occurrences
claims have been sent to the Swedish Social Insurance Agency (Försäkringskassan)
and AFA Insurance’s Work Injury Insurance (TFA).
2. You can narrow your search by using different selection criteria. Which submenu you chose,
determines which selection criteria you can use. Section 5.1.1 Selection criteria in the action
plan displays all selection criteria that are available for the different submenus.
a) You can click on one of the column headings to open the selection criteria that are
related to that column. That way you can filter the results quickly.
b) To see all selection criteria, click on the Selection criteria button and select an
alternative from the list. You can search in the list to quickly find the selection criterion
you are looking for.
3. Depending on the criterion you choose, a text field, a selection list or a checkbox will be
displayed. Fill in the text field or select a list value, respectively. If you chose a checkbox it will
be selected right away.
4. Add perhaps more selection criteria by repeating steps 2 and 3.
5. Click on View or Enter to perform the search. The latest added criteria are displayed with
orange color, until you have performed the search.
The results displayed in the list depend both on the selection criteria you have chosen and on
the units and occurrence types you have permission to. If you did not choose any selection
criteria, everything that you are authorized to see is displayed. If you combine several criteria,
only results that meet all of them will be shown in the list of results. In section 5.1.2
Information displayed in the action plan you can see which information is displayed in the list.
Page 77 of 111
6. By default, the list displays 50 results. To see more results, increase the number in the Show
field and press Enter.
7. In the list of results, you can click on the small arrows next to a column heading to sort the
results in increasing or decreasing order. When sorting, IA goes through all search results,
even those that are not displayed on the page. That is the case when your search resulted in
more results than chosen in the Show field. Therefore, you may see different search results
depending on if you sort the list in increasing or decreasing order.
8. To remove a selection criterion, reset it by clicking on the cross to the right of your selected
value or by deselecting the checkbox. If you want to remove all selection criteria, click on the
Delete button. Then click on Visa or press Enter to reload the search results.
9. If you want to export the displayed search results to Excel, click on the Export button.
10. If you switch to a different submenu beneath Action plan or Risk management, the criteria
you selected will apply to the new submenu as well (if they are available for this submenu).
11. Click on a row in the list to go directly to the occurrence or risk management that the
investigation, action, risk assessment, follow-up or FK/TFA belongs to. For risk managements
you can click in the Type column to get to the Planning tab of this risk management. Click in
any of the other columns to get to the Performance tab of the risk management.
5.1.1 Selection criteria in the action plan
The table displays all selection criteria that are available for the different submenus in the action plan,
in alphabetical order. In the Available for column you can see which criteria are available for which
submenu.
Please note: The FK/TFA claims submenu is only available for Swedish companies. Criteria that are
exclusive for this submenu are shown in italic in the table.
Selection criterion
Description How to use Available for
Action owner For Actions: Is used to search for actions (from occurrences and risk managements) where the selected person is action owner.
You can also search for actions where no action owner has been chosen.
For Follow-ups: Is used to search for follow-ups from occurrences and risk managements where the selected person is action owner.
You can also search for follow-ups from occurrences and risk managements where no action owner has been chosen.
Click in the field and select a person or the <Missing> alternative. You can write a name to quickly find the person you are looking for. You can only select one person at a time.
Actions and Follow-ups
Action period Is used to search for actions (from occurrences and risk managements) that have been done or are planned to be done
Click in the fields and select a start and end date.
Enter just an end date if
Actions
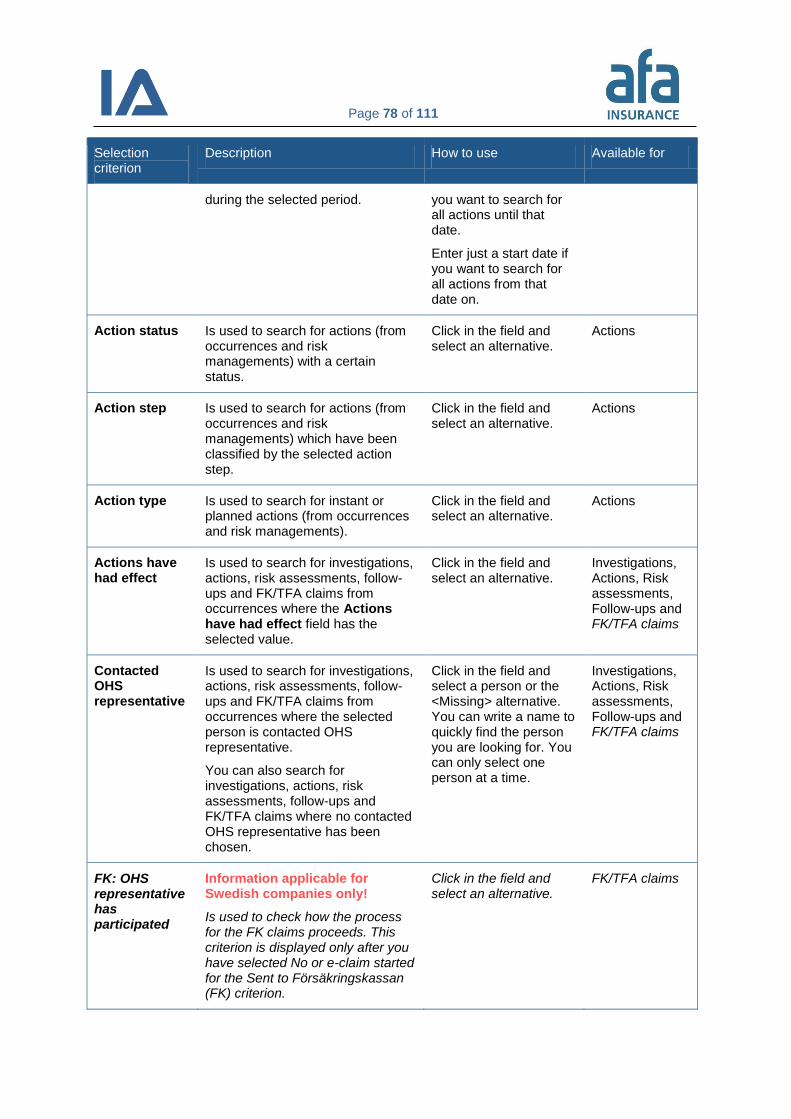
Page 78 of 111
Selection criterion
Description How to use Available for
during the selected period. you want to search for all actions until that date.
Enter just a start date if you want to search for all actions from that date on.
Action status Is used to search for actions (from occurrences and risk managements) with a certain status.
Click in the field and select an alternative.
Actions
Action step Is used to search for actions (from occurrences and risk managements) which have been classified by the selected action step.
Click in the field and select an alternative.
Actions
Action type Is used to search for instant or planned actions (from occurrences and risk managements).
Click in the field and select an alternative.
Actions
Actions have had effect
Is used to search for investigations, actions, risk assessments, follow-ups and FK/TFA claims from occurrences where the Actions have had effect field has the selected value.
Click in the field and select an alternative.
Investigations, Actions, Risk assessments, Follow-ups and FK/TFA claims
Contacted OHS representative
Is used to search for investigations, actions, risk assessments, follow-ups and FK/TFA claims from occurrences where the selected person is contacted OHS representative.
You can also search for investigations, actions, risk assessments, follow-ups and FK/TFA claims where no contacted OHS representative has been chosen.
Click in the field and select a person or the <Missing> alternative. You can write a name to quickly find the person you are looking for. You can only select one person at a time.
Investigations, Actions, Risk assessments, Follow-ups and FK/TFA claims
FK: OHS representative has participated
Information applicable for Swedish companies only!
Is used to check how the process for the FK claims proceeds. This criterion is displayed only after you have selected No or e-claim started for the Sent to Försäkringskassan (FK) criterion.
Click in the field and select an alternative.
FK/TFA claims

Page 79 of 111
Selection criterion
Description How to use Available for
FK: The employer has participated
Information applicable for Swedish companies only!
Is used to check how the process for the FK claims proceeds. This criterion is displayed only after you have selected No or e-claim started for the Sent to Försäkringskassan (FK) criterion.
Click in the field and select an alternative.
FK/TFA claims
FK: The injured/other person has participated
Information applicable for Swedish companies only!
Is used to check how the process for the FK claims proceeds. This criterion is displayed only after you have selected No or e-claim started for the Sent to Försäkringskassan (FK) criterion.
Click in the field and select an alternative.
FK/TFA claims
Follow-up by OHS representative OK
Is used to search for investigations, actions, risk assessments, follow-ups and FK/TFA claims from occurrences where the OHS representative’s follow-up has the selected value.
Please note that an OHS representative’s follow-up only can be done for accidents, near misses, risk observations and work-related illnesses.
Click in the field and select an alternative.
Investigations, Actions, Risk assessments, Follow-ups and FK/TFA claims
Follow-up period
Is used to search for follow-ups (from occurrences and risk managements) that have been done or are planned to be done during the selected period.
Click in the fields and select a start and end date.
Enter just an end date if you want to search for all follow-ups until that date.
Enter just a start date if you want to search for all follow-ups from that date on.
Follow-ups
OHS representative responsible for follow-up
Is used to search for investigations, actions, risk assessments, follow-ups and FK/TFA claims from occurrences where the selected person is responsible for the OHS representative’s follow-up.
You can also search for investigations, actions, risk assessments, follow-ups and
Click in the field and select a person or the <Missing> alternative. You can write a name to quickly find the person you are looking for. You can only select one person at a time.
Investigations, Actions, Risk assessments, Follow-ups and FK/TFA claims

Page 80 of 111
Selection criterion
Description How to use Available for
FK/TFA claims where no one has been chosen as responsible for the OHS representative’s follow-up.
Hide completed
Is used to filter out completed investigations, actions or follow-ups.
Deselect this checkbox if you want to include them again in the list.
The checkbox is selected right away when you choose this criterion.
Investigations, Actions and Follow-ups
ID Is used to quickly find an investigation, action, risk assessment, follow-up or FK/TFA claim from a specific occurrence or risk management.
Enter the ID in the format 2000-1 and press Enter.
Investigation, Actions, Risk assessments, Follow-ups and FK/TFA claims
Investigation period
Is used to search for investigations that have been done or are planned to be done during the selected period.
Click in the fields and select a start and end date.
Enter just an end date if you want to search for all investigations until that date.
Enter just a start date if you want to search for all investigations from that date on.
Investigation
Investigation status
Is used to search for investigations with a certain status.
Click in the field and select an alternative.
Investigation
Investigator Is used to search for investigations where the selected person is investigator.
You can also search for investigations where no investigator has been chosen.
Click in the field and select a person or the <Missing> alternative. You can write a name to quickly find the person you are looking for. You can only select one person at a time.
Investigation
Location Is used to search for investigations, actions and follow-ups from occurrences where the Location field has the selected value.
Click in the field and select an alternative.
Investigation, Actions, Follow-ups
Mine only For Investigations: Is used if you only want to view investigations from occurrences where you are investigator, occurrence manager, responsible for follow-up or contacted OHS representative.
The checkbox is selected right away when you choose this criterion.
Investigation, Actions, Risk assessments, Follow-ups and FK/TFA claims

Page 81 of 111
Selection criterion
Description How to use Available for
For Actions: Is used if you only want to view actions from occurrences where you are action owner, occurrence manager, responsible for follow-up, contacted OHS representative or OHS representative responsible for follow up as well as actions from risk managements where you are responsible, action owner or responsible for follow-up.
For Risk assessments: Is used if you only want to view risk assessments from occurrences where you are investigator, action owner, occurrence manager, responsible for follow-up, contacted OHS representative or OHS representative responsible for follow up as well as risk assessments from risk managements where you are responsible, participant, action owner or responsible for follow-up.
For Follow-ups: Is used if you only want to view follow-ups from occurrences where you are occurrence manager, responsible for follow-up, contacted OHS representative or OHS representative responsible for follow up as well as follow-ups from risk managements where you are responsible or responsible for follow-up.
Information applicable for Swedish companies only! For FK/TFA claims: Is used if you only want to view accidents, commuting accidents and work-related illnesses where you are occurrence manager, responsible for follow-up, contacted OHS representative or OHS representative responsible for follow up.
Occurrence manager
Is used to search for investigations
from occurrences where the
selected person is occurrence
manager.
Click in the field and select a person or the <Missing> alternative. You can write a name to quickly find the person
Investigation
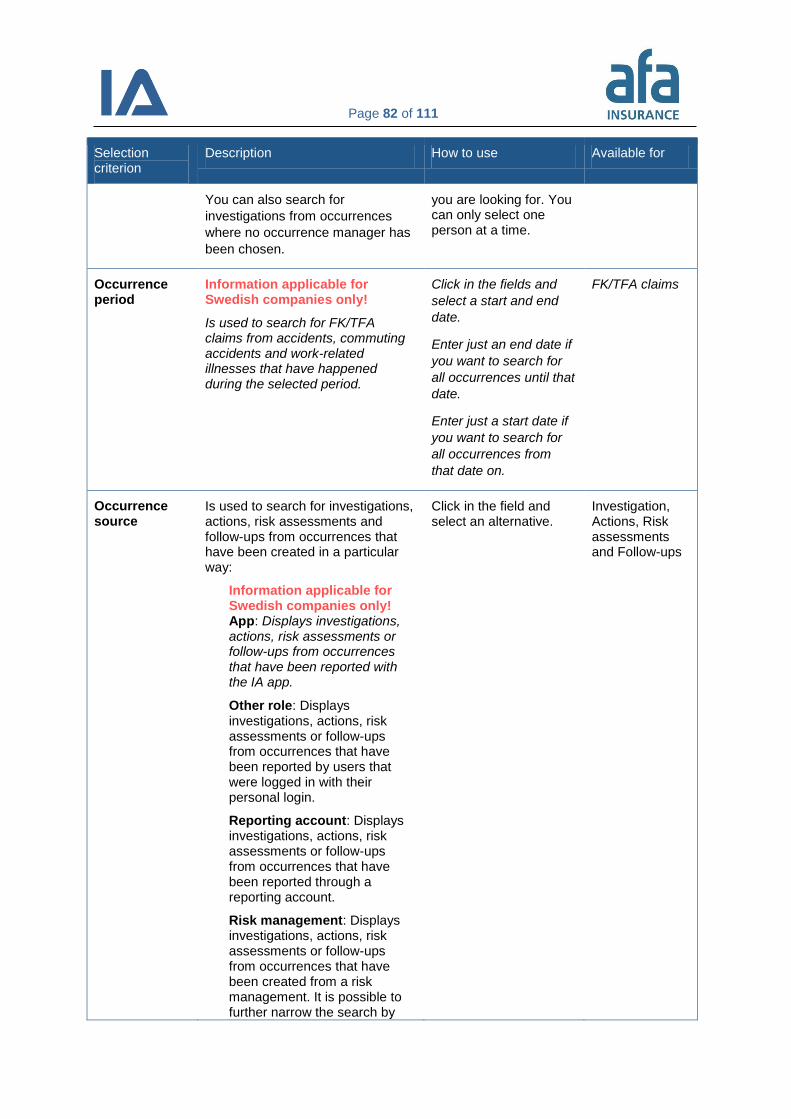
Page 82 of 111
Selection criterion
Description How to use Available for
You can also search for
investigations from occurrences
where no occurrence manager has
been chosen.
you are looking for. You can only select one person at a time.
Occurrence period
Information applicable for Swedish companies only!
Is used to search for FK/TFA claims from accidents, commuting accidents and work-related illnesses that have happened during the selected period.
Click in the fields and
select a start and end
date.
Enter just an end date if
you want to search for
all occurrences until that
date.
Enter just a start date if
you want to search for
all occurrences from
that date on.
FK/TFA claims
Occurrence source
Is used to search for investigations, actions, risk assessments and follow-ups from occurrences that have been created in a particular way:
Information applicable for Swedish companies only! App: Displays investigations, actions, risk assessments or follow-ups from occurrences that have been reported with the IA app.
Other role: Displays investigations, actions, risk assessments or follow-ups from occurrences that have been reported by users that were logged in with their personal login.
Reporting account: Displays investigations, actions, risk assessments or follow-ups from occurrences that have been reported through a reporting account.
Risk management: Displays investigations, actions, risk assessments or follow-ups from occurrences that have been created from a risk management. It is possible to further narrow the search by
Click in the field and select an alternative.
Investigation, Actions, Risk assessments and Follow-ups
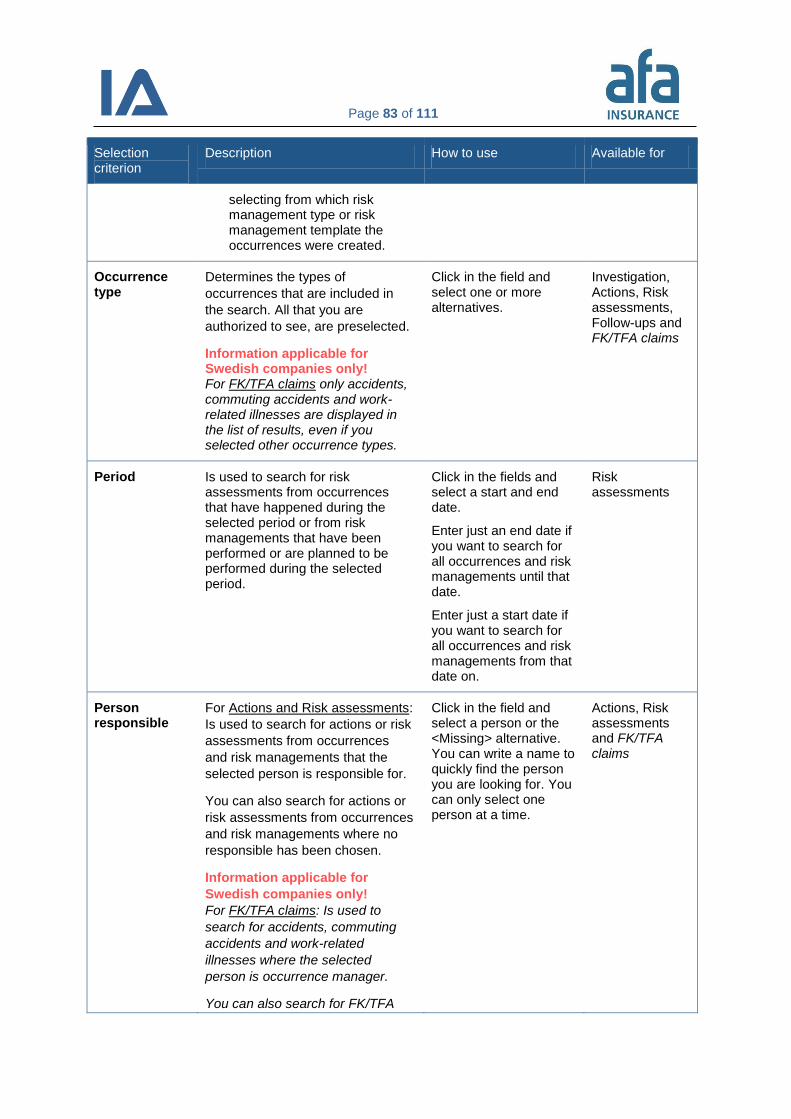
Page 83 of 111
Selection criterion
Description How to use Available for
selecting from which risk management type or risk management template the occurrences were created.
Occurrence type
Determines the types of
occurrences that are included in
the search. All that you are
authorized to see, are preselected.
Information applicable for Swedish companies only! For FK/TFA claims only accidents, commuting accidents and work-related illnesses are displayed in the list of results, even if you selected other occurrence types.
Click in the field and select one or more alternatives.
Investigation, Actions, Risk assessments, Follow-ups and FK/TFA claims
Period Is used to search for risk assessments from occurrences that have happened during the selected period or from risk managements that have been performed or are planned to be performed during the selected period.
Click in the fields and select a start and end date.
Enter just an end date if you want to search for all occurrences and risk managements until that date.
Enter just a start date if you want to search for all occurrences and risk managements from that date on.
Risk assessments
Person responsible
For Actions and Risk assessments:
Is used to search for actions or risk
assessments from occurrences
and risk managements that the
selected person is responsible for.
You can also search for actions or
risk assessments from occurrences
and risk managements where no
responsible has been chosen.
Information applicable for
Swedish companies only!
For FK/TFA claims: Is used to
search for accidents, commuting
accidents and work-related
illnesses where the selected
person is occurrence manager.
You can also search for FK/TFA
Click in the field and select a person or the <Missing> alternative. You can write a name to quickly find the person you are looking for. You can only select one person at a time.
Actions, Risk assessments and FK/TFA claims
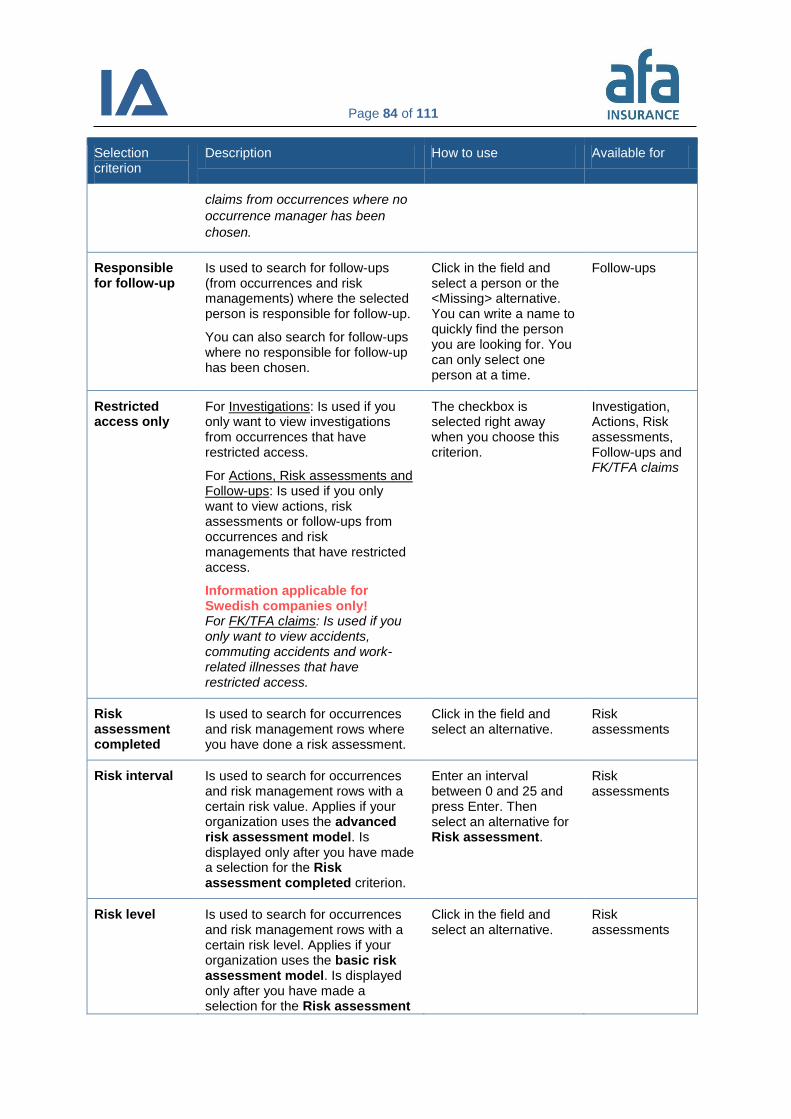
Page 84 of 111
Selection criterion
Description How to use Available for
claims from occurrences where no
occurrence manager has been
chosen.
Responsible for follow-up
Is used to search for follow-ups (from occurrences and risk managements) where the selected person is responsible for follow-up.
You can also search for follow-ups where no responsible for follow-up has been chosen.
Click in the field and select a person or the <Missing> alternative. You can write a name to quickly find the person you are looking for. You can only select one person at a time.
Follow-ups
Restricted access only
For Investigations: Is used if you only want to view investigations from occurrences that have restricted access.
For Actions, Risk assessments and Follow-ups: Is used if you only want to view actions, risk assessments or follow-ups from occurrences and risk managements that have restricted access.
Information applicable for Swedish companies only! For FK/TFA claims: Is used if you only want to view accidents, commuting accidents and work-related illnesses that have restricted access.
The checkbox is selected right away when you choose this criterion.
Investigation, Actions, Risk assessments, Follow-ups and FK/TFA claims
Risk assessment completed
Is used to search for occurrences and risk management rows where you have done a risk assessment.
Click in the field and select an alternative.
Risk assessments
Risk interval Is used to search for occurrences and risk management rows with a certain risk value. Applies if your organization uses the advanced risk assessment model. Is displayed only after you have made a selection for the Risk assessment completed criterion.
Enter an interval between 0 and 25 and press Enter. Then select an alternative for Risk assessment.
Risk assessments
Risk level Is used to search for occurrences and risk management rows with a certain risk level. Applies if your organization uses the basic risk assessment model. Is displayed only after you have made a selection for the Risk assessment
Click in the field and select an alternative.
Risk assessments
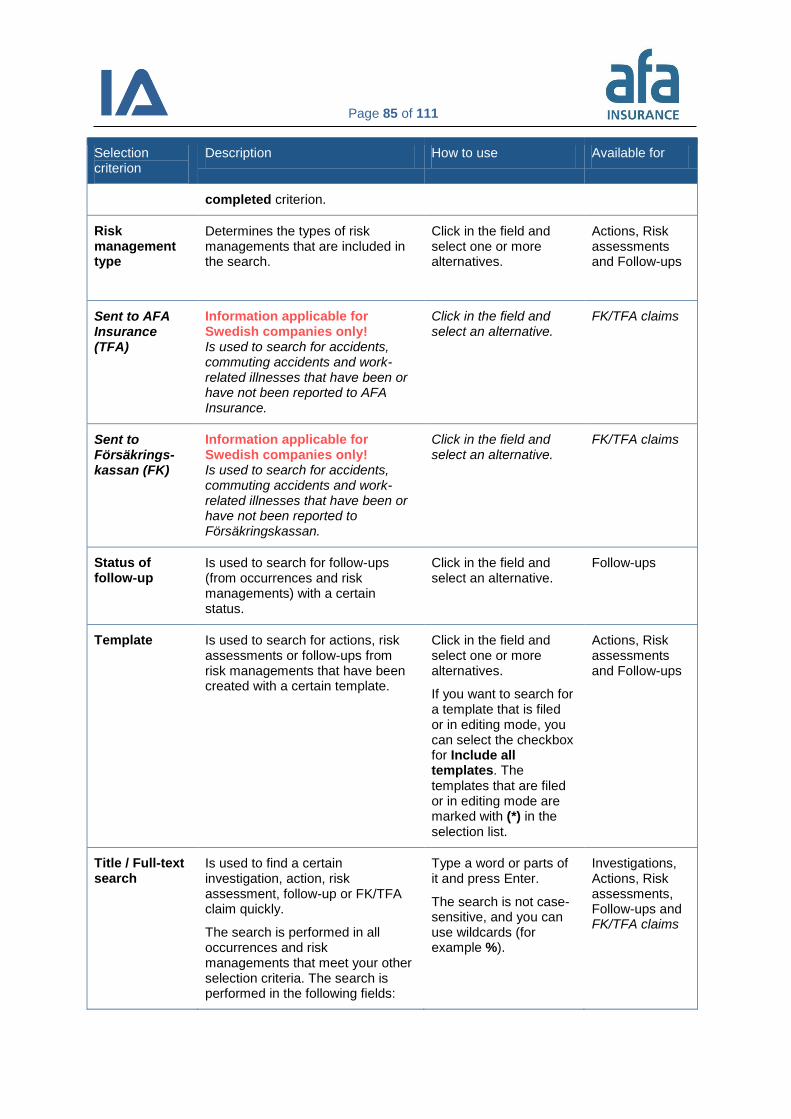
Page 85 of 111
Selection criterion
Description How to use Available for
completed criterion.
Risk management type
Determines the types of risk managements that are included in the search.
Click in the field and select one or more alternatives.
Actions, Risk assessments and Follow-ups
Sent to AFA Insurance (TFA)
Information applicable for Swedish companies only! Is used to search for accidents, commuting accidents and work-related illnesses that have been or have not been reported to AFA Insurance.
Click in the field and select an alternative.
FK/TFA claims
Sent to Försäkrings-kassan (FK)
Information applicable for Swedish companies only! Is used to search for accidents, commuting accidents and work-related illnesses that have been or have not been reported to Försäkringskassan.
Click in the field and select an alternative.
FK/TFA claims
Status of follow-up
Is used to search for follow-ups (from occurrences and risk managements) with a certain status.
Click in the field and select an alternative.
Follow-ups
Template Is used to search for actions, risk assessments or follow-ups from risk managements that have been created with a certain template.
Click in the field and select one or more alternatives.
If you want to search for a template that is filed or in editing mode, you can select the checkbox for Include all templates. The templates that are filed or in editing mode are marked with (*) in the selection list.
Actions, Risk assessments and Follow-ups
Title / Full-text search
Is used to find a certain investigation, action, risk assessment, follow-up or FK/TFA claim quickly.
The search is performed in all occurrences and risk managements that meet your other selection criteria. The search is performed in the following fields:
Type a word or parts of it and press Enter.
The search is not case-sensitive, and you can use wildcards (for example %).
Investigations, Actions, Risk assessments, Follow-ups and FK/TFA claims
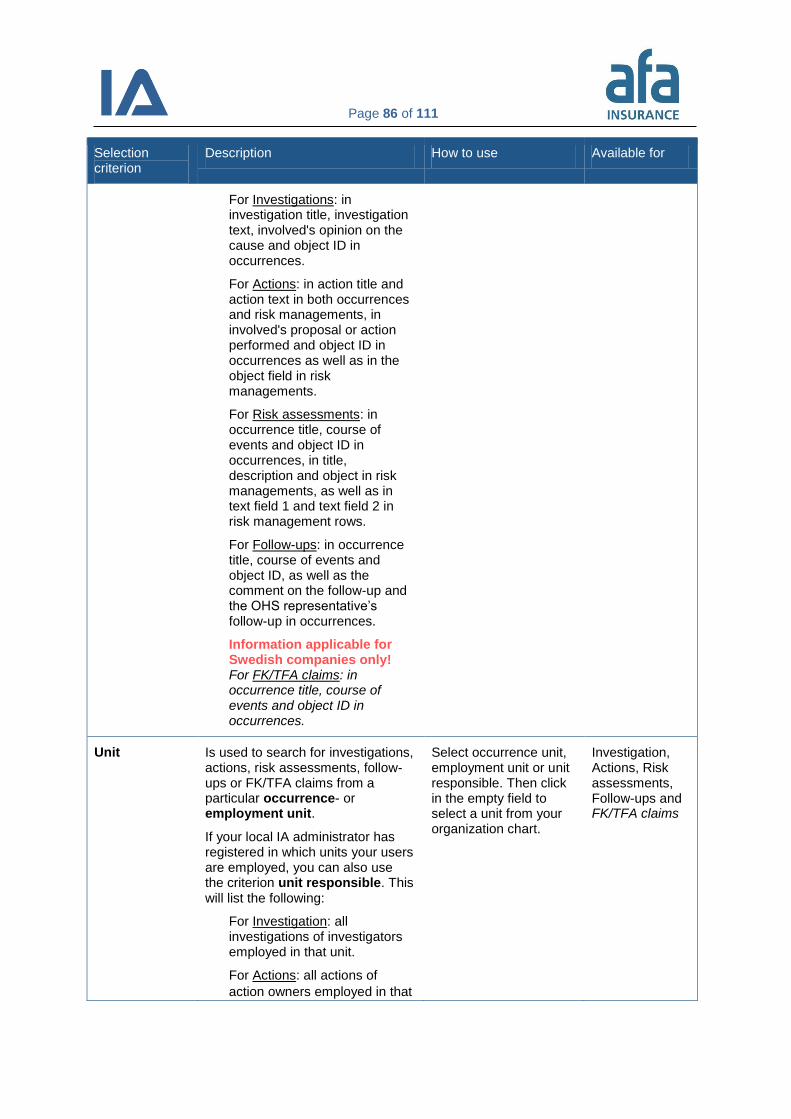
Page 86 of 111
Selection criterion
Description How to use Available for
For Investigations: in investigation title, investigation text, involved's opinion on the cause and object ID in occurrences.
For Actions: in action title and action text in both occurrences and risk managements, in involved's proposal or action performed and object ID in occurrences as well as in the object field in risk managements.
For Risk assessments: in occurrence title, course of events and object ID in occurrences, in title, description and object in risk managements, as well as in text field 1 and text field 2 in risk management rows.
For Follow-ups: in occurrence title, course of events and object ID, as well as the comment on the follow-up and the OHS representative’s follow-up in occurrences.
Information applicable for Swedish companies only! For FK/TFA claims: in occurrence title, course of events and object ID in occurrences.
Unit Is used to search for investigations, actions, risk assessments, follow-ups or FK/TFA claims from a particular occurrence- or employment unit.
If your local IA administrator has registered in which units your users are employed, you can also use the criterion unit responsible. This will list the following:
For Investigation: all investigations of investigators employed in that unit.
For Actions: all actions of
action owners employed in that
Select occurrence unit, employment unit or unit responsible. Then click in the empty field to select a unit from your organization chart.
Investigation, Actions, Risk assessments, Follow-ups and FK/TFA claims
Page 87 of 111
Selection criterion
Description How to use Available for
unit.
For Risk assessments: all risk
assessments from occurrences
and risk managements where
the responsible is employed in
that unit.
For Follow-ups: all follow-ups
of follow-up responsibles
employed in that unit.
Information applicable for Swedish companies only! For FK/TFA claims: All accidents, commuting accidents and work-related illnesses where the occurrence manager is employed in that unit.
Work order number
Is used to search for the work order number that you have entered for the action.
Type the work order number and press Enter.
Actions
5.1.2 Information displayed in the action plan
The table shows all columns that are displayed for the different submenus beneath Action plan in
alphabetical order. In the Available for column you can see which columns are available for which
submenu.
Please note: The FK/TFA claims submenu is only available for Swedish companies. Columns that are
exclusive for this submenu are shown in italic in the table.
Column Description Available for
Action owner Displays the person selected as action owner. Actions
Date Displays the date when the occurrence happened or when the risk management has been performed.
Risk assessments and FK/TFA claims
Estimated completed
Displays the date when the investigation or the action should be completed. If it is completed, the completion date is displayed instead.
If the investigation or action is completed, a blue checkmark is displayed. If it is overdue, an orange exclamation mark is displayed.
Investigations and Actions
FK sent Information applicable for Swedish companies only! Displays if the occurrences has or has not been
FK/TFA claims

Page 88 of 111
Column Description Available for
reported to Försäkringskassan.
ID Displays the ID of the occurrence, risk management, risk management row or action.
If you point at the ID the title of the occurrence or risk management is displayed.
Investigations, Actions, Risk assessments, Follow-ups and FK/TFA claims
Injured person Information applicable for Swedish companies only! Displays the name of the person that has been injured. If you have selected Hide personal data at the top of the page, no names will be displayed in the Injured person column.
FK/TFA claims
Investigator Displays the person selected as investigator. Investigations
OHS representative
For Follow-ups: the OHS representative responsible for the follow-up is displayed.
Information applicable for Swedish companies only! For FK/TFA claims: the contacted OHS representative is displayed.
Follow-ups and FK/TFA claims
Person responsible
Displays the person responsible for the occurrence or the risk management.
For Follow-ups the person responsible for the follow-up is displayed.
Investigations, Actions, Risk assessments, Follow-ups and FK/TFA claims
Status Displays the status of the occurrence. You can read more about the different statuses in section 3.1.5 Occurrence status.
Follow-ups and FK/TFA claims
TFA sent Information applicable for Swedish companies only! Displays if the occurrences has or has not been reported to AFA Insurance’s Work Injury Insurance (TFA or TFA-KL).
FK/TFA claims
Title Displays the title of the investigation, action, or occurrence or the follow-up comment.
Investigations, Actions, Risk assessments, Follow-ups
Type Displays the type of the occurrence or the risk management. An (S) next to the occurrence type indicates that it is an occurrence with sick leave.
Investigations, Actions, Risk assessments, Follow-ups and FK/TFA claims
If you have risk assessed an occurrence or a risk management row, the risk before and after actions is displayed in these columns.
Investigations, Actions, and Risk assessments,
Displays the number of completed actions and the total number of actions.
Investigations, Risk assessments, Follow-ups
Page 89 of 111
Column Description Available for
Displays how many attachments an occurrence or risk management has.
Investigations, Actions, Risk assessments, Follow-ups and FK/TFA claims
Click on that icon to open a PDF file of the occurrence or risk management.
Investigations, Actions, Risk assessments, Follow-ups and FK/TFA claims
5.1.3 Why can’t I find the information I’m looking for in the list?
If you cannot find a particular investigation, action, risk assessment, follow-up or FK/TFA claim in the list, this can be due to the following reasons:
Only 50 results are displayed by default. To see all results you have to change the number in the Show field.
If you have selected the checkbox for Hide completed, completed investigations, actions and follow-ups are not displayed in the list. Risk assessments and FK/TFA claims are not displayed in the list, if the occurrence or risk management that they belong to has status Completed and you have selected the checkbox for Hide completed.
If you do not have permission for the occurrence type that the investigation, action, risk assessment, follow-up or FK/TFA claim belongs to, you cannot see it in the list.
If you do not have permission for the unit of the occurrence or risk management that the investigation, action, risk assessment, follow-up or FK/TFA claim belongs to, you cannot see it in the list.
If the occurrence or risk management that the investigation, action, risk assessment, follow-up or FK/TFA claim belongs to has Restricted access, you can see it only if you have a function in the occurrence or risk management or if you have the super user role in IA.
If you have access to multiple companies within your group of companies you have to select the correct company in the Company list.
If someone has deleted the occurrence or risk management that the investigation, action, risk assessment, follow-up or FK/TFA claim belongs to, you cannot find it in the list. Neither is it possible to restore it.
Which information is visible for the Reporting account, is decided by your local IA administrator. He/she can decide that the reporting account only can be used to report occurrences but not to read occurrences and risk managements.
Page 90 of 111
6. Reports
IA offers five different kinds of reports: Overview, Per unit, Injured body parts, Occurrences per
month and Risk rating. Some sectors also have a special sector report. This report is available for
Swedish companies only.
The content in each report can be adapted to your needs. The Overview, Injured body parts and
Occurrences per month reports are available for different organizational levels: a particular unit, the
whole company or your group of companies. Swedish companies can also select the whole sector.
The levels that are available for you to select will depend on your level of authorization.
The numbers in the reports include occurrences with restricted access.
In each report, you can select which category of persons you want to include in the report: All, Own
staff, Other persons or Contractors only.
6.1 Overview
The report is an overview of all the occurrences that took place during a specified period of time.
1. Point at Reports and click on the Overview submenu.
2. In the Selection panel, select the organizational level for which you want to create the report:
a certain unit, your company or your group of companies. Swedish companies can also select
the whole sector. The levels that are available for you to select will depend on your level of
authorization.
3. Use the Selection criteria panel to adapt the report to your needs. Click on the arrow next to
the heading if the panel is not displayed. You can combine several selection criteria to narrow
your search:
Select the Period you wish to view and if you want to base the report on Occurrence
period or Registration period. For both alternatives you will find several predefined
periods to choose from. If you want to enter a period not listed, select User defined
period and enter the dates.
Use the Occurrence type list to select which types of occurrences should be included
in the report:
o To select multiple options in the list: hold down the Ctrl key and select one at a time.
o To select or deselect all alternatives: select or deselect the checkbox next to the selection list.
o To deselect one alternative: click on the cross to the right of this alternative.
Beneath the heading Injured/Person reporting, select which occurrences should be
included in the report:
o All: All occurrences that meet your other selection criteria are included.
o Own staff: Only occurrences that were reported by own staff or where own
staff was injured are included.
o Contractors only: Only occurrences that were reported by contractors or
where contractors were injured are included.
o Other persons: Those occurrences that were neither reported by own staff
nor by contractors, and where neither own staff nor contractors were injured

Page 91 of 111
are included. For example, that can be occurrences where customers or
visitors were injured.
Occurrences with the status Reported are included by default. If you do not want to
include them in the report, deselect the checkbox for Include occurrences with the
status “Reported”.
4. Click on Create report.
5. You can view the report directly in your browser or export it. To export it, click on the disk
icon and select the file format that best suits your needs. When you have exported the report,
you can save it or print it.
6.1.1 Content in the Overview report
The information and charts displayed in the report will depend on the organizational level and the
occurrence types that you have chosen. Since the information in the report is anonymous you might
see information about occurrence types that you are not authorized to otherwise.
Information about accidents, near misses and risk observations is displayed in relation to each other (if
you selected at least two of them). All the other occurrence types have their own section in the report.
The table below displays which charts could be included in the report. The charts displayed to you
depend on your selection criteria and on the information that you have registered in your occurrences.
For example, if you have not registered an activity in any of your occurrences, the Activity chart will not
be displayed in the report.
Information applicable for Swedish companies only: Swedish companies can also select the whole
sector. The sector report only displays information about accidents, near misses and risk observations.
Chart Description Available for the following levels
Available for the following occurrence types
Location / Place / Stage/Phase
Displays what has been selected in the Location / Place / Stage/Phase field in the occurrences.
Sector, Group, Organization, Unit
All occurrence types that are displayed beneath Selection criteria, except for commuting accident and safety observation.
Activity / Work step Displays what has been selected in the Activity / Work step field in the occurrences.
Sector, Group, Organization, Unit
All occurrence types that are displayed beneath Selection criteria, except for commuting accident and safety observation.
Reason of injury/risk Displays what has been selected in the Reason for injury or Injury risk field in the occurrences.
Sector, Group, Organization, Unit
Accident, near miss and risk observation.
Object involved / Object/person involved / Object / Machine/Tool/Substance
Displays what has been selected in the Object involved / Object/person involved / Object / Machine/Tool/Substance field in the occurrences.
Sector, Group, Organization, Unit
All occurrence types that are displayed beneath Selection criteria, except for commuting accident and safety observation.
Cause of illness Displays what has been selected in the Cause of illness field in the occurrences.
Group, Organization, Unit Work-related illness
Estimated sick leave Sums up the estimated sick leave. All accidents in which Sick leave was set to None or is empty are
Sector, Group, Organization, Unit
Accident, commuting accident and work-related
Page 92 of 111
Chart Description Available for the following levels
Available for the following occurrence types
included in the No sick leave slice. All accidents in which Sick leave was set to Probably 1-3 Days, Probably 4-14 Days, Probably >14 Days or Death are included in the slice Sick leave.
illness.
Actual number of sick days
Displays the actual number of sick days. The figures are based on the numbers that were entered in the Actual sick days field in the occurrences.
Sector, Group, Organization, Unit
Accident, commuting accident and work-related illness.
Accidents with LTI (Lost Time Injury)
If your organization uses LTI (Lost Time Injury) the number of occurrences where Yes was selected in the LTI (Lost Time Injury) field is displayed.
Sector, Group, Organization, Unit
Accident
Type of injury Displays what has been selected in the Type of injury field in the occurrences.
Sector, Group, Organization, Unit
Accident and commuting accident.
Type of illness Displays what has been selected in the Type of illness field in the occurrences.
Group, Organization, Unit Work-related illness
Injured body part Displays what has been selected in the Injured body part field in the occurrences.
Sector, Group, Organization, Unit
Accident, commuting accident and work-related illness.
Type of divergence Displays what has been selected in the Type of divergence field in the occurrences.
Group, Organization, Unit Environment, quality, property/security and other divergence.
Claim reported Displays to which external parts claims have been sent to by listing the Type of links that have been selected on the Claims tab in the occurrences.
Sector, Group, Organization, Unit
All occurrence types that are displayed beneath Selection criteria, except for safety observation.
6.2 Per unit
Reports per unit show numbers for a specified period of time according to the units in your
organization chart:
The numbers without brackets specify the number of occurrences in a unit.
The numbers within brackets specify the total number of occurrences in a unit and its sub-
units.
As the reports are interactive, you can click on the numbers and access the list of occurrences or risk
managements on which the numbers in the reports are based.
All your selections are saved in cookies so that when you next log in to IA from the same computer,
you will see these selections and can easily recreate the same report
1. Point at Reports and click on the Per unit submenu.
2. Select a report:
Page 93 of 111
Occurrences by occurrence type: shows occurrences per occurrence type and unit
Occurrences by status: shows occurrences per status and unit
Risk management by risk management type: shows risk managements per risk
management type and unit
Risk management by status: shows risk managements per status and unit
Risks: shows the number of risks in each unit. Each occurrence and each risk
management row with at least one action counts as one (1) risk. Furthermore, each
action in a risk management that is not connected to a risk management row, counts
as one (1) risk. A risk is considered as completed as soon as all actions in that
occurrence or risk management row are marked as completed. A risk is considered
overdue as soon as one of the actions is overdue.
Risk assessed occurrences & risk management rows by risk level: shows
occurrences and risk management rows that are risk assessed both before and after
actions. They are shown according to their risk value and per unit.
Occurrence investigation by investigation status: shows all investigations per
status and unit
Actions by action status: shows all actions per status and unit
Average handling times: shows the handling times for completed occurrences.
Since there may be a difference between the date when an occurrence happened and
the date when it was reported, you can choose if the calculation should be based
upon the Occurrence date or the Registration date.
The handling time is the time from registration of an occurrence until the last action is
completed. The time for follow-up and OHS representative follow-up is not included,
since they can be carried out quite some time after the last action is completed.
You can choose if you want to see a report about the Average or the Median. The
column Number of completed occurrences shows how many occurrences the
numbers in the report are based upon.
The result is displayed in Number of days. Number 1 in the report means that
something has been done the same day, for example that the investigation was
completed the same day that the occurrence was reported.
3. Use the Selection criteria panel to adapt the report to your needs. Click on the arrow next to
the heading if the panel is not displayed. You can combine several selection criteria to narrow
your search:
Select the Period you wish to view and if you want to base the report on Occurrence
period or Registration period. For both alternatives you will find several predefined
periods to choose from. If you want to enter a period not listed, select User defined
period and enter the dates.
Use the Occurrence type and/or Risk management type lists to select which types
of occurrences and/or risk managements should be included in the report:
o To select multiple options in the list: hold down the Ctrl key and select one at a time.
o To select or deselect all alternatives: select or deselect the checkbox next to the selection list.
o To deselect one alternative: click on the cross to the right of this alternative.
Page 94 of 111
For reports about occurrences, you can select if unit should refer to occurrence or
employment unit.
Beneath the heading Injured/Person reporting, select which occurrences should be
included in the report:
o All: All occurrences that meet your other selection criteria are included.
o Own staff: Only occurrences that were reported by own staff or where own
staff was injured are included.
o Contractors only: Only occurrences that were reported by contractors or
where contractors were injured are included.
o Other persons: Those occurrences that were neither reported by own staff
nor by contractors, and where neither own staff nor contractors were injured
are included. For example, that can be occurrences where customers or
visitors were injured.
4. If the report does not update automatically click on View.
5. The report is displayed in your browser and lists all units in your organization. Inactive units
are displayed as well, if they have registered occurrences that meet your selection criteria, for
example if you selected All for Occurrence period.
6. If you want to export the search results displayed on your screen, click on the Export to Excel
button. You can also print the report.
7. You can click on the numbers in the report to access the list of occurrences or risk
managements on which the numbers are based.
6.3 Injured body parts
This report shows which body parts have been injured in accidents during a specified period of time.
1. Point at Reports and click on the Injured body parts submenu.
2. In the Selection panel, select the organizational level for which you want to create the report:
a certain unit, your company or your group of companies. The levels that are available for you
to select will depend on your level of authorization.
3. Use the Selection criteria panel to adapt the report to your needs. Click on the arrow next to
the heading if the panel is not displayed:
Enter an Occurrence period.
Select which accidents should be included in the report:
o All: All accidents that meet your other selection criteria are included.
o Own staff: Only accidents where own staff was injured are included.
Note:
The number of listed items may be less than the number you see in the report. This
depends on your level of authorization; the listed items only include the occurrences and
risk managements that you are authorized to view, while the report sums up all of them.
Page 95 of 111
o Contractors only: Only accidents where contractors were injured are
included.
o Other persons: Only accidents where neither own staff nor contractors were
injured are included. For example, that can be occurrences where customers
or visitors were injured.
Occurrences with the status Reported are included by default. If you do not want to
include them in the report, deselect the checkbox for Include occurrences with the
status “Reported”.
4. Click on Create report. The report opens in a pop-up window and shows an image of a body
with the injured body parts marked out.
5. To print the report, click on Print.
6.4 Occurrences per month
This report displays the number of occurrences that have happened each month or week during a
specified period of time.
1. Point at Reports and click on the Occurrences per month submenu.
2. In the Selection panel, select the organizational level for which you want to create the report:
a certain unit, your company or your group of companies. Swedish companies can also select
the whole sector. The levels that are available for you to select will depend on your level of
authorization.
3. Use the Selection criteria panel to adapt the report to your needs. Click on the arrow next to
the heading if the panel is not displayed. You can combine several selection criteria to narrow
your search:
Select if you want to display the information Per month or Per week.
Select the year, and month or week, until which you want to view the numbers.
Indicate the number of months or weeks you want to view in the report (from 1 to 13).
Use the Occurrence type list to select which types of occurrences should be included
in the report. You can select accidents, near misses, risk observations, commuting
accidents, work-related illnesses and safety observations:
o To select multiple options in the list: hold down the Ctrl key and select one at a time.
o To select or deselect all alternatives: select or deselect the checkbox next to the selection list.
o To deselect one alternative: click on the cross to the right of this alternative.
When you select accidents, the report will display accidents with sick leave, accidents without sick leave and accidents (total). If your company uses Lost Time Injury (LTI), this will also be displayed in the report.
Beneath the heading Injured/Person reporting, select which occurrences should be
included in the report:
o All: All occurrences that meet your other selection criteria are included.
o Own staff: Only occurrences that were reported by own staff or where own
staff was injured are included.

Page 96 of 111
o Contractors only: Only occurrences that were reported by contractors or
where contractors were injured are included.
o Other persons: Those occurrences that were neither reported by own staff
nor by contractors, and where neither own staff nor contractors were injured
are included. For example, that can be occurrences where customers or
visitors were injured.
Occurrences with the status Reported are included by default. If you do not want to
include them in the report, deselect the checkbox for Include occurrences with the
status “Reported”.
4. The chart is updated after every selection that you make. You can point the mouse on a
column to see an explanation. You can click on the icon in the upper right corner of the chart
to export or print the image.
5. If you want to see the report in Excel, click on Export to Excel and then on Open or Save.
When you have opened the report in Excel you have to click on Enable Editing before you
can edit the file.
The report contains three worksheets: The first one shows a chart of the number of
occurrences per month; the second one shows a chart of the accumulated number of
occurrences per month; and the third one shows the data on which the report is based upon.
6.5 Template report
Here you can create a report about all risk managements that have been done with a certain template.
The report displays a summary of all entered answers on checkpoint, heading and section level as
well as for the template as a whole.
By default, completed, ongoing as well as planned risk managements are included in the report.
However, risk managements with Restricted access are not included.
Actions are included if they are linked to a row, but not if they are linked to the risk management as a
whole.
Follow these steps to create the report:
1. Point on Report and click on the Template report submenu.
2. In the Template report list, select which template you want to create the report for.
3. You can narrow your search by using different selection criteria. Click on the Selection
criteria button to do so.
6.6 Risk rating
You can only create this report if your local IA administrator has registered the numbers, on which this
report is based upon, in IA. The report shows a chart of your risk rating either per working hours or per
number of employees.
1. Point at Reports and click on the Risk rating submenu.
2. In the Selection panel, select the organizational level for which you want to create the report:
your company or a certain employment unit. The levels that are available for you to select will
depend on your level of authorization.
Page 97 of 111
3. Use the Selection criteria panel to adapt the report to your needs. Click on the arrow next to
the heading if the panel is not displayed. You can combine several selection criteria to narrow
your search:
Use the Occurrence type list to select which types of occurrences should be included
in the report. You can select accidents, near misses, risk observations, commuting
accidents, work-related illnesses and safety observations:
o To select multiple options in the list: hold down the Ctrl key and select one at a time.
o To select or deselect all alternatives: select or deselect the checkbox next to the selection list.
o To deselect one alternative: click on the cross to the right of this alternative.
When you select accidents, the report will display accidents with sick leave, accidents without sick leave and accidents (total). If your company uses Lost Time Injury (LTI), this will also be displayed in the report.
Beneath the heading Injured/Person reporting, select which occurrences should be
included in the report:
o All: All occurrences that meet your other selection criteria are included.
o Own staff: Only occurrences that were reported by own staff or where own
staff was injured are included.
o Contractors only: Only occurrences that were reported by contractors or
where contractors were injured are included.
o Other persons: Those occurrences that were neither reported by own staff
nor by contractors, and where neither own staff nor contractors were injured
are included. For example, that can be occurrences where customers or
visitors were injured.
Occurrences with the status Reported are included by default. If you do not want to
include them in the report, deselect the checkbox for Include occurrences with the
status “Reported”.
Beneath the heading Risk rating per, indicate whether you want to view the risk
rating per Hours worked or Number of employees. If you want to use a different
factor than the default one, simply change the number. The choices you can make
beneath Risk rating per depend on the numbers that your local IA administrator has
registered in IA.
Beneath the heading Distribution, select whether you want to see the numbers per
year, quarter or month and up to which year the numbers should be displayed. The
choices you can make beneath Distribution depend on the numbers that your local
IA administrator has registered in IA.
4. The chart is updated after every selection that you make. You can point the mouse on a
column to see an explanation. You can click on the icon in the upper right corner of the chart
to export or print the image.
5. If you want to see the report in Excel, click on Export to Excel and then on Open or Save.
When you have opened the report in Excel you have to click on Enable Editing before the
chart is displayed.
The report contains two worksheets: one that shows the chart and one that shows the data on
which the chart is based upon. The Data tab in the Excel-file displays both Number and Risk
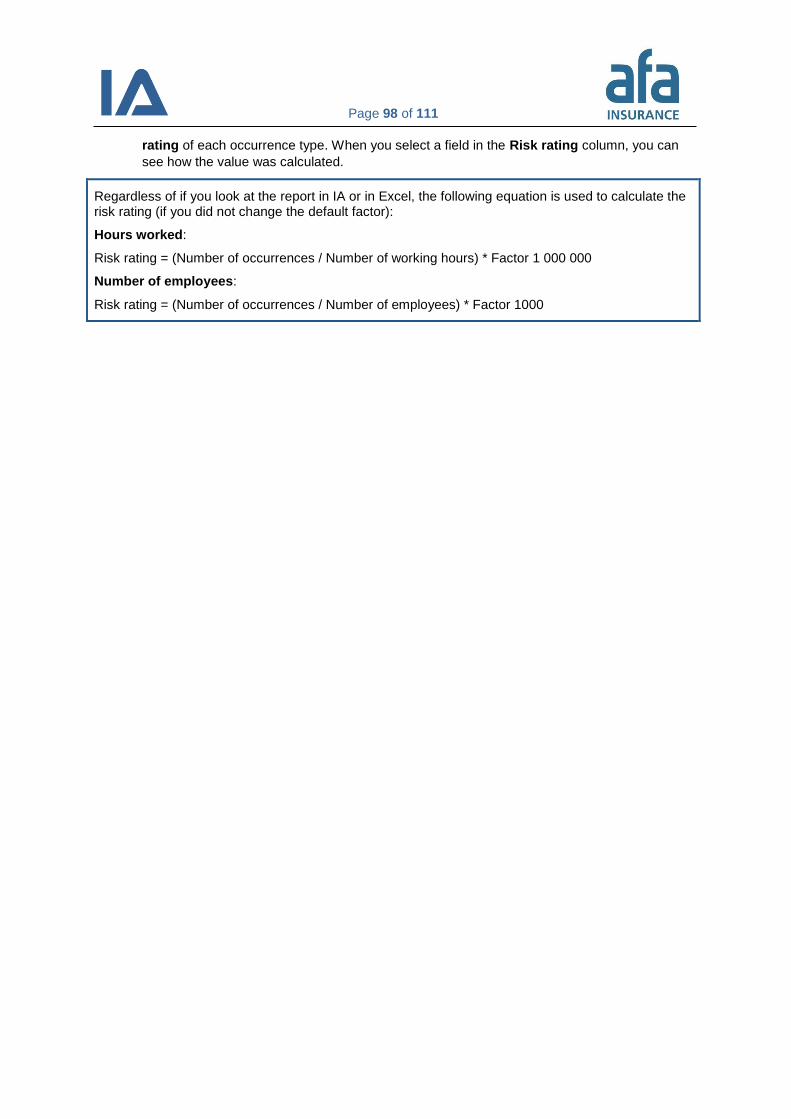
Page 98 of 111
rating of each occurrence type. When you select a field in the Risk rating column, you can
see how the value was calculated.
Regardless of if you look at the report in IA or in Excel, the following equation is used to calculate the risk rating (if you did not change the default factor):
Hours worked:
Risk rating = (Number of occurrences / Number of working hours) * Factor 1 000 000
Number of employees:
Risk rating = (Number of occurrences / Number of employees) * Factor 1000
Page 99 of 111
6.7 Sector statistics (PIA, MIA, GRIA AND ENIA)
6.7.1 Registering sector statistics
Information applicable for Swedish companies only!
Only users with the Super user and Registrator of sector statistics roles can register information for the
sector statistics.
Follow these steps to register information for the sector statistics:
1. Point at Occurrences and click on the Sector statistics submenu.
2. The numbers in the table are based upon the occurrences that where registered in your
company the previous year. Occurrences with the status Reported are not included.
3. Click on Transfer IA values to transfer the numbers to the editable fields.
4. Controll the numbers and edit them if necessary. Click on Save repeatedly.
5. When you have controlled and corrected the report, select the checkbox for The report is now
complete and can be downloaded by a sector representative.
6. Click on Send report.
6.7.2 Creating a sector report
Information applicable for Swedish companies only!
The sector report shows information about occupational health and safety occurrences, i.e. near
misses, accidents, commuting accidents and work-related illnesses. The report is defined by branch
representatives.
Follow these steps to create the report:
1. Point at Reports and click on the Sector statistics submenu.
2. Select for which Occurrence year you want to create the report. Which years you can select, is
determined by the years that you have registered sector statistics for.
3. Select if you want to create the report for the whole sector or for your company.
4. Click on Create report.
Note:
Once you have sent the report, you can no longer edit it. Therefore, control the report
carefully, before you send it.
Page 100 of 111
7. Analysis
The Analysis function lets you view almost all occurrences that have been reported in IA in your
organization. It can be used to compile a base for risk analyses, or to collect facts before rebuilding or
buying a new machine. Since it is possible to create charts based on most variables, you can use the
Analysis function as a complement to the Reports function. Swedish companies can also use the
Analysis function to compare themselves to their sector and to learn from each other’s experiences.
Furthermore, the Analysis function contains a function to export information about all your occurrences
to Excel, to give you the possibility to process your data according to your own needs.
7.1 Searching for occurrences in the Analysis function
In the Analysis function you can search for occurrences in a certain unit, in your company, in your
group of companies and in your sector11
. Not all occurrences are displayed in the Analysis function.
Therefore, the number of occurrences may differ from the number of occurrences in the occurrence
list. Which rules apply and which occurrences are not included, is displayed in the table:
Rule Explanation
Only own staff You can only see occurrences that have been reported by own staff, or where own staff was injured.
Restricted access is exkluded
Occurrences with Restricted access are not included in the analysis. This is due to their sensitive nature.
Work-related illness is excluded
Occurrences of the Work-related illness type are not included in the analysis. This is due to their sensitive nature.
Status Reported is not included on sector level
Information applicable for Swedish companies only! Occurrences with the status Reported are only displayed if you have selected your group, your organization or a unit within your organization. Occurrences are not displayed for your sector until they have received the status Registration in progress.
Commuting accidents are not included on sector level
Information applicable for Swedish companies only! Occurrences of the Commuting accident type are not included in searches on the sector level.
Permission for occurrence types
You can see all of the following work environment occurrences: accident, commuting accident, near miss and risk observation. Of the other occurrence types you can only see those that you have permission to.
Limited number of columns in charts
Due to technical reasons, the number of columns in the charts is limited. Therefore, you may see fewer columns than your number of variables. If this is true, the information “X occurrences have other information about Y noted” is displayed below the chart.
Follow these steps to search for occurrences:
1. Point at Analysis and click on the Selection submenu.
11
The sector level is available for Swedish companies only.

Page 101 of 111
2. In the Selection panel, select the organizational level for which you want to create the report:
a certain unit, your company or your group of companies. Swedish companies can also select
the whole sector. The levels that are available for you to select will depend on your level of
authorization.
3. In the Selection criteria panel, select the types of occurrences you want to view. The types of
occurrences that are available for you to select will depend on the organizational level you are
viewing and your level of authorization.
For accidents and commuting accidents, you can select to view occurrences With or Without
sick leave or both.
4. You can narrow your search by adding one or more Selection criteria. The criteria
correspond to the information that is registered in your occurrences. Section 7.1.1 Selection
criteria in the Analysis function lists all selection criteria that are available for the different
occurrence types and levels. If you combine several criteria, only occurrences that contain all
of them will be shown in the search results. For most of the search criteria you can choose to
search for occurrences that contain certain information and for occurrences that do not contain
certain information.
Some selection criteria are only available for certain types of occurrences. If you select one of
these criteria, only those occurrence types that contain it will be displayed in the result list,
even if you have selected other occurrence types as well.
Information applicable for Swedish companies only! Some criteria are not displayed when
you have selected the sector level, since the occurrence types that they are linked to are not
shared within the sector.
5. When you have chosen a selection criterion you have to click on Add criteria to use it for your
search. Some of the criteria can be used several times with different values by clicking on Add
criteria after each selection. That way, you can, for example, search for occurrences where
the age bracket is 40-49, 50-59 and >=60.
6. Click on View details to view a list of the occurrences that match your selection criteria.
To make the search function as fast as possible, IA only displays the first 50 hits. The number
inside brackets shows how many hits your selection criteria matched. Even if you did not
search for flagged occurrences specifically, flagged occurrences are always shown with a red
border in the list of results.
For occurrences within your own company, you can see in which unit they have taken place.
You also see the names of the occurrence manager, OHS representative, investigator and
action owner. This information is never displayed to other companies and you are therefore
not able to see this information for occurrences in other companies. However, information
about investigations and actions is shared between companies.
No personal records, except for age bracket and sex, are displayed in the search results. You
can open occurrences within your own company directly by clicking on the occurrence ID.
If you want to get to know more about an occurrence from another company, follow these
steps:
(1) Click on the company’s name.
(2) The e-mail function opens in a pop-up window.
(3) The e-mail subject contains the ID of the occurrence. You can change the subject.
(4) Enter your message. You cannot see the name of the company or the e-mail
recipient. Instead the recipient will receive your contact information to be able to get
back to you.
Page 102 of 111
(5) Click on Send. If an error message is displayed, the company that you are trying to
contact has not specified an external contact.
7. To view the search results as a chart, select the criterion you want to see from the list in View.
Then select the Type of graph and whether you want to view the results Accumulated or
Summarized by year. Click on Display chart. To make the charts readable, not all values
are shown for some variables, for example Occupation, Activity and Location.
8. When you have specified coordinates for your occurrences, you can view the search results
on a map. This option is available, if you have selected your group, your organization or a unit
within your organization beneath the heading Selection:
(1) Click on Show on map. If you cannot see the map, but a pop-up window with the
information Only secure content is displayed, click on Display all content.
(2) Google Maps opens in a new window and shows a pin for each occurrence with
specified coordinates.
(3) Click on a pin to view information about the particular occurrence.
9. You can print the list with details, the charts and the map.
7.1.1 Selection criteria in the Analysis function
The table displays all selection criteria that are available for the different occurrence types and
organizational levels. In the Available for these levels and Available for these occurrence types
columns you can see which criteria are available for which level and for which occurrence type,
respectively. Please note: The sector level is only available for Swedish companies.
Apart from the criteria listed below your local IA administrator may have created user-defined fields for
your occurrences. These are also displayed in the Selection criteria list and you can use them the
same way as the built in selection criteria. However, they are only available when you have selected
your organization or a specific unit.
Criterion Description Available for these levels
Available for these occurrence types
Action description
Is used to search for the information that has been entered in the Action field in the occurrences.
Sector, Group, Organization, Unit
All occurrence types that are displayed beneath Selection criteria.
Actions steps Is used to search for the action steps that have been entered for the actions.
Sector, Group, Organization, Unit
All occurrence types that are displayed beneath Selection criteria.
Activity Is used to search for the information that has been registered in this field in the occurrences. Is called Work step in some sectors.
Sector, Group, Organization, Unit
All occurrence types that are displayed beneath Selection criteria, except for commuting accident and safety observation.
Actual number of sick days
Is used to search for the number of sick days that has been entered in the Actual sick days field in the occurrences. You
Sector, Group, Organization,
Accident and commuting accident.
Page 103 of 111
Criterion Description Available for these levels
Available for these occurrence types
can search for an interval between 0 and 9999. If you only want to search for a single digit, enter it in both search fields.
Unit
Age Is used to search for the age bracket that the injured person belongs to.
Sector, Group, Organization, Unit
Accident and commuting accident.
Behavior Is used to search for safety observations with safe or unsafe behavior.
Group, Organization, Unit
Safety observation
Cause Is used to search for the factors that contributed to the occurrences.
Sector, Group, Organization, Unit
Risk observation, near miss, accident, commuting accident, property/security, improvement proposals and safety observation.
Course of events or title
Is used to search for the information that has been registered in the Course of events and Occurrence title fields in occurrences.
Sector, Group, Organization, Unit
All occurrence types that are displayed beneath Selection criteria.
Death Is used to filter the occurrences that have led to death.
Sector, Group, Organization, Unit
Accident (with sick leave) and commuting accident (with sick leave).
Description or title
Is used to search for the information that has been registered in the Description and Title fields in safety observations.
Group, Organization, Unit
Safety observation
Divergence type
Is used to search for the divergence types that have been entered in the occurrences.
Group, Organization, Unit
Environment, property/security, quality and other divergence.
Estimated number of sick days
Is used to search for the intervals that have been selected in the Sick leave list in the occurrences.
Sector, Group, Organization, Unit
Accident (with sick leave) and commuting accident (with sick leave).
External place
Is used to search for the information that has been entered in the External place field in occurrences.
Sector, Group, Organization, Unit
All occurrence types that are displayed beneath Selection criteria.
Flagged Is used to search for flagged occurrences. They are marked with a red border in the list of results.
Even if you did not search for flagged occurrences specifically, flagged
Sector, Group, Organization, Unit
All occurrence types that are displayed beneath Selection criteria.
Page 104 of 111
Criterion Description Available for these levels
Available for these occurrence types
occurrences are always shown with a red border in the list of results
Gender Is used to search for the gender that the injured persons have.
Sector, Group, Organization, Unit
Accident and commuting accident.
ID The IDs of occurrences in IA consist of the year and a sequence number. You can use ID to search for the sequence number by entering an interval between 0-99. If you want to search for a single digit, enter it in both search fields. The search results show this ID for all years that you have been using IA.
Example: If you enter 3 - 3 the results will show occurrences with the Ids 2015-3, 2014-3, 2013-3 and so on.
Sector, Group, Organization, Unit
All occurrence types that are displayed beneath Selection criteria.
Injured body parts
Is used to search for one or more injured body part.
Sector, Group, Organization, Unit
Accident and commuting accident.
Injury type Is used to search for one or more types of injuries.
Sector, Group, Organization, Unit
Accident and commuting accident.
Investigation description
Is used to search for information that has been registered in the Investigation field in the occurrences.
Sector, Group, Organization, Unit
All occurrence types that are displayed beneath Selection criteria.
Location Is used to search for the information that has been registered in this field in the occurrences. Is called Place or Stage/Phase in some sectors.
Sector, Group, Organization, Unit
All occurrence types that are displayed beneath Selection criteria, except for commuting accident and safety observation.
LTI (Lost Time Injury)
If your company uses the classification of work injuries, LTI, you can search for if LTI is Yes, No or Unknown.
Group, Organization, Unit
Accident (with sick leave)
Machine/Tool/ Substance
Is used to search for one or more objects that have been involved in the occurrences.
Is called Object involved or Object/person involved in some sectors.
Sector, Group, Organization, Unit
Risk observation, near miss, accident, and property/security.

Page 105 of 111
Criterion Description Available for these levels
Available for these occurrence types
Medically treated
Is used to search for the information that has been registered in the Medically treated field in the occurrences.
Sector, Group, Organization, Unit
Accident (with sick leave) and commuting accident (with sick leave).
No actions Is used to search for occurrences where no actions need to be taken.
Organization, Unit
All occurrence types that are displayed beneath Selection criteria.
No investigation
Is used to search for occurrences that do not need to be investigated.
Organization, Unit
All occurrence types that are displayed beneath Selection criteria.
Observation type
Is used to search for the observation types that have been registered in safety observations.
Group, Organization, Unit
Safety observation
Object (free text)
Is used to search for the information that has been entered in the fields Object ID (Internal number etc.) or Machine/Tool/Substance code, respectively, in the occurrences.
Is called Object/person involved (free text) in some sectors.
Sector, Group, Organization, Unit
Risk observation, near miss, accident and property/security.
Object involved
Is used to search for one or more objects that have been involved in the occurrences.
Is called Object/person involved or Machine/Tool/Substance in some sectors.
Sector, Group, Organization, Unit
Risk observation, near miss, accident, and property/security.
Object/person involved
Is used to search for one or more objects that have been involved in the occurrences.
Is called Object involved or Machine/Tool/Substance in some sectors.
Sector, Group, Organization, Unit
Risk observation, near miss, accident, and property/security.
Object/person involved (free text)
Is used to search for the information that has been entered in the fields Object ID (Internal number etc.) or in the occurrences.
Is called Object (free text) in some sectors.
Sector, Group, Organization, Unit
Risk observation, near miss, accident and property/security.
Occupation Is used to search for one or more occupations that the injured persons have.
Sector, Group, Organization,
Accident and commuting accident.

Page 106 of 111
Criterion Description Available for these levels
Available for these occurrence types
Unit
Occurrence period
Is used to search for occurrences that have happened between the dates you enter.
Sector, Group, Organization, Unit
All occurrence types that are displayed beneath Selection criteria.
Occurrence time
Is used to search for occurrences that have happened a certain time of the day.
Sector, Group, Organization, Unit
All occurrence types that are displayed beneath Selection criteria.
Occurrence unit
Is used to search for one or more occurrence units in your organization chart. The list of results displays all occurrences where these units have been selected as occurrence unit.
Organization All occurrence types that are displayed beneath Selection criteria.
Operating situation
Is used to search for the information that has been registered in this field in the occurrences. Is called Operation or Type of operation in some sectors.
Sector, Group, Organization, Unit
All occurrence types that are displayed beneath Selection criteria, except for commuting accident, improvement proposals and safety observation.
Operation Is used to search for the information that has been registered in this field in the occurrences. Is called Operating situation or Type of operation in some sectors.
Sector, Group, Organization, Unit
All occurrence types that are displayed beneath Selection criteria, except for commuting accident, improvement proposals and safety observation.
Place Is used to search for the information that has been registered in this field in the occurrences. Is called Location or Stage/Phase in some sectors.
Sector, Group, Organization, Unit
All occurrence types that are displayed beneath Selection criteria, except for commuting accident and safety observation.
Reason for injury/risk
Is used to search for the information that has been registered in the Reason for injury and Injury risk fields in the occurrences.
You will get a search result only if you have chosen accident, commuting accident, near miss or risk observation as occurrence types
Sector, Group, Organization, Unit
Risk observation, near miss, accident or commuting accident.
Registration period
Is used to search for occurrences that have been registered between the dates
Sector, Group, Organization,
All occurrence types that are displayed beneath Selection
Page 107 of 111
Criterion Description Available for these levels
Available for these occurrence types
you enter. Unit criteria.
Stage/Phase Is used to search for the information that has been registered in this field in the occurrences. Is called Location or Place in some sectors.
Sector, Group, Organization, Unit
All occurrence types that are displayed beneath Selection criteria, except for commuting accident and safety observation.
Status Is used to search for occurrences that have a certain status.
Sector, Group, Organization, Unit
All occurrence types that are displayed beneath Selection criteria.
Type of employment
Is used to search for the type of employment that the injured persons or the persons reporting the occurrence have.
Sector, Group, Organization, Unit
Risk observation, near miss, accident or commuting accident.
Type of employment (for safety observations)
Is used to search for the safety observations that have been reported by own staff or contractors.
Group, Organization, Unit
Safety observation
Type of link Is used to see which occurrences have been reported to external parts via the links that your local IA administrator has created.
Group, Organization, Unit
All occurrence types that are displayed beneath Selection criteria.
Type of operation
Is used to search for the information that has been registered in this field in the occurrences. Is called Operation or Operating situation in some sectors.
Sector, Group, Organization, Unit
All occurrence types that are displayed beneath Selection criteria, except for commuting accident, improvement proposals and safety observation.
Working hours
Is used to search for which working hours the injured persons have.
Sector, Group, Organization, Unit
Accident and commuting accident.
Works within unit
Is used to search for one or more occurrence units in your organization chart. The list of results displays all occurrences where these units have been selected as employment unit.
Organization All occurrence types that are displayed beneath Selection criteria.
Work step Is used to search for the information that has been filled in in this field in the occurrences. Is called Activity in some sectors.
Sector, Group, Organization, Unit
All occurrence types that are displayed beneath Selection criteria, except for commuting accident and
Page 108 of 111
Criterion Description Available for these levels
Available for these occurrence types
safety observation.
Years of experience
Is used to search for how many years of experience the injured persons have within their occupation.
Sector, Group, Organization, Unit
Accident and commuting accident.
7.2 Exporting data
It is possible to export all information about your occurrences to Excel. You can use this Excel file to
filter out the data you are interested of and create your own charts and reports based on it.
The table shows the rules that apply to the export to Excel:
Rule Explanation
Maximum of one year Data can be retrieved for a maximum of one year at a time, but data can be retrieved multiple times to collect information from several years back.
Restricted access is exkluded
Occurrences with Restricted access are not included in the export. Therefore the number of occurrences may differ between the Excel file and the occurrence list in IA.
Follow these steps to create the Excel file:
1. Point at Analysis and click on the Export data submenu. It depends on your level of
authorization in IA, whether you can see the Export data submenu.
2. Select the whole company or a certain unit. The units that are available for you to select will
depend on your level of authorization.
3. Select if the period should refer to Occurrence period, Registration period or Update
period.
4. Enter the period. You can select a maximum of one year.
5. Select which version of the export function you want to use. Whenever we update the export
we create a new version (for example when new fields are added to IA). Select the highest
number to get the latest version. Select a lower number to be able to compare the data with a
previous Excel file.
6. Select the checkbox for Show static columns if you are using the Excel file in a program.
This ensures that the Excel file always contains the same tab and column names, even if they
have been changed in IA.
7. Click on Export to Excel.
8. Choose Open or Save.
The report contains one tab for each type of occurrence. Furthermore, it contains one tab for
all actions and one tab for all user-defined fields from these occurrences as well as one tab
that shows all relations that these occurrences have. The actions, user-defined fields and
Page 109 of 111
relations are tagged with the occurrence’s ID, to enable you to search for all actions, all user-
defined fields and/or all occurrences and risk managements that are related to a certain
occurrence.
7.3 More information about the Analysis function
7.3.1 Contact other organizations
If you want to contact other companies that use IA, point at Analysis and click on the Selection
submenu. Then click on the Contact information button. This will open a pop-up window, where you
can see all IA users within your sector in the Company selection list. Select a company to view its
contact information.
7.3.2 Sectors that share information
Information applicable for Swedish companies only!
Sectors that share information with each other can only see organization names within their own
sector in the search results. For organizations in other branches the branch name is displayed instead.
If you want to get more information about a certain occurrence, click on the branch name above the
search result to contact the organization where this occurrence was reported.
Page 110 of 111
8. Tips and tricks
Here we have gathered tips that show how you can filter certain types of information in an easy way.
8.1 See the occurrence managers or units that have overdue
occurrences
1. Point at Occurrences and click on the List occurrences submenu.
2. Click on the column heading Status to open the Status field.
3. Select Overdue in the Status field.
4. You can use additional selection criteria to filter the search results.
5. Change the number in the Show field if necessary.
6. Click on View and then on Export. Only the search results displayed in the list will be
exported.
7. Select Open or Save.
8. Click on Enable editing in Excel.
9. In the Excel file you can see a column with the heading Occurrence manager. In this column
you can see which occurrence mangers have occurrences that are overdue. If you rather want
to see which units that have overdue occurrences, you look at the Occurrence unit or
Employment unit columns.
10. Click on Sort and filter and select Filter if you want to be able to sort the rows alphabetically.
8.2 Calculating the time for handling occurrences
1. Point at Analysis and click on the Export data submenu. It depends on your level of
authorization in IA, whether you can see the Export data submenu.
2. Select the whole company or a certain unit.
3. Enter an Occurrence, Registration or Update period.
4. Click on Export to Excel.
5. Choose Save as and save the file on your computer.
6. Then click on Open.
7. Hide the columns that are not relevant. Keep ID, Date of registration and Date of follow-up
as well as other columns that you are interested of.
8. Add a column that calculates the total time that it took to handle an occurrence (Total time =
Date of follow-up – Date of registration).
Figure 9: Calculation of the time for handling occurrences
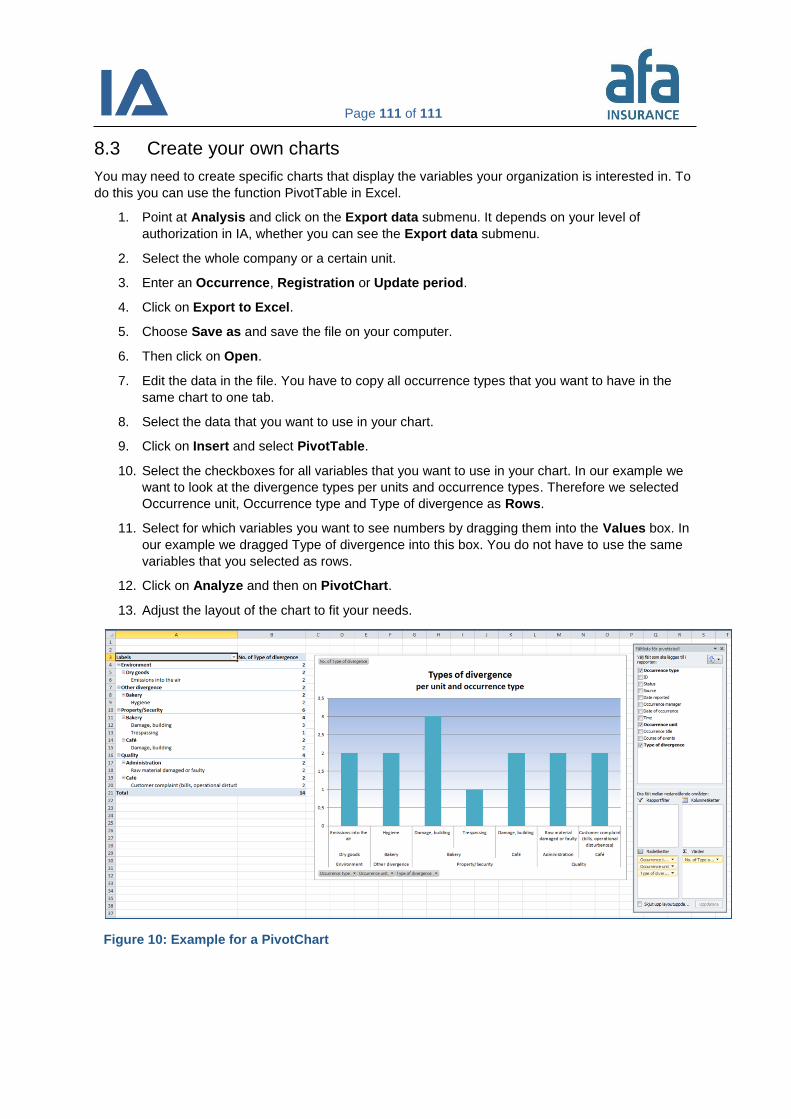
Page 111 of 111
8.3 Create your own charts
You may need to create specific charts that display the variables your organization is interested in. To
do this you can use the function PivotTable in Excel.
1. Point at Analysis and click on the Export data submenu. It depends on your level of
authorization in IA, whether you can see the Export data submenu.
2. Select the whole company or a certain unit.
3. Enter an Occurrence, Registration or Update period.
4. Click on Export to Excel.
5. Choose Save as and save the file on your computer.
6. Then click on Open.
7. Edit the data in the file. You have to copy all occurrence types that you want to have in the
same chart to one tab.
8. Select the data that you want to use in your chart.
9. Click on Insert and select PivotTable.
10. Select the checkboxes for all variables that you want to use in your chart. In our example we
want to look at the divergence types per units and occurrence types. Therefore we selected
Occurrence unit, Occurrence type and Type of divergence as Rows.
11. Select for which variables you want to see numbers by dragging them into the Values box. In
our example we dragged Type of divergence into this box. You do not have to use the same
variables that you selected as rows.
12. Click on Analyze and then on PivotChart.
13. Adjust the layout of the chart to fit your needs.
Figure 10: Example for a PivotChart