![Vigyan Ashram Status Reportvigyanashram.com/UploadedFiles/Reports/24.pdf · Vigyan Ashram Status Report ... DST Core support project 1] Egg incubator – Egg incubator ... Anand conducted](https://static.fdocuments.net/doc/165x107/5af25c6c7f8b9aa916903fa0/vigyan-ashram-status-ashram-status-report-dst-core-support-project-1-egg-incubator.jpg)
LUMIA 8 Incubator in HEAT RESISTANT ABS - Borotto · Instructions manual for the artificial egg...
20
Page 1 of 20 Rev 00 Instructions manual for the artificial egg incubator LUMIA 8 Incubator in HEAT-RESISTANT ABS
Transcript of LUMIA 8 Incubator in HEAT RESISTANT ABS - Borotto · Instructions manual for the artificial egg...
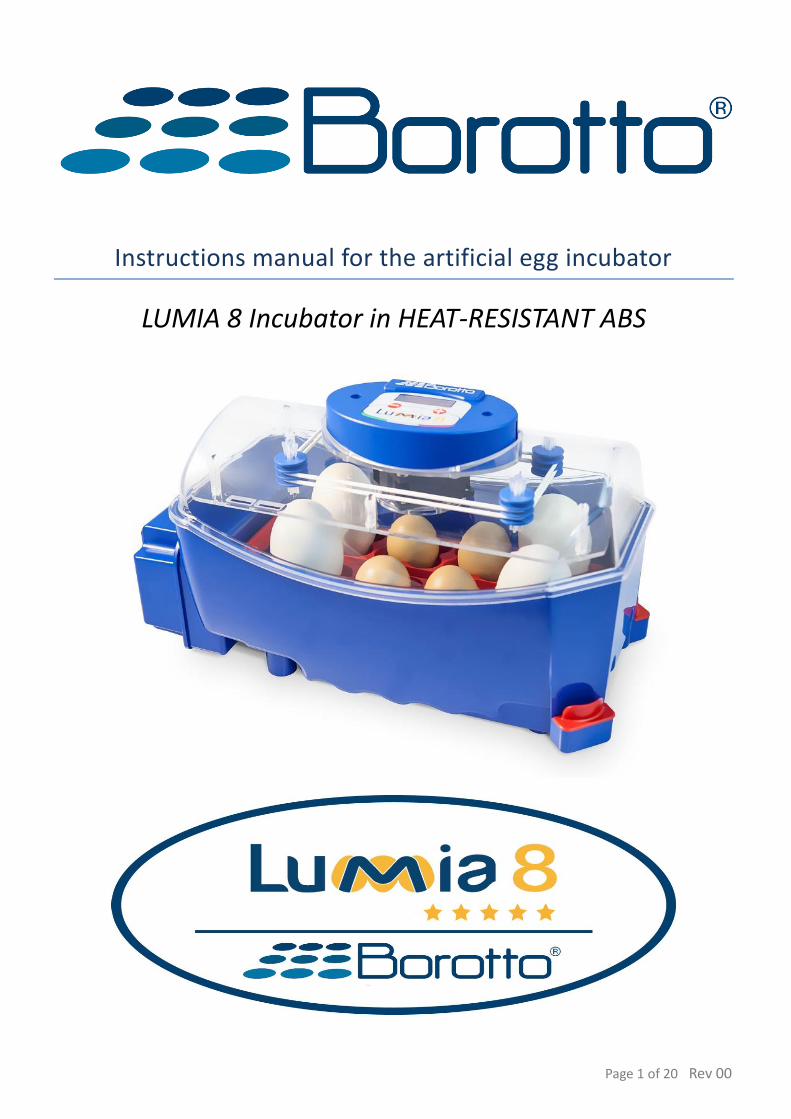
Page 1 of 20 Rev 00
Instructions manual for the artificial egg incubator
LUMIA 8 Incubator in HEAT-RESISTANT ABS
Page 2 of 20 Rev 00
Translation of the original instructions
1 – Warnings for safe utilisation
When using electrical appliances it is always required to adhere to some basic safety pre-
cautions, including the following:
1. READ THE INSTRUCTIONS IN THEIR ENTIRETY. 2. Use the appliance only with electrical system features complying with the label
affixed on the appliance and with this manual. 3. The appliance must be powered with low safety voltage only, which corresponds to
the marking on the appliance, and must only be used with the supplied power supply unit.
4. Do not touch hot surfaces (there is a resistor in the appliance). Wait for at least 10 minutes even after switching off in the event you should need to access hot parts for cleaning or maintenance.
5. Do not place the appliance near sources of heat. 6. Keep away from the reach of children. 7. Do not leave the appliance unattended for long periods of time when it is connected
to the power mains. 8. To prevent electric shocks, do not immerse the appliance in water or other liquids. 9. Disconnect the plug from the power socket when the appliance is not in use and/or
prior to opening (lifting the cover plate) and cleaning. 10. Do not use the appliance with damaged cables or plugs, or if it has been dropped or
damaged in some way. Consign the appliance to the nearest authorised service centre requesting check, or repair.
11. Use of accessories not recommended or not sold by the manufacturer is forbidden. 12. Do not use the appliance outdoors and do not move the appliance when in
operation. 13. The appliance can be used by children older than 8 years of age and persons with
reduced physical or mental capacity, or without experience or the necessary knowledge, as long as supervised by an adult or after they have received instructions related to safe appliance use and understand the dangers related to it. Cleaning and maintenance operations by user must not be carried out by unsupervised children.
14. Before starting, always check the condition of the external cables. Then insert the power supply plug into the power socket. To disconnect the unit, unplug it from the socket.
15. During use, place the appliance on a horizontal, stable and well-aerated surface, at a height of 500 mm from the floor.
16. Children must be supervised to ensure they do not play with the appliance. 17. Do not cover internal and external parts to prevent seriously damaging operation of
the product.
Page 3 of 20 Rev 00
18. The power supply cable must be positioned and protected in such a way that it can neither be accessed by pets nor damaged by them.
19. The power supply cable must be placed so that the plug can be easily accessible to disconnect the device from the mains, if required.
20. To unplug the appliance from the mains supply, hold the plug directly and extract it from the wall outlet.
21. Any modifications to this product, not expressly authorised by the manufacturer, may involve deterioration of the safety and forfeiture of the warranty on its use by the user.
22. STORE THESE INSTRUCTIONS WITH CARE.
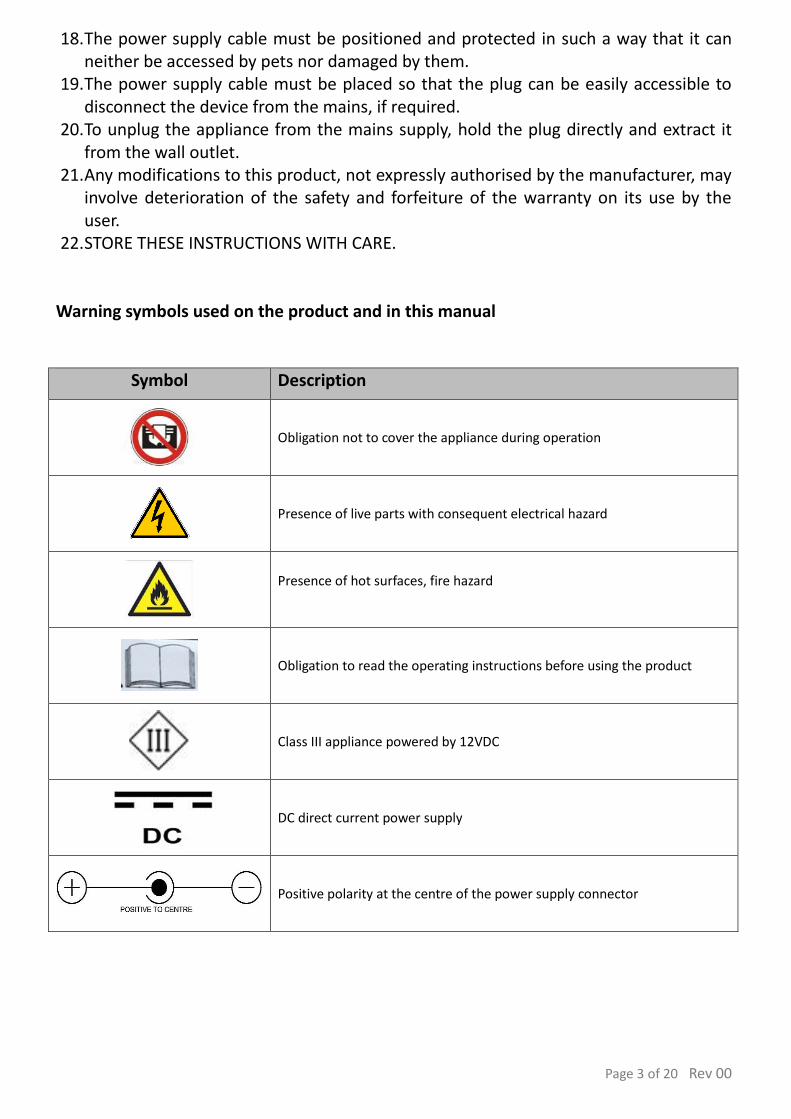
Warning symbols used on the product and in this manual
Symbol Description
Obligation not to cover the appliance during operation
Presence of live parts with consequent electrical hazard
Presence of hot surfaces, fire hazard
Obligation to read the operating instructions before using the product
Class III appliance powered by 12VDC
DC direct current power supply
Positive polarity at the centre of the power supply connector
Page 4 of 20 Rev 00
Contents 1 – Warnings for safe utilisation .................................................................................................................................. 2
2 - Declaration of conformity ....................................................................................................................................... 5
3 – Presentation of the manual ................................................................................................................................... 6
4 - Identification te ....................................................................................................................................................... 8
5 – Incubator technical features and specifications. ................................................................................................... 8
5.1 – Power supply technical features and specifications. ...................................................................................... 8
6 – General information ............................................................................................................................................... 9
7 - Transport and handling instructions ....................................................................................................................... 9
8 – Selection and preservation of the eggs for incubation ........................................................................................ 10
9 - Preparation and commissioning of the incubator ................................................................................................ 12
9.1 - Use ................................................................................................................................................................. 13
9.2 - Information regarding correct incubation: all poultry eggs ........................................................................... 14
9.3 - Information regarding correct incubation: eggs of all exotic birds ................................................................ 15
9.4 - Incubation of palmiped eggs (goose, duck, etc.) ........................................................................................... 15
10 – Periodic egg inspection during incubation (candling) ........................................................................................ 15
11 – Chick hatching .................................................................................................................................................... 16
12 – First days of life .................................................................................................................................................. 17
12.1 - Benefits of the infra-red lamp ..................................................................................................................... 17
12.2 - Nutrition ...................................................................................................................................................... 17
13 – Problems that may be encountered during use ................................................................................................. 17
13.1 - Guaranteed NON-STOP power supply ......................................................................................................... 17
14 – Problems that may be encountered during incubation ..................................................................................... 18
15 –Cleaning, sanitising and maintenance of the incubator at the end of cycle. ...................................................... 19
15.1- Spare parts .................................................................................................................................................... 19
16 - Disposal ............................................................................................................................................................... 19
17 – Warranty / after sale service .............................................................................................................................. 20
Electronic format copy of this instructions manual can be downloaded from the site www.borotto.com or can be
requested writing to the e-mail address [email protected] specifying the product and manual revision.
Page 5 of 20 Rev 00
2 - Declaration of conformity
EU Declaration of conformity
The undersigned Andrea Borotto, as legal representative of the company BOROTTO® headquartered in Via
Papa Giovanni Paolo II, 7 37060 Buttapietra (VR) Italy VAT No 03787910235
DECLARES
That the product as per label shown below:
Is intended for the use: incubator for animal eggs, specifically: hen, pheasant, turkey, guinea fowl, quail, grey
partridge, partridge, goose, Muscovy/common/wild duck, peacock, rock partridge, pigeon, Virginia quail, exotic
birds and birds of prey.
The following declaration of conformity is released under the exclusive responsibility of the manufacturer.
And it conforms to the following directives:
Directive 2014/35/EU known as Low Voltage Directive.
Directive 2014/30/EU known as "Electromagnetic compatibility Directive".
Directive 2011/65/EC ROHS II
The products are made in compliance with the following standards:
• Standard EN 60335-1:2012 + A11:2014 + A1(IEC):2013 Safety of electrical appliances for household use
and similar – Safety – Part 1: General Regulations.
• Standard EN 60335-2-71:2003 + A1:2007 Safety of electrical appliances for household use and similar –
Part 2: Special regulations for electrical heating appliances for animal husbandry.
• Standard EN 55014-1:2006 + A1:2009+A2:2011
• Standard EN 61000-3-2:2014
• Standard EN 61000-3-3:2013
• Standard EN 55014-2:2015
The person responsible for the technical dossier and
Legal Representative
Buttapietra – VR - Italy 01/01/2017 BOROTTO ANDREA
Page 6 of 20 Rev 00
Attention, prior to performing any operation, carefully read
the instructions manual.
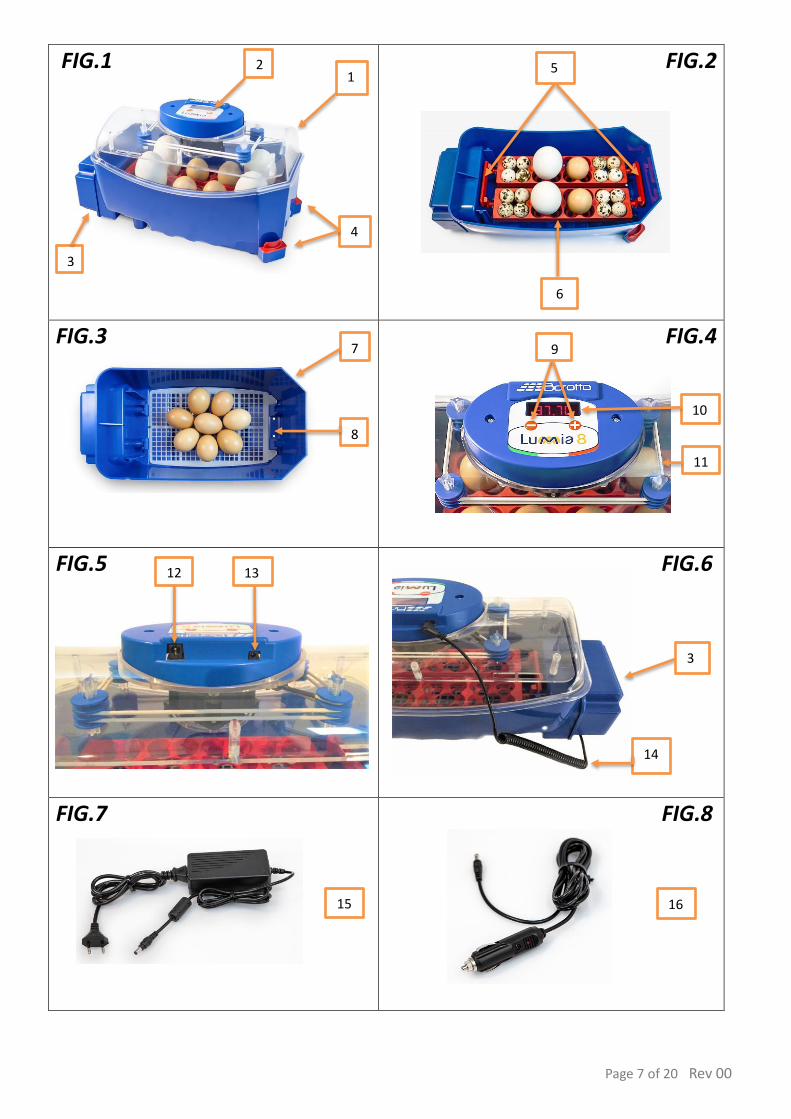
3 – Presentation of the manual This manual contains the instructions for the installation, use and relative maintenance of incubator model LUMIA 8. The manual consists of various sections, each one of which deals with a series of topics, divided into chapters and paragraphs. The general index lists all the topics dealt with by the entire manual. This manual is intended for users of the equipment, and concerns its technical life after its production and sale. In the event it should be subsequently be transferred to third parties for any reason (sale, loan for use, or any other reason), the incubator must be delivered complete with all the documentation This manual contains proprietary information and may not be, even partially, provided to third parties for any purpose and in any form, without the prior written consent of the manufacturer. The manufacturer declares that the information contained herein is consistent with the technical and safety specifications of the egg incubator the manual refers to.
LEGEND
1 Incubator cover plate
2 Control panel
3 Automatic egg turning unit
4 Tray filling nozzles with relative closing caps
5 Element joint rods
6 Egg tray element
7 Incubator base
8 Bottom grate to be only used at hatching (last 3 days)
9 Temperature control buttons
10 Digital display
11 Heating element (resistance)
12 12VDC power supply inlet
13 Power supply outlet for automatic egg turning unit
14 Automatic egg turning unit power supply cable
15 12VDC 5.0A 60W power supply
16 Power supply cable with car cigarette lighter outlet
Page 7 of 20 Rev 00
FIG.1
FIG.2
FIG.3 FIG.4
FIG.5 FIG.6
FIG.7 FIG.8
4
3
10
00
00
00
1
11
11
7
2
5
9
12
8
13
15 16
6
3
14
Page 8 of 20 Rev 00
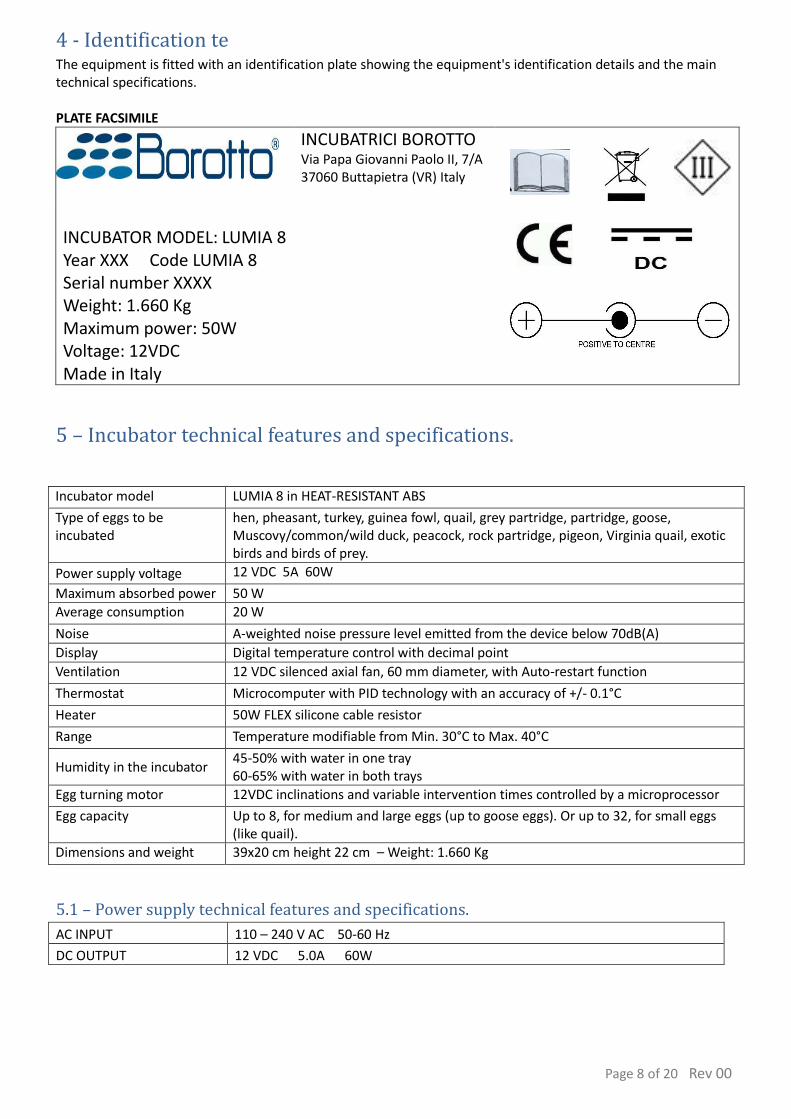
4 - Identification te The equipment is fitted with an identification plate showing the equipment's identification details and the main technical specifications. PLATE FACSIMILE
INCUBATRICI BOROTTO Via Papa Giovanni Paolo II, 7/A 37060 Buttapietra (VR) Italy
INCUBATOR MODEL: LUMIA 8 Year XXX Code LUMIA 8 Serial number XXXX Weight: 1.660 Kg Maximum power: 50W Voltage: 12VDC Made in Italy
5 – Incubator technical features and specifications.
Incubator model LUMIA 8 in HEAT-RESISTANT ABS
Type of eggs to be incubated
hen, pheasant, turkey, guinea fowl, quail, grey partridge, partridge, goose, Muscovy/common/wild duck, peacock, rock partridge, pigeon, Virginia quail, exotic birds and birds of prey.
Power supply voltage 12 VDC 5A 60W
Maximum absorbed power 50 W
Average consumption 20 W
Noise A-weighted noise pressure level emitted from the device below 70dB(A)
Display Digital temperature control with decimal point
Ventilation 12 VDC silenced axial fan, 60 mm diameter, with Auto-restart function
Thermostat Microcomputer with PID technology with an accuracy of +/- 0.1°C
Heater 50W FLEX silicone cable resistor
Range Temperature modifiable from Min. 30°C to Max. 40°C
Humidity in the incubator 45-50% with water in one tray 60-65% with water in both trays
Egg turning motor 12VDC inclinations and variable intervention times controlled by a microprocessor
Egg capacity Up to 8, for medium and large eggs (up to goose eggs). Or up to 32, for small eggs (like quail).
Dimensions and weight 39x20 cm height 22 cm – Weight: 1.660 Kg
5.1 – Power supply technical features and specifications.
AC INPUT 110 – 240 V AC 50-60 Hz
DC OUTPUT 12 VDC 5.0A 60W
Page 9 of 20 Rev 00
6 – General information The LUMIA 8 series incubator has been designed for hatching chicks of hen, pheasant, guinea fowl, quail, grey
partridge, grouse, ducks (Muscovy/ common/wild duck, goose, etc.), peacock, turkey, rock partridge, pigeon,
Virginia quail, exotic birds and birds of prey.
The incubator is made with a special engineering polymer in high HEAT-RESISTANT ABS, which makes the machine
solid and sturdy. The material is also provided with special BIOMASTER® silver-based ion antimicrobial additive to
destroy any bacterial flora that may develop inside the incubator.
The incubator is equipped with an automatic variable egg turning unit that automatically tilts the incubated eggs.
The microprocessor inside is programmed to regularly change the inclination time, always varying the tilt degree
of the eggs differently, exactly as it happens inside a nest.
The heat required for incubation is generated by an electrical resistor controlled by a latest-generation digital PID
microcomputer control that makes it possible to regulate in a constant and precise manner the average internal
temperature, setting it with the buttons on the control panel.
Ventilation takes place by means of an axial fan that distributes the warm and humid air evenly.
The natural free surface humidification takes place thanks to the water contained in the trays stamped on the
bottom of the incubator, which are filled via two outer nozzles - a convenient system that no longer requires the
incubator to be opened.
NOTE: The incubator can also be equipped with an automatic SIRIO humidifier available from: www.borotto.com
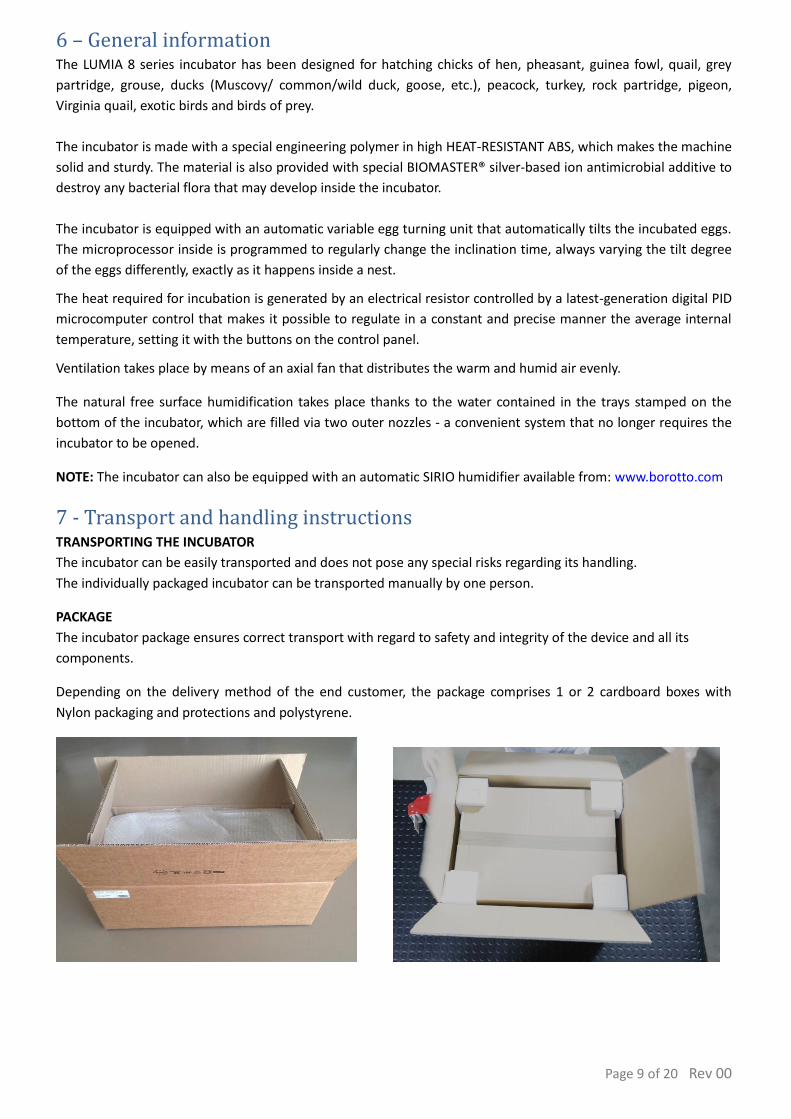
7 - Transport and handling instructions TRANSPORTING THE INCUBATOR
The incubator can be easily transported and does not pose any special risks regarding its handling.
The individually packaged incubator can be transported manually by one person.
PACKAGE
The incubator package ensures correct transport with regard to safety and integrity of the device and all its
components.
Depending on the delivery method of the end customer, the package comprises 1 or 2 cardboard boxes with
Nylon packaging and protections and polystyrene.

Page 10 of 20 Rev 00
TRANSPORT
ATTENTION: the entire package must be kept for any future machine movements.
OPENING THE PACKAGE
To remove the machine from the package:
1) Open the box carefully without damaging it
2) Remove the incubator from its protections.
3) Check that the package contents include:
- Incubator base.
- 2 “DUST STOP” antimicrobial caps to close the water filling nozzles.
- Base hatching grid.
- Egg tray.
- Complete incubator cover plate.
- 12VDC 60W 5.0A power supply.
- Power supply cable with car cigarette lighter outlet.
- User manual and purchase receipt invoice .
HANDLING THE DEVICE Remove
the incubator from the package and place it directly on a horizontal surface higher than 500mm. Since it is light,
the operation can be carried out by one person.
ATTENTION: the incubator must be lifted from the base only. Do not lift the incubator by applying force on the
cable, clamps, lever, or similar.
8 – Selection and preservation of the eggs for incubation It is recommended to incubate eggs from one's own farm. Eggs that have travelled for kilometres with couriers will have less than 50% hatching due to factors of travel stress, vibration, temperature changes, embryos that have died from asphyxiation because eggs that are closed inside packaging do not breathe!
If you have actually taken eggs that have travelled, let them rest on an egg platform for at least 24 hours with the tip downwards before incubating them.
Choose eggs from breeders that are well developed, well fed and healthy.
NOTE: The breeders must not be inbred (no brothers, i.e. the males must always arrive from another farm), as
they would result in eggs containing weak embryos destined to die in the process of hatching (the chick grows,
but remains trapped inside the egg as it is weak and does not have the strength to break the shell to hatch),
nature is very selective and does not allow vulnerable creatures to be born!
The breeders must be sexually mature, and the males must be present in the right proportions with respect to
females, adhere to the information given in the following table
PROPORTION BETWEEN SEXUAL MATURITY Individual Male and Female Male Female
Hen 1 6 6/8 months 6/8 months Pheasant 1 4 6/7 months 6/7 months Duck 1 4 8 months 4 months Goose 1 4 8 months 7 months Guinea fowl 1 2 8/10 months 8/10 months Partridge 1 1 10/12 months 10/12 months Quail 1 3 60 days 50 days Turkey 1 8 7 months 7 months
Remember breeders lose their fertility after 3 years of age.
Page 11 of 20 Rev 00
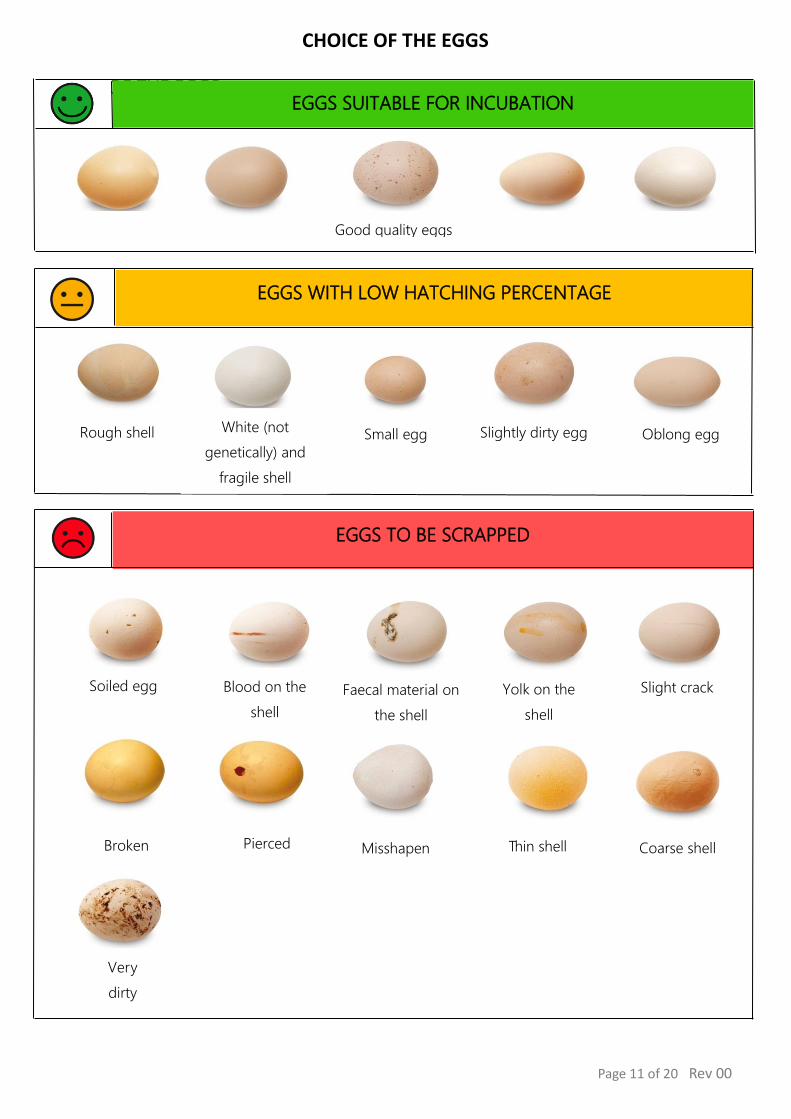
EGGS TO BE SCRAPPED
CHOICE OF THE EGGS
CHOICE OF THE EGGS
Good quality eggs
EGGS WITH LOW HATCHING PERCENTAGE
Rough shell
White (not
genetically) and
fragile shell
Small egg
Slightly dirty egg
Oblong egg
EGGS SUITABLE FOR INCUBATION
Soiled egg Blood on the
shell
Faecal material on
the shell
Yolk on the
shell
Slight crack
Broken Pierced Misshapen Thin shell
Coarse shell
Very
dirty
Page 12 of 20 Rev 00
The embryo begins developing before incubation and, therefore, it needs proper care, otherwise there will be a
decrease in the hatching percentage.
Below are some rules that will be helpful in obtaining suitable eggs for incubation:
1. Collect the eggs at least 5 times a day to prevent environmental contamination. Never incubate eggs that
have been at a temperature lower than 5°C or higher than 24°C. Over this figure the germinating cell
developing in an abnormal way, it still develops when incubated but the chick will die during hatching!
NEVER store the eggs in the refrigerator.
2. Do not incubate eggs dirty with faecal material, as during incubation the temperature and humidity would
lead to the establishment of a bacterial flora that would contaminate all the eggs, causing infections to the
embryos and resulting in chick death during hatching. The eggs must not have blood stains.
Do not wash the eggs for any reason, at the most you may dry brush them with an abrasive sponge.
3. Store the eggs in a cool room with a temperature between 14°C and 16°C and humidity approximately 65-
75%.
4. NOTE: Store the eggs in the egg trays with the tip downwards.
5. The eggs are suited to incubation from the second to the sixth/seventh day after laying. Incubating eggs
older than 8 days significantly reduces the hatching percentage, up to almost zero in the event of eggs stored
longer than 15 days!
6. Choose eggs of normal shape (they must not be elongated, spherical, undulated or with any other
malformation)
7. The egg shell must not be cracked, broken, creased, soft, thin or with bluish spots (old eggs).
8. Allow cold eggs (from storage temperature) to slowly reach room temperature before placing them in the
incubator. Suddenly going from 12°C to 38°C would cause condensate on the shell which would lead to a
reduction in hatchings.
NOTE: during incubation DO NOT add eggs at a later time!
9 - Preparation and commissioning of the incubator During transportation, pay attention not to cause collisions and/or damage to the incubator. Always position flat,
avoiding crushing and/or breakage.
For successful hatchings it is recommended to keep the incubator in residential premises, not in sheds, porches or
garages. The room temperature should ideally be between 20°C and 25°C and have no air drafts. The suitable
room must be well aerated and comfortable. Ensure the incubator is not exposed to direct sun rays or placed
close to direct heat sources such as radiators, stoves, fireplaces, boilers etc. Relative humidity must be between
50% and 75%.
ATTENTION: DO NOT USE THE INCUBATOR IN ROOMS WITH TEMPERATURES BELOW 20°C OR HIGHER THAN 25°C!
NOTE: it is strongly recommended to keep the incubator at home!
Do not use or store the incubator in rooms where are chemicals, poisons, toxic or flammable substances, even at
low concentrations, as they adversely affect embryo development. Do not use the incubator where there is a
danger of water or other substances being sprayed.
NOTE: These instructions help acquiring familiarity with the incubator. Carefully reading these instructions results
in high hatching yield, therefore this manual must not only be followed to the letter but seriously complied with!
Neglecting or overlooking even one instruction only will make a difference in hatching! Egg selection is therefore
recommended: the secret of high hatching yield lies exactly in obtaining compliant eggs.
Page 13 of 20 Rev 00
9.1 - Use
Place the incubator on a flat table higher than 500 mm from the floor.
Do not place other objects between the incubator and the surface, such as table cloths or blankets that might
obstruct the aeration holes at the base of the incubator.
Remove the cover plate and lay it next to the incubator.
Remove the bottom plastic hatching grate, which is not used at the moment (it is only used in hatching, i.e. for
the last 3 days). NEVER LEAVE IT IN THE INCUBATOR DURING THE INCUBATION PERIOD!
Ensure the egg supports are well positioned in their seats and that the steel tab of the egg turning motor is
properly inserted in the slot of the egg support, i.e. the plastic of the egg support must be inserted onto the
steel tab.
Fill one of the nozzles at the outer base of the incubator (either one) with drinking water, pouring the water
slowly.
Use the 2 “DUST STOP” antimicrobial caps to close the 2 water filling nozzles (4-Fig.1).
NOTE: THESE 2 CAPS MUST NEVER BE REMOVED DURING INCUBATION. THEY MUST ONLY BE REMOVED FOR
THE TIME REQUIRED TO FILL WATER AND MUST BE CLOSED AGAIN!
Replace the cover plate, ensuring the rim of the incubator's lower part perfectly meshes with the duct in the
cover plate base. The small half-moon slit on the upper edge of the base is used to insert the SIRIO automatic
humidifier sensor cable, if this accessory is used.
Insert the power supply connector in the outlet on the incubator’s control cover (12-Fig. 5), connect power supply
by inserting the plug into a normal socket outlet. Ventilation will start immediately, the internal temperature will
then be displayed.
ATTENTION:
Should the fan not work, immediately unplug the appliance and contact the service.
To set the temperature, use the (+) and (-) buttons on the upper control panel (9-Fig. 4). Press one of the two
buttons to access the Program (the letter “P” will appear next to the degrees). Keep pressing until the desired
temperature is obtained. Once the temperature has been set, wait for it to be stored. Wait a few seconds for the
current internal temperature and the letter “C” to be displayed.
NOTE: leave the incubator on while empty for minimum 2-3 hours before putting any eggs in order to stabilise
the temperature and humidity (the incubator must operate without any eggs).
After ensuring the incubator works properly, remove the cover plate and lay it next to the incubator. Gently place
the eggs in the cells with the tip downwards. Close the incubator again.
Insert the small connector of the egg turning unit cable (14-Fig. 6) into the socket on the cover (13-Fig. 5).
The egg turning motor will then start turning at variable times.
NOTE: egg turning unit movement is managed by a programmed microprocessor to regularly change the tilt time,
always varying the tilt degree of the eggs differently, exactly as it happens inside a nest. Therefore, there is no
need to worry if the motor starts at different times and tilts in different positions; this operation has been
specifically designed.
The incubation cycle now starts. It is advisable to mark the day on a calendar and follow the instructions of the
table below.
Page 14 of 20 Rev 00
Check the water level on a daily basis, and top it up with clean drinking water using the suitable filling nozzles.
The water level, which may be seen in the filling nozzle, coincides with the one inside the tray. Humidity is
generated by the water surface produced and not by its quantity. Therefore, whether the level of water in the tray
is minimum, half way or full, the humidity in the incubator will always be the same!
USEFUL TIP: to permanently control the level of humidity and automatic input of water in the machine, you can
use the automatic SIRIO humidifier, which is available from Borotto incubator sales outlets or from the website:
www.borotto.com
ATTENTION: do not cover the incubator with blankets for any reason nor close it in boxes thinking this will lead to
energy savings! The incubator is designed to exchange the air inside it through the holes at the bottom: if the
embryo does not breathe it will die of asphyxiation!
SUGGESTION: change the position of the eggs every 5 days, moving those in the centre of the incubator with
those on the sides (this is to ensure better even hatching).
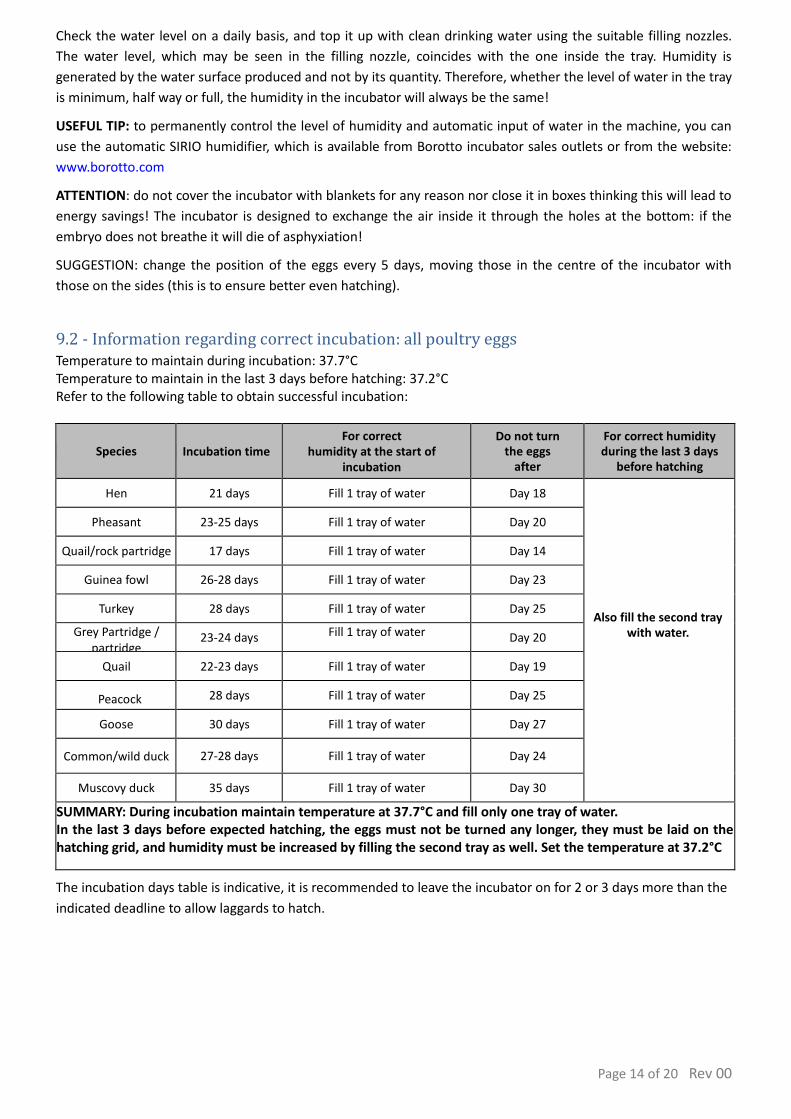
9.2 - Information regarding correct incubation: all poultry eggs Temperature to maintain during incubation: 37.7°C Temperature to maintain in the last 3 days before hatching: 37.2°C Refer to the following table to obtain successful incubation:
Species Incubation time For correct
humidity at the start of incubation
Do not turn the eggs
after
For correct humidity during the last 3 days
before hatching
Hen 21 days Fill 1 tray of water Day 18
Also fill the second tray with water.
Pheasant 23-25 days Fill 1 tray of water Day 20
Quail/rock partridge 17 days Fill 1 tray of water Day 14
Guinea fowl 26-28 days Fill 1 tray of water Day 23
Turkey 28 days Fill 1 tray of water Day 25
Grey Partridge / partridge
23-24 days Fill 1 tray of water
Day 20
Quail 22-23 days Fill 1 tray of water Day 19
Peacock 28 days Fill 1 tray of water Day 25
Goose 30 days Fill 1 tray of water Day 27
Common/wild duck 27-28 days Fill 1 tray of water Day 24
Muscovy duck 35 days Fill 1 tray of water Day 30
SUMMARY: During incubation maintain temperature at 37.7°C and fill only one tray of water. In the last 3 days before expected hatching, the eggs must not be turned any longer, they must be laid on the hatching grid, and humidity must be increased by filling the second tray as well. Set the temperature at 37.2°C
The incubation days table is indicative, it is recommended to leave the incubator on for 2 or 3 days more than the
indicated deadline to allow laggards to hatch.
Page 15 of 20 Rev 00
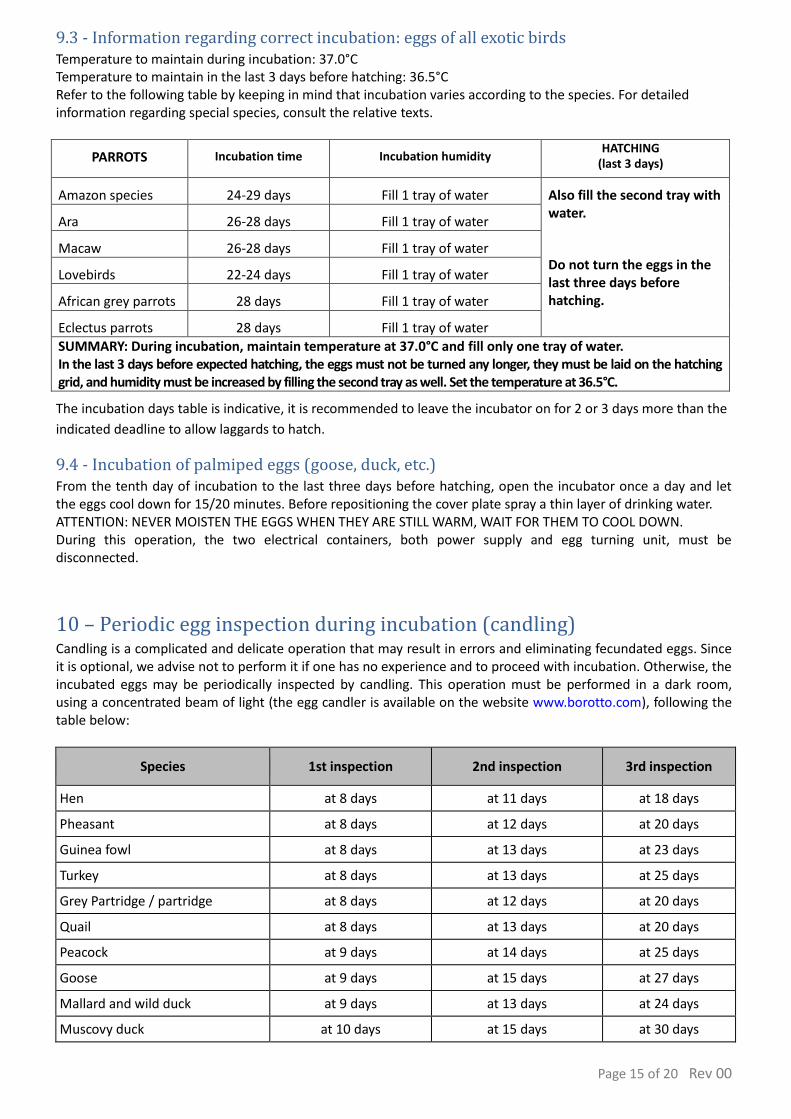
9.3 - Information regarding correct incubation: eggs of all exotic birds Temperature to maintain during incubation: 37.0°C Temperature to maintain in the last 3 days before hatching: 36.5°C Refer to the following table by keeping in mind that incubation varies according to the species. For detailed information regarding special species, consult the relative texts.
PARROTS Incubation time Incubation humidity HATCHING
(last 3 days)
Amazon species 24-29 days Fill 1 tray of water Also fill the second tray with water.
Do not turn the eggs in the last three days before hatching.
Ara 26-28 days Fill 1 tray of water
Macaw 26-28 days Fill 1 tray of water
Lovebirds 22-24 days Fill 1 tray of water
African grey parrots 28 days Fill 1 tray of water
Eclectus parrots 28 days Fill 1 tray of water
SUMMARY: During incubation, maintain temperature at 37.0°C and fill only one tray of water. In the last 3 days before expected hatching, the eggs must not be turned any longer, they must be laid on the hatching grid, and humidity must be increased by filling the second tray as well. Set the temperature at 36.5°C.
The incubation days table is indicative, it is recommended to leave the incubator on for 2 or 3 days more than the
indicated deadline to allow laggards to hatch.
9.4 - Incubation of palmiped eggs (goose, duck, etc.) From the tenth day of incubation to the last three days before hatching, open the incubator once a day and let the eggs cool down for 15/20 minutes. Before repositioning the cover plate spray a thin layer of drinking water. ATTENTION: NEVER MOISTEN THE EGGS WHEN THEY ARE STILL WARM, WAIT FOR THEM TO COOL DOWN. During this operation, the two electrical containers, both power supply and egg turning unit, must be disconnected.
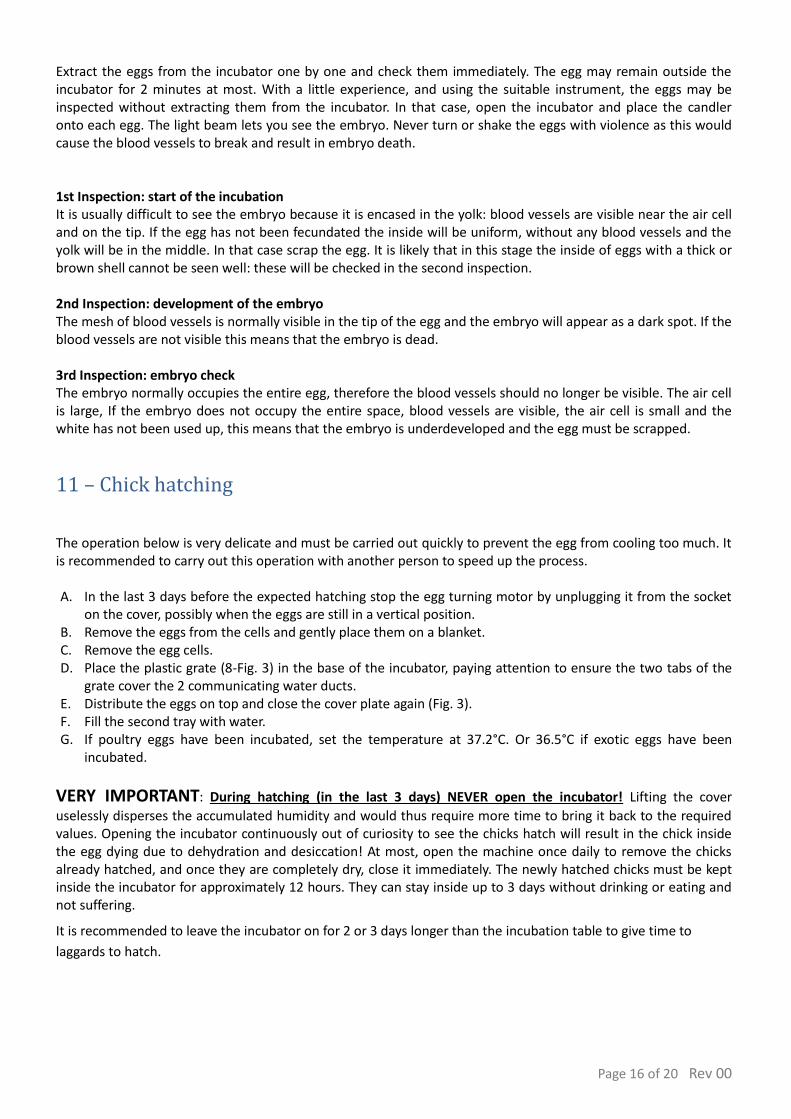
10 – Periodic egg inspection during incubation (candling) Candling is a complicated and delicate operation that may result in errors and eliminating fecundated eggs. Since it is optional, we advise not to perform it if one has no experience and to proceed with incubation. Otherwise, the incubated eggs may be periodically inspected by candling. This operation must be performed in a dark room, using a concentrated beam of light (the egg candler is available on the website www.borotto.com), following the table below:
Species 1st inspection 2nd inspection 3rd inspection
Hen at 8 days at 11 days at 18 days
Pheasant at 8 days at 12 days at 20 days
Guinea fowl at 8 days at 13 days at 23 days
Turkey at 8 days at 13 days at 25 days
Grey Partridge / partridge at 8 days at 12 days at 20 days
Quail at 8 days at 13 days at 20 days
Peacock at 9 days at 14 days at 25 days
Goose at 9 days at 15 days at 27 days
Mallard and wild duck at 9 days at 13 days at 24 days
Muscovy duck at 10 days at 15 days at 30 days
Page 16 of 20 Rev 00
Extract the eggs from the incubator one by one and check them immediately. The egg may remain outside the incubator for 2 minutes at most. With a little experience, and using the suitable instrument, the eggs may be inspected without extracting them from the incubator. In that case, open the incubator and place the candler onto each egg. The light beam lets you see the embryo. Never turn or shake the eggs with violence as this would cause the blood vessels to break and result in embryo death. 1st Inspection: start of the incubation It is usually difficult to see the embryo because it is encased in the yolk: blood vessels are visible near the air cell and on the tip. If the egg has not been fecundated the inside will be uniform, without any blood vessels and the yolk will be in the middle. In that case scrap the egg. It is likely that in this stage the inside of eggs with a thick or brown shell cannot be seen well: these will be checked in the second inspection. 2nd Inspection: development of the embryo The mesh of blood vessels is normally visible in the tip of the egg and the embryo will appear as a dark spot. If the blood vessels are not visible this means that the embryo is dead. 3rd Inspection: embryo check The embryo normally occupies the entire egg, therefore the blood vessels should no longer be visible. The air cell is large, If the embryo does not occupy the entire space, blood vessels are visible, the air cell is small and the white has not been used up, this means that the embryo is underdeveloped and the egg must be scrapped.
11 – Chick hatching
The operation below is very delicate and must be carried out quickly to prevent the egg from cooling too much. It is recommended to carry out this operation with another person to speed up the process. A. In the last 3 days before the expected hatching stop the egg turning motor by unplugging it from the socket
on the cover, possibly when the eggs are still in a vertical position. B. Remove the eggs from the cells and gently place them on a blanket. C. Remove the egg cells. D. Place the plastic grate (8-Fig. 3) in the base of the incubator, paying attention to ensure the two tabs of the
grate cover the 2 communicating water ducts. E. Distribute the eggs on top and close the cover plate again (Fig. 3). F. Fill the second tray with water. G. If poultry eggs have been incubated, set the temperature at 37.2°C. Or 36.5°C if exotic eggs have been
incubated.
VERY IMPORTANT: During hatching (in the last 3 days) NEVER open the incubator! Lifting the cover
uselessly disperses the accumulated humidity and would thus require more time to bring it back to the required values. Opening the incubator continuously out of curiosity to see the chicks hatch will result in the chick inside the egg dying due to dehydration and desiccation! At most, open the machine once daily to remove the chicks already hatched, and once they are completely dry, close it immediately. The newly hatched chicks must be kept inside the incubator for approximately 12 hours. They can stay inside up to 3 days without drinking or eating and not suffering.
It is recommended to leave the incubator on for 2 or 3 days longer than the incubation table to give time to
laggards to hatch.
Page 17 of 20 Rev 00
12 – First days of life Place the chicks in an environment that assures the necessary heat and light, with no air drafts, where they can be fed and watered. SUGGESTIONS: you can use a 50x50 cm cardboard box. Cover the bottom with newspaper, which must be changed every day. Otherwise you may use the complete weaning pen or artificial hen available on the website www.borotto.com For heating, hank a reflector with infra-red lamp at about 20-25 cm from the ground. Adjust the temperature by changing the height of the reflector. The box must be large enough to contain a water pan and one for the feed.
12.1 - Benefits of the infra-red lamp Infra-red lamps not only serve to warm the chick, but act in depth, on the tissues and muscles, fixing calcium in the bones and supporting the expansion of the blood and lymph vessels, thus improving blood circulation and, consequently, the nutrition of cells. This promotes healthy growth of the chick which will also be more resistant to disease. The reflectors (used to convey heat) and infra-red lamps are available on the website: www.borotto.com
12.2 - Nutrition Chicks usually start eating and drinking from the second/third day of life. Place in the box/pen: a water trough and a manger with chick feed. We suggest scattering some feed also on the newspaper. Manger and water troughs are available on the website www.borotto.com If other water troughs are used, ensure the pan is not higher than 3-4 cm otherwise the chicks will risk getting wet or drowning. To prevent that, place pebbles on the bottom, which will also attract the chick to the drinking water.
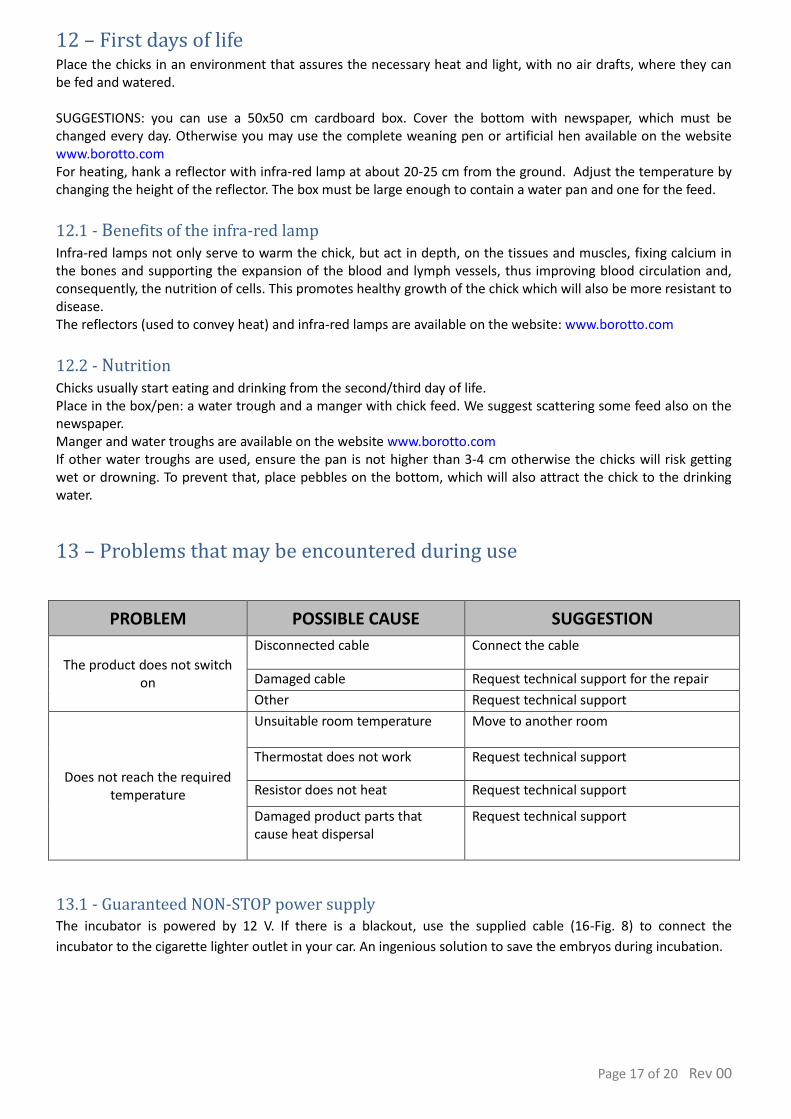
13 – Problems that may be encountered during use
PROBLEM POSSIBLE CAUSE SUGGESTION
The product does not switch on
Disconnected cable Connect the cable
Damaged cable Request technical support for the repair
Other Request technical support
Does not reach the required temperature
Unsuitable room temperature Move to another room
Thermostat does not work Request technical support
Resistor does not heat Request technical support
Damaged product parts that cause heat dispersal
Request technical support
13.1 - Guaranteed NON-STOP power supply The incubator is powered by 12 V. If there is a blackout, use the supplied cable (16-Fig. 8) to connect the
incubator to the cigarette lighter outlet in your car. An ingenious solution to save the embryos during incubation.
Page 18 of 20 Rev 00
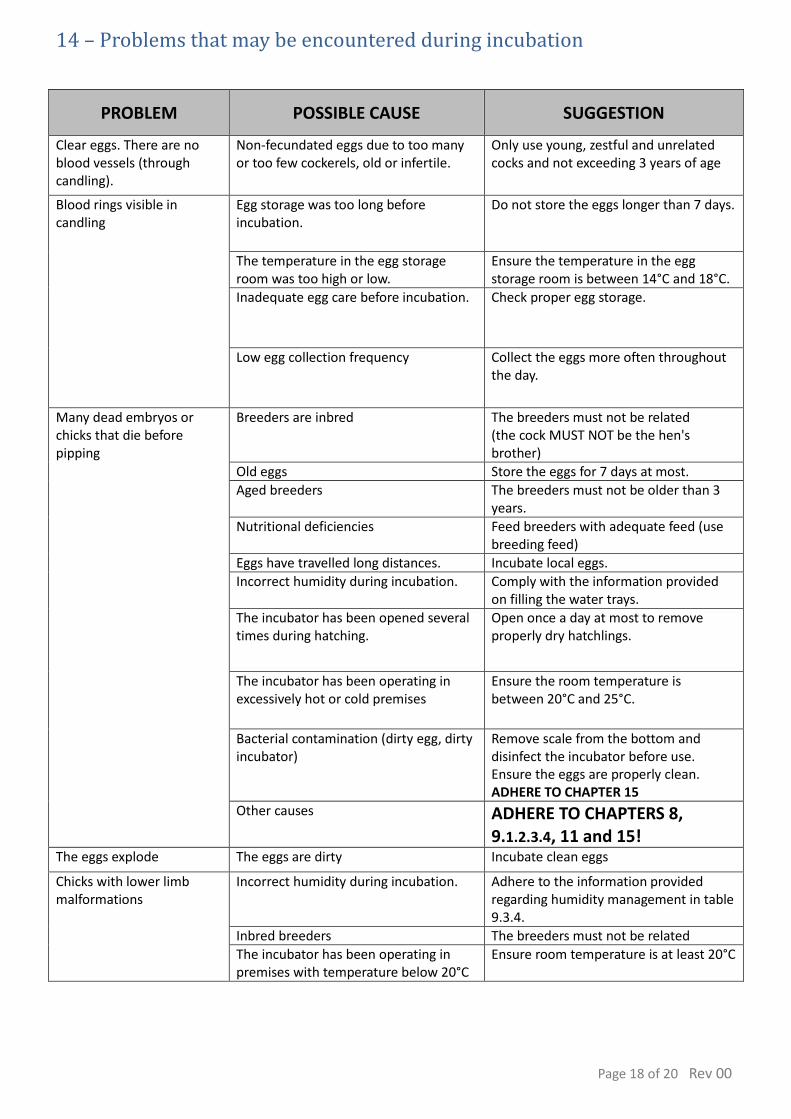
14 – Problems that may be encountered during incubation
PROBLEM POSSIBLE CAUSE SUGGESTION
Clear eggs. There are no blood vessels (through candling).
Non-fecundated eggs due to too many or too few cockerels, old or infertile.
Only use young, zestful and unrelated cocks and not exceeding 3 years of age
Blood rings visible in candling
Egg storage was too long before incubation.
Do not store the eggs longer than 7 days.
The temperature in the egg storage room was too high or low.
Ensure the temperature in the egg storage room is between 14°C and 18°C.
Inadequate egg care before incubation. Check proper egg storage.
Low egg collection frequency Collect the eggs more often throughout the day.
Many dead embryos or chicks that die before pipping
Breeders are inbred The breeders must not be related (the cock MUST NOT be the hen's brother)
Old eggs Store the eggs for 7 days at most.
Aged breeders The breeders must not be older than 3 years.
Nutritional deficiencies Feed breeders with adequate feed (use breeding feed)
Eggs have travelled long distances. Incubate local eggs.
Incorrect humidity during incubation. Comply with the information provided on filling the water trays.
The incubator has been opened several times during hatching.
Open once a day at most to remove properly dry hatchlings.
The incubator has been operating in excessively hot or cold premises
Ensure the room temperature is between 20°C and 25°C.
Bacterial contamination (dirty egg, dirty incubator)
Remove scale from the bottom and disinfect the incubator before use. Ensure the eggs are properly clean. ADHERE TO CHAPTER 15
Other causes ADHERE TO CHAPTERS 8, 9.1.2.3.4, 11 and 15!
The eggs explode The eggs are dirty Incubate clean eggs
Chicks with lower limb malformations
Incorrect humidity during incubation. Adhere to the information provided regarding humidity management in table 9.3.4.
Inbred breeders The breeders must not be related
The incubator has been operating in premises with temperature below 20°C
Ensure room temperature is at least 20°C
Page 19 of 20 Rev 00
15 –Cleaning, sanitising and maintenance of the incubator at the end of
cycle. Cleaning, sanitising and maintenance operations must be performed with appliance off, unplugged and after a sufficient time to allow hot parts to cool down. Keep the appliance in a horizontal position and placed on a flat table. The heating element (resistance) must be kept clean from dust and any dirt. Cleaning incubator bottom: at the end of the cycle thoroughly wash the bottom of the incubator with a water softener to remove any scaling left during water evaporation (do not use steel wool or scrapers to remove the scale), rinse thoroughly with water to remove all water softener residues before moving to the sanitising stage in order to avoid chemical reactions. Sanitising incubator bottom: disinfect it with bleach or Amuchina (the one used for laundry is fine), then pour about half a glass at the bottom of the incubator with a little water, shake the incubator so that the liquid covers every part of the base including the walls, then rinse as well as possible. MANDATORY: TO SANITISE THE INCUBATOR BASE ONLY USE BLEACH OR AMUCHINA! IT IS FORBIDDEN TO USE ALCOHOL OR OTHER CHEMICALS. If you disinfect the inside of the incubator with alcohol or other chemical detergents, when the incubator is used again the residual chemical particles will affect the embryos leading to infections and resulting in death on hatching. Do not open the automatic egg turning unit of the incubator for any reason whatsoever. Incubator cover plate cleaning: accurately clean the outside of the cover plate with a soft cloth moistened with alcohol. Blow the inside of the cover plate (along the perimeter of the protective grid) with compressed air to remove the down lost by chicks during hatching. You can also use compressed air cylinders (those used to clean PC keyboards). NOTE: SANITISING MUST BE PERFORMED BEFORE INCUBATING STORAGE: perfectly dry the inside of the incubator, operating it dry for 2/3 hours. Store the incubator in a dry and clean place, away from shocks and changes in temperature. Do not place any objects on top of the incubator. No electrical maintenance is to be performed by the user.
15.1- Spare parts
Any product spare part can be found on the website www.borotto.com.
16 - Disposal In implementation of Directives 2011/65/EU and 2012/19/EU, LEGISLATIVE DECREE 4 March 2014, n. 27 and LEGISLATIVE DECREE 14 March 2014 , n. 49, relative to the use of hazardous substances in electrical and electronic equipment and the disposal of waste, the symbol of the crossed wheelie bin, shown here, indicates that at the end of its service life the product must be collected separately from other waste. The user shall therefore deliver the appliance at the end of its service life to the suitable electric and electronic separate waste collection facilities. Appropriate separate collection for subsequent recycling of the decommissioned appliance, treatment and environmentally compatible disposal contributes to avoiding possible negative effects on the environment and health and promotes the recycling of the materials the appliance consists of Unlawful disposal by the user involves the application of the administrative sanctions provided for by the laws in force. The information related to the correct procedure of available collection systems must be obtained from the Local Waste Disposal Service.
AEE ITALY REGISTRATION NUMBER: IT14080000008557

Page 20 of 20 Rev 00
17 – Warranty / after sale service INCUBATRICI BOROTTO® (hereinafter the Manufacturer) grants a 24 month warranty to the product from the date of purchase. During this period, the Manufacturer undertakes to repair at its expense any defect that might occur during normal operation of the appliance, attributable to manufacture. Upon requesting servicing under warranty, show this contract complete with date, stamp and signature. The incubator must be shipped in its original packaging under the customer's responsibility. If the incubator is in the warranty period and has been used correctly it will be repaired free of charge. It is understood that no reimbursement shall be acknowledged in the event of lack of fault or defect of the product. However, the Manufacturer reserves the right to charge to the customer the expenses incurred for the demand for servicing in warranty in the absence of the prerequisites. The warranty does not cover damage caused by: transport; wear, water, dirt; use in conditions other than herein specified by the Manufacturer; repairs or modifications made by personnel not authorised by the Manufacturer; force majeure (earthquakes, floods, fires etc.). Only use the incubator for the purpose it is intended for; uses other than indicated in these instructions shall be deemed as hazardous and the Manufacturer disclaims any and all liability for any damage to persons, animals or property arising from failure to comply with this warning. The Manufacturer shall not be deemed liable, nor shall they grant any servicing under warranty or compensation for negative results due to failure to comply with these instructions, misuse, incorrect installation of the appliance or problems arising from the inadequacy of the electrical installations or other facilities, or arising from environmental, climate or other conditions, or from entrusting the appliance to minors or persons manifestly unsuitable to using or handling the appliance. No compensation shall be requested from the Manufacturer for indirect damage due to loss of material occurred as a consequence of product defects such as, eggs inserted or to be inserted in the incubator, or further damage to property, persons or animals.
BOROTTO ®
Via Papa Giovanni Paolo II, 7
37060 Buttapietra (Verona) Italy
VAT: 03787910235
REA No.: VR-365973 TRADE REGISTER 143429
AEE REGISTRATION NUMBER: IT14080000008557 web site: WWW.BOROTTO.COM
Date, stamp and signature for the warranty