LRFD Steel Girder Superstructure Design Example-Abutment and Wingwall
120
28/09/2013 LRFD Steel Girder SuperStructure Design Example - LRFD - Design - Bridge - Structures - Federal Highway Administration www.fhwa.dot.gov/bridge/lrfd/us_ds7.cfm#designstep712_19 1/120 Bridges & Structures LRFD Steel Girder SuperStructure Design Example Abutment and Wingwall Design Example Design Step 7 Table of Contents Design Step 7.1 - Obtain Design Criteria Design Step 7.2 - Select Optimum Abutment Type Design Step 7.3 - Select Preliminary Abutment Dimensions Design Step 7.4 - Compute Dead Load Effects Design Step 7.5 - Compute Live Load Effects Design Step 7.6 - Compute Other Load Effects Design Step 7.7 - Analyze and Combine Force Effects Design Step 7.8 - Check Stability and Safety Requirements Design Step 7.9 - Design Abutment Backwall Design Step 7.10 - Design Abutment Stem Design Step 7.11 - Design Abutment Footing Design Step 7.12 - Draw Schematic of Final Abutment Design Design Step 7.2 - Select Optimum Wingwall Type Design Step 7.3 - Select Preliminary Wingwall Dimensions Design Step 7.4 - Compute Dead Load Effects Design Step 7.5 - Compute Live Load Effects Design Step 7.6 - Compute Other Load Effects Design Step 7.7 - Analyze and Combine Force Effects Design Step 7.9 - Design Wingwall Stem Design Step 7.12 - Draw Schematic of Final Wingwall Design Design Step 7.1 - Obtain Design Criteria This abutment and wingwall design example is based on AASHTO LRFD Bridge Design Specifications (through 2002 interims). The design methods presented throughout the example are meant to be the most widely used in general bridge engineering practice. The example covers the abutment backwall, stem, and footing design, using pile loads from Design Step P, Pile Foundation Design Example. The wingwall design focuses on the wingwall stem only. All applicable loads that apply to the abutment and wingwall are either taken from design software or calculated herein. The wingwall design utilizes the same flowchart as the abutment. Design Step 7.1 is shared by both the abutment and wingwall. After Design Step 7.1, Design Steps 7.2 through 7.12 are for the abutment. For the wingwall, any Design Steps from 7.2 through 7.12 that apply to the wingwall follow at the end of the abutment design steps. For example, there are two Design Steps 7.2 - one for the abutment and one for the wingwall (after Design Step 7.12 of the abutment). Refer to Design Step 1 for introductory information about this design example. Additional information is presented about the design assumptions, methodology, and criteria for the entire bridge, including the abutments and wingwalls.
-
Upload
sana-ullah -
Category
Documents
-
view
184 -
download
21
description
Steel Girder-Abitment and wing wall design
Transcript of LRFD Steel Girder Superstructure Design Example-Abutment and Wingwall

28/09/2013 LRFD Steel Girder SuperStructure Design Example - LRFD - Design - Bridge - Structures - Federal Highway Administration
www.fhwa.dot.gov/bridge/lrfd/us_ds7.cfm#designstep712_19 1/120
Bridges & Structures
LRFD Steel Girder SuperStructure Design Example
Abutment and Wingwall Design Example Design Step 7
Table of Contents
Design Step 7.1 - Obtain Design Criteria
Design Step 7.2 - Select Optimum Abutment Type
Design Step 7.3 - Select Preliminary Abutment Dimensions
Design Step 7.4 - Compute Dead Load Effects
Design Step 7.5 - Compute Live Load Effects
Design Step 7.6 - Compute Other Load Effects
Design Step 7.7 - Analyze and Combine Force Effects
Design Step 7.8 - Check Stability and Safety Requirements
Design Step 7.9 - Design Abutment Backwall
Design Step 7.10 - Design Abutment Stem
Design Step 7.11 - Design Abutment Footing
Design Step 7.12 - Draw Schematic of Final Abutment Design
Design Step 7.2 - Select Optimum Wingwall Type
Design Step 7.3 - Select Preliminary Wingwall Dimensions
Design Step 7.4 - Compute Dead Load Effects
Design Step 7.5 - Compute Live Load Effects
Design Step 7.6 - Compute Other Load Effects
Design Step 7.7 - Analyze and Combine Force Effects
Design Step 7.9 - Design Wingwall Stem
Design Step 7.12 - Draw Schematic of Final Wingwall Design
Design Step 7.1 - Obtain Design Criteria
This abutment and wingwall design example is based on AASHTO LRFD Bridge Design Specifications
(through 2002 interims). The design methods presented throughout the example are meant to be the most
widely used in general bridge engineering practice. The example covers the abutment backwall, stem, and
footing design, using pile loads from Design Step P, Pile Foundation Design Example. The wingwall design
focuses on the wingwall stem only. All applicable loads that apply to the abutment and wingwall are either
taken from design software or calculated herein.
The wingwall design utilizes the same flowchart as the abutment. Design Step 7.1 is shared by both the
abutment and wingwall. After Design Step 7.1, Design Steps 7.2 through 7.12 are for the abutment. For the
wingwall, any Design Steps from 7.2 through 7.12 that apply to the wingwall follow at the end of the abutment
design steps. For example, there are two Design Steps 7.2 - one for the abutment and one for the wingwall
(after Design Step 7.12 of the abutment).
Refer to Design Step 1 for introductory information about this design example. Additional information is
presented about the design assumptions, methodology, and criteria for the entire bridge, including the
abutments and wingwalls.

28/09/2013 LRFD Steel Girder SuperStructure Design Example - LRFD - Design - Bridge - Structures - Federal Highway Administration
www.fhwa.dot.gov/bridge/lrfd/us_ds7.cfm#designstep712_19 2/120
In order to begin the design, the abutment and wingwall properties as well as information about the
superstructure that the abutment supports is required.
The following units are defined for use in this design example:
It should be noted that the superstructure loads and plate girder dimensions used in this design step are
based on the first trial of the girder design.
Material properties:
Concrete density: STable 3.5.1-1
Concrete 28-day compressive
strength:
S5.4.2.1 & SC5.4.2.1 & STable
C5.4.2.1-1
Reinforcement strength: S5.4.3
Reinforcing steel cover requirements:
Backwall back cover: STable 5.12.3-1
Stem back cover: STable 5.12.3-1
Footing top cover: STable 5.12.3-1
Footing bottom cover: STable 5.12.3-1
Backwall back cover - Assuming that the backwall will be subject to deicing salts, the cover is set at 2.5
inches.
STable 5.12.3-1
Stem cover - The stem cover is set at 2.5 inches. This will allow the vertical flexure reinforcement in the stem
to be lapped with the vertical back face reinforcement in the backwall. Also, it is assumed that the stem may
be exposed to deicing salts due to the abutment having an expansion joint.
STable 5.12.3-1
Footing top cover - The footing top cover is set at 2.0 inches.
STable 5.12.3-1
Footing bottom cover - Since the footing bottom is cast directly against the earth, the footing bottom cover
is set at 3.0 inches.
STable 5.12.3-1
Relevant superstructure data:

28/09/2013 LRFD Steel Girder SuperStructure Design Example - LRFD - Design - Bridge - Structures - Federal Highway Administration
www.fhwa.dot.gov/bridge/lrfd/us_ds7.cfm#designstep712_19 3/120
Girder spacing:
Number of girders:
Span length:
Parapet height:
Parapet weight (each):
Out-to-out deck width:
Superstructure data - The above superstructure information was taken from Design Steps 1 and 2.
Abutment and wingwall height S2.3.3.2
Abutment stem height:
Wingwall stem design height: use height at 3/4 point
Abutment and wingwall length S11.6.1.4
Abutment length:
Wingwall length:
Design Step 7.2 - Select Optimum Abutment Type
Selecting the optimal abutment type depends on the site conditions, cost considerations, superstructure
geometry, and aesthetics. The most common abutment types include cantilever, gravity, counterfort,
mechanically-stabilized earth, stub, semi-stub or shelf, open or spill through, and integral or semi-integral. For
this design example, a full-depth reinforced concrete cantilever abutment was chosen because it is the most
economical for the site conditions. For a concrete cantilever abutment, the overturning forces are balanced by
the vertical earth load on the abutment heel. Concrete cantilever abutments are the typical abutment type
used for most bridge designs and is considered optimal for this abutment design example.
S11.2

28/09/2013 LRFD Steel Girder SuperStructure Design Example - LRFD - Design - Bridge - Structures - Federal Highway Administration
www.fhwa.dot.gov/bridge/lrfd/us_ds7.cfm#designstep712_19 4/120
Figure 7-1 Full-Depth Reinforced Concrete Cantilever Abutment
Design Step 7.3 - Select Preliminary Abutment Dimensions
Since AASHTO does not have standards for the abutment backwall, stem, or footing maximum or minimum
dimensions, the designer should base the preliminary abutment dimensions on state specific standards,
previous designs, and past experience. The abutment stem, however, must be wide enough to allow for the
minimum displacement requirements. The minimum support length is calculated in Design Step 7.6.
S4.7.4.4
The following figure shows the preliminary dimensions for this abutment design example.

28/09/2013 LRFD Steel Girder SuperStructure Design Example - LRFD - Design - Bridge - Structures - Federal Highway Administration
www.fhwa.dot.gov/bridge/lrfd/us_ds7.cfm#designstep712_19 5/120
Figure 7-2 Preliminary Abutment Dimensions
For sealed expansion joints, slope the top surface of the abutment (excluding bearing seats) a minimum of 5%
towards the edge.
S2.5.2.1.2
Design Step 7.4 - Compute Dead Load Effects
Once the preliminary abutment dimensions are selected, the corresponding dead loads can be computed.
Along with the abutment dead loads, the superstructure dead loads must be computed. The superstructure
dead loads acting on the abutment will be given based on the superstructure output from the software used to
design the superstructure. The dead loads are calculated on a per foot basis. Also, the dead loads are
calculated assuming the beam seat is level.
S3.5.1
The superstructure dead load reactions per bearing were obtained from trial one of the steel grider design and
are as follows.
Fascia girder:
28/09/2013 LRFD Steel Girder SuperStructure Design Example - LRFD - Design - Bridge - Structures - Federal Highway Administration
www.fhwa.dot.gov/bridge/lrfd/us_ds7.cfm#designstep712_19 6/120
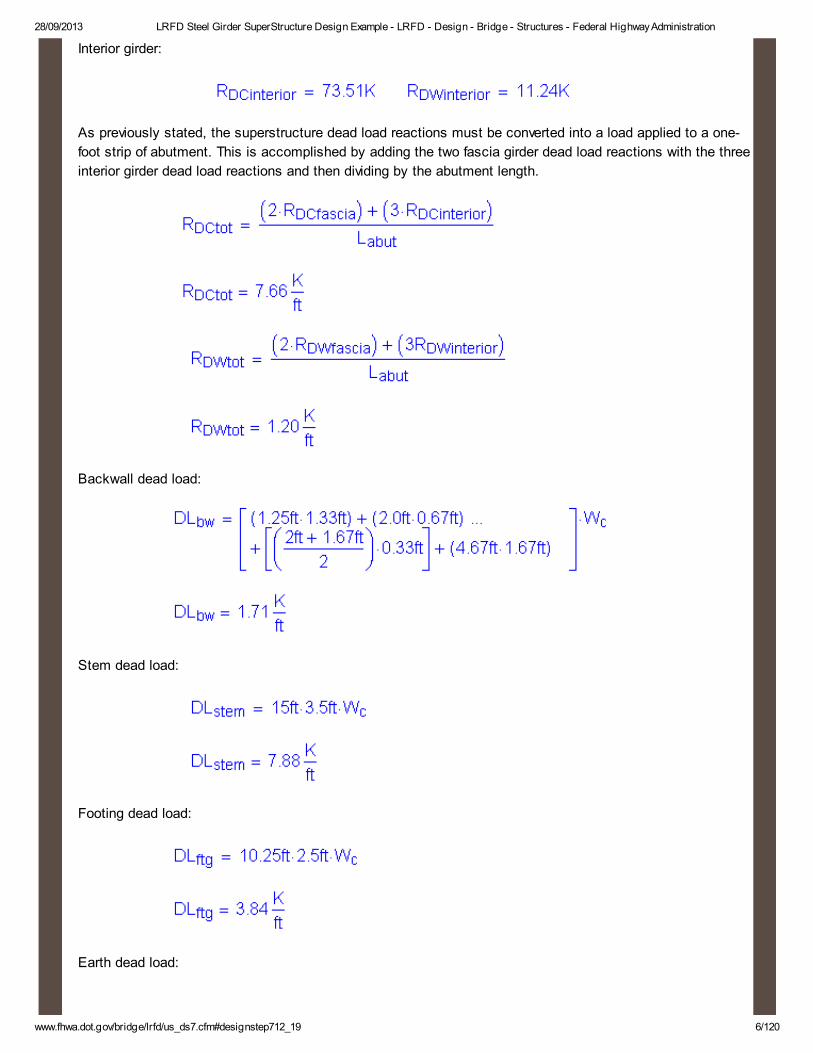
Interior girder:
As previously stated, the superstructure dead load reactions must be converted into a load applied to a one-
foot strip of abutment. This is accomplished by adding the two fascia girder dead load reactions with the three
interior girder dead load reactions and then dividing by the abutment length.
Backwall dead load:
Stem dead load:
Footing dead load:
Earth dead load:

28/09/2013 LRFD Steel Girder SuperStructure Design Example - LRFD - Design - Bridge - Structures - Federal Highway Administration
www.fhwa.dot.gov/bridge/lrfd/us_ds7.cfm#designstep712_19 7/120
use average of loose and compacted gravel
STable 3.5.1-1
Design Step 7.5 - Compute Live Load Effects
The live load effects were also obtained from trial one of the girder design. The reactions for one girder are
given as unfactored, without impact, and without distribution factors. The given reactions are converted into
one loaded lane and then converted into a per foot load.
Dynamic load allowance, IM
STable 3.6.2.1-1
Multiple presence factor, m (1 lane)
STable 3.6.1.1.2-1
Multiple presence factor, m (2 lanes)
STable 3.6.1.1.2-1
Multiple presence factor, m (3 lanes)
STable 3.6.1.1.2-1
For this design example, the backwall live load is computed by placing three design truck axles along the
abutment and calculating the load on a per foot basis including impact and the multiple presence factor. This
load is applied to the entire length of abutment backwall and is assumed to act at the front top corner (bridge
side) of the backwall. This load is not applied, however, when designing the abutment stem or footing.
The following loads are obtained from girder design software output for one lane loaded and they are applied at
the beam seat or top of abutment stem for the stem design.
Based on first trial of girder design

28/09/2013 LRFD Steel Girder SuperStructure Design Example - LRFD - Design - Bridge - Structures - Federal Highway Administration
www.fhwa.dot.gov/bridge/lrfd/us_ds7.cfm#designstep712_19 8/120
Based on first trial of girder design
Based on first trial of girder design
Based on first trial of girder design
The controlling maximum and minimum live loads are for three lanes loaded. The loads are multiplied by
dynamic load allowance and the multiple presence factor.
Maximum unfactored live load used for abutment stem design:
for one lane
Minimum unfactored live load representing uplift used for abutment stem design:
for one lane
The following loads are applied at the beam seat or top of abutment stem for the footing design. The loads do
not include dynamic load allowance, but do include the multiple presence factor.
S3.6.2.1
Maximum unfactored live load used for abutment footing design:
for one lane loaded

28/09/2013 LRFD Steel Girder SuperStructure Design Example - LRFD - Design - Bridge - Structures - Federal Highway Administration
www.fhwa.dot.gov/bridge/lrfd/us_ds7.cfm#designstep712_19 9/120
Minimum unfactored vehicle load used for abutment footing design:
for one lane loaded
Design Step 7.6 - Compute Other Load Effects
Other load effects that need to be computed include braking force, wind loads, earthquake loads, earth
pressure, live load surcharge, and temperature loads.
Braking Force
Since the abutment has expansion bearings, the braking force does not apply at the abutment. The entire
braking force is resisted by the fixed bearings located at the pier. Braking force calculations are provided in
Design Step 8.
Wind Load on Superstructure
S3.8.1.2
When calculating the superstructure wind load, the total depth from the top of the barrier to the bottom of the
girder is required. Included in this depth is any haunch and/or depth due to the bridge deck cross slope. Once
the total depth is known, the wind area can be calculated and the wind pressure can be applied.
The total depth is:
overhang deck thickness
assume no cross slope for design

28/09/2013 LRFD Steel Girder SuperStructure Design Example - LRFD - Design - Bridge - Structures - Federal Highway Administration
www.fhwa.dot.gov/bridge/lrfd/us_ds7.cfm#designstep712_19 10/120
top flange embedded in haunch; therefore, ignore top flange thickness
based on first trial of girder design
use maximum bottom flange thickness, based on first trial of girder
design
The wind load on the abutment from the superstructure will be from one-half of one span length or:
The wind area is:
Since the abutment is less than 30 feet in height, the design wind velocity, VDZ, does not have to be adjusted
and is equal to the base wind velocity.
S3.8.1.1
From this, the design wind pressure is equal to the base wind pressure:
S3.8.1.2.1
or
Also, the total wind loading on girders must be greater than or equal to 0.30 klf:

28/09/2013 LRFD Steel Girder SuperStructure Design Example - LRFD - Design - Bridge - Structures - Federal Highway Administration
www.fhwa.dot.gov/bridge/lrfd/us_ds7.cfm#designstep712_19 11/120
S3.8.1.2.1
, which is greater than 0.30 klf
The wind load from the superstructure acting on the abutment depends on the attack angle of the wind. Two
wind load calculations are provided for two different wind attack angles. All wind loads are tabulated in Table 7-
1 for the various attack angles. The attack angle is measured from a line perpendicular to the girder
longitudinal axis. The wind pressure can be applied to either superstructure face. The base wind pressures for
the superstructure for various attack angles are given in STable 3.8.1.2.2-1. Since the abutment has
expansion bearings, the longitudinal component of the wind load on superstructure will not be resisted by the
abutment and is not required to be calculated. The fixed pier will resist the longitudinal wind component.
S3.8.1.2.2

28/09/2013 LRFD Steel Girder SuperStructure Design Example - LRFD - Design - Bridge - Structures - Federal Highway Administration
www.fhwa.dot.gov/bridge/lrfd/us_ds7.cfm#designstep712_19 12/120
Figure 7-3 Application of Superstructure Wind Load on Abutment
For a wind attack angle of 0 degrees, the superstructure wind loads acting on the abutment are:
STable 3.8.1.2.2-1

28/09/2013 LRFD Steel Girder SuperStructure Design Example - LRFD - Design - Bridge - Structures - Federal Highway Administration
www.fhwa.dot.gov/bridge/lrfd/us_ds7.cfm#designstep712_19 13/120
not applicable due to expansion bearings at
abutment
For a wind attack angle of 60 degrees, the superstructure wind loads acting on the abutment are:
STable 3.8.1.2.2-1
not applicable due to expansion bearings at
abutment
Abutment Design Wind Loads from Superstructure
Wind Attack Angle Bridge Transverse Axis Bridge * Longitudinal Axis
Degrees Kips Kips
0 30.69 0.00
15 27.01 3.68
30 25.16 7.37
45 20.25 9.82
60 10.43 11.66
* Provided but not applicable due to expansion bearings at abutment.
Table 7-1 Abutment Design Wind Loads from Superstructure for Various Wind Attack Angles
Wind Load on Abutment (Substructure)
S3.8.1.2.3
The wind loads acting on the exposed portion of the abutment front and end elevations are calculated from a
base wind pressure of 0.040 ksf. These loads act simultaneously with the superstructure wind loads.
Since all wind loads acting on the abutment front face decrease the maximum longitudinal moment, all
abutment front face wind loads will be conservatively ignored.
The abutment exposed end elevation wind area is:

28/09/2013 LRFD Steel Girder SuperStructure Design Example - LRFD - Design - Bridge - Structures - Federal Highway Administration
www.fhwa.dot.gov/bridge/lrfd/us_ds7.cfm#designstep712_19 14/120
Two wind load calculations for the abutment end elevation are shown below for a wind attack angle of zero and
sixty degrees. All other wind attack angles do not control and are not shown.
For a wind attack angle of 0 degrees, the wind loads acting on the abutment end elevation are:
For a wind attack angle of 60 degrees, the wind loads acting on the abutment end elevation are:
Wind Load on Vehicles
S3.8.1.3
The wind load applied to vehicles is given as 0.10 klf acting normal to and 6.0 feet above the roadway. For
wind loads that are not normal to the roadway, the Specifications give a table of wind components on live load.
For normal and skewed wind pressures on vehicles, the wind load is calculated by multiplying the wind
component by the length of structure over which it acts. An example calculation is provided and Table 7-2
shows all the vehicle wind loads for the various wind attack angles. As with the superstructure wind load, the
longitudinal wind load on vehicles is not resisted by the abutment due to expansion bearings. The calculation
for longitudinal vehicular wind loads is not required but is provided in this design example.
For a wind attack angle of 0 degrees, the vehicular wind loads are:
STable 3.8.1.3-1

28/09/2013 LRFD Steel Girder SuperStructure Design Example - LRFD - Design - Bridge - Structures - Federal Highway Administration
www.fhwa.dot.gov/bridge/lrfd/us_ds7.cfm#designstep712_19 15/120
STable 3.8.1.3-1
not applicable due to expansion bearings at abutment
Design Vehicular Wind Loads
Wind Attack Angle Bridge Transverse Axis Bridge * Longitudinal Axis
Degrees Kips Kips
0 6.00 0.00
15 5.28 0.72
30 4.92 1.44
45 3.96 1.92
60 2.04 2.28
* Provided but not applicable due to expansion bearings at abutment.
Table 7-2 Design Vehicular Wind Loads for Various Wind Attack Angles Vertical Wind Load
S3.8.2
The vertical wind load is calculated by multiplying a 0.020 ksf vertical wind pressure by the out-to-out bridge
deck width. It is applied to the windward quarter-point of the deck only for limit states that do not include wind
on live load. Also, the wind attack angle must be zero degrees for the vertical wind load to apply.
acts vertically upward
Earthquake Load
S3.10
This design example assumes that the structure is located in Seismic Zone I with an acceleration coefficient
of 0.02 and a Soil Type I. For Seismic Zone I, no seismic analysis is required except designing for the
minimum connection force between the superstructure and substructure and the minimum bridge seat
requirements.
S4.7.4.1
S3.10.9
S4.7.4.4
The horizontal connection force in the restrained direction is 0.1 times the vertical reaction due to the tributary
permanent load and the tributary live loads assumed to exist during an earthquake. In addition, since all
abutment bearings are restrained in the transverse direction, the tributary permanent load can be taken as the
reaction at the bearing. Also, γEQ is assumed to be zero. Therefore, no tributary live loads will be considered.
This transverse load is calculate and used to design the bearing anchor bolts and is mentioned here for

28/09/2013 LRFD Steel Girder SuperStructure Design Example - LRFD - Design - Bridge - Structures - Federal Highway Administration
www.fhwa.dot.gov/bridge/lrfd/us_ds7.cfm#designstep712_19 16/120
reference only. Refer to Design Step 6 for bearing and anchor bolt design and the calculation of the horizontal
connection force.
S3.10.9.2
SC3.10.9.2
S3.4.1
From S4.7.4.3, for Seismic Zone I, no seismic analysis is required. Therefore, the minimum displacement
requirement must be obtained from a percentage of the empirical seat width. The percentage of the minimum
support length, N, is based on Seismic Zone I, an acceleration coefficient of 0.02, and Soil Type I. From the
above information, 50 percent or greater of the minimum support length is required.
S4.7.4.4
STable 4.7.4.4-1
Minimum support length required:
S4.7.4.4
Use
Since the selected preliminary abutment dimensions in Design Step 7.3 leave 18 inches as a support length,
this design example will use 100 percent of the minimum support length.
STable 4.7.4.4-1

28/09/2013 LRFD Steel Girder SuperStructure Design Example - LRFD - Design - Bridge - Structures - Federal Highway Administration
www.fhwa.dot.gov/bridge/lrfd/us_ds7.cfm#designstep712_19 17/120
Figure 7-4 Minimum Support Length Required
Earth Loads
S3.11
The earth loads that need to be investigated for this design example include loads due to basic lateral earth
pressure, loads due to uniform surcharge, and live load surcharge loads.
S3.11.5
S3.11.6
The water table is considered to be below the bottom of footing for this design example. Therefore, the effect of
hydrostatic water pressure does not need to be added to the earth pressure. Hydrostatic water pressure
should be avoided if possible in all abutment and retaining wall design cases through the design of an
appropriate drainage system. Some ways that can reduce or eliminate hydrostatic water pressure include the
use of pipe drains, gravel drains, perforated drains, geosynthetic drains, or backfilling with crushed rock. It
should be noted that the use of weep holes, or drains at the wall face, do not assure fully drained conditions.
S3.11.3
S11.6.6
Loads due to basic lateral earth pressure:
S3.11.5
To obtain the lateral loads due to basic earth pressure, the earth pressure (p) must first be calculated from the
following equation.
S3.11.5.1

28/09/2013 LRFD Steel Girder SuperStructure Design Example - LRFD - Design - Bridge - Structures - Federal Highway Administration
www.fhwa.dot.gov/bridge/lrfd/us_ds7.cfm#designstep712_19 18/120
Bottom of backwall lateral earth load:
obtained from geotechnical information
use average of loose and compacted gravel
STable 3.5.1-1
backwall height
Figure 7-5 Backwall Design Earth Pressure
Once the lateral earth pressure is calculated, the lateral load due to the earth pressure can be calculated. This
load acts at a distance of H/3 from the bottom of the section being investigated.
S3.11.5.1
SC3.11.5.1

28/09/2013 LRFD Steel Girder SuperStructure Design Example - LRFD - Design - Bridge - Structures - Federal Highway Administration
www.fhwa.dot.gov/bridge/lrfd/us_ds7.cfm#designstep712_19 19/120
Bottom of abutment stem lateral earth load:
obtained from geotechnical information
use average of loose and compacted gravel
STable 3.5.1-1
height used for maximum moment at bottom of abutment stem
Figure 7-6 Abutment Stem Design Earth Pressure
Once the lateral earth pressure is calculated, the lateral load due to the earth pressure can be calculated. This
load acts at a distance of H/3 from the bottom of the section being investigated.

28/09/2013 LRFD Steel Girder SuperStructure Design Example - LRFD - Design - Bridge - Structures - Federal Highway Administration
www.fhwa.dot.gov/bridge/lrfd/us_ds7.cfm#designstep712_19 20/120
S3.11.5.1
SC3.11.5.1
Bottom of footing lateral earth load:
obtained from geotechnical information
use average of loose and compacted gravel
STable 3.5.1-1
height from top of backwall to bottom of footing
Figure 7-7 Bottom of Footing Design Earth Load

28/09/2013 LRFD Steel Girder SuperStructure Design Example - LRFD - Design - Bridge - Structures - Federal Highway Administration
www.fhwa.dot.gov/bridge/lrfd/us_ds7.cfm#designstep712_19 21/120
Once the lateral earth pressure is calculated, the lateral load due to the earth pressure can be calculated. This
load acts at a distance of H/3 from the bottom of the section being investigated.
S3.11.5.1
SC3.11.5.1
Loads due to uniform surcharge:
S3.11.6.1
Since an approach slab and roadway will cover the abutment backfill material, no uniform surcharge load will
be applied.
Loads due to live load surcharge:
S3.11.6.4
Loads due to live load surcharge must be applied when a vehicular live load acts on the backfill surface behind
the back face within one-half the wall height. The horizontal pressure increase due to live load surcharge is
estimated based on the following equation:
Bottom of backwall live load surcharge load:
use average of loose and compacted gravel
STable 3.5.1-1
equivalent height of soil for vehicular loading based on 7ft backwall height
(interpolate between 4 and 3 in the Table)
STable 3.11.6.4-1

28/09/2013 LRFD Steel Girder SuperStructure Design Example - LRFD - Design - Bridge - Structures - Federal Highway Administration
www.fhwa.dot.gov/bridge/lrfd/us_ds7.cfm#designstep712_19 22/120
The lateral load due to the live load surcharge is:
Bottom of abutment stem live load surcharge load:
use average of loose and compacted gravel
STable 3.5.1-1
equivalent height of soil for vehicular loading based on stem height
STable 3.11.6.4-1
The lateral load due to the live load surcharge is:
Bottom of footing live load surcharge load:
use average of loose and compacted gravel
STable 3.5.1-1
equivalent height of soil for vehicular loading
STable 3.11.6.4-1

28/09/2013 LRFD Steel Girder SuperStructure Design Example - LRFD - Design - Bridge - Structures - Federal Highway Administration
www.fhwa.dot.gov/bridge/lrfd/us_ds7.cfm#designstep712_19 23/120
The lateral load due to the live load surcharge is:
Since one edge of the approach slab will be supported by the abutment, a reduction of live load surcharge
could be taken into account. For this design example, a surcharge reduction is not accounted for.
S3.11.6.5
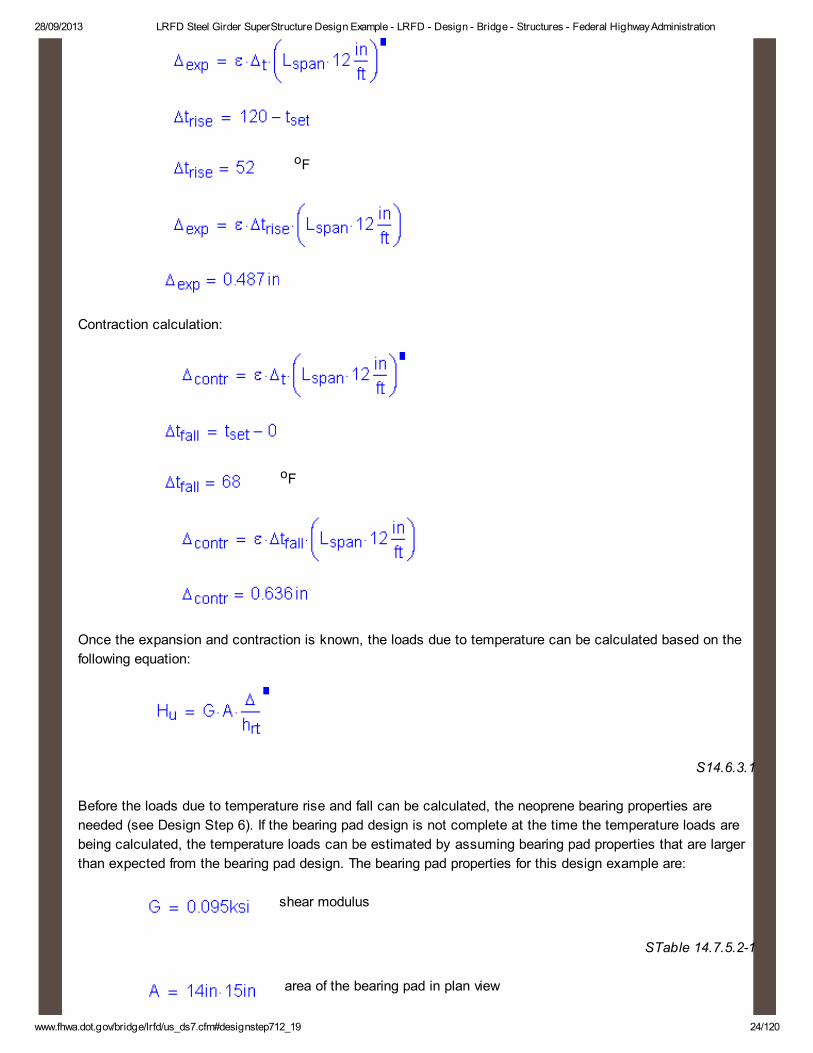
Loads due to temperature:
S3.12
For this abutment design example, two horizontal temperature loads need to be calculated: load due to
temperature rise and load due to temperature fall. To calculate these loads, the steel girder setting
temperature is required. Also, the temperature range, as well as the thermal coefficient of expansion for steel,
is needed. The expansion or contraction can then be calculated. Using the expansion or contraction, the
thermal loads can be calculated based on the neoprene bearing properties.
S3.12.2.2
STable 3.12.2.1-1
S6.4.1
S14.6.3.1
(in/in/oF)
S6.4.1
oF assumed steel girder setting temperature
For this design example, assume a moderate climate. The temperature range is then 0 oF to 120 oF
STable 3.12.2.1-1
Expansion calculation:
28/09/2013 LRFD Steel Girder SuperStructure Design Example - LRFD - Design - Bridge - Structures - Federal Highway Administration
www.fhwa.dot.gov/bridge/lrfd/us_ds7.cfm#designstep712_19 24/120
oF
Contraction calculation:
oF
Once the expansion and contraction is known, the loads due to temperature can be calculated based on the
following equation:
S14.6.3.1
Before the loads due to temperature rise and fall can be calculated, the neoprene bearing properties are
needed (see Design Step 6). If the bearing pad design is not complete at the time the temperature loads are
being calculated, the temperature loads can be estimated by assuming bearing pad properties that are larger
than expected from the bearing pad design. The bearing pad properties for this design example are:
shear modulus
STable 14.7.5.2-1
area of the bearing pad in plan view

28/09/2013 LRFD Steel Girder SuperStructure Design Example - LRFD - Design - Bridge - Structures - Federal Highway Administration
www.fhwa.dot.gov/bridge/lrfd/us_ds7.cfm#designstep712_19 25/120
elastomer thickness (not including steel reinforcement)
Load due to temperature rise:
per bearing
Now, multiply Hurise by five bearings and divide by the abutment length to get the total load due to
temperature rise:
Load due to temperature fall:
Now, multiply Hufall by five bearings and divide by the abutment length to get the total load due to temperature
fall:
Design Step 7.7 - Analyze and Combine Force Effects
There are three critical locations where the force effects need to be combined and analyzed for an abutment
design. They are the base or bottom of the backwall, the bottom of stem or top of footing, and the bottom of
footing. For the backwall and stem design, transverse horizontal loads do not need to be considered due to
the high moment of inertia about that axis, but at the bottom of footing, the transverse horizontal loads will
need to be considered for the footing and pile design, although they are still minimal.

28/09/2013 LRFD Steel Girder SuperStructure Design Example - LRFD - Design - Bridge - Structures - Federal Highway Administration
www.fhwa.dot.gov/bridge/lrfd/us_ds7.cfm#designstep712_19 26/120
Bottom of Abutment Backwall
In order to analyze and combine the force effects, the abutment backwall dimensions, the appropriate loads,
and the application location of the loads are needed. The small moment that is created by the top of the
backwall corbel concrete will be neglected in this design example.
Figure 7-8 Abutment Backwall Dimensions and Loading
The following limit states will be investigated for the backwall analysis. The load factor for future wearing
surface is given, but the load due to future wearing surface on the abutment backwall will be ignored since its
effects are negligible. Also, limit states that are not shown either do not control or are not applicable. In
addition, Strength III and Strength V limit states are included but generally will not control for an abutment with
expansion bearings. Strength III or Strength V may control for abutments supporting fixed bearings.
Load Factors
Strength I Strength III Strength V Service I
Loads γmax γmin γmax γmin γmax γmin γmax γmin
DC 1.25 0.90 1.25 0.90 1.25 0.90 1.00 1.00
DW 1.50 0.65 1.50 0.65 1.50 0.65 1.00 1.00
LL 1.75 1.75 --- --- 1.35 1.35 1.00 1.00
EH 1.50 0.90 1.50 0.90 1.50 0.90 1.00 1.00
LS 1.75 1.75 --- --- 1.35 1.35 1.00 1.00
STable 3.4.1-1
STable 3.4.1-2
Table 7-3 Applicable Abutment Backwall Limit States with the Corresponding Load Factors

28/09/2013 LRFD Steel Girder SuperStructure Design Example - LRFD - Design - Bridge - Structures - Federal Highway Administration
www.fhwa.dot.gov/bridge/lrfd/us_ds7.cfm#designstep712_19 27/120
The loads that are required from Design Steps 7.4, 7.5, and 7.6 include:
Abutment backwall Strength I force effects:
The following load factors will be used to calculate the force effects for Strength I. Note that eta (η), the
product of ductility, redundancy, and operational importance factors, is not shown. Eta is discussed in detail
in Design Step 1. For all portions of this design example, eta is taken as 1.0, and will not be shown.
STable 3.4.1-2
STable 3.4.1-1
STable 3.4.1-2
STable 3.4.1-1
The factored vertical force at the base of the backwall is:
The factored longitudinal shear force at the base of the backwall is:
The factored moment at the base of the backwall is:

28/09/2013 LRFD Steel Girder SuperStructure Design Example - LRFD - Design - Bridge - Structures - Federal Highway Administration
www.fhwa.dot.gov/bridge/lrfd/us_ds7.cfm#designstep712_19 28/120
Abutment backwall Strength III force effects:
The following load factors will be used to calculate the force effects for Strength III:
STable 3.4.1-2
STable 3.4.1-1
STable 3.4.1-2
STable 3.4.1-1
The factored vertical force at the base of the backwall is:
The factored longitudinal shear force at the base of the backwall is:
The factored moment at the base of the backwall is:

28/09/2013 LRFD Steel Girder SuperStructure Design Example - LRFD - Design - Bridge - Structures - Federal Highway Administration
www.fhwa.dot.gov/bridge/lrfd/us_ds7.cfm#designstep712_19 29/120
Abutment backwall Strength V force effects:
The following load factors will be used to calculate the force effects for Strength V:
STable 3.4.1-2
STable 3.4.1-1
STable 3.4.1-2
STable 3.4.1-1
The factored vertical force at the base of the backwall is:
The factored longitudinal shear force at the base of the backwall is:
The factored moment at the base of the backwall is:

28/09/2013 LRFD Steel Girder SuperStructure Design Example - LRFD - Design - Bridge - Structures - Federal Highway Administration
www.fhwa.dot.gov/bridge/lrfd/us_ds7.cfm#designstep712_19 30/120
Abutment backwall Service I force effects:
The following load factors will be used to calculate the force effects for Service I:
STable 3.4.1-2
STable 3.4.1-1
STable 3.4.1-2
STable 3.4.1-1
The factored vertical force at the base of the backwall is:
The factored longitudinal shear force at the base of the backwall is:
The factored moment at the base of the backwall is:
The maximum factored backwall vertical force, shear force, and moment for the strength limit state are:

28/09/2013 LRFD Steel Girder SuperStructure Design Example - LRFD - Design - Bridge - Structures - Federal Highway Administration
www.fhwa.dot.gov/bridge/lrfd/us_ds7.cfm#designstep712_19 31/120
Bottom of Abutment Stem
The combination of force effects for the bottom of abutment stem are similar to the backwall with the addition
of the superstructure dead and live loads.

28/09/2013 LRFD Steel Girder SuperStructure Design Example - LRFD - Design - Bridge - Structures - Federal Highway Administration
www.fhwa.dot.gov/bridge/lrfd/us_ds7.cfm#designstep712_19 32/120
Figure 7-9 Abutment Stem Dimensions and Loading
The force effects for the stem will be combined for the same limit states as the backwall. The loads and load
factors are also similar to the backwall with the addition of wind on structure, wind on live load, and thermal
effects. As with the backwall, the extreme event limit states will not be investigated.
Load Factors
Strength I Strength III Strength V Service I
Loads γmax γmin γmax γmin γmax γmin γmax γmin
DC 1.25 0.90 1.25 0.90 1.25 0.90 1.00 1.00
DW 1.50 0.65 1.50 0.65 1.50 0.65 1.00 1.00
LL 1.75 1.75 --- --- 1.35 1.35 1.00 1.00

28/09/2013 LRFD Steel Girder SuperStructure Design Example - LRFD - Design - Bridge - Structures - Federal Highway Administration
www.fhwa.dot.gov/bridge/lrfd/us_ds7.cfm#designstep712_19 33/120
EH 1.50 0.90 1.50 0.90 1.50 0.90 1.00 1.00
LS 1.75 1.75 --- --- 1.35 1.35 1.00 1.00
WS --- --- 1.40 1.40 0.40 0.40 0.30 0.30
WL --- --- --- --- 1.00 1.00 1.00 1.00
TU 0.50 0.50 0.50 0.50 0.50 0.50 1.00 1.00
STable 3.4.1-1
STable 3.4.1-2
Table 7-4 Applicable Abutment Stem Limit States with the Corresponding Load Factors
The loads that are required from Design Steps 7.4, 7.5 and 7.6 include:
Abutment stem Strength I force effects:
The following load factors will be used to calculate the controlling force effects for Strength I:
STable 3.4.1-2
STable 3.4.1-2
STable 3.4.1-1
STable 3.4.1-2

28/09/2013 LRFD Steel Girder SuperStructure Design Example - LRFD - Design - Bridge - Structures - Federal Highway Administration
www.fhwa.dot.gov/bridge/lrfd/us_ds7.cfm#designstep712_19 34/120
STable 3.4.1-1
use contraction temperature force
STable 3.4.1-1
The factored vertical force at the base of the abutment stem is:
The factored longitudinal shear force at the base of the stem is:
The factored moment about the bridge transverse axis at the base of the abutment stem is:
Abutment stem Strength III force effects:
The following load factors will be used to calculate the force effects for Strength III:
STable 3.4.1-2

28/09/2013 LRFD Steel Girder SuperStructure Design Example - LRFD - Design - Bridge - Structures - Federal Highway Administration
www.fhwa.dot.gov/bridge/lrfd/us_ds7.cfm#designstep712_19 35/120
STable 3.4.1-2
STable 3.4.1-2
all longitudinal wind loads ignored
STable 3.4.1-1
use contraction temperature force
STable 3.4.1-1
The factored vertical force at the base of the abutment stem is:
The factored longitudinal shear force at the base of the stem is:
The factored moment about the bridge transverse axis at the base of the abutment stem is:
Abutment stem Strength V force effects:
The following load factors will be used to calculate the force effects for Strength V:
STable 3.4.1-2

28/09/2013 LRFD Steel Girder SuperStructure Design Example - LRFD - Design - Bridge - Structures - Federal Highway Administration
www.fhwa.dot.gov/bridge/lrfd/us_ds7.cfm#designstep712_19 36/120
STable 3.4.1-2
STable 3.4.1-1
STable 3.4.1-2
STable 3.4.1-1
all longitudinal wind loads ignored
STable 3.4.1-1
only applicable for wind angle of 0 degrees
STable 3.4.1-1
use contraction temperature force
STable 3.4.1-1
The factored vertical force at the base of the abutment stem is:
The factored longitudinal shear force at the base of the stem is:

28/09/2013 LRFD Steel Girder SuperStructure Design Example - LRFD - Design - Bridge - Structures - Federal Highway Administration
www.fhwa.dot.gov/bridge/lrfd/us_ds7.cfm#designstep712_19 37/120
The factored moment about the bridge transverse axis at the base of the abutment stem is:
Abutment stem Service I force effects:
The following load factors will be used to calculate the force effects for Service I:
STable 3.4.1-2
STable 3.4.1-2
STable 3.4.1-1
STable 3.4.1-2
STable 3.4.1-1
use for wind on stem end face for controlling wind at 60 degrees
STable 3.4.1-1
only applicable for wind angle of 0 degrees
STable 3.4.1-1
use contraction temperature force

28/09/2013 LRFD Steel Girder SuperStructure Design Example - LRFD - Design - Bridge - Structures - Federal Highway Administration
www.fhwa.dot.gov/bridge/lrfd/us_ds7.cfm#designstep712_19 38/120
STable 3.4.1-1
The factored vertical force at the base of the abutment stem is:
The factored longitudinal shear force at the base of the stem is:
The factored moment about the bridge transverse axis at the base of the abutment stem is:
The maximum factored abutment stem vertical force, shear force, and moment for the strength limit state are:

28/09/2013 LRFD Steel Girder SuperStructure Design Example - LRFD - Design - Bridge - Structures - Federal Highway Administration
www.fhwa.dot.gov/bridge/lrfd/us_ds7.cfm#designstep712_19 39/120
Bottom of Abutment Footing
The combination of force effects for the bottom of abutment footing are similar to the backwall and stem with
the addition of the earth load on the abutment heel. Also, dynamic load allowance must be removed from the
live load portion of the force effects for foundation components that are completely below the ground level.
S3.6.2.1
Figure 7-10 Abutment Footing Dimensions and Loading

28/09/2013 LRFD Steel Girder SuperStructure Design Example - LRFD - Design - Bridge - Structures - Federal Highway Administration
www.fhwa.dot.gov/bridge/lrfd/us_ds7.cfm#designstep712_19 40/120
The force effects for the bottom of footing will be combined for the same limit states as the backwall and stem.
The loads and load factors are also similar with the addition of vertical earth load.
Load Factors
Strength I Strength III Strength V Service I
Loads γmax γmin γmax γmin γmax γmin γmax γmin
DC 1.25 0.90 1.25 0.90 1.25 0.90 1.00 1.00
DW 1.50 0.65 1.50 0.65 1.50 0.65 1.00 1.00
LL 1.75 1.75 --- --- 1.35 1.35 1.00 1.00
EH 1.50 0.90 1.50 0.90 1.50 0.90 1.00 1.00
EV 1.35 1.00 1.35 1.00 1.35 1.00 1.00 1.00
LS 1.75 1.75 --- --- 1.35 1.35 1.00 1.00
WS --- --- 1.40 1.40 0.40 0.40 0.30 0.30
WL --- --- --- --- 1.00 1.00 1.00 1.00
TU 0.50 0.50 0.50 0.50 0.50 0.50 1.00 1.00
STable 3.4.1-1
STable 3.4.1-2
Table 7-5 Applicable Abutment Footing Limit States with the Corresponding Load Factors
The loads that are required from Design Steps 7.4, 7.5, and 7.6 include:

28/09/2013 LRFD Steel Girder SuperStructure Design Example - LRFD - Design - Bridge - Structures - Federal Highway Administration
www.fhwa.dot.gov/bridge/lrfd/us_ds7.cfm#designstep712_19 41/120
Abutment bottom of footing Strength I force effects using the maximum load factors:
The following load factors will be used to calculate the controlling force effects for Strength I:
STable 3.4.1-2
STable 3.4.1-2
STable 3.4.1-1
STable 3.4.1-2
use maximum value to maximize the pile loads
STable 3.4.1-2
STable 3.4.1-1
use contraction temperature force
STable 3.4.1-1
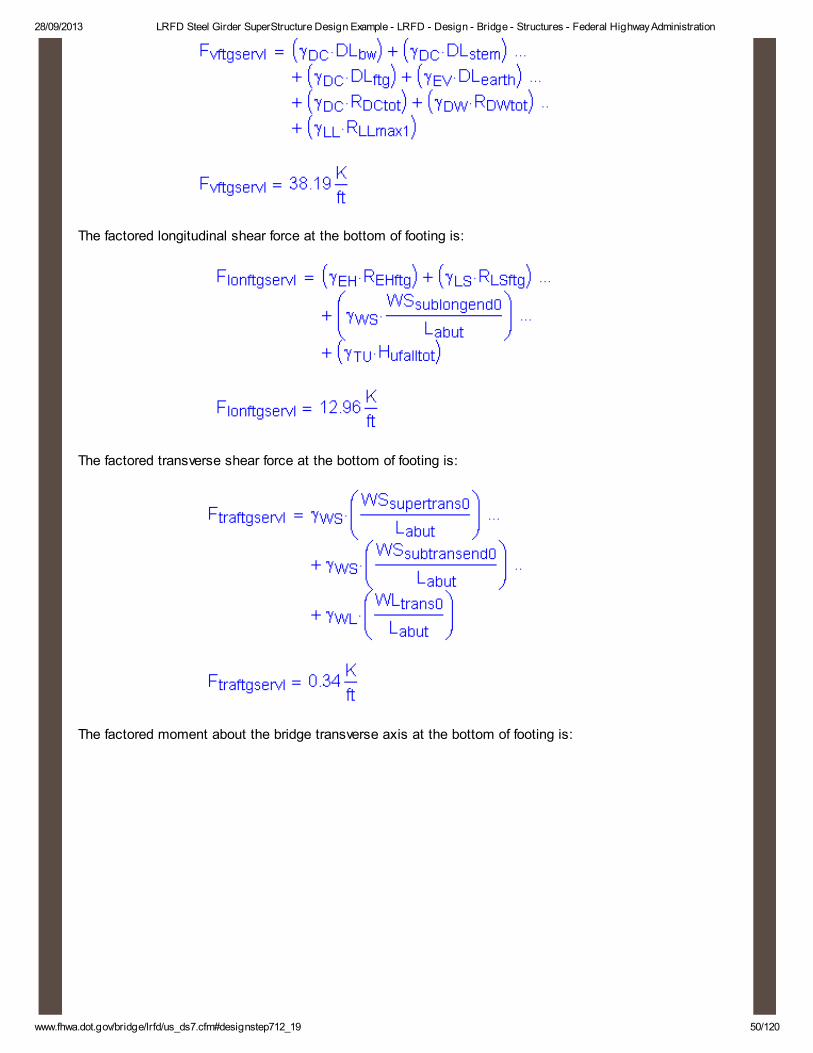
The factored vertical force at the bottom of footing is:

28/09/2013 LRFD Steel Girder SuperStructure Design Example - LRFD - Design - Bridge - Structures - Federal Highway Administration
www.fhwa.dot.gov/bridge/lrfd/us_ds7.cfm#designstep712_19 42/120
The factored longitudinal horizontal force at the bottom of footing is:
The factored transverse horizontal force at the bottom of footing is:
The load factors for the loads that produce transverse horizontal
forces are zero for Strength I.
The factored moment about the bridge transverse axis at the bottom of footing is:
The factored moment about the bridge longitudinal axis at the bottom of footing is:
The load factors for the loads that produce transverse
horizontal forces are zero for Strength I.
Abutment bottom of footing Strength I force effects using the minimum load factors:
The following load factors will be used to calculate the controlling force effects for Strength I:

28/09/2013 LRFD Steel Girder SuperStructure Design Example - LRFD - Design - Bridge - Structures - Federal Highway Administration
www.fhwa.dot.gov/bridge/lrfd/us_ds7.cfm#designstep712_19 43/120
STable 3.4.1-2
STable 3.4.1-2
STable 3.4.1-1
STable 3.4.1-2
use minimum value to minimize the pile loads
STable 3.4.1-2
STable 3.4.1-1
use contraction temperature force
STable 3.4.1-1
The factored vertical force at the bottom of footing is:
The factored longitudinal horizontal force at the bottom of footing is:

28/09/2013 LRFD Steel Girder SuperStructure Design Example - LRFD - Design - Bridge - Structures - Federal Highway Administration
www.fhwa.dot.gov/bridge/lrfd/us_ds7.cfm#designstep712_19 44/120
The factored transverse horizontal force at the bottom of footing is:
The load factors for the loads that produce transverse
horizontal forces are zero for Strength I.
The factored moment about the bridge transverse axis at the bottom of footing is:
The factored moment about the bridge longitudinal axis at the bottom of footing is:
The load factors for the loads that produce transverse
horizontal forces are zero for Strength I.
Abutment bottom of footing Strength III force effects:
Load Combinations
There are numerous load factor combinations for each limit state as can be seen from STables
3.4.1-1 and 3.4.1-2. It is possible to check one limit state, such as Strength I, over and over
again using many different load factor combinations to obtain the controlling factored effects.
The engineer should use engineering judgement when selecting the most appropriate load
factor for each individual load within a limit state.
For the Strength III force effects below, the horizontal earth load is factored by the maximum
load factor while the vertical earth load is factored by the minimum factor to maximize the
overturning moment.
S3.4.1
The following load factors will be used to calculate the force effects for Strength III:

28/09/2013 LRFD Steel Girder SuperStructure Design Example - LRFD - Design - Bridge - Structures - Federal Highway Administration
www.fhwa.dot.gov/bridge/lrfd/us_ds7.cfm#designstep712_19 45/120
STable 3.4.1-2
STable 3.4.1-2
STable 3.4.1-2
use minimum value to maximize the longitudinal moment
STable 3.4.1-2
use a wind angle of 0 degrees
STable 3.4.1-1
use contraction temperature force
STable 3.4.1-1
Vertical wind load will be ignored since the moment of inertia about the abutment longitudinal axis is so large.
The factored vertical force at the bottom of footing is:
The factored longitudinal horizontal force at the bottom of footing is:
The factored transverse horizontal force at the bottom of footing is:

28/09/2013 LRFD Steel Girder SuperStructure Design Example - LRFD - Design - Bridge - Structures - Federal Highway Administration
www.fhwa.dot.gov/bridge/lrfd/us_ds7.cfm#designstep712_19 46/120
The factored moment about the bridge transverse axis at the bottom of footing is:
The factored moment about the bridge longitudinal axis at the bottom of footing is:
Abutment bottom of footing Strength V force effects:
The following load factors will be used to calculate the force effects for Strength V:
STable 3.4.1-2
STable 3.4.1-2

28/09/2013 LRFD Steel Girder SuperStructure Design Example - LRFD - Design - Bridge - Structures - Federal Highway Administration
www.fhwa.dot.gov/bridge/lrfd/us_ds7.cfm#designstep712_19 47/120
STable 3.4.1-1
STable 3.4.1-2
use minimum value to maximize the longitudinal moment
STable 3.4.1-2
STable 3.4.1-1
use a wind angle of 0 degrees
STable 3.4.1-1
STable 3.4.1-1
use contraction temperature force
STable 3.4.1-1
The factored vertical force at the bottom of footing is:
The factored longitudinal horizontal force at the bottom of footing is:

28/09/2013 LRFD Steel Girder SuperStructure Design Example - LRFD - Design - Bridge - Structures - Federal Highway Administration
www.fhwa.dot.gov/bridge/lrfd/us_ds7.cfm#designstep712_19 48/120
The factored transverse shear force at the bottom of footing is:
The factored moment about the bridge transverse axis at the bottom of footing is:
The factored moment about the bridge longitudinal axis at the bottom of footing is:

28/09/2013 LRFD Steel Girder SuperStructure Design Example - LRFD - Design - Bridge - Structures - Federal Highway Administration
www.fhwa.dot.gov/bridge/lrfd/us_ds7.cfm#designstep712_19 49/120
Abutment bottom of footing Service I force effects for wind at 0 degrees and maximum live load:
The following load factors will be used to calculate the force effects for Service I:
STable 3.4.1-2
STable 3.4.1-2
STable 3.4.1-1
STable 3.4.1-2
STable 3.4.1-2
STable 3.4.1-1
use wind at 0 degrees
STable 3.4.1-1
STable 3.4.1-1
use contraction temperature force
STable 3.4.1-1
The factored vertical force at the bottom of footing is:
28/09/2013 LRFD Steel Girder SuperStructure Design Example - LRFD - Design - Bridge - Structures - Federal Highway Administration
www.fhwa.dot.gov/bridge/lrfd/us_ds7.cfm#designstep712_19 50/120
The factored longitudinal shear force at the bottom of footing is:
The factored transverse shear force at the bottom of footing is:
The factored moment about the bridge transverse axis at the bottom of footing is:

28/09/2013 LRFD Steel Girder SuperStructure Design Example - LRFD - Design - Bridge - Structures - Federal Highway Administration
www.fhwa.dot.gov/bridge/lrfd/us_ds7.cfm#designstep712_19 51/120
The factored moment about the bridge longitudinal axis at the bottom of footing is:
Abutment bottom of footing Service I force effects for wind at 60 degrees and minimum live load:
The following load factors will be used to calculate the force effects for Service I:
STable 3.4.1-2
STable 3.4.1-2
STable 3.4.1-1

28/09/2013 LRFD Steel Girder SuperStructure Design Example - LRFD - Design - Bridge - Structures - Federal Highway Administration
www.fhwa.dot.gov/bridge/lrfd/us_ds7.cfm#designstep712_19 52/120
STable 3.4.1-2
STable 3.4.1-2
STable 3.4.1-1
use for wind on stem end face for wind at 60 degrees
STable 3.4.1-1
only applicable for wind angle of 0 degrees
STable 3.4.1-1
use contraction temperature force
STable 3.4.1-1
The factored vertical force at the bottom of footing is:
The factored longitudinal shear force at the bottom of footing is:

28/09/2013 LRFD Steel Girder SuperStructure Design Example - LRFD - Design - Bridge - Structures - Federal Highway Administration
www.fhwa.dot.gov/bridge/lrfd/us_ds7.cfm#designstep712_19 53/120
The factored transverse shear force at the bottom of footing is:
The factored moment about the bridge transverse axis at the bottom of footing is:
The factored moment about the bridge longitudinal axis at the bottom of footing is:
The following table summarizes the combined forces at the bottom of footing that were calculated above. The
forces were calculated at the center of the bottom of footing. The values shown in the table were multiplied by
the abutment length to obtain the total effect. These forces are required for the geotechnical engineer to design
the pile foundation. It should be noted that Design Step P was based on preliminary pile foundation design
forces. In an actual design, the geotechnical engineer would need to revisit the pile foundation design
calculations and update the results based on the final design bottom of footing forces given below.

28/09/2013 LRFD Steel Girder SuperStructure Design Example - LRFD - Design - Bridge - Structures - Federal Highway Administration
www.fhwa.dot.gov/bridge/lrfd/us_ds7.cfm#designstep712_19 54/120
Limit State Vertical Force
(K)
Long. Moment
(K-ft)
Trans. Moment
(K-ft)
Lateral Load
(Long. Direction)
(K)
Lateral Load
(Trans. Direction)
(K)
Strength I Max/Final 2426 8020 0 913 0
Strength I Min/Final 1366 4836 0 610 0
Strength III Max/Final 1815 6022 795 769 47
Service I Max/Final 1790 5302 353 607 16
Service I Min/Final 1508 5310 63 608 4
Table 7-6 Pile Foundation Design Forces
Design Step 7.8 - Check Stability and Safety Requirements
For abutment footings supported by piles, the stability and safety requirements deal with the amount of
settlement that will occur to the substructure. For this design example, 1.5 inches of horizontal movement is
acceptable and 0.5 inches of vertical settlement is acceptable. Design Step P verifies that less than the
allowable horizontal and vertical displacements will take place using the pile size and layout described in
Design Step P.
S10.7.2.2 & C11.5.2
Design Step 7.9 - Design Abutment Backwall
It is recommended that Pier Design Step 8.8 is reviewed prior to beginning the abutment design. Design Step
8.8 reviews the design philosophy used to design the structural components of the pier and is applicable for
the abutment as well.
Design for flexure:
Assume #5 bars:
First, the minimum reinforcement requirements will be calculated. The tensile reinforcement provided must be
enough to develop a factored flexural resistance at least equal to the lesser of 1.2 times the cracking strength
or 1.33 times the factored moment from the applicable strength load combinations.
S5.7.3.3.2
The cracking strength is calculated by:
SEquation
5.7.3.6.2-2

28/09/2013 LRFD Steel Girder SuperStructure Design Example - LRFD - Design - Bridge - Structures - Federal Highway Administration
www.fhwa.dot.gov/bridge/lrfd/us_ds7.cfm#designstep712_19 55/120
Figure 7-11 Abutment Backwall Cracking Moment Dimensions
S5.4.2.6

28/09/2013 LRFD Steel Girder SuperStructure Design Example - LRFD - Design - Bridge - Structures - Federal Highway Administration
www.fhwa.dot.gov/bridge/lrfd/us_ds7.cfm#designstep712_19 56/120
1.33 times the factored controlling backwall moment is:
Since 1.33 times the controlling factored backwall moment controls the minimum reinforcement requirements,
use:
Effective depth, de = total backwall thickness - cover - 1/2 bar diameter
backwall thickness
Solve for the required amount of reinforcing steel, as follows:
S5.5.4.2.1

28/09/2013 LRFD Steel Girder SuperStructure Design Example - LRFD - Design - Bridge - Structures - Federal Highway Administration
www.fhwa.dot.gov/bridge/lrfd/us_ds7.cfm#designstep712_19 57/120
Note: The above two equations are derived formulas that can be found in most reinforced concrete textbooks.
Required bar spacing =
Use #5 bars @
per foot
Once the bar size and spacing are known, the maximum reinforcement limit must be checked.
S5.7.3.3.1
S5.7.2.2
S5.7.2.2
where
S5.7.3.3.1
OK
The backwall flexure reinforcement bar spacing was set at 9.0 inches so that it could lap with the flexure
reinforcement in the stem. Originally, the backwall bars were set at 12.0 inches. After completing the stem
design, the backwall design was updated to match the stem flexure reinforcement bar spacing.
Check crack control:

28/09/2013 LRFD Steel Girder SuperStructure Design Example - LRFD - Design - Bridge - Structures - Federal Highway Administration
www.fhwa.dot.gov/bridge/lrfd/us_ds7.cfm#designstep712_19 58/120
The control of cracking by distribution of reinforcement must be checked.
S5.7.3.4
Since this design example assumes that the backwall will be exposed to deicing salts, use:
Thickness of clear cover used to compute dc should not be greater than 2 inches:
use
Concrete area with centroid the same as transverse bar and bounded by the cross section and line parallel to
neutral axis:
The equation that gives the allowable reinforcement service load stress for crack control is:
where
Use
S5.4.3.2
S5.4.2.4

28/09/2013 LRFD Steel Girder SuperStructure Design Example - LRFD - Design - Bridge - Structures - Federal Highway Administration
www.fhwa.dot.gov/bridge/lrfd/us_ds7.cfm#designstep712_19 59/120
Use
Service backwall total load moment:
To solve for the actual stress in the reinforcement, the transformed moment of inertia and the distance from
the neutral axis to the centroid of the reinforcement must be computed:

28/09/2013 LRFD Steel Girder SuperStructure Design Example - LRFD - Design - Bridge - Structures - Federal Highway Administration
www.fhwa.dot.gov/bridge/lrfd/us_ds7.cfm#designstep712_19 60/120
Figure 7-12 Abutment Backwall Crack Control Check
Once kde is known, the transformed moment of inertia can be computed:
Now, the actual stress in the reinforcement can be computed:
OK
Design for shear:
The factored longitudinal shear force at the base of the backwall is:
The nominal shear resistance is the lesser of:
S5.8.3.3
or
where:

28/09/2013 LRFD Steel Girder SuperStructure Design Example - LRFD - Design - Bridge - Structures - Federal Highway Administration
www.fhwa.dot.gov/bridge/lrfd/us_ds7.cfm#designstep712_19 61/120
and
neglect for this abutment design
Before the nominal shear resistance can be calculated, all the variables used in the above equations need to
be defined.
S5.8.3.4.1
S5.8.2.9
where:
Now, Vn1 and Vn2 can be calculated:
For
Use:
The factored shear resistance is then:

28/09/2013 LRFD Steel Girder SuperStructure Design Example - LRFD - Design - Bridge - Structures - Federal Highway Administration
www.fhwa.dot.gov/bridge/lrfd/us_ds7.cfm#designstep712_19 62/120
S5.5.4.2.1
OK
Shrinkage and temperature reinforcement:
S5.10.8
For members less than 48.0 inches thick, the area of reinforcement in each direction shall not be spaced
greater than 12.0 inches and satisfy the lesser of:
S5.10.8.2
As must be greater than or equal to 0.36in2/ft
The above steel must be distributed equally on both faces of the backwall.
Try 1 horizontal # 4 bar for each face of the backwall at 12.0 inch spacing:

28/09/2013 LRFD Steel Girder SuperStructure Design Example - LRFD - Design - Bridge - Structures - Federal Highway Administration
www.fhwa.dot.gov/bridge/lrfd/us_ds7.cfm#designstep712_19 63/120
OK
Based on the backwall design, #5 bars at 9.0 inch spacing will be used for the back face flexure
reinforcement. The same bar size and spacing will be used for the front face vertical reinforcement. The
horizontal temperature and shrinkage reinforcement will consist of #4 bars at 12.0 inch spacing for the front
and back faces.
Design Step 7.10 - Design Abutment Stem
Design for flexure:
Assume #9 bars:
As with the backwall, the minimum reinforcement requirements will be calculated for the stem. The tensile
reinforcement provided must be enough to develop a factored flexural resistance at least equal to the lesser of
1.2 times the cracking strength or 1.33 times the factored moment from the applicable strength load
combinations.
S5.7.3.3.2
The cracking strength is calculated by:
SEquation
5.7.3.6.2-2

28/09/2013 LRFD Steel Girder SuperStructure Design Example - LRFD - Design - Bridge - Structures - Federal Highway Administration
www.fhwa.dot.gov/bridge/lrfd/us_ds7.cfm#designstep712_19 64/120
Figure 7-13 Abutment stem Cracking Moment Dimensions
S5.4.2.6
1.33 times the factored controlling stem moment is:

28/09/2013 LRFD Steel Girder SuperStructure Design Example - LRFD - Design - Bridge - Structures - Federal Highway Administration
www.fhwa.dot.gov/bridge/lrfd/us_ds7.cfm#designstep712_19 65/120
1.2 times the cracking moment controls the minimum reinforcement requirements. 1.2 times the cracking
moment is also greater than the controlling applied factored moment, therefore, use 1.2 times the cracking
moment for design.
Effective depth, de = total backwall thickness - cover - 1/2 bar diameter
thickness of stem:
Solve for the required amount of reinforcing steel, as follows:
S5.5.4.2.1
Note: The above two equations are derived formulas that can be found in most reinforced concrete textbooks.
28/09/2013 LRFD Steel Girder SuperStructure Design Example - LRFD - Design - Bridge - Structures - Federal Highway Administration
www.fhwa.dot.gov/bridge/lrfd/us_ds7.cfm#designstep712_19 66/120
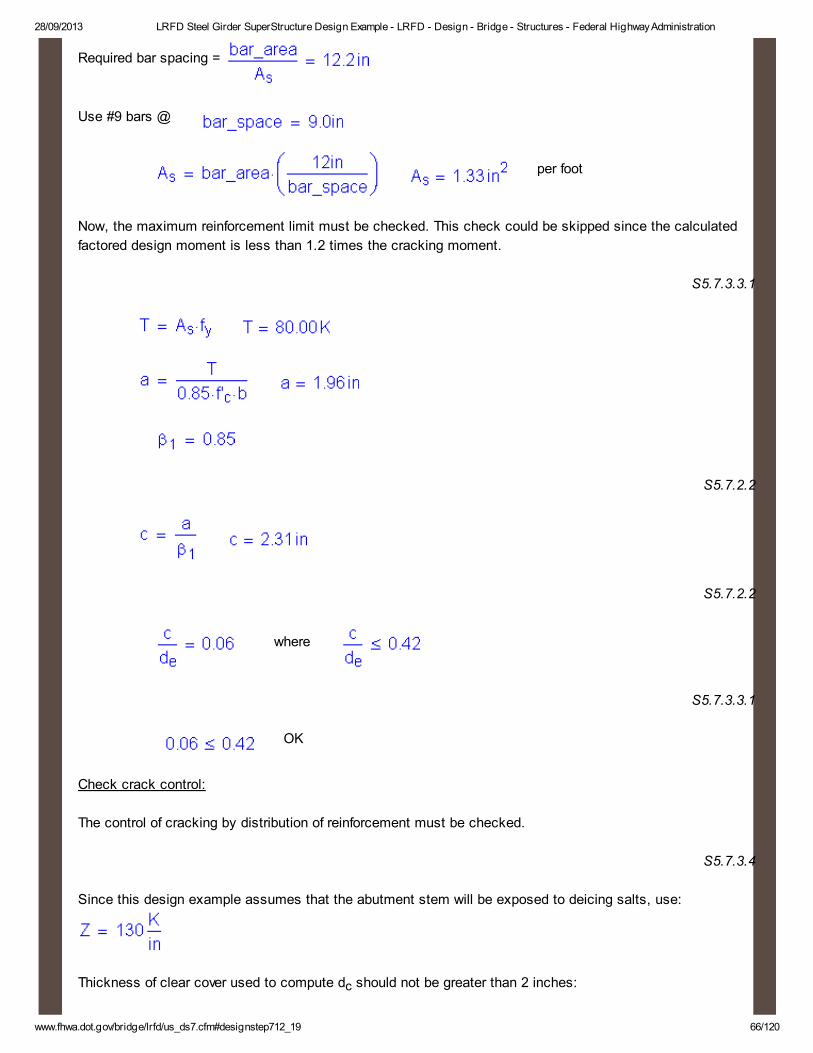
Required bar spacing =
Use #9 bars @
per foot
Now, the maximum reinforcement limit must be checked. This check could be skipped since the calculated
factored design moment is less than 1.2 times the cracking moment.
S5.7.3.3.1
S5.7.2.2
S5.7.2.2
where
S5.7.3.3.1
OK
Check crack control:
The control of cracking by distribution of reinforcement must be checked.
S5.7.3.4
Since this design example assumes that the abutment stem will be exposed to deicing salts, use:
Thickness of clear cover used to compute dc should not be greater than 2 inches:

28/09/2013 LRFD Steel Girder SuperStructure Design Example - LRFD - Design - Bridge - Structures - Federal Highway Administration
www.fhwa.dot.gov/bridge/lrfd/us_ds7.cfm#designstep712_19 67/120
use
Concrete area with centroid the same as transverse bar and bounded by the cross section and line parallel to
neutral axis:
The equation that gives the allowable reinforcement service load stress for crack control is:
where
Use
S5.4.3.2
S5.4.2.4
Use
Stem factored service moment:
To solve for the actual stress in the reinforcement, the transformed moment of inertia and the distance from

28/09/2013 LRFD Steel Girder SuperStructure Design Example - LRFD - Design - Bridge - Structures - Federal Highway Administration
www.fhwa.dot.gov/bridge/lrfd/us_ds7.cfm#designstep712_19 68/120
the neutral axis to the centroid of the reinforcement must be computed:
Figure 7-14 Abutment Stem Crack Control Check
Once kde is known, the transformed moment of inertia can be computed:

28/09/2013 LRFD Steel Girder SuperStructure Design Example - LRFD - Design - Bridge - Structures - Federal Highway Administration
www.fhwa.dot.gov/bridge/lrfd/us_ds7.cfm#designstep712_19 69/120
Now, the actual stress in the reinforcement can be computed:
OK
Design for shear:
The factored longitudinal shear force at the base of the stem is:
The nominal shear resistance is the lesser of:
S5.8.3.3
or
where:
and
neglect for this abutment design
Before the nominal shear resistance can be calculated, all the variables used in the above equations need to
be defined.

28/09/2013 LRFD Steel Girder SuperStructure Design Example - LRFD - Design - Bridge - Structures - Federal Highway Administration
www.fhwa.dot.gov/bridge/lrfd/us_ds7.cfm#designstep712_19 70/120
S5.8.3.4.1
S5.8.2.9
where:
Now, Vn1 and Vn2 can be calculated:
For
use
The factored shear resistance is then:
S5.5.4.2.1

28/09/2013 LRFD Steel Girder SuperStructure Design Example - LRFD - Design - Bridge - Structures - Federal Highway Administration
www.fhwa.dot.gov/bridge/lrfd/us_ds7.cfm#designstep712_19 71/120
OK
Shrinkage and temperature reinforcement:
S5.10.8
For members less than 48.0 inches thick, the area of reinforcement in each direction shall not be spaced
greater than 12.0 inches and satisfy the lesser of:
S5.10.8.2
As must be greater than or equal to 0.76in2/ft
The above steel must be distributed equally on both faces of the stem.
Try 1 horizontal # 5 bar for each face of the stem at 9.0 inch spacing:

28/09/2013 LRFD Steel Girder SuperStructure Design Example - LRFD - Design - Bridge - Structures - Federal Highway Administration
www.fhwa.dot.gov/bridge/lrfd/us_ds7.cfm#designstep712_19 72/120
OK
Based on the abutment stem design, #9 bars at 9.0 inch spacing will be used for the back face flexure
reinforcement. The same bar size and spacing will be used for the front face vertical reinforcement to reduce
design steps. The horizontal temperature and shrinkage reinforcement will consist of #5 bars at 9.0 inch
spacing for the front and back faces.
Design Step 7.11 - Design Abutment Footing
The abutment footing is designed for flexure in the heel and toe, one-way and two-way shear action, and the
control of cracking by the distribution of reinforcement. For footings supported by pile foundations, the footing
and pile foundation designs are interdependent and should be designed concurrently to be more efficient. Refer
to Design Step P for the pile foundation design.
S5.13.3
S5.7.3.4
The following figures show the assumed footing dimensions and pile locations within the footing.
28/09/2013 LRFD Steel Girder SuperStructure Design Example - LRFD - Design - Bridge - Structures - Federal Highway Administration
www.fhwa.dot.gov/bridge/lrfd/us_ds7.cfm#designstep712_19 73/120
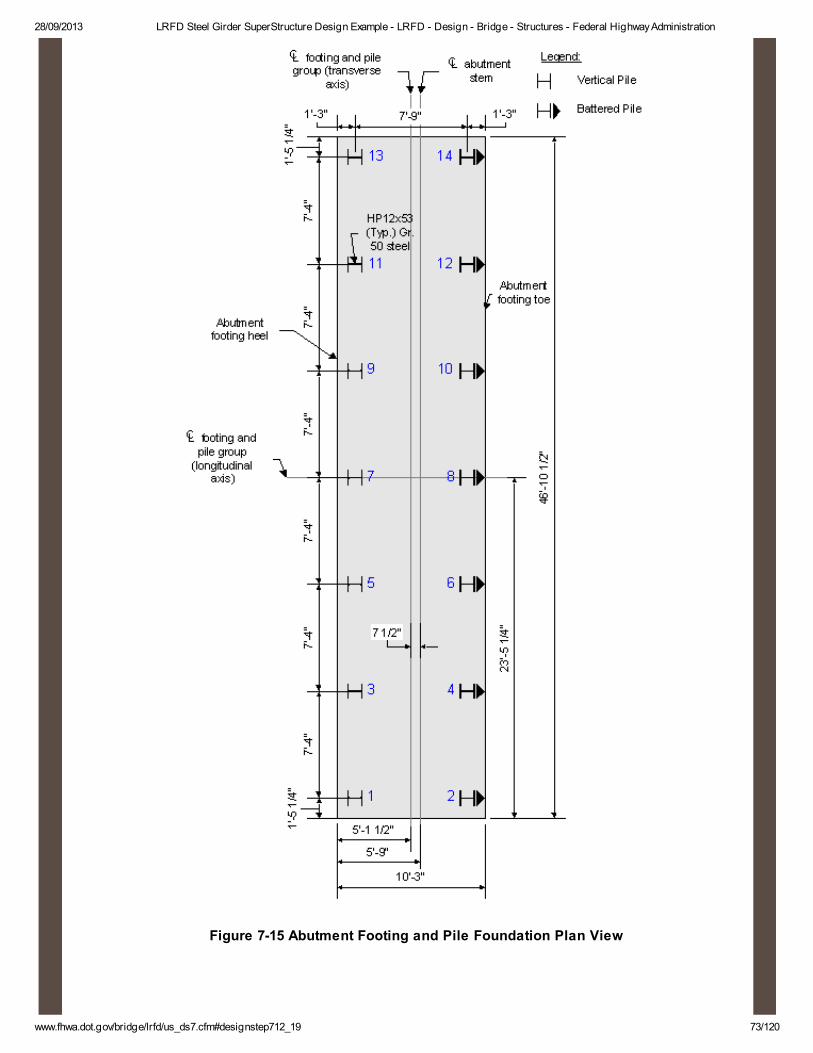
Figure 7-15 Abutment Footing and Pile Foundation Plan View

28/09/2013 LRFD Steel Girder SuperStructure Design Example - LRFD - Design - Bridge - Structures - Federal Highway Administration
www.fhwa.dot.gov/bridge/lrfd/us_ds7.cfm#designstep712_19 74/120
Figure 7-16 Abutment Footing and Pile Foundation Elevation View
Design for flexure:
The flexure reinforcement must be designed at two critical sections for abutment footings. The two sections
include the back and front face of the stem. The moments at the abutment faces are calculated from the pile
reactions.
S5.13.3.4
For the abutment front face, the following moment arm will be used:

28/09/2013 LRFD Steel Girder SuperStructure Design Example - LRFD - Design - Bridge - Structures - Federal Highway Administration
www.fhwa.dot.gov/bridge/lrfd/us_ds7.cfm#designstep712_19 75/120
Figure 7-17 Abutment Toe Critical Flexure Section
The controlling moment on the critical section occurs when the pile loads on the front row of piles are
maximized. From Tables P-17 to P-20, the front row pile loads are maximized for Strength I using the
maximum load factors at the final construction condition and are summarized below.
Since the above pile loads are already factored, no load factors need to be applied and the total factored
moment is as follows:
The moment on a per foot basis is then:

28/09/2013 LRFD Steel Girder SuperStructure Design Example - LRFD - Design - Bridge - Structures - Federal Highway Administration
www.fhwa.dot.gov/bridge/lrfd/us_ds7.cfm#designstep712_19 76/120
Once the maximum moment at the critical section is known, the same procedure that was used for the
backwall and stem to calculate the flexure reinforcement must be followed. The footing toe flexure
reinforcement is located longitudinally in the bottom of the footing since the bottom of footing is in tension at
the critical toe section. These bars will extend from the back of the heel to the front of the toe taking into
account the clear cover:
Assume #8 bars:
The footing toe critical section minimum tensile reinforcement requirements will be calculated. The tensile
reinforcement provided must be enough to develop a factored flexural resistance at least equal to the lesser of
1.2 times the cracking strength or 1.33 times the factored moment from the applicable strength load
combinations.
S5.7.3.3.2
The cracking strength is calculated by:
SEquation
5.7.3.6.2-2
28/09/2013 LRFD Steel Girder SuperStructure Design Example - LRFD - Design - Bridge - Structures - Federal Highway Administration
www.fhwa.dot.gov/bridge/lrfd/us_ds7.cfm#designstep712_19 77/120
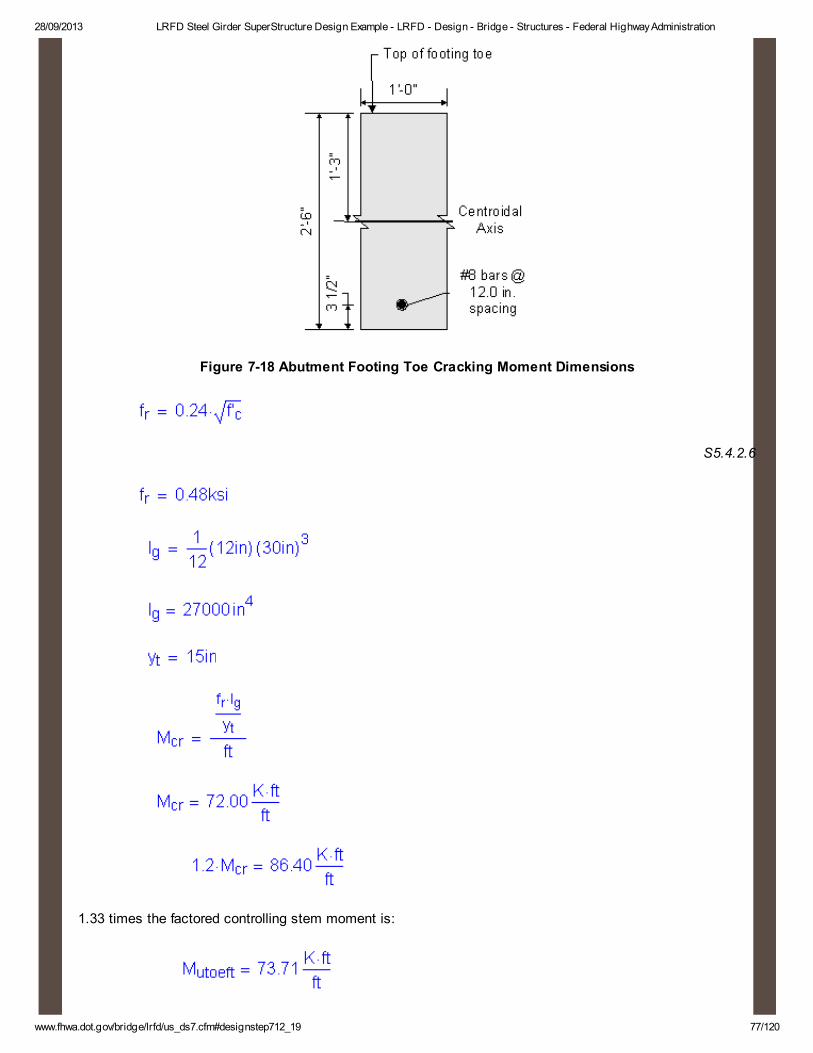
Figure 7-18 Abutment Footing Toe Cracking Moment Dimensions
S5.4.2.6
1.33 times the factored controlling stem moment is:

28/09/2013 LRFD Steel Girder SuperStructure Design Example - LRFD - Design - Bridge - Structures - Federal Highway Administration
www.fhwa.dot.gov/bridge/lrfd/us_ds7.cfm#designstep712_19 78/120
1.2 times the cracking moment controls the minimum reinforcement requirements. 1.2 times the cracking
moment is also greater than the factored footing toe moment. Therefore, use 1.2 times the cracking moment
to design the toe flexure reinforcement.
Effective depth, de = total footing thickness - cover - 1/2 bar diameter
thickness of footing:
Solve for the required amount of reinforcing steel, as follows:
S5.5.4.2.1
Note: The above two equations are derived formulas that can be found in most reinforced concrete textbooks.

28/09/2013 LRFD Steel Girder SuperStructure Design Example - LRFD - Design - Bridge - Structures - Federal Highway Administration
www.fhwa.dot.gov/bridge/lrfd/us_ds7.cfm#designstep712_19 79/120
Required bar spacing =
Use #8 bars @
per foot
Once the bar size and spacing are known, the maximum reinforcement limit must be checked.
S5.7.3.3.1
S5.7.2.2
S5.7.2.2
where
S5.7.3.3.1
OK
Check crack control:
The control of cracking by distribution of reinforcement must be checked for the abutment toe.
S5.7.3.4
Since the footing is buried, moderate exposure will be assumed, use:

28/09/2013 LRFD Steel Girder SuperStructure Design Example - LRFD - Design - Bridge - Structures - Federal Highway Administration
www.fhwa.dot.gov/bridge/lrfd/us_ds7.cfm#designstep712_19 80/120
Thickness of clear cover used to compute dc should not be greater than 2 inches:
use
Concrete area with centroid the same as transverse bar and bounded by the cross section and line parallel to
neutral axis:
The equation that gives the allowable reinforcement service load stress for crack control is:
where
Use
S5.4.3.2
S5.4.2.4
Use
The pile loads used to compute the controlling footing toe moment for the Service I limit state are again taken
from Design Step P, Tables P-17 through P-20.

28/09/2013 LRFD Steel Girder SuperStructure Design Example - LRFD - Design - Bridge - Structures - Federal Highway Administration
www.fhwa.dot.gov/bridge/lrfd/us_ds7.cfm#designstep712_19 81/120
The footing toe service moment is then calculated by:
The moment on a per foot basis is then:
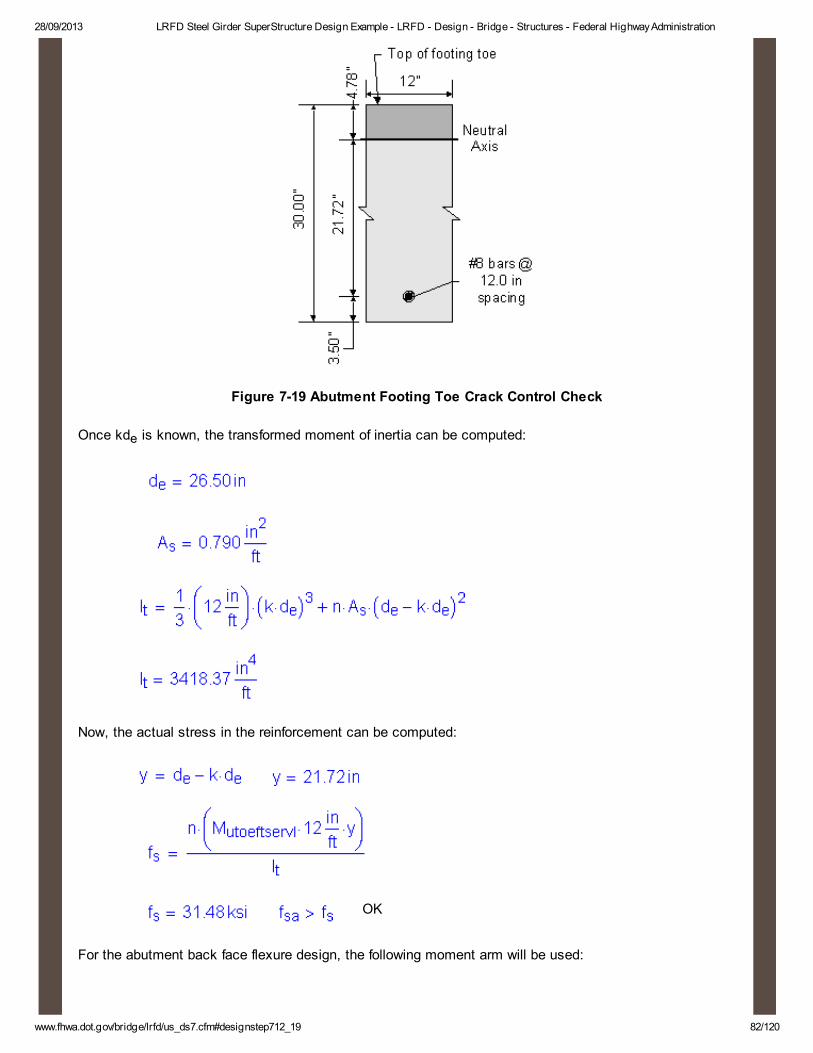
To solve for the actual stress in the reinforcement, the transformed moment of inertia and the distance from
the neutral axis to the centroid of the reinforcement must be computed:
28/09/2013 LRFD Steel Girder SuperStructure Design Example - LRFD - Design - Bridge - Structures - Federal Highway Administration
www.fhwa.dot.gov/bridge/lrfd/us_ds7.cfm#designstep712_19 82/120
Figure 7-19 Abutment Footing Toe Crack Control Check
Once kde is known, the transformed moment of inertia can be computed:
Now, the actual stress in the reinforcement can be computed:
OK
For the abutment back face flexure design, the following moment arm will be used:
28/09/2013 LRFD Steel Girder SuperStructure Design Example - LRFD - Design - Bridge - Structures - Federal Highway Administration
www.fhwa.dot.gov/bridge/lrfd/us_ds7.cfm#designstep712_19 83/120
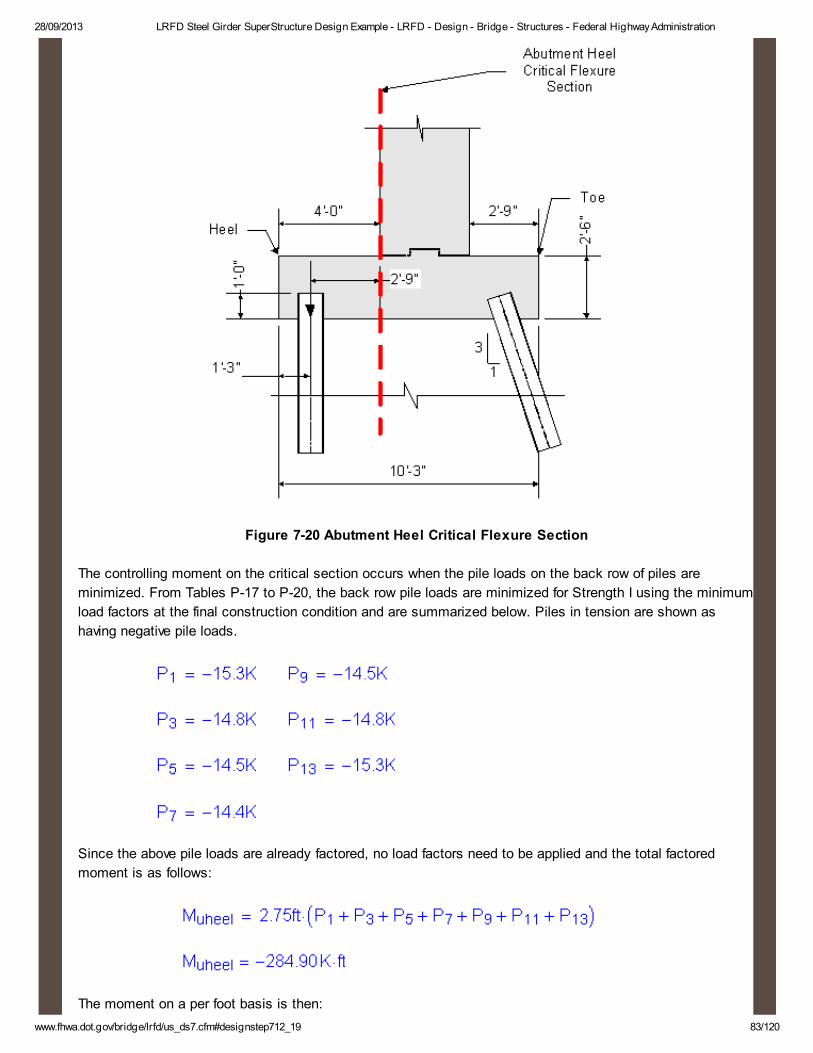
Figure 7-20 Abutment Heel Critical Flexure Section
The controlling moment on the critical section occurs when the pile loads on the back row of piles are
minimized. From Tables P-17 to P-20, the back row pile loads are minimized for Strength I using the minimum
load factors at the final construction condition and are summarized below. Piles in tension are shown as
having negative pile loads.
Since the above pile loads are already factored, no load factors need to be applied and the total factored
moment is as follows:
The moment on a per foot basis is then:

28/09/2013 LRFD Steel Girder SuperStructure Design Example - LRFD - Design - Bridge - Structures - Federal Highway Administration
www.fhwa.dot.gov/bridge/lrfd/us_ds7.cfm#designstep712_19 84/120
Once the moment at the critical section is known, the same procedure that was used for the toe must be
followed. The flexure reinforcement for the footing heel is placed longitudinally along the top of the footing since
the top of the footing heel is in tension at the critical heel section. The bars will extend from the back of the
heel to the front of the toe taking into account the concrete cover.
Assume #5 bars:
The footing heel critical section minimum tensile reinforcement requirements will be calculated. The tensile
reinforcement provided must be enough to develop a factored flexural resistance at least equal to the lesser of
1.2 times the cracking strength or 1.33 times the factored moment from the applicable strength load
combinations.
S5.7.3.3.2
The cracking strength is calculated by:
SEquation 5.7.3.6.2-2

28/09/2013 LRFD Steel Girder SuperStructure Design Example - LRFD - Design - Bridge - Structures - Federal Highway Administration
www.fhwa.dot.gov/bridge/lrfd/us_ds7.cfm#designstep712_19 85/120
Figure 7-21 Abutment Footing Heel Cracking Moment Dimensions
S5.4.2.6
1.33 times the factored controlling heel moment is:
28/09/2013 LRFD Steel Girder SuperStructure Design Example - LRFD - Design - Bridge - Structures - Federal Highway Administration
www.fhwa.dot.gov/bridge/lrfd/us_ds7.cfm#designstep712_19 86/120
1.33 times the factored controlling heel moment controls the minimum reinforcement requirements. Use 1.33
times the factored controlling heel moment to design the heel flexure reinforcement.
Effective depth, de = total footing thickness - cover - 1/2 bar diameter
thickness of footing:
Solve for the required amount of reinforcing steel, as follows:
S5.5.4.2.1
Note: The above two equations are derived formulas that can be found in most reinforced concrete textbooks.

28/09/2013 LRFD Steel Girder SuperStructure Design Example - LRFD - Design - Bridge - Structures - Federal Highway Administration
www.fhwa.dot.gov/bridge/lrfd/us_ds7.cfm#designstep712_19 87/120
Required bar spacing =
Use #5 bars @
per foot
Once the bar size and spacing are known, the maximum reinforcement limit must be checked.
S5.7.3.3.1
S5.7.2.2
S5.7.2.2
where
S5.7.3.3.1
OK
The crack control check for the footing heel critical section will not be carried out. The calculations are similar
to that of the abutment backwall, stem, and footing toe.
Preliminary Design
A quick way to come up with a design section that will probably work for all design checks is to
just check the crack control requirements for LRFD. It has been the designer's experience that
in many footing designs, the crack control requirements control the footing design. The above is

28/09/2013 LRFD Steel Girder SuperStructure Design Example - LRFD - Design - Bridge - Structures - Federal Highway Administration
www.fhwa.dot.gov/bridge/lrfd/us_ds7.cfm#designstep712_19 88/120
true for LRFD because LFD allows a certain percentage of overstress for the service cases due
to the low probability that the loads combined for each service case will actually occur
simultaneously.
Shrinkage and temperature reinforcement:
S5.10.8
For members less than 48.0 inches thick, the area of reinforcement in each direction shall not be spaced
greater than 12.0 inches and satisfy the lesser of:
S5.10.8.2
or
The total combined amount of reinforcing steel on the top and bottom transverse faces must be greater than or
equal to 0.54 in2/ft.
For one face only:
Try 1 # 5 bar at 12.0 inch spacing for one face:

28/09/2013 LRFD Steel Girder SuperStructure Design Example - LRFD - Design - Bridge - Structures - Federal Highway Administration
www.fhwa.dot.gov/bridge/lrfd/us_ds7.cfm#designstep712_19 89/120
OK
Based on the abutment footing flexure design, #8 bars at 12.0 inch spacing are required for the bottom
longitudinal flexure reinforcement. #5 bars at 12.0 inch spacing are required for the top longitudinal flexure
reinforcement. In the footing transverse direction, the shrinkage and temperature reinforcement calculations
require #5 bars at 12.0 inch spacing for the top and bottom mats.
Design for shear:
S5.13.3.6
Shear design in abutment footings consists of having adequate resistance against one-way action and two-
way action. For both one-way and two-way actions, the design shear is taken at a critical section. For
abutments, one-way action is checked in the toe and heel. The factored shear force at the critical section is
computed by cutting the footing at the critical section and summing the pile loads or portions of pile loads that
are outside the critical section. Two-way action in abutment footings supported by piles is generally checked
taking a critical perimeter around individual piles or around a group of piles when the critical perimeter of
individual piles overlap.
For one way action in the abutment footing toe, the critical section is taken as the larger of:
S5.13.3.6.1 & S5.8.3.2
or
The term dv is calculated the same as it is for the backwall and stem:
S5.8.2.9
where:
taken from footing toe strength flexure design
taken from footing toe strength flexure design

28/09/2013 LRFD Steel Girder SuperStructure Design Example - LRFD - Design - Bridge - Structures - Federal Highway Administration
www.fhwa.dot.gov/bridge/lrfd/us_ds7.cfm#designstep712_19 90/120
Now the critical section can be calculated:
or
use
Figure 7-22 Abutment Toe One-way Action Critical Section
Since the front row of piles are all inside the critical section, the factored shear outside the critical section is
zero and does not have to be checked. However, the manner in which the design shear force would be
calculated if the front row of piles were outside the critical section is shown below. Note that this check is not
required and does not apply since the front row of piles are all inside the critical section.
The pile loads used to compute the controlling footing toe shear force are for the Strength I limit state using
the maximum load factors at the final construction stage. They are taken from Design Step P, Tables P-17
through P-20 and are as follows:

28/09/2013 LRFD Steel Girder SuperStructure Design Example - LRFD - Design - Bridge - Structures - Federal Highway Administration
www.fhwa.dot.gov/bridge/lrfd/us_ds7.cfm#designstep712_19 91/120
The factored one-way shear force at the abutment footing toe critical section on a per foot basis is then:
The nominal shear resistance is the lesser of:
S5.8.3.3
or
where:
and
neglect for this abutment design
Before the nominal shear resistance can be calculated, all the variables used in the above equations need to
be defined.
S5.8.3.4.1
S5.8.2.9
Now, Vn1 and Vn2 can be calculated:
For

28/09/2013 LRFD Steel Girder SuperStructure Design Example - LRFD - Design - Bridge - Structures - Federal Highway Administration
www.fhwa.dot.gov/bridge/lrfd/us_ds7.cfm#designstep712_19 92/120
Use:
The factored shear resistance is then:
S5.5.4.2.1
N.G.
If the front row of piles were outside the critical section, the one-way shear for the abutment footing toe would
fail. The footing depth would have to be increased or the piles would have to be redesigned to reduce the shear
force outside the critical section. Again, the above design shear force and resistance are just shown to
illustrate the toe one-way shear check if the pile loads were outside the critical section.
For one way action in the abutment footing heel, the critical section is taken at the abutment face for heels
that are in tension on the top face of the heel. For heels that are in compression on the top face, the critical
section is calculated according to S5.8.2.9. The maximum factored abutment footing heel shear occurs when
the heel is in tension on the top face. Therefore, the critical section is taken at the stem back face.
S5.13.3.6.1 & C5.13.3.6.1
The term dv is calculated the same as it is for the abutment toe:
S5.8.2.9
where:

28/09/2013 LRFD Steel Girder SuperStructure Design Example - LRFD - Design - Bridge - Structures - Federal Highway Administration
www.fhwa.dot.gov/bridge/lrfd/us_ds7.cfm#designstep712_19 93/120
use the same effective depth as the toe - conservative
use the same stress block depth as the toe - conservative
Figure 7-23 Abutment Heel One-way Action Critical Section
Since the back row of piles are all outside the critical section, the factored shear is computed by summing all
the back row pile loads.
The pile loads used to compute the controlling footing heel shear force are for the Strength I limit state using
the minimum load factors at the final construction stage. They are taken from Design Step P, Tables P-17
through P-20 and are as follows:

28/09/2013 LRFD Steel Girder SuperStructure Design Example - LRFD - Design - Bridge - Structures - Federal Highway Administration
www.fhwa.dot.gov/bridge/lrfd/us_ds7.cfm#designstep712_19 94/120
The factored one-way shear force at the abutment footing heel critical section on a per foot basis is then:
The nominal shear resistance is the lesser of:
S5.8.3.3
or
where:
and
neglect for this abutment design
Before the nominal shear resistance can be calculated, all the variables used in the above equations need to
be defined.
S5.8.3.4.1
S5.8.2.9
Now, Vn1 and Vn2 can be calculated:
For

28/09/2013 LRFD Steel Girder SuperStructure Design Example - LRFD - Design - Bridge - Structures - Federal Highway Administration
www.fhwa.dot.gov/bridge/lrfd/us_ds7.cfm#designstep712_19 95/120
Use:
The factored shear resistance is then:
S5.5.4.2.1
OK
For two-way action, the pile critical perimeter, bo, is located a minimum of 0.5dv from the perimeter of the pile.
If portions of the critical perimeter are located off the footing, that portion of the critical perimeter is limited by
the footing edge.
Two-way action should be checked for the maximum loaded pile, or pile # 8 (see Design Step P - Tables P-17
through P-20). The effective shear depth, dv, is the same as that used for the one-way shear check for the
footing toe.
S5.13.3.6.1
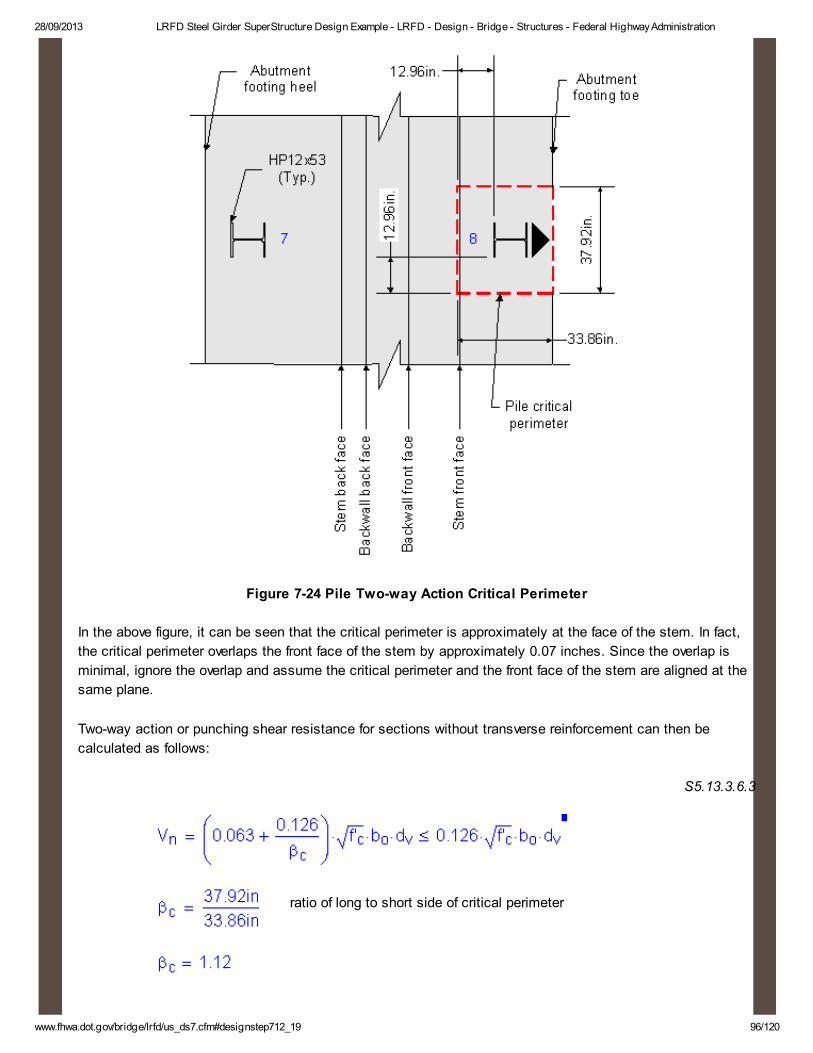
28/09/2013 LRFD Steel Girder SuperStructure Design Example - LRFD - Design - Bridge - Structures - Federal Highway Administration
www.fhwa.dot.gov/bridge/lrfd/us_ds7.cfm#designstep712_19 96/120
Figure 7-24 Pile Two-way Action Critical Perimeter
In the above figure, it can be seen that the critical perimeter is approximately at the face of the stem. In fact,
the critical perimeter overlaps the front face of the stem by approximately 0.07 inches. Since the overlap is
minimal, ignore the overlap and assume the critical perimeter and the front face of the stem are aligned at the
same plane.
Two-way action or punching shear resistance for sections without transverse reinforcement can then be
calculated as follows:
S5.13.3.6.3
ratio of long to short side of critical perimeter

28/09/2013 LRFD Steel Girder SuperStructure Design Example - LRFD - Design - Bridge - Structures - Federal Highway Administration
www.fhwa.dot.gov/bridge/lrfd/us_ds7.cfm#designstep712_19 97/120
use
The factored punching shear resistance is then:
S5.5.4.2.1
OK
Design Step 7.12 - Draw Schematic of Final Abutment Design
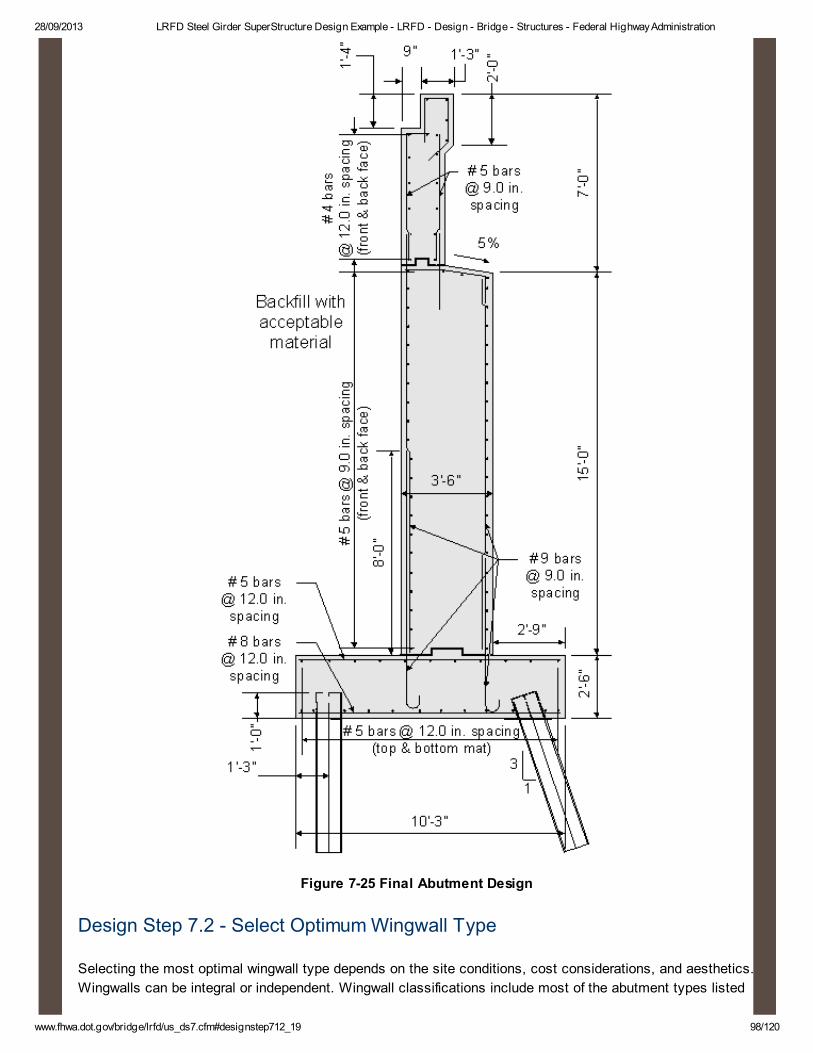
28/09/2013 LRFD Steel Girder SuperStructure Design Example - LRFD - Design - Bridge - Structures - Federal Highway Administration
www.fhwa.dot.gov/bridge/lrfd/us_ds7.cfm#designstep712_19 98/120
Figure 7-25 Final Abutment Design
Design Step 7.2 - Select Optimum Wingwall Type
Selecting the most optimal wingwall type depends on the site conditions, cost considerations, and aesthetics.
Wingwalls can be integral or independent. Wingwall classifications include most of the abutment types listed

28/09/2013 LRFD Steel Girder SuperStructure Design Example - LRFD - Design - Bridge - Structures - Federal Highway Administration
www.fhwa.dot.gov/bridge/lrfd/us_ds7.cfm#designstep712_19 99/120
in the abutment section. For this design example, a reinforced concrete cantilever wingwall was chosen. The
wingwall is skewed at a 45 degree angle from the front face of the abutment stem.
S11.2
Figure 7- 26 Reinforced Concrete Cantilever Wingwall
Design Step 7.3 - Select Preliminary Wingwall Dimensions
The designer should base the preliminary wingwall dimensions on state specific standards, previous designs,
and past experience.
The following figure shows the preliminary dimensions for the wingwall.

28/09/2013 LRFD Steel Girder SuperStructure Design Example - LRFD - Design - Bridge - Structures - Federal Highway Administration
www.fhwa.dot.gov/bridge/lrfd/us_ds7.cfm#designstep712_19 100/120
Figure 7-27 Preliminary Wingwall Dimensions
Design Step 7.4 - Compute Dead Load Effects
Once the preliminary wingwall dimensions are selected, the corresponding dead loads can be computed. The
dead loads are calculated on a per foot basis. For sloped wingwalls, the design section is generally taken at a
distance of one-third down from the high end of the wingwall.
S3.5.1
Design section stem height:
Distance from start of slope at high end of stem:
Amount wingwall stem drops per foot:

28/09/2013 LRFD Steel Girder SuperStructure Design Example - LRFD - Design - Bridge - Structures - Federal Highway Administration
www.fhwa.dot.gov/bridge/lrfd/us_ds7.cfm#designstep712_19 101/120
The wingwall design height is then:
Use
Figure 7-28 Wingwall Design Section
Wingwall stem:
Design Step 7.5 - Compute Live Load Effects
Since the wingwall does not support a parapet, the only live load effects are from live load surcharge. The
effects from live load surcharge are computed in Design Step 7.6.
Design Step 7.6 - Compute Other Load Effects
28/09/2013 LRFD Steel Girder SuperStructure Design Example - LRFD - Design - Bridge - Structures - Federal Highway Administration
www.fhwa.dot.gov/bridge/lrfd/us_ds7.cfm#designstep712_19 102/120
Other load effects that need to be computed include: wind loads, earthquake loads, earth pressure, live load
surcharge, and temperature loads.
Wind Load on Wingwall
S3.8.1.2.3
The wind loads acting on the exposed portion of the wingwall front and end elevations are calculated from a
base wind pressure of 0.040 KSF. In the wingwall final state, the wind loads acting on the wingwall will only
decrease the overturning moment and will be ignored for this design example. For the wingwall temporary
state, the wind loads acting on the wingwall should be investigated. Also, any wind loads that produce a
transverse shear or moment in the wingwall footing are ignored. The reason for this is due to the fact that the
majority of force effects required to produce a transverse shear or moment will also reduce the maximum
overturning moment.
Earthquake Load
S3.10
This design example assumes that the structure is located in seismic zone I with an acceleration coefficient of
0.02. For seismic zone I, no seismic analysis is required.
Earth Loads
S3.11
The earth loads that need to be investigated for this design example include: loads due to basic lateral earth
pressure, loads due to uniform surcharge, and live load surcharge loads.
S3.11.5
S3.11.6
Loads due to basic lateral earth pressure:
S3.11.5
To obtain the lateral loads due to basic earth pressure, the earth pressure (p) must first be calculated from the
following equation.
S3.11.5.1
Bottom of wingwall stem lateral earth load:
obtained from geotechnical information
use average of loose and compacted gravel

28/09/2013 LRFD Steel Girder SuperStructure Design Example - LRFD - Design - Bridge - Structures - Federal Highway Administration
www.fhwa.dot.gov/bridge/lrfd/us_ds7.cfm#designstep712_19 103/120
STable 3.5.1-1
Depth below the surface of the earth
Figure 7-29 Wingwall Stem Design Earth Pressure
Once the lateral earth pressure is calculated, the lateral load due to the earth pressure can be calculated. This
load acts at a distance of H/3 from the bottom of the section being investigated. For cases where the ground
line is sloped, H is taken as the height from the top of earth to the bottom of the section being investigated.
S3.11.5.1
SC3.11.5.1
Since the ground line is sloped, REHstem, must be broken down into horizontal and vertical components as

28/09/2013 LRFD Steel Girder SuperStructure Design Example - LRFD - Design - Bridge - Structures - Federal Highway Administration
www.fhwa.dot.gov/bridge/lrfd/us_ds7.cfm#designstep712_19 104/120
follows:
Loads due to uniform surcharge:
S3.11.6.1
Since an approach slab and roadway will cover the abutment backfill material, no uniform surcharge load will
be applied.
Loads due to live load surcharge:
S3.11.6.4
Loads due to live load surcharge must be applied when a vehicular live load acts on the backfill surface behind
the backface within one-half the wall height. Since the distance from the wingwall back face to the edge of
traffic is greater than one foot, the equivalent height of fill is constant. The horizontal pressure increase due to
live load surcharge is estimated based on the following equation:
Bottom of wingwall stem live load surcharge load:
use average of loose and compacted gravel
STable 3.5.1-1
equivalent height of soil for vehicular loading
STable 3.11.6.4-1

28/09/2013 LRFD Steel Girder SuperStructure Design Example - LRFD - Design - Bridge - Structures - Federal Highway Administration
www.fhwa.dot.gov/bridge/lrfd/us_ds7.cfm#designstep712_19 105/120
The lateral load due to the live load surcharge is:
Since the ground line is sloped, RLSstem, must be broken down into horizontal and vertical components as
follows:
Loads due to temperature:
S3.12
Temperature loads are not applicable for the wingwall design.
Design Step 7.7 - Analyze and Combine Force Effects
There are two critical locations where the force effects need to be combined and analyzed for design. They
include: the bottom of stem or top of footing and the bottom of footing. For the stem design, transverse
horizontal loads do not need be considered due to the high moment of inertia about that axis, but at the
bottom of footing, the transverse horizontal loads will need to be considered for the footing and pile design.
Note that the footing design calculations for wingwalls are similar to abutments. Therefore, the wingwall footing
design calculations will not be shown.
Bottom of Wingwall Stem
The combination of force effects for the bottom of the wingwall stem includes:
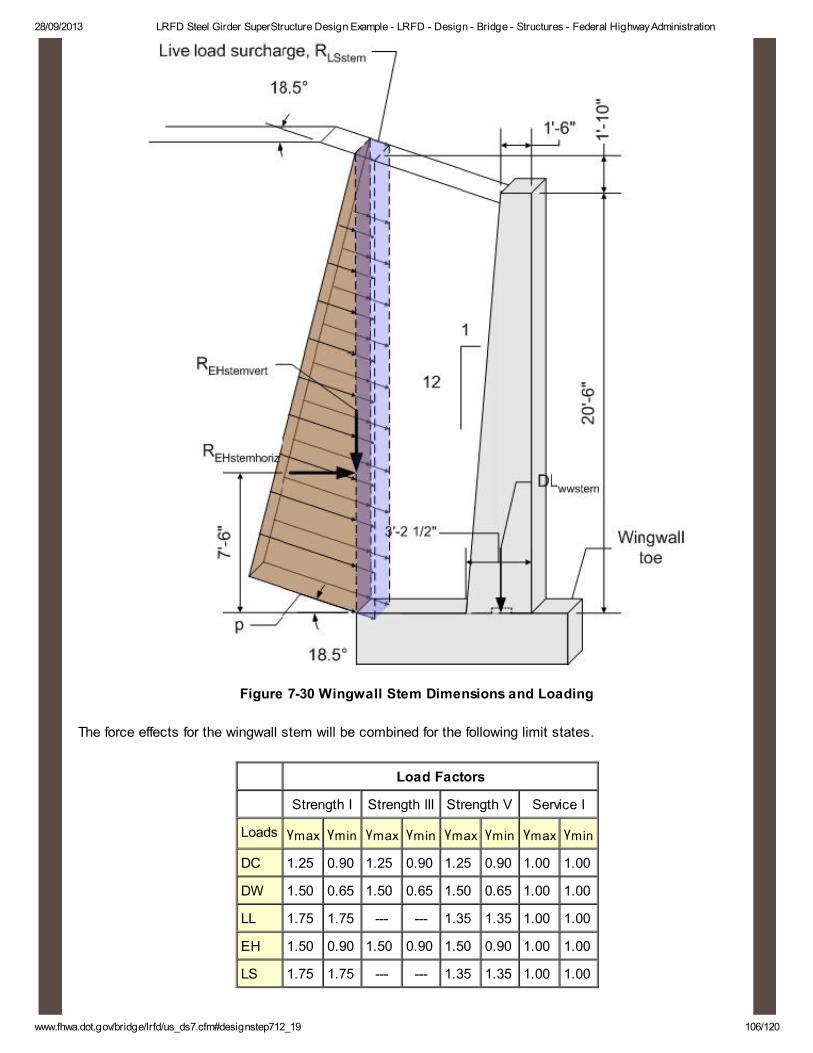
28/09/2013 LRFD Steel Girder SuperStructure Design Example - LRFD - Design - Bridge - Structures - Federal Highway Administration
www.fhwa.dot.gov/bridge/lrfd/us_ds7.cfm#designstep712_19 106/120
Figure 7-30 Wingwall Stem Dimensions and Loading
The force effects for the wingwall stem will be combined for the following limit states.
Load Factors
Strength I Strength III Strength V Service I
Loads γmax γmin γmax γmin γmax γmin γmax γmin
DC 1.25 0.90 1.25 0.90 1.25 0.90 1.00 1.00
DW 1.50 0.65 1.50 0.65 1.50 0.65 1.00 1.00
LL 1.75 1.75 --- --- 1.35 1.35 1.00 1.00
EH 1.50 0.90 1.50 0.90 1.50 0.90 1.00 1.00
LS 1.75 1.75 --- --- 1.35 1.35 1.00 1.00

28/09/2013 LRFD Steel Girder SuperStructure Design Example - LRFD - Design - Bridge - Structures - Federal Highway Administration
www.fhwa.dot.gov/bridge/lrfd/us_ds7.cfm#designstep712_19 107/120
STable 3.4.1-1
STable 3.4.1-2
Table 7-7 Applicable Wingwall Stem Limit States with the Corresponding Load Factors
The loads that are required to combine force effects at the base of the wingwall stem include:
Wingwall stem Strength I force effects:
The following load factors will be used to calculate the controlling force effects for Strength I:
STable 3.4.1-2
STable 3.4.1-2
STable 3.4.1-1
The factored vertical force at the base of the wingwall stem is:
The factored longitudinal shear force at the base of the wingwall stem is:

28/09/2013 LRFD Steel Girder SuperStructure Design Example - LRFD - Design - Bridge - Structures - Federal Highway Administration
www.fhwa.dot.gov/bridge/lrfd/us_ds7.cfm#designstep712_19 108/120
The factored moment about the bridge transverse axis at the base of the wingwall stem is:
Wingwall stem Strength III force effects:
The following load factors will be used to calculate the force effects for Strength III:
STable 3.4.1-2
STable 3.4.1-2
The factored vertical force at the base of the wingwall stem is:
The factored longitudinal shear force at the base of the abutment stem is:
The factored longitudinal moment at the base of the wingwall stem is:
Wingwall stem Strength V force effects:
The following load factors will be used to calculate the force effects for Strength V:

28/09/2013 LRFD Steel Girder SuperStructure Design Example - LRFD - Design - Bridge - Structures - Federal Highway Administration
www.fhwa.dot.gov/bridge/lrfd/us_ds7.cfm#designstep712_19 109/120
STable 3.4.1-2
STable 3.4.1-2
STable 3.4.1-1
The factored vertical force at the base of the wingwall stem is:
The factored longitudinal shear force at the base of the wingwall stem is:
The factored longitudinal moment at the base of the wingwall stem is:
Wingwall stem Service I force effects:
The following load factors will be used to calculate the force effects for Service I:
STable 3.4.1-2
STable 3.4.1-2

28/09/2013 LRFD Steel Girder SuperStructure Design Example - LRFD - Design - Bridge - Structures - Federal Highway Administration
www.fhwa.dot.gov/bridge/lrfd/us_ds7.cfm#designstep712_19 110/120
STable 3.4.1-1
The factored vertical force at the base of the wingwall stem is:
The factored longitudinal shear force at the base of the wingwall stem is:
The factored longitudinal moment at the base of the wingwall stem is:
The maximum factored wingwall stem vertical force, shear force, and moment for the strength limit state are:
Design Step 7.9 - Design Wingwall Stem

28/09/2013 LRFD Steel Girder SuperStructure Design Example - LRFD - Design - Bridge - Structures - Federal Highway Administration
www.fhwa.dot.gov/bridge/lrfd/us_ds7.cfm#designstep712_19 111/120
Design for flexure:
Assume #9 bars:
First, the minimum reinforcement requirements will be calculated. The tensile reinforcement provided must be
enough to develop a factored flexural resistance at least equal to the lesser of 1.2 times the cracking strength
or 1.33 times the factored moment from the applicable strength load combinations.
S5.7.3.3.2
The cracking strength is calculated by:
SEquation
5.7.3.6.2-2
Figure 7-31 Wingwall Cracking Moment Dimensions
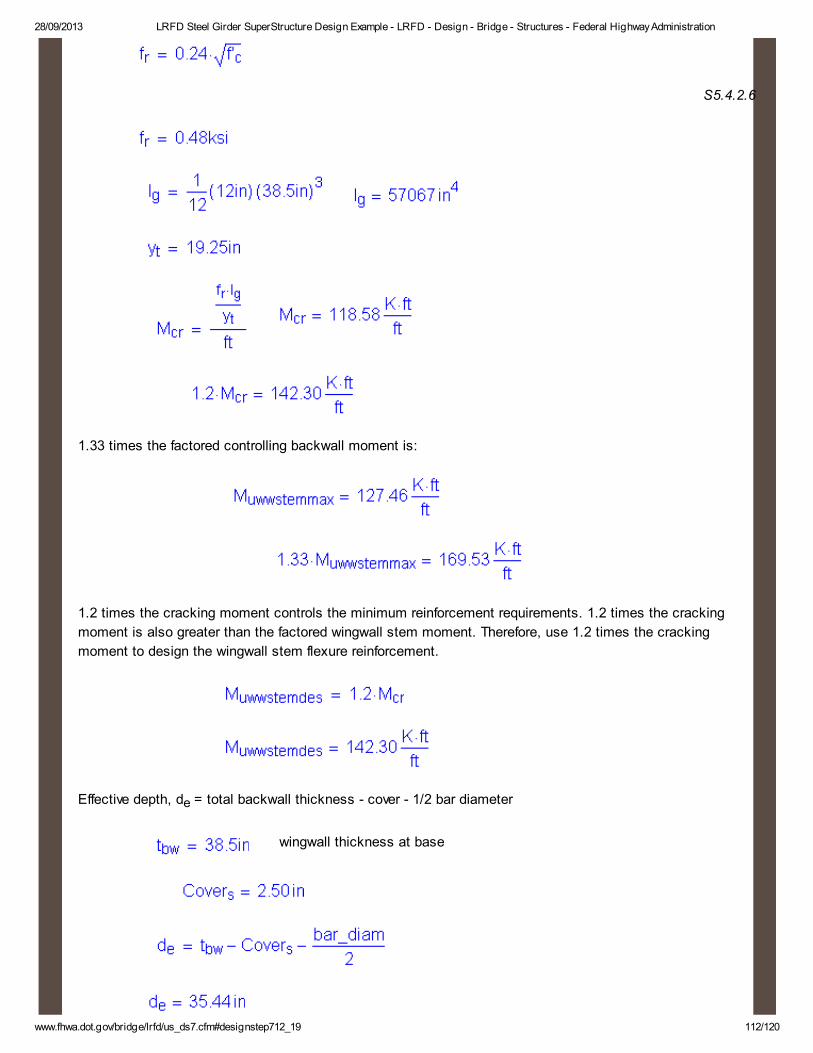
28/09/2013 LRFD Steel Girder SuperStructure Design Example - LRFD - Design - Bridge - Structures - Federal Highway Administration
www.fhwa.dot.gov/bridge/lrfd/us_ds7.cfm#designstep712_19 112/120
S5.4.2.6
1.33 times the factored controlling backwall moment is:
1.2 times the cracking moment controls the minimum reinforcement requirements. 1.2 times the cracking
moment is also greater than the factored wingwall stem moment. Therefore, use 1.2 times the cracking
moment to design the wingwall stem flexure reinforcement.
Effective depth, de = total backwall thickness - cover - 1/2 bar diameter
wingwall thickness at base

28/09/2013 LRFD Steel Girder SuperStructure Design Example - LRFD - Design - Bridge - Structures - Federal Highway Administration
www.fhwa.dot.gov/bridge/lrfd/us_ds7.cfm#designstep712_19 113/120
Solve for the required amount of reinforcing steel, as follows:
S5.5.4.2.1
Note: The above two equations are derived formulas that can be found in most reinforced concrete textbooks.
Required bar spacing =
Use #9 bars @ to match the abutment stem vertical bar spacing
per foot
Once the bar size and spacing are known, the maximum reinforcement limit must be checked.
S5.7.3.3.1
S5.7.2.2
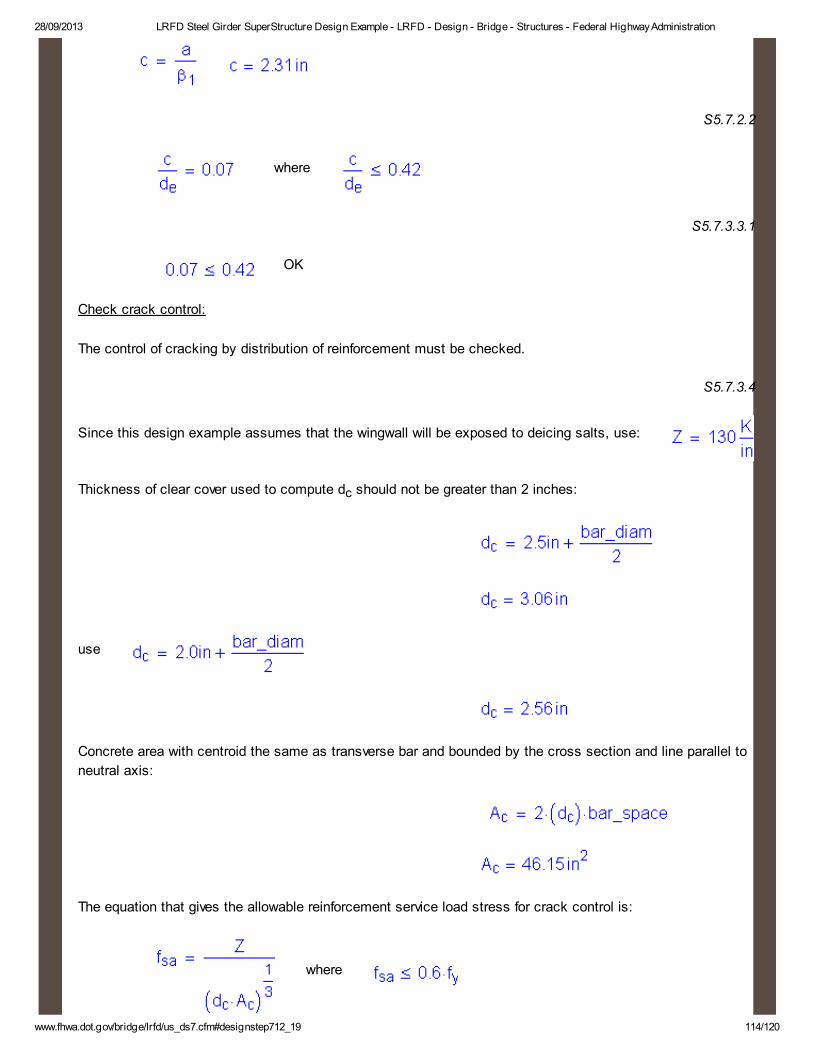
28/09/2013 LRFD Steel Girder SuperStructure Design Example - LRFD - Design - Bridge - Structures - Federal Highway Administration
www.fhwa.dot.gov/bridge/lrfd/us_ds7.cfm#designstep712_19 114/120
S5.7.2.2
where
S5.7.3.3.1
OK
Check crack control:
The control of cracking by distribution of reinforcement must be checked.
S5.7.3.4
Since this design example assumes that the wingwall will be exposed to deicing salts, use:
Thickness of clear cover used to compute dc should not be greater than 2 inches:
use
Concrete area with centroid the same as transverse bar and bounded by the cross section and line parallel to
neutral axis:
The equation that gives the allowable reinforcement service load stress for crack control is:
where

28/09/2013 LRFD Steel Girder SuperStructure Design Example - LRFD - Design - Bridge - Structures - Federal Highway Administration
www.fhwa.dot.gov/bridge/lrfd/us_ds7.cfm#designstep712_19 115/120
Use
S5.4.3.2
S5.4.2.4
Use
Service backwall total load moment:
To solve for the actual stress in the reinforcement, the transformed moment of inertia and the distance from
the neutral axis to the centroid of the reinforcement must be computed:

28/09/2013 LRFD Steel Girder SuperStructure Design Example - LRFD - Design - Bridge - Structures - Federal Highway Administration
www.fhwa.dot.gov/bridge/lrfd/us_ds7.cfm#designstep712_19 116/120
Figure 7-32 Wingwall Crack Control Check
Once kde is known, the transformed moment of inertia can be computed:
Now, the actual stress in the reinforcement can be computed:
OK

28/09/2013 LRFD Steel Girder SuperStructure Design Example - LRFD - Design - Bridge - Structures - Federal Highway Administration
www.fhwa.dot.gov/bridge/lrfd/us_ds7.cfm#designstep712_19 117/120
Design for shear:
The factored longitudinal shear force at the base of the wingwall is:
The nominal shear resistance is the lesser of:
S5.8.3.3
or
where:
and
neglect for this wingwall design
Before the nominal shear resistance can be calculated, all the variables used in the above equations need to
be defined.
S5.8.3.4.1
S5.8.2.9
where:

28/09/2013 LRFD Steel Girder SuperStructure Design Example - LRFD - Design - Bridge - Structures - Federal Highway Administration
www.fhwa.dot.gov/bridge/lrfd/us_ds7.cfm#designstep712_19 118/120
Therefore:
Now, Vn1 and Vn2 can be calculated:
For
Use:
The factored shear resistance is then:
S5.5.4.2.1
OK
Shrinkage and temperature reinforcement:
S5.10.8
For members less than 48.0 inches thick, the area of reinforcement in each direction shall not be spaced
greater than 12.0 inches and satisfy the lesser of:

28/09/2013 LRFD Steel Girder SuperStructure Design Example - LRFD - Design - Bridge - Structures - Federal Highway Administration
www.fhwa.dot.gov/bridge/lrfd/us_ds7.cfm#designstep712_19 119/120
S5.10.8.2
As must be greater than or equal to 0.69in2/ft
The above steel must be distributed equally on both faces of the wingwall.
Try 1 horizontal # 5 bar for each face of the wingwall at 9.0 inch spacing:
OK
Based on the wingwall design, #9 bars at 9.0 inch spacing will be used for the back face flexure reinforcement.
Use # 5 bars at 9.0 inch spacing for the front face vertical reinforcement. The horizontal temperature and
shrinkage reinforcement will consist of #5 bars at 9.0 inch spacing for the front and back faces.
Design Step 7.12 - Draw Schematic of Final Wingwall Design

28/09/2013 LRFD Steel Girder SuperStructure Design Example - LRFD - Design - Bridge - Structures - Federal Highway Administration
www.fhwa.dot.gov/bridge/lrfd/us_ds7.cfm#designstep712_19 120/120
Figure 7-33 Final Wingwall Design
<< previous Contents next >>
Federal Highw ay Administration | 1200 New Jersey Avenue, SE | Washington, DC 20590 | 202-
366-4000


![Internal - Luciano Chinellato · AnyOne® Internal è -P_[\YL 3L]LS 7YVZ[OLZPZ EZ Post Milling Abutment Angled Abutment CCM Abutment Temporary Abutment [Titanium] Temporary Abutment](https://static.fdocuments.net/doc/165x107/5c038f7909d3f2156d8cd7fd/internal-luciano-anyone-internal-e-pyl-3lls-7yvzolzpz-ez-post-milling.jpg)