Lesson6 Curves and Surfaces
37
© 2011 Autodesk 1
-
Upload
roberto-costa-da-matta -
Category
Documents
-
view
237 -
download
2
description
muita doiddera pra uma coisa so
Transcript of Lesson6 Curves and Surfaces

© 2011 Autodesk 1

© 2011 Autodesk 2

© 2011 Autodesk 3
© 2011 Autodesk
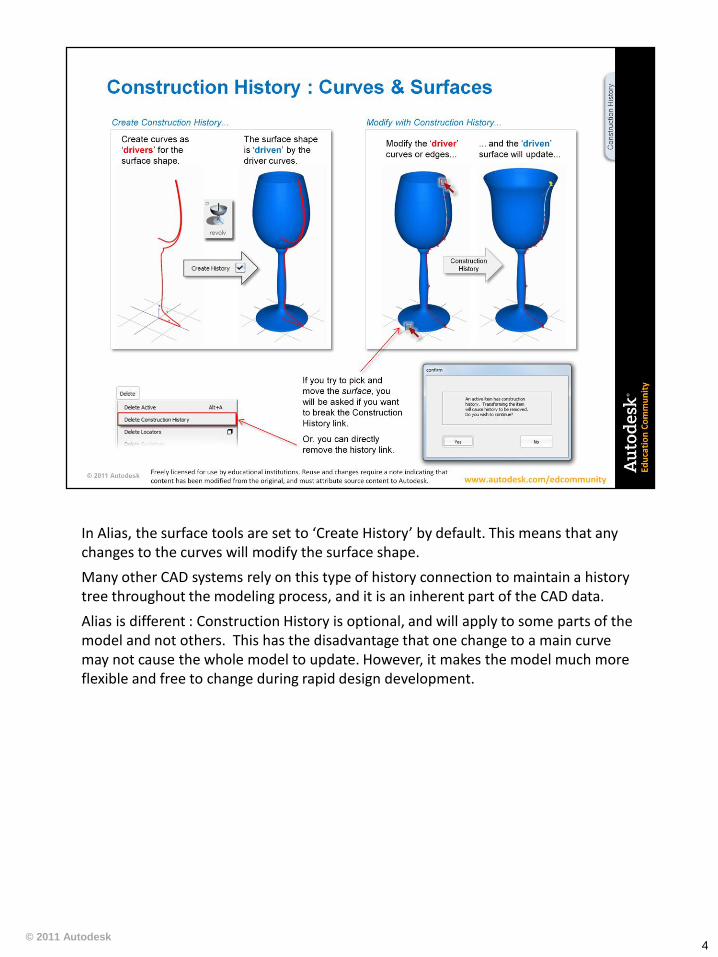
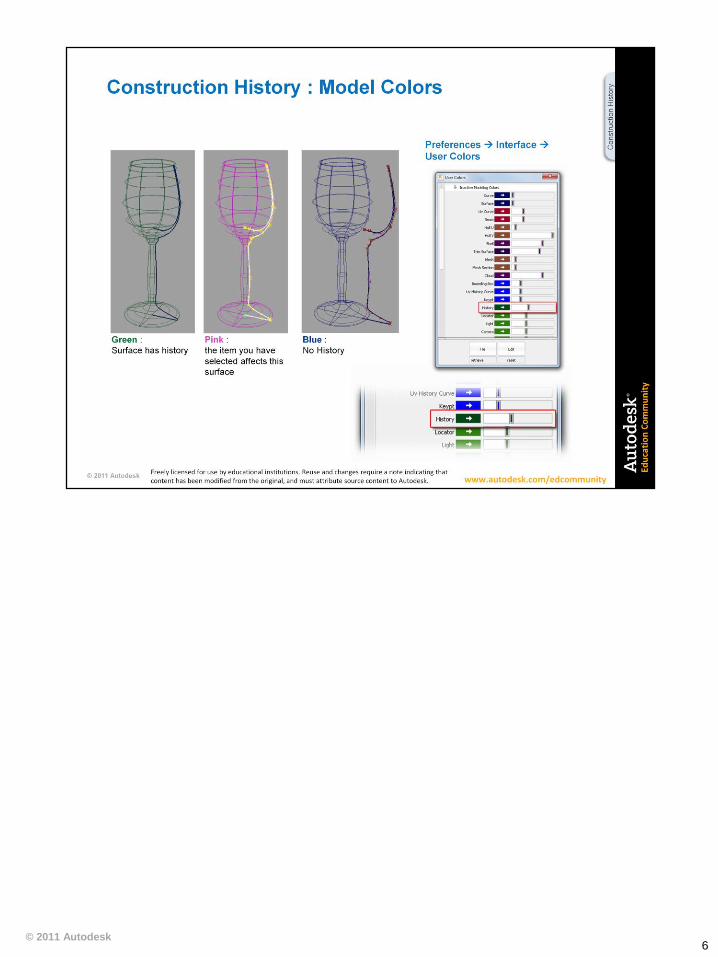
In Alias, the surface tools are set to ‘Create History’ by default. This means that any changes to the curves will modify the surface shape.
Many other CAD systems rely on this type of history connection to maintain a history tree throughout the modeling process, and it is an inherent part of the CAD data.
Alias is different : Construction History is optional, and will apply to some parts of the model and not others. This has the disadvantage that one change to a main curve may not cause the whole model to update. However, it makes the model much more flexible and free to change during rapid design development.
4

© 2011 Autodesk
The second way to use construction history to update and change your surfaces is through changing the settings in a control window.
Not all surface tools have a ‘Control Window’, some only have an ‘Option Window’. The difference is that the settings in an option window can only be chosen once, before the curves are chosen.
With a Control Window, you can always return to the settings and make changes at any time (as long as the construction history has not been deleted).
5
© 2011 Autodesk 6

© 2011 Autodesk
The History View in Alias may look similar to a ‘history tree’ found in engineering CAD systems, but it doesn’t work in the same way.
The Alias History View is for viewing the model links and history, and in practice isn’t used regularly. Whereas a CAD system history tree is normally a fundamental part of the CAD model structure.
The most useful tool is the ‘suspend rebuilds’ option. If you have a large model, with lots of history connections, then modifying a CV on an early curve can cause the system to pause, while it is updating all the dependent surfaces, which makes interactive sculpting difficult. This temporarily suspends these rebuilds while you sculpt a new shape for a curve, and removing it then allows all the rebuilds to be done afterwards.
7

© 2011 Autodesk
Focus on Curve Quality
The structure of your curves will directly affect the structure of your surfaces, and so most of the time is spent creating and refining the curves.
8
© 2011 Autodesk 9

© 2011 Autodesk 10

© 2011 Autodesk
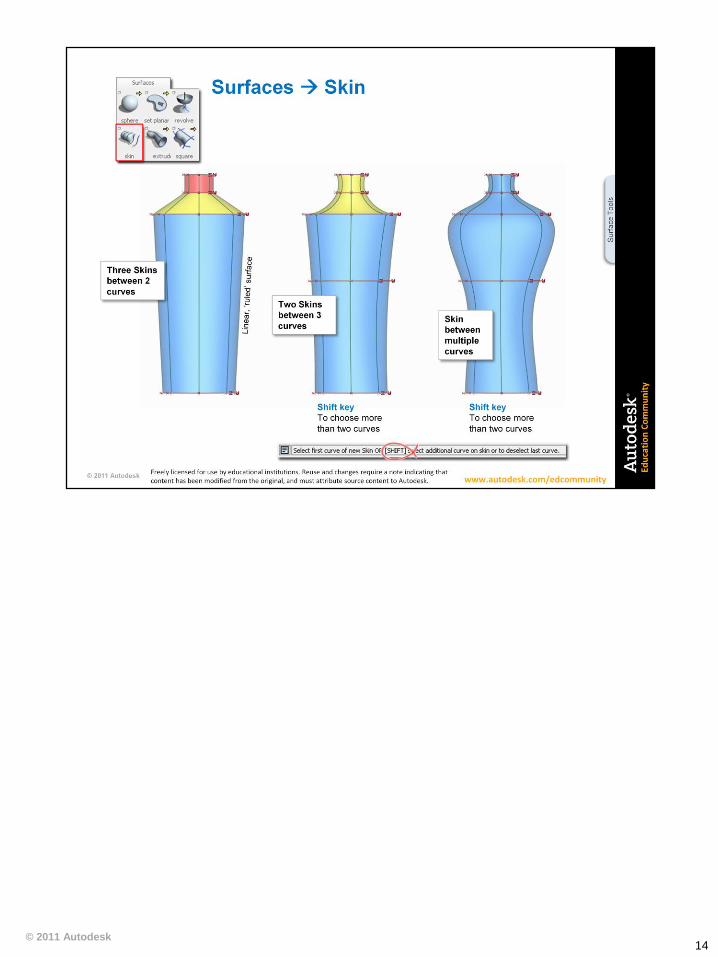
Minimum number of curves
There are many shapes that could be built using a variety of surface tools. Always try to use the minimum number of curves to achieve a shape.
11

© 2011 Autodesk
There are too many individual options for each tool to go through them one-by-one in a lecture, so you will need to explore and experiment with them to expand your skill and knowledge.
Learning by Exploring
Particularly if you have experience with other CAD systems, you can learn to use the surface tools by just trying them, and following the prompts.
Learning by Reading
To get information on all the options for each surface, access the help documentation.
12

© 2011 Autodesk
Further information on the revolve tool can be found in the What’s new videos ;
13
© 2011 Autodesk 14
© 2011 Autodesk 15
© 2011 Autodesk 16

© 2011 Autodesk 17
© 2011 Autodesk 18
© 2011 Autodesk 19
© 2011 Autodesk
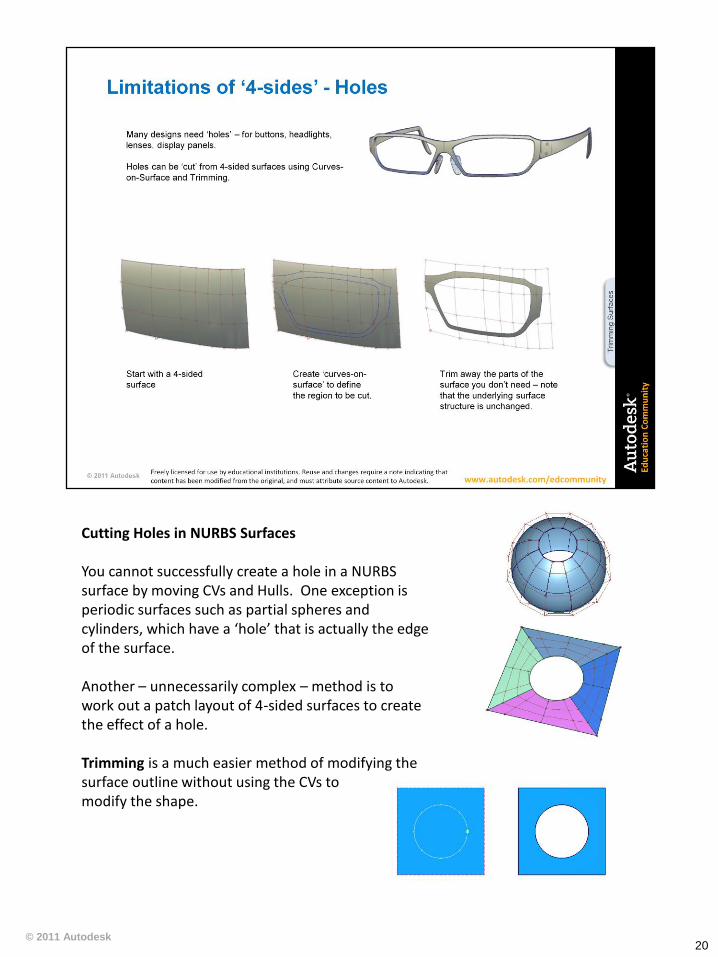
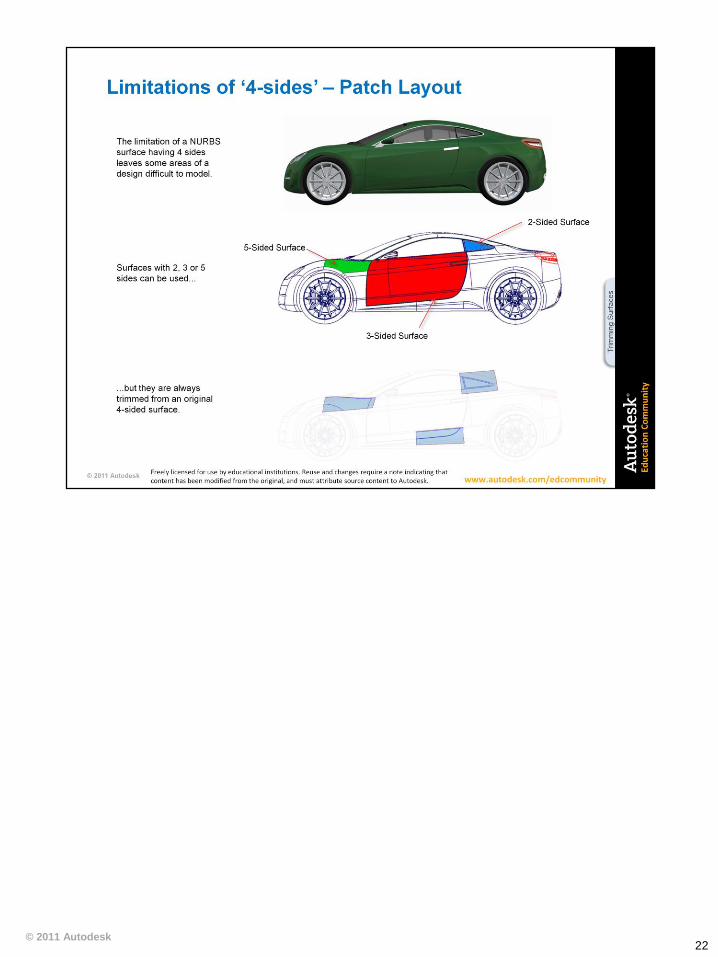
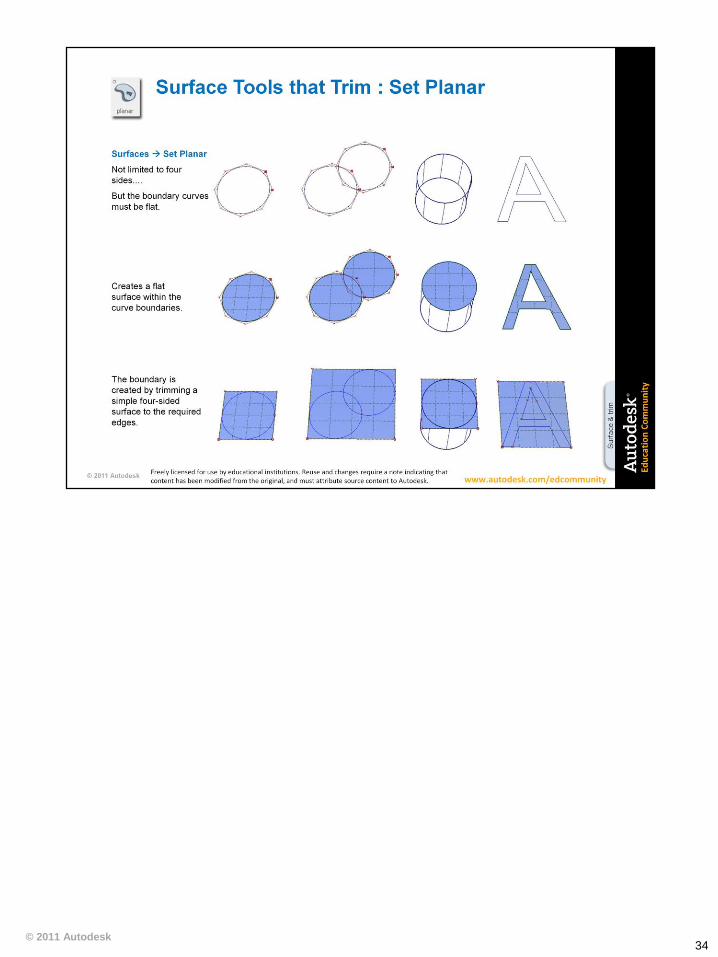
Cutting Holes in NURBS Surfaces You cannot successfully create a hole in a NURBS surface by moving CVs and Hulls. One exception is periodic surfaces such as partial spheres and cylinders, which have a ‘hole’ that is actually the edge of the surface. Another – unnecessarily complex – method is to work out a patch layout of 4-sided surfaces to create the effect of a hole. Trimming is a much easier method of modifying the surface outline without using the CVs to modify the shape.
20

© 2011 Autodesk 21
© 2011 Autodesk 22
© 2011 Autodesk
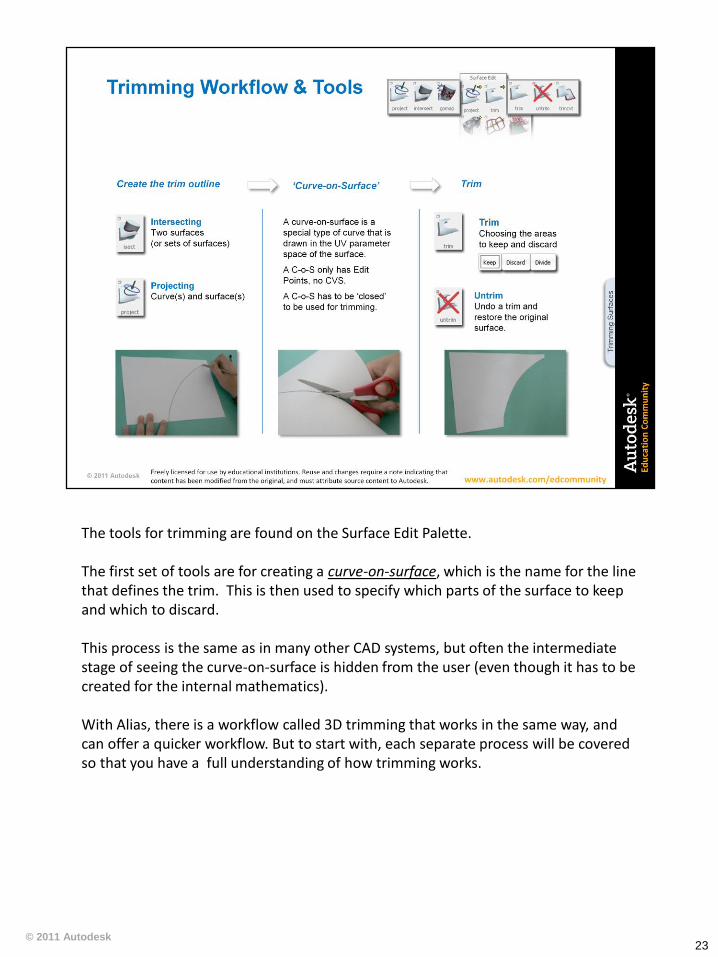
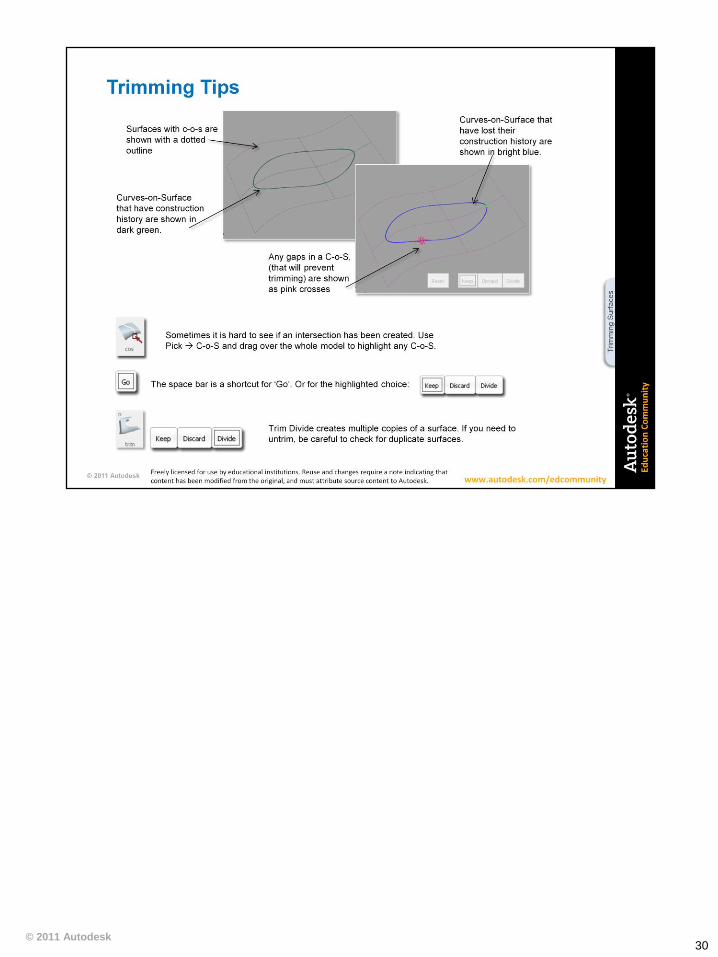
The tools for trimming are found on the Surface Edit Palette. The first set of tools are for creating a curve-on-surface, which is the name for the line that defines the trim. This is then used to specify which parts of the surface to keep and which to discard. This process is the same as in many other CAD systems, but often the intermediate stage of seeing the curve-on-surface is hidden from the user (even though it has to be created for the internal mathematics). With Alias, there is a workflow called 3D trimming that works in the same way, and can offer a quicker workflow. But to start with, each separate process will be covered so that you have a full understanding of how trimming works.
23

© 2011 Autodesk
By default, the Intersect option window is set to create curves-on-surface on both surfaces (or sets of surfaces)
24
© 2011 Autodesk
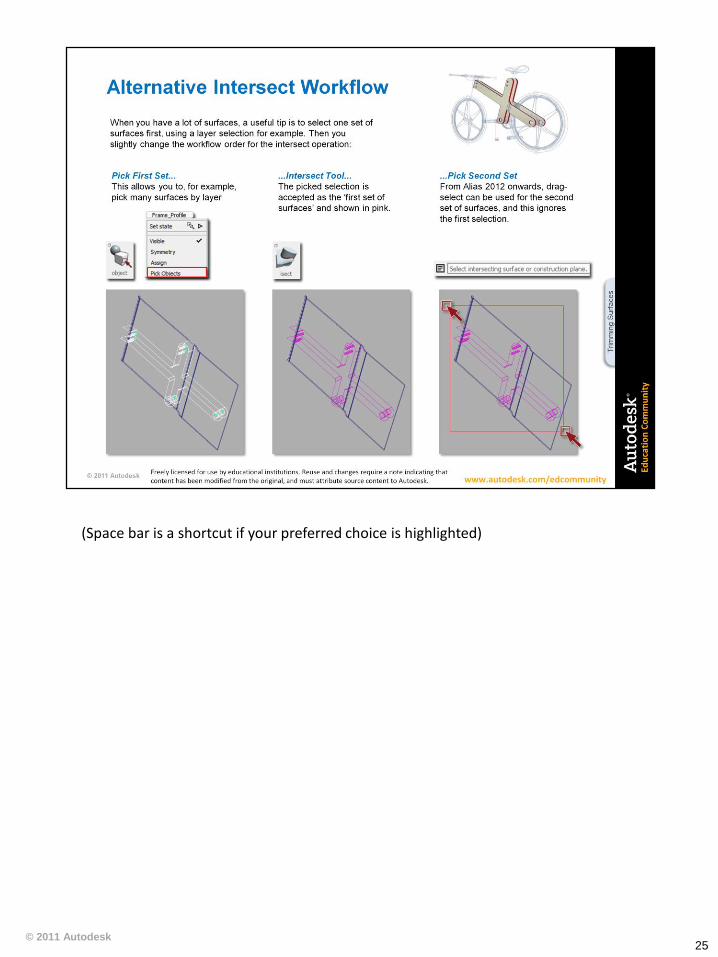
(Space bar is a shortcut if your preferred choice is highlighted)
25

© 2011 Autodesk
By default, Project creates a curve-on-surface ready for trimming.
You can also create a normal curve which can then be used for building further curves and surfaces
26

© 2011 Autodesk 27
© 2011 Autodesk 28

© 2011 Autodesk 29
© 2011 Autodesk 30

© 2011 Autodesk 31

© 2011 Autodesk 32

© 2011 Autodesk 33
© 2011 Autodesk 34

© 2011 Autodesk 35

© 2011 Autodesk 36

© 2011 Autodesk 37