Labtainer Lab Designer User Guide - NPS
63
Labtainer Lab Designer User Guide Fully provisioned cybersecurity labs October 30, 2020 This document was created by United States Government employees at The Center for Cybersecurity and Cyber Operations (C3O) at the Naval Postgraduate School NPS. Please note that within the United States, copyright protection is not available for any works created by United States Government employees, pursuant to Title 17 United States Code Section 105. This document is in the public domain and is not subject to copyright.
Transcript of Labtainer Lab Designer User Guide - NPS
Labtainer Lab Designer User Guide
Fully provisioned cybersecurity labs
October 30, 2020
This document was created by United States Government employees at The Center forCybersecurity and Cyber Operations (C3O) at the Naval Postgraduate School NPS. Please
note that within the United States, copyright protection is not available for any works createdby United States Government employees, pursuant to Title 17 United States Code Section
105. This document is in the public domain and is not subject to copyright.
Contents
1 Introduction 41.1 Benefits of Labtainers . . . . . . . . . . . . . . . . . . . . . . . . . . . . . . . . . 41.2 Obtaining the Labtainer development kit . . . . . . . . . . . . . . . . . . . . . . 51.3 Content of this guide . . . . . . . . . . . . . . . . . . . . . . . . . . . . . . . . . 5
2 Overview of the student environment and workflow 5
3 Creating new labs 73.1 Create the first lab computer . . . . . . . . . . . . . . . . . . . . . . . . . . . . 73.2 Testing the new lab . . . . . . . . . . . . . . . . . . . . . . . . . . . . . . . . . . 73.3 Multiple containers . . . . . . . . . . . . . . . . . . . . . . . . . . . . . . . . . . 9
4 Defining the lab execution environment 94.1 Docker files . . . . . . . . . . . . . . . . . . . . . . . . . . . . . . . . . . . . . . 94.2 Container definitions in start.config . . . . . . . . . . . . . . . . . . . . . . . . . 104.3 Lab-specific files in the student’s home directory . . . . . . . . . . . . . . . . . . 14
4.3.1 Large or numerous files in the home directory . . . . . . . . . . . . . . . 144.4 Lab-specific system files . . . . . . . . . . . . . . . . . . . . . . . . . . . . . . . 154.5 System services . . . . . . . . . . . . . . . . . . . . . . . . . . . . . . . . . . . . 154.6 Lab Text and Instructions for Students . . . . . . . . . . . . . . . . . . . . . . . 164.7 Running programs in Virtual Terminals . . . . . . . . . . . . . . . . . . . . . . . 174.8 Final lab environment fixup . . . . . . . . . . . . . . . . . . . . . . . . . . . . . 174.9 Persistent storage . . . . . . . . . . . . . . . . . . . . . . . . . . . . . . . . . . . 17
5 Parameterizing a lab 185.1 Parameterization configuration file syntax . . . . . . . . . . . . . . . . . . . . . 185.2 Synchronizing startup and parameterization . . . . . . . . . . . . . . . . . . . . 205.3 Parameterizing start.config . . . . . . . . . . . . . . . . . . . . . . . . . . . . . . 205.4 Simple Parameterization for Checking Own-work . . . . . . . . . . . . . . . . . 205.5 Debugging parameterizing . . . . . . . . . . . . . . . . . . . . . . . . . . . . . . 21
6 Automated assessment of student labs 216.1 Artifact files . . . . . . . . . . . . . . . . . . . . . . . . . . . . . . . . . . . . . . 21
6.1.1 Capturing stdin and stdout . . . . . . . . . . . . . . . . . . . . . . . . . 216.1.2 Capturing program file output . . . . . . . . . . . . . . . . . . . . . . . . 226.1.3 Bash History . . . . . . . . . . . . . . . . . . . . . . . . . . . . . . . . . 226.1.4 System logs . . . . . . . . . . . . . . . . . . . . . . . . . . . . . . . . . . 236.1.5 Capturing information about the environment . . . . . . . . . . . . . . . 236.1.6 Capturing file access events . . . . . . . . . . . . . . . . . . . . . . . . . 236.1.7 Generating results upon stopping the lab . . . . . . . . . . . . . . . . . . 246.1.8 Artifact archives . . . . . . . . . . . . . . . . . . . . . . . . . . . . . . . 24
6.2 Artifact result values . . . . . . . . . . . . . . . . . . . . . . . . . . . . . . . . . 256.2.1 Result field values . . . . . . . . . . . . . . . . . . . . . . . . . . . . . . . 256.2.2 Converting artifact file formats . . . . . . . . . . . . . . . . . . . . . . . 27
6.3 Evaluating results . . . . . . . . . . . . . . . . . . . . . . . . . . . . . . . . . . . 286.3.1 Goal definitions . . . . . . . . . . . . . . . . . . . . . . . . . . . . . . . . 286.3.2 Distinguish between results generated before and after configuration changes 316.3.3 Replace answers with hashes . . . . . . . . . . . . . . . . . . . . . . . . . 316.3.4 Assessment Report . . . . . . . . . . . . . . . . . . . . . . . . . . . . . . 32
1
6.3.5 Document the meaning of goals . . . . . . . . . . . . . . . . . . . . . . . 326.4 Student self-assessment . . . . . . . . . . . . . . . . . . . . . . . . . . . . . . . . 33
6.4.1 Current state assessment . . . . . . . . . . . . . . . . . . . . . . . . . . . 336.5 Current state artifacts . . . . . . . . . . . . . . . . . . . . . . . . . . . . . . . . 336.6 Assessment examples . . . . . . . . . . . . . . . . . . . . . . . . . . . . . . . . . 34
6.6.1 Did a program output an expected answer? . . . . . . . . . . . . . . . . 346.6.2 Do artifact files contain one of two specific strings? . . . . . . . . . . . . 346.6.3 Compare value of a field from a selected line in an artifact file . . . . . . 346.6.4 Was a log entry written while some command executed? . . . . . . . . . 356.6.5 My desired artifacts are not in stdin or stdout, the program outputs a file 356.6.6 Delimiting time using log file entries . . . . . . . . . . . . . . . . . . . . 356.6.7 Delimiting time via program invocations . . . . . . . . . . . . . . . . . . 36
6.7 Debugging automated assessment in labs . . . . . . . . . . . . . . . . . . . . . . 37
7 Quizzes 377.1 True or False . . . . . . . . . . . . . . . . . . . . . . . . . . . . . . . . . . . . . 377.2 Preface . . . . . . . . . . . . . . . . . . . . . . . . . . . . . . . . . . . . . . . . . 38
8 Networking 388.1 Network Taps . . . . . . . . . . . . . . . . . . . . . . . . . . . . . . . . . . . . . 398.2 Realistic Network Routing and DNS . . . . . . . . . . . . . . . . . . . . . . . . 398.3 Communicating with external hosts or VMs . . . . . . . . . . . . . . . . . . . . 408.4 Network interface assignments . . . . . . . . . . . . . . . . . . . . . . . . . . . . 41
9 Building, Maintaining and Publishing Labs 419.1 NPS Development Operations . . . . . . . . . . . . . . . . . . . . . . . . . . . . 419.2 Alternate registry for testing . . . . . . . . . . . . . . . . . . . . . . . . . . . . . 429.3 Large lab files . . . . . . . . . . . . . . . . . . . . . . . . . . . . . . . . . . . . . 42
9.3.1 Reuse of large file sets . . . . . . . . . . . . . . . . . . . . . . . . . . . . 439.4 Package sources for apt and yum . . . . . . . . . . . . . . . . . . . . . . . . . . 439.5 Locale settings . . . . . . . . . . . . . . . . . . . . . . . . . . . . . . . . . . . . 439.6 Lab versions . . . . . . . . . . . . . . . . . . . . . . . . . . . . . . . . . . . . . . 449.7 Creating new base images . . . . . . . . . . . . . . . . . . . . . . . . . . . . . . 449.8 Importing labs: Warning! . . . . . . . . . . . . . . . . . . . . . . . . . . . . . . . 44
10 Labtainer Instructor Modules (IModules) 4510.1 Labtainers distribution strategy . . . . . . . . . . . . . . . . . . . . . . . . . . . 4510.2 Imodule distribution strategy . . . . . . . . . . . . . . . . . . . . . . . . . . . . 4510.3 Testing IModules . . . . . . . . . . . . . . . . . . . . . . . . . . . . . . . . . . . 4610.4 Custom lab manuals . . . . . . . . . . . . . . . . . . . . . . . . . . . . . . . . . 4610.5 Imodule examples . . . . . . . . . . . . . . . . . . . . . . . . . . . . . . . . . . . 47
10.5.1 Modify a lab manual for the telnet-lab . . . . . . . . . . . . . . . . . . . 4710.5.2 Create a new lab . . . . . . . . . . . . . . . . . . . . . . . . . . . . . . . 47
11 Remote access and control of Labtainer exercises 4811.1 Remote management . . . . . . . . . . . . . . . . . . . . . . . . . . . . . . . . . 49
11.1.1 File copying . . . . . . . . . . . . . . . . . . . . . . . . . . . . . . . . . . 4911.1.2 Client and server setup . . . . . . . . . . . . . . . . . . . . . . . . . . . . 49
11.2 Remote access to containers . . . . . . . . . . . . . . . . . . . . . . . . . . . . . 5011.2.1 Remote access without GNS3 . . . . . . . . . . . . . . . . . . . . . . . . 5011.2.2 Remote access with GNS3 . . . . . . . . . . . . . . . . . . . . . . . . . . 50
2
12 Multi-user Labtainers 5112.0.1 Multi-user Labtainers, one Labtainer VM per student . . . . . . . . . . . 5212.0.2 Single Labtainers VM with multiple students . . . . . . . . . . . . . . . . 53
12.1 Creating conformant multi-user labs . . . . . . . . . . . . . . . . . . . . . . . . . 53
13 Limitations 55
14 Notes 5514.1 Firefox . . . . . . . . . . . . . . . . . . . . . . . . . . . . . . . . . . . . . . . . . 55
14.1.1 Profile and configuration changes . . . . . . . . . . . . . . . . . . . . . . 5514.1.2 Browser history . . . . . . . . . . . . . . . . . . . . . . . . . . . . . . . . 5514.1.3 Slow browser startup . . . . . . . . . . . . . . . . . . . . . . . . . . . . . 5514.1.4 Crashes in SimLab . . . . . . . . . . . . . . . . . . . . . . . . . . . . . . 56
14.2 Wireshark . . . . . . . . . . . . . . . . . . . . . . . . . . . . . . . . . . . . . . . 5614.3 Elgg . . . . . . . . . . . . . . . . . . . . . . . . . . . . . . . . . . . . . . . . . . 5614.4 Host OS dependencies . . . . . . . . . . . . . . . . . . . . . . . . . . . . . . . . 5614.5 Login Prompts . . . . . . . . . . . . . . . . . . . . . . . . . . . . . . . . . . . . 5614.6 Networking Notes . . . . . . . . . . . . . . . . . . . . . . . . . . . . . . . . . . . 56
14.6.1 SSH . . . . . . . . . . . . . . . . . . . . . . . . . . . . . . . . . . . . . . 5614.6.2 X11 over SSH . . . . . . . . . . . . . . . . . . . . . . . . . . . . . . . . . 5714.6.3 Traffic mirroring . . . . . . . . . . . . . . . . . . . . . . . . . . . . . . . 5714.6.4 DNS . . . . . . . . . . . . . . . . . . . . . . . . . . . . . . . . . . . . . . 5714.6.5 Overriding Docker routing and DNS . . . . . . . . . . . . . . . . . . . . 57
14.7 User management and sudo . . . . . . . . . . . . . . . . . . . . . . . . . . . . . 5714.8 DNS fixes for rebuild problems . . . . . . . . . . . . . . . . . . . . . . . . . . . . 5814.9 Suggestions for Developers . . . . . . . . . . . . . . . . . . . . . . . . . . . . . . 58
14.9.1 Testing assessment directives . . . . . . . . . . . . . . . . . . . . . . . . . 5814.9.2 3rd party applications . . . . . . . . . . . . . . . . . . . . . . . . . . . . 5814.9.3 Msc . . . . . . . . . . . . . . . . . . . . . . . . . . . . . . . . . . . . . . 5814.9.4 Docker cache . . . . . . . . . . . . . . . . . . . . . . . . . . . . . . . . . 58
14.10Container isolation . . . . . . . . . . . . . . . . . . . . . . . . . . . . . . . . . . 5914.11Test registry setup . . . . . . . . . . . . . . . . . . . . . . . . . . . . . . . . . . 5914.12CentOS containers . . . . . . . . . . . . . . . . . . . . . . . . . . . . . . . . . . 59
ASimLab for testing labs 60A.1 Preparations Before Running SimLab . . . . . . . . . . . . . . . . . . . . . . . . 60A.2 Running SimLab . . . . . . . . . . . . . . . . . . . . . . . . . . . . . . . . . . . 60A.3 SimLab Directives . . . . . . . . . . . . . . . . . . . . . . . . . . . . . . . . . . . 60A.4 SimLab application notes . . . . . . . . . . . . . . . . . . . . . . . . . . . . . . . 62A.5 Regression testing with smoketest.py . . . . . . . . . . . . . . . . . . . . . . . . 62
3
1 Introduction
This manual is intended for use by lab designers wanting to create or adapt cybersecuritylabs to use the Docker container-based lab framework known as “Labtainers”. The Labtainerframework is designed for use with computer and network security laboratory exercises targetingLinux environments, and it is built around standard Linux Docker containers. A Labtainer exer-ciese may include multiple networked components, all running locally on a student’s computer,but without the performance degredation associated with running multiple virtual machines.
While most Labtainer exercises focus on exploring concepts via the Linux command line –GUI based applications, e.g., browsers and Wireshark are also supported.
1.1 Benefits of Labtainers
Deploying cybersecurity labs using this framework provides three primary benefits:
1. The lab execution environment is controlled and consistent across all student comput-ers regardless of the Linux distribution and configuration present on individual studentcomputers. This allows each lab designer to control which software packages are present,the versions of libraries and specific configuration settings, e.g., /etc file values. Theseconfigurations may vary between labs, and they may vary between multiple computers ina single lab.
2. Assessment of student lab activity can be automated through a set of configuration filesthat identify expected results, thus relieving lab instructors from having to individuallyreview detailed lab results.
3. Labs may be automatically “parameterized” for each student such that students cannoteasily copy results from another student or from internet repositories.
Labtainers provide the advantages of a consistent execution environment without requiringan individual Virtual Machine (VM) per lab, and without requiring all labs to be adapted fora common Linux execution environment. These benefits can be realized whether or not labsare configured for automatic assessment, or are parameterized for each student.
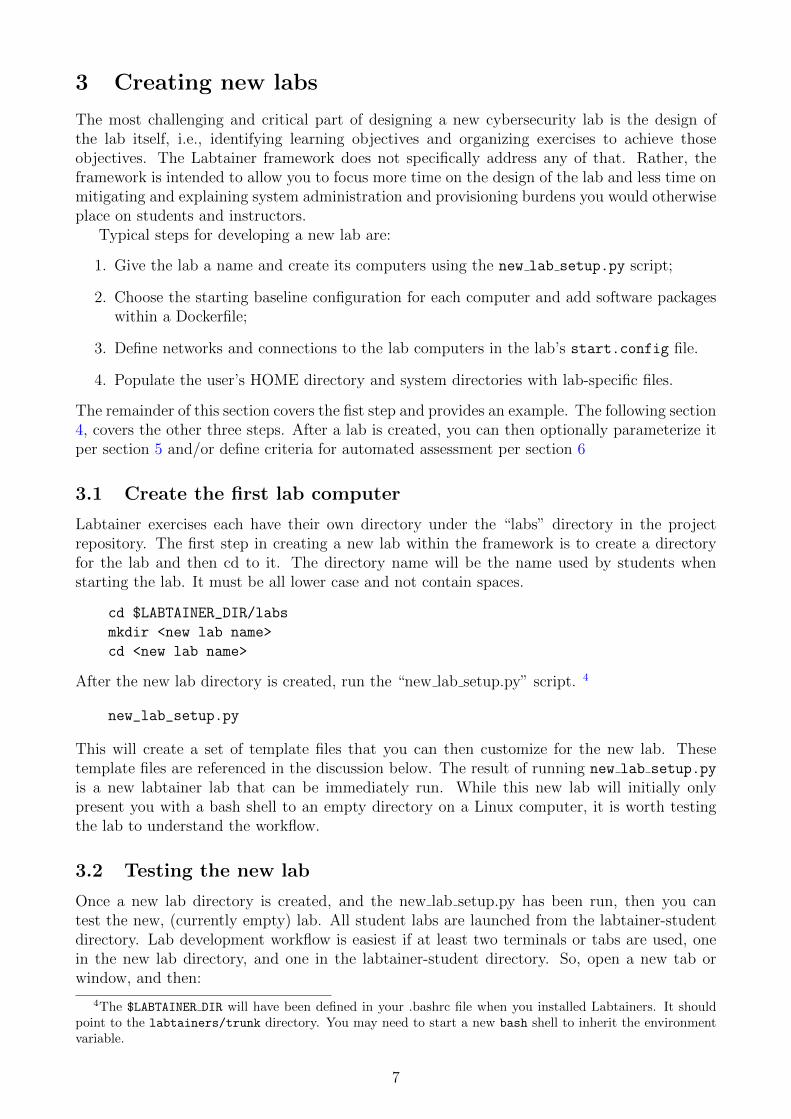
Figure 1: Example Labtainers network topology
4
Exercises that include multiple networked computers illustrate an advantage of using con-tainers over VMs, namely, containers require significantly less resources than do VMs. Astudent laptop that struggles to run two or more VMs can readily run multiple containerssimultaneously, as shown in this 50 second demonstration: https://youtu.be/JDV6jGF3Szw
Lab designers enhance labs to include automated assessment using directives built intothe famework. For example, ten rather simple directives can evaluate the following questionregarding a student’ work on a lab depicted in Figure 1:
“Was there any single iptables configuration during which the student used nmap to demon-strate that:
• The remote workstation could reach the HTTPS port but not the SQL port, and,
• The local workstation could reach the HTTPS port and the SQL port.”
1.2 Obtaining the Labtainer development kit
Installation of Labtainers is described in the Labtainer Student Guide, which also includesinstructions for installing an Ubuntu VM (if you do not already have a Linux system), and theLabtainer framework. Our website also distributes pre-packaged VM appliances that alreadyhave Labtainers installed. Labtainers will work with any Linux distribution that supportsDocker containers. If you already have Docker installed on a Linux system, reference theStudent Guide for other dependencies.
The difference between the development kit and the standard Labtainer distribution isprimarily just the lab definition files, which are withheld from the general distribution forefficiency.
If you have a Labtainer installation (e.g., our pre-packaged VM), you can get the developerfiles by going to your labtainers directory, e.g., ~/labtainer/ and running ./update-designer.sh1 You may then want to logout and login again, or run a new bash shell because that scriptsets some environment variables.
It is suggested that you periodically run that update script to get the latest lab definitionfiles, and to update framework software.
1.3 Content of this guide
This guide describes how to build new labs, but first, section 2 gives an overview of how studentsinteract with Labtainers. The steps taken to create a new lab are provided in section 3, andthe mechanics of defining the lab execution environment are in section 4.
Individualizing labs to discourage sharing of solutions is described in 5. Section 6 thendescribes how to define criteria to enable automated assessment of student work.
Networking considerations are described in 8. Section 9 covers the process of building,publishing and maintaining labs.
Strategies for creating mulit-user Labtainer exercises are discussed in section 12. Section 13identifies limitations of the framework and section 14 includes application-specific notes, e.g.,notes relavent to including Firefox in a lab.
Automated testing of labs is supported using our SimLab tool as described in Appendix A.
2 Overview of the student environment and workflow
Labtainers support laboratory exercises designed for Linux environments, ranging from interac-tion with individual programs to labs that include what appear to be multiple components and
1The student password for the pre-packaged VM is ”password123”.
5

networks. Students see and interact with Linux computers, primarily via bash shell commandsand GUI-based applications. In general, the Labtainer framework implementation is not visibleto the student, and the Linux environment as seen by the student is not noticeably augmentedto support the framework.
Labtainers are intended for use on individual student computers, e.g., a laptop, or potentiallya VM allocated to the student from within a VM farm. 2 The computer utilized by a studentmust include the Linux operating system, e.g., as a single VM. This Linux operating system,referred to herein as the Linux host, can be any distribution and version which supports Docker.Students download and expand a tarball, and run an installation script as described in theLabtainer Student Guide 3 Alternately, students can use a Linux VM that is pre-configuredwith Labtainers and Docker, and is available at our website.
It is suggested that the student’s Linux host be a virtual machine that is not used forpurposes requiring trust. Software programs contained in cybersecurity lab exercises are not,in general, trusted. And while Docker containers provide namespace isolation between thecontainers and the Linux host, the containers run as privileged.
Labtainer exercises can include networking to external hosts, e.g., a Windows VM runningalongside the Linux host VM, as described in section 8.3.
Students initiate any and all labs from a single workspace directory on the Linux host. Toperform a specific Labtainer exercise, the student runs a labtainer command from the Labtainerworkspace, naming the lab exercise. This results in one or more containers starting up alongwith corresponding virtual terminals via which the student will interact with the containers.These virtual terminals typically present a bash shell. Each container appears to the studentas a separate computer, and these computers may appear to be connected via one or morenetworks.
When a student starts a given exercise for the first time, the framework fetches Dockerimages from the Docker registry. Docker manages container images as a set of layers, providingefficient storage and retrieval of images having common components. The initial Labtainerinstallation step pulls a few baseline images (about 1.5 GB) from the public Docker registry,known as the Docker hub. Images for specific labs are pulled from the Docker hub by down-loading only those additional layers required by that lab, and which had not been previouslypulled from the hub. This is transparent to the student, other than waiting for downloads tocomplete.
After the student performs the lab exercise, artifacts from the container environments areautomatically collected into an archive, (a zip file), that appears on the student’s Linux host.The student forwards this archive file to the instructor, e.g., via email or a learning managementsystem (LMS). The instructor collects student archive files into a common directory on his orher own Linux host, and then issues a command that results in automated assessment of studentlab activity, (if the lab is designed for that), and the optional creation of an environment inwhich the instructor can review the work of each student.
Many cybersecurity lab exercises are assessed through use of reports in which studentsdescribe their activities and answer specific questions posed by the instructor. Labtainers areintended to augment, rather than supplant this type of reporting. The framework includesmechanisms for automating the collection of student lab reports into the artifact archive filesthat are collected by instructors.
2Labtainers can also support labs in which students collaborate (or compete) on shared infrastructure. Pleasesee section 12 for information on multi-user environments.
3This tarball may someday be replaced by standard Linux distribution packages, e.g., Debian and/or RPMpackages.
6
3 Creating new labs
The most challenging and critical part of designing a new cybersecurity lab is the design ofthe lab itself, i.e., identifying learning objectives and organizing exercises to achieve thoseobjectives. The Labtainer framework does not specifically address any of that. Rather, theframework is intended to allow you to focus more time on the design of the lab and less time onmitigating and explaining system administration and provisioning burdens you would otherwiseplace on students and instructors.
Typical steps for developing a new lab are:
1. Give the lab a name and create its computers using the new lab setup.py script;
2. Choose the starting baseline configuration for each computer and add software packageswithin a Dockerfile;
3. Define networks and connections to the lab computers in the lab’s start.config file.
4. Populate the user’s HOME directory and system directories with lab-specific files.
The remainder of this section covers the fist step and provides an example. The following section4, covers the other three steps. After a lab is created, you can then optionally parameterize itper section 5 and/or define criteria for automated assessment per section 6
3.1 Create the first lab computer
Labtainer exercises each have their own directory under the “labs” directory in the projectrepository. The first step in creating a new lab within the framework is to create a directoryfor the lab and then cd to it. The directory name will be the name used by students whenstarting the lab. It must be all lower case and not contain spaces.
cd $LABTAINER_DIR/labs
mkdir <new lab name>
cd <new lab name>
After the new lab directory is created, run the “new lab setup.py” script. 4
new_lab_setup.py
This will create a set of template files that you can then customize for the new lab. Thesetemplate files are referenced in the discussion below. The result of running new lab setup.py
is a new labtainer lab that can be immediately run. While this new lab will initially onlypresent you with a bash shell to an empty directory on a Linux computer, it is worth testingthe lab to understand the workflow.
3.2 Testing the new lab
Once a new lab directory is created, and the new lab setup.py has been run, then you cantest the new, (currently empty) lab. All student labs are launched from the labtainer-studentdirectory. Lab development workflow is easiest if at least two terminals or tabs are used, onein the new lab directory, and one in the labtainer-student directory. So, open a new tab orwindow, and then:
4The $LABTAINER DIR will have been defined in your .bashrc file when you installed Labtainers. It shouldpoint to the labtainers/trunk directory. You may need to start a new bash shell to inherit the environmentvariable.
7

cd $LABTAINER_DIR/scripts/labtainer-student
Then start the lab using the:
rebuild [labname]
command, where labname is the name of the lab you just created.The rebuild command 5 will remove and recreate the lab containers each time the script
is run. And it will rebuild the container images if any of their configuration information haschanged. 6 This is often necessary when building and testing new labs, to ensure the newenvironment does not contain artifacts from previous runs. The progress of the build, and errormessages can be viewed in the labtainer.log file. While developing, it is generally a good ideato tail this log in a separate terminal:
tail -f labtainer.log
If the rebuild fails with a error reflecting a problem resolving hostnames, e.g., mirror.centos.com,please see 14.8.
Note the rebuild command is not intended for use by students, they would use the “lab-tainer” command. The rebuild utility compares file modification dates to Docker image creationdates to determine if a given image needs to be rebuilt. The rebuild may miss file deletions.Thus, if files are deleted, you must force the rebuild using the -f option at the end of the rebuildcommand. Also, addition of symbolic links will not trigger a rebuild. Rebuild references gitmodify dates (vice file modify dates).
Stop the lab with
stoplab
When you stop the lab, a path to saved results is displayed. This is the zip file that the studentwill forward to the instructor.
To test adding a “hello world” program to the new labtainer, perform the following steps:
• From the new lab directory window, cd $LABTAINER_DIR/labs/[labname]/[labname]
• Create a “hello world” program, e.g., in python or compiled C.
• From the labtainer-student window, run rebuild [labname]
You should see the new program in the container’s home directory. If you run the programfrom the container, and then stop the lab with stoplab, you will see the stdin and stdout resultsof the program within the saved zip file.
The “hello world” program was placed in $LABTAINER_DIR/labs/[labname]/[labname].The seemingly redundant “labname” directories are a naming convention in which the seconddirectory names one of potentially many containers. In this simple example, the lab has butone container, whose name defaults to the lab name.
The following sections describe how to further alter the lab execution environment seen bythe student.
5Previously named rebuild.py6The build process may generate warnings in red text, some of which are expected. These include an
unreferenced “user” variable and the lack of apt-utils if apt-get is used to install packages in Dockerfiles.
8
3.3 Multiple containers
The new lab setup.py script can be used to create additional containers for use in the lab.For example, from your new lab directory:
new_lab_setup.py -a joe_computer
will create a second container for your lab, named “joe computer”. If you again run the rebuildscript, you will see two virtual terminals, each connected to one of your two independentcomputers. Use
new_lab_setup.py -h
to view the operations available in that script.The following sections describe how to configure the execution environments on your com-
ponents, and how to define virtual networks connected to the components.
4 Defining the lab execution environment
A given lab typically requires some set of software packages, and some system configuration,e.g., network settings, and perhaps some lab-specific files. It can include multiple containers,each appearing as distinct computers connected via networks. The execution environmentseen by a student when interacting with one of these “computers” is therefore defined by theconfiguration of the associated container.
Software packages are defined in each container’s Dockerfile, described in the subsectionbelow. That is followed by subsection 4.2 describing network definitions, (and other computerattributes) in the start.config file. The remaining subsections then described populating theuser HOME directory and system directories, and methods for starting system services andmiscellaneous environment settings.
Labtainer containers, by default, present students with a virtual terminal and a bash shellrequiring no login. Alternate initial environments, including use of the login program, aredescribed in section 4.7.
Section 4.9 describes how to allow students to share tools they’ve developed between differentlabs.
4.1 Docker files
A default Labtainer-specific Dockerfile is placed in the new lab’s “Dockerfiles” directory whenthe new lab is created. And additional Dockerfiles are added when the new lab setup.py -a
script adds computers to the lab. We use standard Docker file syntax, which is described athttps://docs.docker.com/engine/reference/builder/
Simple labs should be able to use the default Dockerfile copied by the new lab setup.pyscript. That Dockerfile refers to a base Labtainer image that contains the minimum set of Linuxpackages necessary to host a lab within the framework. The default execution environmentbuilds off of a recent Ubuntu image.Each container has its own Dockerfile within the
$LABTAINER_DIR/labs/[labname]/dockerfiles
directory. The naming convention for Dockerfiles is
Dockerfile.[labname].[container_name].student
9
The first line of each Dockerfile identifies the baseline Labtainer image to be pulled from theDocker Hub. The initial default image is a basic Ubuntu system with a minimal set of packages.To use an alternate image having additional networking packges (e.g., tcpdump, xinetd, sshd),change the first line to:
FROM $registry/labtainer.network
Base images include:
• labtainer.base – Minimal Ubuntu system.
• labtainer.network – Networking packages installed and xinetd running, but network ser-vices not activated
• labtainer.network.ssh – Same as network, but with ssh active in the xinetd configuration.
• labtainer.centos – A CentOS server with systemd and the true “init” initial process.
• labtainer.lamp – A CentOS server with Apache, Mysql and PHP, (the LAMP stack)
• labtainer.firefox – An Ubuntu container with the Firefox browser.
• labtainer.wireshark – The labtainer.network with wireshark added.
• labtainer.java – An Ubuntu container with the Firefox browser and the open JDK.
• labtainer.kali – A Kali Linux system with the Metasploit framework.
• labtainer.metasploitable – The Metasploitable-2 vulnerable server.
• labtainer.bird – The Bird router (See the bird labs).
• labtainer.owasp – The firefox base with the OWASP zap toolset.
• labtainer.juiceshop – The OWASP vulnerable Juice Shop web server.
Refer to the Dockerfiles in $LABTAINER DIR/scripts/designer/base dockerfiles to see whichsoftware packages are included within each baseline image.
The Dockerfile is used to add packages to your container, e.g.,
RUN apt-get update && apt-get install -y some_package
You will also see “ADD” commands in the Docker file that populate the container directorieswith lab-specific files such as described in section 4.3.
Next, you must also describe your containers within the start.config file as described below.
4.2 Container definitions in start.config
Most single container labs can use the automatically generated start.config file without modifi-cation. Adding networks to containers and defining users other than the default ”ubuntu” userrequires modification of the start.config file. The following describes the major sections of thatconfiguration file. Most of the configuration entries can be left alone for most labs.
• GLOBAL SETTINGS – These lab-wide parameters include:
– GRADE CONTAINER – Deprecated
10
– HOST HOME XFER [dir name] – Identifies the host directory via which to transferstudent artifacts, relative to the home directory. For students, this is where the zipfiles of their results end up. For instructors, this is where zip files should be gatheredfor assessment.
– LAB MASTER SEED [seed] – The master seed string for this lab. It is combinedwith the student email address to create an instance seed that controls parameteri-zation of individual student labs.
– REGISTRY [registry] – The id of the Docker Hub registry that is to contain the labimages. This defaults to the registry value defined in the labtainers.config file.
– BASE REGISTRY [base registry] – The id of the Docker Hub registry that containsthe base image for the container. This defaults to the default registry per thelabtainer.config file. See 9 for details on the use of this keyword.
– COLLECT DOCS [yes/no] – Optional directive to collect lab/docs content as part ofstudent artifacts. These are then available to the instructor in the labtainer xfer/[lab]/docsdirectory. Also see 4.6.
– CHECKWORK [yes/no] – Optional directive to disable (set to “no”) ability of stu-dent to check their own work from the labtainer-student directory.
• NETWORK [network name] – One of these sections is required for each network withinthe lab. The name is used within the start.config file to refer to the network. It issuggested that this name NOT be used in lab guides since it is not visible to students7.Where possible, name networks with their subnet mask, e.g., 10.1.0.0/24. In addition toproviding a name for the network, the following values are defined for the NETOWRK:
– MASK [network address mask] – The network mask, e.g., 172.25.0.0./24
– GATEWAY [gateway address] – The IP address of the network gateway used byDocker to communicate with the host. Please note that to define a different net-work gateway for the component, you should use the LAB GATEWAY parameter forcontainers. This GATEWAY field should not name the IP of any of your othercomponents.
– MACVLAN EXT [N] – Optional, causes the Docker network driver to create anduse a macvlan tied to the given Nth ethernet interface (in alphabetical order) thatlacks an assigned IP address. The network device is expected to be on a “host-only”VM network. The VMM should disable the DHCP server on this network. Thenetwork adaptor itself needs to be placed in primiscous mode on the Linux VM,e.g., using “sudo ifconfig enp0s8 promisc.” These types of interfaces can be used tocommunicate with external hosts, e.g., other VMs as described in 8.3
– MACVLAN – Similar to MACVALN EXT, except a macvlan will not be createdunless the Labtainer lab is started as a multi-user lab as descrbed in 12.
– IP RANGE [range] – Optional, allocates an ip range to the network, e.g., 192.168.1.4/30
• CONTAINER [container name] – One of these sections is required for each container in thelab. Default values for container sections are automatically created by the new lab setup.py
script. In addition to naming the container, the following values are defined:
7You may note several Labtainers labs failed to heed this advise.
11

– TERMINALS [quantity] – The number of virtual terminals to open and attach tothis container when a lab starts. If missing, it defaults to 1. Terminal titles are setto the bash shell prompt. A value of 0 suppresses creation of a terminal, and a valueof -1 prevents the student from attaching a terminal to the container.
– TERMINAL GROUP [name] – All virtual terminals within the same group are or-ganized as tabs within a single virtual terminal. Terminal group names can bearbitrary strings.
– XTERM [title] [script] – The named script is executed in a virtual terminal with thegiven title. The system will change to the user’s home directory prior to executingthe script. The script should be placed in container bin directory, i.e.,
$LABTAINER_DIR/labs/[labname]/[container]/_bin
If the title is “INSTRUCTIONS”, no script is necessary and the instructions.txt filein the container home directory will be displayed.
– USER [user name] – The user name whose account will be accessed via the virtualterminals. This defaults to “ubuntu.”
– PASSWORD [password] – The password for the user name whose account will beaccessed via the virtual terminals. This defaults to the user name defined above.
– [network name] [ip address] – Network address assignments for each network (de-fined via a NETWORK section), that is to be connected to this container. A sepa-rate line should be entered for each network. The given ip address can be one of thefollowing:
∗ An IP address
∗ An IP address with an optional MAC address assignment as a suffix followinga colon, e.g., 172.25.0.1:2:34:ac:19:0:2.
∗ An IP address with an optional clone offset, e.g., 172.25.0.1+CLONE to causeeach clone to be assigned an address from a sequence starting with the given ad-dress. Only intended for use with containers having the CLONE option describedbelow.
∗ Similar to the use of the +CLONE suffix, CLONE MAC only takes effect if the labis started in multi-user mode. When started with the --workstation switch,this directs the system to generate a MAC address whose last four bytes matchthose of the host network interface. When stated as a multi-user lab with allcontainers on one VM, e.g., the --client count switch, then the allocated IPaddress is incremeted by one less than the clone instance number.
∗ If AUTO is provided as the address, an address is chosen for you from the subnetrange.
Multiple IP addresses per network interface by appending a :n to the network name,e.g.,
MY_LAN:1 172.24.0.3
MY_LAN:2 172.24.0.4
– SCRIPT [script] – Optional script to provide to the Docker create command, defaultsto “bash”. This must be set to “NONE” for CentOS-based components, Ubuntusystemd components, or other images that run a true Linux init process.).
– ADD-HOST [host:ip — network] – Optional addition to the /etc/hosts file, a con-tainer may have multiple ADD-HOST entries. If a network name is provided, thenevery component on that network will get an entry in the hosts file.
12

– X11 [YES/NO] – Optional, defaults to NO. If YES, the container mounts the TCPsocket used by the hosts X11 server, enabling the container to run applications withGUIs, e.g., browsers or wireshark. See sql-inject as an example. See the Notessection (14) at the end of this manual for tips on using Firefox and Wireshark.
– CLONE [quantity] – optional quantity of copies of this container to create. Eachcopy is assigned a monotonically increasing integer starting with one, and this valuecan be used for the network address as describe above, and within parameterizationas described in section 5. This option is not intended for use in creating multi-userlabs.
– NO PULL [YES/NO] – Use a local instance of the container image rather thanpulling it from the Docker hub.
– LAB GATEWAY – Optional IP address of the component’s default network gateway.If set, this will replace the default Docker gateway. Students can toggle betweengateways by using the togglegw.sh command, e.g., to enable communication with thehost VM or the internet8. This option will also replace the components resolv.confwith the given IP and will cause the static route to the my host address to be deleted.
– NO GW [YES/NO] – Disable the Docker default gateway, preventing network com-munication with the host or external devices.
– REGISTRY [registry] – The id of the Docker Hub registry that is to contain the labimages. This overrides the value set in the GLOBAL section.
– BASE REGISTRY [base registry] – The id of the Docker Hub registry that containsthe base image for the container. This defaults to the default registry per thelabtainer.config file.
– THUMB VOLUME – Optional arguments to a mount command that will be exe-cuted in a GNS3 environment when the student selects insert thumb drive froma component menu. NOTE: Use of this option will cause the host /dev directoryto be shared with the container. This allows the container to perform all kinds ofmischief.
– THUMB COMMAND – Optional command that will run prior mounting the THUMBvolume defined above.
– THUMB STOP – Optional command that will run when the container is stoppedunder GNS3.
– PUBLISH [publish] – Optional arguments to the Docker --publish argument formaking container ports visible at the host interface. For example, a value of
127.0.0.1:60022:22/tcp
will bind host port 60022 to container port 22.
– HIDE [hide] – If YES, the associated node will be hidden in GNS3 environmentswhen the --student option if
– NO PRIVILEGE – If YES, the container runs without Docker privilege.
– MYSTUFF – if YES, the directory at labtainerstudent/mystuff is shared withthe container in /home/<user>/mystuff. used.
– MOUNT [hostv:containerv] – Intended for use with licensed software installations,e.g., IDA Free, will cause a directory located at:
8This replaces use of the set default gw.sh script from within fixlocal.sh scripts
13
~/.local/share/labtainers/[hostv]
at a mount point on the container at:
~/[containerv]
The purpose is allow that host directory to be reused across labs to avoid re-installinglicensed software, i.e., something where the student takes a distinct action to ac-knowledge a license.
A simple example of a two-container lab with network settings in the start.config file canbe found in
$LABTAINER_DIR/labs/telnetlab
Entries in the start.config file can be parameterized as described in section 5, e.g., to allocaterandom IP addresses to components.
4.3 Lab-specific files in the student’s home directory
Files that are to reside relative to the student’s $HOME directory are placed in the new labcontainer directory. For example, if a lab is to include a source code file, that should be placedin the lab container directory. The file will appear in the student’s home directory within thecontainer when the container starts. The lab container directory is at:
$LABTAINER_DIR/labs/[labname]/[container name]
The container name in labs with a single container matches the labname by default.All files and directories in the lab container directory will be copied to the student’s HOME
directory except for the bin and system directories. Each initial Dockerfile from the templatesinclude this line:
ADD $labdir/$lab.tar.gz $HOME
to accomplish the copying. Except as noted below, Dockerfiles should not include any otherADD commands to copy files to the HOME directory.
4.3.1 Large or numerous files in the home directory
If there are large sized, or a high quantity of files that are to be placed relative to a containerhome directory, those should be placed into a “home tar” directory at:
$LABTAINER_DIR/labs/[labname]/[container_name]/home_tar/
Use of this technique prevents these files from being collected as student artifacts, which oth-erwise include copies of everything relative to the home directory 9. This can save considerabletime and space, e.g., on the instructor’s computer that must collect all student artifacts. Theindividual files should exist in the home tar directory, and the framework automatically createsthe tar file for transfer to the Docker image, (and will do so if an existing tar file is older thanany file in the directory). Manifests can be used for the home tar content as described in 9.3.1.You can force collection of selected files from the home tar by putting the filename into a fileat:
9Actually, we only collect files whose modify dates are more recent than the container, so use of home tar isnot as important as it previously was.
14
$LABTAINER_DIR/labs/[labname]/[container_name]/_bin/noskip
Files whose basenames match any found in noskip will be collected.Alternately, a file at /var/tmp/home.tar will be expanded into the user home directory. Use
the Docker COPY directive to place a file here. See the
$LABTAINER_DIR/scripts/designer/base_dockerfiles/Dockerfile.labtainer.firefox
for an example. These files will not be collected unless they are newer than the original file, orif the base file name appears in the noskip list described above.
4.4 Lab-specific system files
All files in the
$LABTAINER_DIR/labs/[labname]/[container name]/_system
directory will be copied to their corresponding paths relative to the root directory. For example,configuration files for /etc should appear in system/etc/.
The initial Dockerfile from the templates include this line:
ADD $labdir/sys_$lab.tar.gz /
to accomplish the copying. If a lab contains a large quantity of system files, or large files, thosecan be placed into the directory named:
$LABTAINER_DIR/labs/[labname]/[container name]/sys_tar
either as individual files, or in a “sys.tar” archive. In the former case, the framework willautomatically create the sys.tar file. This technique can save time in building lab imagesbecause the files do not need to be archived for each build.
In general, files modified and maintained by the designer should go into the system directorywhile static system files should go into the sys tar directory.
NOTE: CentOS systems do not have a /bin directory, that is actually a link. If you createa system/bin directory for the lab, that will trash the /bin link and result in an obscureDocker build error.
4.5 System services
The general Docker model is that a single Docker container runs a single service started viathe ENTRYPOINT command, with logging being forwarded to the host. Labtainers disregardsthis model because our goal is to make a container look more like a Linux system rather thana conformant Docker container. Labtainer Dockerfiles for Ubuntu and Centos containers usesystemd based images that run the /usr/sbin/init process. 10 The labtainer.network configu-ration of the baseline Dockerfile also starts xinetd, which will then fork services, e.g., the sshd,per the /etc/xinet.d/ configuration files.
Services should be added using systemd constructs. For those of us who often forget whatthose are, a simple web server service can be added to a container by unpacking this tar fromthe witin the container’s directory:
tar -xf $LABTAINER_DIR/scripts/designer/services/web-server.tar
10Now deprecated Ubuntu-based Labtainer Dockerfiles included an ENTRYPOINT command that launchesa faux init script that starts rsyslog, (so that system logs appear in /var/log), and runs rc.local.
15
And enable the service in the bin/fixlocal file with:
echo $1 | sudo -S systemctl enable httpserver.service
echo $1 | sudo -S systemctl start httpserver.service
The centos-logs lab provides an example of forcing the student to login using the traditionallogin program, as described in section 4.7.
See section 14.9 for guidance on including 3rd party applications within your labs (e.g., onesthat are not simply added to your container via package managers.)
4.6 Lab Text and Instructions for Students
Create a ’docs’ directory in the [labname] directory if there isn’t one there. This is where mosttextual information about the lab, as well as the lab manual, should be stored and modified.The ’about.txt’ is an exception to this.
Use LateX to write and create PDF files in the docs directory. Look at other lab’s docs direc-tory on how to create a Makefile for the LateX file.
Display a message to the student before any of the lab virtual terminals are created by creatinga read first.txt in the ’docs’ directory. Any text within the
$LABTAINER_DIR/labs/[labname]/docs/read_first.txt
file will be displayed on the Linux host in the terminal in which the student starts the lab.
• Any “LAB MANUAL” string in that file will be replaced with the full path to a [lab-name].pdf file within that same docs directory. And “LAB DOCS” is replaced by thepath to the lab docs directory.
• One intended use is to prompt the student to open a PDF lab manual and perhaps readparts of it prior to continuing with the lab. Another intended use is to display the pathto a reporting template that a student is to use for answering lab-specific questions andnote taking.
• If the name of the symbols are prefaced by “file://”, then the paths will display as linksthat can be opened via a right click.
An ’about.txt’ file will be present in the ’config’ directory of the lab. Any text inside willbe displayed as a description to the lab when listed from running the ’labtainer’ command in$LABTAINER DIR/trunk/scripts/labtainer-student. This text will also appear when clickingon the logo in the GNS3 environment of Labtainers.
If the start.config file includes “COLLECT DOCS YES”, the content of the lab/docs directorywill be included with the student artifacts and available extracted into the instructor’s lab-tainer xfer/[lab]/docs directory.
A deprecated feature that still exists in a tiny handful of labs: ”Lab instructions for studentscan be displayed in a virtual terminal by placing an “instructions.txt” file within the homedirectory of one of the containers. Refer to existing labs for conventions.”
16

4.7 Running programs in Virtual Terminals
Programs can be started automatically within virtual terminals using two methods. The firstis the “XTERM” directive in the container section in the start.config file described in 4.2. Thatis intended for programs whose results are displayed within the virtual terminal, (see the plclab for examples). The second method is intended for user authentication and for starting GUIbased programs that will use the Linux host Xserver. If a file exists at:
$LABTAINER_DIR/labs/[labname]/[container name]/_bin/student_startup.sh
it will be executed from each virtual terminal created for the container. See the sql-inject laband the centos-log lab examples, with the latter running the login program to require studentsto login prior to getting a shell prompt. 11 Note that on CentOS systems, the student startup.shscript will be executed twice: first as root and then as the default user. Use constructs such asthe following to avoid repeating operations:
id | grep root >>/dev/null
result=$?
if [[ $result -eq 0 ]]; then
# stuff to do as root
else
# stuff to do as default user
fi
4.8 Final lab environment fixup
The initial environment encountered by the student is further refined using the optional bin/fixlocal.shscript. The framework executes this script the first time a student starts the lab container. Forexample, this could be used to compile lab-specific programs afer they have been parameterized,(as described below in 5). Or this script could perform final configuration adjustments thatcannot be easily performed by the Dockerfile. These scripts are per-container and reside at:
$LABTAINER_DIR/labs/[labname]/[container name]/_bin/fixlocal.sh
Note the fixlocal.sh script runs as the user defined in the start.config for the container, regardlessof whether root is set as the user in the Dockerfile. The fixlocal.sh script is primarily intendedfor parameterizing labs. Other initialization and synchronization between multiple componentsshould be performed as within any Linux system, e.g., via services or rc.local.
12
4.9 Persistent storage
Sequences of labs may benefit from a student’s ability to employ tools they have developedwithin more than one lab. For example, a set of data analysis scripts initially developed forone lab may be a useful starting point when performing a subsequent, more advanced lab. Youcan provide students with persistent storage by defining the
MYSTUFF YES
11On CentOS systems, copy the login program from labs/centos-log/centos-log/ system/sbin/login to yourcontainer’s system/sbin directory. The login program from Ubuntu works as is.
12Use of sed -i ... to modify configuration files (e.g., in etc), might result in overwriting symbolic links.Use sed -i --follow-symlinks ... to avoid that pit.
17
attribute for a container in the start.config file. That will cause the associated container to havea directory at $HOME/mystuff which is mapped to the directory at labtainer-student/mystuffAll labs that employ the MYSTUFF attribute will share the same directory. It is intended thatat most one container in any given lab will use this directory. And it is suggested that thesedirectories only be used for labs that anticipate evolving development of tools by the student.
Persistent storage is also provided for purposes of re-using licensed software across differentlabs. See the use of the VOLUME option in 4.2.
5 Parameterizing a lab
This section describes how to individualize the lab for each student to discourage sharing of labsolutions. This is achieved by defining symbols within source code or/and data files residing onlab containers. 13 The framework will replace these symbols with randomized values specific toeach student. The config/parameter.config file identifies the files, and the symbols withinthose files that are to be modified. A simple example can be found in
$LABTAINER_DIR/labs/formatstring/formatstring/config/parameter.config
That configuration file causes the string SECRET2 VALUE within the file:
/home/ubuntu/vul_prog.c
to be replaced with a hexidecimal representation of a random value between 0x41 and 0x5a,inclusive.
This symbolic replacement occurs when the student first starts the lab container, but beforethe execution of the bin/fixlocal.sh script. Thus, in the formatstring lab, the executable pro-gram resulting from the fixlocal.sh script will be specific to each student (though not necessarilyunique).
5.1 Parameterization configuration file syntax
Symbolic parameter replacement operations are defined within the config/parameter.config
file. Each line of that file must start with a "<parameter_id> : ", which is any unique string,and is followed by one of the following operations:
RAND_REPLACE : <filename> : <symbol> : <LowerBound> : <UpperBound>
Replace a symbol within the named file with a random value within a given
range. The random value generator is initialized with the lab instance
seed.
where: <filename> - the file name (file must exist) where <symbol> is
to be replaced. The file name is prefixed
with a container name and a ":", (the container
name is optional for single-container labs).
This may be a list of files, delimited by semicolons.
A file name of "start.config" will cause symbols
in the lab’s start.config file to be replaced, e.g.,
to randomize IP addresses.
<symbol> - the string to be replaced
<LowerBound> and <UpperBound> specifies the lower and upper bound
13An exception is the start.config file, which can be parameterized as described in the syntax description.
18

to be used by random generator
example:
some_parameter_id : RAND_REPLACE : client:/home/ubuntu/stack.c
: BUFFER_SIZE : 200 : 2000
(all one line) will randomly replace the token string "BUFFER_SIZE" found in
file stack.c on the mylab.client.student container with a number ranging from
200 to 2000
RAND_REPLACE_UNIQUE : <filename> : <symbol> : <LowerBound> : <UpperBound>
Identical to RAND_REPLACE, except randomly selected values are never resused
within any given upper/lower bound range. This is intended for use on IP
addresses, e.g., 198.18.1.WEB_IP. It is suggested that random ranges be selected
such that they do not intersect any non-random address allocations.
HASH_CREATE : <filename> : <string>
Create or overwrite a file with a hash of a given string and the lab
instance seed.
where: <filename> - the file name that is to contain the resulting hash.
The file name is prefixed with a container name
and a ":", (the container name is optional for
single-container labs).
This may be a list of files, delimited by semicolons
The file name is is optionall, (in cases of a single
container). This may be a
list of files, delimited by semicolons.
<string> - the input to a MD5 hash operation (after concatenation
with the lab instance seed)
example:
some_parameter_id : HASH_CREATE : client:/home/ubuntu/myseed
: bufferoverflowinstance
A file named /home/ubuntu/myseed will be created (if it does not exist),
containing an MD5 hash of the lab instance seed concatentated with the
string ’bufferoverflowinstance’.
HASH_REPLACE : <filename> : <symbol> : <string>
Replace a symbol in a named file with a MD5 hash of a given string
concatenated with the lab instance seed.
where: <filename> - the file name (file must exist) where <symbol> is
to be replaced. The file name is prefixed
with a container name and a ":", (the container
name is optional for single-container labs).
This may be a list of files, delimited by semicolons.
<symbol> - a string that will be replaced by the hash
<string> - a string contatenated with the lab instance seed and hashed
example:
some_parameter_id HASH_REPLACE : client:/root/.secret :
19
ROOT_SECRET : myrootfile
The string "ROOT_SECRET" in file /root/.secret will be replaced with an MD5 hash
of the concatenation of the lab instance seed and "myrootfile".
CLONE_REPLACE : <filename> : <symbol> : <ignored>
Replace a symbol with the clone instance number of a container per the CLONE option
in the start.config file. This is intended for use in providing instance-
unique values on cloned containers, e.g., to assign a unique password to
each container based on the clone number. If the container has no clone
instance number then the symbol is replaced with an empty string.
The parameter id fields may be referenced during the automated grading function, describedbelow in section 6.3.
5.2 Synchronizing startup and parameterization
System initialization should generally occur as with any Linux based system, e.g., using rc.localor system services. You can enable rc.local by placing RUN systemctl enable rc-local inthe Dockerfile. Parameterizing occurs subsequent to container “boot”, but prior to runningthe fixlocal.sh script. The Ubuntu based images include a waitparam.service that delaysreporting its initialization to systemd until parameterization has completed. That service isconfigured to run prior to rc.local. The service unit file is at:
trunk/scripts/designer/system/lib/systemd/system
If you have defined system services that should not start until parameterization has occurred,then add this to the [Unit] section of their service unit file:
After=waitparam.service
Note that if your fixlocal.sh script starts any such service, you must create a flag directoryfrom within your fixlocal.sh script to unblock the waitparam.service. The following lineswould achieve that:
PERMLOCKDIR=/var/labtainer/did_param
sudo mkdir -p "$PERMLOCKDIR"
5.3 Parameterizing start.config
Parameterizing of the start.config file occurs prior to Docker container creation. The frameworkmodifies a copy of the file stored in /tmp/start.config and uses that when assigning attributesto containers, e.g., IP addresses. Currently only IP addresses within the start.config can beparameteterized (e.g., not user names).
5.4 Simple Parameterization for Checking Own-work
The simplest, though by no means robust, strategy for ensuring students have turned in theirown work, (vice getting a zip file from a friend and simply changing the name of the file), isto individualize some file on one of the containers, and then check that file and the archivefile names during grading. The framework does this automatically and reports on any studentarchive that does not seem to have originated from a Labtainer initiated with that student’semail address.
20
5.5 Debugging parameterizing
The parameterization step occurs the first time each container is started. It occurs by runningthe .local/bin/parameterize.sh script on the container. Debugging output from the executionof this script can be found on the container in /tmp/parameterize*
Within the labtainer.log, you can see the step occur following the log entry that reads:“About to call parameterize.sh...”. The parameterizing step is preceded by a copying of thefiles in the labtainer-student/lab bin directory into the container.
6 Automated assessment of student labs
This section describes how to configure a lab for automated assessment of student work. Notethe framework does not require automated assessment, e.g., the “results” of a lab may consistentirely of a written report submitted by the student. Support for automated collection ofwritten reports is described in 4.6 and the use of COLLECT DOCS in the start.config file.
The goal of automated assessment is to provide instructors with some confidence that stu-dents performed the lab, and to give instructors insight into which parts of a lab students maybe having difficulty with. The automated assessment functions are not intended to standardizeeach student’s approach to a lab, rather the goal is to permit ad-hock exploration by students.Therefore, lab designer should consider ways to identify evidence that steps of a lab were per-formed rather than trying to identify everything a student may have done in the course of thelab.
Automated assessment is achieved by first generating artifact files while the student works.That is described in the first subsection below. Next, artifacts within those files are identifiedas described in section 6.2. The values of the resulting artifacts are then compared to expectedvalues, as per section 6.3.
6.1 Artifact files
The files from which artifacts are derived include persisent data, such as system logs and.bash history, as well as timestamped snapshots of transitory data such as stdout of a pro-gram. Lab designers can also generate customized artifacts in response to student actions usingscripts that automatically execute when selected programs or utilities are executed – or whenselected files are accessed. The following paragraphs describe how these artifacts are generated.
The Labtainer framework use of timestamps allows designers to express temporal relation-ships between artifacts, and thus between events. For example, the designer can determine iftwo distinct artifacts were part of the same stdout stream. Or if artifacts in the stdout streamfrom one program were occuring during the invocation of a different program that generatedother specific artifacts. The framework also can incorporate timestamps from standard log fileformats, e.g., syslog, allowing the designer to determine if some logfile entry occurred during theinvocation of a program whose stdout stream contains selected artifacts. As a more concreteexample, the use of timestamps allows the designer to determine that a spcific web log recordoccurred during invocation of some program that produced a specific artifact.
6.1.1 Capturing stdin and stdout
Each time the student invokes a selected program or utility, the framework captures copies ofstandard input and standard output, (stdin and stdout) into timestamped file sets. This istransparent to the student. (Also see the following section for capturing program output otherthan stdout.) These timestamped file sets, selected system logs, and everything relative to
21

the student’s home directory, are automatically packaged when the student completes the lab.These packages of artifacts are then transferred to the instructor, (e.g., via email or a LMS),and ingested into the instructor’s system where lab assessment occurs. Timestamped stdin andstdout files are captured in $HOME/.local/result
By default, stdin and stdout for all non-system programs is captured, e.g., the results of an“ls” command are not captured. The stdin and stdout of system programs14 will be capturedif the program names appear at the beginning of a line in the treataslocal file at
$LABTAINER_DIR/labs/[labname]/[container name]/_bin/treataslocal
The basename of the treataslocal entries are compared to the basename of each command. 15
Non-system programs can be excluded from stdin/stdout capturing by including their namesin a “ignorelocal” file in that same directory. 16
The student commands are parsed to first account for the use of sudo, time, python orpython3. The commands are also processed to account for the use of pipes and redirection.
6.1.2 Capturing program file output
Sometimes program file output is of interest to automated assessment, e.g., the program maynot have useful stdout. The treataslocal entries can include optional output file identifiers thatcause timestamped copies of specified files to be made whenever the named program terminates.If program file output from local programs is to be captured in timestamp files (in additionto the stdout and stdin), simply include those program names in the treataslocal file. Theseoutput file identifiers are of the form:
program delim_type:delim_value
where delim_type is one of:
starts -- the output file name is derived from the
substring following the given delim_value within the
command line typed by the student. For example,
"dd starts:of=" for a command line of
"dd in=myfs.img of=newfile" would yield an output
file name of "newfile".
follows -- the output file name is the command line
token following the given delim_value. For example,
"myprogram follows:myprogram" for a command line of
"myprogram outfile" would yield "outfile" as the output
file name.
file -- the delim_value is the output file name
The resulting timestamped files are located with the stdin and stdout files in .local/result
6.1.3 Bash History
The framework collects all student bash history into the $HOME/.bash history and/root/.bash history files. These files are available for reference as an artifact file.
14The “source” directive is not a system program, and should not be included in a treataslocal file.15In other words, if the treataslocal entry is: usr/bin/nmap, the path leading to nmap is ignored.16These should not include path information, just the program name.
22

6.1.4 System logs
All files referenced in the results.config file, (described below in section 6.2 will be collectedinto the artifact archive.
6.1.5 Capturing information about the environment
Some labs require the student to alter system configuration settings, e.g., using the sysctlcommand to affect ASLR. A precheck.sh script in:
$LABTAINER_DIR/labs/[labname]/[container name]/_bin
is intended to contain whatever commands are necessary to record the state of the system at thetime a program was invoked. The stdout of the precheck.sh script is recorded in a timestampedprecheck.stdout file. The timestamp of this file will match the timestamp of the stdin andstdout artifacts associated with the command that caused precheck.sh to run. The precheck.shis passed in the full path of the program as an argument, thereby allowing the designer tocapture different environment information for different commands.
As another example, consider the file-deletion lab precheck.sh script. It mounts a directory,lists its content, and unmounts it. This all occurs transparently to the student, and, in thisexample, helps confirm a specific file was in fact deleted at the time of issuing a command torecover deleted content from the volume.
In other situations, you may wish to capture environment information when selected com-mands are executed, even though you have no interest in stdin or stdout of those commands.For example, imagine you want to capture the file permissions of /usr/bin/tcpdump wheneverthat command is executed. This can be achieved by including /usr/bin/tcpdump in a listwithin a file at:
$LABTAINER_DIR/labs/[labname]/[container name]/_bin/forcecheck
and then include ls -l /usr/bin/tcpdump in the precheck.sh script. Note that the forcechecklist of programs must include the full path name. The forcecheck file can be used instead of atreataslocal file entry for those cases where stdin and stdout are not required for goal assessment.An example of the use of forcecheck can be found in the capabilities lab.
6.1.6 Capturing file access events
File creation, reading and modification events can be recorded using a combination of a notify
file and an optional notify cb.sh script at:
$LABTAINER_DIR/labs/[labname]/[container name]/_bin/
The notify file will name directory or file paths and the access modes of interest, one entryper line, having this format:
<file_path> <mode> [output file]
where the file path is the absolute path to the file of interest, and mode is one of the following:
• CREATE Assumes the path is to a directory. This will capture any file or directory creationwithin the named directory.
• ACCESS will capture any read of the file named by the path.
• MODIFY will capture any write to the file named by the path.
23
• OPEN will capture any open of the file or directory named by the path.
The optional output file will be used for the timestamped filename of the output from theevent (instead of the default notify.stdout.YYMMDDHHMM Each time an event occurs matchinga criteria specified in the notify file, the notify cb.sh script is invoked (if it exists), passingin the given path and access mode. The script is also provided with the most recent commandissued by either the container user, or the root account (whichever is more recent). If there isno notify cb.sh script, then the output consists of the file path, the most recent command,and the associated user (e.g., root). See the acl lab for an example.
The output from the notify event is captured in timestamped files, just as those resultingfrom events described in Section 6.1.5. If the optional output file provided in the notify listis given as precheck, then events resulting from program invocation, e.g., due to use of aforcecheck file, can be recorded in the very same timestamped file as events resulting from anotify file. In such cases, output from the former will preceed output from the latter withinthe file. The framework will append the notify output to any timestamped precheck.stdout
file that was created up to two seconds prior to the notify event. Inclusion of both outputsinto one timestamped file allows the designer to identify events that occured as part of a singleprogram invocation. Again, see the acl lab for an example.
6.1.7 Generating results upon stopping the lab
The lab designer can cause a script to run on selected containers whenever the student stopsa lab, or when a student issues the checkwork command per 6.4. This is achieved by creatingan script or executable program at:
trunk/labtainers/lab/<lab>/_bin/prestop
The stdout of any such program will be written to a timestamped file named prestop.stdout.timestamp
The framework ensures that all such scripts on all of the lab containers will complete prior toshutting down any of the containers, and all the timestamps will be the same. Note the Labtain-ers framework generally allows students to acheive their goals at any point in their exploration,and the labs typically do not require the student to leave the system in any particular state.In other words, students should be free to continue experimenting subsequent to getting thecorrect results. Thus, any use of the prestop feature, (other than for current state assessmentper 6.4.1), should be accompanied by a lab manual entry advising the student that they mayrestart a lab after issuing the stoplab command. 17
All prestop scripts will timeout after 30 seconds with a SIGTERM. For debugging support,please consider adding signal handling to your prestop scripts. For example, for a bash script,include:
trap "echo Timed out; exit" SIGTERM
6.1.8 Artifact archives
Artifacts from student labs are combined into a zip file that is placed in the student trans-fer directory, typically at /labtainer/xfer/<labname>. Students provide this file to theirinstructor for automated assessment, e.g., via email or an LMS.
Other uses for student artifacts are facilitated through use of a script named:
labtainers/labs/<lab>/bin/postzip
If such a script exists, it is executed after all of the student artifacts are zipped up. See thecyberciege lab for an example of postzip processing.
17Perhaps a goalsmet type of command should be added that does nothing but record prestop results withoutactually stopping the lab?
24
6.2 Artifact result values
The automated assessment functions encourage labs to be organized into a set of distinct“goals”. For each goal, the lab designer identifies one or more specific fields or attributes ofartifact files that could be compared to “expected” values. These lab-specific artifacts areidentified within the configuration file at:
labtainer/trunk/labs/<lab>/instr_config/results.config file
Artifact files are identified in terms of:
1. The program that was invoked
2. Whether the artifact is in stdin or stdout or is program output (prgout) as descrbed insection 6.1.2
3. An explicit file name, either as an absolute path or relative to the user HOME directory.These are intended to be persistent log files, e.g., syslogs.
One or more properties of each artifact file are assigned symbolic names, referred to hereinas results, which are then referenced in the goals.config file to assess whether results matchexpected values. Directives within the results.config file assign each result a value having oneof three types:
• Boolean, e.g., did an artifact file contain a specific string or regular expression?
• String, e.g., the third space-delimited token on the first line containing the string ”Audi-ence says:”
• Numeric such as the quantity of lines in an artifact file, or the quantity of occurances ofa string in an artifact file.
There are typically multiple instances of each result, each with its own associated timestamp.The framework automatically associates timestamps with results, thereby allowing the designerto express temporal relationships between results as introduced in section 6.1 The timestampassociated with any given result will be derived from different sources depending on the natureof the results.config directive:
• The timestamp of the artifact file. For example, each stdout artifact file name includesa timestamp reflecting when the program was invoked, (and its corresponding stdin filecontains an entry reflecting when the program terminated).
• A timestamped entry from a log file, e.g., an entry in a web log, that matches criteriaspecified in the results.config directive.
6.2.1 Result field values
Directives within the results.config file each have the following format:
<result> = <file_id> : <field_type> : <field_id> [: <line_type> : <line_id>]
Fields are defined below.
• result The symbolic name of the result, which will be referenced in the goals configurationfile. It must be alphanumeric, underscores permitted.
25

• file id Identifies a single file, or the set of files to be parsed. The format of this id is:
[container_name:]<prog>.[stdin | stdout | prgout]
Where prog is a program or utility name whose stdin, stdout, or program output (prgout)artifacts will include timestamps. The optional container name identifies the containerhosting the file. Labs with a single container can omit this qualifier. Alternately, anexplicit file path is intended for log files of services that persist across multiple studentoperations. If the given path is not absolute, it is relative to the container user’s homedirectory. The wildcard character ’*’ can be used in place of prog, i.e., *.stdin is for allstdin artifacts and *.stdout is for all stdout artifacts. Note prestop files are excluded fromwildcard results.
• field type The following field type’s are used to identify fields within a selected linein the file, as determined by the line type and line id defined further below. Once theline is found, the field type and the field id locate the value within the line.
– TOKEN Treat the line as space-delimited tokens
– PARENS The desired value is contained in parenthesis
– QUOTES The desired value is contained in quotes
– SLASH The desired value is contained within slashes, e.g., /foo/
– SEARCH The result is assigned the value of the search defined by the givenfield id, which is treated as an expression having the syntax of pythons parse.searchfunction. E.g., frame.number=={:d} would yield the frame number.
– GROUP Intended for use with ”REGEX” line types, the result is set to the valueof the regex group number named by the field id. Regular expressions and theirgroups are processed using the python re.search semantics.
• line type Each of the above field type’s require a line type and line id to locatethe line within the file. The line type value is one of the following:
– LINE – The line id is an integer line number (starting at one). Use of this toidentify lines is discouraged since minor lab changes might alter the count.
– STARTSWITH – the line id is a string. This names the first occurrence of a linethat starts with this string.
– HAVESTRING – The line id is a string. This names the first occurrence of aline that contains the string.
– REGEX – The line id is a regular expression. This names the first occurrence ofa line that matches the regular expression. Also see the ”GROUP” field type.
– NEXT STARTSWITH – the line id is a string. This names the line preceedingthe first occurrence of a line that starts with this string.
– HAVESTRING TS – Intended for use with log files that have timestamped en-tries. Each entry containing the string identified in line id will have its result storedas a timestamped value as if it came from a timestamped stdout or stdin file. Seethe snort lab for an example.
– REGEX TS – Similar to HAVESTRING TS, but with REGEX semantics, includ-ing optional use of the GROUP field type.
26

• line id can be a parameterized value from the param.config file. Preface these with a”$”.
• field type (without line id) The following field types operate on the entire file, notjust on selected lines. These entries will have no line type or line id fields.
– LINE COUNT – The quantity of lines in the file. Remaining fields are ignored.
– CHECKSUM – The result value is set to the md5 checksum of the file.
– CONTAINS – The result value is set to TRUE if the file contains the string rep-resented in field id.
– FILE REGEX – The result value is set to TRUE if the file contains the regularexpression represented in field id. The python findall function is used on the entirefile. See the acl lab for an example of multi-line expressions.
– LOG TS – Used with timestamped log files, this results in a timestamped set ofboolean results with a value of TRUE for each log line that contains the stringrepresented in the field id.
– FILE REGEX TS Like LOG TS, but uses regular expressions.
– LOG RANGE – Similar to LOG TS, except the timestamped entries are rangesdelimited by the matching log entries.
– STRING COUNT–The result value is set to the quantity of occurances of thestring represented in field id.
– COMMAND COUNT-Intended for use with bash history files, counts the occu-rances of the command given in the field id. Commands are evaluatd consideringuse of sudo, time, etc.
– PARAM – The result value is set to nth parameter (0 is the program name),provided in the program invocation.
– TIME DELIM – The timestamps of the named files are used to create a set of timeranges with periods between the timestamps of each file, e.g., for use in time duringgoal operators. File identifiers should not include stdin or stdout qualifiers. The fileidentifier may be a list of container:file pairs separated by semicolons.
• field id – An integer identifying the nth occurance of the field type. Alternately maybe ”LAST” for the last occurance of the field type, or ”ALL” for the entire line (whichcauses the field type to be ignored). Or if field type is SEARCH, the field id is treated asthe search expression. If field type is ”CONTAINS”, the remainder of the line is treatedas a string to be searched for. If field type is ”PARAM”, the field id is the 1-based indexof the parameter whose value is to be assigned, and no other fields should be present. Iffield type is ”CHECKSUM”, no other field is required.
6.2.2 Converting artifact file formats
Some artifact file formats are not easily referenced by results.config directives. For example,a browser history file in the .sqlite format is binary. Such files can be processed into a moreconvenient form through use of a script at:
$LABTAINER_DIR/labs/[lab]/instr_config/pregrade.sh
Modify or expand on the default pregrade.sh script. In general, the pregrade.sh script is ex-pected to extract or convert data from an artifact file, and write it into a new file in the.local/results directory of the container. The pubkey lab has an example use of pregrade.sh.
27

6.3 Evaluating results
Results of student lab activity are assigned symbolic names by the results.config file as describedabove. These results are then referenced in the goals.config to evaluate whether the studentobtained expected results. Most lab goals defined in the goals.config file will evaluate to TRUEor FALSE, with TRUE reflecting that the student met the defined goal. In addition to thesebinary goals, the designer can capture and report on quantities of events, e.g., the numberof times a student ran a specific program. Once evaluated, a goal value may affect the valueof subsequent goals within the goals.config file, i.e., through use of boolean expressions andtemporal comparisons between goals. The evaluated state of each goal can then contribute toan overall student assessment.
Student results may derive from multiple invocations of the same program or system utility.The framework does not discourage students from continuing to experiment and explore aspectsof the exercise subsequent to obtaining the desired results. In general, Labtainer assessmentdetermines if the student obtained expected results during any invocation of a program orsystem utility, or during a time period delineated by timestamp ranges described in 6.3.2. 18
The goals.config file contains directives, each of which assigns a value to a symbolic namereferred to as the goal id. Each goal id may have multiple instances of timestamped values,with their associated timestamp ranges inherited from results. Examples of assigning values toa goal id include:
• A goal id is automatically created for each boolean result from the results.config file. Thetimestamps are directlly inherited from the results.
• The value of a specific result is compared (e.g., do two strings match?) to a literal expectedvalue. A boolean goal id value is generated for each referenced result’s timestamp.
• The value of a specific result is compared to a parameterized value generated from thestudent email address as described in section 5. A boolean goal id value is generated foreach referenced result’s timestamp.
• A keyed hash of a specific result is compared to the keyed hash of an expected value – toavoid publishing the actual value of the expected result. See 6.3.3.
• Timestamps and boolean values of two different goal id’s are compared. For example,“was a TRUE value for result A generated while a TRUE value for result B was beinggenerated?” A boolean goal id is generated for each timestamp range of result B withinwhich falls at least one result A timestamp.
• A boolean expression consisting of multiple goal id’s and boolean operators such as OR,AND, NOT AND. A boolean goal id is generated for each timestamp range for whichthere is an instance of every goal id named in the expression.
6.3.1 Goal definitions
The following syntax defines each goal within the goals.config file. While the syntax may appearcomplex, most goals can be expressed simply as can be seen in section 6.6 and in the Labtainerexercises distributed with the framework.
<goal_id> = <type> : [<operator> : <resulttag> : <answertag> | <boolean_expression>
| goal1 : goal2 | <resulttag> | value : subgoal_list]
18In those cases where the student is required to obtain the expected results during the final invocation of aprogram, the matchlast goal type may be specified as described below.
28
Where:
<goal_id> - An identifer for the goal. It must be alphanumeric
(underscores permitted).
<type> - must be one of the following:
matchany - Results from all timestamped sets are evaluated.
If the answertag names a result, then both that
result and the resulttag must occur in the same
timestamped set. The ’matchany’ goals are treated
as a set of values, each timestamped based on the
timestamp of the reference resulttag.
matchlast - only results from the latest timestamped set are
evaluated.
matchacross - The resulttag and answertag name results. The
operator is applied against values in different
timestamped sets. For example, a "string_diff"
operator would require the named results to have
at least two distinct values in different
timestamped sets. Note: ’matchacross’ cannot
be used within the boolean expression defined below.
boolean - The goal value is computed from a boolean expression
consisting of goal_id’s and boolean operators, ("and",
"or", "and_not", "or_not", and "not"), and parenthisis
for precedence. The goal_id’s must be from goals defined
earlier in the goals.config file, or boolean results
from results.config. The goal evalutes to
TRUE if the boolen expression evaluates to TRUE for any
of the timestamped sets of goal_ids, (see the ’matchany’
discussion above). The goal_id’s cannot include any
"matchacross" goals. NOTE: evaluation is within
timestamped sets. If you want to evaluate across
timestamps, use the count_greater_operator below.
count_greater The goal is TRUE if the count of TRUE subgoals in the
list exceeds the given value. The subgoals are
summed across all timestamps. The subgoal list is
comma-separated within parenthesis.
time_before - Both goal1 and goal2 must be goal_ids from previous
matchany, or boolean values from results.config
A timestamped goal is created for each goal2
timestamped instance whose timestamp is proceeded
by a goal1 timestamped instance. The goal for that
timestamp will be TRUE if the goal2
instance is TRUE, and at least one of the goal1
instances is TRUE. These timestamped goals can
then be evaluated within boolean goals.
time_during - Both goal1 and goal2 must be goal_ids from previous
matchany goal types, or boolean values from
results.config. Timestamps include a start and end
time, reflecting when the program starts and when it
terminates. A timestamped goal is created for each
29
goal2 range that encompasses a goal1 timestamp.
The goal for that timestamp will be TRUE if the
goal2 instance is TRUE, and at least one goal1 instance
is TRUE. These timestamped goals can then be
evaluated within boolean goals.
time_not_during Similar to time_during, but timestamped goals are
always created for each goal2. Each such goal is True
unless one or more goal1 times occur within a True goal2
range.
execute - The <operator> is treated as a file name of a script to
execute, with the resulttag and answertag passed to the
script as arguments. The resulttag is expected to be
one of the symbolic names defined in the results.config
file, while the answertag is expected to be a literal
value or the symbolic name in the parameters.config file
Note: the answertag cannot be a symbolic name from
results.config
count - If the remainder of the line only includes a resulttag,
then the goal value is assigned the quanity of
timestamped files containing the given resulttag.
Otherwise the goal value is assigned the
quantity of timestamped files having results
that satisfy the given operator and arguments.
value - The goal value is assigned the given resulttag value from
the most recent timestamped file that contains the resulttag.
<operator> - the following operators evaluate to TRUE as described below:
string_equal - The strings derived from <answertag> and <resulttag>
are equal.
hash_equal - The resulttag value is hashed using the Lab Master Seed
defined in the start.config. That is compared with
the answertag, which should have been generated by
the hash-goals.py utility (see below).
string_diff - The strings derived from <answertag> and <resulttag>
are not equal.
string_start - The string derived from <answertag> is at the start of
the string derived from <resulttag>.
example: answertag value = ’MySecret’
resulttag value = ’MySecretSauceIsSriracha’
string_end - The string derived from <answertag> is at the end of
the string derived from <resulttag>.
example: answertag value = ’Sriracha’
resulttag value = ’EatMoreFoodWithSriracha’
string_contains The string derived from <answertag> is contained within the
string derived from <resulttab>.
integer_equal - Integers derived from <answertag> and <resulttag>
are equal.
integer_greater - The integer derived from <answertag> is greater than
that derived from <resulttag>.
integer_lessthan- The integer derived from <answertag> is less than
30

that derived from <resulttag>
<executable_file> - If the type is ’execute’ then <operator> is a filename of
an executable.
<resulttag> -- One of the symbolic names defined in the results.config file.
The value is interpreted as either a string or an integer,
depending on the operator as defined above. Alternately,
for integer operators within matchany types, this
may be an arithmetic expression within parentheses. For example,
"(frame_number-44)".
<answertag> -- Either a literal value (string, integer or hexidecimal), or a
symolic name defined in the results.confg file or the
parameters.config file:
answer=<literal> -- literal string, integer or hex value
(leading with 0x), interpretation depending
on the operator as described above.
result.<symbol> -- symbol from the results.config file
parameter.<symbol> -- symbol from the parameters.config file
parameter_ascii.<symbol> -- same as above, but the value parsed as
an integer or hexidecimal and converted to an
ascii character.
Note that values derived from the parameters.config file are assigned the same values as wereassigned when the lab was parameterized for the student.
6.3.2 Distinguish between results generated before and after configuration changes
Some labs direct students to configure a system so that it is “secure”, or meeting some criteriagermane to lab learning objectives. Once the system is so configured, the student is thendirected to perform a specific set of actions to demonstrate the correctness of the configuration.For purposes of automated assessment, we would like evidence that the student performedall the prescribed demonstration steps without intervening configuration changes. In otherwords, though the student may perform a myriad of configuration changes and demonstratesteps (encourage experimentation!), we’d like to know if there ever was a single configurationin which all of the demonstration steps were performed.
Labtainers provides the LOG RANGE and TIME DELIM result types to establish timeranges over which we can assert that no configuration changes were made. Once those timeranges are established, i.e., as a set of results with a single tag, the time during and time not during
goal operators bin other results into those time ranges. Once so binned, the boolean operatorcan be used to determine if the desired conditions were met within a single configuration state.See sections 6.6.6 and 6.6.7 for examples.
6.3.3 Replace answers with hashes
Automated assessment files include expected results, which sometimes reflect “answers” toproblems that instructors would prefer not to publish, e.g., how many packets did source Xsend? While automated assessment can help the instructor confirm that the student ran aprogram that generated the desired output, not all instructors use automated assessment. For
31
example, they may simply review lab reports. Note this is not an issue when parameterizationindividualizes the expected result for each student.
Labtainers allows designers to include keyed hashes of answers within the published filesrather than the answers themselves. The hash equal operator used in a goals.config filefunctions like the string equal operator, except the comparison is made on a hash of thenamed result value, generated using the Lab Master SEED as the key.
Instead of creating a goals.config file directly, the designer creates a goals.answers filethat contains the intended content of the goals.config file, but with the actual answers, e.g.,:
ipv4_count = matchany : hash_equal : _ipv4_count : answer=2029121
The hash-goals.py utility is then used to generate the goals.config file, replacing the plaintext answers with the appropriate hashes.
It is intended that the goals.answers files will not be distributed, e.g., they would be main-tained with the SimLab solutions repo.
6.3.4 Assessment Report
Evaluation of student results occurs on a grading container that starts when the instructorruns the gradelab <lab> command. A report is generated and displayed on the screen. Acopy of the report is also placed in the latainer xfer directory. Debugging your assessmentconfiguration an be aided by using gradelab -d <lab>, which will start the grading containerand give you a shell into it. From there, run the script named instructor.py. There is a login /tmp/instructor.log in addition to diagnostics that might be generated on the terminal.See section 6.7 for additional information on debugging grading.19. By convention, all goals andboolean results whose symbolic names are not prefaced with an underscore ( ) or an cw (see6.4), will have corresponding entries in the assessment report, located in the home directory ina file named <lab name>.grades.txt>
6.3.5 Document the meaning of goals
Instructors will see descriptions of lab goals when they start the lab using gradelab. Thesedescriptions are embedded within directives within the goals.config and results.config files. Thedescriptions are associated with symbolic names that immediately follow the documentationdirectives as described below:
# SUM: -- The remainder of the line and comment lines that immediately
follow are displayed independent of any goal symbols.
# DOC: -- The remainder of the line and comment lines that immediately
follow are displayed for the symbolic name that follows
the comment lines.
# GROUP:-- The remainder of the line and comment lines that immediately
follow are displayed for the group symbolic names that
follows the comment lines. The group ends on a blank line, or
new comment.
See existing labs for examples. Also see the 6.4 for additional directives.
19Be sure to run stoplab after use of the -d option to shut down the grading container when you are donewith it
32
6.4 Student self-assessment
The checkwork command allows students to assess their own work against the criteria used byinstructors for automated assessment of lab performance. This can be disabled on a deployment-wide basis using the CHECKWORK no directive in the config/labtainers.config file. Of coursethis assumes you have separately provided access control over that file, e.g., through use of acustom VM appliance.20
6.4.1 Current state assessment
The lab designer can define a subset of goals and results that inform the student whether thecurrent system state is as desired. This greatly differs from typical Labtainer goal assessment,which measure whether the student ever achieved expected results, regardless of the system’scurrent state. These current state goals are intended to guide the student with potentially moreinformation than is found (or is practical) in the standard goals. The current state goals arenot intended to replace other goals, and they are not displayed to instructors.
The current state goals and results must have a prefix of cw , and they are required to havedocumentation directives of CHECK TRUE or CHECK FALSE. Text included within a directive willbe displayed to students if the value of the associated goals at the time checkwork was rundoes not match the directive value. In the example below the documentation directive will bedisplayed if the cw ssh open value is False.
#CHECK_TRUE: The SSH port is not open.
cw_ssh_open = client:prestop.stdout : FILE_REGEX : 22/tcp.*open
A CHECK OK documentation directive can be added display text in the event that all of the cw
goals match their documentation directives.Current state goals are expected to reflect the current state of the computers as described
below.
6.5 Current state artifacts
Results and goals used for current state assessment should primarily be derived from artifactsgenerated by prestop scripts described in 6.1.7. The system uses the most recent timestampfound for any files named by current state results, i.e., those with the cw prefix. The designercan name any file for a current state result – but note it may be difficult to divine current statesolely from previous artifacts, e.g., the state may have changed. For this reason, we suggestuse of prestop scripts.
To highlight the differences between current state assessment and standard Labtainers as-sessment, consider an example lab that requires the student to enforce an access control policyon a database having several users with differing authorizations. To support the instructor,we’d like to report on whether the student ever managed to configure the database permissionswithin a single configuration such that all users were prevented from exceeding their authoriza-tion and yet were able to access data to which they were authorized. Providing the instructorwith point details of whether individual modes of access were permitted or denied at any timein the lab might not be very helpful because the context of such access would not be known.For example, a goal might reflect that John was denied access to some table at some point, butwas it due to everyone being denied access? Or due to John being denied access to everything?Such intermediate results can be presented to instructors (or they can delve into intermediateresults themselves on the grader container), but those results lack context within the grading
20 Disabling self-assessment might be useful if Labtainers was repurposed for skills assessment testing.
33
report. On the other hand, when the student runs checkwork, the context is clear and we canprovide feedback to the student about the current state of the system relative to the goals.Now the questions are better formed, e.g., does John currently have access to the expectedtable columns?.
The above discussion is not intended to dissuade lab designers from informing instructorsabout partial success. If goals can be defined to show the student was able to provide most ofthe desired access controls though unable to enforce the entire policy, that is to be encouraged.But that can also be hard to do. It is often far easier to provide the student with informationabout partial goal achievement because the context is now.
6.6 Assessment examples
The following examples illustrate some typical assessment operations as they would be definedin the results.config and goals.config files.
6.6.1 Did a program output an expected answer?
Often, the easiest approach to such an assement is to simply use a FILE REGEX field type withinthe results.config – and not bother with the goals.config.
got_x = *.stdout : FILE_REGEX : X is:.*347
The lab goals will include a boolean named got x, which will be true if any stdout file containeda string matching that REGEX.
6.6.2 Do artifact files contain one of two specific strings?
Consider the labs/formatstring/instr config/results.config file for a few examples. The firstnon-comment line defines a result having the symbolic name “ crash sig”:
_crash_sig = vul_prog.stdout : CONTAINS : program exit, segmentation
_crash_smash = vul_prog.stdout : CONTAINS : *** stack smashing detected
This result is TRUE for each timestamped stdout file resulting from running the vul progprogram in which the file contains the string “program exit, segmentation”. The goals.configincludes this goal:
crash = boolean : ( _crash_smash or _crash_sig )
The value of the crash goal is TRUE if either result was ever true. Use of the count greater
operator in the above example would also provide the desired assessment. Note that the booleanoperator only assesses values within timestamped sets. For example, if the result values camefrom different program outputs, then they may not be within the same timestamp, and thuswould not compare. In such a case, the count greater operator should be used.
6.6.3 Compare value of a field from a selected line in an artifact file
Again refrence the labs/formatstring/instr config/results.config file. The third non-commentline defines a result having the symbolic name “origsecret1value”:
origsecret1value = vul_prog.stdout : 6 : STARTSWITH : The original secrets:
newsecret1value = vul_prog.stdout : 6 : STARTSWITH : The new secrets:
34
The timestamped results are found by looking at stdout from the “vul prog” program, andfinding the first line that starts with: “The original secrets:”. The result is assigned the valueof the sixth space-delimited token in that line. The “newsecret1value“ assignment is similar.The goals.config file includes:
modify_value = matchany : string_diff : newsecret1value : result.origsecret1value
, which will be TRUE if any of the vul prog stdout files include a “newsecret1value” that differsfrom its “oldsecret1value“.
6.6.4 Was a log entry written while some command executed?
Consider these two entries in results.config:
# Time stamp of log entry containing IP address
log-from-w1 = w3:/var/log/myhttplogfile.txt : LOG_TS : 202.25.4.2
# Use of wget -- will result in time stamp range: start-finish
wget-w1 = w1:wget.stdin : CONTAINS : 202.25.4.2
The following goals.config entry will be true if the log entry was ever generated using wgetfrom the w1 computer:
didit = time_during : log-from-w1 : wget-w1
6.6.5 My desired artifacts are not in stdin or stdout, the program outputs a file
See section 6.1.2
6.6.6 Delimiting time using log file entries
The LOG RANGE result type generates a set of results having timestamp ranges that coverthe period between specified log entries. For example, a results.config directive of:
syslog_slices = server:/var/log/messages : \
LOG_RANGE : Started System Logging Service
would create a set of time ranges with periods between each start of the system logging service.The use of time during and/or time not during and boolean in the goals.config could thenassess whether two or more events occurred during a given system log configuration. Forexample, assume the results.config file also included these directives:
_did_first_thing = client1:did_this.stdout : CONTAINS : Did that thing
_did_second_thing = client2:did_other.stdout : CONTAINS : Did that other thing
We’d like to know if the above two results were ever achieved within one configuration ofthe logging system. This can be determined by first binning the above two results into thetime ranges established by the syslog slices result through use of time during within thegoals.config as follows.
_did_first_during = time_during : _did_first_thing : syslog_slices
_did_second_during = time_during : _did_second_thing : syslog_slices
That yields two sets of goals having time ranges defined by the LOG RANGE results. We canthen use a boolean operator to determine if those two goals were ever achived within the sameestablished time range21:
did_both = boolean : (_did_first_during and _did_second_during)
See the centos-log2 lab for an example.
21Recall that the use of the boolean operator only makes sense for goals/results having matching timestamps
35
6.6.7 Delimiting time via program invocations
The TIME DELIM result type is intended to identify some program whose invocation times willbe used to create a set of time ranges. These results, like those from LOG RANGE differ fromother result types in that they define ranges between events. For example, a CONTAINS resultset from stdout files would have timestamps reflecting the corresponding program start andstop time, while a TIME DELIM result would have timestamps reflecting the periods betweeninvocations of the program named in the directive.
Consider a lab that directs students to alter iptables on a component. The student isrequired to demonstrate a desired iptables configuration by running nmap on various othercomponents. The instructor wants to confirm that some set of expected stdout from nmaprunning on different components all occurred within a single configuration of iptables, delimitedby the running of the iptables command. In other words, the student cannot succeed by alteringiptables between invocations of nmap on different components.
Note, that to be generally useful, we do not wish to simply look for invocations of iptablesby the student. For example, using the command to view the configuration does not representa change to the configuration. Also, the iptables may be called from a script, e.g., rc.local, andour typical use of stdout files would not see the running of iptables. It is therefore suggestedthat TIME DELIM results be tied to files created as an effect of notify events described in 6.1.6.In this example, the notify event would be execution of /sbin/iptables, and the notify cb.sh
script would determine if a change were being made to the configuration.Then, if the lab results.config were:
iptables = firewall:iptables : TIME_DELIM
_remote_nmap_443 = remote_ws:nmap.stdout : CONTAINS : 443/tcp open https
_remote_nmap_sql = remote_ws:nmap.stdout : CONTAINS : 3306/tcp open mysql
_local_nmap_443 = ws1:nmap.stdout : CONTAINS : 443/tcp open https
_local_nmap_sql = ws1:nmap.stdout : CONTAINS : 3306/tcp open mysql
The iptables result set would then include up to N+1 timestamped instances, where N isthe quantity of times that iptables was executed to change the configuraion. The first possibletimestamp would have a starting time of zero and an ending time of the very first consequentialinvocation of iptables. The nmap results would each have timestamps corresponding to theirtimes of execution. Note the nmap results include results from two different computers, ws1and remote ws.
A goals.config file of:
remote_nmap_443 = time_during : _remote_nmap_443 : iptables
remote_nmap_sql = time_during : _remote_nmap_sql : iptables
local_nmap_443 = time_during : _local_nmap_443 : iptables
local_nmap_sql = time_during : _local_nmap_sql : iptables
remote_correct = boolean : ((remote_nmap_443 and_not remote_nmap_sql) \
and local_nmap_443 and local_nmap_sql)
would generate sets of nmap goals with timestamp ranges corresponding to the iptables
results. The remote correct boolean expression could then be read as: “Was there any singleiptables configuration during which the student used nmap to demonstrate that:
• The remote workstation could reach the HTTPS port but not the SQL port, and,
• The local workstation could reach the HTTPS port and the SQL port.
The file identifiers for TIME DELIM commands can be lists of container:file pairs separated bysemicolons. This is useful when configuration changes are delimited by modifications made onmore than one component or by more than one program
36

6.7 Debugging automated assessment in labs
Developing automated assessment for a new lab typically requires some amount of debugging.This section is intended to guide new developers through the process.
When the gradelab script is run from labtainers-instructor, the configuration files in labs/[labname]/instr config are validated. If syntax errors are found, error messages are displayed atthe terminal and processing halts. The error messages identify the offending results.config orgoals.config entry. Refer to sections 6.2 and 6.3 for the expected syntax of these files.
Once initial syntax checking is passed, the lab is graded for each student. If the gradingtable does not display, or it displays incorrects values, then find run the gradelab commandwith the -d option. At the resulting terminal, enter the instructor.py command. That maydisplay diagnostics at the terminal. It will also generate a /tmp/instructor.log file of debuggingmessages.
At this point, the workflow is easiest if you edit/test from that container – just rememberto transfer your revised .config files from the container before doing a gradelab [lab] -r! Acopy of your config files are in ~/.local/instr\_config. You can edit those and try runninginstructor.py again. The [lab].grades.json contains the results of the goals assessment. You canfind the results assessment for each student beneath the directory whose name is prefaced withthe student email. From there, look in .local/result to find json files reflecting intermediateresults of assessing the student results. The actual student result arifacts can be found in~/[student dir]/[lab].[container].student/.local/result.
The mechanics of performing the lab (so that you can test grading for different outcomes)can be automated using the SimLab tool described in Appendix A.
7 Quizzes
Labs may include simple quizzes intended to re-enforce a student’s understanding of conceptsnecessary to perform the lab. The quizzes are not intended to be a primary source of studentassessment, rather, they are intended to help the student understand if they understand. Noattempt is made to protect quiz answers, or to randomize or parameterize quizzes. An exampleapplication of quizzes is to allow the student to confirm his or her understanding of a securitypolicy prior to trying to implement enforcement of that policy.
Quizzes are performed on the Labtainer host from within the labtainer-student directoryusing the quiz command. Use the -h option to see its usage.
A lab may have multiple quizzes. Each is defined in a file in the lab config directory withina file having an extension of .quiz. Each quiz includes a set of questions. Each question isdefined by a comma separated list. If a line terminates without a comma or a backslash, it istreated as the end of the question, and the next line is treated as the beginning of the nextquestion. Question types include the following:
7.1 True or False
A question whose answer is either true or false.
ID, TrueFalse, question, answer, right_response, wrong_response, prerequisit
Where:
• ID – any string identifier, must be unique. Currently only used to identify prerequisitesas described below.
• TrueFalse – identifies this as a True or False question.
37

• question – The question, in double quotes.
• answer – Ether T or F.
• right response – Message to display if a correct response is provided. All correct responsescause the word Correct to be display in bold font. Use empty double quotes of if thatshould be the only message.
• wrong response – Message to display if a incorrect response is provided. All incorrectresponses cause the word Incorrect to be display in bold font. Use empty double quotesof if that should be the only message.
• prerequisite – Optional ID of a another question. If provided, and that question wasanswered correctly, then this question will be skipped. This is intended to re-enforceconcepts that the student previously answered incorrectly.
7.2 Preface
Text to display, e.g., prior to a set of questions.
ID, preface, text
Where:
• ID – any string identifier, must be unique.
• preface – identifies this as a preface whose text will be displayed.
• text – The text to be displayed. This text is intended to provide context for whateverquestions follow.
Here is an example quiz question and prefix:
0, Preface,
"The following quiz is intended to help you determine if you are \
ready to perform the lab."
1, TrueFalse,
"In this lab, you will configure a firewall to use malware signatures to block \
traffic destined for a server.", F,
"This lab will use iptables to filter network traffic destined for a server.",
"This lab will use iptables to filter network traffic destined for a \
server based on IP packet addresses and port numbers."
8 Networking
Most networking is simply a matter of defining networks and assigning them to containers asdescribed in 4.2.
In addition to networks properties defined in the start.config file, each container /etc/hostfile includes a “my host entry” that names the host Linux. By Docker default, each containerincludes a default gateway that leads to the Linux host. This allows students to scp filesto/from the container and host. It also allows the student to reach external networks, e.g., tofetch additional packages in support of student exploration.
38
In many instances, the lab designer will want to define a different default route for a con-tainer. The start.config definitions for each container include an optional LAB GATEWAY param-eter that, if set, will replace the default Docker gateway with the given gateway, and it willreplace the resolv.conf entry and delete the route to the my host address. That configurationsetting is implemented using a set default gw.sh, which designers can optionally chose to di-rectly use instead of LAB GATEWAY in order to get more control over the setting of a defaultgateway, e.g., as part of parameterization. This script will automatically retain a route tableentry so that the student can reach the “my host” address. Additionally, those baseline imagesinclude a togglegw.sh script that the student can use to toggle the default gateway between onethat leads to the host, and one defined for the lab. This allows students to add packages oncomponents having lab-specific default gateways.
8.1 Network Taps
In general, Docker containers will only see network traffic addressed to the specific container, (orbroadcast traffic). The behavior is consistent with use of a layer 2 network switch to interconnectcontainers on the same subnet. In some labs, the designer may wish to provide students withcopies of all network traffic that occurs on one or more subnets. Labtainers supports networktaps through use of two container base images: tap and netmon. The tap component shouldnot be visible to the student, it exists to collect traffic off of all networks whose start.config
definitions include the TAP YES attribute. The netmon component should be defined with asingle network interface to a network called TAP LAN. The netmon component should be theonly one on the TAP LAN network, (do not add the tap component to any network). The tap
component must have the TAP YES attribute. A service runs on the netmon component thatwill receive network traffic sent by the tap component, and store it into the /taps directorywithin PCAP files named using the network name. See the plc-traffic lab as an example.
The netmon base is derived from the wireshark base. You may add other tools to thatcontainer as needed.
All containers attached to tapped networks will not be started until the tap and netmoncontainers are up and ready. This ensures that all startup traffic is captured in the PCAPs.
8.2 Realistic Network Routing and DNS
Some labs will strive to represent realistic networking environments, e.g., several networkedcomponents including gateways and DNS servers. To achieve that, you must override Docker,which automatically sets the container’s /etc/resolv.conf file to use the host system DNS res-olution. This is in addition to the default routes described above. While convenient, thesemechanisms can distract and confuse students, particularly when routing and DNS resolutionare central to the point of the exercise, (e.g., a DNS cache poisoning lab).
These Docker defaults can be easily overridden to present a more realistic networking envi-ronment. A worked example of such a topology can be seen in the routing-basics lab. This labincludes the following properties that can be reproduced in other labs:
• Default routes to gateway components.
• DNS definitions in /etc/resolv.conf that name gateway components.
• Use of iptables in gateway components to implement NAT.
• A hidden ISP component that exchanges network traffic with the host Linux system,thereby allowing all visible components to include routing, DNS and iptables entries thatdo not expose virtual networking tricks. See section 14.6 for additional information.
39

8.3 Communicating with external hosts or VMs
A container can be configured to support network communication hosts external to Labtainers.For example, consider a VirtualBox VMM that hosts a Linux VM that runs Labtainers and aWindows VM. Assume the Windows VM has a fixed IP of 192.168.1.12 and the container willbe assigned a network address of 192.168.1.2. To permit network communication between acontainer on the Linux VM and the Windows VM:
• Define a host-only network in VirtualBox with ip address/mask 192.168.1.1/24, and assignthat to the two VMs, configuring the VM network links to use promiscuous mode.
• Start both VMs. On the Linux VM, make note of the ethernet interface associated withthe host-only network (assumed to be enp0s8 below).
• On the Linux VM, ensure the network interface is in promiscuous mode, sudo ifconfig
enp0s8 promisc
• In the container start.config file, define a network as:
NETWORK LAN
MASK 192.168.1.0/24
GATEWAY 192.168.1.1
MACVLAN_EXT 1
IP_RANGE 192.168.1.0/24
where the MACVLAN value is the Nth network interface (alphabetically ordered), thatlacks an assigned IP address.
• Assign 192.168.1.2 to the container in the start.config
Figure 2: Networking with external hosts.
Also see the description of Multi-user labs in 12.
40
8.4 Network interface assignments
Docker appears to assign network connections to containers in alphabetical order. E.g., con-necting networks LAN1 and LAN2 to a container would result in LAN1 being connected todevice eth0 – regardless of the order in which LANs are defined within the start.config file.Understanding this ordering may be helpful for networking labs, e.g., when defining routes.
9 Building, Maintaining and Publishing Labs
This section describes how labs are built, maintained and published. Additional informationon tools and strategies intended for use by outside developers are described in section 10
Typically, when a Labtainer is started, the container’s associated Docker images are pulledfrom the Docker Hub if they are not already local on the Linux host. When building and editinglabs, the designer desires to run images reflecting recent changes that have been made. Theframework includes logic to identify dependencies within containers whose image content haschanged, and it will rebuild those images, (using the Docker build command). The frameworkwill only rebuild those images that have changed. The designer can force the rebuild of allimages within a lab by appending the “-f” switch to the end of the “rebuild.py” command.That switch is not intended for routine use because it wastes time and masks errors in ourdependency logic.
If you build a new Labtainer exercise, the container images will not be on the DockerHub unless you put them there. If you create your own public repository on the DockerHub (https://hub.docker.com/), you can populate that with your lab(s) by setting the “REG-ISTRY ID” value in the start.config file for the lab(s). You would then use the distrib/publish.pyscript to build, tag and push your lab container images to your registry. Please refer to thesection 10.
9.1 NPS Development Operations
When building lab images at NPS, please set the LABTAINER NPS environment variable to”YES”, e.g.,
export LABTAINER_NPS=YES
This will force packages to be retrieved from the local NPS mirrors (centosmirror.uc.nps.edu orubuntumirror.uc.nps.edu). Refer to section 9.4 for additional information. If builds fail withthis environment set, it is likely due to trying to install packages not present in the mirror. Inthose cases, edit the Dockerfile to remove this line:
ENV APT_SOURCE $apt_source
That will force use of the original apt-sources for that container.Labs must be checked into the local Git repository in order to be distributed. After creating
and testing a new lab, use the scripts/designer/bin/cleanlab4svn.py script to remove temporaryfiles that do not belong in git. Use the publish.py script (described above) to publish the labcontainers. The distrib/mkdist.sh script is used by NPS to create the distribution tar file. Thisscript relies on your local Git repository as the source to the Labtainer scripts and labs. Usethe mk-devel-distrib.sh script to publish the developer configuration of the tar file.
The mkdist.sh and mk-devel-distrib.sh scripts include ”myshare” variables that define a pathto a directory shared with the development VM’s host. The scripts will place the resulting tarfiles in this directory. You must then manually transfer the updated tar files (including thelabtainer pdf.zip file) to the Liferay server at
41
davs://my.nps.edu/webdav/c3o-staging/document_library/labtainers
After transfering the files, use the Liferay “Publish to Live” function to make the files availableon the Labtainers website (which is also where they are pulled from when a student runsupdate-labtainer.sh).
Be sure to push your Git repository updates to the GitHub master.The distrib/publish.py script is used to rebuild and publish individual labs, or optionally all
of the Labtainer exercises managed by NPS. The publish.py (without the -l option) script willonly rebuild labs that have changed. After pushing a new lab container image to the Dockerhub, the script deletes the image from the local system. The intent is to ensure that futuretesting of the lab is done on the authoritative copy, i.e., from the hub.
Labtainer base images are built and published from the scripts/designer/bin directory. Priorto publishing baseline images, it is suggested that all local images be purged from the develop-ment machine, e,g.,
/trunk/setup_scripts/destroy-docker.sh
This will ensure that new baseline images do not incorporate layer remnants.All new images should be first built and pushed onto the test registry, i.e., using the
./publish image.sh <image> -t
Framework modifications made to support changed or new functions within container imagesmust be evaluated with respect to their impact on compatibility. If a new lab image requiresan updated Labtainers framework, then the ”framework version” must be incremented withinthe bin/labutils.py script before the image is built and published. This will prompt users torun update-labtainer.sh prior to running any newer lab image. Also insure that these lines arepresent in the container dockerfile:
ARG version
LABEL version=$version
And, be sure to publish the revised framework before publishing the revised lab(s).
9.2 Alternate registry for testing
If the environment variable TEST REGISTRY, is set to TRUE, labs to be pulled and pushed into analternate registry defined in the trunk/config/labtainer.config file test registry entry. Also, thebuild lab.py, labtainer, and publish.sh scripts include -t flags to force the system to refer-ence the test registry instead of the Docker Hub. It is easy to set up a registry (it is a container!),https://docs.docker.com/registry/deploying/ Use the trunk/setup scripts/prep-testregistry.sh
script to prepare a test system to use a test registry.
9.3 Large lab files
Consider storing the authoritative source of large files (e.g., pcaps) or directories in externallocations, e.g., nps.box.com. This has two advantages: 1) Reduces the size of the lab designerdistribution tar; 2) avoids putting large files into github. Note this issue does not affect containerimages, which will always include the large files regardless of how they are stored. The questionis simply the location of the source of the large files for purposes of rebuilding a specific lab. Ourmodel is to provide potential lab developers with a distribution that is not gigabytes, but alsocontains whatever is needed to rebuild existing labs – or at least links that are automaticallyfollowed when building the lab.
A file named <lab>/config/bigexternal.txt with entries as follows:
42

<url> <relative_path>
will cause a rebuild to look for a file at relative path relative to the lab directory, and fetchit from the url if it is missing. Note that the date/times of these files are not referenced forrebuild dependencies due to limitations in product such as box.com which fails to provide filemodification times. Instead, the modification time of the bigexternal.txt file is used to controlrebuilds. Thus, if you update one of the large files, you will want to make a gratuitous changeto the bigexternal.txt file to force a rebuild (for you and others who may extend your lab.)
9.3.1 Reuse of large file sets
The use of “sys tar” and “home tar” described in 4.3.1 facilitates sharing of common baselinesof large or numerous files. New labs can incorporate tar files from existing labs through theuse of “external-manifest” files, (see the xsite/victim/home tar as an example). The syntax ofthe external-manifest is shown below, and it may contain multiple entries, one per line:
lab:container
Where “lab” is the name of the lab, and “container” is the name of the container whose tar fileis to be included.
The framework will include content of tar archives referenced within these files when creatingan archive for the new lab. This allows the sys tar to include lab-specific files as well as filesfrom other labs. Designers should avoid adding duplicate tar files to the SVN repository. Thiswill avoid duplication of the files when a new distribution is created.
9.4 Package sources for apt and yum
Labtainer base images include configuration files to use local NPS mirrors when creating deriva-tive images. The original apt or yum sources are restored to an image if it is built without an en-vironment variable of LABTAINER NPS=YES The original sources are also restored when any con-tainer is first run. See the baseline Labtainer Dockerfiles in trunk/scripts/designer/base dockerfiles
to understand how the sources files are manipulated.The apt source entry in the trunk/config/labtainer.config file will set the $apt source
environment variable in a Dockerfile, and this can be used by lab designers to force imagebuilds to use alternate sources. By default, the value of the variable is “archive.ubuntu.com”.This hostname can be overridden via the trunk/config/labtainer.config file apt source entry,and having the following in your Dockerfile:
RUN sed -i s/archive.ubuntu.com/$apt_source/ /etc/apt/sources.list
9.5 Locale settings
The locale settings, (e.g., used when interpreting character encodings) are set to en US.utf-8as can be seen in
trunk/scripts/labdesigner/base_dockerfiles/Dockerfile.labtainer.base
Similar Dockerfile entries in new or existing labs can provide alternate locale settings.
43
9.6 Lab versions
Substantive changes to an existing published lab should be made in a new named lab. Asubstantive change is defined as one that would break any existing installation in a mannerthat could not be corrected with a framework update. Issues with compatibility between twolab versions is often due to there being lab-specific files on the framework, (i.e., from where thelab is run) as well as within the Docker images that make up the lab. When a newer versionof a lab image is published, it must be able to work with existing installations. If that requiresan update to the framework, then that update cannot break any existing labs present in thatinstallation, i.e., labs that have already been started.
For example, never change container names for existing labs. If such a change is needed,create a new lab, and assign version numbers to it and the old lab.
Lab version numbers are kept in the optional labs/[lab]/config/version file. There isno need to have such a file until there are two or more versions of the same lab. (Note if youwant two versions of a given lab to be runnable and to appear in the list of labs, then they arenot versions of the same lab. They are different labs.) The format of a lab version file is:
lab-base version
where lab-base is a name to associate with the multiple versions. It can be anything and doesnot appear at the user interface. The version is an integer.
To create a new version of a lab:
• Create a new lab using new lab setup.py (perhaps with the clone option).
• Create a version file for the old lab (if it does not already have one).
• Create a version file for the new lab, giving it a version numerically greater than the oldversion.
• Add the old lab name to the trunk/publish/skip-labs list.
When the user types the labtainer command with no arguments, the list will then onlyinclude the latest version of that lab. An exception is if the old lab already has been run inthis installation, in which case both lab versions will display.
9.7 Creating new base images
Labtainer base images are managed using scripts and configuration files in the scripts/designerdirectory. The bin subdirectory includes a set of scripts that create various base images, andthe base dockerfiles contain their Dockerfiles. Use those as a template.
Typically, new base images are created to support a new lab. Proper Labtainer lab Docker-files have FROM directives that include the $registry/ qualifier, however your new base imagemight not yet be published to a registry as you test it, and tagging the new base image withthe registry name may complicate your desired workflow. Use the -L option to the rebuild
command to direct the build to use unqualified image names if needed.
9.8 Importing labs: Warning!
Avoid the use of “shared folders” in VMWare and VirtualBox as a means of copying labdirectories. Use tar and/or scp instead. Otherwise permissions of directories may be changed,e.g., no x access to /etc for other.
44

10 Labtainer Instructor Modules (IModules)
This guide describes how instructors can add content to Labtainers. Instructors extend Lab-tainers with new labs or customized versions of existing labs by defining IModules and directingtheir students to enable the IModules within their individual Labtainers instances.22 Studentssimply type: imodule <path> to add a given URL to their Labtainers instance. The scope ofinstructor-generated extensions can range from modified lab manuals to new Labtainer exer-cises. The Labtainers framework provides tools to assist instructors in creating and publishingthese extensions.
10.1 Labtainers distribution strategy
To understand how IModules are distributed, it is helpful to first review the general Labtainersdistribution strategy. A Labtainers installation, (e.g., the initial content of a Labtainers VMappliance, or the results of installing from the distribution), includes the scripts and configura-tion files needed to run all Labtainers exercises. The installation initially only includes a smallnumber of Docker container images that provide the core of container images for each of thelabs. When a student first starts a given lab, the framework retrieves all Docker image layersrequired for that lab. These layers are retrieved from the Docker Hub, and build upon the coreimages present in the initial distribution. The scripts and configuration files are published asa tar archive on the Labtainers website. Whenever a Labtainers installation is updated, thearchive is retrieved from the website and used to update the installation.
Files needed to create Docker images are typically not distributed in Labtainers distribu-tions, but are installed when the user runs the update-designer script. These files are drawnfrom a separate tar archive on the Labtainers website.
10.2 Imodule distribution strategy
Instructors place archives on a web server and student instances of Labtainers retrieve thosearchives from the web server while retrieving other Labtainer updates. When creating newlabs, instructors publish the lab Docker images to DockerHub, where they’ll be retrieved by theframework when students run that lab. While the publishing of extensions does not depend onany particular source control system, supporting tools that simplify archive creation are builtaround git.
Archives published by instructors are tar files that include only changed and new files,relative to the Labtainers baseline. Inclusion of unchanged (relative to the Labtainers baseline)files is discouraged, as is publishing only deltas from previous IModule publications. Putanother way, an IModule will contain any and all files necessary for running, (not building),all new labs – or to modify existing labs, relative to the Labtainers baseline as defined by theGitHub master repository.
Support tools simplify creation of IModule tar files through use of git attributes. Instructorswho chose not to use git are responsible for creating a tar of selected files – which may be trivial,e.g., if the IModule consists of lab manual modifications or new lab guides. Paths within tarfiles will be relative to the labtainers/lab directory. For example, a revised telnet-lab manualwould have the path:
telnet-lab/docs/telnet-lab.pdf
Note the modified source, e.g., docx files, need not be included in the IModule archive, thoughthe support tools do include them.
22Or, instructors can enable IModules in VMs, and direct students to use those.
45

Typically, each participating instructor will publish a single archive (i.e., a tar file) at apublically accessible URL specific to the instructor or institution. The URL is distributedto students and entered into their Labtainers instance using the imodule command 23. Forexample, if the instructor publishes at https://myschool/mystuff/labtainers/imodule.
tar, the students would each issue this command to Labtainers:
imodule myschool/mystuff/labtainers/imodule.tar
The student labs will be updated to include those IModules. Student labs will be updatedwhenever the student runs either update-labtainer.sh or imodule -u.
IModule support tools rely on instructor contributions existing in local git repositories.The tools do not reference remote repositories. IModule repositories have no relationship tothe main Labtainers repository, and should be managed within Labtainer distributions ratherthan within local repo copies of the main Labtainer repository. 24
10.3 Testing IModules
Use a separate VM to test your IModules, i.e., not the VM used to develop the lab. A separateLabtainer VM is suggested. Use this independent VM to mimic what a student will see anddo. If you’d prefer to test an IModule prior to publishing the imodule.tar file, place the file onthe test system and use the file:// URL syntax, e.g.,
imodule file://home/student/imodules/imodule.tar
Use of SimLab, as described in A is encouraged to ensure the lab behaves as intended.
10.4 Custom lab manuals
The easiest way to provide your students with a custom version of a lab manual that they canreference from Labtainers is described below. This does not require that you use the LabtainerVM or git. The example assumes you are customizing the telnet-lab manual.
• Create your version of the manual in the pdf format (if the manual source is docx, exportit as pdf).
• Put that manual in a file with the original name, in a directory whose name is the lab,e.g.,
telnet-lab/telnet-lab.pdf
• Create a tar file of the manual including the lab name in the path.
• Publish that tar file onto a web server, i.e., something that responds to http get com-mands.
• Instruct your students to provide that URL to the imodule command.
If you wish to publish multiple custom lab manuals, put them all in the same tar file.
23The full URL is published because many web hosting systems, e.g., box.com make it impossible to constructURLs from relative paths
24In general, instructors and lab designers are encourage to work from Labtainer distributions rather thanrepos pulled from the Labtainers repo at GitHub to avoid git repository conflicts.
46
10.5 Imodule examples
These examples assume the instructor is working from a Labtainers distribution, e.g., one ofthe VM appliance.
10.5.1 Modify a lab manual for the telnet-lab
In this example, the instructor wants his or her students to work with a customized version ofthe telnet-lab manual.
• Change directory to $LABTAINER DIR/labs
• Initialize the git archive:
git init
(Do this only once, no need to repeat for each IModule.)
• Add the original Labtainer file as the baseline:
git add telnet-lab/docs/telnet-lab.docx
• Edit the telnet-lab/docs/telnet-lab.docx file
• Commit your change:
git commit telnet-lab/docs/telnet-lab.docx
This change has no effect on any Docker container, so we need only generate the updatedtar:
create-imodules.sh
Then publish the imodule.tar to the website.
10.5.2 Create a new lab
In this example, the instructor wants to create a new lab for use by his or her students. Thisexample assumes the instructor has created a DockerHub registry that is publicly accessible.
• Change directory to labtainer/labs
• Initialize git archive: git init (Do this only once, no need to repeat for each IModule.)
• Create the lab per the Lab Designer User Guide, for this example, we assume the lab ismy-new-lab.
• Include the name of your Docker Hub registry the lab config/start.config file REGISTRY
attribute.
• Complete development and testing of the lab, e.g., build a SimLab test.
• While in the my-new-lab directory, run cleanlab4svn.py to remove temporary files thatshould not be under source control.
• While in the lab directory (parent of my-new-lab), add the lab to source control:
47

git add my-new-lab
git commit my-new-lab -m "Adding an IModule"
• Publish the lab container images:
cd $LABTAINER_DIR/distrib
./publish.py -d -l my-new-lab
This will rebuild the lab container images and publish them to your DockerHub registry.Your start.config files for your labs name this registry, and that allows student Lab-tainer implementations to retrieve your lab images without having to rebuild them. Notethe -d option directs the function to publish to the DockerHub registry named in your labstart.config file. Otherwise, it will try to publish to a test registry. Use of test registriesis optional, and are described in the Lab Designer User Guide.
• Generate the updated IModule tar:
create-imodules.sh
This creates a tar that contains all of your IModule labs, i.e., those you have added toyour git repo. If you do not use git to manage your lab source, you will have to createthe IModule.tar yourself.
• Then publish the imodule.tar to your website and distribute the URL to whoever youwant to have access to your labs.
11 Remote access and control of Labtainer exercises
This section describes features intended for use within structured environments in which oneor more students are performing a lab exercise under supervision of an instructor or red-teammember. This does not apply to environments in which students individualy run Labtainerson dedicated computers at their own pace.
The environment may have one of two forms:
1. Each student has a dedicated computer upon which a Labtainer VM resides, and theinstrutor has network access to each computer; or,
2. Multiple Labtainer VMs (or custom-built VMs containing Labtainers) run on one or moreservers that are networked together. Students interact individually with their allocatedVM using a tool such as VMWare Horizon or Apache Guacamole, which presents thestudent with the Linux desktop of their allocated VM via a browser or client application.
We assume that something within the infrastructure allows remote network access by an in-structor to each VM, e.g., via port forwarding. The instructor will use this network accessto manage aspects of the lab exercise, and/or remotely access selected containers, e.g., as ared-team activity.
48
11.1 Remote management
Labtainer remote management functions allow instructors to query and change the state of theLabtainers exercise currently running on each VM. The remote access functions available toinstructors currently include:
• status – Display the name of the lab running on a specific VM.
• copy – Copy files into a Labtainer container per a copy directive defined in:
<lab>/config/copy.config}
11.1.1 File copying
The copy.config file contains one or more directives, one per line as follows:
<directive> <container> <source> <destination>
Where:
• directive is a arbitrary string identifier that names the directive.
• container is the name of the container into which the files are to be copied.
• source is a source path upon the VM. If this path starts with $LAB, the path is relativeto the lab directory. Otherwise, a full pathname is expected, e.g., the path to a foldershared with all VMs on a host.
• destination is the destination path upon the target container. Permissions are retained ifpossible, e.g, if the source files are owned by root:root, that will be maintained on thedestination.
The semantics of source and destination are per the Unix cp -a command. Please see the dis-cussion of SRC PATH and DEST PATH in https://docs.docker.com/engine/reference/commandline/
cp/
11.1.2 Client and server setup
The python service at scripts/remote/remote.py should be started on each Labtainers VMwith the --daemon option.
The python client at host scripts/remote/remote.py should be copied to whatever hostthe instructor will work from.
Port forwarding for each VM should be defined such that some host port is forwarded toport 60000 on the VM. You would assign each VM on a given host a different host port number.That host port number will be how the instructor names different VMs on the same host. Forexample, on VirtualBox, the port forwarding entry for one VM might look like:
Host IP Host Port Guest IP Guest Port
0.0.0.0 60003 0.0.0.0 60000
Then, if the instructor is working from the computer that hosts the VM, the followingcommand would cause a copy directive named one to occur on that VM if it is running a labnamed tlab:
./remote.py -l tlab -c one -p 60003
49

11.2 Remote access to containers
This section describes environments in which an instructor or red team member is to interactwith containers within the lab, e.g., to perform penetration testing. This interaction wouldoccur via computers external to the lab exercise, e.g., networked to a server hosting VMs. Thestrategy employed to achieve this depends on whether the lab utilizes GNS3, (which managesthe virtual networks without relying on Docker networking).
11.2.1 Remote access without GNS3
Docker port publishing provides external network access to containers. For example, remotessh access to a specific container within the lab can be achieved as follows:
• Use the PUBLISH directive in the start.config to bind a container port to a host VM port,e.g.,
PUBLISH 0.0.0.0:60020:20/tcp
• Use port forwarding to bind the VM port to a server port. Here, the host port woulddiffer for each VM on a server as a means of naming the VM whose lab is to accessed.For example, on VirtualBox, a port forwarding entry might be:
Host IP Host Port Guest IP Guest Port
0.0.0.0 61022 0.0.0.0 60022
The above example would then allow an external computer to ssh into the selected containerusing port 60122, assuming the container has SSH enabled (see the telnet-lab server containerfor an example). Authentication to control who can SSH into a given container could beprovided through use of SSH keys. This remotely accessed container can be hidden from thestudent, and provide the instructor or red-team participant with a means to probe and attemptto compromise the other computers within the Labtainers exercise network.
11.2.2 Remote access with GNS3
For labs that run in the GNS3 environment, remote network access is provided through use ofthe GNS3 cloud endpoint device, which interacts with an Ethernet network interface. In thisexample, access is provided from external to the VM – with no network access to the containerfrom within the VM.
The following assumes your VM has a virtual Ethernet interface named enp0s3, with IPan address on the 10.0.2.0/24 subnet. On your VM, find the Ethernet interface that has anassigned IP address. Alternately you could define the VM to share a physical host network,but that is outside the scope of this example.
Define a component within your Labtainers lab that is be remotely accessed, e.g., a work-station or router, and assign it an IP address on the enp0s3 interface subnet, e.g., 10.0.2.100.Within the start.config file, provide the container with the KICK ME <LAN> attribute, whereLAN is the name of the network intended to be connected to the cloud component. Then,when defining the GNS3 network topology, i.e., creating and connecting links:
• Select a Cloud component from the Browse End Devices menu, and drag it to the desk-top. (computer terminal icon).
50
• Right click, select Configure and confirm that the Ethernet interface that you selected(e.g., enp0s3) is in the list. If it is not there, select the device from the pull-down list andclick the Add button. Then click OK.
• Use the network links to connect the cloud to the desired component.
• Use port forwarding as described earlier to map host ports to ports on the VM. Whendefining port forwarding, enter 0.0.0.0 as the “Host IP”, and the container IP address,e.g., 10.0.2.100 as the “Guest IP”.
• You should now be able to ssh to the container from outside of the VM using the mappedport.
Alternately, to provide access from the VM (but not from external sources), pick virbrEthernet interface and:
• Select a Cloud component from the Browse End Devices menu, and drag it to the desk-top. (computer terminal icon).
• Right click, select Configure and delete the default Ethernet interface if any is selected.
• Click the Show special Ethernet interfaces checkbox in the lower left. That shouldadd devices to the pull-down list.
• Select the virbr0 device from the pull-down list and click the Add button. Then click OK.
• Use the network links to connect the cloud to the desired component.
• When the lab is started, you should be able to ping the connected container from theVM.
• Use port forwarding as described earlier to map host ports to ports on the VM. Whendefining port forwarding, enter the container IP address as the “Guest IP”.
Note that the subnet used for this remote access is defined by the VM’s Ethernet device.Putting multiple lab computers on that subnet as part of the lab network topology may beawkward and confusing to students since 192.168 addresses are private.
When a GNS3 Labtainer is run with the --student option, the Cloud components arehidden, as are any Labtainer components whose start.config entries include HIDE YES. Linksto hidden devices are also hidden.
12 Multi-user Labtainers
Labtainer exercises can support multiple concurrent users, such as students collaborating orcompeting on a shared set of networked components. A multi-user lab can be operated in anyone of three modes:
1. Dedicated to a single student, e.g., on a laptop or a VM allocated to the student from aVM farm.
2. Shared by multiple students, each running Labtainers on a per-student VM with sharedcomponets running on separate Labtainers VM. This is illustrated in Figure 3
3. Shared by multiple students, each SSHing from a non-Labtainer VM into a per-studentLabtainer computer on a single VM running Labtainers. This is illustrated in Figure 4
51
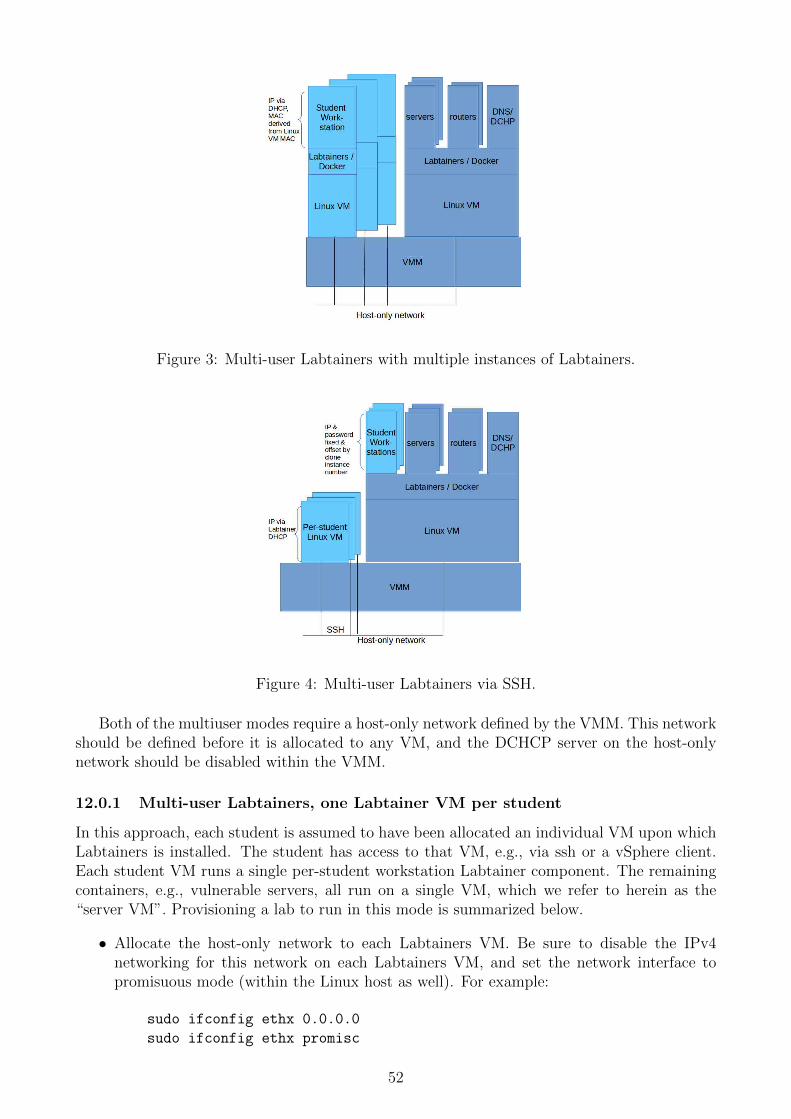
Figure 3: Multi-user Labtainers with multiple instances of Labtainers.
Figure 4: Multi-user Labtainers via SSH.
Both of the multiuser modes require a host-only network defined by the VMM. This networkshould be defined before it is allocated to any VM, and the DCHCP server on the host-onlynetwork should be disabled within the VMM.
12.0.1 Multi-user Labtainers, one Labtainer VM per student
In this approach, each student is assumed to have been allocated an individual VM upon whichLabtainers is installed. The student has access to that VM, e.g., via ssh or a vSphere client.Each student VM runs a single per-student workstation Labtainer component. The remainingcontainers, e.g., vulnerable servers, all run on a single VM, which we refer to herein as the“server VM”. Provisioning a lab to run in this mode is summarized below.
• Allocate the host-only network to each Labtainers VM. Be sure to disable the IPv4networking for this network on each Labtainers VM, and set the network interface topromisuous mode (within the Linux host as well). For example:
sudo ifconfig ethx 0.0.0.0
sudo ifconfig ethx promisc
52
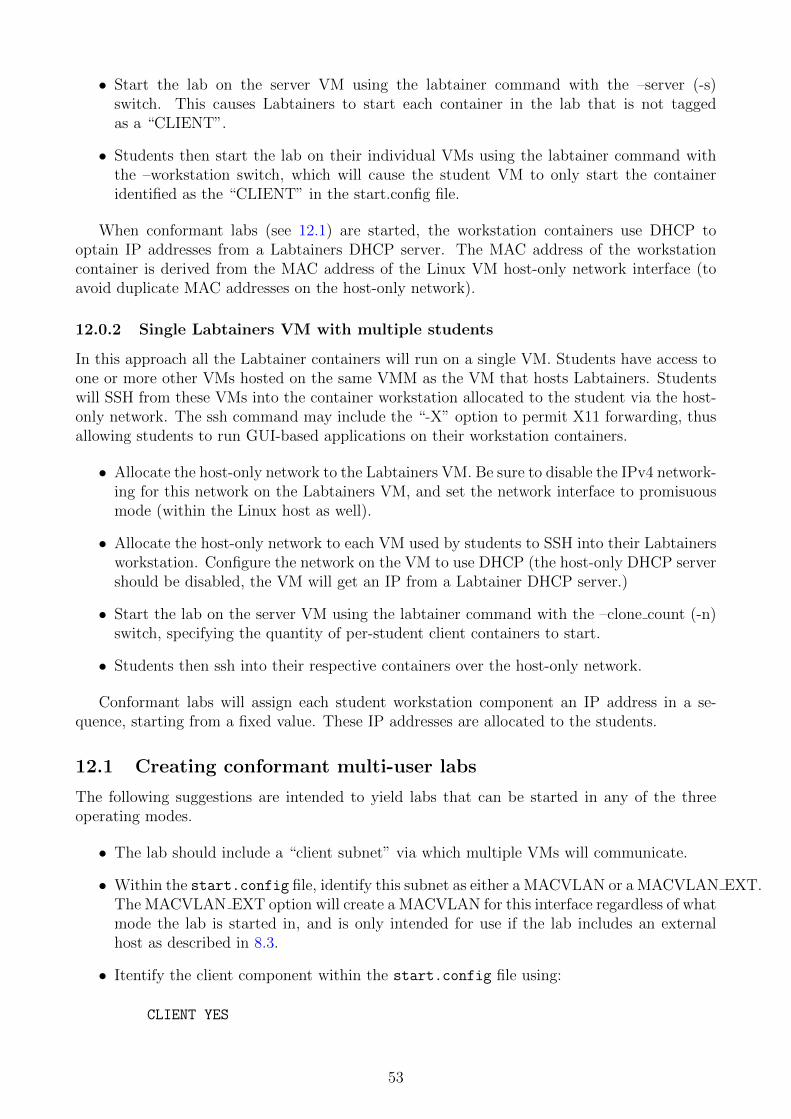
• Start the lab on the server VM using the labtainer command with the –server (-s)switch. This causes Labtainers to start each container in the lab that is not taggedas a “CLIENT”.
• Students then start the lab on their individual VMs using the labtainer command withthe –workstation switch, which will cause the student VM to only start the containeridentified as the “CLIENT” in the start.config file.
When conformant labs (see 12.1) are started, the workstation containers use DHCP tooptain IP addresses from a Labtainers DHCP server. The MAC address of the workstationcontainer is derived from the MAC address of the Linux VM host-only network interface (toavoid duplicate MAC addresses on the host-only network).
12.0.2 Single Labtainers VM with multiple students
In this approach all the Labtainer containers will run on a single VM. Students have access toone or more other VMs hosted on the same VMM as the VM that hosts Labtainers. Studentswill SSH from these VMs into the container workstation allocated to the student via the host-only network. The ssh command may include the “-X” option to permit X11 forwarding, thusallowing students to run GUI-based applications on their workstation containers.
• Allocate the host-only network to the Labtainers VM. Be sure to disable the IPv4 network-ing for this network on the Labtainers VM, and set the network interface to promisuousmode (within the Linux host as well).
• Allocate the host-only network to each VM used by students to SSH into their Labtainersworkstation. Configure the network on the VM to use DHCP (the host-only DHCP servershould be disabled, the VM will get an IP from a Labtainer DHCP server.)
• Start the lab on the server VM using the labtainer command with the –clone count (-n)switch, specifying the quantity of per-student client containers to start.
• Students then ssh into their respective containers over the host-only network.
Conformant labs will assign each student workstation component an IP address in a se-quence, starting from a fixed value. These IP addresses are allocated to the students.
12.1 Creating conformant multi-user labs
The following suggestions are intended to yield labs that can be started in any of the threeoperating modes.
• The lab should include a “client subnet” via which multiple VMs will communicate.
• Within the start.config file, identify this subnet as either a MACVLAN or a MACVLAN EXT.The MACVLAN EXT option will create a MACVLAN for this interface regardless of whatmode the lab is started in, and is only intended for use if the lab includes an externalhost as described in 8.3.
• Itentify the client component within the start.config file using:
CLIENT YES
53
• Define the client component network address for the client subnet using the +CLONE MAC
option, e.g.,
LAN 192.168.1.10+CLONE_MAC
When run in single user mode, the +CLONE MAC suffix is ignored. When run with multipleLabtainer instances, the last four bytes of the network MAC address for each client iscloned from the network interface tied to the MACVLAN. When all multi-user Labtainerworkstations run on a single VM, then the IP address is incremented by one less than theclone instance number.
• Include a dhcp server as one of your containers, e.g., per the dhcp-client lab. The lab-tainer.network base includes the dnsmasq service, which includes a DHCP server. Recon-figure dnsmasq to start the DHCP service, e.g., in your fixlocal.sh script.
• Edit the dhcp container’s system/etc/dnsmasq.conf file to include the range of DHCPaddresses you wish to allocate to the clients. When multiple instances of Labtainersare run, then “client” is the per-student Labtainer workstation. When there is a singleLabtainers VM, then “clients” are the VMs from which students SSH into their Labtainerworkstations. An example dnasq.conf entry is:
dhcp-range=192.168.1.10, 192.168.1.99, 12h
• Enable dhcp on the client workstation components by installing isc-dhcp-client (via theDockerfile), and putting this in the workstation system/etc/rc.local:
/sbin/dhclient-labtainer eth0
Note the dhclient-labtainer invokes the dhclient program and then manually sets the ipaddress. This is a workaround for a Docker limitation.
• Include an SSH server in the workstation container, e.g., by deriving it from the lab-tainer.network base. Include a system/etc/ssh/sshd config file for the workstationcontainer that permits X11 forwarding (if desired), e.g., by copying the file from thekali-test lab.
• Password management (only has an effect in multiuser mode when all Labtainers com-ponents are on a single VM). Assuming you’d like to allocate each student a unique(insecure) password for purposes of further ensuring one student does not accidently sshinto some other student’s workstation, put this in the workstation’s bin/fixlocal.sh file:
newpwd=studentCLONE\_NUM
user=$2
/usr/bin/passwd $user <<EOF
$1
$newpwd
$newpwd
EOF
Add, this in the labs/[your lab]/config/parameter.config
PASSWD : CLONE_REPLACE : .local/bin/fixlocal.sh : CLONE_NUM : CLONE
54
13 Limitations
The labtainers framework limits labs to the Linux execution environment. However, a labdesigner could prescribe the inclusion of a separate VM, e.g., a Windows system, and thatVM could be networked with the Linux VM that hosts the Docker containers as described in8.3. Future work would be necessary to include artifacts from the Windows system within theframework’s automated assessment and parameterization.
The user does not see the /etc/fstab file. Only virtual file systems can be mounted (or thosemounted when the container is created.)
Kernel logs do not appear in /var/log/kern.log. For logging events such as iptables,consider using ulogd and a “NFLOG” directive in place of a “LOG” directive. See the dmz-labas an example.
The available Docker network drivers do not permit IP address overlap between virtualnetworks. For example, you cannot define two 192.168.1.0/24 LANs.
Student use of the shell directive ”source” will cause stdin/stdout to not be captured.Inquisitive students will see evidence of artifact collection. Home directories on containers
includes a .local directory that includes Labtainer scripts that manage capturing and collec-tion of artifacts, and that directory contains the stdin and stdout files generated by studentactions. Additionally, when the student starts a process that will have stdin and stdout cap-tured, the student will see extra processes within that process tree, e.g., the tee function thatgenerates copies of those data streams. All of the containers share the Linux kernel with theLinux host. Changes to kernel configuration settings, e.g., enabling ASLR, will be visible acrossall of the containers.
14 Notes
14.1 Firefox
14.1.1 Profile and configuration changes
The labtainer.firefox image includes a /var/tmp/home.tar which is expanded into the user homedirectory when parameterize.sh is run. This tar includes a profile in .mozilla that avoids firefoxstarting with its welcome pages and privacy statements. The labtainer.firefox image includesa customized /usr/bin/firefox that starts the browser in a new instance so it does not shareexisting browsers. The about:config was altered to disabled insecure field warnings for thelabs that do not use SSL connections to web servers.
14.1.2 Browser history
If you wish to assess places a browser has visited, e.g., use a pregrade.sh to extract sites fromthe firefox places.sqlite file, put places.sqlite into the lab’s / bin/noskip file.
14.1.3 Slow browser startup
Some html, e.g., for the softplc, want to visit fonts.googleapis.com. If no gateway/dns isavailable, there is a long timeout. Try adding
ADD-HOST fonts.googleapis.com:127.0.0.1
to start.config to avoid the timeout.
55

14.1.4 Crashes in SimLab
See A.4 for information on avoiding firefox crashes when it is restarted in SimLab.
14.2 Wireshark
Wireshark will not run as root in Labtainer containers. The wireshark installion in the lab-tainer.wireshark image is configured to not require root to collect network packets:
When using the wireshark image, after the existing
RUN adduser $user_name sudo
add:
RUN adduser $user_name wireshark
14.3 Elgg
The xsite/vuln-site/myelgg.sql file needs to be loaded for elgg to run. First edit it to change xss-labelgg.com to your site name (two changes). Copy the sys tar/var/www/xsslabelgg.com/elggto your new lab. Note the elgg/views/default/output files have been modified to permit crosssite scripting.
14.4 Host OS dependencies
On rare occations, performance of a lab may depend on the host Linux OS. An example issome kernel tuning parameters viewed and set via sysctl are not visible within containers oneariler versions of Ubuntu. If your lab has such OS dependencies, you can check the OS andwarn the student/instructor via a script named ”hostSystemCheck.py” placed withe the bindirectory of any of the lab’s containers. This script shall return the value ’0’ if dependenciesare met, and ’1’ if dependencies are not met. In the latter case, the startup.py will prompt theuse to continue or abort. Your script should explain the situation to the student. An exampleof such a script is in the labs/tcpip/server/ bin directory.
14.5 Login Prompts
See the centos-log lab for an example of a lab that prompts users to login to the virtual terminal.In particular, you will need the bin/student startup.sh script, and the system/sbin/login
program and the system/etc/login.defs and securetty files.
14.6 Networking Notes
14.6.1 SSH
The labtainer.network baseline Dockerfile includes the following:
ADD system/var/run/sshd /var/run/sshd
RUN sudo chmod 0755 /var/run/sshd
For containers derived from the kali base, and others non-labtainer bases, use this line inyour dockerfile to enable ssh into the box.
RUN sed -i ’s/UsePAM yes/UsePAM no/’ /etc/ssh/sshd_config
56
14.6.2 X11 over SSH
The scripts/designer/system/etc/ssh/sshd conf allows X11 tunneling over ssh, e.g., from a re-mote VM connected to the same host-only lan as a container running the GUI application. Usessh -X container ip to enable X11 tunneling in the ssh session.
14.6.3 Traffic mirroring
Send copies of traffic from one ethernet port to another using the iptables TEE operation, e.g.,
iptables -t mangle -A PREROUTING -i eth1 -j TEE --gateway 172.16.3.1
will send copies of all incoming traffic on eth1 to the component with address 172.16.3.1. Notethat gateway must be a next hop, or you will have to configure the nexthop to forward it further.This is useful for IDS labs, e.g., snort. Mirroring all incoming traffic into a component will letyou reconstruct TCP sessions within that component. Mirroring output from components isnot always reliable. Besides potential for duplicate traffic, Docker networks seem to sometimesgratuitously replace destination addresses with those of the Docker network gateway, i.e., thegateway to the host.
14.6.4 DNS
Install bind9 in Dockerfile. Add zone files to /etc/bind and db files to ../ system/var/cache/bind/.Add reference to the /etc/bind/named.conf.local as seen in local-dns/ bin/fixlocal.sh
14.6.5 Overriding Docker routing and DNS
Realistic network topologies require components to have /etc/resolv.conf and routing tableentries that do not depend on Docker gateways and related magic. However, at some point youmay want components to be able to reach the outside world. If you’ve fiddled resolv.conf androuting, you likely broke the default Docker method for doing this. One solution is to define anisp component that has a default gateway and resolv.conf as Docker defines them. Then routeall traffic and DNS queries to that (making use of dnsmasq and your own resolv.conf entries).Note you will also have to set up your own NAT on that ISP component. See the dmz-examplelab ISP component .local/bin/fixlocal.sh as a worked example of a simple NAT setup.
As a worked example, the dmz-example lab components (other than the ISP), typically usethe .local/bin/fixlocal.sh script to delete the Docker-generated route:
sudo route del -host 172.17.0.1
And the fixlocal.sh also replaces the resolv.conf entry with either a local DNS component,or a gateway running the dnsmasq utility. The /etc/rc.local script generally sets the defaultgateway, and configures iptables.
14.7 User management and sudo
The Dockerfile should make the initial user, i.e., the user named in the start.config file, a memberof sudoers. Otherwise, the fixlocal.sh script will not be unable to modify the environment. Ifdesired, that user can be removed from sudoers at the end of the fixlocal.sh script.
Only the initial user (and that user’s actions taken as root) are monitored. Additionalusers can be added, e.g., in the Dockerfile, but their actions are not monitored or recorded inartifacts.
57
14.8 DNS fixes for rebuild problems
When building a container, Docker uses its Daemon’s default DNS addresses, which are theexternal Google DNS. Some sites disallow use of external DNS, and this results in rebuilds failingwhen yum/apt are unable to resolve host names. The script at setup scripts/dns-add.sh
will update those default DNS entres to include the DNS used by the host.
14.9 Suggestions for Developers
14.9.1 Testing assessment directives
The result and goals configuration files can be revised and tested within a running gradercontainer by starting grader with the -d option. This saves time because you do not need torebuild the container for each iteration of the development of configuration files. However, besure to scp the configuration files from the container to your host Linux system. The files arein .local/instr config. See the tt /tmp directory for logs.
Most result and goal assessment can occur once you have generated a suitable sample ofexpected student artifacts. In other words, adding new goal does not typically require that yougo back and re-perform student actions. Exceptions to this are:
1. Adding new system commands to a “treataslocal” file;
2. Identifying new system files to be parsed as results. For example, results in a log file willnot be collected unless that log file has been named in the results.config file.
14.9.2 3rd party applications
Some applications that you may wish to include in your lab may already have Docker containerinstances. Bringing those into Labtainers can sometimes be challenging because such containersoften lack execution environment elements required by Labtainers for configuration steps, e.g.,sudo. Most such applications are traditional Docker images whose purpose is to package anapplication. In contrast, Labtainer Docker containers are intended to look like computersrunning applications – not as applications packaged as containers. Is is therefore often easier,(and less disruptive to what students see), to include the 3rd party installation procedures,(e.g., what they publish to allow you to install their application on a Linux system), withinyour lab’s Labtainer Docker file.
14.9.3 Msc
Use TERMINAL GROUPS in the start.config file to organize terminals if you have more than a few.Otherwise the student will spend time trying to find each terminal.
14.9.4 Docker cache
By default, a rebuild will make use of the Docker cache to speed up the image building process.Use the -N option to supress use of the cache. This may be needed if you expect the resultsof a RUN command within a Dockerfile to change between builds. When using the publish.py
command, the cache is disabled by default.
58
14.10 Container isolation
Docker provides namespace isolation between different containers, and between the containersand the host platform. Note however, that all containers and the host share the same operatingsystem kernel. Some kernel configuration changes will affect all containers and the host. Forexample, use of sysctl to modify Address Space Layout Randomization (ASLR) will effect allcontainers and the effects will persist in the host after the containers are stopped. However,some tuning parameters such as net.ipv4.ip forward are isolated, i.e., local to the container.These do get reset in ways that are hard to predict, so it is suggested that sysctl tuning bedone in rc.local scripts so that they happen on each boot.
Note also, that the Docker group (in which containers execute) is root equivalent, and thusa hostile container can do damage to the Linux host.
14.11 Test registry setup
The test registry is a Docker container that runs on the host, i.e., native OS upon which theVMs run. The same test registry is shared by multiple development VMs. The test registry iscreated via host scripts/registry/start reg.sh. It listens to port 5000 on the localhost.
A VM is configured to use the test registry via setup scripts/./prep-testregistry.sh
The test registry is populated using publish.py -t
14.12 CentOS containers
CentOS base containers do not run 32-bit binaries. Add the following to your dockerfile to dothat:
RUN yum install -y compat-libstdc++-296.i686 compat-libstdc++-33.i686
59

A
SimLab for testing labs
SimLab is a testing tool used to simulate a user performing a lab. It utilizes the xdotool utilityto generate keyboard input and window selections. The SimLab tool is driven by a sequenceof directives stored in a file at this location:
labtainer/simlab/<labname>/simthis.txt
The simlab directory is at the same level as $LABTAINER DIR, i.e. at $LABTAINER DIR/../simlab.Note that simlab files are not in the github repository. These files essentially contain lab solu-tions, and thus should not be openly published. files essentially contain lab solutions, and thusshould not be openly published. 25
With SimLab, you can fully automate the performance of a lab, including the use of GUIs.This facilitates regression testing, and the initial development of labs – particularly the debug-ging of automated assessment.
Full automation of regression testing is achieved using the smoketest.py utlity describedbelow in A.5
A.1 Preparations Before Running SimLab
• Ensure that you have ’xdotool’ install. Run this to install if you haven’t :sudo apt-get install xdotool
• Ensure your system’s $PATH includes $LABTAINERS DIR/testsets/bin
• Ensure the saved email used for each lab is ’[email protected]’. You can do this bymodifying ~/.local/share/labtainers/email.txt with only ’[email protected]’ at thetop.
A.2 Running SimLab
This is all run from the ’../scripts/labtainer-student’ directory.
1. Start targeted lab with the redo flag, ’-r’.
2. Run SimLab.py on targeted lab.
3. Do not click or type anything on the computer. This will disrupt the simulation.
4. The process ends when the user prompt comes back. If the simulation hangs up, ’ctrl +C’ and run stoplab.
A.3 SimLab Directives
Directives within a simthis.txt file name windows to select, (i.e., gain focus), and keystrokesto generate as described in the list below. The SimLab utility includes limited synchronizationfeatures to pause the input stream. These currently include a directive to wait until somenamed process has completed execution; and a directive to wait until network connections witha given host have terminated.
The SimLab directives are as follows:
25If you require simlab files for existing labs, contact me and try to convince me you actually need them([email protected]).
60
• window <text> – Selects the window having a title that contains. Note that tabs withinwindows are selected by first selecting the window, and then use key "ctrl+Next" to tabover to the desired terminal tab. the given text. Will timeout and fail after 20 seconds.
• window wait <text> – Like window, but no timeout. Intended for use when the xtermtitle is changed by a program.
• type line <text> – Types the given text followed by a newline.
• type lit <text> – Types a sequence of keys, replacing grave, minus and space with X11keysims. Followed by a newline.
• key <keysym> – Performs a keypress for the given X11 keysim, see http://xahlee.
info/linux/linux_show_keycode_keysym.html and https://www.in-ulm.de/~mascheck/
X11/keysyms.txt
• rep key <count> <keysym> – Repeats a keypress for the given X11 keysim <count>times.
• sleep <seconds> – Sleeps for the given number of seconds.
• wait proc <text> – Delays until a ps au <text> returns nothing. Intended for useto wait for a command to complete. This runs on the Linux host, so do not be vauge,or it may never return. Note: If the command was added to the keyboard buffer, thenwait proc may not catch a command.
• type command <text> – Types the given text and uses wait proc to wait for thecommand to finish.
• wait net <container>:<text> – Delays until network connections to a given remote hosthave terminated. The given <text> is searched for as a substring within the host nameouput from a netstat command run on the given container.
• type file <file name> – Reads and types each line in the named file. Blank lines willcause a 2 second sleep. Note: Each line is typed into a keyboard buffer and a line commndwill not wait for the previous line to complete its process before running itself. Refer tocommand file for this function.
• command file <file name> – Intended for use in issuing a series of commands from theshell. This reads and types each line in the named file. A wait proc function is thenautomatically performed on the line.
• key file <file name> – Reads each line in the named file, and performs a keypress. Thelines should contain X11 keysims. Blank lines cause a 2 second sleep.
• replace file <source file> <container>:<dest file> – Copies content of a source file onthe Linux host relative the simlab directory, to a destination path on the named selectedcontainer.
• add file <source file> <dest file> – Will append text from the source file to the endof the destination file. The destination file will be accessed from the currently selectedvirtual terminal. This uses a simple VI scheme to append text, and thus assumes thewindow and cwd are as needed.
61
• include <file> Reads the named file and treats each line as a SimLab directive, and thencontinues processing the next directive in the source file. This is similar to the C includedirective.
• type function <command> – Will execute the given command, read stdout from thecommand and then type that.
A.4 SimLab application notes
Most GUI’s have shortcut keys that can be used to automate their inclusion in a lab.Firefox is brittle when it restarts. See the fixfirefox.txt SimLab script for the snort lab
for an example of avoiding errors when Firefox restarts.
A.5 Regression testing with smoketest.py
The smoketest.py utility automates regression testing of labs. It will automatically:
• Start a lab
• Use SimLab to perform the lab
• Stop the lab
• Use gradelab to assess the lab
• Compare the results of gradelab to those stored in the directory at:
labtainer/simlab/<labname>/expected/
Populate the expected results with the results from the labtainer xfer directory after you’vemanually determine the results you desire. If smoketest.py is started with no parameters,it will iterate through each lab in the labs directory. The that lab lacks simthis.txt file,then the lab is simply started and stopped (hence the tool’s name). The tool will stop uponencountering the first error. If a lab’s simlab includes an expected directory it will comparethe results and report on whether they match. If no expected results are found, no status isdisplayed (unless an error is encountered.)
62