Lab 100 Teacher Training Guide - sanako.s3.eu-west-2 ...
35
SANAKO Lab 100 User Guide For Educational Establishments
Transcript of Lab 100 Teacher Training Guide - sanako.s3.eu-west-2 ...

SANAKO Lab 100 User Guide
For Educational Establishments

SANAKO Lab 100 - Contents Page
Produced by R. Baker UK Training Manager SANAKO UK Ltd
Beech House, Woodland Park, Bradford, BD19 6BW Tel: (01274) 863380, Fax: (01274) 863381, www.sanako.co.uk
Company Reg No: 1984957
Title: Page(s)
• Introduction 1 • Getting Started 2 - 3 • Copy Files to/from MSU 4 - 5 • Monitoring (individual & Automonitor), Intercom,
Recorder Controls & Recorder Status 6 - 7 • Audio Sources, Session Call, All Call & Recording Options 8 - 9 • Seating Plans 10 • Grouping/Preparing the Session 11
Tutor-led Activities:
• Listening Comprehension 12 • Model Imitation 13 - 14 • Reading Practice 15 - 16 • Phone Conversation 17 • Pair Discussion 18 • Group Discussion 19 • Simultaneous Interpretation 20 - 21 • Consecutive Interpretation 22 - 23 • Recorded Response 24 - 25 • Quiz 26 - 28 • Q&A 29 - 30
Student-led Activities:
• Library Mode 31 • Audio on Demand 32 - 33
SANAKO Lab 100 Contents Page

SANAKO Lab 100 User Guide - Introduction
Produced by R Baker UK Training Manager SANAKO UK Ltd
Beech House, Woodland Park, Bradford, BD19 6BW Tel: (01274) 863380, Fax: (01274) 863381, www.sanako.co.uk
Company Reg No: 1984957
SANAKO Lab 100 User Guide Introduction: SANAKO Lab 100 is a hardware solution that allows you to carry out a wide range of pedagogical activities (both tutor and student-led) using a variety of different sound sources. This User Guide is designed to give the reader a helpful insight in to using SANAKO Lab 100. It follows an effective philosophy of ‘Why use the ... feature/activity?’, with pedagogical examples and then ‘How to use ...’ with a practical, step-by-step approach using images taken from the SANAKO Lab 100 interface to aid understanding and use. Each page has an overall view (top right) highlighting the area (if appropriate) where the Tutor/Student will be focussing, followed by more detailed ‘close-up’ images with instructions.
When doing most of the Tutor-led activities (in their basic forms), it is a good idea to break it down in to 8 simple steps going from the top of the Tutor GUI and then working down the right-hand side;
1. New Session 2. Who is doing the activity (Select members for this session - lasso add/remove All Remaining)? 3. What are they going to do (Select Activity)? 4. Are they going to listen to anything (Select media source)? 5. Additional options (if applicable e.g. what is being recorded, pairing students etc) 6. Start the activity 7. End the activity 8. Exit the session
At your fingertips, you also have access to the Help section within the SANAKO Lab 100 interface, the SANAKO Virtual Educational Community @ http://members.sanako.com and a range of Support Contracts (see address below for thorough, detailed information and assistance). Alternatively, email [email protected]. Nb: The pictures shown are from SANAKO Lab 100 v7.01 and may differ slightly from the version you are operating. Podcasting is from v7 onwards.
1

SANAKO Lab 100 User Guide – Getting Started
SANAKO UK Ltd Beech House, Woodland Park, Bradford, BD19 6BW
Tel: (01274) 863380, Fax: (01274) 863381, www.sanako.co.uk Company Reg No: 1984957
SANAKO Lab 100 User Guide Getting Started inc;
Turning on the hardware Opening SANAKO Lab 100 SANAKO Lab 100 User Interface User Audio Panel (UAP)
When using the SANAKO Lab 100, the software must be connected to the Media Storage Unit (MSU). If the whole lab is turned off, it needs to be put on in a particular order.
Turning on the hardware (MSU – Media Storage Unit & CU – Connection Unit):
The MSU has a ‘rocker’ switch, press this first. After a short while, the light will turn from amber to green. NOTE: You MUST use the ‘rocker’ switch when SHUTTING DOWN, NOT the main switch at the wall At this point, you can turn on the CU and then finally, the computer. Once logged in, you will see an icon in the system tray of an ‘S’ with a green tick (√) to show the MSU is connected.
Opening the SANAKO Lab 100 software: This can be done in 2 ways;
• Double-clicking a shortcut icon on the desktop • Or; Start, All Programs, SANAKO Lab 100, Lab 100
The SANAKO Lab 100 user interface:
Student positions (layout of the room)
Activity selection & options
Top toolbar features/functions
Activity summary information
Work your way across the top (L-R) and then down the right hand-side
2

SANAKO Lab 100 User Guide – Getting Started
SANAKO UK Ltd Beech House, Woodland Park, Bradford, BD19 6BW
Tel: (01274) 863380, Fax: (01274) 863381, www.sanako.co.uk Company Reg No: 1984957
The User Audio Panel (UAP): Call teacher – When pressed, it gets the attention of the teacher in the SANAKO Lab 100 software, showing this symbol It is also used to change tracks in Audio on Demand Bookmarks (inc √ true & × false) – As well as marking points along a track, they are also used for multiple choice & true/false answers in the Quiz activity, dialling other positions in Phone Conversation and creating a loop between bookmarks. To set a bookmark, simply press one of the numbers. Press again to jump to that point on the track. To answer in the quiz, the teacher will allow access to the bookmarks, so you can press the appropriate one. Everyone is a 2-digit number when dialling people up e.g. 0,1 Clear – Used to hang up in the Phone Conversation and to remove bookmarks and loops. Press Clear & then you can dial a new number Hold down Clear and then the number of the bookmark Mode* - Used for setting up & removing loops with bookmarks Hold down mode & then press on the bookmarks to select a segment e.g. at 10 seconds press bookmark 1 and then bookmark 2 at 20 seconds to play between 10 and 20 seconds. To remove loop, hold down Mode & then press Clear LCD – displays time, UAP number, symbols for activities, volumes, who you have dialled & been paired with & what control buttons you have pressed e.g. Play, rewind. Volumes – increase & decrease the volumes of the program track/source and the student’s voice Track navigation buttons & Record – allow you to Play, Stop, Rewind, Fast-forward, Recap a track & Record your voice For further details on the UAP, please refer to the Quick Reference Guide that came with your lab.
Call Teacher
Bookmarks 1.... 0 (they have several functions)
LCD
Volume (Program track/source =
Student = )
Clear & Mode*
Track navigation buttons & Record
3

SANAKO Lab 100 User Guide – Copy files to/from MSU
SANAKO UK Ltd Beech House, Woodland Park, Bradford, BD19 6BW
Tel: (01274) 863380, Fax: (01274) 863381, www.sanako.co.uk Company Reg No: 1984957
What is the MSU? The MSU or Media Storage Unit is in essence, a storage device (hard drive) that you use within your SANAKO Lab 100. You can save material directly to it through the software interface after doing an activity, copy files to/from it as well as manage the contents of it through your own directories (folders). Note – You MUST use the method stated (not copy & paste through a Windows environment) To Copy files to/from the MSU;
• Click on the Menu button
• Select Copy files to/from MSU from the list in the menu. This will then bring up the interface for the MSU
The left hand side of the window is where you would browse from (where your files currently reside). The right hand side is the MSU and its directories.
• On the left, browse to where your files that you want to send across are located e.g. M:\MFL\Listening Material. They will now appear in the second window
Note; you can send across whole folders if desired. Holding down Ctrl or Shift and then using the left hand mouse button can select sporadic (Ctrl) or consecutive (Shift) files in a list. The more files/folders you select, the longer it will take to copy. The MSU will convert other file types e.g. MP3s to highly compressed .WAV (its default file format)
• On the right, browse to where you want the files to be on the MSU e.g. Audio\French\Y7
Note; If there isn’t a suitable directory (folder), you can make one by right hand mouse clicking on the MSU side and selecting Create Directory
SANAKO Lab 100 User Guide Copy files to/from MSU: Why copy files to/from the MSU?
• To create a bank of audio resources to use within the Lab from a shared network area & other locations
• To give students ‘playlists’/choices of files to work through • To share material with other staff & students
Where files currently reside e.g. network drive or pen stick The MSU & its directories
4

SANAKO Lab 100 User Guide – Copy files to/from MSU
SANAKO UK Ltd Beech House, Woodland Park, Bradford, BD19 6BW
Tel: (01274) 863380, Fax: (01274) 863381, www.sanako.co.uk Company Reg No: 1984957
• Once you have selected your files/folders & destination, the arrow button in the middle
(pointing right) will be active
• Confirm your actions
• Press the button & the files/folders will now move across (a status window will appear to show progress). See below for where the “Test” sound file went from & to
• To send copies of files from the MSU, simply carry out the process in reverse & use the arrows pointing to the left
• If desired, you can convert the files back in a different format by selecting from the list .MP3, .WAV or .WMA
You may use this to make files available to students on the school network for homework or self study purposes.
5

SANAKO Lab 100 - Monitoring (individual & Automonitor), Intercom, Recorder Controls & Recorder Status
SANAKO UK Ltd Beech House, Woodland Park, Bradford, BD19 6BW
Tel: (01274) 863380, Fax: (01274) 863381, www.sanako.co.uk Company Reg No: 1984957
To listen in to a student position (or more if using Pair & Group Discussion activities) at any point, you need to;
• Click on the student position (the student icon changes). You can now hear what they are playing/recording/saying in pairs & groups
The window for that student will also appear To Intercom with that position;
• Click on the student position
• Click on Intercom or hold the right-hand mouse button down directly on a student position & speak. Again, the student icon changes
• To stop, click on Intercom again
To listen to everyone in turn (Automonitor);
• Click on a student position
• Click on Automonitor . By default, every 5 seconds, it will move on to the next student (but this can be changed by manually inserting another number
• Click on Stop Automonitor when finished & then Close
To Control a student UAP (when ‘Free’ or in a student-led activity);
• Click on a student position
• Click on Recorder Controls . The right hand side changes to show the UAP of the student
• You can now click on the any of the buttons on the UAP
• When finished, click Close
SANAKO Lab 100 Monitoring (individual & Automonitor), Intercom, Recorder Controls & Recorder Status Why would you want to Monitor positions & control UAPs?
• To ensure students are listening to the correct material • To make sure students are progressing • To control a student’s UAP (if they are unsure of what to do) (Recorder
Controls) • To keep students focused & on track • To discuss something with a student (Intercom) • To provide direct praise/verbal assistance to an individual (Intercom) • Listen to students in turn within a session (Automonitor)
Before After
6

SANAKO Lab 100 - Monitoring (individual & Automonitor), Intercom, Recorder Controls & Recorder Status
SANAKO UK Ltd Beech House, Woodland Park, Bradford, BD19 6BW
Tel: (01274) 863380, Fax: (01274) 863381, www.sanako.co.uk Company Reg No: 1984957
A quick & easy way of seeing what is happening on the student UAPs, is to use Recorder Status. This will show you what state the UAP is in e.g. is it playing a file, set to record a student voice or stopped? To do this;
• Click on Recorder Status . You will now see what the different symbols above the student positions are according to what they are doing. Play = Green Triangle Stop = Blue Square Record = Red Circle
7

SANAKO Lab 100 User Guide – Audio sources & Recording options
SANAKO UK Ltd Beech House, Woodland Park, Bradford, BD19 6BW
Tel: (01274) 863380, Fax: (01274) 863381, www.sanako.co.uk Company Reg No: 1984957
There are several sound sources available within SANAKO Lab 100. You can also attach further audio devices via USB & soundcard ports. Not every list is the same as each installation can be different. However, there are several ‘standard’ sources. These are;
Teacher – Teacher’s voice, sent out via the mic on the Teacher’s headset Student – One of the student’s voices via the mic on the Student’s headset + any material
they are playing on their UAP. To select a Student;
• Choose ‘Student’ from the dropdown menu
• The mouse pointer then becomes a speech bubble with an ‘S’ in it
• Click on your chosen student in the interface. The student icon displays a speech bubble with an ‘S’
• To change to a different student, click ‘Select Student’ and then click on another position PC Audio CD – Insert a CD in to the CD drawer of the Teacher’s PC & skip to the desired
track. This will often be done within the Windows Media Player® interface/default media player Teacher PC – What is being played on the Teacher’s PC at that time e.g. internet radio Cassette – A cassette player that has been configured in to the system (often placed in a
drawer within the Teacher’s desk) USB Cassette Recorder – A cassette player plugged in to a USB port of the Teacher’s PC Internet Radio – Select this as a source, browse to a web page and play the appropriate
file/stream/media
Media File – A file that may be stored in a network drive/folder, pen stick or CDROM. The
Select media file window will open automatically. If you close it, you can open it again by clicking on the ‘Open File’ button . Browse for the file & open
SANAKO Lab 100 User Guide Audio sources, Session Call, All Call & Recording options:
8

SANAKO Lab 100 User Guide – Audio sources & Recording options
SANAKO UK Ltd Beech House, Woodland Park, Bradford, BD19 6BW
Tel: (01274) 863380, Fax: (01274) 863381, www.sanako.co.uk Company Reg No: 1984957
MSU File – A file that is stored on the Media Storage Unit. Browse to your chosen file as with Media File but within the MSU directories. The file can be controlled within the SANAKO Lab 100 user interface. Note; When an MSU file is selected for Tutor-led activities, you can Free up the student positions and they can work on the material at their own pace without having to Start the activity.
Line In – An external source plugged in to the Line In of the soundcard e.g. VHS recorder None – No sound will be put out to the students
Mix – When pressed, it allows the Teacher to insert their voice along with the selected Audio Source. The mixed sources are part of the track
Edit – Pauses the selected Audio Source & replaces it with the Teacher’s voice. The Teacher’s voice is then included in the track
Session Call – Pressing this mutes the Audio Source and allows the Teacher to speak to the
students in the session. The ‘On Air’ button also lights up.
The student icon changes at this point It is also possible to use a student as a source here, so they can be heard by the rest of the room. E.g. to answer a question. Press the Session Call & then on the student position
All Call – Allows the Teacher to speak to everyone regardless of which session they are in. The ‘On Air’ button also lights up.
The student icon changes at this point Recording options; When you carry out an activity, be default, certain tracks/sounds are recorded. But you can cater this to your requirements by going in to the Advanced
options and deciding what you want to record e.g. Pair discussions.
• Click on Advanced to open the options box • Click which box you wish to record
See below for which options are recorded by default; Listening Comprehension Master track Model Imitation All Reading Practice Student track + Sidetone Phone Conversation Sidetone Pair Discussion Sidetone Group discussion Sidetone Simultaneous Interpreting Master + Student track Consecutive Interpreting Master + Student track Recorded Response Master + Student track Q&A All Quiz N/A Library Mode N/A – Student lead, students press Record themselves on UAP Audio on Demand N/A – Student lead, students press Record themselves on UAP
9

SANAKO Lab 100 User Guide – Seating Plans
Produced by R. Baker SANAKO UK Ltd
Beech House, Woodland Park, Bradford, BD19 6BW Tel: (01274) 863380, Fax: (01274) 863381, www.sanako.co.uk
Company Reg No: 1984957
To create a seating plan;
• Click on the Attendance button
• Select Edit Name from the dropdown menu
• Click on each student position and type in a name
• If the student position is obscured by the dropdown menu, hold the left-hand mouse button down on the ‘cross’ and drag the menu to a side
• To save a seating plan, click on Seating Plan and then choose Save
Seating Plan from the dropdown menu and then save to a chose location with a sensible name
• To open a seating plan, click on Seating Plan. You will often see that the last 2 or 3 plans used/saved are in the dropdown menu. If yours isn’t, click on Open Seating Plan
• Browse to the correct location
• Select & Open. The student names will then appear in
the software
Note: this does mean that students must sit at the same position each week – unless you edit your seating plan
SANAKO Lab 100 User Guide Seating Plans: Why have seating plans?
• To know who is sat where • To help learn names • Student recordings that are collected in can be “their name”.mp3
for ease of identification & marking purposes • Results of tests have student names instead of UAP numbers
10

SANAKO Lab 100 User Guide – Grouping/Preparing the Session
SANAKO UK Ltd Beech House, Woodland Park, Bradford, BD19 6BW
Tel: (01274) 863380, Fax: (01274) 863381, www.sanako.co.uk Company Reg No: 1984957
Within SANAKO Lab 100 you can have up to 3 different activities going on simultaneously. These are indicated by 3 different coloured tabs (turquoise blue , yellow & red ) with one, two or three white spots. To add students to a session;
• Click on New Session
• The mouse pointer new turns in to a lasso
• Hold down the left-hand mouse button & ‘drag’ over the positions you want to add to the session or click on the individual position when the hand icon appears (for 1 student)
• To add additional positions, click on Add/Remove – again this will produce the lasso
• To remove positions from a session the Add/Remove button becomes ‘remove’ to positions that have
already been assigned. Either lasso over or click an individual position
• If you want to select everyone, the easiest thing to do is click on All Remaining which will put all the unassigned positions in to a session
Student positions indicate which session they are in by the colour of the box Each active session is summarised at the bottom of the interface;
SANAKO Lab 100 User Guide Grouping/Preparing the Session: Why add students to different sessions?
• To allow differentiation by ability or activity • To manage the class • To match students of equal or differing ability
11

SANAKO Lab 100 User Guide – Listening Comprehension
SANAKO UK Ltd Beech House, Woodland Park, Bradford, BD19 6BW
Tel: (01274) 863380, Fax: (01274) 863381, www.sanako.co.uk Company Reg No: 1984957
To carry out a Listening Comprehension, you need to:
• Start a new session
• Select students (unless all in the same session)
• Select Listening Comprehension as an activity
• Choose what they are going to listen to
• Additional options? – By default, the Master track is recorded so the material can be saved to the MSU for future use or even as a podcast (v7 onwards) when you End the activity. You can change what is recorded in the Advanced options if you wish
• Start the activity
• End the activity*
• Exit the session
*When you End the activity, you will be prompted to Save the Source material for later use to the MSU. When you click on Save, you can then choose where in the MSU you wish to save it. In addition, if you want to save it as a Podcast, you can do, saving it to the chosen directory in your server
Before exiting the session, you can press Free. This will allow the students to work with the material at their own pace. Note; if the audio source is an MSU file, the activity doesn’t need to be started as the students can work on it immediately. However, you may want to listen once through altogether.
SANAKO Lab 100 User Guide Listening Comprehension: Why use the Listening Comprehension activity?
• To control what the students are listening to • To play/put out material that supports the lesson • To practice language listening skills
12

SANAKO Lab 100 User Guide – Model Imitation
SANAKO UK Ltd Beech House, Woodland Park, Bradford, BD19 6BW
Tel: (01274) 863380, Fax: (01274) 863381, www.sanako.co.uk Company Reg No: 1984957
To carry out a Model Imitation, you need to:
• Start a new session
• Select students (unless all in the same session)
• Select Model Imitation as an activity
• Choose what they are going to listen to
• Additional options? – By default, everything is recorded so the material can be saved to the MSU for future use or even as a podcast (v7 onwards) when you End the activity as well as Collecting student work. You can change what is recorded in the Advanced options if you wish
• Start the activity
• End the activity*
• Exit the session
*When you End the activity, you will be prompted to Save the Source material for later use to the MSU. When you click on Save, you can then choose where in the MSU you wish to save it. In addition, if you want to save it as a Podcast, you can do, saving it to the chosen directory in your server You will be prompted to Collect the student recordings for later use to your chosen directory.
SANAKO Lab 100 User Guide Model Imitation: Why use the Model Imitation activity?
• To practice listening and speaking activities, such as Listen & Repeat • To practice oral work, such as translation exercises or preparation for
speaking tests • To carry out repetition exercises & drill-type activities
13

SANAKO Lab 100 User Guide – Model Imitation
SANAKO UK Ltd Beech House, Woodland Park, Bradford, BD19 6BW
Tel: (01274) 863380, Fax: (01274) 863381, www.sanako.co.uk Company Reg No: 1984957
To Collect in the student responses; • Click on Collect. This will then process the students’ voices and gather them in
• At this point, you can decide whether there are any responses you don’t wish to
collect. To do this, click on the name in the list, so they are no longer highlighted in blue
• Click on Collect and decide where you wish to store them e.g. Pen stick, network
area Note; Using a seating plan means the names are also the file names for ease of identification. Before exiting the session, you can press Free. This will allow the students to work with the material & go over the activity again at their own pace. If the students do re-record, you will be asked again to Collect when you exit the session.
Whenever a student has recorded their voice, the teacher can Replay it back to them
14

SANAKO Lab 100 User Guide – Reading Practice
SANAKO UK Ltd Beech House, Woodland Park, Bradford, BD19 6BW
Tel: (01274) 863380, Fax: (01274) 863381, www.sanako.co.uk Company Reg No: 1984957
To carry out a Reading Practice, you need to:
• Start a new session
• Select students (unless all in the same session)
• Select Reading Practice as an activity
• Choose what they are going to listen to
• Additional options? – By default, Student track + Sidetone are recorded so when you End the activity you can Collect the student work. You can change what is recorded in the Advanced options if you wish
• Start the activity
• End the activity*
• Exit the session
*When you End the activity, you will be prompted to Collect the student recordings for later use to your chosen directory.
SANAKO Lab 100 User Guide Reading Practice: Why use the Reading Practice activity?
• To practice reading (out aloud) and speaking skills – particularly useful for presentation practice
• To bring back student recordings that have been done at the same time by all of the students in the session
15

SANAKO Lab 100 User Guide – Reading Practice
SANAKO UK Ltd Beech House, Woodland Park, Bradford, BD19 6BW
Tel: (01274) 863380, Fax: (01274) 863381, www.sanako.co.uk Company Reg No: 1984957
To Collect in the student responses; • Click on Collect. This will then process the students’ voices and gather them in
• At this point, you can decide whether there are any responses you don’t wish to
collect. To do this, click on the name in the list, so they are no longer highlighted in blue
• Click on Collect and decide where you wish to store them e.g. Pen stick, network area
Note; Using a seating plan means the names are also the file names for ease of identification. Before exiting the session, you can press Free. This will allow the students to work with the material & go over the activity again at their own pace. If the students do re-record, you will be asked again to Collect when you exit the session.
Whenever a student has recorded their voice, the teacher can Replay it back to them
16

SANAKO Lab 100 User Guide – Phone Conversation
SANAKO UK Ltd Beech House, Woodland Park, Bradford, BD19 6BW
Tel: (01274) 863380, Fax: (01274) 863381, www.sanako.co.uk Company Reg No: 1984957
To carry out a Phone Conversation, you need to:
• Start a new session
• Select students (unless all in the same session)
• Select Phone Conversation as an activity
• Choose what they are going to listen to
• Additional options? N/A
• Start the activity
• Students use their bookmarks to dial each other up. Everyone is a 2 digit number e.g. 0,2. The Teacher sees who has dialled whom
• To hang up or dial another, press the Clear button on the UAP
• End the activity*
• Exit the session
*When you End the activity, (if you have selected to) you will be prompted to Collect the student recordings for later use to your chosen directory.
SANAKO Lab 100 User Guide Phone Conversation: Why use the Phone Conversation activity?
• To perform role plays & pair work • To match students of equal ability • To allow students to choose who they speak to • To carry out ‘fact finding’ & ‘get to know you’ exercises • To discuss topics/events • To get students to quiz/test each other
17

SANAKO Lab 100 User Guide – Pair Discussion
SANAKO UK Ltd Beech House, Woodland Park, Bradford, BD19 6BW
Tel: (01274) 863380, Fax: (01274) 863381, www.sanako.co.uk Company Reg No: 1984957
To carry out a Pair Discussion, you need to:
• Start a new session
• Select students (unless all in the same session)
• Select Pair Discussion as an activity
• Choose what they are going to listen to
• Additional options? How are you going to Pair up the students? Are you going to record pair discussions (Advanced, Student track)
Fixed – puts the students with the next in their session
Random – gives randomised pairs
Manual – Teacher decides who is paired with whom. Click on Manual & then on each student position in turn and Manual again to finish You will now see who is paired with whom & the students will also see the Pair symbol on their UAPs
• Start the activity
• End the activity*
• Exit the session
*When you End the activity, (if you have selected to) you will be prompted to Collect the student recordings for later use to your chosen directory.
SANAKO Lab 100 User Guide Pair Discussion: Why use the Pair Discussion activity?
• To perform role plays & pair work • To match students of equal ability • To pair students of differing abilities to help improve grades e.g. 1
lower with 1 higher ability student • To carry out ‘fact finding’ & ‘get to know you’ exercises • To discuss topics/events • To get students to quiz/test each other
18

SANAKO Lab 100 User Guide – Group Discussion
SANAKO UK Ltd Beech House, Woodland Park, Bradford, BD19 6BW
Tel: (01274) 863380, Fax: (01274) 863381, www.sanako.co.uk Company Reg No: 1984957
To carry out a Group Discussion, you need to:
• Start a new session
• Select students (unless all in the same session)
• Select Group Discussion as an activity
• Choose what they are going to listen to
• Additional options? How are you going to Group the students? Group sizes? Are you going to record group discussions (Advanced, Student track)?
Fixed – puts the students with the next in their session
Random – gives randomised groupings
Manual – Teacher decides who is grouped with whom. Click on Manual & then on each student position in turn and Manual again to finish You will now see who is grouped with whom & the students will also see the Group symbol on their UAPs
• Start the activity
• End the activity*
• Exit the session
*When you End the activity, (if you have selected to) you will be prompted to Collect the student recordings for later use to your chosen directory.
SANAKO Lab 100 User Guide Group Discussion: Why use the Group Discussion activity?
• To perform role plays & group work • To match students of equal ability • To group students of differing abilities to help improve grades e.g.
2 lower with 2 higher ability students • To carry out ‘fact finding’ & ‘get to know you’ exercises • To discuss topics/events • To get students to quiz/test each other
19

SANAKO Lab 100 User Guide – Simultaneous Interpreting
SANAKO UK Ltd Beech House, Woodland Park, Bradford, BD19 6BW
Tel: (01274) 863380, Fax: (01274) 863381, www.sanako.co.uk Company Reg No: 1984957
To carry out a Simultaneous interpretation, you need to:
• Start a new session
• Select students (unless all in the same session)
• Select Simultaneous interpreting as an activity
• Choose what they are going to listen to
• Additional options? – By default, Master + Student track are recorded so the material can be saved to the MSU for future use or even as a podcast (v7 onwards) when you End the activity as well as Collecting student work. You can change what is recorded in the Advanced options if you wish
• Start the activity (speaking continuously)
• End the activity*
• Exit the session
*When you End the activity, you will be prompted to Save the Source material for later use to the MSU. When you click on Save, you can then choose where in the MSU you wish to save it. In addition, if you want to save it as a Podcast, you can do, saving it to the chosen directory in your server You will be prompted to Collect the student recordings for later use to your chosen directory.
SANAKO Lab 100 User Guide Simultaneous Interpreting: Why use the Simultaneous Interpreting activity?
• To practice listening and speaking activities • To practice oral work, such as translation exercises
20

SANAKO Lab 100 User Guide – Simultaneous Interpreting
SANAKO UK Ltd Beech House, Woodland Park, Bradford, BD19 6BW
Tel: (01274) 863380, Fax: (01274) 863381, www.sanako.co.uk Company Reg No: 1984957
To Collect in the student responses;
• Click on Collect. This will then process the students’ voices and gather them in
• At this point, you can decide whether there are any responses you don’t wish to collect. To do this, click on the name in the list, so they are no longer highlighted in blue
• Click on Collect and decide where you wish to store them e.g. Pen stick, network
area Note; Using a seating plan means the names are also the file names for ease of identification. Before exiting the session, you can press Free. This will allow the students to work with the material & go over the activity again at their own pace. If the students do re-record, you will be asked again to Collect when you exit the session.
Whenever a student has recorded their voice, the teacher can Replay it back to them
21

SANAKO Lab 100 User Guide – Consecutive Interpreting
SANAKO UK Ltd Beech House, Woodland Park, Bradford, BD19 6BW
Tel: (01274) 863380, Fax: (01274) 863381, www.sanako.co.uk Company Reg No: 1984957
To carry out a Consecutive interpretation, you need to:
• Start a new session
• Select students (unless all in the same session)
• Select Consecutive Interpreting as an activity
• Choose what they are going to listen to
• Additional options? – By default, Master + Student track are recorded so the material can be saved to the MSU for future use or even as a podcast (v7 onwards) when you End the activity as well as Collecting student work. You can change what is recorded in the Advanced options if you wish
• Start the activity (speak, then leave gaps for responses)
• End the activity*
• Exit the session
*When you End the activity, you will be prompted to Save the Source material for later use to the MSU. When you click on Save, you can then choose where in the MSU you wish to save it. In addition, if you want to save it as a Podcast, you can do, saving it to the chosen directory in your server You will be prompted to Collect the student recordings for later use to your chosen directory.
SANAKO Lab 100 User Guide Consecutive Interpreting: Why use the Consecutive Interpreting activity?
• To practice listening and speaking activities • To practice oral work, such as translation exercises
22

SANAKO Lab 100 User Guide – Consecutive Interpreting
SANAKO UK Ltd Beech House, Woodland Park, Bradford, BD19 6BW
Tel: (01274) 863380, Fax: (01274) 863381, www.sanako.co.uk Company Reg No: 1984957
To Collect in the student responses;
• Click on Collect. This will then process the students’ voices and gather them in
• At this point, you can decide whether there are any responses you don’t wish to collect. To do this, click on the name in the list, so they are no longer highlighted in blue
• Click on Collect and decide where you wish to store them e.g. Pen stick, network
area Note; Using a seating plan means the names are also the file names for ease of identification. Before exiting the session, you can press Free. This will allow the students to work with the material & go over the activity again at their own pace. If the students do re-record, you will be asked again to Collect when you exit the session.
Whenever a student has recorded their voice, the teacher can Replay it back to them
23
SANAKO Lab 100 User Guide – Recorded Response
SANAKO UK Ltd Beech House, Woodland Park, Bradford, BD19 6BW
Tel: (01274) 863380, Fax: (01274) 863381, www.sanako.co.uk Company Reg No: 1984957
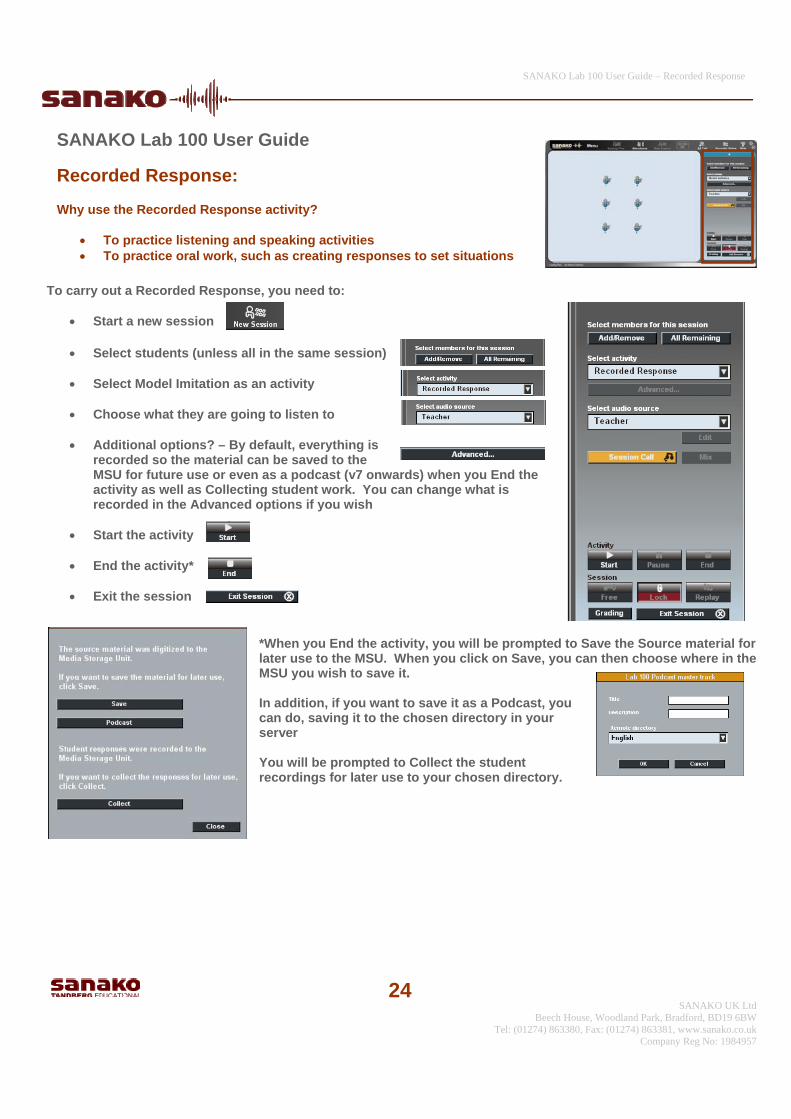
To carry out a Recorded Response, you need to:
• Start a new session
• Select students (unless all in the same session)
• Select Model Imitation as an activity
• Choose what they are going to listen to
• Additional options? – By default, everything is recorded so the material can be saved to the MSU for future use or even as a podcast (v7 onwards) when you End the activity as well as Collecting student work. You can change what is recorded in the Advanced options if you wish
• Start the activity
• End the activity*
• Exit the session
*When you End the activity, you will be prompted to Save the Source material for later use to the MSU. When you click on Save, you can then choose where in the MSU you wish to save it. In addition, if you want to save it as a Podcast, you can do, saving it to the chosen directory in your server You will be prompted to Collect the student recordings for later use to your chosen directory.
SANAKO Lab 100 User Guide Recorded Response: Why use the Recorded Response activity?
• To practice listening and speaking activities • To practice oral work, such as creating responses to set situations
24

SANAKO Lab 100 User Guide – Recorded Response
SANAKO UK Ltd Beech House, Woodland Park, Bradford, BD19 6BW
Tel: (01274) 863380, Fax: (01274) 863381, www.sanako.co.uk Company Reg No: 1984957
To Collect in the student responses;
• Click on Collect. This will then process the students’ voices and gather them in
• At this point, you can decide whether there are any responses you don’t wish to collect. To do this, click on the name in the list, so they are no longer highlighted in blue
• Click on Collect and decide where you wish to store them e.g. Pen stick, network
area Note; Using a seating plan means the names are also the file names for ease of identification. Before exiting the session, you can press Free. This will allow the students to work with the material & go over the activity again at their own pace. If the students do re-record, you will be asked again to Collect when you exit the session.
Whenever a student has recorded their voice, the teacher can Replay it back to them
25

SANAKO Lab 100 - Quiz
SANAKO UK Ltd Beech House, Woodland Park, Bradford, BD19 6BW
Tel: (01274) 863380, Fax: (01274) 863381, www.sanako.co.uk Company Reg No: 1984957
There are 2 types of quiz that can be carried out; Multiple choice & True/False. Both require the students to answer using their bookmarks, with Multiple choice utilising numbers 1-8 & True/False using 9-0 (√ Green × Red). To carry out a listening comprehension, you need to:
• Start a new session
• Select students (unless all in the same session)
• Select Quiz as an activity
• Choose what they are going to listen to
• Additional options? True/False or Multiple choice quiz?
True/False;
• Select True/False answers
• Fixed answering time or will you decide how long students have? If fixed, tick the box and use the arrows to increase/decrease the time
• Press Question & ask your question to the students
• When you ask the question a graph appears
(this is a live update & shows how students are answering)
Note; it is important to select students for this exercise otherwise your results will be based on all of the UAPs in the room, not just the active ones
• Press Start . The students can now press their True & False buttons on their UAPs
• You can see who has pressed what answer on the interface
& the graph updates accordingly
• When the students have had enough time to answer, press Stop
• Click on the correct answer (True or False)
SANAKO Lab 100 Quiz: Why use the Quiz activity?
• To carry out multiple choice quizzes/tests with students • To carry out True/False quizzes/tests with students • To introduce or sum up a lesson • Measure objectives of a lesson
26

SANAKO Lab 100 - Quiz
SANAKO UK Ltd Beech House, Woodland Park, Bradford, BD19 6BW
Tel: (01274) 863380, Fax: (01274) 863381, www.sanako.co.uk Company Reg No: 1984957
• The correct answer is shown on the Graph and the student’s UAPs light up on
the correct bookmark
• Repeat the process until all questions are completed & press End
• A report will now be produced showing students results. The correct answers are those in the square brackets e.g. [T]
• Exit the session
Multiple choice;
• Select Multiple Choice
• Decide how many multiple choice options there will be (max of 8)
• Press Question & ask your question to the students
• When you ask the question a graph appears (this is a live update & shows how students are answering)
Note; it is important to select students for this exercise otherwise your results will be based on all of the UAPs in the room, not just the active ones
• Press Start . The students can now press their Multiple choice buttons (bookmarks) on their UAPs
• You can see who has pressed what answer on the
interface & the graph updates accordingly
• When the students have had enough time to answer, press Stop
• Click on the number for the correct answer
• The correct answer is shown on the Graph and the student’s UAPs light up on the correct bookmark
27

SANAKO Lab 100 - Quiz
SANAKO UK Ltd Beech House, Woodland Park, Bradford, BD19 6BW
Tel: (01274) 863380, Fax: (01274) 863381, www.sanako.co.uk Company Reg No: 1984957
• Repeat the process until all questions are completed & press End
• A report will now be produced showing students results. The correct answers are those in the square brackets e.g. [2]
• It is possible to save & print the report as
evidence
• Exit the session
Note; Having a seating plan means that the names are displayed in the report instead of ‘Student 1’ etc. It is also possible to save a quiz, were you actually save the sequence of events e.g. the time allotted to answer and the correct answers, so you don’t have insert them every time a question is played
• Click on Save Quiz
• Decide what you are going to call it & where you are going to save it
• Save
• To Open a saved quiz, click on Open Quiz
• Browse for it
• Open
• Start your quiz.
Note; you will still need to open the audio source/file that goes with the quiz UNLESS it is an MSU file as that will be saved as part of the Quiz file
28

SANAKO Lab 100 – Q&A
SANAKO UK Ltd Beech House, Woodland Park, Bradford, BD19 6BW
Tel: (01274) 863380, Fax: (01274) 863381, www.sanako.co.uk Company Reg No: 1984957
To carry out the Q&A activity, you need to:
• Start a new session
• Select students (unless all in the same session)
• Select Q&A as an activity
• Choose what they are going to listen to
• Additional options? – By default, everything is recorded so the material can be saved to the MSU for future use or even as a podcast (v7 onwards) when you End the activity as well as Collecting student work. You can change what is recorded in the Advanced options if you wish
• Click on Question and the students will hear the audio source
• Now click on Answer The students are now recorded & the audio source is paused
• Repeat the Question & Answer steps until finished
• End the activity*
• Exit the session
*When you End the activity, you will be prompted to Save the Source material for later use to the MSU. When you click on Save, you can then choose where in the MSU you wish to save it. In addition, if you want to save it as a Podcast, you can do, saving it to the chosen directory in your server You will be prompted to Collect the student recordings for later use to your chosen directory.
SANAKO Lab 100 Q&A (Question & Answer): Why use the Q&A activity?
• To quiz/test students • To collect oral answers from students as evidence
29

SANAKO Lab 100 – Q&A
SANAKO UK Ltd Beech House, Woodland Park, Bradford, BD19 6BW
Tel: (01274) 863380, Fax: (01274) 863381, www.sanako.co.uk Company Reg No: 1984957
To Collect in the student responses; • Click on Collect. This will then process the students’ voices and gather them in
• At this point, you can decide whether there are any responses you don’t wish to
collect. To do this, click on the name in the list, so they are no longer highlighted in blue
• Click on Collect and decide where you wish to store them e.g. Pen stick, network
area Note; Using a seating plan means the names are also the file names for ease of identification. Before exiting the session, you can press Free. This will allow the students to work with the material & go over the activity again at their own pace. If the students do re-record, you will be asked again to Collect when you exit the session. Whenever a student has recorded their voice, the teacher can
Replay it back to them It is also possible to save a Q&A, were you actually save the sequence of events e.g. the time allotted to hear the questions and answer them, so you don’t have to click on Question & Answer every time.
• Click on Save
• Decide what you are going to call it & where you are going to save it
• Save
• To Open a saved Q&A, click on Open File
• Browse for it
• Open
• Start your Q&A
Note; you will still need to open the audio source/file that goes with the Q&A UNLESS it is an MSU file as that will be saved as part of the Q&A file
30

SANAKO Lab 100 User Guide – Library Mode
SANAKO UK Ltd Beech House, Woodland Park, Bradford, BD19 6BW
Tel: (01274) 863380, Fax: (01274) 863381, www.sanako.co.uk Company Reg No: 1984957
Library Mode is one of the two student-led activities within SANAKO Lab 100. Just as a librarian would hand out books, the Teacher hands out files (which are stored in the MSU). Note: ALL the materials you use MUST be on the MSU (see Copy Files to/from MSU to move resources) To use Library Mode, you need to:
• Start a new session
• Select students (unless all in the same session)
• Select Library Mode as an activity The contents of the MSU will now be viewable
• Additional options? – By default, the Student track is recorded only if the student presses Record on their UAP
• Select a file by clicking on it
• Decide who is going to receive the file by either
lassoing a group of students or clicking on individuals
• The students will receive the file instantaneously and the track name will be displayed on the software interface. The students have complete control of their UAPs & can navigate the file as desired
• When the student has finished with a file, they can use the Call Teacher button to get your attention
• You can then select another file & hand it out to that student, some students or all. Therefore, everyone
could work on different material if required
• Exit the Session*
*When you Exit Session, (if they have recorded) you will be prompted to Collect the student recordings for later use to your chosen directory.
SANAKO Lab 100 User Guide Library Mode: Why use the Library Mode activity?
• To distribute material out to students to work on at their pace • To differentiate by giving different files to various students • To allow for student centred learning by giving them all different
files if required
31

SANAKO Lab 100 User Guide – Audio on Demand
SANAKO UK Ltd Beech House, Woodland Park, Bradford, BD19 6BW
Tel: (01274) 863380, Fax: (01274) 863381, www.sanako.co.uk Company Reg No: 1984957
Audio on Demand is one of the two student-led activities within SANAKO Lab 100. To use Audio on Demand, you need to:
• Start a new session
• Select students (unless all in the same session)
• Select Audio on Demand as an activity The contents of the MSU will now be viewable
• Additional options? – By default, the Student track is recorded only if the student presses Record on their UAP
• Set the maximum length of recording time for
the students UAPs
• Browse the MSU and select the tracks you wish to use. Each track is assigned a number
• Students use their UAP bookmarks to dial the number e.g.0,2
• The students will receive the file instantaneously and the track name will be displayed on the software interface. The students have complete control of their UAPs & can navigate the file as desired
SANAKO Lab 100 User Guide Audio on Demand: Why use the Audio on Demand activity?
• For students to choose their own material to work on at their pace • To differentiate by having different files for various students • To allow for student centred learning • To create playlists of revision material/listening activities
32

SANAKO Lab 100 User Guide – Audio on Demand
SANAKO UK Ltd Beech House, Woodland Park, Bradford, BD19 6BW
Tel: (01274) 863380, Fax: (01274) 863381, www.sanako.co.uk Company Reg No: 1984957
So the students know which file to choose, a Report can be produced with the selected files & their corresponding numbers on
• Click on Report
• The Report is produced & can then be printed out or displayed via a projector so the students have access to it
• When the student has finished with a file, they can use the Call Teacher button to clear it. They can then dial up another file
• Exit the Session* *When you Exit Session, (if they have recorded) you will be prompted to Collect the student recordings for later use to your chosen directory. You can also save your Report for future use. It will then associate the files on the MSU with the assigned numbers from before.
• Click on Save
• Decide what you want to call it & where it will be saved
• Click Open File...
• Browse for it & Open
33