Komplete Audio 6 Manual English - g-ec2.images...
58
Manual
Transcript of Komplete Audio 6 Manual English - g-ec2.images...

Manual

ENGL
ISH
KOMPLETE AUDIO 6Manual

Table Of Contents1 WelcometoKOMPLETEAUDIO 6! ................................................................................................................. 4
1.1 What is Included in the Box? ........................................................................... 41.2 Manual Conventions ....................................................................................... 4
2 Safety Considerations .................................................................................................................................. 62.1 Warning......................................................................................................... 62.2 Caution ......................................................................................................... 62.3 Important Notes ............................................................................................. 72.4 Disposal Notice .............................................................................................. 7
3 Software Installation ................................................................................................................................... 83.1 System Requirements ..................................................................................... 83.2 Installation .................................................................................................... 8
3.2.1 InstallingKOMPLETEAUDIO 6onWindows7 .......................................... 83.2.2 InstallingKOMPLETEAUDIO 6onWindowsXP/Vista ...............................113.2.3 InstallingKOMPLETEAUDIO 6onMacOSX ...........................................14
3.3 Registration ..................................................................................................19
4 BasicConfiguration .................................................................................................................................... 204.1 SelectingtheKOMPLETEAUDIO 6asYourSystem’sDefaultAudioOutput
Device ..........................................................................................................204.1.1 WindowsXP ........................................................................................ 204.1.2 WindowsVista,Windows7 .................................................................... 204.1.3 MacOSX ............................................................................................ 21
4.2 UsingtheKOMPLETEAUDIO 6asanAudioOutputDevicewithMusic Software ......................................................................................................21
5 The Hardware in Detail ............................................................................................................................... 225.1 Front Panel ...................................................................................................225.2 Rear Panel ...................................................................................................235.3 Top Panel .....................................................................................................24
6 AdvancedConfiguration ............................................................................................................................. 266.1 AdvancedConfigurationonWindows(ControlPanel) .........................................26
6.1.1 Audio Settings Page ............................................................................. 276.1.2 Diagnostics Page ................................................................................. 30
6.2 AdvancedConfigurationonMacOS X(AudioMIDISetup) .................................336.2.1 Input Pane .......................................................................................... 336.2.2 Output Pane ........................................................................................ 34
7 UsingtheKOMPLETEAUDIO 6(SetupScenarios) ..................................................................................... 357.1 Connecting Speakers .....................................................................................35
7.1.1 Connecting Active Monitor Speakers ...................................................... 357.1.2 UsingKOMPLETEAUDIO 6inaSetupwithPassiveSpeakers .................. 36
7.2 Connecting Headphones ................................................................................36

ENGL
ISH
7.3 KOMPLETEAUDIO 6inaRecordingSetup ......................................................377.3.1 Connecting a Condenser Microphone ..................................................... 377.3.2 Connecting a Dynamic Microphone ........................................................ 407.3.3 ConnectingaGuitar/BassGuitar(withheadphones) ............................... 427.3.4 Connecting Line Level Equipment
(Synthesizer/Computer/Tapedeck/MixerLineOut) .................................... 447.4 KOMPLETEAUDIO 6withMIDIDevices ..........................................................457.5 Using the Digital Input and Output..................................................................47
7.5.1 Connecting a DAT Tapedeck ...................................................................477.5.2 ConnectingaSynthesizerviaDigitalI/O ................................................. 49
8 Troubleshooting .......................................................................................................................................... 508.1 SolvingHardware-relatedProblems .................................................................508.2 HowtoCheckWhethertheKOMPLETEAUDIO 6DriversareInstalled
Correctly ......................................................................................................508.3 USBTroubleshooting .....................................................................................51
8.3.1 USB 2.0 required ..................................................................................518.3.2 TryanotherUSBcable ...........................................................................518.3.3 UsingapoweredUSB2.0hub .............................................................. 528.3.4 RecommendedUSB-ports(MacBookOnly) ............................................. 528.3.5 DisableUSBEnergySavingMode(Windowsonly) ................................... 528.3.6 Update the Driver ................................................................................ 52
8.4 HowtoavoidGroundLoops ............................................................................528.5 PhysicallyRe-configuringtheKOMPLETEAUDIO 6 ..........................................538.6 CheckyourIRQs(Windowsonly) .....................................................................53
9 GettingHelp ................................................................................................................................................. 549.1 Readme/KnowledgeBase/TechnicalSupport ................................................549.2 Forum ..........................................................................................................549.3 Updates .......................................................................................................54
10 Appendix ...................................................................................................................................................... 5510.1TechnicalSpecifications ................................................................................5510.2AboutLatencyandBuffers .............................................................................5510.3DifferentTypesofASIO(Windows) ..................................................................56

4–KOMPLETEAUDIO6–Manual
1 WelcometoKOMPLETEAUDIO 6!ThankyouforyourpurchaseofKOMPLETEAUDIO 6.Itistheultimatehardwarecomple-mentforavarietyofhomestudioandDJapplications.TheKOMPLETEAUDIO 6providesthefollowingfeatures:
• 24-bitanalog-to-digital/digital-to-analogconverters
• 2analoginputswithXLR/1/4”jackcombosockets,48Vphantompower,andindi-vidualinputgaincontrolknobsontheinterface’sfrontpanel
• 2additionalbalancedinputswith1/4”TRSjacksocketsontheinterface’srearpanel
• 4 analog and 2 digital outputs
• 1/4”TRSjackheadphonesocketwithbuttontoswitchbetweensourceoutputs1/2and3/4
• S/PDIFDigitalI/O
• Upto96kHzsamplingrate
• 15statusLEDindicatorsformonitoringtheinterface’sconnections
• ASIOandCoreAudiolow-latencydrivers
1.1 WhatisIncludedintheBox?Thepackagingcontains:
• 1xKOMPLETEAUDIO 6audiointerface
• 1xUSB2.0cable
• 1xinstallationdisc
• AsoftwarebundlecomprisingKOMPLETE 7ELEMENTS,TRAKTOR LE 2,andCu-base 5 LE
• Aprintedcopyofthismanual
1.2 Manual ConventionsThismanualusesparticularformattingtopointoutspecialfactsandtowarnyouofpotentialissues.Theiconsintroducingthefollowingnotesletyouseewhatkindofinformationistobeexpected:
!!Wheneverthisexclamationmarkiconappears,youshouldreadthecorrespondingnotecarefullyandfollowtheinstructionsandhintsgiventhereifapplicable.
!%Thislightbulbiconindicatesthatanotecontainsusefulextrainformation.Thisinforma-tionmayoftenhelpyoutosolveataskmoreefficiently,butdoesnotnecessarilyapplytothesetuporoperatingsystemyouareusing;however,it’salwaysworthalook.

KOMPLETEAUDIO6–Manual–5
ENGL
ISH
Furthermore,thefollowingformattingisused:
• Textappearingin(drop-down)menus(suchasOpen…,Save as…etc.)andpathstolocations on your hard drive or other storage devices is printed in italics.
• Textappearingelsewhereonthescreen(labelsofbuttons,controls,textnexttocheck-boxesetc.)isprintedinlight blue.Wheneveryouseethisformattingapplied,youwillfindthesametextappearingsomewhereonthescreen.
• Important names and concepts are printed in bold.
• Referencestokeysonyourcomputer’skeyboardyou’llfindputinsquarebrackets(e.g.,“Press[Shift]+[Return]”).
► Singleinstructionsareintroducedbythisplaybuttontypearrow.
→ Resultsofactionsareintroducedbythissmallerarrow.

6–KOMPLETEAUDIO6–Manual
2 Safety ConsiderationsPleasereadthefollowingsectionsthoroughly,astheycontainimportantinformationregard-ingtheuseoftheKOMPLETEAUDIO 6.
2.1 WarningTheKOMPLETEAUDIO 6,incombinationwithanamplifier,headphonesorspeakers,canproducesoundsindecibelrangesthatmaycausehearingdamage.Forprotection,setallvolumelevelstoaminimumbeforeusingKOMPLETEAUDIO 6.Graduallyraisethevolumecontrolswhilemusicisplayingtosetthedesiredlisteninglevel.Ifyouexperienceanyhear-ingproblemsorringingintheears,consultahearingspecialistimmediately.
2.2 Caution• BeforeconnectingtheKOMPLETEAUDIO 6hardwaretootherelectroniccomponents,
turnoffthepowerforalldevices.Beforepoweringyoursystemupordown,setallvolume levels to minimum.
• TheKOMPLETEAUDIO 6hardwarecontainsnouser-serviceableparts.Donotopenitorattempttodisassembleormodifyanyinternalcomponents.Ifthereappearstobeahardwaremalfunction,immediatelystopusingthehardwareandcontactNativeInstruments.
• DonotexposetheKOMPLETEAUDIO 6torain,anddonotuseitnearwaterorindamporwetconditions.Also,neverplaceanythingontopoftheunit,andbecarefulthatnoobjectsorliquidsofanykindentertheunit.
• TheKOMPLETEAUDIO 6hardwareispoweredviaUSB.OperationcanbeguaranteedonlywhentheinterfaceistheonlypieceofequipmentconnectedtoaparticularUSB2.0controller,orifitisconnectedtoaself-poweredUSB2.0hub.
• DonotplacetheKOMPLETEAUDIO 6hardwareinanunstablepositionwhereitmightaccidentallyfalltotheground.
• BeforemovingtheKOMPLETEAUDIO 6hardware,removeallconnectedcables.
• Neversubjecttheunittoextremetemperatures(e.g.,directsunlightinanenclosedvehicleornearaheatsource)orhighlevelsofvibration.
• Donotuseexcessiveforceonthebuttons,knobs,switchesorconnectors.
• WhencleaningtheKOMPLETEAUDIO 6hardware,useasoft,drycloth.Donotusepaintthinner,solvents,cleaningfluids,orchemically-impregnatedwipingcloths.

KOMPLETEAUDIO6–Manual–7
ENGL
ISH
2.3 ImportantNotes• Disclaimer:NativeInstrumentsGmbHcannotbeheldresponsiblefordamageordata
losscausedbyimproperuseof,ormodificationto,theKOMPLETEAUDIO 6hardwareorsoftware.Itisyourresponsibilitytobackupdatayoudonotwanttolose.
• Specificationssubjecttochange:Theinformationcontainedinthismanualisbelievedtobecorrectatthetimeofpublication.However,NativeInstrumentsreservestherighttomakechangestothespecificationsofsoftwareandhardwareatanytimewithoutnoticeorobligationtoupdateexistingunits.
• Nameplatelocation:ThenameplateislocatedonthebottomoftheKOMPLETEAUDIO 6hardwareandliststheProductionID.
• Copyright:©NativeInstrumentsGmbH2010.Allrightsreserved.Thispublicationmaynotbereproducedinwholeorinpart,summarized,transmitted,transcribed,storedinaretrievalsystem,ortranslatedintoanylanguage,inanyformorbyanymeanswithoutthepriorwrittenpermissionofNativeInstrumentsGmbH.
• Allproductandcompanynamesaretrademarksorregisteredtrademarksoftheirrespectiveowners.
2.4 DisposalNoticeShouldthisproductbecomedamagedbeyondrepair,orifyouwishtodisposeit,pleaseob-servetheregulationsofyourareaandcountrythatrelatetothedisposalofelectronicproducts.

8–KOMPLETEAUDIO6–Manual
3 Software InstallationInorderfortheKOMPLETEAUDIO 6toworkproperlywithyourcomputer,thefollowingtwoprogramsareautomaticallyinstalledonyoursystemduringthesoftwareinstallationprocess:
• TheKOMPLETEAUDIO 6driver.Thishandlesthecommunicationbetweentheaudiointerfaceandyourcomputer.
• TheControlPanelsoftware.Thisallowsyoutoadjustperformancesettingsandcontrolsyncandpre-ampsettingsforWindows(inMacOS X,therelevantsettingsarecon-trolledfromthesystem’sAudioMIDIsetup).
!%IfyouarefamiliarwiththeinstallationprocedureandthegeneralconfigurationofUSB-driven audio devices on your computer, you can skip this chapter and continue withregistration chapter 3.3.
3.1 System RequirementsForlatestsystemrequirements,compatibilityandsupportofthelatestoperatingsystems,pleasevisitourproductpageat:http://www.native-instruments.com/KA6
3.2 Installation
3.2.1 InstallingKOMPLETEAUDIO 6onWindows7
!!DonotconnecttheKOMPLETEAUDIO 6toyourcomputerbeforethesoftwareinstalla-tionprocessisfinished.
ToinstalltheKOMPLETEAUDIO 6onWindows7:
1. Placetheinstallationdiscinyourcomputer’sCD/DVD-ROMdrive.
2. UseWindowsExplorertobrowsethecontentsofthedisc.
3. Double-clicktheinstallerfile:“KOMPLETEAUDIO 6SetupPC.exe.”

KOMPLETEAUDIO6–Manual–9
ENGL
ISH
4. Intheinstallationwelcomescreen,clickNext.
5. Tocontinue,youneedtofirstacceptthelicenseagreement.Afteryouhavereadthelicenseagreement,clickonthecorrespondingcheckbox.ThenclickNext.

10–KOMPLETEAUDIO6–Manual
6. TheInstallAwareWizardwillpromptyoutobegintheconfiguration.ClickNext to proceed.
7. Oncetheinstallationhasbeenperformedsuccessfully,clickFinish.
→ Allsoftwarecomponentsarenowinstalled,andtheKOMPLETEAUDIO 6shouldbereadytouse.Proceedwithregistrationchapter3.3.

KOMPLETEAUDIO6–Manual–11
ENGL
ISH
3.2.2 InstallingKOMPLETEAUDIO 6onWindowsXP/Vista
!!DonotconnecttheKOMPLETEAUDIO 6toyourcomputerbeforethesoftwareinstalla-tionprocessisfinished.
ToinstalltheKOMPLETEAUDIO 6onWindowsXP/Vista:
1. Placetheinstallationdiscinyourcomputer’sCD/DVD-ROMdrive.
2. UsetheWindowsExplorertobrowsethecontentsofthedisc.
3. Double-clicktheinstallerfile:“KOMPLETEAUDIO 6SetupPC.exe.”
4. Intheinstallationwelcomescreen,clickNext.
12–KOMPLETEAUDIO6–Manual
5. Tocontinue,youfirstneedtoacceptthelicenseagreement.Afteryouhavereadthelicenseagreement,clickonthecorrespondingcheckbox.ThenclickNext.
6. TheInstallAwareWizardwillpromptyoutobegintheconfiguration.ClickNext to proceed.
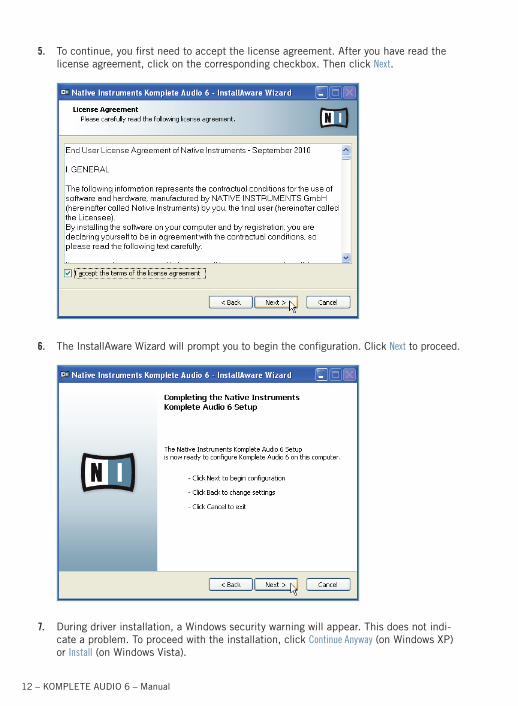
7. Duringdriverinstallation,aWindowssecuritywarningwillappear.Thisdoesnotindi-cateaproblem.Toproceedwiththeinstallation,clickContinue Anyway(onWindowsXP)or Install(onWindowsVista).
KOMPLETEAUDIO6–Manual–13
ENGL
ISH
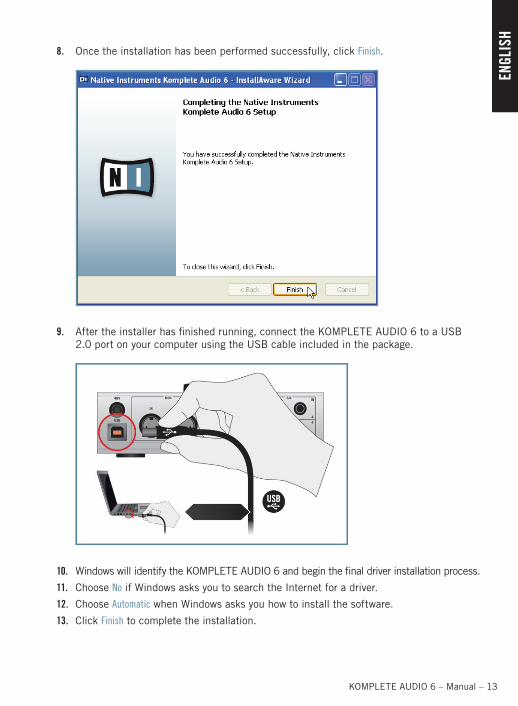
8. Oncetheinstallationhasbeenperformedsuccessfully,clickFinish.
9. Aftertheinstallerhasfinishedrunning,connecttheKOMPLETEAUDIO 6toaUSB2.0portonyourcomputerusingtheUSBcableincludedinthepackage.
10. WindowswillidentifytheKOMPLETEAUDIO 6andbeginthefinaldriverinstallationprocess.
11. Choose NoifWindowsasksyoutosearchtheInternetforadriver.
12. Choose AutomaticwhenWindowsasksyouhowtoinstallthesoftware.
13. Click Finish to complete the installation.

14–KOMPLETEAUDIO6–Manual
14. Afteryouhavecompletedthedriverinstallationprocedure,thedriverinstallerwillstartagain.Thisisintendedbehavior.Repeatsteps11to14inordertoinstallallrequireddriver components.
→ Allsoftwarecomponentsarenowinstalled,andtheKOMPLETEAUDIO 6shouldbereadytouse.Proceedwithregistrationchapter3.3.
3.2.3 InstallingKOMPLETEAUDIO 6onMacOSX
ToinstalltheKOMPLETEAUDIO 6onMacOSX:
1. ConnecttheKOMPLETEAUDIO 6toaUSB2.0portonyourcomputerusingtheUSBcableprovidedintheKOMPLETEAUDIO 6package.
2. Placetheinstallationdiscinyourcomputer’sCD/DVD-ROMdrive.ItsiconwillappearintheMacOSXFinder.
3. Double-clicktheKOMPLETEAUDIO 6discicontodisplaythecontentsofthedisc.
4. Double-clicktheinstallerfile:“KOMPLETEAUDIO 6InstallerMac.mpkg.”Theinstalla-tionwillstart,andawelcomescreenwillappear.

KOMPLETEAUDIO6–Manual–15
ENGL
ISH
5. Click Continue to proceed.
6. ReadtheSoftwareLicenseAgreementandclickContinue to proceed.
16–KOMPLETEAUDIO6–Manual
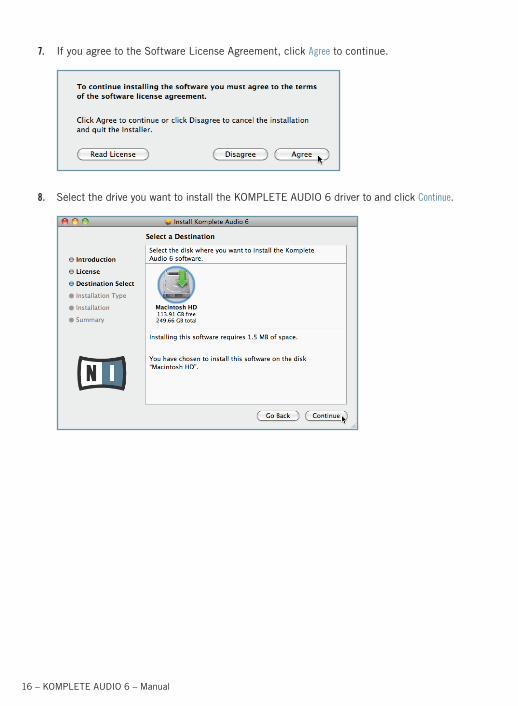
7. IfyouagreetotheSoftwareLicenseAgreement,clickAgree to continue.
8. SelectthedriveyouwanttoinstalltheKOMPLETEAUDIO 6drivertoandclickContinue.

KOMPLETEAUDIO6–Manual–17
ENGL
ISH
9. Click Install to install the driver.
10. MacOSXwillpromptyoutoauthenticatetheinstallation.Enterthenameandcorre-spondingpasswordofauserwithadministratorprivilegesandclickOK. Another screen willinformyouthatrestartingthecomputerwillbenecessaryaftertheinstallerhasfinished.Confirmagain.

18–KOMPLETEAUDIO6–Manual
11. Thenextscreeninformsyouabouttheprogressoftheinstallationprocedure.
12. Oncetheinstallationhasbeenperformedsuccessfully,youwillbepromptedtorestartyour Mac. Click Restart to restart your computer.
→ Allsoftwarecomponentsarenowinstalled,andtheKOMPLETEAUDIO 6isreadytouse.Proceedwithregistrationchapter3.3.

KOMPLETEAUDIO6–Manual–19
ENGL
ISH
3.3 RegistrationRegisteringtheKOMPLETEAUDIO 6isnotmandatory.Nevertheless,registrationisrecom-mendedforsupportinquiriesorincaseoftheft.Asaregistereduser,youwillalsobenefitfromexclusiveincentivesandinsiderspecials.
!%Registeryourhardware:ifyouregisteryourKOMPLETEAUDIO6now,youwilladdition-allyberewardedwithavoucherforNIproducts,sodon’tsleeponit!
!!ToregisteryourKOMPLETEAUDIO 6ontheNativeInstrumentswebsite,youwillneedtheserialnumberfromtheproductactivationsticker.ThisislocatedonthebottomsideofyourKOMPLETEAUDIO 6.
To register your KOMPLETE AUDIO 6, visit our registration page on: http://www.native-instruments.com/registrationandfollowtheinstructions.
20–KOMPLETEAUDIO6–Manual
4 BasicConfigurationIn orderfortheKOMPLETEAUDIO 6tooperateasyourcomputer’sdefaultsoundcard,youwillneedtoselectitwithinthesystem’saudiopreferences.Findtherelevantinstructionsinchapter4.1.
Touse theKOMPLETEAUDIO 6as yourmusic software’sdefault audio output, see theinformationgiveninchapter4.2.
4.1 SelectingtheKOMPLETEAUDIO 6asYourSystem’sDefaultAudioOutputDevice
Inthefollowingsections,youwilllearnhowtosetuptheKOMPLETEAUDIO 6asyoursys-tem’sdefaultaudiooutputdevice.
4.1.1 WindowsXP
1. Open Start > Control Panel > Hardware and Sound > Sound.
2. In the Sounds and Audio Devices Propertieswindow,selecttheAudiotab.
3. From the Default Devicedrop-downlist,selectoneoftheKOMPLETEAUDIO 6entries.
4. Click OKtoconfirmyourselectionandclosethewindow.
→ TheKOMPLETEAUDIO 6isnowselectedasthedefaultaudiooutputdevice.
4.1.2 WindowsVista,Windows7
1. Open Start > Control Panel > Hardware and Sound > Sound.
2. In the Soundcontrolpanel,selectthePlaybacktab.
3. SelecttheKOMPLETEAUDIO 6’spairofoutputs(ChA,Out1|2orChB,Out3|4)thatyouwanttosetasdefaultbyclickingthecorrespondingentry.
4. Click Set Default.
5. Click OKtoconfirmyourselectionandclosethewindow.
→ KOMPLETEAUDIO 6isnowselectedasthedefaultaudiooutputdevice.

KOMPLETEAUDIO6–Manual–21
ENGL
ISH
4.1.3 MacOSX
1. Open the System PreferencesunderthegrayAppleIconmenuinthetopleftcornerofyour screen.
2. BelowHardware(secondrowfromtop),selectSound.3. In the Soundcontrolpanel,selecttheOutputtab.4. SelecttheKOMPLETEAUDIO 6fromthelistofavailablesoundcards.5. Close the panel.
→ KOMPLETEAUDIO 6isnowselectedasthedefaultaudiooutputdevice.
4.2 UsingtheKOMPLETEAUDIO 6asanAudioOutputDevicewithMusic Software
BeforeusingtheKOMPLETEAUDIO 6withmusicproductionorDJsoftware,youwillneedtosetitupasthesoftware’saudiooutputdevice.MostmusicproductionandDJprogramsprovidedirectaccesstothesoundcardpropertiesintheaudioandMIDIsetupsectionoftheirpreferencesdialog.PleaserefertothedocumentationofyourmusicproductionorDJsoftwareformoreinformationonhowtoconfigureaudioandMIDIinterfaces.

22–KOMPLETEAUDIO6–Manual
5 The Hardware in DetailTheKOMPLETEAUDIO 6processesbothincomingaudioandtheaudiosenttoyourcom-puter(andexternalequipment)inanaloganddigitalform.Itisastand-alonedevicewhichdrawspowerfromtheUSBconnectionofyourcomputer.Thus,anexternalpowersupplyisunnecessary.Thedeviceprovides:
• soundconversion(fromanalogtodigitalandviceversa)
• playback/monitoring(fromaninputdeviceorcomputertoheadphones/speakers)
• recording(fromanalog/digitalinputsintodigitaldata)
5.1 Front Panel
5.1ThefrontpaneloftheKOMPLETEAUDIO 6.
(1)INPUT1and INPUT 2 (LineandMicrophone):TheseinputshaveacombinationsocketforusewithXLRor1/4”jackconnectors.WhenconnectinganXLRconnector,anXLRlocklatches.Youcaneasilyreleasetheconnectorbypressingthereleasetab.
The input GAINknoblowers/raisestheamountofsignalgoingintotheKOMPLETEAUDIO 6.The LINE/INST togglebuttonselectseitherLINEmodeforstrong-signaledinputs(likeasyn-thesizerortheoutputofanelectricpiano)orINSTforweak-signaledinputs(suchasaguitarorabassguitar).XLRconnectedgearisnotaffectedbythisbutton.
(2)MONITORsection:TheONswitchturnsdirectmonitoringon/off.Withdirect monitoring acti-vated,theunaffectedinputsignalwillbeheardwithzerolatency.TheONswitchalsodoublesas a monitor selector switch.Whenheld foronesecond, it cycles through threemonitormodes:monitorsignaltooutputs1/2;monitorsignaltooutputs3/4;andmonitorsignaltobothoutputpairs1/2and3/4.TheLEDsfromtheMONITORsectiononthedevice’stoppaneldisplaywhichmonitoringmodeiscurrentlyactive.
The MONOswitchtogglesthemonitoroutputselectionbetweenamono signal and a stereo signal.Switching toamono settingaids inmonitoringamono signal, suchasaguitar’smono input.
The VOLUMEcontrollowers/increasestheoutputlevelofthemonitorsignal.

KOMPLETEAUDIO6–Manual–23
ENGL
ISH
(3)Headphonessection:Theheadphonesocketisforplugginginheadphoneswitha1/4”TRSjack.
The VOLUMEcontrollowers/increasestheoutputsignaloftheheadphones.Thetoggleswitch1/2 and 3/4allowsyoutodeterminewhichoutputismonitoredbytheheadphones.
5.2 Rear Panel
5.2TherearpaneloftheKOMPLETEAUDIO 6.
(1)Phantompowerbutton(48V):The phantompowerbuttonsupplies48Vtocondensermicro-phones,whichneedthisDCvoltagetopowertheiractiveelectricalcircuitry.Thisfeatureeliminatestheneedfordirectboxesorotheradditionalhardwarewhenusingacondensermicrophone.
!!Beawarethatphantompowercancauseseriousdamagetoribbonmicrophones.Checkyourmicrophone’smanualtoseewhetheritissafetousephantompoweronit.Ifitisn’t,makesuretodisablephantompowerontheinterfacebeforeconnecting:Switchthe48Vphantompowerbuttono1nthedevice’srearpaneloff.The48VLEDonthedevice’stoppanelstopslightingorangewhenphantompowerisdisabled.
(2)USBport:TheUSBportsocketconnectstheKOMPLETEAUDIO 6devicetoyourcomputerlaptoporworkstationviaUSB2.0.
(3)MIDI:TheMIDIinput(IN)andoutput(OUT)socketsconnecttoMIDIdevicessuchasMIDIcontrollersandhardwaresynthsorworkstations. These connections also send and receive MIDIdatatoandfromyourcomputer,andcanbeutilizedbythemusicsoftwareofyourchoice.
(4)Mainoutputs1/2:TheMAIN1/2outsarebalancedoutputs.Normally,thesearecoupledtoamixer,mixingboard,oractivespeakersvia1/4”jacks.However,youcanalsouseRCA(phono)cableswithsuitable1/4”jackadapters.
(5)Outputs3/4:TheOUT 3/4socketsarebalancedoutputs.Theyoffertheoptionofadditionaloutputswhensettingup4-channelapplications,suchassurroundsound.Theyalsomakeassigningcertaininstrumentstocertainoutputs/outputpairsormonitoringwithasecondpairofspeakerspossible.Theseoutputshavenodedicatedvolumecontrol(theoutputisalwaysat0dB)soyouwillneedtocontrolthevolumefromwithinyoursoftwareorthegearthey are connected to.

24–KOMPLETEAUDIO6–Manual
(6) Inputs 3/4: The Input 3/4 sockets are balanced1/4” jack sockets. They are usedwithsynths,tapedecks,CDplayers,oranyotherdevicesorinstrumentsthatdon’trequirephan-tompowering.
(7)InputandOutput5/6:TheRCA(phono)sockets5/6areusedfordigital input/output,andsyncingtoexternaldigitalclocks.Typically,DATtapedecksorsynthesizerswithdigitalins/outsutilizethesesockets.
5.3 TopPanel
5.3ThetoppaneloftheKOMPLETEAUDIO 6.
• Volumecontrolknob(MAINVOLUME1/2):Theknobatthecenterofthetoppanelprovidesamastervolumecontrolforthemainoutputs(MAIN1/2).
• Status LEDs:ThestatusLEDssurroundingtheVolumeControlKnoballowyoutoquicklyidentifythestatusofalltheconnectionsgoinginandoutofthedevice,especiallyinlowlightingenvironments,wheresetupandtroubleshootingcanbecumbersome.SeethefollowinglistfortheLED’stasksinmoredetail: • INPUT 1,2,3,and4:Lightgreenwhenincomingsignalontherelevantchannelis
detected.TheLEDslightredwhenthereistoomuchsignalpresent,i.e.clipping. • OUTPUT1/2 and 3/4:Lightsgreenwhenthereisanoutgoingaudiosignal.

KOMPLETEAUDIO6–Manual–25
ENGL
ISH
• MIDI:LightsgreenwhenaMIDIconnectionisdetectedandactive;flashesonincoming or outgoing MIDI data.
• 48V:Lightsorangewhenphantompowerisactivated. • USB:LightsgreenwhentheUSBportisconnectedtoacomputer.Flashingindi-
catesaUSBconnectionproblem. • Headphones1/2:Lightsorangewhenthereisoutgoingsignalontheheadphone
outputs1and2(see5.1forheadphonesourcesettings). • Headphones3/4:Lightsorangewhenthereisoutgoingsignalontheheadphone
outputs3and4(see5.1forheadphonesourcesettings). • MONITOR1/2:Lightsorangewhendirectmonitoringisactivatedwithoutputs1/2
selected(seeMONITORsectionofchapter5.1forfurtherinformationondirectmonitoring).
• MONITOR3/4:Lightsorangewhendirectmonitoringisactivatedwithoutputs3/4selected(seeMONITORsectionofchapter5.1forfurtherinformationondirectmonitoring).
• SPDIFSYNC:LightsorangewhenExternalDigitalClockSyncisestablished;doesnotlightwhentheinternalclockisused(seechapters6.1.1and6.2.1forfurtherinfor-mationonsynchronizingtheKOMPLETEAUDIO 6’sclocktoexternalequipment).

26–KOMPLETEAUDIO6–Manual
6 AdvancedConfigurationOnceyouhaveinstalledtheKOMPLETEAUDIO 6(3)andsetitupasyoursystem’sdefaultaudiooutputdevice(4),therearemoreoptionsavailable,suchaslatencyoptimization(seealso10.2)andaudioqualitysettings.
On WindowsAll advancedconfigurationsettingsonWindowscanbeaccessedfromtheControlPanelsoftware,whichwasinstalledonyourcomputerduringthesoftwareinstallationprocedureinchapter3.Proceedwithsubchapter6.1.
!%If youexperienceproblemswithyoursetup,please refer to theAudioTroubleshootingGuide,whichyoucanaccessfromtheInformationsectionoftheControlPanel’sDiagnostics page,oropenitdirectlyfromthesoftware’sdocumentationfolder.
OnMacOS XAlladvancedconfigurationsettingsonMacOS XcanbeaccessedfromtheMacOS XAudioMIDISetup.Proceedwithsubchapter6.2.
!%If youexperienceproblemswithyoursetup,please refer to theAudioTroubleshootingGuide,whichyoucanaccessdirectlyfromthesoftware’sdocumentationfolder.
6.1 AdvancedConfigurationonWindows(ControlPanel)The ControlPanelsoftwareallowsyoutochangethedriver’sperformancesettings,monitorperformanceanddetecterrors.ToopentheControlPanel:
► Navigate to Start > All Programs > Native Instruments > KOMPLETE AUDIO 6 Driver > Control Panel.
!!IfyoucannotfindtheControlPanel,thesoftwareismostlikelynotinstalled.Inthiscase,please(re-)installthesoftwareasdescribedinchapter3.
Ontheleft-handsideoftheControlPanel,youfindtwotabs:Audio Settings and Diagnostics:
► ClickonthetabstoopenthecorrespondingpageoftheControlPanel.
Proceedtochapters6.1.1and6.1.2formoreinformationontheControlPanel’spages.

KOMPLETEAUDIO6–Manual–27
ENGL
ISH
6.1.1 AudioSettingsPage
6.1TheControlPanel’sAudio Settings page.
In the Audio Settingspage,youcanconfiguretheaudiolatencyandsamplerate;monitorthedevice’sstatus;enableclocksyncingtoexternaldevices;andactivatedirectmonitoring.
The Audio Settingspageconsistsoffoursections:Audio Processing,Device Monitor,Digital Sync Source,and Direct Monitoring.Seethefollowingsubchaptersforfurtherinformation.
AudioProcessingSection
6.2TheAudio Processing section in the Audio SettingspageoftheControlPanel.
The Audio Processingsectionsetstheparametersfortheanalog-to-digital/digital-to-analogcon-versiondonebyyouraudiointerface.Ithastwomenus:
• Sample Rate:Chooseasampleratethatiscompatiblewithyourmusicapplicationandbestsuitedtoyourcomputingpower.Ahighersamplerateimprovestheaudioquality,butalsocauseshigherCPUload.Bydefault,thesamplerateissetto44100 Hz(CDquality).
!%Thesampleratedefineshowmanysamplesareplayed/recordedperonesecondofsound.Ahigher sample rate results inhigher audioquality;however,44100 Hz (asused forrecordingaudioCDs)isacommonsettingandabsolutelysufficientformosttasks.IfyourfinaldestinationisCD,youshouldusethissettingoramultipleofit(88200 Hz).Forabetterunderstanding:48000 HzisusedbyDATrecordersandforDVD(films)recording.96000 HzandhigherratesaretypicalforDVD,HDDVD,andBlu-rayDiscaudiorecord-ing.YoushouldbeawarethatahighersampleratealsocauseshigherCPUload.

28–KOMPLETEAUDIO6–Manual
!!Ifyouwanttousemultiplesoftwareclientssimultaneouslywiththedevice,keepinmindthey’llalsohavetosharethesamesamplerate.
• Process Buffer:Lowerthebuffersizevalueforaquickerresponsetimefromyourcom-putertoaudiosoftwareandMIDIcontrolleractions.
!%Whenconvertingaudio informationtodigitalandviceversa, theaudiodriverneedstostorethedatainbufferpackages(audiobuffers)whicharethensenttoandprocessedbytheCPU.Thehigherthebuffersize,thelongerittakesforasignaltofinallyarriveattheoutputasaudio.Youmightexperiencethisasadelaybetweenthetimeyouhitakeyonyourcomputerorcontrollerandwhenyouactuallyhearthesound.Thisdelayiscalledlatency.Aruleofthumbis:lowerbuffersizeresultsinlowerlatency.However,therearemorefactorstolatencythanbuffersizealone(e.g.,CPUspeedandRAMsize).Youshouldstartoffwithahigherbuffersizesetting,andgraduallydecreasethevalueuntilyoufindtheperfectbalancebetweenplayabilityandsystemperformance.Ifyouexperiencecrack-lingattheaudiooutput,thechosenbuffersizeisverylikelytoolowforyourcomputer’sCPUtocopewith,aslowerbuffersizecauseshigherCPUload.
Device Monitor Section
6.3TheDevice Monitor section in the Audio SettingspageoftheControlPanel.
The Device Monitorsectiondisplaysinformationabouttheaudiointerface’sprocessingstatusandyoursystem’soutputlatency.Ithastwodisplays:
• Processing State:Theprocessingstatemonitorprovidesfeedbackonthecurrentstatusofthedevice.Therearethreepossiblestatusmessages: • Idle:interfaceisconnected,butnoclientdeliversaudiodata. • Streaming:driverisworkingandprocessingaudiodata. • Panic:driverstoppedstreaming.ToomanyUSBI/Oerrorsoccurredintheinterface
communication.• Output Latency:Showstheamountofoutputlatencyinmilliseconds.

KOMPLETEAUDIO6–Manual–29
ENGL
ISH
DigitalSyncSourceSection
6.4TheDigital Sync Source section in the Audio SettingspageoftheControlPanel.
In the Digital Sync Source section,youcanselectwhetherthedeviceusesitsinternalclockorgetssynchronizedtotheclockofanexternaldevice:
• Internal (standardsetting):Leavethisradiobuttonselectedifyoudon’twantthedevicetobesynchronizedtotheclockofanexternaldevice.
• External S/PDIF 5|6:SelectthisradiobuttonifyouwantthedevicetobesynchronizedtotheclockofanotherexternaldeviceviaS/PDIF.Whenswitchingtothissetting,thede-viceautomaticallytriestoestablishsynchronizationtoanexternalclockatthedigitalinput/output5and6(seealsochapter5.2).Ifthesynchronizationrequestfails,theinterfaceswitchesbacktointernalclockmode.Ifthesynchronizationissuccessful,thetoppanel’sSPDIFSYNClights(seechapter5.3).
DirectMonitoringSection
6.5TheDirect Monitoring section in the Audio SettingspageoftheControlPanel.
In the Direct Monitoring section,youcansetthedevicetobypassanysignalprocessingandsendthesignalfromtheinputdirectlytotheoutputofthedevice(atzerolatency).
!%ThisfunctioncanbeaccessedfromtheMONITORsectiononthedevice’sfrontpaneltoo;seechapter5.1forfurtherinformation.
The Direct Monitoringsectionhasabuttonandadrop-downmenu:
• Monitor Status:Activatingthedirectmonitoringroutesthesignaloftheinputs1and2di-rectlytotheselectedoutputs(seeChannelsettingbelow)withoutsendingthemthroughthecomputer,soyoucanmonitortheinputatzerolatency.
• Channel:Whendirectmonitoringisactive,selecttowhichoutputchannelssignalsfrominputs1and2willberouted.

30–KOMPLETEAUDIO6–Manual
6.1.2 DiagnosticsPage
6.6TheControlPanel’sDiagnostics page.
The Diagnosticspageallowsyoutomonitorperformanceanddetecterrors.Theinformationprovidedinthispageismoreofinteresttoadvancedusers;however,incaseofproblemswiththedevice,youshouldhavealookatthispage.TheDiagnosticspageconsistsofthefoursections:Drop-Out Detection; Connection Monitor; System Performance Test; and Information.Seethefol-lowingsubchaptersforfurtherinformationonthesesections.
Drop-OutDetectionSection
6.7TheDrop-Out Detection section in the DiagnosticspageoftheControlPanel.
The Drop Out Detection sectionprovidesfeedbackonUSBinput/outputandbufferingerrors.Ithastwodisplaysandabutton:
• USB I/O Errors:providesfeedbackonUSBinput/outputerrors.AhighUSB I/O Errors count pointstoyoursystembeingoverloaded.
• Buffer Underruns:Bufferunderrunsoccurwhenyourcomputerisn’tabletoprocessanaudiobufferintime.ReasonsforunderrunsincludetoomanyongoingbackgroundtasksorhighCPUusagewithinamusicprogram.
• Reset:Aclickonthisbuttonresetstheerrorcount.

KOMPLETEAUDIO6–Manual–31
ENGL
ISH
Connection Monitor Section
6.8TheConnection Monitor section in the DiagnosticspageoftheControlPanel.
The Connection Monitor sectionprovidesfeedbackonconnectedclientsandUSBdataerrors.Ithastwodisplaysandabutton:
• Number of Clients:displaysthenumberofclientsconnectedtotheinterface.MultipleASIOapplicationsarecountedseparately.WDMandWASAPIincreasethenumberbyone,nomatterhowmanyWDM/WASAPIapplicationsplayaudio.
• USB Data Errors:countsUSBdataerrors.Poorquality,orlongUSBcablesaswellasir-radiationcanbethesourceofconnectionerrorsontheUSBbus.
• Reset:Aclickonthisbuttonresetstheerrorcount.
System Performance Test Section
6.9TheSystem Performance Test section in the DiagnosticspageoftheControlPanel.
The System Performance TestsectionprovidesmonitoringofthecurrentDPC(DeferredProce-dureCall)latencyvalueofyourWindowssystem.ADeferredProcedureCallisaWindowsmechanismwhichallowshigh-prioritytasks(suchasthebasicsystemtasks)todelaylower-prioritytasks.ThisspecificDPClatencyisnottobeconfusedwiththeoveralllatency,ex-plainedinchapter10.2,butitcanaddtoit.Thesectionhastwodisplaysandtwobuttons:
• Current Latency:displaysthecurrentDPClatencyvalue.
• Maximum Latency:displaysthehighestDPClatencyvaluemonitoredsincethelasttimeyou either started or restarted monitoring.
• Reset:PressthisbuttontoresettheMaximum Latencyvaluetozero.
• Start/Stop:PressthisbuttontostartmonitoringDPClatency.Oncestarted,thebuttonlabelchangestoStop.
32–KOMPLETEAUDIO6–Manual
Information Section
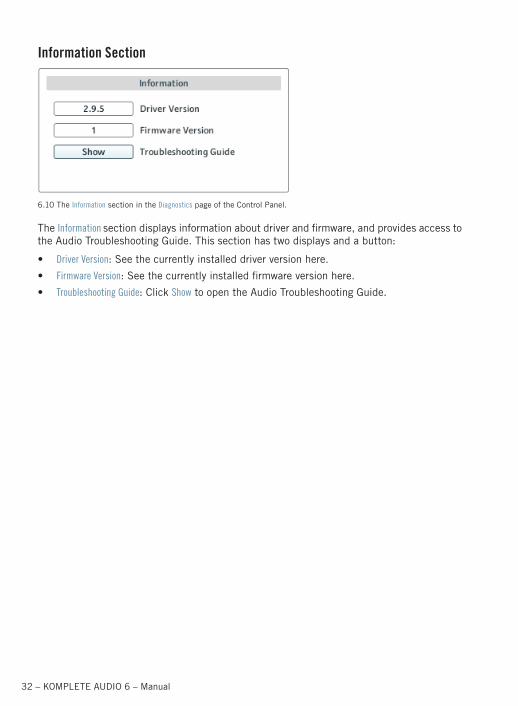
6.10TheInformation section in the DiagnosticspageoftheControlPanel.
The Information sectiondisplaysinformationaboutdriverandfirmware,andprovidesaccesstotheAudioTroubleshootingGuide.Thissectionhastwodisplaysandabutton:
• Driver Version:Seethecurrentlyinstalleddriverversionhere.
• Firmware Version:Seethecurrentlyinstalledfirmwareversionhere.
• Troubleshooting Guide:ClickShowtoopentheAudioTroubleshootingGuide.

KOMPLETEAUDIO6–Manual–33
ENGL
ISH
6.2 AdvancedConfigurationonMacOS X(AudioMIDISetup)OnMacOS X,alladvancedconfigurationsettingscanbeaccessedfromtheAudioMIDISetuputility.ToopentheAudioMIDISetuputility:
► Go to Applications > Utilities > Audio and MIDI Setup.
→ TheAudioMIDISetuputilitywillpopupinawindow,entitledAudio Devices.
6.2.1 InputPane
6.11TheInputpaneoftheAudioMIDISetuputilityinMacOS X 10.6.
TheAudioMIDISetup’sInputpaneallowsforselectionofclocksourcesettings,samplerate,anddirectmonitoring.Therelevantareas/elementsherearetheClock sourcedrop-downmenu,the Formatdrop-downmenu,andtheThrucheckboxes,respectively.Seethefollowinglistformoredetaileddescriptions:
• Clock source:IntheClock sourcedrop-downmenuyoucanselectwhetherthedeviceusesitsinternalclockorgetssynchronizedtotheclockofanexternaldevice. This is rel-evantwhenconnectingtoanexternaldeviceviathedigitalIn/Out5/6sockets(seealsochapter5.2).Thedrop-downmenuholdsthefollowingentries: • Internal Clock (standardsetting):Leavethisradiobuttonselectedifyoudon’twant
thedevicetobesynchronizedtotheclockofanexternaldevice. • External Clock (S/PDIF):Selectthisradiobuttonifyouwantthedevicetobesynchro-
nizedtotheclockofanexternaldeviceviaS/PDIF.Whenswitchingtothissetting,thedeviceautomaticallytriestoestablishsynchronizationtoanexternalclockatthedigitalinputs5/6(seechapter5.2).Ifthesynchronizationrequestfails,theinterfaceswitchesbacktointernalclockmode.Ifsynchronizationispossible,thetoppanel’sSPDIFSYNClights(seechapter5.3).

34–KOMPLETEAUDIO6–Manual
• Format:Chooseasampleratethatiscompatiblewithyourmusicapplicationandsuitedtoyourcomputingpower.Ahighersamplerateimprovestheaudioquality,butalsocauseshigherCPUload.Bydefault,thesamplerateissetto44100 Hz(CDquality).
!%Thesampleratedefineshowmanysamplesareplayed/recordedperonesecondofsound.Ahigher sample rate results inhigher audioquality;however,44100 Hz (asused forrecordingaudioCDs)isacommonsettingandabsolutelysufficientformosttasks.IfyourfinaldestinationisCD,youshouldusethissettingoramultipleofit(88200 Hz).Forabetterunderstanding:48000 HzisusedbyDATrecordersandforDVD(films)recording.96000 HzandhigherratesaretypicalforDVD,HDDVD,andBlu-rayDiscaudiorecord-ing.YoushouldbeawarethatahighersampleratealsocauseshigherCPUload.
• Thru:TheThrucheckboxesenabledirectmonitoring.Thissendstheinputsignalsdirect-lytoitsoutputatzerolatencywithoutanyinternalsignalprocessing.Tickthecheck-boxoftherelevantchanneltoactivatedirectmonitoring.Thissettingisalsoaccessiblefromthehardware’sfrontpanelintheMONITORsection(seealsochapter5.1).
!!Thechannels’volumesettingscannotbecontrolledfromtheAudioMIDISetuputility;usetherelevanthardwarecontrols(seechapter5).
6.2.2 OutputPane
AllrelevantoutputsettingsoftheKOMPLETEAUDIO 6arecontrolledfromthehardware(see5).Seechapter6.2.1forgeneralsettingsandinputchannelsettings.

KOMPLETEAUDIO6–Manual–35
ENGL
ISH
7 UsingtheKOMPLETEAUDIO 6(SetupScenarios)In thischapter, youwill learnhow toconnect theKOMPLETEAUDIO 6 invarioussetupscenarios.Althoughwecannotcoverallimaginablesetupshere,theexamplesaregeneralenoughtoapplytheinformationtomostsituations.
!!PleasemakesuretohaveinstalledtheKOMPLETEAUDIO 6driverasdescribedinchap-ter3priortoconnectingtheKOMPLETEAUDIO 6toyourcomputer.Thedevicewillnotworkproperlyotherwise.
7.1 ConnectingSpeakers
7.1.1 ConnectingActiveMonitorSpeakers
7.1KOMPLETEAUDIO 6setupwithactivemonitors.
Make sure theKOMPLETEAUDIO 6isconnectedtoyourcomputerasdescribedduringtheinstallationchapter(chapter3),andconfiguredasyourcomputer’smainaudiooutputdevice(seechapter4).
Touseactivespeakers(self-poweredspeakerswithabuilt-inamplifier)withyourKOMPLETEAUDIO 6:
1. TurntheVolumeControlknob(MAINVOLUME 1/2)onthetoppaneloftheKOMPLETEAUDIO 6totheleft-endstoptosetthevolumetominimum.
2. Connectthemainoutputs(MAIN1/2)ontherearpaneloftheKOMPLETEAUDIO 6toyouractivespeakerswithstereo1/4”cables.First,connecttheLoutputchannelwiththeleftspeaker,thentheRoutputchanneltotherightspeaker.
3. Onceyouhaveconnectedthespeakerstothedevice,setthegainknobonyouractiveboxestotheappropriatelevel(0dB)andturnthemon.

36–KOMPLETEAUDIO6–Manual
4. Starttheplaybackofanaudiofileonyourcomputer.
5. GraduallyturntheVolumeControlknob(MAINVOLUME 1/2)ontopoftheKOMPLETEAUDIO 6totherightuntilyoureachagoodlisteninglevel.
7.1.2 UsingKOMPLETEAUDIO 6inaSetupwithPassiveSpeakers
MakesuretheKOMPLETEAUDIO 6isconnectedtoyourcomputerasdescribedduringtheinstallationchapter(chapter3),andconfiguredasyourcomputer’smainaudiooutputdevice(seechapter4).
Passivespeakersrequireamplification,sotherewillbeamixerorstereoamplifierbetweenthespeakersandtheKOMPLETEAUDIO 6.TousetheKOMPLETEAUDIO 6inasetupwithpassivespeakers:
1. Turnyourstereoamplifier/mixeroff.
2. Connectthemainoutputs(MAIN1/2)ontherearpaneloftheKOMPLETEAUDIO 6toapairoflineinputsonyourstereoamplifier/mixerwithstereo1/4”toRCA(phono)cablesorsuitableadapters.ConnecttheLoutputchanneltotheleftlineinputchan-nel,andtheRoutputchanneltotherightlineinputchannelofyourstereoamplifier/mixer.
3. Turnyourstereoamplifier/mixeron.
4. TurntheVolumeControlknob(MAINVOLUME 1/2)onthetoppaneloftheKOMPLETEAUDIO 6totheright-endstoptosettheoutputtoitsmaximumlevel.
5. Starttheplaybackofanaudiofileonyourcomputer.
6. Graduallyraiseyourstereoamplifier’s/mixer’svolumecontrolleveluntilyoureachagood listening level.
7.2 ConnectingHeadphones
7.2KOMPLETEAUDIO 6setupwithheadphones.
Make suretheKOMPLETEAUDIO 6isconnectedtoyourcomputerasdescribedduringtheinstallationchapter(chapter3),andconfiguredasyourcomputer’smainaudiooutputdevice(seechapter4).
TouseheadphoneswithyourKOMPLETEAUDIO 6:

KOMPLETEAUDIO6–Manual–37
ENGL
ISH
1. Plugthe1/4”TRSjackofyourheadphonesintothePHONESsocketontheKOM-PLETEAUDIO 6’sfrontpanel.TurntheHeadphoneVolumeControlknob(VOLUME)oftheKOMPLETEAUDIO 6totheleft-endstoptosetthevolumetominimum.
2. Starttheplaybackofanaudiofileonyourcomputer.
3. GraduallyturntheHeadphoneVolumeControlknob(VOLUME)oftheKOMPLETEAUDIO 6totherightuntilyoureachagoodlisteninglevel.
7.3 KOMPLETEAUDIO 6inaRecordingSetupThefollowinginstructionswillassistyouinusingtheKOMPLETEAUDIO 6inarecordingsituation for capturing audio to your computer, andmonitoring the input and result overyourspeakersorheadphones.Inmostcases,youwilluseathirdpartyDAW(digitalaudioworkstation)softwareoranotheraudio recordingandeditingsoftware for recordingvoiceorinstruments.ForinstructionsonhowtoconfigureaudioandMIDIroutingandrecording,pleaserefertoyoursoftware’sdocumentation.
7.3.1 ConnectingaCondenserMicrophone
7.3KOMPLETEAUDIO 6setupwithmicrophoneandheadphones.
Make suretohaveconnectedtheKOMPLETEAUDIO 6toyourcomputerasdescribedduringtheinstallationchapter(chapter3)ofthismanual.

38–KOMPLETEAUDIO6–Manual
!!Makesure thevolumeon theKOMPLETEAUDIO 6’smainouts (VolumeControlknob“MAIN VOLUME 1/2”) is turned down before connecting amicrophone to the KOM-PLETEAUDIO 6.MicrophonesnearbyspeakerscancausealoudsquealingtonefromthespeakersduetoaphenomenoncalledtheLarseneffectoraudiofeedbackloopandcanseriouslydamageyourhearingandyourequipment.Thegreaterthedistancebetweenamicrophoneandspeakersmeansthiseffectislesslikelytooccur.
TousetheKOMPLETEAUDIO 6inarecordingsetupwithacondensermicrophone:
1. TurntheVolumeControlknob(MAINVOLUME 1/2)onthetoppaneloftheKOMPLETEAUDIO 6totheleft-endstoptosetthemainoutputvolumetominimum.
2. PluganXLRcablejackfromyourcondensermicrophoneintoeitherINPUT1orINPUT2onthefrontpanelofyourKOMPLETEAUDIO 6.
3. Switchthephantompower(48Vbuttononthedevice’srearpanel)on.The48VLEDonthedevice’stoppanelwilllightorange.

KOMPLETEAUDIO6–Manual–39
ENGL
ISH
4. Plugthe1/4”TRSjackofyourheadphonesintothePHONESsocketontheKOMPLETEAUDIO 6’sfrontpanel.TurntheVolumeControlknob(VOLUME)intheheadphonesec-tionoftheKOMPLETEAUDIO 6totheleft-endstoptosetthevolumetominimum.
5. Opentheaudiopreferencesofyouraudiorecordingsoftware,andselectKOMPLETEAUDIO 6asyourinputandoutputdevice(youmayhavetorestartyourhostsoftwareforthechangestobecomeactive).Pleaserefertothedocumentationofyouraudiorecordingsoftwareforinformationonhowtoconfiguretheaudiodevicesetup.
6. Whilesinging/playinganinstrumentintothemicrophone,adjusttheinputsignalbyturningtherelevantinputchannel’sGAINknobgraduallytotheright.ChecktheinputLEDs(INPUT1and2onthetoppaneloftheKOMPLETEAUDIO 6)tomakesureyourinputsignaldoesnotclip;adjusttheinputlevelsothattheLEDslightgreenoninput.A red lighting LED indicates signal clipping.
7. GraduallyturntheVolumeControlknob(VOLUME)intheheadphonesectionoftheKOMPLETEAUDIO 6totherightuntilyoureachagoodlisteninglevel.
!!For informationonhowtoadjust theaudio inputfor recording inyouraudiorecordingsoftware,pleaserefertoyoursoftware’sdocumentation.

40–KOMPLETEAUDIO6–Manual
7.3.2 ConnectingaDynamicMicrophone
7.4KOMPLETEAUDIO 6setupwithmicrophoneandheadphones.
MakesuretohaveconnectedtheKOMPLETEAUDIO 6toyourcomputerasdescribedduringtheinstallationchapter(chapter3)ofthismanual.
!!Makesure thevolumeon theKOMPLETEAUDIO 6’smainouts (VolumeControlknob“MAIN VOLUME 1/2”) is turned down before connecting amicrophone to the KOM-PLETEAUDIO 6.MicrophonesnearbyspeakerscancausealoudsquealingtonefromthespeakersduetoaphenomenoncalledtheLarseneffectoraudiofeedbackloopandcanseriouslydamageyourhearingandyourequipment.Thegreaterthedistancebetweenamicrophoneandspeakersmeansthiseffectislesslikelytooccur.
!!Beawarethatphantompowercancauseseriousdamagetoribbonmicrophones.Checkyourmicrophone’smanualtoseewhetheritissafetousephantompoweronit.Ifitisn’t,makesuretodisablephantompowerontheinterfacebeforeconnecting:Switchthe48Vphantompowerbuttononthedevice’srearpaneloff.The48VLEDonthedevice’stoppanelstopslightingorangewhenphantompowerisdisabled.
TousetheKOMPLETEAUDIO 6inarecordingsetupwithadynamicmicrophone:
1. TurntheVolumeControlknob(MAINVOLUME 1/2)onthetoppaneloftheKOMPLETEAUDIO 6totheleft-endstoptosetthevolumetominimum.
2. PlugtheXLRcableconnectionofyourdynamicmicrophoneintoeitherINPUT1orINPUT2onthefrontpanelofyourKOMPLETEAUDIO 6.

KOMPLETEAUDIO6–Manual–41
ENGL
ISH
3. Plugthe1/4”TRSjackofyourheadphonesintothePHONESsocketontheKOM-PLETEAUDIO 6’sfrontpanel.TurntheVolumeControlknob(VOLUME)intheheadphonesectionoftheKOMPLETEAUDIO 6totheleft-endstoptosetthevolumeto minimum.
4. Opentheaudiopreferencesofyouraudiorecordingsoftware,andselectKOMPLETEAUDIO 6asyourinputandoutputdevice(youmayhavetorestartyourhostsoftwareforthechangestobecomeactive).Refertothedocumentationofyouraudiorecordingsoftwareforinformationonhowtoconfiguretheaudiodevicesetup.
5. Whilesinging/playinganinstrumentintothemicrophone,adjusttheinputsignalbyturningtherelevantinputchannel’sGAINknobgraduallytotheright.ChecktheinputLEDs(INPUT1and2onthetoppaneloftheKOMPLETEAUDIO 6)tomakesureyourinputsignaldoesnotclip;adjusttheinputlevelsothattheLEDslightgreenoninput.A red lighting LED indicates signal clipping.
6. GraduallyturntheVolumeControlknob(VOLUME)intheheadphonesectionoftheKOMPLETEAUDIO 6totherightuntilyoureachagoodlisteninglevel.
!!Forinformationonhowtorecordinyouraudiorecordingsoftware,pleaserefertoyoursoftware’sdocumentation.

42–KOMPLETEAUDIO6–Manual
7.3.3 ConnectingaGuitar/BassGuitar(withheadphones)
7.5KOMPLETEAUDIO 6setupwithguitar/bassguitarandheadphones.
MakesuretohaveconnectedtheKOMPLETEAUDIO 6toyourcomputerasdescribedduringtheinstallationchapter(chapter3)ofthismanual.
TousetheKOMPLETEAUDIO 6inarecordingsetupwithaguitar/bassguitar:
1. TurntheVolumeControlknob(MAINVOLUME 1/2)onthetoppaneloftheKOMPLETEAUDIO 6totheleft-endstoptosetthevolumetominimum.
2. Pluga1/4”instrumentcable(unbalanced)fromyourinstrumentintoeitherINPUT1orINPUT2oftheKOMPLETEAUDIO 6.
3. MakesuretheLINE/INSTbuttonadjacenttothejackissettoINST(forinstrumentswithactiveelectronics,setthistoLINE).

KOMPLETEAUDIO6–Manual–43
ENGL
ISH
4. Plugthe1/4”TRSjackofyourheadphonecableintothePHONESsocketontheKOMPLETEAUDIO 6’sfrontpanel.TurntheVolumeControlknob(VOLUME)intheheadphonesectionoftheKOMPLETEAUDIO 6totheleft-endstoptosetthevolumeto minimum.
5. Opentheaudiopreferencesofyouraudiorecordingsoftware,andselectKOMPLETEAUDIO 6asyourinputandoutputdevice(youmayhavetorestartyourhostsoftwareforthechangestobecomeactive).Refertothedocumentationofyouraudiorecordingsoftwareforinformationonhowtoconfiguretheaudiodevicesetup.
6. MakesurethattheVolumeknobonyourinstrumentisatmaximum.
7. Whileplayingyourinstrument,adjusttheinputsignalbyturningtherelevantinputchannel’sGAINknobgraduallytotheright.ChecktheinputLEDs(INPUT1and2LEDsonthetoppaneloftheKOMPLETEAUDIO 6)tomakesureyourinputsignaldoesnotclip;adjusttheinputlevelsothattheLEDslightsgreenoninput.Aredlight-ing LED indicates signal clipping.
8. GraduallyturntheVolumeControlknob(VOLUME)intheheadphonesectionoftheKOMPLETEAUDIO 6totherightuntilyoureachagoodlisteninglevel.
!!For informationonhowtoadjust theaudio inputfor recording inyouraudiorecordingsoftware,pleaserefertoyoursoftware’sdocumentation.
!%Insteadofusingheadphones,youcouldalsolistentotheinstrumentsoundusingyourmonitorspeakers.SeetherelevantchaptersforinformationonhowtoconnectspeakerstotheKOMPLETEAUDIO 6.Alwaysmakesurethevolumeissettominimumwhencon-nectingtheinstrument,andgraduallyraisethevolumeafterwardsuntilyoureachagoodlistening level.

44–KOMPLETEAUDIO6–Manual
7.3.4 ConnectingLineLevelEquipment(Synthesizer/Computer/Tapedeck/MixerLineOut)
7.6KOMPLETEAUDIO 6setupwithasynthesizerandactivespeakers.
MakesuretheKOMPLETEAUDIO 6isconnectedtoyourcomputerasdescribedduringtheinstallationchapter(chapter3),andconfiguredasyourcomputer’smainaudiooutputdevice(seechapter4).Seechapter7.1for instructionsonhowtoconnectspeakers(activeandpassive)toyourKOMPLETEAUDIO 6.
TousetheKOMPLETEAUDIO 6inasetupwithtypicallinelevelequipment:
1. TurntheVolumeControlknob(MAINVOLUME 1/2)onthetoppaneloftheKOMPLETEAUDIO 6totheleft-endstoptosetthevolumetominimum.
2. Plugapairofstereo1/4”TRScablesfromtheoutputsofyourdeviceintotheinputs3and4ontherearpaneloftheKOMPLETEAUDIO 6.

KOMPLETEAUDIO6–Manual–45
ENGL
ISH
3. Opentheaudiopreferencesofyouraudiorecordingsoftware,andselecttheKOM-PLETEAUDIO 6asyourinputandoutputdevice(youmayhavetorestartyourhostsoftwareforthechangestobecomeactive).Refertothedocumentationofyouraudiorecordingsoftwareforinformationonhowtoconfiguretheaudiodevicesetup.
4. Adjusttheoutputsignalofyourconnecteddevicebyusingtherelevantvolume/gaincontrol.ChecktheKOMPLETEAUDIO 6’sinputLEDs(INPUT3and4onthetoppanel)tomakesureyourinputsignaldoesnotclip;adjustthedevice’soutputlevelsothat the LEDs light green on input. A red lighting LED indicates signal clipping.
5. GraduallyturntheVolumeControlknob(MAINVOLUME 1/2)ontopoftheKOMPLETEAUDIO 6totherightuntilyoureachagoodlisteninglevel.
!%YoucanalsouseINPUT1andINPUT2onthefrontpaneloftheKOMPLETEAUDIO 6toconnectalineleveldevicewithastereooutput.TheLINE/INSTbuttonsadjacenttothesocketshavetobesettoLINEinthatcaseandyou’dusetherelevantGAINcontrolknobsnexttothesocketstoadjusttheleftandrightchannelsinputgain.
7.4 KOMPLETEAUDIO 6withMIDIDevices
7.7KOMPLETEAUDIO 6inaMIDIcontroller/synthesizersetup.
Make sure theKOMPLETEAUDIO 6 is connected to your computer asdescribedduringtheinstallationchapter(chapter3),andconfiguredasyourcomputer’smainaudiooutputdevice(seechapter4).Seechapter7.1forinstructionsonhowtoconnectspeakers(activeandpassive)toyourKOMPLETEAUDIO 6.TousetheKOMPLETEAUDIO 6inasetupwithaMIDIcontroller:
1. MakesuretohavetheVolumeControlknob(MAINVOLUME 1/2)onthetoppaneloftheKOMPLETEAUDIO 6turnedtotheleft-endstopsothevolumeissettominimum.

46–KOMPLETEAUDIO6–Manual
2. AttachaMIDIcable.OneendgoestoyourMIDIcontroller’sMIDIOutport,theotherendtotheMIDIINportoftheKOMPLETEAUDIO 6.
3. Ifyouarecontrollinganexternalsynth:attachaMIDIcable,oneendtoyourSynth’sMIDIINport,theothertotheMIDIOUTportoftheKOMPLETEAUDIO 6.
4. OpentheaudioandMIDIsettingsdialogofyourdigitalaudioworkstationsoftwareandactivatetheMIDIinputandtheMIDIoutputchannelofyourKOMPLETEAUDIO 6.Forinformationonwheretofindtherelevantdialogandhowtoapplythesettings,pleaserefertothedocumentationofyourdigitalaudioworkstationsoftware.
5. GraduallyturntheVolumeControlknob(MAINVOLUME 1/2)ontopoftheKOMPLETEAUDIO 6totherightuntilyoureachagoodlisteninglevel.
!%Todevelopthissetupfurther,youcouldnowconnectthesynth’saudiooutputtotheKOM-PLETEAUDIO 6andrecordthesynthesizerwithyourdigitalaudioworkstation.

KOMPLETEAUDIO6–Manual–47
ENGL
ISH
7.5 UsingtheDigitalInputandOutput
AboutDigitalI/OandS/PDIFTheRCA(phono)sockets5/6ontherearpaneloftheKOMPLETEAUDIO 6aredigitalcon-nectorsemployingtheS/PDIF(Sony/PhilipsDigitalInterconnectFormat)transferprotocol.S/PDIF allows for carrying digital audio signals between devices without loss of quality.TypicalusersoftheRCA(phono)sockets5/6wouldbeDATtapedecks,synthesizersandCDplayerswithdigitaloutput.
Inessence,DigitalI/Otransmitsdigitalinformationinbothdirections(usingtwomonoRCAcables).ThesignaltransferredisdigitaldataandgetstranslatedtosoundwaveformsviaS/PDIF.Forthisconnection,adigitalRCAcableshouldbeused,althoughitisalsopossibletousestandardRCA(phono)cables.
In order for the transfer to work, the devices need to be synchronized with each other,wherebyoneofthedevicesactsasamasterandsendsasyncingsignalandtheotheractsasaslaveandsyncstoit.TheKOMPLETEAUDIO 6canbesettoactasaslave,andsyncto external devices in such a setup.
7.5.1 ConnectingaDATTapedeck
7.8KOMPLETEAUDIO 6connectedtoaDATtapedeck.
MakesuretoconnecttheKOMPLETEAUDIO 6toyourcomputerasdescribedduringtheinstallationchapter(chapter3)ofthismanual.
TousetheKOMPLETEAUDIO 6inasetupwithaDATtapedeck:

48–KOMPLETEAUDIO6–Manual
1. ConnecttheKOMPLETEAUDIO 6’sRCA(phono)inputjack5/6tothedigitaloutputofyourDATtapedeck,andtheKOMPLETEAUDIO 6’sRCA(phono)outputjack5/6tothedigitalinputofyourDATtapedeck.
2. For Windows users:OpentheKOMPLETEAUDIO 6’sControlPanelsoftware.IntheControlPanel,gototheAudio Settings page and set the Digital Sync Source to the External S/PDIF 5|6 setting.TheKOMPLETEAUDIO 6checksforavailabilityofexternalsyncingsources.Ifthesynchronizationrequestfails,theinterfaceswitchesbacktointernalclockmode.Ifsynchronizationispossible,thetoppanel’sSPDIFSYNClights(seechapter5.3).
3. ForMacOS Xusers:GotoApplications > Utilities > Audio and MIDI Setup to open the Audio and MIDI Setup utility. From the Clock sourcedrop-downmenuselectExternal Clock (S/PDIF).TheKOMPLETEAUDIO 6checksforavailabilityofexternalsyncingsources.Ifthesynchronizationrequestfails,theinterfaceswitchesbacktointernalclockmode.Ifsynchronizationispossible,thetoppanel’sSPDIFSYNClights(seechapter5.3).

KOMPLETEAUDIO6–Manual–49
ENGL
ISH
7.5.2 ConnectingaSynthesizerviaDigitalI/O
MakesuretoconnecttheKOMPLETEAUDIO 6toyourcomputerasdescribedduringtheinstallationchapter(chapter3)ofthismanual.
TousetheKOMPLETEAUDIO 6withasynthesizerwithdigitaloutput:
1. ConnecttheKOMPLETEAUDIO 6’sRCA(phono)inputjack5/6tothedigitaloutputofyoursynthesizer.
2. For Windows users:OpentheKOMPLETEAUDIO 6’sControlPanelsoftware.IntheControlPanel,gototheAudio Settings page and set the Digital Sync Source to the External S/PDIF 5|6setting.TheKOMPLETEAUDIO 6checksforavailabilityofexternalsyncingsources.Ifthesynchronizationrequestfails,theinterfaceswitchesbacktointernalclockmode.Ifsynchronizationispossiblethetoppanel’sSPDIFSYNClightsorange(seealsochapter5.3).
3. ForMacOS Xusers:GotoApplications > Utilities > Audio and MIDI Setup to open the Audio and MIDI Setup utility. From the Clock sourcedrop-downmenuselectExternal Clock (S/PDIF).TheKOMPLETEAUDIO 6checksforavailabilityofexternalsyncingsources.Ifthesynchronizationrequestfails,theinterfaceswitchesbacktointernalclockmode.Ifsynchronizationispossiblethetoppanel’sSPDIFSYNClightsorange(seealsochapter5.3).

50–KOMPLETEAUDIO6–Manual
8 TroubleshootingThe informationprovidedinthischaptershouldhelpyoutosolvemostoftheproblemsyoumayencounterwhileyouareusingtheKOMPLETEAUDIO 6.
8.1 SolvingHardware-relatedProblemsAllNativeInstrumentsproductsareextensivelytestedinreallifesituationsduringthede-velopmentphase.However,ifyouencounteranyproblemswithyourhardware,pleasecheckthefollowingpoints:
• Verifythatyouhaveinstalledthelatestdriverandthelatestsoftwareupdate.ChecktheNativeInstrumentswebsiteforfurtherinformation.
• MakesuretheKOMPLETEAUDIO 6interfaceisconnectedtoaUSB2.0portonyourcomputer(seealso8.3).
• MakesuretheKOMPLETEAUDIO 6isconnecteddirectlytoaUSBportofthecom-puterandnotthroughaUSBhub(seealso8.3).
• TrychangingouttheUSBcable(seealso8.3).
• DisconnectallotherUSBdevicesfromthecomputer(exceptkeyboard/mouse).
• TryusinganotherUSBportonyourcomputer(seealso8.3).
Ifnoneofthesetipshelp,pleasecontactourTechnicalSupportteam.Thecontactinforma-tionisavailableunderthefollowingURL:http://www.native-instruments.com/contactinfo. In casetheKOMPLETEAUDIO 6needstobereturned,theTechnicalSupportteamatNativeInstrumentswillassignyouanRA (ReturnAuthorization)number,whichisrequiredtohandleyourreturn.PackagesreturnedwithoutthisRAnumberwillnotbecorrectlyidentifiedandassuchmightnotbeprocessedproperly.
8.2 HowtoCheckWhethertheKOMPLETEAUDIO 6DriversareInstalled Correctly
WindowsOpen Start > All Programs > Native Instruments > KOMPLETE AUDIO 6 Driver. There you willfindthehelperapplicationControlPanel.MakesurethatthedeviceisconnectedtothecomputerandopentheControlPanel.Ifallthedrop-downmenusaregrayedout(i.e.,therearenopresetsinthepresetdrop-downlistandnosampleratevaluestochoosefrom)theremustbesomethingwrongwiththeconnection.IftheKOMPLETE AUDIO 6 Driver entry in theNativeInstrumentsfolderoftheStartMenuismissing,thedriverismostprobablynotinstalled.
• Ifthedriverisnotinstalled,youcaninstallitasdescribedinchapter3.
• Ifthedriverisnotrecognized,checkyourUSB2.0connectionasdescribedinchapter8.3.

KOMPLETEAUDIO6–Manual–51
ENGL
ISH
• AsanyotherUSBdevice,thedriverinstallsexactlyforoneUSBport.IfyouconnecttheKOMPLETEAUDIO 6toanotherport,astandardWindowsdialogopensinwhichyoucaninstallthedrivertothatport.Ifyouhavepreviouslyinstalledthedriveronyourcomputeronce,Windowswillfindtherightdriversitselfoncethatyoustartthedriverinstallation procedure.
• Ifyoudonotknowwhetherdriverswereinstalledcorrectly,itisadvisabletostartthesetupprogramoftheKOMPLETEAUDIO 6again(seechapter3).Ifthesetupprogramstatesthatitwillfirstuninstallthedrivers,youalreadyhaveinstalledthedriversonyour computer. In this case you can connect the device to any other USB port and WindowswillfindtherightdriverwheninstallingtheKOMPLETEAUDIO 6onanotherUSB port.
MacOSXOnMacOSX,opentheSystemPreferences;withthedeviceconnectedandthedriverin-stalled,theKOMPLETEAUDIO 6iconshouldbelistedintheOther section.
• Iftheiconismissinghere,thedriverisprobablynotinstalled.
• Ifthedriverisnotinstalled,youcaninstallitasdescribedinchapter3.
• Ifthedeviceisnotrecognized,checkyourUSB2.0connectionasdescribedinchapter8.3.
8.3 USBTroubleshootingIfyouexperienceproblemscausedby theUSBconnectionbetweentheKOMPLETEAU-DIO 6andyourcomputer,checkthefollowingchaptersfirst;severalpossiblesourcesforUSB issues are covered here.
8.3.1 USB 2.0 required
TheKOMPLETEAUDIO 6isaUSB2.0interfaceandwillnotworkatallonaUSB1.0/1.1port. Inaddition,althoughtheminimumpowerspecifiedforaUSB2.0port is500mA,wehaveseenafewcaseswheretheUSB2.0portsoncertaincomputersdonotmeettheminimumrequirements.Inthiscase,youmayseeamessagesayingthatthereisnotenoughpoweravailabletooperateyourdeviceandyoumayencountercrackling/poppingsounds,orthedevicemayfailtooperatealtogether.
8.3.2 Try another USB cable
AbadUSBcablecanberesponsibleforaudiodropoutsandotherconnectivityproblems.Itisrecommendedyouchangeoutthecableifyouexperiencedifficulties.Also,makesuretouseacablebearingtheofficialUSBlogo.

52–KOMPLETEAUDIO6–Manual
8.3.3 UsingapoweredUSB2.0hub
ConnecttheKOMPLETEAUDIO 6toaUSB2.0portdirectlyonyourcomputer.Incertainsituations,apoweredUSBhubmayalsowork(e.g.,ifyouarehavingproblemsconnectingyourKOMPLETEAUDIO 6toanonboardUSBport);inthiscase,trytoavoidconnectingotherdevicestothehubifpossible,aseachbus-powereddevicetakesitssharefromthetotalamountofpoweravailableperbus.
8.3.4 RecommendedUSB-ports(MacBookOnly)
For a current list of recommended ports onMac Laptops (MacBook andMacBookPro),please refer toourknowledgebasearticlehttp://www.native-instruments.com/knowledge/questions/263.
8.3.5 DisableUSBEnergySavingMode(Windowsonly)
IftheKOMPLETEAUDIO 6iscausingcrashesorperformingbadlyonaWindowsmachine,disablepowermanagementtotheUSBhubsfirst;seetheWindowsdocumentationforfur-ther instructions.
8.3.6 UpdatetheDriver
Wheneveryouencounterproblems,youshouldalsocheckifyouhavethelatestdriverisinstalled.Forupdates,visittheproductpageonourwebsite:http://www.native-instruments.com/KA6.
8.4 HowtoavoidGroundLoopsGround loopsareacommonproblemwithinanyenvironmentwheremultipleelectricalde-vicesareconnectedtothesamepowercircuit.Incomplexsetups,thecause(s)ofthenoisecanbedifficulttofind.Groundloopsareperceivedusuallyasahumorbuzzinyouraudiosignal,butthiscanalsotransmitandamplifyothersoundsfromthedevicesconnectedtothecircuit.Forexample,oneverycommonproblemisthatyouhearinternalclickingsoundscreatedbyyourcomputer.
Thecauseofthenoiseisusuallythecomputeranditsinternaldevices,ordevicesconnectedto thecomputersuchasexternalharddrives (note thateven if thepowersupplyofyournotebookcomputerisnotconnected,yoursetupmaystillbevulnerabletogroundnoisefromanexternaldevicewithitsownpowersupply).Thecausecanalsobeanyotherdevice(suchasaradioortelevision).Thereasonwhythisnoiseispresentatthemonitorspeakersinputhastodowithaloopinthesetupofyourelectricalandaudiocableconnections.Mostlikelythisloopoccursthroughthegroundofoneormoreofthesecables.Withthisinmind,thefollowingsectionshouldhelptoeliminatethegroundloop.

KOMPLETEAUDIO6–Manual–53
ENGL
ISH
EliminatingtheLoopAsafirststep,alwaysconnectyourdevicestothesamepoweroutlet(e.g.,withamulti-outletpowerstrip).Assumingthatyouhaveconnectedyouraudiointerface,thenexttrouble-shootingstepistodisconnectalldevicesthatyouarenotcurrentlyusing,butnottheampli-fierand/orspeakers.Thisalsoappliestootherperipheraldevicesyoumayhaveconnectedtoyourcomputer(externaldatastorage,CDrecordersandespeciallyradioortelevisioncables).Incasethegroundloopdisappeared,youcanaddthedevicesoneafteranothertoidentifywhichdeviceisresponsible.
• Youcantestwhethertheamplifierorpoweredmonitorscreatethegroundloop.Moni-toryouraudiosignalfromtheheadphonesoutputoftheKOMPLETEAUDIO 6.Theamplifier/poweredmonitorsneedtobephysicallydisconnectedfromtheKOMPLETEAUDIO 6forthat.Incasethegroundloopisnotaudibleontheheadphones,youneedtoliftthegroundonyouramplifierorthepoweredspeakers.Contactthemanufacturerofyouramplifier/speakersbeforeliftingthegroundtofindoutifgroundliftingissup-ported on your device.
• Onlaptops,lowqualitypowersuppliesoftenleadtogroundloopnoise.Runyourlaptoponitsbatterytoseeifthegroundloopdisappears.Incasethegroundloopdis-appears,youneedtoliftthegroundonyourlaptop.Contactthemanufacturerofyourlaptopbeforeliftingthegroundtofindoutifgroundliftingissupportedonyourdevice.
• Ondesktopcomputers,thecomputermonitor(screen)mightcausethegroundloop.Turnyourmonitoroffanddisconnectitspowersupplywhileyouhearthegroundloop.Incasethegroundloopdisappears,youneedtoliftthegroundonyourmonitor.Contactthemanufacturerofyourmonitorbeforeliftingthegroundtofindoutifgroundliftingissupportedonyourdevice.
8.5 PhysicallyRe-configuringtheKOMPLETEAUDIO 6ConnecttheKOMPLETEAUDIO 6toanotherUSBportonyourcomputer.TryallUSBportsonyourcomputeruntilyoufindtheonethatworksbest.
8.6 CheckyourIRQs(Windowsonly)IRQstandsforInterruptRequest.ThisisthewayinwhichWindowsallocatesresourcestothevariousdevicesandportsinyoursystem.IfyourKOMPLETEAUDIO 6isonaportthatsharesanIRQwithotherdevices,youmayhaveanIRQconflict.PleaserefertotheKnowl-edgeBaseontheNativeInstrumentswebsiteandcontactsupport.

54–KOMPLETEAUDIO6–Manual
9 GettingHelpNativeInstrumentsprovidesvarioussourcesofsupportandinformationtoregisteredusers.
9.1 Readme/KnowledgeBase/TechnicalSupport
ReadmeAlwaysreadthe“Readme”filefoundontheinstallationCD.Itcontainsimportantinforma-tionandalllastminutechangesthatcouldnotbeincludedinthismanual.
KnowledgeBaseAccess the Knowledge Base at http://www.native-instruments.com/knowledgebase. To searchtheKnowledgeBase,logintoyouruseraccountfirst.Forinformationonregisteringauseraccount,seechapter3.3.
TechnicalSupportYou can reach the Technical Support teamonline via http://www.native-instruments.com > Support > Product Support.Thesubsequentformwillaskyouforallinformationaboutyourhardwareandsoftwareenvironmenttobetterfacilitateoursupportteam.Inyourcommuni-cationwiththesupportteam,youshouldofferasmuchinformationaspossible;aboutyourhardware,youroperatingsystemandthesoftwareyouarerunning.Inyourdescription,youshouldmention:
• Howtoreproducetheproblem
• Whatyouhavealreadydonetotrytofixtheproblem
• Adescriptionofyoursetup,includingallhardwareandsoftwareinvolved
• Theexactmodelandtechnicalspecificationsofyourcomputer
9.2 ForumCheckouttheNITRAKTORandtheNIproducerforumtodiscussallaspectsofKOMPLETEAUDIO 6andTRAKTORLEwithotherusers:http://www.native-instruments.com/djforums and http://www.native-instruments.com/forum/.
9.3 UpdatesWheneveryouencounterproblems,youshouldalsocheck ifyouhavethe latestdriver isinstalled.Forupdates,visittheproductpageonourwebsite:http://www.native-instruments.com/KA6.

KOMPLETEAUDIO6–Manual–55
ENGL
ISH
10 Appendix
10.1 TechnicalSpecifications
Output (D/A)
Channels 6
Sampling Rate 44.1, 48, 88.2, 96 kHz
Bit Resolution 24
Converter Cirrus Logic
Spec Line Headphone
Cross Talk -87 dBu -87 dBu
Impedance 100 Ohms unbalanced 200 Ohms balanced
8... 600 Ohms (Load)
Maximum Output Level 9.6 dBu 9.3 dBu 4.26 V rms, 100 mW @ 100 Ohms
THD + N 0.007 % 0.012 %
SNR 101 dB (A-weighted) 95 dB (A-weighted)
Frequency Response 10 - 40 kHz±0.5 dB 10 - 40 kHz±0.5 dB
10.2 About Latency and BuffersWhenconvertingaudioinformationtodigitalandviceversa,theaudiodriverneedstostorethedatainbufferpackages(audiobuffers)whicharethensenttoandprocessedbytheCPUofyourcomputer.Thehigherthebuffersize,thelongerittakesforasignaltofinallyarriveattheoutputasaudio.Youmightexperiencethisaslateresponsebetweenhittingakeyonacontrollerwhichcontrolsmusicsoftwareonyourcomputer,andhearingthesoundattheoutput.Fortunately,withtoday’scomputersandlow-latencysoundcarddrivers,thisdelayisusuallyverylow(e.g.,threemillisecondsisaboutthesamedelaycausedbyfingerssnap-pingonemeterawayfromyourears).LatencymustbekeptataminimuminordertomakesoftwareinstrumentsandDJapplicationsplayable.

56–KOMPLETEAUDIO6–Manual
HowLowCanYouGo?1.5msof latencyapproaches the theoreticalminimumbecause itwillalways takesometimetoprocessinformationinacomputer.Notethatultra-lowbuffersizesettings(aswellashighersamplerates)makeyourcomputerworkharder,whichcanaffecttheperformance.
See6.1.1(Windows)and6.2.1(MacOS X)forinstructionsonhowtoadjustbuffersizesandsampleratesforshorterlatency.
!!ForWindowsusers:Ifyoucannotgetridofaudiodropouts,cracklesandnoisesbyad-justingbuffersizeandsampleratesettings,youmightalsocheckyoursystemforDPClatencyproblems(seethe“SystemPerformanceTest”sectionofchapter6.1.2formoreinfoonDPClatency)usingtheDPCLatencyCheckerprogram,whichisfoundonthewebathttp://www.thesycon.de/eng/latency_check.shtml.
10.3 DifferentTypesofASIO(Windows)ItisextremelyimportanttousethededicatedASIOdriverwrittenfortheKOMPLETEAU-DIO 6andinstalledduringsoftwareinstallation(chapter3).However, ifyoursystemalsoprovidesgenericASIOdrivers,typicallycalledASIODirectXFullDuplexDriverorASIOMul-timediaDriver,andyoucannotgettheKOMPLETEAUDIO 6drivertoworkatlowlatencies,trythemallandchoosetheonethatprovidesthebestperformance.

Theinformationinthisdocumentissubjecttochangewithoutnoticeanddoesnotrepresenta commitment on the part ofNative Instruments GmbH. The software described by thisdocumentissubjecttoaLicenseAgreementandmaynotbecopiedtoothermedia.Nopartofthispublicationmaybecopied,reproducedorotherwisetransmittedorrecorded,foranypurpose,withoutpriorwrittenpermissionbyNativeInstrumentsGmbH,hereinafterreferredto as Native Instruments.
“NativeInstruments”,“NI”andassociatedlogosare(registered)trademarksofNativeInstru-mentsGmbH.
Mac,MacOS,GarageBand,Logic,iTunesandiPodareregisteredtrademarksofAppleInc.,registered in the U.S. and other countries.
Windows,WindowsVistaandDirectSoundareregisteredtrademarksofMicrosoftCorpora-tionintheUnitedStatesand/orothercountries.
IntelandPentiumareregisteredtrademarksofIntelCorporationintheUnitedStatesandother countries.
CirrusLogicisatrademarkofCirrusLogic,Inc.
XMOSisatrademarkofXmosLtd.,UK.
Allothertrademarksarethepropertyoftheirrespectiveownersanduseofthemdoesnotimplyanyaffiliationwithorendorsementbythem.
TraktorScratchproductsareauthorizedforuseunderlicenseofpatentsownedbyN2ITholdings B.V.,includingU.S.PatentNos.7,012,184 B2and7,238,874 B2.
©2011,NativeInstrumentsGmbH.Allrightsreserved.
Native Instruments GmbHSchlesische Straße 28 | 10997 Berlin | Germany
www.native-instruments.de
NativeInstrumentsNorthAmerica,Inc.5631 Hollywood Blvd. | Los Angeles, CA 90028 | USA
www.native-instruments.com