Kindergarten Science Unit 09 Exemplar Lesson 02: … Physical Characteristics of... · Science...
14
Kindergarten Science Unit: 09 Lesson: 02 Suggested Duration: 9 days Kindergarten Science Unit 09 Exemplar Lesson 02: Exploring Physical Characteristics of Organisms Kindergarten Science Unit 09 Exemplar Lesson 02: Exploring Physical Characteristics of Organisms This lesson is one approach to teaching the State Standards associated with this unit. Districts are encouraged to customize this lesson by supplementing with district-approved resources, materials, and activities to best meet the needs of learners. The duration for this lesson is only a recommendation, and districts may modify the time frame to meet students’ needs. To better understand how your district may be implementing CSCOPE lessons, please contact your child’s teacher. (For your convenience, please find linked the TEA Commissioner’s List of State Board of Education Approved Instructional Resources and Midcycle State Adopted Instructional Materials.) Lesson Synopsis Students will be exploring the physical characteristics of both plants and animals. The emphasis with animals is on color, size, and body covering. The emphasis with plants is on leaf shape. TEKS The Texas Essential Knowledge and Skills (TEKS) listed below are the standards adopted by the State Board of Education, which are required by Texas law. Any standard that has a strike-through (e.g. sample phrase ) indicates that portion of the standard is taught in a previous or subsequent unit. The TEKS are available on the Texas Education Agency website at http://www.tea.state.tx.us/index2.aspx?id=6148. K.10 Organisms and environments. The student knows that organisms resemble their parents and have structures and processes that help them survive within their environments. The student is expected to: K.10A Sort plants and animals into groups based on physical characteristics such as color, size, body covering, or leaf shape. Scientific Process TEKS K.2 Scientific investigation and reasoning. The student develops abilities to ask questions and seek answers in classroom and outdoor investigations. The student is expected to: K.2D Record and organize data and observations using pictures, numbers, and words. K.4 Scientific investigation and reasoning. The student uses age-appropriate tools and models to investigate the natural world. The student is expected to: K.4B Use senses as a tool of observation to identify properties and patterns of organisms, objects, and events in the environment. GETTING READY FOR INSTRUCTION Performance Indicators Kindergarten Science Unit 09 PI 02 Sort a set of pictures of plants into groups based on their physical characteristics, such as leaf shape, color, and size, and justify the groups made. AND Sort a set of pictures of animals into groups based on their physical characteristics, such as body covering, color, and size, and justify the groups made. Standard(s): K.2D , K.10A ELPS ELPS.c.1E , ELPS.c.3D Key Understandings Animals can be identified and sorted by their coverings (exoskeletons, skin, feathers, or scales). — Which animals have the coverings of fur, feathers, and scales? Animals need coverings (skin, feathers, or scales) to protect them from their environment, as well as from other animals. — Why do animals have coverings? Plants and animals have observable characteristics that can be used to compare and sort them into groups. — What are some of the observable characteristics of animals? — What are some of the observable characteristics of plants? Vocabulary of Instruction physical characteristics color size large small body covering skin hair/fur feathers scales leaf shape sort group Last Updated 04/26/13 page 1 of 14
Transcript of Kindergarten Science Unit 09 Exemplar Lesson 02: … Physical Characteristics of... · Science...

Kindergarten
Science
Unit: 09
Lesson: 02
Suggested Duration: 9 days
Kindergarten Science Unit 09 Exemplar Lesson 02: Exploring Physical Characteristics of OrganismsKindergarten Science Unit 09 Exemplar Lesson 02: Exploring Physical Characteristics of Organisms
This lesson is one approach to teaching the State Standards associated with this unit. Districts are encouraged to customize this lesson by
supplementing with district-approved resources, materials, and activities to best meet the needs of learners. The duration for this lesson is only a
recommendation, and districts may modify the time frame to meet students’ needs. To better understand how your district may be implementingCSCOPE lessons, please contact your child’s teacher. (For your convenience, please find linked the TEA Commissioner’s List of State Board of
Education Approved Instructional Resources and Midcycle State Adopted Instructional Materials.)
Lesson Synopsis
Students will be exploring the physical characteristics of both plants and animals. The emphasis with animals is on color, size, and body covering. The
emphasis with plants is on leaf shape.
TEKS
The Texas Essential Knowledge and Skills (TEKS) listed below are the standards adopted by the State Board of Education, which are required by
Texas law. Any standard that has a strike-through (e.g. sample phrase) indicates that portion of the standard is taught in a previous or subsequent
unit. The TEKS are available on the Texas Education Agency website at http://www.tea.state.tx.us/index2.aspx?id=6148.
K.10 Organisms and environments. The student knows that organisms resemble their parents and have structures and
processes that help them survive within their environments. The student is expected to:
K.10A Sort plants and animals into groups based on physical characteristics such as color, size, body covering, or leaf
shape.
Scientific Process TEKS
K.2 Scientific investigation and reasoning. The student develops abilities to ask questions and seek answers in classroom
and outdoor investigations. The student is expected to:
K.2D Record and organize data and observations using pictures, numbers, and words.
K.4 Scientific investigation and reasoning. The student uses age-appropriate tools and models to investigate the natural
world. The student is expected to:
K.4B Use senses as a tool of observation to identify properties and patterns of organisms, objects, and events in the environment.
GETTING READY FOR INSTRUCTION
Performance Indicators
Kindergarten Science Unit 09 PI 02
Sort a set of pictures of plants into groups based on their physical characteristics, such as leaf shape, color, and size, and justify the groups made.
AND
Sort a set of pictures of animals into groups based on their physical characteristics, such as body covering, color, and size, and justify the groups made.
Standard(s): K.2D , K.10A
ELPS ELPS.c.1E , ELPS.c.3D
Key Understandings
Animals can be identified and sorted by their coverings (exoskeletons, skin, feathers, or scales).
— Which animals have the coverings of fur, feathers, and scales?Animals need coverings (skin, feathers, or scales) to protect them from their environment, as well as from other animals.
— Why do animals have coverings?Plants and animals have observable characteristics that can be used to compare and sort them into groups.
— What are some of the observable characteristics of animals?— What are some of the observable characteristics of plants?
Vocabulary of Instruction
physical characteristics
color
size
large
small
body covering
skin
hair/fur
feathers
scales
leaf shape
sort
group
Last Updated 04/26/13 page 1 of 14

Materials
bag (to hold “clues”, see Advance Preparation, 1 per class)book (about leaves, 1 per class)
egg (plastic, wooden, or real, see Advance Preparation, 1 per class)
feathers (1 for “clue” and 1 per student)fur (or animal skins, see Advance Preparation, per class)
hand lenses (1 per student)
leaves (variety of real or artificial, see Advance Preparation, per class)
magazines (or books with pictures of animals, per 2 students)
mammal (‘live’ animal, gerbil or other small animal, 1 per class)Mystery Mammal folder (see Advance Preparation, 1 per class)
objects (different “coverings”, see Advance Preparation, per class)pencils (1 per student)
plastic worm or bug (or picture, see Advance Preparation, 1 per class)
sticky notes (2 per student)
stuffed animal (small, good quality, 1 per class) – Optionaltwigs (size for nest building, see Advance Preparation, per class)
Attachments
All attachments associated with this lesson are referenced in the body of the lesson. Due to considerations for grading or student assessment,
attachments that are connected with Performance Indicators or serve as answer keys are available in the district site and are not accessible on the
public website.
Teacher Resource: PowerPoint: Animal Coverings-Fur
Teacher Resource: Mystery Mammal
Teacher Resource: Bird Feathers (1 for projection)
Teacher Resource: Scales (1 or projection)
Teacher Resource: Power Point: Physical Characteristics of Animals: Size and Color
Teacher Resource: Animals (1 for projection and PI activity)
Teacher Resource: Leaves (1 for projection and PI activity)
Resources
Suggested Websites:
Texas Wildlife Association has a Discovery Trunk “Texas Critters” available for teachers (no cost). They also have a magazine forchildren with animal pictures.
http://www.texaswildlife.org/index.php?option=com_content&view=article&id=162:discovery-trunks-and-education-
modules&catid=60:youth-education&Itemid=165
http://www.mnh.si.edu/education/printable_resources/10-11LessonPlanAnimalCoverings.pdf
http://www.critterzone.com/magazineresource/animal-kingdom-class-definitions.htm
http://www.uen.org/Lessonplan/preview.cgi?LPid=629
http://www.bing.com/search?q=Types%20of%20Animal%20Coverings%20for%20protection&FORM=DLCBLB&PC=MDDC&QS=n
http://www.scopeonarope.lsu.edu/classroom/lessonplans/lessons/Animal_coverings.pdf
http://library.thinkquest.org/5386/animals.htm
http://www.sciencekids.co.nz/gamesactivities/plantanimaldif.html
http://www.brainpopjr.com/science/animals/classifyinganimals/grownups.weml
http://sln.fi.edu/tfi/units/life/classify/classify.html
http://science.pppst.com/sorting.html
http://serc.carleton.edu/sp/mnstep/activities/19856.html
Suggested Books:
Khisty, V. (2006). Leaves. Mankato: Capstone Press, Inc.
Miles, E. (2002). Fur and feathers. NH: Heinemann.
Miles, E. (2002). Skin, scales, and shells. NH: Heinemann.
Perkins, W. (2007). Let’s look at animal feathers. Mankato, MN: Capstone Press.
Advance Preparation
1. Collect a variety of objects that we use as “coverings”, to protect us as humans. This can include a winter cap, gloves or mittens, an umbrella,a rain coat or rain poncho, sunscreen, etc.
2. Collect books or magazines with pictures of a variety of animals.
3. Gather samples of animal fur or skins for students to observe and feel. This could be a few strands (Perhaps zoos, agriculture departments at
Kindergarten
Science
Unit: 09
Lesson: 02
Suggested Duration: 9 days
Last Updated 04/26/13 page 2 of 14

high schools or counties, 4-H clubs, or State Agricultural departments would donate.), or some wildlife associations and museums have
samples for teacher use.
4. Directions for constructing the Mystery Mammal folder: Copy the Teacher Resource: Mystery Mammal in color. Glue the pictures of the
animal skins on the inside of a manila folder. On the outside of the manila folder, glue the second page, making sure that the windows will be
lined up. Open the manila folder up, and place it on a cutting board or other protected surface. Use an XactoTM knife to cut the flaps.
Remember to only cut on the three dotted edges, not the solid top line.
5. For the animal clues needed on Day 4, gather some small twigs (the size for used for nest building), a plastic bug or picture of a bug or worm,
an egg (It can be plastic, wooden, or real.), and a feather. Place these clues together in a bag.
6. Gather a variety of different color, size, and shaped leaves. These can be real or artificial leaves used for student observation.
7. Make copies of the Teacher Resources: Leaves and Animals in color onto cardstock. Cut out the cards, and laminate them for greater
durability. The number of sets needed will depend on if you will be conducting the Performance Indicator one-on-one (1 set needed), in a small
group setting (4–5 sets needed), or as a whole class (1 set each per student).8. Prepare attachment(s) as necessary.
Background Information
According to the introductory TEKS material in Kindergarten, “students observe and describe the natural world using their five senses. Students do science as inquiry in
order to develop and enrich their abilities to understand scientific concepts and processes.”
This lesson focuses on sorting organisms into groups and observing specific parts of organisms. Prior to this lesson, kindergartners have compared living organisms to
nonliving objects to understand that there are important differences. During this lesson, students will become aware that survival is a key component of life for all living
organisms. Structure and characteristics will be addressed. After this unit, students will have a good foundation for content and concepts in future grades addressing
inherited traits, learned behaviors, and adaptive features.
For more information, please consider the following websites:
Information on how animals can be identified and sorted by their coverings:
http://www.mnh.si.edu/education/printable_resources/10-11LessonPlanAnimalCoverings.pdf
http://www.critterzone.com/magazineresource/animal-kingdom-class-definitions.htm
http://www.uen.org/Lessonplan/preview.cgi?LPid=629
Information on how animals’ coverings protect them from their environment, as well as from other animals:
http://www.bing.com/search?q=Types%20of%20Animal%20Coverings%20for%20protection&FORM=DLCBLB&PC=MDDC&QS=n
http://www.scopeonarope.lsu.edu/classroom/lessonplans/lessons/Animal_coverings.pdf
http://library.thinkquest.org/5386/animals.htm
Information on using characteristics to compare and sort plants and animals into groups:
http://www.sciencekids.co.nz/gamesactivities/plantanimaldif.html
http://www.brainpopjr.com/science/animals/classifyinganimals/grownups.weml
http://sln.fi.edu/tfi/units/life/classify/classify.html
http://science.pppst.com/sorting.html
http://serc.carleton.edu/sp/mnstep/activities/19856.html
INSTRUCTIONAL PROCEDURES
Instructional Procedures
ENGAGE – Animal Coverings
Notes for Teacher
NOTE: 1 Day = 30 minutes
Suggested Day 1
1. Show students items like an umbrella, rain poncho, winter cap, gloves or mittens,
and sunscreen.
2. Ask:
What are the names of these objects, and why do we use them? Answers
will vary depending on students’ experiences. (If the word protection is not
mentioned, introduce it.)
3. Work with students to formulate a working definition for the word “protection”.
Materials:
objects (different “coverings”, see AdvancePreparation, per class)
magazines (or books with pictures of animals, per 2
students)
sticky notes (2 per student)
pencils (1 per student)
Kindergarten
Science
Unit: 09
Lesson: 02
Suggested Duration: 9 days
Last Updated 04/26/13 page 3 of 14

4. Say:
If we are outside and cannot get out of the rain, sun, or cold, we can put
on clothing that will protect us and protect our skin.
Ask:
How do animals protect themselves from the rain, sun, or cold?
Record student responses on a chart page. Some responses might include
hiding in a cave, tunnel, or under a rock or bush. Record all reasonable
responses in the class science notebook.
5. Say:
Animals have different coverings on their bodies. One job (or function)
of an animal’s covering is to protect it.Review the class definition for protection.
You will be learning about different animal coverings this week.
6. Distribute sticky notes and a magazine or book to each pair of students.
Say:
Write your name on the two sticky notes. (Provide a minute for students to
do this.)
Look for pictures of animals.
When you find a picture that you want to share with the class, place one
of your sticky notes on that page.
You may choose only two pictures. Remember to put your sticky note on
your pictures.
Remember to focus on the animal’s covering.
7. Bring students together to talk about their pictures. (If each student had a
book/magazine, students can share and discuss animal coverings with a group,
rather than the whole class. If time is short, this will allow all students to have an
opportunity to participate.)
8. As students share, listen, and take note of prior knowledge, misconceptions, and
vocabulary, use this information to guide upcoming discussions.
Instructional Notes:
Amphibians will NOT be observed or discussed in this lesson
because Grade 1 will be studying frogs. If students ask about
frogs, have a brief discussion about them being amphibians and
that they have skin, but NO feathers, fur, or scales.
EXPLORE – Exploring Hair And Fur Suggested Days 2 and 3
1. If possible, show students a gerbil or other small mammal with hair. If a “live” animalis not available, a really good quality stuffed toy animal or a picture of an animal
could be substituted.
Say:
This is a (name of animal or picture). It has hair or fur.
What kind of animal is it? Mammal
2. If it is safe, allow students to gently pet the animal while you are holding it. This will
give students an opportunity to use their sense of touch to describe the animal’s fur.Talk about how the hair looks and feels.
3. Restate that animals with hair or fur are called mammals. Tell students that we are
mammals too. Provide students with hand lenses to look at the hair on their arms.
4. (Optional) Let students look at and touch the different animal skins or fur sample
that you were able to collect.
Ask:
How is your hair like the gerbils? Different?
or if a stuffed animal is used
How is your hair like the ___________animal? Different?
5. Give students samples of different kinds of animal hair to look at with the hand
lenses. Look at some of the hair under a simple microscope, if possible. (“Pocket”microscopes are great for this if you have them.)
Ask:
What does the animal hair look like? Thin, long, and straight, like wire
Materials:
mammal (‘live’ animal, gerbil or other small animal,1 per class)
stuffed animal (small, good quality, 1 per class) –Optional
hand lenses (1 per student)
fur (or animal skins, see Advance Preparation, per
class)
Mystery Mammal folder (see Advance
Preparation, 1 per class)
Attachments:
Teacher Resource: PowerPoint: Animal
Coverings-Fur
Teacher Resource: Mystery Mammal
Safety Notes:
If students touch the animal, make sure they wash their hands.
Ensure that you have checked for student allergies to animal hair
before bringing an animal into the classroom.
Instructional Notes:
The Texas Wildlife Association has a Discovery Trunk “Texas
Critters” available for teachers (no cost). They also have a
Kindergarten
Science
Unit: 09
Lesson: 02
Suggested Duration: 9 days
Last Updated 04/26/13 page 4 of 14

6. Watch the Teacher Resource: PowerPoint: Animal Coverings-Fur.
7. Call on students to share their observations. Record key words on a vocabulary
chart for students to use in writing.
8. Show students the Teacher Resource: Mystery Mammal.
9. Instruct the students to try and identify the animal from the color and design of the
fur showing through the flaps in the papers.
10. Discuss the different colors and patterns that helped them identify the animals.
Students will recognize that animal fur can have designs like stripes and spots.
11. Inform students that the animal’s fur is called its coat. Unlike people, animals cannot
take off their coats. Remind students that pets are animals that people take care of,
and the pets depend on their owners for food, shelter, and care. People sometimes
shave or cut their pets’ hair so that they will be cooler in the warm weather. Theysometimes dress them in sweaters to keep them warm in cold weather.
12. Say:
Tomorrow, you will discover more about how some animals stay warm.
magazine for children with animal pictures.
http://www.texaswildlife.org/index.php?
option=com_content&view=article&id=162:discovery-trunks-and-
education-modules&catid=60:youth-education&Itemid=165
If samples of animal fur were obtained, place these at a center
where students have the opportunity to explore. Place hand lenses
at the science learning center.
Misconceptions:
When discussing animals, students may describe
animals or groups of animals in terms of “all” or“none”, such as all animals have fur.
EXPLORE – Exploring Feathers and Scales Suggested Days 4 and 5
1. Say:
I have some clues about the animals that the class will be learning about
today.
Take some small twigs out of the bag (the size for nest building), a plastic
bug (or picture of a bug or worm), and finally, an egg (plastic, wooden, or real).
2. Ask:
What animal do all of these things relate to? Ask more specific questions
about each item if the students do not give “bird” as the answer. Twigs forbuilding a nest, a bug or worm for food, eggs hatch into baby birds, etc.
What kind of covering does a bird have? Feathers
3. Take a feather out of the bag. Hold it up so students can see it.
Ask:
What kind of animal does this come from? Answers may vary.
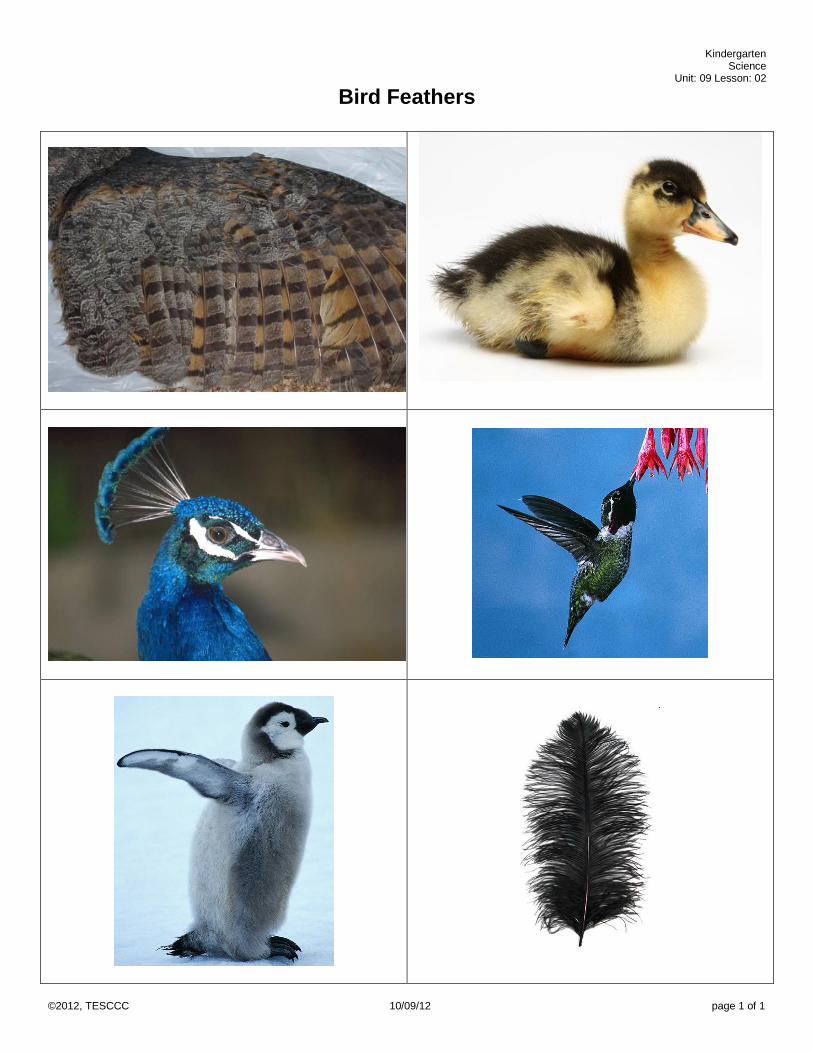
4. Show students a variety of bird pictures that illustrate examples of different kinds of
feathers (down, body feathers, wing feathers, tail feathers) and different colors of
feathers. The Teacher Resource: Bird Feathers has several pictures, if needed.
5. Explain to the students that feathers are another kind of animal covering, but only
birds have feathers.
Say:
You are going to take a closer look at feathers today.
You will be making careful observations as good scientists do.
6. Distribute a feather and hand lens to each student. As they are observing the
feathers,
Ask:
What do you notice about your feather? Answers may vary.
How does it look? Feel? Answers may vary.
Does it have different parts? Answers may vary.
How are the parts different? Answers may vary.
Do you think that feathers help keep the bird warm? Why? Answers may
vary.
7. Explain that animals with feathers are called birds. They are not mammals because
they do not have hair or fur. Birds have feathers. Birds control their body warmth by
fluffing their feathers.
Materials:
twigs (size for nest building, see Advance
Preparation, per class)
plastic worm or bug (or picture, see Advance
Preparation, 1 per class)
egg (plastic, wooden, or real, see Advance
Preparation, 1 per class)
feathers (1 for “clue” and 1 per student)bag (to hold “clues”, see Advance Preparation, 1per class)
hand lenses (1 per student)
Attachments:
Teacher Resource: Bird Feathers (1 for
projection)
Teacher Resource: Scales (1 for projection)
Misconception:
Students may think that people, birds, fish, insects,
worms, etc. are not animals.
Science Notebooks:
As students respond to the questions, record their responses in
the class science notebook.
Kindergarten
Science
Unit: 09
Lesson: 02
Suggested Duration: 9 days
Last Updated 04/26/13 page 5 of 14

8. Project the Teacher Resource: Scales.
Ask:
What are the animals in this picture? (A snake and a goldfish)
Do these two animals have any body parts that are the same? (Yes,
students may notice that both have eyes. They both have mouths, but this may
not be noticeable to students.)
9. Say:
Another characteristic they both have in common is that they both have
scales.
Scales is a word that has more than one meaning. When we go to the
doctor, we stand on a scale, and it displays our weight.
When we talk about the word scales on an animal, we are describing the
type of covering on its body.
10. Ask:
As you are comparing the snake and goldfish, why do you think they
have scales? Scales are a body covering that protects the organism. If students
look carefully, they can see that the scales are overlapping.
11. Say:
Many animals have scales including lizards, snakes, crocodiles, fish,
turtles, tortoises, alligators, geckos, and chameleons.
Scales protect the animal.
12. Summarize:
Ask:
Why do animals have coverings? (Animal coverings protect the skin. Fur and
feathers help keep the animal warm.)
Which animals have the coverings of fur, feathers, and scales? (Mammals
have fur or hair, birds have feathers, and reptiles and fish have scales.)
EXPLORE – Looking at Size and Color Suggested Day 6
1. Show the Teacher Resource: Power Point: Physical Characteristics of Animals:
Size and Color.
2. As slides are being shown, facilitate a discussion about the physical characteristics
of size and color.
Attachments:
Teacher Resource: Power Point: Physical
Characteristics of Animals: Size and Color
Instructional Notes:
A visit to a zoo would reinforce many of the concepts in this lesson.
If this is not possible, consider a virtual field trip to observe
animals.
http://www.homeworkspot.com/fieldtrip/sandiegozoo.htm
http://www.scholastic.com/teachers/lesson-plan/zoos-online-
animal-encounters
Check For Understanding:
As students participate in the discussion, listen for any content that
may need to be reviewed.
EXPLORE/EXPLAIN – Classifying Animals Suggested Day 6 (continued)
1. Project the Teacher Resource: Animals.
Ask:
In what ways could we classify the animals in this picture? Some
suggestions include, but are not limited to:
By animal classification: amphibians, birds, fish, insects, mammals, and
reptiles
By the number of legs (or none at all)
By the different ways they move
By their coverings: skin, fur, scales, or feathers
Attachments:
Teacher Resource: Animals (1 for projection)
Science Notebooks:
Record student classifications in the class science notebook. The
Teacher Resource: Animals could be cut apart and sorted on the
chart.
Kindergarten
Science
Unit: 09
Lesson: 02
Suggested Duration: 9 days
Last Updated 04/26/13 page 6 of 14

2. Facilitate a discussion with the students around the idea that animals are different,
but can be classified in many ways.
3. Optional Activity: Students could participate in a kinesthetic activity based on how
animals move. The teacher could say the movement (walking, running, hopping,
slithering, swimming, swinging, galloping, jumping, or crawling), and students would
act it out.
EXPLORE/EXPLAIN – Looking at Leaves Suggested Day 7
1. Take students outside to look at a variety of leaves.
OR Bring in a variety of leaves for students to look at (real or artificial).
OR Look at a variety of pictures of leaves.
2. Facilitate a discussion about observations of leaf size, shape, color, and what the
edge looks like.
3. Chart observations in the class science notebook.
4. The headings should include color, size, shape, and leaf edge. Give students the
opportunity to provide the descriptive words that will go in each column.
Materials:
leaves (variety of real or artificial, see Advance
Preparation, per class)
Attachments:
Teacher Resource: Leaves (1 for projection)
Science Notebooks:
Create a Leaves chart in the class science notebook. The
headings should include color, size, shape, and leaf edge. Give
students the opportunity to provide the descriptive words that will
go in each column.
ELABORATE – A Literature Connection Suggested Day 8
1. Read a book about leaves.
2. As the book is read, emphasize the concepts that leaves are different colors, sizes,
and shapes. Additionally, leaves have different shapes around the edges. Some are
smooth, some have rounded bumps, and some have jagged edges.
Materials:
book (about leaves, 1 per class)
EVALUATE – Performance Indicator Suggested Day 9
Kindergarten Science Unit 09 PI 02
Sort a set of pictures of plants into groups based on their physical characteristics, such as leaf
shape, color, and size, and justify the groups made.
AND
Sort a set of pictures of animals into groups based on their physical characteristics, such as body
covering, color, and size, and justify the groups made.
Standard(s): K.2D , K.10A
ELPS ELPS.c.1E , ELPS.c.3D
1. Use the pictures from the Teacher Resources: Leaves and Animals.
2. These should be copied in color on cardstock and laminated for greater durability.
The number of sets needed will depend on if you will be conducting the Performance
Indicator oneonone (1 set needed), in a small group setting (4–5 sets needed), oras a whole class (1 set each per student).
3. Students should have the opportunity to sort the cards and then justify the groups
made.
Attachments:
Teacher Resource: Leaves (1 per student, group,
or class) (from previous activity)
Teacher Resource: Animals (1 per student, group,
or class) (from previous activity)
Kindergarten
Science
Unit: 09
Lesson: 02
Suggested Duration: 9 days
Last Updated 04/26/13 page 7 of 14

Kindergarten Science
Unit: 09 Lesson: 02
©2012, TESCCC 10/09/12 page 1 of 2
Mystery Mammal

Kindergarten Science
Unit: 09 Lesson: 02
©2012, TESCCC 10/09/12 page 2 of 2
Kindergarten Science
Unit: 09 Lesson: 02
©2012, TESCCC 10/09/12 page 1 of 1
Bird Feathers

Kindergarten Science
Unit: 09 Lesson: 02
©2012, TESCCC 10/09/12 page 1 of 1
Scales

Kindergarten Science
Unit: 09 Lesson: 02
©2012, TESCCC 10/09/12 page 1 of 1
Animals

Kindergarten Science
Unit: 09 Lesson: 02
©2012, TESCCC 10/09/12 page 1 of 2
Leaves

Kindergarten Science
Unit: 09 Lesson: 02
©2012, TESCCC 10/09/12 page 2 of 2