Kenexa Access User Guide - depts.ttu.edu
73
Kenexa Access User Guide HIRING MANAGER FUNDAMENTALS
Transcript of Kenexa Access User Guide - depts.ttu.edu

Kenexa Access User Guide HIRING MANAGER FUNDAMENTALS


Hiring Manager User Guide
Revised 11-12-2015 Page 1
TABLE OF CONTENTS
INTRODUCTION ................................................................................................................................................................................ 2
Chapter 1: Getting Started ...................................................................................................................... 3
PREPARING TO USE TEXAS TECH CAREERS .......................................................................................................................... 4 CLEARING THE CACHE .................................................................................................................................................................. 5
ACCESSING AND LOGGING ON TO TEXAS TECH CAREERS ............................................................................................. 6
NAVIGATING WITHIN TEXAS TECH CAREERS ...................................................................................................................... 7 NAVIGATING BEST PRACTICES .................................................................................................................................................. 9
Chapter 2: Managing Reqs .................................................................................................................... 11
OVERVIEW OF REQS .................................................................................................................................................................... 12 CREATING A REQ .......................................................................................................................................................................... 14 ELEMENTS OF THE REQ ............................................................................................................................................................. 18 APPROVING OR DECLINING A REQ ........................................................................................................................................ 26 SEARCHING FOR REQS ................................................................................................................................................................ 29
Chapter 3: Viewing Candidates ............................................................................................................. 32
OVERVIEW OF OUTPUT GRID .................................................................................................................................................. 33 VIEW A SINGLE TALENT RECORD .......................................................................................................................................... 34 PRINTING A TALENT RECORD ................................................................................................................................................. 37 VIEW CANDIDATES IN PORTAL PANELS ............................................................................................................................. 38
Chapter 4: Candidate Tracking .............................................................................................................. 40
CANDIDATE WORKFLOW .......................................................................................................................................................... 41 TRANSITION CANDIDATES: CANDIDATE WORKFLOW INSTRUCTIONS .................................................................. 42 CHANGING HR STATUS ............................................................................................................................................................... 44 ACCESS AND COMPLETE FORMS ............................................................................................................................................ 48 ELINK OVERVIEW ......................................................................................................................................................................... 51 ELINK A CANDIDATE RECORD ................................................................................................................................................. 51 VIEW AND RESPOND TO ELINKS ............................................................................................................................................ 53
Chapter 5: Prepare and Extend an Offer ............................................................................................... 55
PREPARE OFFER FORM AND APPROVAL ............................................................................................................................. 56 CREATE, POST, AND SEND AN OFFER DOCUMENT (OFFER LETTER) ....................................................................... 59 CANDIDATE PORTAL ................................................................................................................................................................... 63 BACKGROUND CHECK PROCESS ............................................................................................................................................. 64 FINAL HR STATUSES FOR HIRED CANDIDATE .................................................................................................................. 64
Chapter 6: Closing the Req .................................................................................................................... 66
FINAL DISPOSITIONS .................................................................................................................................................................. 67 CLOSING A REQ .............................................................................................................................................................................. 67
APPENDIX A .......................................................................................................................................... 69
APPENDIX B .......................................................................................................................................... 70
APPENDIX C .......................................................................................................................................... 71

Hiring Manager User Guide
Revised 11-12-2015 Page 2
Introduction
Welcome to Hiring Manager User Manual for the
Texas Tech Careers: Applicant Tracking System!
About This Manual
This guide provides an introductory walk-through of the system from the perspective of a Hiring Manager. With this system reqs will be created and candidates will be viewed and tracked through the hiring process. This manual contains the steps, tips, and shortcuts, for navigating and working more efficiently with the Texas Tech Careers site.
At the end of this manual there are additional tools and guides to help hiring managers utilize the system. For additional assistance please contact the TTU HR-Talent Acquisition office at [email protected] or 806-742-3851.

Hiring Manager User Guide
Revised 11-12-2015 Page 3
Chapter 1: Getting Started
Chapter Overview:
Before creating reqs and managing candidates, it’s important to dedicate time to some basics. Texas Tech Careers is a web-based application. In other words, it is accessed from a web browser and run over the internet. This first chapter focuses on accessing, logging on to, and basic navigation within Texas Tech Careers.
Objectives:
At the end of this chapter hiring manager users will be able to:
Check browser settings
Log on to Texas Tech Careers
Navigate through Texas Tech Careers

Hiring Manager User Guide
Revised 11-12-2015 Page 4
Preparing to Use Texas Tech Careers
To take maximum advantage of Texas Tech Careers, do a quick check to ensure that your computer and browser are configured with the appropriate desktop and browser settings. If attempts to use Texas Tech Careers are troublesome, you are encouraged to first walk through these steps prior to seeking additional help.
Supported Browsers
Internet Explorer Firefox Safari Chrome
Mobile Devices
8 9 10 11 22ESR+/28+ 5-6 34+
IBM® Kenexa® BrassRing®
IBM® Kenexa® BrassRing® on Talent Gateways
Because Texas Tech Careers is a Windows-based application, your browser should be
configured to accept cookies and allow pop-ups for the Texas Tech Careers site
(brassring.com).
TTU HR Talent Acquisition recommends to use the Firefox or Internet Explorer web
browser for best results.
Mobile apply is supported on mobile devices using Android 2.1 and higher and on Apple iOS4 and higher.

Hiring Manager User Guide
Revised 11-12-2015 Page 5
Clearing the Cache
A browser's cache stores the contents of all the web page addresses visited during a session. A browser retains within its memory, or “cache”, all the different pages that are hit when navigating through different websites. Clearing the cache once a week ensures pages within Texas Tech Careers load properly.
Clearing Your Cache – Internet Explorer
1. From the Internet Explorer menu bar, click Tools Internet Options.
2. Click the General tab.
3. Under Temporary Internet files, click Delete Files.
4. Check Delete all offline content.
5. Click OK.
Clearing Your Cache – Firefox
1. Open the Firefox browser and navigate to the Tools menu (for Windows users) or the Firefox menu (for Mac users).
2. View the drop down menu display and choose Options (for Windows) or Preferences
(for Macs). A new dialog box will appear.
3. Click the Privacy icon to get to the cache options. Now you can click the 'Clear Now' button.
4. Watch for a drop down box to appear with numerous checkable boxes. Check Cache and
press the Clear Private Data Now button.
5. Press the OK button (Windows) or simply close the preferences box (Mac). Your cache will now be clear.
If the cache is not clearing properly, database updates may not be seen or the forms may
not display properly.

Hiring Manager User Guide
Revised 11-12-2015 Page 6
Accessing and Logging on to Texas Tech Careers
Accessing Texas Tech Careers is similar to accessing any site on the internet. The site may be accessed from the Raiderlink portal, A & F Work Tools tab in the Human Resources section. Click on Careers at Texas Tech for Hiring Managers to reach the login page. The web address to login may be typed directly into the browser. The URL is: http://www.texastech.edu/careers/hr/
Accessing Texas Tech Careers
To access Texas Tech Careers:
1. Launch a browser and enter the unique address as depicted in Figure 1-1. 2. Click the TTU Login button at the bottom of the page. See Figure 1-2. This goes to the
log on page where the user may enter their eRaider username and password.
Figure 1- 1: Direct link to site
Figure 1- 2: TTU login page

Hiring Manager User Guide
Revised 11-12-2015 Page 7
Navigating within Texas Tech Careers
This section will briefly review Hiring Manager access within Texas Tech Careers.
The Welcome Page
The Welcome Page provides a landing portal created to improve the work experience within Texas Tech Careers. This section provides a brief overview of what is common within each area accessed from the Welcome Page portal itself. See Figure 1-3.
Figure 1- 3: Welcome page
Portal panels
The panels are the framed content areas that appear on the Welcome Page workspace. The panels can be repositioned by clicking on the boarder of the panel, then dragging and dropping into place. Maximizing, minimizing, and closing panels may be done by utilizing the icons on the following table. The Welcome Page relocations persist for future login sessions.

Hiring Manager User Guide
Revised 11-12-2015 Page 8
The following table describes the icons and links available on the Welcome Page and common to the portal panels.
Icon or Link Description
From Left to right:
Support Portal –Click to display the resources available in the User Resource Center. This site contains generic IBM Kenexa Brassring information. Contact the HR Talent Acquisition office for system support.
Home—Click to return to the Welcome Page that displayed when you initially logged in.
Logoff—Click to log out of the system. Users cannot log back on to the site from the IBM Kenexa log on page. Users must return to the Raiderlink Portal or enter the direct log on link in their browser.
Search—Click here to “quick search” for requisitions that match specific criteria. This convenient feature remains open for future login sessions – you can click to close it.
Help—Click to display help text. Not all features described here are available to Texas Tech users.
Click this icon to refresh the data shown.
Click this icon to minimize panels. When you minimize a panel, it “floats” to the top of the screen and appears as a button with the panel’s title. The panel remains minimized for the current and future login sessions until you reopen it -- click the panel name tab to reopen in its former position.
Click this icon to maximize the panel to fill the entire panel window (persists only for the current login session).
Click this icon to return the maximized panel back to its default location in your portal panel window.

Hiring Manager User Guide
Revised 11-12-2015 Page 9
Click this icon to close and remove the panel so that it no longer appears on your Welcome Page. The icon does not appear for required panels.
This icon indicates the current sort column in panels with columnar data. Click the sort icon once to change the sort order from ascending to descending, and then click it again to reverse the order. Names of the additional columns by which you can sort are underlined. Click the name to sort by that column. Column-level sorting stays in effect only for your current session.
Click this icon to add or remove panels from your Welcome Page.
Navigating Best Practices
To have the best possible experience when using Texas Tech Careers, follow these proven best practices:
Only a single-click is necessary. Double-clicking will delay the pages from loading and may cause multiple entries.
When using Internet Explorer, to refresh information on the current page, place your cursor on a blank spot on the page Click the right mouse button (right-click) click Refresh. This refreshes the browser and returns to the most current page.
Refreshing using the Refresh option at the top of your browser menu will return you to the Welcome page.
Texas Tech Careers is a secure web site, therefore the back button on the browser should not be used, as it may result in the “Page cannot be displayed” message.
It is best practice to always click OK buttons after taking an action within the system.
Never close out of the Texas Tech Careers window displaying TTU System logo. This will result in having to log back in to the system.

Hiring Manager User Guide
Revised 11-12-2015 Page 10
Chapter Summary
TTU HR Talent Acquisition recommends to use Internet Explorer or Firefox browsers
It is important to confirm the computer and web browser are configured with the
appropriate desktop settings and browser requirements
The quick search function is available in the top right corner; use this to quickly locate
reqs and candidates
When using Texas Tech Careers, open only one browser and use only single-clicks
Hiring Manager User Guide
Revised 11-12-2015 Page 11
Chapter 2: Managing Reqs
Chapter Overview
Recruitment begins with the creation of a job requisition (req). This chapter will portray the entire lifecycle of a req, from creation, to approval, and more. Using Texas Tech Careers, the req process is streamlined and efficient. This chapter focuses on managing reqs, the first phase of the recruiting process.
Chapter Objectives
At the end of this chapter hiring manager users will be able to:
Recognize the various lifecycle statuses of reqs
Search for a req
Access and complete a req
Save an incomplete req form as a draft, to allow you to complete later
Approve or decline a req sent for online approval

Hiring Manager User Guide
Revised 11-12-2015 Page 12
Overview of Reqs
Requisitions (reqs) are online forms documenting position information and are posted to the applicant site. Requisitions may be created with Hiring Manager access.
Navigating through Reqs
To access reqs, hover over the Reqs tab on the main tool bar and allow the drop down menu to appear (refer to Figure 2-1). From here add, search for, or view a list of reqs assigned to a certain req lifecycle status-such as Open or Closed. Click and the system will take you to the page. Users will only have access to view those reqs they are associated with (View my reqs). Reqs appearing within the View my reqs option are those reqs where the user 1) initially created the req, 2) was selected as a hiring team member, and/or 3) was listed as the Hiring Manager on the req.
Figure 2- 1: The reqs menu
Life cycle of Reqs
In Texas Tech Careers, a req goes through at least five different stages. Here is a typical progression:
Pending Approved Open (Unposted) Closed A req can also be assigned to the stages of Cancelled or Declined.

Hiring Manager User Guide
Revised 11-12-2015 Page 13
Let’s define each of these stages in greater detail:
Pending req- one that has been created and is in the process of being approved online, as defined by Texas Tech and your department’s specific approval process. Approved req- has received each required approval. When the final approval is granted, the system automatically updates the status of the req from Pending to Approved and sends an e-mail to the Hiring Manager and Req Creator, as well as the HR Talent Acquisition office, who will open and post the req. Open req-is available for recruiting. The approved req has been manually updated to the open status. Once opened, the system generates a req folder used to track candidates for the job. The req will be posted to the TTU careers web site via a Talent Gateway. Unposted req- is still in the open status, but has been removed from the applicant site so that no further applications are accepted. The department may wish to unpost when their applicant pool is sufficient and no longer wants to accept applications for that req. HR Talent Acquisition will typically unpost reqs for single positions when the Offer Outline form is submitted to HR for approval. Users will still have access to the req and candidate records. Closed req- has been filled. All candidates will be in a final status: a candidate will have reached the Hired status and all other candidates will have a Disposition form added to their record.
Cancelled req- will no longer be recruited for due to reasons such as budget constraints, restructuring, job level changes, etc. No hire is made for a cancelled req.
Declined req- turned down during the approval process.

Hiring Manager User Guide
Revised 11-12-2015 Page 14
Creating a Req
Only a user with Hiring Manager access will have the access to create a requisition in the
system.
Adding a New Req
1. Hover over Reqs Add new req.
Figure 2- 2: Add new req
A new screen will pop open to complete the req.
2. Complete Section 1, the Job Details section. See Figure 2-3.
a. Select the appropriate Hiring Manager by typing their name and then selecting
from the drop down list.
b. Choose the correct options for all fields. All information entered in this section
will affect the hiring process.
i. The Position Class Code chosen will autocomplete some sections on the
req to match the TTU System Pay Plan.
ii. Remember the Org Level 7 field drives the selection of Position
Numbers to choose from.
Figure 2- 3: Job Details
c. The Extended Job Title field may be edited, but must include the Position Class
Title for all staff and student positions. Faculty titles may be edited to reflect an
open rank search.

Hiring Manager User Guide
Revised 11-12-2015 Page 15
d. Select TTU Talent Acquisition in the Human Resources field.
e. Add any Hiring Team members who will need access to the req and/or
candidates in the req folder, such as search committee members, ePAF
originator, etc.
3. Complete Section 2, the Job Description and Requirements section.
a. Use the text editor boxes to complete the Major/Essential Functions,
Occasional Duties, and Preferred Qualifications fields.
b. Complete all other required questions/fields.
c. Select Job Specific Questions for the req by entering a key word and choosing
from the list OR type any questions not in the list in the appropriate box. See
Figure 2-4.
Figure 2- 4: Request Job Specific Questions
4. Complete Section 3, the Physical Requirements section. This should match the Position
Description document.
5. Select the appropriate Approval Routing for your req. See Figure 2-5.
Figure 2- 5: Req Approval Routing

Hiring Manager User Guide
Revised 11-12-2015 Page 16
a. Required Approvals:
i. Staff and student reqs: HR Approval, Hiring Manager, and a minimum
of one other approver at the Department Head, Dean/Next Level, or
AVP/VP/Provost level.
ii. Faculty reqs: HR Approval, Hiring Manager, Diversity Office,
AVP/VP/Provost (refer to Create a Faculty Req guide).
iii. Additional approvers are selected per department/college/division
policies and practices.
b. Notify Upon Approval Completion- Select TTU Talent Acquisition here to
ensure a member of HR can open your req.
6. Click Save when all fields are completed. Once Save is clicked, no further edits may be
made by the req creator. (Click Save as Draft if you need to continue editing). See Figure
2-6.
Figure 2- 6: Save versus Save as Draft
7. The req will be assigned a Req ID (xxxxBR) and can be sent through the approval
process. Click Route req for approval when ready. See Figure 2-7. (Refer to Create a
Faculty Req guide for faculty postings that must adhere to OP 32.16).
Figure 2- 7: Route req for approval
Any field with a red asterisk (*) is required.
When adding a req, some fields are “read only”, meaning they cannot be edited, such
as position description and required qualifications fields.
Copying and pasting into the text editor boxes can sometimes cause errors. The error
often occurs when copying from a web browser and/or PDF document. It is
recommended to copy from a MS Word document, Notepad, or type directly in the text
editor boxes.

Hiring Manager User Guide
Revised 11-12-2015 Page 17
Save Req as New
Save as new is a shortcut for creating a req by duplicating a req that is already in the system. All information is copied including: hiring manager, position class code, major/essential functions, hiring team, and approval routing. The copied information may be edited. To save an existing req as new:
1. Select the req you want to duplicate and click Save as new on the Actions toolbar.
2. Edit any req fields as necessary.
3. Click Save to route for approval, or save the req without routing.
Save Req as Draft
The system allows for the creation of a req to save and finish at a later time by clicking the Save as Draft button at the bottom of the req form. Later, to access saved drafts for completion:
1. From the main toolbar, go to Reqs View my drafts, and select the draft req of your
choice.
2. Click Edit from the Actions menu and make any updates.
3. Click Save to route for approval, or save the req without routing.
Only the req creator will have access to any req in a draft state.
A draft req cannot be sent to another user for completion or viewing.

Hiring Manager User Guide
Revised 11-12-2015 Page 18
Elements of the Req
This section will review the fields on the req. The req comes with standard fields (most with default populated information), such as position class title, location, major/essential functions, pay grade, etc.
Hiring Manager
Select one Hiring Manager per req. The person selected will have access to the req and will be the person to receive automatic e-mail notifications from the system throughout the recruiting and hiring process (e.g. when the req is opened, when a background check is initiated, when a candidate is cleared to hire, etc.).
If the name of the hiring manager is not in the list, please contact the TTU HR Talent
Acquisition office.
Position Type
Select whether the position being recruited for is a Faculty, Staff, or Student position type. When Faculty is selected, tenure status must be indicated.
Position Class Code
To select a position class code, begin typing the code or title. A drop down list will appear and will shorten as your type. Select the correct code and title. Refer to Figure 2-8 regarding the selection of a position class code. By selecting a position class code, the following fields on the req will populate with pre-defined information; extended job title, job type, job group, pay basis, FLSA type, salary grade, pay range, position description, and required qualifications.
Figure 2 - 8: Selecting a Position Class Code
Extended Job Title
The Extended Job Title field auto-populates with the Position Class Code selected. However, this field may be edited to provide a descriptive title. For staff and student positions, this field must include the position class code title. For example, Unit Coordinator for Scholarship Programs or Academic Advisor – Economics.
Hiring Manager User Guide
Revised 11-12-2015 Page 19
Org Level 7
Select the appropriate organization code that the position number being recruited for is associated to. Begin typing the org code or org title, then select the correct Org Level 7 from the list. Contact human resources for information if the Org Level 7 is unknown. This will auto populate the department field.
Work Location
Select the city/location where the position will be located.
Position Number
This is this T# or S# that has been approved to use for the position title. The Org Level 7 chosen will determine the list of available position numbers to select on the req. To select the number, start by typing “T” (for TTU positions) or “S” (for TTUS positions). Contact HR Talent Acquisition if the number is not appearing as an option in the list. This will auto populate the Org Level 1, 2, 3, and Campus fields.
Number of Positions
This field will default to 1, meaning one person is to be hired for this position. Hiring that one person will change the “1” to “0”. The number may only be increased if the Position Number (T or S number) listed on the req is a pooled position. The system will automatically decrease the number of positions whenever a candidate is hired for this req until 0 is reached.
FTE
Enter the correct FTE percent as a decimal, up to 1.
Requisition Type
Select whether the position being recruited for is for a New Position (new T# or S#) or a Replacement.
If the position is a Replacement, another field will appear: Last Incumbent. Enter the name of the last employee in the position number. For pooled positions, type “Pooled”.

Hiring Manager User Guide
Revised 11-12-2015 Page 20
Funding Source (FOP)
Enter the FOP or FOPs that will be used to fund the position. Include percentages for each FOP if more than one is used.
Departmental Contact
This is an optional field that is for internal use only. List the person who should be contacted when HR Talent Acquisition has a question about the job posting. If no name is listed, HR will contact the person listed in the Hiring Manager field.
Dept. Contact Phone/Email
If a Departmental Contact person is listed provide their phone number and email address.
Human Resources
Select A Talent Acquisition, TTU (Main Campus) in the Human Resources field. This will ensure the Texas Tech University Human Resources, Talent Acquisition office will have access to the req.
Hiring Team
Hiring team members are those individuals who might assist with filling a req. It could be someone who is participating on the search committee or assists with the interviewing process. To add a member to the hiring team, begin typing the person’s name in the field. A drop down list will appear, and the search will narrow as a name is typed. When the name of the person appears, click the checkbox next to their name. Refer to Figure 2-9 below.
Figure 2- 9: Req team

Hiring Manager User Guide
Revised 11-12-2015 Page 21
There are two user types: Hiring Manager and Limited Access.
Hiring Manager access is only given to those who have attended the training course. This access allows the user to create reqs, add forms, and transition candidate HR statuses. Limited Access is given to all others who need to view applications and/or complete required forms, such as the Interview Feedback form.
If a user needs to be added, please contact the TTU HR Talent Acquisition office
before submitting the req.
Hiring Team users can be added after the req has been created; only HR Talent
Acquisition has access to add users as requested.
Position Description
This field will auto populate based on the position class code selected. The information will match the TTUS Pay Plan.
Major/Essential Functions
Complete this field by listing the Major/Essential Functions for the position. This should resemble the official Position Description created for the position.
This field uses a text editor box. Copying and pasting information from other
documents can sometimes cause errors or formatting issues. It is recommended to
only copy and paste from MS Word documents or the Notepad application. Contact
HR Talent Acquisition if assistance is needed.
Occasional Duties
List any occasional duties, if any. This is an optional field; if nothing is entered it will not display to the candidates.
This field uses a text editor box. Copying and pasting information from other
documents can sometimes cause errors or formatting issues. It is recommended to
only copy and paste from MS Word documents or the Notepad application. Contact
HR Talent Acquisition if assistance is needed.

Hiring Manager User Guide
Revised 11-12-2015 Page 22
Required Qualifications
This field auto populates with information from the TTUS Pay Plan. It will match the information associated to the Position Class Code/Title chosen. This field, in general, may not be edited.
Please contact HR TA if the prescribed requirement in the pay plan states that the
qualifications are determined by the hiring department and provide the qualifications.
Preferred Qualifications
Type the preferred qualifications for the position. This should reflect what is listed on the official Position Description created for the position.
This field uses a text editor box. Copying and pasting information from other
documents can sometimes cause errors or formatting issues. It is recommended to
only copy and paste from MS Word documents or the Notepad application. Contact
HR Talent Acquisition if assistance is needed.
EEO Statement
This field is auto populated and has a standard statement that is set by university administration.
Required Attachments
Select the attachments to be required for applicants to submit with the application. For example, a resume, cover letter, professional/personal references may be listed as required.
The items selected will be displayed as required on the requisition to candidates and
on the document upload page in the application. However, the system does not
prevent applications from being submitted if the documents are not attached. It is the
responsibility of the Hiring Manager/Search Committee to verify that the requested
documents are uploaded and attached to the candidate’s record.
Option Attachments
Select any additional documents.

Hiring Manager User Guide
Revised 11-12-2015 Page 23
Req Notes
This field is for internal use only as it does not display to candidates. Use this field to track any special notes or actions related to the requisition. HR may list notes for tracking purposes as well.
Grant Funded
Select “Yes” or “No”. This will display to candidates.
Security Sensitive Level
Select the appropriate Security Sensitive Level: I or II. This will display to candidates.
Some positions (like IT positions) are required to be Security Sensitive Level II. Please
refer to OP 70.20: Employment for Security-sensitive Positions and OP 70.35: Drug
and Alcohol Testing for Safety-and Security-sensitive Positions for additional
information.
Travel Required
Select the approximate percentage of required travel. This will display to candidates.
Shift
Select the most appropriate shift option: Day, Evening, Night, or Other. This will display to candidates.
Schedule Details
The schedule may be described in further detail here. Use this space to clarify the hours, required overtime, etc. This section will display to candidates if something is entered. This will not display to candidates should nothing be entered.

Hiring Manager User Guide
Revised 11-12-2015 Page 24
Approval Routing- Options
There are two possible options when selecting req approvers:
Use… When…
Bypass approval An approval for this req is not necessary or required from this approval group (ex. Dean/Next Level). This depends on the type of req (Faculty or Staff) and the department/college/division’s practices and policies.
Name in list The approver is included in and selected from a list of names. If the correct approver is not found, contact the TTU HR Talent Acquisition office.
Notify Upon Approval Completion
Always choose TTU Talent Acquisition. When all approvals have been submitted, the TTU Talent Acquisition team will receive an eLink indicating the req has been approved, allowing the req to be opened and posted to the applicant site. See Figure 2-10.
Figure 2- 10: An example of approval routing options

Hiring Manager User Guide
Revised 11-12-2015 Page 25
Completion of the Req
Once the requisition has been completed, click the Save button at the bottom of the Req
Form.
The system assigns a unique req number for every req created, whether the req is ever
posted or not. See Figure 2-11.
Figure 2- 11: Routing the req for approval
Click Route req for approval if the req is ready to route. If it is not ready, choose Save without routing for approval and the req will be saved in the Pending status. Once the req is ready to be routed, access the req from Pending reqs and click Route for Approval located in the Actions menu. See Figure 2-12.
Figure 2- 12: Routing the req for approval from Pending status

Hiring Manager User Guide
Revised 11-12-2015 Page 26
Approving or Declining a Req
The system uses eLinks to send the created req via e-mail to approvers. Req approvals are sent in sequential order the first approver must approve the req before the second approver receives an eLink to approve the req, and so on.
Approvers have three options: Approve- may include a brief comment, they must type their comments in the available box.
This is the only req field that may be modified during approval routing which won’t result in the
req being re-routed back to the first approver.
Decline- if an approver declines the req, the req approval process is immediately halted. A
decline by any approver will result in the req being returned to the originator. The Hiring
Manager will need to update and manually re-route the req for approval.
Save Edits and Restart Approvals- the req is sent through the approval process again from the
beginning.
Reviewing the Req eLink in Approval Routing
Req approvers receive an eLink to the req in their e-mail inbox. To respond to the approval request:
1. Open the e-mail. Click the link marked View req details. See Figure 2-13. Note: the link is embedded in the e-mail text. The link will launch a new window with the req.
Figure 2- 13: The req e-link

Hiring Manager User Guide
Revised 11-12-2015 Page 27
2. Review the information on the req. a. The req may be edited by each approver.
3. Click Approve, Decline or Save Edits and Restart Approvals. A message is required if
Decline is chosen. See Figure 2-14.
Figure 2- 14: Approving or declining a req
Watching the Routing
To track the approval process to determine who has yet to approve the req:
1. From the Reqs menu, click View my reqs Pending.
2. View the req by clicking on the link of the req number.
3. Scroll to the bottom of the req form to the Approval routing section. See Figure 2-15.
a. A date stamp appears next to the name of the person who has approved the
req, along with any comment the approver may have added.
b. Any name that does not have a date means they have yet to approve.
4. Click Ok to close the window.
Figure 2- 15: The approval routing.* Note that Department Head has yet to approve the req.

Hiring Manager User Guide
Revised 11-12-2015 Page 28
A few things to know about tracking the approval process:
If a req has all the necessary approvals, it will automatically update from the status of
Pending to the next req status of Approved.
When blank space displays next to an approver’s name under Date, it means he/ she
has not yet approved the req.
If an approval level was initially bypassed, the date the req was originally completed-
and the date the approval was bypassed-will display.
If a req is declined during the approval process, it will automatically update from the
status of Pending to the status of Declined.
When an approver modifies a req, these modifications replace the original information
entered on the req.
Notification e-mails are distributed when a req changes status, such as to Open or to
Declined.
Req approvers have two ways to access the eLinked req form: 1. The standard link-
“View Requisition Details” 2. Copy the http link and paste it into the browser’s
address bar. Note: you must copy the entire http address, including any characters as
the end, such as the = sign.
Req Routing Troubleshooting
Here are some troubleshooting tips for routing of reqs:
To… In the system you should… Send an additional approval eLink From the list of Pending reqs, select the req, click Route for
approval. A new eLink will be sent only to that approver who has stalled the process.
Refer to figure 2-12: Routing the req for approval from Pending status.

Hiring Manager User Guide
Revised 11-12-2015 Page 29
Searching for Reqs
Texas Tech Careers provides two options to use when searching for reqs.
Search Reqs
1. From the tabs at the top of the Welcome Page, click Reqs Search reqs.
2. Select the criteria by which you want to search. See Figure 2-16.
An option does not have to be chosen for each field; only from those you want to
include. The more criteria added, the fewer results received.
3. Click Search to initiate the search. To run a new search, choose Clear. Revert to last
search restores what was cleared.
Figure 2- 16: Searching reqs

Hiring Manager User Guide
Revised 11-12-2015 Page 30
Quick Search for Reqs
Located in the upper right corner of the home page via Search, quick search is always available from any page within Texas Tech Careers , allowing searches for reqs based on: job title, portion of the job title, req number, or a portion of the req number. Example: enter the word coordinator into Search, click the submit search button (circled in red in Figure 2-17) and the system will display those reqs that contain “coordinator” in the job titles.
Figure 2- 17: Quick search feature
When the results are returned, click on the req number to view the req or place a in the box on the left and choose an action from the Actions menu. Refer to Figure 2-18.
Figure 2- 18: Req search/Quick search results
The following Quick Search hot keys are supported from anywhere in the system :
ALT + 1: Opens the Quick Search controls if not already open and sets the search mode to Search Candidate.
ALT + 2: Opens the Quick Search controls if not already open and sets the search mode to Search Reqs.

Hiring Manager User Guide
Revised 11-12-2015 Page 31
Chapter Summary
From the Reqs menu, users can add, search, and view reqs
The typical lifecycle progression for a req is:
Pending Approved Open (Unposted) Closed
To have access to a req, users must be listed as the Hiring Manager or as a Hiring Team
member on the req
Approvers receive reqs for approval via e-mail (eLink) and the emails can be tracked in
the system
Opening a req is a manual step taken once the req is approved. It is taken by the TTU
Talent Acquisition office which is indicated on the req form in the field labeled Notify
upon approval completion

Hiring Manager User Guide
Revised 11-12-2015 Page 32
Chapter 3: Viewing Candidates
Chapter Overview
Once candidates apply, those meeting the required qualifications will be filed to the req folder. The first phase of candidate tracking involves reviewing the qualified candidates’ records.
Chapter Objectives
At the end of this chapter hiring manager users will be able to:
View candidates in the req folder
View resumes/CVs
View Gateway Questionnaires (GQs) and Job Response forms

Hiring Manager User Guide
Revised 11-12-2015 Page 33
Overview of Output Grid
To start the process, review candidates in the req folder, as seen in Figure 3-1. From here view the Resumes/CVs, Cover Letter, Gateway Questionnaire (application), Job Response Form (answers to job specific questions) and begin the decision making process of whether to have the candidate move to the next stage (i.e. phone screen, interview, etc.).
Figure 3- 1: An example of candidates in a req folder
Elements of Output Fields and the Output Grid
The candidate’s name, whether or not they have been viewed, Forms, HR status, and
most recent Candidate type are standard fields on the grid
o Candidates are filed into the folder alphabetically by last name
o A check mark will appear after clicking on a candidate’s name to open their
Talent Record to view attachments, Gateway Questionnaire and any other
actions taken in the system for this candidate
o There are four candidate types: Internal, External, Former TX Foster Youth
Preference, and Veteran Preference
Contact HR Talent Acquisition for additional information and
requirements regarding the candidate types
To move between pages of results, click the desired numeric group of results from the
Show results menu, or use the “>” at the top of the page
Sort the results by clicking any of the column headings once for ascending order
(123/abc) and once again for descending order (321/zyx)

Hiring Manager User Guide
Revised 11-12-2015 Page 34
View a Single Talent Record
To view a Talent Record, click the link of the candidate’s name. Talent Records provide access to all pertinent candidate info: forms, HR Status, eLink history, additional documents (e.g. Resume/CV, Cover Letter), etc. See Figure 3-2.
Figure 3- 2: A Talent Record
Some candidates may have applied to more than one req that a user is assigned to.
All of the actions for that candidate will appear in their Action Log. To view only the
actions for a single req, click the Filter button. Then select “This Folder” from the
drop down list.
Actions in Talent Record
Several actions may be taken within a Talent Record. Some actions, like Add Form or Update Status may be taken within the Talent Record or elsewhere in the system. See Figure 3-3 for a view of all actions that may be taken.
Figure 3- 3: Actions available in a Talent Record

Hiring Manager User Guide
Revised 11-12-2015 Page 35
Available Actions
Action Description
Send eLink
Send an eLink of candidate’s Talent Record to another system user. The user can access the link via email to review the candidate’s record. Refer to Ch. 4, eLink a Candidate Record for more information.
Send candidate ad-hoc email
Send the candidate an email through the system. This option allows the hiring manager to send their email while also tracking it in the system.
Send Candidate Communication
Send the candidate an email template through the system. The email template that notifies candidates of their offer document is located here.
Create Document
Click here to generate the offer document. Refer to Ch. 5, Prepare and Extend an Offer.
Post to Candidate Portal
Use this action to post or repost the Offer Document to the candidate portal.
Forward via Email
This feature will forward the candidate’s Cover Letter and Resume/CV to another system user to review via Email. Note: the cover letter and resume will send in the unformatted version.
Add Form
A form may be added from this action item. Hover over Add Form to see the forms menu. Select the necessary form. The form will open in a new window.
Update Status
The candidate’s HR Status may be updated from this action item. Hover over Update Status. The next available statuses will appear in the menu. Select the status to update to.
Print Resume/CV
This action will open the candidate’s Resume/CV in a window by itself. Users may choose to view the PDF, then print.
Print Talent Record
Selected items from the candidate’s Talent Record can be generated into the PDF format in order to print. Refer to Printing a Talent Record, later in this chapter.
Prepare for Bulk Printing
This feature will generate a link containing the candidate’s information and forms, then send it to the email address chosen.
Upload attachment
Hiring Manager users may upload additional attachments to the Talent Record. These uploaded documents are not visible to the candidate, but are viewable to other internal users.

Hiring Manager User Guide
Revised 11-12-2015 Page 36
Viewing Multiple Resumes/CVs
1. From the Search results screen, select all candidates of interest. Click View on the Action toolbar. See Figure 3-5.
Figure 3- 5: Selecting multiple candidates to view
2. The system displays the first candidate’s information. To move from this candidate to one of the other records, click the drop down arrow next to the candidate’s name of the resume/CV that is currently being viewed. A list of the other selected candidates will appear in a drop down list. (See Figure 3-6.)
Figure 3- 6: Viewing multiple resumes/CVs

Hiring Manager User Guide
Revised 11-12-2015 Page 37
Printing a Talent Record
There are available options to print specific areas of a single Talent Record:
1. From within a Talent Record, click Print Talent Record in the Actions Menu (see Figure 3-3).
2. A pop-up menu will open with the Print Talent Record options. See Figure 3-4.
Figure 3- 4: Print Talent Record options
3. Deselect the Backup Information Form and Talent Gateway Questions. Do this by clicking the check box next to the form title/s (refer to Figure 3-4).
4. All available form titles will be available to print from this menu. Deselect any other
forms you do not wish to print.
5. Click Print. It may take a few minutes to generate a printable document depending on the number of records you chose.
6. When the Document is ready, the option to Save or Open (in Adobe Reader) will appear.
Click Open to view the printable record.
7. Printer information will appear to select printing options. Click Print. OR Close the print menu and the document will be available as a PDF in Adobe Reader.

Hiring Manager User Guide
Revised 11-12-2015 Page 38
View Candidates in Portal Panels
Candidates may also be viewed within the Portal Panels on the home page. In the My Open Reqs Panel, the number of candidates in each HR status is viewable in an output grid. Refer to Figure 3-7.
Figure 3- 7: Viewing candidates in portal panel
Click a number in a HR status column to access candidates. A new panel will open and display all candidates in the HR status number selected. From here, the candidate’s Talent Record may be accessed, the HR status may be changed, and forms may be viewed/added/edited.
Speed Browse
Candidates can be viewed side by side using the Speed Browse option.
1. Select all of the candidates of interest. 2. Click Actions * Speed Browse. 3. Choose to view Contact Details, Resume/CV, Cover Letter, or Experience/Education for each
candidate selected. Refer to Figure 3-8 for an example of viewing experience/education.
Figure 3- 8: View multiple candidates using Speed Browse
Hiring Manager User Guide
Revised 11-12-2015 Page 39
Chapter Summary
Candidates can be viewed within the req folder and in the Portal Panels
Actions, such as Add a Form, can be taken from within the Talent Record
An Action Log is stored in the Talent Record for each candidate
Access a candidate’s Resume and/or Cover Letter in the Talent Record
The candidates Gateway Questionnaire (GQ) Response (application) and Job Response
form (answers to specific questions) are stored as forms which can be accessed in the
Talent Record in the Action Log
There are options to view multiple candidates at once

Hiring Manager User Guide
Revised 11-12-2015 Page 40
Chapter 4: Candidate Tracking
Chapter Overview
The system facilitates an efficient, online hiring process and centralizes communication between members of the organization, candidates, and Human Resources. This is a key to move candidates through the hiring pipeline efficiently. Two tools that accomplish this are forms and eLinks. Chapter 3 shows how to review candidate records; now learn how to manage the tracking of candidates through the hiring process within Texas Tech Careers .
Chapter Objectives
At the end of this chapter hiring manager users will be able to:
Update the HR status on candidates to track through hiring process
Understand the candidate workflow
Access and complete a form
eLink a blank form by itself to be completed by the recipient

Hiring Manager User Guide
Revised 11-12-2015 Page 41
Candidate Workflow
The candidate workflow is the path/s for each candidate to move through the hiring process. Each hired candidate must move through the required workflow statuses and steps to reach the Hired status. Other candidates will not reach the final Hired status, but may instead move through other various statuses before having the disposition form added. The workflow consists of many HR Statuses and required forms. Below is a copy of the workflow chart (refer to Appendix B for a larger view).

Hiring Manager User Guide
Revised 11-12-2015 Page 42
Transition Candidates: Candidate Workflow Instructions
Below are each of the steps that must be taken to transition candidates through the workflow process in Kenexa. Each status has step-by-step instructions on the actions required to move the candidate to the next status. *NOTE: Some statuses are automatically changed by the system, while others are initiated by the department. 1. Manager Review:
a. All candidates who self disclose that they meet the minimum qualifications of the position come into the applicant pool at this status.
Not Interested in candidates? a. Department adds the Disposition form to each candidate record.
System will change the candidate’s HR Status.
Applicant record will be removed from your pool for review. Interested in Candidates? 2. Request Interview:
a. Department changes status to Request Interview.
3. Interview Complete: a. Department changes status to Interview Complete.
Department adds the Interview Feedback form.
Not interested in a candidate after the interview? a. The Interview Feedback form should still be added. b. Then add the Disposition Form.
System will change the candidate’s HR Status.
Applicant record will be removed from your pool for review.
4. Reference Check: a. Department adds reference check form/s. (Professional/Personal Reference Check
or the TTU Employment History Verification).
5. Prepare Offer: (*See the Offer Outline Form guide) a. Department adds the Offer Outline form.
Follow the guidelines associated with this form. b. This form must be routed for approvals and approved. c. System will change status to Extend Offer when form is approved.

Hiring Manager User Guide
Revised 11-12-2015 Page 43
6. Extend Offer: (*See the Create Official Offer Document guide)
a. Department creates the Offer Document. b. Post document to Candidate Portal. c. Candidate must accept the offer online. d. System will change status to Offer Accepted when candidate accepts.
7. Offer Accepted:
a. After the candidate accepts, they will receive an e-mail from HireRight to conduct the background check.
*The candidate must complete the information on the HIreRight site in order for the background check to be conducted.
8. HR Processes:
a. The following status changes happen and do not require any action from the department.
Initiate Background Check
Background Results
Final Offer
9. Final Offer: a. Hiring Manager listed on the req will receive an email stating candidate is “Cleared
to hire”. b. Department will then add the Final Offer form. c. Department will change the HR status to Ready to Hire. d. The following status changes are automatically made by the system:
Send to Banner
Send to Onboarding
10. Send to Onboarding: a. Candidate will receive an e-mail to complete the new hire forms in the Onboarding
site. b. Candidate remains in this status until onboarding has been completed, the Form I-9
and EVerify process has been completed, and the ePAF has been processed. c. HR will change status to Hired.
11. Hired:
a. This is the Final Status for the hired candidate. b. When all candidates are in a final status, HR will close the req.

Hiring Manager User Guide
Revised 11-12-2015 Page 44
Changing HR Status
The HR status describes where a candidate is in the hiring process. Visible within Texas Tech Careers, the HR status is also a significant communication tool upon which reporting metrics are based. Each step or phase in the process has an HR status to reflect it. The applicant workflow chart (Appendix B) depicts the order of the statuses available.
Elements of HR Status
The following are important considerations regarding HR status:
Designating an HR status is done from within a folder.
It is not possible to undo an HR status and go back to the previous step. If a mistake is
made or something has changed with the candidate, please contact the TTU Talent
Acquisition team.
Some HR Statuses are associated with forms. For example, when you update a candidate
to the Interview Complete status, the Interview Feedback form will pop-up to be
completed in a new window.
The statuses should be changed/updated to accurately reflect all candidates who were
interviewed, had references checked, were given and offer, etc.

Hiring Manager User Guide
Revised 11-12-2015 Page 45
Changing the HR Status in Folder
To change or update the HR status for a candidate:
1. Click the current HR Status for the chosen candidate. A pop-up window will appear with
the next available statuses to transition a candidate.
2. Click the appropriate HR status. See Figure 4-1 for an example.
3. Click Save to save the new status and close the screen.
4. The Action date defaults to the current date. This date only reflects the date the status
was changed in the system; there is no need to change this date.
Figure 4- 1: Changing HR status in req folder
Changing the HR Status in Homepage Panel
To change or update the HR status for a candidate while on a homepage panel:
1. Click the HR Status for the chosen candidate. A drop-down menu will appear with the
next available statuses to transition a candidate.
2. Click the appropriate HR status. See Figure 4-2 for an example.
3. Click Save to save the new status.
Figure 4- 2: Updating HR status in panel

Hiring Manager User Guide
Revised 11-12-2015 Page 46
Changing the HR Status in the Talent Record
To change or update the HR status for a candidate while viewing the Talent Record:
1. Click the candidate’s name to open their Talent Record.
2. Click the Actions button in the top, right corner; a drop down menu will appear.
3. Hover the mouse over Update Status; a menu will appear to the left of the original
menu.
4. Choose and click the status to update to. See Figure 4-3 for an example.
Figure 4- 3: Updating HR status in Talent Record
Candidates will see not see all of the different status changes. The candidate’s status
will update as they are transitioned in the workflow. Refer to Appendix C for a chart
displaying the statuses candidates will see.

Hiring Manager User Guide
Revised 11-12-2015 Page 47
Update and Add Next
To process a candidate through several statuses at one time, use Update and add next. This processes the current status change/update and refreshes the screen to allow immediate selection to the next status (if available). This option will not work for all statuses as some require forms to be added/completed or other action. To use update and add next:
1. Click the HR Status for the chosen candidate. Update status screen displays the status
options for the candidate.
2. Click the appropriate HR status.
3. Click Update and add next. The screen refreshes and moves the candidate to the next
HR status. Some statuses may require a form to be completed before adding the next
status. If the form is not completed, the status will not change. Refer to Appendix B:
Candidate Workflow Chart to see which statuses require a form.
4. When finished changing the statuses, click OK to close the window.

Hiring Manager User Guide
Revised 11-12-2015 Page 48
Access and Complete Forms
Add, complete and view completed forms within the system. Forms are used to capture and store all types of information related to the hiring process. Examples of forms used include Interview Feedback, Reference Check, Offer Outline, etc.
Accessing/Viewing Forms
Forms can be accessed in a few different ways:
While viewing a candidate’s Talent Record, in the Action Log
By clicking the forms icon
While viewing an eLink
Add a Form in Req Folder or Homepage Panel
To add a form while viewing candidates in the req folder or homepage panel:
1. From a list of candidates, click the forms icon .
2. Select the form to add from the drop-down menu at the top-left side of the screen.
3. Click the button marked Add form. See Figure 4-4.
4. Complete all required fields (*) and any appropriate optional fields.
5. Click Save or next appropriate button (some forms need to be routed for approval or
sent to another user to complete).
6. Click OK to close the confirmation message.
Figure 4- 4: Adding forms

Hiring Manager User Guide
Revised 11-12-2015 Page 49
Add a Form in Talent Record
To add a form while viewing candidates on the homepage panel:
1. Click the candidate’s name to open their Talent Record.
2. Click the Actions button in the top, right corner; a drop down menu will appear.
3. Hover the mouse over Add Form; a menu will appear to the left of the original menu.
4. Choose and click the form to add. See Figure 4-5 for an example.
5. Complete all required fields (*) and any appropriate optional fields.
6. Click Save or next appropriate button (some forms need to be routed for approval or
sent to another user to complete).
7. Click OK to close the confirmation message.
Figure 4- 5: Adding forms in Talent Record

Hiring Manager User Guide
Revised 11-12-2015 Page 50
Sending a Blank Form
Blank forms may be sent via an eLink for completion. Once the forms are completed by the recipient, the completed form will be added to the candidate record. To send only a form to be completed (not the form along with the resume/CV):
1. From a list of candidates, click the forms icon .
2. Select the form to send from the drop-down menu.
3. Click eLink blank form. See Figure 4-4.
4. Address the eLink as follows:
If receipt is a … Then
User of Texas Tech Careers Select the name from the System users list.
Not a User of Texas Tech Careers Type the complete e-mail address in the box provided for
Non-system users.
Multiple recipients may be entered at one time. Separate each email address with a
semi-colon (;).
5. Type a message to the recipient. See Figure 4-6.
6. Click Send. A confirmation message appears.
7. Click OK to close the confirmation message.
Figure 4- 6: eLink options

Hiring Manager User Guide
Revised 11-12-2015 Page 51
eLink Overview
Use eLinks to send resumes/CVs and/or forms to others via e-mail. Without logging in to Texas Tech Careers, these people will be able to perform actions such as:
View resumes/CVs sent to them
Complete a blank form that was sent to them
Review an already completed form that was sent to them
Send comments back to the sender via e-mail
Elements of an eLink
Texas Tech Careers automatically records eLink history: the recipient’s name, the date
the eLink was sent, date viewed by the recipient and date responded to by the recipient
The recipient’s response is automatically recorded in the candidate’s Talent Record
The sender of the eLink will receive confirmation of receipt e-mail as well as an e-mail
with the recipient’s response to the eLink (once the recipient responds)
eLink a Candidate Record
To send an eLink:
1. From a list of candidates, select the checkbox/es for the candidate/s record/s to eLink.
2. Click eLink via the Actions menu.
3. Address the eLink as follows:
If receipt is a… Then
User of Texas Tech Careers
Select the name if the system users list.
Not a user of Texas Tech Careers
Type the complete e-mail address in the e-mail address field.

Hiring Manager User Guide
Revised 11-12-2015 Page 52
4. Decide whether or not to Include HR status and click that checkbox. This shows the
recipient the HR status for that candidate within that folder.
5. The Forms to view field includes a list of completed forms that are assigned to each
candidate the forms are for viewing only, not editing.
6. The Forms to complete field includes blank forms that must be filled out by the
recipient of the eLink. It is recommended to check the field to Notify me when these
forms have been submitted. This will send a confirmation message via e-mail once the
form(s) have been completed and thus returned to the system .
7. Complete the Subject and Your message fields.
8. Click Send. See Figure 4-7.
Figure 4- 7: Sending an eLink

Hiring Manager User Guide
Revised 11-12-2015 Page 53
View and Respond to eLinks
To review and respond to an eLink:
1. Open the e-mail message. Click the link composed of the candidate’s name (and any
additional information, such as title and employer).This launches the eLink in a web
browser.
2. Click the Overview, Text resume/CV, PDF resume/CV, Forms, or HR Status tabs to
access the various kinds of information the sender included.
3. To complete a blank form, click Forms. Refer to Figure 4-8.
Click the form name to either view or complete the form(s) sent. When you complete a
form, the information is automatically updated back in the system.
4. When you have finished reviewing the eLink, either close the window or click Respond
to send comments back to the sender via e-mail.
Figure 4- 8: Reviewing the Forms section of an eLink
Responding to eLinks
To respond to an eLink:
1. Click the link in your e-mail to open the eLink. Click the button marked Respond located
in the top right of the window.
2. Click Send.

Hiring Manager User Guide
Revised 11-12-2015 Page 54
Chapter Summary
HR statuses are used to track candidates through the hiring process
Some HR statuses require a form to be completed
Texas Tech Careers forms are used to capture and store all types of information
Depending on your user type, you may or may not be able to add, view, edit and/or
delete forms
eLinks allow you to send resumes/CVs and forms to hiring managers via e-mail
The sender of an eLink will receive a confirmation e-mail as well as an e-mail with the
recipient's response, if the recipient responds
When an eLink is responded to, the sender receives a notification via e-mail

Hiring Manager User Guide
Revised 11-12-2015 Page 55
Chapter 5: Prepare and Extend an Offer
Chapter Overview
Once interviews and reference checks have been completed, an Offer Outline Form is ready to be prepared. Once approved, an Offer Document (letter) may be extended to the candidate. The Offer Document is created within the system and posted to the Candidate Portal in the candidate’s account. When the candidate accepts the offer, the candidate will continue through a series of HR statuses to complete the hiring process. This chapter will review the offer process in the system, as well as review the remaining HR statuses.
Chapter Objectives
At the end of this chapter hiring manager users will be able to:
Add and complete the Offer Outline Form
Create the Offer Document and post to candidate portal
Take a hired candidate through remaining steps of hiring process in the system

Hiring Manager User Guide
Revised 11-12-2015 Page 56
Prepare Offer Form and Approval
The Offer Outline Form must first be approved before extending the Offer Document to a candidate. The Offer Outline Form will capture most of the information to be transferred onto the system built ePAF, including the funding source and proposed salary.
Offer Outline Form
To add form: Note: the candidate should be in “Prepare Offer” HR status before beginning the form.
1. When the status is updated to Prepare Offer, the Offer Outline Form will automatically open
in a new window. It may be completed then, or the window may be closed and the form can
be accessed later by clicking the forms icon . in the req folder’s candidate grid
a. Select the Offer Outline Form to add from the drop-down menu at the, top-left side
of the screen.
b. Click the button marked Add form. Refer to Chapter 4: Adding a Form.
2. Complete all required fields (*) and any appropriate optional fields. Below is a quick chart
with some helpful tips on completing this form:
Candidate Information For rehire, transfer, or concurrent processes, make sure you have the candidate’s R#
Position Information Ensure the Departmental ePAF Originator is correct.
Enter the Proposed Rate, Premium Pay Code, and Targeted Start Date.
NOTE: There should be at least 10 business days between the day the Offer Outline form is approved and
the targeted start date.
Organization and Funding for Salary Enter information as you would for a traditional ePAF
NOTE: Do not use codes for the Building/Location or County
NOTE: Be sure to follow directions in the information circles
Funding Source Add up to five FOAPs
There is a text box in this section for any additional notes or information
Please Provide Billing Information for the Background Check The FOP listed here will be charged
Hiring Manager Signature and Sponsorship Choose the correct Hiring Manager to sign the offer letter by clicking List>> and selecting the appropriate
name.

Hiring Manager User Guide
Revised 11-12-2015 Page 57
Form Approval Hiring Manager Department Selects
Department Head Department Selects
HR Approval A Talent Acquisition, TTU (HR-Main Campus)
Compensation Bypass
Additional Approvers 1 & 2 Select any additional people who need to approve the offer. Notice you
can choose a system user or non-system user (enter any e-mail address).
3. Select the appropriate person/people for “Notify upon form approval completion”. This
person/people will receive a system generated email once the form is fully approved. It is
recommended to select the Form Creator at minimum.
4. Click Save and send for approval to route the form. See Figure 5-1.
Figure 5- 1: Offer Outline Form
In order for an offer outline form to be approved the following must be met:
The requisition must have been posted a minimum of 10 business days;
The candidate’s HR status must be Prepare Offer;
A minimum of one Interview Feedback form and Reference Check form must be completed;
There must be a minimum of 10 business days between the date the Offer Outline form is approved and the Targeted Start Date;
Interview selections must be compliant with TX Veteran’s recruitment requirements. This includes interviewing at least 1 individual qualifying for the Veteran’s Preference for every 6 interviews conducted or 20% of the pool. Leave these candidates in the Interview Complete HR Status.

Hiring Manager User Guide
Revised 11-12-2015 Page 58
Form Approval
An eLink will be sent immediately to the first approver and every subsequent user as the form moves through the process. Any form sent via eLink can be approved through the link. Refer to Chapter 4-Candidate Tracking to review the eLinks. You may check the status of the approval routing by viewing the form:
1. From a list of candidates, click the forms icon .
From the list of forms, find the Offer Outline Form. The form will be marked Pending if it was properly routed. See Figure 5-2.
Figure 5- 2: Approve form in system
2. Click on Offer Outline Form link to review the information for accuracy.
3. Scroll to the Form Approval section at the end of the form (See Figure 5-3):
a. A date stamp appears next to the name of the person who has approved the form,
along with any comment the approver may have added.
b. Any name that does not have a date means they have yet to approve.
Figure 5- 3: Approve form in system
Declined Offer Outline Form/Editing
The Offer Outline Form may be declined by any approver for various reasons. When the form is
declined, edits should be made so that the form can be re-routed for approvals.
1. When changes need to be made, click the edit pencil icon . This will open the form in a new
window.
2. Make all necessary changes on the form.
3. Click Save and send for approval. Refer to Figure 5-1.

Hiring Manager User Guide
Revised 11-12-2015 Page 59
Create, Post, and Send an Offer Document (Offer Letter)
Create the official Offer Document for candidates within the REQ folder or directly from the Talent Record Actions menu for candidates. The Offer Outline Form must be approved and the candidate must be at the Extend Offer status to create, post, and send an offer document to be successfully accepted. 1. From within a REQ folder, select the candidate from a list of candidates.
2. Click Create Document via the Actions menu. See Figure 5-4.
Figure 5- 4: Select Create document
3. Select the correct document template from the list and click Go. Templates are labeled Hourly or Monthly, select according to the position. See Figure 5-5.
Figure 5- 5: Select document template

Hiring Manager User Guide
Revised 11-12-2015 Page 60
4. The Create Document page displays. See Figure 5-6.
Figure 5- 6: Select document template
5. Click Preview to see what your document will look like when printed. Click the X in the top right corner to close the preview window.
6. Click Save as PDF to create a PDF version of the document.
7. Click Go to post the document to the Candidate Portal. See Figure 5-7.
Figure 5- 7: Option to post to Candidate Portal

Hiring Manager User Guide
Revised 11-12-2015 Page 61
8. Ensure the document is selected. If it does not appear, search by typing Offer Document in the box. See Figure 5-8.
9. Choose a date to remove the document from the candidate portal. All offers should
have an expiration date.
10. Click Post to candidate portal.
Figure 5- 8: Post to Candidate Poral
11. The confirmation window will open and show whether the posting was successful or
unsuccessful. The option to send an email communication to the candidate will appear.
See Figure 5-7.
12. From the drop down menu, select the appropriate template. The Candidate Offer Email
is for external candidates. The Candidate Offer Email-Internal is for internal candidates.
Then click Go. See Figure 5-9.
Figure 5- 9: Post to Candidate Portal Confirmation

Hiring Manager User Guide
Revised 11-12-2015 Page 62
13. The next screen will include the email template. See Figure 5-10.
Figure 5- 10: Send email communication
14. The Position Description should be attached to send to the candidate.
Click the Browse button, under Upload attachments from the local file.
Browse for the document on the computer and follow the screen instructions to
upload.
Once the process is complete, the file will show up in the bottom right corner,
under File. See Figure 5-10.
15. Click Preview to see what the email will look like. Click the X in the top right corner to
close the preview window.
16. Click Send to complete and notify the candidate of the offer.
Hiring Manager User Guide
Revised 11-12-2015 Page 63
Candidate Portal
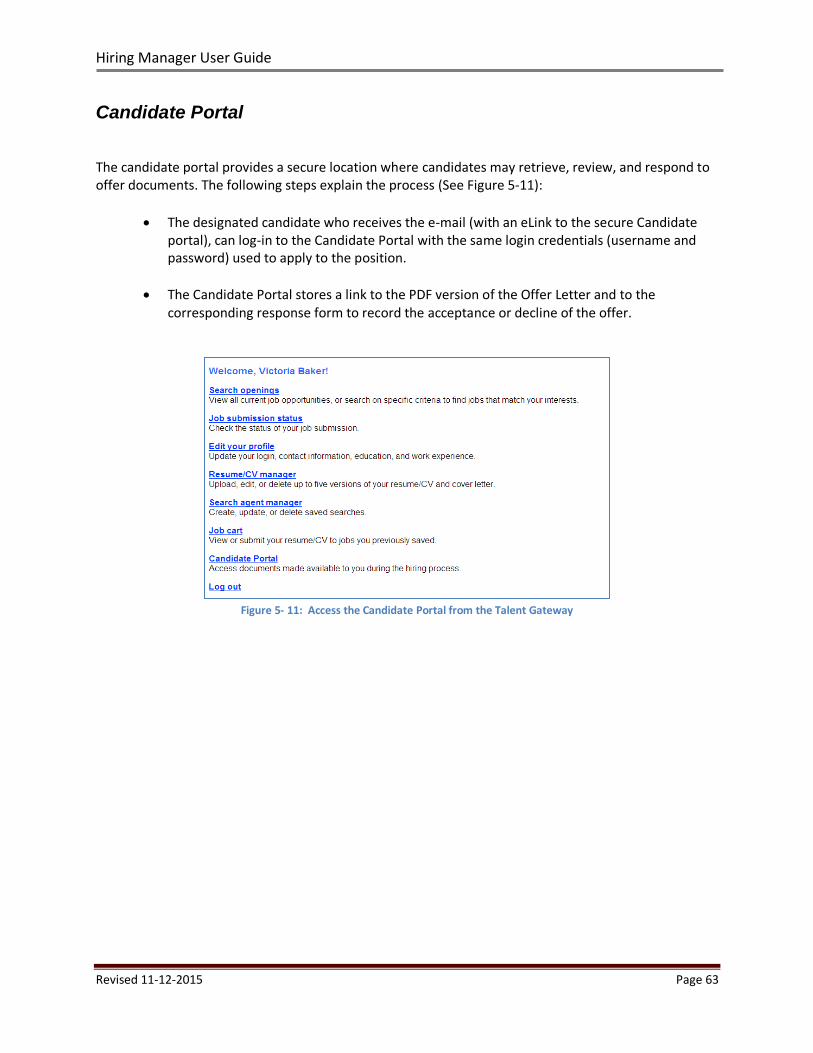
The candidate portal provides a secure location where candidates may retrieve, review, and respond to offer documents. The following steps explain the process (See Figure 5-11):
The designated candidate who receives the e-mail (with an eLink to the secure Candidate portal), can log-in to the Candidate Portal with the same login credentials (username and password) used to apply to the position.
The Candidate Portal stores a link to the PDF version of the Offer Letter and to the corresponding response form to record the acceptance or decline of the offer.
Figure 5- 11: Access the Candidate Portal from the Talent Gateway

Hiring Manager User Guide
Revised 11-12-2015 Page 64
Background Check Process
After the candidate digitally accepts the offer, the background check process will begin. This consists of the following steps:
1. HR will be notified that the candidate has digitally accepted the offer and will initiate the background check with HireRight (background check vendor).
2. HireRight will send an email to the candidate requesting them to login to the HireRight site. The candidate must follow all instructions and provide consent for the background check.
3. HR will receive the results of the background check and will review. If there are any
issues or concerns, HR will contact the department. The Hiring Manager (listed on the req) will receive an approve to hire email for those candidates without issues.
Final HR Statuses for Hired Candidate
Once the candidate is cleared for hire, HR will update the candidate’s HR status to Final Offer and the person listed as the Hiring Manager on the req will receive an email notification. The department should then add the Final Offer form and update the status to Ready to Hire. The Final Offer form is used to confirm the start date of the hire and starting salary. The date entered will be generated on the ePAF (if system generated) and will be the date used in reports.
Please refer to Chapter 4 for instructions to add a form and/or update the HR status.
Completing this last step will either transition the candidate’s record to Send to Onboarding (if New Hire or Rehire was selected on the Offer Outline form) or straight to the Hired status (if Transfer or Concurrent was selected on the Offer Outline form).

Hiring Manager User Guide
Revised 11-12-2015 Page 65
Chapter Summary
The Offer Outline Form must be created and approved before creating an Offer
Document
The Offer Document is created in the system, then posted and emailed to the candidate
to view and accept
The candidate accepts the offer in the Candidate Portal
The background check process is triggered within the system
The Final Offer form must be completed and the status must be updated to Ready to
Hire in order for the candidate to start the onboarding process

Hiring Manager User Guide
Revised 11-12-2015 Page 66
Chapter 6: Closing the Req
Chapter Overview
Once a hire is made and the position is filled, all remaining candidates should be transitioned to a final status to allow the req to be closed.
In this chapter we’ll take a look at concluding the hiring cycle by updating candidates’ HR statuses and closing the req.
Chapter Objectives
At the end of this chapter hiring manager users will be able to:
Take candidates through the remaining steps of the hiring cycle

Hiring Manager User Guide
Revised 11-12-2015 Page 67
Final Dispositions
Updating the statuses of candidates is important for two reasons. Keeping candidates’ HR statuses up to date, allows candidates to know the status of the hiring process and accurately document the decision making with each candidate in the process. Many reports are based on HR status. Keeping this information current is a key to maximizing the usefulness and validity of reports. Examples of final dispositions include:
Not Interviewed-Not Selected
Interviewed-Not Hired
Offer Declined
Hired
Other than the Hired status, all other candidates must be dispositioned by adding a Disposition Form. Refer to Chapter 2 to review how to add a form. Within the form, choose the appropriate Disposition status and reason for choosing the status. Click Save.
To ensure accurate reporting, be sure to update all candidates in req folders to a final
status
Closing a Req
Once all candidates have been transitioned to a final disposition status the TTU Talent Acquisition office will change the status of the req to Closed.

Hiring Manager User Guide
Revised 11-12-2015 Page 68
Chapter Summary
All remaining candidates must be transitioned to close the req
TTU Talent Acquisition changes the req status to closed

Hiring Manager User Guide
Revised 11-12-2015 Page 69
APPENDIX A
Glossary of Terms
Auto-filer Feature in BrassRing in which resumes submitted for your jobs are automatically filed to the req folder associated with that position.
Auto Req ID The unique BrassRing generated req number, assigned to each req in the system. An example of an auto req ID is 123BR.
Candidate Type A term used to define the type of candidate one sees within BrassRing . The types are internal, external, Veteran Preference, or Former TX Foster Youth Preference
eLink A functionality allowing e-mail to be used to streamline the hiring process. The e-mails directed to Hiring Manager contain a link that allows them to review and provide feedback regarding candidates sent to them by the Recruiter.
Forms Online versions of forms that are housed in Texas Tech Careers.
Hiring Team Group of people who will need access to the candidate pool, who will assist with the recruitment.
HR Status The term used to identify where in the hiring process/workflow a candidate lies, such as Interview Complete or Prepare Offer.
PDF Resume/CV A tab found within the eLink of a candidate directed to Hiring Managers that displays the PDF version of a candidate’s resume, if the candidate opted to upload his/her resume when applying for the job. The PDF retains all of the original formatting of the uploaded resume file.
Req Folder A folder in Texas Tech Careers which is automatically created when a requisition is opened to store candidate resume data.
Requisition A requisition, also referred to as a req, is an online form that documents position information. Requisitions maybe created by users with Hiring Managers access.
Talent Gateways Job hosting portals that allow job seekers to search and apply for jobs.
Talent Record This includes all applicants’/candidates’ information, including his or her resume, as well as any forms or notes associated with the application/candidate.

Hiring Manager User Guide
Revised 11-12-2015 Page 70
APPENDIX B

Hiring Manager User Guide
Revised 11-12-2015 Page 71
APPENDIX C
HR Status in Manager Portal Status Candidate Sees
Manager Review Applied
Manager Hold Applied
Request Interview Under Review
Interview Scheduled Under Review
Interview Complete Under Review
Reference Check Under Review
Prepare Offer Under Review
Extend Offer Pre Onboard Activities
Offer Accepted Pre Onboard Activities
Initiate Background Check Pre Onboard Activities
Background Results Pre Onboard Activities
Final Offer Pre Onboard Activities
Ready to Hire Pre Onboard Activities
Hired Hired
Offer Declined Candidate Withdrew
Applicant Self Withdrew Candidate Withdrew
Position Filled No Longer Under Consideration
Does Not Meet Min Qualifications No Longer Under Consideration
Company Not Interested No Longer Under Consideration
Candidate Not Interested Candidate Withdrew