K SMART K ECOSMART - aslotel smart k ecosmart srkecosmart-01_15-01 ... serie k ecosmart...
77
K SMART K ECOSMART SRKECOSMART-01_15-01-2014 ISTRUZIONI PER L’USO INSTRUCTIONS FOR USE INSTRUCCIONES PARA EL USO MODE D’EMPLOI GEBRAUCHSANLEITUNGEN MINIBAR A COMPRESSORE MINIBAR WITH COMPRESSOR MINIBAR DE COMPRESOR MINIBAR A COMPRESSEUR KOMPRESSOR-MINIBAR INDEL B S.p.A. Loc. Cà Baldone 47866 S. Agata Feltria (RN) ITALY Tel.: +39 0541 848 711 - Fax: +39 0541 848 000 www.indelb.com [email protected]
-
Upload
hoangthuan -
Category
Documents
-
view
232 -
download
0
Transcript of K SMART K ECOSMART - aslotel smart k ecosmart srkecosmart-01_15-01 ... serie k ecosmart...

K S M A R TK E C O S M A R T
SRKECOSMART-01_15-01-2014
ISTRUZIONI PER L’USOINSTRUCTIONS FOR USE
INSTRUCCIONES PARA EL USOMODE D’EMPLOI
GEBRAUCHSANLEITUNGEN
MINIBAR A COMPRESSOREMINIBAR WITH COMPRESSOR
MINIBAR DE COMPRESORMINIBAR A COMPRESSEUR
KOMPRESSOR-MINIBAR
INDEL B S.p.A.Loc. Cà Baldone47866 S. Agata Feltria (RN) ITALYTel.: +39 0541 848 711 - Fax: +39 0541 848 [email protected]
REFRIGERAZIONE MOBILE - FRIGOBARISO 9002 certified

SERIE K ECOSMART
SRKECOSMART-01_15-01-2014 1
ITALIANO
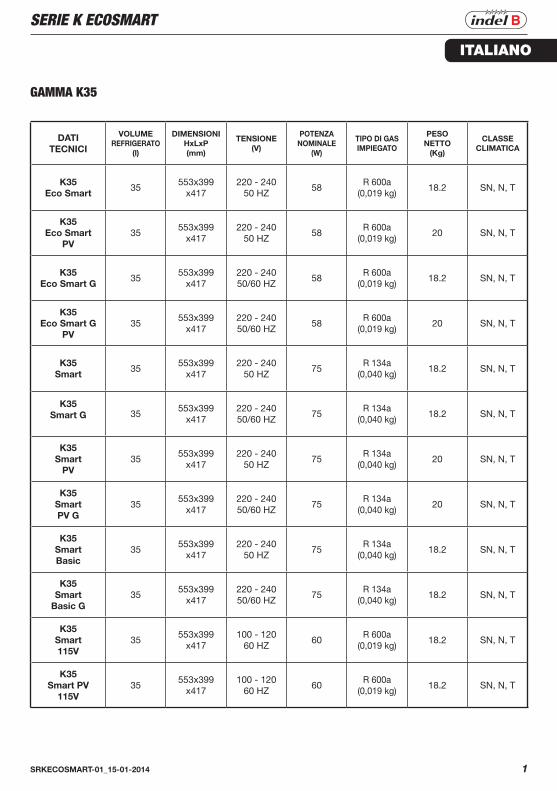
GAMMA K35
DATITECNICI
VOLUMEREFRIGERATO
(l)
DIMENSIONIHxLxP(mm)
TENSIONE(V)
POTENZANOMINALE
(W)
TIPO DI GASIMPIEGATO
PESONETTO
(Kg)
CLASSECLIMATICA
K35Eco Smart
35553x399
x417220 - 240
50 HZ58
R 600a(0,019 kg)
18.2 SN, N, T
K35Eco Smart
PV35
553x399x417
220 - 24050 HZ
58R 600a
(0,019 kg)20 SN, N, T
K35Eco Smart G
35553x399
x417220 - 24050/60 HZ
58R 600a
(0,019 kg)18.2 SN, N, T
K35Eco Smart G
PV35
553x399x417
220 - 24050/60 HZ
58R 600a
(0,019 kg)20 SN, N, T
K35Smart
35553x399
x417220 - 240
50 HZ75
R 134a(0,040 kg)
18.2 SN, N, T
K35Smart G 35
553x399x417
220 - 24050/60 HZ
75R 134a
(0,040 kg)18.2 SN, N, T
K35Smart
PV35
553x399x417
220 - 24050 HZ
75R 134a
(0,040 kg)20 SN, N, T
K35SmartPV G
35553x399
x417220 - 24050/60 HZ
75R 134a
(0,040 kg)20 SN, N, T
K35SmartBasic
35553x399
x417220 - 240
50 HZ75
R 134a(0,040 kg)
18.2 SN, N, T
K35Smart
Basic G35
553x399x417
220 - 24050/60 HZ
75R 134a
(0,040 kg)18.2 SN, N, T
K35Smart115V
35553x399
x417100 - 120
60 HZ60
R 600a(0,019 kg)
18.2 SN, N, T
K35Smart PV
115V35
553x399x417
100 - 12060 HZ
60R 600a
(0,019 kg)18.2 SN, N, T

SERIE K ECOSMART
2 SRKECOSMART-01_15-01-2014
ITALIANO
DATITECNICI
VOLUMEREFRIGERATO
(l)
DIMENSIONIHxLxP(mm)
TENSIONE(V)
POTENZANOMINALE
(W)
TIPO DI GASIMPIEGATO
PESONETTO
(Kg)
CLASSECLIMATICA
K35BASIC
PV35
553x399x417
220 - 24050 HZ
75R 134a
(0,040 kg)20 SN, N, T
K35BASICPV G
35553x399
x417220 - 24050/60 HZ
75R 134a
(0,040 kg)20 SN, N, T
K35BASIC 115V
35553x399
x417100 - 120
60 HZ60
R 600a(0,019 kg)
18.2 SN, N, T
K35BASIC PV
115V35
553x399x417
100 - 12060 HZ
60R 600a
(0,019 kg)18.2 SN, N, T
K35BASIC
Standard 115V
35553x399
x417100 - 120
60 HZ60
R 600a(0,019 kg)
18.2 SN, N, T
K35BASIC
Standard PV 115V
35553x399
x417100 - 120
60 HZ60
R 600a(0,019 kg)
18.2 SN, N, T
K35PLUS
Standard 115V
35553x399
x417100 - 120
60 HZ60
R 600a(0,019 kg)
18.2 SN, N, T
K35PLUS PV
115V35
553x399x417
100 - 12060 HZ
60R 600a
(0,019 kg)18.2 SN, N, T

SERIE K ECOSMART
SRKECOSMART-01_15-01-2014 3
ITALIANOGAMMA K40
DATITECNICI
VOLUMEREFRIGERATO
(l)
DIMENSIONIHxLxP(mm)
TENSIONE(V)
POTENZANOMINALE
(W)
TIPO DI GASIMPIEGATO
PESONETTO
(Kg)
CLASSECLIMATICA
K40Eco Smart
40553x399
x470220 - 240
50 HZ58
R 600a(0,019 kg)
20 SN, N, T
K40Eco Smart
PV40
553x399x470
220 - 24050 HZ
58R 600a
(0,019 kg)22 SN, N, T
K40Eco Smart G
40553x399
x470220 - 24050/60 HZ
58R 600a
(0,019 kg)20 SN, N, T
K40Eco Smart G
PV40
553x399x470
220 - 24050/60 HZ
58R 600a
(0,019 kg)22 SN, N, T
K40Smart
40553x399
x470220 - 240
50 HZ75
R 134a(0,040 kg)
20 SN, N, T
K40Smart G 40
553x399x470
220 - 24050/60 HZ
75R 134a
(0,040 kg)20 SN, N, T
K40Smart
PV40
553x399x470
220 - 24050 HZ
75R 134a
(0,040 kg)22 SN, N, T
K40Smart PV G
40553x399
x470220 - 24050/60 HZ
75R 134a
(0,040 kg)22 SN, N, T
K40Smart115V
35553x399
x417100 - 120
60 HZ60
R 600a(0,019 kg)
18.2 SN, N, T
K40Smart PV
115V35
553x399x417
100 - 12060 HZ
60R 600a
(0,019 kg)18.2 SN, N, T
K40PLUS
Standard 115V
35553x399
x417100 - 120
60 HZ60
R 600a(0,019 kg)
18.2 SN, N, T
K40PLUS PV
115V35
553x399x417
100 - 12060 HZ
60R 600a
(0,019 kg)18.2 SN, N, T

SERIE K ECOSMART
4 SRKECOSMART-01_15-01-2014
ITALIANO
GAMMA K60
DATITECNICI
VOLUMEREFRIGERATO
(l)
DIMENSIONIHxLxP(mm)
TENSIONE(V)
POTENZANOMINALE
(W)
TIPO DI GASIMPIEGATO
PESONETTO
(Kg)
CLASSECLIMATICA
K60Eco Smart
60485x490
x570220 - 240
50 HZ58
R 600a(0,019 kg)
21 SN, N, T
K60Eco Smart
PV60
485x490x570
220 - 24050 HZ
58R 600a
(0,019 kg)24 SN, N, T
K60Eco Smart G
60485x490
x570220 - 24050/60 HZ
58R 600a
(0,019 kg)21 SN, N, T
K60Eco Smart G
PV60
485x490x570
220 - 24050/60 HZ
58R 600a
(0,019 kg)24 SN, N, T
K60Smart
60485x490
x570220 - 240
50 HZ75
R 134a(0,040 kg)
21 SN, N, T
K60Smart G 60
485x490x570
220 - 24050/60 HZ
75R 134a
(0,040 kg)21 SN, N, T
K60Smart
PV60
485x490x570
220 - 24050 HZ
75R 134a
(0,040 kg)24 SN, N, T
K60Smart PV G
60485x490
x570220 - 24050/60 HZ
75R 134a
(0,040 kg)24 SN, N, T
K60Smart115V
35553x399
x417100 - 120
60 HZ60
R 600a(0,019 kg)
18.2 SN, N, T
K60Smart PV
115V35
553x399x417
100 - 12060 HZ
60R 600a
(0,019 kg)18.2 SN, N, T
K60PLUS
Standard 115V
35553x399
x417100 - 120
60 HZ60
R 600a(0,019 kg)
18.2 SN, N, T
K60PLUS PV
115V35
553x399x417
100 - 12060 HZ
60R 600a
(0,019 kg)18.2 SN, N, T

SERIE K ECOSMART
SRKECOSMART-01_15-01-2014 5
ITALIANO
AVVERTENZE I Minibar non possono essere installati all’aperto, nemmeno nel caso in cui siano riparati da una tettoia.Nei collegamenti si sconsiglia di ricorrere a prolunghe e prese multiple; nel caso in cui il Minibar sia installato
tra altri elementi di arredo, controllare che il cavo non subisca piegature o compressioni pericolose.Non eseguire interventi di pulizia o manutenzione senza aver prima scollegato il Minibar dalla rete di alimentazione.Per garantire un buon funzionamento e un consumo contenuto di elettricità è importante che l’installazione
sia eseguita correttamente. Per un funzionamento ottimale assicurarsi che sia garantita l’aerazione del gruppo refrigerante.
non si assume la responsabilità per eventuali danni a persone o cose e/o al Minibar stesso, derivati da un’installazione differente da quella illustrata in questo manuale.
AVVERTENZA!Fare in modo che le aperture di ventilazione, presenti nel corpo dell’apparecchio o nella struttura incorpo-
rata, siano sempre prive di ostruzioni.
AVVERTENZA!Non usare dispositivi meccanici o altri mezzi diversi quelli raccomandati dal produttore per accelerare lo
sbrinamento.
AVVERTENZA!Non danneggiare il circuito del refrigerante.
AVVERTENZA!Non usare apparecchi elettrici diversi da quelli raccomandati dal produttore all’interno del vano conser-
vazione cibi dell’apparecchio.
CautelaTenere il frigorifero lontano da fiamme o simili sostanze incandescenti prima del suo smaltimento.
Attenzione!Prima di smaltire il Minibar, conservarlo lontano dal fuoco o da simili sostanze incandescenti.
Attenzione!Il Minibar non può essere utilizzato su mezzi di trasporto pubblici.
Attenzione!Sorvegliare attentamente i bambini per evitare che giochino con questa apparecchiatura.
Attenzione!Si raccomanda di non utilizzare prolunghe sul cavo di alimentazione.
Attenzione!Rischio di intrappolamento bambini. Prima di gettare il vecchio refrigeratore o freezer:• Rimuovere gli sportelli• Lasciare i ripiani in posizione in modo che i bambini non possano entrarci facilmente.

SERIE K ECOSMART
6 SRKECOSMART-01_15-01-2014
ITALIANO
GENERALITÀ
I Minibar della Serie K Ecosmart rientrano nella categoria di Classe Energetica A+++, con un consumo ridotto dell’83% rispetto ai migliori prodotti ad assorbimento sul mercato.
Possono funzionare in tre modalità differenti:
NORMALE: uno switch seleziona le opzioni minimo e massimo freddo. Impostandoil termostato, si ha un ciclo frigorifero normale, con sbrinamento elettronico.
TIMER: programma i tempi di funzionamento del compressore.
SISTEMA SMART: Rileva la presenza dell’ospite in camera e mette in funzione il compressore quando l’ospite esce.
All’atto del ricevimento il Minibar è impostato in modalità NORMALE

SERIE K ECOSMART
SRKECOSMART-01_15-01-2014 7
ITALIANO
INSTALLAZIONE
Per un’ottimale installazione del Minibar è opportuno garantire l’areazione del gruppo refrigerante praticando delle aperture per l’ingresso e l’uscita dell’aria come indicato nella figura che segue.
AERAZIONE
Il sistema refrigerante a compressore emette calore e richiede una buona aerazione, sono perciò poco adatti gli ambienti con una ventilazione non perfetta. Il Minibar va installato in un ambiente servito da un’apertura che assicuri il necessario ricambio d’aria ed è indispensabile non coprire od ostruire le griglie che permettono la buona ventilazione dell’apparecchio. Inoltre va evitato il posizionamento dello stesso in un luogo direttamente esposto alla luce solare o nei pressi di altre fonti di calore.
Per i modelli a incasso, inserire il Minibar nel mobiletto, ga-rantendo una sezione per ingresso e uscita dell’aria di almeno 200 cm2, corrispondente a un’altezza di mm. 48 per l’intera larghezza del refrigeratore. Lasciare 60 mm liberi fra il Minibar e il mobile sui lati superiore, sinistro e destro.
SE
ZIO
NE
LIB
ER
A 2
00 c
m2

SERIE K ECOSMART
8 SRKECOSMART-01_15-01-2014
ITALIANO
COLLEGAMENTO ELETTRICO E MESSA A TERRA
Prima di inserire la spina nella presa di corrente assicurarsi che la tensione di rete sia corrispondente a quella indicata sulla targhetta dati tecnici (posta all’interno del Minibar) e che la presa sia dotata di un regolare impianto di messa a terra, come prescrivono le normative sulla sicurezza degli impianti elettrici. Inoltre la presa elettrica deve essere in grado di sopportare il carico massimo di potenza dell’apparecchio, indicata sulla targhetta stessa.
Attenzione!Se la presa non è dotata di impianto di messa a terra o nel caso in cui si utilizzino prese multiple o adattatori
il Costruttore declina ogni responsabilità per eventuali danni a persone o cose e/o al Minibar stesso.
Attenzione!L’utente deve avere sempre accesso alla spina di alimentazione.
Attenzione!Se il cavo di alimentazione è danneggiato, per evitare ogni rischio, esso deve essere sostituito dal produttore
o dal suo addetto alla manutenzione oppure da una persona con requisiti simili.
Attenzione!Se il Minibar viene disinstallato è necessario rimuovere lo sportello anteriore.
Sul retro del Minibar sono presenti due spine di alimentazione.
Collegare la spina “POWER” alla presa della camera predisposta per il Minibar (presa non collegata all’unità di risparmio energetico).
Collegare la spina “SIGNAL” ad una presa qualsiasi collegata all’unità di risparmio energetico (Energy saver) .
NOTA: Il Minibar funziona in modalità NORMALE/TIMER se la spina “SIGNAL” non è collegata, si intende quindi un funzionamento non collegato alla presenza dell’Ospite in camera e regolato dalla tempera-tura scelta dal Cliente tramite il selettore descritto nel capitolo DESCRIZIONE E FUNZIONAMENTO.
Attenzione!Se il cavo POWER e il cavo SIGNAL vengono collegati al contrario, il Minibar funzionerà quando l’ospite è
dentro la stanza e si spegnerà quando l’ospite non è in camera. Per verificare che il collegamento sia stato fatto correttamente, verificare che la luce sia accesa aprendo
la porta del Minibar dopo avere controllato che:1) l’unità di risparmio energetico (Energy saver) non sia in funzione ovvero che la smart card non sia inserita 2) il Minibar sia acceso (il selettore di temperatura davanti al Minibar non sia in posizione “0”)
In caso in cui la luce non si accenda, invertire il collegamento dei due cavi di alimentazione.

SERIE K ECOSMART
SRKECOSMART-01_15-01-2014 9
ITALIANO
DESCRIZIONE E FUNZIONAMENTO
Funzionamento in modalità NORMALEÈ possibile regolare la temperatura di accumulo all’interno del Minibar attraverso il selettore posto sulla
parte frontale del Minibar:- in posizione “0” il Minibar è spento- in posizione “*” il Minibar funziona ad una temperatura interna costante più alta (minor freddo)- in posizione “**” il Minibar funziona ad una temperatura interna costante più bassa (maggiore freddo).
Funzionamento in modalità TIMERVedi Capitolo USO DEL TIMER
Funzionamento in modalità SISTEMA SMARTIl SISTEMA SMART regola l’accensione e lo spegnimento del compressore in base alla presenza o assenza
dell’ospite in camera. L’utilizzo del SISTEMA SMART richiede la presenza in camera di un Energy Saver: una tasca porta card per il risparmio energetico.
Il cliente entra in camera e inserisce la card nella tasca, l’Energy Saver invia al Sistema Smart un segnale di presenza dell’ospite in stanza e il compressore del Minibar si ferma (i prodotti all’interno rimangono freschi a lungo grazie al freddo rilasciato dalla piastra ad accumulo). Quando il cliente esce dalla camera e toglie la card dall’Energy Saver un altro messaggio è inviato al Sistema Smart e il Minibar si rimette in funzione. Se l’ospite si ferma molte ore in camera e il freddo accumulato nella piastra si esaurisce, il Minibar si rimette in funzione automaticamente per mantenere i prodotti all’interno freschi. Se la camera rimane non occupata a lungo, il Minibar funziona in modalità ad alto risparmio energetico.
Attenzione!In modalità SISTEMA SMART non è previsto l’uso del telecomando e del timer.

SERIE K ECOSMART
10 SRKECOSMART-01_15-01-2014
ITALIANO
USO DEL TIMERI Minibar della serie K ECOSMART sono dotati di un termostato pre-tarato posto sul retro del frigo (la
temperatura è già regolata a livelli ottimali di funzionamento). La durata dei cicli di raffreddamento è selezionabile tramite il telecomando. Quando il Minibar viene attaccato all’alimentazione di rete, si accende automaticamente utilizzando le funzionalità del termostato meccanico.
Ciclo di funzionamento del compressore nel K ECOSMART controllato da timer elettronico
PROGRAMMA ORE DI FUNZIONAMENTO TEMPERATURA AMBIENTE
1° CICLO 2° CICLO
P1 09-12 18-21 25°C
P2 09-13 17-21 28°C
P3 09-13 17-22 30°C
P4 PROGRAMMABILE
OFF TASTO SPEGNIMENTO
Il compressore è in funzione per raf-freddare il contenuto del Minibar e per congelare la piastra ad accumulo di freddo (6 ore su 24 sono sufficienti).
ON OFFIl compressore è spento ed il freddo im-
magazzinato nella piastra ad accumulo provvede a mantenere la temperatura interna al Minibar. Quindi di notte il Minibar è completamente silenzioso.
Programmi impostati per K Ecosmart versione porta pannellabile
PROGRAMMA ORE DI FUNZIONAMENTO TEMPERATURA AMBIENTE
1° CICLO 2° CICLO
P1 09-13 18-22 ≤ 25°C
P2 09-14 18-23 ≤ 28°C
P3 08-14 17-23 ≤ 30°C
P4 PROGRAMMABILE
OFF TASTO SPEGNIMENTO
Programmi impostati per K Ecosmart versione porta vetro

SERIE K ECOSMART
SRKECOSMART-01_15-01-2014 11
ITALIANO
�� �����
���
���
�������������������������
���� ��
�����
USO DEL TELECOMANDO
Il Minibar a compressore dotato di telecomando permette di agire sul funzionamento del compressore in modo che funzioni durante determinati periodi della giornata. Ogni frigo ha tre periodi di utilizzo già preimpostati ed uno (P4) programmabile dall’utente. Si possono stabilire al massimo due cicli di ON/OFF nelle 24 ore. Il telecomando è di facile utilizzo. Dopo aver selezionato il programma prescelto sul telecomando, basta avvicinare il telecomando al ricevitore posto sull’esterno del Minibar (ad una distanza di circa 30-40 cm). Tenere premuto il tasto del telecomando relativo al programma prescelto per almeno due secondi: il Minibar inizierà a funzionare. Il display visualizzerà il simbolo che segue.
P1 P4P2-
P3+
SET
Minibar Remote Programmer
189A0477
OFF
for GLASS DOOR
189A0476
“beep”

SERIE K ECOSMART
12 SRKECOSMART-01_15-01-2014
ITALIANO
SET TIME OFF TIME ON 1
TIME ON 2
TIMEON 1
TIMEON 2
TIMEOFF 1
TIMEOFF 2
TIMEON 1
TIMEON 2
TIMEON 1
TIMEON 2
TIMEOFF 1
TIMEOFF 2
TIMEOFF 1
TIMEOFF 2
Dopo l’installazione della batteria, il display visualizza per 5 secondi l’immagine che segue.
Il display mostra successivamente l’ora corrente. Se nessun tasto viene premuto per i successivi 8 secondi, sul display scompaiono le scritte fino a che non viene premuto un tasto.
Premendo i tasti P1, P2 o P3, sul display appariranno i programmi preimpostati come nelle immagini che seguono. Attenzione: i programmi P1-P2 e P3 sono preimpostati e non possono essere modificati.
SET TIME OFF TIME ON 1
TIME ON 2
Programmi impostati per K Ecosmart versione porta pannellabile
Programmi impostati per K Ecosmart versione porta vetro
Programmi impostati per K Ecosmart versione porta pannellabile
TIMEON 1
TIMEON 2
TIMEOFF 1
TIMEOFF 2
TIMEON 1
TIMEON 2
TIMEON 1
TIMEON 2
TIMEOFF 1
TIMEOFF 2
TIMEOFF 1
TIMEOFF 2
Programmi impostati per K Ecosmart versione porta vetro

SERIE K ECOSMART
SRKECOSMART-01_15-01-2014 13
ITALIANO
Premendo il tasto P4, il display mostra quanto segue:
Il programma P4 consente all’utente di impostare due cicli di funzionamento del Minibar (il primo ciclo Time on1 –Time off1 e il secondo ciclo Time on2 e Time off2).
Per personalizzare il programma P4:premere contemporaneamente P1 e P4.“Time On1” sulla sinistra comincerà a lampeggiare.Utilizzare i tasti - (P2) e + (P3) per impostare l’ora di start del primo ciclo.Premere il tasto P1 per passare ai campi successivi e utilizzare nuovamente i tasti - e + per modificare l’ora
di start e stop dei cicli di funzionamento del compressore.Dopo avere ultimato la personalizzazione del programma, premere P4 per salvare le nuove impostazioni.
NOTA: Dopo aver utilizzato il Minibar in modalità TIMER, per riportarlo alla modalità NORMALE, si deve premere il testo P4 nel telecomando, dopo aver impostato in tutti gli orari il valore 00:00
(vedi paragrafo : IMPOSTAZIONE DELL’ORA)
NOTA: dopo avere utilizzato il minibar in modalità SMART, per riportarlo alla modalità NORMALE si deve staccare il cavo SIGNAL e premere il tasto P4 nel telecomando, dopo avere impostato in tutti gli orari il valore 00:00 (vedi paragrafo: IMPOSTAZIONE DELL’ORA)
TIMEON 1
TIMEON 2
TIMEOFF 1
TIMEOFF 2
Premendo il tasto P4, il display mostra quanto segue:
TIMEON 1
TIMEON 2
TIMEOFF 1
TIMEOFF 2
Programmi impostati per K Ecosmart versione porta pannellabile
Programmi impostati per K Ecosmart versione porta vetro
SERIE K ECOSMART
14 SRKECOSMART-01_15-01-2014
ITALIANO
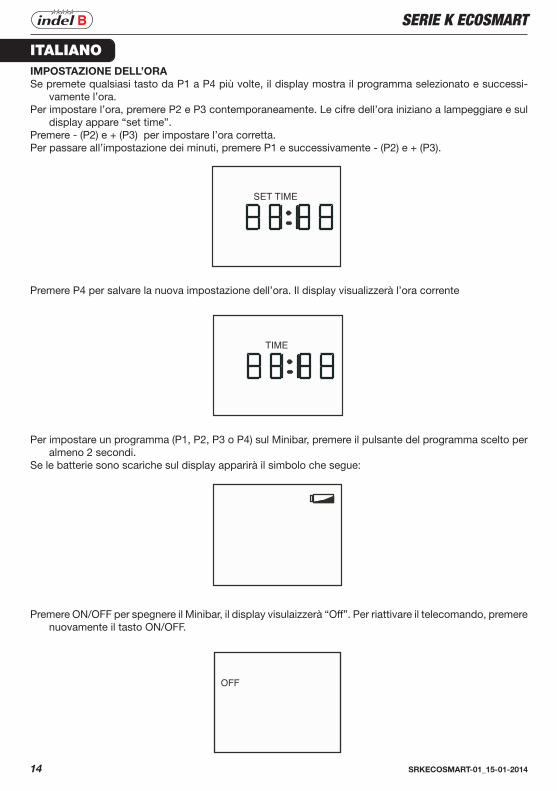
Premere P4 per salvare la nuova impostazione dell’ora. Il display visualizzerà l’ora corrente
IMPOSTAZIONE DELL’ORASe premete qualsiasi tasto da P1 a P4 più volte, il display mostra il programma selezionato e successi-
vamente l’ora.Per impostare l’ora, premere P2 e P3 contemporaneamente. Le cifre dell’ora iniziano a lampeggiare e sul
display appare “set time”.Premere - (P2) e + (P3) per impostare l’ora corretta. Per passare all’impostazione dei minuti, premere P1 e successivamente - (P2) e + (P3).
SET TIME
TIME
Per impostare un programma (P1, P2, P3 o P4) sul Minibar, premere il pulsante del programma scelto per almeno 2 secondi.
Se le batterie sono scariche sul display apparirà il simbolo che segue:
Premere ON/OFF per spegnere il Minibar, il display visulaizzerà “Off”. Per riattivare il telecomando, premere nuovamente il tasto ON/OFF.
OFF

SERIE K ECOSMART
SRKECOSMART-01_15-01-2014 15
ITALIANO
Attenzione!Se la tensione di rete viene interrotta per meno di 48 ore, il Minibar si riaccenderà con il programma pre-
cedentemente impostato. Se la tensione di rete viene interrotta per oltre 48 ore, il miniera funzionerà secondo il termostato pre-tarato. Al fine di impostare nuovamente un programma, seguire le istruzioni nel capitolo USO DEL TELECOMANDO.
Attenzione!Nel caso in cui la tensione venga interrotta volontariamente, non riaccendere (collegare il Minibar alla
tensione di rete) prima che siano passati almeno 15 minuti. In caso contrario il compressore potrebbe bloccarsi per alcuni minuti prima di riprendere il normale funzionamento.
MANUTENZIONE
• Per la pulizia, usare un panno umido.• In caso di non utilizzo si consiglia di asciugare bene l’interno e di lasciare la porta semiaperta per aerare
l’interno.
In caso di mancato o anomalo funzionamento verificare che:a) la spina sia correttamente inserita nella presa di rete;b) la tensione di rete sia corrispondente a quella indicata nell’etichetta DATI TECNICI;c) il Minibar non sia posto in prossimità di fonti di calore o sotto il sole.
PER LO SMALTIMENTO, RISPETTARE LE DISPOSIZIONI IN VIGORE RELATIVAMENTE AI RIFIUTI SPECIALI
Questo apparecchio è contrassegnato in conformità alla Direttiva Europea 2002/96/EC, Waste Electrical and Electronic Equipment (WEEE). Assicurandosi che questo prodotto sia smaltito in modo corretto, l’utente contribuisce a prevenire le potenziali conseguenze negative per l’ambiente e la salute.
Il simbolo sul prodotto o sulla documentazione di accompagnamento indica che questo prodotto non deve essere trattato come rifiuto domestico ma deve essere consegnato presso l’idoneo punto di rac-colta per il riciclaggio di apparecchiature elettriche ed elettroniche. Disfarsene seguendo le normative locali per lo smaltimento dei rifiuti. Per ulteriori informazioni sul trattamento, recupero e riciclaggio di questo prodotto, contattare l’idoneo ufficio locale, il servizio di raccolta dei rifiuti domestici o il negozio presso il quale il prodotto è stato acquistato.

ENGLISH
SERIE K ECOSMART
16 SRKECOSMART-01_15-01-2014
SERIES K35
TECHNICAL SPECIFICATIONS
REFRIGERATEDVOLUME
(l)
DIMENSIONHxWxD(mm)
VOLTAGE(V)
NOMINALPOWER
(W)GAS USED
NETWEIGHT
(Kg)
CLIMATECLASS
K35Eco Smart
35553x399
x417220 - 240
50 HZ58
R 600a(0,019 kg)
18.2 SN, N, T
K35Eco Smart
PV35
553x399x417
220 - 24050 HZ
58R 600a
(0,019 kg)20 SN, N, T
K35Eco Smart G
35553x399
x417220 - 24050/60 HZ
58R 600a
(0,019 kg)18.2 SN, N, T
K35Eco Smart G
PV35
553x399x417
220 - 24050/60 HZ
58R 600a
(0,019 kg)20 SN, N, T
K35Smart
35553x399
x417220 - 240
50 HZ75
R 134a(0,040 kg)
18.2 SN, N, T
K35Smart G 35
553x399x417
220 - 24050/60 HZ
75R 134a
(0,040 kg)18.2 SN, N, T
K35Smart
PV35
553x399x417
220 - 24050 HZ
75R 134a
(0,040 kg)20 SN, N, T
K35SmartPV G
35553x399
x417220 - 24050/60 HZ
75R 134a
(0,040 kg)20 SN, N, T
K35SmartBasic
35553x399
x417220 - 240
50 HZ75
R 134a(0,040 kg)
18.2 SN, N, T
K35Smart
Basic G35
553x399x417
220 - 24050/60 HZ
75R 134a
(0,040 kg)18.2 SN, N, T
K35Smart115V
35553x399
x417100 - 120
60 HZ60
R 600a(0,019 kg)
18.2 SN, N, T
K35Smart PV
115V35
553x399x417
100 - 12060 HZ
60R 600a
(0,019 kg)18.2 SN, N, T

ENGLISH
SERIE K ECOSMART
SRKECOSMART-01_15-01-2014 17
TECHNICAL SPECIFICATIONS
REFRIGERATEDVOLUME
(l)
DIMENSIONHxWxD(mm)
VOLTAGE(V)
NOMINALPOWER
(W)GAS USED
NETWEIGHT
(Kg)
CLIMATECLASS
K35BASIC
PV35
553x399x417
220 - 24050 HZ
75R 134a
(0,040 kg)20 SN, N, T
K35BASICPV G
35553x399
x417220 - 24050/60 HZ
75R 134a
(0,040 kg)20 SN, N, T
K35BASIC 115V
35553x399
x417100 - 120
60 HZ60
R 600a(0,019 kg)
18.2 SN, N, T
K35BASIC PV
115V35
553x399x417
100 - 12060 HZ
60R 600a
(0,019 kg)18.2 SN, N, T
K35BASIC
Standard 115V
35553x399
x417100 - 120
60 HZ60
R 600a(0,019 kg)
18.2 SN, N, T
K35BASIC
Standard PV 115V
35553x399
x417100 - 120
60 HZ60
R 600a(0,019 kg)
18.2 SN, N, T
K35PLUS
Standard 115V
35553x399
x417100 - 120
60 HZ60
R 600a(0,019 kg)
18.2 SN, N, T
K35PLUS PV
115V35
553x399x417
100 - 12060 HZ
60R 600a
(0,019 kg)18.2 SN, N, T

ENGLISH
SERIE K ECOSMART
18 SRKECOSMART-01_15-01-2014
SERIES K40
TECHNICAL SPECIFICATIONS
REFRIGERATEDVOLUME
(l)
DIMENSIONHxWxD(mm)
VOLTAGE(V)
NOMINALPOWER
(W)GAS USED
NETWEIGHT
(Kg)
CLIMATECLASS
K40Eco Smart
40553x399
x470220 - 240
50 HZ58
R 600a(0,019 kg)
20 SN, N, T
K40Eco Smart
PV40
553x399x470
220 - 24050 HZ
58R 600a
(0,019 kg)22 SN, N, T
K40Eco Smart G
40553x399
x470220 - 24050/60 HZ
58R 600a
(0,019 kg)20 SN, N, T
K40Eco Smart G
PV40
553x399x470
220 - 24050/60 HZ
58R 600a
(0,019 kg)22 SN, N, T
K40Smart
40553x399
x470220 - 240
50 HZ75
R 134a(0,040 kg)
20 SN, N, T
K40Smart G 40
553x399x470
220 - 24050/60 HZ
75R 134a
(0,040 kg)20 SN, N, T
K40Smart
PV40
553x399x470
220 - 24050 HZ
75R 134a
(0,040 kg)22 SN, N, T
K40Smart PV G
40553x399
x470220 - 24050/60 HZ
75R 134a
(0,040 kg)22 SN, N, T
K40Smart115V
35553x399
x417100 - 120
60 HZ60
R 600a(0,019 kg)
18.2 SN, N, T
K40Smart PV
115V35
553x399x417
100 - 12060 HZ
60R 600a
(0,019 kg)18.2 SN, N, T
K40PLUS
Standard 115V
35553x399
x417100 - 120
60 HZ60
R 600a(0,019 kg)
18.2 SN, N, T
K40PLUS PV
115V35
553x399x417
100 - 12060 HZ
60R 600a
(0,019 kg)18.2 SN, N, T
ENGLISH
SERIE K ECOSMART
SRKECOSMART-01_15-01-2014 19
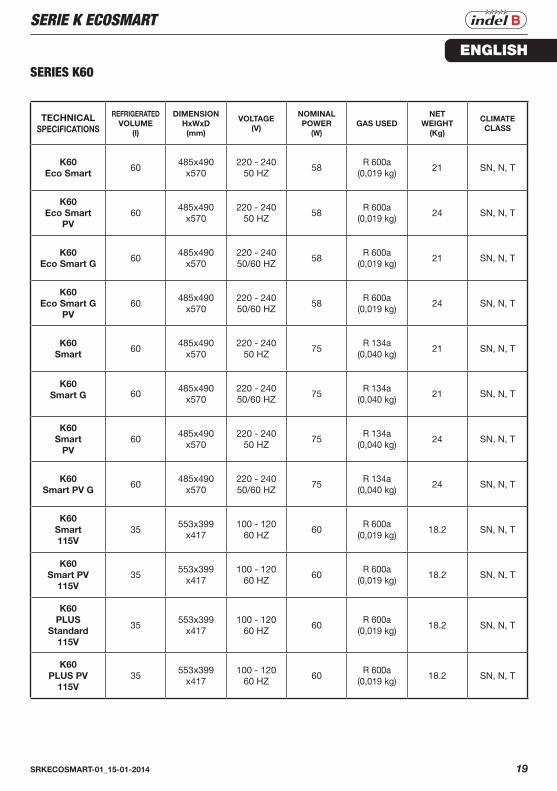
SERIES K60
TECHNICAL SPECIFICATIONS
REFRIGERATEDVOLUME
(l)
DIMENSIONHxWxD(mm)
VOLTAGE(V)
NOMINALPOWER
(W)GAS USED
NETWEIGHT
(Kg)
CLIMATECLASS
K60Eco Smart
60485x490
x570220 - 240
50 HZ58
R 600a(0,019 kg)
21 SN, N, T
K60Eco Smart
PV60
485x490x570
220 - 24050 HZ
58R 600a
(0,019 kg)24 SN, N, T
K60Eco Smart G
60485x490
x570220 - 24050/60 HZ
58R 600a
(0,019 kg)21 SN, N, T
K60Eco Smart G
PV60
485x490x570
220 - 24050/60 HZ
58R 600a
(0,019 kg)24 SN, N, T
K60Smart
60485x490
x570220 - 240
50 HZ75
R 134a(0,040 kg)
21 SN, N, T
K60Smart G 60
485x490x570
220 - 24050/60 HZ
75R 134a
(0,040 kg)21 SN, N, T
K60Smart
PV60
485x490x570
220 - 24050 HZ
75R 134a
(0,040 kg)24 SN, N, T
K60Smart PV G
60485x490
x570220 - 24050/60 HZ
75R 134a
(0,040 kg)24 SN, N, T
K60Smart115V
35553x399
x417100 - 120
60 HZ60
R 600a(0,019 kg)
18.2 SN, N, T
K60Smart PV
115V35
553x399x417
100 - 12060 HZ
60R 600a
(0,019 kg)18.2 SN, N, T
K60PLUS
Standard 115V
35553x399
x417100 - 120
60 HZ60
R 600a(0,019 kg)
18.2 SN, N, T
K60PLUS PV
115V35
553x399x417
100 - 12060 HZ
60R 600a
(0,019 kg)18.2 SN, N, T

ENGLISH
SERIE K ECOSMART
20 SRKECOSMART-01_15-01-2014
WARNINGS The Minibars must not be installed outdoors, even if they are protected by a roof.When making the connections, it is not advisable to use extensions or multiple sockets. if the Minibar is
installed between other furniture items, makesure the cable is not bent or dangerously compressed.Do not undertake cleaning or maintenance operations unless you have first disconnected the Minibar from
the power supply mains interventi.To ensure proper operation and a limited power consumption, it is important for the installation to be
performed properly. To obtain the best operation, make sure that the cooling unit is properly aired.
no responsibility is taken for any injury or damage to things and/or to the Minibar due to a kind of installation different from the one illustrated in this manual.
WARNING!Keep ventilation openings, in the appliance enclosure or in the built-in structure, clear of obstruction.
WARNING!Do not use mechanical devices or other means to accelerate the defrosting process, other than those
recommended by the manufacturer.
WARNING!Do not damage the refrigerant circuit.
WARNING!Do not use electrical appliances inside the food storage compartments of the appliance, unless they are
of the type recommended by the manufacturer.
Caution!Please keep the products away from the fire or similar glowing substance before you dispose the refrigerator.
Attention please!Please keep the products away from the fire or similar glowing substance before you dispose the refrigerator.
Attention please!The appliance cannot be used in public transportation.
Attention please!Young children should be supervised to ensure that they do not play with the appliance.
Attention please!The appliance is not intended for use by young children or infirm persons unless they have been adequately
supervised by a responsible person to ensure that they can use the unit safety.
Attention please!This appliance is not intended for use by persons (including children) with reduced physical, sensory or
mental capabilities, or lack of experience and knowledge, unless they have been given supervision or instruction concerning use of the appliance by a person responsible for their safety. Children should be supervised that they do not play with the appliance.
ENGLISH
SERIE K ECOSMART
SRKECOSMART-01_15-01-2014 21
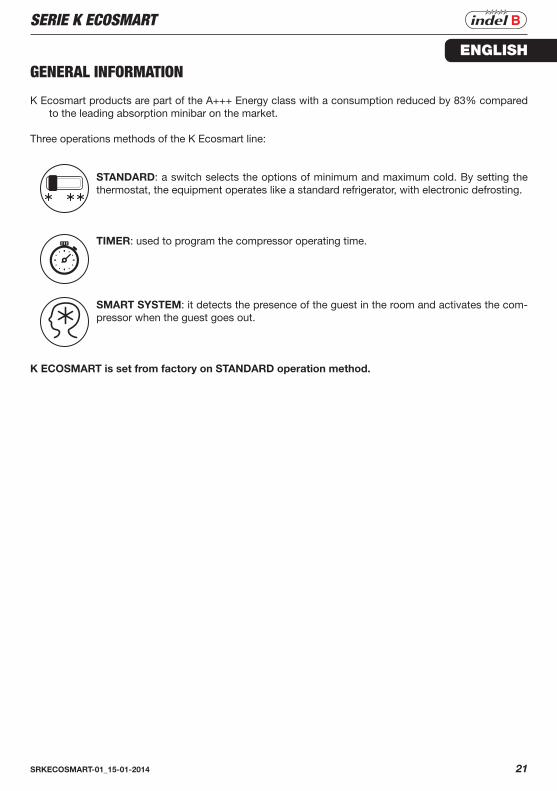
GENERAL INFORMATION
K Ecosmart products are part of the A+++ Energy class with a consumption reduced by 83% compared to the leading absorption minibar on the market.
Three operations methods of the K Ecosmart line:
STANDARD: a switch selects the options of minimum and maximum cold. By setting the thermostat, the equipment operates like a standard refrigerator, with electronic defrosting.
TIMER: used to program the compressor operating time.
SMART SYSTEM: it detects the presence of the guest in the room and activates the com-pressor when the guest goes out.
K ECOSMART is set from factory on STANDARD operation method.
ENGLISH
SERIE K ECOSMART
22 SRKECOSMART-01_15-01-2014
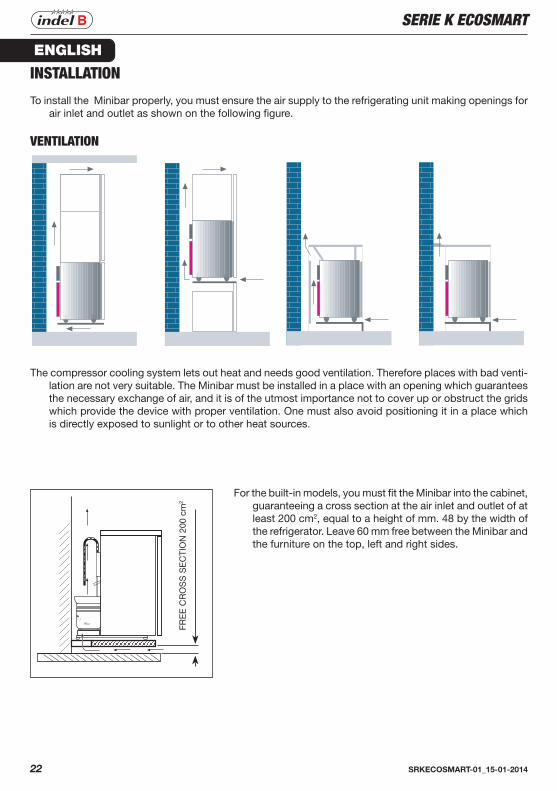
INSTALLATION
To install the Minibar properly, you must ensure the air supply to the refrigerating unit making openings for air inlet and outlet as shown on the following figure.
VENTILATION
FRE
E C
RO
SS
SE
CTI
ON
200
cm
2
The compressor cooling system lets out heat and needs good ventilation. Therefore places with bad venti-lation are not very suitable. The Minibar must be installed in a place with an opening which guarantees the necessary exchange of air, and it is of the utmost importance not to cover up or obstruct the grids which provide the device with proper ventilation. One must also avoid positioning it in a place which is directly exposed to sunlight or to other heat sources.
For the built-in models, you must fit the Minibar into the cabinet, guaranteeing a cross section at the air inlet and outlet of at least 200 cm2, equal to a height of mm. 48 by the width of the refrigerator. Leave 60 mm free between the Minibar and the furniture on the top, left and right sides.

ENGLISH
SERIE K ECOSMART
SRKECOSMART-01_15-01-2014 23
WIRING CONNECTIONS AND EARTHING
Before putting the plug into the power socket, make sure the mains voltage is the same as the one shown on the technical specification plate (located inside the Minibar) and that the socket is equipped with proper earthing, as laid down in the regulations on wiring system safety. Also, the power socket must be able to hold up to the maximum power of the device, shown on the same plate.
Attention please!If the socket is not equipped with an earthing system or if multiple sockets or adaptors are used, the Ma-
nufacturer will not be liable for any injury or damage to things and/or to the Minibar.
Attention please!The user must always be able to access the power supply socket.
Attention please!If the power cord is damaged, it must be replaced by the manufacturer or its service agent or a similarly
qualified person in order to avoid a hazard.
Attention please!If you dispose the fridge, you must take off the front door.
There are two power supply plugs on the back of the Minibar.
Connect the “POWER” plug to the socket in the room specifically for the Minibar (socket not connected to the energy saving system).
Connect the “SIGNAL” plug to any socket connected to the energy saving system (Energy saver).
NOTE: The K Ecosmart Minibar operates in STANDARD/TIMER mode where the “SIGNAL” plug is not connected. Standard mode refers to operation not relative to identification of the Guest in the room and operation which is regulated by the temperature selected by the Client using the switch described above.
Attention!If the POWER and SIGNAL cables are connected in reverse, the fridge will operate whilst the guest is in
the room and will switch itself off when the guest leaves the room. To confirm that the connection is correct, check that the light illuminates when opening the Minibar door
subsequent to checking that:1) the energy saving system (Energy saver) is not functioning and that the smart card has not been inserted 2) the Minibar is on (the temperature switch at the front of the Minibar must not be in position “0”).
In the instance that the light does not illuminate, invert the connection of the two power cables.
ENGLISH
SERIE K ECOSMART
24 SRKECOSMART-01_15-01-2014
DESCRIPTION AND OPERATION
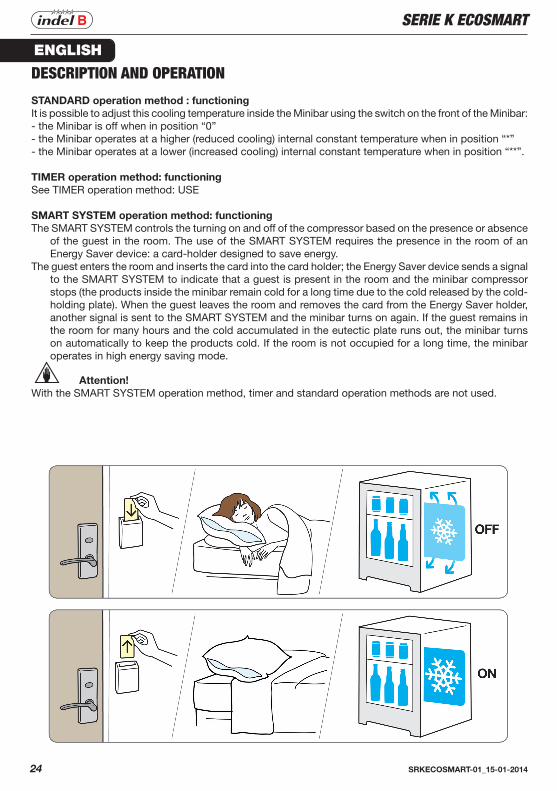
STANDARD operation method : functioningIt is possible to adjust this cooling temperature inside the Minibar using the switch on the front of the Minibar:- the Minibar is off when in position “0”- the Minibar operates at a higher (reduced cooling) internal constant temperature when in position “*” - the Minibar operates at a lower (increased cooling) internal constant temperature when in position “**”.
TIMER operation method: functioningSee TIMER operation method: USE
SMART SYSTEM operation method: functioningThe SMART SYSTEM controls the turning on and off of the compressor based on the presence or absence
of the guest in the room. The use of the SMART SYSTEM requires the presence in the room of an Energy Saver device: a card-holder designed to save energy.
The guest enters the room and inserts the card into the card holder; the Energy Saver device sends a signal to the SMART SYSTEM to indicate that a guest is present in the room and the minibar compressor stops (the products inside the minibar remain cold for a long time due to the cold released by the cold-holding plate). When the guest leaves the room and removes the card from the Energy Saver holder, another signal is sent to the SMART SYSTEM and the minibar turns on again. If the guest remains in the room for many hours and the cold accumulated in the eutectic plate runs out, the minibar turns on automatically to keep the products cold. If the room is not occupied for a long time, the minibar operates in high energy saving mode.
Attention!With the SMART SYSTEM operation method, timer and standard operation methods are not used.

ENGLISH
SERIE K ECOSMART
SRKECOSMART-01_15-01-2014 25
TIMER OPERATION METHOD: USEThe Minibars of the K Ecosmart series are equipped with a pre-set thermostat located on the back of the
refrigerator (the temperature has already been adjusted to the correct operating levels). You can select the duration of the cooling cycles using the remote control. When the Minibar is connected to power supply, it automatically turns on using the mechanical thermostat functions.
Operating cycles of K Ecosmart compressor unit controlled by the electronic timer
PROGRAM WORKING TIME AMBIENTE TEMPERATURE
1ST CYCLE 2ND CYCLE
P1 09-12 18-21 25°C
P2 09-13 18-22 28°C
P3 09-14 17-22 30°C
P4 ADJUSTABLE
OFF SWITCH ON/OFF
ON OFFThe compressor is in operation to cool
the contents of Minibar and to freeze the eutectic plate (6 hours over 24 hour are sufficient).
The compressor is Off and the cooling energy stored in the holding plate maintains the inside Minibar tem-perature. The Minibar is completely noiseless during the night.
Preset programs for K Ecosmart version, in which a panel can be installed on the door
Preset programs for K Ecosmart version with glass door
PROGRAM WORKING TIME AMBIENTE TEMPERATURE
1ST CYCLE 2ND CYCLE
P1 09-13 18-22 ≤ 25°C
P2 09-14 18-23 ≤ 28°C
P3 08-14 17-23 ≤ 30°C
P4 ADJUSTABLE
OFF SWITCH ON/OFF
ENGLISH
SERIE K ECOSMART
26 SRKECOSMART-01_15-01-2014
�� �����
���
���
�������������������������
���� ��
�����
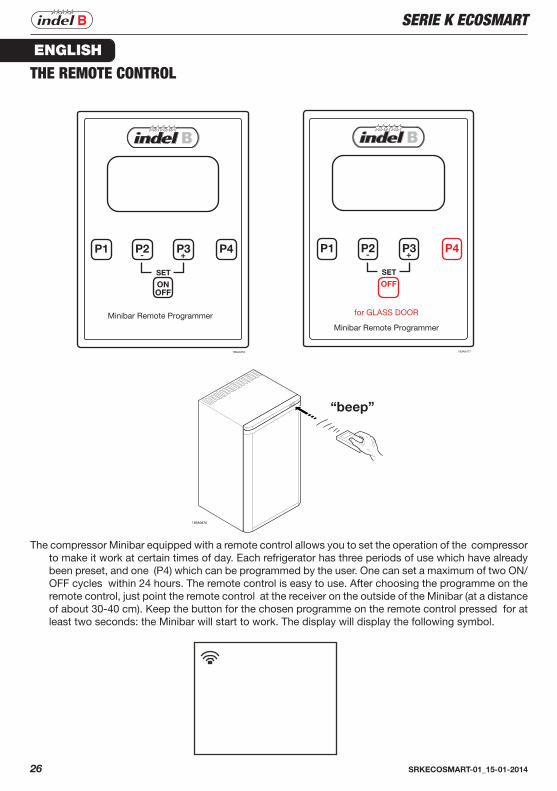
The compressor Minibar equipped with a remote control allows you to set the operation of the compressor to make it work at certain times of day. Each refrigerator has three periods of use which have already been preset, and one (P4) which can be programmed by the user. One can set a maximum of two ON/OFF cycles within 24 hours. The remote control is easy to use. After choosing the programme on the remote control, just point the remote control at the receiver on the outside of the Minibar (at a distance of about 30-40 cm). Keep the button for the chosen programme on the remote control pressed for at least two seconds: the Minibar will start to work. The display will display the following symbol.
THE REMOTE CONTROL
P1 P4P2-
P3+
SET
Minibar Remote Programmer
189A0477
OFF
for GLASS DOOR
189A0476
“beep”

ENGLISH
SERIE K ECOSMART
SRKECOSMART-01_15-01-2014 27
SET TIME OFF TIME ON 1
TIME ON 2
TIMEON 1
TIMEON 2
TIMEOFF 1
TIMEOFF 2
TIMEON 1
TIMEON 2
TIMEON 1
TIMEON 2
TIMEOFF 1
TIMEOFF 2
TIMEOFF 1
TIMEOFF 2
After installing the battery, the display will show the following picture for 5 seconds.
The display then shows the current hour. if no button is pressed during the following 8 seconds, the words will disappear on the display until another button is pressed.
If you press the buttons P1, P2 or P3, the display will show the pre-set programmes as in the following images. Attention: the programmes P1-P2 and P3 are pre-set and cannot be changed.
SET TIME OFF TIME ON 1
TIME ON 2
Preset programs for K Ecosmart version, in which a panel can be installed on the door
Preset programs for K Ecosmart version with glass door
Preset programs for K Ecosmart version, in which a panel can be installed on the door
Preset programs for K Ecosmart version with glass door
TIMEON 1
TIMEON 2
TIMEOFF 1
TIMEOFF 2
TIMEON 1
TIMEON 2
TIMEON 1
TIMEON 2
TIMEOFF 1
TIMEOFF 2
TIMEOFF 1
TIMEOFF 2

ENGLISH
SERIE K ECOSMART
28 SRKECOSMART-01_15-01-2014
The programme P4 allows the user to set two refrigerator working cycles (the first cycle Time on1 –Time off1 and the second cycle Time on2 and Time off2).
To customise the programme P4:press P1 and P4 simultaneously.“Time On1” will start to flash on the left.Use the buttons - (P2) and + (P3) to set the starting time of the first cycle.Press the button P1 to move ahead to the following fields and then use the - and + buttons again to change
the starting and stopping time of the operation cycles of the compressor.After completing the customisation of the programme, press P4 to save the new settings.
NOTE: After having used the minibar with the TIMER operation method, to pass again in STANDARD ope-ration method, please set P4 on the remote control with all value at 00:00 and push P4 (see instruction SETTING THE TIME).
NOTE: after having used the minibar with the SMART operation method, to pass again in STANDARD operation method, unplug the SIGANL cable and st P4 on the remote control with a value at 00.00 and push P4 (see instruction SETTING THE TIME).
If you press the button P4, the display will show the following:
TIMEON 1
TIMEON 2
TIMEOFF 1
TIMEOFF 2
TIMEON 1
TIMEON 2
TIMEOFF 1
TIMEOFF 2
Preset programs for K Ecosmartversion with glass door
Preset programs for K Ecosmart version, in which a panel can be installed on the door
ENGLISH
SERIE K ECOSMART
SRKECOSMART-01_15-01-2014 29
SET TIME
TIME
OFF
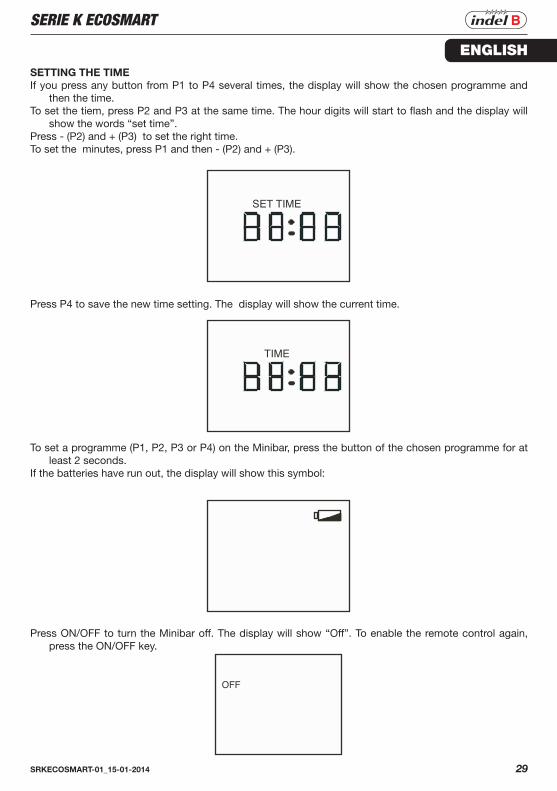
SETTING THE TIMEIf you press any button from P1 to P4 several times, the display will show the chosen programme and
then the time.To set the tiem, press P2 and P3 at the same time. The hour digits will start to flash and the display will
show the words “set time”.Press - (P2) and + (P3) to set the right time. To set the minutes, press P1 and then - (P2) and + (P3).
Press P4 to save the new time setting. The display will show the current time.
To set a programme (P1, P2, P3 or P4) on the Minibar, press the button of the chosen programme for at least 2 seconds.
If the batteries have run out, the display will show this symbol:
Press ON/OFF to turn the Minibar off. The display will show “Off”. To enable the remote control again, press the ON/OFF key.

ENGLISH
SERIE K ECOSMART
30 SRKECOSMART-01_15-01-2014
Attention!If the mains power supply is cut off for less than 48 hours, the Minibar turns on again using the previously
set program. If the mains power supply is cut off for more than 48 hours, the Minibar will be operated by the pre-calibrated thermostat. To set a program again, follow the instructions given on THE REMOTE CONTROL.
Attention!If the power supply is voluntarily cut off, wait at least 15 minutes before turning the refrigerator on again (i.e.
before connecting it to mains supply). If not, the compressor could be locked for few minutes before starting its normal operationg.
MAINTENANCE
• Use a moisture cloth to clean.• If you are not using the Minibar, we suggest cleaning it well inside and leaving the door ajar to ventilate
the interior.
In case of failure to work or faulty operation make sure that:a) the plug is fitted properly into the mains socket;b) the power mains voltage is the same as the one specified on the TECHNICAL SPECIFICATIONS label;c) the refrigerator is not located near heat sources or under the sun.
DIAPOSAL TO MANAGE THE WASTE
This appliance is marked according to the European directive 2002/96/EC on Waste Electrical and Electronic Equipment (WEEE). By ensuring this product is disposed of correctly, you will help prevent potential negative consequences for the environment and human health, which could otherwise be caused by inappropriate waste handling of this product.
The symbol on the product, or on the documents accompanying the product, indicates that this appliance may not be treated as household waste. Instead it shall be handed over to the applicable collection point for the recycling of electrical and electronic equipment. Disposal must be carried out in accordance with local environmental regulations for waste disposal. For more detailed information about treatment, recovery and recycling of this product, please contact your local city office, your household waste disposal service or the shop where you purchased the product.

ESPAÑOL
SERIE K ECOSMART
SRKECOSMART-01_15-01-2014 31
SERIE K35
DATOSTÈCNICOS
VOLUMENREFRIGERADO
(l)
DIMENSIONESHxLxP(mm)
TENSIÓN(V)
POTENCIANOMINAL
(W)
TIPO DE GAS
UTILIZADO
PESO NETTO
(Kg)
CLASE CLIMÁTICA
K35Eco Smart
35553x399
x417220 - 240
50 HZ58
R 600a(0,019 kg)
18.2 SN, N, T
K35Eco Smart
PV35
553x399x417
220 - 24050 HZ
58R 600a
(0,019 kg)20 SN, N, T
K35Eco Smart G
35553x399
x417220 - 24050/60 HZ
58R 600a
(0,019 kg)18.2 SN, N, T
K35Eco Smart G
PV35
553x399x417
220 - 24050/60 HZ
58R 600a
(0,019 kg)20 SN, N, T
K35Smart
35553x399
x417220 - 240
50 HZ75
R 134a(0,040 kg)
18.2 SN, N, T
K35Smart G 35
553x399x417
220 - 24050/60 HZ
75R 134a
(0,040 kg)18.2 SN, N, T
K35Smart
PV35
553x399x417
220 - 24050 HZ
75R 134a
(0,040 kg)20 SN, N, T
K35SmartPV G
35553x399
x417220 - 24050/60 HZ
75R 134a
(0,040 kg)20 SN, N, T
K35SmartBasic
35553x399
x417220 - 240
50 HZ75
R 134a(0,040 kg)
18.2 SN, N, T
K35Smart
Basic G35
553x399x417
220 - 24050/60 HZ
75R 134a
(0,040 kg)18.2 SN, N, T
K35Smart115V
35553x399
x417100 - 120
60 HZ60
R 600a(0,019 kg)
18.2 SN, N, T
K35Smart PV
115V35
553x399x417
100 - 12060 HZ
60R 600a
(0,019 kg)18.2 SN, N, T

ESPAÑOL
SERIE K ECOSMART
32 SRKECOSMART-01_15-01-2014
DATOSTÈCNICOS
VOLUMENREFRIGERADO
(l)
DIMENSIONESHxLxP(mm)
TENSIÓN(V)
POTENCIANOMINAL
(W)
TIPO DE GAS
UTILIZADO
PESO NETTO
(Kg)
CLASE CLIMÁTICA
K35BASIC
PV35
553x399x417
220 - 24050 HZ
75R 134a
(0,040 kg)20 SN, N, T
K35BASICPV G
35553x399
x417220 - 24050/60 HZ
75R 134a
(0,040 kg)20 SN, N, T
K35BASIC 115V
35553x399
x417100 - 120
60 HZ60
R 600a(0,019 kg)
18.2 SN, N, T
K35BASIC PV
115V35
553x399x417
100 - 12060 HZ
60R 600a
(0,019 kg)18.2 SN, N, T
K35BASIC
Standard 115V
35553x399
x417100 - 120
60 HZ60
R 600a(0,019 kg)
18.2 SN, N, T
K35BASIC
Standard PV 115V
35553x399
x417100 - 120
60 HZ60
R 600a(0,019 kg)
18.2 SN, N, T
K35PLUS
Standard 115V
35553x399
x417100 - 120
60 HZ60
R 600a(0,019 kg)
18.2 SN, N, T
K35PLUS PV
115V35
553x399x417
100 - 12060 HZ
60R 600a
(0,019 kg)18.2 SN, N, T

ESPAÑOL
SERIE K ECOSMART
SRKECOSMART-01_15-01-2014 33
SERIE K40
DATOSTÈCNICOS
VOLUMENREFRIGERADO
(l)
DIMENSIONESHxLxP(mm)
TENSIÓN(V)
POTENCIANOMINAL
(W)
TIPO DE GAS
UTILIZADO
PESO NETTO
(Kg)
CLASE CLIMÁTICA
K40Eco Smart
40553x399
x470220 - 240
50 HZ58
R 600a(0,019 kg)
20 SN, N, T
K40Eco Smart
PV40
553x399x470
220 - 24050 HZ
58R 600a
(0,019 kg)22 SN, N, T
K40Eco Smart G
40553x399
x470220 - 24050/60 HZ
58R 600a
(0,019 kg)20 SN, N, T
K40Eco Smart G
PV40
553x399x470
220 - 24050/60 HZ
58R 600a
(0,019 kg)22 SN, N, T
K40Smart
40553x399
x470220 - 240
50 HZ75
R 134a(0,040 kg)
20 SN, N, T
K40Smart G 40
553x399x470
220 - 24050/60 HZ
75R 134a
(0,040 kg)20 SN, N, T
K40Smart
PV40
553x399x470
220 - 24050 HZ
75R 134a
(0,040 kg)22 SN, N, T
K40Smart PV G
40553x399
x470220 - 24050/60 HZ
75R 134a
(0,040 kg)22 SN, N, T
K40Smart115V
35553x399
x417100 - 120
60 HZ60
R 600a(0,019 kg)
18.2 SN, N, T
K40Smart PV
115V35
553x399x417
100 - 12060 HZ
60R 600a
(0,019 kg)18.2 SN, N, T
K40PLUS
Standard 115V
35553x399
x417100 - 120
60 HZ60
R 600a(0,019 kg)
18.2 SN, N, T
K40PLUS PV
115V35
553x399x417
100 - 12060 HZ
60R 600a
(0,019 kg)18.2 SN, N, T

ESPAÑOL
SERIE K ECOSMART
34 SRKECOSMART-01_15-01-2014
SERIE K60
DATOSTÈCNICOS
VOLUMENREFRIGERADO
(l)
DIMENSIONESHxLxP(mm)
TENSIÓN(V)
POTENCIANOMINAL
(W)
TIPO DE GAS
UTILIZADO
PESO NETTO
(Kg)
CLASE CLIMÁTICA
K60Eco Smart
60485x490
x570220 - 240
50 HZ58
R 600a(0,019 kg)
21 SN, N, T
K60Eco Smart
PV60
485x490x570
220 - 24050 HZ
58R 600a
(0,019 kg)24 SN, N, T
K60Eco Smart G
60485x490
x570220 - 24050/60 HZ
58R 600a
(0,019 kg)21 SN, N, T
K60Eco Smart G
PV60
485x490x570
220 - 24050/60 HZ
58R 600a
(0,019 kg)24 SN, N, T
K60Smart
60485x490
x570220 - 240
50 HZ75
R 134a(0,040 kg)
21 SN, N, T
K60Smart G 60
485x490x570
220 - 24050/60 HZ
75R 134a
(0,040 kg)21 SN, N, T
K60Smart
PV60
485x490x570
220 - 24050 HZ
75R 134a
(0,040 kg)24 SN, N, T
K60Smart PV G
60485x490
x570220 - 24050/60 HZ
75R 134a
(0,040 kg)24 SN, N, T
K60Smart115V
35553x399
x417100 - 120
60 HZ60
R 600a(0,019 kg)
18.2 SN, N, T
K60Smart PV
115V35
553x399x417
100 - 12060 HZ
60R 600a
(0,019 kg)18.2 SN, N, T
K60PLUS
Standard 115V
35553x399
x417100 - 120
60 HZ60
R 600a(0,019 kg)
18.2 SN, N, T
K60PLUS PV
115V35
553x399x417
100 - 12060 HZ
60R 600a
(0,019 kg)18.2 SN, N, T

ESPAÑOL
SERIE K ECOSMART
SRKECOSMART-01_15-01-2014 35
ADVERTENCIAS Los Minibares no pueden instalarse al aire libre, ni siquiera protegiéndolos con una marquesina. Para la conexión, se desaconseja el uso de alargadores y de tomas múltiples; si el Minibar se instala entre
otros elementos decorativos, compruebe que el cable no se doble ni esté sometido a compresiones peligrosas.
Antes de realizar operaciones de limpieza o mantenimiento, desconecte el Minibar de la red de alimentación. Para garantizar un buen funcionamiento y reducir el consumo de electricidad, es importante que la insta-
lación se realice correctamente. Para conseguir un óptimo funcionamiento, asegúrese de que el grupo refrigerante esté convenientemente ventilado.
no asume ninguna responsabilidad por los eventuales daños a personas, objetos o al Minibar en cuestión, derivados de una instalación que incumpla las instrucciones incluidas en este manual.
¡ADVERTENCIA!Procure que los orificios de ventilación, situados en el cuerpo del aparato o en la estructura incorporada,
estén siempre libres, sin obstrucciones.
¡ADVERTENCIA!No utilice dispositivos mecánicos u otros medios diferentes de los recomendados por el fabricante para
acelerar la descongelación.
¡ADVERTENCIA!No estropee el circuito del refrigerante.
¡ADVERTENCIA!No utilice aparatos eléctricos diferentes de los recomendados por el fabricante en el interior del hueco de
conservación de alimentos del aparato.
¡Precaución! Mantenga el frigorífico alejado de llamas o sustancias incandescentes similares antes de su eliminación
definitiva.
¡Atención! Antes de desechar el Minibar, manténgalo alejado del fuego o de sustancias incandescentes similares.
¡Atención! El Minibar no puede utilizarse en medios de transporte públicos.
¡Atención! Vigile atentamente a los niños para evitar que jueguen con este aparato.
¡Atención! ! Se recomienda no utilizar alargadores en el cable de alimentación.
¡Atención! ! Los niños pueden quedar atrapados. Antes de eliminar el viejo frigorífico o el congelador, quite las puertas y mantenga los estantes en su posición original para evitar que los niños puedan
entrar fácilmente.

ESPAÑOL
SERIE K ECOSMART
36 SRKECOSMART-01_15-01-2014
DATOS GENERALES
Los Minibares de la Serie K Ecosmart forman parte de la categoría de Clase Energética A+++; se caracte-rizan por un consumo reducido un 83% respecto de los mejores productos de absorción presentes en el mercado.
Pueden funcionar en tres modos diferentes:
NORMAL: mediante un interruptor, se seleccionan las opciones de frío mínimo y frío máximo. Programando el termostato, se establece un ciclo frigorífico normal, con descongelación electrónica.
TEMPORIZADOR: programa los tiempos de funcionamiento del compresor.
SISTEMA SMART: detecta la presencia del huésped en la habitación y pone en funciona-miento el compresor cuando el huésped sale.
El Minibar se entrega al cliente programado en modo de funcionamiento NORMAL

ESPAÑOL
SERIE K ECOSMART
SRKECOSMART-01_15-01-2014 37
El sistema de refrigeración por compresión emite calor y precisa una sistema de ventilación adecuado. Por ello se desaconseja elegir ambientes dotados de sistemas de ventilación imperfectos. Instalar el Minibar en un ambiente dotado de aberturas adecuadas que aseguren el cambio de aire necesario. No cubrir ni obstruir nunca las rejillas de ventilación del aparato. Evitar incluso colocar la unidad en un lugar expuesto a la luz solar directa o cerca de otras fuentes de calor.
Para los modelos empotrados, introduzca el Minibar en el mue-ble, haciendo que el ventilador sobresalga por el conducto de ventilación y garantizando una sección para la entrada y la salida del aire de por lo menos 200 cm2, correspondiente a una altura de 48 mm. por toda la anchura del refrigerador. Deje 60 mm. libres entre el Minibar y el mueble por los lados superior, izquierdo y derecho.
SE
CC
IÓN
LIB
RE
200
cm
2
INSTALACIÓN
Para instalar el Minibar correctamente es necesario que el grupo frigorífico esté bien ventilado, a tal fin deberá realizar aberturas para la entrada y la salida del aire, tal y como se indica en la figura siguiente.
VENTILACIÓN

ESPAÑOL
SERIE K ECOSMART
38 SRKECOSMART-01_15-01-2014
CONEXIÓN ELÉCTRICA Y PUESTA A TIERRA
Antes de introducir el enchufe en la toma de corriente asegúrese de que la tensión de red corresponda con la indicada en la placa de los datos técnicos (situada dentro del Minibar) y de que dicha toma esté equipada con una adecuada instalación de puesta a tierra, tal y como dictan las normas de seguridad sobre las instalaciones eléctricas. Asimismo, la toma eléctrica debe ser capaz de soportar la carga máxima de potencia del aparato, indicada en la tarjeta.
¡Atención!Si la toma no consta de instalación de puesta a tierra o caso que se utilicen tomas múltiples o adapta-
dores, el Fabricante declina cualquier responsabilidad sobre posibles daños a personas, cosas y/o al propio Minibar.
¡Atención!El usuario debe poder acceder siempre a la toma de alimentación.
¡Atención!Si el cable de alimentación está estropeado, para evitar cualquier tipo de riesgo, debe ser sustituido por
el fabricante o por su encargado de mantenimiento, o bien por una persona que disponga de los requisitos necesarios.
¡Atención!Para desinstalar el Minibar es necesario desmontar la puerta delantera.
En la parte posterior del Minibar hay dos enchufes de alimentación.
Conecte el enchufe “POWER” a la toma de la habitación destinada al Minibar. (La toma no está conectada a la unidad de ahorro energético).
Conecte el enchufe “SIGNAL” a una toma conectada a la unidad de ahorro energético (Energy saver).
NOTA: El Minibar funciona en modo NORMAL/TIMER si el enchufe “SIGNAL” no está conectado; se trata, por tanto, de un funcionamiento no vinculado a la presencia del Huésped en la habitación y regulado a partir de la temperatura configurada por el Cliente mediante el selector descrito en el capítulo DE-SCRIPCIÓN Y FUNCIONAMIENTO.
¡Atención!Si el cable POWER y el cable SIGNAL se conectan al contrario, el Minibar funcionará cuando el huésped
está en el interior de la habitación y se apagará cuando el huésped no está presente en dicho espacio. Para comprobar que la conexión se haya realizado correctamente, controle que la luz esté encendida
abriendo la puerta del Minibar tras haber controlado que: 1) la unidad de ahorro energético (Energy saver) no esté en funcionamiento, o que la tarjeta inteligente no
esté activada 2) el Minibar esté encendido (estor es, que el selector de temperatura situado en la parte frontal del Minibar
no esté en posición “0”)
Si la luz no se enciende, invierta la conexión de los dos cables de alimentación.

ESPAÑOL
SERIE K ECOSMART
SRKECOSMART-01_15-01-2014 39
DESCRIPCIÓN Y FUNCIONAMIENTO
Funcionamiento en modo NORMAL Es posible regular la temperatura de acumulación del interior del Minibar a través del selector situado en
la parte frontal del Minibar: - en posición “0”, el Minibar está apagado - en posición “*”, el Minibar funciona a una temperatura interior constante más alta (menos frío); en posición
“**”, el Minibar funciona a una temperatura interior constante más baja (más frío).
Funcionamiento en modo TEMPORIZADOR (TIMER)Consulte el Capítulo USO DEL TEMPORIZADOR (TIMER)
Funcionamiento en modo SISTEMA SMART El SISTEMA SMART regula el encendido y el apagado del compresor en función de la presencia o ausencia
del huésped en la habitación. El uso del SISTEMA SMART requiere la presencia en la habitación de Energy Saver, es decir, de un soporte para la tarjeta de ahorro energético.
El cliente entra en la habitación e introduce la tarjeta en el soporte, el Energy Saver envía al Sistema Smart un señal de presencia del huésped en la habitación y el compresor del Minibar se detiene. (Los productos que están en el interior de la nevera se mantienen frescos durante un tiempo prolongado gracias al frío procedente de la placa de acumulación.) Cuando el cliente sale de la habitación y extrae la tarjeta del Energy Saver, se envía otro mensaje al Sistema Smart, y el Minibar se pone nuevamente en funcionamiento. Si el huésped permanece varias horas en la habitación y el frío acumulado en la placa se agota, el Minibar se pone de nuevo en marcha automáticamente para mantener los productos frescos. En cambio, si la habitación está desocupada prolongadamente, el Minibar funciona en modo de ahorro energético elevado.
¡Atención!En modo SISTEMA SMART no está previsto el uso de mando a distancia y del temporizador.
ESPAÑOL
SERIE K ECOSMART
40 SRKECOSMART-01_15-01-2014
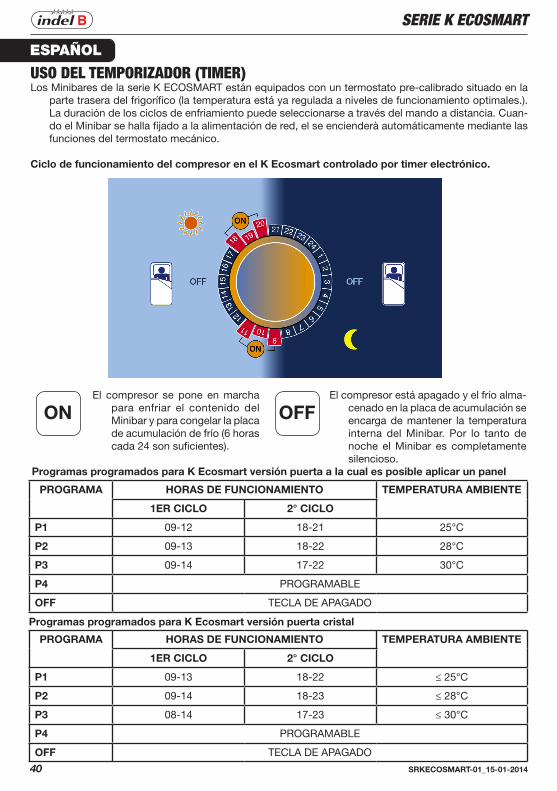
PROGRAMA HORAS DE FUNCIONAMIENTO TEMPERATURA AMBIENTE
1ER CICLO 2° CICLO
P1 09-12 18-21 25°C
P2 09-13 18-22 28°C
P3 09-14 17-22 30°C
P4 PROGRAMABLE
OFF TECLA DE APAGADO
ON OFFEl compresor se pone en marcha
para enfriar el contenido del Minibar y para congelar la placa de acumulación de frío (6 horas cada 24 son suficientes).
El compresor está apagado y el frío alma-cenado en la placa de acumulación se encarga de mantener la temperatura interna del Minibar. Por lo tanto de noche el Minibar es completamente silencioso.
Programas programados para K Ecosmart versión puerta a la cual es posible aplicar un panel
PROGRAMA HORAS DE FUNCIONAMIENTO TEMPERATURA AMBIENTE
1ER CICLO 2° CICLO
P1 09-13 18-22 ≤ 25°C
P2 09-14 18-23 ≤ 28°C
P3 08-14 17-23 ≤ 30°C
P4 PROGRAMABLE
OFF TECLA DE APAGADO
Programas programados para K Ecosmart versión puerta cristal
USO DEL TEMPORIZADOR (TIMER)Los Minibares de la serie K ECOSMART están equipados con un termostato pre-calibrado situado en la
parte trasera del frigorífico (la temperatura está ya regulada a niveles de funcionamiento optimales.). La duración de los ciclos de enfriamiento puede seleccionarse a través del mando a distancia. Cuan-do el Minibar se halla fijado a la alimentación de red, el se encienderà automáticamente mediante las funciones del termostato mecánico.
Ciclo de funcionamiento del compresor en el K Ecosmart controlado por timer electrónico.

ESPAÑOL
SERIE K ECOSMART
SRKECOSMART-01_15-01-2014 41
�� �����
���
���
�������������������������
���� ��
�����
USO DEL MANDO A DISTANCIA
El Minibar equipado con mando a distancia permite intervenir sobre el funcionamiento del compresor, pudiendo determinar los periodos del día en los que se desea hacerlo funcionar. Todos los frigoríficos tienen tres periodos de uso ya programados y uno (P4) programable por el usuario. Se pueden esta-blecer como máximo dos ciclos de ON/OFF en las 24 horas. El mando a distancia es fácil de usar. Después de haber seleccionado el programa preelegido en el mando a distancia, es suficiente que acerque el mando al receptor, situado en el exterior del Minibar (a una distancia de unos 30-40 cm). Mantenga pulsada la tecla del mando a distancia correspondiente al programa preelegido durante por lo menos dos segundos: el Minibar iniciará a funcionar. En la pantalla aparecerá el símbolo siguiente.
P1 P4P2-
P3+
SET
Minibar Remote Programmer
189A0477
OFF
for GLASS DOOR
189A0476
“beep”

ESPAÑOL
SERIE K ECOSMART
42 SRKECOSMART-01_15-01-2014
Después de instalar la batería, en la pantalla aparecerá la siguiente imagen durante 5 segundos.
La pantalla mostrará sucesivamente la hora en curso. Si no se pulsa ninguna tecla durante los siguientes 8 segundos, desaparecerá el texto de la pantalla hasta que se pulse una tecla.
Pulsando las teclas P1, P2 o P3, en el display aparecerán los programas preprogramados tal y como indican las imágenes siguientes. Atención: los programas P1-P2 y P3 están preprogramados y no pueden ser modificados.
TIMEON 1
TIMEON 2
TIMEOFF 1
TIMEOFF 2
TIMEON 1
TIMEON 2
TIMEON 1
TIMEON 2
TIMEOFF 1
TIMEOFF 2
TIMEOFF 1
TIMEOFF 2
TIMEON 1
TIMEON 2
TIMEOFF 1
TIMEOFF 2
TIMEON 1
TIMEON 2
TIMEON 1
TIMEON 2
TIMEOFF 1
TIMEOFF 2
TIMEOFF 1
TIMEOFF 2
Programas programados para K Ecosmart versión puerta a la cual es posible aplicar un panel
Programas programados para K Ecosmart versión puerta cristal
SET TIME OFF TIME ON 1
TIME ON 2
SET TIME OFF TIME ON 1
TIME ON 2
Programas programados para K Ecosmart versión puerta a la cual es
posible aplicar un panel
Programas programados para K Ecosmart versión puerta cristal

ESPAÑOL
SERIE K ECOSMART
SRKECOSMART-01_15-01-2014 43
El programa P4 permite que el usuario programe dos ciclos de funcionamiento del frigorífero (el primer ciclo Time on1 –Time off1 y el segundo ciclo Time on2 y Time off2).
Para personalizar el programa P4:pulse contemporáneamente P1 y P4.“Time On1” en la izquierda empezará a parpadear.Utilice las teclas - (P2) y + (P3) para ajustar la hora de start del primer ciclo.Pulse la tecla P1 para pasar a los campos siguientes y utilice de nuevo las tecla - y + para modificar la
hora de start y stop de los ciclos de funcionamiento del compresor.Tras haber terminado la personalización del programa, pulse P4 para guardar las nuevas configuraciones.
NOTA: Tras haber utilizado el Minibar en modo TIMER, para programarlo en modo NORMAL, hay que presionar la tecla P4 presente en el mando a distancia, tras haber configurado en todos los horarios el valor 00:00 (consulte el apartado: CONFIGURACIÓN DE LA HORA).
NOTA: tras haber utilizado el minibar en modo SMART, para programarlo en el modo NORMAL, hay que desenchufar el cable SIGNAL presionar la tecla P4 presente en el mando a distancia, tras haber con-figurado en todos los horarios el valor 00:00 (consulte el apartado : CONFIGURACIÓN D ELA HORA).
Pulsando la tecla P4, en la pantalla aparece lo siguiente:
TIMEON 1
TIMEON 2
TIMEOFF 1
TIMEOFF 2
TIMEON 1
TIMEON 2
TIMEOFF 1
TIMEOFF 2
Programas programados para K Ecosmart versión puerta a la cual es
posible aplicar un panel
Programas programados para K Ecosmart versión puerta cristal

ESPAÑOL
SERIE K ECOSMART
44 SRKECOSMART-01_15-01-2014
AJUSTE DE LA HORASi pulsa cualquier tecla de P1 a P4 varias veces, en la pantalla aparecerá el programa seleccionado y
sucesivamente la hora.Para introducir la hora, pulse P2 y P3 contemporáneamente. Las cifras de la hora inician a parpadear y en
la pantalla aparece “set time”.Pulse - (P2) y + (P3) para introducir la hora correcta. Para pasar al ajuste de los minutos, pulse P1 y sucesivamente - (P2) y + (P3).
Pulse P4 para guardar la nueva configuración de la hora. En la pantalla aparecerá la hora en curso.
SET TIME
TIME
Para activar un programa (P1, P2, P3 o P4) en el Minibar, pulse el pulsador del programa elegido por lo menos durante 2 segundos.
Si las baterías están descargadas en la pantalla aparecerá el símbolo siguiente:
OFF
Pulse ON/OFF para apagar el Minibar, en la pantalla aparecerá “Off”. Para activar de nuevo el telemando, oprimir nuevamente la tecla ON/OFF.

ESPAÑOL
SERIE K ECOSMART
SRKECOSMART-01_15-01-2014 45
¡Atención!Cuando la tensión de red se interrumpe durante menos de 48 horas, el Minibar se volverá a encender con
el último programa seleccionado. Si la tensión de red se interrumpe durante más de 48 horas, il Minibar volverà a funcionar según el termostato pre-calibrado. Para activar un programa de nuevo, observar las instrucciones en el capítulo USO DEL MANDO A DISTANCIA.
¡Atención! Cuando usted desea interrumpir la tensión de red, no debe volver a encenderla (conectar el frigorífico a
la tensión de red) antes de que hayan trascurrido por lo menos 15 minutos. De lo contrario, se puede producir el bloqueo del compresor durante unos minutos antes de volver al funcionamiento normal.
MANTENIMIENTO
• Para la limpieza, utilice un trapo húmedo.• Caso de que no se utilice el Minibar, se aconseja secar bien el interior y dejar la puerta semiabierta para
ventilar el interior.
Si no funciona o funciona mal, compruebe que:a) el enchufe esté correctamente introducida en la toma de red;b) la tensión de red corresponda a la indicada en la etiqueta DATOS TÉCNICOS;c) el frigorífero no esté colocado cerca de fuentes de calor ni al sol.
PARA LA ELIMINACIÓN, RESPETE LAS DISPOSICIONES VIGENTES SOBRE DESECHOS ESPECIALES
Este aparato lleva el marcado CE en conformidad con la Directiva 2002/96/EC del Parlamento Europeo y del Consejo sobre residuos de aparatos eléctricos y electrónicos (RAEE). La correcta eliminación de este producto evita consecuencias negativas para el medioambiente y la salud.
El símbolo en el producto o en los documentos que se incluyen con el producto, indica que no se puede tratar como residuo doméstico. Es necesario entregarlo en un punto de recogida para reciclar aparatos eléctricos y electrónicos. Deséchelo con arreglo a las normas medioambientales para eliminación de residuos. Para obtener información más detallada sobre el tratamiento, recuperación y reciclaje de este producto, póngase en contacto con el ayuntamiento, con el servicio de eliminación de residuos urbanos o la tienda donde adquirió el producto.

FRANÇAIS
SERIE K ECOSMART
46 SRKECOSMART-01_15-01-2014
SÉRIES K35
CARACTÉRISTiQUESTECHNIQUES
VOLUME RÉFRIGÉRÉ
(l)
DIMENSIONSHxLxP(mm)
TENSION(V)
PUISSANCENOMINALE
(W)
TYPE DE GAZ
UTILISÉ
POIDS NET(Kg)
CLASE CLIMÁTICA
K35Eco Smart
35553x399
x417220 - 240
50 HZ58
R 600a(0,019 kg)
18.2 SN, N, T
K35Eco Smart
PV35
553x399x417
220 - 24050 HZ
58R 600a
(0,019 kg)20 SN, N, T
K35Eco Smart G
35553x399
x417220 - 24050/60 HZ
58R 600a
(0,019 kg)18.2 SN, N, T
K35Eco Smart G
PV35
553x399x417
220 - 24050/60 HZ
58R 600a
(0,019 kg)20 SN, N, T
K35Smart
35553x399
x417220 - 240
50 HZ75
R 134a(0,040 kg)
18.2 SN, N, T
K35Smart G 35
553x399x417
220 - 24050/60 HZ
75R 134a
(0,040 kg)18.2 SN, N, T
K35Smart
PV35
553x399x417
220 - 24050 HZ
75R 134a
(0,040 kg)20 SN, N, T
K35SmartPV G
35553x399
x417220 - 24050/60 HZ
75R 134a
(0,040 kg)20 SN, N, T
K35SmartBasic
35553x399
x417220 - 240
50 HZ75
R 134a(0,040 kg)
18.2 SN, N, T
K35Smart
Basic G35
553x399x417
220 - 24050/60 HZ
75R 134a
(0,040 kg)18.2 SN, N, T
K35Smart115V
35553x399
x417100 - 120
60 HZ60
R 600a(0,019 kg)
18.2 SN, N, T
K35Smart PV
115V35
553x399x417
100 - 12060 HZ
60R 600a
(0,019 kg)18.2 SN, N, T

FRANÇAIS
SERIE K ECOSMART
SRKECOSMART-01_15-01-2014 47
CARACTÉRISTiQUESTECHNIQUES
VOLUME RÉFRIGÉRÉ
(l)
DIMENSIONSHxLxP(mm)
TENSION(V)
PUISSANCENOMINALE
(W)
TYPE DE GAZ
UTILISÉ
POIDS NET(Kg)
CLASE CLIMÁTICA
K35BASIC
PV35
553x399x417
220 - 24050 HZ
75R 134a
(0,040 kg)20 SN, N, T
K35BASICPV G
35553x399
x417220 - 24050/60 HZ
75R 134a
(0,040 kg)20 SN, N, T
K35BASIC 115V
35553x399
x417100 - 120
60 HZ60
R 600a(0,019 kg)
18.2 SN, N, T
K35BASIC PV
115V35
553x399x417
100 - 12060 HZ
60R 600a
(0,019 kg)18.2 SN, N, T
K35BASIC
Standard 115V
35553x399
x417100 - 120
60 HZ60
R 600a(0,019 kg)
18.2 SN, N, T
K35BASIC
Standard PV 115V
35553x399
x417100 - 120
60 HZ60
R 600a(0,019 kg)
18.2 SN, N, T
K35PLUS
Standard 115V
35553x399
x417100 - 120
60 HZ60
R 600a(0,019 kg)
18.2 SN, N, T
K35PLUS PV
115V35
553x399x417
100 - 12060 HZ
60R 600a
(0,019 kg)18.2 SN, N, T

FRANÇAIS
SERIE K ECOSMART
48 SRKECOSMART-01_15-01-2014
SÉRIES K40
CARACTÉRISTiQUESTECHNIQUES
VOLUME RÉFRIGÉRÉ
(l)
DIMENSIONSHxLxP(mm)
TENSION(V)
PUISSANCENOMINALE
(W)
TYPE DE GAZ
UTILISÉ
POIDS NET(Kg)
CLASE CLIMÁTICA
K40Eco Smart
40553x399
x470220 - 240
50 HZ58
R 600a(0,019 kg)
20 SN, N, T
K40Eco Smart
PV40
553x399x470
220 - 24050 HZ
58R 600a
(0,019 kg)22 SN, N, T
K40Eco Smart G
40553x399
x470220 - 24050/60 HZ
58R 600a
(0,019 kg)20 SN, N, T
K40Eco Smart G
PV40
553x399x470
220 - 24050/60 HZ
58R 600a
(0,019 kg)22 SN, N, T
K40Smart
40553x399
x470220 - 240
50 HZ75
R 134a(0,040 kg)
20 SN, N, T
K40Smart G 40
553x399x470
220 - 24050/60 HZ
75R 134a
(0,040 kg)20 SN, N, T
K40Smart
PV40
553x399x470
220 - 24050 HZ
75R 134a
(0,040 kg)22 SN, N, T
K40Smart PV G
40553x399
x470220 - 24050/60 HZ
75R 134a
(0,040 kg)22 SN, N, T
K40Smart115V
35553x399
x417100 - 120
60 HZ60
R 600a(0,019 kg)
18.2 SN, N, T
K40Smart PV
115V35
553x399x417
100 - 12060 HZ
60R 600a
(0,019 kg)18.2 SN, N, T
K40PLUS
Standard 115V
35553x399
x417100 - 120
60 HZ60
R 600a(0,019 kg)
18.2 SN, N, T
K40PLUS PV
115V35
553x399x417
100 - 12060 HZ
60R 600a
(0,019 kg)18.2 SN, N, T

FRANÇAIS
SERIE K ECOSMART
SRKECOSMART-01_15-01-2014 49
SÉRIES K60
CARACTÉRISTiQUESTECHNIQUES
VOLUME RÉFRIGÉRÉ
(l)
DIMENSIONSHxLxP(mm)
TENSION(V)
PUISSANCENOMINALE
(W)
TYPE DE GAZ
UTILISÉ
POIDS NET(Kg)
CLASE CLIMÁTICA
K60Eco Smart
60485x490
x570220 - 240
50 HZ58
R 600a(0,019 kg)
21 SN, N, T
K60Eco Smart
PV60
485x490x570
220 - 24050 HZ
58R 600a
(0,019 kg)24 SN, N, T
K60Eco Smart G
60485x490
x570220 - 24050/60 HZ
58R 600a
(0,019 kg)21 SN, N, T
K60Eco Smart G
PV60
485x490x570
220 - 24050/60 HZ
58R 600a
(0,019 kg)24 SN, N, T
K60Smart
60485x490
x570220 - 240
50 HZ75
R 134a(0,040 kg)
21 SN, N, T
K60Smart G 60
485x490x570
220 - 24050/60 HZ
75R 134a
(0,040 kg)21 SN, N, T
K60Smart
PV60
485x490x570
220 - 24050 HZ
75R 134a
(0,040 kg)24 SN, N, T
K60Smart PV G
60485x490
x570220 - 24050/60 HZ
75R 134a
(0,040 kg)24 SN, N, T
K60Smart115V
35553x399
x417100 - 120
60 HZ60
R 600a(0,019 kg)
18.2 SN, N, T
K60Smart PV
115V35
553x399x417
100 - 12060 HZ
60R 600a
(0,019 kg)18.2 SN, N, T
K60PLUS
Standard 115V
35553x399
x417100 - 120
60 HZ60
R 600a(0,019 kg)
18.2 SN, N, T
K60PLUS PV
115V35
553x399x417
100 - 12060 HZ
60R 600a
(0,019 kg)18.2 SN, N, T

FRANÇAIS
SERIE K ECOSMART
50 SRKECOSMART-01_15-01-2014
AVERTISSEMENTSLes Minibars ne doivent en aucun cas être installés en extérieur, pas même à l’abri sous un auvent. Pour
les branchements, il est déconseillé de faire usage de rallonges et de prises multiples ; dans le cas où le Minibar serait installé entre d’autres éléments d’ameublement, veiller à s’assurer que le câble n’est ni plié ni écrasé au point que cela puisse constituer un danger. Ne pas effectuer d’interventions de nettoyage ou d’entretien sans avoir préalablement débranché le Minibar du secteur d’alimentation électrique. Pour garantir un bon fonctionnement et une consommation de courant limité, il est important que l’installation soit correctement effectuée. Pour garantir un fonctionnement optimal, veiller à ce que le groupe réfrigérant soit bien aéré.
est déchargé de toute responsabilité en cas de dommages physiques ou matériels (Minibar com-pris) causés par une installation effectuée d’une manière autre que celle décrite dans le présent manuel.
AVERTISSEMENT!Faire en sorte que les ouvertures de ventilation, présentes sur le corps de l’appareil ou dans la structure
incorporée, ne soient pas obstruées.
AVERTISSEMENT!Ne pas utiliser de dispositifs mécaniques autres que ceux recommandés par le constructeur pour accélérer
le dégivrage.
AVERTISSEMENT!Ne pas endommager le circuit de réfrigérant.
AVERTISSEMENT!Ne pas utiliser d’appareils électriques autres que ceux recommandés par le constructeur à l’intérieur du
compartiment de conservation des aliments de l’appareil.
PrécautionAvant son élimination, ne pas laisser le réfrigérateur à proximité de flammes ou de substances incande-
scentes.
Attention!Avant de procéder à l’élimination du Minibar, le conserver loin de toute flamme et de toute substance
incandescente.
Attention!Le Minibar n’est pas prévu pour être utilisé sur des véhicules de transport en commun.
Attention!Surveiller soigneusement les enfants pour éviter qu’ils ne jouent avec l’appareil.
Attention!Il est recommandé de ne pas utiliser de rallonges sur le câble d’alimentation.
Attention!Risque pour les enfants de rester enfermés. Avant de jeter le réfrigérateur ou le congélateur usé :• Retirer les volets.• Laisser les claies en place pour que les enfants ne puissent pas s’introduire facilement.

FRANÇAIS
SERIE K ECOSMART
SRKECOSMART-01_15-01-2014 51
GÉNÉRALITÉS
Les Minibars de la Série K Ecosmart rentrent dans la catégorie de Classe Énergétique A+++, avec une consommation de 83% inférieure aux meilleurs produits à absorption présents sur le marché.
Ils peuvent fonctionner dans trois modalités différentes :
NORMALE : un commutateur permet de sélectionner les options de froid minimum et froid maximum. Le réglage du thermostat permet d’obtenir un cycle de réfrigération normal, avec dégivrage électronique.
TIMER : permet de programmer les temps de fonctionnement du compresseur.
SYSTÈME SMART : détecte la présence du client dans la chambre et met en marche le compresseur quand le client sort.
À la livraison, le Minibar est réglé sur la modalité NORMALE.

FRANÇAIS
SERIE K ECOSMART
52 SRKECOSMART-01_15-01-2014
INSTALLATION
Pour garantir une installation optimale, veiller à ce que soit garantie l’aération du groupe réfrigérant en réalisant des ouvertures d’arrivée et de sortie d’air comme indiqué sur la figure qui suit.
AÉRATION
Le système de réfrigération à compresseur dégage de la chaleur et nécessite une bonne aération (l’in-stallation dans une pièce mal ou peu ventilée est par conséquent déconseillée). Le Minibar doit être installé au sein d’un espace doté d’une ouverture qui assure le renouvellement d’air nécessaire et il est indispensable de ne pas couvrir et de ne pas obstruer les grilles assurant la ventilation de l’appareil. Il est par ailleurs important d’éviter d’installer le Minibar à un endroit directement exposé à la lumière du soleil ni à proximité d’autres sources de chaleur.
Pour les modèles à encastrer, introduire le Minibar dans le meuble en veillant à ce que le ventilateur dépasse dans le conduit de ventilation en garantissant une section d’arrivée et de sortie d’air d’au moins 200 cm2, ce qui correspond à une hauteur de 48 mm sur toute la largeur du Minibar. Maintenir un dégagement de 60 mm entre le Minibar et le meuble sur la partie supérieure, sur le côté droit et sur le côté gauche.
SE
CTI
ON
LIB
RE
200
cm
2
FRANÇAIS
SERIE K ECOSMART
SRKECOSMART-01_15-01-2014 53
BRANCHEMENT ÉLECTRIQUE ET MISE A LA TERRE
Avant de brancher la fiche à une prise de courant, s’assurer que la tension de secteur correspond à celle indiquée sur la plaque des données techniques (apposée à l’intérieur du Minibar) et que la prise est reliée à la terre, conformément aux normes de sécurité en vigueur applicables aux installations électriques. Par ailleurs, la prise doit être mesure de supporter la puissance maximum de l’appareil (indiquée sur la plaque susmentionnée).
Attention!Si la prise n’est pas reliée à la terre et/ou en cas d’utilisation de prises multiples ou d’adaptateurs, le fabri-
cant décline toute responsabilité en cas de dommages physiques et/ou matériels (Minibar compris).
Attention!L’utilisateur doit impérativement avoir accès à la prise d’alimentation.
Attention!Dans le cas où le câble d’alimentation serait endommagé, pour prévenir tout risque, il doit être changé par le
fabricant, par un technicien d’entretien de ce dernier ou par une personne possédant les compétences nécessaires à cet effet.
Attention!En cas de désinstallation du Minibar, il est nécessaire de retirer le volet antérieur.
Au dos du Minibar, deux fiches d’alimentation sont présentes.
Brancher la fiche “POWER” à la prise de la chambre prévue pour le Minibar (prise non reliée à l’unité d’économies d’énergie).
Brancher la fiche “SIGNAL” à toute prise reliée à l’unité d’économies d’énergie (Energy saver).
NOTE : le Minibar fonctionne en modalité NORMALE/TIMER si la fiche “SIGNAL” n’est pas branchée ; dans ce cas le fonctionnement n’est pas lié à la présence du client dans la chambre et le Minibar fon-ctionne en fonction de la température réglée par le client à l’aide du sélecteur décrit dans le chapitre DESCRIPTION ET FONCTIONNEMENT.
Attention!!Si le câble POWER et le câble SIGNAL sont branchés intervertis, le Minibar fonctionne quand le client est
dans la chambre et s’éteint quand il en est absent.Pour s’assurer que le branchement a été effectué correctement, s’assurer que la lumière s’allume en ouvrant
la porte du Minibar après s’être assuré que :1) l’unité d’économies d’énergie (Energy saver) n’est pas en marche, à savoir que la smart card n’est pas
en place.2) le Minibar est allumé (à savoir que le sélecteur de température sur le devant du Minibar n’est pas sur
la position “0”).
Dans le cas où la lumière ne s’allumerait pas, intervertir le branchement des deux câbles d’alimentation.
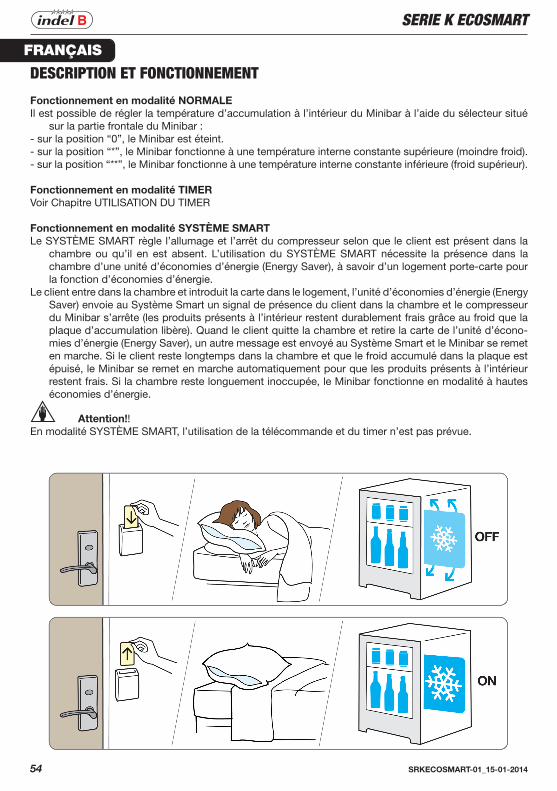
FRANÇAIS
SERIE K ECOSMART
54 SRKECOSMART-01_15-01-2014
DESCRIPTION ET FONCTIONNEMENT
Fonctionnement en modalité NORMALEIl est possible de régler la température d’accumulation à l’intérieur du Minibar à l’aide du sélecteur situé
sur la partie frontale du Minibar :- sur la position “0”, le Minibar est éteint.- sur la position “*”, le Minibar fonctionne à une température interne constante supérieure (moindre froid).- sur la position “**”, le Minibar fonctionne à une température interne constante inférieure (froid supérieur).
Fonctionnement en modalité TIMERVoir Chapitre UTILISATION DU TIMER
Fonctionnement en modalité SYSTÈME SMARTLe SYSTÈME SMART règle l’allumage et l’arrêt du compresseur selon que le client est présent dans la
chambre ou qu’il en est absent. L’utilisation du SYSTÈME SMART nécessite la présence dans la chambre d’une unité d’économies d’énergie (Energy Saver), à savoir d’un logement porte-carte pour la fonction d’économies d’énergie.
Le client entre dans la chambre et introduit la carte dans le logement, l’unité d’économies d’énergie (Energy Saver) envoie au Système Smart un signal de présence du client dans la chambre et le compresseur du Minibar s’arrête (les produits présents à l’intérieur restent durablement frais grâce au froid que la plaque d’accumulation libère). Quand le client quitte la chambre et retire la carte de l’unité d’écono-mies d’énergie (Energy Saver), un autre message est envoyé au Système Smart et le Minibar se remet en marche. Si le client reste longtemps dans la chambre et que le froid accumulé dans la plaque est épuisé, le Minibar se remet en marche automatiquement pour que les produits présents à l’intérieur restent frais. Si la chambre reste longuement inoccupée, le Minibar fonctionne en modalité à hautes économies d’énergie.
Attention!!En modalité SYSTÈME SMART, l’utilisation de la télécommande et du timer n’est pas prévue.
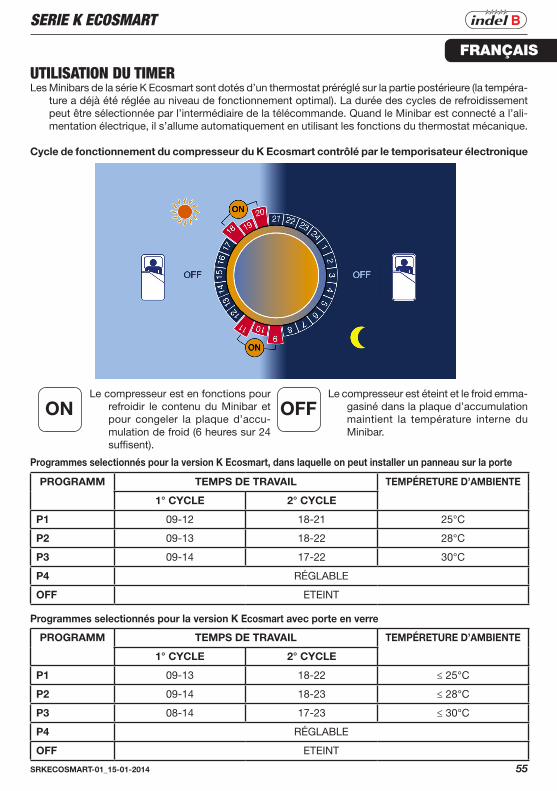
FRANÇAIS
SERIE K ECOSMART
SRKECOSMART-01_15-01-2014 55
UTILISATION DU TIMERLes Minibars de la série K Ecosmart sont dotés d’un thermostat préréglé sur la partie postérieure (la tempéra-
ture a déjà été réglée au niveau de fonctionnement optimal). La durée des cycles de refroidissement peut être sélectionnée par l’intermédiaire de la télécommande. Quand le Minibar est connecté a l’ali-mentation électrique, il s’allume automatiquement en utilisant les fonctions du thermostat mécanique.
Cycle de fonctionnement du compresseur du K Ecosmart contrôlé par le temporisateur électronique
PROGRAMM TEMPS DE TRAVAIL TEMPÉRETURE D’AMBIENTE
1° CYCLE 2° CYCLE
P1 09-12 18-21 25°C
P2 09-13 18-22 28°C
P3 09-14 17-22 30°C
P4 RÉGLABLE
OFF ETEINT
ON OFFLe compresseur est en fonctions pour
refroidir le contenu du Minibar et pour congeler la plaque d’accu-mulation de froid (6 heures sur 24 suffisent).
Le compresseur est éteint et le froid emma-gasiné dans la plaque d’accumulation maintient la température interne du Minibar.
Programmes selectionnés pour la version K Ecosmart, dans laquelle on peut installer un panneau sur la porte
PROGRAMM TEMPS DE TRAVAIL TEMPÉRETURE D’AMBIENTE
1° CYCLE 2° CYCLE
P1 09-13 18-22 ≤ 25°C
P2 09-14 18-23 ≤ 28°C
P3 08-14 17-23 ≤ 30°C
P4 RÉGLABLE
OFF ETEINT
Programmes selectionnés pour la version K Ecosmart avec porte en verre

FRANÇAIS
SERIE K ECOSMART
56 SRKECOSMART-01_15-01-2014
�� �����
���
���
�������������������������
���� ��
�����
UTILISATION DE LA TÉLÉCOMMANDE
Le Minibar à compresseur est doté d’une télécommande qui permet d’intervenir sur le fonctionnement du compresseur de telle sorte que celui-ci soit activé à des moments précis de la journée. A chaque Minibar correspondent trois périodes d’activation préprogrammées et une, (P4), programmable par l’utilisateur. Il est possible d’établir au maximum deux cycles ON/OFF sur l’arc de 24 heures. La télécommande est facile à utiliser. Après avoir sélectionné le programme voulu sur la télécommande, il suffit d’approcher cette dernière du récepteur situé à l’extérieur du Minibar (à une distance d’environ 30 à 40 cm). Maintenir enfoncée la touche de la télécommande relative au programme voulu pendant au moins deux secondes: le Minibar se met ensuite à fonctionner et le moniteur affiche le symbole qui suit.
P1 P4P2-
P3+
SET
Minibar Remote Programmer
189A0477
OFF
for GLASS DOOR
189A0476
“beep”

FRANÇAIS
SERIE K ECOSMART
SRKECOSMART-01_15-01-2014 57
SET TIME OFF TIME ON 1
TIME ON 2
Après installation de la batterie, le moniteur affiche pendant 5 secondes le symbole qui suit.
Ensuite, le moniteur affiche l’heure. Dans le cas où aucune touche ne serait enfoncée dans les 8 secondes qui suivent, les indications s’effacent du moniteur jusqu’à ce qu’une touche ne soit à nouveau enfoncée.
En appuyant sur la touche P1, P2 ou P3, le moniteur visualise les programmes préétablis et les symboles qui suivent. Attention: les programmes P1-P2 et P3 sont préétablis et ne peuvent être modifiés.
SET TIME OFF TIME ON 1
TIME ON 2
Programmes selectionnés pour la version K Ecosmart, dans laquelle on peut installer
un panneau sur la porte
Programmes selectionnés pour la version K Ecosmart avec porte en verre
TIMEON 1
TIMEON 2
TIMEOFF 1
TIMEOFF 2
TIMEON 1
TIMEON 2
TIMEON 1
TIMEON 2
TIMEOFF 1
TIMEOFF 2
TIMEOFF 1
TIMEOFF 2
TIMEON 1
TIMEON 2
TIMEOFF 1
TIMEOFF 2
TIMEON 1
TIMEON 2
TIMEON 1
TIMEON 2
TIMEOFF 1
TIMEOFF 2
TIMEOFF 1
TIMEOFF 2
Programmes selectionnés pour la version K Ecosmart, dans laquelle on peut installer un panneau sur la porte
Programmes selectionnés pour la version K Ecosmart avec porte en verre

FRANÇAIS
SERIE K ECOSMART
58 SRKECOSMART-01_15-01-2014
En appuyant sur la touche P4, le moniteur affiche le symbole suivant:
Le programme P4 permet à l’utilisateur de définir deux cycles de fonctionnement du Minibar (le premier cycle Time on1 –Time off1 et le second cycle Time on2 et Time off2).
Pour personnaliser le programme P4:appuyer simultanément sur P1 et P4.“Time On1”, sur la gauche, doit ensuite se mettre à clignoter.Utiliser les touches - (P2) et + (P3) pour programmer l’heure d’activation du premier cycle.Appuyer sur la touche P1 pour passer aux données suivantes et utiliser à nouveau les touches - et + pour
modifier l’heure d’activation et d’arrêt des cycles de fonctionnement du compresseur.Après avoir effectué la personnalisation du programme, appuyer sur P4 pour sauvegarder la programmation.
NOTE : après avoir utilisé le Minibar en modalité TIMER, pour le replacer en modalité NORMALE, appuyer sur la touche P4 de la télécommande, après avoir réglé tous les horaires sur la valeur 00:00 (voir chapitre : RÉGLAGE DE L’HEURE).
NOTE : après avoir utilisé le Minibar en modalité SMART, pour le replacer en modalité NORMALE, débrancher le câble SIGNAL et appuyer sur la touche P4 de la télécommande, après avoir réglé tous les horaires sur la valeur 00:00 (voir chapitre : RÉGLAGE DE L’HEURE).
TIMEON 1
TIMEON 2
TIMEOFF 1
TIMEOFF 2
TIMEON 1
TIMEON 2
TIMEOFF 1
TIMEOFF 2
Programmes selectionnés pour la version K Ecosmart, dans laquelle on peut installer
un panneau sur la porte
Programmes selectionnés pour la version K Ecosmart avec porte en verre

FRANÇAIS
SERIE K ECOSMART
SRKECOSMART-01_15-01-2014 59
PROGRAMMATION DE L’HEUREEn appuyant sur n’importe quelle touche, de P1 à P4, à plusieurs reprises, le moniteur affiche le programme
sélectionné puis l’heure.Pour programmer l’heure, appuyer simultanément sur P2 et P3. Les chiffres de l’heure se mettent ensuite
à clignoter et sur le moniteur s’affiche “set time”.Appuyer sur - (P2) et + (P3) pour régler l’heure.Pour passer au réglage des minutes, appuyer sur P1 puis sur - (P2) et + (P3).
Appuyer sur P4 pour sauvegarder l’heure réglée, laquelle est ensuite affichée par le moniteur.
Pour définir un programme (P1, P2, P3 ou P4) sur le Minibar, appuyer sur la touche du programme voulu pendant au moins 2 secondes.
Si les batteries sont déchargées, sur le moniteur s’affiche le symbole suivant:
SET TIME
TIME
Appuyer sur ON/OFF pour éteindre le Minibar, ensuite le moniteur affiche “Off”. Pour re-activer la télécom-mande, appuyer à nouveau sur la touche ON/OFF.
OFF
FRANÇAIS
SERIE K ECOSMART
60 SRKECOSMART-01_15-01-2014
Attention!En cas de coupure de courant pendant moins de 48 heures, le Minibar se rallume ensuite en activant le
programme précédemment sélectionné. En cas de coupure de courant pendant plus de 48 heures, le fonctionnement du Minibar est contrôlé par le thermostat pré-réglé. Pour re-sélectionner un programme, suivre les instructions fournies dans le chapitre UTILISATION DE LA TÉLÉCOMMANDE.
Attention!En cas de coupure de courant volontaire, attendre au moins 15 minutes avant de re-allumer le réfrigérateur
(c’est-à-dire de le reconnecter à l’alimentation électrique). Autrement, le compresseur peut se bloquer pour quelques minutes avant de fonctionner à nouveau.
ENTRETIEN
• Pour le nettoyage, faire usage d’un chiffon humide.• Dans le cas où le Minibar ne serait pas utilisé, il est recommandé de bien essuyer la partie interne et de
laisser la porte entr’ouverte pour aérer l’intérieur.
En cas de non-fonctionnement ou de fonctionnement anormal s’assurer:a) que la fiche est correctement branchée à la prise de secteur;b) que la tension de secteur correspond à celle figurant sur la plaque des DONNÉES TECHNIQUES;c) que le Minibar ne se trouve pas à proximité de sources de chaleur ni exposé aux rayons du soleil.
POUR L’ÉLIMINATION, VEILLER À RESPECTER LES DISPOSITIONS EN VIGUEUR EN MATIÈRE D’ÉLIMINATION DES DÉCHETS SPÉCIAUX
Cet appareil porte le symbole du recyclage conformément à la Directive Européenne 2002/96/CE concernant les Déchets d’Équipements Électriques et Électroniques (DEEE ou WEEE). En procédant correctement à la mise au rebut de cet appareil, vous contribuerez à empêcher toute conséquence nuisible pour l’environnement et la santé de l’homme.
Le symbole présent sur l’appareil ou sur la documentation qui l’accompagne indique que ce produit ne peut en aucun cas être traité comme déchet ménager. Il doit par conséquent être remis à un centre de collecte des déchets chargé du recyclage des équipements électriques et électroniques. Pour la mise au rebut, respectez les normes relatives à l’élimination des déchets en vigueur dans le pays d’installation. Pour obtenir de plus amples détails au sujet du traitement, de la récupération et du recyclage de cet appareil, veuillez vous adresser au bureau compétent de votre commune, à la société de collecte des déchets ou directement à votre revendeur.

DEUTSCH
SERIE K ECOSMART
SRKECOSMART-01_15-01-2014 61
SERIE K35
TECHNISCHEDATEN
GEKÜHLTES VOLUMEN
(l)
ABMESSUGENHxBxT(mm)
SPANNUNG(V)
NENNLEISTUNG(W)
VERWENDETESGAS
NETTOGEWICHT(Kg)
KLIMAKLASSE
K35Eco Smart
35553x399
x417220 - 240
50 HZ58
R 600a(0,019 kg)
18.2 SN, N, T
K35Eco Smart
PV35
553x399x417
220 - 24050 HZ
58R 600a
(0,019 kg)20 SN, N, T
K35Eco Smart G
35553x399
x417220 - 24050/60 HZ
58R 600a
(0,019 kg)18.2 SN, N, T
K35Eco Smart G
PV35
553x399x417
220 - 24050/60 HZ
58R 600a
(0,019 kg)20 SN, N, T
K35Smart
35553x399
x417220 - 240
50 HZ75
R 134a(0,040 kg)
18.2 SN, N, T
K35Smart G 35
553x399x417
220 - 24050/60 HZ
75R 134a
(0,040 kg)18.2 SN, N, T
K35Smart
PV35
553x399x417
220 - 24050 HZ
75R 134a
(0,040 kg)20 SN, N, T
K35SmartPV G
35553x399
x417220 - 24050/60 HZ
75R 134a
(0,040 kg)20 SN, N, T
K35SmartBasic
35553x399
x417220 - 240
50 HZ75
R 134a(0,040 kg)
18.2 SN, N, T
K35Smart
Basic G35
553x399x417
220 - 24050/60 HZ
75R 134a
(0,040 kg)18.2 SN, N, T
K35Smart115V
35553x399
x417100 - 120
60 HZ60
R 600a(0,019 kg)
18.2 SN, N, T
K35Smart PV
115V35
553x399x417
100 - 12060 HZ
60R 600a
(0,019 kg)18.2 SN, N, T

DEUTSCH
SERIE K ECOSMART
62 SRKECOSMART-01_15-01-2014
TECHNISCHEDATEN
GEKÜHLTES VOLUMEN
(l)
ABMESSUGENHxBxT(mm)
SPANNUNG(V)
NENNLEISTUNG(W)
VERWENDETESGAS
NETTOGEWICHT(Kg)
KLIMAKLASSE
K35BASIC
PV35
553x399x417
220 - 24050 HZ
75R 134a
(0,040 kg)20 SN, N, T
K35BASICPV G
35553x399
x417220 - 24050/60 HZ
75R 134a
(0,040 kg)20 SN, N, T
K35BASIC 115V
35553x399
x417100 - 120
60 HZ60
R 600a(0,019 kg)
18.2 SN, N, T
K35BASIC PV
115V35
553x399x417
100 - 12060 HZ
60R 600a
(0,019 kg)18.2 SN, N, T
K35BASIC
Standard 115V
35553x399
x417100 - 120
60 HZ60
R 600a(0,019 kg)
18.2 SN, N, T
K35BASIC
Standard PV 115V
35553x399
x417100 - 120
60 HZ60
R 600a(0,019 kg)
18.2 SN, N, T
K35PLUS
Standard 115V
35553x399
x417100 - 120
60 HZ60
R 600a(0,019 kg)
18.2 SN, N, T
K35PLUS PV
115V35
553x399x417
100 - 12060 HZ
60R 600a
(0,019 kg)18.2 SN, N, T
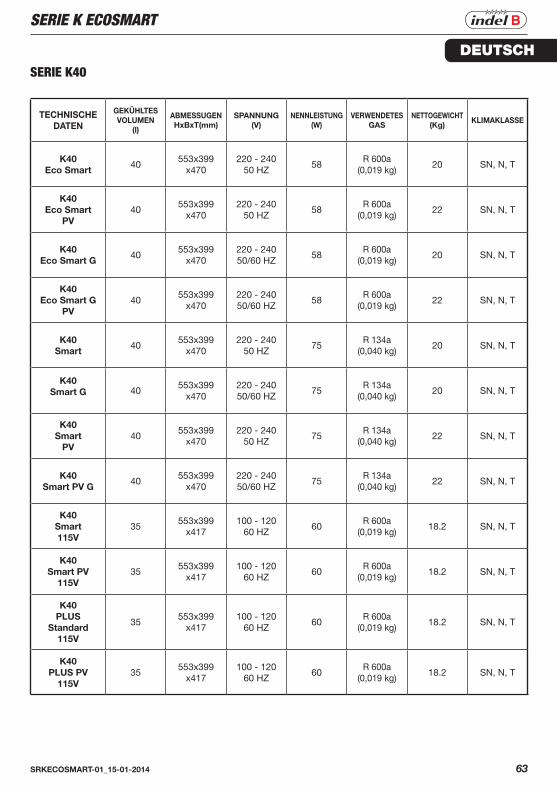
DEUTSCH
SERIE K ECOSMART
SRKECOSMART-01_15-01-2014 63
SERIE K40
TECHNISCHEDATEN
GEKÜHLTES VOLUMEN
(l)
ABMESSUGENHxBxT(mm)
SPANNUNG(V)
NENNLEISTUNG(W)
VERWENDETESGAS
NETTOGEWICHT(Kg)
KLIMAKLASSE
K40Eco Smart
40553x399
x470220 - 240
50 HZ58
R 600a(0,019 kg)
20 SN, N, T
K40Eco Smart
PV40
553x399x470
220 - 24050 HZ
58R 600a
(0,019 kg)22 SN, N, T
K40Eco Smart G
40553x399
x470220 - 24050/60 HZ
58R 600a
(0,019 kg)20 SN, N, T
K40Eco Smart G
PV40
553x399x470
220 - 24050/60 HZ
58R 600a
(0,019 kg)22 SN, N, T
K40Smart
40553x399
x470220 - 240
50 HZ75
R 134a(0,040 kg)
20 SN, N, T
K40Smart G 40
553x399x470
220 - 24050/60 HZ
75R 134a
(0,040 kg)20 SN, N, T
K40Smart
PV40
553x399x470
220 - 24050 HZ
75R 134a
(0,040 kg)22 SN, N, T
K40Smart PV G
40553x399
x470220 - 24050/60 HZ
75R 134a
(0,040 kg)22 SN, N, T
K40Smart115V
35553x399
x417100 - 120
60 HZ60
R 600a(0,019 kg)
18.2 SN, N, T
K40Smart PV
115V35
553x399x417
100 - 12060 HZ
60R 600a
(0,019 kg)18.2 SN, N, T
K40PLUS
Standard 115V
35553x399
x417100 - 120
60 HZ60
R 600a(0,019 kg)
18.2 SN, N, T
K40PLUS PV
115V35
553x399x417
100 - 12060 HZ
60R 600a
(0,019 kg)18.2 SN, N, T
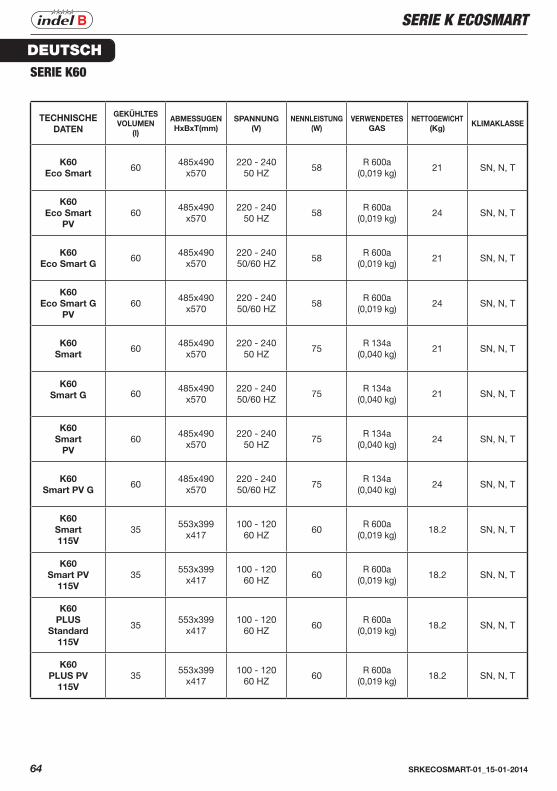
DEUTSCH
SERIE K ECOSMART
64 SRKECOSMART-01_15-01-2014
SERIE K60
TECHNISCHEDATEN
GEKÜHLTES VOLUMEN
(l)
ABMESSUGENHxBxT(mm)
SPANNUNG(V)
NENNLEISTUNG(W)
VERWENDETESGAS
NETTOGEWICHT(Kg)
KLIMAKLASSE
K60Eco Smart
60485x490
x570220 - 240
50 HZ58
R 600a(0,019 kg)
21 SN, N, T
K60Eco Smart
PV60
485x490x570
220 - 24050 HZ
58R 600a
(0,019 kg)24 SN, N, T
K60Eco Smart G
60485x490
x570220 - 24050/60 HZ
58R 600a
(0,019 kg)21 SN, N, T
K60Eco Smart G
PV60
485x490x570
220 - 24050/60 HZ
58R 600a
(0,019 kg)24 SN, N, T
K60Smart
60485x490
x570220 - 240
50 HZ75
R 134a(0,040 kg)
21 SN, N, T
K60Smart G 60
485x490x570
220 - 24050/60 HZ
75R 134a
(0,040 kg)21 SN, N, T
K60Smart
PV60
485x490x570
220 - 24050 HZ
75R 134a
(0,040 kg)24 SN, N, T
K60Smart PV G
60485x490
x570220 - 24050/60 HZ
75R 134a
(0,040 kg)24 SN, N, T
K60Smart115V
35553x399
x417100 - 120
60 HZ60
R 600a(0,019 kg)
18.2 SN, N, T
K60Smart PV
115V35
553x399x417
100 - 12060 HZ
60R 600a
(0,019 kg)18.2 SN, N, T
K60PLUS
Standard 115V
35553x399
x417100 - 120
60 HZ60
R 600a(0,019 kg)
18.2 SN, N, T
K60PLUS PV
115V35
553x399x417
100 - 12060 HZ
60R 600a
(0,019 kg)18.2 SN, N, T
DEUTSCH
SERIE K ECOSMART
SRKECOSMART-01_15-01-2014 65
HINWEISE Die Minibars dürfen nicht im Freien installiert werden, auch nicht, wenn sie durch ein Dach geschützt sind. Bei den Anschlüssen wird von Verlängerungen und Mehrfachsteckdosen abgeraten. Falls die Minibar
zwischen Einrichtungselementen installiert wird, kontrollieren, ob das Kabel nicht in gefährlicher Weise geknickt oder gequetscht wird.
Keine Reinigungs- oder Wartungsarbeiten durchführen, wenn die Minibar nicht vorher vom Stromnetz ausgesteckt wurde.
Um einen einwandfreien Betrieb und niedrigen Stromverbrauch zu garantieren, ist es wichtig, dass die Installation vorschriftsmäßig durchgeführt wird. Für optimalen Betrieb sicherstellen, dass die Belüftung des Kühlaggregats gewährleistet ist.
haftet nicht für eventuelle Personen- oder Sachschäden und/oder Schäden an der Minibar selbst, die auf eine andere als die in diesem Handbuch erläuterte Installation zurückzuführen sind.
WARNUNG!Sorgen Sie dafür, dass die im Gehäuse des Geräts oder in dem Einbauteil befindlichen Lüftungsöffnungen
stets verstopfungsfrei sind.
WARNUNG!Verwenden Sie keine mechanischen Vorrichtungen oder andere Hilfsmittel, die nicht den Empfehlungen
des Herstellers entsprechen, um den Abtauprozess zu beschleunigen.
WARNUNG!Beschädigen Sie nicht den Kühlmittelkreislauf.
WARNUNG!Verwenden Sie keine Elektrogeräte, die nicht den Empfehlungen des Herstellers entsprechen, im Kühlgut-
Lagerfach des Geräts.
Vorsicht!Vor seiner Entsorgung muss der Kühlschrank von offenen Flammen oder ähnlichen glühend heißen Stoffen
ferngehalten werden.
Achtung!Die Minibar bis zur Entsorgung von Feuer und glühend heißen Stoffen fernhalten.
Achtung!Die Minibar darf nicht in öffentlichen Verkehrsmitteln benutzt werden.
Achtung!Besonders darauf Acht geben, dass keine Kinder mit diesem Gerät spielen.
Achtung!Von einer Verwendung von Verlängerungen am Versorgungskabel wird abgeraten.
Achtung!Einklemmrisiko für Kinder. Vor dem Wegwerfen des alten Kühlschranks oder der Kühltruhe: • Die Türen entfernen. • Die Ablageflächen in ihren Positionen belassen, damit keine Kinder in das Innere gelangen können.

DEUTSCH
SERIE K ECOSMART
66 SRKECOSMART-01_15-01-2014
ALLGEMEINES
Die Minibars der Serie K Ecosmart gehören der Kategorie der Energieklasse A+++ an und weisen im Ver-gleich zu den besten auf dem Markt erhältlichen Geräten mit Energiebedarf einen um 83% reduzierten Verbrauch auf.
Sie können auf drei verschiedene Weisen funktionieren:
NORMAL: Die Optionen für die minimale und maximale Kälte werden mit einem Schalter eingestellt. Durch Einstellung des Thermostats wird ein normaler Kühlzyklus mit elektronischer Abtauung bewirkt.
TIMER: Programmiert die Betriebszeiten des Kompressors.
SMART-SYSTEM: Stellt fest, wenn der Gast sich nicht im Zimmer befindet und schaltet den Kompression ein, wenn der Gast das Zimmer verlässt.
Zum Zeitpunkt des Erhalts ist die Minibar auf NORMALBETRIEB eingestellt.
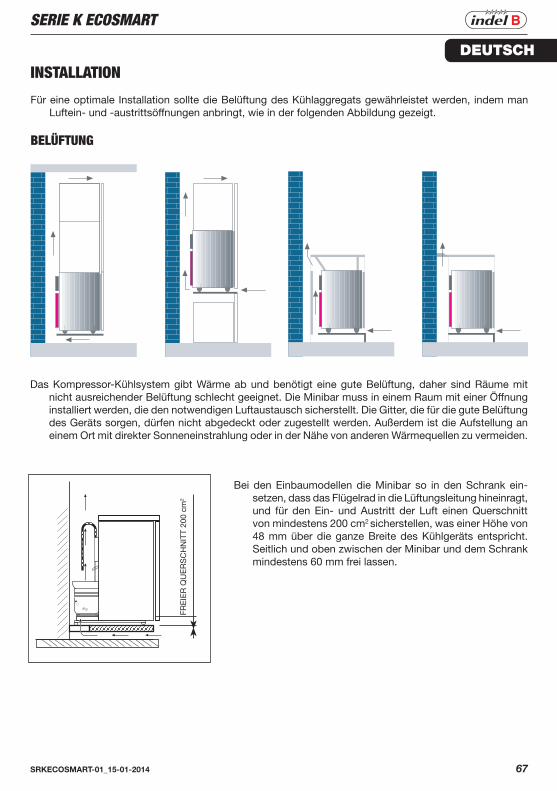
DEUTSCH
SERIE K ECOSMART
SRKECOSMART-01_15-01-2014 67
FRE
IER
QU
ER
SC
HN
ITT
200
cm2
INSTALLATION
Für eine optimale Installation sollte die Belüftung des Kühlaggregats gewährleistet werden, indem man Luftein- und -austrittsöffnungen anbringt, wie in der folgenden Abbildung gezeigt.
BELÜFTUNG
Das Kompressor-Kühlsystem gibt Wärme ab und benötigt eine gute Belüftung, daher sind Räume mit nicht ausreichender Belüftung schlecht geeignet. Die Minibar muss in einem Raum mit einer Öffnung installiert werden, die den notwendigen Luftaustausch sicherstellt. Die Gitter, die für die gute Belüftung des Geräts sorgen, dürfen nicht abgedeckt oder zugestellt werden. Außerdem ist die Aufstellung an einem Ort mit direkter Sonneneinstrahlung oder in der Nähe von anderen Wärmequellen zu vermeiden.
Bei den Einbaumodellen die Minibar so in den Schrank ein-setzen, dass das Flügelrad in die Lüftungsleitung hineinragt, und für den Ein- und Austritt der Luft einen Querschnitt von mindestens 200 cm2 sicherstellen, was einer Höhe von 48 mm über die ganze Breite des Kühlgeräts entspricht. Seitlich und oben zwischen der Minibar und dem Schrank mindestens 60 mm frei lassen.

DEUTSCH
SERIE K ECOSMART
68 SRKECOSMART-01_15-01-2014
ELEKTROANSCHLÜSSE UND ERDUNG
Vor Einsetzen des Steckers in die Steckdose sich vergewissern, dass die Netzspannung derjenigen entspricht, die auf dem Schild Technische Daten (im Inneren der Minibar) angegeben ist, und dass die Steckdose eine reguläre Erdungsanlage besitzt, wie die Sicherheitsbestimmungen für Elektroanlagen vorschreiben. Außerdem muss die Steckdose die ebenfalls auf dem Schild angegebene maximale Leistungsbelastung des Geräts aushalten können.
Achtung!Wenn die Steckdose nicht geerdet ist oder wenn Mehrfachsteckdosen oder Adapter benutzt werden, lehnt
der Hersteller jede Haftung für Personen- oder Sachschäden und/oder Schäden an der Minibar selbst ab.
Achtung!Der Benutzer muss immer Zugang zum Netzstecker haben.
Achtung!Wenn das Versorgungskabel beschädigt sind, muss es, um jedes Risiko auszuschließen, vom Hersteller oder
seinem Wartungsbeauftragten oder einer Person mit ähnlichen Voraussetzungen ausgewechselt werden.
Achtung!Wenn der Kühlschrank ausgebaut wird, muss die vordere Tür entfernt werden.
Auf der Rückseite der Minibar sind zwei Netzstecker angebracht.
Den “POWER”-Stecker in die für die Minibar vorgesehene Steckdose im Zimmer (nicht mit der Energie-spareinheit verbundene Steckdose) stecken.
Den “SIGNAL”-Stecker in eine beliebige, mit der Energiespareinheit (Energy saver) verbundene Steckdose stecken.
HINWEIS: Die Minibar läuft im NORMALBETRIEB/TIMER, wenn der “SIGNAL-”Stecker nicht eingesteckt ist. Es handelt sich hier um eine Betriebsweise, die nicht an die Anwesenheit des Gastes im Zimmer gebun-den ist und die Temperatur vom Gast durch den im Kapitel BESCHREIBUNG UND FUNKTIONSWEISE beschriebenen Wahlschalter eingestellt wird.
Achtung!Wenn das POWER-Kabel und das SIGNAL-Kabel verkehrt herum angeschlossen werden, arbeitet die Mini-
bar, wenn der Gast im Zimmer ist und schaltet sich aus, wenn der Gast sich nicht im Zimmer befindet. Um sicherzugehen, dass das Gerät richtig angeschlossen wurde, bitte überprüfen, ob sich das Licht beim
Öffnen der Minibar-Tür einschaltet, nachdem kontrolliert wurde, dass: 1) die Energiespareinheit (Energy saver) nicht in Betrieb ist bzw. die Smart Card nicht eingeführt wurde. 2) die Minibar eingeschaltet ist (der Temperaturwahlschalter vorne an der Minibar nicht auf “0” steht).
Falls das Licht nicht angeht, die zwei Stromkabel anders herum anschließen.

DEUTSCH
SERIE K ECOSMART
SRKECOSMART-01_15-01-2014 69
BESCHREIBUNG UND FUNKTIONSWEISE
Funktionsweise im NORMAL-BetriebDie Speichertemperatur im Inneren der Minibar kann über den Schalter an der Vorderseite eingestellt werden: - In der Position “0” ist die Minibar ausgeschaltet. - In der Position “*” funktioniert die Minibar bei einer höheren konstanten Innentemperatur (geringere Kälte) - In der Position “**” funktioniert die Minibar bei einer niedrigeren konstanten Innentemperatur (höhere Kälte).
Funktionsweise im TIMER-BetriebSiehe Kapitel VERWENDUNG DES TIMERS
Funktionsweise im SMART-SYSTEM-Betrieb Je nach der Anwesenheit bzw. Abwesenheit des Gastes im Zimmer wird das Ein- und Ausschalten des
Kompressors vom SMART-SYSTEM geregelt. Die Nutzung des SMART-SYSTEMS erfordert die An-wesenheit einer Energiespareinheit im Zimmer, d.h. einen Kartenschalter für die Energieeinsparkarte.
Der Gast betritt das Zimmer und steckt die Karte in den Kartenschalter. Die Energiespareinheit überträgt ein Signal für die Anwesenheit des Gastes im Zimmer zum Smart-System und der Kompressor der Minibar hält an (durch die von der Speicherplatte abgegebene Kälte kann das darin enthaltene Kühlgut über lange Zeit hinweg frisch gehalten werden). Wenn der Gast das Zimmer verlässt und die Karte aus der Energiespareinheit nimmt, wird eine andere Meldung zum Smart-System übertragen und die Minibar schaltet sich wieder ein. Wenn sich der Gast über viele Stunden hinweg im Zimmer aufhält und die in der Platte gespeicherte Kälte verbraucht ist, schaltet sich die Minibar automatisch wieder ein, um das darin enthaltene Kühlgut frisch zu halten. Wenn das Zimmer über längere Zeit hinweg nicht belegt wird, arbeitet die Minibar im Betriebsmodus mit hoher Energieeinsparung.
Achtung!Im SMART-SYSTEM-Betrieb ist die Verwendung der Fernbedienung und des Timers nicht vorgesehen.

DEUTSCH
SERIE K ECOSMART
70 SRKECOSMART-01_15-01-2014
PROGRAMM ARBEITSZEIT AMBIENTE TEMPERATUR
1. ZYKLUS 2. ZYKLUS
P1 09-12 18-21 25°C
P2 09-13 18-22 28°C
P3 09-14 17-22 30°C
P4 JUSTIERBAR
OFF AUSGELÖSCHTER
ON OFF
Eingestellte Programme für K Ecosmart Version mit dekorfähiger Tür
PROGRAMM ARBEITSZEIT AMBIENTE TEMPERATUR
1. ZYKLUS 2. ZYKLUS
P1 09-13 18-22 ≤ 25°C
P2 09-14 18-23 ≤ 28°C
P3 08-14 17-23 ≤ 30°C
P4 JUSTIERBAR
OFF AUSGELÖSCHTER
Eingestellte Programme für K Ecosmart Version mit Glastür
VERWENDUNG DES TIMERS Die Minibars der Serie K ECOSMART besitzen einen voreingestellten Thermostaten auf der Rückseite (die
Temperatur ist bereits auf ein optimales Betriebsniveau eingestellt.). Die Dauer der Kühlzyklen kann über die Fernbedienung gewählt werden. Wenn die Minibar an das Stromnetz angeschlossen wird, schaltet sie sich automatisch ein und benutzt die Funktionen des mechanischen Thermostaten.
Betriebszyklus des K Ecosmart Kompressors mit elektronischem Timer
Während des Kompressorbetriebs wird der Inhalt der Minibar gekühlt und die Kätespeicherplatte gefroren (6 h auf pro 24 h sind ausreichend).
Wenn der Kompressors ausgeschaltet ist, hält die Kältespeicherplatte die Temperatur in der Minibar auf einem Konstanten Wert.

DEUTSCH
SERIE K ECOSMART
SRKECOSMART-01_15-01-2014 71
�� �����
���
���
�������������������������
���� ��
�����
P1 P4P2-
P3+
SET
Minibar Remote Programmer
189A0477
OFF
for GLASS DOOR
189A0476
“beep”
VERWENDUNG DER FERNBEDIENUNG
Bei der Kompressor-Minibar mit Fernbedienung kann der Kompressor so eingestellt werden, dass er zu bestimmten Tageszeiten läuft. Jeder Kühlschrank hat drei bereits voreingestellte Betriebeszeiten und eine (P4) vom Benutzer programmierbare. Es können maximal zwei ON/OFF-Zyklen in 24 Stunden festgelegt werden. Die Fernbedienung ist einfach zu benutzen. Nachdem man das gewünschte Programm an der Fernbedienung Minibar gewählt hat, braucht man die Fernbedienung nur an den Empfänger außen an der Minibar anzunähern (auf etwa 30-40 cm). Die Fernbedienungstaste für das gewählte Programm mindestens zwei Sekunden lang gedrückt halten, dann beginnt die Minibar zu funktionieren. Am Display wird das folgende Symbol angezeigt.
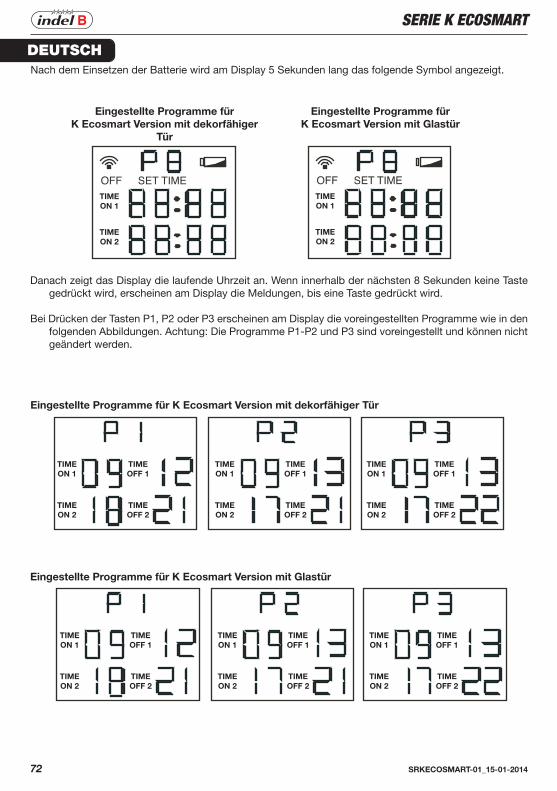
DEUTSCH
SERIE K ECOSMART
72 SRKECOSMART-01_15-01-2014
SET TIME OFF TIME ON 1
TIME ON 2
SET TIME OFF TIME ON 1
TIME ON 2
TIMEON 1
TIMEON 2
TIMEOFF 1
TIMEOFF 2
TIMEON 1
TIMEON 2
TIMEON 1
TIMEON 2
TIMEOFF 1
TIMEOFF 2
TIMEOFF 1
TIMEOFF 2
TIMEON 1
TIMEON 2
TIMEOFF 1
TIMEOFF 2
TIMEON 1
TIMEON 2
TIMEON 1
TIMEON 2
TIMEOFF 1
TIMEOFF 2
TIMEOFF 1
TIMEOFF 2
Eingestellte Programme für K Ecosmart Version mit dekorfähiger Tür
Eingestellte Programme für K Ecosmart Version mit Glastür
Eingestellte Programme für K Ecosmart Version mit dekorfähiger
Tür
Eingestellte Programme für K Ecosmart Version mit Glastür
Nach dem Einsetzen der Batterie wird am Display 5 Sekunden lang das folgende Symbol angezeigt.
Danach zeigt das Display die laufende Uhrzeit an. Wenn innerhalb der nächsten 8 Sekunden keine Taste gedrückt wird, erscheinen am Display die Meldungen, bis eine Taste gedrückt wird.
Bei Drücken der Tasten P1, P2 oder P3 erscheinen am Display die voreingestellten Programme wie in den folgenden Abbildungen. Achtung: Die Programme P1-P2 und P3 sind voreingestellt und können nicht geändert werden.

DEUTSCH
SERIE K ECOSMART
SRKECOSMART-01_15-01-2014 73
TIMEON 1
TIMEON 2
TIMEOFF 1
TIMEOFF 2
TIMEON 1
TIMEON 2
TIMEOFF 1
TIMEOFF 2
Eingestellte Programme für K Ecosmart Version mit dekorfähiger
Tür
Eingestellte Programme für K Ecosmart Version mit Glastür
Bei Drücken der Taste P4 wird am Display Folgendes angezeigt:
Mit dem Programm P4 kann der Benutzer zwei Betriebszyklen des Kühlschranks einstellen (den ersten Zyklus Time on1 –Time off1 und den zweiten Zyklus Time on2 und Time off2).
Zur individuellen Einstellung des Programms P4:gleichzeitig P1 und P4 drücken.“Time On1” auf der linken Seite beginnt zu blinken.Mit den Tasten - (P2) und + (P3) die Startzeit des ersten Zyklus einstellen.Die Taste P1 drücken, um auf die nächsten Felder zu gehen, und erneut die Tasten - und + benutzen, um
die Start- und Stoppzeiten der Betriebszyklen des Kompressors zu ändern.Wenn die individuelle Einstellung des Programms abgeschlossen ist, P4 drücken, um die neuen Einstel-
lungen zu speichern.
HINWEIS: Um die Minibar nach ihrer Benutzung im TIMER-Betriebsmodus wieder in den NORMALEN Betriebsmodus zurückzuversetzen, muss man die Taste P4 der Fernbedienung drücken. Zuvor muss man für alle Uhrzeiten den Wert 00:00 eingeben (siehe Abschnitt: EINSTELLUNG DER UHRZEIT).
HINWEIS: Um die Minibar nach ihrer Benutzung im SMART-Betriebsmodus wieder in den NORMALEN Betriebsmodus zurückzuversetzen, muss man das SIGNAL-Kabel abtrennen und die Taste P4 der Fernbedienung drücken. Zuvor muss man für alle Uhrzeiten den Wert 00:00 eingeben (siehe Abschnitt: EINSTELLUNG DER UHRZEIT).

DEUTSCH
SERIE K ECOSMART
74 SRKECOSMART-01_15-01-2014
SET TIME
TIME
OFF
EINSTELLUNG DER UHRZEITWenn man irgendeine Taste von P1 bis P4 mehrmals drückt, zeigt das Display das gewählte Programm
und anschließend die Uhrzeit.Zum Einstellen der Uhrzeit P2 und P3 gleichzeitig drücken. Die Ziffern der Stunde beginnen zu blinken und
am Display erscheint “set time”.Mit - (P2) und + (P3) die Stunde einstellen. Um zur Einstellung der Minuten zu kommen, P1 und anschließend - (P2) und + (P3) drücken.
P4 drücken, um die neue Einstellung der Uhrzeit zu speichern. Das Display zeigt die laufende Uhrzeit an.
Um ein Programm (P1, P2, P3 oder P4) an der Minibar einzustellen, den Knopf für das gewählte Programm mindestens 2 Sekunden lang drücken.
Wenn die Batterien leer sind, erscheint am Display folgendes Symbol:
Zum Ausschalten der Minibar ON/OFF drücken, am Display wird “Off” angezeigt. Um die Fernbedienung wieder einzuschalten, erneut die Taste ON/OFF drücken.

DEUTSCH
SERIE K ECOSMART
SRKECOSMART-01_15-01-2014 75
Achtung!Wenn die Netzspannung für weniger als 48 Stunden unterbrochen war, schaltet sich die Minibar mit dem
vorher eingestellten Programm wieder ein. Wenn die Netzspannung für mehr als 48 Stunden unterbrochen war, funktioniert die Minibar nach dem voreingestellten Thermostaten. Um ein Programm erneut einzu-geben, müssen die Anleitungen des folgenden Kapitels befolgt werden: Verwendung der Fernbedienung.
Achtung!Falls die Spannung absichtlich unterbrochen wird, frühestens nach 15 Minuten wieder einschalten (den
Kühlschrank an Netzspannung anschließen), sonst kann der Kompressor für einige Minuten blockiert sein, bevor er den normalen Betrieb wieder aufnimmt.
WARTUNG
• Für die Reinigung einen feuchten Lappen verwenden.• Bei Nichtbenutzung empfiehlt es sich, den Innenraum gut zu trocknen und die Tür halb offen zu lassen,
um das Innere zu lüften.
Wenn das Gerät schlecht oder gar nicht funktioniert, kontrollieren:a) ob der Stecker richtig in der Steckdose sitzt;b) ob die Netzspannung der auf dem Etikett TECHNISCHE DATEN angegebenen entspricht;c) ob der Kühlschrank in der Nähe von Wärmequellen oder an der Sonne steht.
BEI DER ENTSORGUNG DIE GELTENDEN BESTIMMUNGEN FÜR SONDERMÜLL BEACHTEN
In Übereinstimmung mit den Anforderungen der Europäischen Richtlinie 2002/96/EG über Elektro- und Elektronik-Altgeräte (WEEE) ist vorliegendes Gerät mit einer Markierung versehen. Sie leisten einen positiven Beitrag für den Schutz der Umwelt und die Gesundheit des Menschen, wenn Sie dieses Gerät einer gesonderten Abfallsammlung zuführen. Im unsortierten Siedlungsmüll könnte ein solches Gerät durch unsachgemäße Entsorgung negative Konsequenzen nach sich ziehen.
Auf dem Produkt oder der beiliegenden Produktdokumentation ist folgendes Symbol einer durchgestri-chenen Abfalltonne abgebildet. Es weist darauf hin, dass eine Entsorgung im normalen Haushaltsabfall nicht zulässig ist Entsorgen Sie dieses Produkt im Recyclinghof mit einer getrennten Sammlung für Elektro-und Elektronikgeräte. Die Entsorgung muss gemäß den örtlichen Bestimmungen zur Abfallbe-seitigung erfolgen. Bitte wenden Sie sich an die zuständigen Behörden Ihrer Gemeindeverwaltung, an den lokalen Recyclinghof für Haushaltsmüll oder an den Händler, bei dem Sie dieses Gerät erworben haben, um weitere Informationen über Behandlung, Verwertung und Wiederverwendung dieses Pro-dukts zu erhalten.