Jungle Dream Fuschia Strip Quilt - Michael Miller Fabrics€¦ · Jungle Dream Fuschia Strip Quilt...
4
MINKY Jungle Dream Fuschia Strip Quilt SIZE : 58” x 58” Free Pattern available on michaelmillerfabrics.com
Transcript of Jungle Dream Fuschia Strip Quilt - Michael Miller Fabrics€¦ · Jungle Dream Fuschia Strip Quilt...

MINKY
Jungle Dream Fuschia Strip Quilt SIZE : 58” x 58”
Free Pattern available on michaelmillerfabrics.com

- Free Store Model with Purchase as Shown on Cover -
Get a Free Store Model 58” x 58” strip quilt featuring Jungle Dream Fucsia
with an order of a casepack (the entire collection is 7 skus). All bolt sizes are 12 yards.
Free Store Display - use style #GWP0041
SMZ7747 FUSCHIA JUNGLE DREAM
RS7583 ORCHIDROSEBUD SNUGGLE
SMZ7703 WHITE SWISS DOT
SMZ7746 FUSCHIAMARCHING ELEPHANT
SMZ7703 SILVER SWISS DOT
SMZ7745 FUSCHIADITSY
SMD7581 GRAY SILKY MINKY DOT SOLID
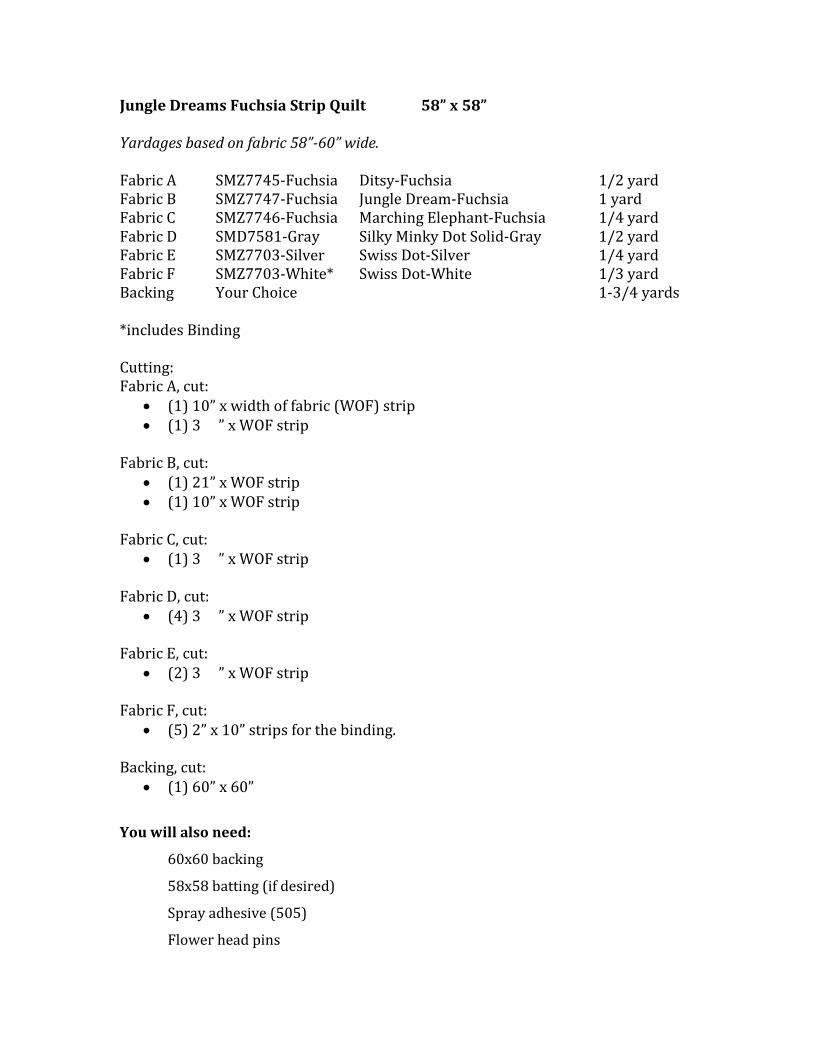
Jungle Dreams Fuchsia Strip Quilt 58” x 58” Yardages based on fabric 58”-60” wide. Fabric A SMZ7745-Fuchsia Ditsy-Fuchsia 1/2 yard Fabric B SMZ7747-Fuchsia Jungle Dream-Fuchsia 1 yard Fabric C SMZ7746-Fuchsia Marching Elephant-Fuchsia 1/4 yard Fabric D SMD7581-Gray Silky Minky Dot Solid-Gray 1/2 yard Fabric E SMZ7703-Silver Swiss Dot-Silver 1/4 yard Fabric F SMZ7703-White* Swiss Dot-White 1/3 yard Backing Your Choice 1-3/4 yards *includes Binding Cutting: Fabric A, cut:
• (1) 10” x width of fabric (WOF) strip • (1) 3 ½” x WOF strip
Fabric B, cut:
• (1) 21” x WOF strip • (1) 10” x WOF strip
Fabric C, cut:
• (1) 3 ½” x WOF strip
Fabric D, cut: • (4) 3 ½” x WOF strip
Fabric E, cut:
• (2) 3 ½” x WOF strip Fabric F, cut:
• (5) 2” x 10” strips for the binding. Backing, cut:
• (1) 60” x 60”
You will also need:
60x60 backing
58x58 batting (if desired)
Spray adhesive (505)
Flower head pins

Walking Foot (recommended)
Sewing and Basic Technique for Sewing Strip Quilts:
This quilt is sewn using the flip and sew method. Each strip is sewn on the foundation of
the quilt, sewing through all layers, backing and batting. This means the quilt is quilted
when you are done!
1. Lay the backing fabric on a flat surface. Place the batting centered exactly on
top of the batting. Spray fusible adhesive to hold batting to backing fabric.
2. Smooth out all wrinkles. Fold in half keeping the 60” wide horizontal. Mark
the center of the backing and batting piece.
3. You will start with the third strip for this version. Lay the third strip on the
batting, aligning the top edge with the marked line on the batting. Use spray
adhesive to secure in place.
4. Choose your next strip and pin in place with right sides together, lining up
the raw edges along one horizontal side. Use a 1/2" seam allowance to attach
the strips to the batting and backing. You will be sewing through the strip you
pinned, the center strip, the batting and the backing.
5. Smooth the strip right side up and spray to secure in place. Repeat step 4 on
the other side of the middle strip.
6. Continue to sew strips alternating sides working from the middle. Repeat
pinning and sewing until all strips are sewn. Baste the outer edge down before
you attach binding. Trim all edges to even up.
7. Bind with 2” strips sewn together.