FREE QUILT BLOC ATTERNS Modern Quilt 6 Squares · 2016-07-18 · MODERN QUILT SQUARES 6 FREE QUILT...
22
MODERN QUILT SQUARES: 6 FREE QUILT BLOCK PATTERNS 1 QUILTINGDAILY.COM MODERN QUILT SQUARES 6 FREE QUILT BLOCK PATTERNS ©F+W a Content and eCommerce Company 3 1 2 6 Modern Quilt Squares 6 FREE QUILT BLOCK PATTERNS 1 Linen Square-Block Quilt SIOBHAN ROGERS 2 Scrappy Log Cabin Coasters KATHRYN MORRISON 3 Rubik’s Crush ASHLEY NEWCOMB 4 The Birdhouse Rock Quilt TINA GIVENS 5 A Dotty Garden SARAH FIELKE 6 Quilted Shower Curtain JINA BARNEY 4 5
Transcript of FREE QUILT BLOC ATTERNS Modern Quilt 6 Squares · 2016-07-18 · MODERN QUILT SQUARES 6 FREE QUILT...
MODERN QUILT SQUARES: 6 FREE QUILT BLOCK PATTERNS 1 Q U I LT I N G D A I LY. C O M
MODERN QUILT SQUARES 6 FREE QUILT BLOCK PATTERNS
©F+W a Content and eCommerce Company
3
1 2
6
Modern Quilt Squares
6 FREE QUILT BLOCK PATTERNS
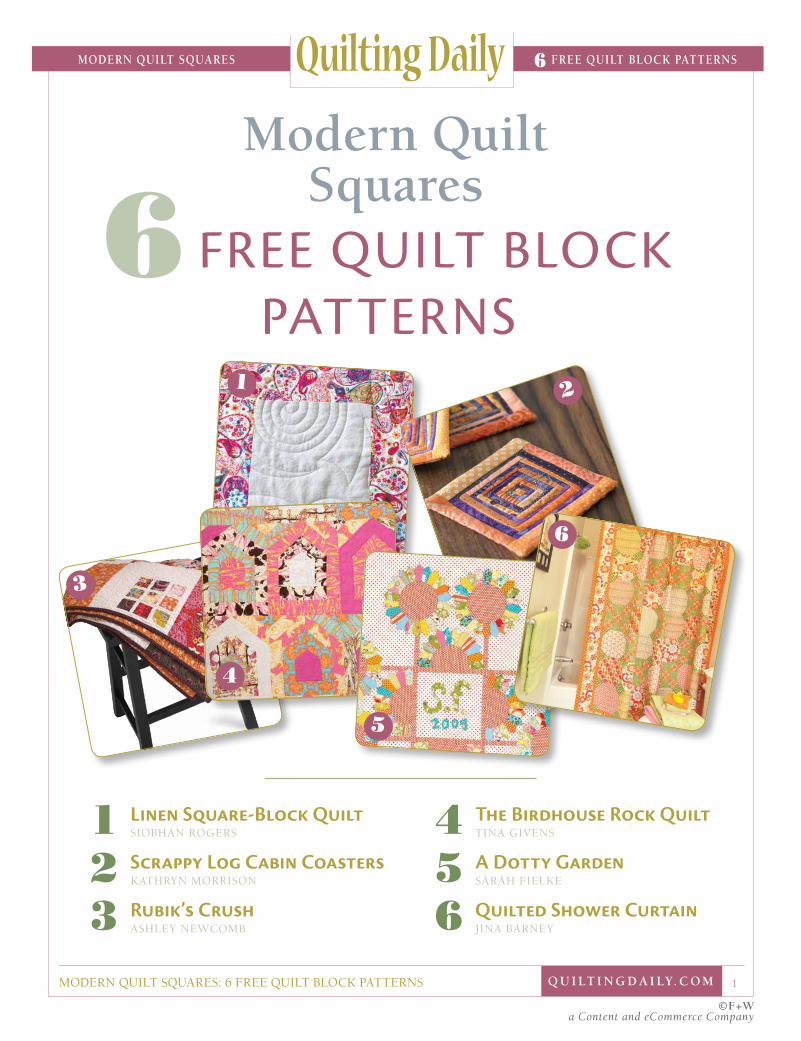
1 Linen Square-Block Quilt SIOBHAN ROGERS
2 Scrappy Log Cabin Coasters KATHRYN MORRISON
3 Rubik’s Crush ASHLEY NEWCOMB
4 The Birdhouse Rock Quilt TINA GIVENS
5 A Dotty Garden SARAH FIELKE
6 Quilted Shower Curtain JINA BARNEY
4
5

MODERN QUILT SQUARES: 6 FREE QUILT BLOCK PATTERNS 2 Q U I LT I N G D A I LY. C O M
MODERN QUILT SQUARES 6 FREE QUILT BLOCK PATTERNS
©F+W a Content and eCommerce Company
These days, in the quilting and sewing world it’s hip to be
square. The popularity of modern patchwork designs means that fiber artists are creating—and clamoring for—contemporary quilt block patterns for
quilt designs and other patchwork projects.
In Modern Quilt Squares: 6 Free Quilt Block Patterns, we’ve added two new patterns to our line-up of free contemporary quilt designs with quilt squares and easy quilt blocks: the Linen Square Block Quilt and Scrappy Log Cabin Coasters, plus a fresh take on traditional quilt blocks in the form of a shower curtain.
The “Linen Square Block Quilt” by Siobhan Rogers pairs neutral linen fabric with bright prints for a sophisticated block design.
You can shrink your scrap stash and practice improv piecing a quilt block at the same time with the “Scrappy Log Cabin Coasters” by Kathryn Morrison.
“Rubik’s Crush” by Ashley Newcomb comes together quickly, pairing large print quilting squares with more intricate pieced quilting blocks.
Tina Givens’ “Birdhouse Rock” quilt is based on nine simple quilt blocks in the shape of a birdhouse. A mix of solids and prints makes each pieced quilt square unique.
MODERN QUILT SQUARES
6 FREE QUILT BLOCK
PATTERNS
EDITORIAL DIRECTOR Vivika Hansen DeNegre
ONLINE EDITOR Cate Prato
CREATIVE SERVICES DIVISION ART DIRECTOR Larissa Davis PHOTOGRAPHER Larry Stein
Projects and information are for inspiration and personal use only. F+W Media, Inc. is not responsible for any liability arising from errors, omissions, or mistakes contained in this eBook, and readers should proceed cautiously, especially with respect to technical information. F+W Media grants permission to photocopy any patterns published in this issue for personal use only.
“A Dotty Garden” is one of those quilt block patterns that would look perfect at a cottage or sunny bed-and-breakfast in the country. Designer Sarah Fielke shares her easy method for how to appliqué quilt blocks in this pattern, and templates are included, too.
Finally, fill your bathroom with quilt block beauty by making a quilted shower curtain like the one by Jina Barney for Riley Blake Designs. Quilt squares come together to make larger quilt blocks in this combination of two traditional quilt block designs: the snowball and the Irish chain.
With so many easy quilt block patterns to try, we’re sure you’ll enjoy Modern Quilt Squares: 6 Free Quilt Block Patterns.
Warmly,
ViVika Hansen Denegre
Editorial Director
With a swipe of your fi nger you’ll have access to:
� e latest posts, free patterns, and eBooks
Over 100 how-to videos
Tips and techniques from industry leading experts
*Apple, iPad, iPhone, iPod touch, and iTunes are trademarks of Apple Inc., registered in the U.S. and
other countries. App Store is a service mark of Apple Inc. Non-US residents: if the above link does
not work for you, feel free to browse our selection of Apps from within the Apple App Store itself
by searching for “Interweave”.
Take Quilting Daily on the go with the FREE Mobile app for
your iPhone or iPod Touch.
Get your FREE Quilting Daily app atwww.QuiltingDaily.com/app

MODERN QUILT SQUARES: 6 FREE QUILT BLOCK PATTERNS 3 Q U I LT I N G D A I LY. C O M
MODERN QUILT SQUARES 6 FREE QUILT BLOCK PATTERNS
©F+W a Content and eCommerce Company
Directions1. Use a 1/4" seam allowance and press
the seams open. Refer to figure 1 to
see the order for adding the strips
to the block center.
2. From the solid fabric, cut:
• 4 strips 8" × 70" (cut on the
lengthwise grain) for the
horizontal sashing
• 9 strips 8" × 22" (cut on the
lengthwise grain) for the
vertical sashing
• 6 squares 6" × 6" for the block
centers
Quilt machine stitched by Kim Bradley.
I love linen. I think it adds a lovely
look and feel to quilts. The pink
fabrics in this quilt are very bright
and vibrant, and the natural linen
seems to tone them down. Also,
I find that linen really shows
off machine quilting. This quilt
features circular machine quilting
on the square quilted blocks. I
feel that the swirls in the machine
quilting add a lovely movement to
the quilt.
LINEN square-block QUILT
by siobHan rogers
AdApted from modern pAtchwork 2012

MODERN QUILT SQUARES: 6 FREE QUILT BLOCK PATTERNS 4 Q U I LT I N G D A I LY. C O M
MODERN QUILT SQUARES 6 FREE QUILT BLOCK PATTERNS
©F+W a Content and eCommerce Company

MODERN QUILT SQUARES: 6 FREE QUILT BLOCK PATTERNS 5 Q U I LT I N G D A I LY. C O M
MODERN QUILT SQUARES 6 FREE QUILT BLOCK PATTERNS
©F+W a Content and eCommerce Company
3. Each block has 4 different print
fabrics that frame the center
square. From your 4 print fabrics,
cut strips 21/2" × WOF (width of
fabric). You will trim the strips to
length as you assemble the blocks.
4. Sew 1 print A strip to 1 solid
6" × 6" square. Press open, and
trim the strip even with the square.
Repeat on the opposite side. Add
print A to the remaining sides in
the same manner.
5. Repeat the process to add the B–D
print strips. Create 5 additional
blocks in the same manner. They
should measure 22" square.
Note: To speed up the piecing process,
you may wish to chain piece the blocks.
First sew all of the 6" center squares
to a print A strip. Trim the units apart,
press open, and trim the A strip even
with the 6" square. Sew the opposite
side of the center blocks to the next A
strip; cut, press, and trim. Continue in
the same manner to complete adding the
A strips, and then do likewise with the
B–D strips.
6. For each block row, alternately sew
together (3) 8" × 22" sashing strips
and 2 blocks. Press the seams in 1
direction.
7. Sew an 8" × 70" sashing strip to
the top of the first block row. Press,
and then trim the ends of the strip
even with the block row. In the
same manner, join the remaining
sashing strips and block rows, and
sew together to make the quilt top.
8. If you are using yardage for the
backing, cut the yardage in half to
get (2) 3 yd. lengths. Sew together
lengthwise. Layer the quilt back,
batting, and quilt top. Hand or
machine quilt the layers together
as you choose. This quilt was
machine quilted with a longarm
machine by Kim Bradley.
9. Trim away the excess batting and
backing.
10. Prepare the binding. I used 21/2"-
wide strips of the pink paisley
fabric. Join the binding strips
together and press the seams
open. Fold the binding in half
lengthwise, wrong sides together.
Press the fold. Attach the binding
to the front of the quilt with a
1/4" seam sewn through all layers.
Fold the binding to the back of the
quilt, and hand stitch to finish.
beaspokequilts.blogspot.com
Figure 1
M A T E R I A L S
Finished size: 66" × 95"
• Solid fabric for the block centers and sashing, 31⁄2" yds. (I used a cotton-linen blend in natural.)
• 4 coordinating print fabrics to frame the solid block centers:
• Print A, 3⁄4 yd. (innermost)
• Print B, 1 yd.
• Print C, 13⁄8 yds.
• Print D, 13⁄4 yds. (outermost)
• Backing fabric, 6 yds. (I pieced fabric scraps together to make a 74" × 103" rectangle for the backing.)
• Binding fabric, 7⁄8 yd.
• Batting, queen size (I used wool.)
• Rotary cutting tools
• Sewing machine (with free-motion capabilities, if desired)
• Thread in matching and/or contrasting colors

MODERN QUILT SQUARES: 6 FREE QUILT BLOCK PATTERNS 6 Q U I LT I N G D A I LY. C O M
MODERN QUILT SQUARES 6 FREE QUILT BLOCK PATTERNS
©F+W a Content and eCommerce Company
scrappy LOG CABIN COASTERS
by katHryn Morrison
AdApted from modern pAtchwork Spring 2014
MODERN QUILT SQUARES: 6 FREE QUILT BLOCK PATTERNS 7 Q U I LT I N G D A I LY. C O M
MODERN QUILT SQUARES 6 FREE QUILT BLOCK PATTERNS
©F+W a Content and eCommerce Company
DirectionsAll seams are 1/4". See “Sewing Basics”
for more information.
1. Cut a square of both orange and
purple fabric, each roughly 1"
square.
2. With right sides together, stitch the
squares together right sides facing.
Press the seam open.
3. Cut a purple strip as long as the
side you’re adding it to—roughly
2" long.
TIP: The strips do not need to be
precisely cut. Use scissors to cut the
strip roughly the size you need. As you
continue sewing, trim the strips even
with the stitched end.
4. With the orange square toward the
top, place the purple strip right
side down along the right side of
the piece. (figure 1)
TIP: To create the scrappy look, don’t
try for a perfectly aligned seam. Play
with angling each edge slightly—but
remember that a little angling goes a
long way!
5. Sew the purple piece down. Trim
excess seam allowance. Press the
seam open.
6. Turn the piece clockwise so the
last sewn seam is on the bottom.
Place another purple strip on
the right side. Sew the seam,
trim the excess seam allowance
(figure 2), and press. Add 2 more
purple strips.
7. Once you have purple strips on all
4 sides, use the same method to
add 4 orange strips.
8. Alternate colors until the coaster is
about 33/4" square. To measure the
block, align the seam line of the
outer row of strips to the 1/2" mark
on the 6" square ruler. (figure 3)
This will account for the width of
the log and the seam allowance.
NOTE: The number of rows you have
will vary depending on how wide or
narrow you made your strips.
9. Use strips that are about 11/2" wide
for the final row. Once all 4 of
these wider strips are sewn, trim
the coaster to 43/4" × 43/4". (figure 4)
The width of the outer row after
trimming should be about 3/4”.
10. Layer the pieced coaster and
backing fabric right sides together.
Place the batting square on top and
pin the layers together.
11. Sew around the edges with a
1/4" seam allowance. Leave a 2"
opening in the center of 1 side of
the coaster. To make it easier to get
crisp corners when you turn the
coaster right side out, clip a small
triangle off each corner.
M A T E R I A L S
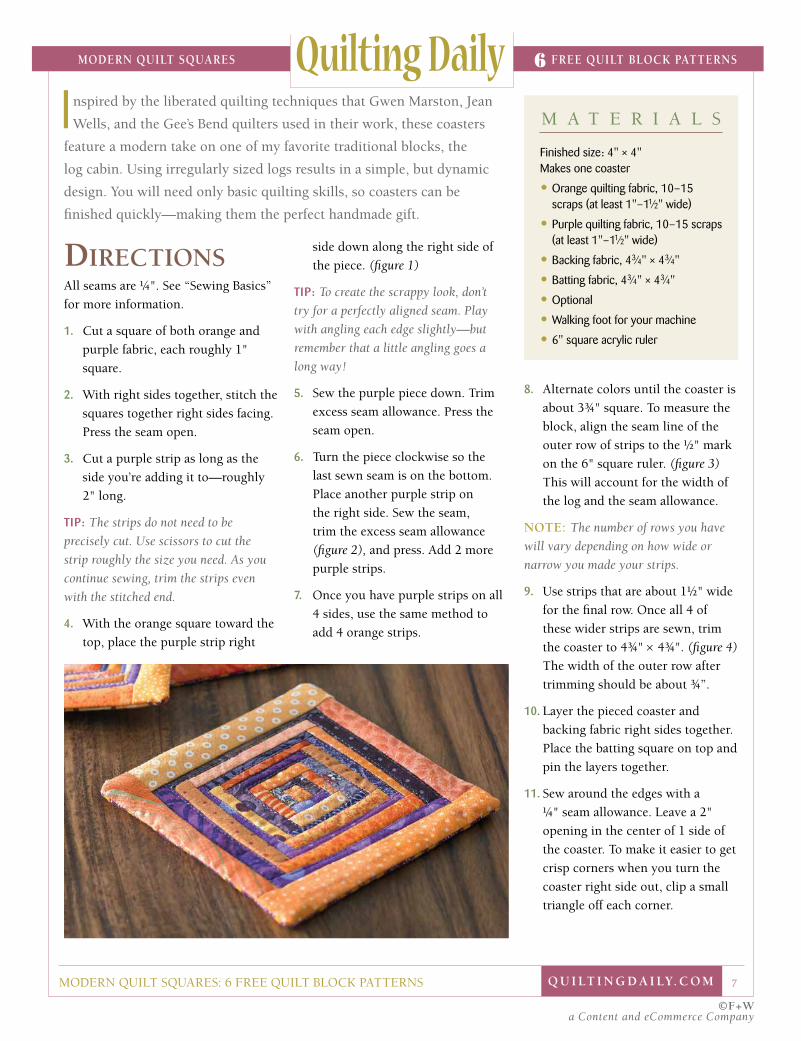
Finished size: 4" × 4" Makes one coaster
• Orange quilting fabric, 10–15 scraps (at least 1"–11⁄2" wide)
• Purple quilting fabric, 10–15 scraps (at least 1"–11⁄2" wide)
• Backing fabric, 43⁄4" × 43⁄4"
• Batting fabric, 43⁄4" × 43⁄4"
• Optional
• Walking foot for your machine
• 6" square acrylic ruler
Inspired by the liberated quilting techniques that Gwen Marston, Jean
Wells, and the Gee’s Bend quilters used in their work, these coasters
feature a modern take on one of my favorite traditional blocks, the
log cabin. Using irregularly sized logs results in a simple, but dynamic
design. You will need only basic quilting skills, so coasters can be
finished quickly—making them the perfect handmade gift.

MODERN QUILT SQUARES: 6 FREE QUILT BLOCK PATTERNS 8 Q U I LT I N G D A I LY. C O M
MODERN QUILT SQUARES 6 FREE QUILT BLOCK PATTERNS
©F+W a Content and eCommerce Company
12. Turn the coaster right side out
through the seam opening. Gently
poke out the corners and roll the
edges of the coaster in your fingers
to flatten the seam. Press.
13. Tuck the edges of the opening
under 1/4" and hand sew shut.
14. Quilt the coaster. Use a straight
stitch and sew along the inner and
outer edges of the purple rows.
Optional: A walking foot is helpful
for this.
thevegankat.com
Figure 1 Figure 2
Figure 3 Figure 4
design options• It’s fun to choose your own colors—
and this project is perfect for using up scraps. Just make sure one color reads as light and the other color reads as dark to create contrast in the design.
• Change the look of the coaster by starting with a different center shape. Try a rectangle or a triangle and build the logs out in the same way. You may
need to get creative when assembling the triangles together by adding extra strips to make the piece rectangular or square at the end.
• Another way to change the look is to change the scale. Set multiple blocks together to create a mug mat or a quilt.

MODERN QUILT SQUARES: 6 FREE QUILT BLOCK PATTERNS 9 Q U I LT I N G D A I LY. C O M
MODERN QUILT SQUARES 6 FREE QUILT BLOCK PATTERNS
©F+W a Content and eCommerce Company
‘rubik’s crush’ CREATE A DELIGHTFUL
QUILT WITH
LARGE-SCALE
FABRICS
AdApted from 101 pAtchwork projectS + quiltS
2011by asHley newcoMb
This is a fun quilt to
showcase a favorite
fabric collection, especially
one with large-scale prints, such
as Anna Maria Horner’s “Innocent
Crush” collection for FreeSpirit. This
quick quilt contains plenty of interest,
pairing large print squares with more
intricate pieced blocks, which I think
resemble a Rubik’s Cube.

MODERN QUILT SQUARES: 6 FREE QUILT BLOCK PATTERNS 10 Q U I LT I N G D A I LY. C O M
MODERN QUILT SQUARES 6 FREE QUILT BLOCK PATTERNS
©F+W a Content and eCommerce Company
The size of this quilt makes it a great
throw for the couch, or you could
increase (or decrease) the number of
blocks to make a bed or crib quilt.
The quilt top is made up of two types
of blocks: 121/2" squares of print
fabrics (these can be one fabric cut
to 121/2", or you can choose to sew
two fabrics together and then cut the
pieced unit to 121/2") and the Rubik’s
block, which consists of a small
patchwork square that is sashed with a
light-colored solid fabric. The Rubik’s
blocks are bordered with the same
solid fabric. To add interest, I elected
to center some of the Rubik’s centers
and to offset the remaining ones;
these instructions will lead you to do
likewise.
Directionscutting the soliD fabricNOTE: Cut all strips across the full
width of the fabric, from selvedge to
selvedge.
1. Cut (14) 1" strips. Sub-cut the
strips to get a total of (102) 21/2"
lengths, and (34) 71/2" lengths.
2. Cut (5) 31/4" strips, (2) 4" strips,
(2) 21/2" strips, (2) 41/2" strips,
(2) 2" strips, (2) 5" strips, and
(2) 11/2" strips. From each of these
strips, cut (2) 71/2" lengths and
(2) 13" lengths.
M A T E R I A L S
Finished size: 55" × 77"
• Assorted print fabrics, (18) 121⁄2" squares and (153) 21⁄2" squares
• Light-colored solid fabric for the Rubik’s block sashing, 2 yards

MODERN QUILT SQUARES: 6 FREE QUILT BLOCK PATTERNS 11 Q U I LT I N G D A I LY. C O M
MODERN QUILT SQUARES 6 FREE QUILT BLOCK PATTERNS
©F+W a Content and eCommerce Company
the block centers 1. Select (9) 21/2" square blocks
and arrange them on your work
surface in 3 rows, 3 blocks per row.
Position a 1" × 21/2" strip of solid
fabric between each square.
2. Sew each row as follows: small
block, solid strip, small block,
solid strip, small block. Iron flat,
pressing all seams open. Repeat for
each row.
3. Sew the 3 rows together alternately
with (3) 1" × 71/2" solid strips.
Press the seams open. The pieced
square should measure 71/2" × 71/2"
(raw edge to raw edge). Make a
total of 17 block centers.
sashingNOTE: Once the outer strips are added to
each block center, the block will measure
13" × 13", and it will be necessary to
trim each block to 121⁄2" square.
centered block
1. Sew (1) 31/4" × 71/2" solid strip to
the top of a Rubik’s block center,
and sew (1) 31/4" × 71/2" solid strip
to the bottom. Press the seams
open.
2. Sew a 31/4" × 13" solid strip to each
side of the block. Press the seams
open. Trim the block to 121/2" ×
121/2". Make a total of 5 blocks.
off-center block #1
1. Sew (1) 21/2" × 71/2" solid strip to
the top of a Rubik’s block center,
and sew (1) 4" × 71/2" solid strip to
the bottom. Press the seams open.
2. Sew (1) 21/2" × 13" solid strip to
1 side, and sew (1) 4" × 13" solid
strip to the opposite side of the
block. Press the seams open, and
trim the block. Make 4 blocks.
off-center block #2
1. Sew (1) 2" × 71/2" solid strip to the
top of a Rubik’s block center, and
sew (1) 41/2" × 71/2" solid strip to
the bottom. Press the seams open.
2. Sew (1) 2" × 13" solid strip to 1
side, and sew (1) 41/2" × 13" solid
strip to the opposite side of the
block. Press the seams open, and
trim the block to size. Make 4
blocks.
off-center block #3
1. Sew (1) 11/2" × 71/2" solid strip to
the top of a Rubik’s block center,
and sew (1) 5" × 71/2" solid strip to
the bottom. Press the seams open.
2. Sew (1) 11/2" × 13" solid strip to
1 side of the block, and sew (1)
5" × 13" solid strip to the opposite
side. Press the seams open. Trim
the block to size. Make 4 blocks.
the quilt topNOTE: There are seven rows of 5 squares
each (alternating print squares with
pieced Rubik’s blocks).
1. For the first row, alternate
1 print 121/2" square with
1 Rubik’s block, starting with the
print square. Arrange your blocks
as desired, balancing out the color
placement. Sew the blocks together
and press the seams open.
2. Sew the second row, starting with
a Rubik’s block and alternating the
Rubik’s blocks with the print 121/2"
squares. Press the seams open.
3. Continue this pattern to make all
7 rows.
4. Sew the rows together, pressing the
seams open.
finishing1. Layer the backing, batting, and
top. Baste as desired.
2. Free-motion quilt as desired.
3. Square up the quilt and trim
as needed. Attach the binding,
following your preferred binding
method.
filminthefridge.com
MODERN QUILT SQUARES: 6 FREE QUILT BLOCK PATTERNS 12 Q U I LT I N G D A I LY. C O M
MODERN QUILT SQUARES 6 FREE QUILT BLOCK PATTERNS
©F+W a Content and eCommerce Company
birdhouse rockQUILT
by tina giVens
AdApted from 101 pAtchwork projectS + quiltS
2011
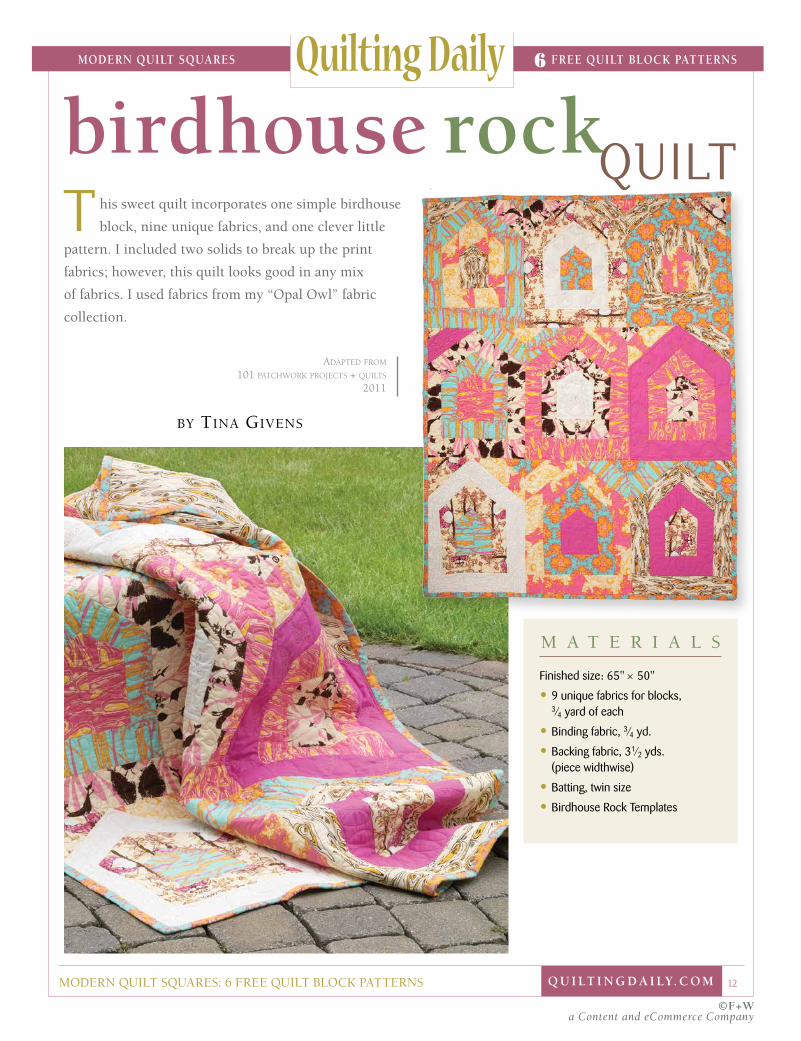
T his sweet quilt incorporates one simple birdhouse
block, nine unique fabrics, and one clever little
pattern. I included two solids to break up the print
fabrics; however, this quilt looks good in any mix
of fabrics. I used fabrics from my “Opal Owl” fabric
collection.
M A T E R I A L S
Finished size: 65" × 50"
• 9 unique fabrics for blocks, 3⁄4 yard of each
• Binding fabric, 3⁄4 yd.
• Backing fabric, 31⁄2 yds. (piece widthwise)
• Batting, twin size
• Birdhouse Rock Templates

MODERN QUILT SQUARES: 6 FREE QUILT BLOCK PATTERNS 13 Q U I LT I N G D A I LY. C O M
MODERN QUILT SQUARES 6 FREE QUILT BLOCK PATTERNS
©F+W a Content and eCommerce Company
Directionscutting the fabricsEach block is made up of various
shapes and rectangles. Most of these
are provided as templates in the
Pattern Insert; the remaining 3 (A1,
B1, and C1) are easily rotary cut.
From each of the 9 fabrics, cut:
(1) 4" × 191⁄2" strip (label A1)
(2) 4" × 7" rectangles (label B1)
(2) 61⁄2" × 4" rectangles (label C1)
(1) and (1 reverse) for each of A2,
A3, B2, B3, C2, D1, and E1
Separate each piece by its letter, so all
A’s, B’s, C’s, D’s, and E’s are in separate
piles.
laying out the blocks1. On a flat surface large enough to lay
out the entire quilt, you are going
to plan out the fabric arrangement
for each block, and at the same
time you will determine the overall
block/fabric arrangement. Refer
to Figure 1 and the photos as you
design the blocks.
2. Begin by creating the inside bird-
house shape using the C pieces
from 1 fabric. Continue until you
have 9 of these little houses laid
out, 1 from each fabric.
3. Gather all of the B pieces from 1
fabric, and place them around 1 of
the little houses. Do likewise for
all of the B fabrics.
TIP: Play with the fabric combinations to ensure that the B fabrics contrast with the inner house fabrics as desired.
4. Now select all of the A pieces from
1 fabric, and place these outside
of 1 of the B/C arrangements. Do
likewise for all of the A fabrics,
again paying attention to the fabric
mix (within each block and from
block to block).
5. Place the D and E pieces in place,
and play until you are satisfied
with what you have.
sewing the blocksNOTE: Use 1⁄4" 1seam allowances. Stitch
all pieces with the right sides together,
and press after each seam is stitched.
1. Start with your first block and see
Figure 2 for reference. Use the
matchpoints to help match up
your corners.
2. Match C2 and B3 along the side
marked 1. Stitch these pieces
together with their right sides
together.
3. Stitch C2 to C1 along side 2 as
marked on the template.
4. Add this piece to the B2 fabric,
and then add B1 along the bottom
edge.
5. Add A3 and then A2.
6. Add D1 and then E1.
7. Repeat steps 1–6 for the other side
of the block.
8. At this point you will have 2
mirrored pieces for the block; sew
these together along the center line.
9. Finally, add A1 along the bottom
edge.
This completes the block, which
should measure approximately
23" × 19". Repeat this process until
you have completed all 9 blocks.
assembling anD finishing1. Sew the blocks into 3 rows of
3 blocks each. Sew the rows
together. Press.
2. Layer, baste, and quilt as desired.
The featured quilt was machine
quilted by Donna Sontag of
Whatever’s Quilted at Quilts Like
Crazy using a Handi Quilter.
3. Add the binding. I made a
double-fold binding (from
4"-wide strips).
TinaGivens.blogspot.com
E1 E1
D1 D1A3
A2 A2B2B2
B1 B1
A1
C2
C1 C1
C2
B3 B3
A3
Figure 2
Figure 1
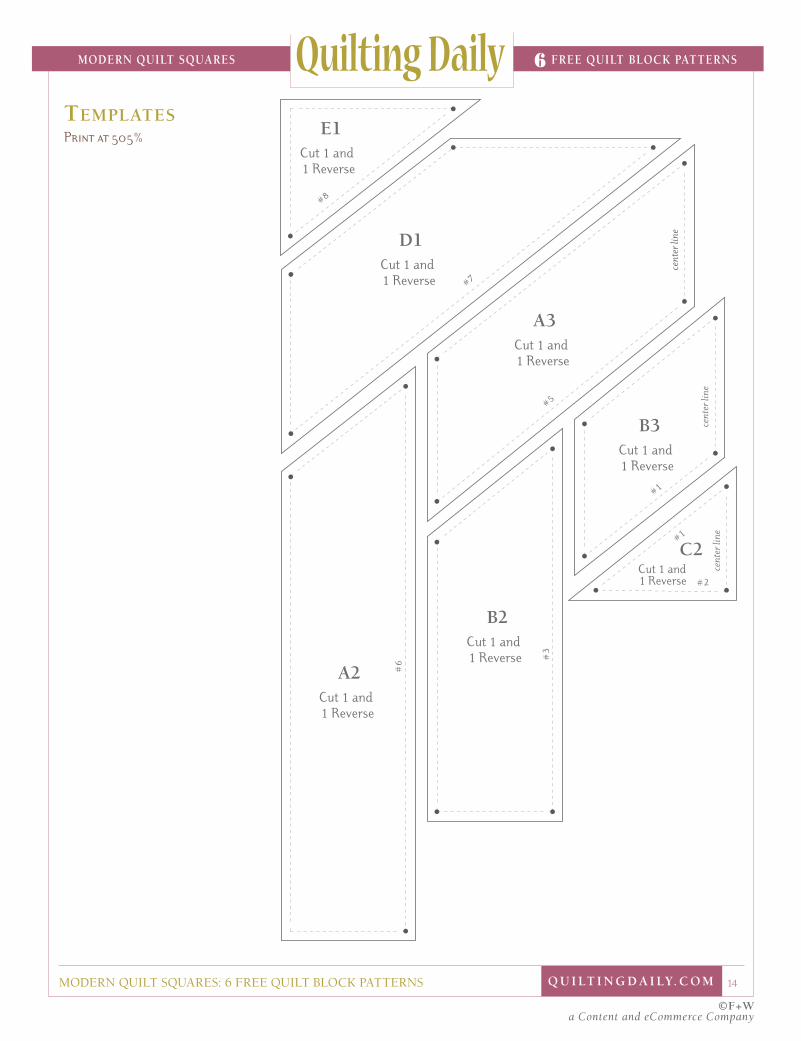
MODERN QUILT SQUARES: 6 FREE QUILT BLOCK PATTERNS 14 Q U I LT I N G D A I LY. C O M
MODERN QUILT SQUARES 6 FREE QUILT BLOCK PATTERNS
©F+W a Content and eCommerce Company
#6
A2Cut 1 and1 Reverse
#3
B2Cut 1 and1 Reverse
#8
E1Cut 1 and1 Reverse
#7
D1Cut 1 and1 Reverse
#5
cent
er li
ne
A3Cut 1 and1 Reverse
#1
cent
er li
ne
B3Cut 1 and1 Reverse
#1
#2
cent
er li
ne
Cut 1 and1 Reverse
C2
templatesPrint at 505%
MODERN QUILT SQUARES: 6 FREE QUILT BLOCK PATTERNS 15 Q U I LT I N G D A I LY. C O M
MODERN QUILT SQUARES 6 FREE QUILT BLOCK PATTERNS
©F+W a Content and eCommerce Company
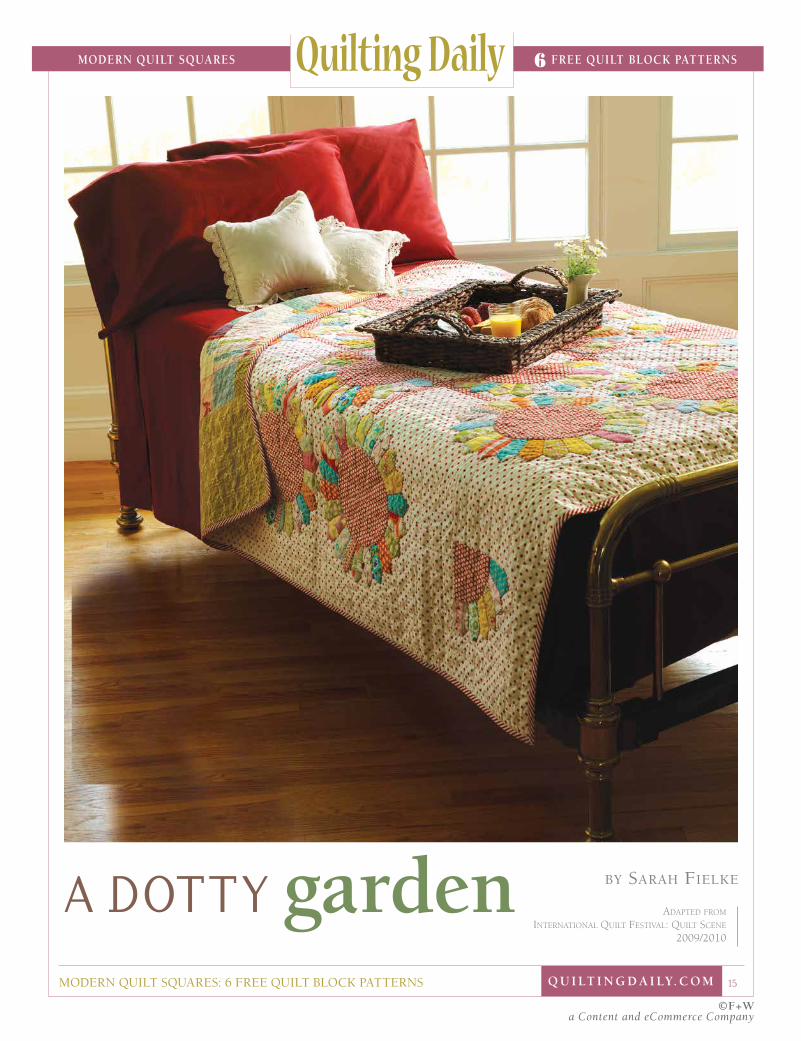
A DOTTY garden by saraH Fielke
AdApted from internAtionAl quilt feStivAl: quilt Scene
2009/2010

MODERN QUILT SQUARES: 6 FREE QUILT BLOCK PATTERNS 16 Q U I LT I N G D A I LY. C O M
MODERN QUILT SQUARES 6 FREE QUILT BLOCK PATTERNS
©F+W a Content and eCommerce Company
DirectionsNOTE: It is recommended that all fabric
be 100% cotton or linen, and be ironed.
You may want to color test any dark
fabric to ensure that it will not run.
Unless otherwise stated, all seams are
¼” throughout.
templatesFrom the template plastic, cut one
each of Templates 1 and 2. To make
a template for a half circle, trace
the Template 2 pattern twice on
the template plastic; cut out the
half circle. In the same manner, use
the Template 2 pattern to make a
full-circle template from template
plastic. If you wish to add the year
and your initials to the center of the
quilt, as I did, cut these from the
template plastic as well. If you are not
comfortable hand drawing the letters
and numbers, use a computer to
enlarge a font and trace over them. My
letters are 6" tall.
cuttingNOTE: Cut all strips across the width of
the fabric, from selvage to selvage.
M A T E R I A L S
Finished size: 63" × 63"
• Fabric for background and border, 31⁄4 yds. (white with red dots)
• Fabric for sashing and appliqué, 11⁄8 yds. (red with white dots)
• Fabrics for plates*, 1⁄4 yd. each of 6 greens, 6 yellows, 6 blues, and 6 pinks
• 2 fabrics for center appliqué, 1 fat quarter each (blue dot and green floral)
• Binding, 1 yd. for bias, or 3⁄4 yd. for straight-of-grain
• Backing, 4 yds.
• Cotton batting, 72" × 72"
• Template plastic
• Silver gel pen
• Roxanne™ Glue-Baste-It
• Embroidery/crewel needles, size 9 for quilting
• Straw needles for appliqué
• Cotton thread for piecing and to match appliqué fabrics
• Rotary cutter, mat, and clear acrylic quilter’s ruler
• Sewing machine
• General sewing supplies
• Masking tape (I used 11⁄2"-wide tape to mark the quilting lines.)
Optional
• 18°-wedge ruler from Creative Grids®, or similar (replaces Template 1)
• #8 perle cotton thread for hand quilting, red and white
* The fabric amounts for the plate blades allow you to cut more than the necessary quantity of blades. I used this amount of fabric for variety and scrappiness. You could use only four fabrics if you wish.

MODERN QUILT SQUARES: 6 FREE QUILT BLOCK PATTERNS 17 Q U I LT I N G D A I LY. C O M
MODERN QUILT SQUARES 6 FREE QUILT BLOCK PATTERNS
©F+W a Content and eCommerce Company
1. From the background fabric, cut
3 strips 131⁄2" and subcut them
to yield 9 squares 131⁄2". Also cut
6 strips 111⁄2". From 2 of these
strips, subcut 4 squares 111⁄2" for
the corners. Trim the remaining 4
strips to 411⁄2" for the borders.
2. From the red with white dots,
cut 4 strips 11⁄2". Subcut 2 of
these strips into 6 strips 11⁄2" ×
131⁄2". Trim the remaining 2 strips
to measure 11⁄2" × 411⁄2". (The
remaining fabric will be cut during
the appliqué steps.)
3. From each of the green, blue,
yellow, and pink fabrics, cut 1
strip 4". Using either the Template
1 piece or the 2" line on the 18°
ruler, cut a total of 248 plate
blades, which is approximately 11
from each fabric. You may want to
cut more than this so you can play
with color/fabric arrangement.
4. From the binding fabric, cut 7
strips 3". (If you are using a striped
fabric and desire a diagonally
striped binding, as on my quilt, cut
the binding strips on the bias.) Set
aside.
plates1. First sew the tops of the
blades. Fold each wedge in half
lengthwise, with right sides
together, and sew along the top
edge using a 1⁄4" seam. This is an
excellent time to chain piece.
2. Turn the wedges right-side out,
taking care to poke the point out
so it is nice and sharp. Press the
wedges flat, with the seam at the
back aligning with the center line
of the wedge.
3. Sew the wedges together along the
long raw edges, alternating them to
form a loose color pattern. Repeat
until you have sewn 22 wedges
together to form a circle. Press to
one side. You have completed one
plate. Repeat this process to make
8 complete plates; set aside.
4. Using the same method, make 4
half plates (12 wedges each) and
4 quarter plates (6 wedges each).
Press all the seams to one side and
set aside.
appliquéThe following method of appliqué
may be a little different from what
you are used to, but I find it to be
very easy for beginners. Please use
whatever method of appliqué you are
comfortable with.
1. Place your full-circle template on
the right side of the
red-with-white-dot fabric and trace
around it using the gel pen.
2. Using small, sharp scissors, cut out
the shape, leaving a scant 1⁄4" seam
allowance beyond the pen line.
3. Repeat this process with the other
appliqué shapes, including the
ones for the center block. Set aside
all of the appliqué shapes except
those for the center block.
4. For the center block, fold a 131⁄2"
background fabric square into
quarters and finger press the
MODERN QUILT SQUARES: 6 FREE QUILT BLOCK PATTERNS 18 Q U I LT I N G D A I LY. C O M
MODERN QUILT SQUARES 6 FREE QUILT BLOCK PATTERNS
©F+W a Content and eCommerce Company
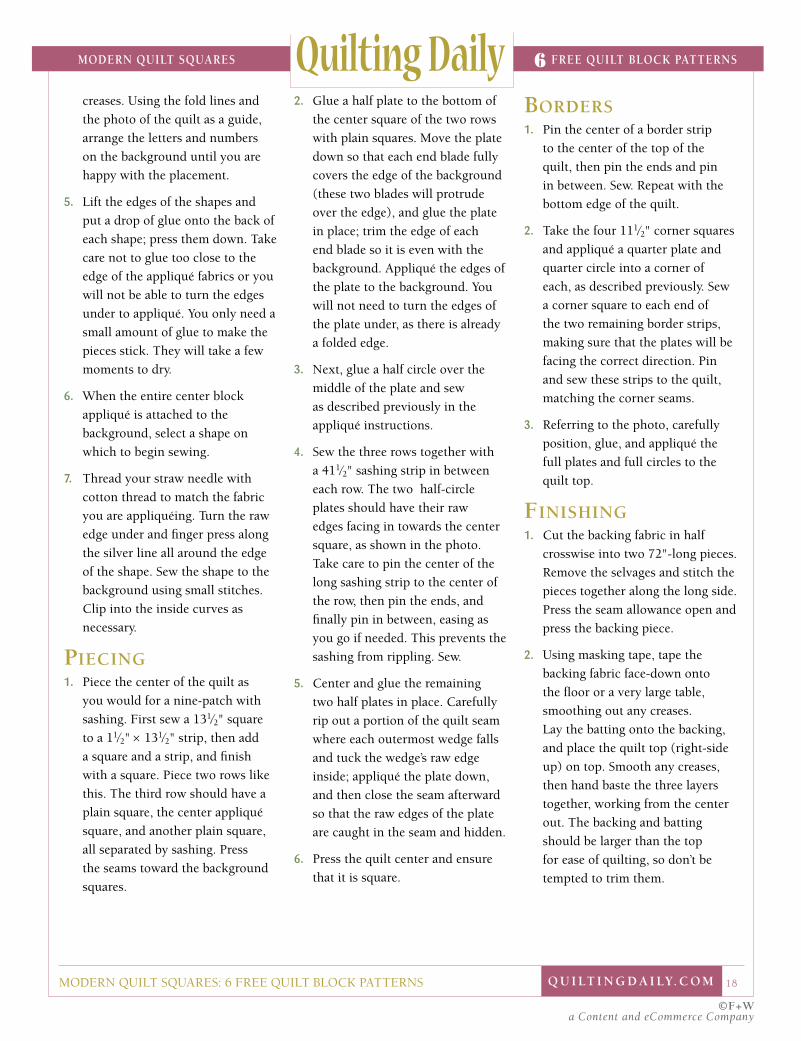
creases. Using the fold lines and
the photo of the quilt as a guide,
arrange the letters and numbers
on the background until you are
happy with the placement.
5. Lift the edges of the shapes and
put a drop of glue onto the back of
each shape; press them down. Take
care not to glue too close to the
edge of the appliqué fabrics or you
will not be able to turn the edges
under to appliqué. You only need a
small amount of glue to make the
pieces stick. They will take a few
moments to dry.
6. When the entire center block
appliqué is attached to the
background, select a shape on
which to begin sewing.
7. Thread your straw needle with
cotton thread to match the fabric
you are appliquéing. Turn the raw
edge under and finger press along
the silver line all around the edge
of the shape. Sew the shape to the
background using small stitches.
Clip into the inside curves as
necessary.
piecing1. Piece the center of the quilt as
you would for a nine-patch with
sashing. First sew a 131⁄2" square
to a 11⁄2" × 131⁄2" strip, then add
a square and a strip, and finish
with a square. Piece two rows like
this. The third row should have a
plain square, the center appliqué
square, and another plain square,
all separated by sashing. Press
the seams toward the background
squares.
2. Glue a half plate to the bottom of
the center square of the two rows
with plain squares. Move the plate
down so that each end blade fully
covers the edge of the background
(these two blades will protrude
over the edge), and glue the plate
in place; trim the edge of each
end blade so it is even with the
background. Appliqué the edges of
the plate to the background. You
will not need to turn the edges of
the plate under, as there is already
a folded edge.
3. Next, glue a half circle over the
middle of the plate and sew
as described previously in the
appliqué instructions.
4. Sew the three rows together with
a 411⁄2" sashing strip in between
each row. The two half-circle
plates should have their raw
edges facing in towards the center
square, as shown in the photo.
Take care to pin the center of the
long sashing strip to the center of
the row, then pin the ends, and
finally pin in between, easing as
you go if needed. This prevents the
sashing from rippling. Sew.
5. Center and glue the remaining
two half plates in place. Carefully
rip out a portion of the quilt seam
where each outermost wedge falls
and tuck the wedge’s raw edge
inside; appliqué the plate down,
and then close the seam afterward
so that the raw edges of the plate
are caught in the seam and hidden.
6. Press the quilt center and ensure
that it is square.
borDers1. Pin the center of a border strip
to the center of the top of the
quilt, then pin the ends and pin
in between. Sew. Repeat with the
bottom edge of the quilt.
2. Take the four 111⁄2" corner squares
and appliqué a quarter plate and
quarter circle into a corner of
each, as described previously. Sew
a corner square to each end of
the two remaining border strips,
making sure that the plates will be
facing the correct direction. Pin
and sew these strips to the quilt,
matching the corner seams.
3. Referring to the photo, carefully
position, glue, and appliqué the
full plates and full circles to the
quilt top.
finishing1. Cut the backing fabric in half
crosswise into two 72"-long pieces.
Remove the selvages and stitch the
pieces together along the long side.
Press the seam allowance open and
press the backing piece.
2. Using masking tape, tape the
backing fabric face-down onto
the floor or a very large table,
smoothing out any creases.
Lay the batting onto the backing,
and place the quilt top (right-side
up) on top. Smooth any creases,
then hand baste the three layers
together, working from the center
out. The backing and batting
should be larger than the top
for ease of quilting, so don’t be
tempted to trim them.

MODERN QUILT SQUARES: 6 FREE QUILT BLOCK PATTERNS 19 Q U I LT I N G D A I LY. C O M
MODERN QUILT SQUARES 6 FREE QUILT BLOCK PATTERNS
©F+W a Content and eCommerce Company
3. Quilt as desired. I marked out a
11⁄2" grid across the background
fabrics using masking tape, then
hand quilted using #8 white perle
cotton. Using red perle cotton, I
outline quilted the appliqués, the
blades, and along the blade seams.
4. Using diagonal seams, join the
binding strips into one long strip.
Press it in half along the width,
wrong sides together. Position
the binding along the edges of
the quilt top, aligning the binding
raw edge with the quilt raw edge.
Using a walking foot and a 1⁄2"
seam allowance, sew the binding to
the quilt. Trim the excess backing
and batting so it is even with the
edge of the quilt top, then turn the
binding to the back of the quilt
and blind stitch it in place using
coordinating thread.
thelastpiece.net
template 1Includes seam allowance
Interweave Press LLC grants permission to photocopy this pattern for personal use.
template 2No seam allowance included
Interweave Press LLC grants permission to photocopy this pattern for personal use.

MODERN QUILT SQUARES: 6 FREE QUILT BLOCK PATTERNS 20 Q U I LT I N G D A I LY. C O M
MODERN QUILT SQUARES 6 FREE QUILT BLOCK PATTERNS
©F+W a Content and eCommerce Company
QUILTED shower curtain
AdApted from internAtionAl quilt feStivAl:
quilt Scene winter 2010/2011
by Jina barney For riley blake Designs
This colorful quilted
shower curtain
is sure to jazz up any
bathroom. It’s quick and
easy to piece, and you
can use the same general
design for a bed quilt
or throw. The design
incorporates two blocks:
a snowball block and
an Irish Chain block.
I made this version
with fabrics from
the “Summer Song”
collection by Riley Blake
Designs.

MODERN QUILT SQUARES: 6 FREE QUILT BLOCK PATTERNS 21 Q U I LT I N G D A I LY. C O M
MODERN QUILT SQUARES 6 FREE QUILT BLOCK PATTERNS
©F+W a Content and eCommerce Company
Directionscutting NOTE: Please read all of the
instructions before cutting the fabrics.
All measurements include 1⁄4" seam
allowances.
1. For the Summer Snowball Block,
cut:
• 36 squares 101⁄8" × 101⁄8" from
the assorted prints
• 144 squares 3" × 3" from the
green polka dot
2. For the Flower Chain Block, cut:
• 12 strips 15⁄8" × width of fabric
(WOF) from the orange polka
dot
• 5 strips 15⁄8" × WOF from the
green damask
• 13 strips 15⁄8" × WOF from the
pink mini flowers
• 52 squares 37⁄8" × 37⁄8" from the
green damask
3. For the borders, cut:
• 8 strips 11⁄2" × WOF from the
orange polka dot (border 1)
• 8 strips 41⁄2" × WOF from the
white main print (border 2)
• 9 strips 11⁄2" × WOF from the
orange polka dot (border 3)
making the blocksNOTE: Sew with the right sides of the
fabrics facing unless otherwise stated.
1. Draw a line from corner to corner
on the wrong side of each 3" × 3"
green polka dot square.
2. Place a square on each corner of
the assorted 101⁄8" × 101⁄8" squares,
with the right sides together and
raw edges aligned. Sew on the
drawn line.
3. Trim 1⁄4" beyond the seam line.
Press the corner fabrics open.
(Figure 1)
4. Repeat Steps 1–3 to make 36 total
Summer Snowball blocks.
5. Using the 15⁄8" strips, sew 3 strips
together to make the following
strip sets:
• 5 sets of orange, pink, green
• 3 sets of pink, orange, pink
• 2 sets of orange, pink, orange
6. Cut each of the strip sets into 15⁄8"-
wide segments.
7. Sew the segments together to make
nine-patch blocks as illustrated.
(Figure 2) Make 52 Unit A and 13
Unit B.
8. Using Unit A, Unit B, and
the green damask 37⁄8" × 37⁄8"
squares, assemble 13 Flower
Chain Blocks. (Figure 3)
assembling anD finishing1. Refer to the photo and Figure
4 for block placement. Lay out
the blocks in 7 rows of 7. Sew
the blocks together to make the
rows. Sew the rows together to
complete the center of the quilt.
2. Measure and add the border
strips as follows.
borDer 1: Measure the height of
the quilt (measure through the
quilt center from raw edge to raw
edge). Sew 2 of the orange polka
dot 11⁄2" strips together end to
end, and trim the resulting strip
Figure 2: Unit A
Figure 2: Unit B
Figure 1
M A T E R I A L S
Finished quilt size: 827⁄8" × 827⁄8"
Finished block size: 101⁄8" × 101⁄8"
• Assorted prints for the snowball blocks, 3 yds. total
• Green polka dot for the snowball block corners, 11⁄8 yds.
• Orange polka dot for the chain blocks and borders, 13⁄8 yds.
• Green damask for the chain blocks, 1 yd.
• Pink mini flowers for the chain blocks, 3⁄4 yd.
• White large print for the middle border, 11⁄2 yds.
• Binding, 2⁄3 yd.
• Backing, 71⁄2 yds.
• Batting, queen size
• Muslin fabric for sleeve, 2 strips 10" × width of fabric (WOF)

MODERN QUILT SQUARES: 6 FREE QUILT BLOCK PATTERNS 22 Q U I LT I N G D A I LY. C O M
MODERN QUILT SQUARES 6 FREE QUILT BLOCK PATTERNS
©F+W a Content and eCommerce Company
to the measured length (the side
borders should be approximately
713⁄8"); sew this strip to 1 side.
Repeat for the opposite side. In the
same manner, measure the width
of the quilt, piece the strips for the
top and bottom, and trim them to
size (the top and bottom borders
should be approximately 733⁄8");
sew these strips to the top and
bottom.
borDer 2: Repeat the Border 1
instructions, using the white
print 41⁄2" strips. The side borders
should be approximately 733⁄8".
The top and bottom borders should
be approximately 813⁄8".
borDer 3: Repeat the process
for the third border, using the
remaining orange polka dot 11⁄2"
strips. The side borders should
be approximately 813⁄8", and the
top and bottom borders should be
approximately 833⁄8".
3. Finish the quilt by layering the
quilt top (right-side up), batting,
and backing (right-side down).
Bind the quilt using your preferred
method.
4. To add the casing for the shower
curtain rod, use the muslin strips
to make a sleeve.
jinabarneydesignz.com
Figure 3
Figure 4