JOSHTECH -...
35
1 JOSHTECH
Transcript of JOSHTECH -...

1
JOSHTECH

Pippi Programming & Design: Joshtech aka CoOkIeMoNsTeR
Author: Joshtech
Co-Author: Fia
Additional Write-Ups: ContrastX
Cover & Interior Art: ContrastX, Fia
Pippi Mascot Art: Powermogri
Layout & Editing: Fia
Testers: Koros, Fia, ContrastX, and many other wonderful players
Special Dedication: To Caroline for understanding all the long days and nights I spent to complete my work.
Donors: Without your contribution and support we could not push Pippi into the future.
Cheer Section: To the Pippsters and Steam Workshop Subscribers, please know that each of you
made an impact with your support of Pippi.
Special Thanks: To the Funcom devs, especially Scooper, the Advanced Server's Build Team: Frostydog, Madasyn, Brother Yig,
all gamers, and my fellow modders who make this hobby worth pursuing.
©2018 Joshtech. All Rights Reserved
This guide and all information herein may not reproduced in anyway without the expressed written permission from its
author. Any additional information or images provided and not related to Pippi in this document are the property of Funcom
and material used must be approved under their expressed permission. Any resemblance of people, places and things, living
or dead is entirely coincidental.
Third Edition

Introduction ............................................................................................ 3 - 4
Players Guide ............................................................................................... 5
Server Rules ................................................................................................. 5
Chat Box, Chat Tabs ..................................................................................... 6
Chat Settings ................................................................................................ 7
Help, Mute, Clear Chat, Vote ....................................................................... 8
Pippi Currency, Pay ...................................................................................... 9
Kits, Purchashing Kits ................................................................................ 10
Using Warps, Set Home, Customize ........................................................... 11
Roll and Flip, Gonds and Goochers ............................................................ 12
Admins Guide ............................................................................................ 13
Admins Guide Overview, A Certain Point of View, Setup Instructions ...... 14
Players Tab .......................................................................................... 15 - 17
Clans Tab, Temp Ban Tab, Warps Tab .................................................. 18 - 19
Commands Tab .......................................................................................... 20
Kits Tab ............................................................................................... 21 - 23
Pippi Settings Tab................................................................................ 24 - 27
NPC Spawns Tab, Cheats(Self) Tab ............................................................. 28
Admin Tools, Glorbs ................................................................................... 29
Loot Spawners ........................................................................................... 30
NPC Spawners ............................................................................................ 31
Thespians ................................................................................................... 32
Warpers ..................................................................................................... 33
Commands >1.8.0 ............................................................................... 34 - 35

3
Brief Overview
Pippi is a mod created for Conan Exiles by the user
Joshtech a.k.a. CoOkIeMoNsTeR. Pippi adds new
features and systems to game play which assist
admins in maintaining players while also adding to
the player’s experience. Pippi is modular by design,
meaning that each system is separate from each
other but they all work together. A good example
of this would be the Warp System and the Map
System. By having warps in the Warp System, the
Map System can be configured to provide a visual
representation of where the warps are to the
player. Further on in this document each system
will be explained in greater detail. Certain existing
features of Conan Exiles have been completely
rewritten to provide a better experience, some of
these features are the Chat System and Map
System.
- Joshtech
Why the Name?
Often enough people ask why the mod was titled
Pippi. When Josh began his journey to create a
program that would expand on the functionalities
of Conan Exiles, it was not yet named. His creation
was small but growing powerful by giving admins
and players more useable features. The further he
traveled down the rabbit hole, the more important
it was for a name to be given to the mod. He
remembered a character created by Astrid
Lindgren, the author of a series of children's
books. This fictional character, Pippi
Longstocking, was also small but powerful.
Thus, began the first release of the
synonymous mod, Pippi.
What Comes in the Box
What is Pippi? In short, it is many things. Pippi
offers admins the ability to easily operate their
servers and maintain their player base. They can
enlist the help of moderators without giving them
full access to the admin panel. Admins also have
the option to enhance their players’ gameplay by
creating kits, warp points for fast travel, and easily
change character names, levels, and skill points.
That is just to name a few features.
Players may interact with the mod through chat
commands with the enhanced chat window, earn
money through time played in-game, purchase
kits, set a personal home warp and much more.
Admins have the freedom to choose which of
these options are available to their players.
This manual will expand upon the vast options
admins have, explain the system as it is intended
for players, and perhaps uncover other hidden
features.

4
What is Team Pippi?
Team Pippi was started by Josh in Pippi’s earlier
days. I met Josh while creating my first Unreal
Engine Mod. He was not only an invaluable
resource but a mentor and teacher for me. His
background was in programming while I dabbled in
modeling and texturing. As our relationship grew,
Fia arrived on the scene and promoted Pippi on
her server. Pippi was a hit amongst her community
of players. Requests would come in and we would
take the information back to Josh to be
implemented.
Pippi spread like wildfire. Other server admins also
reached out to establish a relationship with this
talented modder. Josh jokingly referred to us as
Team Pippi. Eventually, we retired my mod and
decided to dedicate our full attention to Team
Pippi, promoting and teaching the UI to other
server admins. So, who is Team Pippi? Well, if I
were to give an answer, it’s you! The community.
Though Josh is the sole creator and father of the
mod, Fia and I love what Pippi has grown into...and
we’re rather fond of Josh too.
- ContrastX
How to Use This Manual
The manual is separated into three guides. The
first section is the Players Guide with explanations
for some of Pippi’s features. The second section is
the Admin Guide that breaks down the Admin
Panel tabs. The Quick Guide is at the end for easy
reference to Pippi’s Commands.
Summary of Features
Below is a brief list of features Pippi offers admins
and players:
• Player Details (Steam ID, Steam Name, Ping)
• Character Info (Race, Religion, Gender, Clan,
Clan Rank)
• Adjustment of a character’s clan rank
• Character Stats (Level, Experience,
Encumbrance, Attributes, etc.)
• The ability to view and adjust a player’s recipes.
• The ability to view and adjust a character’s vital
statistics.
• The ability to kick, kill, teleport, summon, and
send home a character
• Mute, Silence, and Ban Players
• Clan Recognition (Clan names and member
totals)
• Create Warps
• Warpers for a visual accompaniment to Warps
• Currency System
• Kit creation for character purchase, creature
loot, and loot spawners
• Loot Spawners that can be placed anywhere
• NPC Spawners for custom dungeons or
adventure locations
• Set player permissions for Pippi’s features and
commands
• The ability to add cooldowns and cost to any
Pippi command
• Chat Tabs with individual settings and alerts
• Profanity Filters
• Custom MOTD, Rules, and Announcement
Settings
• Commands for spawning meteors and
sandstorms
These boxes are placed throughout the
guide for helpful tips. The information in
them will be brief and related to the
information on the current page.
PIPPI TIPS

5
Server Rules
When you log onto a Pippi server for the first time
you may notice a pop-up window providing
information about the server. Admins configure
this feature and must rewrite the default message.
If you accept the server rules, you will be able to
continue into the game. If you decline the rules
you will not be able to join the server and the
Conan Exiles’ client will close. You will then need to
restart the game.
This is a useful feature for server admins and
players alike. Admins can provide a list of server
rules and information for new players. In return,
players will know if the server accommodates their
playstyle and can decline if it is not for them. You
no longer need to ask a ton of questions in chat or
spend hours playing to find you’ve joined a server
with rules you don’t like. Admins will know with a
player clicking accept, they have read the server’s
rules and any other information provided before
joining the server.
Chat Box
Once you have created your character one of the
first features you will has access to is the Pippi
chat window. Chat has four tabs: Global, Local,
Clan, and Whisper.
These tabs can be accessed two ways; by
pressing the Enter key and using the mouse
pointer to click on the desired chat tab or by
using the Tab key to circulate through each chat
window.
Chat Tabs
• Global chat allows all players to see what is
being broadcast across the game.
• Local chat allows players to talk within the
server’s local chat radius. Their conversation
cannot be broadcasted to all players in game.
• Clan chat only works if players are in a Clan. This
can be used at any proximity between
clanmates.
• Whisper chat allows two players to speak
privately at any distance. You only need to type
the whisper command once to continue a
conversation. However, if you wish to start a
new whisper with another player you will need
to type out the command again with the new
character’s name.
Pippi automatically checks the selection box
to Show Servers With Mods.
Once a player is subscribed to Pippi, they
will no longer have to remember to do this.
PIPPI TIPS
The two ways to Whisper another player:
/w <Character Name> < Message>
/whisper <Character Name> <Message>
To quickly reply type: /r <Message>
PIPPI TIPS

6
Chat Settings
Pippi offers customizable chat settings that the
default game does not. These have been broken up
into three categories: Notification, General, and
Channel Config. Chat Settings can be accessed by
pressing your Enter Key and left clicking on the Cog
in the bottom right corner of the chat line. Now
that you have opened your chat settings we can
dive right in.
• Notification allows a player to change the tone
and volume of the alert when there is activity in
another chat tab. You can listen to the sound by
clicking on the Preview button.
• General allows players to turn on/off time
stamp, auto scroll, and the Tab key function.
Players also have the option to change their font
size. An exciting feature is the ability to expand
the chat window. To resize it simply adjust the
length slider left or right. Opacity is used to
adjust visibility of the chat box. These setting
choices are persistent.
• Channel Config allows a player to choose what
types of messages appear in each chat tab. In
our example below the Global Tab has
Announcements, Actions and Global check
marked. That means those message types will be
seen in Global chat. However, the Local Tab has
Announcements, Action, and Local checked. That
means anytime there is a server announcement
in global it will also show in the Local Tab.
For a quick resizing of the chat window,
press Enter and then + on the number pad.
PIPPI TIPS
7
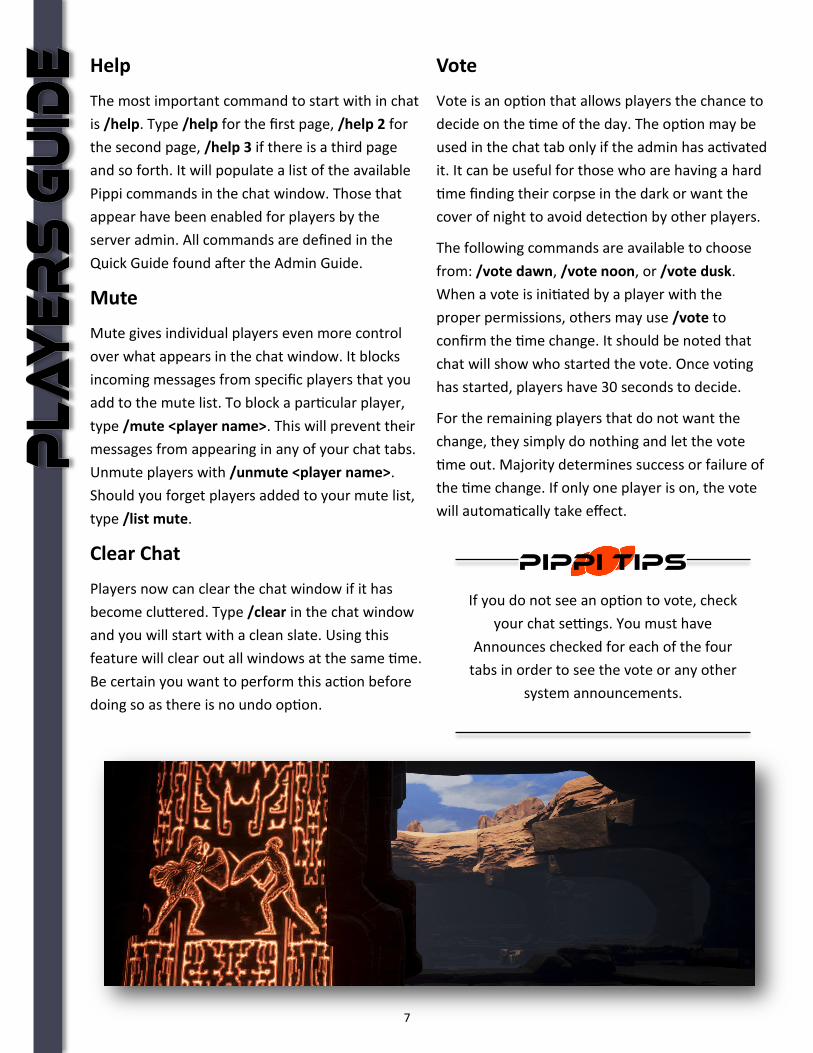
Help
The most important command to start with in chat
is /help. Type /help for the first page, /help 2 for
the second page, /help 3 if there is a third page
and so forth. It will populate a list of the available
Pippi commands in the chat window. Those that
appear have been enabled for players by the
server admin. All commands are defined in the
Quick Guide found after the Admin Guide.
Mute
Mute gives individual players even more control
over what appears in the chat window. It blocks
incoming messages from specific players that you
add to the mute list. To block a particular player,
type /mute <player name>. This will prevent their
messages from appearing in any of your chat tabs.
Unmute players with /unmute <player name>.
Should you forget players added to your mute list,
type /list mute.
Clear Chat
Players now can clear the chat window if it has
become cluttered. Type /clear in the chat window
and you will start with a clean slate. Using this
feature will clear out all windows at the same time.
Be certain you want to perform this action before
doing so as there is no undo option.
Vote
Vote is an option that allows players the chance to
decide on the time of the day. The option may be
used in the chat tab only if the admin has activated
it. It can be useful for those who are having a hard
time finding their corpse in the dark or want the
cover of night to avoid detection by other players.
The following commands are available to choose
from: /vote dawn, /vote noon, or /vote dusk.
When a vote is initiated by a player with the
proper permissions, others may use /vote to
confirm the time change. It should be noted that
chat will show who started the vote. Once voting
has started, players have 30 seconds to decide.
For the remaining players that do not want the
change, they simply do nothing and let the vote
time out. Majority determines success or failure of
the time change. If only one player is on, the vote
will automatically take effect.
If you do not see an option to vote, check
your chat settings. You must have
Announces checked for each of the four
tabs in order to see the vote or any other
system announcements.
PIPPI TIPS

8
Pippi Currency
Players can earn Bronze, Silver and Gold with the
currency system. Players have the potential to gain
coin upon joining the server for the first time,
through a scheduled payday, exchanging it with
other players, or finding it as loot.
To see what the balance, type /wallet in chat.
Players can earn currency based on time played in-
game and potentially offline as well. Each day and
night cycle counts as 24 hours. For example; if the
admin gives the players 20 Bronze for their payday,
at the end of a 7 day game cycle, that coin will go
directly into the wallet. The announcement will
display, PAYDAY: You have been credited 20
Bronze.
This feature is only available if the admin has
activated it in the Pippi Admin Panel. So, what can
players do with the currency system? Players may
purchase kits, use warps, and pay other players for
example. Admins can set a cost to every Pippi
command. Refer to the Quick Guide in the back of
the manual.
Pay
Characters can pay one another with the Pippi
system. This allows players to pay for services and
conduct commerce without the need to barter.
Remember there are three coin types: Gold, Silver,
and Bronze. To pay another player type /pay
<character name> <amount> <coin type> like in
this example: /pay Gond 1 Bronze.
Coins do not go into the character’s
inventory and cannot be stolen.
PIPPI TIPS
9
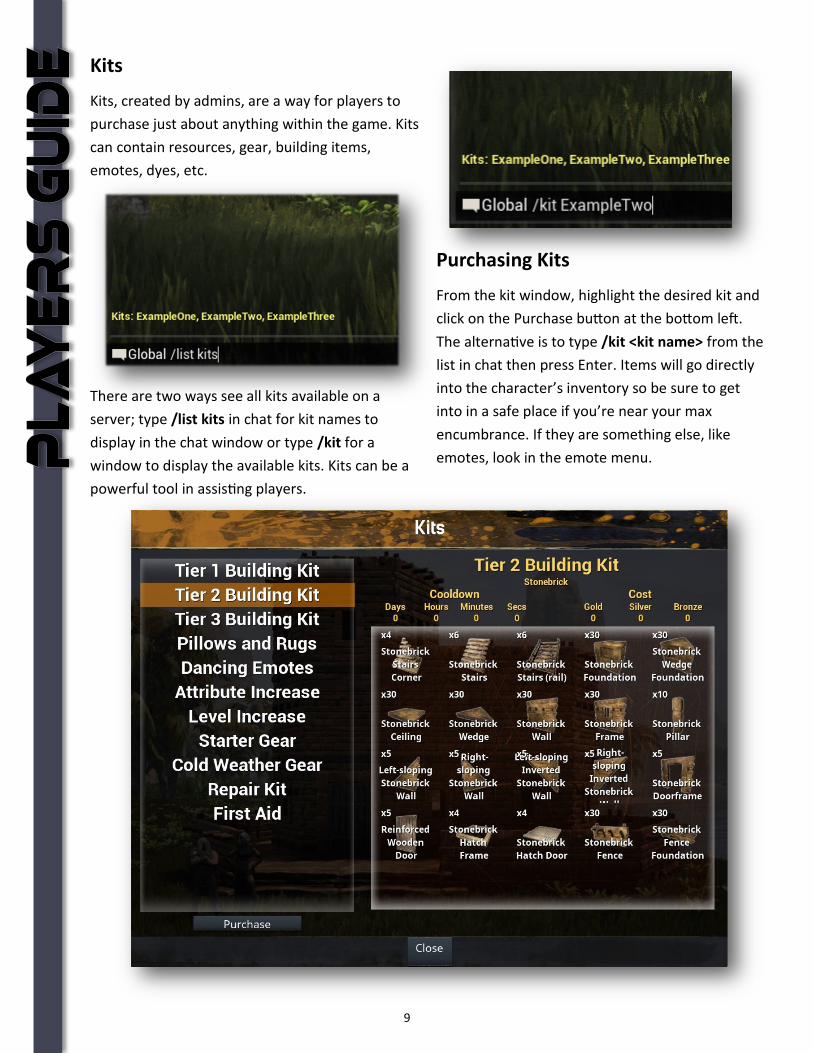
Kits
Kits, created by admins, are a way for players to
purchase just about anything within the game. Kits
can contain resources, gear, building items,
emotes, dyes, etc.
There are two ways see all kits available on a
server; type /list kits in chat for kit names to
display in the chat window or type /kit for a
window to display the available kits. Kits can be a
powerful tool in assisting players.
Purchasing Kits
From the kit window, highlight the desired kit and
click on the Purchase button at the bottom left.
The alternative is to type /kit <kit name> from the
list in chat then press Enter. Items will go directly
into the character’s inventory so be sure to get
into in a safe place if you’re near your max
encumbrance. If they are something else, like
emotes, look in the emote menu.

10
Using Warps
Warps allow characters the ability to teleport to
preset locations on the map. Why would admins
allow such a feature? It could be for easy access to
an event area, trade center, or even a tutorial
location. The creation and cost of warps is
controlled by the admin. To find what warps are on
the server, type /list warps. This will show the
warps available to your character in the chat box.
Type /warp <warp name> to use an available
warp. For example: /warp The Far North. If the
warp has a cost it will be deducted from your
wallet. There is another option players can use
called /home which acts like a warp but we will
discuss that next.
Warps can also be visually placed on the map for
players to enter. Admins will need to provide the
destination and information for each warp. Walk
into the warp to travel to the preset location.
Set Home
Sethome is like a warp feature that the player
controls if the command is enabled by an admin.
Essentially, sethome allows a player to return
home quickly without having to travel across the
map after a long day of gathering and exploring.
To get started, stand in the location where you
want the return point then type /sethome in the
chat box. This command sets the character’s home
location. Once this has been set, type /home in the
chat box to return your character to the
designated location. You can only have one set
home location. To change the location of your
home, find a new area and retype /sethome.
Customize
Pippi offers players the ability to change the
physical appearance of their character in-game.
This eliminates the need to recreate and begin the
leveling process over again. Admins have control
over player access to this as with all of Pippi’s
commands. For players who are granted access,
type /customize or /customise. The GUI will open
and you are free to change the look of your
character. Click the Apply button and the changes
take effect immediately and cannot be undone.
/sethome can only be used on your claimed
land, your clan’s land, or on unclaimed land.
PIPPI TIPS

11
Roll and Flip
Roll and flip is a mini game feature designed within
Pippi. Roll allows a player to roll a die or dice to
determine a random numerical outcome. Flip
allows a player to flip a virtual coin to determine
heads or tails. This feature is great for games of
chance and ties in nicely with the pay command.
Type /roll in the chat box to have a six-sided die
give a number range between 1 and 6. That’s not
all /roll can do. Let’s say you want to roll 3 six-
sided dice. You simply type /roll 3d6 (3 is the
amount of dice, d means dice, and 6 is the type of
die used). You can also roll different die types such
as a hundred-sided die. To flip a coin, call heads or
tails and type /flip.
Gonds and Goochers
Gonds and Goochers is a mini gambling game used
for an in-game event. One player acts as the
house. He not only runs the game but also acts as
the pot. That means all players at the table pay
him with the /pay <character name> <amount>
<coin type>.
The house determines what the amount is, in the
case the bet is 1 bronze. The dice in this example is
a d6 so the command /roll is used. Everyone rolls
and the winner with the highest result wins. If two
or more players have the highest number the pot
is simply split between the two. The exception to
the rule is the house always wins on rolls of 1. The
house also wins if its roll the highest.
So, in this example we have used three player
commands; /roll, /roll 1d100 for a dice variant,
and /pay <character name> <amount with the coin
type>. You can come up with your own mini games
for anyone who wants to risk losing a little bit of
coin.
100 Copper = 1 Silver
100 Silver = 1 Gold
PIPPI TIPS

Admins guide

13
Admin Guide Overview
In the following pages, you will find a detailed
explanation of the Pippi Admin Control Panel. We
will walk you through each step and give helpful
tips on how to set up your server.
While you are reading this, you will find some of
Josh’s original writings and thoughts as he moved
through development. To clarify some of the
technical jargon, we will attempt to explain certain
parts of the document from a player’s point of
view. Let’s get started!
A Certain Point of View
Before rewriting the documentation of the Pippi
User Manual, Contrast had the privilege of
interviewing Josh and Scooper (a Funcom
developer). This was not an interview about Pippi
itself but about the terminologies programmers
use. For us, the non-tech savvy, listening to
programmer’s talk is like trying to understand a
foreign language.
For instance, you see in the Players Guide the
following /kit <kit name>. For the technically
challenged you may think that the < > should be
typed into chat. In all actuality, all the < > mean is
“insert here”. So why do they write like this? Well
it comes from their programming skill set. When
writing normally we would use ( ) they use < >.
Pretty simple when you think about it.
So, with that in mind, we will try to connect the
two languages and make you, the admin, more
comfortable with what you are about to read. If
you are already familiar with this jargon, using
Pippi will be like second nature. If this is all new to
you, don’t worry you will be a master of your craft
by the end of this book.
Setup Instructions
Since Pippi is a Mod for Conan Exiles, it is installed
the same way as other mods. A player trying to log
into a server using Pippi must first subscribe to
Pippi on Steam.
STEP 1: If you are installing Pippi on a Server, place
the Pippi.pak in your Server’s Mod directory. Make
sure to configure your modlist.txt to reflect the
new mod added if needed.
STEP 2: If you are installing Pippi on a Client, place
the Pippi.pak in your Client’s Mod directory making
sure to configure your modlist.txt to reflect the
new mod added.
Once you have installed the Pippi.pak run Conan
Exiles and join your game. On first run, Pippi will
generate default settings. Depending on how you
want you server configured these default settings
may work for you straight out of the box. It is
recommended that admins at least read over all of
Pippi's configurations and tabs.
You may have a different setup based on
your server provider. Add the Pippi.pak how
you normally add any other mod.
PIPPI TIPS

14
Players Tab
1. Players Online:
Players Online lists the player’s character name,
SteamID, and server rank. The small box next to
Players Online will show both online and offline
SteamIDs and their associated ranks when it is
checked. All players who log on to the server
whether it is continuous or for one time will have
their SteamID listed. The offline list displays players
in order of when they were last online; the most
recent starting at the top of the list.
2. User Info:
With the player’s name highlighted in Players
Online, you will see their character name, Steam
Name and ID, and their current Ping. Admins can
change a character’s name in this section by
clicking on the Edit button next to Player Name. A
small window will open for the new name to be
entered. Changing a character’s name takes effect
once the admin clicks on OK. All buildings owned
by the player will remain under their control. The
player may need to relog for the name to change
to appear on their items.
3. Character Info:
This information provides the player’s chosen
religion, race, and gender. Admins can change Clan
Rank for an online player and move players in and
out of any existing clan. Transfer will allow players
access to all the clan owns. Players retain their
personal building they had before joining the clan
ONLY if they leave through Pippi.
To adjust any information in Player Details,
admins must have that player's name
highlighted in the Players Online list.
PIPPI TIPS
5
1
2
6
4
3

15
4. Pippi Player Config:
This is an important section for admins to focus on.
Rank - This is the heart of the permission system.
It determines what commands and features each
player will have access to on the server. All players
join the server at the rank of Normal. With the
player’s name highlighted, you can change their
rank from the drop-down menu.
Accepted Rules - Displays confirmation that the
player has read the Server Rules. Players must
accept the Rules to join the server. See Pippi
Settings for further information on setting up
Rules.
Silenced - Players that silenced are limited to what
they can do on the server. They can neither access
chat to type nor use the in-game mic. With access
to chat cut off, they will not be able to utilize any
of Pippi’s commands.
Jailed - (NOT ENABLED)
Home - If players have set a /home location, this
displays its coordinates. You can visit an online
player’s /home by clicking on the Teleport button.
You can also send a player to their home if they
activated the command.
Currency - This lists the player’s current wallet
contents. Admins can increase or decrease this
amount with the plus or minus buttons for each of
the three currencies.
5. Punishments, Interactions, & Tools:
Ban Player - (NOT ENABLED)
Kick Player - Kicking a player will temporarily
remove them from the server. They will be able to
log back.
Kill Player - Killing a character works like removing
a bracelet; it is instant death for a character.
Freeze Player - Stop a player in their tracks even if
it's while they are falling.
Teleport to Player - With the player’s name
highlighted, click on the button to teleport to
them.
Summon Player - When highlighted, click on the
button to summon an online player.
Send Home - If the player has a home location
established, admins can send them back to their
home by clicking on the button.
Delete Player – This will delete the player’s
character. There is a secondary window for
confirmation of this action. After confirming it, the
action cannot be undone. Please use with extreme
caution.
Admins, remember to change your rank
from Normal to Admin under Pippi Player
Config. All players start at Normal ranking
by default.
PIPPI TIPS

16
6. Character Stats:
Character Stats is the largest section of the Players
Tab. Here, an admin can see even more details
about individual characters as well as adjust many
of these aspects.
Level - To adjust a player’s level, click on the plus
or minus. This only affects the player’s level and
not their experience points.
Experience - Displays the character’s current
amount on the left and the needed amount for the
next level on the right. To grant additional XP, you
may either use the slider or enter in a specific
value. The slider ranges from zero to the max XP
for the player’s current level. Drag the circle to
adjust the XP. The numbers will display in the box
below. Click on Give XP when you are happy with
the amount. To enter a specific amount, click on
the box below the slider and type. Click on Give XP
when you are done.
Encumbrance - Displays the player’s current
carried weight and the max amount.
Movement Penalty - Encumbrance ratio has a
direct effect on the moment penalty.
Strength, Agility, Vitality, Accuracy, Grit,
Encumbrance, and Survival - The character stats
can all be increased or decreased. The points given
here are in addition to what they earn.
Edit Character - Admins may edit any online
character. Ensure you have the correct name
highlighted BEFORE opening the editor. Changes
take effect immediately and cannot be undone.
View Inventory- (NOT ENABLED)
View Recipes - Admin can see the recipe list of
each player. Unlocked recipes are indicated with
an orange highlighted square. Admins can also
unlock recipes for players in this menu by clicking
on the desired recipe. Clicking on a recipe gives
players access to it and bypasses any prerequisites
it might have. You can also take a recipe from the
player’s list by clicking on any that are already
highlighted in orange.
Health, Stamina, Thirst, and Hunger - Display the
character’s current and max values. The left
numbers list the current values. These can be
adjusted point by point and are temporary based
on the character’s activity. The right numbers are
the max value the character has. Health and
Stamina adjusted in the right column will be
permanently change.
Fill - Click this button to max out the temporary
values.
Corruption - Displays the character’s current
corruption level and can be increased or
decreased. If it is increased, the corruption level
remains until the player can find in-game means to
remove it.
Temperature - Displays the character’s current hot
or cold rating. This rating can be raised or lowered
temporarily. The area’s temperature will affect the
altered temperature of the character immediately.
Attribute and Knowledge Points - Admins can see
what players spent and have yet to spend for both
categories. Admins may also increase the totals.
This is in addition to what characters gain
normally.
“The Player Management System oversees
all player modifications. If you make any
changes to a player, it more than likely goes
through this system. Its purpose is mainly
for ease of getting/setting player data.”
~Joshtech
PIPPI TIPS

17
Clans Tab
The Clans window lists all clans on the server as
well as the number of members currently in the
clan. This can be used to keep an eye on how many
buildings a clan can have if the server rules
stipulate a build limit per clan member.
Temp Ban Tab
The Temporary Ban tab is Funcom's Default game
tab. It will allow an immediate ban of online
players, list banned players, and gives an admin
the in-game ability to lift a ban.
Warps Tab
The Warps Tab is used to create and modify more
in-depth warps over the /warp create command.
1. Warps:
This window will list all the warps existing on your
server. The first five warps shown in the picture
are original default warps and can be deleted.
Selecting a warp from this list will display its
configuration in the Warp Details section.
2. Warp System Settings:
This is offers control of all warps.
Enable Warps - Activates the use of Warps.
SpawnPoint Override - Admins can create new
spawn points beyond Funcom’s starter locations in
the southern desert. This must be Enabled along
with Is Spawn Point in Warp Details.
3. Warp Details:
The first section, Warp Basic Info, will show you
the Warp Name, Warp Description, Warp ID and
the Player that created the warp if you have a
single warp highlighted.
The second section, Warp Settings, gives detailed
information on the warp as well as configurable
options detailed on the next page.
Enabled - Enable or Disable the warp.
1 2
3
4

18
Hidden - Sets whether the warp is hidden or not. If
you have a hidden warp, it will not display in /list
warps. It can still be used if a player privately
knows the name.
Is Spawn Point - Sets location(s) on the map for
new characters and characters without a saved
bed/bedroll to spawn. It will override the vanilla
spawn points in the southern desert. Pippi will
randomly choose a spawn point warp if there is
more than one to choose from.
Delay (secs) - Time a player must wait before they
warp. (NOT ENABLED)
Cooldown - Time a player must wait before they
can use this warp again.
Position - This is the position of the warp in world
coordinates.
Use Count - This is the amount of times the warp
has been used by players. The Counter can be
reset by pressing the Reset button.
Requires Currency - Sets whether the warp
requires currency to use. If the /warp command on
the Commands tab also has a price, the warp will
charge both the individual price and the Command
price.
Currency Cost - The amount of currency required
to use the warp.
Requires Rank - Sets whether the warp requires a
certain rank to be used. If this is checked, Rank and
Inheritable will become accessible.
Rank - This is the rank required to be able to use
this warp.
Inheritable - Sets whether the rank requirements
are inheritable. This means either a specified rank
is solely allowed to use this warp or higher ranks
may use it as well. For example; a VIP Rank
required warp with Inheritable disabled will only
permit VIP players to use the warp. If Inheritable is
enabled, Moderators and Admins may also use this
warp since they are of higher rank.
4. Actions:
Create Warp - Press the Create Warp button to
open a new window. From here, you can provide a
Name and Description of the warp. Once you have
filled out the configuration of the warp, pressing
Create will create the warp at your current
location. Pressing Cancel on this window will
negate any information you have entered and
cancel the warp creation.
Delete Warp - Highlight the warp and click on
Delete Warp to remove it. This cannot be undone.
The Name of the warp you are creating is
not case sensitive and may contain spaces.
PIPPI TIPS

19
Commands Tab (>1.7.8)
In this section we’ll only cover the settings for
commands. Each Command is defined in the Quick
Guide at the end of the manual. All commands are
executed in the chat window.
1. Command Settings:
Enable Commands - Enables or Disables all
commands used by any player from Normal to
Admin rank.
Enabled - Enable or Disable a single command.
Command - This is the command used to execute
the /command through the Chat Window.
Rank - Sets the rank required to use the command.
Inheritable - Sets whether the rank requirements
are inheritable; meaning a specified rank is solely
allowed to use the command or higher ranks can
use it as well. Example; a VIP Rank required
command with Inheritable disabled would only
permit VIP players to use the command. If
Inheritable is enabled, Moderators and Admins
would also be able to use this command since they
are of higher rank.
Cooldown - Places a limit on the frequency the
command may be used per player.
Cost - Sets a fee each time a player uses the
command. Some, like /warp, have two separate
settings. If a cost is set on the Commands tab and
the Warps tab, players will be charged both fees.
2. Actions:
Create Command - (NOT ENABLED)
Delete Command - (NOT ENABLED)
Reset Command - Return Commands to Pippi’s
default settings.
1 2
Use Reset Commands if newly updated
commands are not in the list or if all
commands become unusable.
PIPPI TIPS

20
Kits Tab
Kits offer admins the ability to provide items to
their players without the need to spawn them in or
have a physical market location that requires
travel. They also give admins the chance to assign
special drops to NPCs and Loot Spawners.
1. Kits:
Kit Name - This is what players will need to click on
when opening the /kit window or type when
purchasing it through the /kit <kit name>
command. It is best to keep the kit's name simple.
Kit Description - This is short but important
information about the kit.
2. Kit Details:
Enabled - Allows players access to the selected kit.
All kits are disabled by default.
Hidden - Determines if a kit appears through the
commands /list kits or /kit.
Cooldown - Sets the amount of time players must
wait to purchase a kit after the first purchase. This
is based on in-game times. The cooldown will be
affected by any adjustments made to the day/night
cycle.
Assign Kits to Class - Players can loot creatures
with kits the same way they would loot a Thrall's
body. To assign a kit, highlight the kit then click on
the dropdown menu to choose a creature. You
may assign only one kit per creature class.
Use Count - Keeps track of how many times a kit is
obtained by players. It also registers each time a
creature with a kit is killed regardless if a player
loots the creature or not.
Requires Currency - Kits can be made available for
players at no cost or for purchase. Click on the kit
then click on the check box next to Requires
Currency. Once it is checked, Currency Cost will
become usable and a value can be added to the kit.
Each kit created is free by default.
1
2
3
4

21
Requires Rank - Allows admins to set access to
each kit by Rank. All kits begin without any
restrictions. If Rank requirement is checked, the
drop-down menu will become available. You may
then select your preference from the four ranks.
Inheritable will become available to set whether
the rank requirements are inheritable. For
example; if Moderator is chosen for the kit but it is
not inheritable, only Moderator rank will be able to
purchase the kit. Admins will not have access even
though they are higher rank than a Moderator.
Requires Charges - Limits the amount of times a kit
can be purchased server wide. To set the amount
of kits available, check the box. Charges Left will
then become selectable to set your desired limit.
3. Actions:
Create Kit - Opens a secondary window to name
and describe the new kit. To create a kit, click on
the Create button under Actions to the far right of
the window. A smaller window will open called
Create New Kit. Once you are pleased with the
description and name, click Create on the bottom
left of the window. Kits will list in order of creation.
Delete Kit - Removes the highlighted kit. This
cannot be undone.
Edit Kit Name: Allows the kit’s name to be altered.
4. Kit Items:
Each kit created is empty. Once items are added,
they will populate this window with their Item
Name, Item ID, and the amount of that item
players will receive.
Add Item - Opens a secondary window to add
items to the kit. At the bottom of the Kits Items
window, click on this button. The Select Item
window will open with all the available items
listed. You can freely add from this window
without the need to open it for each item added.
Remove Item - Deletes the highlighted item from
the kit.
4a. Select Item (image on page 23)
Click on the Add Item button to open the
secondary Select Item window. Anything from
emotes to raw materials can be added to a kit.
Search - Click on Search and type in the name of
what you are looking for.
Show Pippi Virtual Items - When checked, will list
virtual items provided by Pippi: levels, attribute
bonuses, and Pippi currency.
Show Emotes - When checked, includes available
emotes in the item list.

22
4b. Selected Item Details
Item ID - Used by the developers and modding
community to keep track of each piece added.
Item Name - is self-explanatory.
Item Description - Certain items have additional
descriptive information.
Item Type - Categorizes what the item is used for
within the game.
Mod Item - Items from other mods are indicated
here and made available for kits with Pippi.
Stack Size - The total amount the game will
automatically stack of the same item.
Grade - The rarity, difficulty, or tier that the item is
considered.
Burn Time - Lists the relevant burn time for items
that are fuel sources.
Amount - The field admins adjust to add more than
a single piece of the chosen item.
Virtual Items Expanded
Admins may create kits to that grant levels, bonus
attribute points, or Pippi currency. Pippi's Virtual
Items go directly to their intended locations.
Level - Each level is based on the amount. If you
wish to give five levels, set the amount to five.
Players will still have to earn the equivalent XP
before advancing further. They will gain the
appropriate stat and feat points with the level
increase.
Attributes - Select the desired attribute and set the
amount to give players. This is a bonus to their
normal points.
Currency - Select the currency type and increase
the amount players will receive in their /wallet.
Emotes - Once purchased, will go directly to the
player's emote menu.
Animal Attacks - Please note that these are not
Pippi items and should not be placed in kits.
4a
4b

23
Pippi Settings Tab
The Pippi Settings is made up of multiple system
settings. Each has a unique role for your server.
1. Chat Settings:
Here you enable or disable the profanity filter. It
will filter out any words on the list using *** to
replace them.
Add - Pressing the Add button will open a window
allowing you to enter the new word to filter. On
clicking OK, the word will be added to the Filtered
Word list.
Remove - To remove a word from the Filtered
Word list, select the word in the list then the
Remove button. Changes to this list take effect
immediately.
2. Map Settings (NOT ENABLED):
The Map Settings allow you to configure the Map
Markers that are generated and displayed to
servers on a global basis. These will override the
client's Map Settings.
Compass - (NOT ENABLED)
Map Grid - Enabled or Disables the map grid. (This
is broken currently :/ Sorry)
Warps - Enables or Disables the player’s ability to
see warps on the map regardless of the warps
settings.
Home - Enables or Disables the player’s ability to
see their home position if /sethome is enabled.
Spawn Points - Enables or Disables the player’s
ability to see the spawn points on the map.
Sandstorms - Enables or Disables the player’s
ability to see sandstorms on the map.
Guild Members - Enables or Disables the player’s
ability to see guild members on the map.
Beds - Enables or Disables the player’s ability to
see their bed on the map. (Only the one they will
respawn at on death)
1 2
4 3
5 6 7

24
Jail - (NOT ENABLED)
Private Markers (Personal Markers) - Enables or
Disables the player’s ability to see their personal
markers on the map. (I have no idea why it’s not
there :/ Some pixies must have stolen it)
Public Markers (Guild Markers) - Enables or
Disables the player’s ability to see their guild
member’s guild markers on the Map
Admin Markers - Enables or Disables then player’s
ability to see markers set by admins.
3. Currency Settings:
Pippi Currency is a virtual item. Admins may use
this feature to create an economy on their server.
New Player Start Currency - Set the amount of
money new players receive upon joining the server
for the first time.
PayDay Enabled - Pays players on a reoccurring
cycle. Pay is deposited directly into the /wallet.
Pay Offline Players - Offline players will receive
PayDay at the same time in-game players do.
PayDay Occurrence - Admins may configure how
often players receive currency from PayDay. They
may also set the time of the day that players are
paid.
Currency given per PayDay - Sets the amount of
currency players receive each PayDay.
Transaction Fee - Whenever Pippi currency is used,
this fee, set by admins, will be deducted from the
player's /wallet in addition to the actual
transaction. (NOT ENABLED)
TaxMan Enabled - Admins may set a reoccurring
tax. Tax Percent will determine how much is taken
from the player's wallet.
Tax Offline Players - Admins may opt to tax players
even when they are offline. This will occur at the
same time online players are taxed.
Tax Percent - Adjust this percent to the amount
you wish to deduct from the players’ /wallets.
TaxMan Occurrence - This will set the frequency in
which players are taxed and at what time of day.
Server Capital Cap - Sets the max amount of
currency the server may ever have. Override on
player count will adjust depending on the total
players online. (NOT ENABLED)
Can Players Gamble - Allows players to gamble
(NOT ENABLED)
House Cut Returns to Capital - A percentage of the
gambling winnings will be deducted from the
player's wallet and returned to the server's capital.
(NOT ENABLED)
4. Announcement Settings:
The Announcement Settings allow you to configure
the messages broadcasted to the player, the
interval in which the messages are displayed and
the cycle method in how Pippi chooses the
messages.
Enable Announcements - Enables or Disables the
Announcement System
Announce Player Login - Displays the character's
name in chat when they log on to the server.
Announce Player Log Off - Displays the character's
name in chat when they log off the server.
Announce Player Death - Displays when a player
dies and the means in which they met their end.
Show every X minutes - Sets the interval that an
Announcement will be triggered. 10.0 being 10
minutes, .5 being 30 secs, .1 being 6 seconds
Cycle Method - This is the method of which Pippi
will iterate through the Announcements list.
Sequential will go through each announcement in
the order they appear. Random will choose one at
random to display.

25
Next Announcement - This is the next
announcement that Pippi will broadcast to players.
Announcements List - This list displays the
announcements currently set within Pippi.
Add - Pressing the Add button will prompt you with
a window allowing you to enter the new. On
clicking OK, the new message will be added to the
list.
Remove - Highlight the announcement in the list
then click the Remove button.
Broadcast - Immediately displays the Use Next
announcement in the chat window.
Use Next - With an announcement selected in the
list, press Use Next to force the system to use it for
the next triggered announcement.
5. MOTD Settings:
The MOTD Settings allows you to customize a
preset message displayed when a player’s Chat
Window is initialized.
Enabled MOTD - Enables or Disables the MOTD
being displayed.
Show on Login - Enables or Disables the MOTD
being displayed when a player logs onto the server.
Text Colour - Admins can either use the sliders to
adjust the colour or they can enter a hex value
below the colour sample box. Click Set Colour for
the change to take effect.
The Message of The Day - The list functions very
similar to how the Rules list functions with the
Adding/Remove/Editing with the only exception
being that you cannot set the font size as this is a
client setting. The MOTD Window displays the
current messages players will see.
Add - Pressing the Add button will prompt you with
a window allowing you to enter a new message.
On clicking OK, the new line will be added to the
list.
Remove - To remove a message from the list,
highlight the line then click the Remove button.
Changes to this list take effect immediately.
Edit - Once you have added a line to the MOTD you
may want to edit it. To do this, select the line you
wish to edit within the list then press the Edit
button. A small window will open allowing you to
edit the line. On clicking OK, the edits made to the
rules line will be modified in the MOTD list.
Arrow Buttons - You can move a MOTD line
position by clicking on the line and using the Arrow
buttons located on the right of the MOTD list.
6. Rules Settings:
Rules Settings provides admins the basic tools to
create a rules prompt.
Enable Rules - Enables or Disables Rules.
Show on Character Creation - Sets whether to
display the rules on the character creation screen.
Show on Update - Sets whether to display rules to
players that have already created a character but
have not accepted the updated rules.
Rules - Shows the rules currently set within Pippi.
You can add/remove a line by pressing the Add or
Remove buttons located below the Rules list.
Add - Pressing the Add button will open a window
allowing you to enter the new rule you wish to
add. On clicking OK, the new rule line will be added
to the Rules list.
The Rules window is the only way to display
server info to new players at character
creation.
The vanilla MotD does not display for
players joining a server for the first time.
PIPPI TIPS

26
Remove - To remove a rule line from the Rules list,
select the line by clicking on it then the Remove
button. Changes take effect immediately.
Edit - Select an already existing line to edit within
the Rules list. Press the Edit button. This will open
a window allowing you to edit the line. On clicking
OK, the edits made are effective immediately.
Arrow Buttons - You can move a line's position by
using the Arrow buttons located on the right of the
Rules list.
Text Colour and Size - Change the font size or color
of a Rules line by selecting the line you wish to
change. Use the color sliders or hex value and font
size make the adjustments to your liking. Once you
are happy with the changes press the Set Text
button to set the changes.
Preview - If you wish to preview what the Rules will
look like when presented to a player, you can use
the Preview button located Bottom Right of the
Rules list. This will open a window showing you
what the Rules will look like.
7. Pippi Info:
The Pippi Info displays the current version of Pippi
running on your server, the date that you first
installed Pippi on your server, and the date that
you updated Pippi on your server.
Server Time - Displays your region's time and date.
Game Time - From the moment the server has
started, Pippi will start calculating the Game Time.
This is based off the game's Time of Day. When a
new day has passed in-game, Pippi adds it to the
game's total days.

27
NPC Spawns Tab
This tab offers admins more freedom in
customizing both creatures and humanoids to
spawn into the game. This is feature is in its early
stages and will go through more revisions.
Actions - When you have the NPC ready, click on
this button to spawn them into the game. If they
are hostile, you may wish to have yourself cloaked.
Destroy Spawned NPCs - This will kill all spawned
NPCs for the current gameplay. If you log out and
return, you cannot kill them with this button.
Convert thrall and place in inventory - Human NPCs
can be automatically spawned into your inventory.
NPC List - The list is divided into Humanoids and
Creatures. Before you can customize, you must
choose a specific NPC from either list.
Customize - This offers more control over
appearance and size of NPCs. Humanoids can also
have unique names and profession titles added.
Cheats(Self) Tab
This tab is just the original Funcom Admin Panel.
Everything here should function as normal.
When a command requires a player's name,
Pippi does not require the full name. You
are able to use partial names and Pippi will
try and determine which player you are
trying to use.
If Pippi fails to find the player or there is
more than one possible player, you will get
a message stating so. In this case, you
simply need to increase the length of the
partial name.
PIPPI TIPS

28
Admin Tools
This is a new addition to the Admin Guide. Admin
Tools are items that can be used within the game
that have a direct or indirect effect on players.
Admins can use these tools to create their own
unique locations from dungeons and PVP courses
to taverns and villages. They can also be used in
pre-existing locations within the game to enhance
lighting, difficulty, and reward. They consist of four
placeables designed to tie into other Pippi systems.
As Pippi expands upon the current features, the list
of Admin Tools will continue to grow.
Glorbs
Glorbs are dynamic light sources that can be
placed anywhere on the map regardless of land
claim.
Name - This will be used for admins in the future to
locate each glorb that has been placed on the map.
Enabled - The light will not activate until this is
checked.
Disable Interaction GUI - The GUI will not display
when the owner is near. It remains usable. Press E
to bring up the config.
Strobe - Activating strobe will cause the light to
flash intermittently.
Pulse - Activating pulse will cause the light to throb
rhythmically.
Strobe/Pulse Speed - Adjust the value to speed up
or slow down either effect.
Pulse Change - As the light of the pulses, the light
will shift through random colours
Intensity - Modifies the intensity of the light
emitted from the glorb.
Attenuation Radius - Modifies the distance the
glorb’s light will reach.
Glorb Colour - Colour can be modifies two ways;
using the sliders or entering a hex value. To copy
the colour chosen, highlight the hex value and right
click to copy (CTRL + C). You can then place more
glorbs and paste (CTRL + V) the same value easily.
Apply - For all selections to take effect, remember
to click on Apply.

29
Loot Spawners
Loot Spawners offer the creation of custom loot.
They ignore land claim allowing their use in the
game's dungeons, NPC camps/villages, or admin
created locations.
Name - Name of the spawner for identification
purposes.
Enabled - This will allow access to the kit that is
assigned as loot.
Disable Interaction GUI - The GUI will not display
when the owner is near. It remains usable. Press E
to bring up the config.
Loot Spawner Visual - There are two visuals that
admins may choose from for the Loot Spawner.
More will be introduced over time.
Kit to spawn - Kits are tied into the use of Loot
Spawners. From the dropdown menu, choose the
kit to be assigned to the spawner. If you only want
a kit to be used as loot and not available in the /kit
window, open the Kits Tab and click on the kit you
wish. Leave this kit disabled. The Loot Spawner
overwrites all kit settings.
Kit Spawn Interval - This will set how often the kit
respawns. This is a deterrent for players who might
be inclined to wait for kits to respawn.
Apply - For all selections to take effect, remember
to click on Apply.

30
NPC Spawners
NPC Spawners offer admins the ability to populate
any area they choose with creatures or humanoids.
NPC spawners ignore land claim. Name - Name for
the spawner for identification purposes.
Enabled - When checked, the spawner will activate
once the Apply button is pressed.
Disable Interaction GUI - The GUI will not display
when the owner is near. It remains usable. Press E
to bring up the config.
Hidden - The spawner will disappear from the
owner’s view if this is checked. Only when the
owner is within access range, will the spawner
reappear.
Class to spawn - The dropdown menu provides all
available creatures. Admins are advised to use
creatures from the humanoid list when possible for
better results.
Keep Populated - Continue to keep the NPCs
spawning as they are killed. This is limited to the
Max Count.
NPC Max Count - The number of NPCs that spawn
at any given time.
NPC Spawn Interval - Determines the time
between spawning the Max Count and a new
round of NPCs. The time will not begin counting
until the last creature is killed from the preceding
round of spawned NPCs.
Spawn Radius - Determines how far from the
spawner NPCs will populate.
Roaming Distance - Determines how far NPCs will
roam from the spawner.
NPC Health - NPCs spawn with their default health.
To adjust their hit points, type in the desired
amount. It is point for point.
NPC Damage - NPCs spawn with their default
attack damage. To adjust how dangerous they are,
type in the amount of damage you wish for them
to attack with. This is point for point.
NPC XP - As with Health and Damage, you can
leave this to default or set a specific amount of XP
that players gain upon killing the NPC
NPC Scale - Resize the NPC from its vanilla setting.
Size has no effect on Health, Damage, or XP.
Apply - For all selections to take effect, remember
to click on Apply.

31
Thespians
Thespians are essentially in-game actors that bring
life to the game in ways that thralls cannot. They
can be placed anywhere on the map. Players can
neither harm them nor be harmed by them.
Admins will never need to worry about their
carefully placed NPC’s untimely demise. Any emote
available to players is usable by Thespians as well
as several that are unavailable to players. Created
kits will populate in the drop-down menu for
clothing and arming the Thespians. This is
accompanied by the Character Editor that allows
for even more individualization.
Pippi has also taken into consideration other mods
that have emotes created for them. To have two
thralls interact with each other, place one and then
the other in the same location. The emotes should
take care of the action.
Name – This will display only if it if filled in.
Profession – For immersion purposes only.
Disable Interaction GUI - The GUI will not display
when the owner is near. It remains usable. Press E
to bring up the config.
Emote – The available emotes will populate this list
including emotes from other mods.
Animation Speed – Set how slow or fast an emote
is performed.
Equipment Kit – Kits made in the Kits Tab will be
available to equip Thespians with. Weapons are
only for show.
Character Editor – The appearance of Thespians
can be altered in a similar fashion as characters. A
sub window will open with customization choices.

32
Warpers
Name - Name for the warper for identification
purposes.
Enabled - To allow access for the Warper, check
this box.
Disable Interaction GUI - The GUI will not display
when the owner is near. It remains usable. Press E
to bring up the config.
Use Warp Permissions - Warpers can be tied solely
to the created warps or they can use all the warps
parameters set through the Warps Tab such as
cooldown, cost, etc. If a warper is not working for
players, check all permissions in the Warps Tab
settings and in the Commands Tab.
Warper Size - Allows the scale of a warper to
increase from its default size.
Destination Warp - Warpers tie directly into warps
created in the Warps Tab. The dropdown menu
displays all available warps.
Show Display - The Name will display at the top of
the Warper if this is enabled.
Warper Colour - The colour of the Warper can be
set through the sliders or manually entering in a
hex value.
Opacity - This slider will allow the void’s
appearance to change from opaque to invisible.
Use will caution.
Apply - For all selections to take effect, remember
to click on Apply
All Admin Tool placements can be adjusted
using the Shift, Ctrl, or Alt keys.
PIPPI TIPS

33
Pippi Commands are executed through the chat window. Not all commands will be available to players.
Admins set the permissions for each command.
/help <#> [/h <#>] - Displays the page block of help
/me – Displays action in 3rd person context
/shout - Shouts a message
/whisper [/w] <player> <message> - Whisper to player
/reply [/r] <message> - Replies to last received whisper
/mute <player> - Mutes the player
/unmute <player> - Unmutes the player
/sethome - Sets your current location as your home
/home - Teleports you to your home
/kill - Kill yourself
/list players - Lists all the players online
/list clans – List clans that have members online
/list admins - Lists all the admins online
/list mute - Lists the players you have muted
/list kits - Lists the available kits
/list warps - Lists the available warps
/return - Returns you to the position before you teleported
/teleport <player> - Teleports you to player
/summon <player> - Summons a player to your location
/server <message> - Sends message as server
/silence <player> - Silence a player from all chat
/unsilence <player> - Unsilence a player from chat
/warp <name> - Teleports you to warp
/warp create <name> - Creates warp at your location
/warp delete <name> - Deletes warp
/wallet - Displays amount currently in your wallet
/payday – Calls PayDay

34
/taxman – Calls TaxMan
/pay <playername> <amount> <type> - Pays the specified player the provided amount and type
providing you have the amount in your wallet
/currency - View details about currency settings
/currency add <playername> <amount> <type> - Adds currency to player’s wallet
/currency remove <playername> <amount> <type> - Removes currency from player’s wallet
/kit <name> - Gives you the contents of the specified kit
/kit - Opens a new window to view and purchase kits
/tprequest [/tpr] <playername> - Request to teleport to a player
/tpaccept [/tpa] - Accepts a teleport request
/roll - Roll the dice
/flip - Flip a coin
/afk - Toggles AFK status
/pvp - Toggles PVP status
/vote - Vote for current vote
/vote dawn - Vote for Dawn
/vote noon - Vote for Noon
/vote dusk - Vote for Dusk
/act <name> - Speaks as the specified name instead of your character (/act - disables)
/safezone - While looking at a building executing this command will toggle a safezone (There are
changes coming to safezones)
/rename name <name> II job <job> - Will rename the NPCs name II change the job of the NPC you are
currently looking at
/shutdown – THIS WILL SHUTDOWN THE SERVER! It will restart however.
/gm - Adds GM tags
/meteor - Force meteor shower
/sandstorm - Force a sandstorm
/cleanup – Cleanse your server of all corpses
/kick <playerName> <reason> - Kicks player from server
/customize [or /customise] - Brings up the character editor for your character
/fly - Fly Mode (/fly disables)