Item Code: 560-762 Concrete Block Test bench Construction ... Concrete Block.pdf- 6 blocks of...
24
08 2011 Construction by stacking blocks Concrete Block Test bench Item Code: 560-762 TECHNOLOGY
Transcript of Item Code: 560-762 Concrete Block Test bench Construction ... Concrete Block.pdf- 6 blocks of...
08 2011
Construction by stacking blocks
Concrete BlockTest bench
Item Code: 560-762
TECHNOLOGY

Why are there different types of blocks?
A model/test benchTo test and understand basic construction principles-How are buildings and structures built?- What are the characteristics of buildings where we are?-Why don’t buildings fall down?
How to build a structure?The different types of lintel
Why must the blocks be intersected?Why is there vertical chaining? Is it necessary?The role of the foundations
assembly and dismantling using
“dry” blocks, test different
techniques, easily tidy the materials
away at the end of class.
Real material
Real appearance
Scale 1:10
Grooved base to help set-up,
to show why foundations
are useful

01
SUMMARYTest BenchGeneral Presentation 02 to 03
Product presentation 02Main teaching objectives 03
Activity 1: Build a simple wall using the blocks 04 to 06Student worksheet 04Example of student work 05Student resource sheet 06
Activity 2: Build a wall using chaining 07 to 11Resource sheet 07Student worksheet 08Example of student work 09
Activity 3: Installing a lintel 10 to 11Student worksheet 10Example of student work 11
Activity 4: Construction of a lintel 12 to 13Student worksheet 12Example of student work 13
Activity 5: Building a wall with a door and a window 14 to 15Student worksheet 14Example of student work 15
Activity 6 Extra Activity: Horizontal chaining 16 to 17Student worksheet 16Example of student work 17
Examples of information sheets 18 to 20Activity 1 information sheetActivity 2 information sheetActivity 3 information sheet
181920
Making mini blocks by themselves
This booklet and CDRom may be copied for students for internal school use**This booklet may be copied as many times as necessary within school establishments for educational use only, on the condition that thepublisher’s name is included: A4. Copying or distribution for commercial use is not permitted without agreement from A4. Any copying ordistribution of all or part of this booklet outside of school use is not permitted without agreement from A4.
March 2011Etienne Bernot - Gérald Guillaume
For more information contact:Technology Supplies LimitedPhoenix House, Stafford Park, BattlefieldEnterprise Park, Shrewsbury, SY1 3FE
Published by A4 Company
Concrete Block Test Bench
The CDROM The CDRom for this project is available in the Ste catalogue (Ref “CD PARP”)It contains:- The folder in FreeHand (.FH9), PDF and illustrator (.ai) formats- Photos of the product, drawings in DXF format- 3D model with 3D files for SolidWorks, Parasolid et eDrawings formats.

02
Teacher documentTest bench - construction with blocks
Presentation of the Test bench
Door sill Window sill Rods for chaining
Block 25 x 25 x 50
Multi-functionalblock Half-block
Block Chaining
(x 44) (x 6) (x 12) (x 6)
(x 1) (X 2)(x 2)
Wooden lintel
Base (x 1)
(x 1) (X 2) (X 2) (X 1)
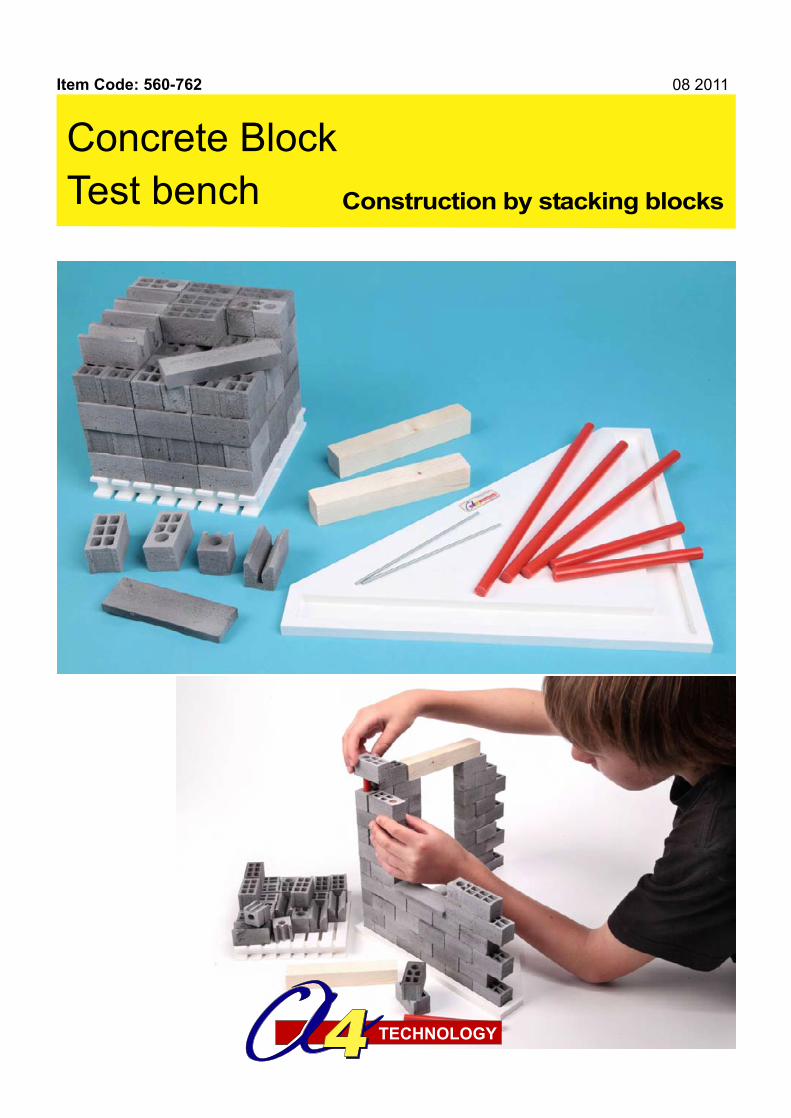
The concrete block test bench allows students to work on basic construction principles using stacked blocks. First the student builds a wall at an angle using a base as a foundation. The construction is then modified to include a window and a door. The building will be done with dry blocks so that material can be reused straight away. You can also use the the special mortar which is water soluble (Ref COL-BRIQ) if there is time (it has to be prepared, installed then left to dry). This allows in particular for the “chaining” blocks and the steel rods provided to build a lintel and test with or without an iron framework (If not you can use the wooden lintel provided).
The test bench comes with:- 1 grooved base which acts as the plot of land with the function of a trench.- Blocks scale 1 : 10 - 44 blocks 25 x 25 x 50 cm on the scale 1 : 10- 26 multifunctional blocks for chaining and table - 12 half-blocks,- 6 blocks of horizontal chaining and lintel- 1 doorsill - 1 window sill - 2 wooden lintels 25 x 25 x 150 cm on the scale 1/ 10- 2 steel rods Ø 4 length 140 acting as reinforcement for the lintel framework- 2 PVC Ø 10 length 125 rods as vertical chaining bars for the window frame.- 2 PVC Ø 10 length 230 rods as vertical chaining bars for the door frame.- 1 PVC Ø 10 length 270 rods as vertical chaining bar for the wall angle.

03
Teacher document
Test Bench PresentationTest bench - construction with blocks
Educational interest
Activities, changes
- Activity 1: By building a wall angle, the students will realise the need to havefoundations and overlapping blocks in order to produce a wall which issufficiently sturdy. They will answer questions and do some drawings.
- Activity 2: Students will learn about force and chaining. They could carryout experiments on the strength needed to destruct a wall depending onthe chaining.
- Activities 3 and 4: Cast a lintel with or without metal structure. Reflect onlintel construction and installation.
- Activity 5: Build a wall angle with a door and a window. Learn some technicalvocabulary.
- Activity 6: Extra: Horizontal chaining
Building very realistic models using mini-blocks
Solution 1 Solution 2
10
07
09
08
04
03
02
01
06
05
03
05
With some simple experiments, the test bench permits the following interests: building environment, technical functions and solutions, stability of a structure, building a structural model. It lets some functions and constraints be identified and tests some specific solutions of the concrete blocks. In the field of habitat and structures, students can learn about the following: foundations, chaining, functions of different blocks, wooden or cast lintels, technical vocabulary, bricklayer’s tools.
Other activities include the materials used to make blocks, industrial fabrication of concrete blocks, history of building with stacked bricks (history of concrete and its advantages).
Useful links and support:http://www.ducotedespros.tv/videos/lhistoire-du-beton - http://www.3mdb.com/http://www.pointp.fr/documentation/maison-de-a-a-z-X39S686r471 - http://www.infociments.fr/
The suggested changes are simple and quick to make; the blocks are easily dry assembled on top of each other. They can also be glued together using mortar (Ref: COL-BRIQ) available in our catalogue. In this case the time taken for the mortar to set should be taken into account during the activities.
The test bench can be used to create a very realistic model with mini-blocks using the scale 1: 10. Sets of blocks are available, as are moulds to make them yourself.See our offers in the catalogue or on www.a4.fr
The constructions are ambitious, very realistic and allowseveral experiments to be done, using a range of skills tosolve real and simplechallenges. The modelsproduced can be kept asclass materials fordevelopment activities orequipment (alarm, homeautomation). See page 18: Some usefulmaterials

04
Activity 1 - Foundation and constructionStudent WorksheetTest bench - construction with blocks
Complete the following two sketches below to show 2 different ways to stack blocks
What are the foundations used for? (represented on the test bench by the grooved rigid base)
Describe how you tested the strength of two different walls and give your conclusions
What are the qualities of a well-built wall and what tools should a bricklayer use?
Base
Wall of bricks Wall of bricks
Solution 1 Solution 2
Base (concrete footing)
Build a double wall that will act as a windbreak so that a barbecue can be installed. On the base acting as the foundation, put six rows of blocks (25 x 25 x 50) to make a wall angle as illustrated below.
Experiment with different ways of stacking theblocks and find a way to test the wall strength.

05
Activity 1 - Foundation and constructionTest bench - construction with blocks
Complete the following two sketches below to show 2 different ways to stack blocks
What are the foundations used for? (represented on the test bench by the grooved rigid base)
Describe how you tested the strength of two different walls and give your conclusions
What are the qualities of a well-built wall and what tools should a bricklayer use?
Base
Wall of bricks Wall of bricks
Base (concrete footing)
Build a double wall that will act as a windbreak so that a barbecue can be installed. On the base acting as the foundation, put six rows of blocks (25 x 25 x 50) to make a wall angle as illustrated below.
Experiment with different ways of stacking theblocks and find a way to test the wall strength.
Solution 1 Solution 2
Example of student work
The blocks must be well aligned, walls must be vertical. The top of the wall must be
horizontal. The bricklayer will use a plumb-line, a level and a ruler. He will also use mortar
to stick blocks together.
We can see that when blocks are placed on top of each other without being intersected the
wall is very fragile. However if blocks are intersected (the vertical joints are staggered in
each row) the wall is much more cohesive, even without mortar, and is more resistant.
To test the strength of the walls we pushed on them with a plate or a ruler to test the
surface and not just one block. After several tries, we can estimate the compared strength
of each construction attempt.
The foundations allow the structure to be anchored to the ground and position the
structure.

06
Resource document
Activity 1: Foundation and construction: A bricklayer’s toolsTest bench - construction with blocks
The trough and trowel forthe mortar
Trowel for laying mortar
The level to verify if the surface is horizontal or vertical
The plumb line to check if the wall is vertical
The rule to verify an alignment
The chalk line (blue) The chalk line string
The hammer to cut and adjust blocksThe cement mixer to mix the mortar
The pencil to draw marks
The laser level
07
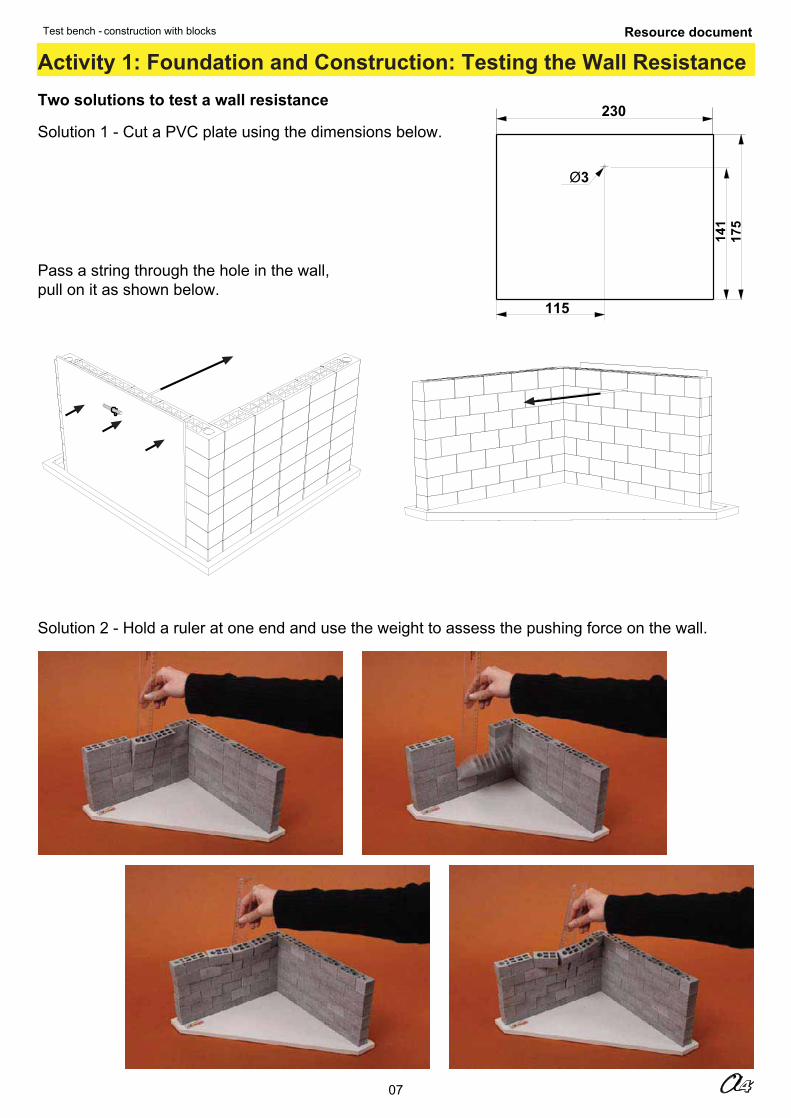
Activity 1: Foundation and Construction: Testing the Wall ResistanceTest bench - construction with blocks Resource document
Two solutions to test a wall resistance
Solution 1 - Cut a PVC plate using the dimensions below.230
115
141
175
Ø3
Pass a string through the hole in the wall,pull on it as shown below.
Solution 2 - Hold a ruler at one end and use the weight to assess the pushing force on the wall.

08
Activity 2 - Construction and chainingStudent WorksheetTest bench - construction with blocks
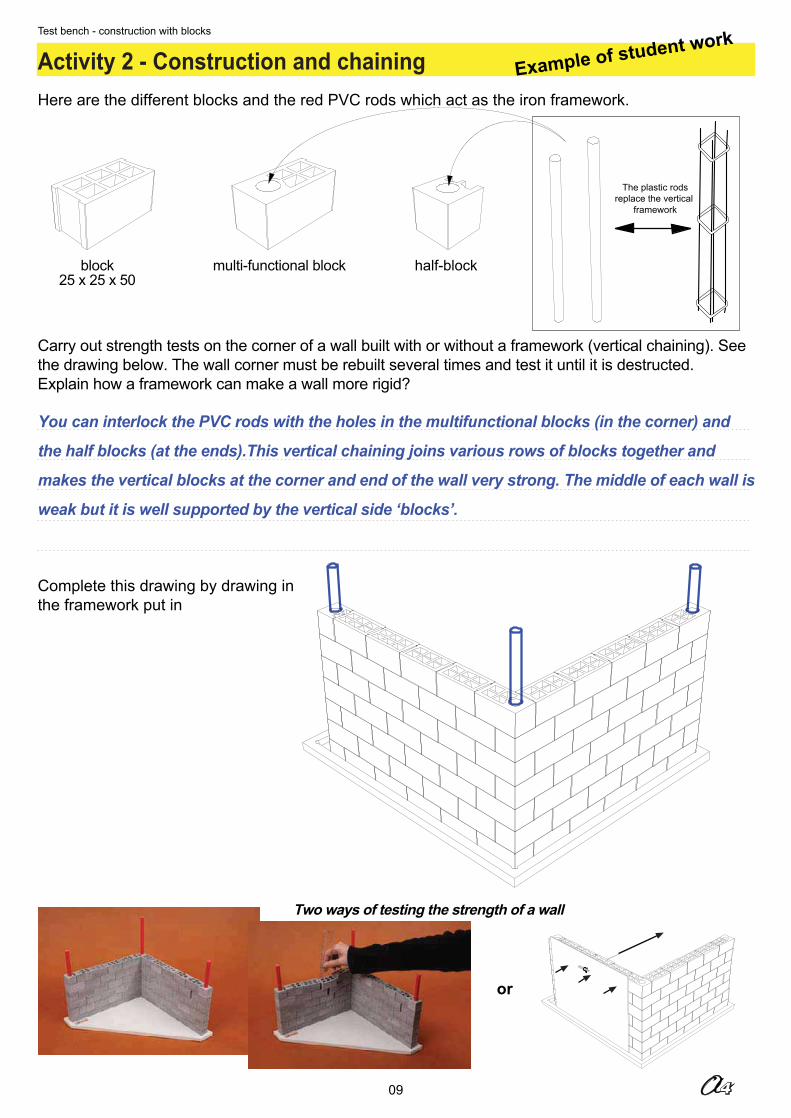
Here are the different blocks and the red PVC rods which act as the iron framework.
Carry out strength tests on the corner of a wall built with or without a framework (vertical chaining). Seethe drawing below. The wall corner must be rebuilt several times and test it until it is destructed. Explain how a framework can make a wall more rigid?
Complete this drawing by drawing inthe framework put in
block25 x 25 x 50
multi-functional block half-block
The plastic rodsreplace the vertical
framework
or
Two ways of testing the strength of a wall
You can interlock the PVC rods with the holes in the multifunctional blocks (in the corner) and
the half blocks (at the ends).This vertical chaining joins various rows of blocks together and
makes the vertical blocks at the corner and end of the wall very strong. The middle of each wall is
weak but it is well supported by the vertical side ‘blocks’.
09
Activity 2 - Construction and chainingTest bench - construction with blocks
Here are the different blocks and the red PVC rods which act as the iron framework.
Carry out strength tests on the corner of a wall built with or without a framework (vertical chaining). Seethe drawing below. The wall corner must be rebuilt several times and test it until it is destructed. Explain how a framework can make a wall more rigid?
Complete this drawing by drawing inthe framework put in
block25 x 25 x 50
multi-functional block half-block
The plastic rodsreplace the vertical
framework
or
Two ways of testing the strength of a wall
You can interlock the PVC rods with the holes in the multifunctional blocks (in the corner) and
the half blocks (at the ends).This vertical chaining joins various rows of blocks together and
makes the vertical blocks at the corner and end of the wall very strong. The middle of each wall is
weak but it is well supported by the vertical side ‘blocks’.
Example of student work

10
Activity 3: Casting a lintelTest bench - construction with blocks Student Worksheet
What are the constraints or difficulties experienced?
Complete the drawings to show the test to determine break strength.What conclusion can you make from our experiments?
Mixing the mortar:7 parts powder for 1 single volume of water
Lintel 1 Lintel 2
Load lintels
Filled in with mortar
We have to build a wall like the one shown opposite, with a door and awindow. Lintels are needed above the door and window to support the partsabove them. The test bench includes wooden lintel and materials to make masonry lintels: chaining blocks and metallic rods used to make frameworks.
To make the masonry lintels, the block chainings are placed side by side and are joined together using mortar that is poured into the gutter they form. For our experiments we will use the special mortar which can be re-diluted (ref COL-PARP).
Think of and describe an experiment to prove the need for using a metal rod framework. Complete the following drawings (include a caption) and describe your experience.

11
Activity 3: Casting a lintelTest bench - construction with blocks
What are the constraints or difficulties experienced?
Complete the drawings to show the test to determine break strength.What conclusion can you make from our experiments?
Mixing the mortar:7 parts powder for 1 single volume of water
Load lintels
We have to build a wall like the one shown opposite, with a door and awindow. Lintels are needed above the door and window to support the partsabove them. The test bench includes wooden lintel and materials to make masonry lintels: chaining blocks and metallic rods used to make frameworks.
To make the masonry lintels, the block chainings are placed side by side and are joined together using mortar that is poured into the gutter they form. For our experiments we will use the special mortar which can be re-diluted (ref COL-PARP).
Think of and describe an experiment to prove the need for using a metal rod framework. Complete the following drawings (include a caption) and describe your experience.
Example of student work
Only mortar
Chaining blockLintel 1 Lintel 2
Metal rod
Filled in with mortar
We made two lintels; one with a metal rod and one without. To test the resistance we will support the
lintels on the exterior blocks and suspend an increasingly heavy mass on the middle block until it
breaks.
The first difficulty was deciding the right amount of mortar to fill the lintels.
The mortar needed to be pushed into the hollow of the lintel using a tool (a spatula or mini trowel)
We had to wait for the mortar to set (one day) before doing the tests
The lintel without the metal
rod breaks under the strain of
a 4kg mass. More than 7 kg
are necessary to start to affect
the lintel with a metal rod.
The lintels with the rods are always more resistant, almost doubly resistant.
Masonry lintels always have a metal rod.
12
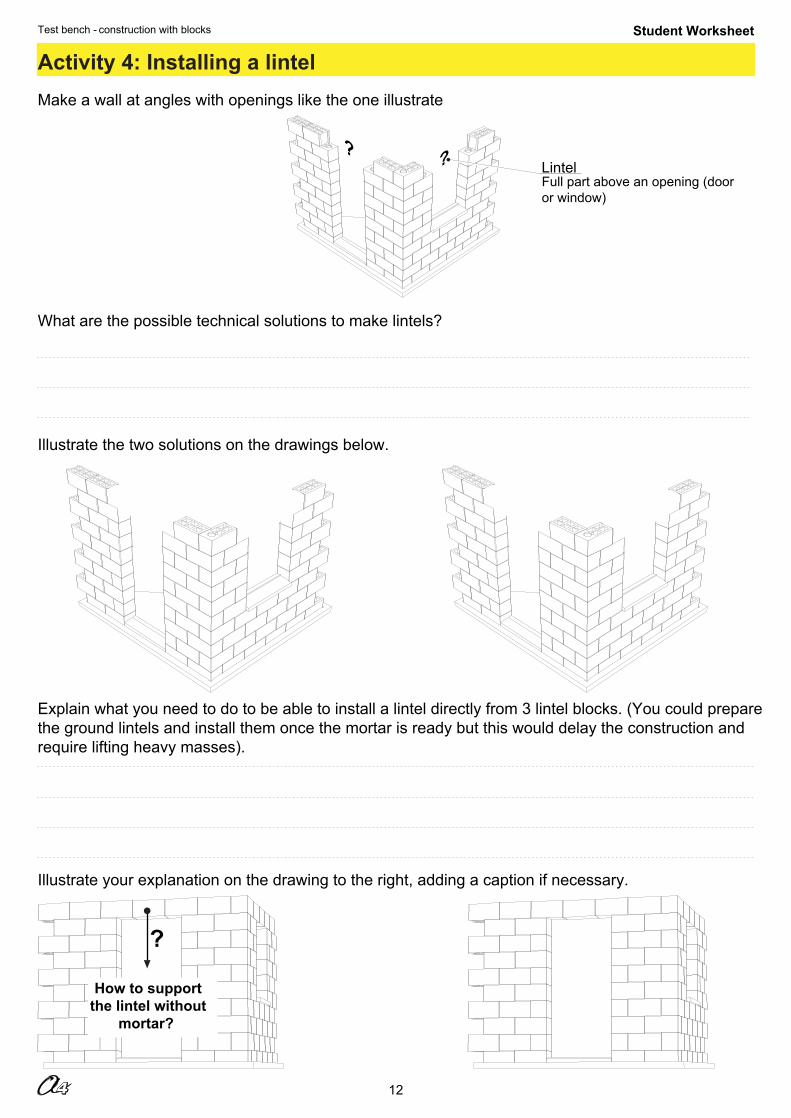
Activity 4: Installing a lintelTest bench - construction with blocks Student Worksheet
Make a wall at angles with openings like the one illustrate
What are the possible technical solutions to make lintels?
Illustrate the two solutions on the drawings below.
Explain what you need to do to be able to install a lintel directly from 3 lintel blocks. (You could preparethe ground lintels and install them once the mortar is ready but this would delay the construction andrequire lifting heavy masses).
Illustrate your explanation on the drawing to the right, adding a caption if necessary.
?
??
Full part above an opening (dooror window)
Lintel
How to supportthe lintel without
mortar?

13
Activity 4: Installing a lintelTest bench - construction with blocks
Make a wall at angles with openings like the one illustrate
What are the possible technical solutions to make lintels?
Illustrate the two solutions on the drawings below.
Explain what you need to do to be able to install a lintel directly from 3 lintel blocks. (You could preparethe ground lintels and install them once the mortar is ready but this would delay the construction andrequire lifting heavy masses).
Illustrate your explanation on the drawing to the right, adding a caption if necessary.
?
??
Full part above an opening(door or window)
Lintel
How to supportthe lintel without
mortar?
Example of student work
We have two possibilities using the material provided: Masonry lintels with lintel blocks or wooden lintels.
To be able to install the lintels, they must be supported with props, then insert the framework and fill with mortar. If the support is solid enough, we can continue the construction without waiting for the mortar to completely set and the full strength of the lintel.
Support board
Support legs
Student Worksheet
14
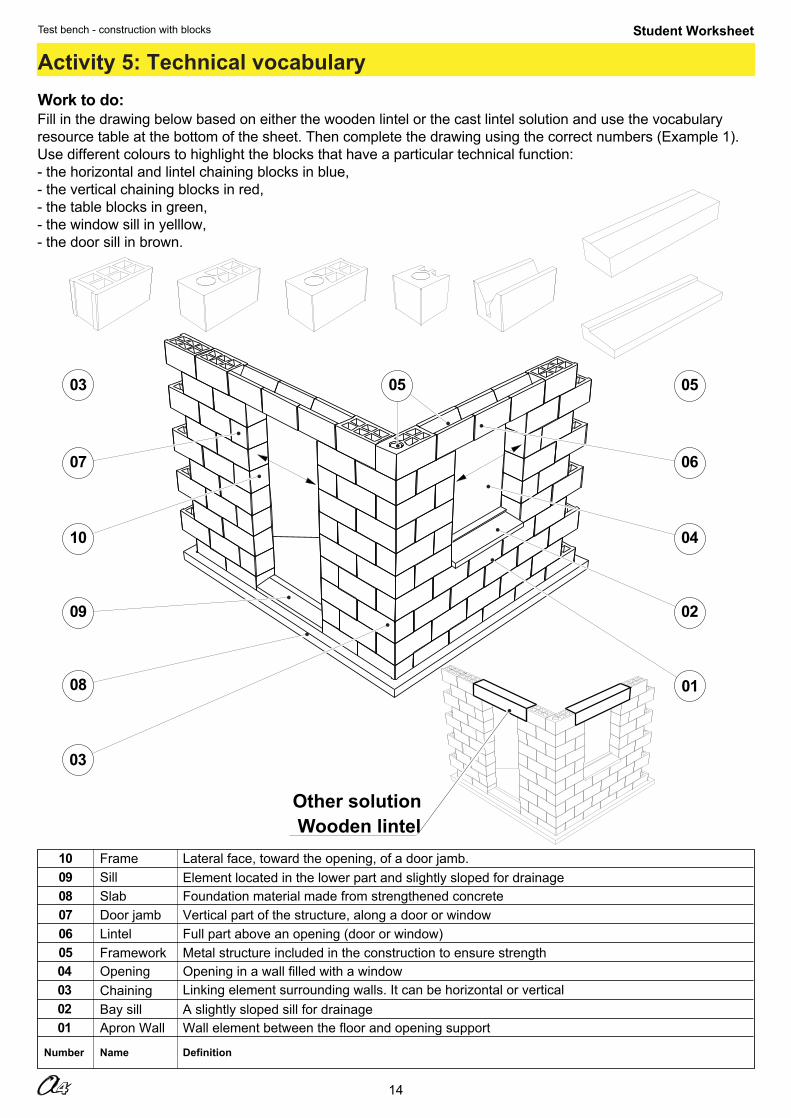
Activity 5: Technical vocabularyTest bench - construction with blocks
Number Definition
01
Linking element surrounding walls. It can be horizontal or vertical
0506
020304
070809
Chaining
Name
A slightly sloped sill for drainageBay sill
Element located in the lower part and slightly sloped for drainage10
Framework Metal structure included in the construction to ensure strength
Work to do:
Other solutionWooden lintel
Foundation material made from strengthened concreteVertical part of the structure, along a door or windowFull part above an opening (door or window)Lintel
Door jambSlab
Opening Opening in a wall filled with a window
Wall element between the floor and opening supportApron Wall
SillLateral face, toward the opening, of a door jamb.Frame
01
Fill in the drawing below based on either the wooden lintel or the cast lintel solution and use the vocabulary resource table at the bottom of the sheet. Then complete the drawing using the correct numbers (Example 1).Use different colours to highlight the blocks that have a particular technical function:- the horizontal and lintel chaining blocks in blue,- the vertical chaining blocks in red,- the table blocks in green,- the window sill in yelllow,- the door sill in brown.
10
07
09
08
04
03
02
06
05
03
05

15
Activity 5: Technical vocabularyTest bench - construction with blocks
Number Definition
01
Linking element surrounding walls. It can be horizontal or vertical
0506
020304
070809
Chaining
Name
A slightly sloped sill for drainageBay sill
Element located in the lower part and slightly sloped for drainage10
Framework Metal structure included in the construction to ensure strength
Work to do:
Foundation material made from strengthened concreteVertical part of the structure, along a door or windowFull part above an opening (door or window)Lintel
Door jambSlab
Opening Opening in a wall filled with a window
Wall element between the floor and opening supportApron Wall
SillLateral face, toward the opening, of a door jamb.Frame
Fill in the drawing below based on either the wooden lintel or the cast lintel solution and use the vocabulary resource table at the bottom of the sheet. Then complete the drawing using the correct numbers (Example 1).Use different colours to highlight the blocks that have a particular technical function:- the horizontal and lintel chaining blocks in blue,- the vertical chaining blocks in red,- the table blocks in green,- the window sill in yelllow,- the door sill in brown.
Example of student work
Other solutionWooden lintel
10
07
09
08
04
03
02
01
06
05
03
05

16
6: Extra activity: Horizontal chainingStudent WorksheetTest bench - construction with blocks
Use horizontal chaining blocks to build an eighth row. Use the metal rods of about 170 length or morefor the chaining. To connect the horizontal chaining to the vertical one, you must drill the PVC Ø 3.5bars at 185 and 190 from the end (See figure below).
Look at the vertical poles. Why do we make holes in them?
Assemble the wall as shown below.
Test the strength of the wall. What can you see?
Chaining block 2 chaining steel rods Ø 3 length170 mm

17
6: Extra activity: Horizontal chainingTest bench - construction with blocks
Use horizontal chaining blocks to build an eighth row. Use the metal rods of about 170 length or morefor the chaining. To connect the horizontal chaining to the vertical one, you must drill the PVC Ø 3.5bars at 185 and 190 from the end (See figure below).
Look at the vertical poles. Why do we make holes in them?
Assemble the wall as shown below.
Test the strength of the wall. What can you see?
Chaining block 2 chaining steel rods Ø 3 length170 mm
Example of student work
The holes allow the vertical and horizontal chaining to connect. Therefore, the wall should become stronger.
We can see that the wall is much more rigid now, with the horizontal structure connected to the vertical one. The wall forms a whole, one part cannot be destructed unless all of it is. Everything is connected, which makes the construction very strong.
18
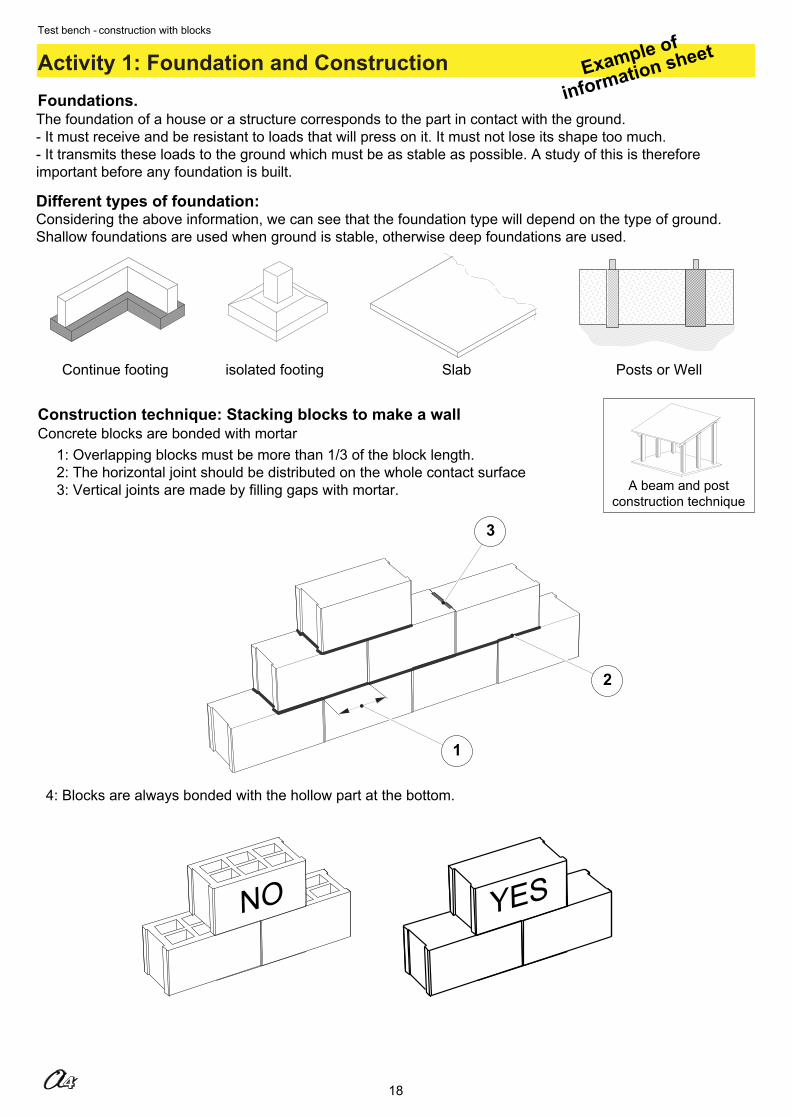
Activity 1: Foundation and ConstructionTest bench - construction with blocks
Foundations.
Continue footing isolated footing Slab Posts or Well
Construction technique: Stacking blocks to make a wallConcrete blocks are bonded with mortar
1: Overlapping blocks must be more than 1/3 of the block length. 2: The horizontal joint should be distributed on the whole contact surface3: Vertical joints are made by filling gaps with mortar.
4: Blocks are always bonded with the hollow part at the bottom.
3
2
1
NO YES
A beam and postconstruction technique
Example of
information sheet
The foundation of a house or a structure corresponds to the part in contact with the ground.- It must receive and be resistant to loads that will press on it. It must not lose its shape too much.- It transmits these loads to the ground which must be as stable as possible. A study of this is therefore important before any foundation is built.
Different types of foundation:Considering the above information, we can see that the foundation type will depend on the type of ground. Shallow foundations are used when ground is stable, otherwise deep foundations are used.

19
Activity 2: Construction and chaining
Test bench - construction with blocks
Chainings:They are made from metal rods embedded in the mortar. They let you link different parts or differentblocks to ensure the structure of the house is rigid.
Vertical chaining Horizontal chaining
The chaining has several functions.When it’s vertical:- It will ensure the wall has a certain mechanical rigidity, strengthens wall angles and the ends. - It will help the wall to support the load of elements above.
When it’s horizontal:- the load of the elements located above will be distributed across the width - it fights pressure on the wall (wind, beams) it stops the wall from ‘opening’- it also acts as a lintel above doors and windows.
Horizontal and vertical chaining are connected in order to ‘bind’ all the materials used in theconstruction.
Mortar
Metal bars
Example of
information sheet
Casted Post
Angle chaining blocks
20
Activity 3: Casting a lintelTest bench - construction with blocks
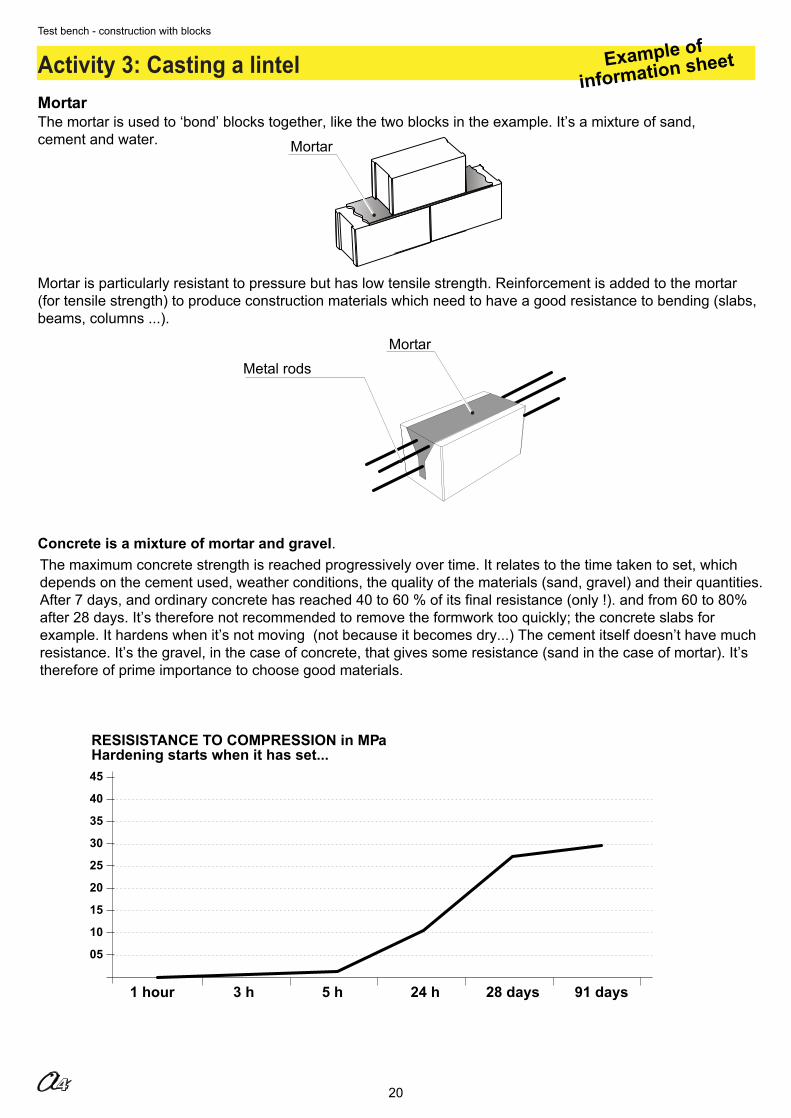
MortarThe mortar is used to ‘bond’ blocks together, like the two blocks in the example. It’s a mixture of sand,cement and water.
Concrete is a mixture of mortar and gravel.
Mortar is particularly resistant to pressure but has low tensile strength. Reinforcement is added to the mortar(for tensile strength) to produce construction materials which need to have a good resistance to bending (slabs,beams, columns ...).
RESISISTANCE TO COMPRESSION in MPaHardening starts when it has set...45
40
35
30
25
20
15
10
05
1 hour 3 h 5 h 24 h 28 days 91 days
Mortar
Mortar
Metal rods
Example of
information sheet
The maximum concrete strength is reached progressively over time. It relates to the time taken to set, which depends on the cement used, weather conditions, the quality of the materials (sand, gravel) and their quantities. After 7 days, and ordinary concrete has reached 40 to 60 % of its final resistance (only !). and from 60 to 80% after 28 days. It’s therefore not recommended to remove the formwork too quickly; the concrete slabs for example. It hardens when it’s not moving (not because it becomes dry...) The cement itself doesn’t have much resistance. It’s the gravel, in the case of concrete, that gives some resistance (sand in the case of mortar). It’s therefore of prime importance to choose good materials.
21
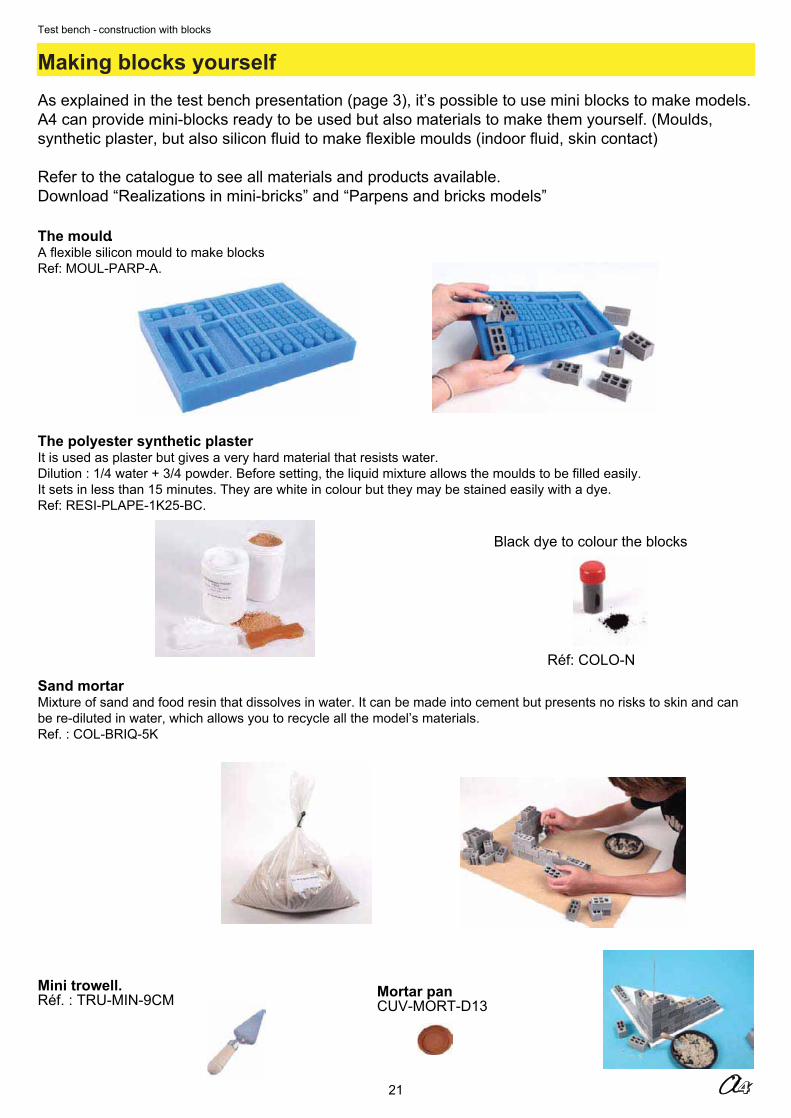
Making blocks yourselfTest bench - construction with blocks
The polyester synthetic plasterIt is used as plaster but gives a very hard material that resists water.Dilution : 1/4 water + 3/4 powder. Before setting, the liquid mixture allows the moulds to be filled easily.It sets in less than 15 minutes. They are white in colour but they may be stained easily with a dye.Ref: RESI-PLAPE-1K25-BC.
Sand mortarMixture of sand and food resin that dissolves in water. It can be made into cement but presents no risks to skin and canbe re-diluted in water, which allows you to recycle all the model’s materials. Ref. : COL-BRIQ-5K
Réf: COLO-N
The mouldA flexible silicon mould to make blocksRef: MOUL-PARP-A.
.
Black dye to colour the blocks
Mini trowell. Réf. : TRU-MIN-9CM Mortar pan
CUV-MORT-D13
As explained in the test bench presentation (page 3), it’s possible to use mini blocks to make models. A4 can provide mini-blocks ready to be used but also materials to make them yourself. (Moulds, synthetic plaster, but also silicon fluid to make flexible moulds (indoor fluid, skin contact)
Refer to the catalogue to see all materials and products available.Download “Realizations in mini-bricks” and “Parpens and bricks models”

22
Test bench - construction with blocks