iRep installation
49
User Guide: iRep
-
Upload
melita-calis -
Category
Documents
-
view
284 -
download
3
description
How to install iRep on your computer/iPad
Transcript of iRep installation

User Guide: iRep

2
User Guide: iRep
For Internal use only – not to be shown to or left with customers
A. Install the Veeva application in the iPad ................................................................................................................. 3
B. Open the Veeva application ..................................................................................................................................... 6
a. Check your tasks ................................................................................................................................................... 6
b. Review the Territory Adds & Drops .................................................................................................................... 10
c. Review your accounts ......................................................................................................................................... 11
1. Edit an account................................................................................................................................................ 12
2. Record a call with an account ......................................................................................................................... 16
3. Launch a CLM .................................................................................................................................................. 17
4. Review an account hierarchy .......................................................................................................................... 20
5. Open the account calendar ............................................................................................................................. 21
6. Review the account Sphere of Influence ........................................................................................................ 22
7. Review the account addresses ........................................................................................................................ 26
8. Review an account plan .................................................................................................................................. 27
9. Create a new account list ................................................................................................................................ 30
10. Use the accounts quick buttons .................................................................................................................. 32
d. Access to your Calendar ...................................................................................................................................... 32
e. Explore the Meetings & Events tab..................................................................................................................... 41
f. Access to other iRep options .............................................................................................................................. 46
C. iRep Synchronization .............................................................................................................................................. 47
Version 8. July 2014
3
User Guide: iRep
For Internal use only – not to be shown to or left with customers
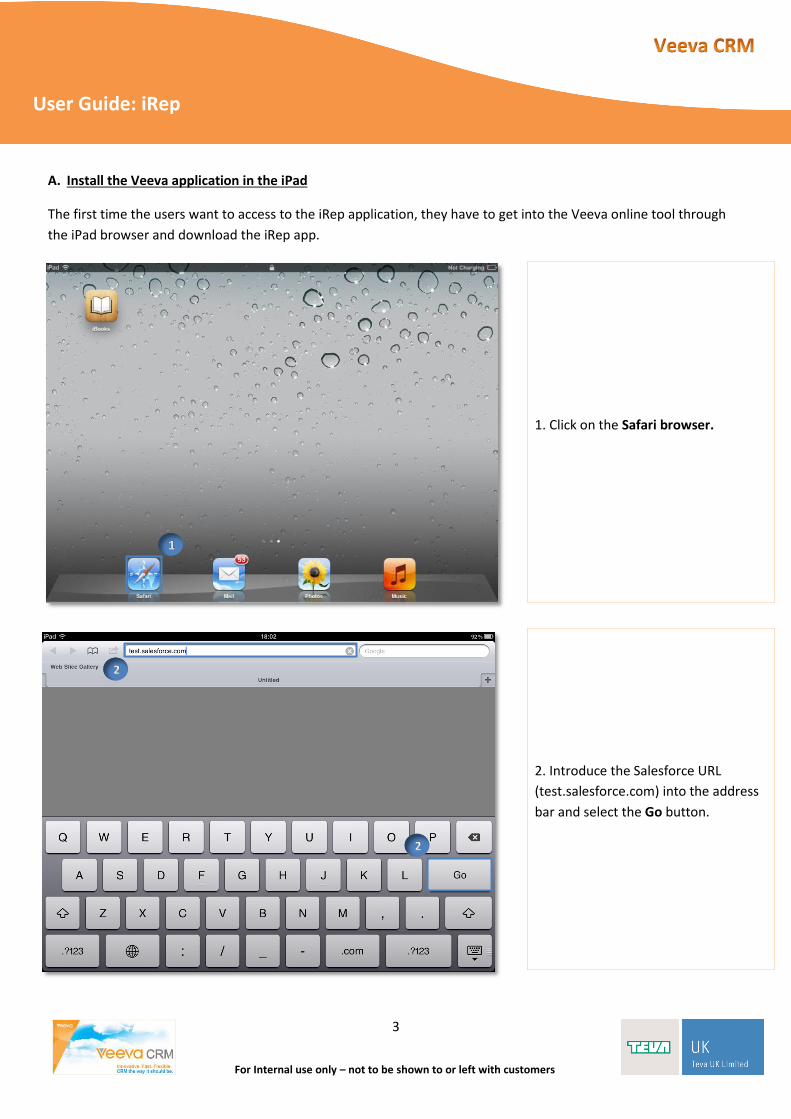
A. Install the Veeva application in the iPad
The first time the users want to access to the iRep application, they have to get into the Veeva online tool through
the iPad browser and download the iRep app.
1. Click on the Safari browser.
1
2. Introduce the Salesforce URL
(test.salesforce.com) into the address
bar and select the Go button.
2
2
4
User Guide: iRep
For Internal use only – not to be shown to or left with customers
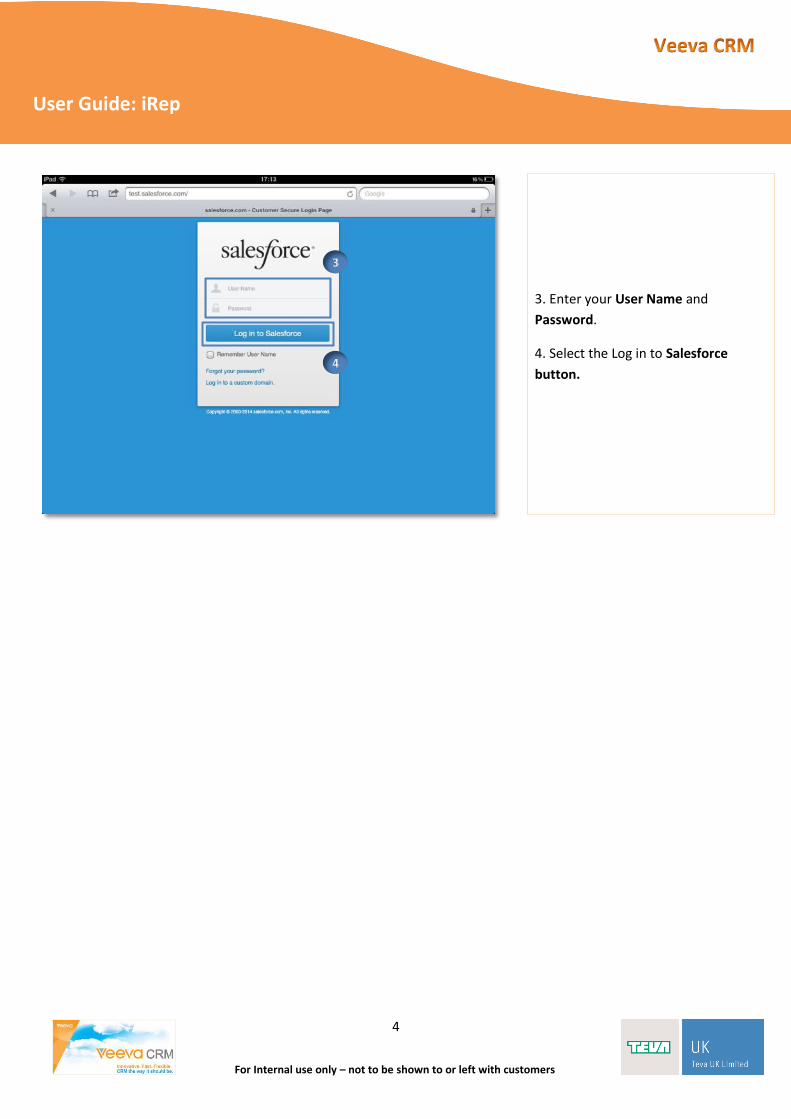
3. Enter your User Name and
Password.
4. Select the Log in to Salesforce
button.
3
4
5
User Guide: iRep
For Internal use only – not to be shown to or left with customers
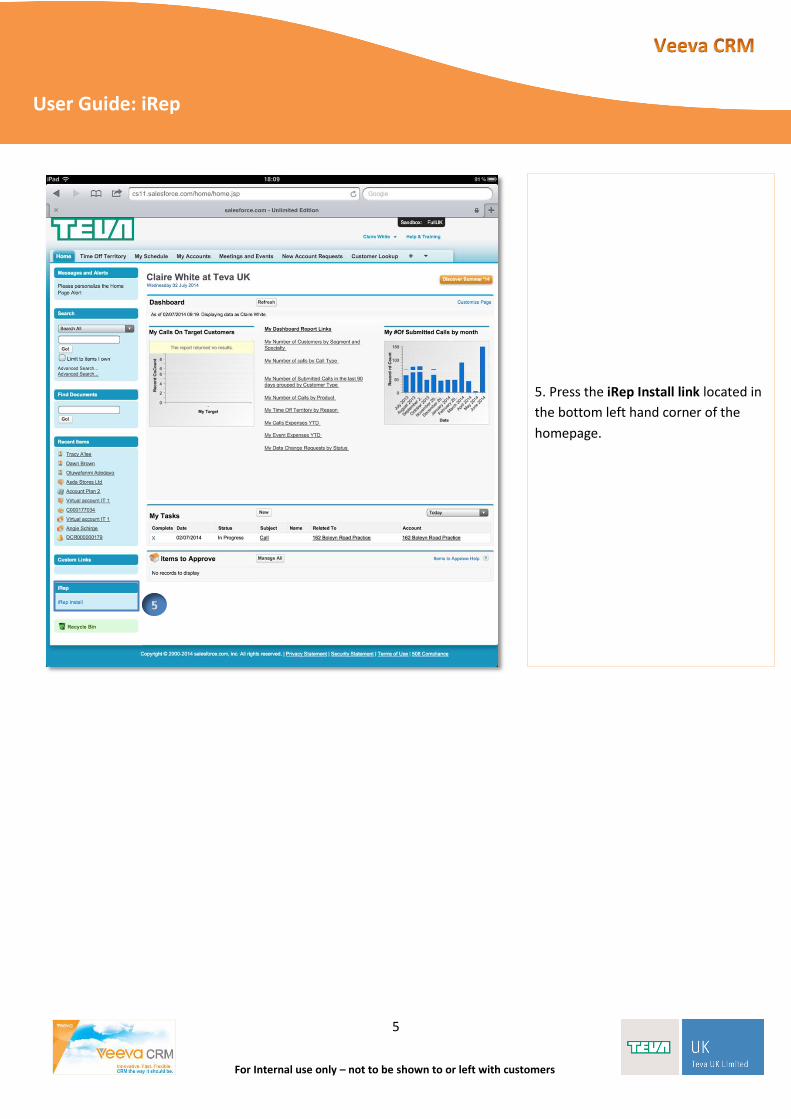
5. Press the iRep Install link located in
the bottom left hand corner of the
homepage.
5
6
User Guide: iRep
For Internal use only – not to be shown to or left with customers
B. Open the Veeva application
a. Check your tasks
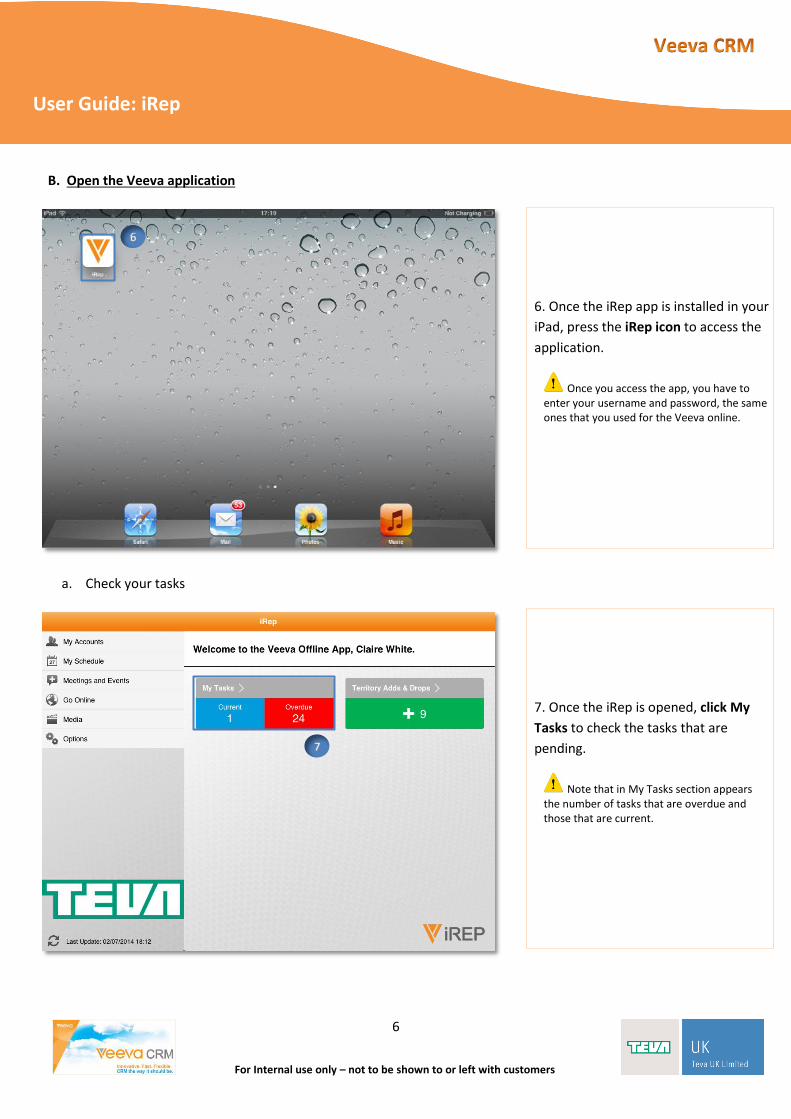
6. Once the iRep app is installed in your
iPad, press the iRep icon to access the
application.
Once you access the app, you have to enter your username and password, the same ones that you used for the Veeva online.
7. Once the iRep is opened, click My
Tasks to check the tasks that are
pending.
Note that in My Tasks section appears the number of tasks that are overdue and those that are current.
6
7

7
User Guide: iRep
For Internal use only – not to be shown to or left with customers
9. Once you review all the task data, if
you want to edit the task information,
select the Edit tab.
Press the world icon to access Veeva online. You will access to the same record that you were reviewing in the iRep.
8. Select from My Tasks list the task
that you want to review.
If you select account name related to the task, the account detail screen will open. If you select the field “Related to” (e.g. C000071393), the record where the task was recorded will open.
8
9
8
User Guide: iRep
For Internal use only – not to be shown to or left with customers
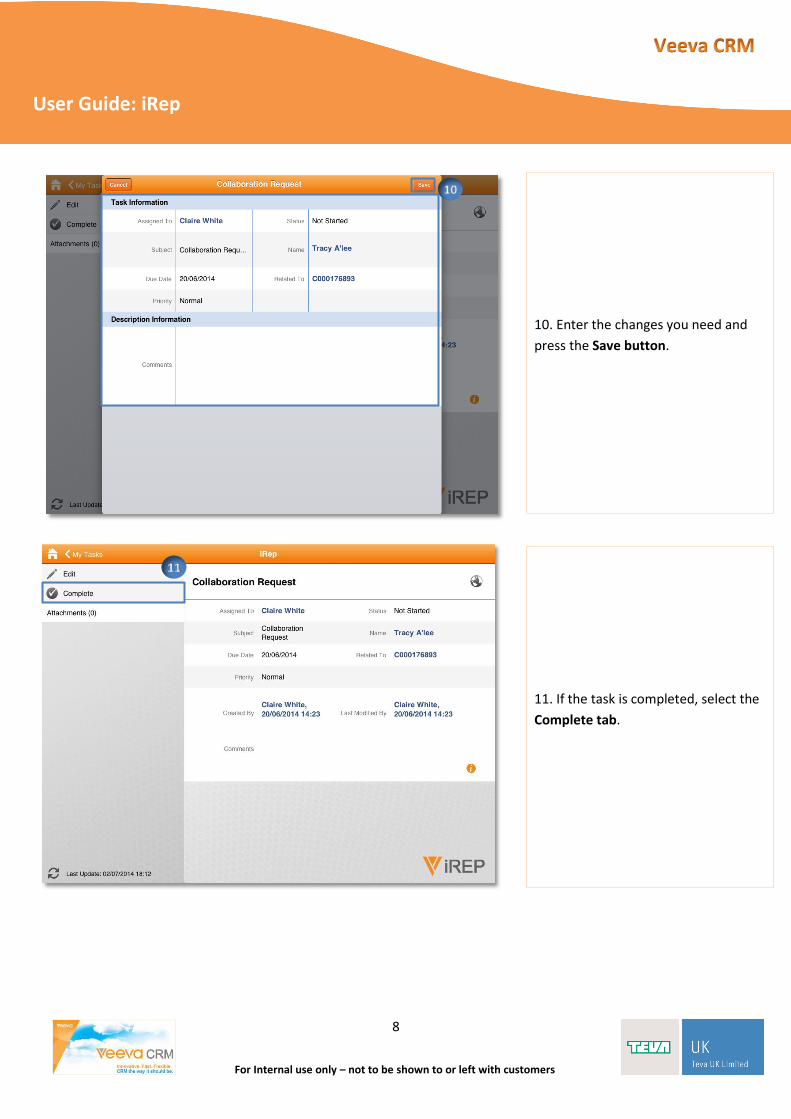
10. Enter the changes you need and
press the Save button.
11. If the task is completed, select the
Complete tab.
11
10
9
User Guide: iRep
For Internal use only – not to be shown to or left with customers
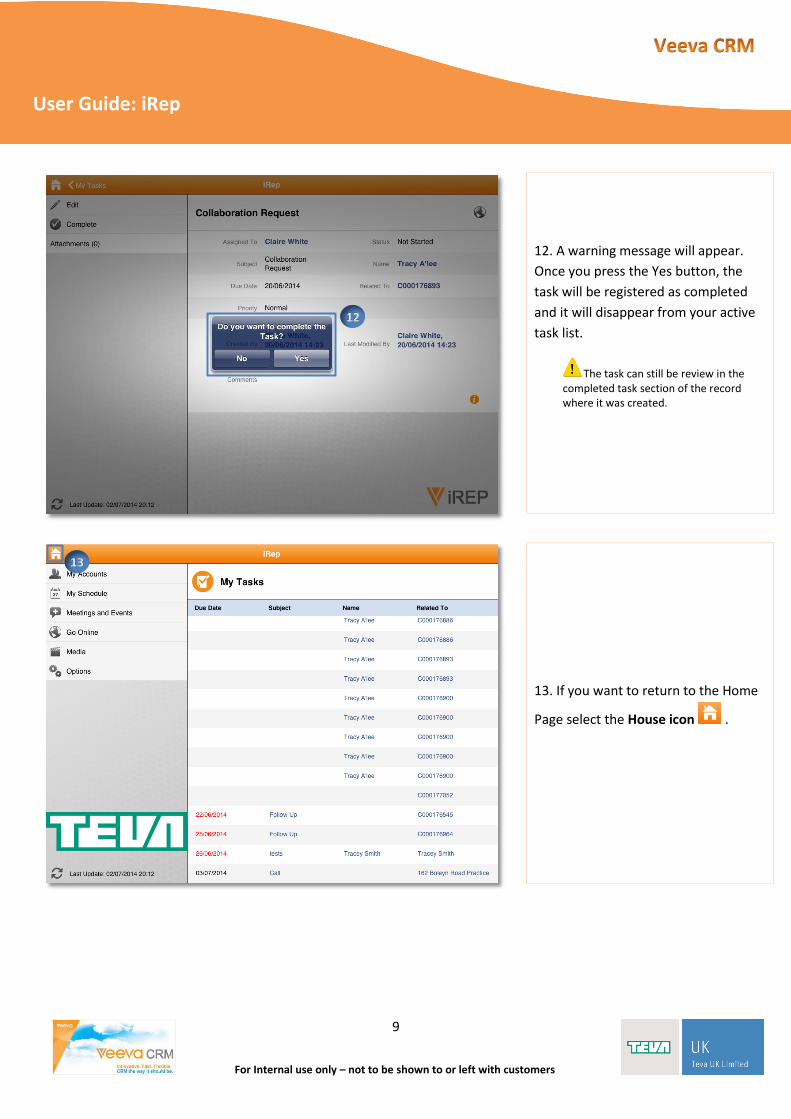
12. A warning message will appear.
Once you press the Yes button, the
task will be registered as completed
and it will disappear from your active
task list.
The task can still be review in the completed task section of the record where it was created.
13. If you want to return to the Home
Page select the House icon .
12
13
10
User Guide: iRep
For Internal use only – not to be shown to or left with customers
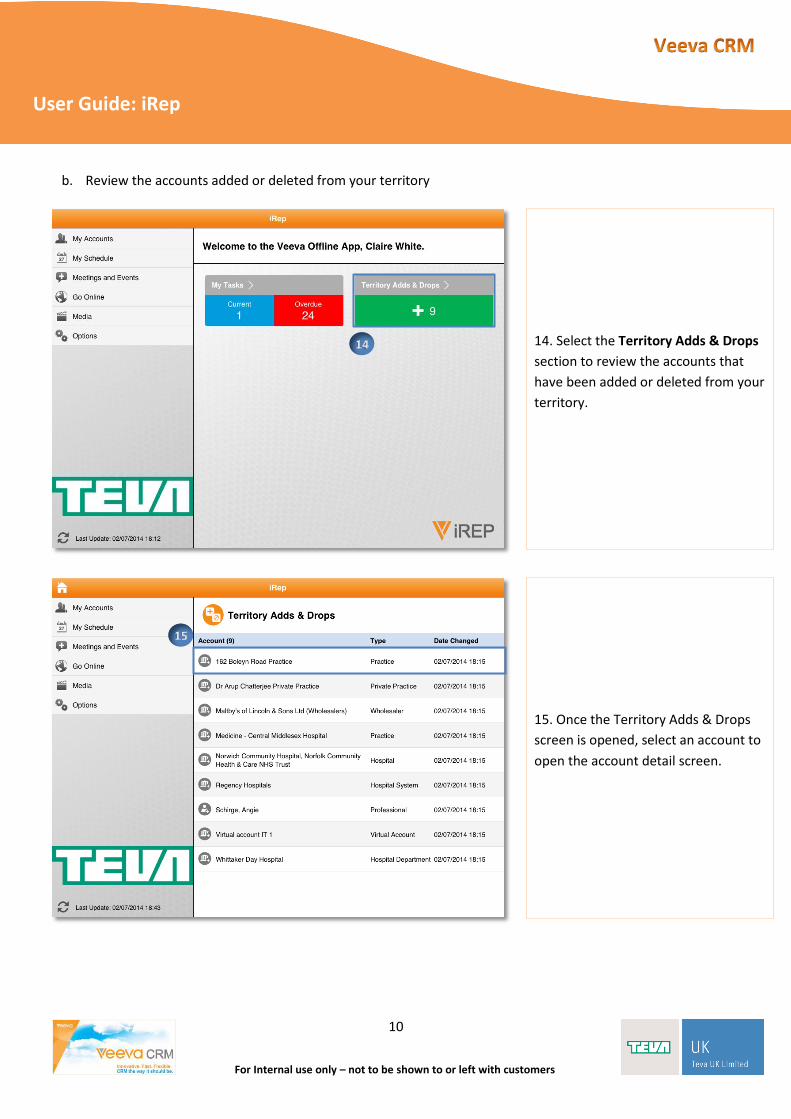
b. Review the accounts added or deleted from your territory
14. Select the Territory Adds & Drops
section to review the accounts that
have been added or deleted from your
territory.
14
15. Once the Territory Adds & Drops
screen is opened, select an account to
open the account detail screen.
15

11
User Guide: iRep
For Internal use only – not to be shown to or left with customers
c. Review your accounts
16. Select My Accounts tab to review
your Accounts.
17. Choose an option from the View list
and select the account you want to
review.
Also you can select an account list to
display the accounts that belong to it.
16
17
12
User Guide: iRep
For Internal use only – not to be shown to or left with customers
1. Edit an account
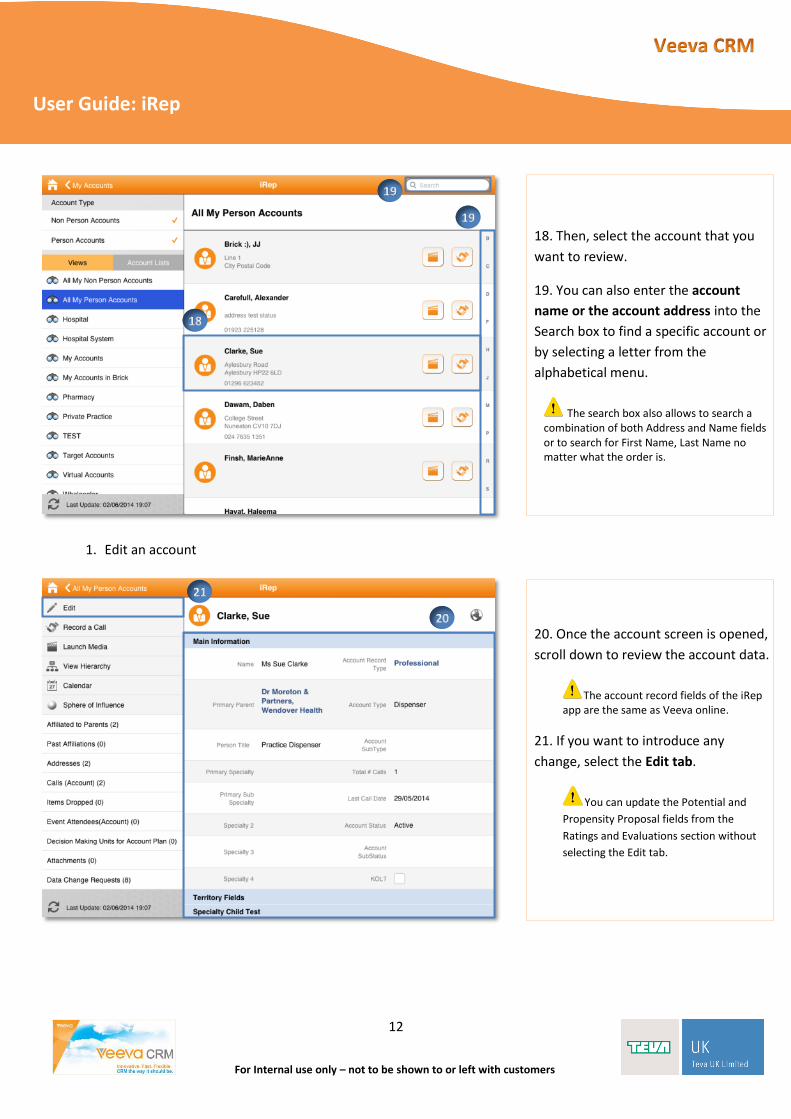
18. Then, select the account that you
want to review.
19. You can also enter the account
name or the account address into the
Search box to find a specific account or
by selecting a letter from the
alphabetical menu.
The search box also allows to search a combination of both Address and Name fields or to search for First Name, Last Name no matter what the order is.
20. Once the account screen is opened,
scroll down to review the account data.
The account record fields of the iRep app are the same as Veeva online.
21. If you want to introduce any
change, select the Edit tab.
You can update the Potential and
Propensity Proposal fields from the
Ratings and Evaluations section without
selecting the Edit tab.
18
20
19
19
21

13
User Guide: iRep
For Internal use only – not to be shown to or left with customers
22. When the account edit screen is
opened, you can update those fields
that are editable.
The non editable fields are marked
with a key
23. Once all the changes are updated,
select the Save button.
22
23
14
User Guide: iRep
For Internal use only – not to be shown to or left with customers
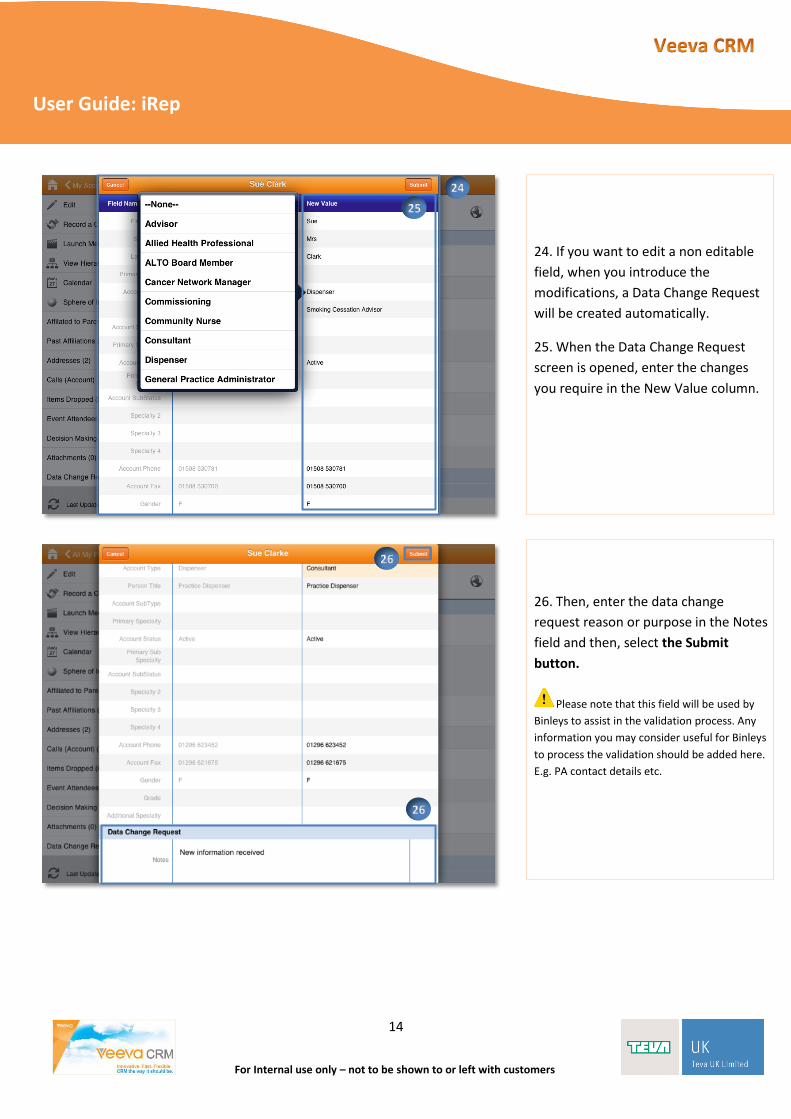
24. If you want to edit a non editable
field, when you introduce the
modifications, a Data Change Request
will be created automatically.
25. When the Data Change Request
screen is opened, enter the changes
you require in the New Value column.
26. Then, enter the data change
request reason or purpose in the Notes
field and then, select the Submit
button.
Please note that this field will be used by
Binleys to assist in the validation process. Any
information you may consider useful for Binleys
to process the validation should be added here.
E.g. PA contact details etc.
24
26
25
26
15
User Guide: iRep
For Internal use only – not to be shown to or left with customers
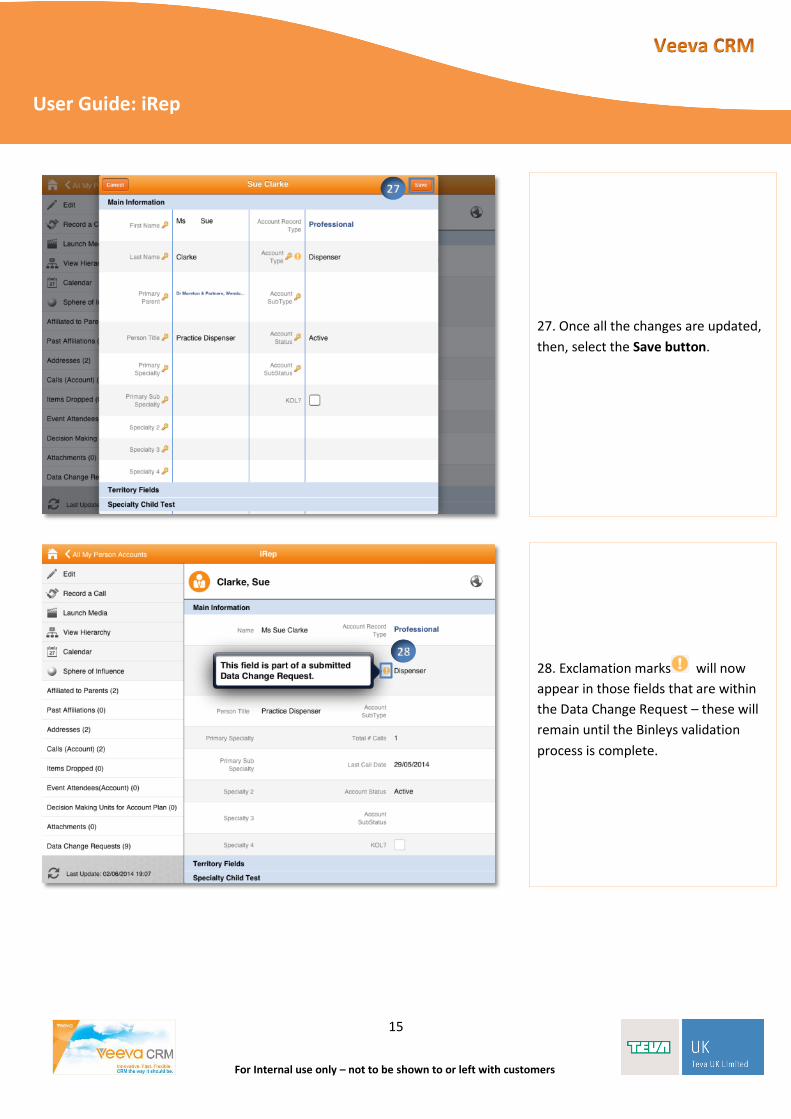
27. Once all the changes are updated,
then, select the Save button.
28. Exclamation marks will now
appear in those fields that are within
the Data Change Request – these will
remain until the Binleys validation
process is complete.
27
28

16
User Guide: iRep
For Internal use only – not to be shown to or left with customers
2. Record a call with an account
29. Select the Record a Call tab.
30. Complete the Call record fields.
The call record fields of the iRep app are the same that the Veeva online tool.
31. If you want to use CLM content
(Closed Loop Marketing), press the
Media button.
29
30 31
17
User Guide: iRep
For Internal use only – not to be shown to or left with customers
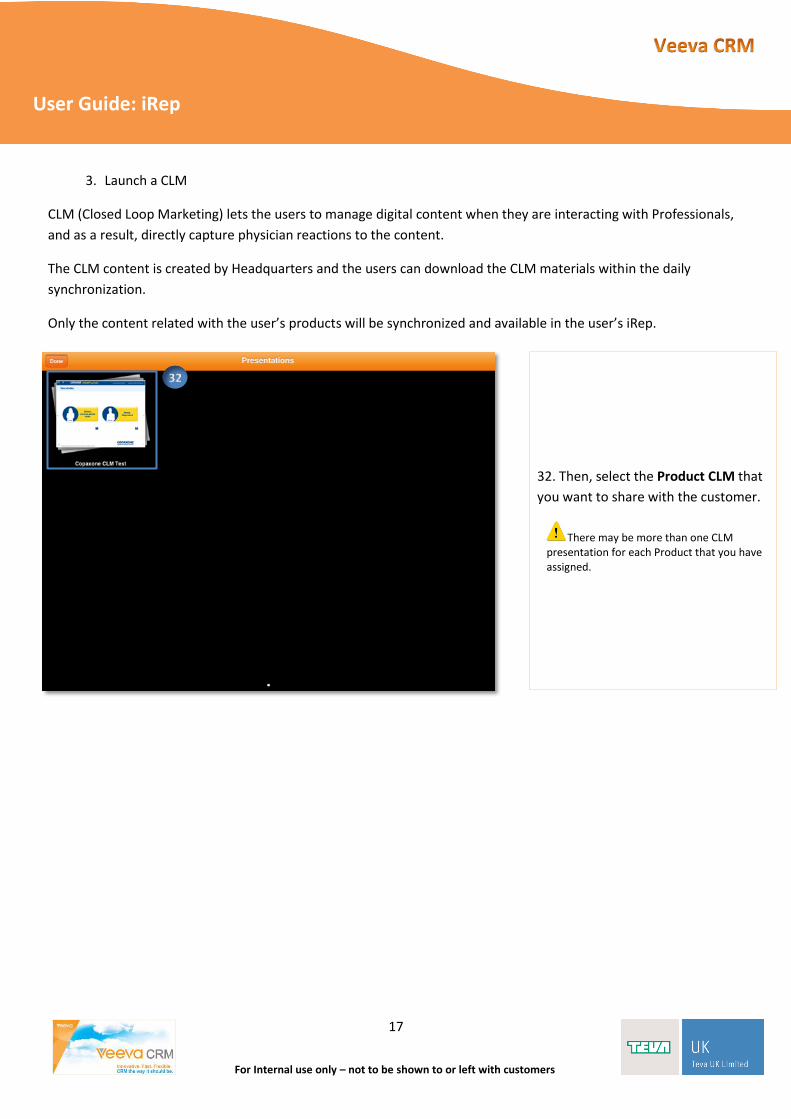
3. Launch a CLM
CLM (Closed Loop Marketing) lets the users to manage digital content when they are interacting with Professionals,
and as a result, directly capture physician reactions to the content.
The CLM content is created by Headquarters and the users can download the CLM materials within the daily
synchronization.
Only the content related with the user’s products will be synchronized and available in the user’s iRep.
32. Then, select the Product CLM that
you want to share with the customer.
There may be more than one CLM presentation for each Product that you have assigned.
32
18
User Guide: iRep
For Internal use only – not to be shown to or left with customers
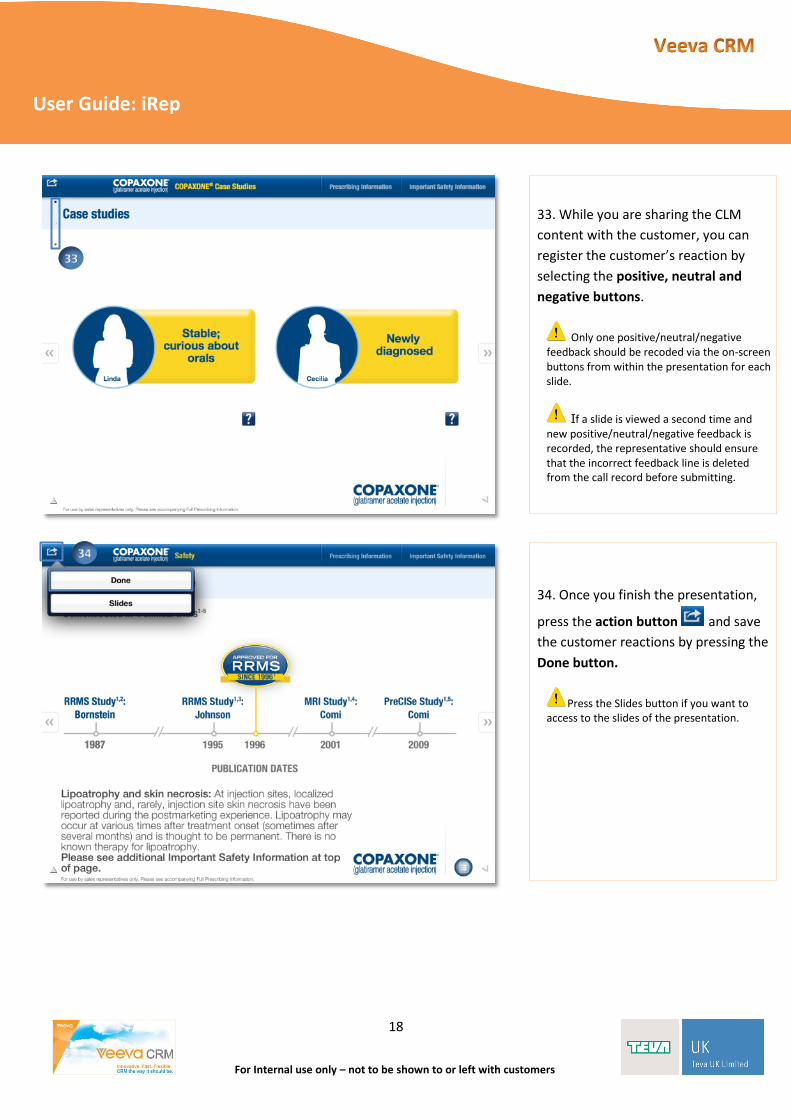
33. While you are sharing the CLM
content with the customer, you can
register the customer’s reaction by
selecting the positive, neutral and
negative buttons.
Only one positive/neutral/negative feedback should be recoded via the on-screen buttons from within the presentation for each slide.
If a slide is viewed a second time and new positive/neutral/negative feedback is recorded, the representative should ensure that the incorrect feedback line is deleted from the call record before submitting.
34. Once you finish the presentation,
press the action button and save
the customer reactions by pressing the
Done button.
Press the Slides button if you want to access to the slides of the presentation.
34
33
19
User Guide: iRep
For Internal use only – not to be shown to or left with customers
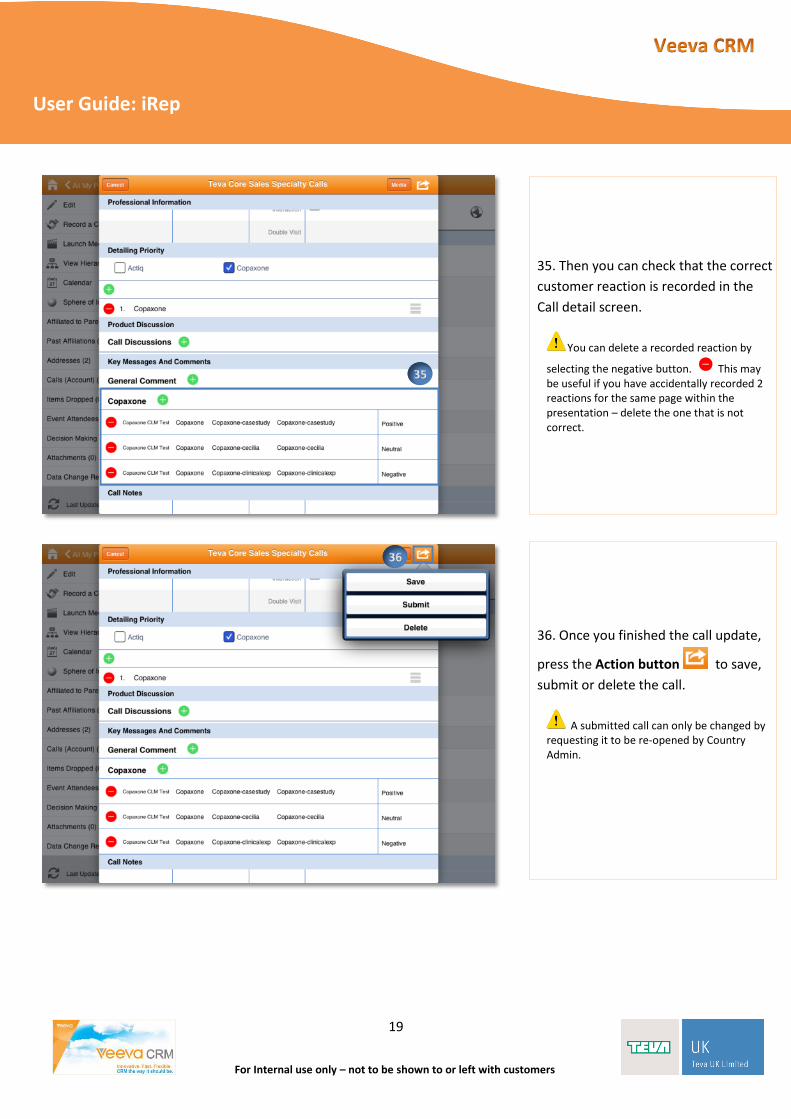
35. Then you can check that the correct
customer reaction is recorded in the
Call detail screen.
You can delete a recorded reaction by
selecting the negative button. This may be useful if you have accidentally recorded 2 reactions for the same page within the presentation – delete the one that is not correct.
36. Once you finished the call update,
press the Action button to save,
submit or delete the call.
A submitted call can only be changed by requesting it to be re-opened by Country Admin.
36
35
20
User Guide: iRep
For Internal use only – not to be shown to or left with customers
4. Review an account hierarchy
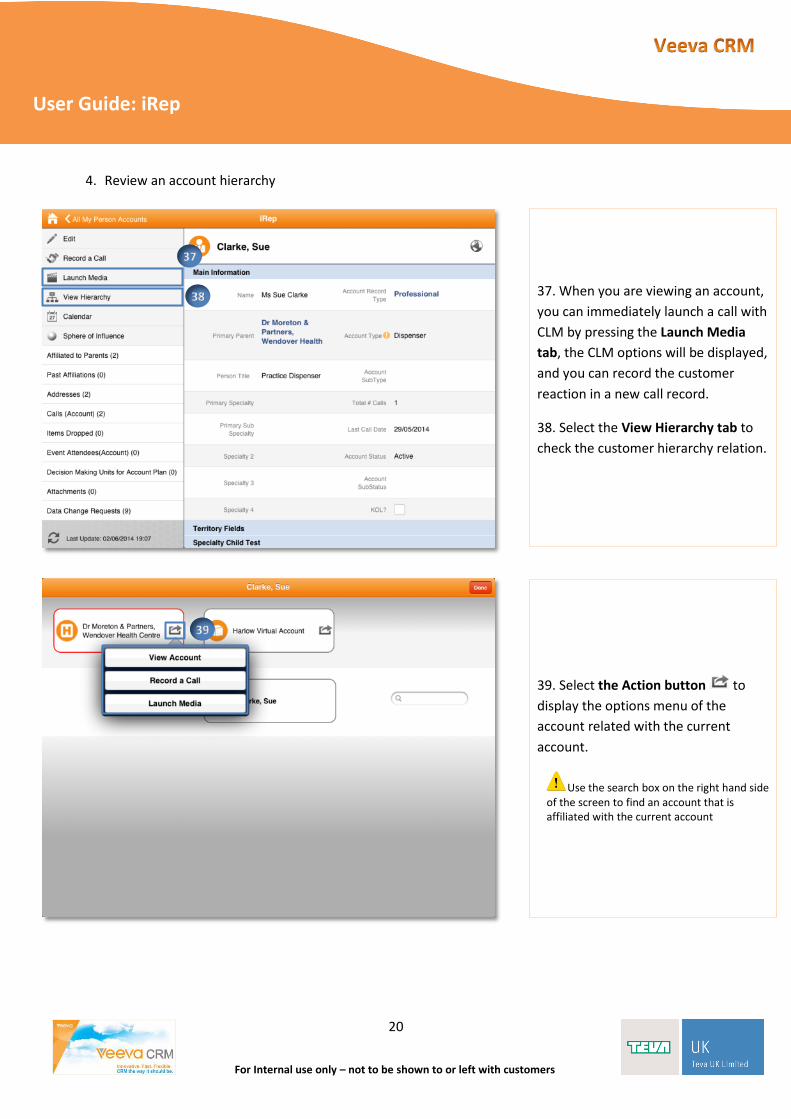
37. When you are viewing an account,
you can immediately launch a call with
CLM by pressing the Launch Media
tab, the CLM options will be displayed,
and you can record the customer
reaction in a new call record.
38. Select the View Hierarchy tab to
check the customer hierarchy relation.
39. Select the Action button to
display the options menu of the
account related with the current
account.
Use the search box on the right hand side of the screen to find an account that is affiliated with the current account
38
37
39
21
User Guide: iRep
For Internal use only – not to be shown to or left with customers
5. Open the account calendar
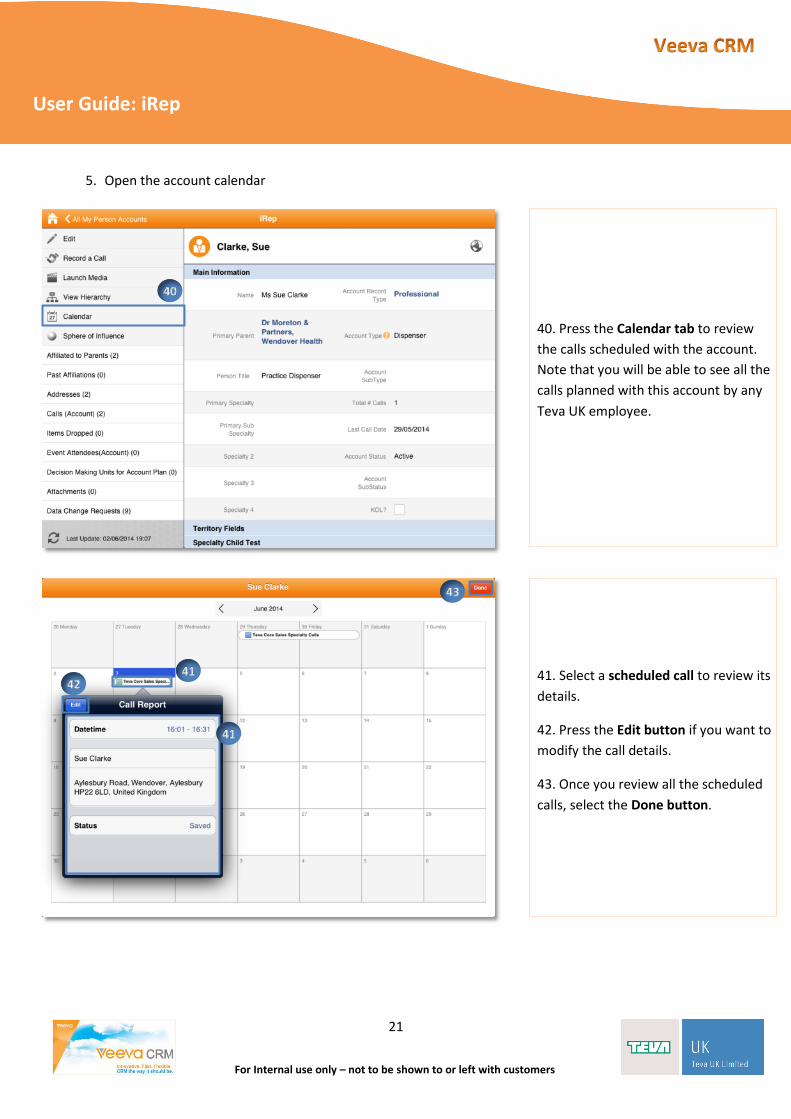
40. Press the Calendar tab to review
the calls scheduled with the account.
Note that you will be able to see all the
calls planned with this account by any
Teva UK employee.
41. Select a scheduled call to review its
details.
42. Press the Edit button if you want to
modify the call details.
43. Once you review all the scheduled
calls, select the Done button.
41
40
41
43
42
22
User Guide: iRep
For Internal use only – not to be shown to or left with customers
6. Review the account Sphere of Influence
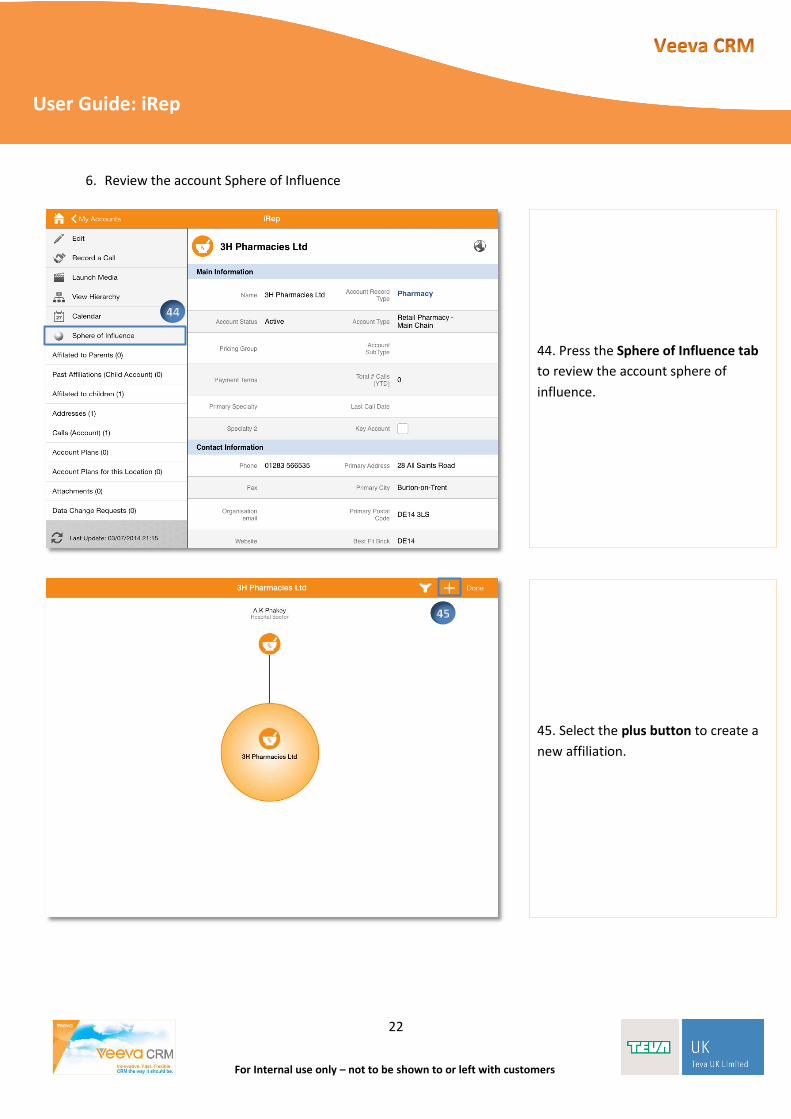
44. Press the Sphere of Influence tab
to review the account sphere of
influence.
45. Select the plus button to create a
new affiliation.
45
44

23
User Guide: iRep
For Internal use only – not to be shown to or left with customers
46. Search for the account that you
want to affiliate to the current account.
47. Select the type of influence that
you want to record.
48. Then, select the role tab to define
the affiliated account role.
46
47
48

24
User Guide: iRep
For Internal use only – not to be shown to or left with customers
49. And choose the role.
50. Finally, press the Save button.
50
49

25
User Guide: iRep
For Internal use only – not to be shown to or left with customers
52. Press the filter button to filter the
affiliated accounts by role, account
type or influence.
53. Then, press the Save button to
apply the filter or the Clear button to
eliminate it.
52
52
53 53
51. If you want to modify an influence relation, click the account logo and select the option that you want to perform:
a. Select the delete button to delete the new influence relationship.
b. Click the Sphere of Influence button
to open the sphere of influence screen of the account selected.
c. Choose the Hands button to record a new call with the account selected.
d. Select the Clapperboard button to launch a CLM.
e. 53. Click the Account button to open the account detail screen.
a.
b. c. d. e.
51

26
User Guide: iRep
For Internal use only – not to be shown to or left with customers
7. Review the account addresses
54. Once you introduce all the changes
into the account influence sphere
screen, press the Done button.
55. Finally there are several tabs which
show additional information: select the
tab that you want to open: a. Affiliated to Parents: shows the accounts
that are affiliated as parents to the currently
account
b. Past Affiliations: shows the accounts that
were associated to the current account in
the past
c. Addresses: collects all the recorded
addresses for the current account
d. Calls (Account): gathers all the calls
executed with the account
e. Items Dropped: reflects the items that you
gave to the customer during a call
f. Event Attendees (Account): registers the
events where the account is an attendee
g. Decision Making Units for Account Plan:
shows the Account plan where the
customer was targeted within a DMU
h. Attachments: reflects the documents
attached to the account
i. Data Change Request: gathers all the DCR
opened for the account
54
55
27
User Guide: iRep
For Internal use only – not to be shown to or left with customers
Press the arrow button every time you want to return to the previous page.
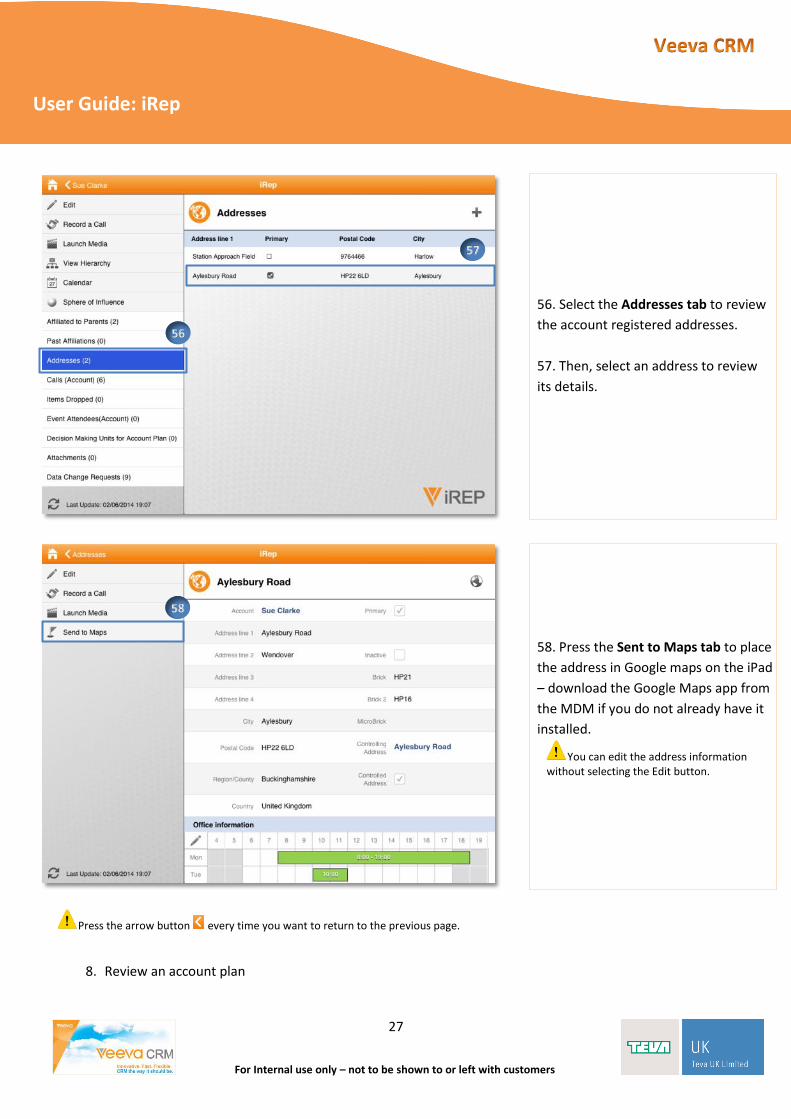
8. Review an account plan
56. Select the Addresses tab to review
the account registered addresses.
57. Then, select an address to review
its details.
58. Press the Sent to Maps tab to place
the address in Google maps on the iPad
– download the Google Maps app from
the MDM if you do not already have it
installed.
You can edit the address information without selecting the Edit button.
56
58
57
28
User Guide: iRep
For Internal use only – not to be shown to or left with customers
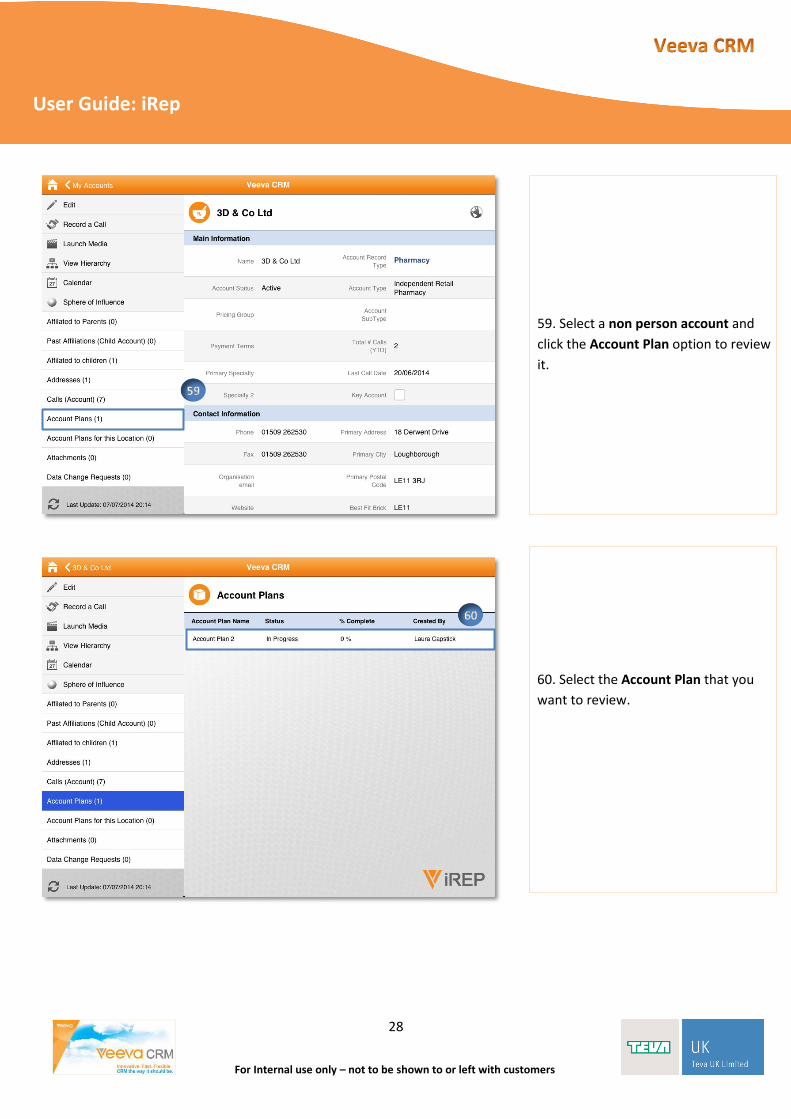
59. Select a non person account and
click the Account Plan option to review
it.
60. Select the Account Plan that you
want to review.
59
60
29
User Guide: iRep
For Internal use only – not to be shown to or left with customers
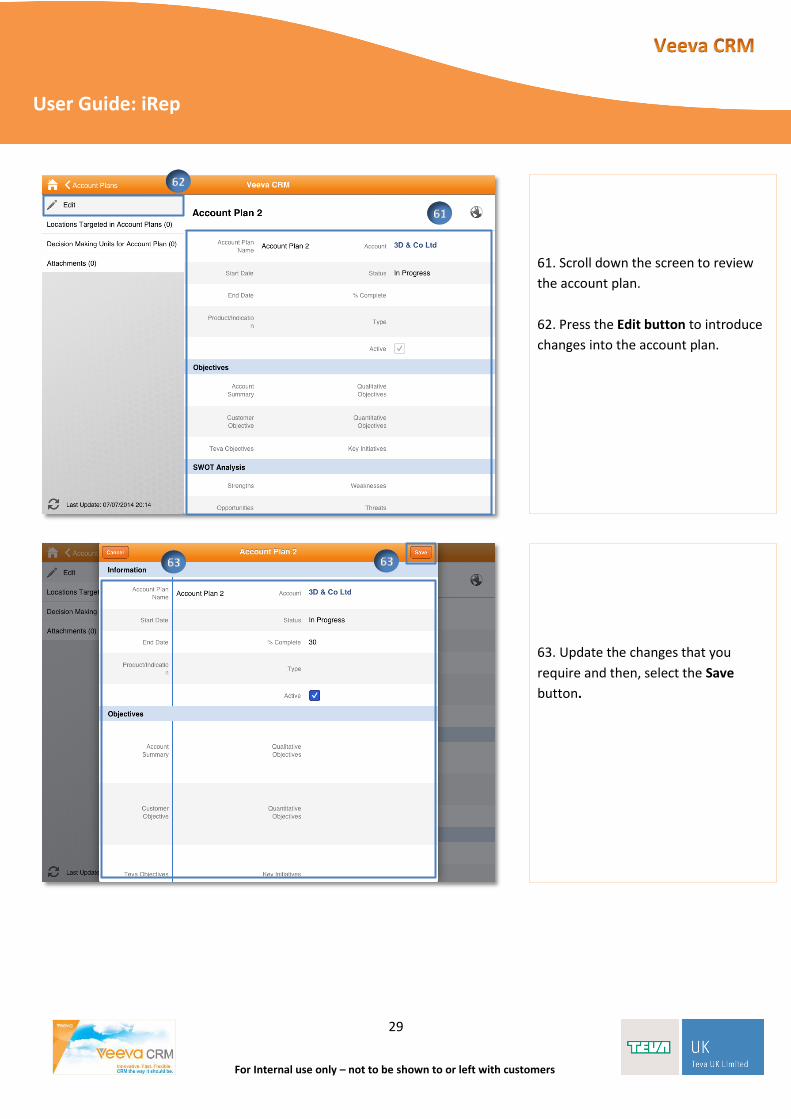
61. Scroll down the screen to review
the account plan.
62. Press the Edit button to introduce
changes into the account plan.
63. Update the changes that you
require and then, select the Save
button.
61
63 63
62
30
User Guide: iRep
For Internal use only – not to be shown to or left with customers
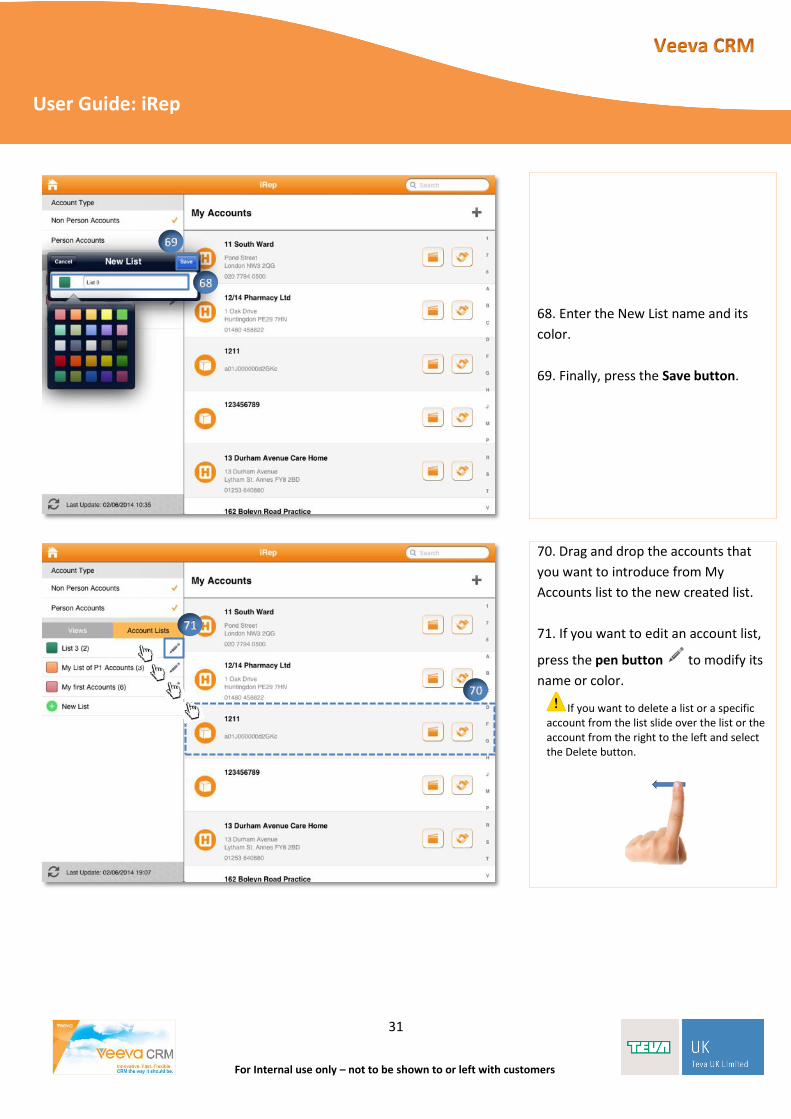
9. Create a new account list
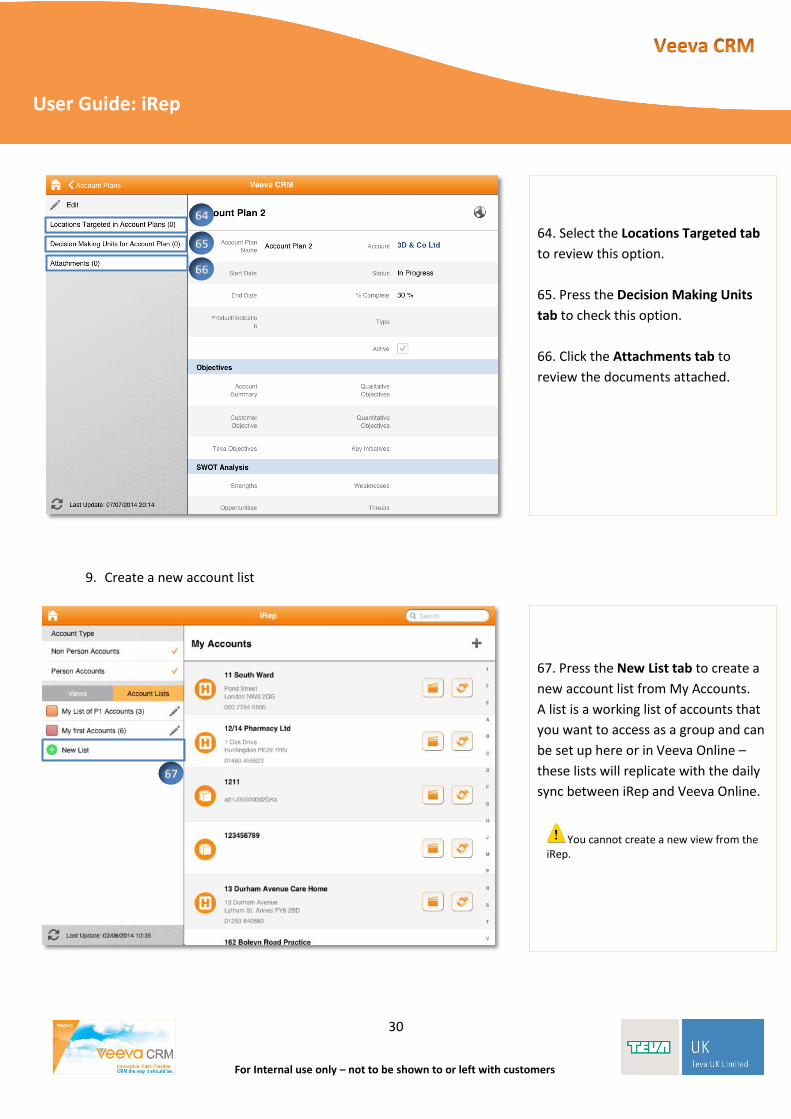
67. Press the New List tab to create a
new account list from My Accounts.
A list is a working list of accounts that
you want to access as a group and can
be set up here or in Veeva Online –
these lists will replicate with the daily
sync between iRep and Veeva Online.
You cannot create a new view from the iRep.
67
64. Select the Locations Targeted tab
to review this option.
65. Press the Decision Making Units
tab to check this option.
66. Click the Attachments tab to
review the documents attached.
64
65
66
31
User Guide: iRep
For Internal use only – not to be shown to or left with customers
68. Enter the New List name and its
color.
69. Finally, press the Save button.
70. Drag and drop the accounts that
you want to introduce from My
Accounts list to the new created list.
71. If you want to edit an account list,
press the pen button to modify its
name or color.
If you want to delete a list or a specific account from the list slide over the list or the account from the right to the left and select the Delete button.
70
68
69
71

32
User Guide: iRep
For Internal use only – not to be shown to or left with customers
10. Use the accounts quick buttons
d. Access to your Calendar
72. You can find from the My Accounts
list some quick buttons for each
account.
73. Press the Clapperboard button
to launch a media
74. Click the Hand button to
create a Call.
75. Select the Hierarchy button to
review the account Hierarchy.
76. Once you return to the iRep Home
Page select the My Schedule tab if you
want to check your calendar.
76
72
73
74
75
33
User Guide: iRep
For Internal use only – not to be shown to or left with customers
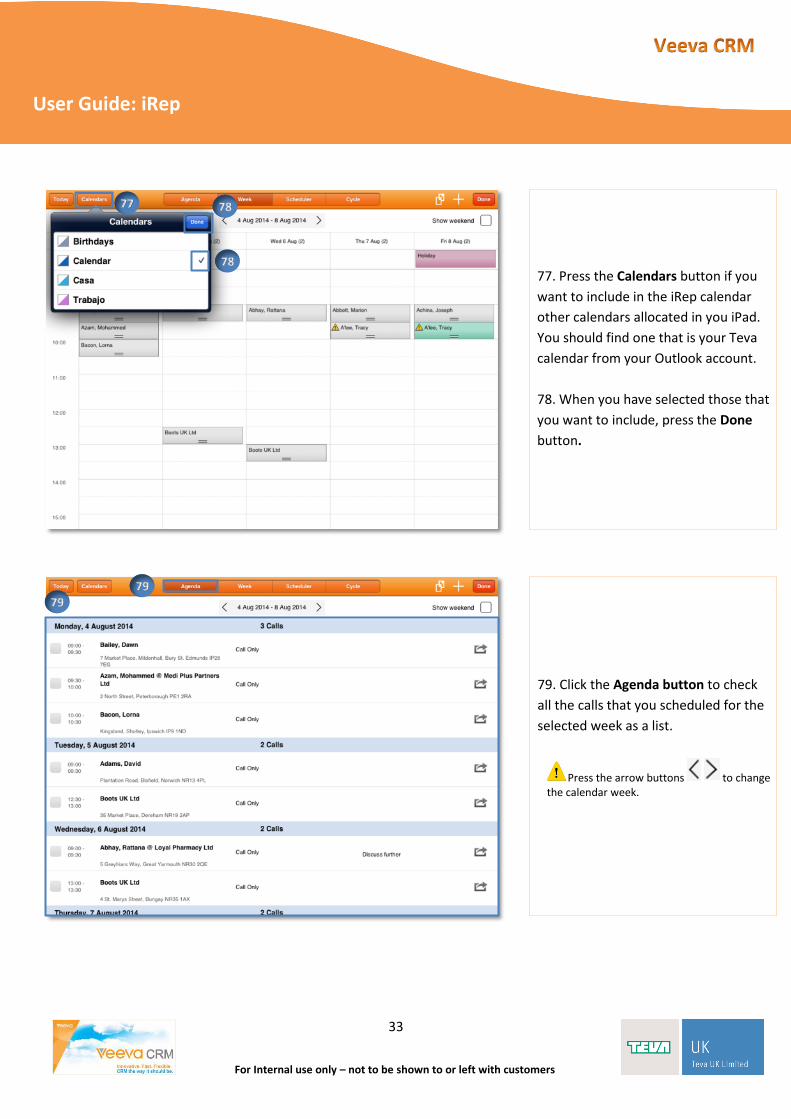
77. Press the Calendars button if you
want to include in the iRep calendar
other calendars allocated in you iPad.
You should find one that is your Teva
calendar from your Outlook account.
78. When you have selected those that
you want to include, press the Done
button.
79. Click the Agenda button to check
all the calls that you scheduled for the
selected week as a list.
Press the arrow buttons to change the calendar week.
79
77 78
78
79
34
User Guide: iRep
For Internal use only – not to be shown to or left with customers
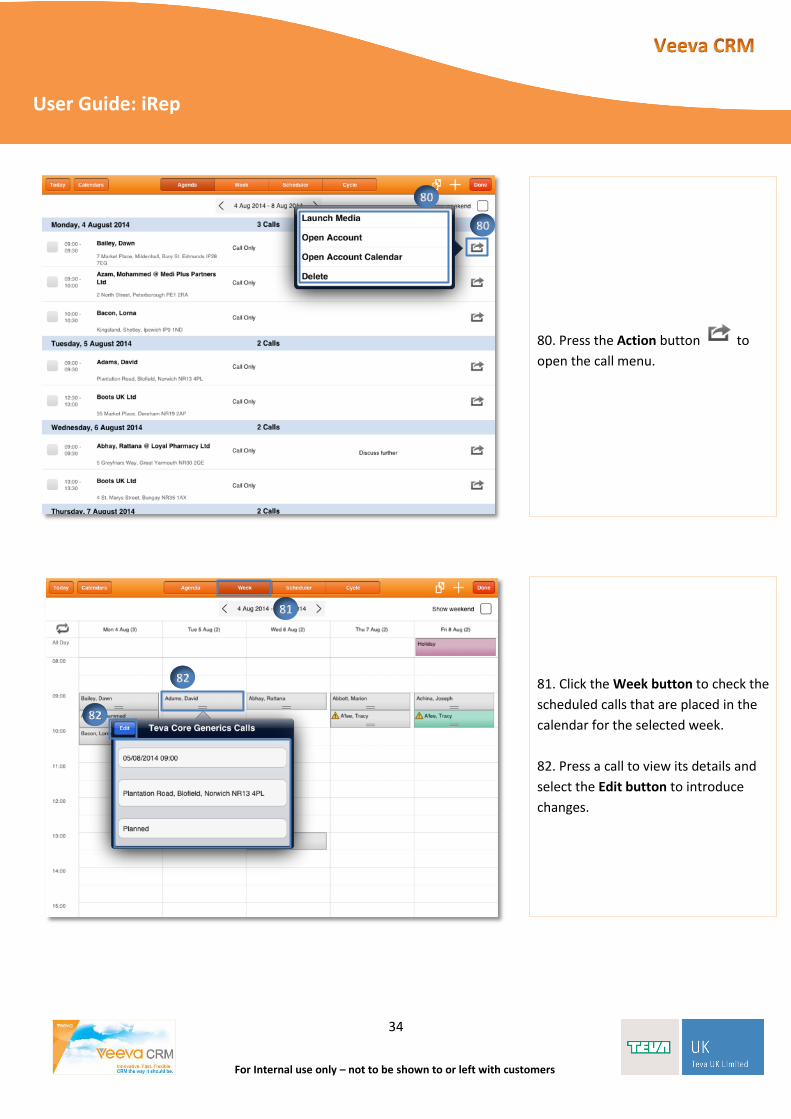
80. Press the Action button to
open the call menu.
81. Click the Week button to check the
scheduled calls that are placed in the
calendar for the selected week.
82. Press a call to view its details and
select the Edit button to introduce
changes.
81
80
80
82
82
35
User Guide: iRep
For Internal use only – not to be shown to or left with customers
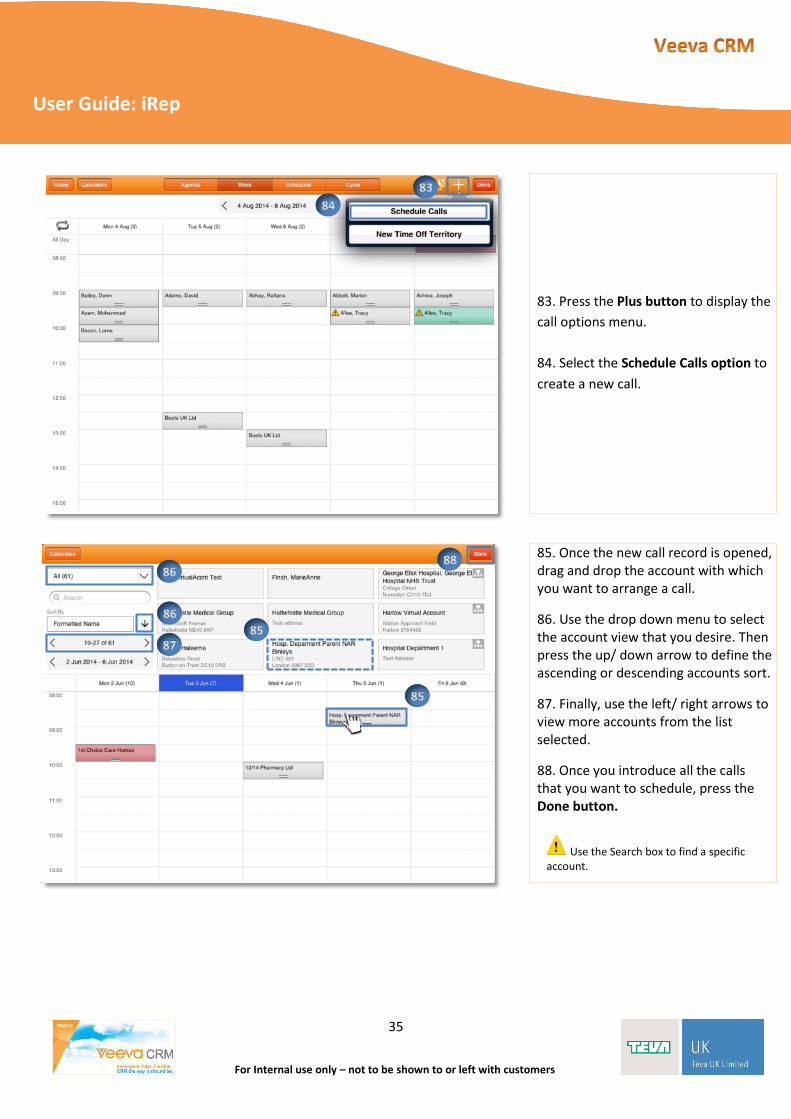
83. Press the Plus button to display the
call options menu.
84. Select the Schedule Calls option to
create a new call.
85. Once the new call record is opened, drag and drop the account with which you want to arrange a call.
86. Use the drop down menu to select the account view that you desire. Then press the up/ down arrow to define the ascending or descending accounts sort.
87. Finally, use the left/ right arrows to view more accounts from the list selected.
88. Once you introduce all the calls that you want to schedule, press the Done button.
Use the Search box to find a specific account.
85
84
85
86
86
87
83
88
36
User Guide: iRep
For Internal use only – not to be shown to or left with customers
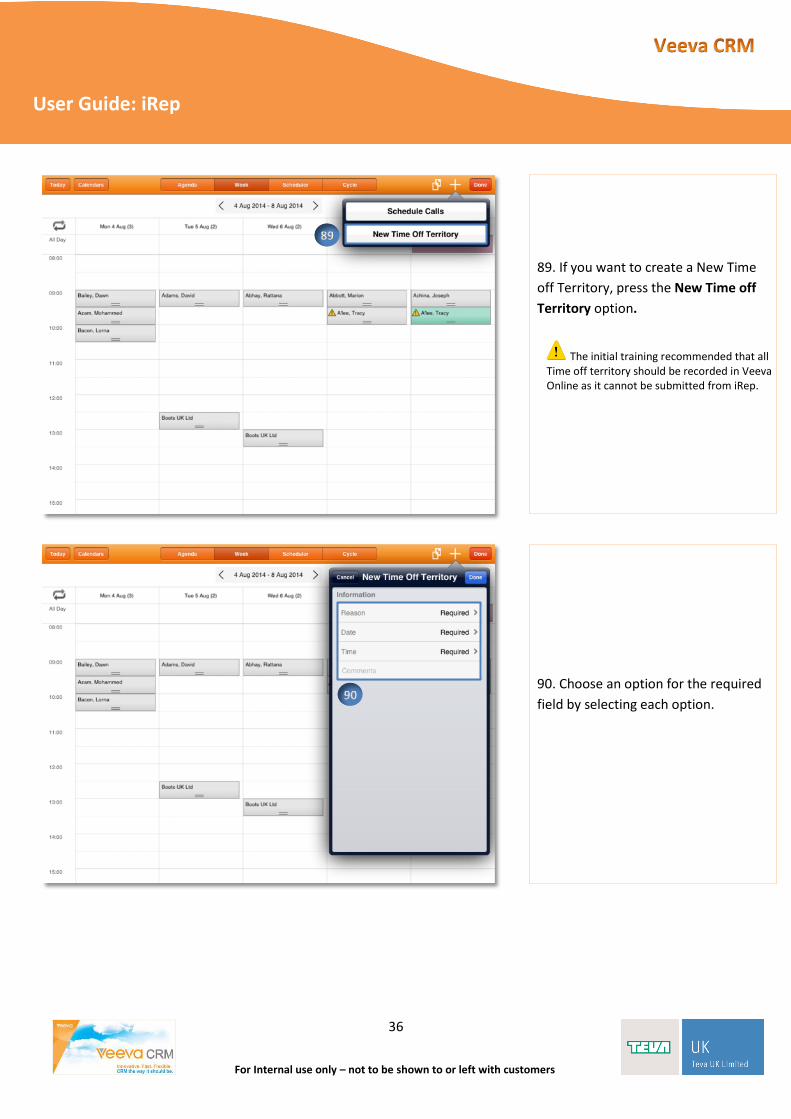
89. If you want to create a New Time
off Territory, press the New Time off
Territory option.
The initial training recommended that all Time off territory should be recorded in Veeva Online as it cannot be submitted from iRep.
90. Choose an option for the required
field by selecting each option.
90
89
37
User Guide: iRep
For Internal use only – not to be shown to or left with customers
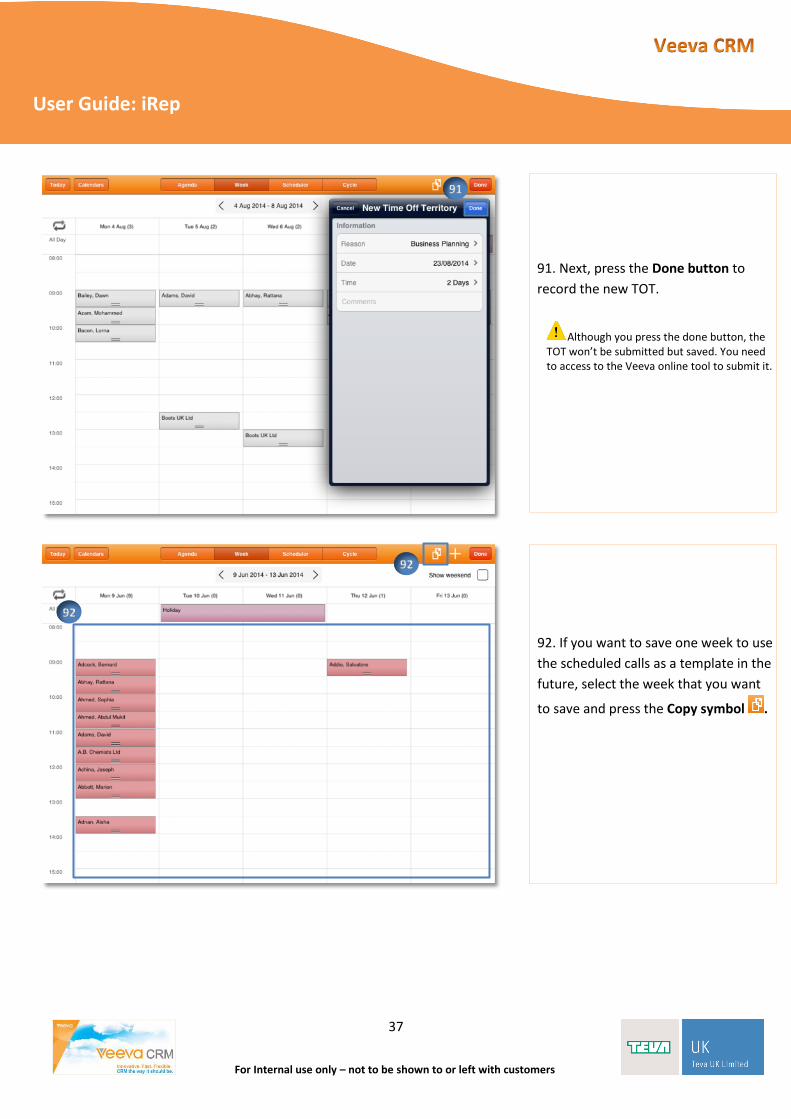
91. Next, press the Done button to
record the new TOT.
Although you press the done button, the TOT won’t be submitted but saved. You need to access to the Veeva online tool to submit it.
91
92. If you want to save one week to use
the scheduled calls as a template in the
future, select the week that you want
to save and press the Copy symbol .
92
92

38
User Guide: iRep
For Internal use only – not to be shown to or left with customers
93. Then, select from the drop down
menu and select an empty week name.
94. And press the Copy button.
93
94
39
User Guide: iRep
For Internal use only – not to be shown to or left with customers
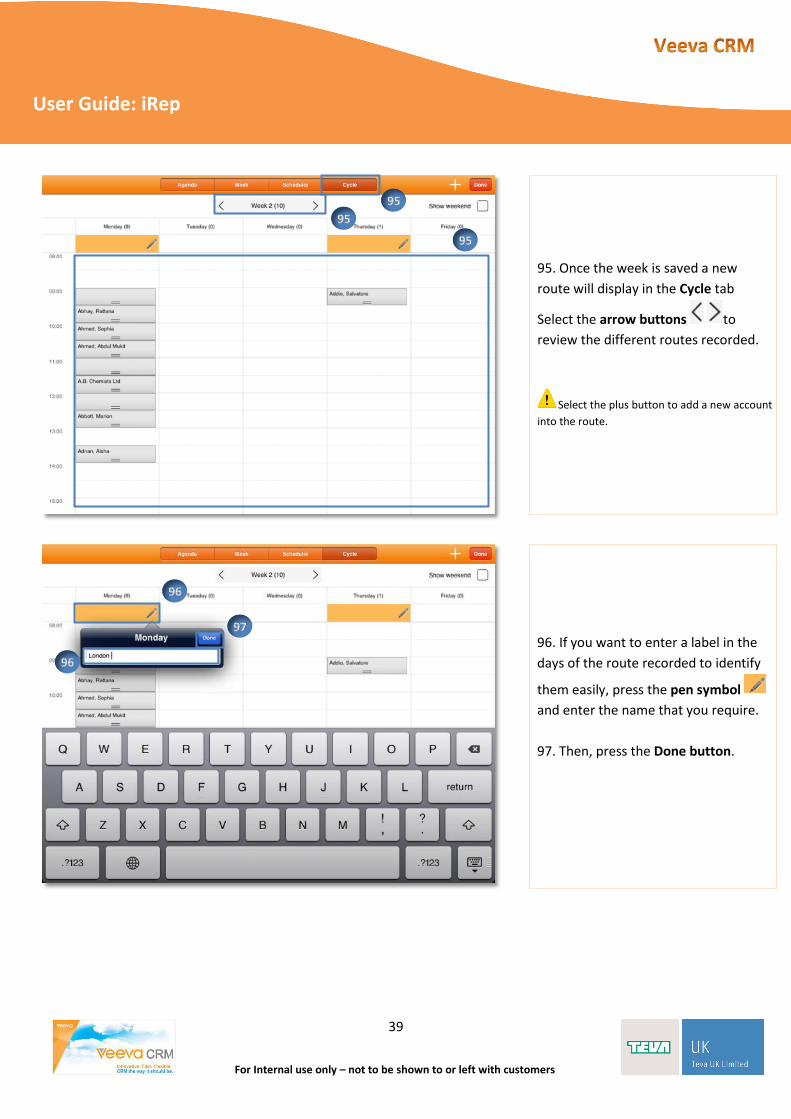
95. Once the week is saved a new
route will display in the Cycle tab
Select the arrow buttons to
review the different routes recorded.
Select the plus button to add a new account
into the route.
96. If you want to enter a label in the
days of the route recorded to identify
them easily, press the pen symbol
and enter the name that you require.
97. Then, press the Done button.
95
95
95
96
96
97
40
User Guide: iRep
For Internal use only – not to be shown to or left with customers
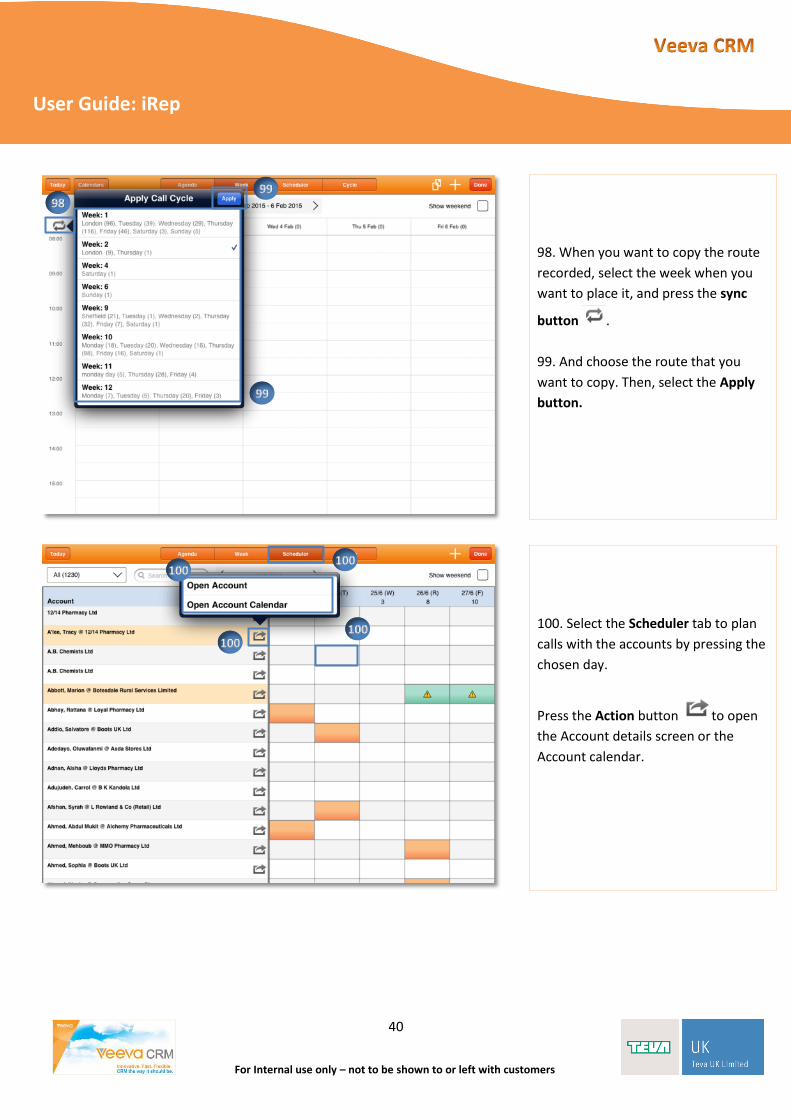
98. When you want to copy the route
recorded, select the week when you
want to place it, and press the sync
button .
99. And choose the route that you
want to copy. Then, select the Apply
button.
100. Select the Scheduler tab to plan
calls with the accounts by pressing the
chosen day.
Press the Action button to open
the Account details screen or the
Account calendar.
98
99
99
100
100
100
100

41
User Guide: iRep
For Internal use only – not to be shown to or left with customers
e. Explore the Meetings & Events tab
101. Once you enter all the changes
you require, press the Done button.
If you want to return to today in the calendar, press the Today button.
102. Once you have returned to the
iRep Home Page, select the Meetings
& Events tab to review all the events
that you arranged, or to create a new
one.
101
102
42
User Guide: iRep
For Internal use only – not to be shown to or left with customers
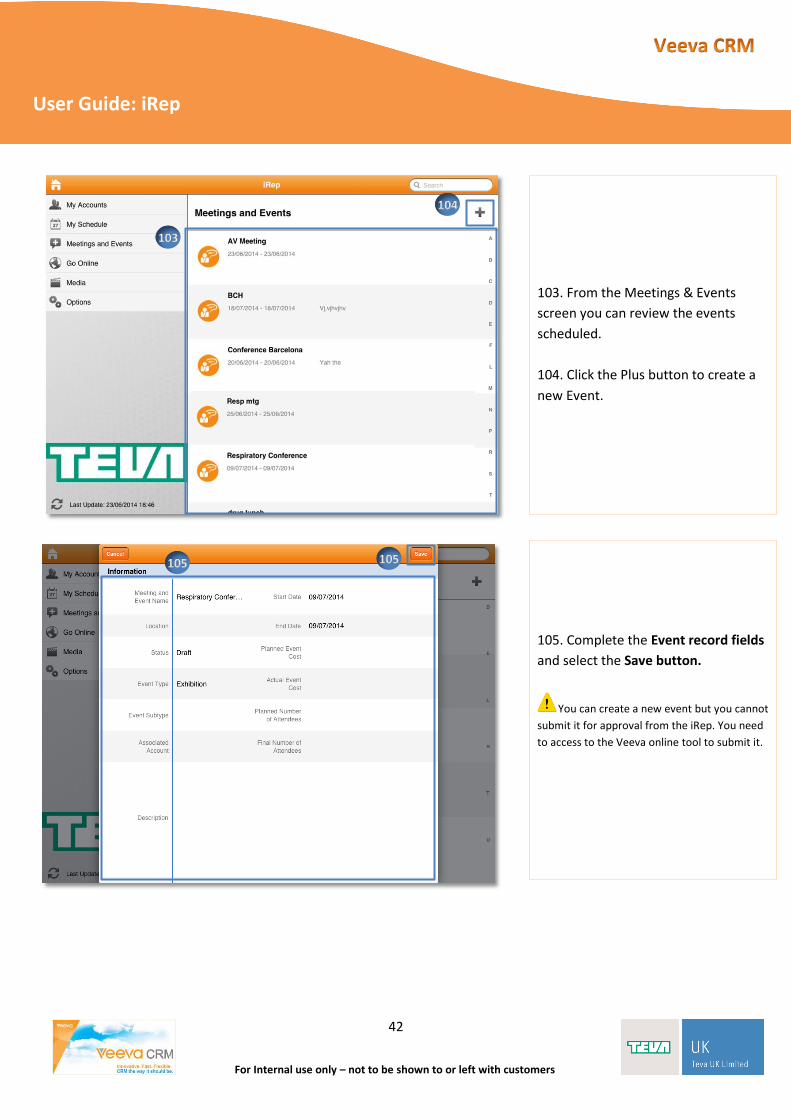
103. From the Meetings & Events
screen you can review the events
scheduled.
104. Click the Plus button to create a
new Event.
104
105. Complete the Event record fields
and select the Save button.
You can create a new event but you cannot
submit it for approval from the iRep. You need
to access to the Veeva online tool to submit it.
103
105 105
43
User Guide: iRep
For Internal use only – not to be shown to or left with customers
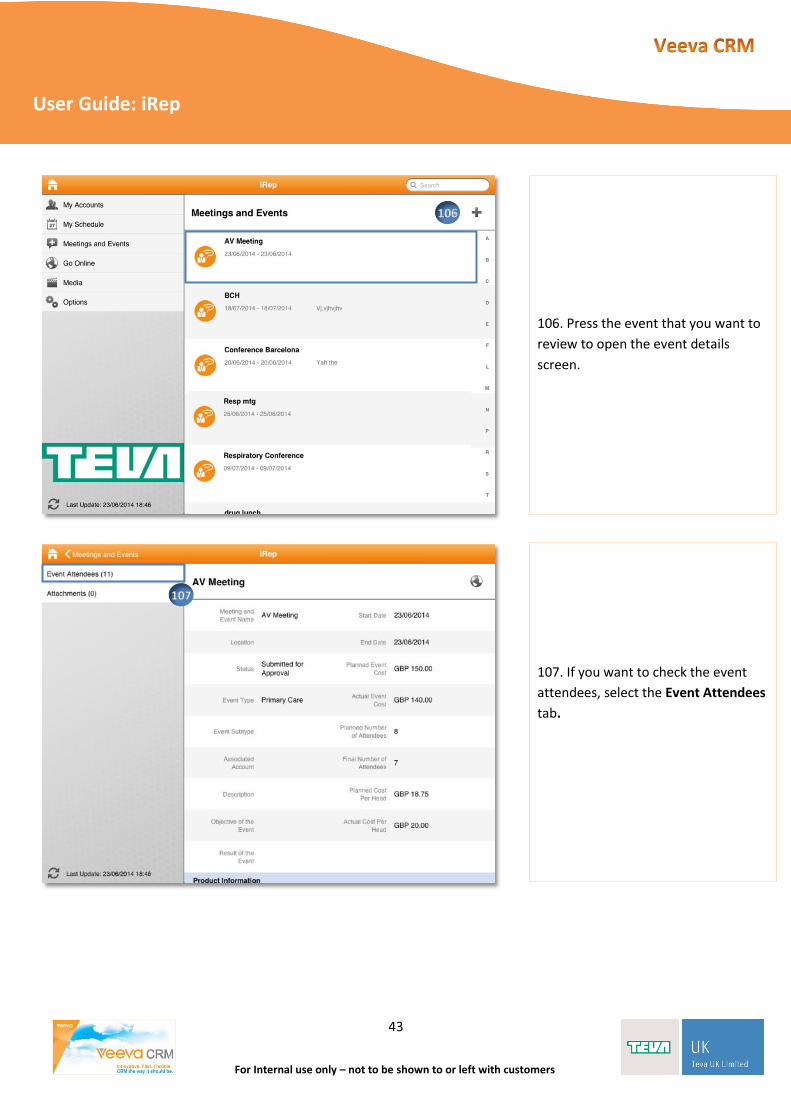
107. If you want to check the event
attendees, select the Event Attendees
tab.
107
106. Press the event that you want to
review to open the event details
screen.
106
44
User Guide: iRep
For Internal use only – not to be shown to or left with customers
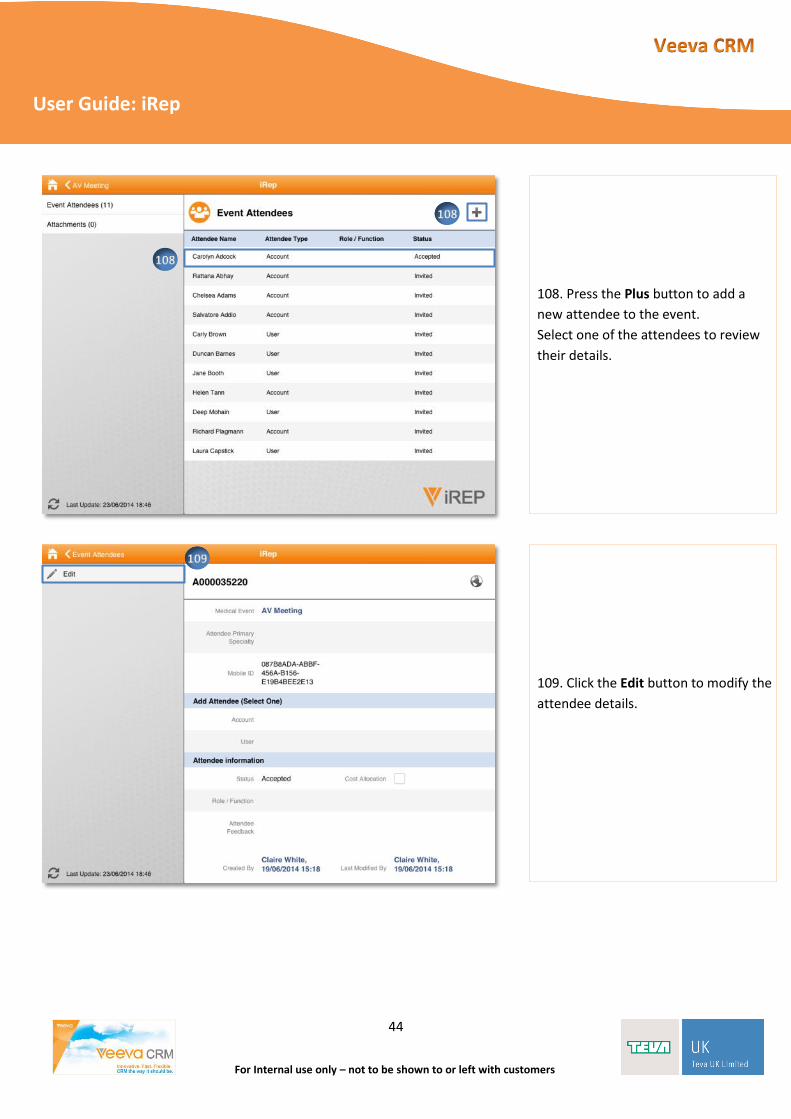
108. Press the Plus button to add a
new attendee to the event.
Select one of the attendees to review
their details.
109. Click the Edit button to modify the
attendee details.
108
108
109

45
User Guide: iRep
For Internal use only – not to be shown to or left with customers
110. Enter the changes you require and
press the Save button.
111. If the event status is draft or
approved, which allows the event to be
edited, the Edit button will appear as
option. Select the Edit button if you
want to introduce changes into the
event details screen.
110
110
111

46
User Guide: iRep
For Internal use only – not to be shown to or left with customers
f. Access to other iRep options
112. When you return to the iRep
Home Page, select the Go Online
option to open the Veeva tool in the
Safari browser.
It is necessary to have internet connection to go to the online option.
113. If you want to review or launch a
CLM presentation, select the Media
tab.
114. Select the Options tab to review
general data of the tool.
115. Once the Options screen is
opened, select the General tab to log
out the session or to check information
about the iRep version or updates.
When a new iRep version is available a green update button will appear in the bottom left corner of the screen – as soon as you have Wi-Fi, please press this button to receive the latest version.
115
112
113
114
115
47
User Guide: iRep
For Internal use only – not to be shown to or left with customers
C. iRep Synchronization
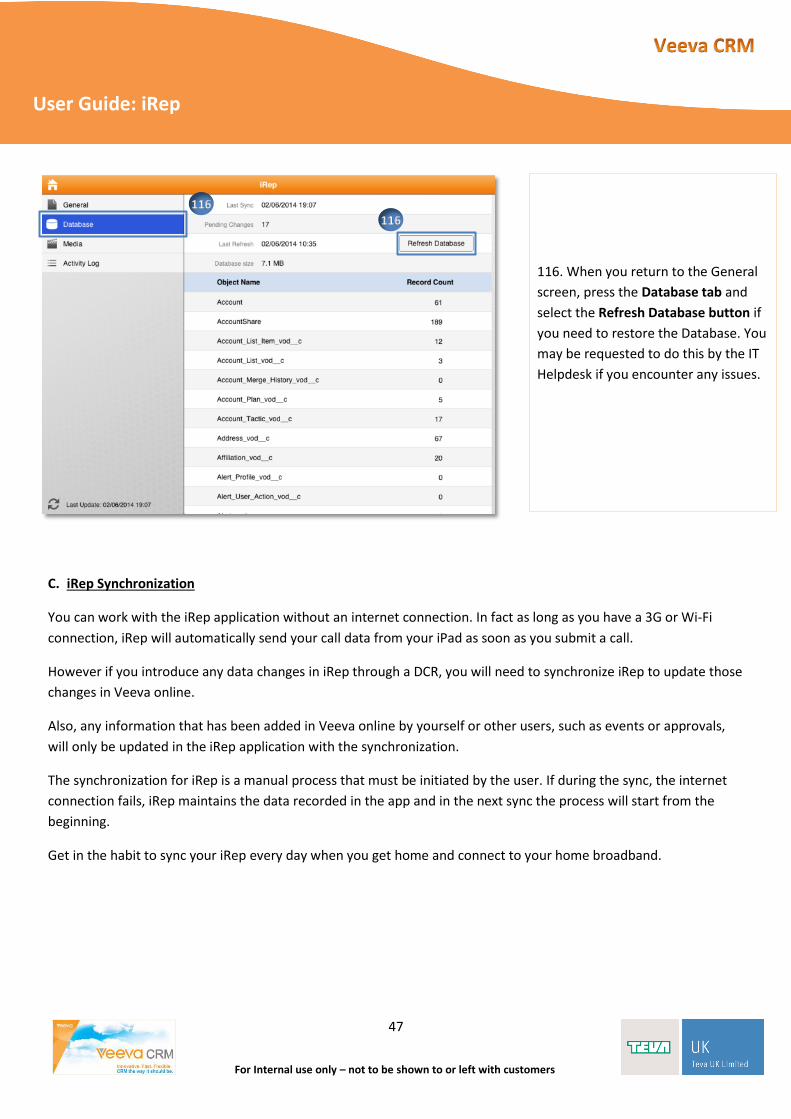
You can work with the iRep application without an internet connection. In fact as long as you have a 3G or Wi-Fi
connection, iRep will automatically send your call data from your iPad as soon as you submit a call.
However if you introduce any data changes in iRep through a DCR, you will need to synchronize iRep to update those
changes in Veeva online.
Also, any information that has been added in Veeva online by yourself or other users, such as events or approvals,
will only be updated in the iRep application with the synchronization.
The synchronization for iRep is a manual process that must be initiated by the user. If during the sync, the internet
connection fails, iRep maintains the data recorded in the app and in the next sync the process will start from the
beginning.
Get in the habit to sync your iRep every day when you get home and connect to your home broadband.
116. When you return to the General
screen, press the Database tab and
select the Refresh Database button if
you need to restore the Database. You
may be requested to do this by the IT
Helpdesk if you encounter any issues.
116 116
48
User Guide: iRep
For Internal use only – not to be shown to or left with customers
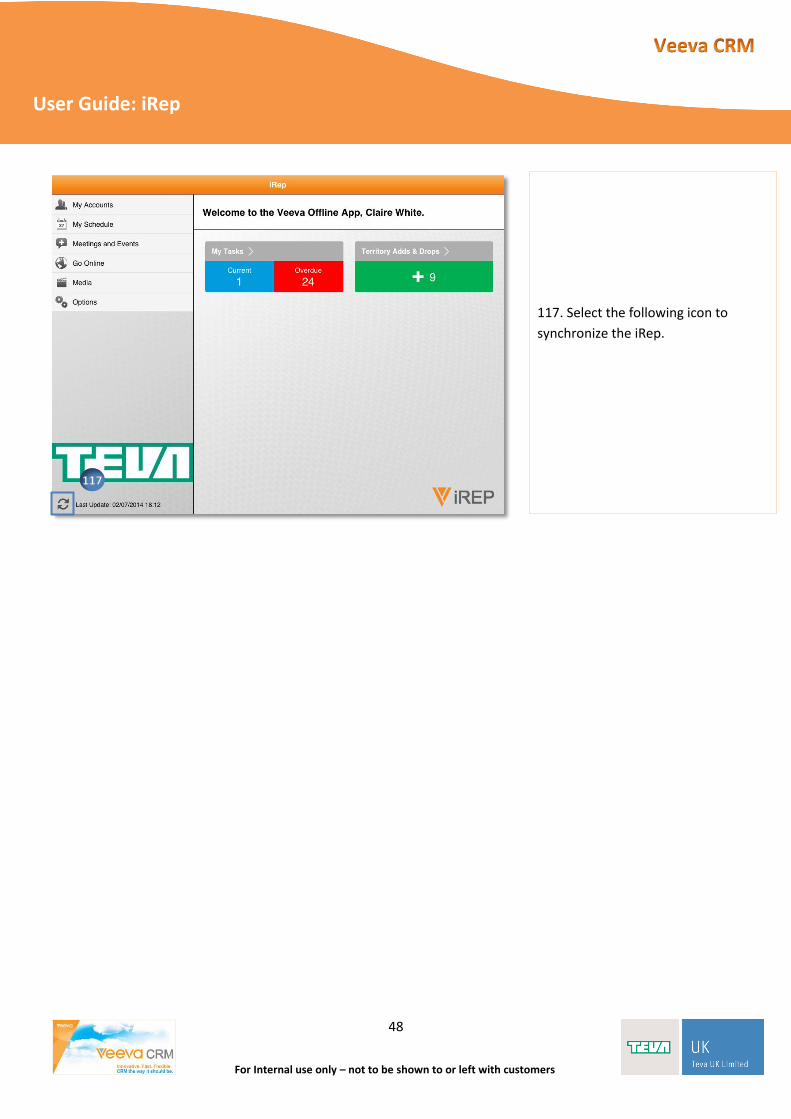
117. Select the following icon to
synchronize the iRep.
117

49
User Guide: iRep
For Internal use only – not to be shown to or left with customers
Teva UK Ltd
Ridings Point Whistler Drive - Castleford
WF10 5HX