Introduction to Paint Shop Pro - UF Health Information ... · About Paint Shop Pro Paint Shop Pro...
20
Transcript of Introduction to Paint Shop Pro - UF Health Information ... · About Paint Shop Pro Paint Shop Pro...

Paint Shop Pro Basics Health Science Center IT Center About Paint Shop Pro...................................................................................................................... 2 Creating New Image ....................................................................................................................... 2
Image Dimensions ...................................................................................................................... 2 Image Characteristics.................................................................................................................. 2
Creating Shapes with Colors........................................................................................................... 3 Selecting Colors with Dropper Tool ............................................................................................... 4 Selecting Colors with the Magic Wand .......................................................................................... 4 Cropping Images............................................................................................................................. 5 Resizing Images .............................................................................................................................. 6 About Layers................................................................................................................................... 6
Why use layers? .......................................................................................................................... 6 Adding Text to an Image ................................................................................................................ 7
Creating Text .............................................................................................................................. 8 Raster or Vector? ........................................................................................................................ 9
Using Preset Shapes...................................................................................................................... 10 Adding Effects .............................................................................................................................. 11 Combining Images ........................................................................................................................ 12 Image Definitions.......................................................................................................................... 13
What is a .gif? ........................................................................................................................... 13 What is a .jpeg?......................................................................................................................... 13 What is a .psp file?.................................................................................................................... 13 Quick Comparison of File Formats........................................................................................... 14
Web Graphic Tips ......................................................................................................................... 14 General Tips.................................................................................................................................. 14 Other Resources ............................................................................................................................ 15
Paint Shop Pro help files........................................................................................................... 15 Newsgroups............................................................................................................................... 15
Andy Kellenberger IT Trainer Information Technology Center
Health Science Center PO Box 100152 Gainesville, FL 32610-0152
Information Technology Center Fax: (352) 392-0101
http://itctraining.health.ufl.edu
Paint Shop Pro Basics Pg. 1 of 15
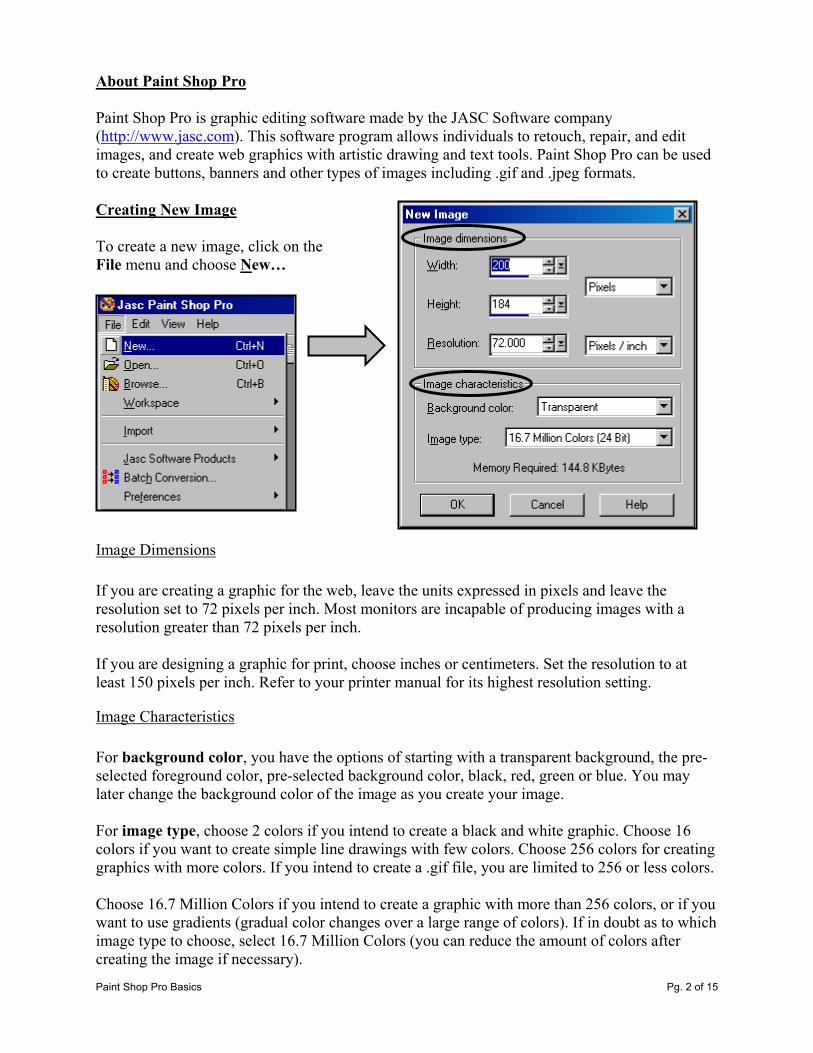
About Paint Shop Pro Paint Shop Pro is graphic editing software made by the JASC Software company (http://www.jasc.com). This software program allows individuals to retouch, repair, and edit images, and create web graphics with artistic drawing and text tools. Paint Shop Pro can be used to create buttons, banners and other types of images including .gif and .jpeg formats. Creating New Image To create a new image, click on the File menu and choose New…
Image Dimensions If you are creating a graphic for the web, leave the units expressed in pixels and leave the resolution set to 72 pixels per inch. Most monitors are incapable of producing images with a resolution greater than 72 pixels per inch. If you are designing a graphic for print, choose inches or centimeters. Set the resolution to at least 150 pixels per inch. Refer to your printer manual for its highest resolution setting.
Image Characteristics For background color, you have the options of starting with a transparent background, the pre-selected foreground color, pre-selected background color, black, red, green or blue. You may later change the background color of the image as you create your image. For image type, choose 2 colors if you intend to create a black and white graphic. Choose 16 colors if you want to create simple line drawings with few colors. Choose 256 colors for creating graphics with more colors. If you intend to create a .gif file, you are limited to 256 or less colors. Choose 16.7 Million Colors if you intend to create a graphic with more than 256 colors, or if you want to use gradients (gradual color changes over a large range of colors). If in doubt as to which image type to choose, select 16.7 Million Colors (you can reduce the amount of colors after creating the image if necessary).
Paint Shop Pro Basics Pg. 2 of 15

Creating Shapes with Colors Create shapes by using the selection tool from the toolbar. When this tool is selected, a tools option window appears which allows you to choose from different selection shapes.
After clicking on the selection tool from the tool bar menu, choose a selection type from the Tool Options box for the shape you wish to create. Click in the image area window and drag the mouse to draw out the shape to the size you desire. If you make a mistake, press the right mouse button to deactivate the selection. Then, use the left mouse button to begin to draw again.
After the shape has been drawn, you will see an animated dotted line appear. This line is called a “marquee.” To apply color to the shape, select a color from the color palette by double-clicking the foreground or background color boxes.
Paint Shop Pro Basi
To change fobackground its respectivethe color pal You may selcolor ring, bcustom coloryour own cowith RGB co Click on the left mouse bOK button.
Foreground color is represented by this
Color Palettecs Pg. 3 of 15
reground or colors, double-click on square just beneath ette.
ect colors from the asic colors section, s section, or define lors if you are familiar lor values.
desired color with the utton and click on the
Background color is represented by this square. To apply this color with the flood fill tool, click the right mouse button.
square. To apply this color with the flood fill tool, click into the shape with the left mouse button.
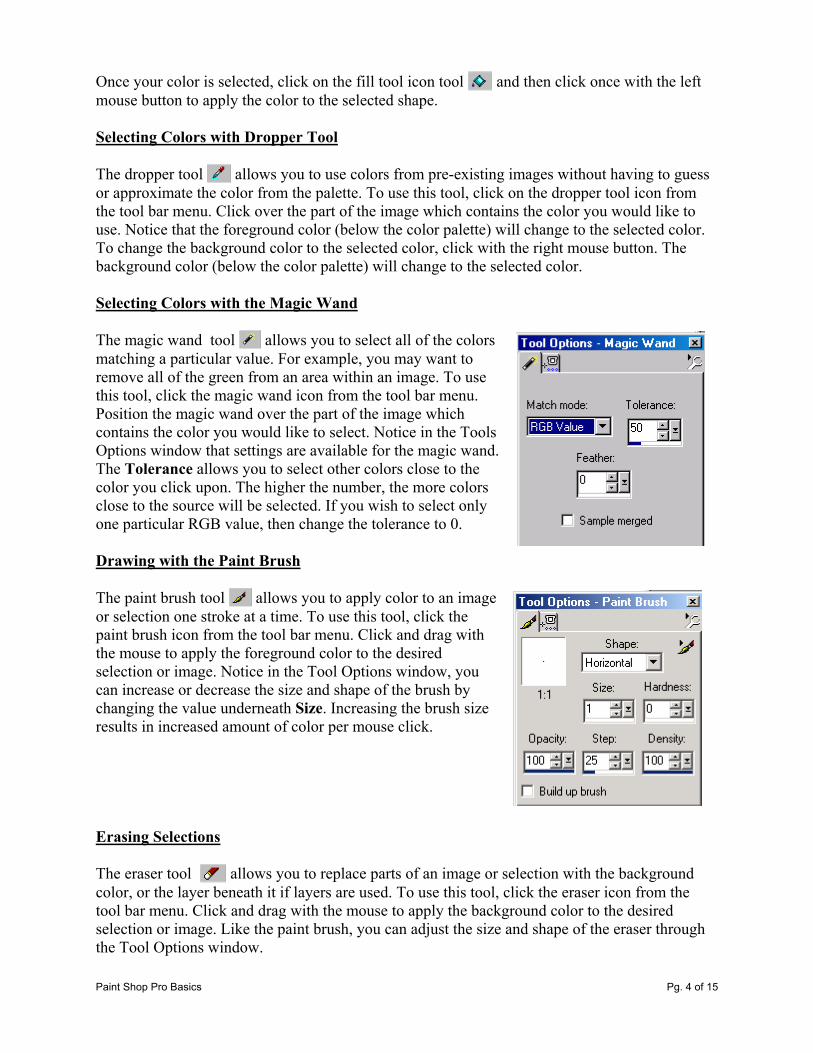
Once your color is selected, click on the fill tool icon tool and then click once with the left mouse button to apply the color to the selected shape. Selecting Colors with Dropper Tool The dropper tool allows you to use colors from pre-existing images without having to guess or approximate the color from the palette. To use this tool, click on the dropper tool icon from the tool bar menu. Click over the part of the image which contains the color you would like to use. Notice that the foreground color (below the color palette) will change to the selected color. To change the background color to the selected color, click with the right mouse button. The background color (below the color palette) will change to the selected color. Selecting Colors with the Magic Wand The magic wand tool allows you to select all of the colors matching a particular value. For example, you may want to remove all of the green from an area within an image. To use this tool, click the magic wand icon from the tool bar menu. Position the magic wand over the part of the image which contains the color you would like to select. Notice in the Tools Options window that settings are available for the magic wand. The Tolerance allows you to select other colors close to the color you click upon. The higher the number, the more colors close to the source will be selected. If you wish to select only one particular RGB value, then change the tolerance to 0. Drawing with the Paint Brush The paint brush tool allows you to apply color to an image or selection one stroke at a time. To use this tool, click the paint brush icon from the tool bar menu. Click and drag with the mouse to apply the foreground color to the desired selection or image. Notice in the Tool Options window, you can increase or decrease the size and shape of the brush by changing the value underneath Size. Increasing the brush size results in increased amount of color per mouse click. Erasing Selections The eraser tool allows you to replace parts of an image or selection with the background color, or the layer beneath it if layers are used. To use this tool, click the eraser icon from the tool bar menu. Click and drag with the mouse to apply the background color to the desired selection or image. Like the paint brush, you can adjust the size and shape of the eraser through the Tool Options window. Paint Shop Pro Basics Pg. 4 of 15

Cropping Images Cropping means to remove part of an image or picture from one or more sides.
Image without cropping: Same image with cropping:
To crop, click on the crop tool (circled below), and then drag over the area you wish to keep. Release the mouse button, and then double-click on the selection and everything outside of the selection will be deleted.
Cropping images reduces the file size of an image, resulting in quicker download times when viewed in web pages. Cropping also helps focus the viewer’s attention on particular details within an image.
Paint Shop Pro Basics Pg. 5 of 15

Resizing Images To resize an image, click on the Image menu, and select Resize … Specify the new desired size in the Resize window. You can specify in terms of pixels, inches, or percentage of the original. Resizing images to a smaller size will reduce the file size of an image, resulting in quicker download times when viewed in web pages. About Layers A layer is an individual level of an image. Layers are like transparent sheets in a stack. Layers can be edited individually without affecting other layers. Layers can either be raster or vector type layers. Raster layers organize image information by storing locations of individual dots, called pixels, arranged in a grid. Most image effects, like drop shadows, motion blurring and bevels, can only be accomplished on raster layers. Vector layers organize image information by storing mathematical formulas for shapes, their locations and characteristics. Vector layers are most practical for text and shapes that may need to be edited multiple times (like navigational buttons) or to be exported to a Macromedia Flash presentation. All layers are listed in the palette menu from top layer to bottom layer.
Why use layers? Layers give you quick and easy control over parts of an image. Layers give you a quick way of reusing parts of an image repeatedly without reproducing an entire image. It is often helpful to hide other layers from view. To hide a layer, click on the eyeglass icon next to the name of the layer you wish to hide. A red X appears over the eyeglass icon. To view a hidden layer, click again on the red X. Paint Shop Pro Basics Pg. 6 of 15

Adjusting Layer Transparency Adjusting the transparency of a layer creates the illusion that light is passing through it, making the layer less prominent in the image. To adjust the transparency of a layer, click the slide markers (circled in image below) for the layer you wish to adjust, and slide to the left. Release the slide marker when you have achieved the desired amount of transparency.
Blend mode leave set to normal to adjust transparency.
Slide Marker . Change the blend mode to adjust other effects aside from transparency with the use of the slide marker including hue, luminance, and saturation. Adding Text to an Image (This portion of the handout is copied from the Paint Shop Pro help files). Use the Text Entry dialog box to create raster and vector text and edit existing text. It contains the options for setting the content, font attributes, alignment, effects, mode, leading, and kerning of the text. Note: All the options in this dialog box are available for 24-bit images. If your image has a lower color depth or is grayscale, some options are not available.
Paint Shop Pro Basics Pg. 7 of 15

Creating Text 1. Activate the Text tool by clicking its button on the tool palette. 2. Click in the image where you want to place the text. 3. Scroll through the Name and Size lists and click to make your selection. Paint Shop Pro displays a sample of a font when you select it. (You can leave the Script box set to Western for most cases). 4. Select the Auto Kern check box to use the default kerning values. To use other values, clear the check box and use the numeric edit controls of the Kerning and Leading boxes to set specific kerning (space between letters) and leading (space between lines). 5. Select the effects for the text by clicking the appropriate buttons along the upper right of the typing area. When you choose an effect, it is applied to the letters you next type. Change the effects of specific letters by highlighting them and then clicking the buttons. You can select from four effects:
Click the Bold button to create bold text.
Click the Italic button to create italic text.
Click the Underline button to place a line under the text.
Click the Strikeout button to place a line through the text.
6. Click on one of the Alignment buttons to choose left, center, or right alignment. Alignment determines how the ends of multiple lines of text line up with each other. The alignment setting affects the entire text and cannot be changed for individual lines. 7. In the Styles and Textures panels, select the Stroke and Fill for the text. The Stroke is used for the outline of the text; the Fill is used for the interior. 8. To create solid-colored text, click the Standard text button. The Stroke Style and Textures Stroke and Fill choices are replaced by the None icon . The Fill Style box displays the current background solid color. 9. In the text box, type the text you want to add to the image. Click the background (away from the text) to remove the highlighting and view the text. Note that the text does not display kerning and leading changes you have made. 10. In the "Create As" panel, choose the mode for the text. You can select one of three modes:
-Vector, which creates the text as a vector object and adds a new vector layer, if necessary, -Selection, which creates the text as an empty raster selection on the current layer, or
Paint Shop Pro Basics Pg. 8 of 15
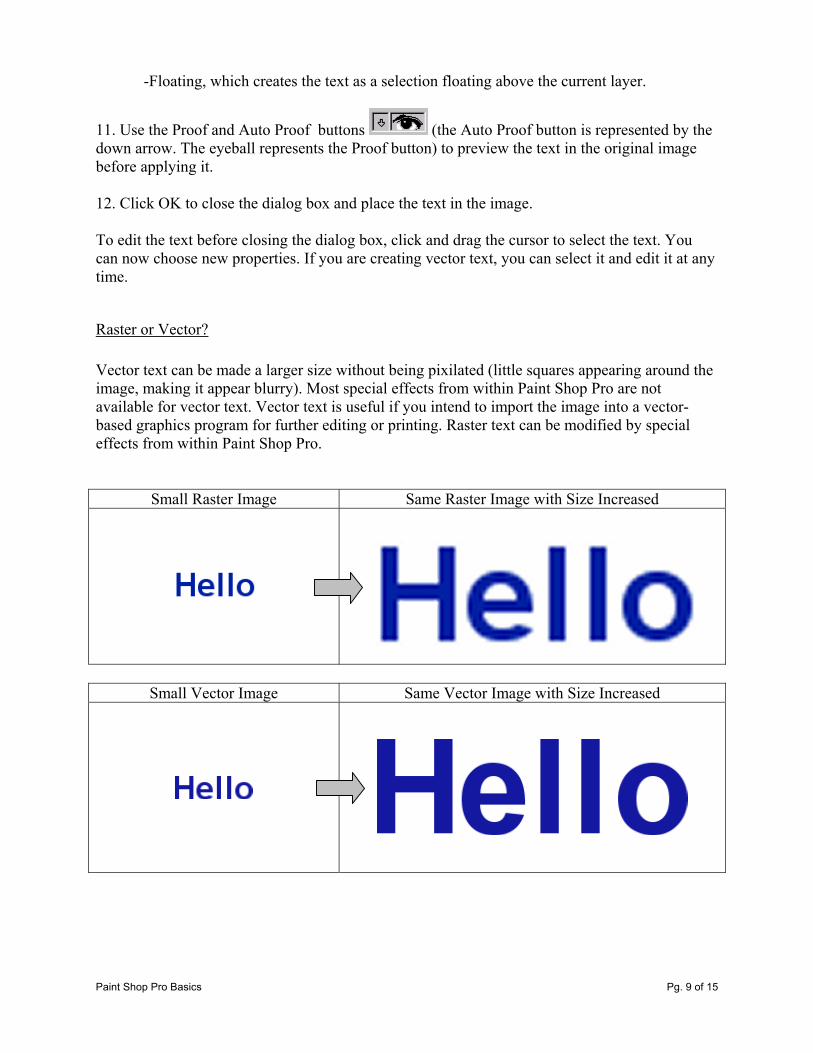
-Floating, which creates the text as a selection floating above the current layer.
11. Use the Proof and Auto Proof buttons (the Auto Proof button is represented by the down arrow. The eyeball represents the Proof button) to preview the text in the original image before applying it. 12. Click OK to close the dialog box and place the text in the image. To edit the text before closing the dialog box, click and drag the cursor to select the text. You can now choose new properties. If you are creating vector text, you can select it and edit it at any time.
Raster or Vector? Vector text can be made a larger size without being pixilated (little squares appearing around the image, making it appear blurry). Most special effects from within Paint Shop Pro are not available for vector text. Vector text is useful if you intend to import the image into a vector-based graphics program for further editing or printing. Raster text can be modified by special effects from within Paint Shop Pro.
Small Raster Image Same Raster Image with Size Increased
Small Vector Image Same Vector Image with Size Increased
Paint Shop Pro Basics Pg. 9 of 15

Using Preset Shapes The preset shape tool can be used to add Paint Shop Pro’s premade shapes, buttons, and artwork to an image. A small sample of the preset shapes available include:
To apply a preset shape, click on the preset shape tool icon . Notice that the Tools Option window opens. Select the desired preset shape from the drop down list.
Click and drag using the left mouse button to enlarge the image to the desired size.
While stretching the preset shape, the shape becomes transparent. Once the left mouse button is released, the shape’s colors will automatically appear.
Paint Shop Pro Basics Pg. 10 of 15

Adding Effects Paint Shop Pro effects can only be applied to raster layers. With a layer active, click on the effects menu and select an effect from one of the categories from the pull-down menu. Effects (also referred to as special effects) can be applied for a number of results including: adding borders, changing the appearance of shading around an item, and making images appear more blurry. Artistic effects can be used to give images a different artistic look. For example, an image that was originally scanned in as a photograph can be changed to look as if it was created with pencils. Examples of some of these effects follow below. Image Without Effects Image After Drop Shadow Effect Image After Inner Bevel Image After Buttonize Effect Paint Shop Pro Basics Pg. 11 of 15

Combining Images To add a pre-existing image (such as a photograph) to another image being created within Paint Shop Pro, the first image is copied and then pasted into the second image. In the example below, we want to add the picture of the UF century tower to the banner to the right. Notice that the images exist in separate windows:
To combine the first image into the second image, select the first image by clicking in the title bar of the image. The title bar is the top part of the window which displays the name of the file. Choose Copy from the Edit pull-down menu. Next, select the second image by clicking on its tool bar. Choose Paste .. as new layer from the Edit Menu. The first image will appear as a new layer on the second image. Use the mover tool to position the layer to the appropriate place.
Paint Shop Pro Basics Pg. 12 of 15

Image Definitions Digital images are representations of pictures, drawings or graphics stored in an electronic format. With respect to computers, digital images are stored in files in a variety of file types. Digital imaging refers to the process of acquiring, editing and presenting digital images.
What is a .gif? The GIF (the original and preferred pronunciation is “JIFF”; it stands for Graphics Interchange Format and was developed by a company called CompuServe) is one of the two most common file formats for graphic images on the World Wide Web. The GIF format is commonly used for images such as drawings with simple colors and shapes. The GIF format cannot display more than 256 colors, so it is generally not recommended for color-intense images such as photographs. Most web browsers recognize GIF files. GIF format allows for images to have a transparency. Transparency allows for an image to appear on a background of any color, and allow the background to pass through the transparent parts.
What is a .jpeg? The JPEG is the other common image file format is the JPEG (stands for Joint Photographic Experts Group) . This file format is ideal for photographs or images with gradual changes in several colors (gradients). A JPEG can handle up to 16.7 million colors. However, it uses a “lossy” compression which means that depending on how much compression is used, the picture quality is less clear. JPEG format does not allow for transparency.
What is a .psp file?
The PSP file format is an image file in the proprietary Paint Shop Pro format. Images in PSP format may only be opened and edited using Paint Shop Pro. Web browsers are not capable of displaying PSP files. PSP files must be saved in a browser-recognized format such as a .gif or .jpeg file to be viewed through a web browser.
PSP files preserve layer information about images. They are useful for editing complex graphics/button templates. Other users with Paint Shop Pro can edit your graphics. It is suggested to keep a PSP version of any graphic that you create so that you may edit it more easily later.
Paint Shop Pro Basics Pg. 13 of 15

Quick Comparison of File Formats Format Number of Colors Best Use JPEG 16.7 million (24-bit) Photographs, images with
gradients (subtle color changes in an image)
GIF 256 colors (8 bit) Logos, icons, small images, line arts and drawings
PSP 16.7 million (24-bit) Creating / altering images prior to saving in other file formats
Web Graphic Tips When designing graphics for use on the web, the same header, icon, button and background image files should be reused throughout a site whenever possible. This repeated use allows for consistency, making the pages easier to navigate. It makes the web pages easier to maintain and allows for quicker download of files. When saving photographic types of images, save in the .jpeg format. When saving drawings, line art, or images with few colors, save in the .gif format. General Tips Save a copy of your image in Paint Shop Pro format before saving as a .gif or .jpeg in case you want to edit the image later, or in case you want to save the image in another file format. Start with large images or photographs whenever possible. Smaller images tend to distort when their size is increased. In general, it is easier to create a smaller version of a large file with good quality than it is to create a large version of a smaller image. Don’t forget to save and save often. If you are working on an very involved image, save the file as different file names as you work. You can then open a previously saved version should you make a mistake. You can undo most actions. Use the Undo option in the Edit menu when you make a mistake (Ctrl-Z is the keyboard shortcut for the menu item). Turn on the grid to (View --> Grid) to help align items. Turn off the grid the same way.
Paint Shop Pro Basics Pg. 14 of 15

Other Resources Paint Shop Pro help files Click on the Help option from the pull down menu. You can search by a table of contents or for particular words with their help system.
Newsgroups Newsgroups are a means of posting information on the Internet about a variety of topics. The Paint Shop Pro newsgroup allows people to ask questions about how to use the product. More experienced users often reply with guidance. http://groups.google.com/ comp.graphics.apps.paint-shop-pro
Paint Shop Pro Basics Pg. 15 of 15
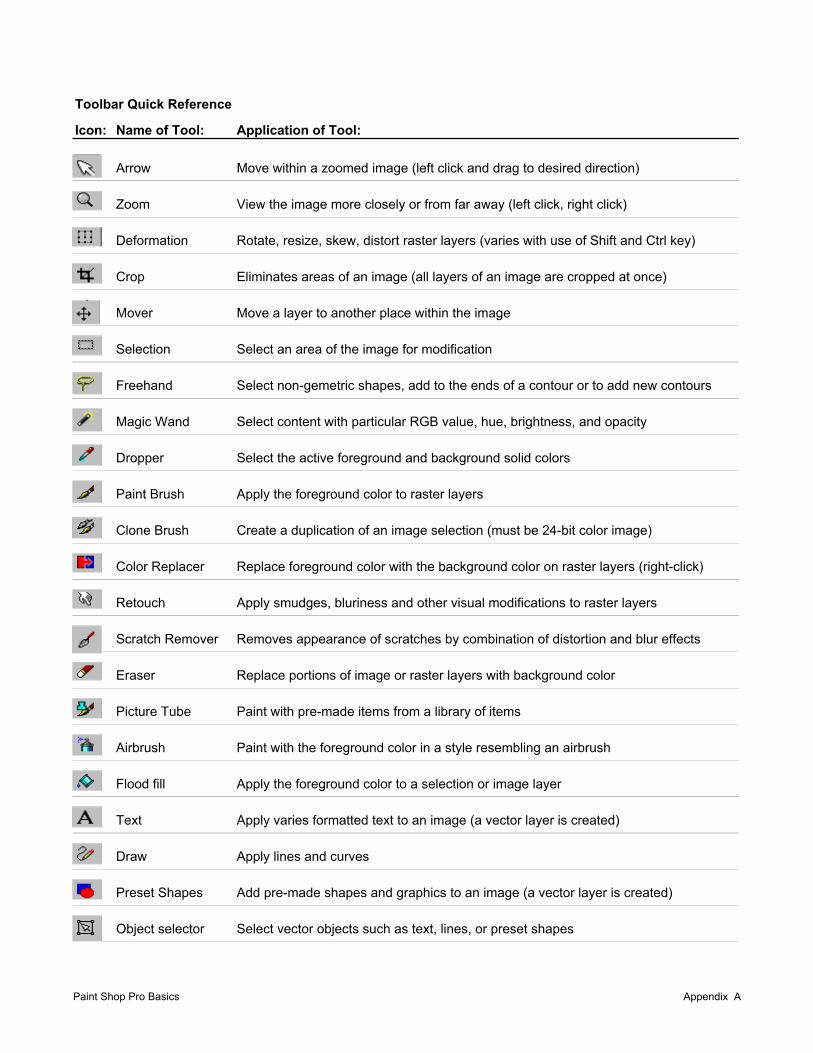
Toolbar Quick Reference
Icon: Name of Tool: Application of Tool:
Arrow Move within a zoomed image (left click and drag to desired direction)
Zoom View the image more closely or from far away (left click, right click)
Deformation Rotate, resize, skew, distort raster layers (varies with use of Shift and Ctrl key)
Crop Eliminates areas of an image (all layers of an image are cropped at once)
Mover Move a layer to another place within the image
Selection Select an area of the image for modification
Freehand Select non-gemetric shapes, add to the ends of a contour or to add new contours
Magic Wand Select content with particular RGB value, hue, brightness, and opacity
Dropper Select the active foreground and background solid colors
Paint Brush Apply the foreground color to raster layers
Clone Brush Create a duplication of an image selection (must be 24-bit color image)
Color Replacer Replace foreground color with the background color on raster layers (right-click)
Retouch Apply smudges, bluriness and other visual modifications to raster layers
Scratch Remover Removes appearance of scratches by combination of distortion and blur effects
Eraser Replace portions of image or raster layers with background color
Picture Tube Paint with pre-made items from a library of items
Airbrush Paint with the foreground color in a style resembling an airbrush
Flood fill Apply the foreground color to a selection or image layer
Text Apply varies formatted text to an image (a vector layer is created)
Draw Apply lines and curves
Preset Shapes Add pre-made shapes and graphics to an image (a vector layer is created)
Object selector Select vector objects such as text, lines, or preset shapes
Paint Shop Pro Basics Appendix A

Final Activity: Reproduce this Image
Paint Shop Pro BasicsAppendix B
ColorPalette
ForegroundAnd
BackgroundColors
ToolBar
LayerPaletteWindow
ToolsOptionsWindow
ActiveLayer
Is Highlighted

Paint Shop Pro Workshop Activities
Activity # 1: (Creating shapes, applying colors and switching between tools)
Creat a new image (sized 432 X 288 pixels)Reproduce the image below using the tools listed beneath this image
Activity # 2 (Working with Layers)
Create the same image above. However, make each shape a separate layer.Then, after creating the image, delete the green triangle layerThen, place the yellow rectangle behind the long purple rectangle
Tip:
While a selection is active, click the right mouse button to deactivate the selection.
Use the left mouse button to create a new selection.
Tip:
To move a layer, click on its name from the layer palette, and drag it up (to bring closer to front), or drag it down (to move it closer to the rear).
Selection Tool Color Palette Tools Option Window Flood Fill Tool
Paint Shop Pro Basics Appendix C

Final Activity: Reproduce this Image
Paint Shop Pro BasicsAppendix D
Tips
Create a new image: (File – New)
Set dimensions (this image will be large; a size of 600 pixels by 600 pixels is suggested)
Open the file dog.jpg
Resize the picture of the dog (Image –Resize) to 300 pixels wide.
Copy and paste the dog into the larger new image. Apply the drop shadow effect to the dog’s picture.
Open the file daytower.jpg
Resize the picture of the tower to 200 pixels wide. Copy and paste the tower picture into the new larger image.
Apply the inner bevel effect to the daytower image layer.
Use the text tool to apply the “I am not a Gator ..” text to the new image.
Use the preset tool to apply the callout box. Drag the text layer above the callout preset shape layer in the layers palette.
Use the selection tool, flood fill tool and color palette to create the purple rectangle with the gradient.