Integrating Juniper Networks Devices and ForeScout ... · Integrating Juniper Networks Devices and...
20
Integrating Juniper Networks Devices and ForeScout CounterACT ® - Wired Pre-Connect Deployment Deployment Guide August2017
Transcript of Integrating Juniper Networks Devices and ForeScout ... · Integrating Juniper Networks Devices and...

Integrating Juniper Networks Devices and ForeScout CounterACT® - Wired Pre-Connect Deployment
Deployment Guide
August 2017

Deployment Guide – Wired Pre-connect
2 © 2017 Juniper Networks, Inc.
Juniper Networks, Inc. 1133 Innovation Way Sunnyvale, California 94089 USA 408-745-2000 www.juniper.net
Copyright © 2017, Juniper Networks, Inc. All rights reserved.

Deployment Guide – Wired Pre-connect
© 2017 Juniper Networks, Inc. 3
Table of Contents Introduction ................................................................................................................................................................. 4
Audience ............................................................................................................................................................. 4 About Wired Pre-Connect Deployment ....................................................................................................................... 5
Advantages of This Approach ............................................................................................................................. 5 Challenges of This A pproach ............................................................................................................................ 5 Policy Flow .......................................................................................................................................................... 6
Integration with Juniper Networks Devices ................................................................................................................. 7 Switch Integration Basics .................................................................................................................................... 7 Data Gathering ................................................................................................................................................... 7 Initial Detection .................................................................................................................................................. 8 Switch Port Detection ......................................................................................................................................... 8 IP-to-MAC Address Mapping .............................................................................................................................. 9 Switch Port Controls ........................................................................................................................................... 9 Summary........................................................................................................................................................... 10
Notifications and Redirects ........................................................................................................................................ 10 Email Notifications ............................................................................................................................................ 10 Managed Systems ............................................................................................................................................. 10 Unmanaged Systems ........................................................................................................................................ 10 Summary........................................................................................................................................................... 11
Wired Pre-Connect Solutions ..................................................................................................................................... 11 Accelerating Inspection: The SecureConnector Option ................................................................................... 11 The Assessment VLAN ...................................................................................................................................... 11 Switch Port Exclusion ........................................................................................................................................ 11 VoIP VLANs ....................................................................................................................................................... 11 Multiple Devices on a Port ............................................................................................................................... 12 Known Good Devices ........................................................................................................................................ 12
Solution Architecture ................................................................................................................................................. 12 Workflow Diagrams and Flowcharts .......................................................................................................................... 12
Sample Policy Flow ........................................................................................................................................... 12 Switch Communication ..................................................................................................................................... 13
Environment Requirements ....................................................................................................................................... 14 CounterACT Requirements ............................................................................................................................... 14 Customer Environment Requirements ............................................................................................................. 14
Configuring CounterACT ............................................................................................................................................ 15 The CounterACT Console .................................................................................................................................. 15
Configuring Juniper Devices ....................................................................................................................................... 18 Verifying Connectivity Status ..................................................................................................................................... 19 For More Information ................................................................................................................................................ 20
Deployment Guide – Wired Pre-connect
4 © 2017 Juniper Networks, Inc.
Introduction This document will describe how to deploy Juniper Networks devices with ForeScout CounterACT® using their pre-connect solution on wired networks, including design considerations, requirements, and an overview of CounterACT operation within this specific methodology.
Audience This guide is intended for security managers, architects, designers, and other security professionals. It can help you determine how best to implement a CounterACT network visibility and access control strategy for your organization, and assumes you are familiar with the following basic concepts:
• The 4 Cs of CounterACT policies - Classification - Clarification - Compliance - Control
• Physical CounterACT deployment architectures - Centralized - Distributed - Hybrid
• CounterACT deployment phases - See - Control - Orchestrate
• CounterACT endpoint inspection and management - Remote inspection - SecureConnector™
• Common data center network model concepts - Core layer - Distribution layer - Access layer
For more information on these concepts, visit https://www.forescout.com/products/counteract/.

Deployment Guide – Wired Pre-connect
© 2017 Juniper Networks, Inc. 5
About Wired Pre-Connect Deployment Wired pre-connect deployment of ForeScout CounterACT is a network access control strategy in which devices initially connect to a limited-access wired network, known as the assessment VLAN, while CounterACT profiles them to determine ownership and assess compliance. Devices that successfully pass this check are then admitted to the production network with the appropriate access level based on user and device properties.
It is recommended that pre-connect controls should be implemented only after an initial post-connect deployment to establish device visibility, develop security, policies and assess their impacts on users. A gradual transition from post- to pre-connect control can help avoid unnecessary blockage of authorized users due to abrupt introduction of new security policy. Incremental deployment allows security and operations teams the necessary time to identify affected devices, measure operational impacts, and adjust policies as necessary before full enforcement begins.
CounterACT also provides the flexibility to apply different control strategies to different network segments, as required by their risk profiles. Pre-connect control might be applied to a higher-risk segment with greater public access, while post-connect security could be used on a more secure segment reserved for internal users.
Advantages of This Approach
Initial quarantine
A pre-connect environment reduces the risk of unwanted or unsecured devices connecting to the network, because devices are initially quarantined. To protect company assets, resource access within the assessment VLAN is tightly restricted while CounterACT profiles a device. Only after a configurable degree of inspection is the device allowed access to additional resources.
Challenges of This pproach
User experience
Because devices are initially restricted to the assessment VLAN, user access to internal resources will be limited until CounterACT policy evaluation is complete. This interval will vary based on the number and complexity of the policies controlling network access. It is important to identify the criteria for allowing a device full internal access. This decision is typically made following clarification or compliance, and its timing will influence the duration of access restriction.
Pre-configuration requirement
A pre-connect deployment depends on full, upfront network segmentation and configuration. This includes not only the assessment VLAN and its static controls, but also the network segments to which a device may be moved following assessment. These may include role-based networks specific to certain departments, networks designed for certain device types, or a combination of the two. Such networks must be pre-configured with the necessary static access controls, such as access control lists (ACLs).
VLAN inspection
In a pre-connect model, devices start out in the assessment VLAN, a limited-access network. CounterACT is required to inspect and profile the device before further access is allowed. This makes CounterACT a critical security appliance for device connectivity.
Network device utilization
In a pre-connect deployment, CounterACT interoperates with network devices to move a known, compliant system into a network with internal resource access. This contrasts with post-connect deployments where CounterACT only acts on unknown or non-compliant systems. Because known systems greatly outnumber those that are not, particularly as the CounterACT deployment matures, the workload imposed on network devices can be significantly greater in pre-connect environments, and this must be taken into consideration.

Deployment Guide – Wired Pre-connect
6 © 2017 Juniper Networks, Inc.
IoT and static-IP devices
Because pre-connect methodology relies on VLAN changes, it can present challenges for some device types. Many Internet of Things (IoT) devices cannot request a new IP address unless physically rebooted. In a pre-connect environment, these devices will be unable to re-address themselves on the production network following inspection and identification on the assessment VLAN. Likewise, devices with static IP addresses will not function on other VLANs.
Policy Flow Basic policy flow concepts are at the core of CounterACT policy methodology, and it is important to understand how different deployment approaches impact the flow of policy. This section covers these concepts as they pertain to a wired pre-connect scenario. While CounterACT discovers and profiles devices it has not previously seen on the network, there is a built-in, configurable, 30-second delay before the device is subjected to policy. This allows time for systems to fully boot and return accurate external profiling results.
Classification
Classification is the first CounterACT policy to which devices are subjected. In a pre-connect model, it is particularly important to follow best practices for a clean and efficient classification policy, as this strongly affects the time required to determine and deliver the correct level of resource access. Because classification sets the stage for the rest of the policy set, speed is important, but accuracy is essential.
Clarification
In the second stage of CounterACT policy, devices are sorted based on ownership (corporate, employee, partner, guest) and whether or not they are under management. Non-manageable systems that are recognized corporate devices—VoIP phones, printers, or IoT devices—are passed immediately to the control stage to be transitioned from the assessment VLAN to the appropriate production network segment. Managed, corporate devices are passed to the compliance stage. Registered guest devices may be moved to a guest network, and non-corporate or otherwise undesired devices may remain indefinitely in the assessment VLAN with restricted access, or have further restrictions placed on them.
Compliance
Devices are now assessed for their compliance with security policies. Those deemed non-compliant may have remediation actions applied to them that essentially automate many security policies. If auto-remediation succeeds, the now-compliant devices can be moved off the assessment VLAN to the appropriate production segments. Those that fail remediation or are exempt from it by policy are passed on to control policies. They may be left in the assessment VLAN with restricted access, or moved to a separate, less restrictive compliance quarantine configured to provide non-compliant devices with access to remediation resources. This can reduce the security risk they might pose while in the assessment VLAN.
Control
At this stage, profiled devices are granted full network access, moved to compliance quarantine, or given some additional, but still-restricted, level of resource access as dictated by policy, circumstance, the user’s role, and the device’s condition. Regardless of the decision, CounterACT can always return a system to the assessment VLAN if necessary.
Timing the control decision
There are various approaches to moving a device off the assessment VLAN and onto a production network. Access can be awarded (or denied) as soon as the clarification assessment is complete, delayed until compliance assessments are complete, or provisionally allowed at some point in between. Making the move immediately after clarification expedites user access to network resources and optimizes productivity. Waiting for full compliance makes the process more secure, because systems are not allowed on a production network without being checked for potential risks. Compliance policies can be included as requirements for movement off the assessment VLAN, and many organizations opt for a practical, intermediate stance that balances security and user experience.
Deployment Guide – Wired Pre-connect
© 2017 Juniper Networks, Inc. 7
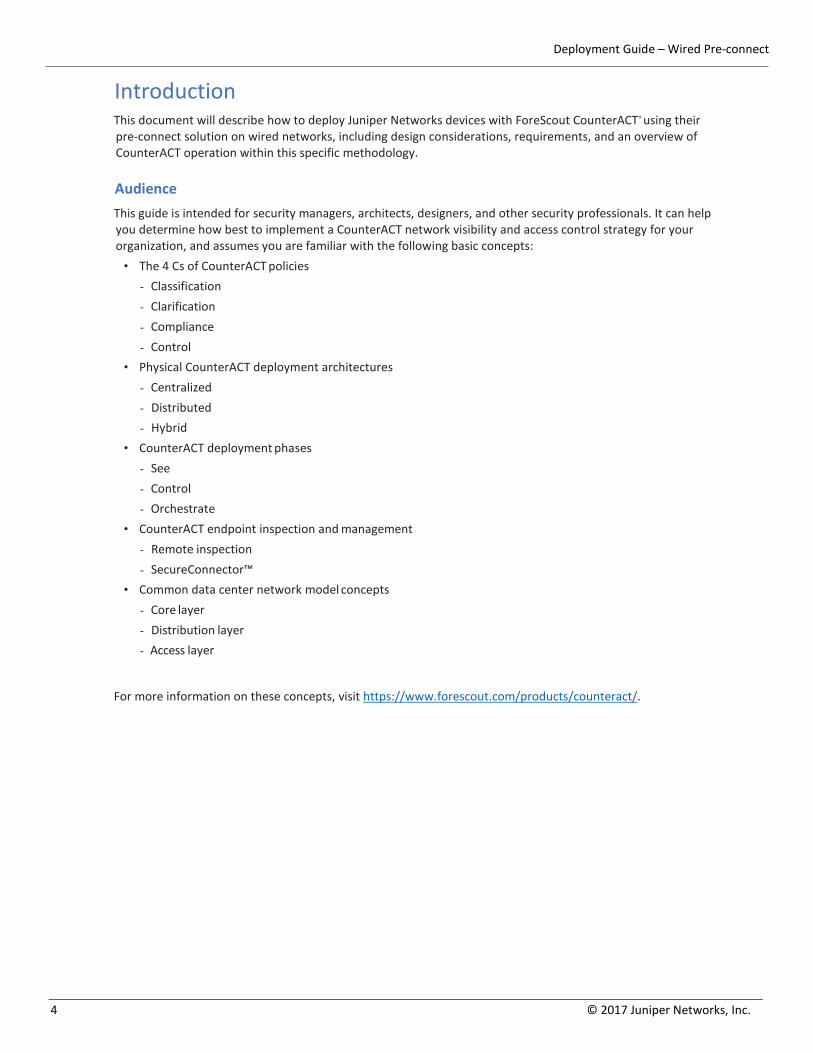
Figure 1 illustrates the interval between CounterACT’s clarification and compliance assessments and the implications for security and user experience of making an initial access control decision at different points in that process.
Figure 1: Production access: clarification vs. compliance
Blue (towards the left arrow) indicates a small user impact with few to no compliance checks. Orange (towards the right arrow) indicates a strong security stance in which compliance checks must be completed. The gray area in the center indicates that some compliance checks have been completed. Requiring more compliance checks before awarding network access increases both network security and the delay before connecting users can become fully productive.
When granting access to production prior to completing compliance checks (the blue and gray areas), it is best practice to complete the assessment after access is granted and adjust control if needed.
Integration with Juniper Networks Devices CounterACT integrates with Juniper Networks EX Series switches, QFX Series switches, and SRX Series Services Gateways. In a pre-connect deployment, CounterACT will change a device’s VLAN assignment on the switch.
CounterACT uses various integration methods individually or in combination, including SNMP, CLI, and NETCONF. Allowing CounterACT full management access to the Juniper devices is necessary to help ensure the most efficient use of resources when gathering data, and the full range of potential device control options. This section describes how CounterACT will interact with your organization’s switch framework, including the options available for device access control.
Switch Integration Basics Three capabilities become important in a wired, pre-connect environment:
1. the ability to quickly detect a device entering the network,
2. the ability to map IP and MAC addresses together, and
3. the ability to attribute a MAC address to a specific switch port.
The speed at which these functions occur plays a major role in how quickly CounterACT discovers the switch port to which a device has connected, which is necessary for control action application.
Data Gathering CounterACT uses NETCONF to gather data from an organization’s switch framework, including routers and firewalls.
MAC tables
CounterACT gathers MAC tables from access layer switches and from other devices where devices are connected or may connect. This is done at a default interval of 60 seconds (configurable per switch).
ARP tables
CounterACT gathers ARP tables from network devices that contain ARP information, including switches, routers,

Deployment Guide – Wired Pre-connect
8 © 2017 Juniper Networks, Inc.
and, firewalls. This is done at a default interval of 600 seconds (configurable per device), and is required for CounterACT to map a device’s IP address to a MAC address. The combination of the MAC and ARP information tells CounterACT the physical switch port to which an endpoint is connected, allowing it to place access controls on that port.
Initial Detection CounterACT sees real-time devices as real-time IP addresses. In a pre-connect environment, the length of time required to discover a device’s IP address is added to the time that device remains in the pre-connect VLAN. A device without an IP address cannot be inspected, and thus cannot be evaluated by policy.
In essence, the challenge of initial detection is in how quickly CounterACT can find an IP address when a device joins the network.
ARP table queries
Initially, CounterACT discovers IP addresses by querying ARP tables through its core integration with switches and other network devices. This provides both the IP and MAC address for devices whose traffic is routing throughout the network, and achieves both initial detection and IP-to-MAC address mapping. These tables and values are rechecked at a default interval of 600 seconds. This value should be increased if Expedite IP Discovery (described later in this section) is enabled, or decreased if the network device being queried has the resources to support a shorter interval. Because of the 600-second gap between queries, CounterACT employs additional methods which serve to supplement initial discovery, identifying IP addresses on a more immediate basis. For more details on discovery methods, refer to the ForeScout Agentless Visibility and Control white paper.
Mirrored traffic monitoring
CounterACT’s initial discovery process can be enhanced by using common switch vendor features that enable mirrored traffic monitoring. This also provides CounterACT with several extra capabilities that can be helpful in a wired pre-connect scenario, and for this reason, allowing CounterACT to monitor mirrored network traffic is considered best-practice design. These benefits include:
• Packets sourced by an IP address that are not currently known by CounterACT trigger an admission event, achieving initial detection
• Actionable, session-based properties can be created so that CounterACT can monitor and take action on network behaviors
• Threat Protection watches for network probing and can create virtual systems to bait and confirm malicious behavior, creating an actionable property on the attacking device
• HTTP redirection allows CounterACT to force devices to a captive portal
• ForeScout Virtual Firewall (vFW) technology enables CounterACT to block systems at Layer 4 through the use of TCP resets
Switch Port Detection Switch port detection begins with the knowledge of the MAC addresses and the switch ports they are connected to. For CounterACT to know the switch port to which a device is connected, it must constantly communicate with your organization’s switch framework to remain apprised of ongoing changes in MAC address connectivity.
MAC table queries
Through its core integration with Juniper devices, CounterACT queries MAC address tables on the devices at a default interval of 60 seconds. This value may be increased if SNMP traps are in use, or decreased if they are not available and a switch can support more frequent queries.
SNMP traps
Using SNMP traps is considered best practice in wired pre-connect design. The fastest way for CounterACT to

Deployment Guide – Wired Pre-connect
© 2017 Juniper Networks, Inc. 9
stay on top of changing connections in a switch framework is to receive MAC address notifications and both linkUp and linkDown SNMP traps from the Juniper switches. This provides instant change notification.
IP-to-MAC Address Mapping When CounterACT knows the MAC addresses on the switch framework and detects a new IP address, it associates the unknown IP address to a known MAC address. At a basic level, this is accomplished by querying ARP tables as discussed in previous sections, without requiring additional functionality. Other methods to expedite this process are discussed below.
DHCP fingerprinting
A common way to associate IP addresses with MAC addresses is by viewing both sides of a DHCP conversation, which requires mirrored traffic monitoring. In each request, the connecting system announces several properties that CounterACT policy can use, including device- and OS-specific information, along with its MAC address. The reply provides the IP address to which the connecting system has been assigned, allowing CounterACT to correlate these addresses simultaneously with the device itself.
Expedite IP Discovery
Developed specifically to eliminate the challenge presented by the 600-second default interval for ARP table queries, this feature allows you to use CounterACT to configure Juniper devices in connectivity groups. When CounterACT discovers a new MAC address within a connectivity group, it immediately interrogates other group devices that are configured for ARP table queries. The switch containing the relevant ARP table will aggregate the requests within a configurable 10-second interval, greatly reducing the potential time to obtain this information. Expedite IP Discovery greatly accelerates IP address collection by creating a targeted, as-needed discovery process.
Switch Port Controls Switch integration affords CounterACT several device control options, at multiple layers of the OSI model.
Layer 1 controls
Switch block – The switch block action simply shuts a port off, effectively severing communication over the wire as if the network cable were disconnected. While it is available on Juniper switches, this control is widely considered inferior due to its simple on-off nature. It is not often used in pre-connect deployments, except when changing VLANs is not possible or completely removing a device from the network is desired. CounterACT must re-enable a port periodically to see if the unwanted device is still connected, so a port may be disabled even after the unwanted device has disconnected. Also, logs reporting devices’ disconnect times will be inaccurate, reducing their forensic usefulness. This action is best used only when total network restriction is necessary, or when no other options are available.
Layer 2 controls
MAC ACL – This control causes a switch to drop Ethernet frames from the blocked device at the network edge, while retaining visibility of the device’s connectivity for immediate release of the action when the device disconnects. Like switch block, this action is not frequently used in pre-connect deployments, and is reserved for when the desired effect is to completely remove network access from a device in the assessment VLAN while still observing physical connectivity.
Assign to VLAN – This is CounterACT’s preferred control action for pre-connect deployments. Devices begin in an assessment VLAN as originally defined by the switch they connect to. After inspection and policy evaluation determine the device to be a corporate, compliant system, CounterACT moves it into a production VLAN with fewer (or no) restrictions. VLANs must be pre-configured and CounterACT must manage their IP address space. CounterACT configuration will be much simpler if the VLAN numbering or naming conventions are consistent on the switches, as CounterACT can employ both methods.

Deployment Guide – Wired Pre-connect
10 © 2017 Juniper Networks, Inc.
Summary Before CounterACT can control the endpoints connecting to Juniper devices, it must first manage the devices themselves. In a pre-connect model, the speed at which CounterACT can identify the switch where an endpoint connects strongly affects the length of time a user’s system remains confined to the assessment VLAN. The functions of discovering a device’s IP address immediately as it comes online, mapping that IP address to a MAC address, and knowing which port the MAC address connects to contribute to the output of this equation. Ideally, the process should take no more time than is required to evaluate a device against policy and determine whether it poses a potential threat. Finally, the control methods used and the strategy for deploying them should be aligned with the capabilities of the switches themselves, the security goals of the organization, and the end user experience impacts they may impose.
Notifications and Redirects Because pre-connect methodology begins in the assessment VLAN and permits additional, internal access after inspection, it is best practice to notify users of the reason they do not have the network access they expect, particularly during initial deployment. The notification methods below assist in CounterACT deployment by helping to ensure that users are aware of new security policies as they are implemented.
Email Notifications CounterACT can send email notifications based on policy rules or sub-rules to users or groups using custom messages and including detected device properties, inspection results, policy results, or switch information. This powerful ability puts precise, actionable knowledge immediately into the correct hands.
Managed Systems CounterACT provides multiple options for direct notification of devices under its management to inform users of upcoming actions to address non-compliance or other device conditions. These include:
• Opening a Web browser to any address
• Opening a balloon or banner notification with SecureConnector (discussed in the next section)
• Sending an email to the logged-in user, provided the user can access email on the assessment VLAN or another device
Unmanaged Systems Because CounterACT cannot take direct action on devices that it does not manage, external methods of notification must be used. CounterACT can intercept a device’s network traffic in two different ways.
Redirects
CounterACT can intercept, and therefore redirect, traffic through its native ability to monitor mirrored traffic. It can redirect traffic from a target device to either a URL on the CounterACT appliance or to a URL on another system. This way, the device’s Web-based traffic is funneled through a captive portal—a method frequently used to force guest systems through a mandatory registration process as they connect. This is best used while evaluating devices before implementing the assessment VLAN, or when there is a need to redirect systems after they have been moved from it.
DNS enforcement
DNS enforcement lends itself very well to the nature of an assessment VLAN. It was developed to overcome an inherent limitation in HTTP redirection—the inability to see network traffic in some locations. With this method, CounterACT is configured as the assessment VLAN’s primary DNS server, and it presents itself to target devices as the DNS result for queries. It redirects the device to an internal Web site, effectively forcing it through a captive portal. For devices that do not require redirection, CounterACT can simply forward queries to a valid DNS server, or respond with an “unknown” result, forcing the devices to use their configured secondary server.

Deployment Guide – Wired Pre-connect
© 2017 Juniper Networks, Inc. 11
Summary The primary method used to inform IT staff of access control actions is email notification. Managed systems can be directly controlled to affect internal user notification, and unmanaged systems can be redirected either through HTTP redirect or DNS enforcement to achieve external user notification. Using notifications both before and after enabling the pre-connect environment raises security awareness and plays a key role in a smooth CounterACT deployment.
Wired Pre-Connect Solutions A wired pre-connect model requires an assessment VLAN for initial device connectivity. This section discusses the assessment environment, the challenges it introduces, and ways to mitigate those challenges.
Accelerating Inspection: The SecureConnector Option Another way to expedite network access is by using SecureConnector, the optional CounterACT agent. Because each agent is uniquely keyed to a specific instance of CounterACT, using it can eliminate the need to prove corporate ownership through an additional device authentication against an external user directory, such as Active Directory. CounterACT can also avoid the need for external credentials to profile a system for compliance. SecureConnector continuously communicates a device’s policy status to CounterACT, greatly decreasing time to compliance and network access. Because it improves both user productivity and assessment VLAN security (by eliminating traffic to external directories), using SecureConnector in pre-connect deployments is considered best practice.
The Assessment VLAN The goal of the pre-connect VLAN is to restrict device communication to those systems necessary for CounterACT to determine the device’s ownership and compliance status. For this to occur, the device must acquire an IP address and communicate with the systems that will identify and assess the device’s status. These systems include:
• CounterACT (for ownership and compliance inspection) – Communication between the device and appliance specifically configured to manage the device’s IP address
• CounterACT (for DNS enforcement) – Communication between the device and appliance specifically configured to manage the device’s IP address and other required DNS server(s)
• DHCP – For dynamic IP address provisioning as normal
• Active Directory – To validate device authentication status and ownership during remote inspection. Note that this is not required when SecureConnector is used to enable direct inspection.
Switch Port Exclusion Some switch ports may be unable to participate in the pre-connect control process. Examples include ports where an IoT device, or device with a static IP address, has connected, as these systems cannot re-address themselves on the network after a VLAN change. CounterACT has multiple ways to exclude such ports from the pre-connect process, the simplest of which is to manually exempt those with a specific alias or description. This is not the recommended process because it can entail security risks, as devices connecting to one of these ports can bypass the pre-connect policy flow. It is recommended that devices on these ports be inspected and controlled using post-connect methodology to restrict them after they connect, and as needed going forward.
VoIP VLANs Switch configurations that use a voice VLAN and a data VLAN on a single port can create an issue with CounterACT’s VLAN reassignment process. When CounterACT grants access to a device and moves it off the assessment VLAN, it does so by reassigning the device’s switch port to a new network segment. The device doesn’t know that its network status has changed, or that it needs to request a new IP address. To trigger that action, CounterACT disables and re-enables the port as part of its normal VLAN change process. The device

Deployment Guide – Wired Pre-connect
12 © 2017 Juniper Networks, Inc.
sees the connection go down and requests a new IP address when it comes back online. When a voice VLAN shares the port, however, devices using Power over Ethernet (PoE), such as a VoIP phone, will temporarily lose power.
This issue can be overcome by using SecureConnector, CounterACT’s optional software agent, which can directly force the device to renew its DHCP lease.
Multiple Devices on a Port There are other circumstances where multiple devices may connect over the same switch port. This can occur when there are hubs or unmanageable switches on the network, or where endpoints connect in a chain. In these instances, changing the port’s VLAN assignment is not an appropriate solution for modifying the network access of a single device, as the other connected devices will also be affected. These instances should be identified and the switch ports should be excluded.
Known Good Devices One of the main challenges of pre-connect methodology is the time it takes to connect users with the authorized network resources they need to be productive. One shortcut is to allow known systems, identified by their MAC addresses, which have previously been granted network access, to retain that access when reconnecting to the network. In this approach, CounterACT maintains trust for offline devices whose ownership and compliance status have been previously assessed, and immediately changes their VLAN to allow access on reconnect. CounterACT still performs a post-connect inspection, and returns a device to the assessment VLAN if it finds changes in security status. While this shortcut does introduce a degree of risk to a pre-connect model, it offers an efficient way to improve the user experience. CounterACT retains device details for a configurable offline interval. The default (and recommended) value is three days.
Solution Architecture Figure 2 shows a typical hybrid deployment, providing a basic overview of how CounterACT interfaces with other networking devices.
Figure 2: CounterACT communication with network devices
Workflow Diagrams and Flowcharts
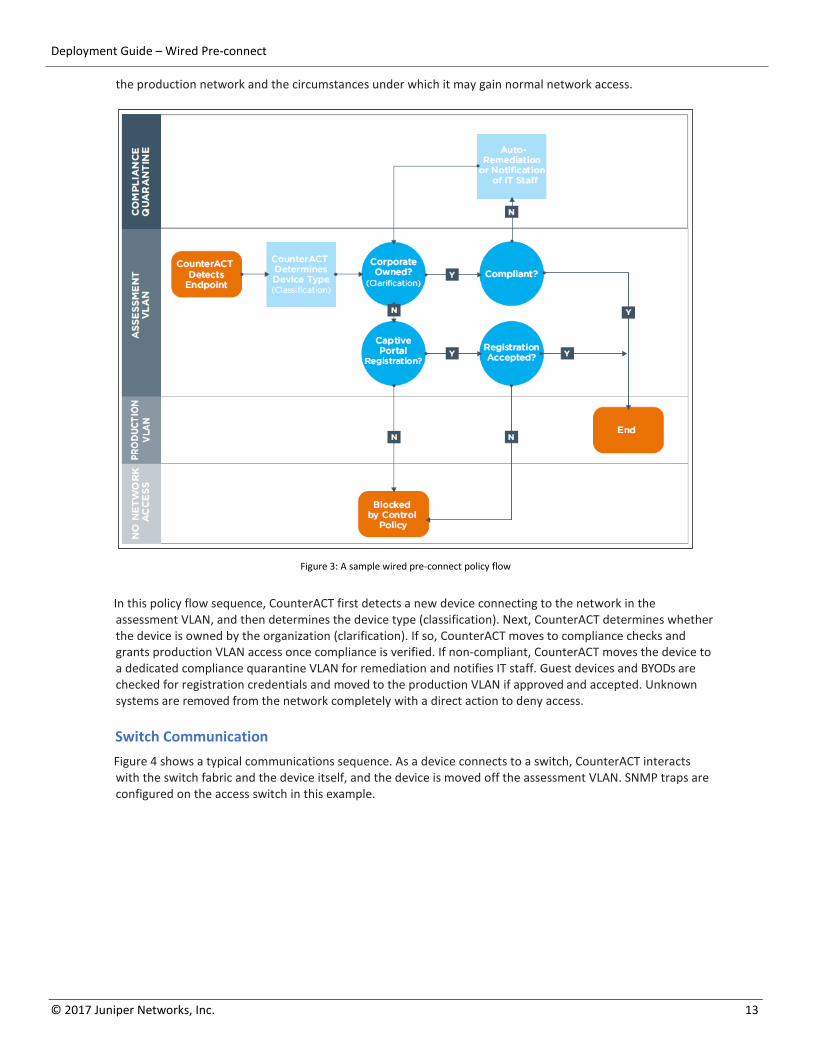
Sample Policy Flow Figure 3 depicts a typical high-level flow of the basic CounterACT policy set, illustrating a device connecting to
Deployment Guide – Wired Pre-connect
© 2017 Juniper Networks, Inc. 13
the production network and the circumstances under which it may gain normal network access.
Figure 3: A sample wired pre-connect policy flow
In this policy flow sequence, CounterACT first detects a new device connecting to the network in the assessment VLAN, and then determines the device type (classification). Next, CounterACT determines whether the device is owned by the organization (clarification). If so, CounterACT moves to compliance checks and grants production VLAN access once compliance is verified. If non-compliant, CounterACT moves the device to a dedicated compliance quarantine VLAN for remediation and notifies IT staff. Guest devices and BYODs are checked for registration credentials and moved to the production VLAN if approved and accepted. Unknown systems are removed from the network completely with a direct action to deny access.
Switch Communication Figure 4 shows a typical communications sequence. As a device connects to a switch, CounterACT interacts with the switch fabric and the device itself, and the device is moved off the assessment VLAN. SNMP traps are configured on the access switch in this example.

Deployment Guide – Wired Pre-connect
14 © 2017 Juniper Networks, Inc.
Figure 4: A sample CounterACT control flow
The sequence of events and communications in this example are as follows:
1. A device connects to an access switch port, which is by default configured on the assessment VLAN.
2. The access switch sends an SNMP trap to CounterACT, which is now aware of a new MAC address online and the port to which it is connected.
3. The device communicates through the network and the core switch sees its traffic.
4. CounterACT monitors mirrored traffic from the core switch and sees the device’s IP address.
5. CounterACT profiles the device’s IP address to determine what it is, and begins policy evaluation to ascertain ownership and compliance.
6. Simultaneously, CounterACT queries the relevant ARP table residing on either the same device or a separate network device using Expedite IP Discovery, mapping the known MAC address and switch port to the IP address that is being profiled.
7. CounterACT changes the VLAN on the switch port to allow the device on the production network, provided the device meets the clarification and compliance policy criteria.
Environment Requirements This section provides an overview of what must be in place for the wired pre-connect scenario to operate successfully within an enterprise network that includes Juniper devices.
CounterACT Requirements CounterACT must have the ability to read ARP and MAC address tables from Juniper devices. This requires the Switch plugin, a core component that is supplied with a basic CounterACT installation. The Switch plugin, together with the DHCP Classifier plugin, can effectively profile endpoints. Details of the DHCP plugin can be found in the help file.
The latest release should always be used to ensure access to the full range of available features. Each Juniper device must be added into the plugin, a process that is covered in more detail later in this document.
Customer Environment Requirements When integrating CounterACT with the existing switch framework, it may be necessary to configure the following items, depending on switch capabilities and the features required to achieve the desired outcome:
• SNMP access to all switches for queries and configurations

Deployment Guide – Wired Pre-connect
© 2017 Juniper Networks, Inc. 15
• CLI access to all switches for queries and configurations
• SNMP trap configuration to CounterACT to speed discovery of connecting devices
• Pre-configured VLANs, including the assessment VLAN and production VLANs, to which CounterACT will be reassigning devices
Configuring CounterACT Configuring CounterACT to interact with Juniper devices and provide controls in a pre-connect model is a straightforward process. Configuration instructions may vary with Switch plugin versions, and specific instructions are provided in the Switch plugin help file, which is accessible directly from the CounterACT management software.
The general steps to add Juniper devices into the CounterACT system are as follows:
• Enter the IP address of the device
• Select the managing appliance
- To reduce dependencies it is best practice to, wherever possible, assign devices to the same appliance that manages the network ranges it may connect to.
• Select the vendor “Juniper” from the drop-down menu
• Enter CLI management credentials
• Enter SNMP version and management credentials
• Enter permissions
- Enable MAC permissions when the network device contains relevant MAC tables
- Enable ARP permissions when the network device contains relevant ARP tables
• Configure ACL settings
The CounterACT Console Figure 5 depicts the Switch plugin configuration page, showing Juniper devices managed by CounterACT. From here you can see alerts showing configuration issues, and edit or test individual or groups of devices.
Figure 5: Switch plugin configuration screen
To add a new Juniper devices, click Add. Figures 6-10 illustrate the steps you must complete, as noted above.

Deployment Guide – Wired Pre-connect
16 © 2017 Juniper Networks, Inc.
Figure 6: Device configuration - General information
Figure 7: Device configuration - CLI information
Figure 8: Device configuration (switch page shown) - SNMP information

Deployment Guide – Wired Pre-connect
© 2017 Juniper Networks, Inc. 17
Figure 9 shows permissions for an individual switch. Network devices managed by CounterACT should have both the read and write checkboxes selected for (i) MAC, if devices connect to it, (ii) ARP, if it serves as a gateway for networks, and (iii) both MAC and ARP if applicable. Except in rare circumstances, allowing CounterACT to automatically use SNMP, CLI, or NETCONF helps to ensure that the most efficient method is used for the specific query or command being performed. The checkboxes on the screen, from top to bottom, do the following:
• MAC Read – Allow CounterACT to query the device’s MAC table
• MAC Write – Allow CounterACT to perform blocking actions on switch ports
• ARP Read – Allow CounterACT to query the device’s ARP table
• ARP Write – Allow CounterACT to clean up duplicate ARP entries
Finally, in the advanced settings, the default VLAN for the device is configured to be the assessment VLAN, by either VLAN ID or name. This helps to ensure that vacant ports are set to the assessment VLAN, eliminating the need to change them manually.
Figure 9: Device configuration (switch page shown) - Permissions

Deployment Guide – Wired Pre-connect
18 © 2017 Juniper Networks, Inc.
Figure 10: Device configuration (switches only) - ACLs
Configuring Juniper Devices On all Juniper devices that will interact with CounterACT, add configuration that matches the following sample:
system {
login {
user admin { ## must match settings entered in the CLI page sbove
class super-user;
authentication {
encrypted-password "$ABC123";
}
}
}
services {
ssh {
root-login allow;
}
netconf {
ssh;
}
}
}
snmp {
v3 {
usm {
local-engine {
user user1 { ## must match settings entered in the SNMP page sbove
authentication-sha {
authentication-key "$ABC123";
}
privacy-aes128 {
privacy-key "$ABC123";

Deployment Guide – Wired Pre-connect
© 2017 Juniper Networks, Inc. 19
}
}
}
}
vacm {
security-to-group {
security-model usm {
security-name user1 { ## must match username above
group group1;
}
}
}
access {
group group1 {
default-context-prefix {
security-model usm {
security-level privacy {
read-view view-all;
write-view write-all;
}
}
}
}
}
}
target-address ta2 {
address 10.1.100.167;
address-mask 255.255.255.0;
target-parameters tp1;
}
target-parameters tp1 {
parameters {
message-processing-model v3;
security-model usm;
security-level privacy;
security-name user1; ## must match username above
}
}
}
engine-id {
local 62;
}
view view-all {
oid 1 include;
}
}
Verifying Connectivity Status To verify that CounterACT has proper connectivity to the Juniper devcies, use the Test button on the Switch plugin page.

Deployment Guide – Wired Pre-connect
20 © 2017 Juniper Networks, Inc.
Figure 11: Test button on Switch plugin page
Figure 12: Test button output
For More Information This completes our overview of design considerations for deploying ForeScout CounterACT with Juniper devices in a wired pre-connect scenario. For additional information, see the following resources:
Solution Brief: Juniper-ForeScout Joint Solution for Endpoint Visibility and Control
Product Page: ForeScout CounterACT®