Installation & Operating Instructions for Tumo Xcel ... · Instructions for Tumo® Xcel Automated...
16
Drapery System Installation & Operating Instructions for Tumo ® Xcel Automated Drapery System ® Energy Saving Products for the Green Building Market
Transcript of Installation & Operating Instructions for Tumo Xcel ... · Instructions for Tumo® Xcel Automated...

Dra
pery
Sys
temInstallation & Operating
Instructions for Tumo® Xcel Automated Drapery System
®
Energy Saving Products for the Green Building Market

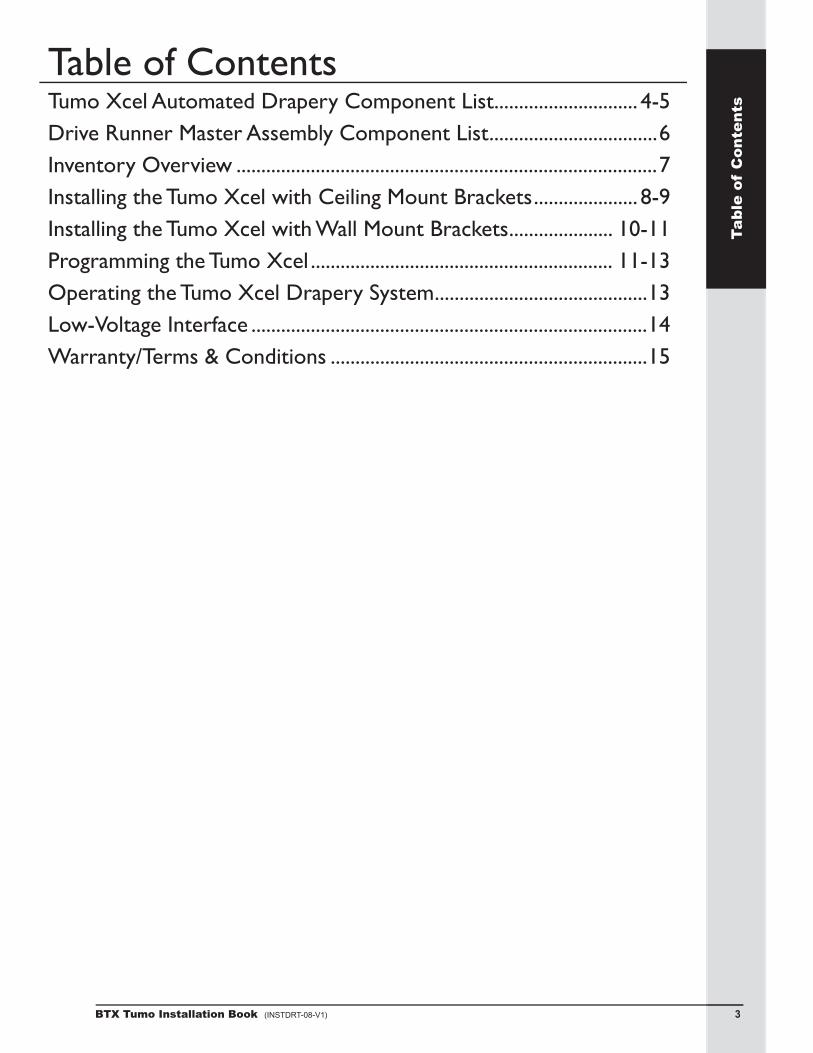
Table of ContentsTumo Xcel Automated Drapery Component List ............................. 4-5Drive Runner Master Assembly Component List ..................................6Inventory Overview .....................................................................................7Installing the Tumo Xcel with Ceiling Mount Brackets ..................... 8-9Installing the Tumo Xcel with Wall Mount Brackets ..................... 10-11Programming the Tumo Xcel ............................................................. 11-13Operating the Tumo Xcel Drapery System ...........................................13Low-Voltage Interface ................................................................................14Warranty/Terms & Conditions ................................................................15
3BTX Tumo Installation Book (INSTDRT-08-V1) 3
Ta
ble
of
Co
nte
nts
BTX Tumo Installation Book (INSTDRT-08-V1)44
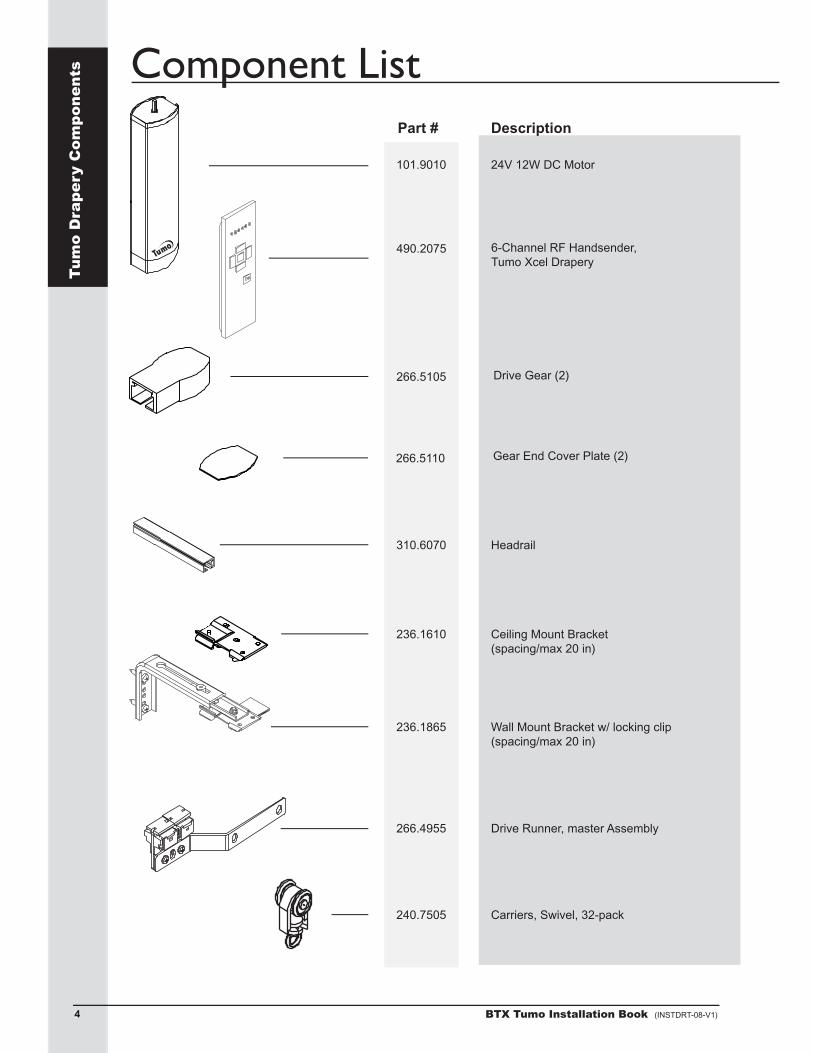
Component ListPart # Description
Carriers, Swivel, 32-pack240.7505
Drive Runner, master Assembly266.4955
Headrail310.6070
Drive Gear (2)266.5105
24V 12W DC Motor101.9010
Ceiling Mount Bracket(spacing/max 20 in)
236.1610
6-Channel RF Handsender, Tumo Xcel Drapery
490.2075
1
1
2
2
3
3
4
4
A A
B B
C C
D D
CONFIDENTIAL All information disclosed inthis document is proprietaryto BTX Window Automation.Holder agrees to maintain itin confidence and must not
replicate or reveal thisinformation in any manner.
Project
Dim
TOLERANCES
.XX .015
.XXX .005
ANG 1
BTX Window Automation10763 Sanden Dr.
Dallas, Texas 75238(214) 340-2800
(214) 343-2444 FAX
Size Matl: Dwg No: Rev
By: Date: Scale: Sheet of
Parts ListPART NUMBERDESCRIPTIONITEM
Headrail1Drive/Non-Drive End224V DC Motor3Master Carrier Assembly4Drapery Carrier5Cager6Cover Plate7Transportation Belt8Mounting Bracket9Fabric Wrap Clip10DC Power Supply11Handsender12
3
2
8
9
92
6 5
4
7
6
11
12
10
1
Drapery
DC Drapery System Yet To Be Named
A sunp drape assyG. Bennett 1-Nov-07 1/4 1 1
1
1
2
2
3
3
4
4
AA
BB
CC
DD
CONFIDENTIAL All information disclosed inthis document is proprietaryto BTX Window Automation.Holder agrees to maintain itin confidence and must not
replicate or reveal thisinformation in any manner.
Project
Dim
TOLERANCES
.XX.015
.XXX.005
ANG 1
BTX Window Automation10763 Sanden Dr.Dallas, Texas 75238
(214) 340-2800(214) 343-2444 FAX
SizeMatl:Dwg No:Rev
By:Date:Scale:Sheetof
Parts ListPART NUMBER DESCRIPTION ITEM
Headrail 1Drive/Non-Drive End 224V DC Motor 3Master Carrier Assembly 4Drapery Carrier 5Cager 6Cover Plate 7Transportation Belt 8Mounting Bracket 9Fabric Wrap Clip 10DC Power Supply 11Handsender 12
3
2
8
9
92
65
4
7
6
11
12
10
1
Drapery
DC Drapery System Yet To Be Named
Asunp drape assyG. Bennett1-Nov-071/411
1
1
2
2
3
3
4
4
AA
BB
CC
DD
CONFIDENTIAL All information disclosed inthis document is proprietaryto BTX Window Automation.Holder agrees to maintain itin confidence and must not
replicate or reveal thisinformation in any manner.
Project
Dim
TOLERANCES
.XX.015
.XXX.005
ANG 1
BTX Window Automation10763 Sanden Dr.Dallas, Texas 75238
(214) 340-2800(214) 343-2444 FAX
SizeMatl:Dwg No:Rev
By:Date:Scale:Sheetof
Parts ListPART NUMBER DESCRIPTION ITEM
Headrail 1Drive/Non-Drive End 224V DC Motor 3Master Carrier Assembly 4Drapery Carrier 5Cager 6Cover Plate 7Transportation Belt 8Mounting Bracket 9Fabric Wrap Clip 10DC Power Supply 11Handsender 12
3
2
8
9
92
65
4
7
6
11
12
10
1
Drapery
DC Drapery System Yet To Be Named
Asunp drape assyG. Bennett1-Nov-071/411
Gear End Cover Plate (2)266.5110
1
1
2
2
3
3
4
4
A A
B B
C C
D D
CONFIDENTIAL All information disclosed inthis document is proprietaryto BTX Window Automation.Holder agrees to maintain itin confidence and must not
replicate or reveal thisinformation in any manner.
Project
Dim
TOLERANCES
.XX .015
.XXX .005
ANG 1
BTX Window Automation10763 Sanden Dr.
Dallas, Texas 75238(214) 340-2800
(214) 343-2444 FAX
Size Matl: Dwg No: Rev
By: Date: Scale: Sheet of
Parts ListPART NUMBERDESCRIPTIONITEM
Headrail1Drive/Non-Drive End224V DC Motor3Master Carrier Assembly4Drapery Carrier5Cager6Cover Plate7Transportation Belt8Mounting Bracket9Fabric Wrap Clip10DC Power Supply11Handsender12
3
2
8
9
92
6 5
4
7
6
11
12
10
1
Drapery
DC Drapery System Yet To Be Named
A sunp drape assyG. Bennett 1-Nov-07 1/4 1 1
Wall Mount Bracket w/ locking clip(spacing/max 20 in)
236.1865
Tu
mo
Dra
pe
ry C
om
po
ne
nts
1
1
2
2
3
3
4
4
A A
B B
C C
D D
LAITNEDIFNOCni desolcsid noitamrofni llA yrateirporp si tnemucod siht.noitamotuA wodniW XTB otti niatniam ot seerga redloHton tsum dna ecnedifnoc ni
siht laever ro etacilper.rennam yna ni noitamrofni
tcejorP
miD
SECNARELOTXX. ` 510.
XXX. ` 500.
GNA ` 1 ~
noitamotuA wodniW XTB.rD nednaS 3670183257 saxeT ,sallaD
0082-043 )412(XAF 4442-343 )412(
eziS :ltaM :oN gwD veR
:yB :etaD :elacS teehS fo
tsiL straP.ON TRAPNOITPIRCSEDMETI
0706.013liardaeH15015.662dnE evirD-noN/evirD20109.101rotoM CD V4235594.662ylbmessA reirraC retsaM45057.042reirraC yreparD50357.042regaC60115.662etalP revoC75003.092tleB noitatropsnarT80161.632tekcarB gnitnuoM90560.642pilC parW cirbaF010032.004ylppuS rewoP CD115702.094rednesdnaH210681.632tnuoM llaW lanoitpO310222.642ecilpS lanoitpO-
yreparD
CD ™omuT metsyS yreparD
A yssa epard pnus4/170-voN-1ttenneB .G 1 4
)4#( reirraC retsaMliateD ylbmessA-buS
1
1
2
2
3
3
4
4
A A
B B
C C
D D
LAITNEDIFNOCni desolcsid noitamrofni llA yrateirporp si tnemucod siht.noitamotuA wodniW XTB otti niatniam ot seerga redloHton tsum dna ecnedifnoc ni
siht laever ro etacilper.rennam yna ni noitamrofni
tcejorP
miD
SECNARELOTXX. ` 510.
XXX. ` 500.
GNA ` 1 ~
noitamotuA wodniW XTB.rD nednaS 3670183257 saxeT ,sallaD
0082-043 )412(XAF 4442-343 )412(
eziS :ltaM :oN gwD veR
:yB :etaD :elacS teehS fo
tsiL straP.ON TRAPNOITPIRCSEDMETI
0706.013liardaeH15015.662dnE evirD-noN/evirD20109.101rotoM CD V4235594.662ylbmessA reirraC retsaM45057.042reirraC yreparD50357.042regaC60115.662etalP revoC75003.092tleB noitatropsnarT80161.632tekcarB gnitnuoM90560.642pilC parW cirbaF010032.004ylppuS rewoP CD115702.094rednesdnaH210681.632tnuoM llaW lanoitpO310222.642ecilpS lanoitpO-
yreparD
CD ™omuT metsyS yreparD
A yssa epard pnus4/170-voN-1ttenneB .G 1 4
)4#( reirraC retsaMliateD ylbmessA-buS

5BTX Tumo Installation Book (INSTDRT-08-V1) 5
Part # Description
Cager240.7530
Fabric Wrap Clip246.0650
Component List
Drive Belt 290.3005
1
1
2
2
3
3
4
4
A A
B B
C C
D D
CONFIDENTIAL All information disclosed inthis document is proprietaryto BTX Window Automation.Holder agrees to maintain itin confidence and must not
replicate or reveal thisinformation in any manner.
Project
Dim
TOLERANCES
.XX .015
.XXX .005
ANG 1
BTX Window Automation10763 Sanden Dr.
Dallas, Texas 75238(214) 340-2800
(214) 343-2444 FAX
Size Matl: Dwg No: Rev
By: Date: Scale: Sheet of
Parts ListPART NUMBERDESCRIPTIONITEM
Headrail1Drive/Non-Drive End224V DC Motor3Master Carrier Assembly4Drapery Carrier5Cager6Cover Plate7Transportation Belt8Mounting Bracket9Fabric Wrap Clip10DC Power Supply11Handsender12
3
2
8
9
92
6 5
4
7
6
11
12
10
1
Drapery
DC Drapery System Yet To Be Named
A sunp drape assyG. Bennett 1-Nov-07 1/4 1 1
Compact Plug-In Power Supply110-240V AC input24V DC outputCord length: 60" input from AC 60" output to motor
400.2300
1
1
2
2
3
3
4
4
A A
B B
C C
D D
CONFIDENTIAL All information disclosed inthis document is proprietaryto BTX Window Automation.Holder agrees to maintain itin confidence and must not
replicate or reveal thisinformation in any manner.
Project
Dim
TOLERANCES
.XX .015
.XXX .005
ANG 1
BTX Window Automation10763 Sanden Dr.
Dallas, Texas 75238(214) 340-2800
(214) 343-2444 FAX
Size Matl: Dwg No: Rev
By: Date: Scale: Sheet of
Parts ListPART NUMBERDESCRIPTIONITEM
Headrail1Drive/Non-Drive End224V DC Motor3Master Carrier Assembly4Drapery Carrier5Cager6Cover Plate7Transportation Belt8Mounting Bracket9Fabric Wrap Clip10DC Power Supply11Handsender12
3
2
8
9
92
6 5
4
7
6
11
12
10
1
Drapery
DC Drapery System Yet To Be Named
A sunp drape assyG. Bennett 1-Nov-07 1/4 1 1
Tu
mo
Dra
pe
ry C
om
po
ne
nts
1
1
2
2
3
3
4
4
A A
B B
C C
D D
LAITNEDIFNOCni desolcsid noitamrofni llA yrateirporp si tnemucod siht.noitamotuA wodniW XTB otti niatniam ot seerga redloHton tsum dna ecnedifnoc ni
siht laever ro etacilper.rennam yna ni noitamrofni
tcejorP
miD
SECNARELOTXX. ` 510.
XXX. ` 500.
GNA ` 1 ~
noitamotuA wodniW XTB.rD nednaS 3670183257 saxeT ,sallaD
0082-043 )412(XAF 4442-343 )412(
eziS :ltaM :oN gwD veR
:yB :etaD :elacS teehS fo
tsiL straP.ON TRAPNOITPIRCSEDMETI
0706.013liardaeH15015.662dnE evirD-noN/evirD20109.101rotoM CD V4235594.662ylbmessA reirraC retsaM45057.042reirraC yreparD50357.042regaC60115.662etalP revoC75003.092tleB noitatropsnarT80161.632tekcarB gnitnuoM90560.642pilC parW cirbaF010032.004ylppuS rewoP CD115702.094rednesdnaH210681.632tnuoM llaW lanoitpO310222.642ecilpS lanoitpO-
yreparD
CD ™omuT metsyS yreparD
A yssa epard pnus4/170-voN-1ttenneB .G 1 4
)4#( reirraC retsaMliateD ylbmessA-buS
1
1
2
2
3
3
4
4
A A
B B
C C
D D
LAITNEDIFNOCni desolcsid noitamrofni llA yrateirporp si tnemucod siht.noitamotuA wodniW XTB otti niatniam ot seerga redloHton tsum dna ecnedifnoc ni
siht laever ro etacilper.rennam yna ni noitamrofni
tcejorP
miD
SECNARELOTXX. ` 510.
XXX. ` 500.
GNA ` 1 ~
noitamotuA wodniW XTB.rD nednaS 3670183257 saxeT ,sallaD
0082-043 )412(XAF 4442-343 )412(
eziS :ltaM :oN gwD veR
:yB :etaD :elacS teehS fo
tsiL straP.ON TRAPNOITPIRCSEDMETI
0706.013liardaeH15015.662dnE evirD-noN/evirD20109.101rotoM CD V4235594.662ylbmessA reirraC retsaM45057.042reirraC yreparD50357.042regaC60115.662etalP revoC75003.092tleB noitatropsnarT80161.632tekcarB gnitnuoM90560.642pilC parW cirbaF010032.004ylppuS rewoP CD115702.094rednesdnaH210681.632tnuoM llaW lanoitpO310222.642ecilpS lanoitpO-
yreparD
CD ™omuT metsyS yreparD
A yssa epard pnus4/170-voN-1ttenneB .G 1 4
)4#( reirraC retsaMliateD ylbmessA-buS
Headrail Splice246.2220
Tumo SplicePart. No. 246.2220
Switch, Single, Low-Voltage, AlmondSwitch, Single, Low-Voltage, WhiteSwitch, Double, Low-Voltage, AlmondSwitch, Double, Low-Voltage, White
480.3000480.3005480.3020480.3025
BTX Tumo Installation Book (INSTDRT-08-V1)66
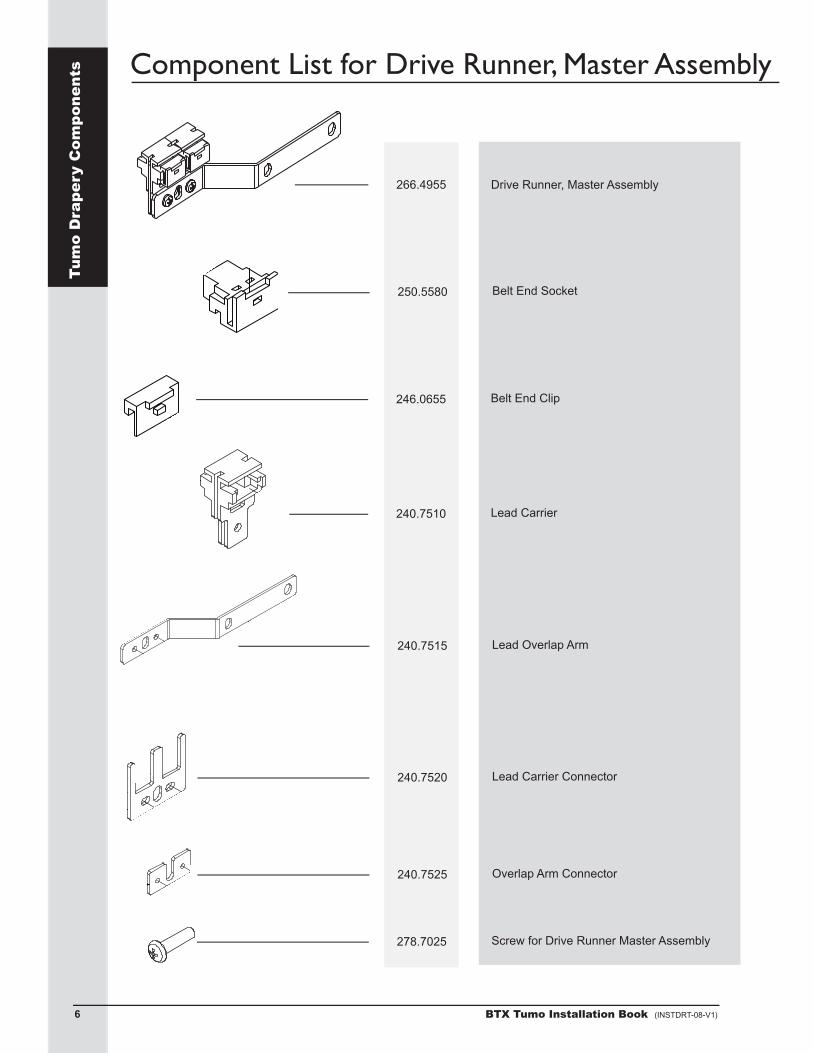
Component List for Drive Runner, Master Assembly
Drive Runner, Master Assembly266.4955
Belt End Socket250.5580
Lead Overlap Arm240.7515
Belt End Clip246.0655
Lead Carrier240.7510
1
1
2
2
3
3
4
4
A A
B B
C C
D D
CONFIDENTIAL All information disclosed inthis document is proprietaryto BTX Window Automation.Holder agrees to maintain itin confidence and must not
replicate or reveal thisinformation in any manner.
Project
Dim
TOLERANCES
.XX .015
.XXX .005
ANG 1
BTX Window Automation10763 Sanden Dr.
Dallas, Texas 75238(214) 340-2800
(214) 343-2444 FAX
Size Matl: Dwg No: Rev
By: Date: Scale: Sheet of
Parts ListPART NO.DESCRIPTIONITEM240.7520Master Carrier Connector1240.7510Master Carrier2240.7515Overlap Arm3240.7525Screw Holder4250.5580Belt End6246.0655Belt End Clip7
Tumo™ DC Drapery Master Carrier Assembly
6
7
2
6
72
4
1
3
Sub-Assembly Parts List(For Internal Use Only)
Drapery
A sunp drape assyG. Bennett 15-Feb-08 1/1 4 4
1
1
2
2
3
3
4
4
A A
B B
C C
D D
CONFIDENTIAL All information disclosed inthis document is proprietaryto BTX Window Automation.Holder agrees to maintain itin confidence and must not
replicate or reveal thisinformation in any manner.
Project
Dim
TOLERANCES
.XX .015
.XXX .005
ANG 1
BTX Window Automation10763 Sanden Dr.
Dallas, Texas 75238(214) 340-2800
(214) 343-2444 FAX
Size Matl: Dwg No: Rev
By: Date: Scale: Sheet of
Parts ListPART NO.DESCRIPTIONITEM240.7520Master Carrier Connector1240.7510Master Carrier2240.7515Overlap Arm3240.7525Screw Holder4250.5580Belt End6246.0655Belt End Clip7
Tumo™ DC Drapery Master Carrier Assembly
6
7
2
6
72
4
1
3
Sub-Assembly Parts List(For Internal Use Only)
Drapery
A sunp drape assyG. Bennett 15-Feb-08 1/1 4 4
Lead Carrier Connector240.7520
1
1
2
2
3
3
4
4
A A
B B
C C
D D
CONFIDENTIAL All information disclosed inthis document is proprietaryto BTX Window Automation.Holder agrees to maintain itin confidence and must not
replicate or reveal thisinformation in any manner.
Project
Dim
TOLERANCES
.XX .015
.XXX .005
ANG 1
BTX Window Automation10763 Sanden Dr.
Dallas, Texas 75238(214) 340-2800
(214) 343-2444 FAX
Size Matl: Dwg No: Rev
By: Date: Scale: Sheet of
Parts ListPART NO.DESCRIPTIONITEM240.7520Master Carrier Connector1240.7510Master Carrier2240.7515Overlap Arm3240.7525Screw Holder4250.5580Belt End6246.0655Belt End Clip7
Tumo™ DC Drapery Master Carrier Assembly
6
7
2
6
72
4
1
3
Sub-Assembly Parts List(For Internal Use Only)
Drapery
A sunp drape assyG. Bennett 15-Feb-08 1/1 4 4
Overlap Arm Connector240.7525
1
1
2
2
3
3
4
4
A A
B B
C C
D D
CONFIDENTIAL All information disclosed inthis document is proprietaryto BTX Window Automation.Holder agrees to maintain itin confidence and must not
replicate or reveal thisinformation in any manner.
Project
Dim
TOLERANCES
.XX .015
.XXX .005
ANG 1
BTX Window Automation10763 Sanden Dr.
Dallas, Texas 75238(214) 340-2800
(214) 343-2444 FAX
Size Matl: Dwg No: Rev
By: Date: Scale: Sheet of
Parts ListPART NO.DESCRIPTIONITEM240.7520Master Carrier Connector1240.7510Master Carrier2240.7515Overlap Arm3240.7525Screw Holder4250.5580Belt End6246.0655Belt End Clip7
Tumo™ DC Drapery Master Carrier Assembly
6
7
2
6
72
4
1
3
Sub-Assembly Parts List(For Internal Use Only)
Drapery
A sunp drape assyG. Bennett 15-Feb-08 1/1 4 4
Tu
mo
Dra
pe
ry C
om
po
ne
nts
1
1
2
2
3
3
4
4
A A
B B
C C
D D
LAITNEDIFNOCni desolcsid noitamrofni llA yrateirporp si tnemucod siht.noitamotuA wodniW XTB otti niatniam ot seerga redloHton tsum dna ecnedifnoc ni
siht laever ro etacilper.rennam yna ni noitamrofni
tcejorP
miD
SECNARELOTXX. ` 510.
XXX. ` 500.
GNA ` 1 ~
noitamotuA wodniW XTB.rD nednaS 3670183257 saxeT ,sallaD
0082-043 )412(XAF 4442-343 )412(
eziS :ltaM :oN gwD veR
:yB :etaD :elacS teehS fo
tsiL straP.ON TRAPNOITPIRCSEDMETI
0706.013liardaeH15015.662dnE evirD-noN/evirD20109.101rotoM CD V4235594.662ylbmessA reirraC retsaM45057.042reirraC yreparD50357.042regaC60115.662etalP revoC75003.092tleB noitatropsnarT80161.632tekcarB gnitnuoM90560.642pilC parW cirbaF010032.004ylppuS rewoP CD115702.094rednesdnaH210681.632tnuoM llaW lanoitpO310222.642ecilpS lanoitpO-
yreparD
CD ™omuT metsyS yreparD
A yssa epard pnus4/170-voN-1ttenneB .G 1 4
)4#( reirraC retsaMliateD ylbmessA-buS
Screw for Drive Runner Master Assembly278.7025
7BTX Tumo Installation Book (INSTDRT-08-V1) 7
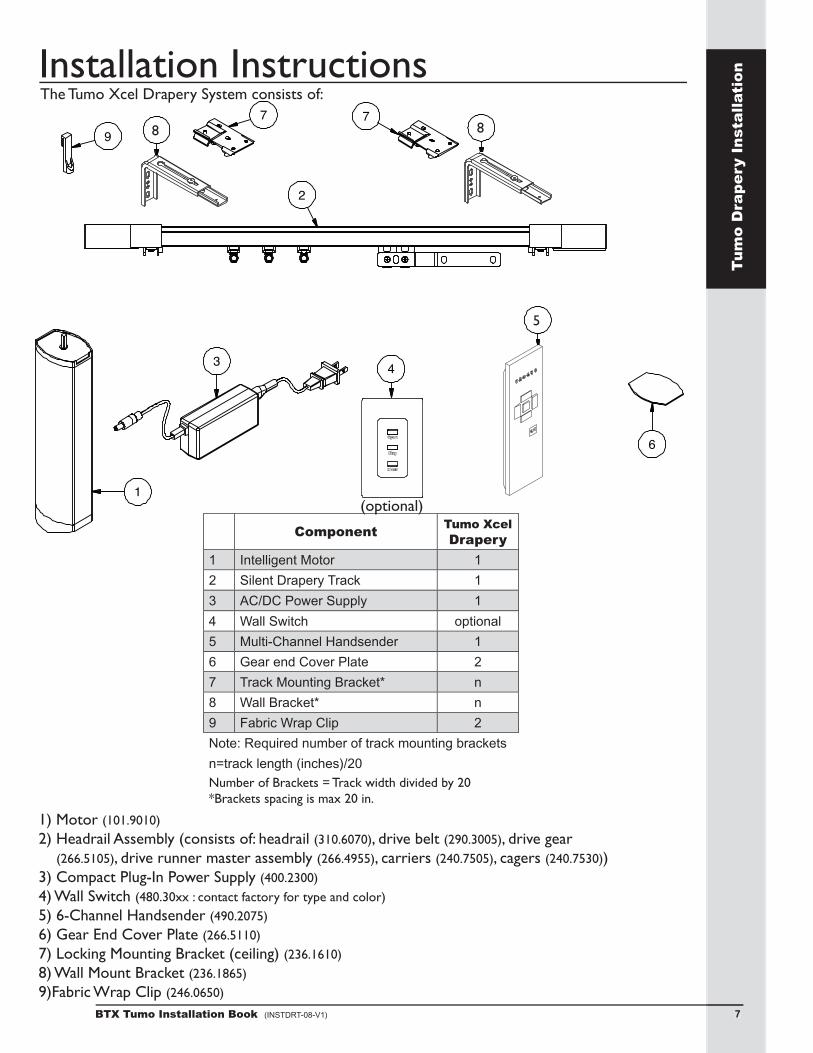
Installation InstructionsThe Tumo Xcel Drapery System consists of:
Tu
mo
Dra
pe
ry I
nsta
llati
on
97 7
9
1
3 4 5
6
2
9
7 7
9
1
3 4 5
6
2
8
9
7 7
9
1
3 4 5
6
2
8
(optional)
9
7 7
9
1
3 4 5
6
2
5
ComponentTumo Xcel Drapery
1 Intelligent Motor 1
2 Silent Drapery Track 1
3 AC/DC Power Supply 1
4 Wall Switch optional
5 Multi-Channel Handsender 1
6 Gear end Cover Plate 2
7 Track Mounting Bracket* n
8 Wall Bracket* n
9 Fabric Wrap Clip 2
Note: Required number of track mounting brackets
n=track length (inches)/20
Number of Brackets = Track width divided by 20*Brackets spacing is max 20 in.
1) Motor (101.9010)
2) Headrail Assembly (consists of: headrail (310.6070), drive belt (290.3005), drive gear (266.5105), drive runner master assembly (266.4955), carriers (240.7505), cagers (240.7530)) 3) Compact Plug-In Power Supply (400.2300)
4) Wall Switch (480.30xx : contact factory for type and color)
5) 6-Channel Handsender (490.2075)
6) Gear End Cover Plate (266.5110)
7) Locking Mounting Bracket (ceiling) (236.1610)
8) Wall Mount Bracket (236.1865)
9)Fabric Wrap Clip (246.0650)
BTX Tumo Installation Book (INSTDRT-08-V1)88
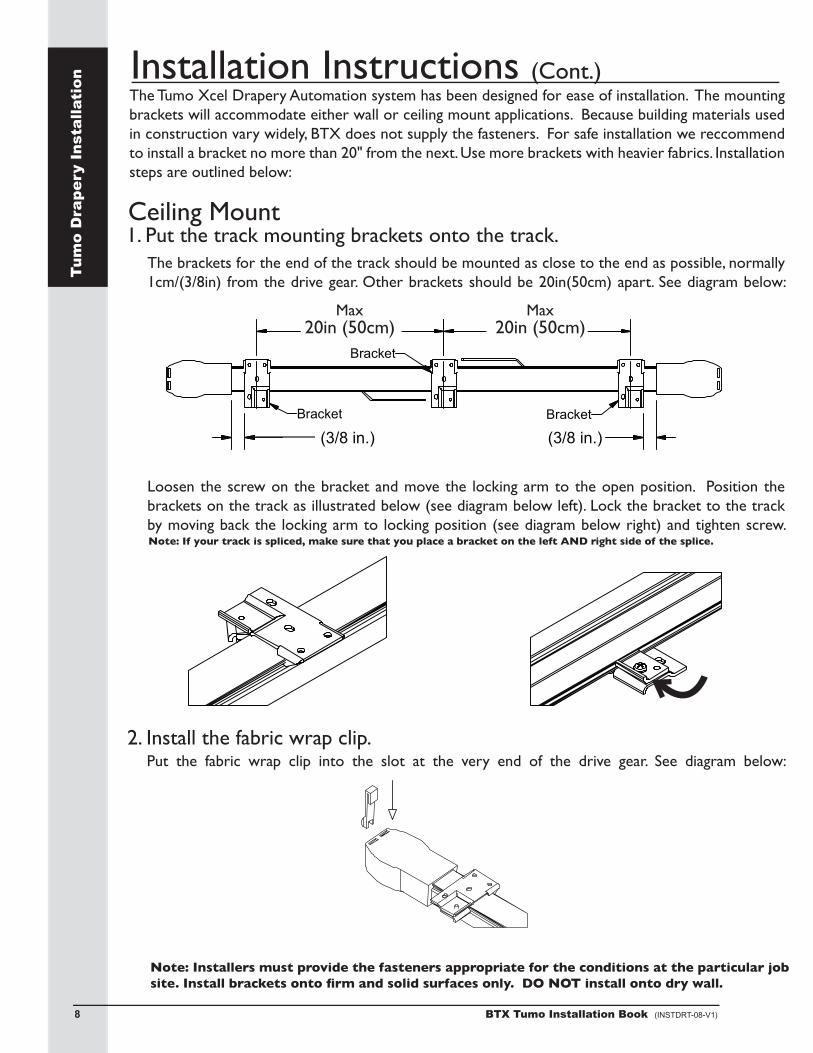
Installation Instructions (Cont.)The Tumo Xcel Drapery Automation system has been designed for ease of installation. The mounting brackets will accommodate either wall or ceiling mount applications. Because building materials used in construction vary widely, BTX does not supply the fasteners. For safe installation we reccommend to install a bracket no more than 20" from the next. Use more brackets with heavier fabrics. Installation steps are outlined below:
The brackets for the end of the track should be mounted as close to the end as possible, normally 1cm/(3/8in) from the drive gear. Other brackets should be 20in(50cm) apart. See diagram below:
1. Put the track mounting brackets onto the track.
60cm (24 in.) 60cm (24 in.)
1cm (3/8 in.) 1cm (3/8 in.)Bracket
Bracket
Bracket
Push the motor upand ensure that it isin alignment with the drive end.
Push the locking arm toward this direction to lock themotor to the drive end.
Loosen the screw on the bracket and move the locking arm to the open position. Position the brackets on the track as illustrated below (see diagram below left). Lock the bracket to the track by moving back the locking arm to locking position (see diagram below right) and tighten screw.
60cm (23 5/8) 60cm (23 5/8 in.)
1cm (3/8 in.) 1cm (3/8 in.)Bracket
Bracket
Bracket
Push the motor upand ensure that it isin alignment with the drive end.
Push the locking arm toward this direction to lock themotor to the drive end.
60cm (23 5/8) 60cm (23 5/8 in.)
1cm (3/8 in.) 1cm (3/8 in.)Bracket
Bracket
Bracket
Push the motor upand ensure that it isin alignment with the drive end.
Push the locking arm toward this direction to lock themotor to the drive end.
Put the fabric wrap clip into the slot at the very end of the drive gear. See diagram below:2. Install the fabric wrap clip.
60cm (23 5/8) 60cm (23 5/8 in.)
1cm (3/8 in.) 1cm (3/8 in.)Bracket
Bracket
Bracket
Push the motor upand ensure that it isin alignment with the drive end.
Push the locking arm toward this direction to lock themotor to the drive end.
Tu
mo
Dra
pe
ry I
nsta
llati
on
Ceiling Mount
Note: If your track is spliced, make sure that you place a bracket on the left AND right side of the splice.
Note: Installers must provide the fasteners appropriate for the conditions at the particular job site. Install brackets onto fi rm and solid surfaces only. DO NOT install onto dry wall.
Max20in (50cm)
Max20in (50cm)

9BTX Tumo Installation Book (INSTDRT-08-V1) 9
1. Put the track mounting brackets onto the track.
2. Install the fabric wrap clip.T
um
o D
rap
ery
In
sta
llati
on
After attaching the mounting brackets to the track, hold up the track to the position where the track should be located. Screw each bracket into solid blocking, using the available holes.
3. Install the track onto the ceiling.
With the motor drive shaft upward, guide the shaft into the center hole of the drive gear, then push the motor up until it fi ts securely in the drive gear (see diagram below left). When the motor and drive gear are fully engaged, push the locking arm to the side un-til you hear a "click" sound (see diagram below right). The motor is now locked into place.
4. Install the motor.
60cm (23 5/8) 60cm (23 5/8 in.)
1cm (3/8 in.) 1cm (3/8 in.)Bracket
Bracket
Bracket
Push the motor upand ensure that it isin alignment with the drive end.
Push the locking arm toward this direction to lock themotor to the drive end.
Connect the power supply to the motor and plug the power supply into a wall outlet for power. 5. Connect the power supply to the motor.
Installation Instructions (Cont.)
Push the locking arm to the side to lock motor into place
Warning: Do not apply load to sheetrock or soft materials!
Motor Drive Shaft
BTX Tumo Installation Book (INSTDRT-08-V1)1010
Installation Instructions (Cont.)
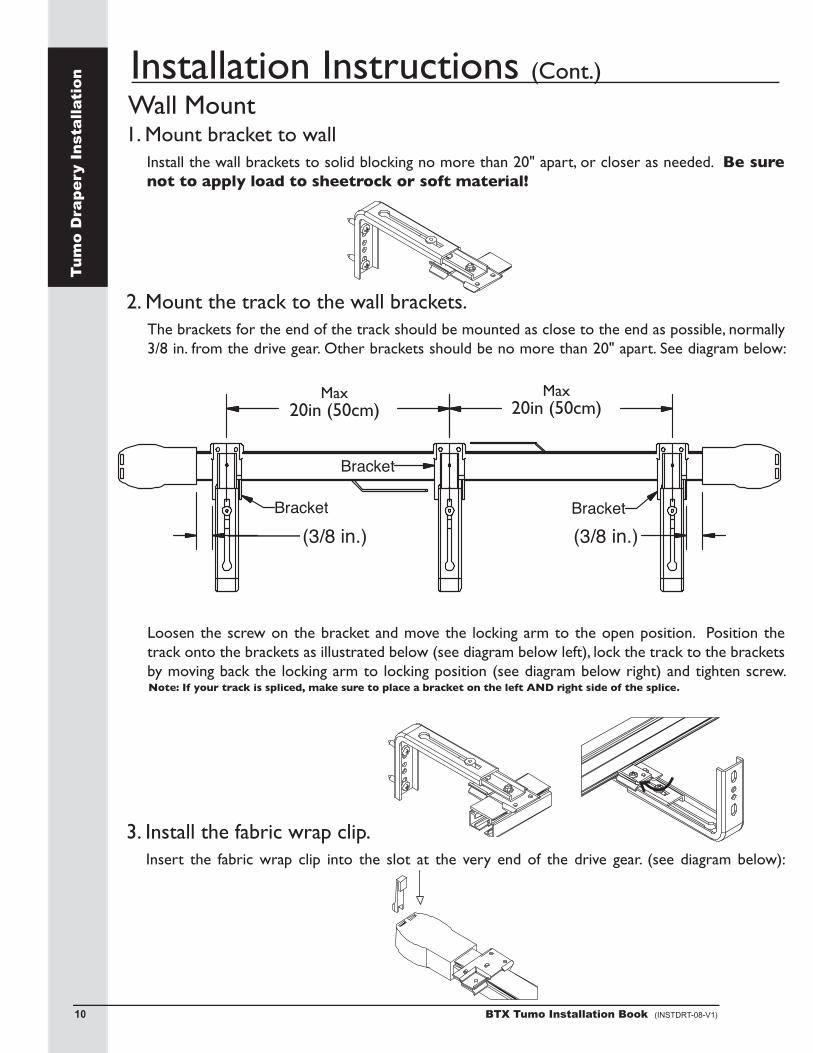
The brackets for the end of the track should be mounted as close to the end as possible, normally 3/8 in. from the drive gear. Other brackets should be no more than 20" apart. See diagram below:
2. Mount the track to the wall brackets.
Loosen the screw on the bracket and move the locking arm to the open position. Position the track onto the brackets as illustrated below (see diagram below left), lock the track to the brackets by moving back the locking arm to locking position (see diagram below right) and tighten screw.
llaWtnuoM
Tu
mo
Dra
pe
ry I
nsta
llati
on
Wall Mount
Note: If your track is spliced, make sure to place a bracket on the left AND right side of the splice.
Install the wall brackets to solid blocking no more than 20" apart, or closer as needed. Be sure not to apply load to sheetrock or soft material!
1. Mount bracket to wall
Insert the fabric wrap clip into the slot at the very end of the drive gear. (see diagram below):
3. Install the fabric wrap clip.
60cm (23 5/8) 60cm (23 5/8 in.)
1cm (3/8 in.) 1cm (3/8 in.)Bracket
Bracket
Bracket
Push the motor upand ensure that it isin alignment with the drive end.
Push the locking arm toward this direction to lock themotor to the drive end.
Max.60cm (24 in.)
Max.60cm (24 in.)
1cm (3/8 in.) 1cm (3/8 in.)Bracket
Bracket
Bracket
50 50 2020Max
20in (50cm)Max
20in (50cm)

11BTX Tumo Installation Book (INSTDRT-08-V1) 11
2. Mount the track to the wall brackets.
1. Mount bracket to wall
3. Install the fabric wrap clip.
The Tumo Xcel handsender can control up to 6 motors or 6 groups of motors. Before using the handsender, the motor needs to recognize the handsender. Put motor into program mode and press the channel selection button. This will light up the last channel that was selected. Press again and the next channel will be selected and light up, etc. Continue pressing the chan-nel selection button until the channel you wish to program is selected and the corresponding channel number LED lights up, then press the stop button. Before the motor leaves program mode, press and hold the UP and DOWN buttons simultaneously. The selected channel num-ber will light up with a slow fl ash. The track will then react with a movement to indicate that the motor is receiving the signal from the handsender and to confi rm that communication be-tween motor and handsender is established. Press the LEFT or RIGHT button, and the over-lap arm of the drapery system should start to move. The channel has now been programmed.
6. Programming the handsender for one motor. (see picture on page 12)
Tu
mo
Dra
pe
ry I
nsta
llati
on
With the motor drive shaft upward, guide the shaft into the center hole of the drive gear then push the motor up until it fi ts securely in the drive gear (see diagram below left). When the motor and drive gear are fully engaged, push the locking arm to the side un-til you hear a "click" sound (see diagram below right). The motor is now locked into place.
4. Install the motor.
Connect the power adaptor to the motor. Plug the power adaptor into a wall outlet for power. 5. Connect the power adaptor to the motor.
Installation Instructions (Cont.)
Push the locking arm to the side to lock motor into place
Motor Drive Shaft
Note: To put motor into program mode, unplug the motor for 30 seconds and then reconnect. The program mode is now engaged for the fi rst three minutes the motor has been plugged in. When programming a new system, any Tumo systems within range that have been pro-grammed within the last three minutes must be unplugged to prevent them from becoming reconfi gured to match the new system. Each motor can learn up to four channels. To delete all channels from a programmed motor, make sure the motor is in program mode and press the STOP and DOWN buttons simultaneously .

BTX Tumo Installation Book (INSTDRT-08-V1)1212
Select channel on the handsender (for example, channel 2) by repeatedly pressing the chan-nel selection button until the "2" is lit. To program another motor to recognize this same chan-nel(2) repeat the same programming procedure in step 6 for the new motor. Six motors can be programmed to be controlled by the same handsender this way. Select this channel to con-fi rm that a particular motor has been programmed to communicate with this channel by pressing LEFT or RIGHT. You should see the system react. Continue this procedure until all six channel number LEDs light up. All the motors will now respond at the same time when you press the LEFT or RIGHT button. Any one of the six channels can be programmed this way for a group of motors. In this case, each channel will control all the motors in that group at the same time.
7. Programming one handsender to control multiple motors or multiple groups of motors.
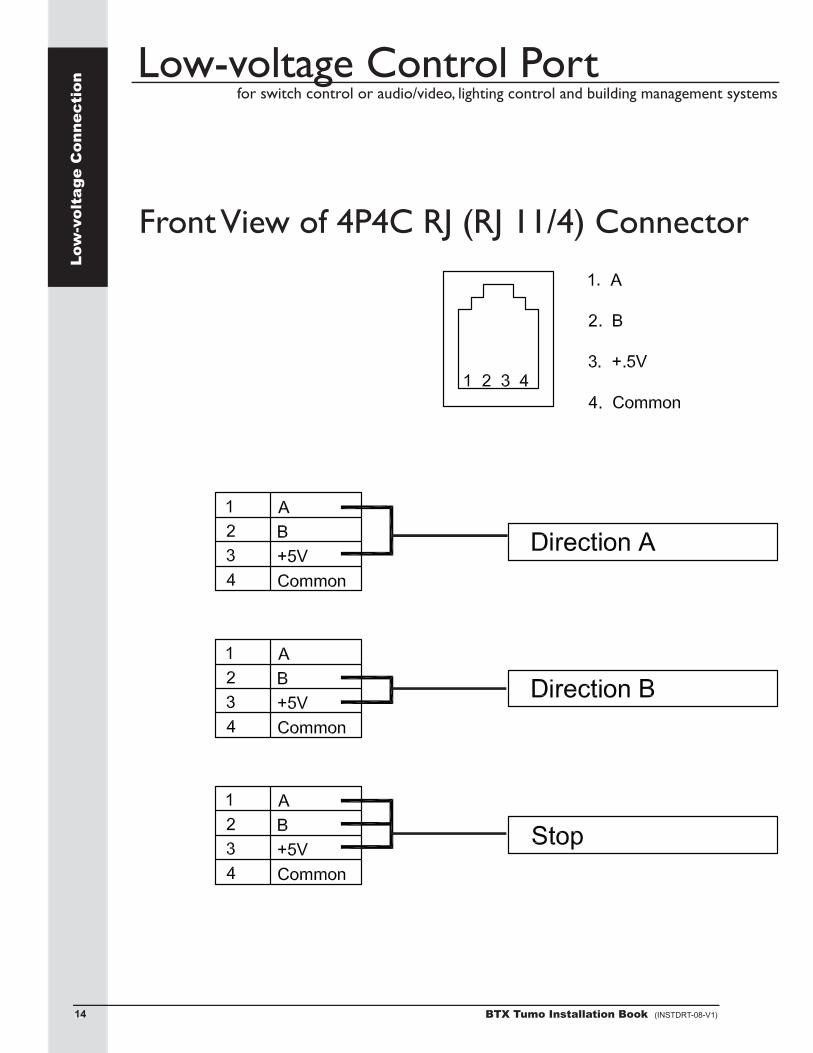
The Tumo Xcel Drapery System can be easily linked with most third-party control devices through the low-voltage connecting port at the bottom of the motor. This port can be used to connect to both local and network controls. BTX Supply can provide technical assistance upon request to meet your project needs. With the Tumo Xcel Drapery System, only a BTX low-voltage wall switch is needed to perform control operations. Simply connect the motor to a low-voltage switch by plugging one end of the provided RJ-11-4 lead into the low-voltage port on the motor. Plug the other end of the modular wire into the low-voltage port of the switch, and fi x the wall switch at convenient position.
8. Connecting Tumo Xcel Drapery Systems to other controls
Installation Instructions (Cont.)
Right
UpChannelIndicator
Stop
Left
Down
Channel Selection Button
Tu
mo
Dra
pe
ry I
nsta
llati
on
Note: When programming a new system, any Tumo systems within range that have been programmed within the last three minutes must be unplugged to prevent them from be-coming reconfi gured to match the new system.
Note: For a pin out diagram, see page 14.

Upon completion of the hardware installation, programming of the handsender and installation of the drapery fabric, the system is ready for long term, reliable operation. The handsender open and close directions are indicated by the arrows, left for open and right for close (or vice versa if desired).
It is not necessary to point the RF handsender in a specifi c direction. The motor receives the sig-nal within a 30ft-50ft range. If more than one track is to be controlled by the handsender, use the channel selection button as described under section 7 on the previous page. Clear open and close signs are on the optional wall switch. At any time, the drapes can be operated manually instead of by handsender or wall switch.
Operating the Tumo Xcel Drapery System
13BTX Tumo Installation Book (INSTDRT-08-V1) 13
Additional Programming Instructions
Tu
mo
Dra
pe
ry I
nsta
llati
on
Once the system has been installed and the handsender has been programmed, the RIGHT and LEFT buttons should match the travel direction of the drapery when engaged to open or close. If the buttons do not match the travel direction of the system, you may choose to reverse the motor direction to match the buttons on the handsender. To change the motor direction, you will need to unplug the motor for one minute, then plug it back in. Press and hold the LEFT and RIGHT buttons simultaneously. The channel indication LED should fl ash slowly. When the change has taken place, the motor should react with a jog within 5 seconds. Give the sysetm a test run to verify the change.
Reverse Motor Direction
Using the CHANNEL SELECTION button, select the channel programmed to the motor for which you wish to cancel the channel setting. Press and hold the UP and STOP buttons until the motor reacts with a jog. This channel setting has now been deleted from the motor. If you now press or hold any of the directional buttons, the motor should not move.
Delete Channel Settings at the Motor
The handsender is powered by two lithium-ion button batteries, model number: CR24300. This battery style is fairly common and should be easy to fi nd at most retail stores that sell electronic equipment or accessories. The battery will last for over two years under normal conditions. When the channel LED numbers one and six are lit up at the same time, this means the batteries are al-most dead and need to be replaced. Open the handsender case with both hands by twisting the top edge of the handsender until the entire front cover pops off. The cover may be a little tight to remove. When inserting the new batteries, be sure to place the positive side down. After inserting the new batteries, replace the cover, and the handsender will be ready for use.
Replacing the Handsender Battery
BTX Tumo Installation Book (INSTDRT-08-V1)1414
Low-voltage Control PortL
ow
-vo
lta
ge
Co
nn
ec
tio
nfor switch control or audio/video, lighting control and building management systems
Front View of 4P4C RJ (RJ 11/4) Connector
15BTX Tumo Installation Book (INSTDRT-08-V1) 15
Low-voltage Control Port1. ContractAll offers, quotes and sales by BTX Window Automation, Inc. (BTX) are subject to these Terms and Conditions of Sale. No other agreements have been made or will be valid unless expressly confi rmed in writing by BTX.2. ACCEPTANCEBY TAKING DELIVERY OF BTX PRODUCTS, PURCHASER ASSENTS TO THE TERMS AND CONDITIONS STATED HEREIN, UNLESS OTHERWISE EXPRESSLY AGREED IN WRITING BY BTX. BTX HEREBY OBJECTS TO ANY DIFFERENT OR ADDITIONAL TERMS AND CONDITIONS WHICH MAY BE PROPOSED OR HAVE BEEN PROPOSED BY PURCHASER IN ANY PURCHASE ORDER FORMS OR OTHER DOCUMENTS. THE TERMS AND CONDITIONS STATED HEREIN SHALL PREVAIL OVER ANY DIFFERENT OR ADDITIONAL TERMS AND CONDITIONS PROPOSED BY PURCHASER AND SHALL APPLY TO THE SALE OR SHIPMENT OF ANY GOODS IN RESPONSE TO PURCHASER'S ORDER.3. Prices and DeliveryAll quoted prices are valid for a period of 60 days from the date of issue, unless otherwise agreed by BTX in writing. Prices on accepted orders remain fi rm for a period of four months from the date of order acceptance, provided fi nal delivery occurs within that period. If delivery is to occur more than four months from the date of order acceptance, prices are subject to change in accordance with any changes in the published BTX price list which occur after the date of order acceptance. All prices quoted are FOB Dallas, excluding all freight, packaging and taxes. All delivery dates are approximate.4. Payment Terms(a) Open account payment terms may be established from time to time at the sole discretion of BTX, and are subject to credit approval in writing. Terms on open accounts are payment in full, net 30 days from date of invoice. Payment terms for single transactions and transactions other than on open account are net C.O.D. or prepay unless confi rmed otherwise in writing by BTX.(b) Amounts past due are subject to a fi nance charge of 1.5% per month to the legal limit, and the fi nance charge will apply without further prior notice. In case of purchaser's delinquency in payment or insolvency, BTX retains the right to halt or interrupt all further deliveries and service to the purchaser until all past due amounts have been paid, and to require payment in advance for orders not yet delivered, without any liability resulting for BTX. Purchaser expressly agrees to indemnify BTX and hold BTX harmless from all charges and liability which might arise in any manner from purchaser's nonpayment. 5. Inspection, Acceptance and ClaimsAll claims by purchaser against BTX for shortages must be made in writing to BTX within fourteen days from date of shipment from BTX's Dallas base or they are waived. Any claims for transport damage are the responsibility of the recipient and must therefore be fi led with the carrier by the recipient.6. Risk of LossFull risk of loss, damage or destruction of the goods shall pass to purchaser upon delivery of the goods to the carrier at the point of shipment or upondelivery at storage, whichever applies.7. Force MajeureIf an order cannot be completed due to causes beyond BTX's control, BTX retains the right to either cancel the uncompleted portion of the order or complete the order if and when this becomes possible. Purchaser shall not have the right to withhold payment on delivered goods and/or services, nor to unilaterally change the order or cancel same. Force majeure includes but is not limited to strikes, lock-outs, storms, fl oods and the like, terrorism, wars, revolutions, major equipment failures or fi re damage at production facilities, etc.8. WarrantyBTX extends a fi ve-year limited warranty for its Tumo™ DC systems and controls. BTX warrants its other systems and 110/220V motors and hardware accessories against defects in material and workmanship for a period of fi ve years from date of shipment from BTX's Dallas base; however, pull chains and cords for roller shades are excluded. BTX controls and electric and electronic components carry a one-year warranty against defects in material and workmanship from date of shipment from BTX's Dallas base. BTX does not warrant cords and tapes for lift systems, nor customer’s own materials, and BTX disclaims any written, oral or implied warranties for such materials. If any item to which a warranty applies proves to be defective during the specifi ed warranty period under normal and proper use and provided the equipment or part has been properly stored, installed and maintained with due regard to any directives, instructions and operating procedures provided, BTX shall, upon presentation of proof of purchase, repair or replace the item at the sole option of BTX, F.O.B. Dallas. Application of the warranty will be determined by BTX technical staff after return of the item, its inspection and any necessary investigation. This warranty does not apply in case of defects resulting from faulty installation, misuse, misapplication, abuse, mishandling, shipping or failure to follow instructions. This warranty does not cover any incidental, special or consequential damages, labor on location, service calls, reinstallation, or expenses involved in shipping, packing, and returning the
Warranty/Terms & Conditionsgoods. It also does not cover damages caused by fi re, fl ood, or act of God. BTX warrants items repaired or replaced pursuant to the above warranty, under normal and proper use, storage, installation and maintenance, against defects in material and workmanship for a period of 30 days from date of start-up of such repaired or replaced item or the expiration of the original warranty, whichever is longer. Correction of non conformities in the manner and for the period of time specifi ed herein shall be purchaser's exclusive remedy and shall constitute fulfi llment of all liabilities of BTX, whether in warranty, contract, negligence, tort, or otherwise with respect to the item delivered. In no event shall BTX be responsible for providing access to the allegedly defective item or for disassembly or reinstallation of such item or parts.9. DISCLAIMERTHE FOREGOING EXPRESS WARRANTIES ARE EXCLUSIVE AND IN LIEU OF ALL OTHER WARRANTIES, WRITTEN, ORAL OR IMPLIED. ALL OTHER WARRANTIES, INCLUDING ANY WARRANTY OF MERCHANTABILITY OR FITNESS FOR A PARTICULAR PURPOSE, ARE HEREBY DISCLAIMED.10. LIMITED LIABILITYBTX'S LIABILITY FOR ANY AND ALL CLAIMS, CHARGES, EXPENSES, DAMAGES, LOSSES AND INJURIES ARISING OUT OF OR RELATING TO ITS PERFORMANCE OR BREACH OF ANY AGREEMENT OF SALE FOR GOODS AND/OR THE MANUFACTURE, SALE, DELIVERY, RESALE, REPAIR OR USE OF ANY GOODS SHALL NOT EXCEED THE PURCHASE PRICE OF SUCH GOODS, REGARDLESS WHETHER THE CLAIM IS BASED ON CONTRACT, TORT, NEGLIGENCE, STATUTE, STRICT LIABILITY, WILLFUL OR WANTON CONDUCT, WARRANTY (EXPRESS OR IMPLIED), OR OTHERWISE. THIS SHALL BE PURCHASER'S SOLE AND EXCLUSIVE REMEDY AGAINST BTX OTHER THAN THE REMEDY PROVIDED FOR UNDER THE EXPRESS BTX WARRANTIES. IN NO EVENT SHALL BTX BE LIABLE FOR INCIDENTAL, SPECIAL, CONSEQUENTIAL OR EXEMPLARY DAMAGES.11. ARBITRATIONBTX AND PURCHASER AGREE THAT THIS TRANSACTION INVOLVES INTERSTATE COMMERCE AND THAT AT THE OPTION OF BTX, ANY DISPUTE RELATING TO IT IN ANY MANNER SHALL BE SUBMITTED TO BINDING ARBITRATION BEFORE THE AMERICAN ARBITRATION ASSOCIATION AND SHALL BE GOVERNED BY THE FEDERAL ARBITRATION ACT OR, IF THAT STATUTE IS INAPPLICABLE, ANY DISPUTE SHALL BE GOVERNED BY THE TEXAS ARBITRATION ACT; HOWEVER, NO ARBITRATOR MAY AWARD PUNITIVE DAMAGES. PURCHASER AGREES TO PAY ALL COSTS INCURRED BY BTX, INCLUDING BUT NOT LIMITED TO COSTS OF ARBITRATION, COLLECTION, REASONABLE ATTORNEY'S FEES, EXPENSES AND ANY COURT COSTS.12. ReturnNo goods may be returned without the express written approval of BTX and the receipt of an BTX RGA identifi cation number. Goods approved for return must be returned in original packaging, freight prepaid, clearly marked with the BTX RGA identifi cation number and be accompanied by a copy of the original invoice. Application of the warranty will be determined by BTX technical staff after return of the item, its inspection, and any necessary investigation. A restocking charge of 25% of invoice value will apply on all items accepted for return.13. Liens and Security InterestPurchaser will not permit to be created or to remain undischarged any lien, encumbrance or charge upon the goods supplied by BTX until BTX has received payment in full for such goods. If any liens, encumbrances or charges shall be fi led against BTX goods prior to payment in full, purchaser shall discharge the liens, encumbrances or charges within ten days and reimburse BTX for expenses incurred in defending its security interest. Title to the goods shall remain with BTX until payment in full has been received. 14. Statute of LimitationsAny action against BTX shall be commenced within one year after the cause of action has arisen.15. Choice of Law and VenueThe rights and duties of the parties hereunder and the construction and effect of these terms and conditions shall be governed by the laws of the State of Texas. Venue shall lie in Dallas, Texas, to the exclusion of any other jurisdiction.16. This agreement supersedes any inconsistent or additional promises made by any employee, representative, agent or dealer of BTX.17. If any part of this agreement is found invalid, the balance of the agreement remains enforceable.
071508
Wa
rra
nty
/Te
rms &
Co
nd
itio
ns

10763 Sanden Drive • Dallas, TX 75238(214) 340-2800 • 1-800-422-8839 • FAX (214) 343-2252
www.btxinc.com • [email protected]