Installation and Operating Instructions - Earth Safe and Operating Instructions Series Z0X-2 ... An...
30
Leader in Level Measurement For Assistance Call 1-800-527-6297 Outside North America + 215-674-1234 Installation and Operating Instructions Series Z0X-2 Z-tron III TM Level Control U.S. and Canada: 1-800-553-9092 24-Hour Service: 1-800-527-6297 International: +1 215-674-1234 Fax: +1 215-674-2731 E-mail: [email protected] Website: www.drexelbrook.com
Transcript of Installation and Operating Instructions - Earth Safe and Operating Instructions Series Z0X-2 ... An...

Leader in Level Measurement
For Assistance Call 1-800-527-6297 Outside North America + 215-674-1234
Installation andOperating Instructions
Series Z0X-2Z-tron IIITM Level Control
U.S. and Canada: 1-800-553-909224-Hour Service: 1-800-527-6297International: +1 215-674-1234Fax: +1 215-674-2731E-mail: [email protected] Website: www.drexelbrook.com

AMETEK Drexelbrook makes no warranty of any kind with regard to the material contained in this manual, including, but not limited to, implied warranties or fitness for a particular purpose. Drexelbrook shall not be liable for errors contained herein or for incidental or consequential damages in connection with the performance or use of material.
Copyright 2008 AMETEK Drexelbrook

Series Z0X-2Z-tron IIITM Level Control
EDO# 09-07-100 Z0X-2-LM
Issue# 8
205 Keith Valley Road, Horsham, PA 19044 U.S. and Canada: 1-800-553-909224-Hour Service: 1-800-527-6297International: +1 215-674-1234Fax: +1 215-674-2731E-mail: [email protected] Website: www.drexelbrook.com
An ISO 9001 Certified Company

Table of Contents

Table of Contents
Section 1: Introduction ................................................................................................1 1.1 System Description ......................................................................................1 1.2 Technology ...................................................................................................1 1.3 Model Number .............................................................................................2
Section 2: Installation ..................................................................................................3 2.1 Unpacking ....................................................................................................3 2.2 Mounting the Level Control .........................................................................3 2.3 Mounting Dimensions ..................................................................................5 2.4 Power Wiring ................................................................................................6 2.5 Relay Wiring .................................................................................................8
Section 3: Operation ....................................................................................................9 3.1 Setpoint Control ...........................................................................................9 3.2 Time Delay Control ......................................................................................9 3.3 Time Delay Action ........................................................................................10 3.4 Failsafe ........................................................................................................10 3.5 Start-up ........................................................................................................10
Section 4: Calibration ..................................................................................................11 4.1 Calibration in Conducting Material ...............................................................11 4.2 Calibration in Insulating Material [Horizontal Mount] ....................................11 4.3 Calibration in Insulating Material [Vertical Mount] ........................................12
Section 5: Troubleshooting .........................................................................................13 5.1 Introduction ..................................................................................................13 5.2 Testing Electronic Unit .................................................................................13 5.3 Testing Sensing Element .............................................................................13 5.4 Testing Relay Circuits...................................................................................15 5.5 Possible Problems and Causes ...................................................................16 5.6 Factory Assistance .......................................................................................17 5.7 Field Service ................................................................................................17 5.8 Customer Training ........................................................................................17 5.9 Equipment Return ........................................................................................18
Section 6: Specifications .............................................................................................19
Appendix A: Shortening or Lengthening the Sensing Element ..................................A-1

Section 1

Introduction
1
Section 1: IntroductionThese instructions are for the AMETEK Drexelbrook Z-tron III™ Series Point Level Control.
The label on top of the electronic unit identifies the model number of the Z-tron III level control.
If the model number on the electronic unit is a 402-3000, the instructions are included in the 502-3000-LM Instruction Manual. Both of these manuals can be downloaded from our resource library at www.Drexelbrook.com
1.1 System Description
Cote-Shield™ action is designed into all Z-tron III level controls and enables the instrument to ignore the effect of buildup or material coating on the sensing element.
The electronic unit:
• Provides double-pole double-throw dry relay contact closure when material reaches a specific point on the sensor. The relay contacts may be used to operate alarms, solenoid valves, or other low power devices.
• Provides a 0-60 second time delay for agitated vessels.
The 700-series sensing element:
• Is mounted on the tank or in the process.• Provides a change in radio frequency (RF) admittance indicating
presence or absence of material.
1.2 TechnologyIn a simple capacitance probe type sensing element, when the level rises and material covers the probe, the capacitance within the circuit between the probe and the medium (conductive applications) or the probe and the vessel wall (insulating applications) increases. This is due to the dielectric constant (k) of the material, which causes a bridge misbalance. The signal is demodulated (rectified), amplified and the output is increased. There are drawbacks, however, especially when there is coating of the probe.
An RF Admittance level transmitter is the next generation. Although similar to the capacitance concept, The Z-tron employs a radio frequency signal and adds the Cote-Shield™ circuitry within the Electronics Unit.
This patented Cote-Shield™ circuitry is designed into Z-tron series and enables the instrument to ignore the effect of buildup or material coating on the sensing element. The sensing element is mounted in the vessel and provides a change in RF admittance indicating presence or absence of material.
The Cote-Shield™ element of the sensor prevents the transmission of RF current through the coating on the sensing element. The only path to ground available for the RF current is through the material being measured.
The result is an accurate measurement regardless of the amount of coating on the probe, making it by far the most versatile technology, good for very wide range conditions from cryogenics to high temperature, from vacuum to 10,000 psi pressure, and works with all types of materials.
k air
Ad
C kmedia
C = k Ad
C =k Ad
A k air
d
C
kmedia
Figure 1-1Capacitance Probe(Insulating Media)
Figure 1-2 RF Admittance Probe
with Cote-Shield

2
Z0X-2 Series Z-tron IIITM Point Level Control
TechnologyZ RF Admittance
Reserved for future use 0
Input0 120Vac1 24Vdc3 230Vac
Output2 Double Pole Double Throw Relay
Sensing ElementApplication Sensing Element Pressure/Temperature Wetted Parts
05 General 700-0206-201 14bar@121°C 316SS Purpose (200psi@250°F) & PEEK
Cote-ShieldTM LengthA 10 inch/254mmB 3.5 inch/88.9mmC 2 inch/51mm
{Insertion Length (IL)
A 6 inch/152mmB 12 inch/305mmC 18 inch/457mmD 36 inch/914mmE 48 inch/1219mmF 60 inch/1524mmH 72 inch/1829mmZ Other
1.3 Model Number
Note:Cote-ShieldshouldextendthroughNozzle+Typical"WallBuildup"+2Inches

Installation
3
Section 2: Installation
2.1 UnpackingCarefully remove the contents of the shipping carton and check each item against the packing list before destroying any packing materials. If there is any shortage or damage, report it to the factory at 1-800-527-6297 (US and Canada) or + 215-674-1234 (International).
2.2 Mounting the Level Control
The Z-tron III Level Control is available with the electronic unit and sensing element as a single integral assembly. Extended sensing element lengths and special mountings can be provided to fit specific applications.
• The Z-tron III Level Control is designed for industrial applications, but it should be mounted in a location as free as possible from vibration, corrosive atmospheres, or any possibility of mechanical damage.
• For convenience when adjusting, place the electronic unit in a reasonably accessible location. Ambient temperature should be between -40°F and 145°F (-40°C to 63°C).
• It may be mounted either vertically or horizontally. See Figures 2-1 and 2-2.
• Avoid mounting closer than 1 inch to any tank structure. Material bridging from structure to sensing element can cause false alarms. Close proximity to tank structure also increases the sensing element’s standing capacitance.
• When installing flange-mounted sensing elements, keep mating surfaces and bolts free of paint and corrosion to ensure proper electrical contact with vessel. Avoid using excessive amounts of TFE tape when installing threaded sensing elements.
• The actual mounting location often depends on the placement of nozzles or openings into the vessel. Do not mount the instrument through a nozzle which exceeds the Cote-Shield element on the sensing element. See Figure 2-1.
• Protect the insulation on the sensing element against cuts and scrapes during installation.
Figure 2-3 provides typical mounting dimensions.

4
Z0X-2 Series Z-tron IIITM Point Level Control
WRONG CORRECTConduitBreather
Drain
All Connections Sealedand Gaskets In Place
WRONG CORRECT
CONDULET
PackingGlandAssemblyDo NotDisturb!
Hold here whentighteningCondulet
Hold here to installor remove SensingElement fromVessel
Figure 2-1 Z-tron III Level Control Mounting Recommendations
2.2 Mounting the Level Control (continued)
NOZZLE
NOZZLE
Wall build-up does not extend past first insulator.
Cote-shield must extend through nozzle and wall build-up by 2".
WrongNozzle too long;
Cote-shield too short.
Factory-supplied Cote-shield extends through nozzle and wall build-up.
Best
BestNo Nozzle
GoodLong Nozzle
Figure 2-2 Z-tron III Level Control Installation Guidelines
WRONG CORRECTConduitBreather
Drain
All Connections Sealedand Gaskets In Place
WRONG CORRECT
CONDULET
PackingGlandAssemblyDo NotDisturb!
Hold here whentighteningCondulet
Hold here to installor remove SensingElement fromVessel
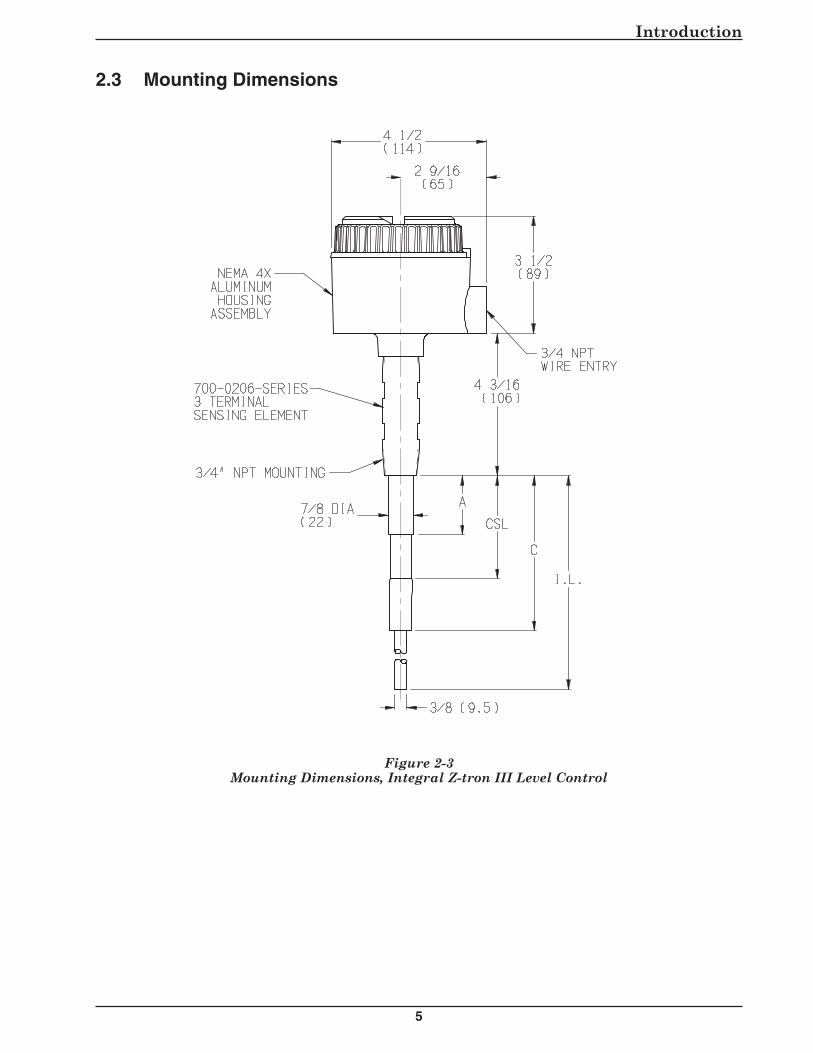
Introduction
5
Figure 2-3 Mounting Dimensions, Integral Z-tron III Level Control
2.3 Mounting Dimensions

6
Z0X-2 Series Z-tron IIITM Point Level Control
2.4 Power Wiring
CAUTION
Do not open enclosure cover or make/break any electrical connections without first disconnecting electrical power at the source. Ensure that area is non-hazardous. Ensure that wiring, electrical fittings and conduit connections conform to electrical codes for the specific location and hazard level.
The Z-tron III level control is a general purpose device and is not agency approved for use in hazardous locations. If agency approval is required, contact your local AMETEK Drexelbrook representative or call 1-800-553-9092.
Refer to Figures 2-5 through 2-7 for the appropriate power wiring and use the following procedure to wire the Z-tron III level control:
1. Ensure that all power to the wiring is off.
2. Remove the cover.
3. The power connections are made to terminals 1, 2, and 3 on the electronic chassis as shown in Figures 2-5 through 2-7, using 12-28 gauge wire. The Z-tron III level control requires at least 1 watt of power.
4. The alarm relays are wired as shown in Figure 2-8.
5. Review Checklist:
a. Wiring correct.
b. Input voltage matches instrument label.
c. Proper output connections.
6. Replace the cover prior to restoring power if in a hazardous area.
7. Turn power on.

Installation
�
Figure 2-7 Wiring the (240 VAC) Electronic Unit
Figure 2-6Wiring the (24 VDC) Electronic Unit
Figure 2-5 Wiring the (120 VAC) Electronic Unit
Relay ConnectionsHOT (L2)
Neutral (L1)Ground (GND)
Power Connections(240Vac)
}
240 VAC
Use 12-28 gauge wire.
2.4 Power Wiring (continued)
Relay ConnectionsHOT (L2)
Neutral (L1)Ground (GND)
Power Connections(120Vac)
}
Relay Connections +
– Power Connections
(24Vdc)}
24 VACGND + –
Use 12-28 gauge wire.
Use 12-28 gauge wire.

�
Z0X-2 Series Z-tron IIITM Point Level Control
2.5 Relay Wiring
Refer to Figure 2-8 for the relay contact wiring. The Z-tron III relay has double-pole, double-throw (DPDT) dry contacts. The relay serves as a switch and does not provide the power to operate an annunciator or other equipment. All relay connections are made to the terminal strip on the electronic unit.
N.C. = Normally Closed
N.O. = Normally Open
Figure 2-8 Wiring the Relays
LED ON
HIGH LEVELFAIL-SAFE
LED ON
TANK EMPTY
HIGH LEVELFAIL-SAFE
LED OFF(ALARM)
TANK FULL
LOW LEVELFAIL-SAFE
LED OFF(ALARM)
(NORMAL)
(NORMAL)
(NORMAL)
TANK EMPTY
LOW LEVELFAIL-SAFE
TANK FULL
1 2 3 4 5 6 7 8 9
HIGH LEVELFAIL-SAFE
1 2 3 4 5 6 7 8 9
HIGH LEVELFAIL-SAFE
1 2 3 4 5 6 7 8 9
LOW LEVELFAIL-SAFE
1 2 3 4 5 6 7 8 9
LOW LEVELFAIL-SAFE
Level Below Sensing Element
Level Above Sensing Element
Level Below Sensing Element
Level Above Sensing Element
Switch 1 RIGHT = High Level Fail Safe
Switch 1 LEFT = Low Level Fail Safe
Switch 1 LEFT = Low Level Fail Safe
12
ONSwitch 1 RIGHT = High Level Fail Safe
12
ON
12
ON
12
ON

Operation
9
3.2 Time Delay Control
The time delay adjustment is located on top of the instrument, as shown in Figure 3-1. It is used to help stop an oscillating relay output due to agitation or waves in the vessel.
CAUTION:THIS adjustment is a 270º (¾ turn) potentiometer. Do not turn it beyond its mechanical stops or damage to unit may occur.
The unit is shipped with the Time Delay set to zero (0) seconds. Using a small screwdriver, turn the adjustment clockwise to set anywhere from 0 to 60 seconds.
Section 3: Operation
This section describes the operating switches of the Z-tron III level control. Remove the dome lid and use a small screwdriver to set the operating controls.
3.1 Setpoint ControlThere is a single operating point adjustment used to control the level at which the relay operates. See Figures 2-8 & 3-1.
This adjustment is an 20-turn potentiometer and does not have a mechanical stop. When in High Level Fail Safe condition, if light (LED) is ON - turn CCW to find SP (relay changes state w/click & light turns OFF)... turn CW if light is initially OFF. Opposite is true in Low Level Fail Safe.
• Turning the setpoint adjustment clockwise (CW) raises the level at which the relay operates.
• Turning the setpoint counterclockwise (CCW) lowers the level at which the relay operates.
• The LED (on) indicates that the relay is energized.
Figure 3-1 Z-tron III Operating Controls and LED
SetpointAdjustment
LED(Alarm whenNOT illuminated)
Time DelayAdjustment
12
ONSwitch 1 LEFT = Low Level Fail SafeSwitch 1 RIGHT = High Level Fail Safe
Switch 2 LEFT = Reverse Time DelaySwitch 2 RIGHT = Forward Time Delay
Hold-down Screws

10
Z0X-2 Series Z-tron IIITM Point Level Control
3.3 Time Delay ActionTime delay action describes whether the relay contacts are delayed from going into the alarm state or recovering from an alarm state.
• FWD: Forward delays the system from coming OUT of alarm.
• REV: Reverse delays the system from going INTO alarm.
• The instrument is supplied with the time delay action set in the forward mode position.
• The time delay action may be selected in the field using the slide switch #2 located on the top of the instrument. See Figure 3-1.
Selecting Time Delay with Slide Switch #2:Forward Acting - Switch #2 is ON, or to the RIGHT.Reverse Acting - Switch #2 is OFF, or to the LEFT.
3.4 Failsafe Failsafe describes the level condition which causes the output relay to de-energize, and determines the condition of the relay upon loss of power or upon the failure of most components.
• The failsafe mode may be selected in the field by changing the position of slide switch #1 located on the top of the instrument. See Figure 3-1.
• High Level Failsafe (HLFS) means the relay will de-energize when level is high, indicating high level upon loss of power. (N.O. contacts open/N.C. contacts closed)
• Low Level Failsafe (LLFS) means the relay will de-energize when level is low, indicating low level upon loss of power. (N.O. contacts open/N.C. contacts closed)
• The instrument is supplied in the failsafe mode that is requested when the order is placed. If none specified, it will be shipped as High Level Failsafe (HLFS).
Selecting Failsafe with Slide Switch #1: High Level Failsafe (HLFS) - Switch #1 is ON, or to the
RIGHT. Low Level Failsafe (LLFS) - Switch #1 is OFF, or to the
LEFT.
3.5 Start-up
Before applying power to the instrument, be sure that the power wiring is correct. See Section 2.3.

Calibration
11
Section 4: CalibrationThis section contains the calibration information for the Z-tron III Level Control.
CAUTION:Do not open enclosure cover or make/break any electrical connections without first disconnecting electrical power at the source. Ensure that area is non-hazardous. Ensure that wiring, electrical fittings and conduit connections conform to the electrical codes for the specific location. The Z-tron III level control is a general purpose device and is not agency approved for use in hazardous locations. If agency approval is required, contact your local AMETEK Drexelbrook representative or call 1-800-553-909
4.1 Calibration in Conducting MaterialAll Z-tron III controls are factory set to switch in water-based conducting materials [setpoint adjustment is set to full clockwise (CW) position]. No calibration adjustment is necessary.If this instrument had been previously adjusted for use in a insulating materials, and is now intended for use in a conducting material, use a small screwdriver to turn the setpoint adjustment to the full clockwise (CW) position. No other adjustment is necessary.
4.2 Calibration in Insulating Material [Horizontal Mount]Use the following procedure:
1. Be sure the material level is well below the sensing element. See Figure 4-1.
2.. Turn the setpoint adjustment to the full counterclockwise (CCW) position.
This 20-turn potentiometer does not have a mechanical stop. Turn 20 times to assure that you are at the extreme end. No damage will occur.The LED (on) indicates that the relay is energized or in normal condition (not alarm).
3. Turn setpoint adjustment slowly clockwise (CW) until the relay just operates. (LED changes state).
4. Increase the material level until it is well above the sensing element. See Figure 4-2. (LED changes state).
5. Mentally note the position of the screwdriver.6. Counting the number of turns, turn the setpoint
adjustment slowly clockwise (CW) until the relay once again just operates.

12
Z0X-2 Series Z-tron IIITM Point Level Control
DESIREDCONTROL
POINT
If less than one turn of the adjustment was observed between the sensing element covered and uncovered, the sensor is not generating enough signal. Consult the factory for further options.
7. Turn the adjustment back counterclockwise (CCW) one half the number of turns that were counted.
8. Record number of turns and save for future calibration reference
Calibration is now complete.
4.3 Calibration in Insulating Material [Vertical Mount]This 20-turn potentiometer does not have a mechanical stop. Turn 20 times to assure that you are at the extreme end. No damage will occur.The LED (on) indicates that the relay is energized or in normal condition (not alarm).
1. Set the level to a point on the active section of the sensing element where control is desired (3 inches [76.2 mm] of coverage minimum). See Figure 4-3.
2. Start from the full counterclockwise (CCW) position. Turn the setpoint adjustment clockwise (CW) until the relay just operates (LED changes states).
If dielectric constant or conductivity of material changes, point of operation may change. Consult factory.Calibration is now complete.
4.2 Calibration in Insulating Material [Horizontal Mount]- (Continued)
Figure 4-1 Level Below Horizontal
Sensing Element
Figure 4-2 Level Above Horizontal
Sensing Element
Figure 4-3 Level Covering Vertical
Sensing Element

Troubleshooting
13
Section 5: Troubleshooting
5.1 IntroductionThe Z-tron III Level Control is a solid-state device with no moving parts other than its relays, and requires no maintenance or adjustments. The units are designed to give years of unattended service.
A spare electronic chassis is recommended for every 10 units so that, in case of a failed unit, a critical application will not be delayed while the unit is returned to the factory for repair.
Use the following troubleshooting procedures to check out the Z-tron III Level Control. If attempts to locate the difficulty fail, notify your local Drexelbrook representative, or call the factory direct at 1-800-527-6297 (US and Canada) or +1 215-674-1234 (International).
5.2 Testing Electronic Unit
It is recommended to begin with Electronic Unit:
1. Verify that voltage is reaching unit.
2. Change fail-safe selector switch (Fig 3-1). If LED does not change state along with relays, Electronic Unit has failed.
3. Remove power from unit, loosen hold-down screws , then remove unit. Remove Blue screw from top of sensing element & disconnect Red spade lug connector. SAFELY reapply power.
4. As in Section 3.1, start with setpoint adjustment in extreme counterclockwise (CCW) position, turn screwdriver clockwise (CW) until relay just operates.
5. Rotate setpoint adjustment back and forth about this point, observing travel of screwdriver between relay pull-in and relay drop-out. If properly operating, screwdriver should travel less than ¼ turn to operate the relay. If not, Electric Unit has failed.
5.3 Testing Sensing Element
Be sure to first test Electronic Unit. Then:
1. Remove Electric Unit, as above, but do not apply power.
2. Use an analog ohmmeter1 that is set to the R x 1K ohm scale. Measure the resistances between each pair of sensing element connections. See Figure 5-1.
Center Conductor to Housing __________ohms Center Conductor to Red Lug __________ohms Red Lug to Housing __________ohms

14
Z0X-2 Series Z-tron IIITM Point Level Control
5.3 Testing Sensing Element (continued)3. A new sensing element that is clean and not coated
or wet should look like an open circuit on all sensing element tests.
4. If the sensing element is clean and dry, and shows resistance between terminals of less than 10K ohms, it is possible that moisture has soaked into the packing gland of the sensing element. In this case, the sensing element may need to be dried until the resistance increases to its maximum value.
5. If the process material is conductive, you may read some resistance between sensing element connections. The lowest permissible resistance values are:
Center Conductor to Housing 1000 ohms. Center Conductor to Red Lug 600 ohms. Red Lug to Housing 300 ohms.6. Resistance values lower than this could mean: • Extremely conductive coating on probe, which is an
application problem. You may wish to call the factory for suggestions for another technique.
• Probe is damaged and needs to be replaced. • Probe is touching vessel.7. A resistance reading of less than 10 ohms on any
sensing element terminal is usually due to a metal-to-metal short circuit. Check that the sensing element is not touching any vessel structure.
1An analog ohmmeter has a lower ohms/volt rating and provides more current to measure the resistance than a digital ohmmeter.
Figure 5-1 Checking the Sensing Element
Center = ProbeOuter = Shield
Housing = Ground
ANALOGOHMMETER
GROUNDEDTO
HOUSING
TO CENTERCONDUCTOR
PACKINGGLAND
DO NOT DISTURB
ANALOGOHMMETER
GROUNDEDTO
HOUSING
TO OUTERCONDUCTOR
Red Lug
PACKINGGLAND
DO NOT DISTURB
PROBE MEASUREMENT SHIELD MEASUREMENT

Troubleshooting
15
5.4 Testing Relay Circuits
Using an ohmmeter, perform the following steps to check out the relay circuits:
1. The relay circuits consist of double-pole double-throw relay contacts brought out to terminal strips. When the relays are operating properly, one pair of contacts will be open with high or low level, and one pair will be closed with high or low level. Refer to Figures 2-10 and 5-2.
2. Relay operation may generally be heard as an audible click when the background noise is not too high. Use one of the methods shown in Figure 5-3 to determine if the relay contacts are switching.
3. Difficulty in calibration can often be traced to improper wiring of the relay terminals to an annunciator or other panel device. Check the wiring against the relay chart in Figure 2-10.
Figure 5-2 Relay Circuit Operation
Figure 5-3 Relay Circuit Troubleshooting
OHMMETER
115Vac LAMP
115Vac
OR
16
Z0X-2 Series Z-tron IIITM Point Level Control
5.5 Possible Problems and Causes
Problem Possible Cause Solution
1. Instrument indicates alarm at all times.
a. Severe coating build upon sensing element (HLFS).
b. Sensing element not “seeing” material (LLFS) due to fill angle.
c. Defect in sensing element. d. Loss of power. e. Improper relay wiring.f. Improper calibration.g. Electronic unit
malfunction.h. Shorted sensor.i. Water in housing or
conduit.
a. Need longer Cote-Shield. Consult factory.
b. Need longer insertion length. Consult factory.
c. See Section 5.3.d. Check power wiring.
See Figure 2-4.e. See Section 2.5.f. See Section 4.g. See Section 5.2.h. See Section 5.3.i. Consult factory.
2. Instrument never indicates alarm.
a. Severe coating build-up on sensing element (LLFS).
b. Sensing element not “seeing” material (HLFS) due to fill angle.
c. Improper wiring.d. Improper calibration.e. Electronic unit
malfunction.
a. Need longer Cote-Shield. Consult factory.
b. Need longer insertion length. Consult factory.
c. See Section 2.d. See Section 4.e. See Section 5.2.
3. Instrument can’t be calibrated.
a. Improper wiring.b. Insufficient signal from
sensing element.c. Setpoint is beyond the
tuning range of the electronics.
d. Electronic unit malfunction
e. Sensor covered with conducting material.
a. See Section 2.b. Need longer insertion
length. Consult factory.c. Consult factory.e. See Section 5.2.
4. Instrument gives a false alarm.
a. Improper calibration.b. Loose wiring.c. Electronic unit
malfunction.d. Time delay required.e. Intermittent short of
sensor.
a. See Section 4.b. See Section 2.c. See Section 5.2.d. Consult factory.e. See Section 5.3.
5. Instrument operates intermittently.
a. Improper calibration.b. Loose wiring.c. Electronic unit
malfunction.d. Dielectric (k) of material
is too low.
a. See Section 4.b. See Section 2.c. See Section 5.2.d. Need high sensitivity unit.
Consult factory.
Troubleshooting
1�
5.6 Factory Assistance
AMETEK Drexelbrook can answer any questions about The Z-tron III series instrument. Call Customer Service at 1-800-553-9092 (US and Canada) or +1 215 674-1234 (International).
If you require assistance and attempts to locate the problem have failed:
Contact your local Drexelbrook representative,
Telephone the Service department toll-free:• 1-800-527-6297 (US and Canada) • +1 215 674-1234 (International)
FAX: Service Department + 215-443-5117E-Mail: [email protected]
Please provide the following information:
• Instrument Model Number• Sensing Element Model Number and Length• Original Purchase Order Number• Material being measured• Temperature• Pressure• Agitation• Brief description of the problem• Checkout procedures that have failed
5.� Field Service
Trained field servicemen are available on a time-plus-expense basis to assist in start-ups, diagnosing difficult application problems, or in-plant training of personnel. Contact the service department for further details.
5.� Customer Training
Periodically, AMETEK Drexelbrook instrument training seminars for customers are held at the factory. These sessions are guided by Drexelbrook engineers and specialists, and provide detailed information on all aspects of level measurement, including theory and practice of instrument operation. For more information write to: AMETEK Drexelbrook, Communications/ Training Group or call 215-674-1234.

1�
Z0X-2 Series Z-tron IIITM Point Level Control
5.9 Equipment Return
In order to provide the best service, any equipment being returned for repair or credit must be pre-approved by the factory.
In many applications, sensing elements are exposed to hazardous materials.
• OSHA mandates that our employees be informed and protected from hazardous chemicals.
• Material Safety Data Sheets (MSDS) listing the hazardous materials to which the sensing element has been exposed MUST accompany any repair.
• It is your responsibility to fully disclose all chemicals and decontaminate the sensing element.
To obtain a return authorization (RA#), contact the Service department at 1-800-527-6297 (US and Canada) or + 215-674-1234 (International).
• Please provide the following information:
• Model Number of Return Equipment
• Serial Number
• Original Purchase Order Number
• Process Materials to which the equipment has been exposed.
• MSDS sheets for any hazardous materials
• Billing Address
• Shipping Address
• Purchase Order Number for Repairs
• Please include a purchase order even if the repair is under warranty. If repair is covered under warranty, you will not be charged.
Ship equipment freight prepaid to:
AMETEK-DREXELBROOK. 205 KEITH VALLEY ROAD HORSHAM, PA 19044-1499COD shipments will not be accepted.

Specifications
19
Section 6: Specifications
Power Requirements: AC Units: 95-145 Vac, 50/60 Hz, 1 Watt 215-265 Vac, 50/60 Hz, 1 Watt
DC Units: 24 Vdc Unit: 19-29 Vdc input, 1 Watt
Sensitivity: 0.3pF or less
Operating Point Range: 0 - 80 pF (20 Turn Pot / 4 pF per Turn)
Load Resistance: Center to Ground, 1500 ohms Center to Shield, 750 ohms Shield to Ground, 750 ohms
Failsafe: Field adjustable to either High-Level Fail-Safe (HLFS) or Low-Level Fail-Safe (LLFS)
Output: DPDT relay closure
Contact Rating: 5A @ 120 Vac non-inductive 2A @ 230 Vac non-inductive
Ambient Temperature: -40°F to 145°F (-40°C to 60°C)
Temperature Effect: 0.5pF/50°F
Line Voltage Effect: 0.2pF/20V @ 120 Vac
Stability: 0.15pF/6 mo. maximum shift
Spark Protection: 100 Amp
Mounting: ¾-inch NPT standard

20
Z0X-2 Series Z-tron IIITM Point Level Control
Section 6: Specifications (Continued)
Housing: The standard explosionproof housing meets the following classifications:
Nema 1 General-Purpose Nema 2 Drip-Tight Nema 3 Weather-Resistant Nema 4 Waterproof Nema 5 Dust-Tight Nema 12 Industrial Use
FM approved for Class I, Groups A, B, C, and D (Div. 1 or 2) and Class II, Groups E, F, and G, (Div. 1 or 2). FM approval on housing only. If agency approval is required, use the Drexelbrook PXL The Point™ instrument for point level control.
Time Delay: 0-60 seconds
Sensing Element:
Sensing Process Process CenterElement Temperature Wetted Rod Model and Pressure Parts O.D.Number
700-206-201 250°F @ 200 psi 316 SS and Peek 3/8 inch
ApprovalsUL/CUL/508 General PurposeCE 0344
Temperature at electronics must not exceed 145° F

Appendix
1
Appendix A: Shortening or Lengthening the Sensing Element
CAUTION: TheinsulationlengthofeitherFlush Sensing ElementsorInsulated Sensing Elements canNOT bechanged.Cable Sensing Elementscanonlybeshortened.Instructionsareincludedwitheachunit.
Note: Any changes to probe length after calibration requires re calibration to ensure proper operation.
Insulators
The NeedSometimes your application calls for probe lengths other than the standard 18-inch or longer insertion lengths supplied. Shortening the sensing element is quite simple and can be done in the field. Lengthening the sensing element, however, is more difficult because the metal rod, typically 304 SS or 316 SS, must be welded.
Before making any Adjustments: 1) Read the following instructions thoroughly. 2) Remove power. 3) Disconnect the electronics. 4) Protect electronics from any static discharge. 5) Protect electronics from any heat.
ShorteningThe bare metal center rod of the sensing element can be shortened with a hacksaw. Be careful not to cut either of the two insulators. See Figure on this page.
In applications using conductive or water-based materials, shortening is not a problem. Leave a minimum bare metal center rod length of two (2) inches.
For dry granular materials, such as powder, sand, corn, clinker, etc., you must leave a minimum bare metal center rod length of eight (8) inches. Consult the factory before shortening beyond this point.
LengtheningTo lengthen the sensing element, an extension rod can be welded onto the end of the bare metal center rod. Make sure that the extension rod is the same metal as the sensing element. Disconnect electronics before welding
An alternate option is to add a pipe coupling and a section of metal pipe after threading the tip of the sensing element. In this case, the metal pipe need not be identical to the metal of the sensing element.
Center Rod
Insertion Length(18" or 36" std.)
NOTE:Cote-ShieldelementmustNEVER bemodified.

Form 440-0001-001 3/1/2006
TERMS AND CONDITIONS OF SALEGENERAL: ALL ORDERS ARE SUBJECT TO THE FOLLOWING TERMS AND CONDITIONS. ANY ACCEPTANCE OF ANY OFFER OF BUYER FOR ANY GOODS OR SERVICES IS CONDITIONED UPON THESE TERMS AND CONDITIONS, AND SELLER OBJECTS TO ANY ADDITIONAL OR DIFFERENT TERMS PROPOSED BY BUYER IN ANY DOCUMENT, WHICH SHALL NOT BE BINDING UPON SELLER. No salesman or other party is authorized to bind the AMETEK DREXELBROOK Division of AMETEK, Inc. (hereinafter “Seller”) by any agreement, warranty, statement, promise, or understanding not herein expressed, and no modifications shall be binding on Seller unless the same are in writing and signed by an executive officer of Seller or his or her duly authorized representative. Verbal orders shall not be executed until written notification has been received and acknowledged by Seller.
QUOTATIONS: Written quotations are valid for thirty (30) days unless otherwise stated. Verbal quotations expire the same day they are made.
PRICES: All prices and terms are subject to change without notice. Buyer-requested changes to its order (“Orders”), including those affecting the identity, scope and delivery of the goods or services, must be documented in writing and are subject to Seller’s prior approval and adjustments in price, schedule and other affected terms and conditions. Orders requiring certified test data in excess of commercial requirements, are subject to a special charge.
ORDER ACCEPTANCE: All Orders are subject to final approval and acceptance by Seller at its office located at 205 Keith Valley Road, Horsham, Pennsylvania 19044.
TERMS OF PAYMENT: Seller’s standard terms of payment for Buyers who qualify for credit are net thirty (30) days from date of invoice. All invoices must be paid in United States dollars.
CREDIT: Seller reserves the right at any time to revoke any credit extended to Buyer or otherwise modify terms of payment if Buyer fails to pay for any shipments when due or if in Seller’s opinion there is a material adverse change in Buyer’s financial condition. Seller may, at its option, cancel any accepted Order if Buyer fails to pay any invoices when due.
DELIVERY: Shipments are F.O.B place of manufacture (“Shipping Point”) and the Buyer shall pay all freight, transportation, shipping, duties, fees, handling, insurance, storage, demurrage, or similar charges from Shipping Point. Delivery of goods to common carrier shall constitute delivery and passing of title to the Buyer, and all risk of loss or damage in transit shall be borne by Buyer. Any claims or losses for damage or destruction after such delivery shall be the responsibility of Buyer.
Seller reserves the right to make delivery in installments which shall be separately invoiced and paid for when due, without regard to subsequent deliveries. Delay in delivery of any installment shall not relieve Buyer of its obligation to accept remaining deliveries.
Acknowledged shipping dates are approximate only and based on prompt receipt of all necessary information from Buyer and Buyer’s compliance with terms of payment.
TAXES: All sales, excise and similar taxes which Seller may be required to pay or collect with respect to the goods and/or services covered by any Order, shall be for the account of the Buyer except as otherwise provided by law or unless specifically stated otherwise by Seller in writing.
TERMINATION AND HOLD ORDERS: No Order may be terminated by Buyer except upon written request by Buyer and approval by Seller, and if said request is approved by Seller, under the following conditions: (1) Buyer agrees to accept delivery of all of the units completed by Seller through the workday on which Seller receives the written termination request; (2) Buyer agrees to pay to Seller all direct costs and expenses applicable to the portion of the Order that is incomplete.
WARRANTY: A. Hardware: Seller warrants its goods against defects in materials and workmanship under normal use and service for one (1) year from the date of invoice. B. Software and Firmware: Unless otherwise specified, Seller warrants for a period of one (1) year from date of invoice that standard software or firmware, when used with Seller specified hardware, shall perform in accordance with Seller’s published specifications. Seller makes no representation or warranty, expressed or implied, that the operation of the software or firmware shall be uninterrupted or error-free, or that functions contained therein shall meet or satisfy the Buyer’s intended use or requirements. C. Services: Seller warrants that services, including engineering and custom application, whether provided on a fixed cost or time and material basis, shall be performed in accordance with generally accepted industry practices. D. Remedies: Seller’s liability under this section is restricted to replacing, repairing, or issuing credit (at Seller’s option) for any returned goods and only under the following conditions: (1) Seller must be promptly notified, in writing, as soon as possible after the defects have been noted by the Buyer, but not later than (1) year from date of invoice from Seller; (2) The defective goods are to be returned to the place of manufacture, shipping charges prepaid by the Buyer; (3) Seller’s inspection shall disclose to its satisfaction that the goods were defective in materials or workmanship at the time of shipment; (4) Any warranty service (consisting of time, travel and expenses related to such services) performed other than at Seller’s factory, shall be at Buyer’s expense. E.Repaired/Reconditioned Goods: As to out-of-warranty goods which Seller has repaired or reconditioned, Seller warrants for a period of sixty (60) days from date of its invoice only new components replaced in the most recent repair/reconditioning. F. Returns and Adjustments: No goods may be returned unless authorized in advance by Seller and then only upon such conditions to which Seller may agree. Buyer must obtain an RMA (Return Material Authorization) number from Seller prior to any return shipment and such RMA number must appear on the shipping label and packing slip. Buyer shall be responsible for the returned goods until such time as Seller receives the same at its plant and for all charges for packing, inspection, shipping, transportation, or insurance associated with returned goods. In the event that credit for returned goods is granted, it shall be at the lesser of the then current prices or the original purchase price. Claims for shortage or incorrect material must be made within five (5) days after receipt of shipment.
ALL OTHER WARRANTIES, FOR ANY OF SELLER’S GOODS OR SERVICES, WHETHER ORAL, WRITTEN, EXPRESS, IMPLIED, STATUTORY OR OTHERWISE, INCLUDING WITHOUT LIMITATION ANY IMPLIED WARRANTY OF MERCHANTABILITY OR FITNESS FOR PURPOSE ARE EXCLUDED.
INTELLECTUAL PROPERTY: Seller’s sale of goods or provision of related documentation or other materials to Buyer shall not transfer any intellectual property rights to Buyer unless Seller specifically agrees to do so in writing. Seller shall retain ownership of all applicable patents, trademarks, copyrights and other intellectual property rights. Buyer shall not use, copy or transfer any such items in violation of Seller’s intellectual property rights or applicable law, or for any purposes other than that for which the items were furnished.
Seller shall defend any lawsuit brought against the Buyer based on a claim that the design or construction of the goods sold hereunder by Seller infringe any United States or Canadian Patent, Copyright or Mask Work Registration, provided that Buyer promptly notifies Seller of such claim in writing and further provided that, at Seller’s expense, (1) Buyer gives Seller the sole right to defend or control the defense of the suit or proceeding, including settlement, and (2) Buyer provides all necessary information and assistance for that defense. In the event of a charge of infringement, Seller’s obligation under the agreement shall be fulfilled if Seller, at its option and expense, either (i) settles such claim; (ii) procures for Buyer the right to continue using such goods; (iii) replaces or modifies goods to avoid infringement; or (iv) accepts the return of any infringing goods and refunds their purchase price; or (iv) defends against such claim.
If Buyer furnishes specifications or designs to Seller, the obligations of Seller set forth above shall not apply to goods made by Seller using such specifications or designs, and Buyer shall defend, indemnify and hold Seller harmless against any third party claims for infringement which arise out of Seller’s use of specifications or designs furnished by Buyer.
SOFTWARE LICENSE: If goods purchased hereunder include software (“Software”), Buyer may use the Software only as part of the goods. Buyer may not use, copy, or transfer any of the Software except as may be permitted under the applicable License Agreement provided with the goods. Buyer’s right to use, copy or transfer the Software shall terminate upon termination of Buyer’s right to use the goods.
PACKAGING/WEIGHTS AND DIMENSIONS: Buyer specified packing or marking may be subject to additional charges not otherwise included in the price of the goods. Published weights and dimensions are estimates or approximate only and are not warranted.
FORCE MAJEURE: Seller shall not be responsible for delays in delivery or any failure to deliver due to causes beyond Seller’s control, including but not limited to the following items: acts of God, war, terrorism, mobilization, civil commotion, riots, embargoes, domestic or foreign governmental regulations or orders, governmental priorities, port congestion, acts of the Buyer, its agents or employees, fires, floods, strikes, lockouts and other labor difficulties, shortages of or inability to obtain shipping space or transportation, inability to secure fuel, supplies or power at current prices or on account of shortages thereof, or due to limitations imposed by the extent of availability of Seller’s normal manufacturing facilities.
If a delay excused per the above extends for more than ninety (90) days and the parties have not agreed upon a revised basis for continuing providing the goods or services at the end of the delay, including adjustment of the price, then Buyer, upon thirty (30) days’ prior written notice to Seller may terminate the Order with respect to the unexecuted portion of the goods or services, whereupon Buyer shall promptly pay Seller its reasonable termination charges upon submission of Seller’s invoices thereof.
LIMITATION OF LIABILITY: Seller’s liability for any claim of any kind, except infringement of intellectual property rights, shall not exceed the purchase price of any goods or services which give rise to the claim. SELLER SHALL IN NO EVENT BE LIABLE FOR BUYER’S MANUFACTURING COSTS, LOST PROFITS, LOSS OF USE OF THE GOODS OR SERVICES, COST OF CAPITAL, COST OF SUBSTITUTE GOODS, FACILITIES, SERVICES OR REPLACEMENT POWER, DOWNTIME COSTS, CLAIMS OF BUYER’S CUSTOMERS FOR DAMAGES, OR OTHER SPECIAL, PROXIMATE, INCIDENTAL, INDIRECT, EXEMPLARY OR CONSEQUENTIAL DAMAGES. Any action against Seller must be brought within eighteen (18) months after the cause of action accrues. These disclaimers and limitations of liability shall apply regardless of the form of action, whether in contract, tort or otherwise, and further shall extend to the benefit of Seller’s vendors, appointed distributors and other authorized resellers as third-party beneficiaries.
PROHIBITION FOR HAZARDOUS USE: Goods sold hereunder generally are not intended for application in and shall not be used by Buyer in the construction or operation of a nuclear installation or in connection with the use or handling of nuclear material, or for any hazardous activity or critical application, where failure of a single component could cause substantial harm to persons or property, unless the goods have been specifically approved for such a use or application. Seller disclaims all liability for any loss or damage resulting from such unauthorized use and Buyer shall defend, indemnify and hold harmless the Seller against any such liability, whether as a result of breach of contract, warranty, tort (regardless of the degree of fault or negligence), strict liability or otherwise.
EXPORT CONTROL: Buyer shall comply with all export control laws and regulations of the United States, and all sales hereunder are subject to those laws and regulations. Seller shall not be named as shipper or exporter of record for any goods sold hereunder unless specifically agreed to in writing by Seller. At Seller’s request, Buyer shall furnish Seller with end-use and end-user information to determine export license applicability. Buyer warrants, in accordance with U.S. Export Law, that goods sold hereunder shall not be destined for facilities or activities involving nuclear, chemical or biological weapons, or related missile delivery systems in named prohibited regions or countries.
GOVERNING LAW: Seller intends to comply with all laws applicable to its performance under any order. All matters relating to interpretation and effect of these terms and any authorized changes, modifications or amendments thereto shall be governed by the laws of the Commonwealth of Pennsylvania. No government contract regulations or clauses shall apply to the goods or services, this agreement, or act to bind Seller unless specifically agreed to by Seller in writing.
NON-WAIVER BY SELLER: Waiver by Seller of a breach of any of these terms and conditions shall not be construed as a waiver of any other breach.
SEVERABILITY AND ENTIRE AGREEMENT: If any provision of these terms and conditions is unenforceable, the remaining terms shall nonetheless continue in full force and effect. This writing, together with any other terms and conditions Seller specifically agrees to in writing, constitutes the entire terms and conditions of sale between Buyer and Seller and supercedes any and all prior discussions, and negotiations on its subject matter.


205 Keith Valley Road, Horsham, PA 19044 U.S. and Canada: 1-800-553-909224-Hour Service: 1-800-527-6297International: +1 215-674-1234Fax: +1 215-674-2731E-mail: [email protected] Website: www.drexelbrook.com
An ISO 9001 Certified Company