InformationNOW - Fees - STI Support...
26
InformationNOW – Fees About this Guide This Quick Reference Guide provides an overview of the fee options available in InformationNOW. Setup The following lookups pertain to fees and should be created before fee records may be created. For complete details regarding adding, viewing and deleting lookups, please refer to the InformationNOW – Lookups Quick Reference Guide. Required fields are indicated with an asterisk (*). Category Categories may be defined for the purpose of grouping fees. Ex.: Textbook, Workbook, Supply, Other. Payment priority may be assigned by category. Proration schedules and exceptions may also be assigned to the category. Add To insert a category, perform the following steps: • Go to Fees | Setup or System Preferences | Setup. • Select Fee Categories from the lookup list and click Refresh. • Click to Add a new category. Required fields are indicated with an asterisk (*). o *Name : Enter the name of the fee (ex.: Workbook). o *Priority : Enter the priority for which payment is to be applied. The higher the number, the higher the priority in payment. For example, if all fees under the category of Workbook are to Quick Reference Guide Chalkable_0407160953 InformationNOW – Fees • 1
Transcript of InformationNOW - Fees - STI Support...
InformationNOW – Fees
About this Guide This Quick Reference Guide provides an overview of the fee options available in InformationNOW.
Setup The following lookups pertain to fees and should be created before fee records may be created. For complete details regarding adding, viewing and deleting lookups, please refer to the InformationNOW – Lookups Quick Reference Guide. Required fields are indicated with an asterisk (*).
Category Categories may be defined for the purpose of grouping fees. Ex.: Textbook, Workbook, Supply, Other. Payment priority may be assigned by category. Proration schedules and exceptions may also be assigned to the category.
Add To insert a category, perform the following steps:
• Go to Fees | Setup or System Preferences | Setup.
• Select Fee Categories from the lookup list and click Refresh.
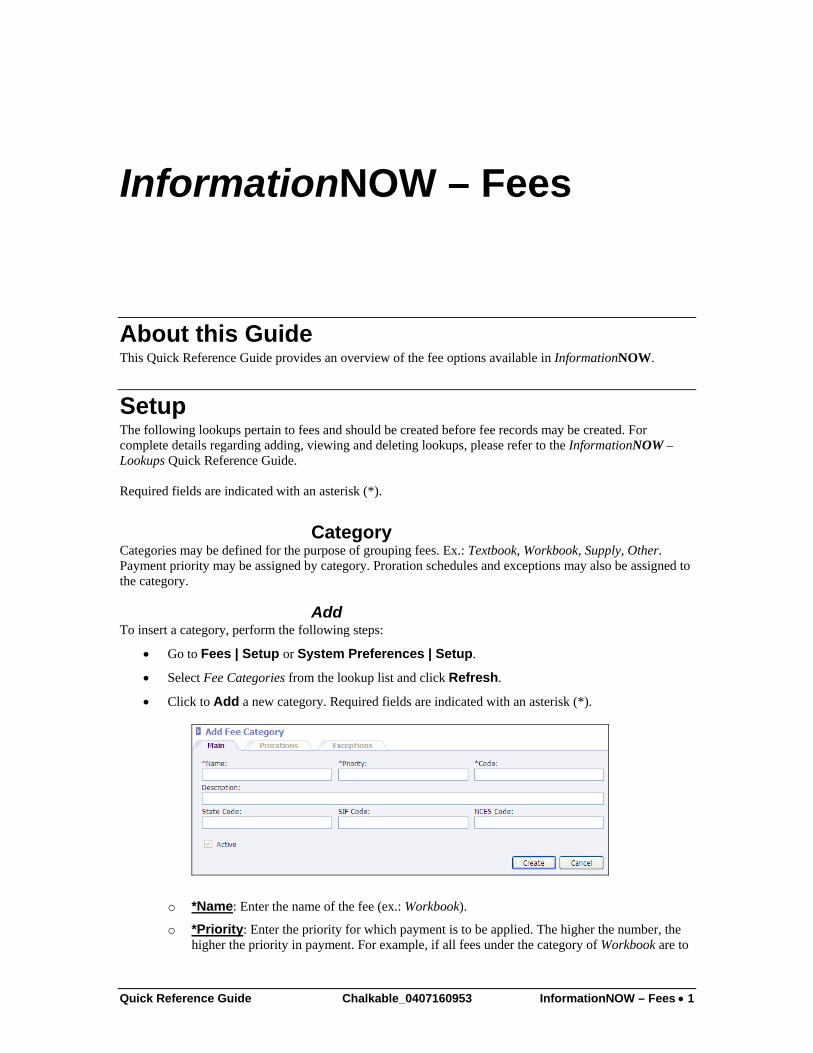
• Click to Add a new category. Required fields are indicated with an asterisk (*).
o *Name: Enter the name of the fee (ex.: Workbook).
o *Priority: Enter the priority for which payment is to be applied. The higher the number, the higher the priority in payment. For example, if all fees under the category of Workbook are to
Quick Reference Guide Chalkable_0407160953 InformationNOW – Fees • 1

be paid as the 2nd fee priority after all fees in the category Supplies have been paid, enter a 2 on the Workbook category and enter a great number (ex. 3 or higher) on the Supplies category.
o *Code: Enter a unique identifier for the category (up to 5 characters).
o Description: Enter a brief description for this fee category.
o State Code: Enter the state code associated to this category. Check state guidelines to determine if this is required.
o SIF Code: Enter the SIF code associated with this category. Check state guidelines to determine if this is required.
o NCES Code: Enter the NCES code associated with this category. Check state guidelines to determine if this is required.
o Active; Check if this fee is currently active. Fees which are not marked as active will not appear in any drop lists for applying fees to students or for reports.
• Click Create. Once a fee is created, the Prorations and Exceptions tabs become available.
Prorations A proration schedule may be created to indicate the percentage discount that a student should receive for a fee if the student enters or withdraws from a course or from school within a given number of days. Proration schedules are assigned to fee categories.
• To create a proration schedule, go to Fees | Setup or to System Preferences | Setup.
• Select Fee Categories and click Refresh.
• Select the Category for which the proration is to be assigned and click View.
• Click the Prorations tab.
• Click Add. Required fields are indicated with an asterisk (*).
o *Number of Terms: Enter the number of terms that the course meets for which the prorated schedule is to be applied. For example, in a two-term school, when creating a prorated schedule for courses that last all year, enter a two (2) for the number of terms. When creating a prorated schedule for courses that last only one term, enter a one (1) for the number of terms. When creating a prorated schedule for a non-course fee (ex.: Registration for the regular school year) enter the number of terms in the current school year.
o *Discount Percentage: Enter the discount percentage. This is the discount amount that a student is to receive when enrolled in school.
o *Days Missed Low/High: Enter the number of days a student should be short in order to receive this discount. The example shown on the following page is for a prorated schedule for a school registration fee in a two-term school with 180 days in the regular school year.
Quick Reference Guide Chalkable_0407160953 InformationNOW – Fees • 2
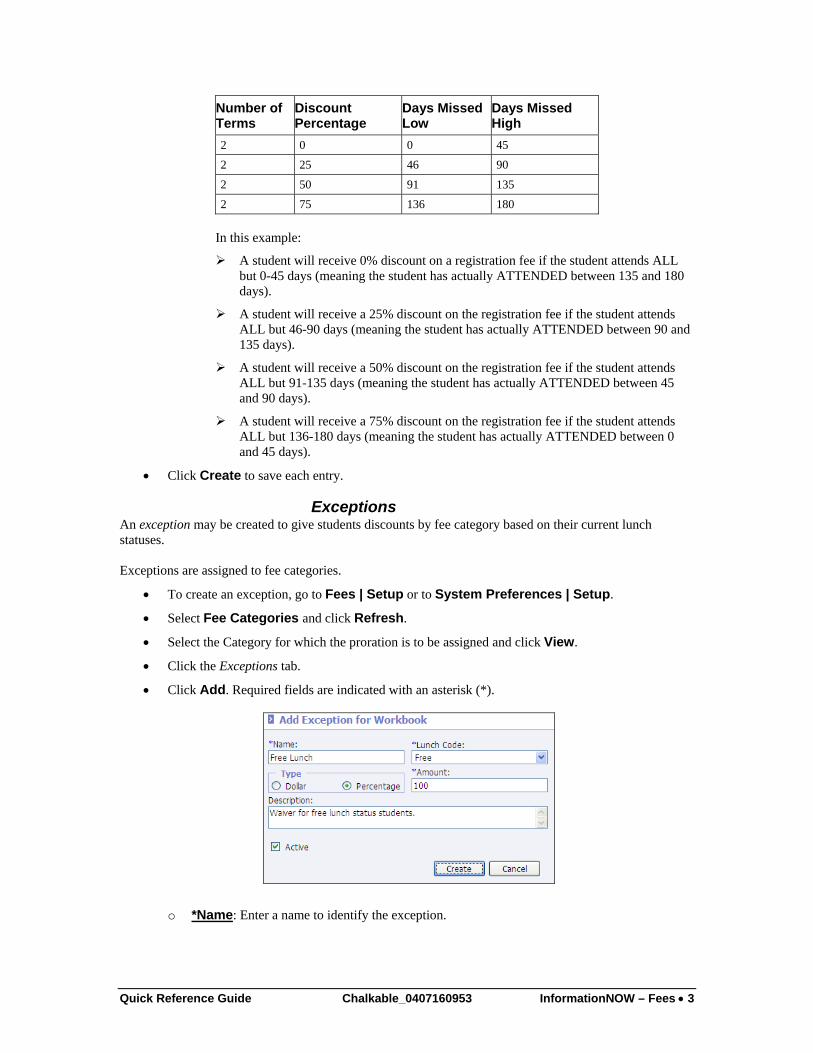
Number of Terms
Discount Percentage
Days Missed Low
Days Missed High
2 0 0 45
2 25 46 90
2 50 91 135
2 75 136 180
In this example:
A student will receive 0% discount on a registration fee if the student attends ALL but 0-45 days (meaning the student has actually ATTENDED between 135 and 180 days).
A student will receive a 25% discount on the registration fee if the student attends ALL but 46-90 days (meaning the student has actually ATTENDED between 90 and 135 days).
A student will receive a 50% discount on the registration fee if the student attends ALL but 91-135 days (meaning the student has actually ATTENDED between 45 and 90 days).
A student will receive a 75% discount on the registration fee if the student attends ALL but 136-180 days (meaning the student has actually ATTENDED between 0 and 45 days).
• Click Create to save each entry.
Exceptions An exception may be created to give students discounts by fee category based on their current lunch statuses. Exceptions are assigned to fee categories.
• To create an exception, go to Fees | Setup or to System Preferences | Setup.
• Select Fee Categories and click Refresh.
• Select the Category for which the proration is to be assigned and click View.
• Click the Exceptions tab.
• Click Add. Required fields are indicated with an asterisk (*).
o *Name: Enter a name to identify the exception.
Quick Reference Guide Chalkable_0407160953 InformationNOW – Fees • 3
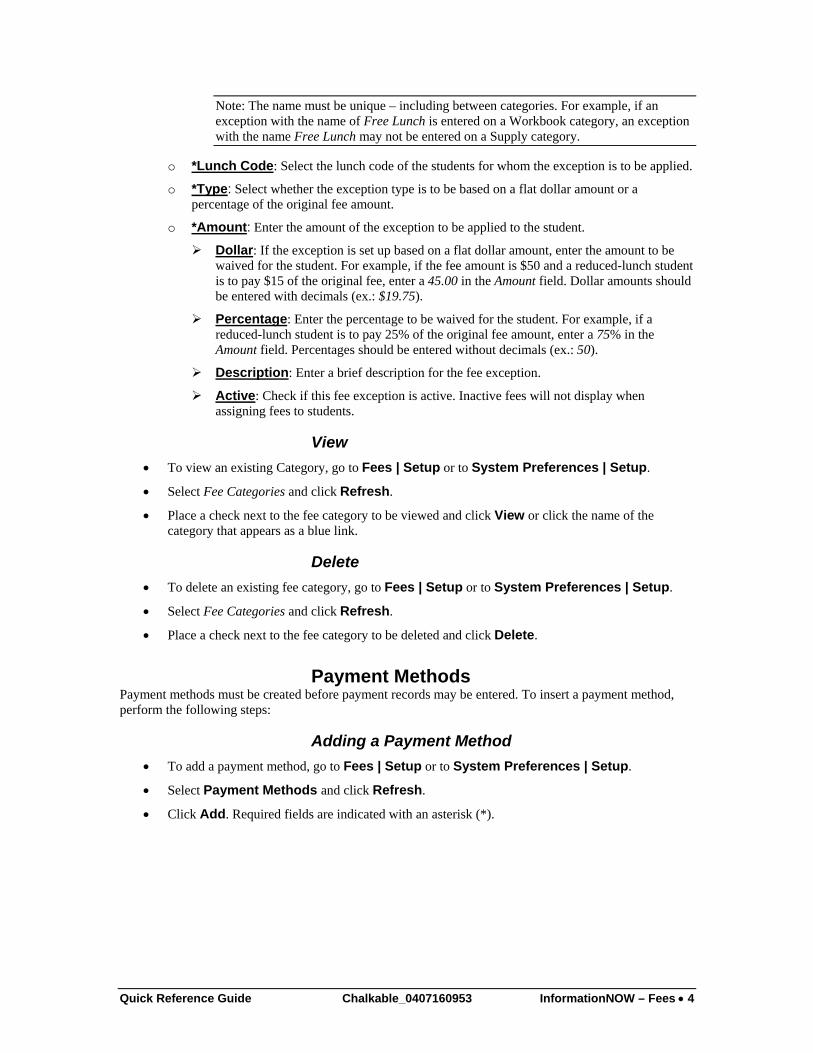
Note: The name must be unique – including between categories. For example, if an exception with the name of Free Lunch is entered on a Workbook category, an exception with the name Free Lunch may not be entered on a Supply category.
o *Lunch Code: Select the lunch code of the students for whom the exception is to be applied.
o *Type: Select whether the exception type is to be based on a flat dollar amount or a percentage of the original fee amount.
o *Amount: Enter the amount of the exception to be applied to the student.
Dollar: If the exception is set up based on a flat dollar amount, enter the amount to be waived for the student. For example, if the fee amount is $50 and a reduced-lunch student is to pay $15 of the original fee, enter a 45.00 in the Amount field. Dollar amounts should be entered with decimals (ex.: $19.75).
Percentage: Enter the percentage to be waived for the student. For example, if a reduced-lunch student is to pay 25% of the original fee amount, enter a 75% in the Amount field. Percentages should be entered without decimals (ex.: 50).
Description: Enter a brief description for the fee exception.
Active: Check if this fee exception is active. Inactive fees will not display when assigning fees to students.
View • To view an existing Category, go to Fees | Setup or to System Preferences | Setup.
• Select Fee Categories and click Refresh.
• Place a check next to the fee category to be viewed and click View or click the name of the category that appears as a blue link.
Delete • To delete an existing fee category, go to Fees | Setup or to System Preferences | Setup.
• Select Fee Categories and click Refresh.
• Place a check next to the fee category to be deleted and click Delete.
Payment Methods Payment methods must be created before payment records may be entered. To insert a payment method, perform the following steps:
Adding a Payment Method • To add a payment method, go to Fees | Setup or to System Preferences | Setup.
• Select Payment Methods and click Refresh.
• Click Add. Required fields are indicated with an asterisk (*).
Quick Reference Guide Chalkable_0407160953 InformationNOW – Fees • 4
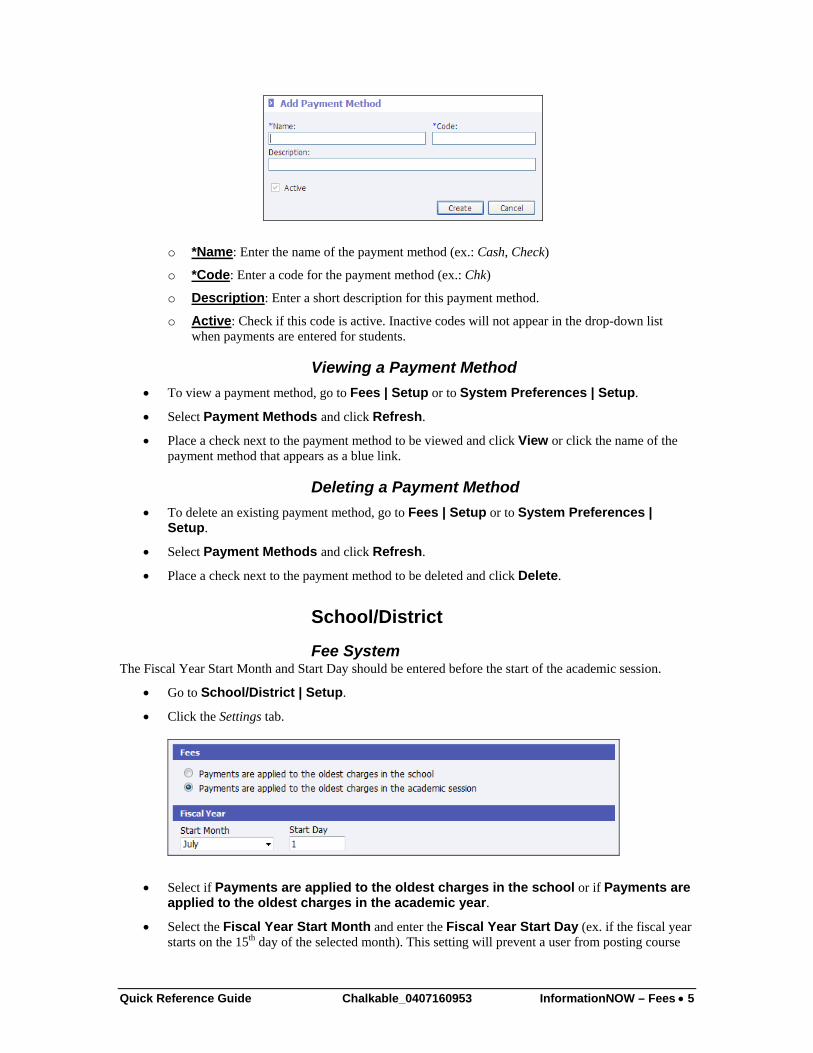
o *Name: Enter the name of the payment method (ex.: Cash, Check)
o *Code: Enter a code for the payment method (ex.: Chk)
o Description: Enter a short description for this payment method.
o Active: Check if this code is active. Inactive codes will not appear in the drop-down list when payments are entered for students.
Viewing a Payment Method • To view a payment method, go to Fees | Setup or to System Preferences | Setup.
• Select Payment Methods and click Refresh.
• Place a check next to the payment method to be viewed and click View or click the name of the payment method that appears as a blue link.
Deleting a Payment Method • To delete an existing payment method, go to Fees | Setup or to System Preferences |
Setup.
• Select Payment Methods and click Refresh.
• Place a check next to the payment method to be deleted and click Delete.
School/District
Fee System The Fiscal Year Start Month and Start Day should be entered before the start of the academic session.
• Go to School/District | Setup.
• Click the Settings tab.
• Select if Payments are applied to the oldest charges in the school or if Payments are applied to the oldest charges in the academic year.
• Select the Fiscal Year Start Month and enter the Fiscal Year Start Day (ex. if the fiscal year starts on the 15th day of the selected month). This setting will prevent a user from posting course
Quick Reference Guide Chalkable_0407160953 InformationNOW – Fees • 5
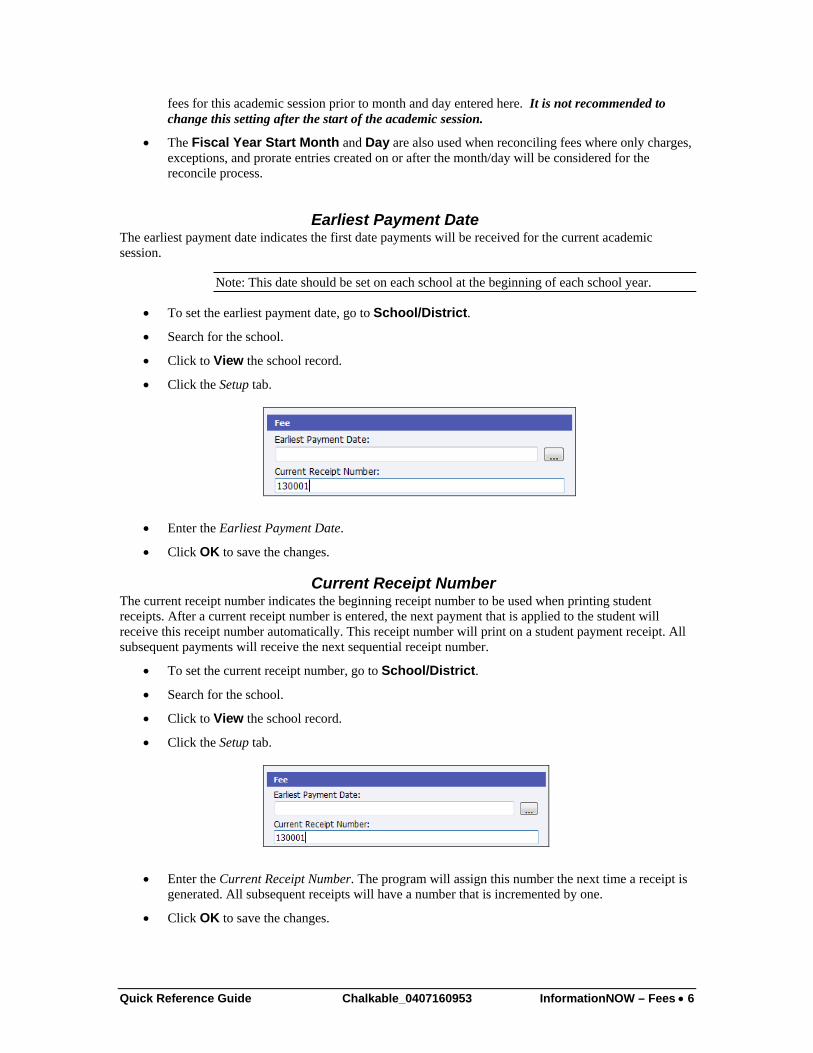
fees for this academic session prior to month and day entered here. It is not recommended to change this setting after the start of the academic session.
• The Fiscal Year Start Month and Day are also used when reconciling fees where only charges, exceptions, and prorate entries created on or after the month/day will be considered for the reconcile process.
Earliest Payment Date The earliest payment date indicates the first date payments will be received for the current academic session.
Note: This date should be set on each school at the beginning of each school year.
• To set the earliest payment date, go to School/District.
• Search for the school.
• Click to View the school record.
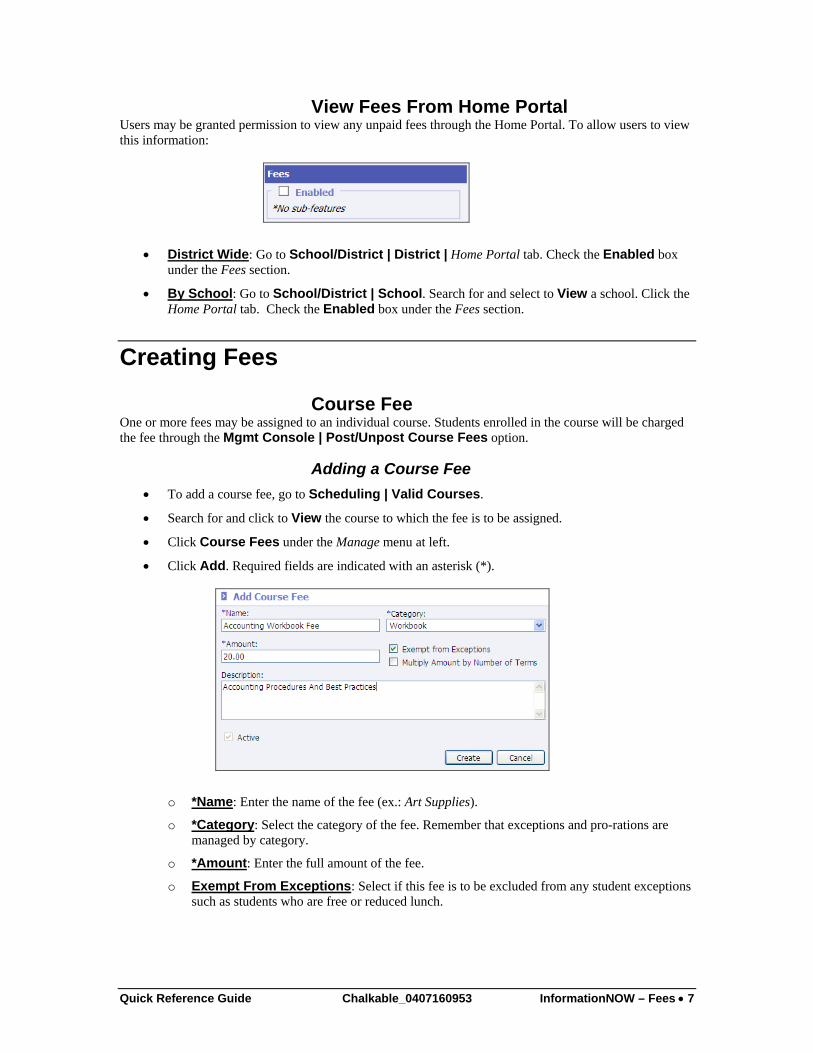
• Click the Setup tab.
• Enter the Earliest Payment Date.
• Click OK to save the changes.
Current Receipt Number The current receipt number indicates the beginning receipt number to be used when printing student receipts. After a current receipt number is entered, the next payment that is applied to the student will receive this receipt number automatically. This receipt number will print on a student payment receipt. All subsequent payments will receive the next sequential receipt number.
• To set the current receipt number, go to School/District.
• Search for the school.
• Click to View the school record.
• Click the Setup tab.
• Enter the Current Receipt Number. The program will assign this number the next time a receipt is generated. All subsequent receipts will have a number that is incremented by one.
• Click OK to save the changes.
Quick Reference Guide Chalkable_0407160953 InformationNOW – Fees • 6
View Fees From Home Portal Users may be granted permission to view any unpaid fees through the Home Portal. To allow users to view this information:
• District Wide: Go to School/District | District | Home Portal tab. Check the Enabled box under the Fees section.
• By School: Go to School/District | School. Search for and select to View a school. Click the Home Portal tab. Check the Enabled box under the Fees section.
Creating Fees
Course Fee One or more fees may be assigned to an individual course. Students enrolled in the course will be charged the fee through the Mgmt Console | Post/Unpost Course Fees option.
Adding a Course Fee • To add a course fee, go to Scheduling | Valid Courses.
• Search for and click to View the course to which the fee is to be assigned.
• Click Course Fees under the Manage menu at left.
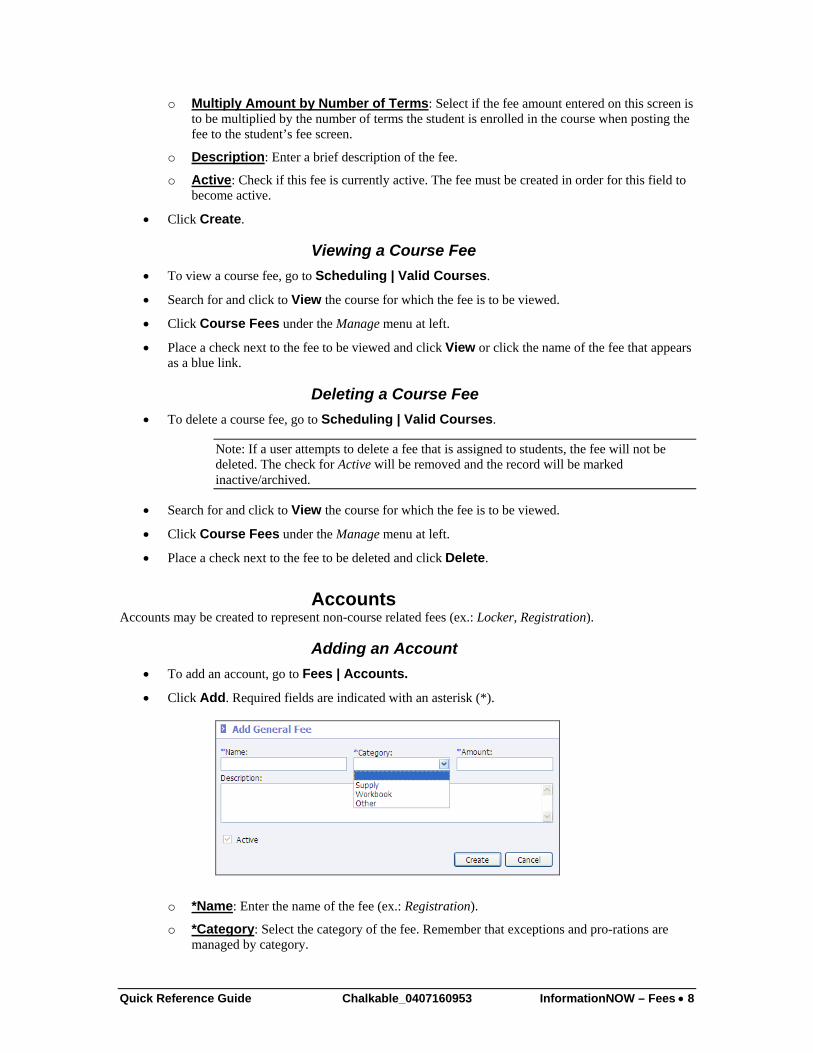
• Click Add. Required fields are indicated with an asterisk (*).
o *Name: Enter the name of the fee (ex.: Art Supplies).
o *Category: Select the category of the fee. Remember that exceptions and pro-rations are managed by category.
o *Amount: Enter the full amount of the fee.
o Exempt From Exceptions: Select if this fee is to be excluded from any student exceptions such as students who are free or reduced lunch.
Quick Reference Guide Chalkable_0407160953 InformationNOW – Fees • 7
o Multiply Amount by Number of Terms: Select if the fee amount entered on this screen is to be multiplied by the number of terms the student is enrolled in the course when posting the fee to the student’s fee screen.
o Description: Enter a brief description of the fee.
o Active: Check if this fee is currently active. The fee must be created in order for this field to become active.
• Click Create.
Viewing a Course Fee • To view a course fee, go to Scheduling | Valid Courses.
• Search for and click to View the course for which the fee is to be viewed.
• Click Course Fees under the Manage menu at left.
• Place a check next to the fee to be viewed and click View or click the name of the fee that appears as a blue link.
Deleting a Course Fee • To delete a course fee, go to Scheduling | Valid Courses.
Note: If a user attempts to delete a fee that is assigned to students, the fee will not be deleted. The check for Active will be removed and the record will be marked inactive/archived.
• Search for and click to View the course for which the fee is to be viewed.
• Click Course Fees under the Manage menu at left.
• Place a check next to the fee to be deleted and click Delete.
Accounts Accounts may be created to represent non-course related fees (ex.: Locker, Registration).
Adding an Account • To add an account, go to Fees | Accounts.
• Click Add. Required fields are indicated with an asterisk (*).
o *Name: Enter the name of the fee (ex.: Registration).
o *Category: Select the category of the fee. Remember that exceptions and pro-rations are managed by category.
Quick Reference Guide Chalkable_0407160953 InformationNOW – Fees • 8

o *Amount: Enter the full amount of the fee, to two decimal places (ex.: 50.00)
o Description: Enter a brief description of the fee.
o Active: Check if this fee is currently active.
• Click Create.
Viewing an Account • To view an account, go to Fees | Accounts.
• Place a check next to the fee to be viewed and click View or click the name of the fee that appears as a blue link.
Deleting an Account • To delete an account, go to Scheduling | Valid Courses.
Note: If a user attempts to delete an account that is assigned to students, the account will not be deleted. The check for Active will be removed and the record will be marked inactive/archived.
• Search for and click to View the course for which the fee is to be viewed.
• Click Course Fees under the Manage menu at left.
• Place a check next to the fee to be deleted and click Delete.
Mass Assign Fees General fees which were created under Fees | Accounts may be assigned to a group of students.
Note: Course fees may be assigned to students by going to Mgmt Console. Select Post/Unpost New Course Fees and then click Post.
As courses are assigned to the student’s schedule under Students | Student Maintenance, the related course fee(s) is automatically assigned to the student’s fee account.
• To assign fees to a group, go to Fees | Mass Assign Fees. A brief description of the process will display.
Quick Reference Guide Chalkable_0407160953 InformationNOW – Fees • 9
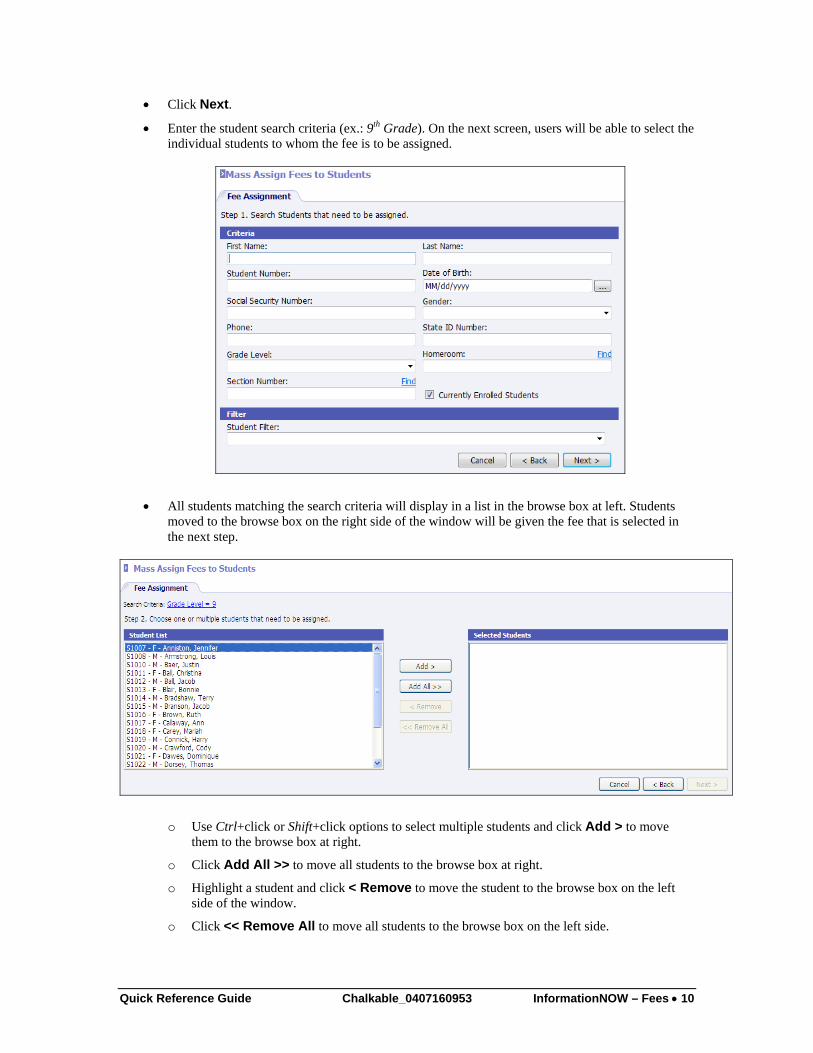
• Click Next.
• Enter the student search criteria (ex.: 9th Grade). On the next screen, users will be able to select the individual students to whom the fee is to be assigned.
• All students matching the search criteria will display in a list in the browse box at left. Students moved to the browse box on the right side of the window will be given the fee that is selected in the next step.
o Use Ctrl+click or Shift+click options to select multiple students and click Add > to move them to the browse box at right.
o Click Add All >> to move all students to the browse box at right.
o Highlight a student and click < Remove to move the student to the browse box on the left side of the window.
o Click << Remove All to move all students to the browse box on the left side.
Quick Reference Guide Chalkable_0407160953 InformationNOW – Fees • 10
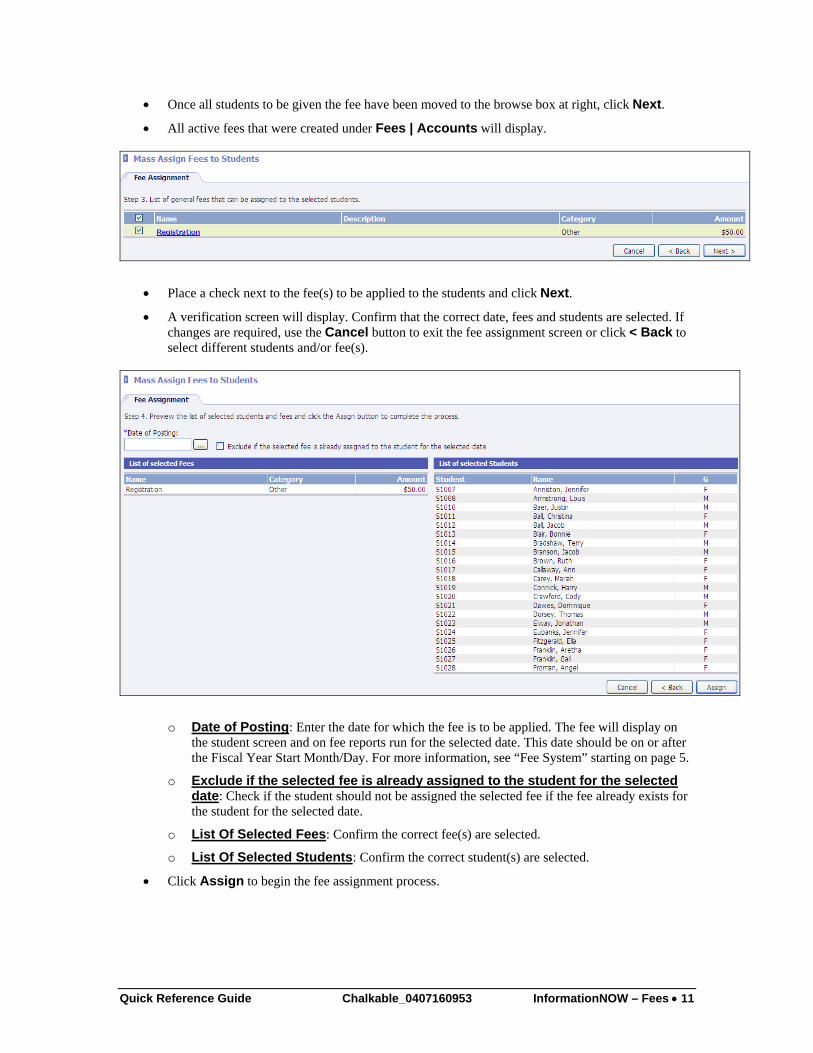
• Once all students to be given the fee have been moved to the browse box at right, click Next.
• All active fees that were created under Fees | Accounts will display.
• Place a check next to the fee(s) to be applied to the students and click Next.
• A verification screen will display. Confirm that the correct date, fees and students are selected. If changes are required, use the Cancel button to exit the fee assignment screen or click < Back to select different students and/or fee(s).
o Date of Posting: Enter the date for which the fee is to be applied. The fee will display on the student screen and on fee reports run for the selected date. This date should be on or after the Fiscal Year Start Month/Day. For more information, see “Fee System” starting on page 5.
o Exclude if the selected fee is already assigned to the student for the selected date: Check if the student should not be assigned the selected fee if the fee already exists for the student for the selected date.
o List Of Selected Fees: Confirm the correct fee(s) are selected.
o List Of Selected Students: Confirm the correct student(s) are selected.
• Click Assign to begin the fee assignment process.
Quick Reference Guide Chalkable_0407160953 InformationNOW – Fees • 11
Mass Change Fees If fees have been applied to students and the amount must be changed, perform the following steps.
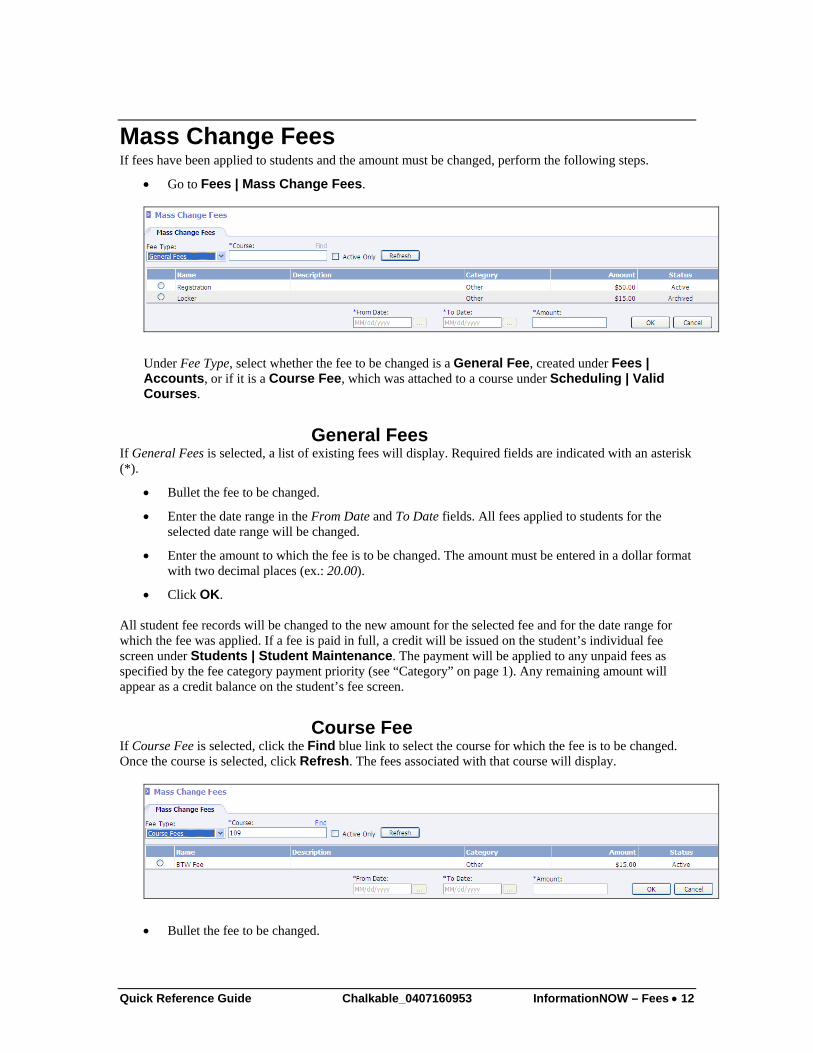
• Go to Fees | Mass Change Fees.
Under Fee Type, select whether the fee to be changed is a General Fee, created under Fees | Accounts, or if it is a Course Fee, which was attached to a course under Scheduling | Valid Courses.
General Fees If General Fees is selected, a list of existing fees will display. Required fields are indicated with an asterisk (*).
• Bullet the fee to be changed.
• Enter the date range in the From Date and To Date fields. All fees applied to students for the selected date range will be changed.
• Enter the amount to which the fee is to be changed. The amount must be entered in a dollar format with two decimal places (ex.: 20.00).
• Click OK. All student fee records will be changed to the new amount for the selected fee and for the date range for which the fee was applied. If a fee is paid in full, a credit will be issued on the student’s individual fee screen under Students | Student Maintenance. The payment will be applied to any unpaid fees as specified by the fee category payment priority (see “Category” on page 1). Any remaining amount will appear as a credit balance on the student’s fee screen.
Course Fee If Course Fee is selected, click the Find blue link to select the course for which the fee is to be changed. Once the course is selected, click Refresh. The fees associated with that course will display.
• Bullet the fee to be changed.
Quick Reference Guide Chalkable_0407160953 InformationNOW – Fees • 12
• Enter the From Date and To Date. All fees applied to students for the selected date range will be changed.
• Enter the amount to which the fee is to be changed. The amount must be entered in a dollar format with two decimal places (ex.: 20.00).
• Click OK. All student fee records will be changed to the new amount for the selected fee and for the date range that the fee was applied. If a fee is paid in full, a credit will be issued on the student’s individual fee screen under Students | Student Maintenance. The payment will be applied to any unpaid fees as specified by the fee category payment priority (see “Category” on page 1). Any remaining amount will appear as a credit balance on the student’s fee screen.
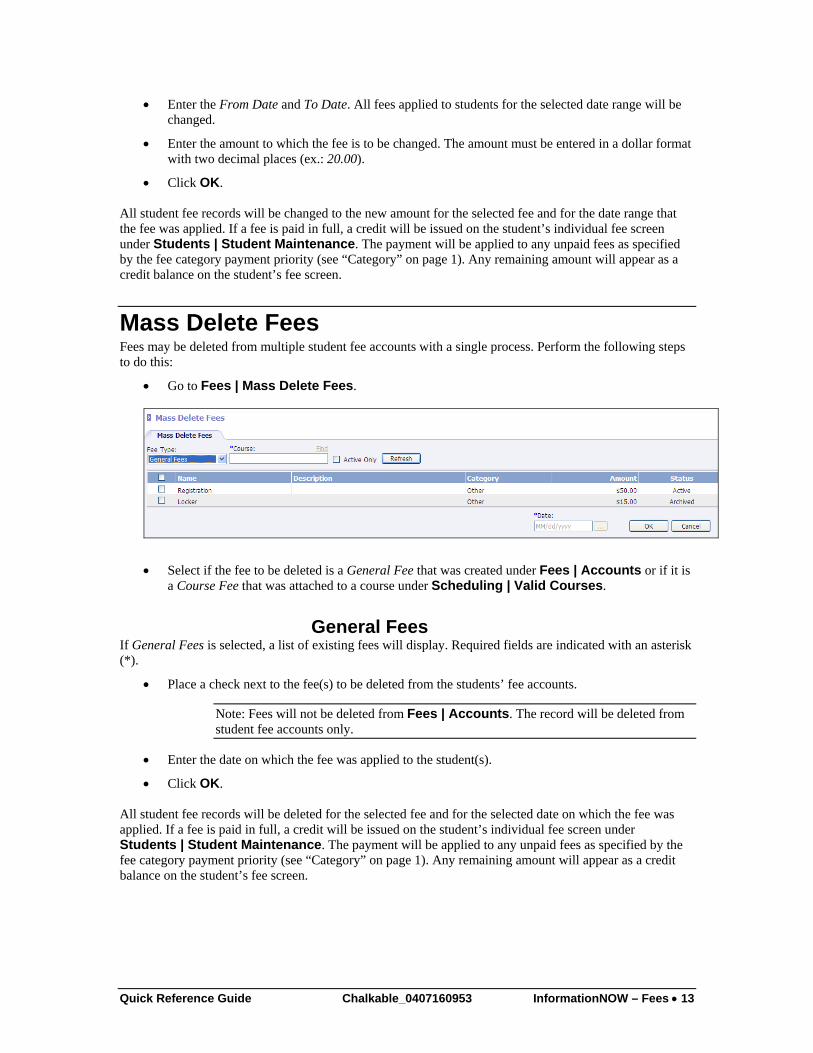
Mass Delete Fees Fees may be deleted from multiple student fee accounts with a single process. Perform the following steps to do this:
• Go to Fees | Mass Delete Fees.
• Select if the fee to be deleted is a General Fee that was created under Fees | Accounts or if it is a Course Fee that was attached to a course under Scheduling | Valid Courses.
General Fees If General Fees is selected, a list of existing fees will display. Required fields are indicated with an asterisk (*).
• Place a check next to the fee(s) to be deleted from the students’ fee accounts.
Note: Fees will not be deleted from Fees | Accounts. The record will be deleted from student fee accounts only.
• Enter the date on which the fee was applied to the student(s).
• Click OK. All student fee records will be deleted for the selected fee and for the selected date on which the fee was applied. If a fee is paid in full, a credit will be issued on the student’s individual fee screen under Students | Student Maintenance. The payment will be applied to any unpaid fees as specified by the fee category payment priority (see “Category” on page 1). Any remaining amount will appear as a credit balance on the student’s fee screen.
Quick Reference Guide Chalkable_0407160953 InformationNOW – Fees • 13

Course Fee If Course Fee is selected, click the Find blue link to select the course for which the fee is to be deleted. Once the course is selected, click Refresh. The fees associated with that course will display.
• Place a check next to the fee(s) to be deleted from the students’ fee accounts.
• Enter the date on which the fee was applied to the student(s).
• Click OK. All student fee records will be deleted for the selected fee and for the date selected that the fee was applied. If a fee is paid in full, a credit will be issued on the student’s individual fee screen under Students | Student Maintenance. The payment will be applied to any unpaid fees as specified by the fee category payment priority (see “Category” on page 1). Any remaining amount will appear as a credit balance on the student’s fee screen.
Post/Unpost Course Fees
Post Course fees may be posted or unposted to student fee account by going to Mgmt Console | Console. Select Post Course Fees. Select the term(s) for which to post and click Post. All course fees that are assigned to the courses on the student’s schedule for the selected term(s) will be applied to the individual student’s fee account. If the student has a credit balance, the credit will be applied to the new course fees.
Note: As courses are assigned to the student’s schedule under Students | Student Maintenance, the related course fee(s) is automatically assigned to the student’s fee account.
Unpost Unposting will remove all course fees from the student’s fee account. To unpost, go to Mgmt Console | Console. Select Unpost Course Fees. Select the term(s) for which to unpost and click Unpost. All course fees that are assigned to the student’s fee account for the selected term(s) will be removed. If the fee is paid, the payment will be applied to any remaining student balance due. If all fees are paid, a credit will display on the student’s fee screen under Students | Student Maintenance.
Quick Reference Guide Chalkable_0407160953 InformationNOW – Fees • 14
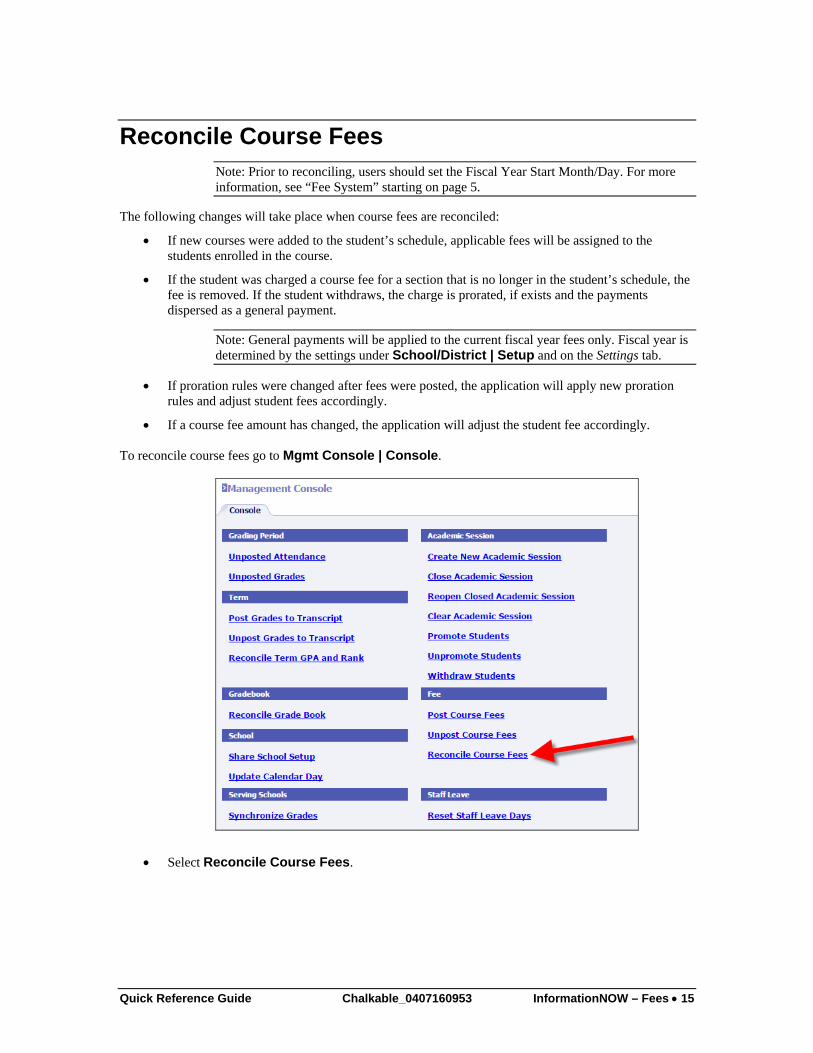
Reconcile Course Fees Note: Prior to reconciling, users should set the Fiscal Year Start Month/Day. For more information, see “Fee System” starting on page 5.
The following changes will take place when course fees are reconciled:
• If new courses were added to the student’s schedule, applicable fees will be assigned to the students enrolled in the course.
• If the student was charged a course fee for a section that is no longer in the student’s schedule, the fee is removed. If the student withdraws, the charge is prorated, if exists and the payments dispersed as a general payment.
Note: General payments will be applied to the current fiscal year fees only. Fiscal year is determined by the settings under School/District | Setup and on the Settings tab.
• If proration rules were changed after fees were posted, the application will apply new proration rules and adjust student fees accordingly.
• If a course fee amount has changed, the application will adjust the student fee accordingly. To reconcile course fees go to Mgmt Console | Console.
• Select Reconcile Course Fees.
Quick Reference Guide Chalkable_0407160953 InformationNOW – Fees • 15

• Review the steps and click Next.
• Enter the criteria to determine the students who may be reconciled. Click Next.
• A search results screen will display. Use the Add>, Add All >>, <Remove or << Remove All options to move students to the right hand side of the screen that are to be reconciled.
• Click Reconcile.
Quick Reference Guide Chalkable_0407160953 InformationNOW – Fees • 16

Individual Student Fee Accounts To access an individual student’s fee account, go to Students | Student Maintenance. Search for and select to view the student. Click Fees under the Manage menu at left.
All existing fees for the student will display:
• Show: Select All Transactions, All Debits, All Credits, Charges, Refunds, Payments or Adjustments.
• In: Select All Schools, This School or This Academic Session.
• Sort By: Select to sort the list by Account, Category, Date (Oldest First), Date (Newest First) or Priority.
• Only Show fees with an outstanding balance: Check to view all fees with greater than a 0.00 balance.
• + Symbol: Click the + symbol next to a fee to expand the view to see credits, payment, prorating entries and exceptions. The expanded lines include the date, transaction type, transaction
information, the amount and an icon to delete the line item. When deleting the following types of line items:
o Payment: Removes the payment record fro m the fee and adjusts the total balance.
o Adjustment Credit Charge: Removes the credit from the fee and adjusts the total balance.
o Refund: Removes the refund and recalculate the total balance due.
o Exception: Removes the exception amount and recalculate the balance for affected charges and the total balance. Does not remove the exception from other fees.
o Prorate Entry: Removes the prorated amount and recalculate the balance for affected charges and the total balance. Does not remove the prorated entry from other charges.
NOTE: Deleting a payment within this view deletes all applications of the payment. If a payment was split between multiple fees and the payment is deleted for one fee, the payments for all fees will be deleted where the same payment was applied.
• Date: The date that was selected when the fee was applied to the student’s fee account.
• School: The school at which the student was enrolled when the fee was added to his/her account.
Quick Reference Guide Chalkable_0407160953 InformationNOW – Fees • 17
• Session: The academic session in which the student was enrolled when the fee was added to the student's account.
• Fee Type: The type of transaction (i.e., General Fee, Course Fee).
• Account: The name of the fee that has been applied to the student.
• Category: The category assigned to the fee (ex. Supply, Workbook, Other).
• Transaction Info: For transaction types of Charge, the Transaction Info column will display the general fee description for any general fees. The transaction info will display the full section number and short name for any course fees. For transaction types of Adjustments, the Transaction Info column will display the date of the adjustment, fee type and account. Category, Priority and Credit will be empty.
• Debit: The amount charged to the student for the fee.
• Credit: The amount credited (via payment, refund or adjustment) to the student’s fee account.
• Balance: The amount remaining to be paid on the account.
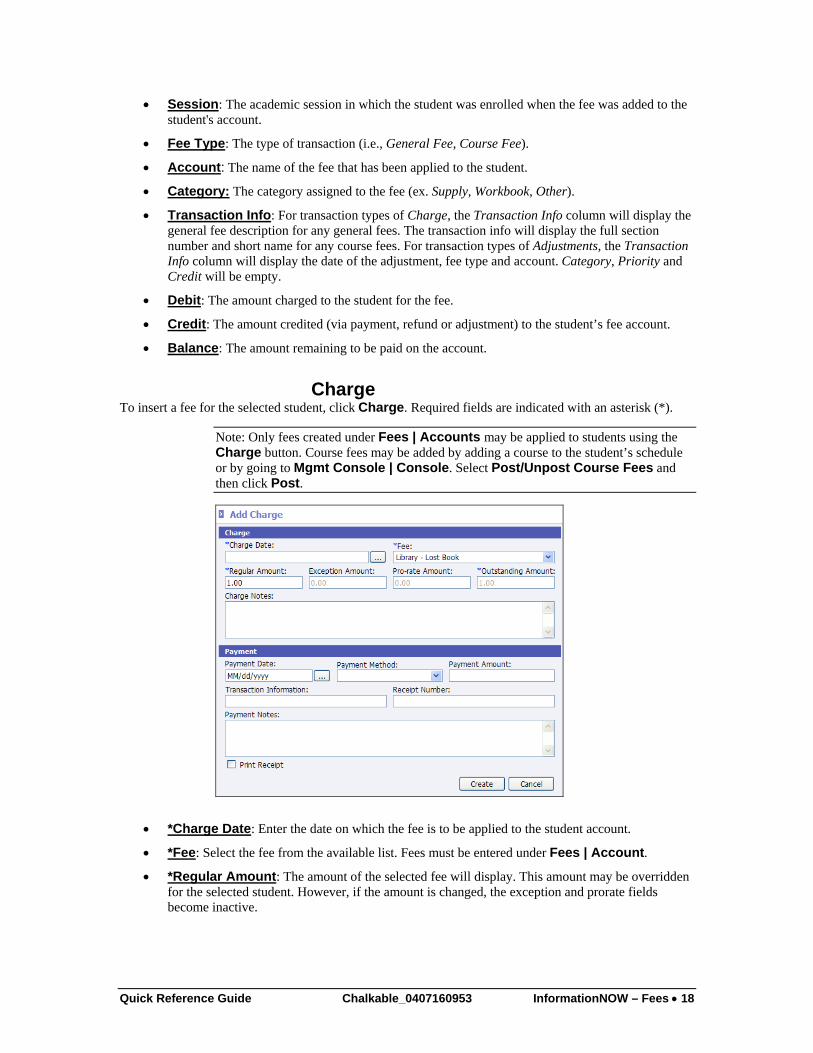
Charge To insert a fee for the selected student, click Charge. Required fields are indicated with an asterisk (*).
Note: Only fees created under Fees | Accounts may be applied to students using the Charge button. Course fees may be added by adding a course to the student’s schedule or by going to Mgmt Console | Console. Select Post/Unpost Course Fees and then click Post.
• *Charge Date: Enter the date on which the fee is to be applied to the student account.
• *Fee: Select the fee from the available list. Fees must be entered under Fees | Account.
• *Regular Amount: The amount of the selected fee will display. This amount may be overridden for the selected student. However, if the amount is changed, the exception and prorate fields become inactive.
Quick Reference Guide Chalkable_0407160953 InformationNOW – Fees • 18

• Exception Amount: If an exception (Ex.: Free Lunch Waiver) has been created for the category to which the fee is assigned, the exception will be applied and the amount of waived for the student will display. See “Category” on page 1 for more details.
• Prorate Amount: If a proration has been created for the category to which the fee is assigned, the proration will be applied and the amount waived for the student will display. See “Category” on page 1 for more details.
• *Outstanding Amount: After the exception and prorate amounts have been deducted, the remaining balance due of the fee will display.
• Charge Notes: Enter a note for the selected fee. Notes may be printed on select fee reports. If a payment is being entered at the same time at which the charge record is created, enter the following information.
• Payment Date: Enter the date on which the payment was received for the fee.
• Payment Method: Select the method by which payment was made. See “Payment Methods” on page 4 for instructions on adding payment methods.
• Payment Amount: Enter the payment amount in a decimal format (ex.: 20.00).
• Transaction Information: Enter the transaction information. This will display on the student’s individual fee screen.
• Receipt Number: Enter the receipt number for the payment.
Note: If using the current receipt number option, this field is disabled. See “Current Receipt Number” on page 6 for more details.
• Payment Notes: Enter any notes regarding this payment.
• Print Receipt: To immediately print a receipt when creating the record, check the Print Receipt box.
Click Create.
Note: If Print Receipt was selected, the fee charge record will be saved. A receipt report will be generated. Select to Open, Save or Cancel the report.
Quick Reference Guide Chalkable_0407160953 InformationNOW – Fees • 19
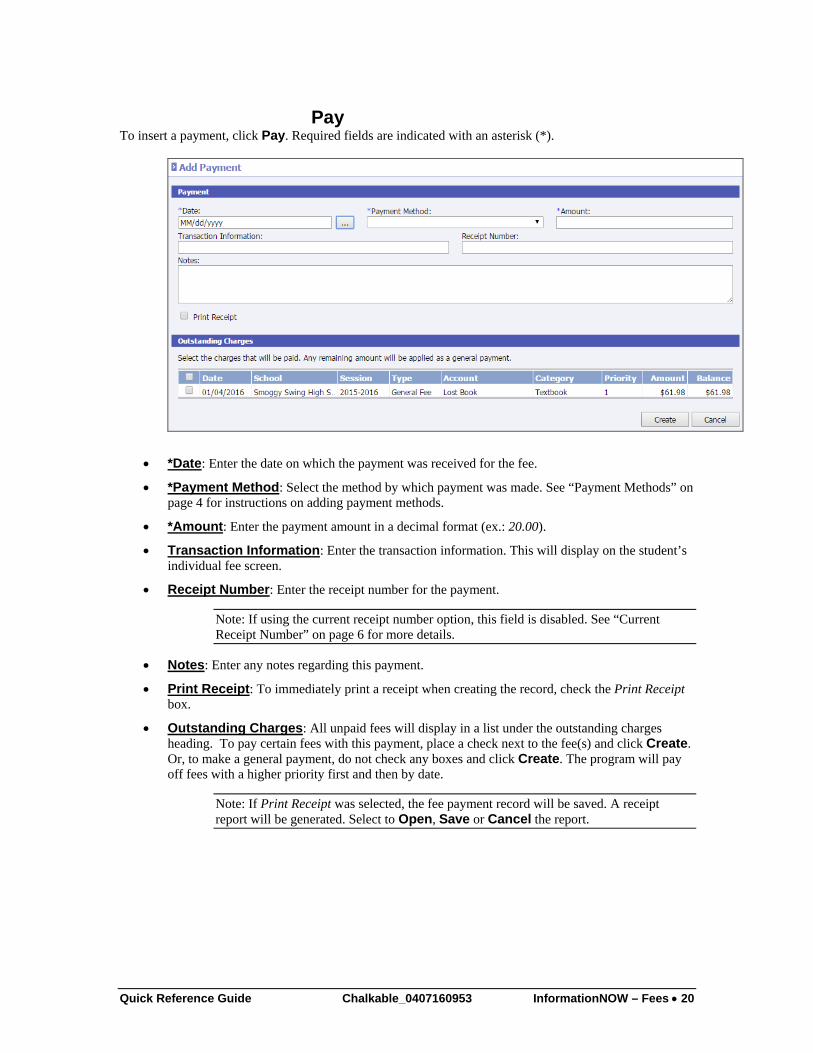
Pay To insert a payment, click Pay. Required fields are indicated with an asterisk (*).
• *Date: Enter the date on which the payment was received for the fee.
• *Payment Method: Select the method by which payment was made. See “Payment Methods” on page 4 for instructions on adding payment methods.
• *Amount: Enter the payment amount in a decimal format (ex.: 20.00).
• Transaction Information: Enter the transaction information. This will display on the student’s individual fee screen.
• Receipt Number: Enter the receipt number for the payment.
Note: If using the current receipt number option, this field is disabled. See “Current Receipt Number” on page 6 for more details.
• Notes: Enter any notes regarding this payment.
• Print Receipt: To immediately print a receipt when creating the record, check the Print Receipt box.
• Outstanding Charges: All unpaid fees will display in a list under the outstanding charges heading. To pay certain fees with this payment, place a check next to the fee(s) and click Create. Or, to make a general payment, do not check any boxes and click Create. The program will pay off fees with a higher priority first and then by date.
Note: If Print Receipt was selected, the fee payment record will be saved. A receipt report will be generated. Select to Open, Save or Cancel the report.
Quick Reference Guide Chalkable_0407160953 InformationNOW – Fees • 20
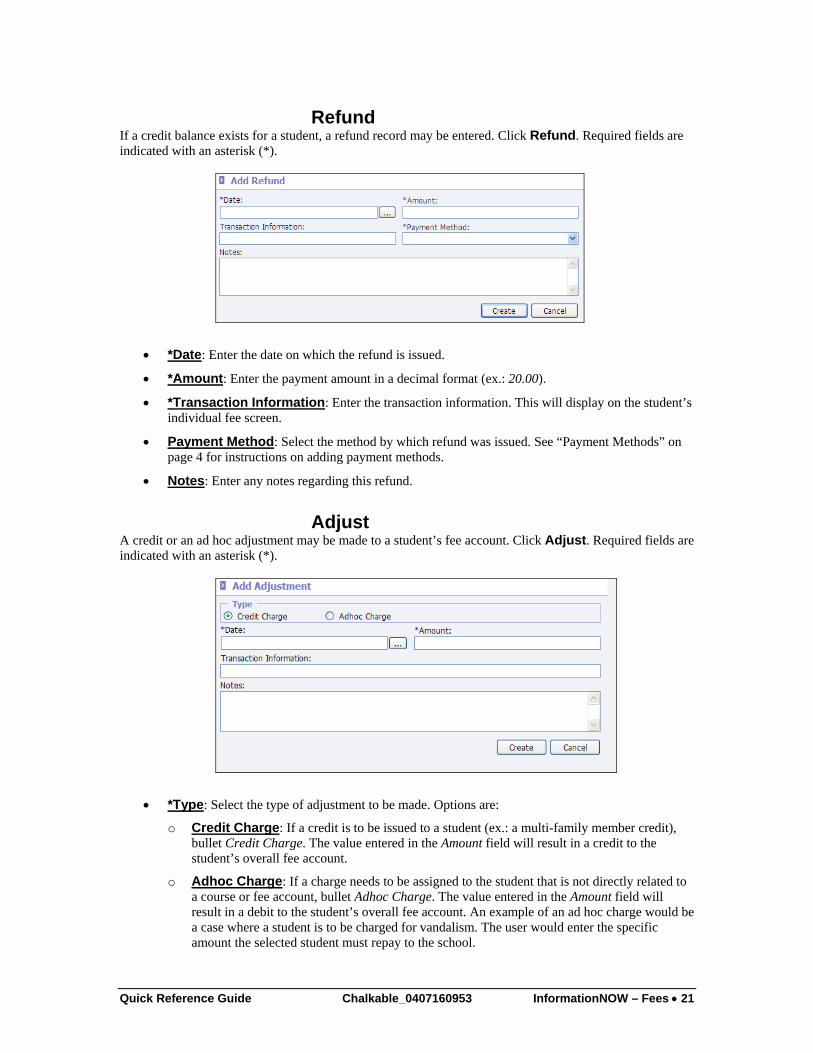
Refund If a credit balance exists for a student, a refund record may be entered. Click Refund. Required fields are indicated with an asterisk (*).
• *Date: Enter the date on which the refund is issued.
• *Amount: Enter the payment amount in a decimal format (ex.: 20.00).
• *Transaction Information: Enter the transaction information. This will display on the student’s individual fee screen.
• Payment Method: Select the method by which refund was issued. See “Payment Methods” on page 4 for instructions on adding payment methods.
• Notes: Enter any notes regarding this refund.
Adjust A credit or an ad hoc adjustment may be made to a student’s fee account. Click Adjust. Required fields are indicated with an asterisk (*).
• *Type: Select the type of adjustment to be made. Options are:
o Credit Charge: If a credit is to be issued to a student (ex.: a multi-family member credit), bullet Credit Charge. The value entered in the Amount field will result in a credit to the student’s overall fee account.
o Adhoc Charge: If a charge needs to be assigned to the student that is not directly related to a course or fee account, bullet Adhoc Charge. The value entered in the Amount field will result in a debit to the student’s overall fee account. An example of an ad hoc charge would be a case where a student is to be charged for vandalism. The user would enter the specific amount the selected student must repay to the school.
Quick Reference Guide Chalkable_0407160953 InformationNOW – Fees • 21

• *Date: Enter the date on which the student is to be credited or charged based on the type selected.
• *Amount: Enter the amount. If credit charge is selected, the amount will be applied as a credit to the student’s overall fee account balance. If Adhoc Charge is selected, the amount will be applied as a debit to the student’s overall fee account balance.
• Transaction Information: Enter a brief (30 character alphanumeric) description of the transaction to be performed.
• Notes: Enter any notes specific to this adjustment. Click Create.
Tasks
• Print Screen: Click to print the screen.
• Fee History: Click to view the entire fee charge, payment, refund and adjustment history.
• Help: Click to access online help regarding fees.
Reports
• Student Fee Activity Listing: Click to generate a report of all student fee activity for a specified date range.
• Student Fee Statement: Click to print a fee statement report for the selected student.
Reports To access fee reports, go to Fees | Reports or open the Reports menu.
Fee Receipt A fee receipt is available that display Receipt Number, Account (If General/Course Fee, Print Fee Name), Transaction Information, Pay Type, Amount and the Balance.
Quick Reference Guide Chalkable_0407160953 InformationNOW – Fees • 22

The fee receipt may be generated from the student’s Charge screen or Payment screen.
Receipts Journal Generate a list of all payments received by student for the selected date range. Option includes the ability to print for a selected payment type.
Student Balance Generate a list of students with their balances due. Options include the ability to print only for students with a balance equal to or greater than a specified amount.
Quick Reference Guide Chalkable_0407160953 InformationNOW – Fees • 23
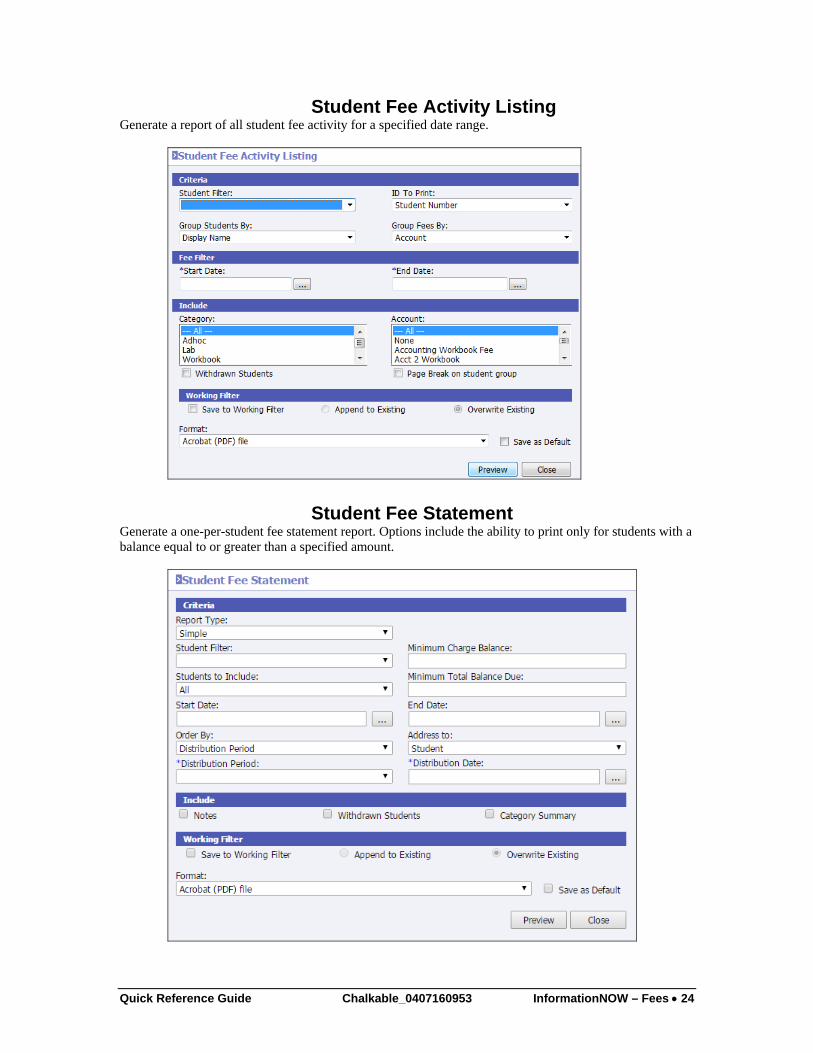
Student Fee Activity Listing Generate a report of all student fee activity for a specified date range.
Student Fee Statement Generate a one-per-student fee statement report. Options include the ability to print only for students with a balance equal to or greater than a specified amount.
Quick Reference Guide Chalkable_0407160953 InformationNOW – Fees • 24
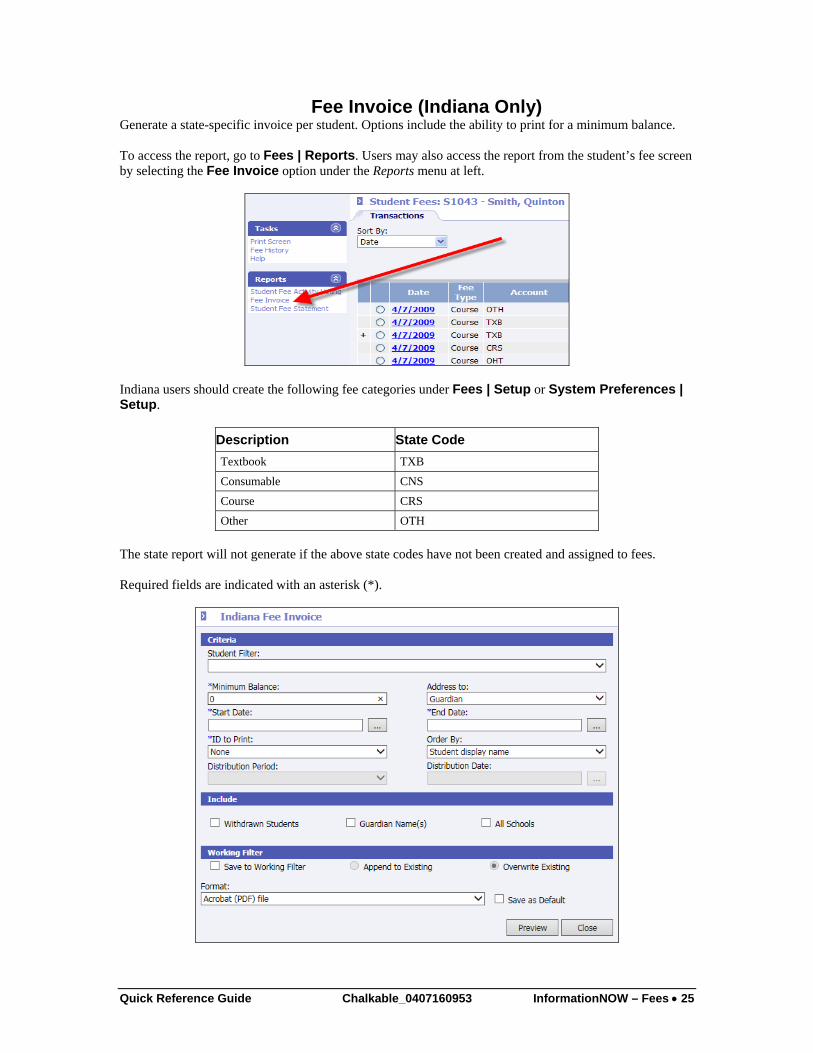
Fee Invoice (Indiana Only) Generate a state-specific invoice per student. Options include the ability to print for a minimum balance. To access the report, go to Fees | Reports. Users may also access the report from the student’s fee screen by selecting the Fee Invoice option under the Reports menu at left.
Indiana users should create the following fee categories under Fees | Setup or System Preferences | Setup.
Description State Code Textbook TXB
Consumable CNS
Course CRS
Other OTH The state report will not generate if the above state codes have not been created and assigned to fees. Required fields are indicated with an asterisk (*).
Quick Reference Guide Chalkable_0407160953 InformationNOW – Fees • 25

• *Minimum Balance: Prints for all students with a minimum balance of equal to or greater than the amount entered here.
• Address to: Select to use the student address or the guardian address. The guardian is the student contact who has been marked as Receives Mailings and Is Custodian.
• Start/End Date: Enter the date range of fees to be included on the report.
• ID To Print: Select to print None, Student Number, State ID Number, Alternate Student Number or Social Security Number.
• Order By: Select Student display name, ID Selected, Grade Level, Homeroom, Zip Code or Distribution Period. If Distribution Period is selected for the Order By, select the period to be used when grouping invoices together under Distribution Period along with the Distribution Date.
• Withdrawn Students: Select to include currently withdrawn students.
• Guardian Name(s): Select to include the guardian name on the report. The guardian is the student contact who has been marked as Receives Mailings and Is Custodian.
• All Schools: Check to include fees for all schools on the report.
Quick Reference Guide Chalkable_0407160953 InformationNOW – Fees • 26