Indoor air quality transmitters User uide Siro & Siro-MOD
8
Copyright HK Instruments 2021 www.hkinstruments.fi User guide version 1.0 2021 User Guide Indoor air quality transmitters Siro & Siro-MOD This document contains informaon about configuring and using Siro indoor air quality transmier. Before reading this guide, check that the transmier has been installed according to the installaon instruc- ons. Siro is available with several oponal air quality sensors. The modu- lar device can be equipped with CO 2 concentraon and VOC (Vola- le Organic Compounds) measurements or alternavely PM (Parcu- late Maer) measurement, and in addion temperature and humidity measurements. Siro is available with a user interface that includes an LCD display and three pushbuons. The device is always equipped with voltage outputs, and oponally with Modbus communicaon and current outputs. Introduction ScHematics OK + – 1 2 3 4 5 1 1 7 6 1 Air flow aperture 2 Display 3 Pushbuon + (up/increase) 4 Pushbuon OK (choose/confirm) 5 Pushbuon – (down/decrease) 6 Lid opening buon 7 Opening for the wires Navigating the menu The device's physical interface includes a display and three pushbuons. By using the user interface, it is possible to choose the desired measurement values on the display and to adjust the sengs of the device. Note that when the menu locking jumper is installed, it is not possible to open the menu and the display will not react when pressing the buon. Please see the installaon instrucons for more details about the locking jumper. The buon funcons: + – OK Scroll up in the menu / increase the value Scroll down in the menu / decrease the value Open the menu / confirm (press shortly) / go back to the basic view (keep the buon down/press longer) OK The use and configuraon of Siro is simple and easy by following this guide describing a Siro device with a display (-D). Please note that this guide includes all measurement opons. The device menu only shows the opons that have been chosen to that parcular device. You can find more informaon about the measur - ment opons in the end of this document.
Transcript of Indoor air quality transmitters User uide Siro & Siro-MOD

Copyright HK Instruments 2021 www.hkinstruments.fi User guide version 1.0 2021
User GuideIndoor air quality transmittersSiro & Siro-MOD
This document contains information about configuring and using Siro indoor air quality transmitter. Before reading this guide, check that the transmitter has been installed according to the installation instruc-tions.
Siro is available with several optional air quality sensors. The modu-lar device can be equipped with CO2 concentration and VOC (Vola-tile Organic Compounds) measurements or alternatively PM (Particu-late Matter) measurement, and in addition temperature and humidity measurements. Siro is available with a user interface that includes an LCD display and three pushbuttons. The device is always equipped with voltage outputs, and optionally with Modbus communication and current outputs.
Introduction
ScHematics
OK
+
–
1
2
3
4
5
1
17 6
1 Air flow aperture
2 Display
3 Pushbutton + (up/increase)
4 Pushbutton OK (choose/confirm)
5 Pushbutton – (down/decrease)
6 Lid opening button
7 Opening for the wires
Navigating the menu
The device's physical interface includes a display and three pushbuttons.By using the user interface, it is possible to choose the desired measurement values on the display and to adjust the settings of the device.Note that when the menu locking jumper is installed, it is not possible to open the menu and the display will not react when pressing the button. Please see the installation instructions for more details about the locking jumper.
The button functions:
+–OK
Scroll up in the menu / increase the value
Scroll down in the menu / decrease the value
Open the menu / confirm (press shortly) / go back to the basic view (keep the button down/press longer)
OK
The use and configuration of Siro is simple and easy by following this guide describing a Siro device with a display (-D).
Please note that this guide includes all measurement options. The device menu only shows the options that have been chosen to that particular device. You can find more information about the measur-ment options in the end of this document.
Copyright HK Instruments 2021 www.hkinstruments.fi User guide version 1.0 2021
Page 2
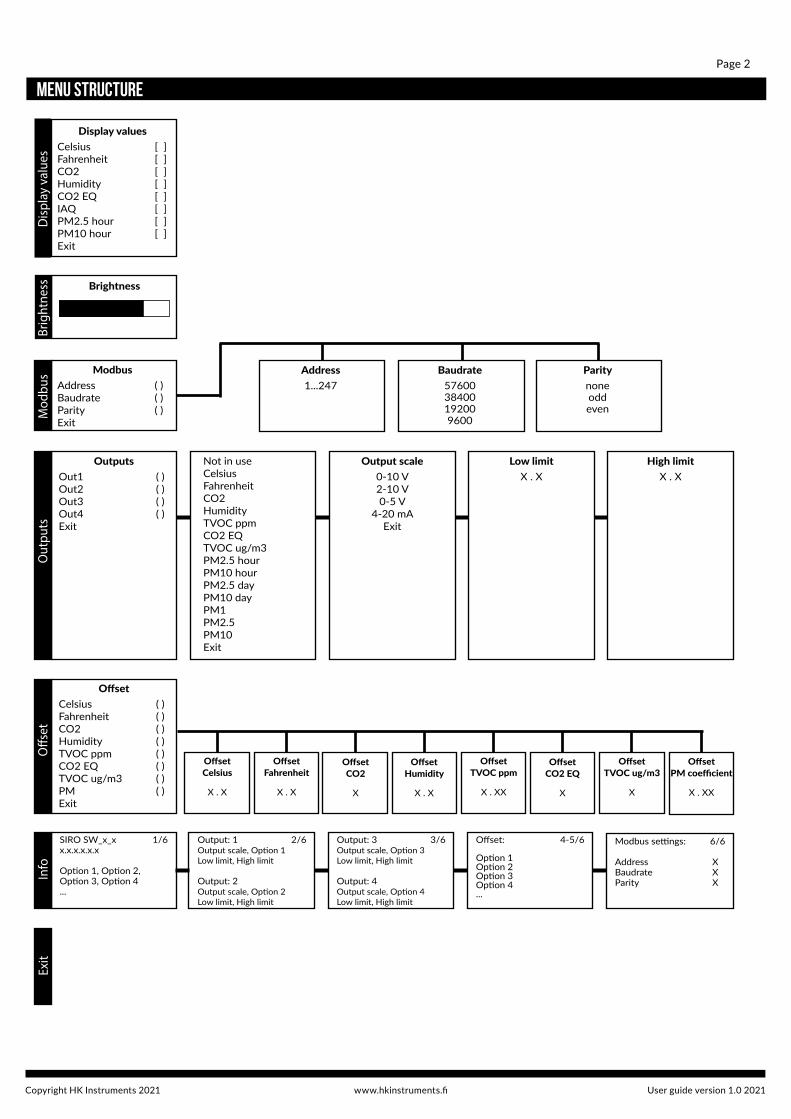
Menu stRucture
Display valuesCelsius [ ]Fahrenheit [ ]CO2 [ ]Humidity [ ]CO2 EQ [ ]IAQ [ ]PM2.5 hour [ ]PM10 hour [ ]Exit
Brightness
ModbusAddress ( )Baudrate ( )Parity ( )Exit
OutputsOut1 ( )Out2 ( )Out3 ( )Out4 ( )Exit
OffsetCelsius ( )Fahrenheit ( )CO2 ( )Humidity ( )TVOC ppm ( )CO2 EQ ( )TVOC ug/m3 ( )PM ( )Exit
SIRO SW_x_x 1/6x.x.x.x.x.x
Option 1, Option 2, Option 3, Option 4...
Address1...247
Baudrate5760038400192009600
Paritynoneoddeven
Not in useCelsiusFahrenheitCO2HumidityTVOC ppmCO2 EQTVOC ug/m3PM2.5 hourPM10 hourPM2.5 dayPM10 dayPM1PM2.5PM10Exit
Output scale0-10 V2-10 V0-5 V
4-20 mAExit
Low limitX . X
High limitX . X
OffsetCelsius
X . X
OffsetFahrenheit
X . X
OffsetCO2
X
OffsetTVOC ppm
X . XX
OffsetCO2 EQ
X
OffsetTVOC ug/m3
X
Output: 1 2/6Output scale, Option 1Low limit, High limit
Output: 2Output scale, Option 2Low limit, High limit
Output: 3 3/6Output scale, Option 3Low limit, High limit
Output: 4Output scale, Option 4Low limit, High limit
Offset: 4-5/6
Option 1Option 2Option 3Option 4...
Modbus settings: 6/6
Address XBaudrate XParity X
Dis
play
val
ues
Brig
htne
ssM
odbu
sO
utpu
tsO
�set
Info
Exit
OffsetPM coefficient
X . XX
OffsetHumidity
X . X

Copyright HK Instruments 2021 www.hkinstruments.fi User guide version 1.0 2021
Page 3
Step 1: Choosing the measurement values on the display
OK
+
–Celsius [1]Fahrenheit [ ]CO2 [3]Humidity [2]CO2 EQ [ ]IAQ [4]
1
1
2
3
1 2
1 2
3 4
12 3
45
21.1°c 42.3 %RH
CO2
510PPM
TVOCIAQ2
10 s
2) Choose Display values.
Figure 1a
OK
+
–
SettingsDisplay valuesBrightnessOutputs
OK
+
–
CelsiusFahrenheitCO2Humidity
[1][ ][3][2]
CO2 EQIAQExit
[ ][4]
The basic view on the display is scaled based on how many measurement values have been chosen to be viewed on the display. 1-4 measurement values can be shown simultaneously (see figure 1a). If five or more values are selected, the measurements are shown one by one and the view changes every 10 seconds. Individual measurements can be scrolled in the basic view with and buttons. If the buttons are unused for 30 minutes, the basic view will reappear automatically.
+–
1) Press to enter the settings menu.OK
3) Choose the desired measurement values to be shown on the display.
• Scroll the menu by pressing the and buttons.• Add/remove the desired measurement values by
pressing the button.
–+
OK
OK
+
–
HumidityCO2 EQIAQExit
[2][ ][4]
Step 1.1: Display view
Step 1.2: Choosing the measurement values
4) Choose Exit to exit the menu.• Scroll the menu to Exit and press to return
to the settings menu or keep the button down to return to the basic view.
OK
OK
Figure 1b
For more information about the measurements, please see page 8.
Figure 1c
Figure 1d

Copyright HK Instruments 2021 www.hkinstruments.fi User guide version 1.0 2021
Page 4
Step 2: Brightness control
2) Choose Brightness.
1) Press to enter the settings menu.OK
OK
+
–
SettingsDisplay values
BrightnessModbus
3) Adjust the brightness.• Increase/decrease the brightness by pressing
and .+
– OK
+
–
Brightness
4) Saving the chosen brightness level and exiting.• Save the brighness level and return to the settings
menu by pressing the button or keep the button down to return to the basic view.
• The chosen brightness level will settle when the buttons have been unpressed for 30 seconds.
OKOK
Step 3: Modbus settings (Modbus devices only)
2) Choose Modbus.
1) Press to enter the settings menu.OK
OK
+
–
SettingsDisplay values
BrightnessModbus
OK
+
–
ModbusAddress 1Baudrate 9600Parity none
OK
+
–
Address
1
Address: 1 – 247 (default = 1)Baud rate: 9600 / 19200 / 38400 / 57600Parity: none / even / odd
OK
+
–
Baudrate
9600
OK
+
–
Parity
none
4) Choose Exit to exit the Modbus menu.• Scroll to Exit and press to return to the
settings menu or keep the button down to return to the basic view.
OK
OK OK
+
–
Modbus
Exit
Baudrate 9600Parity none
3) Choose the desired parameters in the Modbus menu.• The parameters can be scrolled by pressing the
and buttons and chosen by pressing .+
– OK
Figure 2a
Figure 2b
Figure 3a
Figure 3b
Figure 3c
This adjusts the brightness of the display in stand-by mode. The brightness of the display is always at the maximun level when the buttons are used.

Copyright HK Instruments 2021 www.hkinstruments.fi User guide version 1.0 2021
Page 5
Step 4: Outputs
2) Choose Outputs.
1) Press to enter the settings menu.OK
The device includes four freely configurable outputs. Current (optional) or voltage output can be chosen for each of them. The output signal has to be chosen first with a jumper (see the installation instructions), after which the output settings can be changed in the Outputs menu.
OK
+
–
SettingsBrightness
ModbusOutputs
Measurement: Not in use / Celsius 1* / Fahrenheit 1* / CO2 / Humidity / TVOC ppm 2* / CO2 EQ / TVOC ug/m3 2* / PM2.5 hour / PM10 hour / PM2.5 day / PM10 day / PM1 / PM2.5 / PM10 1*) Only one of these can be chosen for outputs.
2*) Only one of these can be chosen for outputs.
OK
+
–
OutputsOut1 CelsiusOut2 HumidityOut3 Not in use
OK
+
–
Not in useCO2TVOC ppmCO2 EQ
Scale: 0–10 V / 2–10 V / 0–5 V 1* / 4–20 mA 2*
1*) When using voltage output, the jumper
setting of that output must be set to V.
2*) When using current output, the jumper
setting of that output must be set to mA.
High limit: See Table 1 - Output limits
Low limit: See Table 1 - Output limits
OK
+
–
Output scale0-10V2-10V0-5V
OK
+
–
Low limitCO2
400
OK
+
–
High limitCO2
2000
Figure 4a
Figure 4b3) Choose measurement, scale and limits for each output.
• The menus and limits can be scrolled by pressing the and buttons. Choose the measurement and scale and set the limits by pressing the button.
+–
OK

Copyright HK Instruments 2021 www.hkinstruments.fi User guide version 1.0 2021
Page 6
Step 5: Offset
1) Press to enter the settings menu.OK
2) Choose Offset.
OK
+
–
SettingsModbus
OffsetOutputs
4) Choose Exit to exit the Outputs menu.• Scroll to Exit and press to return to the
settings menu or keep the button down to return to the basic view.
OK
OK OK
+
–
OutputsOut3 CO2Out4 TVOC ug/m3Exit
Figure 4c
Measurement Default limits Adjustable low limit Adjustable high limit Smallest range available
Celsius 1* 0.0...50.0 °C 0.0...45.0 °C 5.0...50.0 °C 5.0 °CFahrenheit 1* 32...122 °F 32...113 °F 41...122 °F 9 °FCO2 400...2000 ppm 0...1900 ppm 500…2000 ppm 100 ppmHumidity 0.0…100.0 % 0.0…90.0 % 10.0…100.0 % 10.0 %TVOC ppm 0.00…30.00 ppm 0.00…28.00 ppm 2.00…30.00 ppm 2.00 ppmCO2 EQ 400...2000 ppm 0...9900 ppm 500…10000 ppm 100 ppmTVOC µg/m3 0…3000 μg/m3 0…9900 µg/m3 100…10000 µg/m3 100 µg/m3PM (all) 2* 0...500 μg/m3 0...480 μg/m3 20…500 μg/m3 20 μg/m3
Table 1 - Output limits
Outputs continued
OK
+
–
Offset
CO2 0
Celsius 0.0Fahrenheit 0.0
OK
+
–
OffsetCelsius
2.0
Figure 5a
Figure 5b3) Choose offset value for every measurement.
• The Offset menu and limits can be scrolled by pressing the and buttons. Choose the measurement and set the limits by pressing the button.
See Table 2 - Offset limits.
+ –OK
The offset feature enables field calibration. This is necessary in applications that need annual calibration.
1*) Celsius and Fahrenheit limits are interdependent, and thus a change in one limit of a measurement will also change the
limits of the other measurement.
2*) PM2.5, PM2.5 hour and PM2.5 day share the same limits.
PM10, PM10 hour and PM10 day share the same limits.
Changing one limit will also change the limits of the two other measurements.
Copyright HK Instruments 2021 www.hkinstruments.fi User guide version 1.0 2021
Page 7
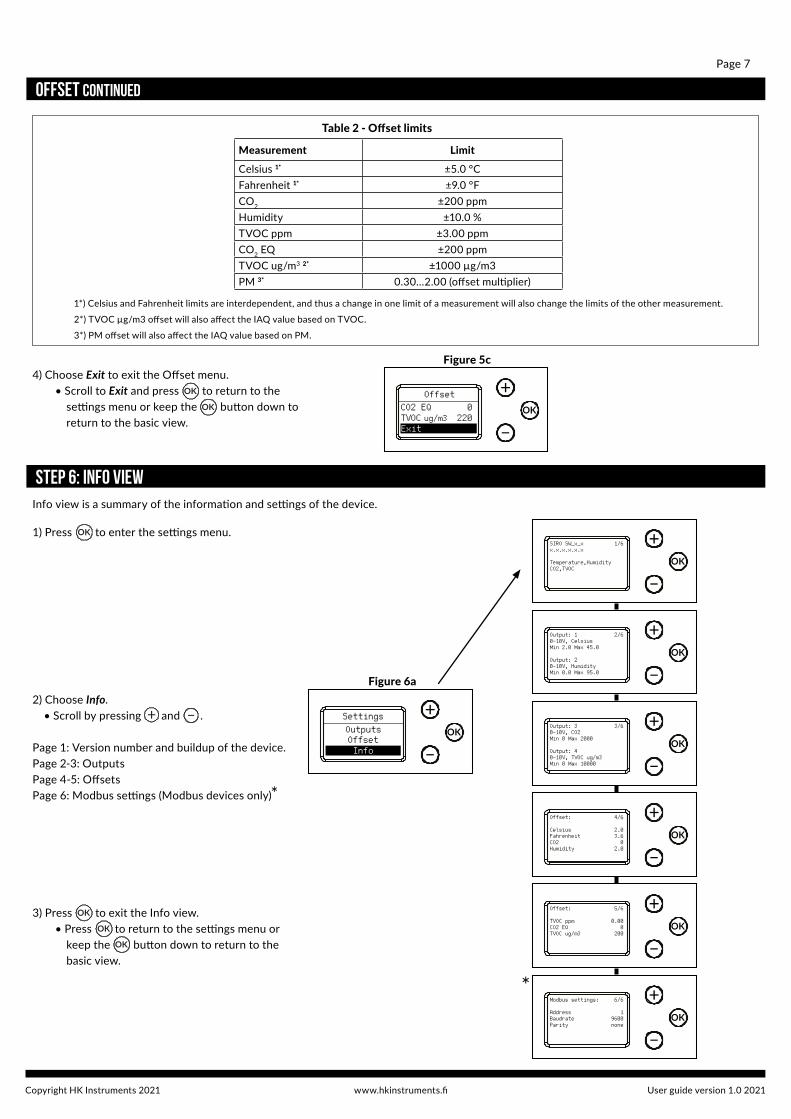
Step 6: Info view
1) Press to enter the settings menu.OK
Offset Continued
Measurement Limit
Celsius 1* ±5.0 °CFahrenheit 1* ±9.0 °FCO2 ±200 ppmHumidity ±10.0 %TVOC ppm ±3.00 ppmCO2 EQ ±200 ppmTVOC ug/m3 2* ±1000 µg/m3PM 3* 0.30…2.00 (offset multiplier)
4) Choose Exit to exit the Offset menu.• Scroll to Exit and press to return to the
settings menu or keep the button down to return to the basic view.
OK
OK
Table 2 - Offset limits
OK
+
–
OffsetCO2 EQ 0TVOC ug/m3 220Exit
Figure 5c
Info view is a summary of the information and settings of the device.
OK
+
–
SettingsOutputs
InfoOffset
Figure 6a
OK
+
–
SIRO SW_x_x 1/6x.x.x.x.x.x
Temperature,HumidityCO2,TVOC
OK
+
–
Output: 1 2/60-10V, CelsiusMin 2.0 Max 45.0
Output: 20-10V, HumidityMin 0.0 Max 95.0
OK
+
–
Output: 3 3/60-10V, CO2Min 0 Max 2000
Output: 40-10V, TVOC ug/m3Min 0 Max 10000
OK
+
–
Offset: 4/6
Celsius 2.0Fahrenheit 3.6CO2 0Humidity 2.0
OK
+
–
Offset: 5/6
TVOC ppm 0.00CO2 EQ 0TVOC ug/m3 200
2) Choose Info.• Scroll by pressing and .
Page 1: Version number and buildup of the device.Page 2-3: OutputsPage 4-5: OffsetsPage 6: Modbus settings (Modbus devices only)*
+ –
OK
+
–
Modbus settings: 6/6
Address 1Baudrate 9600Parity none
*
3) Press to exit the Info view.• Press to return to the settings menu or
keep the button down to return to the basic view.
OK
OK
OK
1*) Celsius and Fahrenheit limits are interdependent, and thus a change in one limit of a measurement will also change the limits of the other measurement.
2*) TVOC µg/m3 offset will also affect the IAQ value based on TVOC.
3*) PM offset will also affect the IAQ value based on PM.
Copyright HK Instruments 2021 www.hkinstruments.fi User guide version 1.0 2021
Page 8
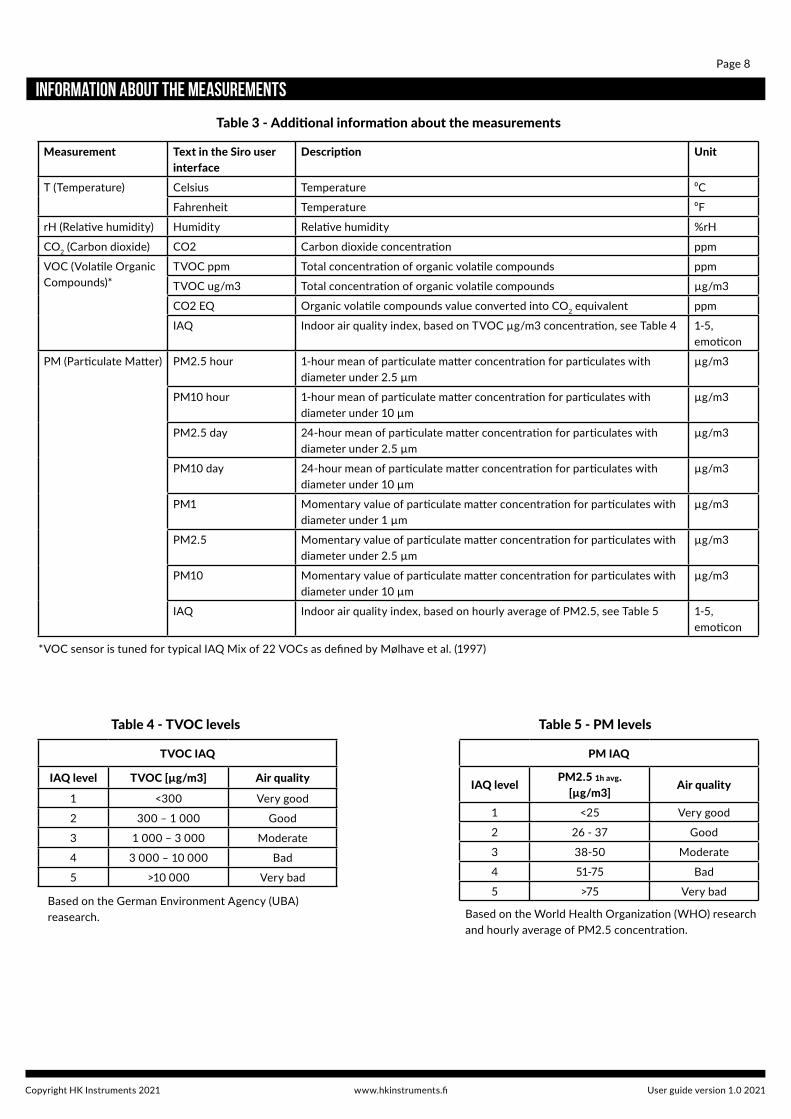
Information about the measurements
Measurement Text in the Siro user interface
Description Unit
T (Temperature) Celsius Temperature ⁰C
Fahrenheit Temperature ⁰F
rH (Relative humidity) Humidity Relative humidity %rH
CO2 (Carbon dioxide) CO2 Carbon dioxide concentration ppm
VOC (Volatile Organic Compounds)*
TVOC ppm Total concentration of organic volatile compounds ppm
TVOC ug/m3 Total concentration of organic volatile compounds µg/m3
CO2 EQ Organic volatile compounds value converted into CO2 equivalent ppm
IAQ Indoor air quality index, based on TVOC µg/m3 concentration, see Table 4 1-5,emoticon
PM (Particulate Matter) PM2.5 hour 1-hour mean of particulate matter concentration for particulates with diameter under 2.5 µm
µg/m3
PM10 hour 1-hour mean of particulate matter concentration for particulates with diameter under 10 µm
µg/m3
PM2.5 day 24-hour mean of particulate matter concentration for particulates with diameter under 2.5 µm
µg/m3
PM10 day 24-hour mean of particulate matter concentration for particulates with diameter under 10 µm
µg/m3
PM1 Momentary value of particulate matter concentration for particulates with diameter under 1 µm
µg/m3
PM2.5 Momentary value of particulate matter concentration for particulates with diameter under 2.5 µm
µg/m3
PM10 Momentary value of particulate matter concentration for particulates with diameter under 10 µm
µg/m3
IAQ Indoor air quality index, based on hourly average of PM2.5, see Table 5 1-5,emoticon
TVOC IAQ
IAQ level TVOC [µg/m3] Air quality
1 <300 Very good
2 300 – 1 000 Good
3 1 000 – 3 000 Moderate
4 3 000 – 10 000 Bad
5 >10 000 Very bad
PM IAQ
IAQ levelPM2.5 1h avg.
[µg/m3]Air quality
1 <25 Very good
2 26 - 37 Good
3 38-50 Moderate
4 51-75 Bad
5 >75 Very badBased on the German Environment Agency (UBA) reasearch. Based on the World Health Organization (WHO) research
and hourly average of PM2.5 concentration.
Table 3 - Additional information about the measurements
Table 4 - TVOC levels Table 5 - PM levels
*VOC sensor is tuned for typical IAQ Mix of 22 VOCs as defined by Mølhave et al. (1997)