Inception to Implementation: Technology Now
21
Inception to Implementation; Technology NOW! The Cavaliers Drum & Bugle Corps 2013 Percussion Ensemble with Michael McIntosh featuring Tom McGillen and Alan Miller Percussive Arts Society International Convention November 16, 2013 GearWORKS.org
-
Upload
drum-corps-international -
Category
Documents
-
view
217 -
download
1
description
Handout from the Cavaliers' presentation at the Percussive Arts Society International Convention on Saturday, Nov. 16 in Indianapolis.
Transcript of Inception to Implementation: Technology Now

Inception to Implementation; Technology NOW!The Cavaliers Drum & Bugle Corps
2013 Percussion Ensemble
with Michael McIntoshfeaturing Tom McGillen and Alan Miller
Percussive Arts Society International ConventionNovember 16, 2013
GearWORKS.org

GearWORKS.org
MADE IN NASHVILLE, TENN.

Tom McGillenElectronics / Sound Reinforcement Designer
Amplification and Sound Reinforcement Products used by The Cavaliers
Audio Technica 2035 Microphone with shock mount; (AT 2035) (from the Audio Technica Website; www.audio-technica.com)
Designed for critical home/project/professional studio applications and live performance, this side-address cardioid studio condensing microphone delivers exceptional detail and low noise. Equipped with a switchable 80 Hz high-pass filter and 10 dB pad, the AT2035 handles high sound pressure levels with ease. Along with its rugged construction and high-performance specifications, the AT2035 provides an exceptional level of consistency from model to model. It comes equipped with a protective pouch and a custom shock mount.
• Large diaphragm for smooth, natural sound and low noise• High SPL handling and wide dynamic range provide unmatched versatility• Custom shock mount provides superior isolation• Switchable 80 Hz high-pass filter and 10 dB pad• Cardioid polar pattern reduces pickup of sounds from the sides and rear, improving isolation
of desired sound source• Includes custom shock mount & protective pouch
Audio Technica 8137 Wind screen; (AT 8137)
Large studio foam windscreen (black).
Shure Beta 98 H/C Microphone with integrated shock mount(from the Shure Website: www.shure.com)Also available as a wireless option
The Shure Beta 98 H/C and the wireless version WB 98 H/C are premium cardioid condenser instrument microphones that clamp onto the bell of wind instruments or onto the rim of percussion instruments. The integrated gooseneck and ratcheting swivel joint allows the microphone to be easily positioned and secured, and an isolation shock-mount reduces the transmission of instrument 'key noise' and other mechanical noise. A gooseneck angle brace is included to provide better retention of the microphone placement during more active performances.
On Stage Boom Side Stand (MSA 9508)
Used to mount to the round pipe of the Yamaha Multi Frame II for the Vibraphones.
GearWORKS.org

On Stage DS 7200 B
Used to mount into the Yamaha RC 10 Clamp on the support bar underneath the keys on the Yamaha Multi Frame II on the Marimbas. The round base is not used.
Microphones and Accessories
Vibraphone - Audio Technica 2035, Audio Technica 8137, On Stage Boom Side stand MSA 9508 stand
Marimba (2 per instrument) - Audio Technica 2035, Yamaha RC 10 Clamp, On Stage DS 7200 B stand Kick Drum - Shure Beta 52-mounted inside the kick drum facing at the batter head
Drum set toms - Shure Beta 98 H/C-1 per tom
Snare drum (batter and snare side head)-Shure Beta 98 H/C-clipped to the rim
Hi Hat - Shure PG 81-mounted with a black metal gooseneck microphone stand
Concert Toms (2) - Audio Technica 2035, Audio Technica 8137, On Stage Boom Side MSA 9508 stand, Yamaha RC 10 Clamp
Bonogos - Shure Beta 98 H/C-mounted to a lug on the bongos
Djembe - Shure Beta 98 H/C-microphone on the top head for articulation
Timpani (2) - Shure SM 137, On Stage MY 320, On Stage Boom Side MSA 9508 stand
Trumpet - Audio Technica 2035, Audio Technica 8137
GearWORKS.org
Radial Pro D2 Stereo Direct Box-used with each Yamaha MOTIF synthesizer and Yamaha DTX 12 M
The Radial ProD2 is a compact stereo direct box developed specifically to address the needs and challenges of interfacing a stereo keyboard to a professional audio system. This passive DI features two independent channels with separate ¼” inputs and thru-puts for the artist's stage amp (monitor speakers) and two fully isolated outputs (XLR) for the PA system.
The Radial ProD2 creates a pleasing effect that naturally rounds out the tone, acting like a subtle limiter, which is particularly advantageous when interfacing the ProD2 with digital pianos, samplers and drum machines that can produce excessive dynamics. Transformers are particularly adept at eliminating hum and buzz caused by ground loops.
Unless you are plugging straight into your mixer with 10ʼ or less of ¼” instrument cable, use a Direct box to help insure a great sounding performance for your electronic equipment that use ¼” cables.
Cases• Microphone-SKB 3i-2015-MC24 Waterproof microphone case• Synthesizers-2 SKB-R5220W Roto Molded 76 key rolling cases• DTX 12 Multi-2 SKB 3i-2015-YMP Multi Pad Cases
Power• Yamaha EF4500ISE Generator and Cart• 1 75ʼ Generator Extension cord (12 gauge)
Speakers• 2 Yamaha CW218V Subwoofers (passive-need an amplifier and Speak on cables)• 8 Yamaha C115V Speakers (passive-need an amplifier and Speak on cables)• 2 Yamaha DSR 215V Full Range Speakers (active-need AC power and XLR cables)
Soundcart• SKB 1SKB19-1406 Mighty Gig Rig Mixing Case (6U X 14U)• SKB 1SKB19-REX 6 Mighty Gig Rig Expander (6U)• SKB 1SKB-AV14 A/V Shelf for the SKB Mighty Gig Rig• Yamaha 01v96i Digital Mixer with the Yamaha MY 16 AT Expansion Card• Yamaha Rack ears for the Yamaha 01v96i• Furman PF Pro Power Factor Power Conditioner• Percussion Solutions Custom Quick Connect Rack Panel (Power, XLR, Speak on)• McCormicks Custom Wiring Solution (for 8 Pole Speaker Cables and up to 4 amps)• Raxxess 2U Metal Locking Rack Drawer• 3 Yamaha P 7000 S Power Amplifiers (one for the CW218V subwoofers, one for 4
C115V speakers on top of the subwoofers, one for the 4 C115V speakers that serve as satellite speakers)
• 3 Presonus Digimax FS Digital Preamplifiers (Expands mixer by 8 XLR channels each)
GearWORKS.org
• Raxxess 3U Fan• Raxxess 2U Fan• McCormicks Stage Snake Carrier• Conquest 28 Channel X 50ʼ Audio Stage Snake• Conquest 20 Channel X 50ʼ Audio Stage Snake• 2 50ʼ Extension cords (power from the sound cart to the Yamaha DSR 215 speakers
and power for electronic instruments in the Front Ensemble)• 2 Conquest Cable 75ʼ 8 Pole Speaker cables with metal Speak on ends• 2 Conquest Cable 50ʼ 4 Pole Speaker cables with metal Speak on ends• 6 Conquest Cable 6ʼ 2 Pole Speaker cables with metal Speak on ends• 2 Conquest Cable 8 Pole Speaker cable junction boxes (Custom made)
CartsMcCormicks Ultimate PA System cart for SKB Mighty Gig Rig2 McCormicks Ultimate PA System Dual Subwoofer carts2 McCormicks Ultimate PA System Upright Speaker carts2 McCormicks Custom Satellite Speaker carts
GearWORKS.org

Planet Waves Cables and Products used by The Cavaliers
5ʼ Custom Series XLR to XLR cable (PW-M-05)
The 5ʼ Custom Series XLR to XLR cables work well to attach to a microphone and get to the end of a vibraphone frame for the “daisy chain” concept. They can be used for a similar purpose on a marimba to attach to a microphone on one of the marimba and get it to the end of the frame to “daisy chain” the instrumentʼs cables towards the audio stage snake. These cables can also be used in connecting the mixer or other components in your sound cart.
10ʼ Custom Series XLR to XLR cable (PW-M-10)
The 10ʼ Custom Series cables are great to attach to a microphone and get to the end of marimba frame if a 5ʼ cable is too short for the “daisy chain” concept. They are excellent to use as an “extension cable” across a vibraphone or marimba of any size. These cables are also useful in making the connection from a DI box to the XLR input on an audio stage snake for a synthesizer, electronic drums, or sampler.
10ʼ American Stage Series XLR to XLR cable (PW-AMSM-10)
The 10ʼ American Stage Series cables are excellent to attach to use with electronic instruments. The high-grade Neutrik ends ensure a great connection from a DI box to the XLR input on an audio stage snake for a synthesizer, electronic drums, or sampler.
25ʼ Custom Series XLR to XLR cable (PW-M-25)
The 25ʼ Custom Series XLR to XLR cable is great to use for wind solo instrument(s) microphones that need to be staged outside of the percussion area of the front ensemble. If needed, combine this cable with another 5ʼ, 10ʼ, or 25ʼ Custom Series XLR to XLR cable to reach your designated wind solo amplification area.
5ʼ ¼” Instrument cable with Compression Springs (PW-GCS-05)
The 5ʼ instrument cable with compression springs is a TS (non-balanced) instrument cable that works well to connect synthesizers or samplers to DI boxes. The compression springs help to insure a tight fit so that the cable does not come out of the jacks during transit.
5ʼ, 10ʼ, and 25ʼ Speak on Cables (PW-SO-05, PW-SO-10, PW-SO-25)
This series of Speak on cables is great to use for your passive speakers and amplifiers. The Speak on connection and molded ends of these cables insure a great connection and fidelity every time.
5ʼ ADAT or Optical cable (PW-OPT-05)
GearWORKS.org
This heavily shielded optical cable is excellent for connecting additional preamplifiers to your 01v96 mixer. The thicker shielding on the outside of the cable adds extra durability to this sensitive cable and makes it stand out from other competing brands.
5ʼ and 10ʼ MIDI Cables (PW-MD-05, PW-MD-10)
These heavily shielded and gold plated MIDI cables offer excellent transfer of data for high performance of your MIDI controllers to other sound modules or synthesizers."5ʼ Dual RCA to 1/8” Stereo cable (PW MP 05)
This cable is excellent to install on your mixer to use with your iPod or mp3 playback device.
Modular Snake Breakouts (PW-XLR-FB-01, PW-XLR-MB-01)
The Modular snake breakouts are cables with 8 XLR Male or Female ends with one DB 25 connection on the opposite end. These can be used in conjunction with audio stage snakes, a Planet Waves Core Cable, and a large quantity of XLR cables to provide a simple “one cable connect” solution for 8 XLR cables.
5ʼ, 10ʼ, and 25ʼ Core Cables (PW-DB25-MM-05, PW-DB25-MM10, PW-DB25-MM-25)
The Core cables are used to connect the DB 25 ends of Modular Snake Breakouts to each other. The Core Cables come in 5ʼ, 10ʼ, and 25ʼ lengths.
GearWORKS.org
Amplification and Digital Mixing Tips for percussion instruments
Marimba
• Marimbas often use 2 microphones. They should NOT be paired, as they would then share the same EQ for the high and low microphone.
• Use an Input Fader Group to group marimba high and low microphones. • Use an Input Mute Group to mute all marimba microphones easily.• Develop an EQ setting of a HPF and LPF to isolate the frequency range that you are
trying to pick up with the microphone. This should be different for the high and low microphone.
• Develop a gate that works for your microphone placement, instruments, and players. Try to have it turn the microphones on when they play a soft volume, but off when they are tacet.
• Decide on how you want to pan the instrument by its set up. This may be different from marimba to marimba or you can leave it centered to get an equal sound out of both speakers.
• Save your channel information into the channel library (one for the High marimba and one for the Low Marimba) and easily apply it to other marimba channels. Adjust the Pan for each as appropriate (see above bullet point).
Vibraphone
• Vibraphones often use one microphone. Due to microphone placement (usually lower), the gain is often different on this instrument than the marimba.
• Use an Input Fader Group to group vibraphones and move them as a choir with one fader.
• Use an Input Mute Group to mute all vibraphone microphones easily.• Develop an EQ setting of a HPF (high pass filter) and LPF (low pass filter) to isolate
the frequency range that you are trying to pick up with the microphone. Leave some room for the frequencies at the top of the instrument to ring. (at least 3 octaves above the highest note is recommended)
• Develop a gate that works for your microphone placement, instruments, and players-try to have it turn the microphones on when they play a soft volume, but off when they are tacet. The hold and decay settings are typically longer for vibraphone gates due to the instrumentʼs resonant nature. Make sure the gate doesnʼt cut the sound off in the PA before the natural sound of the instrument has decayed on long tones.
• Decide on how you want to pan the instrument by its set up. This may be different from vibraphone to vibraphone or you can leave it centered to get an equal sound out of both speakers.
• Save the channel information into the channel library and easily apply it to other vibraphone channels. Adjust the Pan for each as appropriate (see above bullet point).
GearWORKS.org
Timpani
• Timpani often use 2 or more microphones. Try to place the microphone aiming down at the drumhead to reduce wind noise and other sounds near the performer.
• Use an Input Fader Group to group timpani microphones and move them as a choir with one fader.
• Use an Input Mute Group to mute all timpani microphones easily.• Develop an EQ setting of a HPF and LPF to isolate the frequency range that you
are trying to pick up with the microphone. Leave some room for the frequencies at the top of the instrument to ring. (at least 2 octaves above the highest note is recommended)
• Develop a gate that works for your microphone placement, instruments, and players-try to have it turn the microphones on when they play a soft volume, but off when they are tacet. The hold and decay settings are typically longer for timpani gates due to the instrumentʼs resonant nature. Make sure the gate doesnʼt cut the sound off in the PA before the natural sound of the instrument has decayed on long tones.
• Decide on how you want to pan the instrument by its set up. You may decide to pan the sound so that it is directional to the playerʼs set up or you can leave it centered to get an equal sound out of both speakers.
• Save your channel information into the channel library for future use.
Drum set (also applies to hand drums and percussion amplification)
• The drum set often use 5 or more microphones. Make sure you are using the correct microphone for this application and try and get the microphone placement correct to achieve your best sound.
• Make sure the gain settings are so that the channel does not clip when played aggressively.
• After you have a mix of the separate channels of the drum set, use an Input Group to group the drum set microphones and move them as a choir with one fader.
• Use a Mute Group to mute all of the drum set microphones easily.• Use the built in EQ Library for the components of your drum set. Experiment with
the different variations until you find a sound that you like.• Use the built in Library of gates and compressors as a start. This is more
important for sound “bleed over” on a drum set due to the proximity of the microphones to each other.
• Develop a gate that works for your microphone placement, especially for the snare drum and toms. This will help to isolate the sound of each drum.
• Donʼt use a gate on the Hi hat. You will want to capture all of the sensitive playing that this instrument displays.
• If you use two snare drum microphones (top and bottom), make sure to put one of the microphones out of phase with the other.
GearWORKS.org
Electronic Instruments (Synthesizers, Samplers, Electronic Drums, iPod)
• Pair the inputs in adjacent channels.• Pan one channel L63, the other R63 to correspond to the L and R output from the
instrument. This will give you the ability to pan on the instrument and have that affect come across in your PA.
• Set a limiting compressor (limiter) so that the instrument cannot clip due to a wrong setting or being played too aggressively.
• Do not use a gate. Consider using some compression on synthesizers for weaker players to “average out” their playing. Be aware that this will reduce the performerʼs range of musical expression.
Expanding, Controlling, and Refining your PAʼs Output
The Omni Outs 1-4 on the rear panel of the mixer can be used in conjunction with the Aux 1-4 Faders (Master layer) to add additional speaker sets to the Stereo L/R Main outputs of your system for further sound reinforcement and to create special sound effects. You can also create a separate subwoofer or monitor mix with these outputs.
Speakers
•Active-amplifier is attached to the speaker; uses XLR or 1/4” cable for signal and an extension cord for power•Passive-uses an XLR or 1/4”cable out of the mixer to the amplifier; amplifier sends
signal and power using a Speak on cable or 1/4” speaker cable•Subwoofer-a subwoofer typically handles the lower frequencies in a PA system;
usually 150 Hz and lower. 15” and 18” sized “woofers” are common.•Full Range-a full range speaker can handle high, mid, and low frequencies. A horn and
two 15” woofers are common in a “tower” like shape.•Mid/High Range-a mid/high range speaker is designed to handle mid and high
frequencies. They can go down into what is considered “low” frequencies, but they are best used in conjunction with a subwoofer.•Monitor-monitor speakers are used by the performers so that they can hear
themselves more clearly. They are often smaller sized speakers.
Amplifiers
An Amplifier provides power to passive speakers. Yamaha amplifiers come equipped with a crossover. A crossover is an element that can discern and distribute the signals by frequency in Hz to a speaker. This is often used with subwoofer and high/mid range speakers to keep the appropriate frequencies routed to their respective speakers.
GearWORKS.org
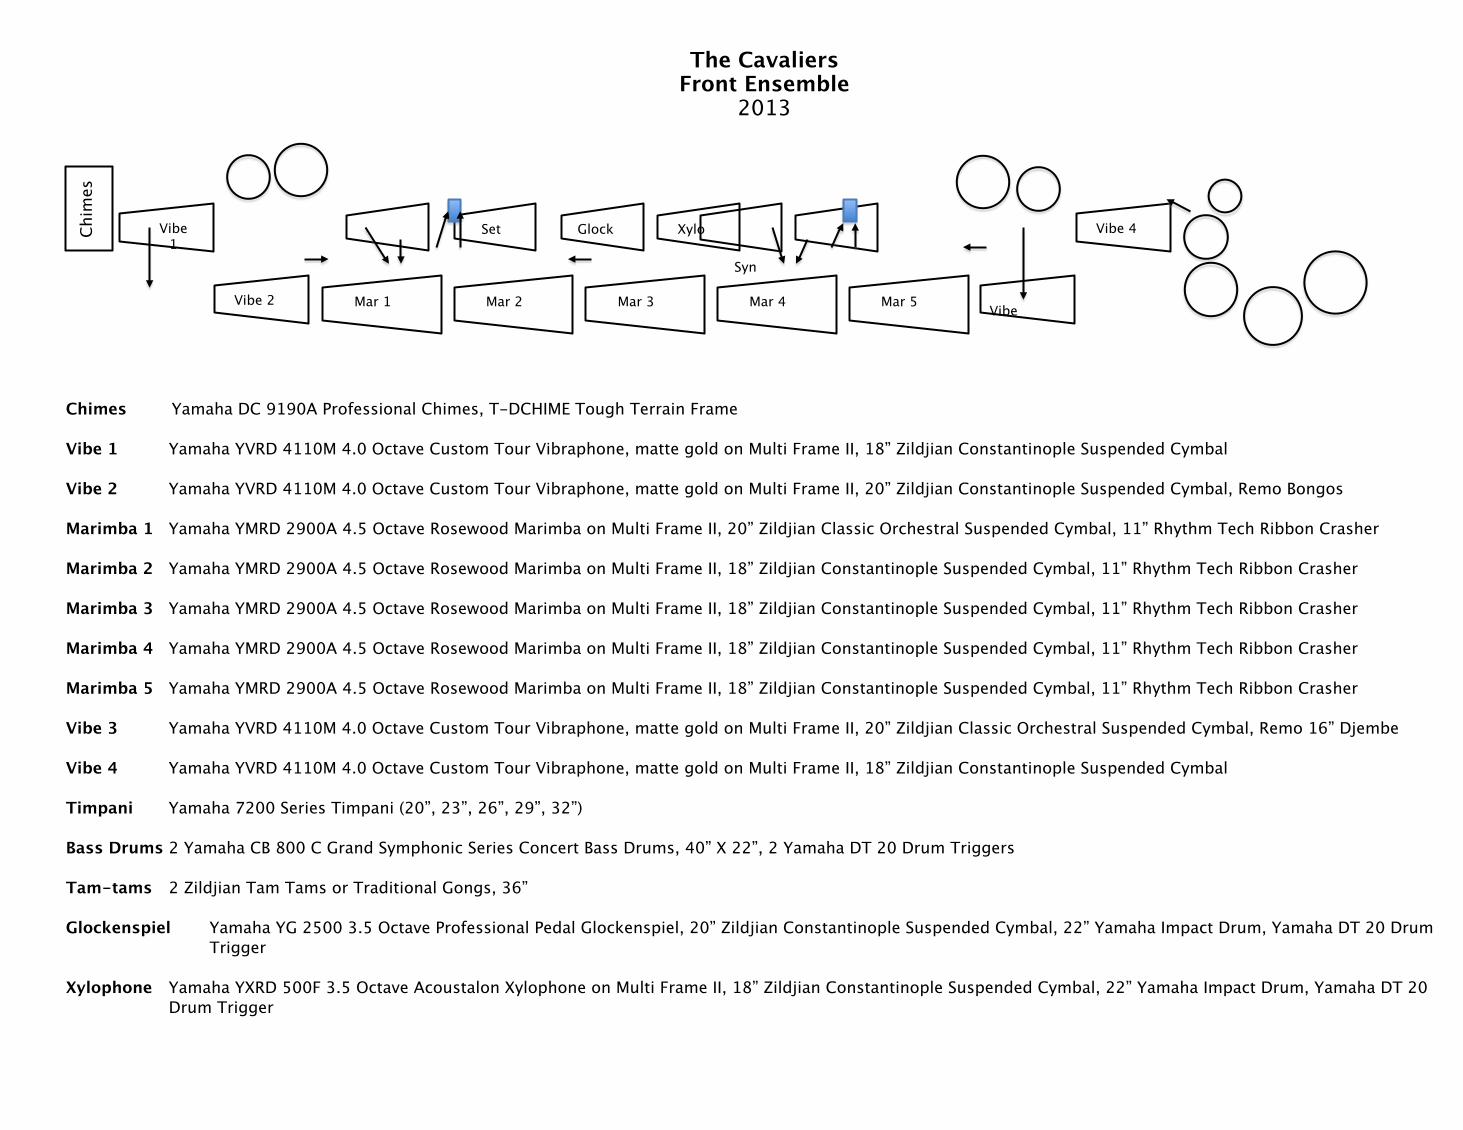
Chimes Yamaha DC 9190A Professional Chimes, T-DCHIME Tough Terrain Frame
Vibe 1 Yamaha YVRD 4110M 4.0 Octave Custom Tour Vibraphone, matte gold on Multi Frame II, 18” Zildjian Constantinople Suspended Cymbal
Vibe 2 Yamaha YVRD 4110M 4.0 Octave Custom Tour Vibraphone, matte gold on Multi Frame II, 20” Zildjian Constantinople Suspended Cymbal, Remo Bongos
Marimba 1 Yamaha YMRD 2900A 4.5 Octave Rosewood Marimba on Multi Frame II, 20” Zildjian Classic Orchestral Suspended Cymbal, 11” Rhythm Tech Ribbon Crasher
Marimba 2 Yamaha YMRD 2900A 4.5 Octave Rosewood Marimba on Multi Frame II, 18” Zildjian Constantinople Suspended Cymbal, 11” Rhythm Tech Ribbon Crasher
Marimba 3 Yamaha YMRD 2900A 4.5 Octave Rosewood Marimba on Multi Frame II, 18” Zildjian Constantinople Suspended Cymbal, 11” Rhythm Tech Ribbon Crasher
Marimba 4 Yamaha YMRD 2900A 4.5 Octave Rosewood Marimba on Multi Frame II, 18” Zildjian Constantinople Suspended Cymbal, 11” Rhythm Tech Ribbon Crasher
Marimba 5 Yamaha YMRD 2900A 4.5 Octave Rosewood Marimba on Multi Frame II, 18” Zildjian Constantinople Suspended Cymbal, 11” Rhythm Tech Ribbon Crasher
Vibe 3 Yamaha YVRD 4110M 4.0 Octave Custom Tour Vibraphone, matte gold on Multi Frame II, 20” Zildjian Classic Orchestral Suspended Cymbal, Remo 16” Djembe
Vibe 4 Yamaha YVRD 4110M 4.0 Octave Custom Tour Vibraphone, matte gold on Multi Frame II, 18” Zildjian Constantinople Suspended Cymbal
Timpani Yamaha 7200 Series Timpani (20”, 23”, 26”, 29”, 32”)
Bass Drums 2 Yamaha CB 800 C Grand Symphonic Series Concert Bass Drums, 40” X 22”, 2 Yamaha DT 20 Drum Triggers
Tam-tams 2 Zildjian Tam Tams or Traditional Gongs, 36”
Glockenspiel Yamaha YG 2500 3.5 Octave Professional Pedal Glockenspiel, 20” Zildjian Constantinople Suspended Cymbal, 22” Yamaha Impact Drum, Yamaha DT 20 Drum Trigger
Xylophone Yamaha YXRD 500F 3.5 Octave Acoustalon Xylophone on Multi Frame II, 18” Zildjian Constantinople Suspended Cymbal, 22” Yamaha Impact Drum, Yamaha DT 20 Drum Trigger
The Cavaliers Front Ensemble
2013
Vibe 1
Vibe 2 Mar 1 Vibe
Vibe 4
Syn
XyloGlockSet
Mar 2 Mar 3 Mar 4 Mar 5
Chim
es
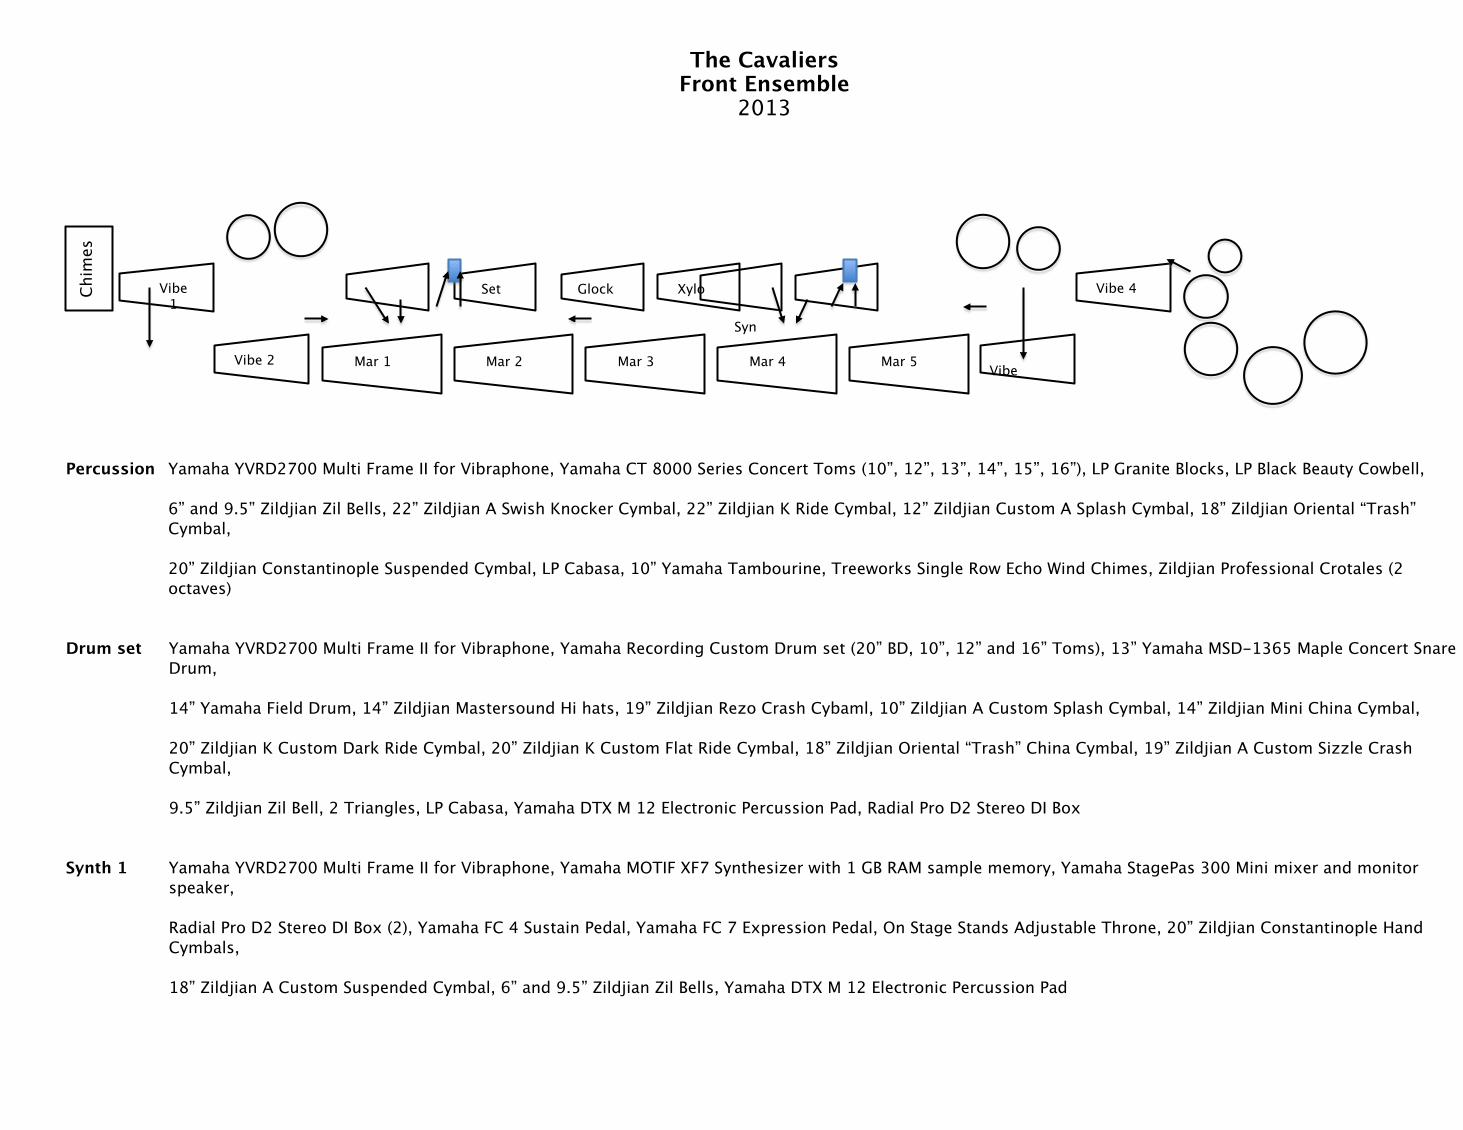
Percussion Yamaha YVRD2700 Multi Frame II for Vibraphone, Yamaha CT 8000 Series Concert Toms (10”, 12”, 13”, 14”, 15”, 16”), LP Granite Blocks, LP Black Beauty Cowbell, 6” and 9.5” Zildjian Zil Bells, 22” Zildjian A Swish Knocker Cymbal, 22” Zildjian K Ride Cymbal, 12” Zildjian Custom A Splash Cymbal, 18” Zildjian Oriental “Trash”
Cymbal, 20” Zildjian Constantinople Suspended Cymbal, LP Cabasa, 10” Yamaha Tambourine, Treeworks Single Row Echo Wind Chimes, Zildjian Professional Crotales (2
octaves)
Drum set Yamaha YVRD2700 Multi Frame II for Vibraphone, Yamaha Recording Custom Drum set (20” BD, 10”, 12” and 16” Toms), 13” Yamaha MSD-1365 Maple Concert Snare Drum, 14” Yamaha Field Drum, 14” Zildjian Mastersound Hi hats, 19” Zildjian Rezo Crash Cybaml, 10” Zildjian A Custom Splash Cymbal, 14” Zildjian Mini China Cymbal, 20” Zildjian K Custom Dark Ride Cymbal, 20” Zildjian K Custom Flat Ride Cymbal, 18” Zildjian Oriental “Trash” China Cymbal, 19” Zildjian A Custom Sizzle Crash Cymbal, 9.5” Zildjian Zil Bell, 2 Triangles, LP Cabasa, Yamaha DTX M 12 Electronic Percussion Pad, Radial Pro D2 Stereo DI Box
Synth 1 Yamaha YVRD2700 Multi Frame II for Vibraphone, Yamaha MOTIF XF7 Synthesizer with 1 GB RAM sample memory, Yamaha StagePas 300 Mini mixer and monitor speaker, Radial Pro D2 Stereo DI Box (2), Yamaha FC 4 Sustain Pedal, Yamaha FC 7 Expression Pedal, On Stage Stands Adjustable Throne, 20” Zildjian Constantinople Hand Cymbals,
18” Zildjian A Custom Suspended Cymbal, 6” and 9.5” Zildjian Zil Bells, Yamaha DTX M 12 Electronic Percussion Pad
The Cavaliers Front Ensemble
2013
Vibe 1
Vibe 2 Mar 1 Vibe
Vibe 4
Syn
XyloGlockSet
Mar 2 Mar 3 Mar 4 Mar 5
Chim
es
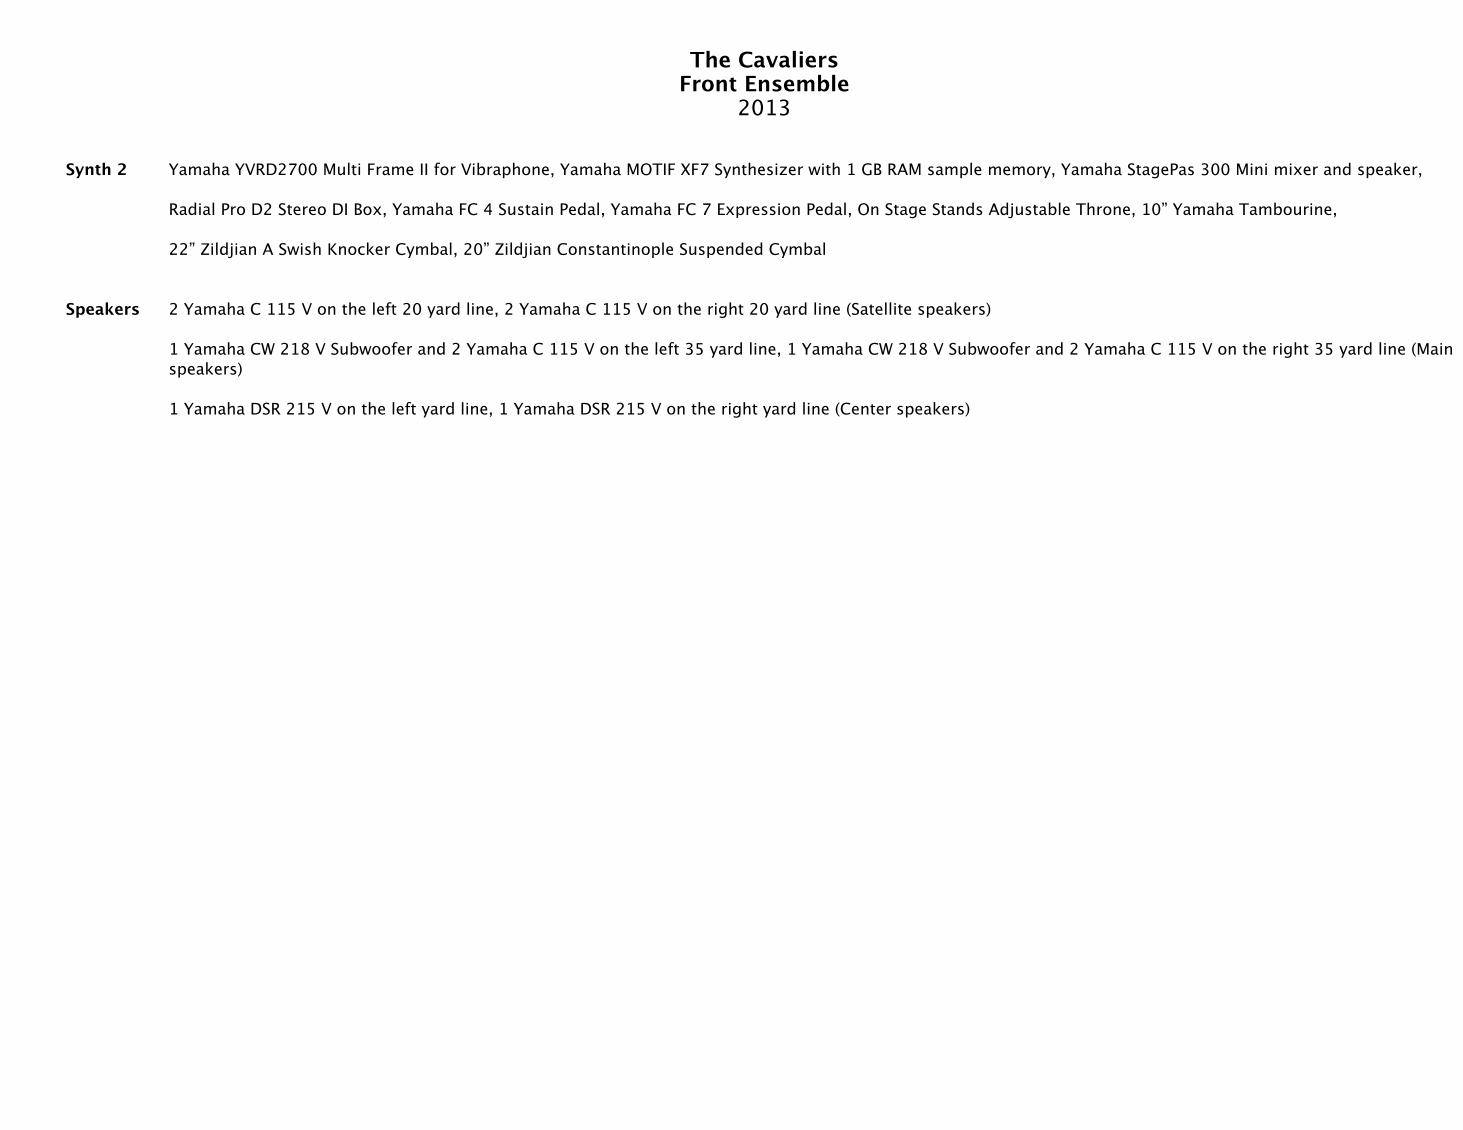
Synth 2 Yamaha YVRD2700 Multi Frame II for Vibraphone, Yamaha MOTIF XF7 Synthesizer with 1 GB RAM sample memory, Yamaha StagePas 300 Mini mixer and speaker, Radial Pro D2 Stereo DI Box, Yamaha FC 4 Sustain Pedal, Yamaha FC 7 Expression Pedal, On Stage Stands Adjustable Throne, 10” Yamaha Tambourine, 22” Zildjian A Swish Knocker Cymbal, 20” Zildjian Constantinople Suspended Cymbal
Speakers 2 Yamaha C 115 V on the left 20 yard line, 2 Yamaha C 115 V on the right 20 yard line (Satellite speakers) 1 Yamaha CW 218 V Subwoofer and 2 Yamaha C 115 V on the left 35 yard line, 1 Yamaha CW 218 V Subwoofer and 2 Yamaha C 115 V on the right 35 yard line (Main speakers) 1 Yamaha DSR 215 V on the left yard line, 1 Yamaha DSR 215 V on the right yard line (Center speakers)
The Cavaliers Front Ensemble
2013

Alan MillerPercussion Composer and Arranger
The Cavaliersʼ Front Ensemble: Mallet Selection
The purpose of this portion of the document is to give a general overview of how The Cavaliersʼ Front Ensemble chooses its keyboard mallets. For any ensemble, the task of choosing the right mallet is a fluid and personal one. We do not make any claim to have the answer. Hopefully this document will help you create new sounds for your groups.
Typical Mallet Inventory
We at The Cavaliers have had the good fortune of having a relationship with Innovative Percussion for nearly two decades now. We believe that IP has the best quality and best variety available today. We have, at times, used almost every mallet from their catalog, however what follows is a list of mallets we typically find ourselves using year after year.
I generally do not like the terms “soft” and “hard” when referring to mallets, as that does not fully encompass all the attributes a mallet possesses (weight, density of core, tightness of wrap, amount of latex, etc.). However for the purposes of this document, that is probably the best way to categorize them.
It may not be within your budget to keep all of these mallets on-hand for your group, but this will give you an idea of what we are drawing from with regard to our “sound palate”...
(Note: A “*” indicates our “go-to” series of mallets. These are the ones we typically warm up with.)
Marimba:IP1003 medium-hard (Casella Series)*FS 150 medium-soft (Field Series)FS 250 hard (Field Series)IP 2001 soft (Ancona Series)IP 701 very soft (Engelman Series)IP 3004 medium-hard (Rarick Series)IP 3003 medium (Rarick Series)
Vibraphones:IP 1006 medium-hard (Casella Series)*FS 320 medium-soft (Field Series)FS 420 very hard (Field Series)IP 2007 hard (Ancona Series)IP 705 very soft (Engelman Series)
GearWORKS.org

IP 3007 medium-hard (Rarick Series)IP 3006 medium (Rarick Series)AA 25 medium (Astrand Series)
Xylophone:IP 904 medium-hard (Ross Series)*IP 903 medium (Ross Series)IP 902 medium-light (Ross Series)IP 905 hard-light (Ross Series)FS 550 very hard (Field Series)IP 1007 medium (Casella Series)AA 35 wrapped (Astrand Series)
Glockenspiel (pedal glock):IP 903 medium-soft (Ross Series)*IP904 medium (Ross Series)IP 905 light (Ross Series)IP 902 effects-only (Ross Series)FS 550 hard/bright (Field Series)ENS 460R wrapped (Ensemble Series)
Crotales:FS 550 medium-hard (Field Series)ENS 760R aluminum/brilliant (Ensemble Series)IP 905 light (Ross Series)IP 902 effects-only (Ross Series)
Mallet Groupings
Generally speaking, we want all the voices within the mallet ensemble to have the same quality for any given section of music. Weʼre most likely not going to mix a super-lush low-end marimba mallet with a super-brilliant, overly-articulate vibe mallet. When I am orchestrating the front ensemble music, Iʼm generally doing it with a mallet selection in mind. Below are three basic categories of mallets that I tend to use as a starting point. Hopefully these will help you choose sounds for each section of your mallet ensemble that match and compliment each other...
“Medium-hard and articulate”The front ensemble plays a lot of notes in the middle to upper range of the instruments. When playing these types of passages, this is the grouping I usually start with:Marimbas - IP 1003Vibes - IP 1006Xylophone - IP 904Glock - IP 904
GearWORKS.org
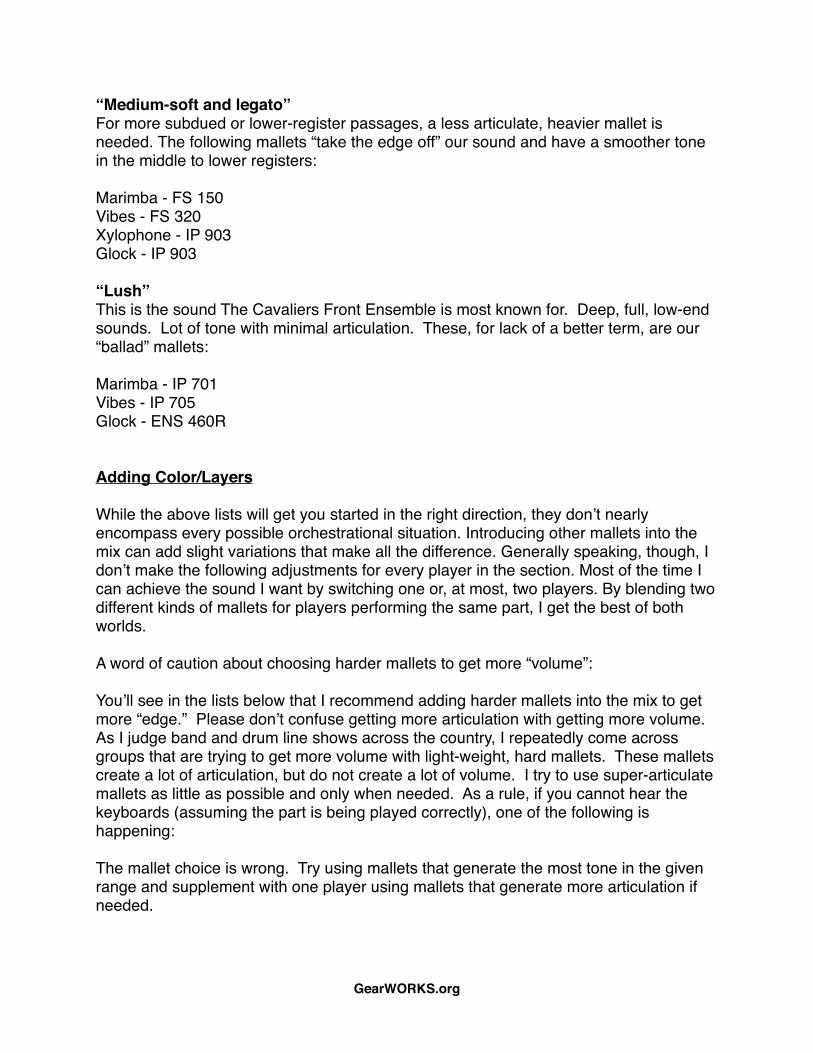
“Medium-soft and legato”For more subdued or lower-register passages, a less articulate, heavier mallet is needed. The following mallets “take the edge off” our sound and have a smoother tone in the middle to lower registers:
Marimba - FS 150Vibes - FS 320Xylophone - IP 903Glock - IP 903
“Lush”This is the sound The Cavaliers Front Ensemble is most known for. Deep, full, low-end sounds. Lot of tone with minimal articulation. These, for lack of a better term, are our “ballad” mallets:
Marimba - IP 701Vibes - IP 705Glock - ENS 460R
Adding Color/Layers
While the above lists will get you started in the right direction, they donʼt nearly encompass every possible orchestrational situation. Introducing other mallets into the mix can add slight variations that make all the difference. Generally speaking, though, I donʼt make the following adjustments for every player in the section. Most of the time I can achieve the sound I want by switching one or, at most, two players. By blending two different kinds of mallets for players performing the same part, I get the best of both worlds.
A word of caution about choosing harder mallets to get more “volume”:
Youʼll see in the lists below that I recommend adding harder mallets into the mix to get more “edge.” Please donʼt confuse getting more articulation with getting more volume. As I judge band and drum line shows across the country, I repeatedly come across groups that are trying to get more volume with light-weight, hard mallets. These mallets create a lot of articulation, but do not create a lot of volume. I try to use super-articulate mallets as little as possible and only when needed. As a rule, if you cannot hear the keyboards (assuming the part is being played correctly), one of the following is happening:
The mallet choice is wrong. Try using mallets that generate the most tone in the given range and supplement with one player using mallets that generate more articulation if needed.
GearWORKS.org
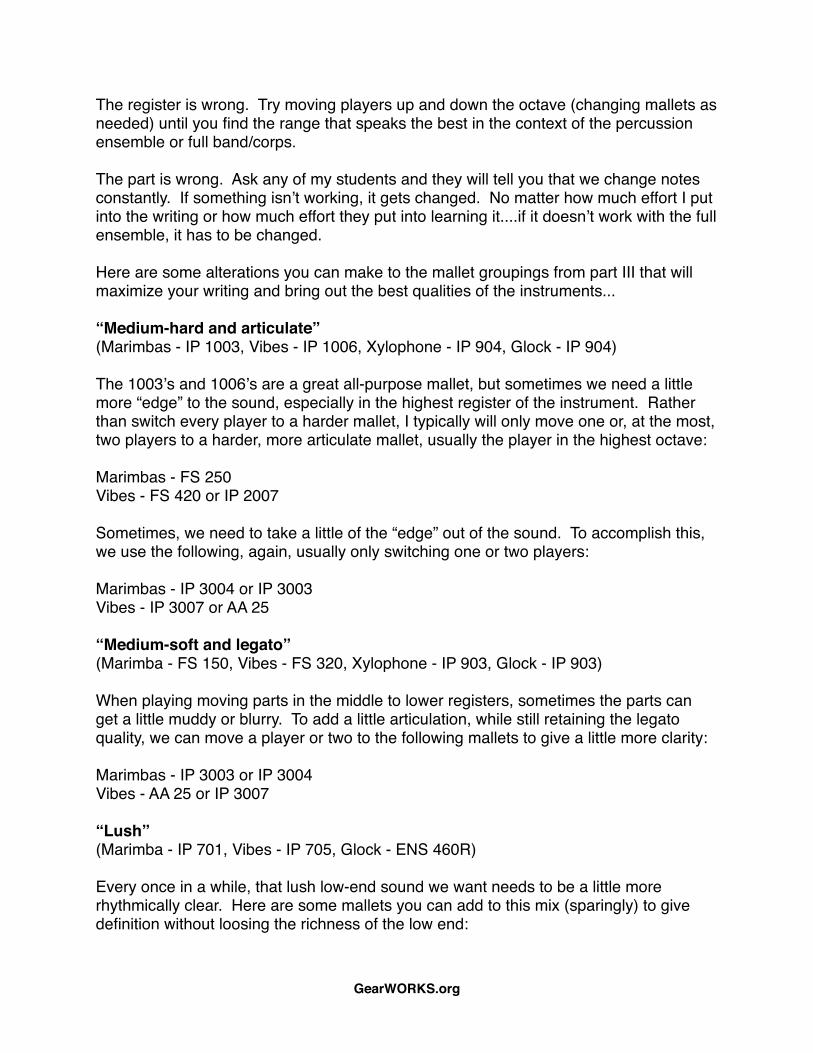
The register is wrong. Try moving players up and down the octave (changing mallets as needed) until you find the range that speaks the best in the context of the percussion ensemble or full band/corps.
The part is wrong. Ask any of my students and they will tell you that we change notes constantly. If something isnʼt working, it gets changed. No matter how much effort I put into the writing or how much effort they put into learning it....if it doesnʼt work with the full ensemble, it has to be changed.
Here are some alterations you can make to the mallet groupings from part III that will maximize your writing and bring out the best qualities of the instruments...
“Medium-hard and articulate”(Marimbas - IP 1003, Vibes - IP 1006, Xylophone - IP 904, Glock - IP 904)
The 1003ʼs and 1006ʼs are a great all-purpose mallet, but sometimes we need a little more “edge” to the sound, especially in the highest register of the instrument. Rather than switch every player to a harder mallet, I typically will only move one or, at the most, two players to a harder, more articulate mallet, usually the player in the highest octave:
Marimbas - FS 250Vibes - FS 420 or IP 2007
Sometimes, we need to take a little of the “edge” out of the sound. To accomplish this, we use the following, again, usually only switching one or two players:
Marimbas - IP 3004 or IP 3003Vibes - IP 3007 or AA 25
“Medium-soft and legato”(Marimba - FS 150, Vibes - FS 320, Xylophone - IP 903, Glock - IP 903)
When playing moving parts in the middle to lower registers, sometimes the parts can get a little muddy or blurry. To add a little articulation, while still retaining the legato quality, we can move a player or two to the following mallets to give a little more clarity:
Marimbas - IP 3003 or IP 3004Vibes - AA 25 or IP 3007
“Lush”(Marimba - IP 701, Vibes - IP 705, Glock - ENS 460R)
Every once in a while, that lush low-end sound we want needs to be a little more rhythmically clear. Here are some mallets you can add to this mix (sparingly) to give definition without loosing the richness of the low end:
GearWORKS.org

Marimbas - IP 2001 or FS 150Vibes - IP 3006 or FS 320
Create your own Palate
I realize that not everyone will have $3,000 to go out and buy every mallet on this list. Sometimes we have to work with what we have. What can you do to maximize your sound palate with the mallets you have already? How can you create your own new sounds?
Categorize: Create a list of all the mallets you have at your disposal (all the “tools in your toolbox”) and write a description of the sound they produce in various ranges of the instrument. “Bright and thin.” “Heavy, fairly articulate in middle register but still legato in lower register.” Simply going through this process will help you understand the variety of sounds you already have at your fingertips.
Analyze: Whether youʼre writing at the computer or rehearsing the group live, ask yourself what sound youʼre trying to create. If you donʼt like the sound youʼre getting, what donʼt you like about it? What other “tool” could you use to get the qualities you want out of the instrument? Too often, we settle for the generic “I donʼt like that sound” without really defining what it is we donʼt like. That second step, though, is vital to problem-solving when it comes to mallet selection.
Experiment: The lists I made are based on fifteen years of playing, teaching and writing for The Cavaliers, but they are not complete. We can always come up with new combinations of sounds. Take the time with your group to experiment with different combinations of mallets. Even if most of them sound terrible (trust me, Iʼve been there), every once in a while we stumble onto something truly unique and new.
Conclusion
Hopefully these thoughts on mallet selection will make a difference in your teaching or arranging. If you have any questions regarding this document or our presentation at PASIC, please feel free to email me at [email protected].
GearWORKS.org

Michael McIntoshPercussion Caption Head, Composer, & Arranger
Electronics• Electronics can add a lot of appropriate and effective color• The language of the youth• The Yamaha MOTIF XF7 and DTX Multi-12• Pick the right source material• Great sampling creates an “environment”
Setup
• Macbook Pro• Midi Controller (either full size or portable)• LOGIC• Various sampling libraries• Sibelius (music notation program)• Finale (music notation program)
ORCHESTRATION
• Less is more sometimes• Color and Texture create great intrigue to the listener• Some things may not work musically due to visual responsibilities
PEOPLE HEAR WHAT THEY SEE
• 90% of information people take in is visual• Look the part, professionalism is everything• Be a cool kid, let your hands and attitude do the talking • A craftsmen needs great gear
The Cavaliersʼ Tuning Scheme
• Snares-D on bottom head, C# on top.• Tuning the top head "lower" than the bottom head will provide a great snare sound by
allowing the shell to enhance and warm the snare sound• Basses (5) from bottom-D, A, D, F#, A• Tenors from bottom-Bb-D-F#-Ab-C
Successful Battery Clarity
• Linear writing creates color and texture• Play unison lines usually during ff wind sustain, otherwise stay linear
GearWORKS.org

Successful Front Ensemble Clarity
• Look for opportunities regarding sus. cymbal to help richen (not cover up) the phrases• Help mask releases and decay of winds• Try and keep metallic line interesting by octave displacement• Make sure synthesizer color is contributing and not in the way
Successful Electronic Clarity
• Spread the speakers a bit to create a stereo effect (35 or 30 yard lines works great)• Create a global eq bump between 300-1kHz to help the mids that get lost in Lucas Oil.• EQ (roll off) bass patches/doubling/reinforcement at around 80kHz• Narration recommendations; a female voice with a slight accent works best and
doesnʼt get lost in the mid range (marimbas, clarinet, french horn, mello)• Any narration or vocal samples, bump 5kHz to bring them "forward" spatially in the mix
GearWORKS.org