Implementing a 32-bit Processor-based Design in …valhalla.altium.com/Learning-Guides/TU0128...
19
1-1 Implementing a 32-bit Processor-based Design in an FPGA Summary Tutorial TU0128 (v1.1) May 16, 2008 This tutorial shows how to create a simple 32-bit FPGA design with a soft-core and program it with a piece of software. The software will access the designed hardware causing a row of LEDs to blink in a counting pattern. 1.1 Introduction In this tutorial we will show how to create a simple 32-bit processor based design in an FPGA. The design includes a soft-core and the FPGA will be connected to a series of LEDs. The processor soft-core in the FPGA will be programmed with a piece of software. The completed example shows a row of 8 LEDs on the NanoBoard that are binary counting from 0 to 255. What do you need? In order to follow the steps described in this tutorial, you need the following: • Altium Designer Embedded Intelligence (Unified licence). • a NanoBoard NB2DSK01 with a Xilinx Spartan 3 S1500 daughter board + Xilinx ISE software. The NanoBoard must be connected to your PC via a USB cable or a parallel cable. Outline of the example A typical design consists of a processing soft-core plus all necessary peripherals living inside an FPGA. This design is made in an FPGA project. Software is needed to make the system do something useful. This software will run on the soft-core and is developed in an embedded project. This tutorial is an embedded hardware equivalent of "Hello world": a counting row of LEDs. The goal of this example is to explain how the FPGA design tools and embedded tools work and how they fit together to create a first working example. The tutorial consists of three major steps: • First an FPGA design is created. The design will contain a processing soft-core, an interface to the LEDs on the NanoBoard, a clock, a reset button and a JTAG chain for communication with your PC. The FPGA design will then be configured for the type of FPGA that is resident on the daughter board plugged into the NanoBoard. • In the next section a software project is created and software will be written to program the soft-core of the FPGA design. The software project will be integrated in the FPGA project. • Finally, the whole project is built and loaded into the FPGA after which the LEDs start counting. Let us start with the tutorial. If you have not done so: • Start Altium Designer.
Transcript of Implementing a 32-bit Processor-based Design in …valhalla.altium.com/Learning-Guides/TU0128...

1−1
Implementing a 32−bit Processor−basedDesign in an FPGA
SummaryTutorialTU0128 (v1.1) May 16, 2008
This tutorial shows how to create a simple 32−bit FPGA design with a soft−core andprogram it with a piece of software. The software will access the designed hardwarecausing a row of LEDs to blink in a counting pattern.
1.1 Introduction
In this tutorial we will show how to create a simple 32−bit processor based design in an FPGA. The design includes a soft−coreand the FPGA will be connected to a series of LEDs. The processor soft−core in the FPGA will be programmed with a piece ofsoftware. The completed example shows a row of 8 LEDs on the NanoBoard that are binary counting from 0 to 255.
What do you need?
In order to follow the steps described in this tutorial, you need the following:
• Altium Designer Embedded Intelligence (Unified licence).
• a NanoBoard NB2DSK01 with a Xilinx Spartan 3 S1500 daughter board + Xilinx ISE software.The NanoBoard must be connected to your PC via a USB cable or a parallel cable.
Outline of the example
A typical design consists of a processing soft−core plus all necessary peripherals living inside an FPGA. This design is made inan FPGA project. Software is needed to make the system do something useful. This software will run on the soft−core and isdeveloped in an embedded project.
This tutorial is an embedded hardware equivalent of "Hello world": a counting row of LEDs. The goal of this example is toexplain how the FPGA design tools and embedded tools work and how they fit together to create a first working example. Thetutorial consists of three major steps:
• First an FPGA design is created. The design will contain a processing soft−core, an interface to the LEDs on the NanoBoard,a clock, a reset button and a JTAG chain for communication with your PC. The FPGA design will then be configured for thetype of FPGA that is resident on the daughter board plugged into the NanoBoard.
• In the next section a software project is created and software will be written to program the soft−core of the FPGA design.The software project will be integrated in the FPGA project.
• Finally, the whole project is built and loaded into the FPGA after which the LEDs start counting.
Let us start with the tutorial. If you have not done so:
• Start Altium Designer.

Implementing a 32−bit Processor−based Design in an FPGA
1−2
1.2 Create the Hardware Design
1.2.1 Create and Save a New FPGA Project
1. From the File menu, select New » Design Workspace to create an empty workspace.
2. From the File menu, select New » Project » FPGA project to create a new FPGA project.
A new project named "FPGA_Project1.PrjFpg" is added in the Projects panel.
3. From the File menu, select New » Schematic to create a new schematic document.
A new schematic document is added to the Projects panel named "Sheet1.SchDoc".This new document is part of the FPGA project.
Projects like these tend to grow quite fast, so it is best to start with a reasonably sized sheet:
4. On the opened schematic, right−click and select Options » Sheet...
The Document Options dialog appears:
• Set the sheet size to, for example, C.
• Click OK to confirm the new settings.
5. To save the new project, click the Workspace button and select Save All:
• In the Examples directory of Altium Designer, create a new directory named (for instance) Getting Started and savethe files. (You can use the default file names or give them more meaningful names. In this tutorial we will useBlinkingLED.SchDoc and FPGA_Processor_32bit.PrjFpg.)

Implementing a 32−bit Processor−based Design in an FPGA
1−3
1.2.2 Draw the Hardware Schematic
1. Add a TSK3000A processor soft−core to the schematic and configure it
First make sure the Libraries panel is visible:
1. Click on the System button at the right bottom of your screen and make sure Libraries is checked.
2. On the Libraries panel: from the FPGA Processors.IntLib library, choose the TSK3000A processor:
• Drag the processor to your empty sheet
• Place the TSK3000A horizontally in a central position towards the top of the sheet.
The TSK3000A is a rather clean processor soft−core with a well defined set of peripherals: it contains a hardware multiply/divideunit, an internal clock, an interrupt controller, a memory controller and some JTAG based debug logic. More information on theTSK3000A is available in the CR0121 TSK3000A 32−bit RISC Processor document. To access this document, click on theTSK3000A you just added to your schematic and press the F1 key.
The TSK3000A processor soft−core as you just placed on the sheet, needs to be configured:
3. Right−click on the TSK3000A you just placed and select Configure U?(TSK3000A)...(U? is the default designator assigned to this component on the sheet, we will annotate later in the tutorial.)
The Configure (32−bit Processors) dialog appears:
• Increase the internal processor memory to 32 kB (other values may work, but we choose 32 kB). Leave the othersettings as they are.
• Click OK to confirm the new settings.

Implementing a 32−bit Processor−based Design in an FPGA
1−4
2. Add LEDs and a general IO port to the schematic to connect them to the TSK3000A
Now, there is a series of LEDs available on the NanoBoard. They are hooked up to the connectors at which the daughter boardis plugged in and so they are available on pins directly on the FPGA.
All you need to do is make sure the system "knows" which pins to use and connect them to a general purpose I/O port. First addthe LEDs to you schematic:
1. On the Libraries panel: from the FPGA NB2DSK01 Port−Plugin.IntLib library, drag the LED component to your sheet:
• Mirror the LED component along its X−axis: left−click on the component, and press the X key while holding your mousebutton down.
• It is best to place the LEDs on the left of your schematic.
As stated, we need to connect these LEDs to a general purpose I/O port:
2. On the Libraries panel: from the FPGA Peripherals.IntLib library, drag the WB_PRTIO component to your sheet:
• Place this component on your schematic and mirror it so that the PAO[7..0] pins are on the left.
• Leave some space between this component and the TSK3000A component.
Your schematic should now look something like this:
The WB_PRTIO GPIO block is configured as an 8−bit output only block by default. It would be nice to be able to read from it too,this way we can create counting LEDs by reading the current LED value, increasing it and writing the new value to the outputport.
3. Right−click on the I/O component you just placed and select Configure U?(WB_PRTIO)...(again, U? is the default designator assigned to this component which we will annotate later.)
The Configure (Wishbone Port I/O) dialog appears:
• Under Kind, select Input/Output.
• Click OK to confirm the new settings.
A second set of pins appears on the left side of the I/O block labelled PAI[7..0].We will connect these later.

Implementing a 32−bit Processor−based Design in an FPGA
1−5
3. Wire the GPIO port to the TSK3000A via a Wishbone Interconnect
Notice that the I/O port has 8 data bits whereas the TSK3000A has 32 data bits. Further more, it has no address lines. To makethe GPIO port available in the processor I/O space, we need to wire the port to the TSK3000A using glue logic.
You could create this glue logic using individual gates and buffers, but that would be quite cumbersome. Fortunately, theTSK3000A uses a standardized bus, known as the Wishbone bus.Actually, there are two buses on the TSK3000A, one on the left (the I/O bus) and another one on the right (the memory bus).Most peripherals (actually, all peripherals that we will use in this example!) feature the same bus.
Now, to make things easy, there is a special Wishbone component that creates the glue logic for you: the Wishboneinterconnect.
1. On the Libraries panel: from the FPGA Peripherals.IntLib library, drag the WB_INTERCON component to your sheet:
• Mirror the component to fit nicely.
• Place the Wishbone component between the TSK3000A and the I/O component.
Also during dragging, you can mirror the component by pressing the X key.
Notice that the interconnect component has changed since you pulled it from the library. When you pulled it from the library, ithad two Wishbone buses, but once placed, one of them is replaced by a bus marked Spare_INT_I[31..0].
2. Connect the Wishbone bus to the TSK3000A:
If you move the interconnect component so that its Wishbone pins touch the corresponding Wishbone pins on the I/O busfrom the TSK3000A, red crosses indicate that a connection is recognized and you can draw lines automatically:
• Click on the WB_INTERCON component, drag it towards the TSK3000A until red crosses appear and release the mousebutton.
• Drag the WB_INTERCON component back to its place while holding down the CTRL−key.Connections (lines) are automatically drawn.
Since we want to use this component to connect the GPIO port to the processor core, we need other pins on the component.Therefore we need to configure it:
3. Right−click on the Wishbone interconnect component and select Configure U?(WB_INTERCON)...
The Configure (Wishbone Intercon) dialog appears:
A. Globally configure the component. At the bottom right of the dialog:
• Set Unused Interrupts to Connect to GND.
• Set Master Address Size to 24−Bit (Peripheral I/O).
This configures the interconnect for I/O purposes (the TSK3000A’s I/O space uses 24−bit addresses) and guaranteesthan unconnected interrupt pins are tied to 0 by default to prevent unexpected interrupts from these.
B. Add the GPIO port to the configuration:
• Click the Add Device... button.
The Device Properties dialog appears.
Change the following settings like shown in the figure below:
• Give the port an Identifier (for example GPIO).
• Set the Address Bus Mode to Byte Addressing.
• Set the Data Bus Width to 8−bit.

Implementing a 32−bit Processor−based Design in an FPGA
1−6
• Click OK to confirm the new settings.
A summary of the properties you’ve just set is shown in the Configure dialog.
Notice that its base address is set to 0xFF00_0000, whilst in the properties it was set to 000000. The interconnectblock "knows" that all I/O space in the TSK3000A is located from address 0xFF000000 and higher so it automaticallyfills in the 8 most significant bits for you.
• Click OK to close the dialog and to return to the schematic.
Notice that the component now once again has a Wishbone bus on the left side where all pin labels are prefixed with s0 (for"slave 0").
4. Connect the GPIO to the Wishbone Interconnect:
• Drag the I/O block so that its Wishbone pins touch the Wishbone pins of the WB_INTERCON component andCTRL−drag it a back to its place so wires and buses are drawn (like you did in step 2).
Now, there are a couple of pins that are not available on the GPIO port but are available on the Wishbone interconnect:s0_SEL_O[3..0]. These are byte−selection pins that enable the selection of bytes when hooking up a 32−bit peripheral. Sincewe configured the GPIO block as an 8−bit peripheral, these pins are not needed. If they are left unconnected, a warning wouldbe generated when synthesizing the block. We can suppress this warning by adding a "No ERC" marker to the pin.
5. From the Place menu, select Directives » No ERC
• Click on the offending pins to place the No ERC marker (red cross)
• Press the ESC key to exit placement mode (and return to normal mouse cursor).

Implementing a 32−bit Processor−based Design in an FPGA
1−7
4. Wire the LEDs to the I/O port
Now you need to connect the LEDs to the PAO pins of the general purpose I/O block and draw a bus between the PAO pins andthe PAI pins. This will allow reading back the value previously written to the port:
1. From the Place menu, select Bus
• Draw the bus (as a bold blue line) from the PAO pins to the LEDs.
• Draw a second bus line from the PAI pins and connect it to the bus you just drew.
• Press the ESC key to exit placement mode (and return to normal mouse cursor).
Wiring functions are also available via the Wiring toolbar:From the View menu, select Toolbars » Wiring.
Your schematic should now look like this:
5. Connect a clock and a reset button to the TSK3000A
At the bottom, the TSK3000A component has two pins, one for a clock and one for a reset.Both components need to be added to the sheet and connected to the TSK3000A.
There are two clocks available on the NanoBoard, one is a fixed reference clock of 20 MHz, the other can be set to anyfrequency (50 MHz by default ). We will use the second clock (because we can set it to a higher frequency which increases theexecution speed of our design!).
1. On the Libraries panel: from the FPGA NB2DSK01 Port−Plugin.IntLib library, drag the CLK_BOARD component to yoursheet:
• Since we need some extra space, place the clock component on the left side of the sheet.
Now connect the Clock to the TSK3000A using Net Labels:
2. From the Place menu, select Wire:
• Draw a short wire (as a thin blue line) from the CLK_I input pin of the TSK3000A.
3. From the Place menu, select Net Label:
• Connect the net label to the short wire. Make sure the red cross marker connects to the wire!
• Double−click on the Net Label, select Net Label (xxxx,yyyy) if asked, and give it a name (for example CLK).
If you did not place the net label, meaning it is still magnetized to the mouse cursor, you can also press the TAB key to toaccess its properties dialog and change its name.
4. Similarly, place a second wire and net label connected to the CLK_BRD component:
• Give this net label the same name CLK so it forms a logical connection to the other CLK net label which is connected tothe TSK3000A.

Implementing a 32−bit Processor−based Design in an FPGA
1−8
Placing and connecting the reset (test button) to the TSK3000A is very similar:
5. Once again, on the Libraries panel: from the FPGA NB2DSK01 Port−Plugin.IntLib library, drag the TEST_BUTTONcomponent to your sheet:
• Place the Test button below the Clock component
Note that the signal from the button is going low when pressed, while the reset input on the TSK3000A is active at high. Thus,we need an inverter connected to the reset button:
6. On the Libraries panel: from the FPGA Generic.IntLib library, drag the INV (Generic Inverter) component to your sheet:
• Connect the inverter to the reset button.
7. Finally, wire the inverter to the RST_I pin, similar to the clock component:
• Use net labels and name them (for example) RST. See steps 3 and 4.
The lower part of the schematic should now look like this:
6. Connect the right side of the TSK3000A component
On the right side of the TSK3000A, there still is the memory bus. In this example, we do not use it. However, there are a coupleof pins that are used as input and these should not be left unconnected! The ME_ACK_I pin needs to be connected to Vcc andthe ME_DAT_I needs to be connected to ground:
1. From the Wiring toolbar, click the Vcc Power Port button with the thin Vcc symbol:
• Do not place it yet, but press the space bar to rotate it to the right orientation.
• Now place the Vcc symbol so it connects to the ME_ACK_I pin.
2. From the Wiring toolbar, click the GND Bus Power Port button with the thick ground symbol:
• Rotate the GND bus to the right orientation.
• Now place the GND bus so it connects to the ME_DAT_I [31..0] bus.
Finally, all unused pins that are left, need to be marked with the No−ERC crosses:
3. From the Wiring toolbar, click the Place No ERC button
• Mark all outputs using No−ERC crosses
The bus on the right side of the TSK3000A should now look like this:

Implementing a 32−bit Processor−based Design in an FPGA
1−9
7. Add a soft−JTAG chain to configure and debug the project from your PC
You have almost finished the hardware design now. What we have to do though, is connect the soft−JTAG chain to theschematic so that we can configure and debug it from the PC. These steps are needed for almost any project. In the libraries, aJTAG connector is available that represents the pins from the JTAG chain:
1. On the Libraries panel: from the FPGA NB2DSK01 Port−Plugin.IntLib library, drag the NEXUS_JTAG_CONNECTORcomponent to your sheet:
• Mirror the JTAG component (remember: left−click, hold down mouse button, press the X key)
• Place it somewhere on the sheet on the left side and below the existing schematic components
2. On the Libraries panel: from the FPGA Generic.IntLib library, drag the NEXUS_JTAG_PORT component to your sheet:
• Mirror the component
• Connect the JTAG port component to the JTAG component
3. Connect the TRST input to Vcc.
This part of the schematic should look like this:
8. Designate all components and save the project
The components on the schematic are still designated as U?. You can can fix this by annotating the design manually, butfortunately there is a quicker way:
1. From the Tools menu, select Annotate Schematics Quietly...
A popup box informs you there are four designators that require update and asks if you want to proceed.
• Click Yes to proceed.
All components will now have unique identifiers. Time to save your work now! The best way to save everything is to use theSave All function:
2. On the Projects panel: Click the Workspace button and select Save All.
If the option Save All is grayed out, there are no changes that need saving.

Implementing a 32−bit Processor−based Design in an FPGA
1−10
1.2.3 Configure the Project for Xillinx Spartan3 FPGA
You have now finished the schematic. But before we start with the software, the system needs to be configured for the type ofFPGA and other hardware you are using.
To map (of constrain) an FPGA design to its physical implementation (the NanoBoard with its daughter boards and FPGA),constraint files are created. Constraint files specify implementation detail such as the target device, the port−to−pin mapping, pinIO standards and so on. A named list of these constraint files forms the configuration of the design project. It is possible tocreate multiple configurations (differing sets of constraint files) in case you want to build the project for different hardwareconfigurations (for example, another type of FPGA).
Creating the configuration for a design on the NB2DSK01 NanoBoard is simplified through use of an auto−configuration feature.The required constraint files are automatically determined and added to this configuration, based on the IDs of the hardware(motherboard, daughter board and peripheral boards) in the system.
For this tutorial example, we will assume the hardware will run on a Xilinx Spartan−3 FPGA device, resident on the daughterboard DB30 which is plugged into the Desktop NanoBoard NB2DSK01.
Though most of the configuration will be done automatically, for the clock on the schematic, we need to create one constraint fileby hand and add it to the configuration. First the automatic part.
1. Configure the FPGA project (adding constraint files)
1. From the View menu, select Devices View.
2. Make sure the NanoBoard has a live connection:
• Turn the NanoBoard on.
• In the toolbar select your type of connection (Parallel−Port or USB JTAG).
• Enable the checkbox Live at the top−left part of the Devices View.
When the connection has established, the NanoBoard is depicted in the Devices View.
3. Right−Click on the NanoBoard picture and select Configure FPGA Project » project name.PrjFpg.
The Configuration Manager For (project name).PrjFpg dialog appears.
Altium Designer detected the configuration of the connected NanoBoard and has automatically added the necessaryconstraint files to the configuration of your project. The configuration manager now shows a list of constraint files as well asthe generated configuration named NB2DSK01_07_DB30_04 (derived from the NanoBoard and the mounted FPGAdaughter board).
Constraint file Function
DB30.04.Constraint board−level constraint file, describes the FPGA daughter board DB30
NB2DSK01.07.Constraint board−level constraint file, describes the NanoBoard itself
NB2DSK01_07_DB30_04_Mapping.Constraint
Interface mapping constraint file that describes the board instances and the daughter board−to−motherboard and peripheral board−to−motherboard connector mappings
PByy.nn.Constraint board−level constraint files, describe the peripheral boards on the NanoBoard.
Board level constraint files for the NB2DSK01 motherboard, daughter boards and peripheral boards are supplied as partof Altium Designer’s installation. The mapping constraint file however, is generated on−the−fly as part of theauto−configuration process, and stored in the same location as the project file itself.
4. Click OK to close the Configuration Manager.
In your Projects panel, a new item called Settings has appeared, being a part of your .PrjFpg project. Take a look and noticethat it contains (links to) the constraint files now being part of your project and of your project configuration.
Implementing a 32−bit Processor−based Design in an FPGA
1−11
2. Create and add an extra constraint file for the clock
Now we need to add one extra constraint file manually. This constraint file is needed to define the frequency of the clock on theschematic. When the project is built, the synthesizer needs this information when it places and routes the hardware. It aims todo this in such a way that the target clock frequency can be guaranteed.
If you do not specify the clock−frequency, the synthesized project will run at an unpredictable clock−speed because thesynthesizer does not know for which frequency it should try to optimize its output.
Add a new constraint file to your project:
1. From the File menu, select New » Other » Constraint File to add a new constraint file to your project.
A new constraint file is added to your project and opened in the editor.
2. Add the following lines to the opened constraint file:
;...............................................................................
Record=Constraint | TargetKind=Port | TargetId=CLK_BRD | FPGA_CLOCK=TRUE
Record=Constraint | TargetKind=Port | TargetId=CLK_BRD | FPGA_CLOCK_FREQUENCY=30 Mhz
Record=Constraint | TargetKind=Port | TargetId=JTAG_NEXUS_TCK | FPGA_CLOCK=TRUE
Record=Constraint | TargetKind=Port | TargetId=JTAG_NEXUS_TCK | FPGA_CLOCK_FREQUENCY=1 Mhz
;...............................................................................
The first two constraint records address the CLK_BRD component on the FPGA design and set it to a target speed of 30MHz. With this FPGA design, the synthesizer can safely reach this target when placing and routing the design. Later on youmay try other frequencies to see if you can increase the performance. If you specify the clock frequency too high, thesynthesizer may fail and quit because it concludes it cannot reach the target frequency.
The other two constraint records set the JTAG_NEXUS_TCK component (the clock of the JTAG component) to 1 MHz.
3. Save the constraint file in your project directory and give it a meaningful name, for example Clock_board.Constraint.
The constraint file we just created is now part of the project, but not yet part of the project configuration:
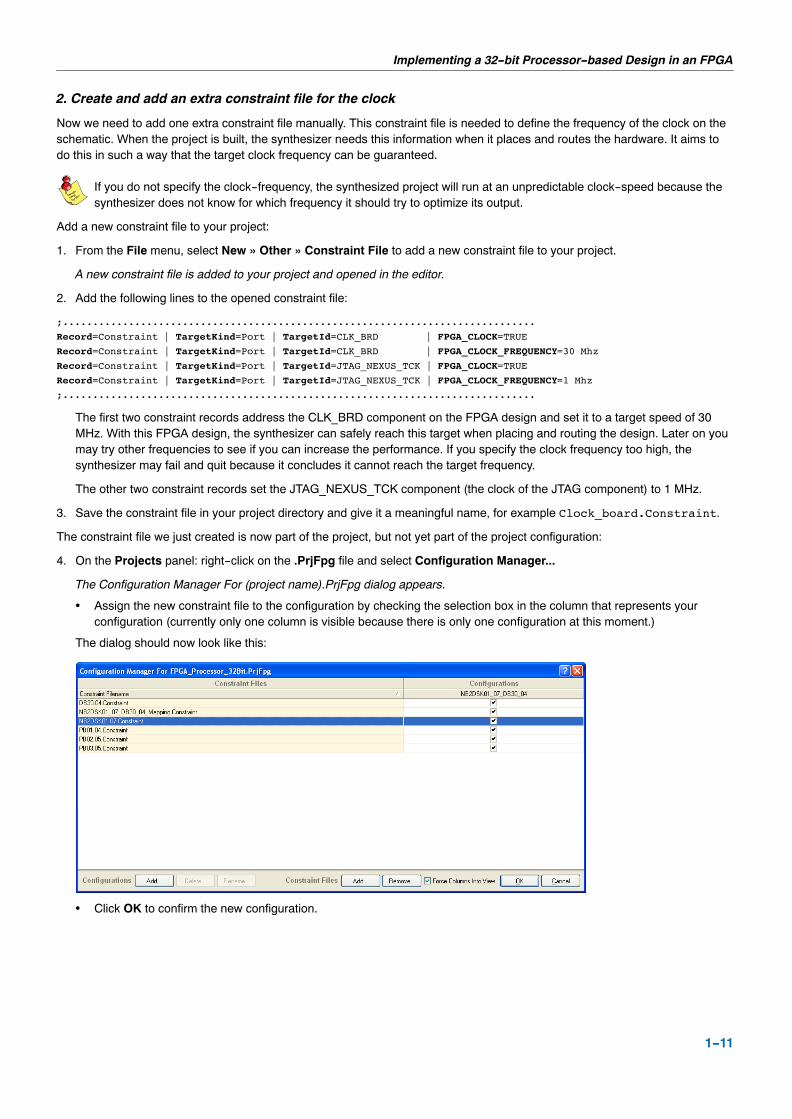
4. On the Projects panel: right−click on the .PrjFpg file and select Configuration Manager...
The Configuration Manager For (project name).PrjFpg dialog appears.
• Assign the new constraint file to the configuration by checking the selection box in the column that represents yourconfiguration (currently only one column is visible because there is only one configuration at this moment.)
The dialog should now look like this:
• Click OK to confirm the new configuration.
Implementing a 32−bit Processor−based Design in an FPGA
1−12
1.2.4 Configure Memory and Peripherals
Next, we need to configure memory for the TSK3000A processor core. In other words, for the TSK3000A processor core weneed to define which memory is available and at which addresses.
1. Configure memory for the TSK3000A
1. Right click on the TSK3000A component and choose Configure Processor Memory.
The Configure Processor Memory dialog appears, showing a graphical representation of the memory for the TSK3000A.
According to the dialog, a single block of 32768 (32k) bytes ROM is allocated to the processor. We will change that intoVolatile RAM.
In fact, all "ROM" on an FPGA is preloaded block RAM. It is possible to overwrite contents in "ROM" memory duringprogram execution in case of, for example, a malicious pointer. So, although we will continue to call it "ROM" by analogywith a hardware processor, be aware that the "ROM" memory is rather non−volatile RAM.
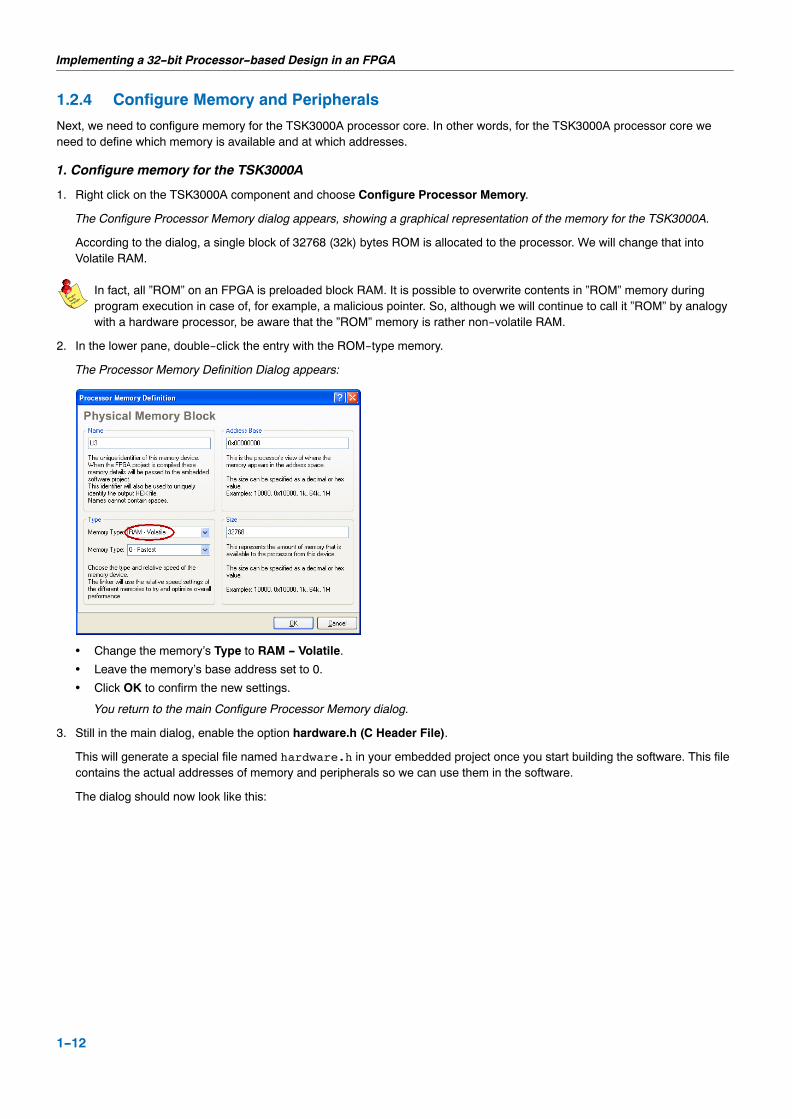
2. In the lower pane, double−click the entry with the ROM−type memory.
The Processor Memory Definition Dialog appears:
• Change the memory’s Type to RAM − Volatile.
• Leave the memory’s base address set to 0.
• Click OK to confirm the new settings.
You return to the main Configure Processor Memory dialog.
3. Still in the main dialog, enable the option hardware.h (C Header File).
This will generate a special file named hardware.h in your embedded project once you start building the software. This filecontains the actual addresses of memory and peripherals so we can use them in the software.
The dialog should now look like this:

Implementing a 32−bit Processor−based Design in an FPGA
1−13
4. Click OK to confirm all settings and to close the main dialog.
2. Configure the peripherals
Something similar must be done for the peripherals. We have defined the general purpose I/O block (GPIO) in the Wishboneinterconnect component, which must be made known to the TSK3000A processor core and the embedded project.
1. Right−click on the TSK3000A component once again and select Configure Processor Peripheral...
The Configure Peripherals dialog appears.
2. Simply click on the Import From Schematic button.
• You are asked whether to delete existing peripherals. Click Yes.
A dialog appears that shows the names of all peripherals, sorted by the Wishbone interconnect they are defined in. Ofcourse, only the GPIO block is listed which is defined in the Wishbone interconnect with designator U2.
3. Click on the Do not import cell associated with the interconnect’s name (U2) and change it to Import.
All sub−entries are changed to import as well.
4. Click OK to confirm the new settings and to return to the main dialog.
The GPIO peripheral is now visible in the Defined Peripheral Devices view.
5. Make sure the option hardware.h (C Header File) is enabled.
6. Click OK to confirm all settings and to close the main dialog.
You now really have finished the hardware part. Save your project with the Save All function and continue with the next part: thesoftware project.

Implementing a 32−bit Processor−based Design in an FPGA
1−14
1.3 Create the Software
1.3.1 Create and Save a New Embedded Project
1. From the File menu, select New » Project » Embedded Project.
A new project named "Embedded_Project1.PrjEmb" is added in the Projects panel.
2. From the File menu, select New » C Source document.
A new C source document is added to the Projects panel named "Source1.C".This new document is part of the embedded project project.
3. To save the new project, click the Workspace button and select Save All:
The Save [...] As dialog appears.
It may be convenient to store the embedded project and its sources in a subdirectory of the project directory GettingStarted you created earlier for the FPGA project.
• Browse to the Getting Started directory and create a subdirectory Embedded.
• Save the empty C source file and give it a proper name, for example leds1.c
Now you are asked to save the embedded project itself:
• Save the embedded project and give it a proper name, for example FPGA_Processor_32Bit_LEDs.PrjEmb (nospaces!).
1.3.2 Configure the Embedded Project
1. Assign the software project to the TSK3000A processor core
The software we will create in this embedded project, must run on the TSK3000A processor core on the FPGA design.Therefore, the hardware FPGA project and the Embedded project need to be combined: we need to assign our software projectto the processor soft−core.
Before we can build the entire project,
1. In the Projects panel, select the Structure Editor radio button.
The Projects panel has switched to the structure editor view.
2. In the Projects panel, right−click on the name of the .PrjFpg project (not the embedded project!) and select CompileFPGA project project_name.PrjFpg.
The schematic document BlinkingLED.SchDoc appears in the overview and, beneath that, the TSK3000A becomes visible.
3. Now drag the embedded project .PrjEmb into the TSK3000A’s symbol.
Verify the old and the new situation:
4. To switch the Projects panel back to normal view, select the File View radio button.
Notice that the file hardware.h has been added to your embedded .PrjEmb project.

Implementing a 32−bit Processor−based Design in an FPGA
1−15
2. Configure the embedded project and configure application memory
The embedded software needs to be compiled for the TSK3000A on the schematic. So first of all we have to specify to theembedded project for which device the project should be compiled. Then we will make some modifications in the default projectsettings. Finally, we need to tell the compiler how the software can access the memory we defined for the TSK3000A.
1. Right−click on the embedded project .PrjEmb and select Project Options...
The Options for Embedded Project .PrjEmb dialog appears.
• First make sure that all default settings are set: click the Set To Installation Defaults button.
• In the Device field, expand the Altium entry, then expand the TSK3000 (core) entry and select the TSK3000A(derivative).
• Type a name for the Output directory, for example: Output.
2. Expand the Linker entry and select Stack/Heap:
• Set the Stack size to, let’s say, 4k so it fits entirely in the internal memory of the TSK3000A processor core on the FPGA.
• Delete the value at Heap size (we do not need any heap, not even a heap of 0 bytes!)
We have equipped the TSK3000A processor core on the schematic with 32k Volatile RAM. Now we need to configure theembedded project as well, so the compiler ’knows’ how the software can access this memory. We need 16k of ROM as wellas 16k of Volatile RAM which both need to be mapped onto the device memory of the TSK3000A.
3. Open the Configure Memory tab.
The Memory Architecture shows the physical memory present on the TSK3000A. The Device Memory shows the memoriesthat are defined for the TSK3000A processor core on the schematic. Finally, the Application Memory shows how thesoftware can access these memories.
At this moment, the TSK3000A’s device memory has already been imported, but the picture still represents a defaultconfiguration for the Application Memory showing xrom and xram. The red color indicates the memories are incorrectlymapped onto the Device Memory. You can either change the default Application Memory or delete it and create a newmapping. Let’s do the latter:
4. Right−click in the Application Memory column and select Delete All (on layer).
The Application Memory column is now empty and blue, indicating available space for mappings.
5. Right−click in the empty Application Memory column and select Add Memory...
The Processor Memory Definition Dialog appears.

Implementing a 32−bit Processor−based Design in an FPGA
1−16
• Change the memory’s Name to something more meaningful: irom.
• Verify that the memory’s Type is set to ROM.
• Change the memory’s Size to 16k.
• Leave the memory’s base address set to 0.
• Click OK to confirm the new settings.
You return to the Options for Embedded Project .PrjEmb dialog.
6. Once again, right−click in the Application Memory column (or in the memory list below) and select Add Memory...
Again, the Processor Memory Definition Dialog appears.
• Change the memory’s Name to something more meaningful: iram.
• Verify that the memory’s Type is set to RAM − Volatile.
• Change the memory’s Size to 16k.
• Change the memory’s Address Base to 16k (since the first 16k were used by the ROM).
• Click OK to confirm the new settings.
The Application Memory now shows the iram and irom, correctly mapped onto the device memory. The green colorindicates that there are no memory conflicts. The dialog should now look like this:

Implementing a 32−bit Processor−based Design in an FPGA
1−17
7. Click OK to confirm all settings and to close the main dialog.
Save your project with Save All.
1.3.3 Write the software
The hardware project and the software project are now properly configured. Peripherals and memory for the TSK3000A can nowbe accessed with the software.
It is time to write the program that causes the LEDs on the NanoBoard to count. Go back to your C source file and enter thefollowing code:
#include <stdint.h>#include "hardware.h"
volatile uint8_t * const leds = (void *)Base_GPIO;
void main( void ){ *leds = 0; // Initialize the LEDs to all OFF for ( ;; ) { (*leds)++; for ( int delay = 0; delay < 5000000; delay++ ) { __nop(); // Two underscores } }}
Note the definition of Base_GPIO. That definition originates from the generated hardware.h file and describes the baseaddress of the general purpose I/O port as defined in the Wishbone interconnect.
Save your project!

Implementing a 32−bit Processor−based Design in an FPGA
1−18
1.4 Build the Project
Now, the whole project has been finished and it is ready to be built. Make sure the NanoBoard is switched on and properlyconnected to your PC.
1. From the View menu, select Devices View.
Below the Spartan3 symbol, there is a wide drop down list.
2. If not selected, select the FPGA_Processor_32bit / NB2DSK01_07_DB30_04 project / configuration (or the name thatcorresponds to the names you gave to your project and project configuration).
3. Click on the Program FPGA button on the right side of the Devices view.
The project is built in several stages. This may take quite some time, especially the stage of synthesizing the hardwaredesign is time consuming.
After the project has been built successfully, it is loaded into the FPGA on the NanoBoard and the LEDs start counting in abinary way.
A Results Summary dialog opens, showing the devices now programmed in the FPGA as well as timing characteristics.
Troubleshooting
Error Possible cause
In the Devices view, no project is visible.Right−click somewhere in the Devices view and select Add »XC3S1500−4FG676C (FPGA_projectname / configurationname).Verify and use the FPGA number on your FPGA daughter board.
In the Devices view, the Spartan FPGA is not visible.
In the Devices view, right−click on the FPGA device and selectChange » XC3S1500−4FG676C (FPGA_projectname /configurationname).Verify and use the FPGA number on your NanoBoard.
See step 5 in section 1.2.1, Create and Save a New FPGA Projectand step 3 in section 1.2.3, Configure the Project for Xillinx Spartan3FPGA.
LSL syntax error: heap "heap" has zero or negativeminimal size
See section 1.3.1, Create a new Embedded Project and Configure it.
Make sure you deleted the value for heap size.
No live connection with the NanoBoard or Failed toprogram FPGA
Make sure the NanoBoard is turned on
Make sure in the Devices view, the option Live is enabled
Sometimes loading via a parallel connection fails. Try again or con�nect the NanoBoard via a USB cable.

Implementing a 32−bit Processor−based Design in an FPGA
1−19
Revision History
Date Version No. Revision
12−Nov−2007 1.0 Initial Release
16−May−2008 1.1 Converted to A4
Software, hardware, documentation and related materials:
Copyright E 2008 Altium Limited. All Rights Reserved.
The material provided with this notice is subject to various forms of national and international intellectual property protection, including but notlimited to copyright protection. You have been granted a non−exclusive license to use such material for the purposes stated in the end−userlicense agreement governing its use. In no event shall you reverse engineer, decompile, duplicate, distribute, create derivative works from or inany way exploit the material licensed to you except as expressly permitted by the governing agreement. Failure to abide by such restrictions mayresult in severe civil and criminal penalties, including but not limited to fines and imprisonment. Provided, however, that you are permitted tomake one archival copy of said materials for back up purposes only, which archival copy may be accessed and used only in the event that theoriginal copy of the materials is inoperable. Altium, Altium Designer, Board Insight, DXP, Innovation Station, LiveDesign, NanoBoard, NanoTalk,OpenBus, P−CAD, SimCode, Situs, TASKING, and Topological Autorouting and their respective logos are trademarks or registered trademarksof Altium Limited or its subsidiaries. All other registered or unregistered trademarks referenced herein are the property of their respective ownersand no trademark rights to the same are claimed.