Identity Manager 4.0.2 Driver for JMS Implementation Guide
50
www.novell.com/documentation Driver for Java Messaging Service Implementation Guide Identity Manager 4.0.2 June 2012
Transcript of Identity Manager 4.0.2 Driver for JMS Implementation Guide
www.novell.com/documentation
Driver for Java Messaging Service Implementation GuideIdentity Manager 4.0.2
June 2012

Legal Notices
Novell, Inc. makes no representations or warranties with respect to the contents or use of this documentation, and specifically disclaims any express or implied warranties of merchantability or fitness for any particular purpose. Further, Novell, Inc. reserves the right to revise this publication and to make changes to its content, at any time, without obligation to notify any person or entity of such revisions or changes.
Further, Novell, Inc. makes no representations or warranties with respect to any software, and specifically disclaims any express or implied warranties of merchantability or fitness for any particular purpose. Further, Novell, Inc. reserves the right to make changes to any and all parts of Novell software, at any time, without any obligation to notify any person or entity of such changes.
Any products or technical information provided under this Agreement may be subject to U.S. export controls and the trade laws of other countries. You agree to comply with all export control regulations and to obtain any required licenses or classification to export, re-export or import deliverables. You agree not to export or re-export to entities on the current U.S. export exclusion lists or to any embargoed or terrorist countries as specified in the U.S. export laws. You agree to not use deliverables for prohibited nuclear, missile, or chemical biological weaponry end uses. For more information on exporting Novell software, see the Novell International Trade Services Web page (http://www.novell.com/info/exports/). Novell assumes no responsibility for your failure to obtain any necessary export approvals.
Copyright © 2004-2012 Novell, Inc. All rights reserved. No part of this publication may be reproduced, photocopied, stored on a retrieval system, or transmitted without the express written consent of the publisher.
Novell, Inc.1800 South Novell PlaceProvo, UT 84606U.S.A.www.novell.com
Online Documentation: To access the online documentation for this and other Novell products, and to get updates, see Novell Documentation (http://www.novell.com/documentation/).
Novell Trademarks
For a list of Novell trademarks, see Trademarks (http://www.novell.com/company/legal/trademarks/tmlist.html).
Third-Party Materials
All third-party trademarks are the property of their respective owners.

Contents
About This Guide 5
1 Understanding the JMS Driver 7
1.1 Supported JMS Vendors and Versions . . . . . . . . . . . . . . . . . . . . . . . . . . . . . . . . . . . . . . . . . . . . . . . . 71.2 Key Terminology . . . . . . . . . . . . . . . . . . . . . . . . . . . . . . . . . . . . . . . . . . . . . . . . . . . . . . . . . . . . . . . . . 71.3 JMS Messaging Models . . . . . . . . . . . . . . . . . . . . . . . . . . . . . . . . . . . . . . . . . . . . . . . . . . . . . . . . . . . . 8
1.3.1 Point-to-Point Messaging. . . . . . . . . . . . . . . . . . . . . . . . . . . . . . . . . . . . . . . . . . . . . . . . . . . . 81.3.2 Publish/Subscribe Messaging . . . . . . . . . . . . . . . . . . . . . . . . . . . . . . . . . . . . . . . . . . . . . . . . 9
1.4 JMS Messages. . . . . . . . . . . . . . . . . . . . . . . . . . . . . . . . . . . . . . . . . . . . . . . . . . . . . . . . . . . . . . . . . . . 91.4.1 Message Structure. . . . . . . . . . . . . . . . . . . . . . . . . . . . . . . . . . . . . . . . . . . . . . . . . . . . . . . . . 91.4.2 Message Types . . . . . . . . . . . . . . . . . . . . . . . . . . . . . . . . . . . . . . . . . . . . . . . . . . . . . . . . . . 10
1.5 How Subscriber and Publisher Channels Work . . . . . . . . . . . . . . . . . . . . . . . . . . . . . . . . . . . . . . . . . 111.5.1 Subscriber Channel . . . . . . . . . . . . . . . . . . . . . . . . . . . . . . . . . . . . . . . . . . . . . . . . . . . . . . . 111.5.2 Publisher Channel . . . . . . . . . . . . . . . . . . . . . . . . . . . . . . . . . . . . . . . . . . . . . . . . . . . . . . . . 12
1.6 Support for Standard Driver Features . . . . . . . . . . . . . . . . . . . . . . . . . . . . . . . . . . . . . . . . . . . . . . . . 121.6.1 Local Platforms . . . . . . . . . . . . . . . . . . . . . . . . . . . . . . . . . . . . . . . . . . . . . . . . . . . . . . . . . . 121.6.2 Remote Platforms . . . . . . . . . . . . . . . . . . . . . . . . . . . . . . . . . . . . . . . . . . . . . . . . . . . . . . . . 121.6.3 Entitlements . . . . . . . . . . . . . . . . . . . . . . . . . . . . . . . . . . . . . . . . . . . . . . . . . . . . . . . . . . . . . 131.6.4 Password Synchronization Support . . . . . . . . . . . . . . . . . . . . . . . . . . . . . . . . . . . . . . . . . . . 131.6.5 Information Synchronized . . . . . . . . . . . . . . . . . . . . . . . . . . . . . . . . . . . . . . . . . . . . . . . . . . 13
1.7 Additional Resources . . . . . . . . . . . . . . . . . . . . . . . . . . . . . . . . . . . . . . . . . . . . . . . . . . . . . . . . . . . . . 13
2 Installing the Driver Files 15
3 Configuring Messaging Vendors 17
3.1 Installing IBM WebSphere MQ on Win32. . . . . . . . . . . . . . . . . . . . . . . . . . . . . . . . . . . . . . . . . . . . . . 173.1.1 Placing Prerequisite Jar Files and Scripts . . . . . . . . . . . . . . . . . . . . . . . . . . . . . . . . . . . . . . 173.1.2 Creating a Server-Connection Channel and Queues . . . . . . . . . . . . . . . . . . . . . . . . . . . . . 183.1.3 Starting the Publish/Subscriber Broker . . . . . . . . . . . . . . . . . . . . . . . . . . . . . . . . . . . . . . . . 183.1.4 Installing System Queues Necessary for Publish/Subscribe . . . . . . . . . . . . . . . . . . . . . . . . 183.1.5 Creating a User Account . . . . . . . . . . . . . . . . . . . . . . . . . . . . . . . . . . . . . . . . . . . . . . . . . . . 193.1.6 Setting Up JMS . . . . . . . . . . . . . . . . . . . . . . . . . . . . . . . . . . . . . . . . . . . . . . . . . . . . . . . . . . 19
3.2 Installing on JBoss Messaging. . . . . . . . . . . . . . . . . . . . . . . . . . . . . . . . . . . . . . . . . . . . . . . . . . . . . . 213.3 Installing on SonicMQ . . . . . . . . . . . . . . . . . . . . . . . . . . . . . . . . . . . . . . . . . . . . . . . . . . . . . . . . . . . . 22
3.3.1 Locating Prerequisite Jar Files . . . . . . . . . . . . . . . . . . . . . . . . . . . . . . . . . . . . . . . . . . . . . . 233.3.2 Running Scripts to Configure the Messaging System . . . . . . . . . . . . . . . . . . . . . . . . . . . . . 23
3.4 Installing on TIBCO EMS . . . . . . . . . . . . . . . . . . . . . . . . . . . . . . . . . . . . . . . . . . . . . . . . . . . . . . . . . . 243.4.1 Locating Prerequisite Client Jar Files . . . . . . . . . . . . . . . . . . . . . . . . . . . . . . . . . . . . . . . . . 243.4.2 Running Scripts to Configure the Messaging System . . . . . . . . . . . . . . . . . . . . . . . . . . . . . 24
4 Creating a New Driver Object 27
4.1 Creating the Driver in Designer . . . . . . . . . . . . . . . . . . . . . . . . . . . . . . . . . . . . . . . . . . . . . . . . . . . . . 274.1.1 Importing the Current Driver Packages . . . . . . . . . . . . . . . . . . . . . . . . . . . . . . . . . . . . . . . . 274.1.2 Installing the Driver Packages . . . . . . . . . . . . . . . . . . . . . . . . . . . . . . . . . . . . . . . . . . . . . . . 284.1.3 Configuring the Driver . . . . . . . . . . . . . . . . . . . . . . . . . . . . . . . . . . . . . . . . . . . . . . . . . . . . . 294.1.4 Deploying the Driver . . . . . . . . . . . . . . . . . . . . . . . . . . . . . . . . . . . . . . . . . . . . . . . . . . . . . . 294.1.5 Starting the Driver . . . . . . . . . . . . . . . . . . . . . . . . . . . . . . . . . . . . . . . . . . . . . . . . . . . . . . . . 30
4.2 Activating the Driver . . . . . . . . . . . . . . . . . . . . . . . . . . . . . . . . . . . . . . . . . . . . . . . . . . . . . . . . . . . . . . 30
Contents 3

4 Iden
4.3 Adding Packages to an Existing Driver . . . . . . . . . . . . . . . . . . . . . . . . . . . . . . . . . . . . . . . . . . . . . . . 31
5 Upgrading an Existing Driver 33
5.1 Supported Upgrade Paths . . . . . . . . . . . . . . . . . . . . . . . . . . . . . . . . . . . . . . . . . . . . . . . . . . . . . . . . . 335.2 What’s New in Version 4.0.2 . . . . . . . . . . . . . . . . . . . . . . . . . . . . . . . . . . . . . . . . . . . . . . . . . . . . . . . 335.3 Upgrade Procedure . . . . . . . . . . . . . . . . . . . . . . . . . . . . . . . . . . . . . . . . . . . . . . . . . . . . . . . . . . . . . . 33
6 Managing the Driver 35
7 Troubleshooting 37
7.1 The Driver Fails to Reconnect to WebMQ if Restarted . . . . . . . . . . . . . . . . . . . . . . . . . . . . . . . . . . . 37
A Driver Properties 39
A.1 Driver Configuration . . . . . . . . . . . . . . . . . . . . . . . . . . . . . . . . . . . . . . . . . . . . . . . . . . . . . . . . . . . . . . 39A.1.1 Driver Module . . . . . . . . . . . . . . . . . . . . . . . . . . . . . . . . . . . . . . . . . . . . . . . . . . . . . . . . . . . 40A.1.2 Driver Object Password . . . . . . . . . . . . . . . . . . . . . . . . . . . . . . . . . . . . . . . . . . . . . . . . . . . 40A.1.3 Authentication . . . . . . . . . . . . . . . . . . . . . . . . . . . . . . . . . . . . . . . . . . . . . . . . . . . . . . . . . . . 40A.1.4 Startup Option . . . . . . . . . . . . . . . . . . . . . . . . . . . . . . . . . . . . . . . . . . . . . . . . . . . . . . . . . . . 41A.1.5 Driver Parameters . . . . . . . . . . . . . . . . . . . . . . . . . . . . . . . . . . . . . . . . . . . . . . . . . . . . . . . . 41A.1.6 ECMAScript . . . . . . . . . . . . . . . . . . . . . . . . . . . . . . . . . . . . . . . . . . . . . . . . . . . . . . . . . . . . . 47A.1.7 Global Configurations . . . . . . . . . . . . . . . . . . . . . . . . . . . . . . . . . . . . . . . . . . . . . . . . . . . . . 47
A.2 Global Configuration Values . . . . . . . . . . . . . . . . . . . . . . . . . . . . . . . . . . . . . . . . . . . . . . . . . . . . . . . 48
B Trace Levels 49
tity Manager 4.0.2 Driver for JMS Implementation Guide

About This Guide
This guide explains how to install and configure the Identity Manager Driver for Java Messaging Service (JMS).
Chapter 1, “Understanding the JMS Driver,” on page 7 Chapter 2, “Installing the Driver Files,” on page 15 Chapter 3, “Configuring Messaging Vendors,” on page 17 Chapter 4, “Creating a New Driver Object,” on page 27 Chapter 5, “Upgrading an Existing Driver,” on page 33 Chapter 6, “Managing the Driver,” on page 35 Chapter 7, “Troubleshooting,” on page 37 Appendix A, “Driver Properties,” on page 39 Appendix B, “Trace Levels,” on page 49
Audience
This guide is intended for developers and administrators using Identity Manager and the JMS driver.
Feedback
We want to hear your comments and suggestions about this manual and the other documentation included with this product. Please use the User Comments feature at the bottom of each page of the online documentation and enter your comments there.
Documentation Updates
For the most recent version of this guide, visit the Identity Manager 4.0.2 Driver Documentation Web site (http://www.netiq.com/documentation/idm402drivers).
Additional Documentation
For documentation on Identity Manager and other drivers, see the Identity Manager 4.0.2 Documentation Web site (http://www.netiq.com/documentation/idm402drivers/index.html).
About This Guide 5

6 Identity Manager 4.0.2 Driver for JMS Implementation Guide

1 1Understanding the JMS Driver
The Identity Manager Driver for Java Messaging Service (JMS), hereafter referred to as the JMS driver or simply the driver, provides Identity Manager integration with various applications that are used for messaging. The driver is JMS-generic and does not target any specific application or messaging provider. It supports all versions of the JMS API defined by Sun Microsystems.
The following sections introduce concepts you should understand before using the driver:
Section 1.1, “Supported JMS Vendors and Versions,” on page 7 Section 1.2, “Key Terminology,” on page 7 Section 1.3, “JMS Messaging Models,” on page 8 Section 1.4, “JMS Messages,” on page 9 Section 1.5, “How Subscriber and Publisher Channels Work,” on page 11 Section 1.6, “Support for Standard Driver Features,” on page 12 Section 1.7, “Additional Resources,” on page 13
1.1 Supported JMS Vendors and VersionsThe driver supports the following vendors and versions:
JBossMQ v4.2.2 JBoss Messaging 1.3.0 IBM WebSphere MQ v6.x and MQ v7.x SonicMQ v7.x TIBCO EMS v4 and v5
The driver uses two main specifications of JMS, 1.0.2b and 1.1.
1.2 Key TerminologyThe following terms are used throughout this document:
JMS: Java Messaging Service. The driver uses two main specifications of JMS, 1.0.2b and 1.1. JNDI: Java Naming and Directory Interface. JNDI is used to look up, connect, and authenticate
to message brokers. Message Broker: The server that handles message interchange between messaging clients. Messaging Client: Messaging clients produce and consume messages. The driver is a
messaging client, and so are third-party applications. Destination: The abstract term for a topic or a queue.
Understanding the JMS Driver 7

Session: A per-thread connection. Each thread creates one or more sessions from a connection to communicate with the message broker.
Persistence: Persistence guarantees that a message is delivered only once; this can be controlled on a per-message basis. Message brokers usually support persistent storage via an underlying database. This is sometimes referred to as stable storage.
Durability: The message broker stores messages for a message receiver when the receiver is inactive or disconnected.
Acknowledgement: When transactions are not being used, a client acknowledges receipt of a message to the message broker in CLIENT_ACKNOWLEDGE mode. In this mode, the client must explicitly acknowledge receipt of one or more messages by committing the current transaction. By rolling back the current transaction, all received messages are re-delivered (or set to retry, in Identity Manager terminology.)
1.3 JMS Messaging ModelsThe driver supports two messaging models: Point-to-Point messaging and Publish/Subscribe messaging.
Section 1.3.1, “Point-to-Point Messaging,” on page 8 Section 1.3.2, “Publish/Subscribe Messaging,” on page 9
The JMS API also uses abstract names. To better understand how these abstract names correspond to model terminology, see the table below.
1.3.1 Point-to-Point Messaging
Point-to-Point messaging is used when one client needs to send a message to another client. As illustrated in Figure 1-1, Client 1 is the sender and Client 2 is the receiver. The queue receives messages, while the message broker receives any acknowledgements.
In Point-to-Point messaging there is a one-to-one relationship between senders and receivers. You configure durability on the broker side.
Figure 1-1 Point-to-Point Messaging
Abstract Terminology Point-to-Point Terminology Publish/Subscribe Terminology
Destination Queue Topic
Sender (or Producer) Sender Publisher
Receiver (or Consumer) Receiver Subscriber
Client 1
MSG
QueueClient 2
Sends
MSG
Consumes
Acknowledges
8 Identity Manager 4.0.2 Driver for JMS Implementation Guide

1.3.2 Publish/Subscribe Messaging
Publish/Subscribe messaging is used when multiple applications need to receive the same messages. Multiple publishers can send messages to a topic, and all subscribers to that topic receive all the messages sent to that topic. This model is useful when a group of applications want to notify each other of a particular event.Publish/Subscribe messaging allows for one-to-many or many-to-many implementations. Durability is configured on either the client side or the broker side.
Figure 1-2 Publish/Subscribe Messaging
1.4 JMS MessagesThe following sections contain information about JMS message structures and message types, as well as examples for each.
Section 1.4.1, “Message Structure,” on page 9 Section 1.4.2, “Message Types,” on page 10
1.4.1 Message Structure
JMS messages consist of metadata (comprised of headers and properties) and message data (a body). In order to make message metadata accessible to policy processing, messages sent to the driver can be wrapped in an envelope, and messages received by the driver and sent to the Metadirectory engine are also wrapped in an envelope. All message envelope elements and special attributes must have a namespace prefix bound to urn:idm:jms. For consistency, the namespace prefix jms is used throughout this document. The root message envelope element jms:message must be a child of the XDS input/output elements.
Client 1
MSGClient 2
Publishes
MSG
Subscribes
Delivers
Client 3MSG
Subscribes
Delivers
Topic
Understanding the JMS Driver 9

Example JMS Message Envelope
<jms:message xmlns:jms="urn:idm:jms"><jms:headers> <!-- standard JMS headers start with "JMS" --> <!-- client-assignable headers --> <jms:header jms:name="JMSDeliveryMode"/> <jms:header jms:name="JMSExpiration"/> <jms:header jms:name="JMSPriority"/ <jms:header jms:name="JMSReplyTo"/> <jms:header jms:name="JMSCorrelationID"/> <jms:header jms:name="JMSType"/> </jms:headers> <jms:properties> <!-- standard JMS properties start with "JMSX" --> <jms:property jms:name="JMSXUserID"/> <jms:property jms:name="JMSXAppID"/> <jms:property jms:name="JMSXProducerTXID"/> <jms:property jms:name="JMSXConsumerTXID"/> <jms:property jms:name="JMSXRcvTimestamp"/> <jms:property jms:name="JMSXDeliveryCount"/> <jms:property jms:name="JMSXState"/> <jms:property jms:name="JMSXGroupID"/> <jms:property jms:name="JMSXGroupSeq"/> <!-- provider-specific properties start with "JMS_" --> <!-- application-specific properties start with anything else --> </jms:properties> <jms:body/></jms:message>
1.4.2 Message Types
Message type refers to how a message is sent, not necessarily what its content is. For example, a text message can be sent as text or bytes. The driver supports both text and bytes messages.
Example Text Message
<jms:message xmlns:jms="urn:idm:jms"> <jms:properties> <!-- send message as text --> <jms:property name="Novell_IDM_MessageType">text</jms:property> </jms:properties> <jms:body>content</jms:body></jms:message>
Example Bytes Message
<jms:message xmlns:jms="urn:idm:jms"> <jms:properties> <!-- send message as bytes --> <jms:property name="Novell_IDM_MessageType">bytes</jms:property> </jms:properties> <jms:body>content</jms:body></jms:message>
10 Identity Manager 4.0.2 Driver for JMS Implementation Guide

1.5 How Subscriber and Publisher Channels WorkThe following sections contain information about how the Subscriber and Publisher channels work with the JMS driver. This driver functions differently than traditional Identity Manager drivers, so it’s important to review this information.
Section 1.5.1, “Subscriber Channel,” on page 11 Section 1.5.2, “Publisher Channel,” on page 12
1.5.1 Subscriber Channel
The Subscriber channel is capable of sending messages to (and optionally receiving messages from) multiple destinations on a single broker. Multi-broker support is not yet implemented. As a side effect of sending a JMS message, the Subscriber channel can receive a response within a specified timeout interval. Message routing and RPC (Remote Procedure Call) emulation are achieved via three special attributes: jms:send-to, jms:receive-from and jms:receive-timeout.
Example Special Attributes
<jms:message xmlns:jms="urn:idm:jms" jms:send-to="queueA" jms:receive-from="queueB" jms:receive-timeout-seconds="10"/>
These attributes can be used on a jms:message envelope tag or any XDS command that is a child of input/output elements. The destination names used in these parameters can either be the JNDI (Java Naming and Directory Interface) name or the unique Identity Manager identifier assigned to the destination in the driver configuration. By default, the Subscriber sends messages to the first-defined send destination and does not wait for a message response (meaning that the message receipt is assumed to be asynchronous).
By using a JMS message envelope, it is possible to override headers/properties or add vendor-specific properties or application properties.
<jms:message xmlns:jms="urn:idm:jms"> <jms:headers> <!-- override standard headers --> <jms:header jms:name="JMSType">type</jms:header> <jms:header jms:name="JMSCorrelationID">blah</jms:header> <jms:header jms:name="JMSDeliveryMode">non-persistent</jms:header> <jms:header jms:name="JMSExpiration">10000</jms:header> <jms:header jms:name="JMSPriority">9</jms:header> <jms:header jms:name="JMSReplyTo">A</jms:header> </jms:headers> <jms:properties> <!-- add/override vendor-specific properties --> <jms:property jms:name="JMS_IBM_Format">MQSTR</jms:property> <!-- add/override application properties --> <jms:property jms:name="Novell_IDM_MessageType">bytes</jms:property> <jms:property jms:name="Novell_IDM_ContentType">xml</jms:property> <jms:property jms:name="Novell_IDM_CharEncoding">UTF-8</jms:property> </jms:properties> <jms:body>text</jms:body></jms:message>
Understanding the JMS Driver 11
1.5.2 Publisher Channel
The Publisher channel is essentially a Subscriber channel (you can send messages to a broker as a side effect of publishing messages—including heartbeat documents—and wait for a response) with the added ability to periodically monitor specified destinations to receive messages for publication.
You can configure the Publisher channel to monitor an unlimited number of destinations on a single message broker bounded only by certain practical considerations. Having too many monitored destinations can significantly slow down rendering of driver parameters in iManager or Designer, as currently implemented. Having too many destinations can result in decreased performance because all destinations are being monitored by a single thread. Furthermore, there is a finite amount of space available for storing a driver's configuration (64 KB).
The Publisher channel polls each monitored destination in a round-robin fashion, starting with the first declared destination. A polling cycle ends when all monitored destinations fail to return messages, at which time the Publisher sleeps for the specified polling interval until it's time to start a new polling cycle.
The Publisher channel receives messages in a synchronous fashion as opposed to an asynchronous one. The main reason for this is to prevent client overrun—when the message broker feeds messages to the driver faster than it can process them—that can lead to memory exhaustion.
1.6 Support for Standard Driver FeaturesThe following sections provide information about how the JMS driver supports these standard driver features:
Section 1.6.1, “Local Platforms,” on page 12 Section 1.6.2, “Remote Platforms,” on page 12 Section 1.6.3, “Entitlements,” on page 13 Section 1.6.4, “Password Synchronization Support,” on page 13 Section 1.6.5, “Information Synchronized,” on page 13
1.6.1 Local Platforms
A local installation is an installation of the driver on the same server as the Metadirectory engine, Identity Vault, and JMS vendor application. Both systems that the driver needs to communicate with (Metadirectory engine and JMS) are local to the driver.
The JMS driver can be installed on the same operating systems that are supported by the Metadirectory server. For information about the operating systems supported by the Metadirectory server, see “System Requirements” in the Identity Manager 4.0.2 Integrated Installation Guide.
1.6.2 Remote Platforms
The JMS driver can use the Remote Loader service. The Remote Loader service for the JMS driver can be installed on any of the Identity Manager supported platforms.
For more information about installing the Remote Loader services, see “Installing Identity Manager” in the Identity Manager 4.0.2 Integrated Installation Guide.
12 Identity Manager 4.0.2 Driver for JMS Implementation Guide
1.6.3 Entitlements
The JMS driver does not have Entitlement functionality defined in its basic configuration files. The driver does support entitlements, if there are policies created for the driver to consume.
1.6.4 Password Synchronization Support
The basic configuration files for the JMS driver do not include policies for synchronizing passwords.
1.6.5 Information Synchronized
The JMS driver synchronizes any messaging format you want. By default, the driver is set up with a Loopback driver configuration.
1.7 Additional ResourcesFor more information about JMS and messaging models, see the following Web sites:
Sun’s Developer Network FAQ on the JMS API (http://java.sun.com/products/jms/faq.html) Getting Started with JMS (http://java.sun.com/developer/technicalArticles/Ecommerce/jms/
index.html) JMS Tutorial (http://java.sun.com/j2ee/1.4/docs/tutorial/doc/index.html) JMS Specifications (1.0.2b and 1.1) (http://java.sun.com/products/jms/docs.html)
Understanding the JMS Driver 13

14 Identity Manager 4.0.2 Driver for JMS Implementation Guide

2 2Installing the Driver Files
By default, the JMS driver files are installed on the Metadirectory server at the same time as the Metadirectory engine. The installation program extends the Identity Vault’s schema and installs both the driver shim and the driver configuration files. It does not create the driver in the Identity Vault (see Chapter 4, “Creating a New Driver Object,” on page 27) or upgrade an existing driver’s configuration (see Chapter 5, “Upgrading an Existing Driver,” on page 33).
You don’t need to install the Metadirectory engine on this same machine. Using a Remote Loader, you can separate the engine and the driver shim, allowing you to balance the load on different machines or accommodate corporate directives.
The installation scenario you select determines how the driver shim is installed. If you choose to install the driver shim on the same machine as Identity Manager (where the Metadirectory engine and the Identity Vault are located), Identity Manager calls the driver shim directly. If you choose to install the driver shim on another machine, you must use the Remote Loader.
You can install the driver in one of the following ways:
On a local machine: Install the JMS driver files on the Metadirectory server and connect to the JMS server by using the JMS PROVIDER URL (Connection Properties). See the instructions in “Installing Identity Manager” in the Identity Manager 4.0.2 Integrated Installation Guide.
On a remote machine, you can install in one of the following ways: You can install the Identity Vault, the Metadirectory engine, and the driver on a separate
computer from the JMS domain controller. This configuration leaves the domain controller free of any Identity Manager software.
Alternatively, you can install the Remote Loader and driver shim on the JMS domain controller, but install the Identity Vault and the Metadirectory engine on a separate server.
See the instructions in “Installing Identity Manager” in the Identity Manager 4.0.2 Integrated Installation Guide.
Installing the Driver Files 15

16 Identity Manager 4.0.2 Driver for JMS Implementation Guide

3 3Configuring Messaging Vendors
The following sections provide information about configuring your JMS vendor to work with the JMS driver:
Section 3.1, “Installing IBM WebSphere MQ on Win32,” on page 17 Section 3.2, “Installing on JBoss Messaging,” on page 21 Section 3.3, “Installing on SonicMQ,” on page 22 Section 3.4, “Installing on TIBCO EMS,” on page 24
3.1 Installing IBM WebSphere MQ on Win32As part of installing WebSphere for the driver, you should complete the following tasks consecutively. These instructions are for Windows, but you can follow the same procedure for other platforms.
Section 3.1.1, “Placing Prerequisite Jar Files and Scripts,” on page 17 Section 3.1.2, “Creating a Server-Connection Channel and Queues,” on page 18 Section 3.1.3, “Starting the Publish/Subscriber Broker,” on page 18 Section 3.1.4, “Installing System Queues Necessary for Publish/Subscribe,” on page 18 Section 3.1.5, “Creating a User Account,” on page 19 Section 3.1.6, “Setting Up JMS,” on page 19
3.1.1 Placing Prerequisite Jar Files and Scripts
1 On your messaging server, locate the following jar files: com.ibm.mq.jar
com.ibm.mqjms.jar
connector.jar
dhbcore.jar
jta.jar
fscontext.jar
jndi.jar
2 Copy the jar files to the Identity Manager server. The following table identifies where to place jar files on an Identity Management server, by platform.
Configuring Messaging Vendors 17
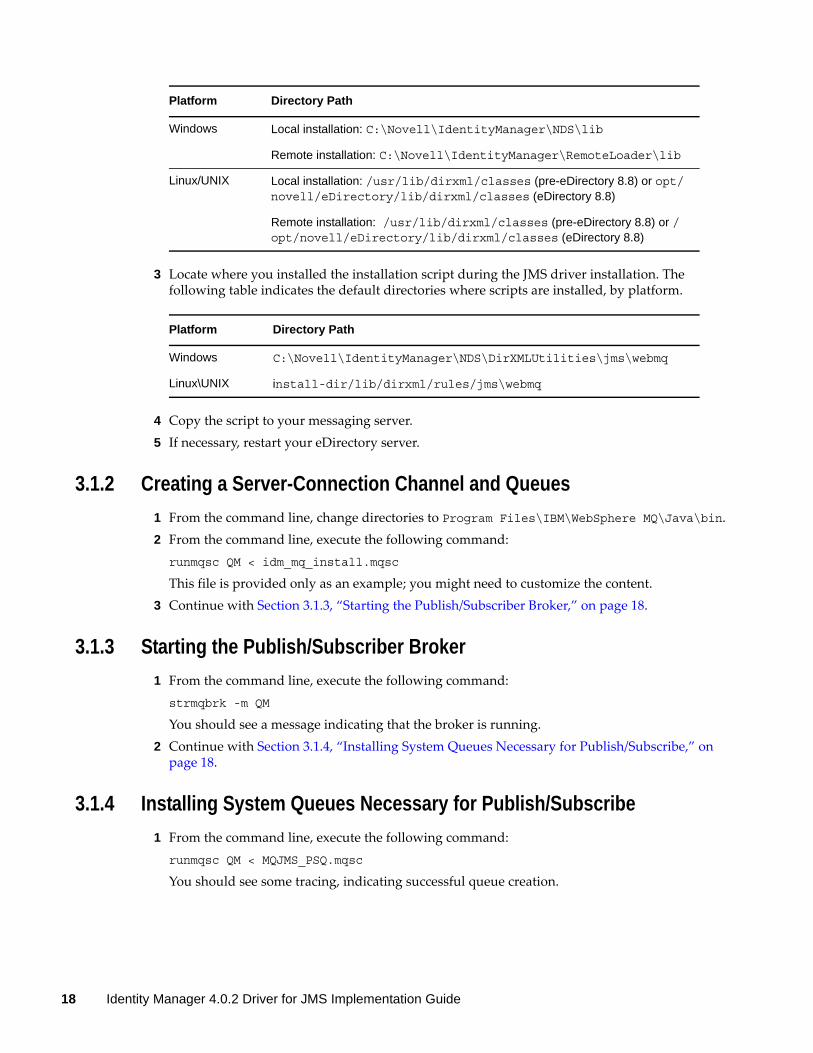
3 Locate where you installed the installation script during the JMS driver installation. The following table indicates the default directories where scripts are installed, by platform.
4 Copy the script to your messaging server.5 If necessary, restart your eDirectory server.
3.1.2 Creating a Server-Connection Channel and Queues
1 From the command line, change directories to Program Files\IBM\WebSphere MQ\Java\bin.2 From the command line, execute the following command:
runmqsc QM < idm_mq_install.mqsc
This file is provided only as an example; you might need to customize the content.3 Continue with Section 3.1.3, “Starting the Publish/Subscriber Broker,” on page 18.
3.1.3 Starting the Publish/Subscriber Broker
1 From the command line, execute the following command: strmqbrk -m QM
You should see a message indicating that the broker is running.2 Continue with Section 3.1.4, “Installing System Queues Necessary for Publish/Subscribe,” on
page 18.
3.1.4 Installing System Queues Necessary for Publish/Subscribe
1 From the command line, execute the following command: runmqsc QM < MQJMS_PSQ.mqsc
You should see some tracing, indicating successful queue creation.
Platform Directory Path
Windows Local installation: C:\Novell\IdentityManager\NDS\lib
Remote installation: C:\Novell\IdentityManager\RemoteLoader\lib
Linux/UNIX Local installation: /usr/lib/dirxml/classes (pre-eDirectory 8.8) or opt/novell/eDirectory/lib/dirxml/classes (eDirectory 8.8)
Remote installation: /usr/lib/dirxml/classes (pre-eDirectory 8.8) or /opt/novell/eDirectory/lib/dirxml/classes (eDirectory 8.8)
Platform Directory Path
Windows C:\Novell\IdentityManager\NDS\DirXMLUtilities\jms\webmq
Linux\UNIX install-dir/lib/dirxml/rules/jms\webmq
18 Identity Manager 4.0.2 Driver for JMS Implementation Guide

NOTE: If you don’t enter this command, you might see the following error: “MQJMS1111: JMS 1.1 The required Queues/Publish Subscribe services are not set up {0} error.”
2 Continue with Section 3.1.5, “Creating a User Account,” on page 19.
3.1.5 Creating a User Account
“Creating a User” on page 19 “Making the User a Member of the mqm Group” on page 19
Creating a User
1 Click Start > Programs > Administrative Tools > Computer Management.2 Expand the Local Users and Groups subtree.3 Right-click the Users folder, then select New User.4 Specify a user name. The scripts referenced in these instructions assume idm.5 Specify a password. The scripts referenced in these instructions assume novell.6 Deselect the User must change password at next login check box.7 Click the Create button. 8 Click the Close button.9 Continue with “Making the User a Member of the mqm Group” on page 19.
Making the User a Member of the mqm Group
1 Right-click the newly created user, then click Properties.2 Select the Member Of tab.3 Select the mqm group.4 Click Add.5 Click OK twice.6 Continue with Section 3.1.6, “Setting Up JMS,” on page 19.
3.1.6 Setting Up JMS
1 Edit the Program Files\IBM\WebSphere MQ\Java\bin\JMSAdmin.bat file
Configuring Messaging Vendors 19
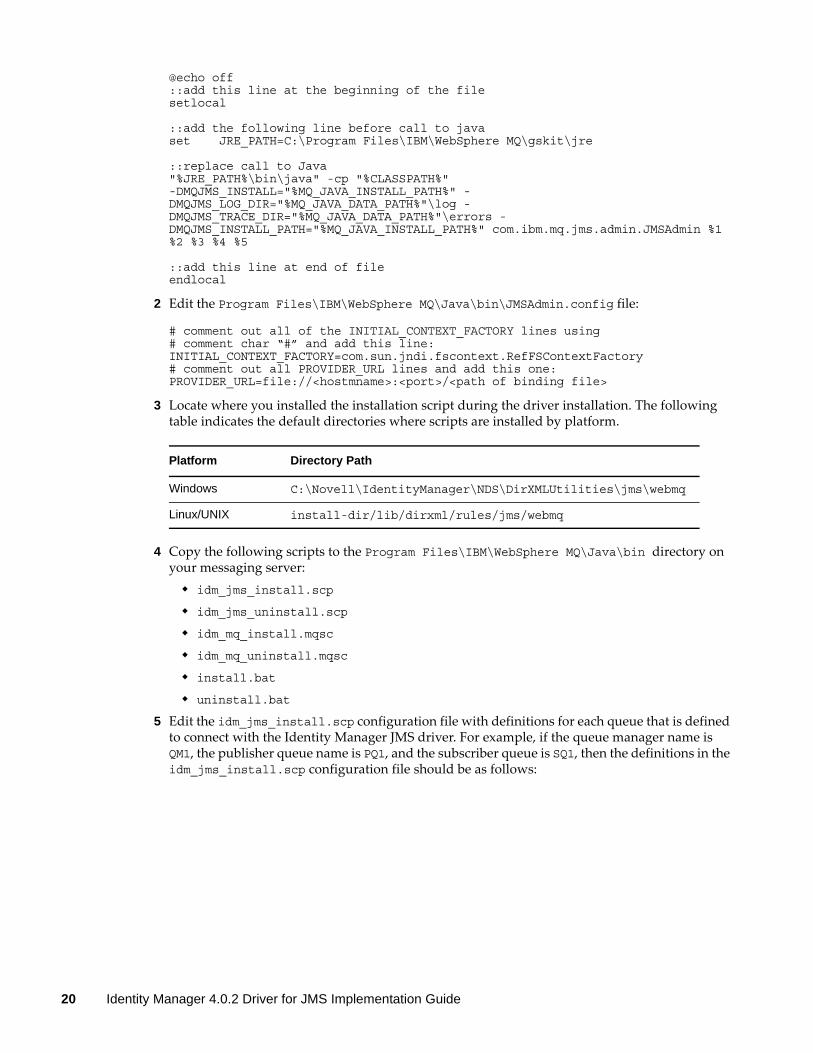
@echo off::add this line at the beginning of the filesetlocal
::add the following line before call to javaset JRE_PATH=C:\Program Files\IBM\WebSphere MQ\gskit\jre
::replace call to Java"%JRE_PATH%\bin\java" -cp "%CLASSPATH%" -DMQJMS_INSTALL="%MQ_JAVA_INSTALL_PATH%" -DMQJMS_LOG_DIR="%MQ_JAVA_DATA_PATH%"\log -DMQJMS_TRACE_DIR="%MQ_JAVA_DATA_PATH%"\errors -DMQJMS_INSTALL_PATH="%MQ_JAVA_INSTALL_PATH%" com.ibm.mq.jms.admin.JMSAdmin %1 %2 %3 %4 %5
::add this line at end of fileendlocal
2 Edit the Program Files\IBM\WebSphere MQ\Java\bin\JMSAdmin.config file:
# comment out all of the INITIAL_CONTEXT_FACTORY lines using# comment char “#” and add this line:INITIAL_CONTEXT_FACTORY=com.sun.jndi.fscontext.RefFSContextFactory# comment out all PROVIDER_URL lines and add this one:PROVIDER_URL=file://<hostmname>:<port>/<path of binding file>
3 Locate where you installed the installation script during the driver installation. The following table indicates the default directories where scripts are installed by platform.
4 Copy the following scripts to the Program Files\IBM\WebSphere MQ\Java\bin directory on your messaging server: idm_jms_install.scp
idm_jms_uninstall.scp
idm_mq_install.mqsc
idm_mq_uninstall.mqsc
install.bat
uninstall.bat
5 Edit the idm_jms_install.scp configuration file with definitions for each queue that is defined to connect with the Identity Manager JMS driver. For example, if the queue manager name is QM1, the publisher queue name is PQ1, and the subscriber queue is SQ1, then the definitions in the idm_jms_install.scp configuration file should be as follows:
Platform Directory Path
Windows C:\Novell\IdentityManager\NDS\DirXMLUtilities\jms\webmq
Linux/UNIX install-dir/lib/dirxml/rules/jms/webmq
20 Identity Manager 4.0.2 Driver for JMS Implementation Guide

-- Queue connection factory definitiondefine qcf(QueueConnectionFactory) + qmgr(QM1) + tran(CLIENT) + host(hostname) + port(1414) -- Publisher Queue Definition---define q(PQ1) + qmgr(QM1) + queue(PQ1) -- Subscriber Queue Definition---define q(SQ1) + qmgr(QM1) + queue(SQ1)
-- q is the jndi name used in the JMS driver configuration. -- qmgr is the queue manager name. -- queue is the queue name. -- host is the IP address or host Name of the IBM Websphere MQ server. -- port is the queue manager listener port.
6 Update the listener port in idm_mq_install.mqsc.7 From the command line, change directories to Program Files\IBM\WebSphere MQ\Java\bin.8 From the command line, execute the following command:
JMSAdmin.bat -v < idm_jms_install.scp
This file is provided as an example only; you might need to customize the content.9 From the command line, manually start the publish/subscribe broker by executing the following
command: Program Files\IBM\WebSphere MQ\bin\strmqbrk.exe.
10 From the command line, ensure that the publish/subscribe broker is configured correctly by executing the following command:Program Files\IBM\WebSphere MQ\Java\PSIVTRun.bat -nojndi -t
11 Make sure the .bindings file resides in the correct location.The .bindings file is generated during the WebSphere MQ configuration. When you run the JMSAdmin.bat -v idm_jms_install.scp command, the .bindings file is generated under the path specified in the JMSAdmin.config file.If the driver, WebSphere MQ, Metadirectory engine, and Identity Vault are all on the same server, make sure the .bindings file resides in the location specified by the PROVIDER_URL option for the driver configuration (see PROVIDER_URL).If the driver and WebSphere MQ are on one server and the Metadirectory engine and Identity Vault are on another server (a Metadirectory server), copy the .bindings file to the Metadirectory server and make sure the PROVIDER_URL includes the correct path to the file. If multiple Metadirectory servers connect to the WebSphere MQ server, copy the .bindings file to the PROVIDER_URL path on each Metadirectory server.
3.2 Installing on JBoss MessagingAs part of installing JBoss for the driver, you should copy the jar files as indicated below. The instructions assume that JBoss already has the default queues and topics available. For information on installing and configuring JBoss Messaging, refer to the JBoss User Guide (http://www.jboss.org/file-access/default/members/jbossmessaging/freezone/docs/userguide-1.3.0.GA/html/index.html).
1 On your messaging server, locate the following jar files:
Configuring Messaging Vendors 21

For JBoss 4: Locate the following files: concurrent.jar
connector.jar
javaassist.jar
jboss-aop-jdk50.jar
jboss-aop-jdk50-client.jar
jboss-common-client.jar
jboss-messaging.jar
jboss-messaging-client.jar
jboss-remoting.jar
jboss-system-client.jar
jnp-client.jar
trove.jar
For JBoss 6.2: Locate the following files: hornetq-core-client-2.3.3.final.jar
hornetq-core.jar
hornetq-jboss-as-integration-2.2.9.as7.final.jar
jboss-client
NOTE: hornetq 2.4(latest) Before using this jar, ensure you go through the known issue that exists with it in the JBoss Developer page (https://issues.jboss.org/browse/HORNETQ-1317).
2 Copy the jar files to the Identity Manager server. The following table identifies where to place jar files on an Identity Management server, by platform.
3 If necessary, restart your eDirectory server.
3.3 Installing on SonicMQAs part of installing SonicMQ for the driver, you should complete the following tasks consecutively. These instructions are for Linux, but you can follow the same procedure for other platforms.
Section 3.3.1, “Locating Prerequisite Jar Files,” on page 23 Section 3.3.2, “Running Scripts to Configure the Messaging System,” on page 23
Platform Directory Path
Windows Local installation: novell\NDS\lib
Remote installation: novell\RemoteLoader\lib
Linux/UNIX Local installation: /usr/lib/dirxml/classes (pre-eDirectory 8.8) or opt/novell/eDirectory/lib/dirxml/classes (eDirectory 8.8)
Remote installation: /usr/lib/dirxml/classes (pre-eDirectory 8.8) or /opt/novell/eDirectory/lib/dirxml/classes (eDirectory 8.8)
22 Identity Manager 4.0.2 Driver for JMS Implementation Guide
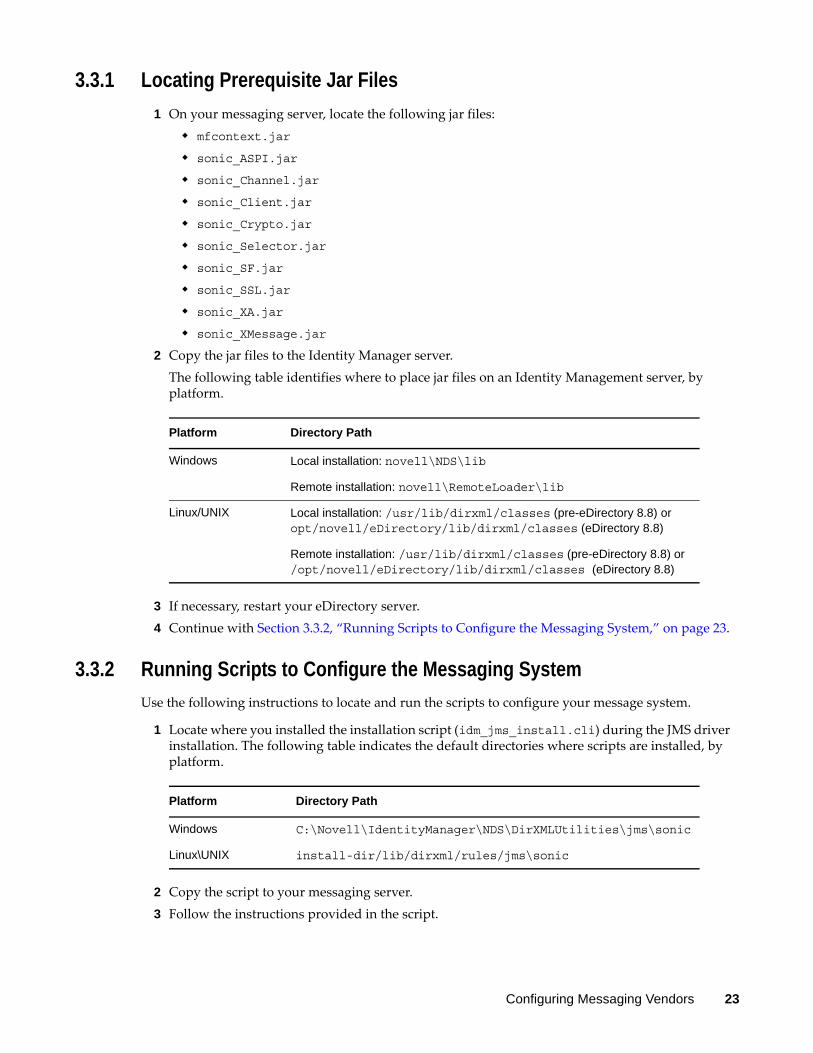
3.3.1 Locating Prerequisite Jar Files
1 On your messaging server, locate the following jar files: mfcontext.jar
sonic_ASPI.jar
sonic_Channel.jar
sonic_Client.jar
sonic_Crypto.jar
sonic_Selector.jar
sonic_SF.jar
sonic_SSL.jar
sonic_XA.jar
sonic_XMessage.jar
2 Copy the jar files to the Identity Manager server. The following table identifies where to place jar files on an Identity Management server, by platform.
3 If necessary, restart your eDirectory server.4 Continue with Section 3.3.2, “Running Scripts to Configure the Messaging System,” on page 23.
3.3.2 Running Scripts to Configure the Messaging System
Use the following instructions to locate and run the scripts to configure your message system.
1 Locate where you installed the installation script (idm_jms_install.cli) during the JMS driver installation. The following table indicates the default directories where scripts are installed, by platform.
2 Copy the script to your messaging server.3 Follow the instructions provided in the script.
Platform Directory Path
Windows Local installation: novell\NDS\lib
Remote installation: novell\RemoteLoader\lib
Linux/UNIX Local installation: /usr/lib/dirxml/classes (pre-eDirectory 8.8) or opt/novell/eDirectory/lib/dirxml/classes (eDirectory 8.8)
Remote installation: /usr/lib/dirxml/classes (pre-eDirectory 8.8) or /opt/novell/eDirectory/lib/dirxml/classes (eDirectory 8.8)
Platform Directory Path
Windows C:\Novell\IdentityManager\NDS\DirXMLUtilities\jms\sonic
Linux\UNIX install-dir/lib/dirxml/rules/jms\sonic
Configuring Messaging Vendors 23

3.4 Installing on TIBCO EMSAs part of installing TIBCO for the driver, you should complete the following tasks consecutively. These instructions are for Linux and Windows.
Section 3.4.1, “Locating Prerequisite Client Jar Files,” on page 24 Section 3.4.2, “Running Scripts to Configure the Messaging System,” on page 24
3.4.1 Locating Prerequisite Client Jar Files
1 On your messaging server, locate the following jar files: tibjms.jar
tibcrypt.jar
2 The following table identifies where to place jar files on a TIBCO server, by platform:
3 Copy the jar files to the Identity Manager server. The following table identifies where to place jar files on an Identity Management server, by platform:
4 If necessary, restart your eDirectory server.5 Continue with Section 3.4.2, “Running Scripts to Configure the Messaging System,” on page 24.
3.4.2 Running Scripts to Configure the Messaging System
Use the following instructions to locate and run the scripts to configure your message system:
1 Locate where you installed the installation script (idm_jms_install.tib) during the driver installation. The following table indicates the default directories where scripts are installed, by platform:
Platform Directory Path
Windows C:tibco\ems\clients\java
Linux /opt/tibco/ems/clients/java
Platform Directory Path
Windows Local installation: novell\NDS\lib
Remote installation: novell\RemoteLoader\lib
Linux/UNIX Local installation: /usr/lib/dirxml/classes (pre-eDirectory 8.8) or opt/novell/eDirectory/lib/dirxml/classes (eDirectory 8.8)
Remote installation: /usr/lib/dirxml/classes (pre-eDirectory 8.8) or /opt/novell/eDirectory/lib/dirxml/classes (eDirectory 8.8)
Platform Directory Path
Windows C:\Novell\IdentityManager\NDS\DirXMLUtilities\jms\tibco_ems
24 Identity Manager 4.0.2 Driver for JMS Implementation Guide

2 Copy the idm_jms_install.tib and idm_jms_uninstall.tib scripts to your messaging server. The following table indicates the location where you should copy the scripts to on your messaging server, by platform.
3 Update the IP address and port number of the connection factory in the idm_jms_install.tib script.
4 Change directories on the messaging server to run the tibjmsadmin utility. The following table indicates where the tibjmsadmin utility is installed, by platform.
5 To run the installation script, enter the following at the command line prompt:>tibjmsadmin -script idm_jms_install.tib
Linux\UNIX install-dir/lib/dirxml/rules/jms\tibco_ems
Platform Directory Path
Windows C:\tibco\ems\bin
Linux/UNIX /opt/tibco/ems/bin
Platform Directory Path
Windows C:\tibco\ems\bin
Linux/UNIX /opt/tibco/ems/bin
Platform Directory Path
Configuring Messaging Vendors 25

26 Identity Manager 4.0.2 Driver for JMS Implementation Guide
4 4Creating a New Driver Object
After the JMS driver files are installed on the server where you want to run the driver (see Chapter 2, “Installing the Driver Files,” on page 15) and you’ve configured the JMS system (see Chapter 3, “Configuring Messaging Vendors,” on page 17), you can create the driver in the Identity Vault.
Section 4.1, “Creating the Driver in Designer,” on page 27 Section 4.2, “Activating the Driver,” on page 30 Section 4.3, “Adding Packages to an Existing Driver,” on page 31
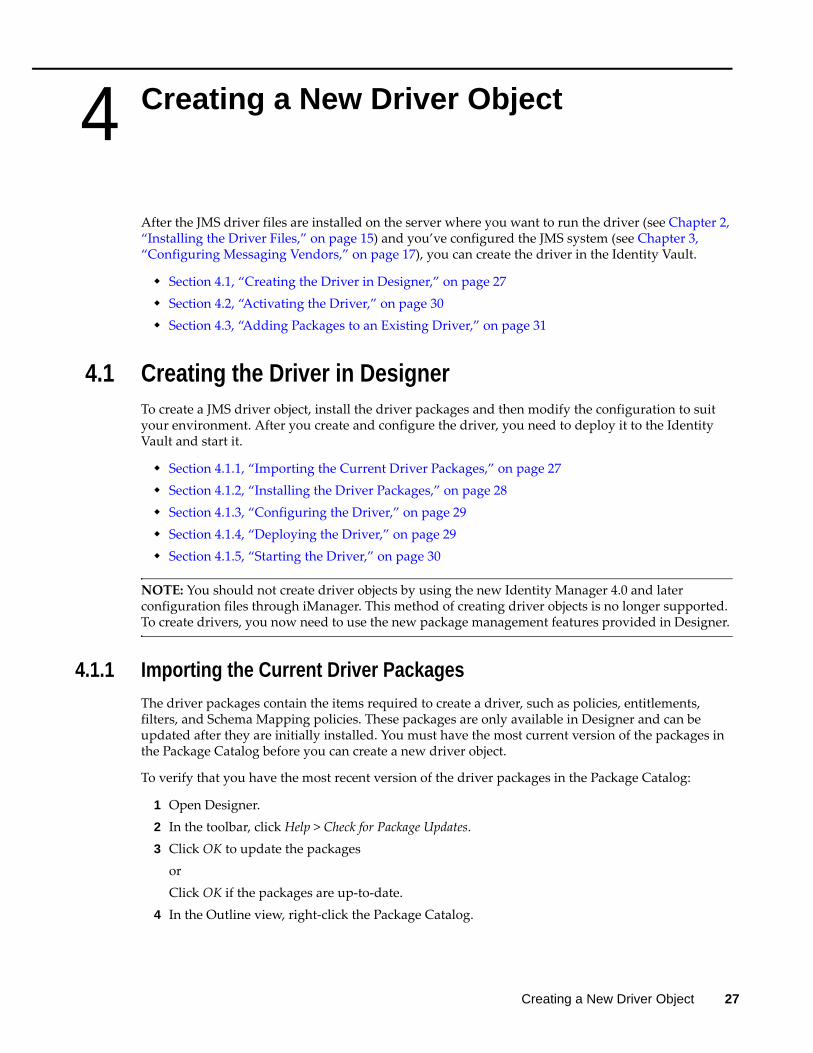
4.1 Creating the Driver in DesignerTo create a JMS driver object, install the driver packages and then modify the configuration to suit your environment. After you create and configure the driver, you need to deploy it to the Identity Vault and start it.
Section 4.1.1, “Importing the Current Driver Packages,” on page 27 Section 4.1.2, “Installing the Driver Packages,” on page 28 Section 4.1.3, “Configuring the Driver,” on page 29 Section 4.1.4, “Deploying the Driver,” on page 29 Section 4.1.5, “Starting the Driver,” on page 30
NOTE: You should not create driver objects by using the new Identity Manager 4.0 and later configuration files through iManager. This method of creating driver objects is no longer supported. To create drivers, you now need to use the new package management features provided in Designer.
4.1.1 Importing the Current Driver Packages
The driver packages contain the items required to create a driver, such as policies, entitlements, filters, and Schema Mapping policies. These packages are only available in Designer and can be updated after they are initially installed. You must have the most current version of the packages in the Package Catalog before you can create a new driver object.
To verify that you have the most recent version of the driver packages in the Package Catalog:
1 Open Designer.2 In the toolbar, click Help > Check for Package Updates.3 Click OK to update the packages
orClick OK if the packages are up-to-date.
4 In the Outline view, right-click the Package Catalog.
Creating a New Driver Object 27

5 Click Import Package.
6 Select any JMS driver packagesorClick Select All to import all of the packages displayed.By default, only the base packages are displayed. Deselect Show Base Packages Only to display all packages.
7 Click OK to import the selected packages, then click OK in the successfully imported packages message.
8 After the current packages are imported, continue with Section 4.1.2, “Installing the Driver Packages,” on page 28.
4.1.2 Installing the Driver Packages
After you have imported the current driver packages into the Package Catalog, you can install the driver packages to create a new driver.
1 In Designer, open your project.2 In the Modeler, right-click the driver set where you want to create the driver, then click New >
Driver.3 Select JMS Base, then click Next.4 Select the corresponding package for one of the supported JMS vendors.
The options are: JMS JBoss JMS SonicMQ JMS WebSphere JMS TIBCO Other
You can select only one package at a time. If you selected Other, then click Next. Otherwise, specify the Broker URL for the JMS vendor you selected, then click Next. The URL usually consists of a protocol (http), an IP address (255.255.255.255), and a port number (8080). For example: jnp://172.17.2.16:1099.
5 On the Driver Information page, specify a name for the driver, then click Next.6 Fill in the following fields for Remote Loader information:
Connect To Remote Loader: Select Yes or No to determine if the driver will use the Remote Loader. For more information, see the Identity Manager 4.0.2 Remote Loader Guide.
28 Identity Manager 4.0.2 Driver for JMS Implementation Guide

If you select No, skip to Step 7. If you select Yes, use the following information to complete the configuration of the Remote Loader, then click Next:Host Name: Specify the IP address or DNS name of the server where the Remote Loader is installed and running.Port: Specify the port number for this driver. Each driver connects to the Remote Loader on a separate port. The default value is 8090.Remote Loader Password: Specify a password to control access to the Remote Loader. It must be the same password that is specified as the Remote Loader password on the Remote Loader.Driver Password: Specify a password for the driver to authenticate to the Metadirectory server. It must be the same password that is specified as the Driver Object Password on the Remote Loader.
7 Review the summary of tasks that will be completed to create the driver, then click Finish.8 After you have installed the driver, you must change the configuration for your environment.
Proceed to Section 4.1.3, “Configuring the Driver,” on page 29.
4.1.3 Configuring the Driver
After installing the driver packages, the driver will start. However, the basic configuration probably does not meet the requirements for your environment. You should complete the following tasks to configure the driver:
Configure the driver parameters: There are many settings that can help you customize and optimize the driver. The settings are divided into categories such as Driver Configuration, Engine Control Values, and Global Configuration Values (GCVs). Although it is important for you to understand all of the settings, your first priority should be to review the Driver Parameters located on the Driver Configuration page.
Configure the driver filter: Modify the driver filter to include the object classes and attributes you want synchronized between the Identity Vault and the JMS vendor.
Configure policies: Modify the policies on the Subscriber and Publisher channels. For information about using policies, see the Policies in Designer 4.0.2 or Policies in iManager for Identity Manager 4.0.2 guide.
After completing the configuration tasks, continue with the next section, Deploying the Driver.
4.1.4 Deploying the Driver
After a driver is created in Designer, it must be deployed into the Identity Vault.
1 In Designer, open your project.2 In the Modeler, right-click the driver icon or the driver line, then select Live > Deploy. 3 If you are authenticated to the Identity Vault, skip to Step 5; otherwise, specify the following
information:Host: Specify the IP address or DNS name of the server hosting the Identity Vault.Username: Specify the DN of the user object used to authenticate to the Identity Vault.Password: Specify the user’s password.
4 Click OK.5 Read the deployment summary, then click Deploy.6 Read the message, then click OK.
Creating a New Driver Object 29

7 Click Define Security Equivalence to assign rights to the driver.The driver requires rights to objects within the Identity Vault and to the input and output directories on the server. The Admin user object is most often used to supply these rights. However, you might want to create a DriversUser (for example) and assign security equivalence to that user. 7a Click Add, then browse to and select the object with the correct rights.7b Click OK twice.
For more information about defining a Security Equivalent User in objects for drivers in the Identity Vault, see “Establishing a Security Equivalent User” in the Identity Manager 4.0.2 Security Guide.
8 Click Exclude Administrative Roles to exclude users that should not be synchronized.You should exclude any administrative User objects (for example, Admin and DriversUser) from synchronization.8a Click Add, then browse to and select the user object you want to exclude.8b Click OK.8c Repeat Step 8a and Step 8b for each object you want to exclude.8d Click OK.
9 Click OK.
4.1.5 Starting the Driver
When a driver is created, it is stopped by default. To make the driver work, you must start the driver and cause events to occur. Identity Manager is an event-driven system, so after the driver is started, it won’t do anything until an event occurs.
To start the driver:
1 In Designer, open your project.2 In the Modeler, right-click the driver icon or the driver line, then select Live > Start Driver.
For information about management tasks with the driver, see Chapter 6, “Managing the Driver,” on page 35.
4.2 Activating the DriverIf you create the driver in a driver set where you have already activated a driver that comes with the Integration Module for Messaging, the driver inherits the activation. If you created the driver in a driver set that has not been activated, you must activate the driver, with the Integration Module for Messaging activation, within 90 days. Otherwise, the driver stops working.
If driver activation has expired, the following error message is displayed in the ndstrace window:
DirXML Log Event -------------------Driver: \META-RHEL6\system\DriverSet\eDirDriver-BulkOperationsChannel: SubscriberStatus: ErrorMessage: Code(-9075) Shutting down because DirXML engine evaluation periodhas expired. Activation is required for further use.
To use the driver, you must reactivate it.
30 Identity Manager 4.0.2 Driver for JMS Implementation Guide

For information on activation, refer to “Activating Novell Identity Manager Products” in the Identity Manager 4.0.2 Integrated Installation Guide.
4.3 Adding Packages to an Existing DriverYou can add new functionality to an existing driver by adding new packages to an existing driver.
1 Right-click the driver, then click Properties.2 Click Packages, then click the Add Packages icon . 3 Select the packages to install. If the list is empty, there are no available packages to install.
4 (Optional) Deselect the Show only applicable package versions option, if you want to see all available packages for the driver, then click OK.This option is only displayed on drivers. By default, only the packages that can be installed on the selected driver are displayed.
5 Click Apply to install all of the packages listed with the Install operation.
Creating a New Driver Object 31
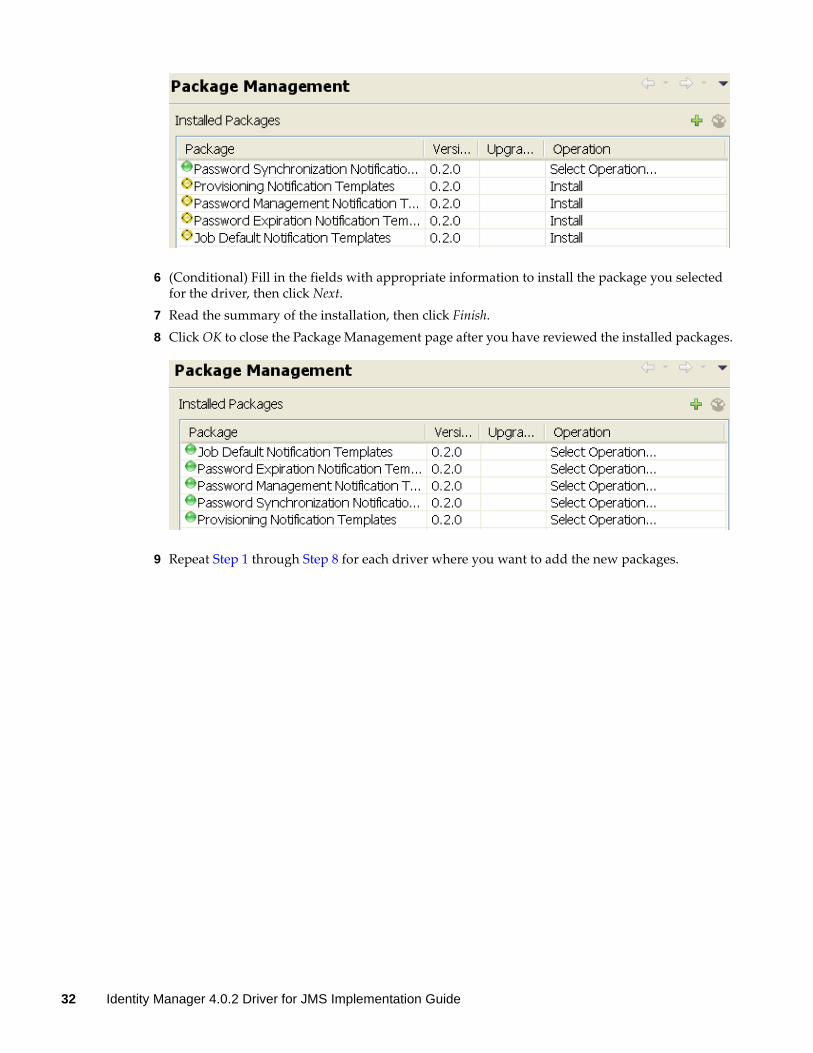
6 (Conditional) Fill in the fields with appropriate information to install the package you selected for the driver, then click Next.
7 Read the summary of the installation, then click Finish.8 Click OK to close the Package Management page after you have reviewed the installed packages.
9 Repeat Step 1 through Step 8 for each driver where you want to add the new packages.
32 Identity Manager 4.0.2 Driver for JMS Implementation Guide

5 5Upgrading an Existing Driver
The following sections provide information to help you upgrade an existing driver to version 4.0.2:
Section 5.1, “Supported Upgrade Paths,” on page 33 Section 5.2, “What’s New in Version 4.0.2,” on page 33 Section 5.3, “Upgrade Procedure,” on page 33
5.1 Supported Upgrade PathsYou can upgrade from any Identity Manager 3.5.x version of the JMS driver. Upgrading a pre-3.5.x version of the driver directly to version 4.0.2 is not supported.
5.2 What’s New in Version 4.0.2Driver content is delivered in packages instead of through a driver configuration file.
5.3 Upgrade ProcedureThe process for upgrading the JMS driver is the same as for other Identity Manager drivers. For detailed instructions, see “Upgrading Drivers to Packages” in the Identity Manager 4.0.2 Upgrade and Migration Guide.
Upgrading an Existing Driver 33

34 Identity Manager 4.0.2 Driver for JMS Implementation Guide

6 6Managing the Driver
As you work with the driver, there are a variety of management tasks you might need to perform, including the following:
Starting, stopping, and restarting the driver Viewing driver version information Using Named Passwords to securely store passwords associated with the driver Monitoring the driver’s health status Backing up the driver Inspecting the driver’s cache files Viewing the driver’s statistics Using the DirXML Command Line utility to perform management tasks through scripts Securing the driver and its information Synchronizing objects Migrating and resynchronizing data Activating the driver Upgrading an existing driver
Because these tasks, as well as several others, are common to all Identity Manager drivers, they are included in one reference, the NetIQ Identity Manager 4.0.2 Common Driver Administration Guide.
Managing the Driver 35

36 Identity Manager 4.0.2 Driver for JMS Implementation Guide

7 7Troubleshooting
Viewing driver processes is necessary to analyze unexpected behavior. To view the driver processing events, use DSTrace. You should only use it during testing and troubleshooting the driver. Running DSTrace while the drivers are in production increases the utilization on the Identity Manager server and can cause events to process very slowly.
The driver supports the following six trace levels:
For information about configuring the driver to use DSTrace, see “Viewing Identity Manager Processes” in the NetIQ Identity Manager 4.0.2 Common Driver Administration Guide.
7.1 The Driver Fails to Reconnect to WebMQ if RestartedThe JMS driver fails to reconnect with the following exception when connecting to either Web MQ 7.1 or 7.5.
The JMS driver fails to reconnect to WebMQ MQ 7.1 and 7.5 and throws the following exception or starts polling only when the driver is started for the first time:
Exception in thread "JMSCCThreadPoolMaster"java.lang.IllegalThreadStateExceptionat java.lang.ThreadGroup.addUnstarted(Unknown Source)at java.lang.Thread.init(Unknown Source)at java.lang.Thread.init(Unknown Source)at java.lang.Thread.<init>(Unknown Source)atcom.ibm.msg.client.commonservices.j2se.workqueue.WorkQueueManagerImplementation$ThreadPoolWorker.<init>(WorkQueueManagerImplementation.java:950)atcom.ibm.msg.client.commonservices.j2se.workqueue.WorkQueueManagerImplementation.createNewThread(WorkQueueManagerImplementation.java:496)at
This is caused by the third party IBM Websphere client jar files used by the driver shim.
To workaround this issue, use the driver with Remote Loader.
Level Description
0 Minimal tracing such as JMS Driver version, Build Stamp, and XDS Library
1 Information on connection
2 Information on messages
3 Verbose information on the messages that are sent or received, and the GUIDs
4 Information on JNDI session, context, and connection
5 Information on the methods and its signatures
Troubleshooting 37

38 Identity Manager 4.0.2 Driver for JMS Implementation Guide
A ADriver Properties
This section provides information about the Driver Configuration and Global Configuration Values properties for the JMS driver. These are the only unique properties for the JMS driver. All other driver properties (Named Password, Engine Control Values, Log Level, and so forth) are common to all drivers. Refer to “Driver Properties” in the NetIQ Identity Manager 4.0.2 Common Driver Administration Guide for information about the common properties.
The information is presented from the viewpoint of iManager. If a field is different in Designer, it is marked with an icon.
Section A.1, “Driver Configuration,” on page 39 Section A.2, “Global Configuration Values,” on page 48
A.1 Driver ConfigurationIn iManager:
1 Click to display the Identity Manager Administration page. 2 Open the driver set that contains the driver whose properties you want to edit:
2a In the Administration list, click Identity Manager Overview.2b If the driver set is not listed on the Driver Sets tab, use the Search In field to search for and
display the driver set.2c Click the driver set to open the Driver Set Overview page.
3 Locate the driver icon, then click the upper right corner of the driver icon to display the Actions menu.
4 Click Edit Properties to display the driver’s properties page.
In Designer:
1 Open a project in the Modeler, then right-click the driver line and click Properties > Driver Configuration.
The Driver Configuration options are divided into the following sections:
Section A.1.1, “Driver Module,” on page 40 Section A.1.2, “Driver Object Password,” on page 40 Section A.1.3, “Authentication,” on page 40 Section A.1.4, “Startup Option,” on page 41 Section A.1.5, “Driver Parameters,” on page 41 Section A.1.6, “ECMAScript,” on page 47 Section A.1.7, “Global Configurations,” on page 47
Driver Properties 39

A.1.1 Driver Module
The driver module changes the driver from running locally to running remotely or the reverse.
Java: Used to specify the name of the Java class that is instantiated for the shim component of the driver. This class can be located in the classes directory as a class file, or in the lib directory as a .jar file. If this option is selected, the driver is running locally.
The name of the Java class is:com.novell.idm.driver.jms.JMSDriverShim
Native: This option is not used with the driver.
Connect to Remote Loader: Used when the driver is connecting remotely to the connected system. Designer includes two suboptions:
Remote Loader Client Configuration for Documentation: Includes information on the Remote Loader client configuration when Designer generates documentation for the JMS driver.
Driver Object Password: Specifies a password for the Driver object. If you are using the Remote Loader, you must enter a password on this page. Otherwise, the remote driver does not run. The Remote Loader uses this password to authenticate itself to the remote driver shim.
A.1.2 Driver Object Password
Driver Object Password: Use this option to set a password for the driver object. If you are using the Remote Loader, you must enter a password on this page or the remote driver does not run. This password is used by the Remote Loader to authenticate itself to the remote driver shim.
A.1.3 Authentication
The Authentication section stores the information required to authenticate to the connected system.
Authentication ID: Specify a user application ID. This ID is used to pass Identity Vault subscription information to the application.
Example: Administrator
Authentication Context: Specify the IP address or name of the server the application shim should communicate with.
Application Password: Specify the password for the user object listed in the Authentication ID field.
Remote Loader Authentication Information: Used only if the driver is connecting to the application through the Remote Loader. The parameter to enter is hostname=xxx.xxx.xxx.xxx port=xxxx kmo=certificatename, when the host name is the IP address of the application server running the Remote Loader server and the port is the port the remote loader is listening on. The default port for the Remote Loader is 8090.
The kmo entry is optional. It is only used when there is an SSL connection between the Remote Loader and the Metadirectory engine.
Example: hostname=10.0.0.1 port=8090 kmo=IDMCertificate
Remote Loader Password: Used only if the driver is connecting to the application through the Remote Loader. The password is used to control access to the Remote Loader instance. It must be the same password specified during the configuration of the Remote Loader on the connected system.
Cache limit (KB): Specify the maximum event cache file size (in KB). If it is set to zero, the file size is unlimited. Click Unlimited to set the file size to unlimited in Designer
40 Identity Manager 4.0.2 Driver for JMS Implementation Guide
A.1.4 Startup Option
The Startup Option section allows you to set the driver state when the Identity Manager server is started.
Auto start: The driver starts every time the Identity Manager server is started.
Manual: The driver does not start when the Identity Manager server is started. The driver must be started through Designer or iManager.
Disabled: The driver has a cache file that stores all of the events. When the driver is set to Disabled, this file is deleted and no new events are stored in the file until the driver state is changed to Manual or Auto Start.
Do not automatically synchronize the driver: This option only applies if the driver is deployed and was previously disabled. If this is not selected, the driver re-synchronizes the next time it is started.
A.1.5 Driver Parameters
The Driver Parameters section lets you configure the driver-specific parameters. When you change driver parameters, you tune driver behavior to align with your network environment.
The parameters are presented by category:
“Driver Options” on page 41 “Subscriber Options” on page 43 “Publisher Options” on page 45
Driver Options
Default JMS version: Specifies the API version this driver should use when communicating with message brokers. If you are uncertain, 1.0.2 is the more widely adopted standard.
This setting is global for all message brokers.
Broker ID: Specifies an identifier for this broker by which it is known in the Identity Manager namespace.The default value is WebSphere MQ 6. To use a value other than the default, you need to specify it.
Show connected-related options: Displays connection-related parameters, such as JNDI connection factory names and usernames or passwords. Select show to display the following options.
Username: Specify the username to authenticate to the message broker. Password: Specify the password to authenticate to the message broker.
After entering the password, you need to re-enter it for validation. Show queue connection factory options: Select show to display the queue connection factory
options. JNDI name: Specify the JNDI name of the connection factory used to create the connections
to the queues. Show topic connection factory options: Select show to display topic connection factory options.
JNDI name: Specify the JNDI name of the connection factory used to create connections to the topics.
Client ID: Specify the client ID used to create the durable topic subscriptions.
Driver Properties 41

NOTE: Changing this value after durable subscriptions have been defined is not recommended. If it is changed, the Publisher is unable to unsubscribe from existing topic subscriptions unless the client ID is set to the same value the subscriptions were created with.
Show standard JNDI context properties: Select show to display the standard JNDI context properties for this message broker. These properties are primarily used to specify the URL, username, and password used to connect to or authenticate with this broker.
INITAL_CONTEXT_FACTORY: The name that uniquely identifies this JNDI context property. Value: Specify the name of the Java class used to create a JNDI context for this message broker. PROVIDER_URL: The name that uniquely identifies this JNDI context property. Value: Specify the URL of this message broker. A URL usually contains a protocol, an IP
address, and a port number. SECURITY_CREDENTIALS: The name that uniquely identifies this JNDI context property. Value: Specify the password used to authenticate to this message broker. SECURITY_PRINCIPAL: The name that uniquely identifies this JNDI context property. Value: Specify the username used to authenticate to this message broker. URL_PKG_PREFIXES: The name that uniquely identifies this JNDI context property. Value: Specify the value of this JNDI context property. Show remaining standard properties: Select show to display the remaining, less commonly
used standard JNDI context properties. APPLET: The name that uniquely identifies this JNDI context property. Value: Specify the name of the applet using used. AUTHORITATIVE: The name that uniquely identifies this JNDI context property. Value: The value of this JNDI context property. BATCHSIZE: The name that uniquely identifies this JNDI context property. Value: The value of this JNDI context property. DNS_URL: The name that uniquely identifies this JNDI context property. Value: The value of this JNDI context property. LANGUAGE: The name that uniquely identifies this JNDI context property. Value: The value of this JNDI context property. OBJECT_FACTORIES: The name that uniquely identifies this JNDI context property. Value: The value of this JNDI context property. REFERRAL: The name that uniquely identifies this JNDI context property. Value: The value of this JNDI context property. SECURITY_AUTHENTICATION: The name that uniquely identifies this JNDI context
property. Value: The value of this JNDI context property. SECURITY_PROTOCOL: The name that uniquely identifies this JNDI context property. Value: The value of this JNDI context property. STATE_FACTORIES: The name that uniquely identifies this JNDI context property. Value: The value of this JNDI context property.
42 Identity Manager 4.0.2 Driver for JMS Implementation Guide
Show vendor-specific JNDI context properties: Select show to display the vendor-specific JNDI context properties.
Name: The name that uniquely identifies this JNDI context property. Value: Specify the value of this JNDI context property.
Subscriber Options
Disable subscriber: Select Yes to prevent this channel from sending messages to the JMS provider.
Show default message options: Select show to display the options that are global to all messages.
Default message expiration (milliseconds): In milliseconds, specify how long messages should live after they reach the destination. This setting is global for all sent messages.
Default message priority: Select the priority of the message. The options are: 0 (normal) 1 (normal) 2 (normal) 3 (normal) 4 (normal, default) 5 (expedited) 6 (expedited) 7 (expedited) 8 (expedited) 9 (expedited)
Specifying expedited delivery can result in “out-of-order” message processing. This setting is global for all sent messages.
Default message type: Select the default message type as text or bytes. This setting is global for all sent messages.
Show default destination options: Select show to display the parameters that show the properties sent with the message.Message properties can be used to prevent message loopback or to pass application-specific information in messages. These properties are global for all sent messages. Name: Message property names beginning with “JMS” must match those defined by the
JMS specification or third-party providers. Property names fall into three general categories: Standard JMS properties. They usually begin with JMS or JMSX. Provider-specific properties. They usually begin with JMS_. Application-specific. Anything else.
Value: The value of the message property.
Show default destination options: Select show to display the options global to all destinations.
Default destination type: Select whether all destinations are queues (default) or topics. This setting is global for all destinations.
Default omit message envelope: Select whether the JMS message envelope should be omitted from received messages. This setting is global to all destinations.
Driver Properties 43
Default receive timeout (seconds): Select how long a channel should wait to receive a response to a sent message. The default value is 10 seconds. Permitted values are no wait and 1-25. This setting is global to all destinations.
Default message filter: Select how the destinations filter receives the messages. The options are: Receive all messages Receive messages from this instance Receive messages from this channel Receive messages from the other channel Block messages from this instance (default) Block messages from this channel Block messages from the other channel Specify a custom message selector
Default message selector: If you select specify a custom message selector, specify a custom message selector to filter received messages. Message selectors are like SQL WHERE clauses, such as JMSCorrelationID LIKE '%01=whatever%'.The % wildcard character can be used to disregard content before or after the part of a header or property value you are interested in filtering on. When used in tandem with a message filter, the message selector is appended to the end of the filter by using an AND operator.
Destination unique id: Specify the identifier for this destination by which it is known in the Identity Manager namespace. This name is also the durable subscription name for topics. This value must be unique per channel (Subscriber/Publisher).
Show additional destination options: Select show to display additional options for this selected destination.
Destination JNDI name: Specify the identifier for this destination that is known in the JNDI namespace. This might not be the name the destination is known by to the broker. This value does not need to be unique.
Destination type: Select whether the destination type is inherited, a topic, or a queue. Destination mode: Select whether the destination is used to send or receive messages. Message type: Select whether messages are sent as a text or as bytes. Show message properties: Select show to display message properties sent with messages.
Message properties can be used to prevent message loopback or pass provider or application-specific information along with messages. Name: The message property names beginning with JMS must match those defined by the
JMS specification or third-party providers. Property names fall into three general categories: Standard JMS properties. They usually begin with JMS or JMSX. Provider-specific properties. They begin with JMS_. Application-specific. Anything else.
Value: Specify the value of the message property.
Destination unique id: Specify the identifier by which this destination is known in the Identity Manager namespace. This name is also the durable subscription name for topics. This value must be unique per channel (Subscriber/Publisher).
44 Identity Manager 4.0.2 Driver for JMS Implementation Guide
Show additional destination options: Select show to display additional options for this selected destination.
Destination JNDI name: Specify the identifier by which this destination is known in the JNDI namespace. This might or might not be the name the destination is known by to the message broker.
This value does not need to be unique. Destination type: Select whether the destination is inherited, a queue, or a topic. Destination mode: Select whether the destination is used to send or receive messages. Omit message envelope: Select whether the JMS message envelope is omitted from messages
received by this destination. Receive timeout (seconds): Select how long a channel should wait to receive a response to a sent
message. The default value is 10 seconds. Permitted values can range from 1-25. Message filter: Select how this destination filter receives messages. The options are:
Receive all messages Receive messages from this instance Receive messages from this channel Receive messages from the other channel Block messages from this instance (default) Block messages from this channel Block messages from the other channel Specify a custom message selector
Message selector: If you selected specify a custom message selector, specify a custom message selector to filter received messages. Message selectors are like SQL WHERE clauses, such as JMSCorrelationID = whatever. When used in tandem with a message filter, the message selector is appended to the end of the filter by using an AND operator.
Publisher Options
Disable publisher: Select Yes to prevent this channel from sending messages to the JMS provider.
Heartbeat interval (minutes): Specifies how many minutes of inactivity should elapse before this channel sends a heartbeat document. In practice, more than the number of minutes specified can elapse. That is, this parameter defines a lower bound.
Show default message options: Select show to display options global to all messages.
Default message expiration (milliseconds): Specify how long the messages live after they reach a destination. Specify the time duration in milliseconds. 0 means the message lives indefinitely. This setting is global for all sent messages.
Default message priority: Select the priority of the message. The options are: 0 (normal) 1 (normal) 2 (normal) 3 (normal) 4 (normal, default) 5 (expedited)
Driver Properties 45

6 (expedited) 7 (expedited) 8 (expedited) 9 (expedited)
Specifying expedited delivery can result in “out-of-order” message processing. This setting is global for all sent messages.
Default message type: Select whether the messages type is text or bytes. This setting is global for all sent messages.
Show default message properties: Select show to display the parameter that specifies the properties sent with messages.Message properties can be used to prevent message loopback or pass application-specific information in messages. These properties are global for all sent messages. Name: The message property names beginning with JMS must match those defined by the
JMS specification or third-party providers. Property names fall into three general categories: Standard JMS properties. They usually begin with JMS or JMSX. Provider-specific properties. They begin with JMS_. Application-specific. Anything else.
Value: Specify the value of the message property.
Show default session options: Select show to display options that are global to all sessions.
Default message acknowledgement threshold: Specify how many messages are received by a monitored destination before an acknowledgement is sent to the broker.
Show default destination options: Select show to display options that are global to all destinations.
Default destination type: Select whether the default destination type is a queue (default) or a topic.
Default omit message envelope: Select whether the JMS message envelope is omitted from the received messages. This setting is global for all destinations.
Default receive timeout (seconds): Select how long a channel waits to receive a response to a sent message. The default value is 10 seconds. The permitted values range from 1-25 seconds.
Default message filter: Select how the destination’s filter receives the messages. The options are: Receive all messages Receive messages from this instance Receive messages from this channel Receive messages from the other channel Block messages from this instance (default) Block messages from this channel Block messages from the other channel Specify a custom message selector
Default message selector: If you selected specify a custom message selector, specify a custom message selector to filter received messages. Message selectors are like SQL WHERE clauses, such as JMSCorrelationID LIKE '%01=whatever%'.
46 Identity Manager 4.0.2 Driver for JMS Implementation Guide
The % wildcard character is used to disregard content before or after the part of a header or property value you are interested in filtering on. When used in tandem with a message filter, the message selector is appended to the end of the filter by using an AND operator.
Default polling interval (milliseconds): Specify how often the destinations are polled for new messages (in milliseconds).
Destination unique id: Specify the identifier by which this destination is known in the Identity Manager namespace. This name is also the durable subscription name for topics. This value must be unique per channel (Subscriber/Publisher).
Show additional destination options: Select show to display parameters for this selected destination.
Destination JNDI name: Specify the identifier for this destination that is known in the JNDI namespace. This might not be the name the destination is known by to the broker. This value does not need to be unique.
Destination type: Select whether the destination type is inherited, a topic, or a queue. Destination mode: Select whether the destination is used to send or receive messages. Message type: Select whether messages are sent as a text or as bytes. Show message properties: Select show to display message properties sent with messages.
Message properties can be used to prevent message loopback or pass provider or application-specific information along with messages. Name: The message property names beginning with JMS must match those defined by the
JMS specification or third-party providers. Property names fall into three general categories: Standard JMS properties. They usually begin with JMS or JMSX. Provider-specific properties. They begin with JMS_. Application-specific. Anything else.
Value: Specify the value of the message property.
A.1.6 ECMAScript
Displays an ordered list of ECMAScript resource files. The files contain extension functions for the driver that Identity Manager loads when the driver starts. You can add additional files, remove existing files, or change the order in which the files are executed.
A.1.7 Global Configurations
Displays an ordered list of Global Configuration objects. The objects contain extension GCV definitions for the driver that Identity Manager loads when the driver is started. You can add or remove the Global Configuration objects, and you can change the order in which the objects are executed.
Driver Properties 47

A.2 Global Configuration ValuesGlobal configuration values (GCVs) are values that can be used by the driver to control functionality. GCVs are defined on the driver or on the driver set. Driver set GCVs can be used by all drivers in the driver set. Driver GCVs can be used only by the driver on which they are defined.
The JMS driver includes several GCVs that are created from driver parameters. When you modify the driver parameters, the GCVs are updated; likewise, when you modify the GCVs, the driver parameters are updated. These GCVs are created so that the driver parameter information can be more easily used in the driver’s policies.
You can also add your own GCVs if you discover you need additional ones as you implement policies in the driver.
To access the driver’s GCVs in iManager:
1 Click to display the Identity Manager Administration page. 2 Open the driver set that contains the driver whose properties you want to edit.
2a In the Administration list, click Identity Manager Overview.2b If the driver set is not listed on the Driver Sets tab, use the Search In field to search for and
display the driver set.2c Click the driver set to open the Driver Set Overview page.
3 Locate the driver icon, click the upper right corner of the driver icon to display the Actions menu, then click Edit Properties.orTo add a GCV to the driver set, click Driver Set, then click Edit Driver Set properties.
To access the driver’s GCVs in Designer:
1 Open a project in the Modeler.2 Right-click the driver icon or line, then select Properties > Global Configuration Values.
or
To add a GCV to the driver set, right-clickthe driver set icon , then click Properties > GCVs.
Destination unique ID: Specifies the identifier by which this destination is known in the Identity Manager namespace. This name is also the durable subscription name for topics.
This value must be unique per channel (Subscriber/Publisher).
48 Identity Manager 4.0.2 Driver for JMS Implementation Guide

B BTrace Levels
The driver supports the following trace levels:
For information about setting driver trace levels, see “Viewing Identity Manager Processes” in the NetIQ Identity Manager 4.0.2 Common Driver Administration Guide.
Level Description
0 Minimal tracing such as JMS Driver version, Build Stamp, and XDS Library
1 Information on connection
2 Information on messages
3 Verbose information on the messages that are sent or received, and the GUIDs
4 Information on JNDI session, context, and connection
5 Information on the methods and its signatures
Trace Levels 49

50 Identity Manager 4.0.2 Driver for JMS Implementation Guide