Rhode Island Multilingual Learner (MLL) / English Learner ...
ADDIS ABABA SCIENCE & TECHNOLOGY UNIVERSITY
ICT Directorate
E-Learning Instructors’ Quick Guide
“We are, as a species, blended learners.” -Elliot Masie
Please email us ([email protected]) if you have any feedback regarding this training manual.
Addis Ababa Science and Technology University E-Learning Guide | By E-Learning Team

E-Learning Instructors’ Quick Guide Page 2
Table of Contents 1. Introduction ....................................................................................................................................... 3
2. How to access & login to AASTU E-Learning portal .................................................................... 3
2.1. Access to AASTU E-Learning portal .......................................................................................... 3
2.2. Logging in .................................................................................................................................... 4
2.3 Site Navigation .............................................................................................................................. 5
2.4 How to edit your user profile ........................................................................................................ 5
2.5 How to Changing your password? ................................................................................................ 6
3. Course Development - Adding Files .................................................................................................. 7
3.1 Adjust the format of your course ................................................................................................ 7
3.2 Adjust the number of weeks or topics in your course ............................................................... 7
3.3 Upload a file ................................................................................................................................. 8
3.4 Add a Resource .......................................................................................................................... 10
3.5 Add an Assignment ................................................................................................................... 12
3.6 Add a Forum .............................................................................................................................. 12
3.7 Add a Quiz ................................................................................................................................. 13
3.8 Set up your Gradebook ............................................................................................................. 13
3.9 Import from a template or a previous course site ...................... Error! Bookmark not defined.
3.10 Set up the Attendance module ................................................... Error! Bookmark not defined.
Take Attendance ................................................................................. Error! Bookmark not defined.
Viewing your course as a student ...................................................... Error! Bookmark not defined.
E-Learning Instructors’ Quick Guide Page 3
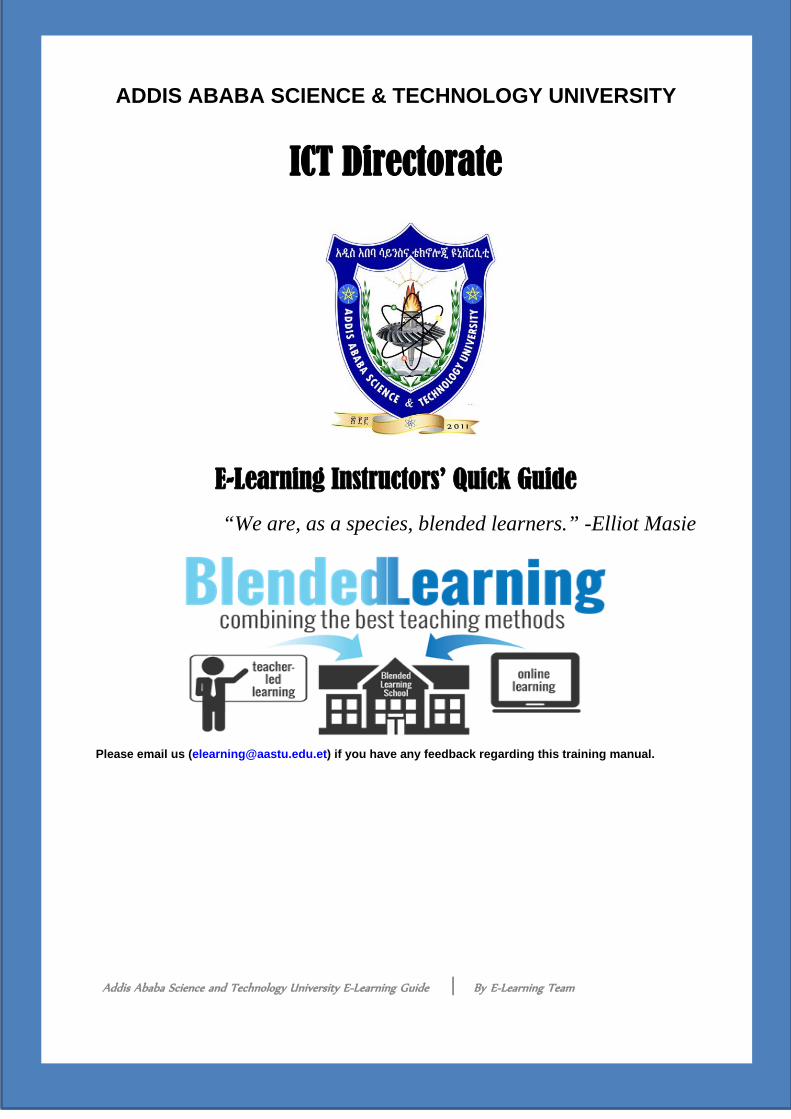
1. Introduction
The Moodle (Modular Object-Oriented Dynamic Learning Environment) e-learning system is
used by the Addis Ababa Science & Technology University to provide a suitable virtual
electronic learning environment for the instructors and students. Moodle is a course
management system (CMS) - a software package designed to help educators create quality
online courses and manage learner outcomes with opportunities for rich interaction and
collaboration. Such e-learning systems are sometimes also called Learning Management
Systems (LMS), Virtual Learning Environments (VLE) and Learning Content Management
Systems (LCMS). Moodle contains various design aspects that allow instructors and students
to interact, collaborate, and experience online learning in multiple ways. Moodle can be used
to supplement on ground courses or can be used to host completely online courses. Students
need only a browser (e.g., IE, Firefox, chrome, Safari etc) to participate in a Moodle course.
The AASTU e-learning management system is a customized Moodle system with the objective
of introducing blended learning system for students.
This Instructors’ quick guide is prepared to provide you with the most important functions in
Moodle like: login process, listing courses and contents, uploading files, formatting courses
pages, and how to design and facilitate your course. This guide covers the most frequently
used features and is a good starting point when using Moodle. The functions are each described
in detail, with a comprehensive explanation of how to carry out the different tasks within that
function.
If you have trouble as you experiment with your courses design, forget your password or have
any other technical questions, please e-mail [email protected]. Keep in mind that you
can always contact AASTU e-learning staff for help or support.
2. How to access & login to AASTU E-Learning portal
2.1. Access to AASTU E-Learning portal
To use AASTU E-Learning portal for the first time, open Internet Explorer, or any web
browser of your choice, and type the following address: http://www.elearning.aastu.edu.et/

E-Learning Instructors’ Quick Guide Page 4
Figure: AASTU E-Learning Layout There is also a link to E-Learning on the top of the AASTU website. This link is for indirect
access to E-Learning, via the University’s own website; even in the rare event that AASTU’s
site is down for whatever reason, you still have direct access to E-Learning at
elearning.aastu.edu.et
2.2. Logging in
To login to AASTU e-learning, you must have an account. If you don’t have an account,
please ask your college/department administrator to request an account on your behalf.
AASTU e-learning team will send you your new username and temporarily password,
which you must change later for your account security.
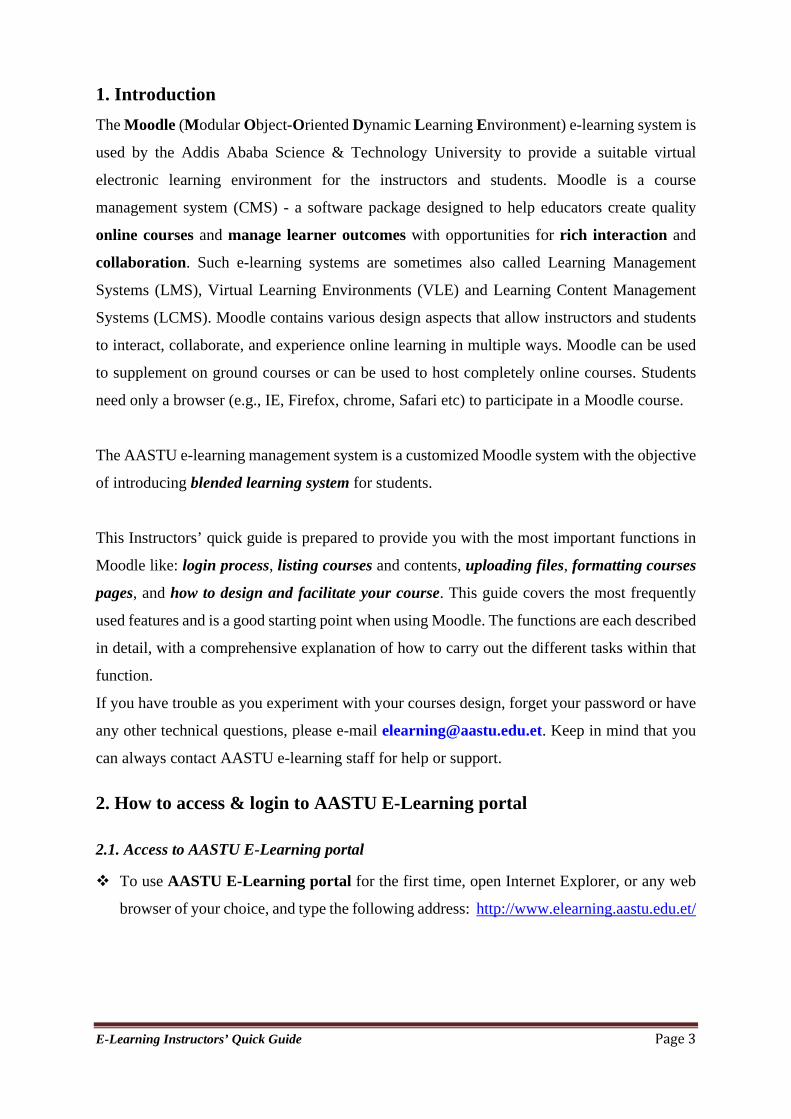
Click on the Login link on the top right-hand corner. You will be redirected to a Log in
page,
Figure: Log in Page Enter your credentials in the Username field, e.g [email protected] and your
E-Learning Instructors’ Quick Guide Page 5
password. Click on the Login button to enter the site.
2.3 Site Navigation
The most efficient way to navigate the site is by clicking on the My Courses Link located
in the Navigation menu. This will show all the courses that you are currently a Teacher in.
Click on the required course to open up the course.
Figure: Home Page (Showing My Courses)
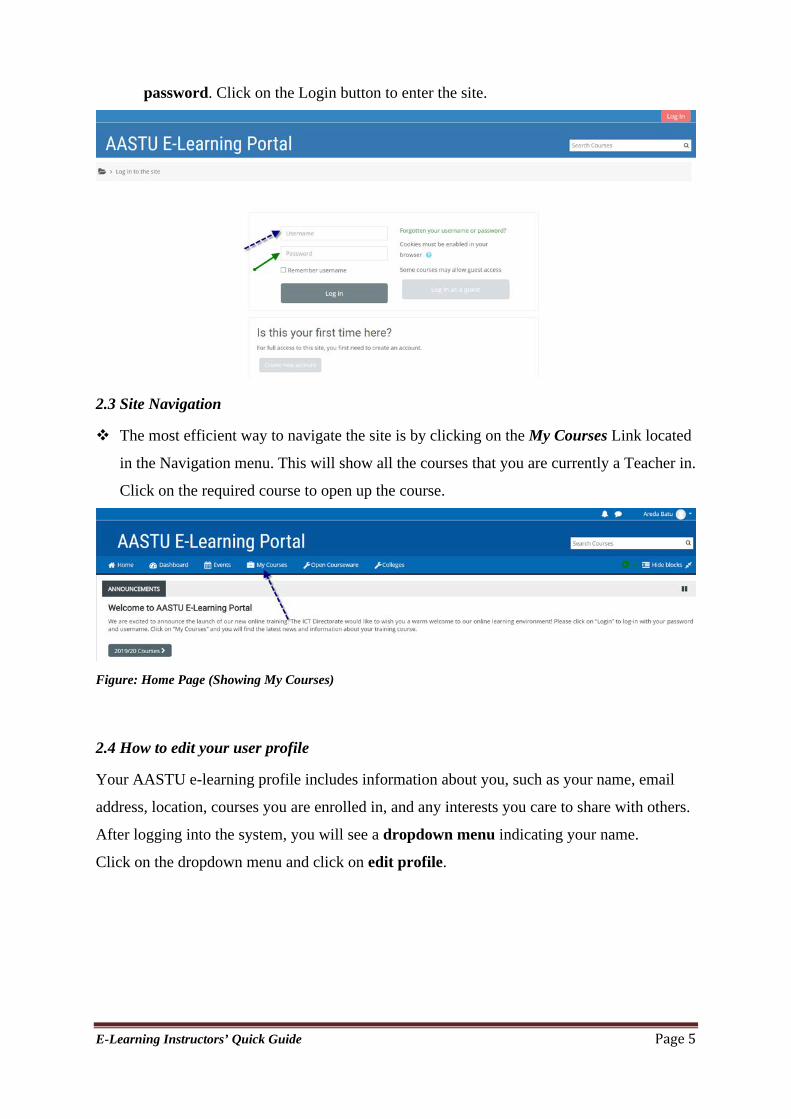
2.4 How to edit your user profile
Your AASTU e-learning profile includes information about you, such as your name, email
address, location, courses you are enrolled in, and any interests you care to share with others.
After logging into the system, you will see a dropdown menu indicating your name.
Click on the dropdown menu and click on edit profile.
E-Learning Instructors’ Quick Guide Page 6
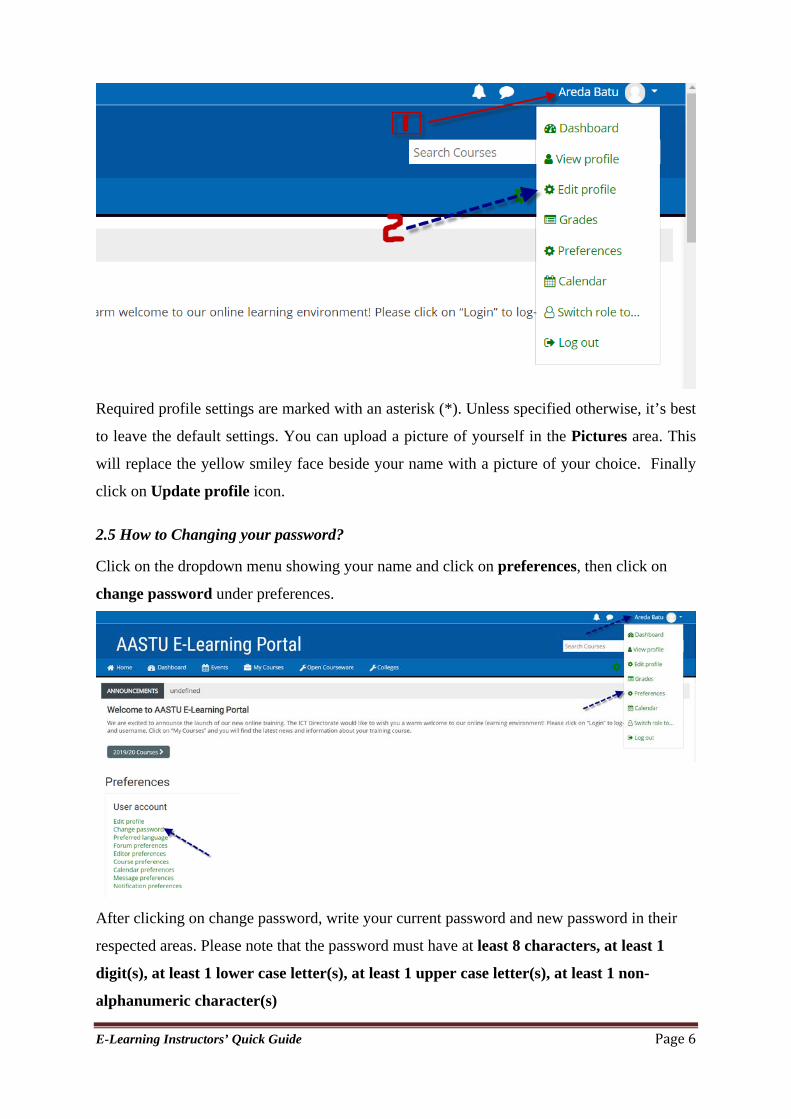
Required profile settings are marked with an asterisk (*). Unless specified otherwise, it’s best
to leave the default settings. You can upload a picture of yourself in the Pictures area. This
will replace the yellow smiley face beside your name with a picture of your choice. Finally
click on Update profile icon.
2.5 How to Changing your password?
Click on the dropdown menu showing your name and click on preferences, then click on
change password under preferences.
After clicking on change password, write your current password and new password in their
respected areas. Please note that the password must have at least 8 characters, at least 1
digit(s), at least 1 lower case letter(s), at least 1 upper case letter(s), at least 1 non-
alphanumeric character(s)

E-Learning Instructors’ Quick Guide Page 7
3. Course Development - Adding Files
3.1 Adjust the format of your course
1. Go to the gear icon at the top right of your course page.
2. Click Edit settings.
3. Expand the Course Format section.
4. Select the Weekly Format from the drop-down menu that has to be enabled
on your site.
5. Scroll down to the bottom of the page and click the Save and display button.
3.2 Adjust the number of weeks or topics in your course
1. Go to the gear icon at the top right of your course page.
2. Click Edit settings.
3. Expand the Course Format section and select Weekly format only.
4. Change the Number of sections setting from the drop-down menu accordingly.
5. Scroll down to the bottom of the page and click the Save and display button.
E-Learning Instructors’ Quick Guide Page 8
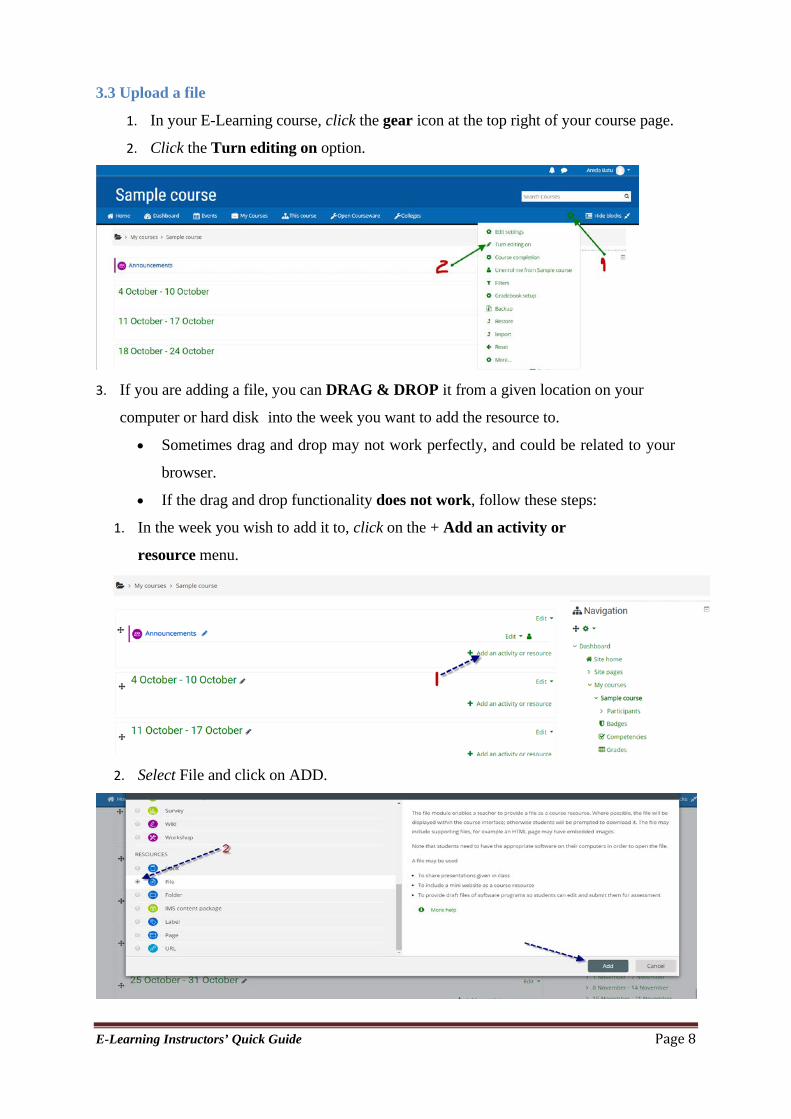
3.3 Upload a file
1. In your E-Learning course, click the gear icon at the top right of your course page.
2. Click the Turn editing on option.
3. If you are adding a file, you can DRAG & DROP it from a given location on your
computer or hard disk into the week you want to add the resource to.
• Sometimes drag and drop may not work perfectly, and could be related to your
browser.
• If the drag and drop functionality does not work, follow these steps:
1. In the week you wish to add it to, click on the + Add an activity or
resource menu.
2. Select File and click on ADD.

E-Learning Instructors’ Quick Guide Page 9
3. Fill in the name of the resource.
4. In the upload area, click on the "Add file" icon in the top left corner. This will open
system's "File Picker".
5. Click "Upload a file" from the menu on the left.
6. Click the choose File button to search for your file.
7. Select your file and click "Open".
8. Click the "Upload this file button".
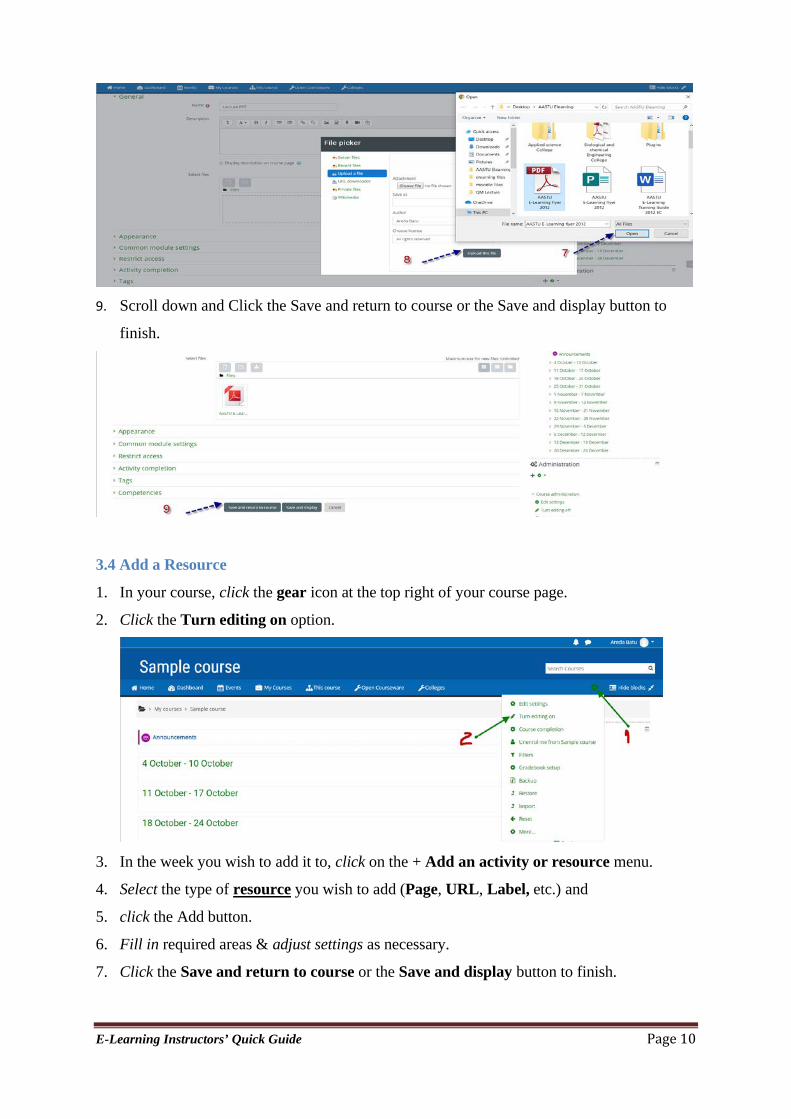
E-Learning Instructors’ Quick Guide Page 10
9. Scroll down and Click the Save and return to course or the Save and display button to
finish.
3.4 Add a Resource
1. In your course, click the gear icon at the top right of your course page.
2. Click the Turn editing on option.
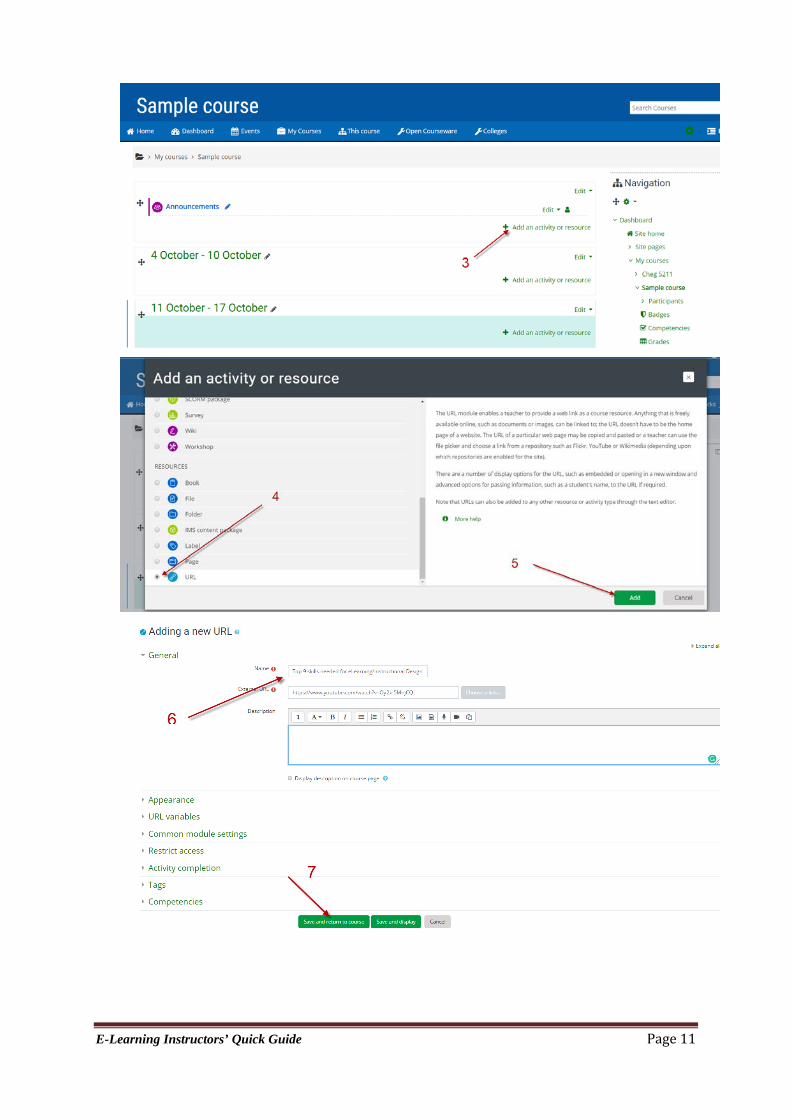
3. In the week you wish to add it to, click on the + Add an activity or resource menu.
4. Select the type of resource you wish to add (Page, URL, Label, etc.) and
5. click the Add button.
6. Fill in required areas & adjust settings as necessary.
7. Click the Save and return to course or the Save and display button to finish.
E-Learning Instructors’ Quick Guide Page 11

E-Learning Instructors’ Quick Guide Page 12
3.5 Add an Assignment
1. In your Moodle course, click the gear icon at the top right of your course page.
2. Click the Turn editing on option.
3. In the week /topic you wish to add it to, click on the + Add an activity or resource menu.
4. Select Assignment from the pop-up that appears and then click the Add button.
5. You will be taken to a screen that allows you to create the activity & set its parameters.
6. Give the assignment a name & description.
7. Set Available from & due dates/times. Note that Moodle uses a 24-hour clock.
8. Set the cut-off date, if desired. This setting allows the students a "grace-period" of time
to submit the assignment late. Moodle will timestamp it as such.
9. The groups of settings that follow can be changed if desired. You can click on the Help
icon for a brief description of what a particular setting does to help you determine
whether or not to change the default.
10. Submission types: By default, the assignment will allow students to upload one file. If
you wish to allow more than one file submission, or prefer to use the online text format
for your assignment, you can configure those settings here.
11. To finish, click either the Save and return to course or Save and display button.
3.6 Add a Forum
1. In your Moodle course, click the gear icon at the top right of your course page.
2. Click the Turn editing on option.
3. In the week /topic you wish to add it to, click on the + Add an activity or resource
menu.
4. Select Forum. You will be taken to a screen that allows you to create the
quiz activity & set its parameters.
5. Give the forum a name and an introduction.
6. Choose a Forum Type to use from the drop-down menu that appears under “Forum
name.”
o If you do not change the forum type, “Standard forum for general use” is the
default. (Most use this type).
o Click on the Help icon for a brief description of the other types of forums.
7. Click the Save and display button.

E-Learning Instructors’ Quick Guide Page 13
3.7 Add a Quiz
1. In your Moodle course, click the gear icon at the top right of your course page.
2. Click the Turn editing on option.
3. In the week /topic you wish to add it to, click on the + Add an activity or resource
menu.
4. Select Quiz.
5. You will be taken to a screen that allows you to create the quiz activity & set its
parameters.
6. When finished click the Save and display button at the bottom of the page.
o Notice that it says, “No questions have been added yet.” Click the Edit
Quiz button to add questions.
o If you plan to write your own questions for this quiz, it’s ok to click the “Add a new
question” on one of the empty pages.
o If using question banks (publisher provided or otherwise), you should set up a
category (like a pool) BEFORE attempting to add questions to your quiz.
3.8 Set up your Gradebook
1. From the Navigation drawer in your Moodle course, click on the Gradebook option.
2. From the dropdown menu at the top center, select Gradebook setup.
3. We recommend that you set up categories based on the grading scheme in your
course outline.
o Scroll to the bottom of the page & click on the Add category button.
o Give the category a name & click the Save changes button.
o Repeat this process for each category you wish to create.
4. Next, choose the Aggregation method for these categories by choosing from
the Edit menu next to the parent category for the course. (This is the
category at the very top, which is named after your course.)
o If you want to weight each of the categories you just added, choose Weighted
mean of grades.
▪ Boxes will appear next to each of the categories, you can enter the
weight for each here & then click the Save changes button at the bottom
of the page.
o If you prefer to use a points-based system, you can leave the default Natural
aggregation method at the parent level and for each category. This method
calculates weights using the total points of each item, which can be

E-Learning Instructors’ Quick Guide Page 14
overridden is desired.
NOTE: As you add quizzes or assignments, you have the option in the activity settings to put
it in one of the grade categories you created. If you want to add something to the grade book
that is done outside the system, then choose to Add grade item by clicking on the button at
the bottom of the Gradebook Setup page. Give it a descriptive name. This will add a column
in your grader report for it.
3.9 Making Content Available (visible or invisible) to Students
When editing is turned on, clicking the Edit link provides several options.
For example, making an item visible or invisible to students you find an option “Hide”
and “Show” within Edit link option.
Just as content is hidden, content can be made available again. Once the content is hidden,
follow the same process and the words SHOW will appear instead of Hide.
3.10 Making an Entire Week Invisible to Students
When editing is turned on, in the right-hand corner of that week, (above the X) is a
symbol of an ‘Eye’ Clicking on that ‘Eye’ will either make that week Invisible or visible
to students. A slash through the eye indicates the eye is closed – meaning that week is
invisible to students.
If there is no slash through the eye, just the eye – that indicates that week is visible to
students.