
IBM Campaign Version 9 Release 1 October 25,2013
96
IBM Campaign Version 9 Release 1 October 25, 2013 Installation Guide
Transcript of IBM Campaign Version 9 Release 1 October 25,2013

IBM CampaignVersion 9 Release 1October 25, 2013
Installation Guide
���

NoteBefore using this information and the product it supports, read the information in “Notices” on page 87.
This edition applies to version 9, release 1, modification 0 of IBM Campaign and to all subsequent releases andmodifications until otherwise indicated in new editions.
© Copyright IBM Corporation 1998, 2013.US Government Users Restricted Rights – Use, duplication or disclosure restricted by GSA ADP Schedule Contractwith IBM Corp.

Contents
Chapter 1. Installation overview . . . . 1Installation roadmap. . . . . . . . . . . . 1How the installers work . . . . . . . . . . 3Modes of installation . . . . . . . . . . . 4Integration of Campaign with eMessage . . . . . 4Integration of Campaign with IBM EMM products . 6IBM Campaign documentation roadmap . . . . . 6
Chapter 2. Planning the Campaigninstallation . . . . . . . . . . . . . 9Prerequisites . . . . . . . . . . . . . . 9Campaign installation worksheet . . . . . . . 10Installation order for IBM EMM products . . . . 13Planning failover configuration of Campaign . . . 14
Chapter 3. Preparing data sources forCampaign . . . . . . . . . . . . . 17Creating database or schema for Campaign systemtables . . . . . . . . . . . . . . . . 17Creating ODBC or native connections . . . . . 17Configuring the web application server for yourJDBC driver . . . . . . . . . . . . . . 18Creating JDBC connections in web applicationserver . . . . . . . . . . . . . . . . 19
Information for creating JDBC connections . . . 20
Chapter 4. Installing Campaign . . . . 23Installing Campaign by using the GUI mode . . . 23
Creating an EAR file after running the installer 28Installing Campaign by using the console mode . . 29Installing Campaign silently . . . . . . . . . 30
Sample response files . . . . . . . . . . 31
Chapter 5. Configuring Campaignbefore deployment . . . . . . . . . 33Creating and populating Campaign system tablesmanually . . . . . . . . . . . . . . . 33
Creating and populating the eMessage systemtables manually . . . . . . . . . . . . 34
Registering Campaign manually . . . . . . . 35Registering eMessage manually. . . . . . . 36
Setting data source variables in the Campaignstartup script (UNIX only) . . . . . . . . . 36
Database and library environment variables . . 37
Chapter 6. Deploying the Campaignweb application . . . . . . . . . . . 39Setting the web application session timeout . . . 39Deploying Campaign on WebSphere ApplicationServer . . . . . . . . . . . . . . . . 39
Deploying Campaign on WAS from a WAR file 39Deploying Campaign on WAS from an EAR file 40
Deploying Campaign on WebLogic . . . . . . 42
Configuring WebLogic to display reports (UNIX) 42Starting the Campaign server . . . . . . . . 43
Starting the Campaign server directly . . . . 43Installing the Campaign server as a Windowsservice . . . . . . . . . . . . . . . 43
Chapter 7. Configuring Campaign afterdeployment. . . . . . . . . . . . . 45Verifying that the Campaign listener is running . . 45Setting up the Campaign system user . . . . . 45Adding data source properties on the Configurationpage . . . . . . . . . . . . . . . . . 46
Importing data source templates . . . . . . 47Duplicating a data source template . . . . . 47
Campaign configuration properties . . . . . . 47Mapping user tables in Campaign . . . . . . . 48Verifying the Campaign installation . . . . . . 49Setting properties for integration with IBM EMMproducts . . . . . . . . . . . . . . . 49
Chapter 8. Configuring multiplepartitions for Campaign . . . . . . . 51How multiple partitions work . . . . . . . . 51Setting up multiple partitions . . . . . . . . 52
Partition superuser . . . . . . . . . . . 53Configuring data source properties for partitions 53Setting up system users for Campaign . . . . 55Using IBM Cognos Reports for multiplepartitions . . . . . . . . . . . . . . 55
Assigning roles, permissions, and groups forpartitions . . . . . . . . . . . . . . . 55
Chapter 9. Configuring multiplepartitions in eMessage . . . . . . . . 57Partitions for eMessage: Overview. . . . . . . 57Roadmap for configuring multiple partitions ineMessage . . . . . . . . . . . . . . . 58Creating a new partition for eMessage . . . . . 58Preparing eMessage system tables for the partition 60
Creating and populating the eMessage systemtables manually . . . . . . . . . . . . 61
Configuring a system user to access IBM EMMHosted Services . . . . . . . . . . . . . 62Enabling eMessage in Campaign for the newpartition . . . . . . . . . . . . . . . 63Specifying the Recipient List Uploader location foreMessage . . . . . . . . . . . . . . . 63Restarting system components after configuringeMessage . . . . . . . . . . . . . . . 64Testing eMessage partition configuration andconnections . . . . . . . . . . . . . . 64
Chapter 10. Marketing Platform utilities 65alertConfigTool . . . . . . . . . . . . . 66
© Copyright IBM Corp. 1998, 2013 iii

configTool . . . . . . . . . . . . . . . 67datafilteringScriptTool . . . . . . . . . . . 71encryptPasswords . . . . . . . . . . . . 72partitionTool . . . . . . . . . . . . . . 73populateDb . . . . . . . . . . . . . . 75restoreAccess . . . . . . . . . . . . . . 76scheduler_console_client . . . . . . . . . . 78eMessage Response and Contact Tracker (RCT)script . . . . . . . . . . . . . . . . 79eMessage MKService_rct script . . . . . . . . 80
Chapter 11. Uninstalling Campaign . . 83
Before you contact IBM technicalsupport . . . . . . . . . . . . . . 85
Notices . . . . . . . . . . . . . . 87Trademarks . . . . . . . . . . . . . . 89Privacy Policy and Terms of Use Considerations . . 89
iv IBM Campaign: Installation Guide

Chapter 1. Installation overview
An installation of Campaign is complete when you install, configure, and deployCampaign. The Campaign Installation Guide provides detailed information aboutinstalling, configuring, and deploying Campaign.
Use the Installation Roadmap section to obtain a broad understanding about usingthe Campaign Installation Guide.
Installation roadmapUse the installation roadmap to quickly find the information that you need forinstalling Campaign.
You can use Table 1 to scan the tasks that must be completed for installingCampaign. The Information column in the following table provides links to thetopics that describe the tasks for installing Campaign:
Table 1. Campaign installation roadmap
Chapter Information
Chapter 1, “Installation overview” This topic provides the followinginformation:
v “How the installers work” on page 3
v “Modes of installation” on page 4
v “Integration of Campaign with eMessage”on page 4
v “Integration of Campaign with IBM EMMproducts” on page 6
v “IBM Campaign documentation roadmap”on page 6
Chapter 2, “Planning the Campaigninstallation,” on page 9
This topic provides the followinginformation:
v “Prerequisites” on page 9
v “Campaign installation worksheet” onpage 10
v “Installation order for IBM EMMproducts” on page 13
v “Planning failover configuration ofCampaign” on page 14
Chapter 3, “Preparing data sources forCampaign,” on page 17
This topic provides the followinginformation:
v “Creating database or schema forCampaign system tables” on page 17
v “Creating ODBC or native connections”on page 17
v “Configuring the web application serverfor your JDBC driver” on page 18
v “Creating JDBC connections in webapplication server” on page 19
© Copyright IBM Corp. 1998, 2013 1

Table 1. Campaign installation roadmap (continued)
Chapter Information
Chapter 4, “Installing Campaign,” on page23
This topic provides the followinginformation:
v “Installing Campaign by using the GUImode” on page 23
v “Installing Campaign by using the consolemode” on page 29
v “Installing Campaign silently” on page 30
Chapter 5, “Configuring Campaign beforedeployment,” on page 33
This topic provides the followinginformation:
v “Creating and populating Campaignsystem tables manually” on page 33
v “Registering Campaign manually” onpage 35
v “Setting data source variables in theCampaign startup script (UNIX only)” onpage 36
Chapter 6, “Deploying the Campaign webapplication,” on page 39
This topic provides the followinginformation:
v “Setting the web application sessiontimeout” on page 39
v “Deploying Campaign on WebSphereApplication Server” on page 39
v “Deploying Campaign on WebLogic” onpage 42
v “Starting the Campaign server” on page43
Chapter 7, “Configuring Campaign afterdeployment,” on page 45
This topic provides the followinginformation:
v “Verifying that the Campaign listener isrunning” on page 45
v “Setting up the Campaign system user”on page 45
v “Adding data source properties on theConfiguration page” on page 46
v “Campaign configuration properties” onpage 47
v “Mapping user tables in Campaign” onpage 48
v “Verifying the Campaign installation” onpage 49
v “Setting properties for integration withIBM EMM products” on page 49
Chapter 8, “Configuring multiple partitionsfor Campaign,” on page 51
This topic provides the followinginformation:
v “How multiple partitions work” on page51
v “Setting up multiple partitions” on page52
v “Assigning roles, permissions, and groupsfor partitions” on page 55
2 IBM Campaign: Installation Guide

Table 1. Campaign installation roadmap (continued)
Chapter Information
Chapter 9, “Configuring multiple partitionsin eMessage,” on page 57.
This topic provides the followinginformation:
v “Partitions for eMessage: Overview” onpage 57
v “Roadmap for configuring multiplepartitions in eMessage” on page 58
v “Creating a new partition for eMessage”on page 58
v “Preparing eMessage system tables for thepartition” on page 60
v “Configuring a system user to access IBMEMM Hosted Services” on page 62
v “Enabling eMessage in Campaign for thenew partition” on page 63
v “Specifying the Recipient List Uploaderlocation for eMessage” on page 63
v “Restarting system components afterconfiguring eMessage” on page 64
v “Testing eMessage partition configurationand connections” on page 64
“configTool” on page 67 This topic provides the followinginformation:
v Chapter 10, “Marketing Platform utilities,”on page 65
v “eMessage Response and Contact Tracker(RCT) script” on page 79
v “eMessage MKService_rct script” on page80
Chapter 11, “Uninstalling Campaign,” onpage 83
This topic provides information about howto uninstall Campaign.
How the installers workYou must use the suite installer and the product installer when you install anyIBM® EMM product. For example, for installing Campaign, you must use the IBMEMM suite installer and the IBM Campaign installer.
Make sure that you use the following guidelines before you use the IBM EMMsuite installer and the product installer:v The suite installer and the product installer must be in the same directory on the
computer where you want to install the product. When multiple versions of aproduct installer are present in the directory with the master installer, the masterinstaller always shows the latest version of the product on the IBM EMMProducts screen in the installation wizard.
v If you are planning to install a patch immediately after you install an IBM EMMproduct, make sure that the patch installer is in the same directory as that of thesuite and product installers.
v The default top-level directory for IBM EMM installations is /IBM/EMM for UNIXor C:\IBM\EMM for Windows. However, you can change the directory duringinstallation.
Chapter 1. Installation overview 3

Modes of installationThe IBM EMM suite installer can run in one of the following modes: GUI mode,console mode, or silent mode (also called the unattended mode). Select a modethat suits your requirements when you install Campaign.
GUI mode
Use the GUI mode for Windows or the X Window System mode for UNIX toinstall Campaign by using the graphical user interface.
Console mode
Use the console mode to install Campaign by using the command-line window.
Note: To display the Installer screens correctly in console mode, configure yourterminal software to support UTF-8 character encoding. Other character encoding,such as ANSI, will not render the text correctly, and some information will not bereadable.
Silent mode
Use the silent or unattended mode to install Campaign multiple times. The silentmode uses response files for installation, and does not require user input duringthe installation process.
Integration of Campaign with eMessageWhen IBM Campaign is integrated with IBM eMessage, you can use eMessage toconduct highly personalized email marketing campaigns. eMessage provides accessto the resources that are hosted by IBM. With eMessage you can design, send, andindividually monitor customized messages that are based on the information thatis stored in your customer data mart.
In Campaign, use flowcharts to create lists of email recipients and selectpersonalization data for each recipient.
In eMessage, use email design, transmission, and delivery resources that are hostedby IBM to conduct email marketing campaigns.
When you install IBM Campaign, the installer automatically includes the files thatare required to support IBM eMessage. The following actions are completed foreMessage:v eMessage is created as a sub-directory in the Campaign directory structure.v eMessage configuration properties are listed in the IBM Marketing Platform, but
the properties are not active.v eMessage-specific database tables are created in the Campaign schema. However,
the database tables contain only initial data.v Menus and other features that are specific to eMessage do not appear until you
enable and configure eMessage.
Before you can send personalized marketing email, you must request a hostedemail account from IBM.
4 IBM Campaign: Installation Guide
When you request an email account, IBM begins a consultation process tofamiliarize you with eMessage, connect you to hosted email resources, andestablish your reputation as a legitimate email marketer among leading InternetService Providers (ISPs). Establishing a favorable reputation is critical tosuccessfully delivering your marketing message to your customers and prospects.
For more information about how to enable and configure eMessage and prepareyour hosted email account, see the IBM eMessage Startup and Administrator's Guide.
eMessage components
eMessage requires specialized components called the Recipient List Uploader(RLU) and the Response and Contact Tracker (RCT).
The RLU is a eMessage plugin component that operates with Campaign to uploadaddresses, personalization data, and metadata that is associated with a list of emailrecipients to IBM EMM Hosted Services.
The eMessage RCT retrieves link tracking and email delivery notification data fromIBM EMM Hosted Services, and stores the data in the eMessage system tables thatreside in the Campaign schema.
The eMessage components operate when you enable and configure IBM eMessage.For more information about enabling eMessage and working with the RLU andRCT, see the IBM eMessage Startup and Administrator's Guide.
Default component installation locations
The IBM installer places the RLU on the computer where you installed theCampaign J2EE application. The RLU location is recorded in the Campaign >partitions > partition1 > eMessage > eMessagePluginJarFile configurationproperty.
The installer places the RCT on the computer where you installed the Campaignserver.
If the J2EE and server components are on separate computers, run the installer oneach machine to install the RLU with the J2EE application and the RCT with theCampaign server.
eMessage components in multiple partitions
One RLU exists for the entire eMessage installation. The installer populates theeMessagePluginJarFile configuration property only for the default partition. If youare using multiple partitions in your eMessage installation, you must manuallyconfigure the location of the RLU for all other partitions. The location specified inthe eMessagePluginJarFile property is the same for all partitions. For moreinformation, see “Specifying the Recipient List Uploader location for eMessage” onpage 63.
Only one RCT exists for the entire eMessage installation. eMessage does not needto specify the location of the RCT in a configuration property. Responses that arereceived by the RCT automatically specify the appropriate local partition forcorrect response attribution.
Chapter 1. Installation overview 5

Integration of Campaign with IBM EMM productsYou can integrate Campaign with multiple IBM EMM products to customize yourcampaigns.
Campaign integrates with the following IBM EMM products:v IBM Marketing Operationsv IBM Digital Analyticsv IBM SPSS® Modeler Marketing Edition
See the documentation for each product for more information. Also, see the IBMCampaign Installation Guide for more information about the integration of Campaignwith other IBM EMM products.
Important: Integration of Campaign and PredictiveInsight is no longer supported.PredictiveInsight is replaced by IBM SPSS Modeler Advantage Marketing Edition.If your Campaign installation uses PredictiveInsight, installing Campaign version9.1 prevents further use of the Model and Score processes in your existingflowcharts. You must install IBM SPSS Modeler Advantage Marketing Edition andredefine the processes that you need if you want to continue predictive modelingin Campaign. See IBM Campaign and IBM SPSS Modeler Advantage Marketing EditionIntegration Guide for more information.
IBM Campaign documentation roadmapIBM Campaign provides documentation and help for users, administrators, anddevelopers.
Table 2. Get up and running
Task Documentation
View a list of new features, known issues, andlimitations
IBM Campaign Release Notes
Learn about the structure of the Campaign database IBM Campaign System Tables and Data Dictionary
Install or upgrade Campaign and deploy the Campaignweb application
One of the following guides:
v IBM Campaign Installation Guide
v IBM Campaign Upgrade Guide
Implement eMessage, if you purchased eMessage v The IBM Campaign Installation and Upgrade guidesexplain how to install and prepare eMessagecomponents in the local environment.
v The IBM eMessage Startup and Administrator's Guideexplains how to connect to the hosted messagingresources.
Implement the IBM Cognos® reports provided withCampaign
IBM EMM Reports Installation and Configuration Guide
Table 3. Configure and use Campaign
Task Documentation
v Adjust configuration and security settings
v Prepare Campaign for users
v Run utilities and perform maintenance
v Integrate Campaign with Digital Analytics
IBM Campaign Administrator's Guide
6 IBM Campaign: Installation Guide

Table 3. Configure and use Campaign (continued)
Task Documentation
v Create and deploy marketing campaigns
v Analyze campaign results
IBM Campaign User's Guide
Improve flowchart performanceIBM Campaign Tuning Guide
Use Campaign macros IBM Macros for IBM EMM User's Guide
Table 4. Integrate Campaign with other products
Task Documentation
Configure eMessage offer integration. IBM Campaign Administrator's Guide
Integrate and use Campaign with Digital Analytics IBM Campaign Administrator's Guide
Integrate and use Campaign with IBM SPSS ModelerAdvantage Marketing Edition
IBM Campaign and IBM SPSS Modeler Advantage MarketingEdition Integration Guide
Integrate and use Campaign with Marketing Operations IBM Marketing Operations and IBM Campaign IntegrationGuide
Table 5. Develop for Campaign
Task Documentation
Develop custom procedures with the API v IBM Campaign Offer API Specification
v JavaDocs in devkits\CampaignServicesAPI
Develop Java™ plug-ins or command-line executables toadd validation to Campaign
v IBM Campaign Validation PDK Guide
v JavaDocs in devkits\validation
Table 6. Get help
Task Instructions
Open online help 1. Choose Help > Help for this page to open acontext-sensitive help topic.
2. Click the Show Navigation icon in the help windowto display the full help.
Obtain PDFs Use either of the following methods:
v Choose Help > Product Documentation to accessCampaign PDFs.
v Choose Help > All IBM EMM Suite Documentationto access all available documentation.
v Access all documentation during the installationprocess from the IBM EMM installer.
Get support Go to http://www.ibm.com/ and click Support &downloads to access the IBM Support Portal.
Chapter 1. Installation overview 7

8 IBM Campaign: Installation Guide

Chapter 2. Planning the Campaign installation
When you plan your Campaign installation, you must ensure that you have set upyour system correctly, and that you have configured your environment to dealwith any failures.
PrerequisitesBefore you install or upgrade any IBM EMM product, you must ensure that yourcomputer complies with all the prerequisite software and hardware.
System requirements
For information about system requirements, see the Recommended SoftwareEnvironments and Minimum System Requirements guide.
Network domain requirements
The IBM EMM products that are installed as a suite must be installed on the samenetwork domain to comply with the browser restrictions that are designed to limitthe security risks that can occur with cross-site scripting.
JVM requirements
IBM EMM applications within a suite must be deployed on a dedicated Java™
virtual machine (JVM). IBM EMM products customize the JVM that is used by theweb application server. If you encounter errors that are related to the JVM, youmust create an Oracle WebLogic or WebSphere® domain that is dedicated to theIBM EMM products.
Knowledge requirements
To install IBM EMM products, you must have a thorough knowledge of theenvironment in which the products are installed. This knowledge includesknowledge about operating systems, databases, and web application servers.
Access permissions
Verify that you have the following network permissions to complete theinstallation tasks:v Administration access for all necessary databases.v Read and write access to the relevant directory and subdirectories for the
operating system account that you use to run the web application server andIBM EMM components
v Write permission for all files that you must editv Write permission for all directories where you must save a file, such as the
installation directory and backup directory if you are upgradingv Appropriate read/write/execute permissions to run the installer
Verify that you have the administrative password for your web application server.
© Copyright IBM Corp. 1998, 2013 9

The following additional permissions are necessary for UNIX:v The user account that installs Campaign and Marketing Platform must be a
member of the same group as the Campaign users. This user account must havea valid home directory, and have write permissions for that directory.
v All installer files for IBM products must have full permissions, for example,rwxr-xr-x.
JAVA_HOME environment variable
If a JAVA_HOME environment variable is defined on the computer where you installan IBM EMM product, verify that the variable points to a supported version ofJRE. For information about system requirements, see the Recommended SoftwareEnvironments and Minimum System Requirements guide.
Make sure that the JAVA_HOME environment variable points to JRE 1.6. If theJAVA_HOME environment variable points to an incorrect JRE, you must clear theJAVA_HOME variable before you run the IBM EMM installers.
You can clear the JAVA_HOME environment variable by using one of the followingmethods:v Windows: In a command window, enter set JAVA_HOME= (leave empty) and
press Enter.v UNIX: In the terminal, enter export JAVA_HOME= (leave empty) and press Enter.
export JAVA_HOME= (leave empty)
After the environment variable is cleared, the IBM EMM installers use the JRE thatis bundled with the installers. You can reset the environment variable after theinstallation is complete.
Marketing Platform requirement
You must install Marketing Platform before you install any IBM EMM products.For each group of products that work together, you must install MarketingPlatform only once. Each product installer checks whether the required productsare installed. If your product or version is not registered with Marketing Platform,a message prompts you to install or upgrade Marketing Platform before youproceed with your installation. Marketing Platform must be deployed and runningbefore you can set any properties on the Settings > Configuration page.
Campaign installation worksheetUse the Campaign installation worksheet to gather information about theCampaign database and about other IBM EMM products that are required for theinstallation of Campaign.
Use the following table to gather information about the database that contains yourCampaign system tables:
Table 7. Information about the database
Field Notes®
Database type
Database name
Database account user name
10 IBM Campaign: Installation Guide

Table 7. Information about the database (continued)
Field Notes®
Database account password
JNDI name UnicaPlatformDS
ODBC name
If you are installing on UNIX, obtain the information that is given in the followingtable:
Table 8. Information about the database for UNIX
Database information Notes
If your database type is one of the followingtypes, record the database installationdirectory:
v DB2®
v Oracle
For all database types when Campaign isinstalled on the Solaris, Linux, or AIX®
operating systems, record the location of thelib directory in the database installation.
You can use the information in Table 8 when you edit the setenv.sh file during theinstallation and configuration process.
Checklist for IBM Marketing Platform database
The installation wizards for each IBM EMM product must be able to communicatewith the Marketing Platform system table database to register the product. Eachtime that you run the installer, you must enter the following database connectioninformation for the Marketing Platform system table database:v JDBC connection URLv Database host namev Database portv Database name or schema IDv User name and password for the database account
Checklist for IBM Marketing Platform deployment on the webapplication server
Obtain the following information before deploying Marketing Platform:v Protocol: HTTP, or HTTPS if SSL is implemented in the web application server.v Host: The name of the machine on which the Marketing Platform will be
deployed.v Port: The port on which the web application server listens.v Domain name: The company domain of each machine where IBM products are
installed. For example, example.com. All IBM products must be installed in thesame company domain, and you must enter the domain name in all lower caseletters.If there is a mismatch in domain name entries, you might encounter problemswhen you attempt to use Marketing Platform features or navigate amongproducts. You can change the domain name after the products are deployed by
Chapter 2. Planning the Campaign installation 11

logging in and changing values of the relevant configuration properties in theproduct navigation categories on the Settings > Configuration page.
Checklist for enabling Marketing Platform utilities
If you plan to use the Marketing Platform utilities, obtain the following JDBCconnection information before you start to install the Marketing Platform.v Path to the JRE. The default value is the path to the 1.7 version of the JRE that
the installer places under your IBM installation directory.You can accept this default or specify a different path. If you specify a differentpath, you must point to the 1.7 version of the Sun JRE.
v JDBC driver class. The installer automatically provides this, based on thedatabase type that you specify in the installer.
v JDBC connection URL. The installer provides the basic syntax, including the hostname, database name, and port. You can customize the URL by addingadditional parameters.
v JDBC driver classpath on your system.
Information about the web component
Obtain the following information for all IBM EMM products that have a webcomponent, which you deploy on a web application server:v The name of the systems on which the web application servers are installed. You
can have one or several web application servers, depending on the IBM EMMenvironment that you are setting up.
v The port on which the application server listens. If you plan to implement SSL,obtain the SSL port.
v The network domain for your deployment system. For example,mycompany.com.
IBM Site ID
If you are installing an IBM EMM product in one of the countries listed on theCountry for Install screen of your product installer, you must enter your IBM SiteID in the space provided. Your IBM Site ID can be found on one of the followingdocuments:v IBM Welcome letterv Tech Support Welcome letterv Proof of Entitlement letterv Other communications that are sent when you purchase your software
IBM might use the data that is provided by the installed software to betterunderstand how customers use our products and to improve customer support.The data that is gathered does not include any information that identifiesindividuals. Complete the following actions if you do not want to have suchinformation to be collected:1. After Marketing Platform is installed, log on to Marketing Platform as a user
with administration privileges.2. Go to Settings > Configuration, and set the Disable Page Tagging property
under the Platform category to True.
12 IBM Campaign: Installation Guide
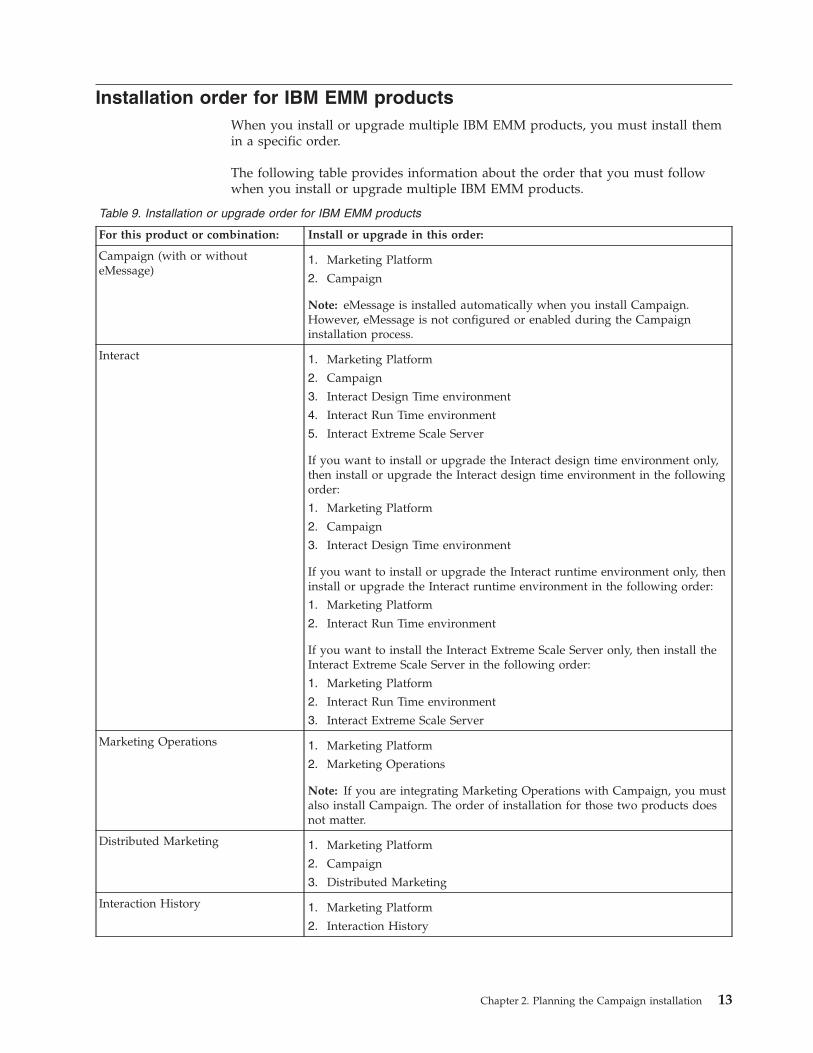
Installation order for IBM EMM productsWhen you install or upgrade multiple IBM EMM products, you must install themin a specific order.
The following table provides information about the order that you must followwhen you install or upgrade multiple IBM EMM products.
Table 9. Installation or upgrade order for IBM EMM products
For this product or combination: Install or upgrade in this order:
Campaign (with or withouteMessage)
1. Marketing Platform
2. Campaign
Note: eMessage is installed automatically when you install Campaign.However, eMessage is not configured or enabled during the Campaigninstallation process.
Interact 1. Marketing Platform
2. Campaign
3. Interact Design Time environment
4. Interact Run Time environment
5. Interact Extreme Scale Server
If you want to install or upgrade the Interact design time environment only,then install or upgrade the Interact design time environment in the followingorder:
1. Marketing Platform
2. Campaign
3. Interact Design Time environment
If you want to install or upgrade the Interact runtime environment only, theninstall or upgrade the Interact runtime environment in the following order:
1. Marketing Platform
2. Interact Run Time environment
If you want to install the Interact Extreme Scale Server only, then install theInteract Extreme Scale Server in the following order:
1. Marketing Platform
2. Interact Run Time environment
3. Interact Extreme Scale Server
Marketing Operations 1. Marketing Platform
2. Marketing Operations
Note: If you are integrating Marketing Operations with Campaign, you mustalso install Campaign. The order of installation for those two products doesnot matter.
Distributed Marketing 1. Marketing Platform
2. Campaign
3. Distributed Marketing
Interaction History 1. Marketing Platform
2. Interaction History
Chapter 2. Planning the Campaign installation 13

Table 9. Installation or upgrade order for IBM EMM products (continued)
For this product or combination: Install or upgrade in this order:
Attribution Modeler 1. Marketing Platform
2. Interaction History
3. Attribution Modeler
Contact Optimization 1. Marketing Platform
2. Campaign
3. Contact Optimization
Opportunity Detection 1. Marketing Platform
2. Opportunity Detection
If Opportunity Detection is integrated with Interact, install the products inthe following order:
1. Marketing Platform
2. Campaign
3. Interact
4. Opportunity Detection
IBM SPSS Modeler AdvantageMarketing Edition
1. IBM SPSS Modeler Advantage Marketing Edition
Planning failover configuration of CampaignWhen you install Campaign, you can configure your environment to address anyfailures of the web application server.
Definition of terms
Component Installation option Definition
Campaign web applicationserver
J2EE Application The web application thatprovides the Campaign userinterface.
Campaign back-end server Campaign Server The startup scripts andcomponents that support thedesign and execution offlowcharts.
Campaign web application server component
The Campaign web application server components do not support a load balancedweb application environment. However, environments can be configured withstandby servers to address web application server failures. The process forswitching to a standby web application server for Campaign is described below.
In Campaign, certain objects, such as offers, are cached in the web applicationserver to improve response times in the user interface. In a load balancedenvironment, offers created on one web application server might not beimmediately available to users whose sessions connect through another server. Toavoid this problem, Campaign does not support a load balanced configuration.
The objects that are cached include: offers, offer templates and attributes,campaigns, sessions, folders, attributes, initiatives, and segments. You can
14 IBM Campaign: Installation Guide

configure how often the cache is refreshed by adjusting the Campaign cacheconfiguration settings, such as offerTemplateDataTTLSeconds. However, thisadjustment can affect performance. Configuration settings are described in the IBMCampaign Administrator's Guide.
A configuration with a standby server can be used to minimize disruptions inapplication availability in the event of a web application server failure. Because theCampaign system tables are stored in an external database, it is not necessary toreplicate data to the standby server. If the primary web application server fails, theCampaign web application must be started on the standby server. When started,the Campaign web application will retrieve all current data from the Campaignsystem table database.
Campaign back-end server component
The recommended configuration consists of two separate Campaign servers, one"hot," and one "cold." A "hot" server is the one being used, while the "cold" serveris the server on standby. Allowing multiple web application servers to access asingle back-end server is not recommended because it can affect performance. Ifyou assume that there is a one to one relationship between web application serversand back-end servers (for performance reasons), then putting the servers onseparate machines introduces more points of failure. The benefit of having onededicated server for the web application and one for the back-end server is thatboth can be tuned appropriately. If the web application server is also used to serveother web applications, consider using a separate back-end server to avoid aperformance impact on the web application server by the back-end server. Thisdetermination needs to be made on a case by case basis and is often part of theimplementation planning.
The following diagram illustrates the recommended configuration:
Chapter 2. Planning the Campaign installation 15

There are several non-IBM Campaign dependencies inherent in this configuration:v The file system and databases must be shared and highly available. There are
several approaches to achieve this requirement, such as file system appliances,RAID, or database vendor solutions. However, the high availability of thosetechnologies is outside the scope of the IBM Campaign application.
v The shared file system must be mounted onto servers A and B becauseCampaign requires the root node to be within the specific partition directorystructure that it expects.
v To support failover, additional software, either custom or commercial, must dothe following things:1. Verify that the Campaign back-end server is up and running.2. Stop the primary back-end server in the event of a failure (if applicable).3. Start the secondary back-end server in the event of a failure.4. Redirect Web Tier requests from the primary back-end server to the
secondary back-end server.
16 IBM Campaign: Installation Guide

Chapter 3. Preparing data sources for Campaign
Campaign uses data sources to store user and interaction data.
Complete the following steps to prepare data sources for Campaign:1. Create a database or a database schema for the Campaign system tables.
Note: Campaign requires customer tables, which should already exist.2. Create a system user account. The system user account must have the following
rights: CREATE, DELETE, DROP, INSERT, SELECT, and UPDATE.3. Create ODBC or native connections.4. Configure the web application server for your JDBC driver.5. Create JDBC data sources in the web application server.
Creating database or schema for Campaign system tablesSet up data sources so that Campaign can store user and interaction data. If youhave multiple partitions, create data sources for each partition where you want toenable Campaign.
Complete the following steps to create a database or database schema forCampaign system tables:
Note: Campaign requires customer tables, which should already exist.1. Create a system user account for later in the installation process.
Note: The system user account must have the following rights: CREATE,DELETE, DROP, INSERT, SELECT, and UPDATE.
2. Print the “Campaign installation worksheet” on page 10. Obtain theinformation about your database or schema and database account, and thennote this information in the checklist. Continue to fill in the checklist as youperform the rest of the steps in this section, so that you can use thisinformation later in the installation process.
Note: The IBM eMessage system tables are created in the Campaign schemaduring the installation. However, eMessage is not enabled.
Creating ODBC or native connectionsCreate ODBC or native connections so that the Campaign server can access theCampaign database. Create ODBC or native connections on the computer whereyou installed the Campaign server.
The computer on which the Campaign server is installed must have an ODBC ornative connection to the following databases:v The database or schema that contains the Campaign system tablesv The database or schema that contains the customer tables.
Use the following guidelines to create these ODBC or native connections:
© Copyright IBM Corp. 1998, 2013 17

v For databases on UNIX: You create native connections for DB2 and Oracledatabases or ODBC connections for other databases, such as SQL Server,Teradata, Netezza®, and so on. The procedure for creating a native data sourcediffers depending on the data source type and the version of UNIX. See the datasource and operating system documentation for specific ODBC driverinstallation and configuration instructions.
v For databases on Windows: You create a new ODBC connection in the ControlPanel's Administrative Tools > Data Sources (ODBC) section.
Record the ODBC name in the “Campaign installation worksheet” on page 10.
Configuring the web application server for your JDBC driverThe web application server where you plan to deploy Campaign must contain thecorrect JAR file to support JDBC connections. You must add the location of the JARfile to the class path of the web application server.
Complete the following actions for each database type that Campaign will connectto, so the Campaign Java™ component can access the Campaign system tables.1. Consult the Recommended Software Environments and Minimum System
Requirements document to determine the correct JAR file for your database type.The following database drivers are supported:v For supported versions of MS SQL Server: sqljdbc4.jarv For IBM DB2 9.7: db2jcc.jarv For IBM DB2 10.1: db2jcc4.jarv For supported versions of Oracle: ojdbc6.jar
2. Obtain the latest vendor-provided Type 4 JDBC driver that is supported by IBMEMM.v If the driver does not exist on the machine where you plan to deploy
Campaign, copy the driver to any location on that machine. Unpack thedriver in a path that does not include spaces.
v If you obtain the driver from a machine where the data source client isinstalled, verify that the version is supported.
3. Include the full path and file name of the driver in the classpath of the webapplication server where you plan to deploy Campaign.v For all supported versions of WebLogic, set the classpath in the setDomainEnv
script in the WebLogic_domain_directory/bin directory where environmentvariables are configured.The driver must be the first entry in the CLASSPATH list of values beforeany existing values. For example:UNIXCLASSPATH="/home/oracle/product/<version>/jdbc/lib/ojdbc6.jar:${PRE_CLASSPATH}${CLASSPATHSEP}${WEBLOGIC_CLASSPATH}${CLASSPATHSEP}${POST_CLASSPATH}${CLASSPATHSEP}${WLP_POST_CLASSPATH}"export CLASSPATH
Windowsset CLASSPATH=c:\oracle\jdbc\lib\ojdbc6.jar;%PRE_CLASSPATH%;%WEBLOGIC_CLASSPATH%;%POST_CLASSPATH%;%WLP_POST_CLASSPATH%
v For all supported versions of WebSphere, set the classpath in theAdministration console when you set up the JDBC providers for the IBMEMM products.
4. Restart the web application server so your changes take effect.
18 IBM Campaign: Installation Guide

During startup, monitor the console log to confirm that the classpath containsthe path to the database driver.
Creating JDBC connections in web application serverCreate JDBC connections on each of the web application servers where Campaignis deployed. Campaign uses the JDBC connections to access the required databases.
Complete the following steps to specify the JDBC provider:1. Log into the Websphere console2. Go to Resources > JDBC > JDBC Providers.3. Click New to open the Create new JDBC provider window.4. In the Database type field, select one of the following database types:
v DB2v Oraclev SQL Server
5. In the Provider type field, select a type 4 JDBC driver that is appropriate foryour database type.
6. In the Implementation type field, select Connection pool data source.7. Click Next and enter the required information.8. Click Next to view the summary.9. Click Finish to configure the JDBC provider.
Use the following list to determine which JDBC connections you must create forthe Campaign web application. The list includes the suggested and required JNDInames.v A connection to the database holding the Campaign system tables.
If there is one partition, the suggested JNDI name is campaignPartition1DS.If there are multiple partitions,, a best practice is to use campaignPartition1DSfor the first connection, campaignPartition2DS for the second, and so on.
Note: This practice is provided as an example. You can specify any JNDI namesfor Campaign system table connections.
v A connection to the database holding the Marketing Platform system tables. UseUnicaPlatformDS as the JNDI name.
Important: UnicaPlatformDS is the required JNDI name.If you are deploying Campaign in the same JVM as your Marketing Platformdeployment, you have probably already set up this connection.For more information about creating JDBC connections in your web applicationserver, see the WebLogic or WebSphere documentation.
Note: If you are using WebLogic to configure a data source to an Oracle or DB2database, you must also specify the database user name in the formuser=<DBUser> in the Properties section on the Connection Pool tab. For moreinformation, see your WebLogic documentation.
Record all JNDI names in the“Campaign installation worksheet” on page 10
Chapter 3. Preparing data sources for Campaign 19

Information for creating JDBC connectionsUse default values when you create JDBC connections if specific values are notprovided. For more information, see the application server documentation.
Note: If you are not using the default port setting for your database, make surethat you change it to the correct value.
WebLogic
Use the following values if your application server is WebLogic:
SQLServerv Database Driver: Microsoft MS SQL Server Driver (Type 4) Versions: 2008,
2008R2v Default port: 1433v Driver class: com.microsoft.sqlserver.jdbc.SQLServerDriverv Driver URL: jdbc:sqlserver://
<your_db_host>:<your_db_port>;databaseName=<your_db_name>
v Properties: Add user=<your_db_user_name>
Oracle 11 and 11 gv Driver: Otherv Default port: 1521v Driver class: oracle.jdbc.OracleDriverv Driver URL:
jdbc:oracle:thin:@<your_db_host>:<your_db_port>:<your_db_service_name>
Enter the driver URL by using the format that is shown. IBM EMM applicationsdo not allow the use of Oracle's RAC (Real Application Cluster) format for JDBCconnections.
v Properties: Add user=<your_db_user_name>
DB2v Driver: Otherv Default port: 50000v Driver class: com.ibm.db2.jcc.DB2Driverv Driver URL: jdbc:db2://<your_db_host>:<your_db_port>/<your_db_name>v Properties: Add user=<your_db_user_name>
WebSphere
Use the following values if your application server is WebSphere:
SQLServerv Driver: N/Av Default port: 1433v Driver class:
com.microsoft.sqlserver.jdbc.SQLServerConnectionPoolDataSource
v Driver URL: N/A
In the Database Type field, select User-defined.
20 IBM Campaign: Installation Guide

After you create the JDBC Provider and data source, go to the Custom Propertiesfor the data source, and add, modify properties as follows.v serverName=<your_SQL_server_name>
v portNumber =<SQL_Server_Port_Number>
v databaseName=<your_database_name>
Add the following custom property:
Name: webSphereDefaultIsolationLevel
Value: 1
Datatype: Integer
Oracle 11 and 11 gv Driver: Oracle JDBC Driverv Default port: 1521v Driver class: oracle.jdbc.OracleDriverv Driver URL:
jdbc:oracle:thin:@<your_db_host>:<your_db_port>:<your_db_service_name>
Enter the driver URL by using the format that is shown. IBM EMM applicationsdo not allow the use of Oracle's RAC (Real Application Cluster) format for JDBCconnections.
DB2v Driver: DB2 Universal JDBC Driver Providerv Default port: 50000v Driver class: com.ibm.db2.jcc.DB2Driverv Driver URL: jdbc:db2://<your_db_host>:<your_db_port>/<your_db_name>
Add the following custom property:
Name: webSphereDefaultIsolationLevel
Value: 2
Datatype: Integer
Chapter 3. Preparing data sources for Campaign 21

22 IBM Campaign: Installation Guide

Chapter 4. Installing Campaign
You must run the IBM EMM installer to start the installation of Campaign. TheIBM EMM installer starts the Campaign installer during the installation process.Make sure that the IBM EMM installer and the product installer are saved at thesame location.
Each time that you run the IBM EMM Suite installer, you must first enter databaseconnection information for the Marketing Platform system tables. When theCampaign installer starts, you must enter the required information for Campaign.
After installing Campaign, you can create an EAR file for your product, and youcan install the reports package for your product. Creating the EAR file andinstalling the reports package are not mandatory actions.
Important: Before you install Campaign, make sure that the available temporaryspace on the computer where you install Campaign is more than three times thesize of the Campaign installer.
Installation files
The installation files are named according to the version of the product and theoperating system on which they must be installed, except UNIX. For UNIX,different installation files exist for the X Window System mode and the consolemode.
The following table displays examples of the installation files that are namedaccording to the product version and the operating system:
Table 10. Installation files
Operating system Installation file
Windows: GUI and console mode Product_N.N.N.N_win64.exe, where Productis the name of your product, N.N.N.N is theversion number of your product, andWindows 64-bit is the operating system onwhich the file must be installed.
UNIX: X Window System mode Product_N.N.N.N_solaris64.bin, whereProduct is the name of your product, andN.N.N.N is the version number of yourproduct.
UNIX: Console mode Product_N.N.N.N.bin, where Product is thename of your product, and N.N.N.N is theversion number of your product. This filecan be used for installation on all UNIXoperating systems.
Installing Campaign by using the GUI modeFor Windows, use the GUI mode to install Campaign. For UNIX, use the XWindow System mode to install Campaign.
© Copyright IBM Corp. 1998, 2013 23

Important: Before you use the GUI mode to install Campaign, make sure that theavailable temporary space on the computer where you install Campaign is morethan three times the size of the Campaign installer.
Make sure that the IBM EMM installer and the Campaign installers are in the samedirectory on the computer where you want to install Campaign.
Complete the following actions to install Campaign by using the GUI mode:1. Go to the folder where you have saved the IBM EMM installer and double-click
the installer to start it.2. Click OK on the first screen to see the Introduction window.3. Follow the instructions on the installer, and click Next. Use the information in
the following table to take the appropriate actions on each window in the EMMinstaller.
Table 11. IBM EMM installer GUI
Window Description
Introduction This is the first window of the IBM EMMsuite installer. You can open the Campaigninstallation and upgrade guides from thiswindow. You can also see a link for theinstallation and upgrade guides for theproducts whose installers are saved in theinstallation directory.
Click Next to go to the next window.
Response Files Destination Click the Generate Response File check boxif you want to generate response files foryour product. Response files store theinformation that is necessary for theinstallation of your product. You can useresponse files for an unattended installationof your product, or to get pre-filled answersif you rerun the installer in the GUI mode
Click Choose to browse to a location whereyou want to store the response files.
Click Next to go to the next window.
IBM EMM Products In the Install Set list, select Custom to selectthe products that you want to install.
In the Install Set area, you can see all theproducts whose installers are in the samedirectory on your computer.
In the Description field, you can view thedescription of the product that you select inthe Install Set area.
Click Next to go to the next window.
24 IBM Campaign: Installation Guide

Table 11. IBM EMM installer GUI (continued)
Window Description
Installation Directory In the Specify the installation directoryfield, click Choose to browse to the directorywhere you want to install your product.
If you want to install the product in thefolder where the installers are stored, clickRestore Default Folder.
Click Next to go to the next window.
Select Application Server Select one of the following applicationservers that you configured for Campaigninstallation:
v IBM WebSphere
v Oracle WebLogic
Click Next to go to the next window.
Platform Database Type Select the appropriate Marketing Platformdatabase type.
Click Next to go to the next window.
Platform Database Connection Enter the following information about yourdatabase:
v Database host name
v Database port
v Database name or System ID (SID)
v Database user name
v Database password
Click Next to go to the next window.
Platform Database Connection (continued) Review and confirm the JDBC connection.
Click Next to go to the next window. TheURL can be customized with additionalparameters if needed.
Preinstallation Summary Review and confirm the values that youadded during the installation process.
Click Install to start the installation process.
The Campaign installer opens.
4. Follow the instructions on the Marketing Platform installer to install or upgradeMarketing Platform. See IBM EMM Marketing Platform Installation Guide formore information.
5. In the Installation Complete window, click Done. The Marketing Platforminstallation is complete, and the Campaign installer opens.
6. Use the information in the following table to navigate the Campaign installer.In the Platform Database Connection window, enter all the requiredinformation and click Next to start the Campaign installer.
Chapter 4. Installing Campaign 25

Table 12. IBM Campaign installer GUI
Window Description
Introduction This is the first window of the Campaigninstaller. You can open the Campaigninstallation and upgrade guides from thiswindow.
Click Next to go to the next window.
Software Licence Agreement Carefully read the agreement. Use Print toprint the agreement. Click Next after youaccept the agreement.
Installation Directory Click Choose to browse to the directorywhere you want to install Campaign.
Click Next to go to the next window.
Campaign Components Select the components that you want toinstall.
When you select the components, theinstaller displays information about thecomponents.
Click Next to go to the next window.
Default locale Select a default locale for your installation.English is selected by default.
Click Next to go to the next window.
Campaign Database Setup Select one of the following options forsetting up the Campaign database:
v Automatic database setup
v Manual database setup
If you select Automatic database setup,select Run Unicode SQL Script if yoursystem tables are configured for unicode.
Click Next to go to the next window.
Campaign Database Type Select the appropriate database type.
Click Next to go to the next window.
Campaign Database Connection Enter the following details for the Campaigndatabase:
v Database host name
v Database port
v Database system ID (SID)
v Database user name
v Password
Important: If IBM EMM products areinstalled in a distributed environment, youmust use the machine name rather than anIP address in the navigation URL for all ofthe applications in the suite.
Click Next to go to the next window.
26 IBM Campaign: Installation Guide

Table 12. IBM Campaign installer GUI (continued)
Window Description
JDBC Connection Review and confirm the JDBC connection.
Click Next to go to the next window.
Campaign Connection Settings Enter the following connection settings:
v Network domain nameNote: When you add the network domainname, you might see the followingmessage:
Warning-Server name includesdomain name, final URL containsseveral occurrences of domainname
Select Modify to change the domainname, or click Cancel to cancel themessage.
v Host name
v Port number
Select the Use secure connection check boxif necessary.
Click Next to go to the next window.
Platform Utilities Settings Review and confirm or change followinginformation for connecting to the MarketingPlatform database:
v JDBC driver class
v JDBC connection URL
v JDBC driver classpath
Click Next to validate your entries and to goto the next window.
Preinstallation Summary Review and confirm the values that youadded during the installation process.
Click Install to start the installation process.
The Campaign installer opens.
Installation Complete Click Done to close the Marketing Platforminstaller and go back to the IBM EMMinstaller.
7. In the Installation Complete window, click Done to exit the Campaign installerand go back to the EMM installer.
8. Follow the instructions on the EMM installer to finish installing Campaign. Usethe information in the following table to take the appropriate actions on eachwindow in the EMM installer.
Chapter 4. Installing Campaign 27

Table 13. EMM installer GUI
Window Description
Deployment EAR file Specify whether you want to create anenterprise archive (EAR) file to deploy yourIBM EMM products.
Click Next to go to the next window.
Package EAR file You can see this window if you select Createan EAR file for deployment in theDeployment EAR file window.
Select the applications that you want topackage in the EAR file.
EAR file details Enter the following information for yourEAR file:
v Enterprise application identifier
v Display name
v Description
v EAR file path
EAR file details (continued) Select Yes or No to create an additional EARfile. If you select Yes, you must enter thedetails for the new EAR file.
Click Next to complete the installation ofyour product.
Deployment EAR file Specify whether you want to create anotherEAR file to deploy your IBM EMMproducts.
Click Next to go to the next window.
Installation Complete This window provides the locations of thelog files that are created during installation.
Click Previous if you want to change anyinstallation details.
Click Done to close the IBM EMM installer.
Creating an EAR file after running the installerYou create EAR files after you install IBM EMM products. You might do this tohave a different combination of products in EAR file.
Note: Run the installer in console mode from the command line.
Use the following procedure if you want to create an EAR file after you install IBMEMM products:1. If this is the first time you are running the installer in console mode, make a
backup copy of the installer's .properties file for each of your installedproducts.Each IBM product installer creates one or more response files with a.properties extension. These files are in the same directory where you placedthe installers. Be sure to back up all files with the .properties extension,including the installer_productversion.properties files and the file for theIBM installer itself, which is named installer.properties.
28 IBM Campaign: Installation Guide

If you plan to run the installer in unattended mode, you must back up theoriginal .properties files, because when the installer runs in unattended mode,it clears these files. To create an EAR file, you need the information that theinstaller writes in the .properties files during the initial installation.
2. Open a command window and change directories to the directory that containsthe installer.
3. Run the installer executable with this option:-DUNICA_GOTO_CREATEEARFILE=TRUE
On UNIX type systems, run the .bin file rather than the .sh file.The installer wizard runs.
4. Follow the instructions in the wizard.5. Before you create more EAR files, overwrite the .properties file or files with
the backups you created before you ran in console mode for the first time.
Installing Campaign by using the console modeUse the console mode to install Campaign by using the command-line window.You can select various options in the command-line window to complete taskssuch as selecting the products to install, or selecting the home directory for theinstallation.
Before you install Campaign, make sure that you have configured the followingelements:v An application server profilev A database schema.
To display the Installer screens correctly in console mode, configure your terminalsoftware to support UTF-8 character encoding. Other character encoding, such asANSI, will not render the text correctly, and some information will not be readable.
Complete the following actions to install Campaign by using the command-linewindow:1. Open a command-line prompt window and navigate to the directory where
you have saved the IBM EMM installer and the Campaign installer.2. Complete one of the following actions:
v For Windows, enter the following command:ibm_emm_installer_full_name -i console
For example, IBM_EMM_Installer_9.1.0.0 -i console
v For Unix, invoke the ibm_emm_installer_full_name.sh file.For example: IBM_EMM_Installer_9.1.0.0.sh
3. Follow the directions that are displayed in the command-line prompt. Use thefollowing guidelines when you have to select an option in the command-lineprompt:v The default options are defined by the symbol [X].v To select or clear an option, type the number that is defined for the option,
and then press Enter.
For example, suppose the following list displays the components that you caninstall:
1 [X] Marketing Platform2 [X] Campaign
Chapter 4. Installing Campaign 29

3 Contact Optimization4 Interaction History
If you want to install Interaction History, and do not want to install Campaign,enter the following command: 2,4The following list would then display the options that you selected:
1 [X] Marketing Platform2 Campaign3 Contact Optimization4 [X] Interaction History
Note: Do not clear the option for Marketing Platform unless you have alreadyinstalled it.
4. The IBM EMM installer launches the Campaign installer during the installationprocess. Follow the instructions in the command-line prompt window of theCampaign installer.
5. After you enter quit in the Campaign installer command-line prompt window,the window shuts down. Follow the instructions in the command-line promptwindow of the IBM EMM installer to complete the installation of Campaign.
Note: If any error occurs during the installation, a log file is generated. Youmust exit the installer to view the log file.
Installing Campaign silentlyUse the unattended or silent mode to install Campaign multiple times.
Before you install Campaign, make sure that you have configured the followingelements:v An application server profilev A database schema
When you install Campaign by using the silent mode, response files are used toobtain the information that is required during installation. You must createresponse files for a silent installation of your product. You can create response filesby using one of the following methods:v Using the sample response files as a template for creating your response files.
The sample response files are included with your product installers in theResponseFiles compressed archive. For more information about sample responsefiles, see “Sample response files” on page 31.
v Running the product installers in the GUI (Windows) or X Window System(UNIX) mode or the console mode before you install the product in the silentmode. One response file is created for the IBM EMM suite installer, and one ormore response files are created for your product installer. The files are created inthe directory that you specify.
Important: For security reasons, the installer does not save database passwordsin the response files. When you create response files, you must edit eachresponse file to enter database passwords. Open each response file and searchfor PASSWORD to find where you must edit the response file.
When the installer runs in the silent mode, it looks for the response files in thefollowing directories sequentially:
30 IBM Campaign: Installation Guide

v In the directory where the IBM EMM installer is saved.v In the home directory of the user who installs the product
Make sure that all response files are in the same directory. You can change the pathwhere response files are read by adding arguments to the command line. Forexample: -DUNICA_REPLAY_READ_DIR="myDirPath" -f myDirPath/installer.properties
Use the following command for Windows:v IBM_EMM_installer_full_name -i silent
For example:IBM_EMM_Installer_9.1.0.0_win.exe -i silent
Use the following command for Unix or Linux:v IBM_EMM_installer_full_name_opertating_system.bin -i silent
For example:IBM_EMM_Installer_9.1.0_unix.bin -i silent
Sample response filesYou must create response files to set up a silent installation of Campaign. You canuse sample response files to create your response files. The sample response filesare included with the installers in the ResponseFiles compressed archive.
The following table provides information about sample response files:
Table 14. Description of sample response files
Sample response file Description
installer.properties The sample response file for the IBM EMMmaster installer.
installer_product intials and productversion number.properties
The sample response file for the Campaigninstaller.
For example,installer_ucn.n.n.n.properties is theresponse file of the Campaign installer,where n.n.n.n is the version number.
installer_report pack initials, productinitials, and version number.properties
The sample response file for the reportspack installer.
For example, installer_urpc.properties isthe response file of the Campaign reportspack installer.
Chapter 4. Installing Campaign 31

32 IBM Campaign: Installation Guide

Chapter 5. Configuring Campaign before deployment
Before you deploy Campaign, create and populate the Campaign and eMessagesystem tables and register Campaignand eMessage manually.
Creating and populating Campaign system tables manuallyBy default, the Campaign installer automatically creates and populates systemtables. However, if the system tables are not created and populated automaticallyduring the installation, you must populate the system tables manually. Use yourdatabase client to run the Campaign SQL scripts against the appropriate databaseto create and populate the Campaign system tables.
Note: If you plan to enable eMessage, you must also manually create and populatethe eMessage system tables if the installer did not do so automatically. For details,see “Creating and populating the eMessage system tables manually” on page 34.
If you selected the Campaign System Table DDL Files option on the CampaignComponents page during installation, the IBM installer installs a collection of SQLscripts that you can use to create and populate the Campaign system tables. TheSQL scripts are installed in the ddl directory under your installation of theCampaign server. If your system tables are configured for Unicode, the appropriatescripts are in the ddl/unicode directory under your Campaign installation.
To use the SQL scripts, run your database client to apply the scripts to thedatabase or schema that holds the Campaign system tables. See the documentationfor your database software for instructions on running SQL scripts.
The following tables list the SQL scripts that are provided for you to use to createand populate the Campaign system tables manually.
Table 15. Scripts for creating Campaign system tables
Data source type Script name
IBM DB2 ac_systab_db2.sql
Microsoft SQLServer
ac_systab_sqlsvr.sql
Oracle ac_systab_ora.sql
Table 16. Scripts for populating Campaign system tables
Data source type Script name
IBM DB2 ac_populate_tables_db2.sql
Microsoft SQLServer
ac_populate_tables_sqlsvr.sql
Oracle ac_populate_tables_ora.sql
© Copyright IBM Corp. 1998, 2013 33

Creating and populating the eMessage system tablesmanually
For eMessage, you must create additional system tables in the Campaign schemaand then populate the tables with initial data. The Campaign installerautomatically creates and populates the eMessage system tables in the Campaignschema if you select the option to create system tables automatically. However, ifyou do not select the option, you must create and populate the eMessage systemtables manually.
Use your database client to run the appropriate script against the Campaigndatabase.
Note: The eMessage installation directory is a subfolder within the Campaigndirectory.
Scripts for creating eMessage tables
IBM provides the ace_op_systab scripts for creating eMessage tables in your localenvironment.
If your Campaign system tables are configured for Unicode, find the appropriatescript in the ddl/unicode directory under your eMessage installation.
If your Campaign system tables are not configured for Unicode, use thenon-Unicode scripts in the ddl directory under your eMessage installation. Use thefollowing table to see the scripts that you must use:
Table 17. Scripts for creating eMessage tables
Data source type Script name
IBM DB2 ace_op_systab_db2.sql
The user tablespace and system temporary tablespace where the systemtables reside must each have a page size of 16K or greater.
Microsoft SQLServer
ace_op_systab_sqlsvr.sql
Oracle ace_op_systab_ora.sql
Scripts for populating eMessage tables
IBM provides the ace_op_populate_systab scripts for populating the eMessagetables in your local environment.
The populate scripts are stored in the ddl directory of your eMessage installation.IBM provides only one version of the populate scripts because you can use themfor either Unicode or non-Unicode tables.
Note: The eMessage installation directory is a subfolder within the Campaigndirectory.
Use the following table to see the scripts that you must use:
34 IBM Campaign: Installation Guide

Table 18. Scripts for populating eMessage tables
Data source type Script name
IBM DB2 ace_op_populate_systab_db2.sql
Microsoft SQLServer
ace_op_populate_systab_sqlsvr.sql
Oracle ace_op_populate_systab_ora.sql
Registering Campaign manuallyDuring the installation process. if the Campaign installer cannot access theMarketing Platform system tables, you must run the configTool utility to registerit manually.
You can use the configTool and populateDb utilities to import and populate theCampaign information in the Marketing Platform system tables.1. Run the populateDb utility by using the following example command as a
guideline.populateDb.bat -n Campaign
The command imports security roles and permissions into the default partition.2. If you are upgrading Campaign, unregister Campaign by using the following
command:configTool -x -p "Affinium|Campaign|about" -f exportedAbout.xml
The command exports the Campaign About node to the exportedAbout.xmlfile.
3. Run the configTool utility by using the following example commands asguidelines:v configTool -r Campaign -f
"full_path_to_Campaign_installation_directory\conf\campaign_configuration.xml"
v configTool -v -i -p "Affinium|suite|uiNavigation|settingsMenu" -f"full_path_to_Campaign_installation_directory\conf\campaign_setup_navigation.xml"
v configTool -v -i -p "Affinium|suite|uiNavigation|mainMenu" -f"full_path_to_Campaign_installation_directory\conf\campaign_navigation.xml"
v configTool -v -i -p "Affinium|suite|uiNavigation|mainMenu|Analytics"-f "full_path_to_Campaign_installation_directory\conf\campaign_analysis_navigation.xml"
v configTool -v -i -p "Affinium|suite|uiNavigation|alerts" -f"full_path_to_Campaign_installation_directory\conf\campaign_alerts.xml"
The commands import configuration properties and menu items. You must runthe utility as many times as there are files.
4. Run the following command after you register Campaign:configtool -i -p "Affinium|Campaign" -f exportedAbout.xml
The command imports the Campaign About node to the exportedAbout.xmlfile.
Chapter 5. Configuring Campaign before deployment 35

Registering eMessage manuallyDuring the installation process. if the eMessage installer cannot access theMarketing Platform system tables, you must run the configTool utility to registerit manually.
By default, the Campaign installer automatically registers eMessage with theMarketing Platform system tables without enabling eMessage. In some situations,the Campaign installer does not connect with the Marketing Platform system tablesto automatically register eMessage.
If the installer does not register eMessage automatically, you must registereMessage manually with the configTool utility that is provided with the IBMEMM installation. The configTool utility is in the tools\bin directory under yourMarketing Platform installation.
To register eMessage manually, use the following command to run the configToolutility:
configTool -r eMessage -f "full_path_to_eMessage_installation_directory\conf\emessage_configuration.xml"
The eMessage installation directory is a subdirectory of the Campaign installationdirectory.
For more information about registering and configuring eMessage, see the IBMeMessage Startup and Administrator's Guide.
Setting data source variables in the Campaign startup script (UNIXonly)
Data source variables are automatically set by the installer during installation ofCampaign. You can change these settings in setenv.sh file. You must restart theserver every time you modify setenv.sh file.
During Campaign installation, the IBM Installer collects database information fromyou and uses that information to automatically configure the database andenvironment variables that are required to create and use the Campaign systemtables. Those settings are stored in the setenv.sh file in the bin directory underyour Campaign server installation.
For access to data sources (such as Campaign customer tables) that do not use thesame type of database as the system tables, you must manually configure thesetenv.sh file to add the database and library environment variables that aredescribed in “Database and library environment variables” on page 37.
Note that if you modify this file when the Campaign server is already running,you must restart the server before changes to the setenv file are recognized. See“Starting the Campaign server” on page 43 for more details.
See Distributed Marketing database information worksheet for the requiredinformation to add to the setenv file.
36 IBM Campaign: Installation Guide

Database and library environment variablesSet database and library environment variables that are required for yourdatabases (customer tables and system tables, if you chose Manual Database Setupduring installation) and operating system. You can set the database and libraryvariables in the setenv.sh file.
Following table describes database names with their syntax and descriptions.
Table 19. Database environment variables
Database Syntax and Description
DB2 DB2DIR=full_dir_path
export DB2DIR
DB2 installation directory (for example, /usr/lpp/db2_06_01)
. full_path_to_db2profile
Sources the database configuration for DB2 users (e.g./home/db2inst1/sqllib/db2profile).
Note the ". " (period and then a space).
Netezza NZ_ODBC_INI_PATH=full_dir_path
export NZ_ODBC_INI_PATH
Directory location of the odbci.ini file
(e.g. /opt/odbc64v51)
ODBCINI=full_path_and_file_name
export ODBCINI
Full path to the odbc.ini file
Oracle ORACLE_BASE=full_dir_path
export ORACLE_BASE
Oracle installation directory
ORACLE_HOME=full_dir_path
export ORACLE_HOME
Oracle's home directory (e.g. /home/oracle/OraHome1).
Teradata ODBCINI=full_path_and_file_name
export ODBCINI
Full path to the obdc.ini file
Define the library environment variable as mentioned in the following table,depending on your UNIX operating system.
Chapter 5. Configuring Campaign before deployment 37

Table 20. Library environment variable
OperatingSystem Value
SunOS and Linux LD_LIBRARY_PATH
For example:
LD_LIBRARY_PATH=<Campaign_Home>/bin:<path to DB libdirectory>:$LD_LIBRARY_PATH
export LD_LIBRARY_PATHNote: If LD_LIBRARY_PATH_64 (for 64-bit linking) is set, remove it. TheLD_LIBRARY_PATH variable will be ignored if LD_LIBRARY_PATH_64 is set.
AIX® LIBPATH
For example: LIBPATH=<Campaign_Home>/bin:<path to DB libdirectory>:/usr/lib:$ORACLE_HOME/lib32:$ORACLE_HOME/lib
HP-UX SHLIB_PATH
For example: SHLIB_PATH=<Campaign_Home>/bin:<path to DB libdirectory>:/usr/lib:$ORACLE_HOME/lib32:$ORACLE_HOME/lib
Library directories for Oracle databases
Different versions of Oracle have different naming conventions for their libdirectories. Older versions used lib for 32-bit and lib64 for 64-bit. Newer versionsuse lib32 for 32-bit and lib for 64-bit.
If you install 32-bit Campaign, you must include either $ORACLE_HOME/lib32 or$ORACLE_HOME/lib , whichever one contains the 32-bit Oracle libraries.
If you install 64-bit Campaign, you must include either $ORACLE_HOME/lib or$ORACLE_HOME/lib64, whichever one contains the 64-bit Oracle libraries.
Note: Do not include paths to both the 32- and 64-bit libraries; include only thepath to the library you are using for your version of Campaign.
38 IBM Campaign: Installation Guide

Chapter 6. Deploying the Campaign web application
You can deploy the Campaign web application by using an EAR file or you candeploy the individual WAR files.
To deploy Campaign, follow the guidelines in this section and then start theCampaign server.
When you ran the IBM installer, you may have included Campaign in an EAR file,or you may choose to deploy the Campaign WAR file. If you included theMarketing Platform or other products in an EAR file, you must follow all thedeployment guidelines detailed in the individual install guides for the productsincluded in the EAR file.
You must know how to work with your web application server. Consult your webapplication server documentation for details such as navigation in theAdministration console.
Setting the web application session timeoutSession timeout determines how long an inactive HTTP session can remain openbefore the session expires. If required, you can set the web application sessiontimeout for Campaign by using the WebSphere console or the WebLogic console toadjust the value of session timeout in seconds or minutes.
Set the session timeout on your web application server:v WebSphere: Use the IBM WebSphere Application Server Administrative Console
to set the Session timeout in minutes. You can adjust this setting at the serverand Enterprise Application levels. See your WebSphere documentation fordetails.
v WebLogic: Use the WebLogic console to set the Session Timeout in seconds, oradjust the TimeoutSecs parameter value for the session-descriptor element inthe weblogic.xml file.
Deploying Campaign on WebSphere Application ServerYou can deploy Campaign runtime environment on supported versions ofWebSphere Application Server (WAS) from a WAR file or EAR file.
Note: Make sure that multiple language encoding is enabled in WAS.
Deploying Campaign on WAS from a WAR fileYou can deploy the Campaign application from a WAR file on WAS.
Complete the following tasks before you deploy Campaign:v Confirm that your version of WebSphere meets the requirements in the
Recommended Software Environments and Minimum System Requirements document,including any necessary fix packs or upgrades.
v Confirm that you created the data sources and database provider in WebSphere.
© Copyright IBM Corp. 1998, 2013 39

To deploy the Campaign application WAR file on WAS, complete the followingsteps:1. Go to the WebSphere Integrated Solutions Console.2. Complete the following steps if your system tables are in DB2:
a. Click the data source that you created. Go to the Custom Properties for thedata source.
b. Select the Custom properties link.c. Set the value for the resultSetHoldability property to 1.
If you do not see the resultSetHoldability property, create theresultSetHoldability property and set its value to 1.
3. Go to Applications > Application Types > WebSphere enterpriseapplications and click Install.
4. In the Preparing for the application installation window, select the Detailed -Show all options and parameters check box and click Next.
5. Click Continue to see the Install New Application wizard.6. Accept the default settings on the windows of the Install New Application
wizard except the following windows:v In step 1 of the Install New Application wizard, select the Precompile
JavaServer Pages files check box.v In step 3 of the installation wizard, set the JDK Source Level to 16.v In step 8 of the installation wizard, set the Context Root to /Campaign.
7. In the left navigation panel of WebSphere Integrated Solutions Console,navigate to Applications > Application Types > WebSphere enterpriseapplications.
8. In the Enterprise Applications window, click the Campaign.war file.9. In the Web Module Properties section, click Session Management and select
the following check boxes:v Override session management
v Enable Cookies
10. Click Enable Cookies, and in the Cookie name field, enter a unique cookiename.
11. If you are using version 8 of WebSphere Application Server, select Servers >WebSphere application server > server 1 > Session management > EnableCookies and clear the check box for Set session cookies to HTTPOnly tohelp prevent cross-site scripting attacks.
12. In the Applications > Enterprise Applications section of the server, select theWAR file that you deployed.
13. In the Detail Properties section, select Class loading and update detection.14. In the Class loader order section, select the Classes loaded with local class
loader first (parent last) option.15. For WAR class loader policy, select Single class loader for application.16. Start your deployment.
Deploying Campaign on WAS from an EAR fileYou can deploy the Campaign application on WAS when Campaign is a modulewithin an EAR file.
You can deploy Campaign by using an EAR file if you included Campaign in anEAR file when you ran the IBM EMM installer.
40 IBM Campaign: Installation Guide

Before you deploy Campaign:v Confirm that your version of WebSphere meets the requirements in the
Recommended Software Environments and Minimum System Requirements document,including any necessary fix packs or upgrades.
v Confirm that you created the data sources and database provider in WebSphere.
To deploy Campaign from an EAR file onto WebSphere Application Server,complete the following steps:1. Go to the WebSphere Integrated Solutions Console.2. If your system tables are in DB2, click the data source that you created. go to
the Custom Properties for the data source. .3. Select the Custom properties link.4. Set the value for the resultSetHoldability property to 1.
If you do not see the resultSetHoldability property, create theresultSetHoldability property and set its value to 1.
5. Go to Applications > Application Types > WebSphere enterpriseapplications and click Install.
6. In the Preparing for the application installation window, select the Detailed -Show all options and parameters check box and click Next.
7. Click Continue to see the Install New Application wizard.8. Accept the default settings on the windows of the Install New Application
wizard except the following windows:v In step 1 of the Install New Application wizard, select the Precompile
JavaServer Pages files check box.v In step 3 of the installation wizard, set the JDK Source Level to 16.v In step 8 of the installation wizard, set the Context Root to /Campaign.
9. In the left navigation panel of WebSphere Integrated Solutions Console,navigate to Applications > Application Types > WebSphere enterpriseapplications.
10. In the Enterprise Applications window, select the EAR file that you want todeploy.
11. In the Web Module Properties section, click Session Management and selectthe following check boxes:v Override session management
v Enable Cookies
12. Click Enable Cookies, and in the Cookie name field, enter a unique cookiename.
13. If you are using version 8 of WebSphere Application Server, select Servers >WebSphere application server > server 1 > Session management > EnableCookies and clear the check box for Set session cookies to HTTPOnly tohelp prevent cross-site scripting attacks.
14. In the Detail Properties section, select Class loading and update detection.15. In the Class loader order section, select the Classes loaded with local class
loader first (parent last) option.16. For WAR class loader policy, select Single class loader for application.17. Start your deployment.
For more information about WebSphere Application Server version 8, seeWelcome to the WebSphere Application Server information center.
Chapter 6. Deploying the Campaign web application 41

Deploying Campaign on WebLogicYou can deploy IBM EMM products on WebLogic.
Use the following guidelines when you deploy Campaign on WebLogic:v IBM EMM products customize the JVM used by WebLogic. You might need to
create a WebLogic instance dedicated to IBM EMM products if you encounterJVM-related errors.
v Verify that the SDK selected for the WebLogic domain you are using is the SunSDK by looking in the startup script (startWebLogic.cmd) for theJAVA_VENDOR variable. It should be set to: JAVA_VENDOR=Sun . If it is set toJAVA_VENDOR=BEA , JRockit has been selected. JRockit is not supported. To changethe selected SDK, refer to the WebLogic documentation.
v Deploy the IBM EMM products as web application modules.v On UNIX systems, you must start WebLogic from the console to allow correct
rendering of graphical charts. The console is usually the machine on which theserver is running. In some cases, however, the web application server is set updifferently.If a console is not accessible or does not exist, you can emulate a console usingExceed. You must configure Exceed so that your local Xserver process connectsto the UNIX machine in root window or single window mode. If you start theweb application server using Exceed, you must keep Exceed running in thebackground to allow the web application server to continue running. Pleasecontact IBM Technical Support for detailed instructions if you encounterproblems with chart rendering.Connecting to the UNIX machine via telnet or SSH always causes problemsrendering charts.
v If you are configuring WebLogic to use the IIS plug-in, review the WebLogicdocumentation.
v If deploying in a production environment, set the JVM memory heap sizeparameters to 1024 by adding the following line to the setDomainEnv script: SetMEM_ARGS=-Xms1024m -Xmx1024m -XX:MaxPermSize=256m
For WebLogic 11g, make the following changes to the campaign.war file:1. If you also use AIX 7.1 with WL11g, remove the xercesImpl.jar file from the
unpackaged WEB_INF/lib directory.2. Build the campaign.war file to include the changes that you made before
deploying the war file.
Configuring WebLogic to display reports (UNIX)If you install Campaign with Contact Optimization on a UNIX system, you mustenable the java.awt.headless JVM property so that the WebLogic web applicationserver can display the graphs in Contact Optimization reports.
To enable graph display in Optimize reports in the WebLogic JVM:1. Shut down the WebLogic server if it is already running.2. Locate and open the startup script for your WebLogic server
(startWebLogic.sh) in any text editor.3. Modify the JAVA_OPTIONS parameter to add the following value:
-Djava.awt.headless=true
4. Save the startup script, then restart the WebLogic server.
42 IBM Campaign: Installation Guide

Starting the Campaign serverMake sure that Marketing Platform and Campaign web application are deployedand running when you start the Campaign server.
You can start the Campaign server directly, or install it as a service.
Starting the Campaign server directlyStart the Campaign server by running the cmpServer.bat file for Windows, or therc.unica_ac for UNIX. The Campaign server processes and computes data.
Follow the instructions appropriate for your operating system.
Windows
Start the Campaign server by running the cmpServer.bat file in the bin directoryunder your Campaign installation. When the unica_aclsnr.exe process appears onthe Windows Task Manager Processes tab, the server has started successfully.
UNIX
Start the Campaign server by executing the rc.unica_ac program with a startargument. You must run this command as root. For example:
./rc.unica_ac start
To determine whether the unica_aclsnr process has started successfully, enter thiscommand:
ps -ef | grep unica_aclsnr
To determine the process ID for the server you started, view the unica_aclsnr.pidfile located in the conf directory under your Campaign installation.
Installing the Campaign server as a Windows serviceYou can install the Campaign server as a Windows service so that it startsautomatically whenever you start Windows. The Campaign server computes andprocesses data.
Complete the following steps to install the Campaign server as a Windows service:1. Add the bin directory under the Campaign installation directory to the user
PATH environment variable. If the PATH environment variable does not exist forthe user, create it.Make sure that you add this path to the user PATH variable, not the system PATHvariable.If the Campaign bin directory exists in the system PATH environment variable,remove it. You do not need it in the system PATH environment variable to installthe Campaign server as a service.
2. If you are upgrading from a previous version of Campaign that had the serverinstalled as a service, stop the service.
3. Open a command window and change directories to the bin directory underyour Campaign installation.
Chapter 6. Deploying the Campaign web application 43

4. Run the following command to create the Campaign server service:unica_aclsnr -i
The service is created.
Note: Make sure CAMPAIGN_HOME has been created as a system environmentvariable before starting the Campaign server service.
5. Open the Unica Campaign Listener Service properties dialog box. Click Log Ontab.
6. Select This account.7. Enter the user name (system user) and password, and start the services.
44 IBM Campaign: Installation Guide

Chapter 7. Configuring Campaign after deployment
After you deploy Campaign, you must verify that the Campaign listener isrunning, set up the Campaign system user, set Campaign configuration properties,and verify the Campaign installation.
If you are using the IBM EMM reporting feature, you must complete the tasks thatare described in the IBM EMM Reports Installation and Configuration Guide.
Note: If you plan to enable IBM eMessage for hosted email, you must use the IBMEMM reporting feature to view standard eMessage performance reports.
Verifying that the Campaign listener is runningThe Campaign listener must be running before users can work with any Campaignfeatures. The listener automatically creates a separate unica_acsvr process for eachlogin and each active flowchart. For example, if one user logs in and then opens aflowchart, the listener creates two instances of unica_acsvr.exe.
Use the following procedure to verify that the Campaign listener is running.1. Use the appropriate procedure for your operating system:
In Windows, look for unica_aclsnr.exe on the Processes tab of the WindowsTask Manager.In UNIX, use the ps command to look for the Campaign server, as in thefollowing example: ps -ef | grep unica_aclsnr.
2. If the listener is not running, restart it:In Windows, run the cmpServer.bat script that is in the bin directory underyour Campaign installation.In UNIX, enter the following command at the system prompt: rc.unica_acstart
For important details about running the listener, including how to start itautomatically, see the IBM Campaign Administrator's Guide.
Setting up the Campaign system userSet up the Campaign system user to directly access databases. For multiplepartitions in Campaign, create a system user for each partition.
A system user is a IBM EMM user account that is configured for use by IBMapplications.
To avoid presenting users with repeated prompts for login credentials you canassociate a system user with one or more data sources. Each data source specifies auser name and password. This allows you to provide a user name and passwordto access a database or other protected resource by referencing the data source. Byadding multiple data sources to the configuration of the system user account, youcan allow the system user to access multiple databases.
In Campaign, the system user holds login credentials for accessing system tablesand other data sources.
© Copyright IBM Corp. 1998, 2013 45

Use an existing or new IBM EMM user account to save credentials for the datasources described here.
You set up IBM EMM users and assign user data sources in the Settings > Usersarea of IBM EMM. See the online help in that section for instructions on how to dothis.
Set up a user account to hold credentials for the following data sources.v Campaign system tables (UA_SYSTEM_TABLES)v All customer (user) tables
On UNIX, for the Alternate Login attribute of the system user, enter the UNIXaccount of a user in a group that shares privileges with the UNIX users ofCampaign.
Note: If you have multiple partitions, each partition must have its own systemuser. The system user cannot be the same across partitions.
Adding data source properties on the Configuration pageUse the appropriate data source template to add data source properties on theConfiguration page for each Campaign data source.
The Campaign installer imports the template for the database type that youspecified for the Marketing Platform database when you ran the IBM installer.
If you need other data source templates for additional database types, you mustimport them manually using the Marketing Platform configTool utility. You canimport as many templates as you need, to correspond to each different type ofdatabase you have.
For example, suppose your installation of Marketing Platform and Campaign usedthe following databases:v Oracle - system tablesv DB2 - customer (user) tablesv DB2 - additional customer (user) tables
In this case, you would import the DB2Template.xml template for the two sets ofcustomer (user) tables.
If your Marketing Platform and Campaign system tables databases are of the samedatabase type, the installer automatically imports the template that is used for thesystem tables; in this example, it imports the Oracle template.
For instructions, see “Importing data source templates” on page 47.
You create a new category from the template, which creates a new set of datasource configuration properties. Create as many new categories as needed, one foreach data source of that type. In the example above, you would use the Oracletemplate to create one new category and the DB2 template to create two newcategories. See “Duplicating a data source template” on page 47.
After you add the data source properties, set the data source configurationproperties in the categories you created from the templates.
46 IBM Campaign: Installation Guide

For instructions, see “Data source properties.”
Importing data source templatesThe Campaign system tables data source (UA_SYSTEM_TABLES) is supportedonly on Oracle, DB2, and SQLServer. Import the data source templates for the usertables by using the configTool utility to support the database types that are notsupported for the Campaign system tables.
The Campaign data source templates are located in the conf directory under yourCampaign installation.
To import and export templates, you use the Marketing Platform configToolutility, located in the tools/bin directory under your Marketing Platforminstallation. If you are not familiar with configTool, see “configTool” on page 67for details on performing this task.
Here is an example of the command you would use to import the Oracle templateinto the default partition (Windows environment).
configTool -i -p "Campaign|partitions|partition1|dataSources" -ffull_path_to_directory_containing_your_Oracle_template\OracleTemplate.xml
Duplicating a data source templateDuplicate the data source templates to create a new set of configuration propertiesin the data source category.1. On the Configuration page, navigate to the data source template you want to
duplicate.Unlike other categories, template category labels are in italics and enclosed inparentheses.
2. Click the data source template.The Create category from Template page displays.
3. Enter a name in the New category name field (required).
Note: The data source category name for Campaign's system tables MUST beUA_SYSTEM_TABLES.
4. If desired, edit properties within the new category. You can also do this later.5. Click Save and Finish to save the new configuration.
The new category appears in the navigation tree.
Campaign configuration propertiesYou must specify configuration properties on the Configuration page for a basicinstallation of Campaign. Additionally, you can use the Configuration page tospecify the properties that perform important functions that you can optionallyadjust.
Data source properties
The following table provides information about the properties that you mustspecify for each Campaign data source:
Chapter 7. Configuring Campaign after deployment 47

Table 21. Properties for each Campaign data source
Property name Description
ASMUserForDBCredentials This property must be the same user youalready created as the Campaign systemuser in “Setting up the Campaign systemuser” on page 45.
DSN For SQL server, set this property to the DSN(data source name) you created. For Oracleand DB2, set this property to the databasename or the SID (service) name.
JndiName Set this property to the JNDI you created inyour application server to connect to thisspecific data source.
SystemTableSchema Not required for SQL server. For other datasources, set this property to the user of thedatabase to which you are trying to connect.
OwnerForTableDisplay Not required for SQL server. For other datasources, set this property to the user of thedatabase to which you are trying to connect.
The data sources are the Campaign system table database and any customer (user)databases you plan to use with Campaign.
Note: The data source category name for the Campaign system tables must beUA_SYSTEM_TABLES.
For details on setting the values, see the context help for these properties or theIBM Marketing Platform Administrator's Guide.
In addition to creating and setting data source properties, you must set thefollowing properties on the Configuration page for a basic installation ofCampaign.v Campaign > unicaACListener > serverHost
v Campaign > unicaACListener > serverPort
v For the default partition, set values as desired in the categories under Campaign> partitions > partition1.
When you change a property, you must restart the Campaign listener for thechanges to take effect.
Mapping user tables in CampaignMapping user tables is the process of making external data sources accessible inCampaign. A typical user table contains information about your company'scustomers, prospects, or products. The data source can be a database table orASCII flat file. You must map any data sources that you configured to make thatdata accessible to processes in flowcharts.
For instructions on how to map user tables, see the Campaign Administrator's Guide.
Note: User tables are different from system tables. Most Campaign system tablesare mapped automatically during initial installation and configuration if you use
48 IBM Campaign: Installation Guide

the system table data source name UA_SYSTEM_TABLES. If a connection issueforces you to map system tables manually, you must log out of Campaign and login again after you map the tables.
Verifying the Campaign installationIf you performed all of the steps to install and configure Campaign, deploy theCampaign web application, and configure Campaign after deployment, you areready to verify your installation.
If you have not already done so, log in to IBM EMM as a user that exists in theCampaign Administrators role (such as asm_admin). In Settings > Users, assign atleast one security role (for example, Global Policy/Admin) to the new user. Afterthe new user is assigned the role, you can log in to Campaign as that new user.
Use the following procedure to verify the installation.1. Log in to IBM EMM.2. Verify that all system tables exist in the Settings > Campaign Settings >
Manage Table Mappings window.3. Create a campaign and create a flowchart in that campaign.
Setting properties for integration with IBM EMM productsCampaign integrates with various IBM applications. If required, you can specifyconfiguration properties to set up an integration between Campaign and other IBMproducts.
See “IBM Campaign documentation roadmap” on page 6 to view the list ofdocuments that provide information about the integration of Campaign with otherIBM products.
Chapter 7. Configuring Campaign after deployment 49

50 IBM Campaign: Installation Guide

Chapter 8. Configuring multiple partitions for Campaign
In the Campaign family of products, partitions provide a way to secure the datathat is associated with different groups of users. When you configure Campaign ora related IBM EMM application to operate with multiple partitions, users can seeeach partition as a separate instance of the application. There is no indication thatother partitions exist on the same computer.
How multiple partitions workFor the IBM EMM applications that operate with Campaign, you can configure theapplication within the partitions where you have configured an instance ofCampaign. Application users within each partition can access the Campaignfunctions, data, and customer tables that are configured for Campaign in the samepartition.
Partition benefits
Multiple partitions are useful for setting up strong security between groups ofusers, because each partition has its own set of Campaign system tables. Multiplepartitions cannot be used when groups of users must share data.
Each partition has its own set of configuration settings, and Campaign can becustomized for each group of users. However, all partitions share the sameinstallation binaries. With the same binaries for all partitions, you can minimize theinstallation and upgrade efforts for multiple partitions.
Partition user assignment
Access to partitions is managed through membership in Marketing Platformgroups.
With the exception of the partition superuser (platform_admin), each IBM user canbelong to one partition. A user who requires access to multiple partitions musthave a separate IBM user account for each partition.
If there is only one Campaign partition, users do not have to be explicitly assignedto that partition to have access to Campaign.
Partition data access
In a multi-partition configuration, partitions have the following securitycharacteristics:v A user cannot access a partition if the user is not a member of a group that is
assigned to a partition.v A user of one partition cannot view or change data in another partition.v Users cannot navigate the Campaign file system above the root directory of their
partition from the browse dialog boxes in Campaign. For example, if twopartitions, named partition1 and partition2 exist, and you belong to the groupthat is associated with partition1, you cannot navigate the directory structure forpartition2 from a dialog box.
© Copyright IBM Corp. 1998, 2013 51

Setting up multiple partitionsConfigure multiple partitions in Campaign to isolate and secure data for differentgroups of Campaign users. As each partition has its own set of configurationproperties, you can customize Campaign for each group of users.
Before you configure additional partitions in Campaign, complete the followingtasks for each partition that you are configuring:1. Create database or schema for the Campaign system tables2. Create ODBC or native connections3. Create JDBC connections in the web application server
Complete the following tasks to set up multiple partitions for Campaign:1. Create the system tables database and any other data sources required for your
partitions. Then configure the JDBC and ODBC or native connections requiredto access your data sources.
2. For each partition, create a different schema in your database to hold thesystem tables. Use the database-specific scripts packaged with Campaign tocreate and populate the system tables.
3. Complete the following tasks to create a directory structure for each additionalpartition:
Note: Save a clean copy of the original partition1 directory to serve as abackup.a. In the partitions directory under your Campaign installation, create a
duplicate of the default partition1 directory for each partition that you areadding, ensuring that you include all subdirectories.
b. Name each partition directory with a unique name. Use these exact samenames for the partitions when you later create their configuration trees onthe Configurations page. If you want to create a second partition andcreated the directory named Campaign/partitions/partition2, when youcreate the configuration tree on the Configurations page, you must use thename "partition2" to identify this partition.
c. Delete any files that exist in the duplicate partition subdirectories.4. Complete the following tasks to use the partitionTool utility with the -s
option to clone the default partition:
Note: If you decide not to use this option, you must stop the web applicationserver where Marketing Platform is deployed before performing this procedure.a. Set the JAVA_HOME environment variable, either in the setenv script located
in the tools/bin directory of your Marketing Platform installation, or in thecommand line window in which you run the partitionTool utility.
b. Open a command line window and run the utility from the tools/bindirectory under your Marketing Platform installation. Use the appropriatecommand and options (as described in the Marketing PlatformAdministrator's Guide) to achieve your desired results. partitionTool -c -spartition1 -n partition2
c. Repeat this procedure for each new partition you need to create.d. When you are finished, stop and restart the application server where
Marketing Platform is deployed to see the groups that were created.
52 IBM Campaign: Installation Guide

Note: For complete information on using this utility, see “partitionTool” onpage 73.
5. Complete the following tasks to create the partition structure on theConfiguration page by using the New partitionTemplate for each new partition:a. On the Configuration page, navigate to Campaign > partitionsand click
(partitionTemplate).If you do not see the (partitionTemplate) property in the list, use theconfigTool utility to import the partition template, using a commandsimilar to the following:configTool -i -p "Affinium|Campaign|partitions"
-f <CAMPAIGN_HOME>/conf/partitionTemplate.xml
Replace CAMPAIGN_HOME with the actual path to your Campaigninstallation.The configTool utility is found in the tools directory under your IBMMarketing Platform installation. See the IBM Marketing PlatformAdministrator's Guide for information on using this utility. In the right pane,you see the partitionTemplate pane with an empty New category namefield.
b. Enter the name for the new partition, using the same name that you usedwhen creating the partition's directory structure in the file system in“Setting up multiple partitions” on page 52.
c. Click Save Changes. You see the new partition structure, with the samecategories and properties as in the partition template.
Partition superuserTo administer security across all users of Marketing Platform, a user account mustexist that has access to all security settings and user accounts in the system.
By default, this user account is platform_admin. This user account does not belongto any one partition; instead, it has access to all user accounts in all partitions.
The IBM administrator can create additional users with the same level of access. Tobe a partition superuser, an account must have Admin access to the MarketingPlatform and have full access to the Users, User Groups, and User Permissionspages. The partition superuser does not require access to product-specific securitypages, such as Campaign security pages.
Configuring data source properties for partitionsYou must configure data source properties for each partition that you create. Usethe appropriate data source template to create data source properties.
The Campaign installer imports the template for the database type that youspecified for the Marketing Platform database when you ran the IBM installer.
If you need other data source templates for additional database types, you mustimport them manually using the Marketing Platform configTool utility. You canimport as many templates as you need to correspond to each different type ofdatabase you have.
For example, suppose your installation of Marketing Platform and Campaign usedthe following databases:v Oracle - system tablesv DB2 - customer (user) tables
Chapter 8. Configuring multiple partitions for Campaign 53

v DB2 - additional customer (user) tables
In this case, you would import the DB2Template.xml template for the two sets ofcustomer (user) tables.
If your Marketing Platform and Campaign system tables databases are of the samedatabase type, the installer automatically imports the template used for the systemtables; in this example, it imports the Oracle template.
Note: When you create a new partition, you must use the configTool utility toimport the data source templates for the system tables and user tables.
For instructions, see “Importing data source templates” on page 47.
You create a new category from the template, which creates a new set of datasource configuration properties. Create as many new categories as needed, one foreach data source of that type. In the example above, you would use the Oracletemplate to create one new category and the DB2 template to create two newcategories. See “Duplicating a data source template” on page 47.
After you add the data source properties, set the data source configurationproperties in the categories you created from the templates.
For instructions, see “Campaign configuration properties” on page 47.
Complete the following tasks to configure data source properties for each partition:1. Add data source configuration properties to the Configuration page for each
Campaign data source by using the appropriate data source template. TheCampaign installer imports the template for the database type that youspecified for the Marketing Platform database when you ran the IBM installer.If you need other data source templates for additional database types, youmust import them manually using the Marketing Platform configTool utility.You can import as many templates as you need, to correspond to each differenttype of database you have. For example, suppose your installation of MarketingPlatform and Campaign used the following databases:v Oracle - system tablesv DB2 - customer (user) tablesv DB2 - additional customer (user) tables
In this case, you would import the DB2Template.xml template for the two setsof customer (user) tables. If your Marketing Platform and Campaign systemtables databases are of the same database type, the installer automaticallyimports the template used for the system tables; in this example, it imports theOracle template. For instructions, see “Importing data source templates” onpage 47.
2. Create a new category from the template, which creates a new set of datasource configuration properties. Create as many new categories as needed, onefor each data source of that type. In the example above, you would use theOracle template to create one new category and the DB2 template to create twonew categories. See “Duplicating a data source template” on page 47.
3. Set the data source configuration properties for each Campaign data source. See“Campaign configuration properties” on page 47 for more information.
54 IBM Campaign: Installation Guide

Setting up system users for CampaignYou can associate a system user with one or more Marketing Platform data sourcesto avoid presenting users with repeated prompts for login credentials. Each datasource specifies a user name and password. You can provide a user name andpassword to access a database or other protected resources by referencing the datasource. By adding multiple data sources to the configuration of the system useraccount, you can allow the system user to access multiple databases.
IBM EMM applications might require a system user account configured with thefollowing attributes:v Login credentials for accessing system tables or other data sources.v Specific permissions to create, modify, and delete objects within the system.
For more information about setting up a new user and assigning a data source to auser, see the IBM Marketing Platform Administrator's Guide.
Complete the following actions to set up system users for Campaign:1. Use an existing or a new user account to save credentials for the following data
sources:v Campaign system tablesv All customer (user) tables
2. On UNIX, for the Alternate Login attribute of the system user, enter the UNIXname for a user in a group that shares privileges with the UNIX users ofCampaign.
Note: If you have multiple partitions, you must create a system user for eachpartition.
Using IBM Cognos Reports for multiple partitionsIf you want to use IBM Cognos Reports for multiple partitions in Campaign,eMessage, or Interact, you must configure IBM Cognos reports packages for eachpartition.
For instructions, see the IBM EMM Reports Installation and Configuration Guide.
Assigning roles, permissions, and groups for partitionsBefore you can use the partitions that you have configured for Campaign, youmust assign roles to the user with administrator role in each partition. You mustalso assign a group to each partition.
Use the partitionTool utility to create a default admin user for each partition thatyou create.
Assign roles to each partition Admin user - The partitionTool utility creates adefault Admin user for each partition you create. On the Users page, assign at leastone security role (for example, Global Policy/Admin) to your new user. Once thenew user has been assigned the role, you can log into the Campaign partition asthat new user.
If you plan to enable IBM eMessage in multiple Campaign partitions, you mustconfigure a corresponding eMessage partition for each Campaign partition. For
Chapter 8. Configuring multiple partitions for Campaign 55

more information about creating additional partitions for eMessage, see Chapter 9,“Configuring multiple partitions in eMessage,” on page 57.
56 IBM Campaign: Installation Guide

Chapter 9. Configuring multiple partitions in eMessage
Configure multiple partitions in eMessage to isolate and secure data for differentgroups of eMessage users. As each partition has its own set of configurationproperties, you can customize eMessage for each group of users.
Installing eMessage creates a default partition for eMessage in the MarketingPlatform. You can configure more partitions for eMessage. Each partition that youcreate for eMessage operates in conjunction with a partition created for Campaign.
Note: To configure multiple partitions in eMessage you must configurecorresponding partitions in Campaign.Adding new partitions for eMessage requires making changes in the MarketingPlatform configurations for eMessage and Campaign.
Important: After you change the eMessage and Campaign configurations, youmust restart the web application server that hosts Campaign and restart theResponse and Contact Tracker (RCT). You might also need to restart the Campaignlistener.
Be sure to back up your existing configurations before you make changes.
Partitions for eMessage: OverviewCreating partitions for eMessage allows you to isolate and secure data for differentgroups of users. Each partition appears to users as a separate instance of eMessage,with no indication that other partitions exist on the same system. Because eachpartition has its own set of configuration properties, you can customize eMessagefor each group of users.
Users within each partition can access only those functions, data, and customertables configured for the partition. For example, if you create partitions namedpartition1 and partition2, eMessage users working in partition1 can selectemail recipients from customer tables configured in partition1, but not inpartition2. IBM does not recommend creating multiple partitions if users need toshare data.
When you work with multiple partitions, you should understand characteristicsthat are unique to partitions for eMessage and how partitions for eMessage relateto partitions for Campaign. You should also be familiar with the workflow forcreating and configuring multiple partitions for eMessage.
Characteristics of partitions for eMessage
Note the following when you create and configure new partitions for eMessage.v You create partitions for eMessage differently than you do for Campaign.
You create new partitions for eMessage using a partition template available inthe eMessage configuration properties in Marketing Platform.
v The name of each eMessage partition must exactly match the name of itscorresponding Campaign partition.
v Each partition that you create for eMessage must be able to connect to IBMEMM Hosted Services.
© Copyright IBM Corp. 1998, 2013 57

You must request a separate IBM EMM Hosted Services account for eachpartition. IBM will provide a user name and password connected to the account.You must configure a Marketing Platform data source that can provide theseaccess credentials automatically when eMessage connects to IBM EMM HostedServices.For more information about how to request an account, see the IBM eMessageStartup and Administrator's Guide.
Relationship to partitions in Campaign
Each partition in eMessage operates in conjunction with a specific partition createdin the Marketing Platform for Campaign. The Campaign partition provides thefollowing.v Campaign schema that contains the eMessage system tablesv File structure for Campaign in the partition, including directories used by
eMessage to create and process recipient listsv Configuration properties associated with creating recipient lists and enabling
eMessage within the partition
Because eMessage operates with Campaign within a specific partition, theeMessage and Campaign partition structures must specify the same name. Thepartition names must match exactly.
Roadmap for configuring multiple partitions in eMessageTo create a partition in eMessage, use the exact same name as the partition inCampaign that exists in the Marketing Platform configurations.
Before you create a new partition for eMessage, confirm that you have satisfied allthe eMessage prerequisites for the partition in Campaign and eMessage.
Complete the following steps to create a new partition for eMessage.1. “Creating a new partition for eMessage”2. “Preparing eMessage system tables for the partition” on page 603. “Configuring a system user to access IBM EMM Hosted Services” on page 624. “Enabling eMessage in Campaign for the new partition” on page 635. “Specifying the Recipient List Uploader location for eMessage” on page 636. “Restarting system components after configuring eMessage” on page 647. “Testing eMessage partition configuration and connections” on page 64
Creating a new partition for eMessageInstalling eMessage creates a default partition for eMessage in Marketing Platform.You can create multiple partitions for eMessage to isolate and secure data fordifferent groups of users.
Before you create and configure partitions for eMessage, you must meet thefollowing requirements for eMessage and Campaign:v Before you create multiple partitions in eMessage, complete the following tasks
for eMessage:
58 IBM Campaign: Installation Guide

– Contact IBM Support to request an account and credentials for each partition.Each partition requires a separate IBM EMM Hosted Services account andaccess credentials. For more information, see the IBM Startup andAdministrator's Guide.
– Create a system user that can access the eMessage system tables that you willcreate in the Campaign schema for the partition.You can update the system user that you created for the Campaign partitionso that it can also access the eMessage system tables.
v Before you create multiple partitions in eMessage, complete the following tasksin Campaign:– Create a partition in Campaign to operate with the partition that you are
creating for eMessage. Note the name of the partition.– Create Campaign system tables in the Campaign partition.– Configure a system user to access the system tables in the partition.
If you have multiple partitions, each partition must have its own system user.The system user cannot be the same across partitions.
The IBM installer registers the eMessage configuration properties and a defaultpartition during initial installation. The default partition includes a template thatyou can copy to create additional partitions.
Complete the following actions to create a new partition for eMessage:1. Navigate to eMessage > partitions > (partition) and duplicate the partition
template.2. Name the new partition.
Note: eMessage does not support deleting a partition after you have created it.
Identifying the partition template
The Configuration page displays the eMessage partition template in the navigationtree for the default partition. You can identify the partition template in the treebecause its label is in italics and enclosed in parentheses.
Naming the new partition
The following restrictions apply when you name a new partition.v The name must be unique among categories that are siblings in the tree (that is,
among categories that share the same parent category).v The partition name may not start with a period. Also, the following characters
are not allowed in partition names.
Chapter 9. Configuring multiple partitions in eMessage 59

Note: Because eMessage operates with Campaign within a specific partition, thepartitions for eMessage and Campaign must specify the same partition name.
Preparing eMessage system tables for the partitionFor each partition that you create for eMessage, you must create, populate andconfigure the eMessage system tables that are used by the partition in theCampaign schema.
Complete the following actions to prepare the eMessage system tables for apartition:1. Create the eMessage system tables. In your database client, run the SQL scripts
for creating system tables against the Campaign database.2. Populate the tables that you created. Use the database client to run the scripts
for populating tables against the Campaign database. For more informationabout the SQL scripts, see the reference table for script names and locations at“Creating and populating the eMessage system tables manually” on page 34.
3. Set the following configuration properties in the eMessage configuration for thepartition, specifying the user name and platform data source that youconfigured for the partition's Campaign system user:v eMessage > partitions > partition [n] < dataSources > systemTables >
asmUserForDBCredentials
v eMessage > partitions > partition [n] < dataSources > systemTables >amDataSourceForDBCredentials
eMessage accesses the partition's system tables through a system userconfigured in Marketing Platform. A Marketing Platform data source added tothe system user provides the required access credentials. Because the eMessage
60 IBM Campaign: Installation Guide

system tables exist in the Campaign schema for the partition, you can use thesystem user that you created to access the Campaign schema to access thepartition's eMessage system tables.
4. Update the following properties in the partition's configuration properties:v eMessage > partitions > partition [n] < dataSources > systemTables >
type
v eMessage > partitions > partition [n] < dataSources > systemTables >schemaName
v eMessage > partitions > partition [n] < dataSources > systemTables >jdbcBatchSize
v eMessage > partitions > partition [n] < dataSources > systemTables >jdbcClassName
v eMessage > partitions > partition [n] < dataSources > systemTables >jdbcURI
See the Marketing Platform online help for each property to learn more aboutsetting the configuration properties. For additional information about theseconfiguration properties and configuring eMessage, see the IBM eMessageStartup and Administrator's Guide.
Creating and populating the eMessage system tablesmanually
For eMessage, you must create additional system tables in the Campaign schemaand then populate the tables with initial data. The Campaign installerautomatically creates and populates the eMessage system tables in the Campaignschema if you select the option to create system tables automatically. However, ifyou do not select the option, you must create and populate the eMessage systemtables manually.
Use your database client to run the appropriate script against the Campaigndatabase.
Note: The eMessage installation directory is a subfolder within the Campaigndirectory.
Scripts for creating eMessage tables
IBM provides the ace_op_systab scripts for creating eMessage tables in your localenvironment.
If your Campaign system tables are configured for Unicode, find the appropriatescript in the ddl/unicode directory under your eMessage installation.
If your Campaign system tables are not configured for Unicode, use thenon-Unicode scripts in the ddl directory under your eMessage installation. Use thefollowing table to see the scripts that you must use:
Table 22. Scripts for creating eMessage tables
Data source type Script name
IBM DB2 ace_op_systab_db2.sql
The user tablespace and system temporary tablespace where the systemtables reside must each have a page size of 16K or greater.
Chapter 9. Configuring multiple partitions in eMessage 61

Table 22. Scripts for creating eMessage tables (continued)
Data source type Script name
Microsoft SQLServer
ace_op_systab_sqlsvr.sql
Oracle ace_op_systab_ora.sql
Scripts for populating eMessage tables
IBM provides the ace_op_populate_systab scripts for populating the eMessagetables in your local environment.
The populate scripts are stored in the ddl directory of your eMessage installation.IBM provides only one version of the populate scripts because you can use themfor either Unicode or non-Unicode tables.
Note: The eMessage installation directory is a subfolder within the Campaigndirectory.
Use the following table to see the scripts that you must use:
Table 23. Scripts for populating eMessage tables
Data source type Script name
IBM DB2 ace_op_populate_systab_db2.sql
Microsoft SQLServer
ace_op_populate_systab_sqlsvr.sql
Oracle ace_op_populate_systab_ora.sql
Configuring a system user to access IBM EMM Hosted ServiceseMessage components must be able to access the IBM EMM Hosted Serviceswithout requiring manual entry of login credentials. To establish automatic login,define a system user in Marketing Platform that can provide the required accesscredentials.
To simplify user administration and troubleshooting, you can modify an existingsystem user to access hosted services and local system tables. You can configure asingle system user to provide credentials for multiple systems. For example,modifying the configuration of the Campaign system user creates a single user thatcan automatically access IBM EMM Hosted Services and the eMessage systemtables in the Campaign schema.
The credentials required to access IBM EMM Hosted Services are the user nameand password that IBM provides for your hosted messaging account. Thecredentials that you use depend on whether you are connecting to IBM's US datacenter or the data center that IBM maintains in the United Kingdom. Consult withIBM to determine which data center you use.
For specific information about how to configure a system user to communicatewith IBM EMM Hosted Services, see the IBM eMessage Startup and Administrator'sGuide.
62 IBM Campaign: Installation Guide

For general information about how to create system users and data sources, see theIBM Marketing Platform Administrator's Guide.
Configuring partition access to IBM EMM Hosted Services
IBM eMessage components in the partition must be allowed to automaticallyprovide valid login credentials when attempting to communicate with IBM EMMHosted Services. To do this, you must add the IBM EMM Hosted Services logincredentials to a Marketing Platform user. This user becomes the eMessage systemuser.
You can add the platform data source containing the IBM EMM Hosted Servicescredentials to the eMessage system user. This user can be the same system userthat accesses the Campaign system tables in the partition.
The steps for configuring system users for a partition are the same as thosefollowed during the initial eMessage installation, which created the first partition.For details about how to add IBM EMM Hosted Services login credentials to asystem user, see the IBM eMessage Startup and Administrator's Guide.
The credentials required to access IBM EMM Hosted Services are the user nameand password that IBM provided during the initial startup process.
Important: For each additional partition, you must request a separate user nameand password from IBM.
Enabling eMessage in Campaign for the new partitionTo allow users of the new eMessage partition to access the eMessage features inCampaign, enable eMessage in the Campaign partition by updating theeMessageInstalled configuration property for the corresponding Campaignpartition.
For example, the eMessage mailing tab does not appear in the Campaign interfaceuntil you enable eMessage in the Campaign configuration.
You enable eMessage in the partition by updating the eMessageInstalledconfiguration property for the corresponding Campaign partition.
In the Marketing Platform configurations, navigate to Campaign | partitions |partition[n] | server | internal and set the eMessageInstalled property to yes.
Specifying the Recipient List Uploader location for eMessageFor each partition where you enable eMessage, specify the location of the RecipientList Uploader (RLU). The RLU uploads the output list tables data and associatedmetadata to the remote services hosted by IBM.
During initial installation, the IBM installer automatically adds the location of theRLU to the configuration for default partition (partition1). However, when you addnew partitions to your environment, you must manually configure all newpartitions to reference the correct location. Because there is only one RLU for eacheMessage installation, all partitions access the same plugin file in the local filesystem of the machine that hosts the Campaign web application.1. In the configuration for partition1 in your Campaign installation, navigate to
Campaign > partitions > partition1 > eMessage > eMessagePluginJarFile.
Chapter 9. Configuring multiple partitions in eMessage 63

The value for this property is the full path to the plugin file(emessageplugin.jar) that operates as the RLU.For example: C:\IBM\Unica\eMessage\plugin\emessageplugin.jar
2. Copy the value for the eMessagePluginJarFile property.3. Navigate to the eMessagePluginJarFile for the new partition and enter the
path you copied from partition1.All partitions must use the same location for the RLU.
Restarting system components after configuring eMessageAfter you change the eMessage and Campaign configurations, you must restart theCampaign web application server, the Response and Contact Tracker (RCT), andthe Campaign listener.1. Restart the web application server for Campaign.
For instructions, see the documentation for your web application server.To verify that the server has started, log in to your IBM EMM installation,access Campaign, and confirm that you can open an existing mailing.
2. Restart the Response and Contact Tracker (RCT).To restart the RCT manually, run the rct script in the bin directory under youreMessage installation, as follows: rct start
If RCT is configured to run as a service, restart the RCT service. The first timethat you restart the RCT as a service, you must manually restart the RCTafterward.For more information, see “eMessage Response and Contact Tracker (RCT)script” on page 79.
3. Restart the Campaign listener:v On Windows, run the cmpServer.bat file in the bin directory under your
Campaign installation.v On UNIX, run the following command as root: ./rc.unica_ac start
Testing eMessage partition configuration and connectionsUse the scripts that are provided by eMessage to verify the partition configurationand its connection to IBM EMM Hosted Services. You must also confirm if you canaccess the mailing interface from the partition.
Important: Before you begin, if you have changed the Campaign or eMessageconfigurations, confirm that you have restarted the web application server thathosts Campaign and that you have restarted the Response and Contact Tracker.
For more information on how to test the partition, see the IBM eMessage Startupand Administrator's Guide.
64 IBM Campaign: Installation Guide

Chapter 10. Marketing Platform utilities
This section provides an overview of the Marketing Platform utilities, includingsome details that apply to all of the utilities and which are not included in theindividual utility descriptions.
Location of utilities
Marketing Platform utilities are located in the tools/bin directory under yourMarketing Platform installation.
List and descriptions of utilities
The Marketing Platform provides the following utilities.v “alertConfigTool” on page 66 - registers alerts and configurations for IBM EMM
productsv “configTool” on page 67 - imports, exports, and deletes configuration settings,
including product registrationsv “datafilteringScriptTool” on page 71 - creates data filtersv “encryptPasswords” on page 72 - encrypts and stores passwordsv “partitionTool” on page 73 - creates database entries for partitionsv “populateDb” on page 75 - populates the Marketing Platform databasev “restoreAccess” on page 76 - restores a user with the platformAdminRole rolev “scheduler_console_client” on page 78 - lists or starts IBM EMM Scheduler jobs
that are configured to listen for a trigger.
Prerequisites for running Marketing Platform utilities
The following are prerequisites for running all Marketing Platform utilities.v Run all utilities from the directory where they are located (by default, the
tools/bin directory under your Marketing Platform installation).v On UNIX, the best practice is to run the utilities with the same user account that
runs the application server on which Marketing Platform is deployed. If you runa utility with a different user account, adjust the permissions on theplatform.log file to allow that user account to write to it. If you do not adjustpermissions, the utility is not able to write to the log file and you might seesome error messages, although the tool should still function correctly.
Troubleshooting connection issues
All of the Marketing Platform utilities except encryptPasswords interact with theMarketing Platform system tables. To connect to the system table database, theseutilities use the following connection information, which is set by the installerusing information provided when the Marketing Platform was installed. Thisinformation is stored in the jdbc.properties file, located in the tools/bin directoryunder your Marketing Platform installation.v JDBC driver namev JDBC connection URL (which includes the host, port, and database name)v Data source login
© Copyright IBM Corp. 1998, 2013 65

v Data source password (encrypted)
In addition, these utilities rely on the JAVA_HOME environment variable, set either inthe setenv script located in the tools/bin directory of your Marketing Platforminstallation, or on the command line. The Marketing Platform installer should haveset this variable automatically in the setenv script, but it is a good practice toverify that the JAVA_HOME variable is set if you have a problem running a utility.The JDK must be the Sun version (not, for example, the JRockit JDK available withWebLogic).
Special characters
Characters that are designated as reserved characters in the operating system mustbe escaped. Consult your operating system documentation for a list of reservedcharacters and how to escape them.
Standard options in Marketing Platform utilities
The following options are available in all Marketing Platform utilities.
-l logLevel
Set the level of log information displayed in the console. Options are high, medium,and low. The default is low.
-L
Set the locale for console messages. The default locale is en_US. The availableoption values are determined by the languages into which the Marketing Platformhas been translated. Specify the locale using the ICU locale ID according to ISO639-1 and ISO 3166.
-h
Display a brief usage message in the console.
-m
Display the manual page for this utility in the console.
-v
Display more execution details in the console.
alertConfigToolNotification types are specific to the various IBM EMM products. Use thealertConfigTool utility to register the notification types when the installer has notdone this automatically during installation or upgrade.
Syntax
alertConfigTool -i -f importFile
66 IBM Campaign: Installation Guide

Commands
-i -f importFile
Import alert and notification types from a specified XML file.
Examplev Import alert and notification types from a file named
Platform_alerts_configuration.xml located in the tools\bin directory underthe Marketing Platform installation.alertConfigTool -i -f Platform_alerts_configuration.xml
configToolThe properties and values on the Configuration page are stored in the systemtables. You can use the configTool utility to import and export configurationsettings to and from the system tables.
When to use configTool
You might want to use configTool for the following reasons.v To import partition and data source templates that are supplied with Campaign,
which you can then modify and duplicate by using the Configuration page.v To register (import configuration properties for) IBM EMM products, if the
product installer is unable to add the properties to the database automatically.v To export an XML version of configuration settings for backup or to import into
a different installation of IBM EMM.v To delete categories that do not have the Delete Category link. You do this by
using configTool to export your configuration, then manually deleting the XMLthat creates the category, and by using configTool to import the edited XML.
Important: This utility modifies the usm_configuration andusm_configuration_values tables in the Marketing Platform system table database,which contains the configuration properties and their values. For best results,either create backup copies of these tables, or export your existing configurationsby using configTool and back up the resulting file so you have a way to restoreyour configuration if you make an error when you use configTool to import.
Syntax
configTool -d -p "elementPath" [-o]
configTool -i -p "parent ElementPath" -f importFile [-o]
configTool -x -p "elementPath" -f exportFile
configTool -vp -p "elementPath" -f importFile [-d]
configTool -r productName -f registrationFile [-o] configTool -uproductName
Commands
-d -p "elementPath" [o]
Chapter 10. Marketing Platform utilities 67

Delete configuration properties and their settings, specifying a path in theconfiguration property hierarchy.
The element path must use the internal names of categories and properties. Youcan obtain them by going to the Configuration page, selecting the wanted categoryor property, and looking at the path that is displayed in parentheses in the rightpane. Delimit a path in the configuration property hierarchy by using the |character, and surround the path with double quotation marks.
Note the following.v Only categories and properties within an application can be deleted by using
this command, not whole applications. Use the -u command to unregister awhole application.
v To delete categories that do not have the Delete Category link on theConfiguration page, use the -o option.
When you use -d with the -vp command, the configTool deletes any child nodes inthe path you specify if those nodes are not included in the XML file you specify.
-i -p "parentElementPath" -f importFile [o]
Import configuration properties and their settings from a specified XML file.
To import, you specify a path to the parent element under which you want toimport your categories. The configTool utility imports properties under thecategory you specify in the path.
You can add categories at any level below the top level, but you cannot add acategory at same level as the top category.
The parent element path must use the internal names of categories and properties.You can obtain them by going to the Configuration page, selecting the requiredcategory or property, and looking at the path that is displayed in parentheses inthe right pane. Delimit a path in the configuration property hierarchy by using the| character, and surround the path with double quotation marks.
You can specify an import file location relative to the tools/bin directory or youcan specify a full directory path. If you specify a relative path or no path,configTool first looks for the file relative to the tools/bin directory.
By default, this command does not overwrite an existing category, but you can usethe -o option to force an overwrite.
-x -p "elementPath" -f exportFile
Export configuration properties and their settings to an XML file with a specifiedname.
You can export all configuration properties or limit the export to a specific categoryby specifying a path in the configuration property hierarchy.
The element path must use the internal names of categories and properties, whichyou can obtain by going to the Configuration page, selecting the wanted categoryor property, and looking at the path that is displayed in parentheses in the right
68 IBM Campaign: Installation Guide

pane. Delimit a path in the configuration property hierarchy by using the |character, and surround the path with double quotation marks.
You can specify an export file location relative to the current directory or you canspecify a full directory path. If the file specification does not contain a separator (/on UNIX, / or \ on Windows), configTool writes the file to the tools/bindirectory under your Marketing Platform installation. If you do not provide thexml extension, configTool adds it.
-vp -p "elementPath" -f importFile [-d]
This command is used mainly in manual upgrades, to import configurationproperties. If you applied a fix pack that contains a new configuration property,and you then upgrade, importing a configuration file as part of a manual upgradeprocess can override values that were set when the fix pack was applied. The -vpcommand ensures that the import does not override previously set configurationvalues.
Important: After you use the configTool utility with the -vp option, you mustrestart the web application server on which Marketing Platform is deployed so thechanges are applied.
When you use -d with the -vp command, the configTool deletes any child nodes inthe path you specify if those nodes are not included in the XML file you specify.
-r productName -f registrationFile
Register the application. The registration file location can be relative to thetools/bin directory or can be a full path. By default, this command does notoverwrite an existing configuration, but you can use the -o option to force anoverwrite. The productName parameter must be one of those names that are listedabove.
Note the following.v When you use the -r command, the registration file must have <application> as
the first tag in the XML.Other files can be provided with your product that you can use to insertconfiguration properties into the Marketing Platform database. For these files,use the -i command. Only the file that has the <application> tag as the first tagcan be used with the -r command.
v The registration file for the Marketing Platform is named Manager_config.xml,and the first tag is <Suite>. To register this file on a new installation, use thepopulateDb utility, or rerun the Marketing Platform installer as described in theIBM Marketing Platform Installation Guide.
v After the initial installation, to re-register products other than the MarketingPlatform, use configTool with the -r command and -o to overwrite the existingproperties.
The configTool utility uses product names as parameters with the commands thatregister and unregister products. With the 8.5.0 release of IBM EMM, manyproduct names changed. However, the names that are recognized by configTooldid not change. The valid product names for use with configTool are listed below,along with the current names of the products.
Chapter 10. Marketing Platform utilities 69

Table 24. Product names for configTool registration and unregistration
Product name Name used in configTool
Marketing Platform Manager
Campaign Campaign
Distributed Marketing Collaborate
eMessage emessage
Interact interact
Contact Optimization Optimize
Marketing Operations Plan
CustomerInsight Insight
Digital Analytics for On Premises NetInsight
Opportunity Detection Detect
Leads Leads
Interaction History InteractionHistory
Attribution Modeler AttributionModeler
IBM SPSS Modeler Advantage EnterpriseMarketing Management Edition
SPSS
Digital Analytics Coremetrics
-u productName
Unregister an application that is specified by productName. You do not have toinclude a path to the product category; the product name is sufficient, and it isrequired. The process removes all properties and configuration settings for theproduct.
Options
-o
When used with -i or -r, it overwrites an existing category or product registration(node).
When used with -d, you can delete a category (node) that does not have theDelete Category link on the Configuration page.
Examplesv Import configuration settings from a file named Product_config.xml in the conf
directory under the Marketing Platform installation.configTool -i -p "Affinium" -f Product_config.xml
v Import one of the supplied Campaign data source templates into the defaultCampaign partition, partition1. The example assumes that you placed the Oracledata source template, OracleTemplate.xml, in the tools/bin directory under theMarketing Platform installation.configTool -i -p "Affinium|Campaign|partitions|partition1|dataSources" -fOracleTemplate.xml
v Export all configuration settings to a file named myConfig.xml in the D:\backupsdirectory.
70 IBM Campaign: Installation Guide

configTool -x -f D:\backups\myConfig.xml
v Export an existing Campaign partition (complete with data source entries), saveit to a file named partitionTemplate.xml, and store it in the default tools/bindirectory under the Marketing Platform installation.configTool -x -p "Affinium|Campaign|partitions|partition1" -fpartitionTemplate.xml
v Manually register an application named productName, by using a file namedapp_config.xml in the default tools/bin directory under the Marketing Platforminstallation, and force it to overwrite an existing registration of this application.configTool -r product Name -f app_config.xml -o
v Unregister an application named productName.configTool -u productName
datafilteringScriptToolThe datafilteringScriptTool utility reads an XML file to populate the datafiltering tables in the Marketing Platform system table database.
Depending on how you write the XML, you can use this utility in two ways.v Using one set of XML elements, you can auto-generate data filters based on
unique combinations of field values (one data filter for each uniquecombination).
v Using a slightly different set of XML elements, you can specify each data filterthat the utility creates.
See IBM Marketing Platform the Administrator's Guide for information about creatingthe XML.
When to use datafilteringScriptTool
You must use datafilteringScriptTool when you create new data filters.
Prerequisites
The Marketing Platform must be deployed and running.
Using datafilteringScriptTool with SSL
When the Marketing Platform is deployed using one-way SSL you must modifythe datafilteringScriptTool script to add the SSL options that perform handshaking.To modify the script, you must have the following information.v Truststore file name and pathv Truststore password
In a text editor, open the datafilteringScriptTool script (.bat or .sh) and find thelines that look like this (examples are Windows version).
:callexec
"%JAVA_HOME%\bin\java" -DUNICA_PLATFORM_HOME="%UNICA_PLATFORM_HOME%"
com.unica.management.client.datafiltering.tool.DataFilteringScriptTool %*
Chapter 10. Marketing Platform utilities 71

Edit these lines to look like this (new text is in bold). Substitute your truststorepath and file name and truststore password for myTrustStore.jks and myPassword.
:callexec
SET SSL_OPTIONS=-Djavax.net.ssl.keyStoreType="JKS"
-Djavax.net.ssl.trustStore="C:\security\myTrustStore.jks"
-Djavax.net.ssl.trustStorePassword=myPassword
"%JAVA_HOME%\bin\java" -DUNICA_PLATFORM_HOME="%UNICA_PLATFORM_HOME%"%SSL_OPTIONS%
com.unica.management.client.datafiltering.tool.DataFilteringScriptTool %*
Syntax
datafilteringScriptTool -r pathfile
Commands
-r path_file
Import data filter specifications from a specified XML file. If the file is not locatedin the tools/bin directory under your installation, provide a path and enclose thepath_file parameter in double quotation marks.
Examplev Use a file named collaborateDataFilters.xml, located in the C:\unica\xml
directory, to populate the data filter system tables.datafilteringScriptTool -r "C:\unica\xml\collaborateDataFilters.xml"
encryptPasswordsThe encryptPasswords utility is used to encrypt and store either of two passwordsthat Marketing Platform uses internally.
The two passwords that the utility can encrypt are as follows.v The password that the Marketing Platform uses to access its system tables. The
utility replaces an existing encrypted password (stored in the jdbc,propertiesfile, located in the tools\bin directory under your Marketing Platforminstallation) with a new one.
v The keystore password used by the Marketing Platform when it is configured touse SSL with a certificate other than the default one supplied with the MarketingPlatform or the web application server. The certificate can be either a self-signedcertificate or a certificate from a certificate authority.
When to use encryptPasswords
Use encryptPasswords as for the following reasons.v When you change the password of the account used to access your Marketing
Platform system table database.
72 IBM Campaign: Installation Guide

v When you have created a self-signed certificate or have obtained one from acertificate authority.
Prerequisitesv Before running encryptPasswords to encrypt and store a new database password,
make a backup copy of the jdbc.properties file, located in the tools/bindirectory under your Marketing Platform installation.
v Before running encryptPasswords to encrypt and store the keystore password,you must have created or obtained a digital certificate and know the keystorepassword.
Syntax
encryptPasswords -d databasePassword
encryptPasswords -k keystorePassword
Commands
-d databasePassword
Encrypt the database password.
-k keystorePassword
Encrypt the keystore password and store it in a file named pfile.
Examplesv When the Marketing Platformwas installed, the login for the system table
database account was set to myLogin. Now, some time after installation, you havechanged the password for this account to newPassword. Run encryptPasswords asfollows to encrypt and store the database password.encryptPasswords -d newPassword
v You are configuring an IBM EMM application to use SSL and have created orobtained a digital certificate. Run encryptPasswords as follows to encrypt andstore the keystore password.encryptPasswords -k myPassword
partitionToolPartitions are associated with Campaign policies and roles. These policies and rolesand their partition associations are stored in the Marketing Platform system tables.The partitionTool utility seeds the Marketing Platform system tables with basicpolicy and role information for partitions.
When to use partitionTool
For each partition you create, you must use partitionTool to seed the MarketingPlatform system tables with basic policy and role information.
See the installation guide appropriate for your version of Campaign for detailedinstructions on setting up multiple partitions in Campaign.
Chapter 10. Marketing Platform utilities 73

Special characters and spaces
Any partition description or user, group, or partition name that contains spacesmust be enclosed in double quotation marks.
Syntax
partitionTool -c -s sourcePartition -n newPartitionName [-uadmin_user_name] [-d partitionDescription] [-g groupName]
Commands
The following commands are available in the partitionTool utility.
-c
Replicates (clones) the policies and roles for an existing partition specified usingthe -s option, and uses the name specified using the -n option. Both of theseoptions are required with c. This command does the following.v Creates a new IBM EMM user with the Admin role in both the Administrative
Roles policy and the global policy in Campaign. The partition name you specifyis automatically set as this user's password.
v Creates a new Marketing Platform group and makes the new Admin user amember of that group.
v Creates a new partition object.v Replicates all the policies associated with the source partition and associates
them with the new partition.v For each replicated policy, replicates all roles associated with the policy.v For each replicated role, maps all functions in the same way that they were
mapped in the source role.v Assigns the new Marketing Platform group to the last system-defined Admin
role created during role replication. If you are cloning the default partition,partition1, this role is the default Administrative Role (Admin).
Options
-d partitionDescription
Optional, used with -c only. Specifies a description that appears in the output fromthe -list command. Must be 256 characters or less. Enclose in double quotationmarks if the description contains spaces.
-g groupName
Optional, used with -c only. Specifies the name of the Marketing Platform Admingroup that the utility creates. The name must be unique within this instance ofMarketing Platform
If not defined, the name defaults to partition_nameAdminGroup.
-n partitionName
Optional with -list, required with -c. Must be 32 characters or less.
74 IBM Campaign: Installation Guide

When used with -list, specifies the partition whose information is listed.
When used with -c, specifies the name of the new partition, and the partitionname you specify is used as the password for the Admin user. The partition namemust match the name you gave the partition in when you configured it (using thepartition template on the Configuration page).
-s sourcePartition
Required, used with -c only. The name of the source partition to be replicated.
-u adminUserName
Optional, used with -c only. Specifies the user name of the Admin user for thereplicated partition. The name must be unique within this instance of MarketingPlatform.
If not defined, the name defaults to partitionNameAdminUser.
The partition name is automatically set as this user's password.
Examplesv Create a partition with the following characteristics.
– Cloned from partition1– Partition name is myPartition
– Uses the default user name (myPartitionAdminUser) and password(myPartition)
– Uses the default group name (myPartitionAdminGroup)– Description is "ClonedFromPartition1"
partitionTool -c -s partition1 -n myPartition -d "ClonedFromPartition1"
v Create a partition with the following characteristics.– Cloned from partition1– Partition name is partition2
– Specifies user name of customerA with the automatically assigned password ofpartition2
– Specifies group name of customerAGroup– Description is "PartitionForCustomerAGroup"
partitionTool -c -s partition1 -n partition2 -u customerA -gcustomerAGroup -d "PartitionForCustomerAGroup"
populateDbThe populateDb utility inserts default (seed) data in the Marketing Platform systemtables.
The IBM EMM installer can populate the Marketing Platform system tables withdefault data for Marketing Platform and for Campaign. However, if your companypolicy does not permit the installer to change the database, or if the installer isunable to connect with the Marketing Platform system tables, you must insertdefault data in the Marketing Platform system tables using this utility.
Chapter 10. Marketing Platform utilities 75

For Campaign, this data includes security roles and permissions for the defaultpartition. For Marketing Platform, this data includes default users and groups, andsecurity roles and permissions for the default partition.
Syntax
populateDb -n productName
Commands
-n productName
Insert default data into the Marketing Platform system tables. Valid product namesare Manager (for Marketing Platform) and Campaign (for Campaign).
Examplesv
Insert Marketing Platform default data manually.populateDb -n Manager
v
Insert Campaign default data manually.populateDb -n Campaign
restoreAccessThe restoreAccess utility allows you to restore access to Marketing Platform if allusers with PlatformAdminRole privileges have been inadvertently locked out or ifall ability to log in to the Marketing Platform has been lost.
When to use restoreAccess
You might want to use restoreAccess under the two circumstances described inthis section.
PlatformAdminRole users disabled
It is possible that all users with PlatformAdminRole privileges in MarketingPlatform might become disabled in the system. Here is an example of how theplatform_admin user account might become disabled. Suppose you have only oneuser with PlatformAdminRole privileges (the platform_admin user). Assume theMaximum failed login attempts allowed property property in the General |Password settings category on the Configuration page is set to 3. Then supposesomeone who is attempting to log in as platform_admin enters an incorrectpassword three times in a row. These failed login attempts cause theplatform_admin account to become disabled in the system.
In that case, you can use restoreAccess to add a user with PlatformAdminRoleprivileges to the Marketing Platform system tables without accessing the webinterface.
When you run restoreAccess in this way, the utility creates a user with the loginname and password you specify, and with PlatformAdminRole privileges.
76 IBM Campaign: Installation Guide

If the user login name you specify exists in Marketing Platform as an internal user,that user's password is changed.
Only a user with the login name of PlatformAdmin and with PlatformAdminRoleprivileges can universally administer all dashboards. So if the platform_admin useris disabled and you create a user with restoreAccess, you should create a userwith a login of platform_admin.
Improper configuration of Active Directory integration
If you implement Windows Active Directory integration with improperconfiguration and can no longer log in, use restoreAccess to restore the ability tolog in.
When you run restoreAccess in this way, the utility changes the value of thePlatform | Security | Login method property from Windows integrated login toMarketing Platform. This change allows you to log in with any user account thatexisted before you were locked out. You can optionally specify a new login nameand password as well. You must restart the web application server on whichMarketing Platform is deployed if you use the restoreAccess utility in this way.
Password considerations
Note the following about passwords when you use restoreAccess.v The restoreAccess utility does not support blank passwords, and does not
enforce password rules.v If you specify a user name that is in use, the utility resets the password for that
user.
Syntax
restoreAccess -u loginName -p password
restoreAccess -r
Commands
-r
When used without the -u loginName option, reset the value of the Platform |Security | Login method property to Marketing Platform. Requires restart of theweb application server to take effect.
When used with the -u loginName option, create a PlatformAdminRole user.
Options
-u loginNname
Create a user with PlatformAdminRole privileges with the specified login name.Must be used with the -p option.
-p password
Specify the password for the user being created. Required with -u.
Chapter 10. Marketing Platform utilities 77

Examplesv Create a user with PlatformAdminRole privileges. The login name is tempUser
and the password is tempPassword.restoreAccess -u tempUser -p tempPassword
v Change the value of the login method to IBM Marketing Platform and create auser with PlatformAdminRole privileges. The login name is tempUser and thepassword is tempPassword.restoreAccess -r -u tempUser -p tempPassword
scheduler_console_clientJobs configured in the IBM EMM Scheduler can be listed and kicked off by thisutility, if they are set up to listen for a trigger.
What to do if SSL is enabled
When the Marketing Platform web application is configured to use SSL, the JVMused by the scheduler_console_client utility must use the same SSL certificatethat is used by the web application server on which the Marketing Platform isdeployed.
Take the following steps to import the SSL certificatev Determine the location of the JRE used by the scheduler_console_client.
– If JAVA_HOME is set as a system environment variable, the JRE it points to isthe one used by the scheduler_console_client utility.
– If JAVA_HOME is not set as a system environment variable, thescheduler_console_client utility uses the JRE set either in the setenv scriptlocated in the tools/bin directory of your Marketing Platform installation, oron the command line.
v Import the SSL certificate used by the web application server on which theMarketing Platform is deployed to the JRE used by scheduler_console_client.The Sun JDK includes a program called keytool that you can use to import thecertificate. Consult the Java documentation for complete details on using thisprogram, or access the help by entering -help when you run the program.
v Open the tools/bin/schedulerconsoleclient file in a text editor and add thefollowing properties. These differ depending on the web application server onwhich Marketing Platform is deployed.– For WebSphere, add these properties to the file.
-Djavax.net.ssl.keyStoreType=JKS-Djavax.net.ssl.keyStore="Path to your key store JKS file"-Djavax.net.ssl.keyStorePassword="Your key store password"-Djavax.net.ssl.trustStore="Path to your trust store JKS file"-Djavax.net.ssl.trustStorePassword="Your trust store password"-DisUseIBMSSLSocketFactory=false
– For WebLogic, add these properties to the file.-Djavax.net.ssl.keyStoreType="JKS"-Djavax.net.ssl.trustStore="Path to your trust store JKS file"-Djavax.net.ssl.trustStorePassword="Your trust store password"
If the certificates do not match, the Marketing Platform log file contains an errorsuch as the following.
78 IBM Campaign: Installation Guide

Caused by: sun.security.provider.certpath.SunCertPathBuilderException:unable to find valid certification path to requested target
Prerequisites
The Marketing Platform must be installed, deployed, and running.
Syntax
scheduler_console_client -v -t trigger_name user_name
scheduler_console_client -s -t trigger_name user_name
Commands
-v
List the scheduler jobs configured to listen for the specified trigger.
Must be used with the -t option.
-s
Send the specified trigger.
Must be used with the -t option.
Options
-t trigger_name
The name of the trigger, as configured in the scheduler.
Examplev List jobs configured to listen for a trigger named trigger1.
scheduler_console_client -v -t trigger1
v Execute jobs configured to listen for a trigger named trigger1.scheduler_console_client -s -t trigger1
eMessage Response and Contact Tracker (RCT) scriptUse this script to run and check the status of the Response and Contact Tracker(RCT).
This script is located in the bin directory under your eMessage installation. TheeMessage directory is a sub-directory in the Campaign directory.
In UNIX or Linux environments run the script as rct.sh.
In Windows, run the script from the command line as rct.bat.
Syntax
rct [ start | stop | check ]
Chapter 10. Marketing Platform utilities 79

Commands
start
Start the RCT
stop
Stop the RCT
Options
check
Check the status of the connection between the RCT and IBM EMM HostedServices.
Examplesv To start the RCT on Windows.
rct.bat start
v To stop the RCT on Windows.rct.bat stop
v In a Linux environment, to determine if the RCT is connected to IBM EMMHosted Services.rct.sh check
Depending on the status of your system, the output of this command might looklike this:C:\<EMM_HOME>\Campaign\eMessage\bin>rct checkTesting config and connectivity for partition partition1Succeeded | Partition: partition1 - Hosted Services Account ID: asm_admin
eMessage MKService_rct scriptThe MKService_rct script adds or removes the Response and Contact Tracker(RCT) as a service. Adding the RCT as a service restarts the RCT every time yourestart the computer where you have installed the RCT. Removing the RCT as aservice prevents the RCT from restarting automatically.
This script is located in the bin directory under your eMessage installation.
In UNIX or Linux environments run MKService_rct.sh. with a user that has rootpermissions or permissions to create daemon processes.
In Windows, run the script from the command line as MKService_rct.bat.
Syntax
MKService_rct -install
MKService_rct -remove
80 IBM Campaign: Installation Guide

Commands
-install
Add the RCT as a service
-remove
Remove the RCT service
Examplesv To add the RCT as a Windows service.
MKService_rct.bat -install
v To remove the RCT service on UNIX or Linux.MKService_rct.sh -remove
Chapter 10. Marketing Platform utilities 81

82 IBM Campaign: Installation Guide

Chapter 11. Uninstalling Campaign
Run the Campaign uninstaller to uninstall Campaign. When you run theCampaign uninstaller, the files that were created during the installation process areremoved. For example, files such as configuration files, installer registryinformation, and user data are removed from the computer.
When you install IBM EMM products, an uninstaller is included in theUninstall_Product directory, where Product is the name of your IBM product. OnWindows, an entry is also added to the Add or Remove Programs list in theControl Panel.
If you manually remove the files in your installation directory instead of runningthe uninstaller, the result might be an incomplete installation if you later reinstallan IBM product in the same location. After uninstalling a product, its database isnot removed. The uninstaller only removes default files that are created duringinstallation. Any file that is created or generated after installation is not removed.
Note: On UNIX, the same user account that installed Campaign must run theuninstaller.
Complete the following tasks to uninstall Campaign:1. If you have deployed the Campaign web application, undeploy the web
application from WebSphere or WebLogic.2. Stop the Campaign listener.3. Shut down WebSphere or WebLogic.4. Stop the processes that are related to Campaign.5. If the ddl directory exists in the product installation directory, run the scripts
that are provided in the ddl directory to drop tables from the system tabledatabase.
6. Complete one of the following steps to uninstall Campaign:v Double-click the Campaign uninstaller that exists in the Uninstall_Product
directory. The uninstaller runs in the mode in which you installed Campaign.v In a command-line window, navigate to the directory where the uninstaller
exists, and run the following command to uninstall Campaign by using theconsole mode:Uninstall_Product -i console
v In a command-line window, navigate to the directory where the uninstallerexists, and run the following command to uninstall Campaign by using thesilent mode:Uninstall_Product -i silent
When you uninstall Campaign by using the silent mode, the uninstallationprocess does not present any dialogs for user interaction.
Note: If you do not specify an option for uninstalling Campaign, the Campaignuninstaller runs in the mode in which Campaign is installed.
© Copyright IBM Corp. 1998, 2013 83

84 IBM Campaign: Installation Guide

Before you contact IBM technical support
If you encounter a problem that you cannot resolve by consulting thedocumentation, your company's designated support contact can log a call withIBM technical support. Use these guidelines to ensure that your problem isresolved efficiently and successfully.
If you are not a designated support contact at your company, contact your IBMadministrator for information.
Note: Technical Support does not write or create API scripts. For assistance inimplementing our API offerings, contact IBM Professional Services.
Information to gather
Before you contact IBM technical support, gather the following information:v A brief description of the nature of your issue.v Detailed error messages that you see when the issue occurs.v Detailed steps to reproduce the issue.v Related log files, session files, configuration files, and data files.v Information about your product and system environment, which you can obtain
as described in "System information."
System information
When you call IBM technical support, you might be asked to provide informationabout your environment.
If your problem does not prevent you from logging in, much of this information isavailable on the About page, which provides information about your installed IBMapplications.
You can access the About page by selecting Help > About. If the About page is notaccessible, check for a version.txt file that is located under the installationdirectory for your application.
Contact information for IBM technical support
For ways to contact IBM technical support, see the IBM Product Technical Supportwebsite: (http://www.ibm.com/support/entry/portal/open_service_request).
Note: To enter a support request, you must log in with an IBM account. Thisaccount must be linked to your IBM customer number. To learn more aboutassociating your account with your IBM customer number, see Support Resources> Entitled Software Support on the Support Portal.
© Copyright IBM Corp. 1998, 2013 85

86 IBM Campaign: Installation Guide

Notices
This information was developed for products and services offered in the U.S.A.
IBM may not offer the products, services, or features discussed in this document inother countries. Consult your local IBM representative for information about theproducts and services currently available in your area. Any reference to an IBMproduct, program, or service is not intended to state or imply that only that IBMproduct, program, or service may be used. Any functionally equivalent product,program, or service that does not infringe any IBM intellectual property right maybe used instead. However, it is the user's responsibility to evaluate and verify theoperation of any non-IBM product, program, or service.
IBM may have patents or pending patent applications covering subject matterdescribed in this document. The furnishing of this document does not grant youany license to these patents. You can send license inquiries, in writing, to:
IBM Director of LicensingIBM CorporationNorth Castle DriveArmonk, NY 10504-1785U.S.A.
For license inquiries regarding double-byte (DBCS) information, contact the IBMIntellectual Property Department in your country or send inquiries, in writing, to:
Intellectual Property LicensingLegal and Intellectual Property LawIBM Japan, Ltd.19-21, Nihonbashi-Hakozakicho, Chuo-kuTokyo 103-8510, Japan
The following paragraph does not apply to the United Kingdom or any othercountry where such provisions are inconsistent with local law: INTERNATIONALBUSINESS MACHINES CORPORATION PROVIDES THIS PUBLICATION "AS IS"WITHOUT WARRANTY OF ANY KIND, EITHER EXPRESS OR IMPLIED,INCLUDING, BUT NOT LIMITED TO, THE IMPLIED WARRANTIES OFNON-INFRINGEMENT, MERCHANTABILITY OR FITNESS FOR A PARTICULARPURPOSE. Some states do not allow disclaimer of express or implied warranties incertain transactions, therefore, this statement may not apply to you.
This information could include technical inaccuracies or typographical errors.Changes are periodically made to the information herein; these changes will beincorporated in new editions of the publication. IBM may make improvementsand/or changes in the product(s) and/or the program(s) described in thispublication at any time without notice.
Any references in this information to non-IBM websites are provided forconvenience only and do not in any manner serve as an endorsement of thosewebsites. The materials at those websites are not part of the materials for this IBMproduct and use of those websites is at your own risk.
© Copyright IBM Corp. 1998, 2013 87

IBM may use or distribute any of the information you supply in any way itbelieves appropriate without incurring any obligation to you.
Licensees of this program who wish to have information about it for the purposeof enabling: (i) the exchange of information between independently createdprograms and other programs (including this one) and (ii) the mutual use of theinformation which has been exchanged, should contact:
IBM Corporation170 Tracer LaneWaltham, MA 02451U.S.A.
Such information may be available, subject to appropriate terms and conditions,including in some cases, payment of a fee.
The licensed program described in this document and all licensed materialavailable for it are provided by IBM under terms of the IBM Customer Agreement,IBM International Program License Agreement or any equivalent agreementbetween us.
Any performance data contained herein was determined in a controlledenvironment. Therefore, the results obtained in other operating environments mayvary significantly. Some measurements may have been made on development-levelsystems and there is no guarantee that these measurements will be the same ongenerally available systems. Furthermore, some measurements may have beenestimated through extrapolation. Actual results may vary. Users of this documentshould verify the applicable data for their specific environment.
Information concerning non-IBM products was obtained from the suppliers ofthose products, their published announcements or other publicly available sources.IBM has not tested those products and cannot confirm the accuracy ofperformance, compatibility or any other claims related to non-IBM products.Questions on the capabilities of non-IBM products should be addressed to thesuppliers of those products.
All statements regarding IBM's future direction or intent are subject to change orwithdrawal without notice, and represent goals and objectives only.
All IBM prices shown are IBM's suggested retail prices, are current and are subjectto change without notice. Dealer prices may vary.
This information contains examples of data and reports used in daily businessoperations. To illustrate them as completely as possible, the examples include thenames of individuals, companies, brands, and products. All of these names arefictitious and any similarity to the names and addresses used by an actual businessenterprise is entirely coincidental.
COPYRIGHT LICENSE:
This information contains sample application programs in source language, whichillustrate programming techniques on various operating platforms. You may copy,modify, and distribute these sample programs in any form without payment toIBM, for the purposes of developing, using, marketing or distributing applicationprograms conforming to the application programming interface for the operatingplatform for which the sample programs are written. These examples have not
88 IBM Campaign: Installation Guide

been thoroughly tested under all conditions. IBM, therefore, cannot guarantee orimply reliability, serviceability, or function of these programs. The sampleprograms are provided "AS IS", without warranty of any kind. IBM shall not beliable for any damages arising out of your use of the sample programs.
If you are viewing this information softcopy, the photographs and colorillustrations may not appear.
TrademarksIBM, the IBM logo, and ibm.com® are trademarks or registered trademarks ofInternational Business Machines Corp., registered in many jurisdictions worldwide.Other product and service names might be trademarks of IBM or other companies.A current list of IBM trademarks is available on the Web at “Copyright andtrademark information” at www.ibm.com/legal/copytrade.shtml.
Privacy Policy and Terms of Use ConsiderationsIBM Software products, including software as a service solutions, ("SoftwareOfferings") may use cookies or other technologies to collect product usageinformation, to help improve the end user experience, to tailor interactions withthe end user or for other purposes. A cookie is a piece of data that a web site cansend to your browser, which may then be stored on your computer as a tag thatidentifies your computer. In many cases, no personal information is collected bythese cookies. If a Software Offering you are using enables you to collect personalinformation through cookies and similar technologies, we inform you about thespecifics below.
Depending upon the configurations deployed, this Software Offering may usesession and persistent cookies that collect each user's user name, and otherpersonal information for purposes of session management, enhanced user usability,or other usage tracking or functional purposes. These cookies can be disabled, butdisabling them will also eliminate the functionality they enable.
Various jurisdictions regulate the collection of personal information throughcookies and similar technologies. If the configurations deployed for this SoftwareOffering provide you as customer the ability to collect personal information fromend users via cookies and other technologies, you should seek your own legaladvice about any laws applicable to such data collection, including anyrequirements for providing notice and consent where appropriate.
IBM requires that Clients (1) provide a clear and conspicuous link to Customer'swebsite terms of use (e.g. privacy policy) which includes a link to IBM's andClient's data collection and use practices, (2) notify that cookies and clear gifs/webbeacons are being placed on the visitor's computer by IBM on the Client's behalfalong with an explanation of the purpose of such technology, and (3) to the extentrequired by law, obtain consent from website visitors prior to the placement ofcookies and clear gifs/web beacons placed by Client or IBM on Client's behalf onwebsite visitor's devices
For more information about the use of various technologies, including cookies, forthese purposes, See IBM's Online Privacy Statement at: http://www.ibm.com/privacy/details/us/en section entitled "Cookies, Web Beacons and OtherTechnologies."
Notices 89

90 IBM Campaign: Installation Guide


����
Printed in USA


