IBackup Drive – User Guide
29
Transcript of IBackup Drive – User Guide
Copyright © Pro Softnet Corporation. All Rights Reserved. 2
IBackup Drive – User Guide
TABLE OF CONTENTS Introduction.................................................................................................................................... 3 Features.......................................................................................................................................... 4
Install IBackup Drive.................................................................................................................... 5 Login to IBackup Drive ................................................................................................................ 5 About Main Screen...................................................................................................................... 7
Settings........................................................................................................................................... 8 Toolbar Options........................................................................................................................... 11 IBackup Drive Tray Menu............................................................................................................ 12 IBackup Drive Monitor ................................................................................................................ 13 Working with IBackup Drive ....................................................................................................... 14
Share Data ................................................................................................................................ 14 Restore Data ............................................................................................................................. 17
Versions........................................................................................................................................ 20 Trash ............................................................................................................................................. 23 Troubleshooting .......................................................................................................................... 27 System Requirements................................................................................................................. 27 Prior Functionalities.................................................................................................................... 28 Technical Support ....................................................................................................................... 29
Copyright © Pro Softnet Corporation. All Rights Reserved. 3
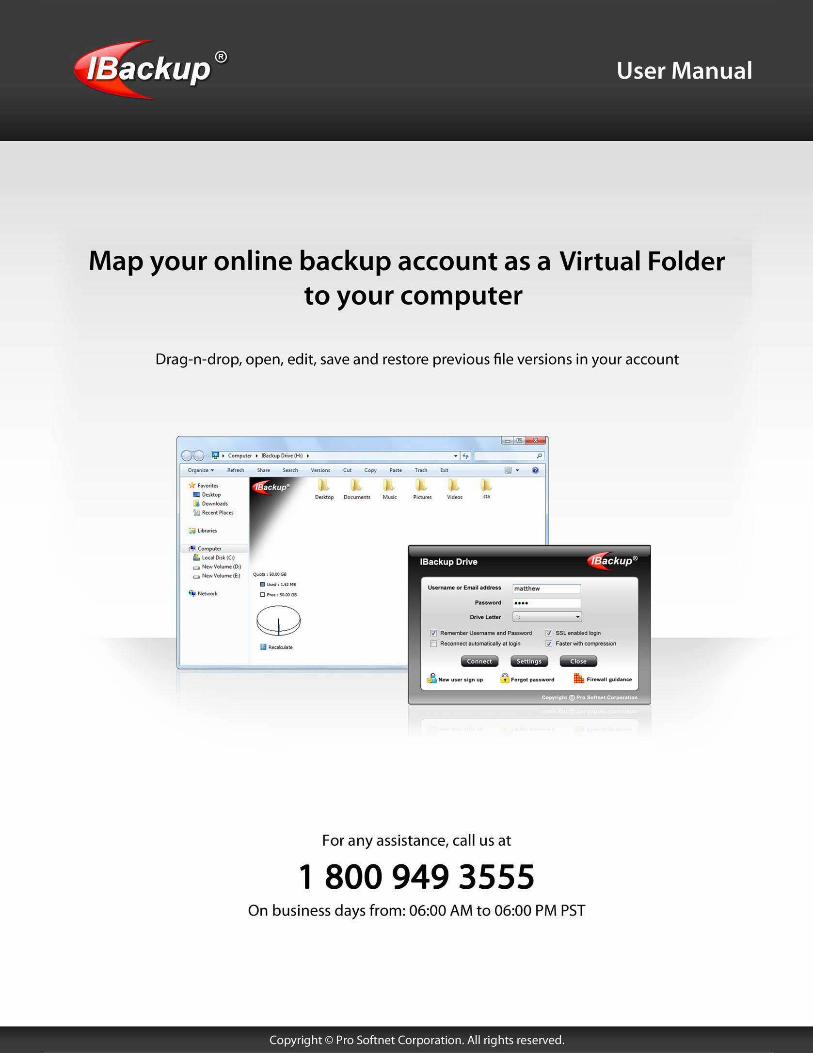
Introduction IBackup Drive is a plug-in that is available as a separate download. It allows you to map your IBackup online account as a virtual folder to your computer. You can easily drag-and-drop files between your account and local machine. Simply open, edit and save files as you do it in your local computer. An added advantage of IBackup Drive is that you do not have to learn a new client interface; the operations are similar to your local computer. You can also share data in your account with your associates for collaborative access. Data is transferred and stored using 256-bit AES encryption. It is also compressed to speed up the process and for optimum bandwidth usage. The application supports character sets of major international languages like Japanese, Chinese, Italian, German, Hebrew, Arabic and so on.
Copyright © Pro Softnet Corporation. All Rights Reserved. 4
Features
Data is secured using 256-bit AES encryption during transfer and storage
Provision to share files / folders for collaborative access
Works behind most of the commonly available HTTP-based proxy servers and also
supports proxy authentication (if required by the proxy server)
Provision to restore 30 previous versions of backed up files
Option to retrieve deleted files from Trash within a 30 day period Automatic proxy detection and update; proxy support
Does not cause any Windows application to hang during file/folder transfer
File caching for faster retrieval of data
File transfer resumption upon temporary disconnections
Supports international character sets of most major languages including French, Spanish,
German, Chinese, Japanese, Hebrew and Italian
Note: Refer http://www.ibackup.com/old-version.htm for the details related to architectural / feature set changes to the IBackup Drive application (accounts created prior to 10th August 2011.)

Copyright © Pro Softnet Corporation. All Rights Reserved. 5
Install IBackup Drive You can download IBackup Drive from http://www.ibackup.com/online-storage-drive/index.html. Upon successful completion of the download, double-click the IBackup Drive setup icon. You will be guided through a step-by-step approach that helps to install the application. Note: Restart the computer once the application has been installed.
Login to IBackup Drive After installation, you can connect to IBackup Drive in the following ways: Double-click the IBackup Drive icon on your Desktop or Start > Programs > IBackup Drive > IBackup Drive
Copyright © Pro Softnet Corporation. All Rights Reserved. 6
The login window has the following options: Username or Email address: Enter the Username or Email address provided while registering for your IBackup account. SSL enabled login: Provides secure transmission of data using the 128-bit Secured Socket Layer encryption technology. Note: For users who have registered after 10th August 2011, data is secured using 256-bit AES encryption during transmission. Remember Username and Password: Saves the 'Username' and 'Password' on a particular machine so that you don't have to type it each time. This option is selected by default, and can be changed. Reconnect automatically at login: With this option enabled, the login screen and IBackup Drive explorer would not appear when there are subsequent logins / restarts. User details and settings are automatically retrieved from the previous successful connection. Faster with compression: It compresses your data during transfer leading to speedy data transfer and optimal bandwidth usage. The option is enabled by default. Settings: Click here to know more. Connect: Connects you to IBackup Drive interface. Close: Closes the login screen. New user sign up: Takes you to sign up page from where you can register for an account. Forgot password: Allows you to retrieve your password in case you have forgotten it. Firewall guidance: Displays the firewall settings required for the proper functioning of IBackup Drive.
Copyright © Pro Softnet Corporation. All Rights Reserved. 7
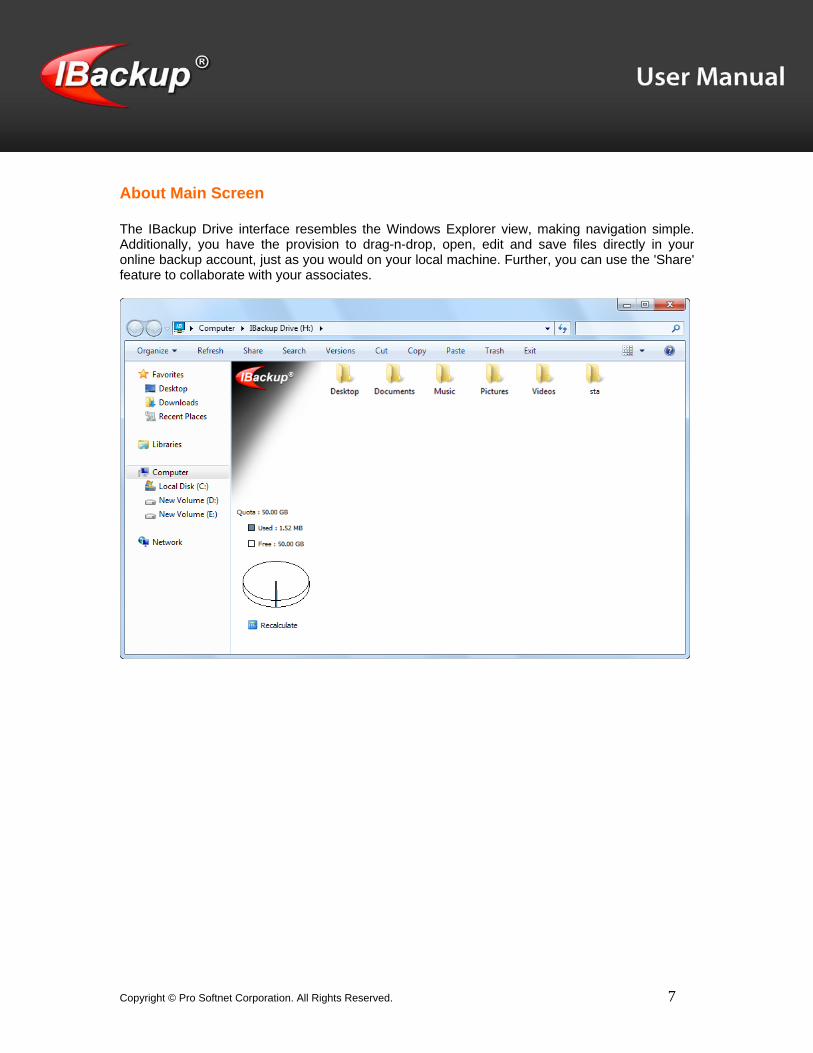
About Main Screen The IBackup Drive interface resembles the Windows Explorer view, making navigation simple. Additionally, you have the provision to drag-n-drop, open, edit and save files directly in your online backup account, just as you would on your local machine. Further, you can use the 'Share' feature to collaborate with your associates.

Copyright © Pro Softnet Corporation. All Rights Reserved. 8
Settings Lets you clear the cache, view and clear the logs and adjust the proxy server settings. It has two tabs: General Advanced
General Tab:
Flush Cache: Cache is a temporary storage for the user’s data. It is designed to speed up subsequent access to the same data. The Cache folder will be available in the folder where your IBackup Drive application has been installed. Clicking the button clears the IBackup Drive cache completely. View Log: Displays all the logs in your IBackup Drive account. Clear Log: Clears all the logs from your account. You also have the option of local caching for faster access to files, and for automatic updates to the modified contents by extracting the latest version from IBackup to the local cache, during any file / folder open or restore operations.
Copyright © Pro Softnet Corporation. All Rights Reserved. 9
Switch to non SSL if SSL connection fails: This option allows you to upload files without any security, and is selected by default. Due to the SSL security, at times the application fails to upload files. This could be due to the absence of some SSL components in your computer. Hence, leaving this option selected will avoid such interruptions in the functioning of the application. However, if you wish to upload the files without security, then clear the check box. Reset: Allows you to reset the options to the default settings. Close: Closes the 'Settings' dialog box. Advanced Tab:
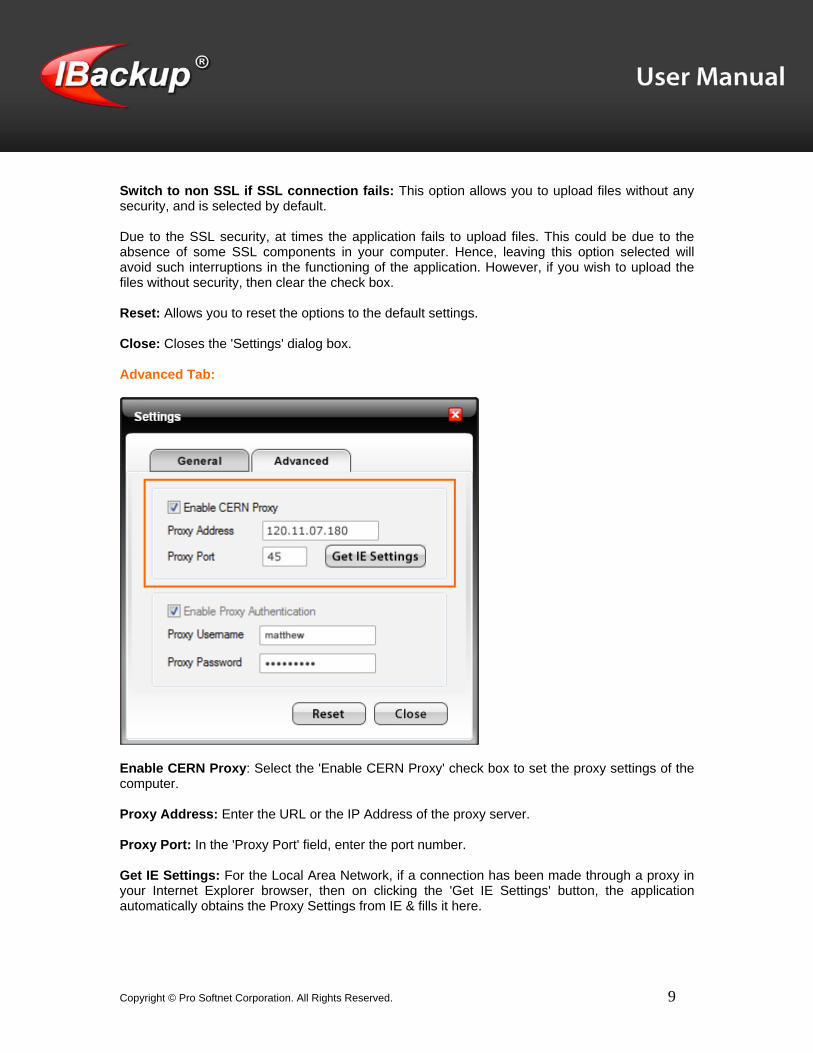
Enable CERN Proxy: Select the 'Enable CERN Proxy' check box to set the proxy settings of the computer. Proxy Address: Enter the URL or the IP Address of the proxy server. Proxy Port: In the 'Proxy Port' field, enter the port number. Get IE Settings: For the Local Area Network, if a connection has been made through a proxy in your Internet Explorer browser, then on clicking the 'Get IE Settings' button, the application automatically obtains the Proxy Settings from IE & fills it here.

Copyright © Pro Softnet Corporation. All Rights Reserved. 10
Enable Proxy Authentication: Grants access to the Internet after valid authentication. The authentication information - Username and Password - provided in the proxy server must be same as those provided in the 'Proxy Username' and 'Proxy Password' fields. Connect: Connects you to IBackup Drive interface. Reset: Allows you to reset the options to the default settings. Close: Closes the 'Settings' dialog box.
Copyright © Pro Softnet Corporation. All Rights Reserved. 11
Toolbar Options Apart from the standard 'Windows Explorer' tool bar options; 'IBackup Drive' has the following features: Versions: Restore 30 previous versions of files in your IBackup account. Trash: Retrieve deleted files from your IBackup account within a 30 day period. Search: Locate data backed up to your IBackup account. Share: Allows for collaborative data access.
See also Cut, Copy and Paste: Cut or copy data and paste to a different location within your account or on the local machine. View log: View all the log records. Exit: Exit the IBackup Drive application.
Copyright © Pro Softnet Corporation. All Rights Reserved. 12
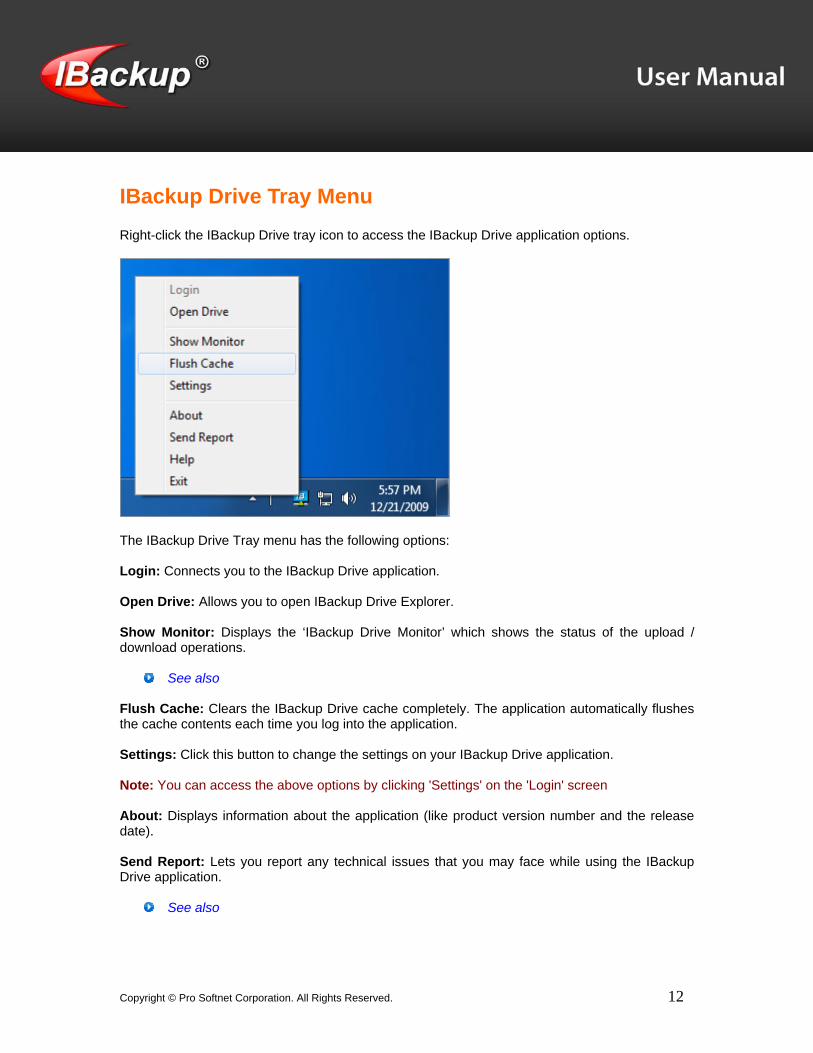
IBackup Drive Tray Menu Right-click the IBackup Drive tray icon to access the IBackup Drive application options.
The IBackup Drive Tray menu has the following options: Login: Connects you to the IBackup Drive application. Open Drive: Allows you to open IBackup Drive Explorer. Show Monitor: Displays the ‘IBackup Drive Monitor’ which shows the status of the upload / download operations.
See also Flush Cache: Clears the IBackup Drive cache completely. The application automatically flushes the cache contents each time you log into the application. Settings: Click this button to change the settings on your IBackup Drive application. Note: You can access the above options by clicking 'Settings' on the 'Login' screen About: Displays information about the application (like product version number and the release date). Send Report: Lets you report any technical issues that you may face while using the IBackup Drive application.
See also

Copyright © Pro Softnet Corporation. All Rights Reserved. 13
Help: Lets you access the Help Guide. Exit: Logs you out from the IBackup Drive application.
IBackup Drive Monitor To access the IBackup Drive Monitor, right-click IBackup Drive tray icon and select 'Show Monitor'.
Following are the different options present on the IBackup Drive Monitor. View Log: Displays the logs of all the operations performed till date. Clear Log: Clears the log information. Flush Cache: Clears the IBackup Drive cache completely.
See also Refresh: Refreshes the logs displayed on the IBackup Drive Monitor. Copy: Lets you copy the log entries and paste it to the required destination. Stop Transfer: Stops the upload / download of the current file.
Copyright © Pro Softnet Corporation. All Rights Reserved. 14
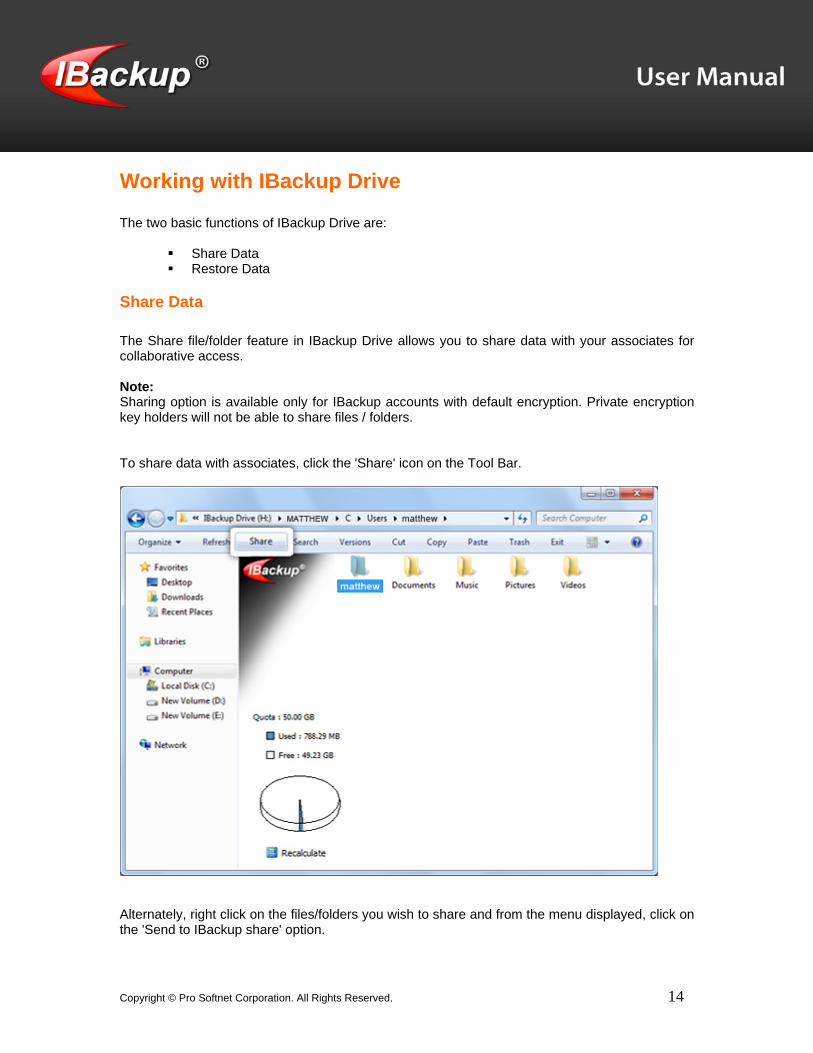
Working with IBackup Drive The two basic functions of IBackup Drive are:
Share Data Restore Data
Share Data The Share file/folder feature in IBackup Drive allows you to share data with your associates for collaborative access. Note: Sharing option is available only for IBackup accounts with default encryption. Private encryption key holders will not be able to share files / folders. To share data with associates, click the 'Share' icon on the Tool Bar.
Alternately, right click on the files/folders you wish to share and from the menu displayed, click on the 'Send to IBackup share' option.

Copyright © Pro Softnet Corporation. All Rights Reserved. 15
Enter the share parameters and the email address of the recipient(s). Click the 'Share' button to make the data available in your account to them.

Copyright © Pro Softnet Corporation. All Rights Reserved. 16
Location: Shows the location of shared file/folder. Write Enabled: Permits your associate to modify and upload the shared file/folder to your account. Upload New File: Allows your associate to upload a new file to your account. Number of Downloads: The number of downloads permitted for your shared file/folder before the link expires. Number of Days: The duration for which the shared link would be active. Password (Optional): Safeguard the shared resource by providing a password and sharing the same with your associates. Mail Details: Enter the email addresses of the recipient of the shared file/folder.

Copyright © Pro Softnet Corporation. All Rights Reserved. 17
Restore Data You can download data from your IBackup account to your local machine. Simply select the file / folder that you want to download and drag-n-drop or cut and paste the same to the desired location on your local machine.
Copyright © Pro Softnet Corporation. All Rights Reserved. 18
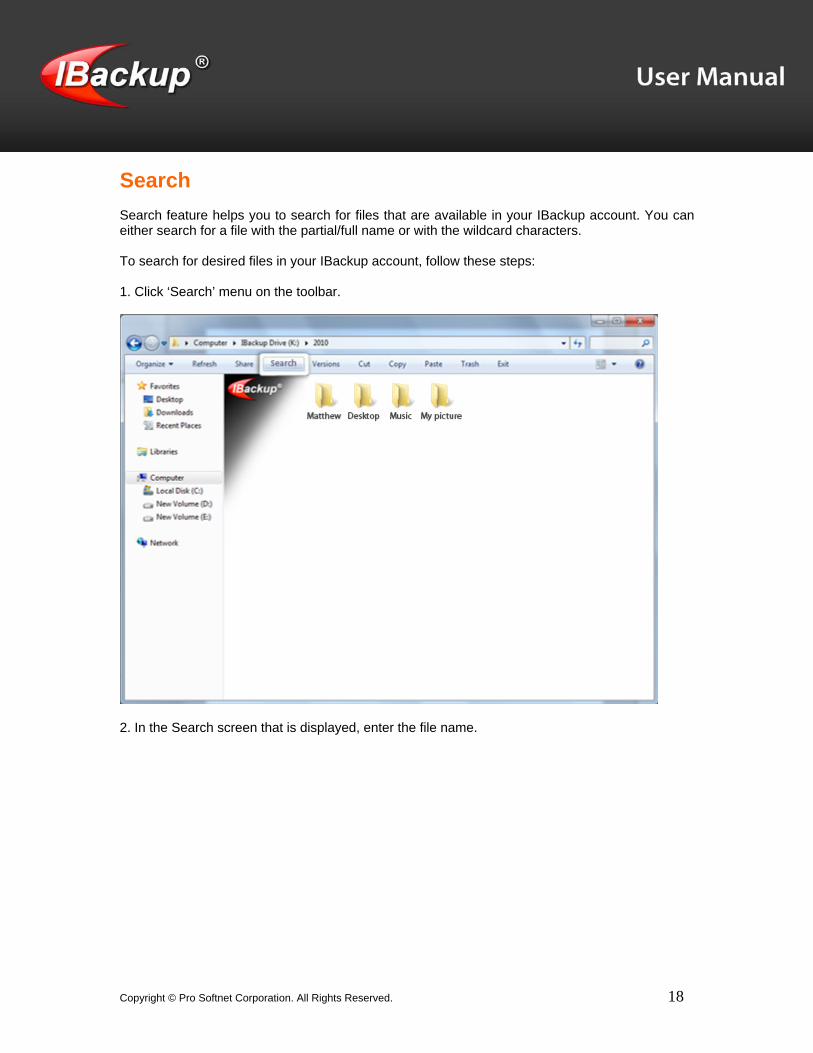
Search Search feature helps you to search for files that are available in your IBackup account. You can either search for a file with the partial/full name or with the wildcard characters. To search for desired files in your IBackup account, follow these steps: 1. Click ‘Search’ menu on the toolbar.
2. In the Search screen that is displayed, enter the file name.

Copyright © Pro Softnet Corporation. All Rights Reserved. 19
3. By default, the 'Search Path' value is set to the drive in your local computer to which the IBackup Drive is mapped. Click 'Browse' button to change the location to any other directory within your IBackup account. 4. Click 'Search' button to search for files. The files matching the search criteria are listed. You can opt to restore or delete a file from the results displayed. 5. Select the check box to restore a file and click the 'Restore' button. To delete a file, select the check box and click 'Delete' button.
Copyright © Pro Softnet Corporation. All Rights Reserved. 20
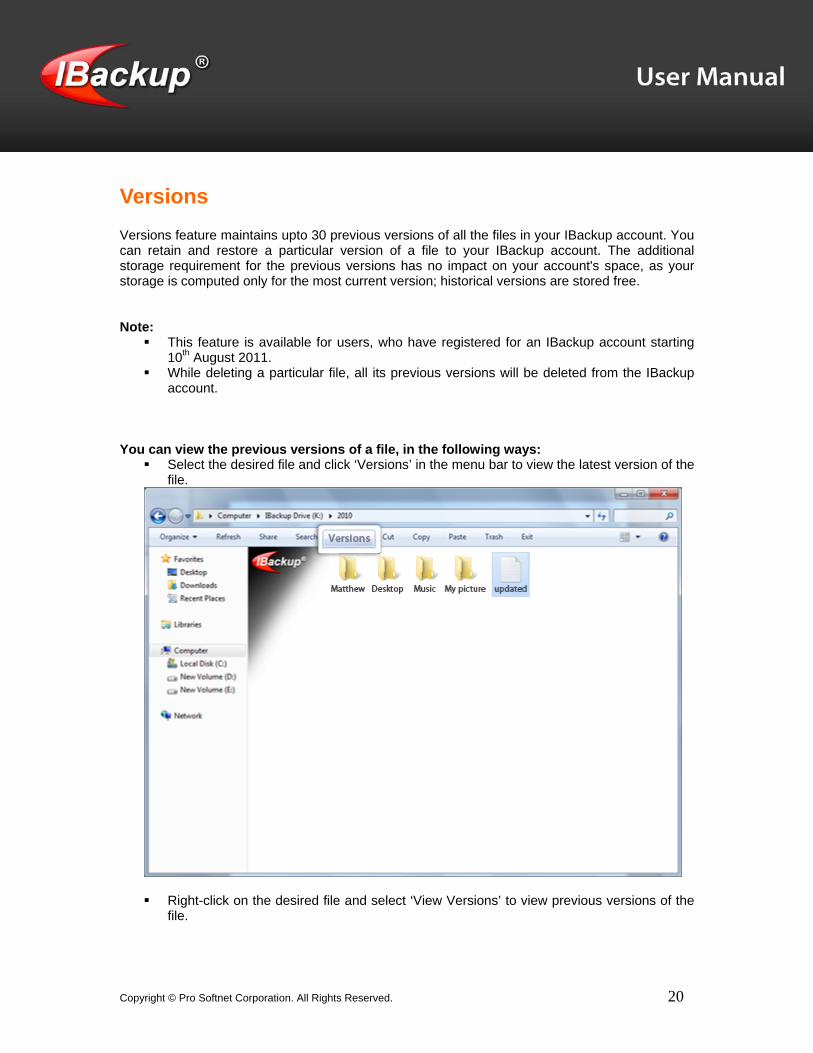
Versions Versions feature maintains upto 30 previous versions of all the files in your IBackup account. You can retain and restore a particular version of a file to your IBackup account. The additional storage requirement for the previous versions has no impact on your account's space, as your storage is computed only for the most current version; historical versions are stored free. Note:
This feature is available for users, who have registered for an IBackup account starting 10th August 2011.
While deleting a particular file, all its previous versions will be deleted from the IBackup account.
You can view the previous versions of a file, in the following ways:
Select the desired file and click ‘Versions’ in the menu bar to view the latest version of the file.
Right-click on the desired file and select ‘View Versions’ to view previous versions of the
file.
Copyright © Pro Softnet Corporation. All Rights Reserved. 21
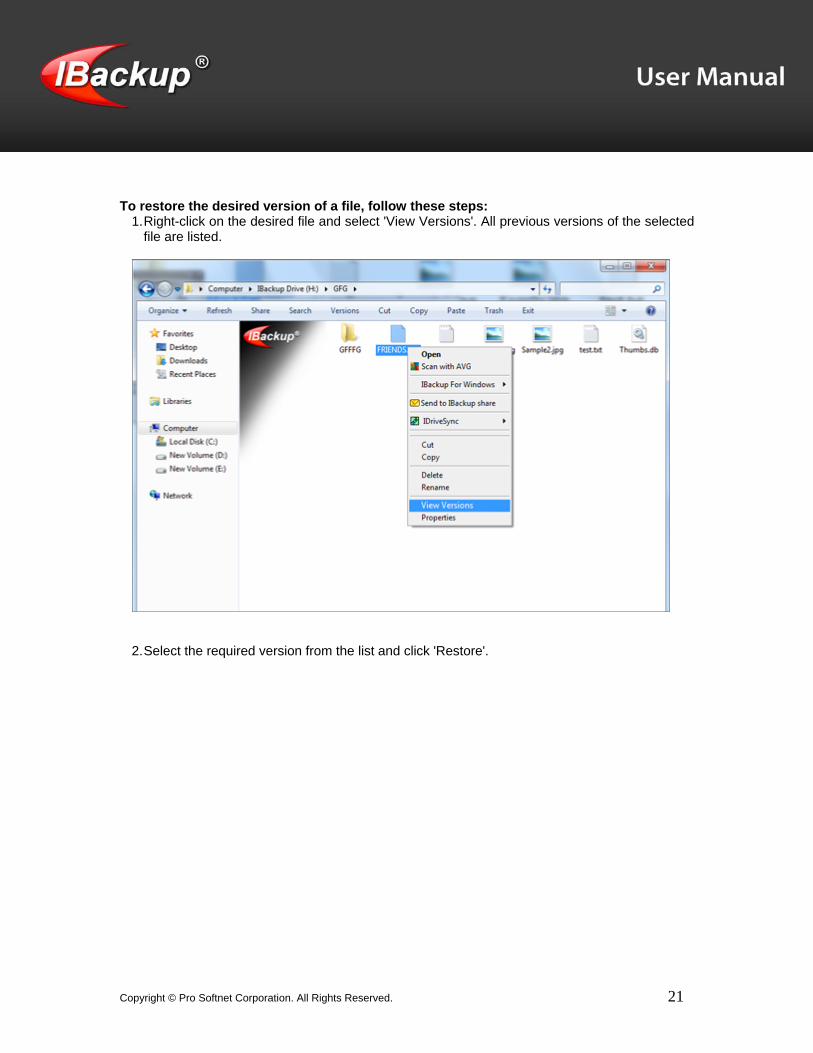
To restore the desired version of a file, follow these steps:
1. Right-click on the desired file and select 'View Versions'. All previous versions of the selected file are listed.
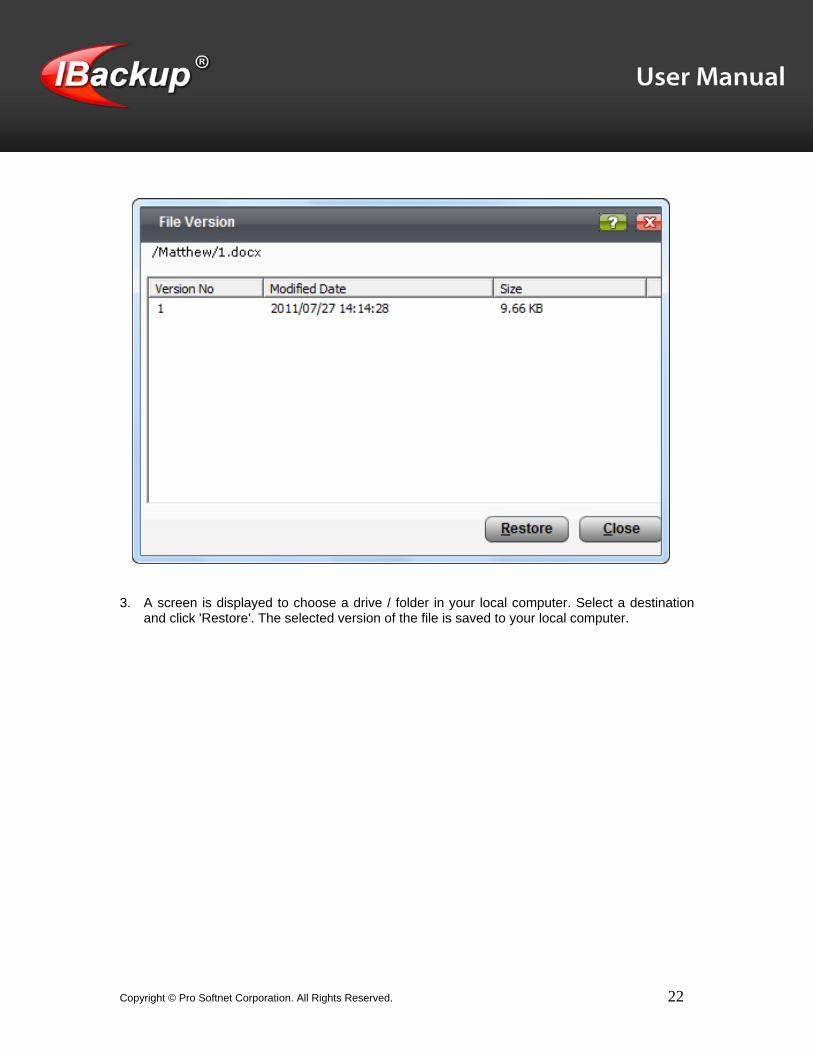
2. Select the required version from the list and click 'Restore'.
Copyright © Pro Softnet Corporation. All Rights Reserved. 22
3. A screen is displayed to choose a drive / folder in your local computer. Select a destination and click 'Restore'. The selected version of the file is saved to your local computer.
Copyright © Pro Softnet Corporation. All Rights Reserved. 23
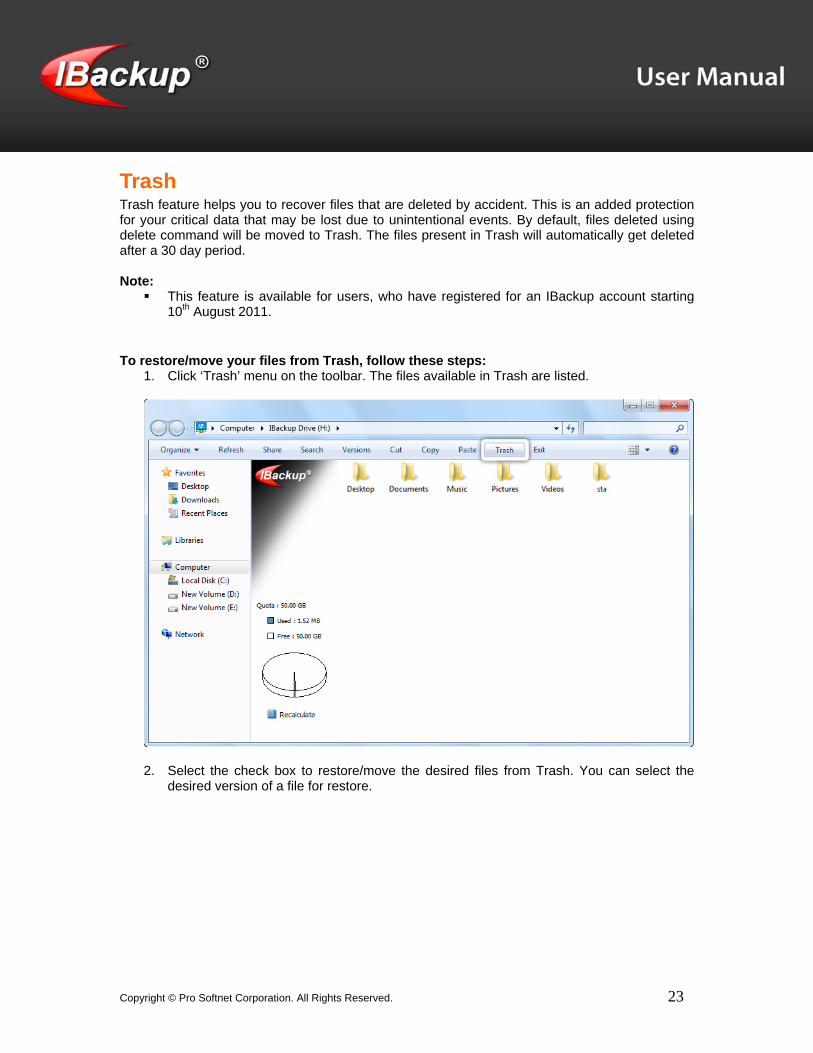
Trash Trash feature helps you to recover files that are deleted by accident. This is an added protection for your critical data that may be lost due to unintentional events. By default, files deleted using delete command will be moved to Trash. The files present in Trash will automatically get deleted after a 30 day period. Note:
This feature is available for users, who have registered for an IBackup account starting 10th August 2011.
To restore/move your files from Trash, follow these steps:
1. Click ‘Trash’ menu on the toolbar. The files available in Trash are listed.
2. Select the check box to restore/move the desired files from Trash. You can select the
desired version of a file for restore.

Copyright © Pro Softnet Corporation. All Rights Reserved. 24
3. Click the ‘Move to Original’ button to move your files to the original location or click
‘Restore’ button to restore them to the desired location in your local computer. To view files / folders deleted from a specific folder in the IBackup account: Right-click on the desired folder > click 'View Trash' from the menu displayed. The files / folders deleted from the respective folder are listed.

Copyright © Pro Softnet Corporation. All Rights Reserved. 25
To restore the previous version of a file from trash: Right-click on the desired file in Trash and click on the ‘Versions’ option. Select the required version and click on ‘Restore’.
Click 'Delete Forever' button to delete a file / folder permanently from Trash, if it is no longer required. To clear all your files/folders from Trash, click 'Empty Trash'.
Copyright © Pro Softnet Corporation. All Rights Reserved. 26
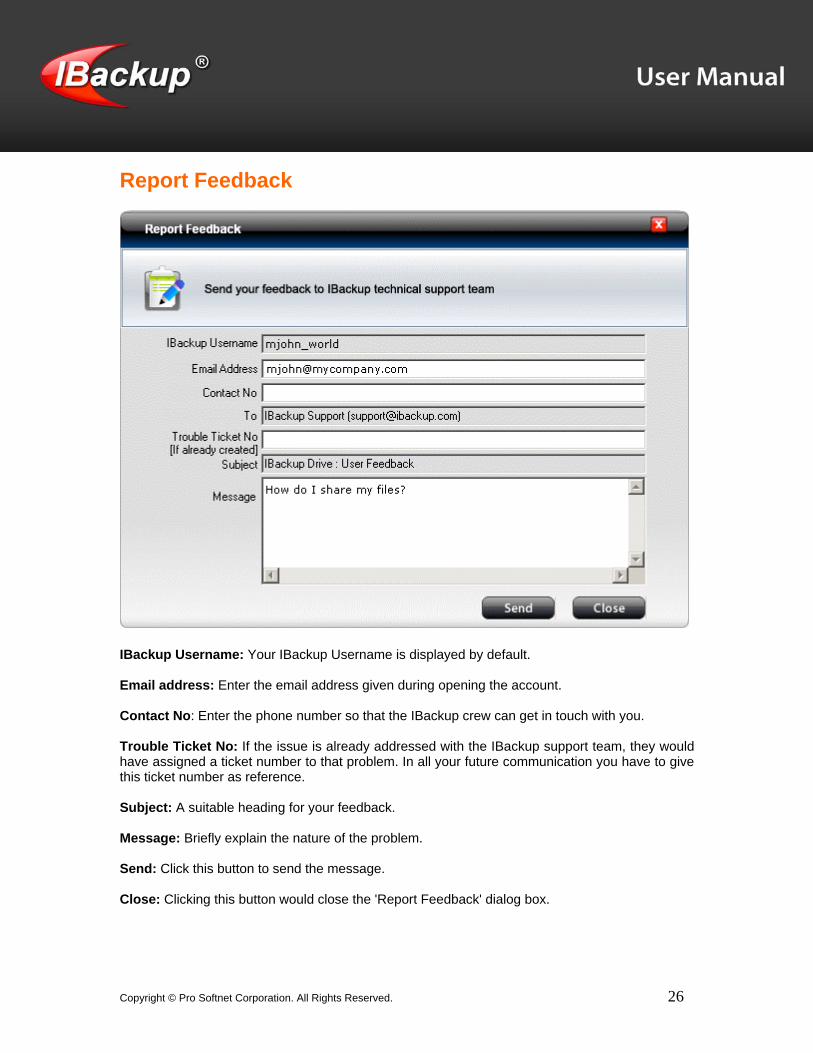
Report Feedback
IBackup Username: Your IBackup Username is displayed by default. Email address: Enter the email address given during opening the account. Contact No: Enter the phone number so that the IBackup crew can get in touch with you. Trouble Ticket No: If the issue is already addressed with the IBackup support team, they would have assigned a ticket number to that problem. In all your future communication you have to give this ticket number as reference. Subject: A suitable heading for your feedback. Message: Briefly explain the nature of the problem. Send: Click this button to send the message. Close: Clicking this button would close the 'Report Feedback' dialog box.

Copyright © Pro Softnet Corporation. All Rights Reserved. 27
Troubleshooting The following are a few useful troubleshooting tips, which could possibly help resolve some of your minor issues you could encounter while working with the IBackup Drive application. While emailing us with any query, it is highly recommended that you mention the IBackup Drive application version info (this can be found from the ‘About’ option). The ‘About’ option can in turn be accessed from the IBackup Drive tray icon. When the application hangs for a long time and no transfer occurs, logout of the application and re-login into the application. When transfer operation is in progress, the IBackup Drive tray icon status changes to a revolving icon. When the error ‘Access Denied’ occurs during the opening or the saving operation of a document, flush the cache and retry the operation. During login, if errors such as ‘Server could not be connected' or 'Operation timed out' appears, check your firewall settings and your proxy settings. It is mandatory that the IBackup Drive application has the necessary privileges set in the firewall settings for it to connect to IBackup.
System Requirements For 32-bit Windows Operating Systems
Microsoft Windows 7, Windows Vista, Windows XP (Service Pack 2), Windows Server 2003, Windows 2000 (Service Pack 3 and higher)
Internet Explorer 6.0 and higher 64 MB RAM or higher (Recommended) 10 MB free hard disk space for the installed program, 20 MB or more recommended for
local caching Administrator privileges to install and use the application
For x64-bit Windows Operating Systems
Microsoft Windows 7, Windows Vista, Windows XP (Service Pack 2), Windows Server 2003.
Internet Explorer 6.0 and higher 256 MB RAM or higher (Recommended) 10 MB free hard disk space for the installed program, 20 MB or more recommended for
local caching Administrator privileges to install and use the application
Copyright © Pro Softnet Corporation. All Rights Reserved. 28
Prior Functionalities Applies to: Users who have registered for an IBackup account prior to 10 August 2011 There are significant changes to the underlying architecture of IBackup accounts starting 10 August, 2011. The current feature-set is described on the regular IBackup website. This page describes the significant aspects of the earlier architecture and is still valid for users, who have registered for an IBackup account prior to 10 August, 2011. Encryption: Secure data transfer using 128-bit SSL technology and optional 256-bit proprietary encryption on storage.
Intelligent Caching: Allows you to access the latest version of the file and the folder that has been stored in the IBackup account. This is useful, when multiple users are accessing the same account from more than one location. You can view the latest folder contents by refreshing the IBackup Drive Explorer.

Copyright © Pro Softnet Corporation. All Rights Reserved. 29
Technical Support Pro Softnet Corporation, IBackup Division, 26115 Mureau Road, Suite A, Calabasas, CA 91302. Telephone 1-800-949-3555 ext 3 within USA 1-818-251-4200 ext 3 outside USA Monday - Friday, 6:00 AM to 6:00 PM PST Fax 1-818-878-9208 Email address [email protected] more information visit: http://www.ibackup.com/