
How to Use the Luminit LSD Scatter Model · 2018-10-30 · 2 . Luminit LSD Scatter Model . In the...
14
1 How to Use the Luminit LSD Scatter Model Summary: This article describes the characteristics and use of Luminit’s LSD scatter model in OpticStudio. The scatter model presented here is the idealized scatter BTDF of the Luminit diffuser product line. For more product information on the Light Shaping Diffuser®, please visit www.luminitco.com. Authored by: Anthony Ang – Senior Optical Engineer and John T. Tran, Luminit LLC. Published on: May 31, 2016 Applies to: OpticStudio Non-Sequential Ray Tracing Illumination & Stray Light Article: Luminit LLC, Light Shaping Diffuser ® The Light Shaping Diffuser® (LSD) is used to scatter incoming light which strikes the surface. Luminit uses its holographic diffuser technology to create pseudo-random micro-lens structures. Since it uses the principle of surface scatter instead of volume (bulk) scatter, it tends to have a much higher transmission efficiency. The LSDs are designed to reduce the effects of diffraction, which eliminates zero order and chromatic variation (rainbow appearance). Hence, the scatter appears white to the eyes (in white light condition). SEM view of LSD surface microstructure
Transcript of How to Use the Luminit LSD Scatter Model · 2018-10-30 · 2 . Luminit LSD Scatter Model . In the...

1
How to Use the Luminit LSD Scatter Model Summary: This article describes the characteristics and use of Luminit’s LSD scatter model in OpticStudio. The scatter model presented here is the idealized scatter BTDF of the Luminit diffuser product line. For more product information on the Light Shaping Diffuser®, please visit www.luminitco.com.
Authored by: Anthony Ang – Senior Optical Engineer and John T. Tran, Luminit LLC.
Published on: May 31, 2016
Applies to:
OpticStudio
Non-Sequential Ray Tracing
Illumination & Stray Light
Article:
Luminit LLC, Light Shaping Diffuser® The Light Shaping Diffuser® (LSD) is used to scatter incoming light which strikes the surface. Luminit uses its holographic diffuser technology to create pseudo-random micro-lens structures. Since it uses the principle of surface scatter instead of volume (bulk) scatter, it tends to have a much higher transmission efficiency. The LSDs are designed to reduce the effects of diffraction, which eliminates zero order and chromatic variation (rainbow appearance). Hence, the scatter appears white to the eyes (in white light condition).
SEM view of LSD surface microstructure

2
Luminit LSD Scatter Model In the OpticStudio platform, the Luminit LSD scatter model is a ‘User Defined’ type scattering function (available only on Professional and Premium Editions), which can model circular and elliptical LSDs. Luminit engineers wrote a formula algorithm in C++ to uniquely emulate the performance of the LSD product line. The file takes the form of a DLL (Dynamic Link Library). Since the DLL file types are native to OpticStudio, it maximizes the processing speed of the ray trace.
There are many types of scatter models and each one has a particular purpose to which they are simulating. Like the product, the LSD model takes the rays which strike the surface of a volume object, and scatters the direction of the light. Since this a random statistical model, each ray which strikes the surface will take a different path to exit, even if it has the same exact path in. This LSD model scatters the rays in such a way as to emulate the shape of statistical distribution of the Luminit LSD product. The shape will change from Gaussian in smaller angles to trapezoidal in larger angles. The amount of angular spread will depend on the LSD angles entered by the user. These angles will be limited to catalog values (given at the end of this article).
For proprietary reasons, only the transmission (BTDF) portion of the BSDF will be traced. TIR, coating and polarization functions are not enabled. The light will be treated as a random polarization input for the calculation of transmission. Only flat surfaces with the surface normal in the Z axis are recommended.
How to Use the Luminit LSD Scatter Model These instructions assume that you have some experience using OpticStudio in the Non-sequential Mode.
1. First make sure that OpticStudio program is closed. Once you download them, you can place the Luminit LSD dll files in the following Zemax OpticStudio DLL folder. (Windows (C:)>Program Files>Zemax Optical Studio>DLL>SurfaceScatter)
LSD Surface
Volume Object
Z direction
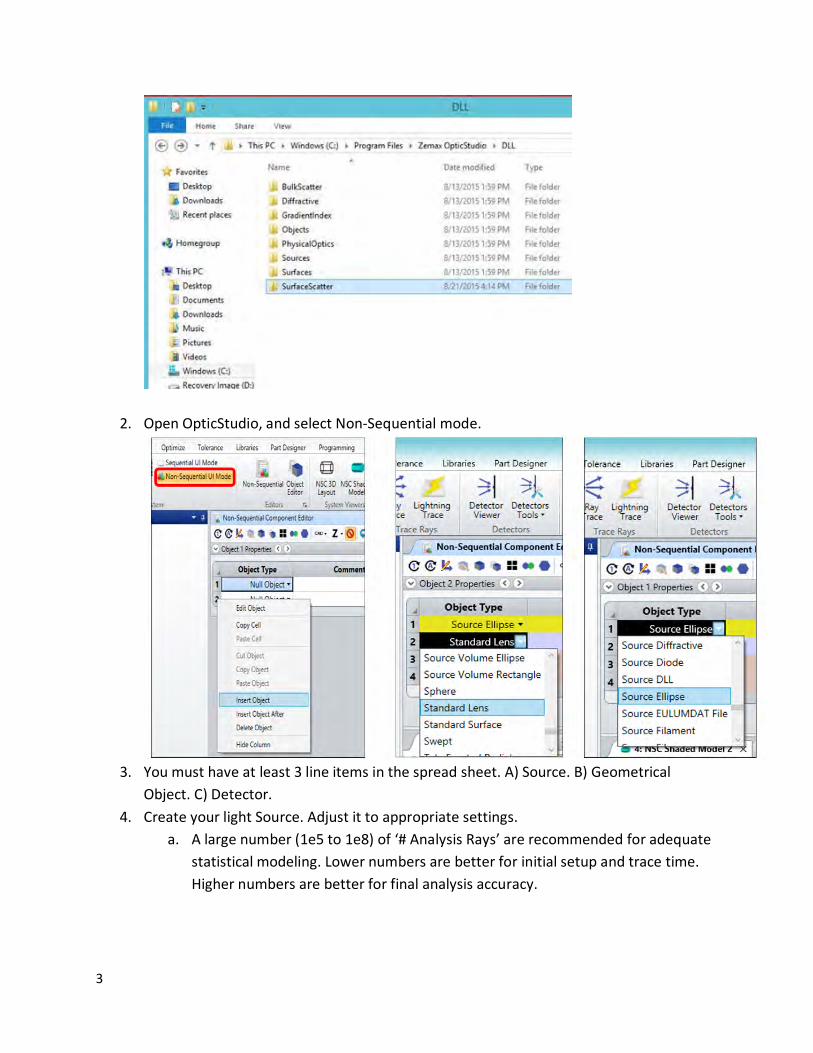
3
2. Open OpticStudio, and select Non-Sequential mode.
3. You must have at least 3 line items in the spread sheet. A) Source. B) Geometrical
Object. C) Detector. 4. Create your light Source. Adjust it to appropriate settings.
a. A large number (1e5 to 1e8) of ‘# Analysis Rays’ are recommended for adequate statistical modeling. Lower numbers are better for initial setup and trace time. Higher numbers are better for final analysis accuracy.

4
b. Select the number of ‘# Layout Rays’ so that there will be adequate viewing of your model in the ‘NSC Shaded Model’ window. Too many may slow down the rendering.
5. Create your Detector. I usually select the ‘Detector Polar’ option to find out which direction the rays are headed.
a. For large LSD Angles set the ‘Maximum Angle’ to 90 degrees. For smaller angles adjust the ‘Maximum Angle’ accordingly to capture all the rays you need.
b. Adjustments to the resolution can also be made. This is done by controlling the ‘# Radial Pixels’ and ‘# Angular Pixels’ in the spread sheet line of the detector.
6. Open the ‘NSC Shaded Model’ viewer. 7. Open the ‘Detector Viewer’ window.
a. A third type of resolution adjustment can be made to the ‘Smoothing’ setting in the ‘Detector Viewer’ controls.
8. Select your ‘Object’ ‘Type:’. Make sure the object ‘Type:’ has volume properties (Cylinder Volume, Rectangular Volume, Standard Lens, etc.).
9. Open the ‘Object’ ‘Properties’. Press the ‘Coat/Scatter’ tab. Select ‘Face’, ‘1) Front Face’ or ‘2) Back Face’.
a. The diffuser function can only be applied if the surface normal of the ‘Face’ is along the Z axis. This must be true before any rotational transformation is applied to the object. Check to see if the object surface ‘Face’ is normal to the Z axes (facing towards or away from the Z axis). You can use the OpticStudio object viewer (icon labeled ‘View Current Object’) for this. The selected surface face will be highlighted in orange.

5
10. In the ‘Scatter Model:’ select the ‘User Defined’ option. In there you should find the appropriate Luminit LSD scatter files. Select one of the files.
a. *“LumLSD_b3.dll” or “LumGlass_b3.dll”. *Some file name inconsistencies in this documentations are due to version changes during development.
11. Important: Set the ‘Scatter Fraction’ to 1. 12. Below the file name of the LSD scatter models (*.dll), select the LSD catalog product
angles: a. Product angles are the full width half maximum (fwhm) of the sliced view in each
axis, in units of degrees. b. Catalog angles come in pairs. Example: The elliptical LSD angle 60x1 can be
entered with (x=60 & y=1) or (x=1 & y=60) depending upon which direction you

6
want the LSD to be oriented. Circular LSD require both x and y entries (x=y=30). Make sure you hit ‘Enter’ on your physical keyboard.
c. Note: Refer to Luminit diffuser catalog at the end of this document to see available angles. Only available catalog angles are enabled to work. Other angle inputs will cause the modeled angle to be near zero.
13. The LSD orientation will follow the object rotational transformations. Caution: Do not trace the rays backwards through the surfaces, as this will cause the rays to stop tracing.
14. Select a ‘Material’ for the object. A ‘Material’ (which controls the index of refraction) must be selected for the scatter to work. There must be two different ‘Material’ indices meeting at the surface boundary. Unless otherwise specified, air is assumed as the default/surrounding ‘Material’. For polymer type LSDs, ‘PMMA’ is recommend for the ‘Material’. If you want to use the Glass type LSD, ‘BK7’ is recommended.
15. You can modify the dimensions, tilts, and shifts of the objects at this point. 16. The initial rendering in the ‘3D System viewer’ will not show any rays that are deviated
with associated scatter models with the default settings. In order to see the scatter effects, go into the ‘NSC Shaded Model’ dialog box using the arrow icon in the upper left hand corner. Then select the ‘Scatter NSC Rays’ option by checking the box. Hit ‘OK’.

7
17. In ‘Ray Analysis’, turn OFF ‘Split’ and ‘Polarization’. Turn ON ‘Scatter’ and ‘Ignore Errors’.
You are now ready to trace the rays. Press the ‘Clear & Trace’ tab.
18. This example shows the minimum number of elements in order to evaluate the LSD. Since most systems have more elements, the LSD model will have more meaningful

8
results in your optical system. You are free to go back and change the LSD angles to any other catalog angle pair. This will allow you to quickly evaluate the performance of different LSD products in your optical system.
a. Remember to make sure you hit ‘Enter’ on the keyboard after each angle entry. b. Also make sure to re-run the ‘Ray Trace’ analysis. c. Please adjust the resolution settings of your Detector accordingly to make a fair
evaluation of the LSD performance. After adjusting the ‘Maximum Angle’ of the polar detector, and tilting the substrate 60 degrees in the X axis…
Example of Luminit LSD scatter function This is a basic example using Luminit LSD scatter function in OpticStudio.

9
1. Open OpticStudio, and set up your source, object and detector in the Non-Sequential Component Editor. Make sure you are in non-sequential mode.
Click the object, and open the object properties. In this case, an acrylic (PMMA) standard lens object is chosen with a thickness of 0.1 and a radius of 0.
The source is a source ellipse and is -2.00 distance away.
The detector is typically of the type ‘Detector Polar’ if you are interested in the direction of spread.

10
2. Check to see if the object surface ‘Face’ is normal to the Z axis (facing towards or away from the Z axis). You can use the OpticStudio object viewer for this. The selected surface face will be highlighted in orange.
3. To use Luminit LSD, follow the menu options: Object Properties>Coat/Scatter>Scatter>Scatter Model>User Defined>DLL Name>LumLSD_b3.dll *Some file name inconsistencies in this documentations are due to version changes during development.
4. Set the ‘Scatter Fraction’ to 1.

11
Apply to ‘1, Front Face’. If the back face is desired, apply to ‘2, Back Face’. The ‘0, Side Faces’ is NOT a good option.
5. Click ‘Ray Trace’, and a window will pop up. Also click the ‘Detector Viewer’, so that you can view of the resulting ray trace.
**Refer to the ‘Extra’ content at the end to learn about the Glass Diffuser.
6. In ‘Ray Trace Control’, turn off ‘Split’ and ‘Polarization’. Turn on ‘Scatter’ and ‘Ignore Errors’. When you are ready to trace the rays, click ‘Clear & Trace’.

12
7. The analysis rays will trace and show up on the analysis detectors.
**Extra Luminit Glass Diffuser: The steps are identical to the Luminit LSD examples, except the Glass model only allows circular patterns because only those are listed in the catalog. Use ‘BK7’ glass for the media.
Recommendations for Detector settings It is important to set the ‘Detector Polar’ and ‘Detector Viewer’ parameters in order to optimize the analysis results.
1. Large LSD angles tend to need ‘Maximum Angle’ set to 90 degrees in order to catch all the rays.
2. Smaller LSD angles may need a smaller ‘Maximum Angle’ in order to resolve all the desired detail.

13
3. Adjust the “# Radial Pixels’ and ‘# Angular Pilexs’ to a high number with a highly elliptical LSDs such as 60x1. Also adjust the ‘Smoothing’ to the appropriate level.
Common missing steps Please make sure these steps are followed. Otherwise the program will not work as you intended.
1. All source parameters are filled out properly. Wavelength, spectral range, direction, etc.. 2. The number of ‘analysis rays’ has to be set to a very high number (1e5 to 1e8) at your
discretion for resolution and trace time. 3. Check to make sure you applied the scatter model to the appropriate ‘Face’ of the
object. 4. Check that the ‘Scatter Fraction’ for the LSD surface is set to 1. 5. The LSD angles must be from the Luminit catalog list at the end of this article. Check to
make sure you press ‘Enter’ on the keyboard after entering the numbers. 6. Make sure the object is a ‘volume’ type object such as rectangular volume, cylindrical
volume, standard lens, etc.. 7. Check that your object has a ‘Material’ associated with it, such as ‘PMMA’ or ‘BK7’. 8. Make sure that the boxes for ‘Ignore Errors’ and ‘NSC Scatter Rays’ is checked in the
‘Ray Trace’ controls. Make sure the boxes for ‘Use Polarization’ and ‘Split NSC Rays’ are Unchecked.
9. Tracing the rays backwards does not work (example: surface 2 to 1 on cylindrical volume).
10. The settings for the resolutions on the Detector should be optimize for the LSD and output distribution of the rays.

14
Tables of Luminit diffuser catalog angles
Revised 8-28-18
Major Minor0.5 0.5
1 12 2
3.5 3.55 15 5
7.5 7.510 110 1015 120 2030 130 330 530 3040 140 1040 4050 360 160 1060 3060 6075 4580 5080 8090 6095 25
100 100
AngleLumLSD_b7
Table of Luminit LSDsTable of Luminit Glass LSDs Circular Angles
0.5 1 5
10 15 20 30 40 50


![[LSD]LSD - Complete FBI Blotter Microgram Analysis Manual (1987)](https://static.fdocuments.net/doc/165x107/55cf98fa550346d0339acf6a/lsdlsd-complete-fbi-blotter-microgram-analysis-manual-1987.jpg)


