How To Make A WebToon - NASA
32
http://science.nas.nasa.gov/Pubs/TechReports/NASreports/NAS-98-014 How To Make A WebToon Pamela P. Walatka NAS-98-014 December 1998 [email protected] MRJ Technology Solutions NASA Ames Research Center Mail Stop T27A-2 Moffett Field, CA 94035-1000 Abstract A WebToon is a cartoon-style table of contents for HTML documents on the web, using imagemaps that are pictures of people talking. The people have word balloons above their heads; the word balloons serve as links to relevant pages. A WebToon adds the human touch to web interfaces, and makes web pages more approachable, interesting, and easier to navigate. Basically, to make a WebToon, you create a one-page collection of imagemaps featuring people talking. The talk is in word balloons that link to a relevant part of a document. The imagemaps are combined in a table that fits on one page. First organize your long document into chapters. Sketch a storyboard with one panel (image) for each chapter. Take photos of people acting out your storyboard. Use image-processing software such as Adobe Photoshop to crop and enhance your photos. Use a new image layer to add words that briefly describe each chapter. Use another layer to put white balloons behind the words. Make each image into a client-side imagemap. Organize the imagemaps with an HTML table. This report explains the details of how to make a WebToon. 1
Transcript of How To Make A WebToon - NASA

http://science.nas.nasa.gov/Pubs/TechReports/NASreports/NAS-98-014
How To Make A WebToon
Pamela P. WalatkaNAS-98-014
December 1998
[email protected] Technology Solutions
NASA Ames Research CenterMail Stop T27A-2
Moffett Field, CA 94035-1000
Abstract
A WebToon is a cartoon-style table of contents for HTMLdocuments on the web, using imagemaps that are pictures of peopletalking. The people have word balloons above their heads; the wordballoons serve as links to relevant pages. A WebToon adds thehuman touch to web interfaces, and makes web pages moreapproachable, interesting, and easier to navigate.
Basically, to make a WebToon, you create a one-page collection ofimagemaps featuring people talking. The talk is in word balloonsthat link to a relevant part of a document. The imagemaps arecombined in a table that fits on one page.
First organize your long document into chapters. Sketch astoryboard with one panel (image) for each chapter. Take photos ofpeople acting out your storyboard. Use image-processing softwaresuch as Adobe Photoshop to crop and enhance your photos. Use anew image layer to add words that briefly describe each chapter. Useanother layer to put white balloons behind the words. Make eachimage into a client-side imagemap. Organize the imagemaps with anHTML table.
This report explains the details of how to make a WebToon.
1
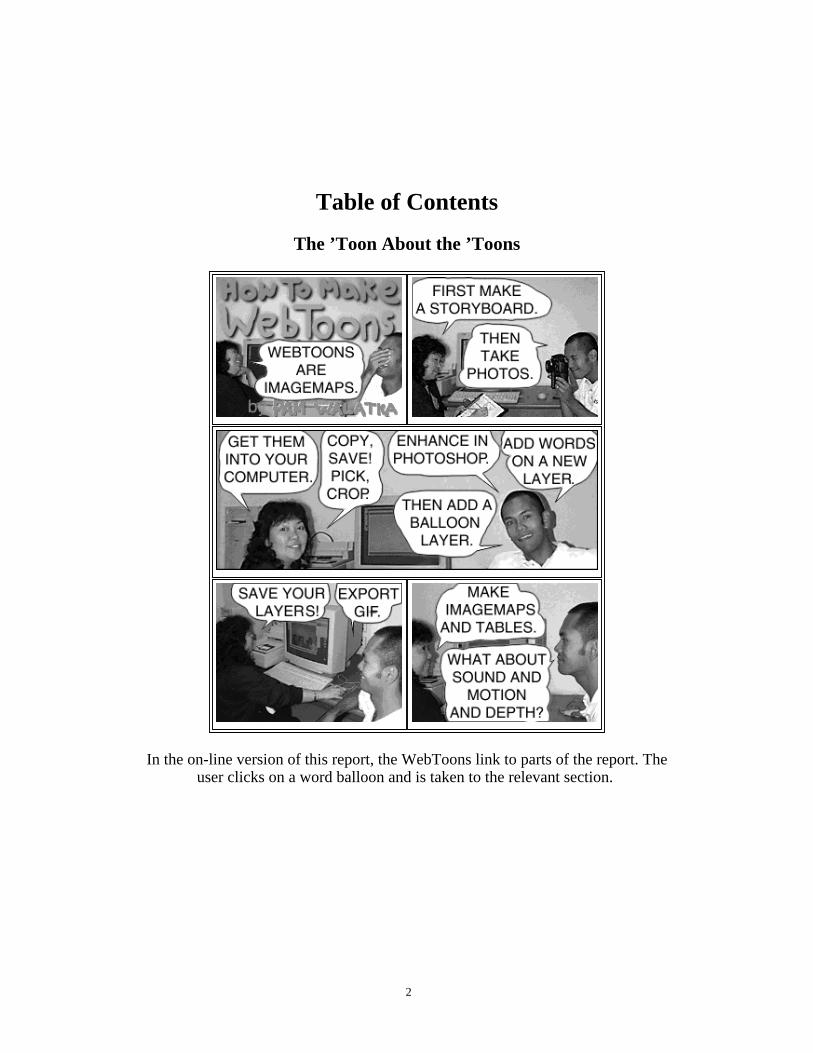
Table of Contents
The ’Toon About the ’Toons
In the on-line version of this report, the WebToons link to parts of the report. Theuser clicks on a word balloon and is taken to the relevant section.
2

Chapter OneWebToons Are Imagemaps
Introduction The purpose of WebToons is to humanize and organize the interfaces to longdocuments. WebToons enhance the usability of the web interface. WebToonimagemaps are like normal imagemaps (which are explained below; what isdifferent is the use of pictures of people, and the cartoon-style word balloons.The people and the cartoon style make the interface more approachable.
The creation of a WebToon forces you to organize your long document, in orderto be able to condense it into a few logical words that fit into word balloons.
In a WebToon, each panel is a separate imagemap. Working with separateimagemaps gives you the option of making quick corrections to a small imageand the flexibility to rearrange the images. Alternately, it could be argued thatworking with one composite of the images is easier. This point will be addressedat the end of the Photoshop section.
Basic Imagemap
Imagemaps are images that contain multiple links. The user clicks somewhere inthe image, and a new resource is retrieved: it could be another image, anotherpage, a sound or anything else that can be represented by a URL. Just as a normalimage can link to a single URL, an imagemap links to multiple URLs. You, thepage creator, must map out the areas of the image that you want to relate to eachspecific link.
Here is a client-side imagemap. See the online version athttp://science.nas.nasa.gov/Pubs/TechReports/NASreports/NAS-98-014/chapter1.html
to see how it works.
In client-side imagemaps, the list of map coordinates is embedded in the HTMLdocument. For details, see Chapter 5.
3

Chapter TwoStoryboards and Photos
First Make a Storyboard
A storyboard is a *rough* sketch of how the WebToon is going to look. I usepaper and pencil. Points to keep in mind:
It all has to fit on one page, because, by definition, WebToons condensedocuments into just a few sentences. A central idea of the WebToons is thatthey force the document author to present ideas in brief logical bits. First sketch out some boxes (panels). Generally nine boxes are themaximum that fit on one page. Five is good, with the middle one long.
See Appendix A for sample storyboard layouts youcan use. Rough in some word balloons. Start filling in the word balloons with the major points of your document.This is *very* hard, and may require several iterations. Get a new sheet ofpaper and start over. Or you could make copies of the boxes and balloons
4

and try different ways of filling in the words. If you are the author of thedocument, you might find yourself reorganizing the chapters to make moresense. Each panel should represent one chapter or section. The words haveto fit in the balloons; you MUST condense. Take some time; do it manytimes until you have the essence. If you have an idea of what the actors should be doing, sketch them in,without worrying about how good they look. For example, when I wassketching frame two of these Toons, I knew I needed Joel to be using acamera. You are finished with the storyboard when you have a set of simple,easy-to-understand word balloons that show the key ideas of your document,along with the positions of your actors.
Creating a WebToon Image
The next phase involves creating the WebToon digital images based on thestoryboard. Now you have a style choice to make: do you want photographicimages or traditional-cartoon drawings?
You could draw the images
There is no requirement for the images used in WebToons to be photographic. Ioriginally tried drawing them in Adobe Illustrator, but the results were poor, dueto my drawing ability. One of the hardest parts was getting the characters to lookconsistent from panel to panel. If you can draw, I encourage you to try it,electronically or on paper (and then scan). Eventually, the images must be digitalin order to be made into imagemaps on the web.
Photos are fast
I found photography a quick and easy means of getting images of people.
Taking Photographs for WebToons
Before you start taking pictures, make sure you have a COMPLETED storyboardand you therefore know what you want your actors to do. This will expedite thefilming process. For actors, use your friends and colleagues. Give your actors atleast a day’s warning so that they can prepare what to wear. Perhaps solid colorclothing would be easier to "select" when you are working with the images, later.Use a setting with plenty of light.
Digital camera is fastest
The fastest and most technically elegant way to get the digital images forWebToons is to use a digital camera of good quality. You will need aresolution of at least 400 x 300 pixels; this gives you the chance to cropdown to 200 x 150. Another alternative would be to use a regular film
5

camera and then scan in the photographs. My final images are 200 x 150 at96 dpi.
Note: be sure to test your camera, in the room that you will be using, anddownload a few test images to make sure that the camera settings arecorrect.
Leave room over the actors’ heads
This is easy to forget. When you are taking the photos, imagine the wordballoons over the heads. The general rule of thumb is to leave the topHALF of the image for the balloons.
Take twice as many snapshots as you think you need
More is better. You can choose which ones to use later. You may have totake many shots before the actors relax. Sometimes the best shots willsurprise you.
Use props
Whenever possible, have something in the picture to illustrate what you aretalking about. If you are talking about fire extinguishers, show the peopleholding up a fire extinguisher. (Later, when you make imagemaps, havesignificant parts of the fire extinguisher be links to relevant information.) Ifyou are talking about something with visible-physical steps, show the stepsin your images.
6
Chapter ThreeWorking With the Images
Get the images into your computer
From digital camera
Many digital cameras come with an A/V line that you hook up to acomputer that has the appropriate software for loading the images. Othercameras write the photos to a removable disk.
From film
You can have your film developed onto a CD ROM, or get prints and thenscan at medium resolution. You want to have at least 400 pixels wide by300 high; this gives you room to crop.
From drawings
If you drew the images on paper, scan them. If you drew themelectronically, they are already in your computer.
Image Processing
At this point, you are ready to start working with the images in your computer.First you will make backups, then load your files into an image processingprogram, pick out which images to use, and crop them to get just the importantparts of the images. Then you will create layers: background, people, balloons,and words. You will save your layered files for future revisions, and save outeach panel as a non-layered GIF file.
Photoshop from Adobe works well as an image processing program forWebToons. The following instructions include details about using Photoshop.NAS staff and users: Photoshop is available on the NAS SGIs; just typephotoshop at the Irix prompt. The latest version for the SGI is 3.0.1, which theseinstructions are based on. A later version of Photoshop is also available on themachines in the NAS Multimedia Lab.
Pick and crop the images you want to use
Make extra copies
You may mess up your images and want to go back to the originals, orneed to copy a part of the image out of the original. Make and save copiesof all your originals.
7

Look, list, pick
Load your image files into an image processing program such asPhotoshop. Spend some time looking at the images you have. Bring asmany as possible up on your screen at the same time. Give each one arepresentative name, and make a list of what you have. Pick the mostexpressive and interesting shots, and decide which will go where. That is,pick one image for each panel of your storyboard. (A cartoon panel is oneframe or box or picture-- nine or fewer panels make one page or oneWebToon).
Crop, leaving extra space on top
Use your image processing program to crop all the images to the same (orcoordinated) size(s). In this WebToon, I used 200 x 150 pixels at 96 dpi foreach panel, except for the extra-wide middle panel, which is 400 x 150.The size will depend on your storyboard; remember that you want theentire WebToon to fit on one browser screen. In Photoshop, you can set thecropping tool to repeat the same dimensions and resolution. Double-click
on the Crop tool and the Cropping Tools Options dialog box willappear. Click Fixed Target Size. Crop down to the most interesting parts ofthe image. Remember to leave room--the top half of the image--for theword balloons.
Add layers to your images, and enhance
If your image processing program offers layers, you can create several differentlayers of your image, and work separately on each layer. Working on layersallows you to make changes to one layer without destroying the pixels on theother layers. It would be possible but treacherous to make WebToons withoutlayers, because without layers each one of your changes would leave permanentchanges on the whole image.
Photoshop (3 or above) offers layers
Layers make it possible, for example, to rewrite the words withoutchanging the pixels on the other parts of the image. This is important; youmay need to write the words many times before you get them to fit youravailable space. When you are working with layers, you put the words on aseparate layer and the balloons on a separate layer to facilitate adjustmentsand corrections.
The first thing to do is make a copy of the background layer. In Photoshop,select Window/Palettes/Show Layers to get the Layers palette. Drag therectangle representing the Background layer down to the new-layer icon.
You now have two layers. The top one is titled "Background copy,"the bottom one "Background." Next, click the eye of the Background layer
8

off, and never look at or work on the background again, unless you need toreplace messed-up pixels. The active layer is highlighted in the layerpalette--click on a layer name to highlight it and make it the layer you areworking on. (When you get a message like "no-pixels-selected," youprobably are not working on the layer you think you are.)
By the time you are done, your image should have the following layers(from the top down):
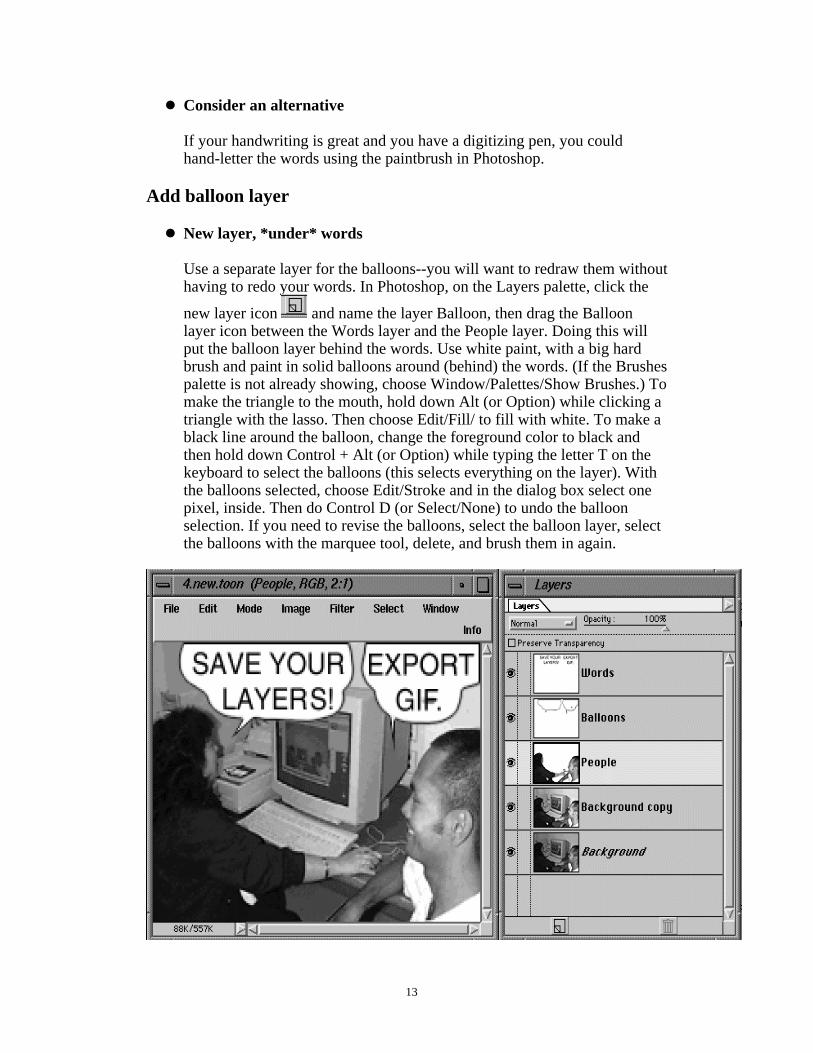
1. Words 2. Balloons 3. People 4. Background copy 5. Background
See the snapshot of a Photoshop session at the top of Chapter Four to seehow the layer palette looks.
Remember that each panel is a separate image which will become aseparate imagemap which you will assemble into a table with borders. Youdo not need to make borders on your images; HTML will do it for you,through the TABLE tag.
Use layers to pop the colors (people)
When an artist draws cartoons, the artist can make the characters stand outfrom the background by making the characters bigger than normal, andmore vividly colored. With photographs, there are ways to make thecharacters stand out. One way is called "popping the color." To pop thecolor means to isolate the subject of interest and then make the rest of theimage grayscale. To do that in Photoshop:
1. Drag the Background copy layer to the new layer icon. Name the newlayer People.
2. Select the characters Check to see that the People layer is highlighted in the Layerspalette, to indicate that it is the active layer. Make a very rough selection of one of the people by choosing
the lasso tool , holding down Alt or Option, and clickingaround the person. Enter Mask mode: make the foreground color black by clicking
on the tiny black box near the color indicator boxes
. Go into mask mode by clicking on the right-hand
mask icon. Refine your selection in Mask mode: use the paintbrush. Click
9

Refine your selection in Mask mode: use the paintbrush. Click
on the paintbrush and paint away any areas of thebackground that are not under the red mask. Use the Brushespalette to change the size of your brush as necessary. If parts ofthe person are covered by the mask, click on the tiny arrowsnear the color indicator boxes to change the current color towhite. (Also click the tiny boxes if the background color wasnot white.) Using white removes the mask. Keep working untilyou have a pretty good selection of the person. Remember,brushing with black adds to the mask; brushing with whiteremoves the mask. The areas not under the mask are the areasthat will become selected as you exit mask mode. That is, maskmode enables you to brush in the details of any selection youare trying to make. You can adjust the edge of your selectionback and forth until you get it right. Exit Mask mode: when you click on the left-side quick mask
icon the mask goes away and your unmasked areasare selected. That is, you have used Mask mode to create aprecise selection.
Then choose Select/Save Selection (the default #4 is fine). Younow have a reusable selection of your person or character.
Review of Photoshop Quick Mask. The red area is the mask. Thenot-red areas become the selection when you exit Quick Mask mode.To add to the mask area, paint with black. To add to the selection,paint with white. Note that the palette showing on the right is theChannels palette (not Layers). You choose which palette to show,from the Windows menu.
3. Repeat the mask-selection process with any remaining person orpersons or characters in that image.
10

4. When you have finished selecting the areas (characters) that you wantto "pop" in the first image, retrieve the first selection you saved(channel 4) by choosing Select/Load Selection/OK. If you savedmore than one mask-selection, repeat Load Selection, changing thechannel number on the Load Selection dialog box to the next one up,and clicking Add to Selection. Repeat until you have loaded all theselections you saved for this image.
5. All your people should now be selected. Choose Select/SaveSelection to save the combined selections for possible future use.
6. Choose Select/Inverse to select the area around the people. 7. Hit the Delete or Backspace key to remove the background from this
layer. You will not see any difference, because the background is stillon the layer underneath. To verify that the background was removedfrom the people layer, click on the eye by the Background Copy layerin the layers palette to make the background layer invisible. Thenclick the eye again.
8. In the layers palette, click on the Background Copy layer to make itactive. Choose Image/Adjust/Desaturate, which will turn yourcolored background to gray. Your people should now be popped.
Also, you can now add a halo around the people. On the Layers palette,
click the new layer icon, and then, still in the Layers palette, drag thenew layer so that it is between the People layer and Background Copy
layer. Select the paintbrush icon, and choose a fuzzy brush from theBrushes palette, and white paint as the foreground color. With the newlayer active (highlighted), just brush at the edge of the people on the image.
Adjust levels; enhance as necessary
With the People layer active, choose Image/Adjust/Levels. In the middle ofthe Levels dialog box, under Input Levels, you will see a histogram (graph)representing the brightness and darkness levels in your people layer. Dragthe little black triangle on the left about half an inch toward the middle.Click OK. Do the same with the white triangle on the right--drag towardthe middle. Adjusting the levels like this makes your grayish tones moreblack and white, increasing punch.
Depending on your available time and talent, make other enhancementssuch as using the Photoshop filters to create effects, or using the PhotoshopImage/Adjust options to give the colors more punch.
At this point, I would recommend that you go back and bring your otherimages up to this stage before adding the words and balloons. Be sure thatall your images receive the same treatments; there should be a consistentlook to your images. Remember that you should have at least three and notmore than nine images, one for each panel of the WebToon, and that thepanels will be assembled into a table. The table supplies the borders.
11
Add the words
Use your storyboard as a guide, but feel free to revise.
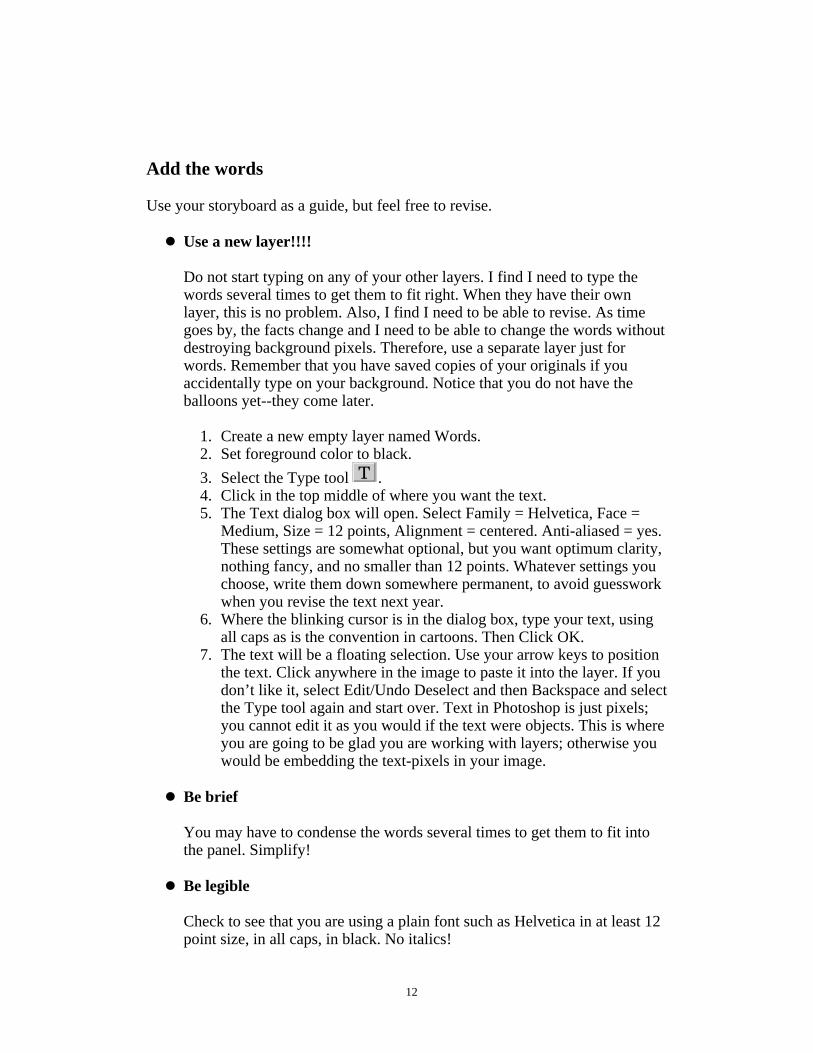
Use a new layer!!!!
Do not start typing on any of your other layers. I find I need to type thewords several times to get them to fit right. When they have their ownlayer, this is no problem. Also, I find I need to be able to revise. As timegoes by, the facts change and I need to be able to change the words withoutdestroying background pixels. Therefore, use a separate layer just forwords. Remember that you have saved copies of your originals if youaccidentally type on your background. Notice that you do not have theballoons yet--they come later.
1. Create a new empty layer named Words. 2. Set foreground color to black.
3. Select the Type tool . 4. Click in the top middle of where you want the text. 5. The Text dialog box will open. Select Family = Helvetica, Face =
Medium, Size = 12 points, Alignment = centered. Anti-aliased = yes.These settings are somewhat optional, but you want optimum clarity,nothing fancy, and no smaller than 12 points. Whatever settings youchoose, write them down somewhere permanent, to avoid guessworkwhen you revise the text next year.
6. Where the blinking cursor is in the dialog box, type your text, usingall caps as is the convention in cartoons. Then Click OK.
7. The text will be a floating selection. Use your arrow keys to positionthe text. Click anywhere in the image to paste it into the layer. If youdon’t like it, select Edit/Undo Deselect and then Backspace and selectthe Type tool again and start over. Text in Photoshop is just pixels;you cannot edit it as you would if the text were objects. This is whereyou are going to be glad you are working with layers; otherwise youwould be embedding the text-pixels in your image.
Be brief
You may have to condense the words several times to get them to fit intothe panel. Simplify!
Be legible
Check to see that you are using a plain font such as Helvetica in at least 12point size, in all caps, in black. No italics!
12
Consider an alternative
If your handwriting is great and you have a digitizing pen, you couldhand-letter the words using the paintbrush in Photoshop.
Add balloon layer
New layer, *under* words
Use a separate layer for the balloons--you will want to redraw them withouthaving to redo your words. In Photoshop, on the Layers palette, click the
new layer icon and name the layer Balloon, then drag the Balloonlayer icon between the Words layer and the People layer. Doing this willput the balloon layer behind the words. Use white paint, with a big hardbrush and paint in solid balloons around (behind) the words. (If the Brushespalette is not already showing, choose Window/Palettes/Show Brushes.) Tomake the triangle to the mouth, hold down Alt (or Option) while clicking atriangle with the lasso. Then choose Edit/Fill/ to fill with white. To make ablack line around the balloon, change the foreground color to black andthen hold down Control + Alt (or Option) while typing the letter T on thekeyboard to select the balloons (this selects everything on the layer). Withthe balloons selected, choose Edit/Stroke and in the dialog box select onepixel, inside. Then do Control D (or Select/None) to undo the balloonselection. If you need to revise the balloons, select the balloon layer, selectthe balloons with the marquee tool, delete, and brush them in again.
13

Composite Alternative
The WebToons in existence so far are composed of separate images made intoseparate imagemaps, arranged in tables. It could be argued that working with onebig composite of the images would be easier. If you want to try that, compositeyour images at this point. Copy and paste your layered images into one big imagewith appropriate borders around the images. Save the layered composite forfuture revisions of the WebToon. I would appreciate knowing how this works outfor you: [email protected]
Adobe Photoshop is a registered trademark of Adobe Systems
Incorporated
14

Chapter FourSaving Your Files
Save the Layers in Your Files!
You will need your layersYou will make changes
One of the great things about the web is the ease with which you can update yourdocuments. The need for revision arises. To facilitate future changes, you willwant to be sure and retain the layers in your images. In Photoshop version 3.xand higher, this usually is not a problem; just be careful not to make the mistakeof flattening your image, or merging layers and then saving the file to the samefilename you used for the layered image. Make a point of saving the layered filesand saving backups to another machine or removable media.
Export GIF
Photoshop/File/Export/Gif89aCompuServe GIF is a graphic image format that works well for imagemapsand is readable on all graphics-capable web browsers. Interlaced GIF givesthe user something to look at while the file is downloading. Alternately, ifimage quality were a big issue, you could use JPEG.
Photoshop version 3.0 and higher offers a safe and convenient method forsaving GIF files.
1. Use File/Export/Gif89a. This works well and leaves your layered fileunaltered. Gif89a gives you the option to interlace your gif file,which makes it appear to load faster because the user can see the gistof the image as it loads. Leave Interlace clicked on.
2. Sometimes, mysteriously, Gif89a is not available (for example, withgrayscale). You can use File/Save a copy/CompuServe GIF. Thismethod also protects your layered files, but your files will be biggerthan Gif89a files and interlace is not offered.
If you are not familiar with the gif file format, look it up in the Glossary athttp://science.nas.nasa.gov/Pubs/TechReports/NASreports/NAS-96-002/glossary.html
15
Chapter FiveImagemaps, Tables and the Future of WebToons
WebToons Are Imagemaps
See our introduction to imagemaps in Chapter One if you are unclear on the basicidea of imagemaps.
WebToons are imagemaps arranged in tables. Each image (panel) is a separateimagemap. A typical WebToon has from five to nine imagemaps, arranged in atable to fill one web browser screen.
The Easy Way
If you are using a visual web page layout tool (such as Dreamweaver), you canmake imagemaps by dragging, dropping and clicking. Then mouse some more toput the imagemaps into a table. Use your storyboard as a guide for the table.
Tables are optional; you could just insert a list of imagemaps into your HTMLand let the user’s browser arrange them according to space available.
Also, you may find it easier to composite all your images into one big imagemap.See information at Composite near the end of Chapter Three. Experience so farindicates that using separate imagemaps facilitates revisions, but this is debatable.
The Hard Code Way
If you like to write your own HTML, read this section. Otherwise, skip ahead toSound, Motion and Depth.
Essentially there are two types of imagemaps: client-side and server-side.Client-side imagemaps are the newer and preferred technology. The instructionsbelow are for client-side imagemaps. Note: in changing my old server-side imagemap filesto client-side files, I found that I needed to move the "default" line to the bottom of the map list, inorder for the imagemaps to work on both major brands of browsers.
What You Need to Make an Imagemap
Once you have created your WebToon images you are ready to turn each of yourimages into an imagemap. Remember that in a WebToon, each panel (image) is aseparate imagemap.
1. Subdivide the image into clickable regions--in WebToons, the wordballoons are the clickable regions. I usually use each panel to represent onechapter, and each balloon in the panel represents one section within the
16
chapter. 2. For each region (word balloon) you will need the following:
1. The URL to the section of the document the region represents 2. The region coordinates.
The URL
Each clickable region of your WebToon image will link to a specific URL(Uniform Resource Locator, web address). If your HTML files are within thesame directory as the WebToons, you only have to use relative URLs, notabsolute path URLs. For example, if all your files are in thehttp://science.nas.nasa.gov/~walatka/WebToons directory or folder, yourURL for Chapter Three could be just chapter3.html instead of the fullpathname.
<A NAME> Anchor
In order to link to a section within your HTML document, you will need to edityour HTML document and add anchor tags, with NAME attributes, at the top ofthe section. For example, <a name="section2"> </A> That is, your imagemap canlink to a particular section within the file if the section has an <a name> tag andclosing </A> tag, usually on a line by themselves just above the title of thesection. In the URL in your imagemap, use the value (for example, section2) ofthe A NAME anchor, preceded by a pound (#) sign. Like this:href="chapter3.html#section2"
Region coordinates
You need to get the pixel coordinates of your clickable regions (the wordballoon). Your image must be in its final dimensions. I use the UNIX utility xv orPhotoshop to measure image coordinates. It is important that your clickableregions do not overlap or share coordinates. You can find automatic mappingprograms on the web; see the References section for some suggestions.
Image coordinates are two-dimensional, measured in pixels. The origin(zero-zero) is at the upper-left corner of the image, with X increasing from left toright, and Y increasing from top to bottom.
The diagram below may clarify. I have sketched in temporary rectangles toroughly approximate the balloons. (The imagemap creator has the option of usingrectangles, circles, or polygons. For now, let’s use rectangles for simplicity, andbecause some browsers do not yet recognize the other shapes).
Rectangles are defined by their upper-left and lower-right coordinates. In thefigure below, the upper-left corner of the first rectangle is at x=11 and y=0. Thatis, the upper-left corner of the clickable rectangle is 11 pixels over and zero pixelsdown from the upper left-hand corner of the image.
17
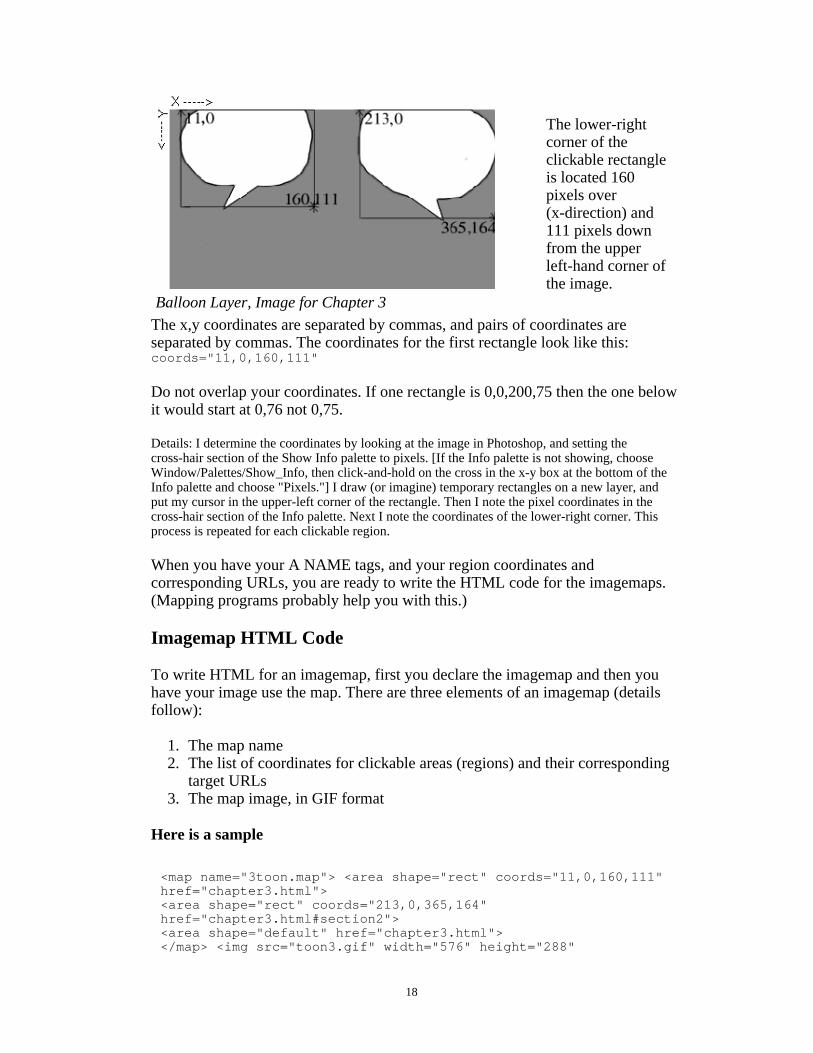
Balloon Layer, Image for Chapter 3
The lower-rightcorner of theclickable rectangleis located 160pixels over(x-direction) and111 pixels downfrom the upperleft-hand corner ofthe image.
The x,y coordinates are separated by commas, and pairs of coordinates areseparated by commas. The coordinates for the first rectangle look like this:coords="11,0,160,111"
Do not overlap your coordinates. If one rectangle is 0,0,200,75 then the one belowit would start at 0,76 not 0,75.
Details: I determine the coordinates by looking at the image in Photoshop, and setting thecross-hair section of the Show Info palette to pixels. [If the Info palette is not showing, chooseWindow/Palettes/Show_Info, then click-and-hold on the cross in the x-y box at the bottom of theInfo palette and choose "Pixels."] I draw (or imagine) temporary rectangles on a new layer, andput my cursor in the upper-left corner of the rectangle. Then I note the pixel coordinates in thecross-hair section of the Info palette. Next I note the coordinates of the lower-right corner. Thisprocess is repeated for each clickable region.
When you have your A NAME tags, and your region coordinates andcorresponding URLs, you are ready to write the HTML code for the imagemaps.(Mapping programs probably help you with this.)
Imagemap HTML Code
To write HTML for an imagemap, first you declare the imagemap and then youhave your image use the map. There are three elements of an imagemap (detailsfollow):
1. The map name 2. The list of coordinates for clickable areas (regions) and their corresponding
target URLs 3. The map image, in GIF format
Here is a sample
<map name="3toon.map"> <area shape="rect" coords="11,0,160,111"href="chapter3.html"><area shape="rect" coords="213,0,365,164"href="chapter3.html#section2"><area shape="default" href="chapter3.html"></map> <img src="toon3.gif" width="576" height="288"
18
USEMAP="#toon3.map" ALT="toon3.map">
Note the # sign before the map name.
The map name
Give the map a name. This is done via the map tag’s NAME attribute, forexample:
<map name="3toon.map">
The region list
For *each* of the imagemap clickable regions, create an area tag:<area shape="option" coords="coords_list" URL>
1. The area tag has a shape attribute. Its value may be: rect for rectangular areas circle for circular areas poly for polygonal areas default for background areas--in case the user clicks inside theimagemap but outside of the defined regions. **Always put thedefault line last in your list of regions.**
Some current browsers recognize only the rectangular shape and default.
2. The area tag has a coords attribute. See the "Region Coordinates" sectionabove for instructions on getting the pixel coordinates. For rects, give theupper left and lower right coordinates in pixels. That is, in pixels, how faraway is the upper left corner of the region from the upper left corner (origin)of the image? And how far from the origin is the lower-right corner? Forcircles, give the x and y for the center point and the radius in pixels. Forpolygons, the format is x comma y comma for each point of the polygon,going all the way around the polygon.
3. href -- give the URL you want to link to, in standard href format; for a filein the same directory, just give the filename. For a specific section withinthe file, use the filename, a pound (#) sign, and the section’s <a name> tag(see the "The URL" section above).
The code for a polygon clickable region looks like this<area shape="poly"coords="79,51,145,53,146,93,133,95,61,87"href="myfile2.html#header6">
Quiz
In the diagram in the previous section, if the first balloon were meantto link to the top of Chapter 3, the imagemap HTML code for the firstballoon would look like this: <area shape="rect" coords="11,0,160,111"
19

href="chapter3.html">
See if you can figure out the code for linking the second balloon tochapter3.html, section2. The answer is in Appendix B.
The image and the end of the imagemap
In addition to giving the map name and a list of regions, you will need to call theimage and close the map. See the example below.
<map name="3toon.map"> <area shape="rect" coords="11,0,160,111"href="chapter3.html"><area shape="rect" coords="213,0,365,164"href="chapter3.html#section2"><area shape="default" href="chapter3.html"></map> <img src="toon3.gif" width="576" height="288"USEMAP="#toon3.map" ALT="toon3.map">
Note the # sign before the map name.
Trouble shooting: If your map does not seem to work,
1. Double-check the punctuation of each set of coordinates:x comma y comma x comma y comma.
2. Check that your regions do not overlap. 3. Check that your default line is last in your area list.
Putting the Imagemaps Together in Tables
WebToons put imagemaps into tables, because you can get nice borders andgood alignment of panels. This section reveals how to create the table ofimagemaps via a set of progressively more detailed examples.
Alternative: Instead of using a table, you could just put the imagemaps into yourHTML, one after another, and let the user’s browser arrange them according tospace available. HTML is designed to give design authority to the browser, notthe page creator.
For introductory table information, see the Table Section in WebPrep atscience.nas.nasa.gov/Pubs/TechReports/NASreports/NAS-96-002/WebPrepChp4.html#HDR7Most HTML editing programs will make tables for you--or you could borrow thesample code in the Appendix. If you want to know how to hard-code a table, readon.
Start with a hard copy of your storyboard--your layout plan for your WebToon.Sketch in (or merely notice) the layout of the rows. The example shown has threerows.
20

This means the HTML document for your WebToon page will have a table withthree rows. This first example is just the framework of the table rows; we will fillin the cells later.
<!-- ***TABLE of IMAGEMAPS for WEBTOONS*** --><table border width="414" ><tr> <!-- Top Row -->
</tr> <!-- End Top Row--><tr> <!-- Middle Row = all one toon-->
</tr> <!-- End Middle Row --><tr> <!-- Bottom Row -->
</tr> <!-- End Bottom Row --></table>
21

When you have your rows coded, as above, youare ready to add your table data cells. Notice inthe sketch to the right that this layout has twocells in the top row, one cell in the middle, andtwo cells in the bottom row. Also note that onecell in the middle row spans two columns.
The cell sketch
Here is the same table code as above but with the cell code added. Notice thateach cell is delimited by a TD tag.
<!-- ***TABLE of IMAGEMAPS for WEBTOONS***---><table border width="414" ><tr> <!-- Top Row -->
<td> <!-- ***Toon 1 = cell 1*** -->
</td> <td> <!-- ***Toon 2 = cell 2*** -->
</td></tr> <!-- End Top Row-->
<tr> <!-- Middle Row = all one toon--just one cell --> <td colspan="2" > <!-- ***Toon 3 = cell 3*** -->
</td></tr> <!-- End Middle Row -->
<tr> <!-- Bottom Row --> <td> <!-- ***Toon 4 = cell 4*** -->
</td> <td> <!-- ***Toon 5 = cell 5*** -->
</td>
22

</tr> <!-- End Bottom Row--></table>
The indents are for clarity, not required.
Take a look at the HTML above and get a feel for the structure of the table.When you understand how the rows and cells are arranged, you are ready to plugin your imagemap code, as follows.
<!-- ---COMPLETE TABLE of IMAGEMAPS for WEBTOONS--- --><table border width="414" ><tr> <!-- Top Row -->
<td> <!-- ***Toon 1*** --> <map name="1toon.map"> <area shape="rect" coords="0,0,200,68" href="index.html"> <area shape="rect" coords="0,69,200,130" href="chapter1.html"> <area shape="rect" coords="0,131,200,150" href="../home.html"> </map> <img src="1toon.gif" width="200" height="150" USEMAP="#1toon.map" ALT="First ’Toon"> </td> <td> <!-- ***Toon 2*** --> <map name="2toon.map"> <area shape="rect" coords="0,0,200,68" href="chapter2.html"> <area shape="rect" coords="0,69,200,150" href="chapter2.html#photo"> </map> <img src="2toon.gif" width="200" height="150" USEMAP="#2toon.map" ALT="Second ’Toon"> </td>
</tr> <!-- End Top Row -->
<tr> <!-- Middle Row = all one toon--just one cell --> <td colspan="2" > <!-- ***Toon 3*** --> <map name="3toon.map"> <area shape="rect" coords="0,0,107,88" href="chapter3.html#getin"> <area shape="rect" coords="108,0,182,107" href="chapter3.html#pick"> <area shape="rect" coords="183,0,305,63" href="chapter3.html#enhance"> <area shape="rect" coords="306,0,410,79" href="chapter3.html#words"> <area shape="rect" coords="87,64,308,138" href="chapter3.html#balloon"> <area shape="default" href="chapter3.html"> </map> <img src="3toon.gif" HEIGHT=150 WIDTH=410 USEMAP="#3toon.map" ALT="Third Toon"> </td>
</tr> <!-- End Middle Row -->
<tr> <!-- Bottom Row --> <td> <!-- ***Toon 4*** --> <!-- in my sample WebToon this one is just a linked image, not an imagemap --> <a href="chapter4.html"> <img src="4toon.gif" width="200" height="150" ALT="Fourth Toon"></a> </td>
23

<td> <!-- ***Toon 5*** --> <map name="5toon.map"> <area shape="rect" coords="0,0,200,64" href="chapter5.html"> <area shape="poly" coords="70,70,150,70,170,90,170,130, 150,130,70,140,50,130,50,90,70,70" href="chapter5.html#html"> <area shape="default" href="chapter5.html"> </map> <img src="5toon.gif" width="200" height="150" USEMAP="#5toon.map" ALT="Fifth Toon"> </td>
</tr> <!-- End Bottom Row --></table>
Summary of Imagemaps-in-Table HTML
1. (Remember that tables are optional; you could let the user’s browserarrange your imagemaps.)
2. Make an HTML table that corresponds to the WebToon storyboard. Foreach horizontal row of the storyboard, there should be a corresponding row(TR) in the table. For each panel (image) in the row, there should be acorresponding table cell (TD).
3. Place the HTML code for one imagemap within each table cell. Open the cell <TD>. Name the map: <map name="1toon.map"> Add the area tags: shape, coords, and href for each clickable areawithin the toon image (each word balloon) plus an area called"default" linking to the top of the chapter, for the regions outside ofyour defined areas (default is optional). Close the map: </map> Call the image, giving width, height, alt, andUSEMAP="toon-name.map". Close the </TD>.
4. When you are at the end of the row, close the TR. 5. When you are at the end of the Toon, close the table.
What About Sound and Motion and Depth?
This is being written in 1998. I think that the current average user’s bandwidthcalls for quiet, static, flat WebToon images. Plain images are neither too muchnor too little to download.
In the very near future, the average user’s bandwidth, coupled with multimediadelivery technology, will allow WebToons to add sound; the WebToons couldtalk out loud. Also, the WebToons could move; there is no inherent reason forthem to be static images. Animation is a cornerstone of modern cartoons. Andthen we could add depth; why not have 3D WebToons?
For the time being, quiet, static, flat WebToon images get the job done.
24
Summary of How To Make WebToons
Make a storyboard summarizing your document. Create digital images of people talking. Copy, save, pick, crop the images. Enhance the images in Photoshop or other image processing software. Add words on new layers and balloons on new layers. Save layered files and GIF files. Create an imagemap for each GIF image. Assemble the imagemaps into an HTML table (optional). Place the table (or series of imagemaps) into an HTML document that willserve as your Table of Contents. Optional: also provide a text-only Tableof Contents, on another page, for those who prefer reading plain text. Alternately, you could composite your Photoshop images into one bigimage, and make one imagemap from that.
Summary of Why to Make a WebToon
A WebToon adds the human touch to your long document on the web. Images ofpeople make your document more approachable. Also, the creation of aWebToon forces you to organize your document such that you can condense itinto logical words that fit into word balloons. Thus, WebToons help humanizeand organize your long documents. WebToons enhance the usability of your website.
If you have any questions, comments or recommendations, please write to me:[email protected]. If you succeed in making a WebToon, I would beinterested in hearing about it. Good luck!
25

Acknowledgments
I am indebted to Sandy Johan, Val Watson and Sharon Marcacci for excellentsuggestions, and to Sam Uselton for guidance, and to Randolph Kaemmerer forhelp with the manuscript. IHiP provided good imagemap information on the web.
I thank all the readers of this document, especially those who try to make aWebToon.
Annotated References
1. An outline of this paper was published in: Walatka, Pamela P.,"WebToons:A Method for Organizing and Humanizing Web Documents," VisualProceedings, The Art and Interdisciplinary Programs of SIGGRAPH96,Computer Graphics Annual Conference Series 1996, Association forComputing Machinery, New York, ISBN 0-89791-784-7, ACM Order No.428961, p. 156.
2. IHiP, at http://www.ihip.com/cside.html gives good information andlinks to mapping tools.
3. www.yahoo.com/Computers_and_Internet/Internet/World_Wide_Web/Imagemaps/ has links to imagemapinformation, including imagemap editors.
4. science.nas.nasa.gov/Pubs/TechReports/NASreports/NAS-96-002/WebPrepChp4.html is part of my guideto putting scientific reports on the web. Chapter Four is about imagemaps;the Glossary explains many of the terms used in this document.
5. The NAS Webweaver’s pagescience.nas.nasa.gov/Services/Education/Resources/webweavers.html
links to good resources for web workers, including guides to HTML.
6. Rick Darnell, et al., HTML 4, Sams.net Publishing, 1998, is a thick,complete book on HTML, including tables and imagemaps. See page 222for imagemap tools.
This is http://science.nas.nasa.gov/Pubs/TechReports/NASreports/NAS-98-014
Updated: February 18, 1999WebWork: Pam Walatka
NASA Responsible official:Lisa Reid
26

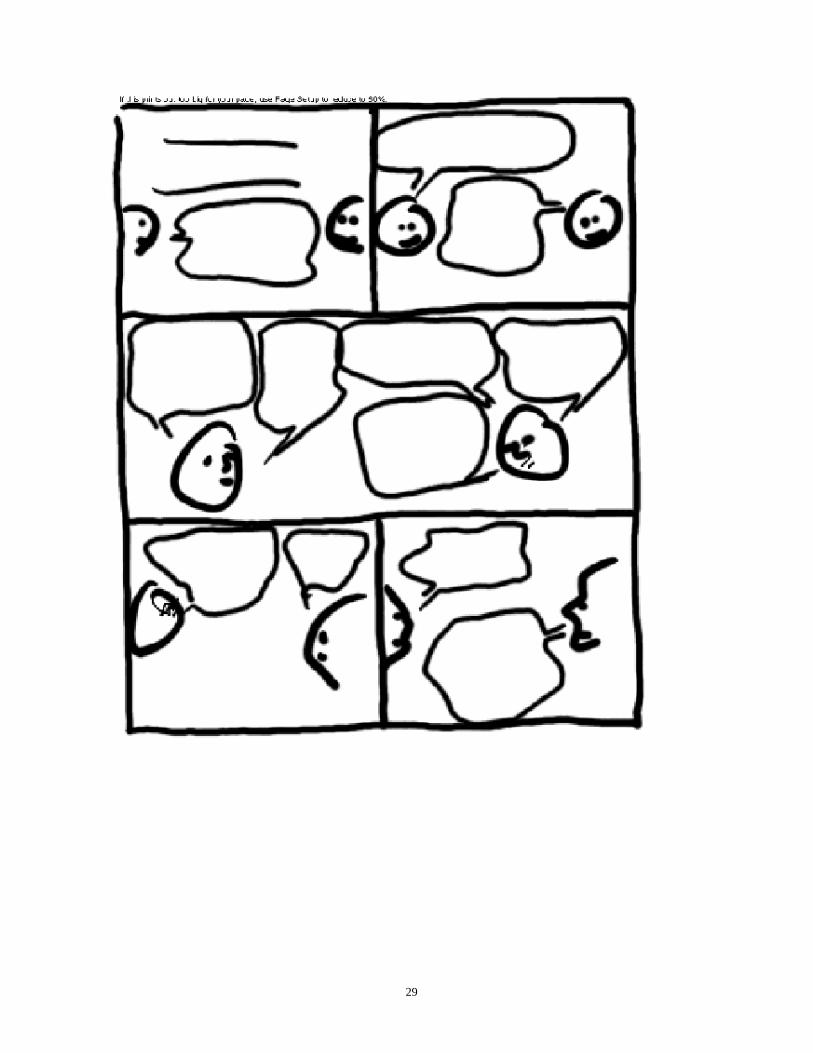
Appendix A
Sample Storyboards
27

28
29

Appendix B
Map Coordinates Quiz Answer
<area shape="rect" coords="213,0,365,164" href="chapter3.html#section2">
30

Appendix C
Sample HTML for Imagemap Tables for WebToons<!-- ***TABLE of IMAGEMAPS for WEBTOONS***---><table border width="414" ><tr> <!-- Top Row--><td><!-- ***Toon 1***--> <map name="1toon.map"> <area shape="rect" coords="0,0,200,68" href="index.html"> <area shape="rect" coords="0,69,200,130" href="chapter1.html"> <area shape="rect" coords="0,131,200,150" href="../home.html"> </map> <img src="1toon.gif" width="200" height="150" USEMAP="#1toon.map" ALT="First ’Toon"></td><td><!-- ***Toon 2***--> <map name="2toon.map"> <area shape="rect" coords="0,0,200,68" href="chapter2.html"> <area shape="rect" coords="0,69,200,150" href="chapter2.html#photo"> </map> <img src="2toon.gif" width="200" height="150" USEMAP="#2toon.map" ALT="Second ’Toon"></td></tr> <!-- End Top Row-->
<tr> <!-- Middle Row = all one toon--><td colspan="2"><!-- ***Toon 3***--> <map name="3toon.map"> <area shape="rect" coords="0,0,107,88" href="chapter3.html#getin"> <area shape="rect" coords="108,0,182,107" href="chapter3.html#pick"> <area shape="rect" coords="183,0,305,63" href="chapter3.html#enhance"> <area shape="rect" coords="306,0,410,79" href="chapter3.html#words"> <area shape="rect" coords="87,64,308,138" href="chapter3.html#balloon"> <area shape="default" href="chapter3.html"> </map> <img src="3toon.gif" HEIGHT=150 WIDTH=410 USEMAP="#3toon.map" ALT="Third Toon"></td></tr> <!-- End Middle Row-->
<tr> <!-- Bottom Row--><td><!-- ***Toon 4***--> <!-- this one is just a linked image, not an imagemap--> <a href="chapter4.html"> <img src="4toon.gif" width="200" height="150" ALT="Fourth Toon"></a></td><td><!-- ***Toon 5***--> <map name="5toon.map"> <area shape="rect" coords="0,0,200,64" href="chapter5.html"> <area shape="poly" coords="70,70,150,70,170,90,170,130, 150,130,70,140,50,130,50,90,70,70" href="chapter5.html#html">
31

<area shape="default" href="chapter5.html"> </map> <img src="5toon.gif" width="200" height="150" USEMAP="#5toon.map" ALT="Fifth Toon"></td></tr> <!-- End Bottom Row--></table><!-- End WEBTOON-->
32