How to Delineate Watersheds in ArcGIS for...
13
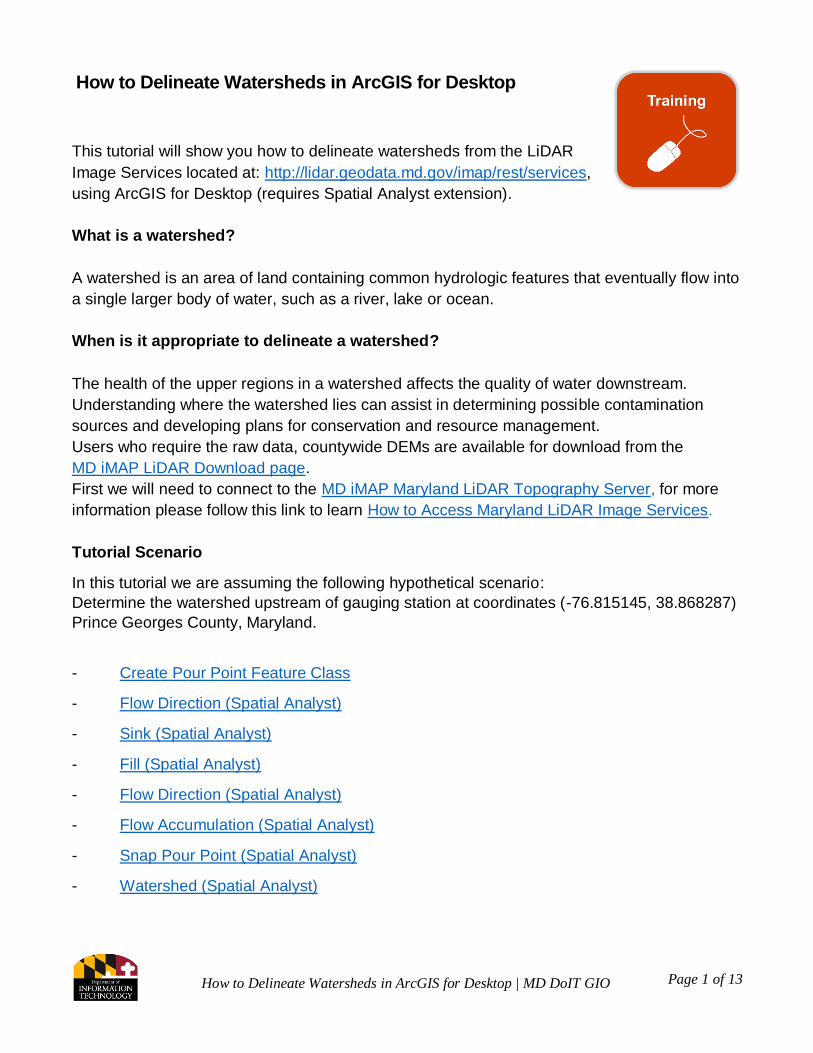
Page 1 of 13 How to Delineate Watersheds in ArcGIS for Desktop | MD DoIT GIO How to Delineate Watersheds in ArcGIS for Desktop This tutorial will show you how to delineate watersheds from the LiDAR Image Services located at: http://lidar.geodata.md.gov/imap/rest/services, using ArcGIS for Desktop (requires Spatial Analyst extension). What is a watershed? A watershed is an area of land containing common hydrologic features that eventually flow into a single larger body of water, such as a river, lake or ocean. When is it appropriate to delineate a watershed? The health of the upper regions in a watershed affects the quality of water downstream. Understanding where the watershed lies can assist in determining possible contamination sources and developing plans for conservation and resource management. Users who require the raw data, countywide DEMs are available for download from the MD iMAP LiDAR Download page. First we will need to connect to the MD iMAP Maryland LiDAR Topography Server , for more information please follow this link to learn How to Access Maryland LiDAR Image Services. Tutorial Scenario In this tutorial we are assuming the following hypothetical scenario: Determine the watershed upstream of gauging station at coordinates (-76.815145, 38.868287) Prince Georges County, Maryland. - Create Pour Point Feature Class - Flow Direction (Spatial Analyst) - Sink (Spatial Analyst) - Fill (Spatial Analyst) - Flow Direction (Spatial Analyst) - Flow Accumulation (Spatial Analyst) - Snap Pour Point (Spatial Analyst) - Watershed (Spatial Analyst)
-
Upload
truongthuy -
Category
Documents
-
view
235 -
download
3
Transcript of How to Delineate Watersheds in ArcGIS for...
Page 1 of 13
How to Delineate Watersheds in ArcGIS for Desktop | MD DoIT GIO
How to Delineate Watersheds in ArcGIS for Desktop
This tutorial will show you how to delineate watersheds from the LiDAR
Image Services located at: http://lidar.geodata.md.gov/imap/rest/services,
using ArcGIS for Desktop (requires Spatial Analyst extension).
What is a watershed?
A watershed is an area of land containing common hydrologic features that eventually flow into
a single larger body of water, such as a river, lake or ocean.
When is it appropriate to delineate a watershed?
The health of the upper regions in a watershed affects the quality of water downstream.
Understanding where the watershed lies can assist in determining possible contamination
sources and developing plans for conservation and resource management.
Users who require the raw data, countywide DEMs are available for download from the
MD iMAP LiDAR Download page.
First we will need to connect to the MD iMAP Maryland LiDAR Topography Server, for more
information please follow this link to learn How to Access Maryland LiDAR Image Services.
Tutorial Scenario
In this tutorial we are assuming the following hypothetical scenario:
Determine the watershed upstream of gauging station at coordinates (-76.815145, 38.868287)
Prince Georges County, Maryland.
- Create Pour Point Feature Class
- Flow Direction (Spatial Analyst)
- Sink (Spatial Analyst)
- Fill (Spatial Analyst)
- Flow Direction (Spatial Analyst)
- Flow Accumulation (Spatial Analyst)
- Snap Pour Point (Spatial Analyst)
- Watershed (Spatial Analyst)
Page 2 of 13
How to Delineate Watersheds in ArcGIS for Desktop | MD DoIT GIO
Create Pour Point Feature Class
1. Open ArcMap
2. Check out Spatial Analyst Extension:
3. Add the desired Image Service to your map. (Prince Georges DEM) For more information on accessing Maryland LiDAR image services, please read How to Access Maryland LiDAR Image Services.
4. Open the Go To XY ( ) tool. Select the Decimal Degrees units from the dropdown:
5. Create a hypothetical gauging station at coordinates: (-76.815145, 38.868287)
Select Add Point ( )
Click Zoom To ( ) to center the display extent on the newly added point
6. Extract a local copy of the DEM. Set extent to 1:18,000 for the extraction.
For more information on the image service extraction process, please read How to Extract
from Image Services in ArcGIS for Desktop.
7. Open the Draw Toolbar in ArcMap
Using the Select Elements tool ( ); highlight/select the added point.
Page 3 of 13
How to Delineate Watersheds in ArcGIS for Desktop | MD DoIT GIO
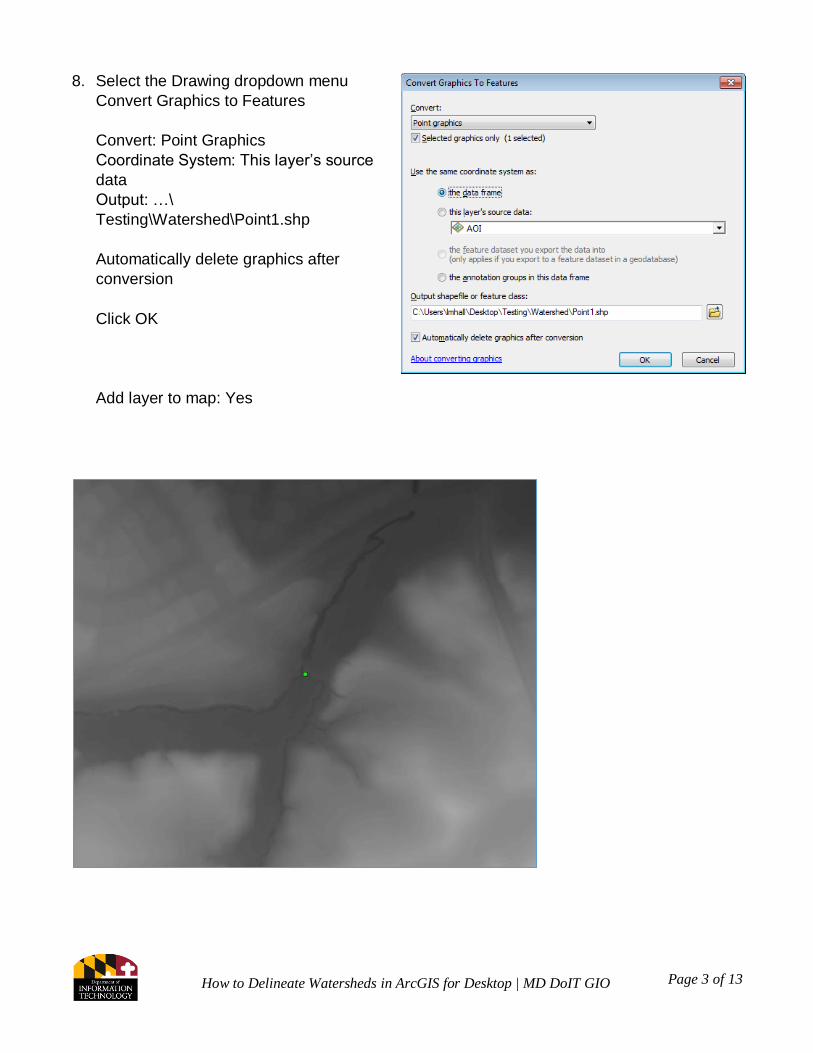
8. Select the Drawing dropdown menu
Convert Graphics to Features
Convert: Point Graphics
Coordinate System: This layer’s source
data
Output: …\
Testing\Watershed\Point1.shp
Automatically delete graphics after
conversion
Click OK
Add layer to map: Yes
Page 4 of 13
How to Delineate Watersheds in ArcGIS for Desktop | MD DoIT GIO
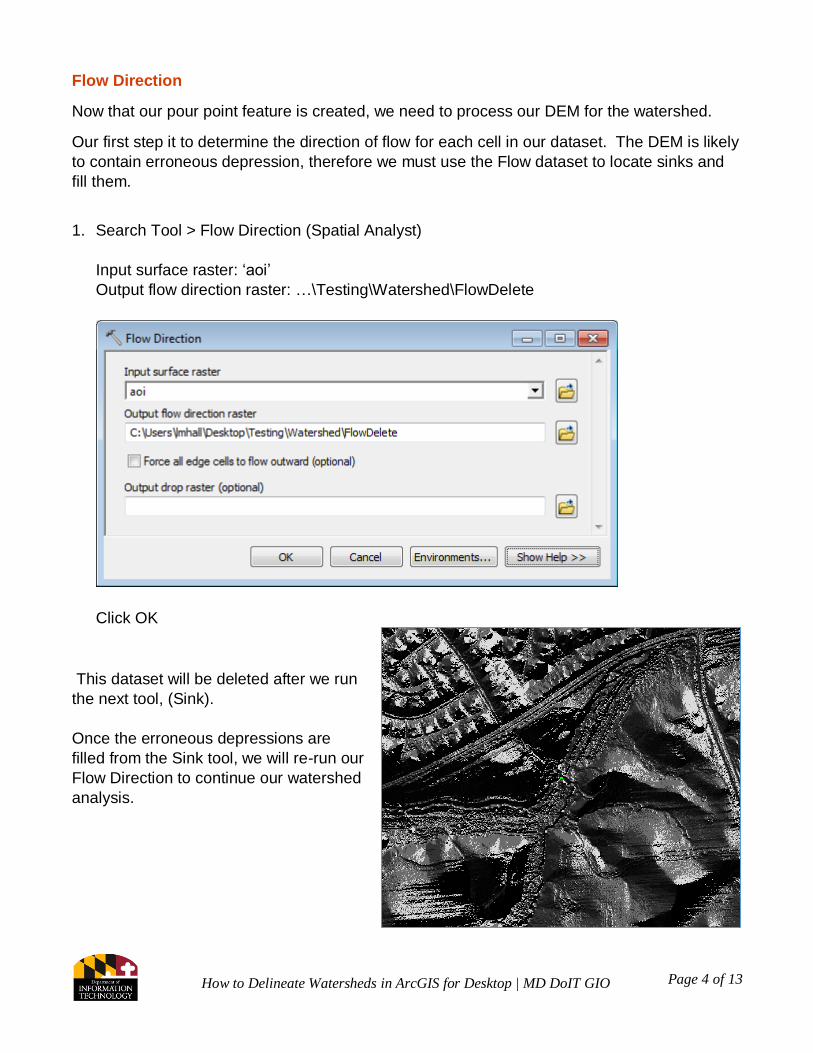
Flow Direction
Now that our pour point feature is created, we need to process our DEM for the watershed.
Our first step it to determine the direction of flow for each cell in our dataset. The DEM is likely
to contain erroneous depression, therefore we must use the Flow dataset to locate sinks and
fill them.
1. Search Tool > Flow Direction (Spatial Analyst)
Input surface raster: ‘aoi’
Output flow direction raster: …\Testing\Watershed\FlowDelete
Click OK
This dataset will be deleted after we run
the next tool, (Sink).
Once the erroneous depressions are
filled from the Sink tool, we will re-run our
Flow Direction to continue our watershed
analysis.
Page 5 of 13
How to Delineate Watersheds in ArcGIS for Desktop | MD DoIT GIO
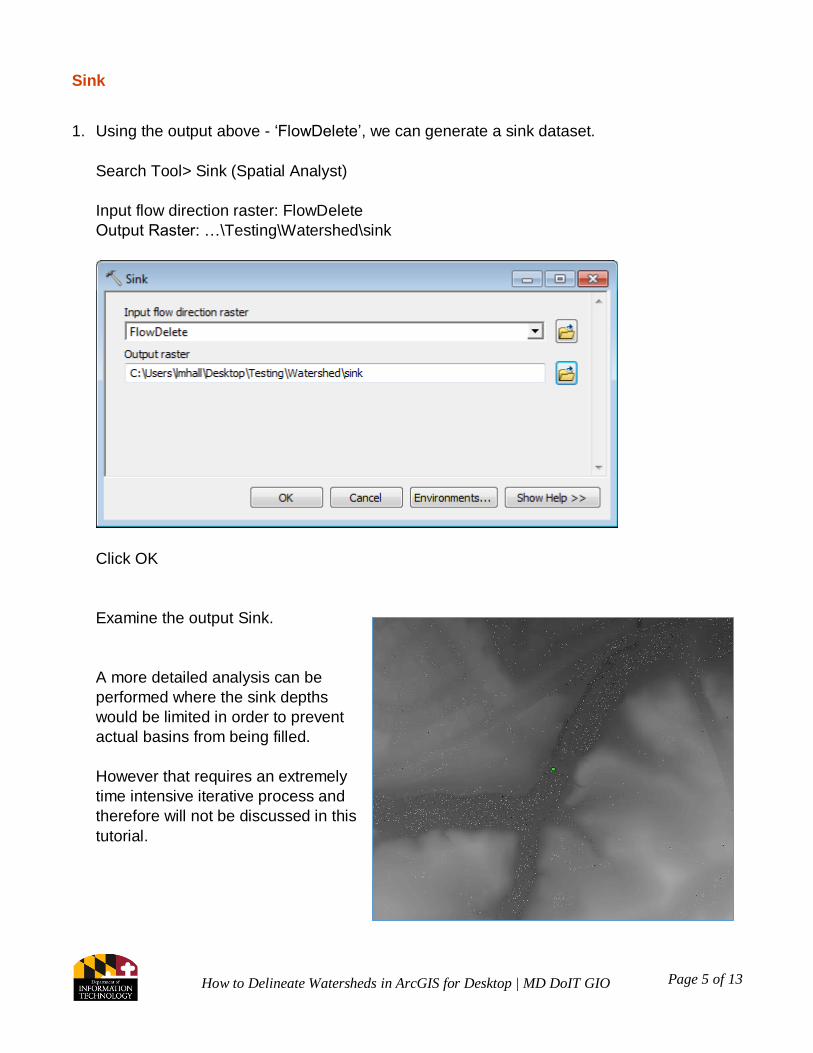
Sink
1. Using the output above - ‘FlowDelete’, we can generate a sink dataset.
Search Tool> Sink (Spatial Analyst)
Input flow direction raster: FlowDelete
Output Raster: …\Testing\Watershed\sink
Click OK
Examine the output Sink.
A more detailed analysis can be
performed where the sink depths
would be limited in order to prevent
actual basins from being filled.
However that requires an extremely
time intensive iterative process and
therefore will not be discussed in this
tutorial.
Page 6 of 13
How to Delineate Watersheds in ArcGIS for Desktop | MD DoIT GIO
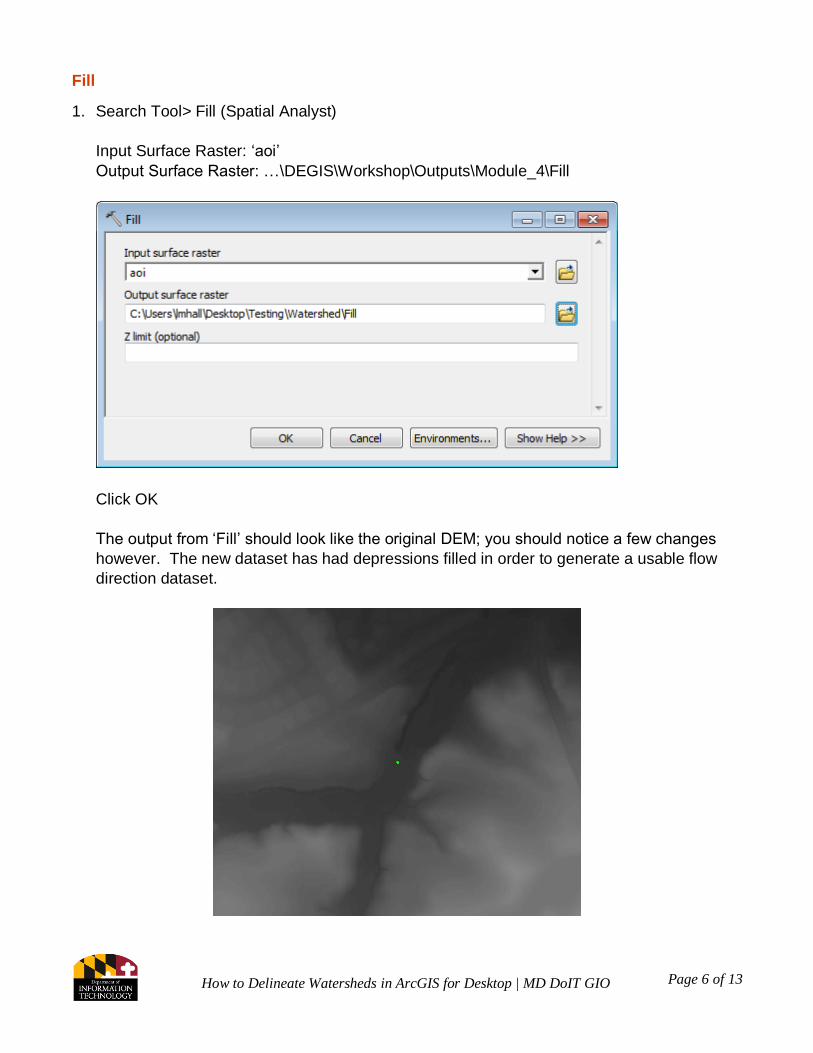
Fill
1. Search Tool> Fill (Spatial Analyst)
Input Surface Raster: ‘aoi’
Output Surface Raster: …\DEGIS\Workshop\Outputs\Module_4\Fill
Click OK
The output from ‘Fill’ should look like the original DEM; you should notice a few changes
however. The new dataset has had depressions filled in order to generate a usable flow
direction dataset.
Page 7 of 13
How to Delineate Watersheds in ArcGIS for Desktop | MD DoIT GIO
Flow Direction
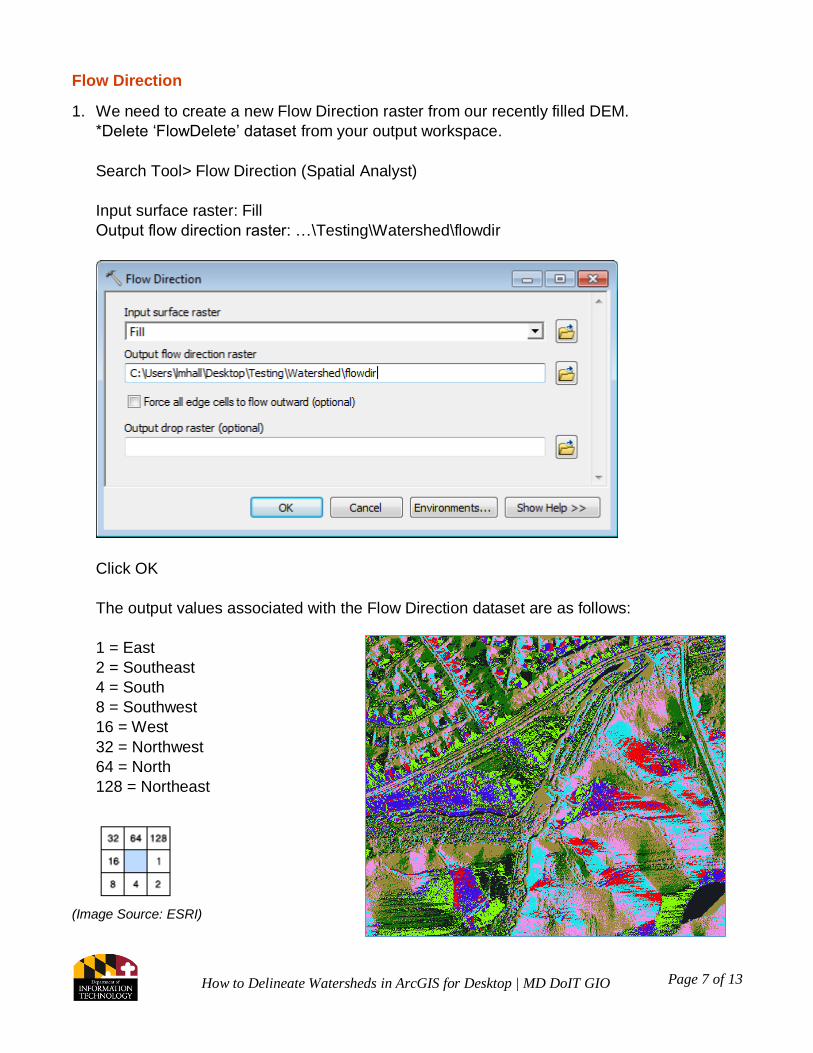
1. We need to create a new Flow Direction raster from our recently filled DEM.
*Delete ‘FlowDelete’ dataset from your output workspace.
Search Tool> Flow Direction (Spatial Analyst)
Input surface raster: Fill
Output flow direction raster: …\Testing\Watershed\flowdir
Click OK
The output values associated with the Flow Direction dataset are as follows:
1 = East
2 = Southeast
4 = South
8 = Southwest
16 = West
32 = Northwest
64 = North
128 = Northeast
(Image Source: ESRI)
Page 8 of 13
How to Delineate Watersheds in ArcGIS for Desktop | MD DoIT GIO
Flow Accumulation
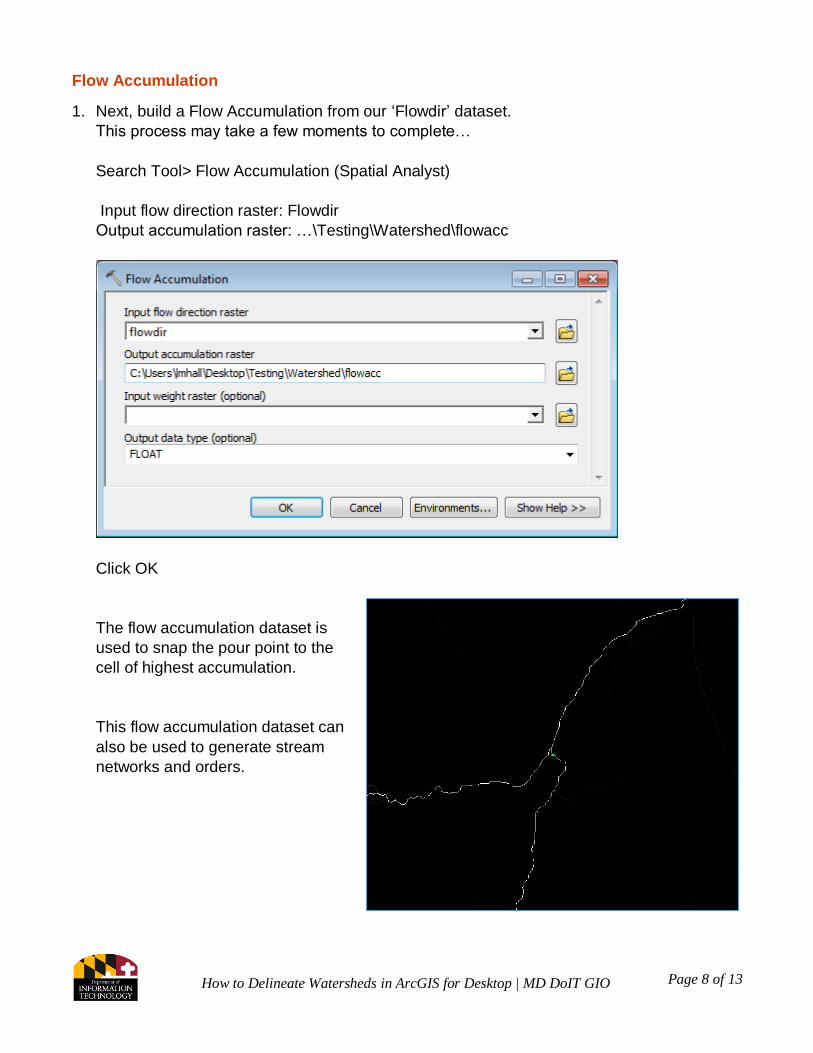
1. Next, build a Flow Accumulation from our ‘Flowdir’ dataset.
This process may take a few moments to complete…
Search Tool> Flow Accumulation (Spatial Analyst)
Input flow direction raster: Flowdir
Output accumulation raster: …\Testing\Watershed\flowacc
Click OK
The flow accumulation dataset is
used to snap the pour point to the
cell of highest accumulation.
This flow accumulation dataset can
also be used to generate stream
networks and orders.
Page 9 of 13
How to Delineate Watersheds in ArcGIS for Desktop | MD DoIT GIO
Snap Pour Point
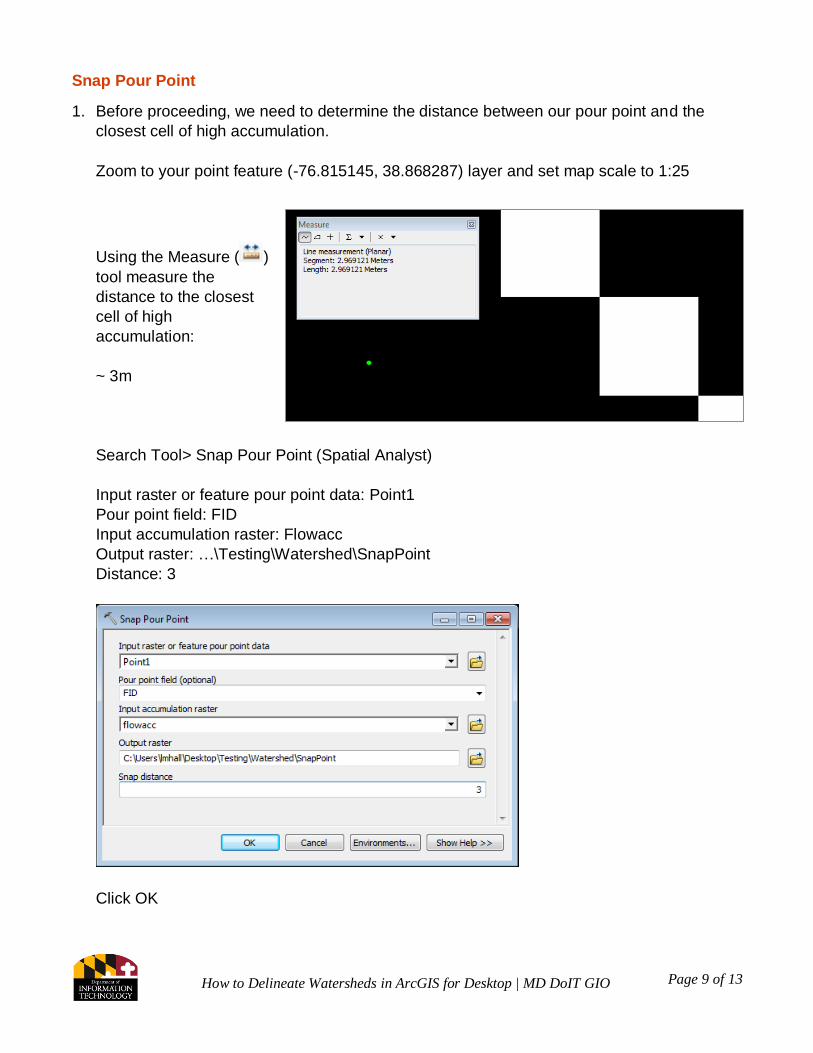
1. Before proceeding, we need to determine the distance between our pour point and the
closest cell of high accumulation.
Zoom to your point feature (-76.815145, 38.868287) layer and set map scale to 1:25
Using the Measure ( )
tool measure the
distance to the closest
cell of high
accumulation:
~ 3m
Search Tool> Snap Pour Point (Spatial Analyst)
Input raster or feature pour point data: Point1
Pour point field: FID
Input accumulation raster: Flowacc
Output raster: …\Testing\Watershed\SnapPoint
Distance: 3
Click OK
Page 10 of 13
How to Delineate Watersheds in ArcGIS for Desktop | MD DoIT GIO
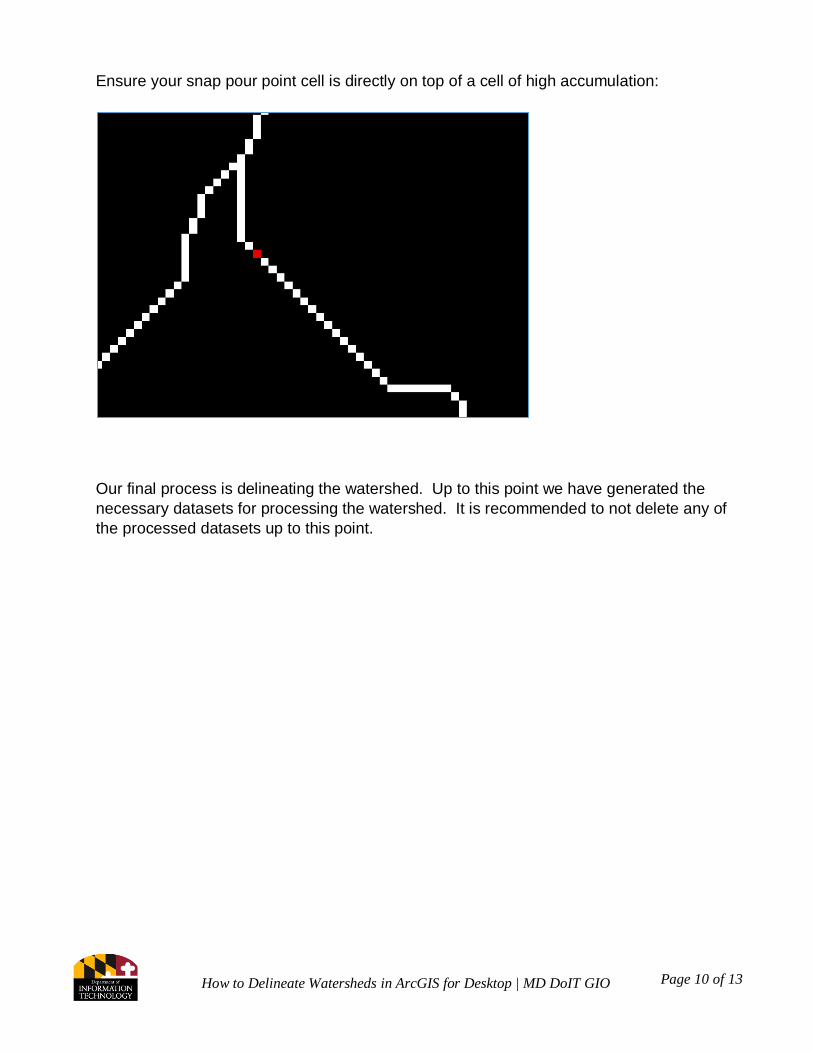
Ensure your snap pour point cell is directly on top of a cell of high accumulation:
Our final process is delineating the watershed. Up to this point we have generated the
necessary datasets for processing the watershed. It is recommended to not delete any of
the processed datasets up to this point.
Page 11 of 13
How to Delineate Watersheds in ArcGIS for Desktop | MD DoIT GIO
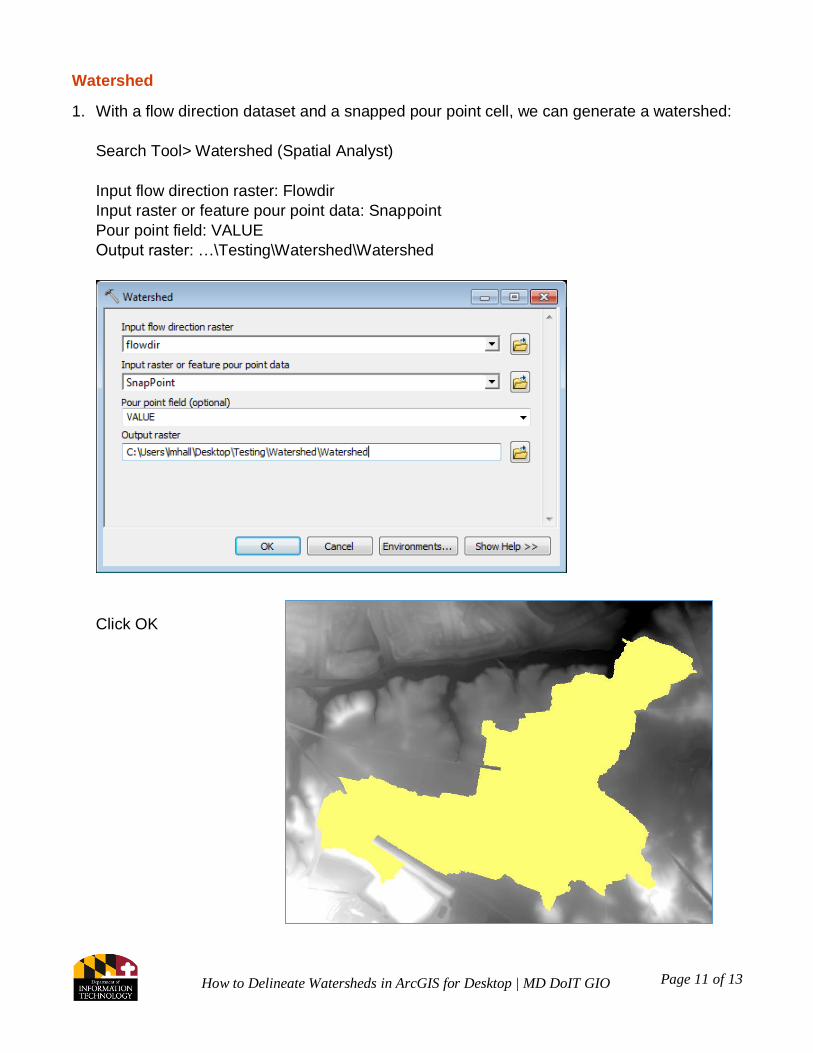
Watershed
1. With a flow direction dataset and a snapped pour point cell, we can generate a watershed:
Search Tool> Watershed (Spatial Analyst)
Input flow direction raster: Flowdir
Input raster or feature pour point data: Snappoint
Pour point field: VALUE
Output raster: …\Testing\Watershed\Watershed
Click OK
Page 12 of 13
How to Delineate Watersheds in ArcGIS for Desktop | MD DoIT GIO
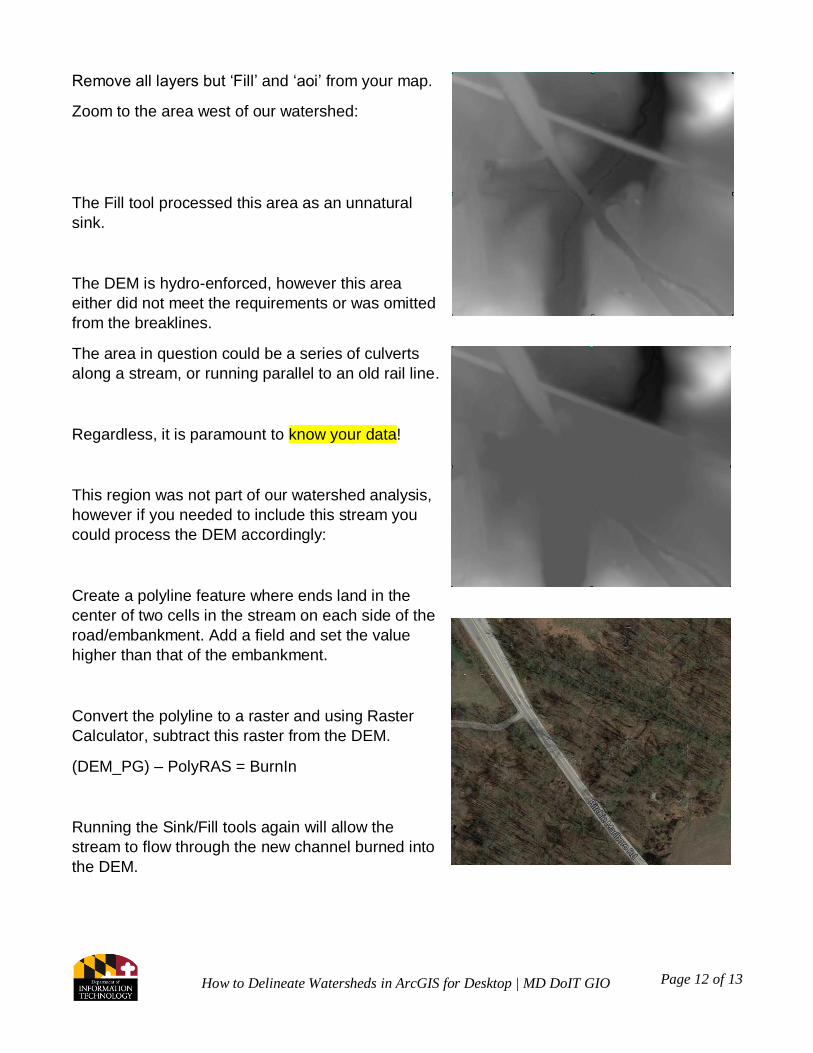
Remove all layers but ‘Fill’ and ‘aoi’ from your map.
Zoom to the area west of our watershed:
The Fill tool processed this area as an unnatural
sink.
The DEM is hydro-enforced, however this area
either did not meet the requirements or was omitted
from the breaklines.
The area in question could be a series of culverts
along a stream, or running parallel to an old rail line.
Regardless, it is paramount to know your data!
This region was not part of our watershed analysis,
however if you needed to include this stream you
could process the DEM accordingly:
Create a polyline feature where ends land in the
center of two cells in the stream on each side of the
road/embankment. Add a field and set the value
higher than that of the embankment.
Convert the polyline to a raster and using Raster
Calculator, subtract this raster from the DEM.
(DEM_PG) – PolyRAS = BurnIn
Running the Sink/Fill tools again will allow the
stream to flow through the new channel burned into
the DEM.

Page 13 of 13
How to Delineate Watersheds in ArcGIS for Desktop | MD DoIT GIO
ADDITIONAL RESOURCES For more information about Maryland LiDAR, please visit the Maryland LiDAR Overview page For more information about additional training opportunities, please visit the MD iMAP Training Overview page, or contact Lisa Lowe, Senior GIS Analyst with the Maryland Department of Information Technology, Geographic Information Office at [email protected].
For additional MD iMAP datasets, please visit the GIS Data Catalog
For all other inquiries related to Maryland LiDAR, please contact the GIO Office at