How to configure your Triton...
9
How to configure your station information www.tritondigital.com | solutions @tritondigital.com UNITED STATES | CANADA | EUROPE | LATIN AMERICA | ASIA | MIDDLE EAST How to configure your Triton Player It is from this screen that you will be able to manage and Edit the Station Name, description, format type, logo, and home page link. Each of these fields directly correspond to a specific element on the player. And you have 100% control over those elements. There are two fields on the Station Settings page that we want to take a second to explain in more detail. First, the Live Connection Time Out Setting. By default this is left empty so that anytime a player session is initiated, the listener’s session will remain active as long as they keep the player open. However, if you were to set this to x number of minutes, say 60 minutes, that would force the player to pause the live audio once that listening threshold has been reached. The listener then would have to click play to confirm that they are in fact still active and listening. Essentially, this setting lets you control how long a listener can listen before they have to manually verify that they are still an active listener. Next is the Autostart option. By default this will be set to, “yes.” And for most people this is the setting that you want because if you change it to “no” the listener will have to manually press play in order to initially begin their listening session. For most clients the default settings will work perfectly. But we wanted to give you the option to control those settings should you have a specific need and reason to do so. This training document is specifically designed to show you how to manage all of the settings needed to control the look, feel and functionality of your new Triton Digital streaming player.
-
Upload
vuongkhanh -
Category
Documents
-
view
234 -
download
5
Transcript of How to configure your Triton...

How to configure your station information
www.tritondigital.com | solutions @tritondigital.com
UNITED STATES | CANADA | EUROPE | LATIN AMERICA | ASIA | MIDDLE EAST
How to configure your Triton Player
It is from this screen that you will be able to manage and Edit the Station Name, description, format type, logo, and home page link. Each of these �elds directly correspond to a speci�c element on the player. And you have 100% control over those elements.
There are two fields on the Station Settings page that we want to take a second to explain in more detail.
First, the Live Connection Time Out Setting. By default this is left empty so that anytime a player session is initiated, the listener’s session will remain active as long as they keep the player open. However, if you were to set this to x number of minutes, say 60 minutes, that would force the player to pause the live audio once that listening threshold has been reached. The listener then would have to click play to con�rm that they are in fact still active and listening. Essentially, this setting lets you control how long a listener can listen before they have to manually verify that they are still an active listener.
Next is the Autostart option. By default this will be set to, “yes.” And for most people this is the setting that you want because if you change it to “no” the listener will have to manually press play in order to initially begin their listening session. For most clients the default settings will work perfectly. But we wanted to give you the option to control those settings should you have a speci�c need and reason to do so.
This training document is specifically designed to show you how to manage all of the settings needed to control the look, feel and functionality of your new Triton Digital streaming player.

How to configure your station now playing data
www.tritondigital.com | solutions @tritondigital.com
UNITED STATES | CANADA | EUROPE | LATIN AMERICA | ASIA | MIDDLE EAST
Once you are in the station’s settings, click the + sign to the right of the Now Playing Information Link. This will expand the page and show the available Now Playing options that you can edit.
There are really only 4 options in this section but they give you very powerful control over the Now Playing information.
You can choose to display how many of the station’s past songs the listener will be able to browse. Keep in mind that for each song listed, users will be able to access enhanced information like artist images, bios and other engaging content.
You can also choose to show the album art on �le for each song. And you can even upload a default image that will be displayed if by chance, the needed album is not on �le.
By setting the next option, Display Artist Pictures in Now Playing Background, to YES, you will enable your player to show various artist images as the player background.
If you set the Display Artist Pictures as Background option to NO, then the player will load and display the Default Cover Image that you can upload in the next �eld.
Keep in mind that if the Display Artist Pictures as background option is set to no, the default Cover Image, and only the default Cover Image will be displayed.

How to configure your player colors
www.tritondigital.com | solutions @tritondigital.com
UNITED STATES | CANADA | EUROPE | LATIN AMERICA | ASIA | MIDDLE EAST
You can customize the look & feel to match your station logo, brand, and color schemes.Once you are in the station’s settings, click the + sign to the right of the Player Colors Link. This will expand the page and show the editable color customization options.
First, you can choose the speci�c Frame color. The de�ned Frame color will be used as the primary color for the Header and Footer sections of the player.
Next, you can set the background color. This is the color that will be used if there is no default background image de�ned. The Highlight color is the color that listeners will see anytime they click a functional button on the player. Once that button is activated it will be highlighted with the color you de�ne right here.
To set any speci�c color, just click on the Color Picker icon. You can then choose to select a color from the Color Wheel, set the color using HSV or RGB designations, or, you can even de�ne the color by its hexadecimal code. Any color can be easily set to match your station’s branding!
Last, you can choose the background image. This can be any image that you want it to be as long as it meets the needed �le requirements. In our opinion, get creative with the image used as the background. Since the Triton Digital player uses Responsive Design Technology, the full background image will scale properly to the listener’s screen and window size automatically! Giving you the ability to always have a clean, appealing, player look! It’s important to note that the Background image will only display if the player is not using Enhanced Now Playing options. If the Enhanced Now Playing options have been enabled the background image will be replaced with artist speci�c images anytime they are available.

How to configure your custom links
www.tritondigital.com | solutions @tritondigital.com
UNITED STATES | CANADA | EUROPE | LATIN AMERICA | ASIA | MIDDLE EAST
The Custom links section of the Triton Digital Player manager allow each and every station to have complete control of the various links that users can access on the player.
You can de�ne up to 5 di�erent links that will display to listeners.
Simply, enter the title and name of the link – as you would like the audience to see it and de�ne the web address that it should link to.The link URL – or link to web address- can be any address! It can be the news page, weather page, or podcasting page of your station website. You can link to your loyalty club, games section or even link to your social media pages.
It is completely up to you!
Remember to click the Save Con�g button at the bottom of the screen.

How to configure your social sharing
www.tritondigital.com | solutions @tritondigital.com
UNITED STATES | CANADA | EUROPE | LATIN AMERICA | ASIA | MIDDLE EAST
You can choose to enable Facebook Likes and Comments, Google plus activities and tweets! Simply expand the Social Sharing section of the Player Con�guration screen and enable any social networking feature that you would like by selecting “Yes” from the drop down boxes.
How to configure your google analytics account
To follow your player’s statistics with your own Google Analytics Account, click the + sign in front of the Advanced Settings title, then click the + sign in front of the Analytics title. Enter your Google Analytics Tracking ID and click the Save Con�g button. The tracking starts immediately, so you can log in into your Google Analytics Account and see your users’ behavior.

www.tritondigital.com | solutions @tritondigital.com
UNITED STATES | CANADA | EUROPE | LATIN AMERICA | ASIA | MIDDLE EAST
How to configure your facebook moderator tools
In order to be able to moderate the users’s facebook comments, you must con�gure your Facebook App ID. To do it, click the + sign in front of the Advanced Settings title, then click the + sign in front of the Advanced Social Sharing title. Enter your Facebook App ID in the �eld and click the Save Con�g button. You must be logged in your Facebook page with the account linked to this Facebook App ID. Go back to your player, refresh it and you will see the Moderator View link and the Settings link.
How to configure your itunes affiliate account
In order to earn money each time your users buy a song on iTunes from your player, you must create an iTunes A�liate Account visiting this page: https://phgconsole.performancehorizon.com/login/itunes/. Once you completed this step, click the + sign in front of the Advanced Settings title, then click the + sign in front of the Itunes A�liate Linking title. Enter your a�liate token ID and click the Save Con�g button. The tracking starts immediately, so you can log in into your iTunes a�liate Account and see the number of clicks. Enter your Google Analytics Tracking ID and click the Save Con�g button. The tracking starts immediately, so you can log in into your Google Analytics Account and see your users’ behavior.
www.tritondigital.com | solutions @tritondigital.com
UNITED STATES | CANADA | EUROPE | LATIN AMERICA | ASIA | MIDDLE EAST
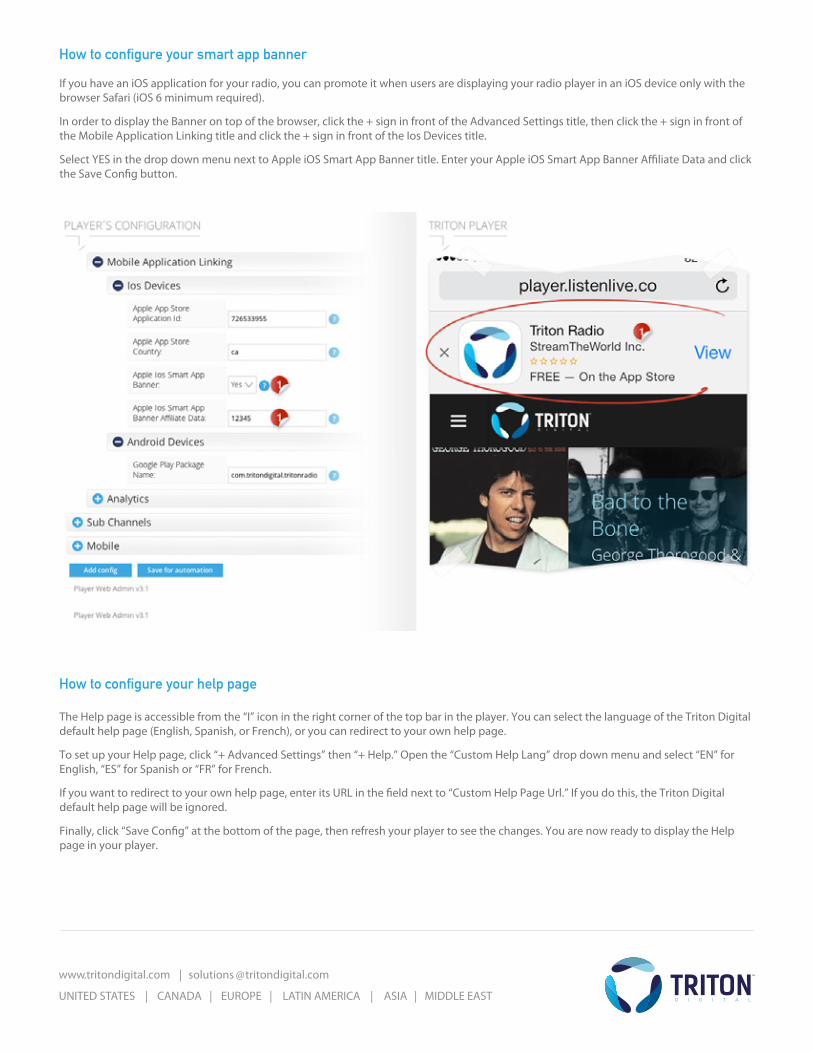
How to configure your smart app banner
If you have an iOS application for your radio, you can promote it when users are displaying your radio player in an iOS device only with the browser Safari (iOS 6 minimum required). In order to display the Banner on top of the browser, click the + sign in front of the Advanced Settings title, then click the + sign in front of the Mobile Application Linking title and click the + sign in front of the Ios Devices title. Select YES in the drop down menu next to Apple iOS Smart App Banner title. Enter your Apple iOS Smart App Banner A�liate Data and click the Save Con�g button.
How to configure your help page
The Help page is accessible from the “I” icon in the right corner of the top bar in the player. You can select the language of the Triton Digital default help page (English, Spanish, or French), or you can redirect to your own help page. To set up your Help page, click “+ Advanced Settings” then “+ Help.” Open the “Custom Help Lang” drop down menu and select “EN” for English, “ES” for Spanish or “FR” for French. If you want to redirect to your own help page, enter its URL in the �eld next to “Custom Help Page Url.” If you do this, the Triton Digital default help page will be ignored. Finally, click “Save Con�g” at the bottom of the page, then refresh your player to see the changes. You are now ready to display the Help page in your player.

www.tritondigital.com | solutions @tritondigital.com
UNITED STATES | CANADA | EUROPE | LATIN AMERICA | ASIA | MIDDLE EAST
How to configure your wishlist page
The optional Wishlist page is accessible from the main menu in the top bar of the player. If you enable it, users can add songs they like to the Wishlist. To set up your Wishlist page, click “+ Advanced Settings” then “+ Wishlist.” Open the Wishlist Active drop down menu select “YES” to enable the Wishlist in the player. Click “Save Con�g” at the bottom of the page, then refresh your player to see the changes. You are now ready to display the Wishlist page in your player.

www.tritondigital.com | solutions @tritondigital.com
UNITED STATES | CANADA | EUROPE | LATIN AMERICA | ASIA | MIDDLE EAST
How to configure your program guide page
Use the Program Guide Editor to set up your station’s schedule by creating show and host pro�les, linking them, and building a schedule of shows in the program grid.
The intuitive interface is easy to use, and a Help page walks you through the basics to get you started.
To access the Program Guide Editor, go into the Player Web Admin (the tool you use to manage your player’s station) and click “Program Guide Editor”
How to embed the Triton Player
The recommended way to access to the Triton Digital player from your website : Create a "Listen Live" html link which open the player link url directly in a new "_blank" page without specifying any dimensions. (See examples below). This will enable your listeners to take full advantage of the responsive design.
Code example:<a href="http://player.listenlive.co/16531" target="_blank">Listen Live</a>
Look and feel examples:'Click here to listen live'
Or