Homeless Management Information System (HMIS) - in.gov · Homeless Management Information System...
30
Homeless Management Information System (HMIS) Indiana Housing & Community Development Authority 3.2.2012
Transcript of Homeless Management Information System (HMIS) - in.gov · Homeless Management Information System...

Homeless Management Information System (HMIS)
Indiana Housing & Community Development Authority
3.2.2012

Homeless Management Information System (HMIS)
New User Training
A Homeless Management Information System is an electronic data collection system that stores longitudinal
client-level information about persons who access homeless prevention and/or homeless services. HMIS is a
valuable resource from the participating homeless assistance and homeless prevention programs in a
Continuum of Care (CoC). Aggregate HMIS data can be used to understand the size, characteristics and needs of
the homeless population at the local, state and national levels. The HMIS enables information about client
needs, goals and service outcomes. IHCDA will begin using a software platform from DSI, Inc called ClientTrack
and can be accessed using the following URL:
https://ihcdaonline.com
Your computer will need to support either Internet Explorer 7 or 8 or Mozilla Firefox 2010 to support the
ClientTrack application.
Objectives:
→ Review ICHDA Implementation of Clienttrack and important changes in data collection
→ Review HMIS Security Policies and Procedures
•New Policy – Implied Consent
→ Learn to log in and complete the following actions:
•Client Look-up
•Client Entry
•HMIS Program Data Intake Workflow (non-HPRP Programs)
•Enter Services
•Complete an Annual Assessment
•HMIS Program Data Exit Workflow (non-HPRP Programs)
•Case Notes
•Submission of Issues to IHCDA
•Sign Out
→ Review HMIS Contacts for IHCDA
HMIS Staff
Kerrie Kikendall, HMIS Manager, [email protected], 317-234-6973
Brennan Butler, HMIS Data Specialist, [email protected], 317-234-7572
Fax Number: 317-232-7778
HMIS ISSUES RELATED TO CLIENTTRACK SHOULD FIRST BE SUBMITTED TO

HMIS Security Policies and Procedures
Personal protected information (PPI) is considered any information that could lead to individual
identification. Participating agencies should have procedures in place for the secure storage and disposal of
hardcopy and electronic data generated from the HMIS or created for entry into the HMIS.
PPI should be stored in locked drawers/file cabinets and hardcopy data should be shredded before
disposal. Electronic PPI data including information contained on disks, CD’s, jump drives, computer hard drives
or other media should be reformatted before disposal.
Privacy and Client Information Restrictions
The Notice of Privacy Practices including the purpose for data collection should be posted in a public
area and in an office where an intake professional meets with clients. The full Privacy Policy Notice is available
on the IHCDA website and should be made available to clients upon request.
A signed client consent form is no longer required. A client who presents to your agency for services
and provides information is giving implied consent to enter and share certain data in the HMIS. However, there
is some information that will not be shared with other agencies. Information that will not be shared includes
HMIS Barriers, domestic violence status and case notes.
Additional information regarding client consent and restrictions will be covered in more detail during
training. No homeless person is to be refused services regardless of their participation in HMIS.
HMIS Computers
All computers that are used to access the HMIS should be situated in secure locations. HMIS computers
in publicly accessible areas should be staffed at all times and should not be viewable by other individuals. All
computers should be password protected and the password you use to log onto your computer should NOT be
the same password as your HMIS password, but rather a password to prevent access to the computer itself.
Passwords
HMIS usernames and passwords should NOT be shared with other users. Users should not keep
username/password information in a public location (i.e. sticky notes on monitors or filed under ClientTrack or
Password in a Rolodex). HMIS security policies require the use of strict passwords.
•Must have at least one number
•Must be between 8 and 12 characters
•Must have at least one non-letter, non-numeric character
•Must contain at least one capital letter
•New passwords will be required upon first login and if an account is deactivated due to inactivity

User Login
Open your web browser and go to https://ihcdaonline.com . Enter your assigned User Name and
Password and click Sign In. You will be required to reset your password upon your first login. Remember,
sharing your user name and password is not permitted. Passwords are case sensitive and pop-up blockers
must be turned off to access the application. You should change your settings to allow for pop-ups from this
site. If prompted to select a workgroup and/or organization, highlight the desired option and click Sign In.
You will be directed to your User Dashboard. You will be notified of any “News” items that IHCDA wants to
communicate to you. Please remember to pay attention to these News items. Other features to become
familiar with on this screen include Tabs (Home, Clients) and Menu Items (along the left side of the screen).

The first time you log into ClientTrack, you will need to follow these instructions in order to get the Menu items
along the left side of the screen to appear.
Click on the Client Tab at the top of screen. Select Find Client from the menu items along the left of the screen.
Enter the name of a client that is currently enrolled in your program. Click Search in the bottom right hand
corner. Select the client from the list that is displayed. Once the client dashboard is visible, click the Case
Management item on the bottom left hand corner of the screen. All Menu items on the left of the screen
should now be visible.
r!!!!!!!J -- ..-:- R
r-
r---
r----13
Use the section cri teria below to find your dieo t. To narrow the search, fill in more than one criteria. Social Security Number and Birth Date are the best fields to narrow your search .
FirstNome: test
i-----
I·,...,".""·'
last Name:
Middle Name:
Full Nome (last, First):
Sociol Security Number: ·I Birth D<'lte:
Ftrst Name last Name Mtddle Name SSN Btrth Date Chent lD •
1 Test Client 12/06/1969 883817
Case Manage-me
.-::-...,....,.-,--------------------:::::::: -'-....!.......!...-"-- -'- cnt r ' Cancel
'o!o% ."" 1:/_ start ll gslndilma UnitedWay ... SCreen SOOts.docx - Mi .. 1 Set rchDesktop P (1J "; Fdl)_,)IS]Q!I'Jc0 11 1
Name: Client, Test Birth Date: 12/6/1969 Age: 41
Gender: Female
Disabling Veter<tn:
Condition:
Ethnicity: H ispan ic/latina Race: Asian
:: ;: Me ;s Enroll D<tte • Exit D<tte EnroiiiD Exit 10 Org<tmzatton :;: sment
)r
Tests Serv ces •
Date • End D<tte Serv ce Umts S Tot<tl Orgamzatton
HMIS Cdse Man<tgeme
d_ start II[iS Indiana United Way ... SCreen SOOts.docx· Mi .. 1 Se<'Jt'c
=h Desk
=top
==================
· I +,toooto • M
p (1) -:I« l)_,)ISJ00 II 1:26PM

Client Lookup
It is imperative you do not enter a duplicate client record into the system in order to ensure the
accuracy and overall quality of the HMIS data. Even though ClientTrack will warn you of potential duplicates, it
is important to search for clients prior to the start of adding a new client. To search for an existing client in the
database, click the Find Client menu item on the Client Tab.
You may search for a client by entering client first/last name, social security number or birth date. It is
important to try different options for your search. It is best to only enter the first few letters of the first/last
name and not rely solely on a social security number or birth date, as those elements have a higher rate of
missing or inaccurate data. Another search hint is to search different spellings and remember to search for
nicknames such as “Bob” in addition to “Robert” or “Bill” in addition to “William”.

If the client is already in the system, highlight the client name in the search results and click to select. The
selected client’s information will be displayed at the top of the screen. All information entered from this point
forward while on the Client Tab will be associated with the currently selected client. You should click on the Edit
Client Information menu item and make any necessary changes to the client demographic information.
Add a New Client to a HUD Program (non-HPRP)
To add a new client or begin the workflow to create an enrollment for a client already in the system,
expand the Menu item “Workflow”. Select the HMIS Intake Workflow to begin. You will be prompted to select
the current client or add a new client.

In order to ensure all required assessments are completed, ClientTrack utilizes a specific workflow that
steps you through this process. Using these built-in workflows, you will step through these processes
automatically. Click the Workflow option that is appropriate. Be sure you begin the workflow while you are on
the client record for the Head of Household. You will be asked to verify the intake information for the client.
Make any changes if necessary and click Save. If there are no changes, click No Changes.
The steps for the workflow will be displayed in the upper left hand corner of the screen. The first step is
the completion of the Master Assessment. On the Master Assessment screen, be sure to change the
Assessment Date if different from today’s date.
To add a NEW client to the database, select the HUD Program Intake menu item to the left. Choose the
appropriate button (Add a New Client).
If a duplicate client already exists (and was not identified during the client lookup), a warning in red
letters will be displayed. It is very important to review the displayed list. If the client is already in the system,
click the client’s name to select. If the client you are entering is in fact a new client (do NOT select a client in the
displayed list), click next to proceed with the intake process.
IHCDA is always working to eliminate duplicate clients in the HMIS. Please contact the IHCDA HMIS help
desk at [email protected] with clients that have multiple records in the system. When sending a
notification of duplicates or any information regarding clients to the [email protected] please DO
NOT include a full social security number. Client ID numbers can be found to the left of the client name on the
client lookup screen or above the client name on the client dashboard.
You will be prompted to enter demographic information for the client. Items with a red asterisk (*) are
required fields and records cannot be saved without entering this data. Birthdate and Phone Number fields are
auto-formatting so that dashes are not required when entering information in these fields. Birthdates can be
entered in mmddyyyy format. Once entered, they will be automatically formatted to the appropriate display.
Information regarding the data elements is listed below:

First Name – Legal first name (do not add nicknames in “quotes” – those are not searchable elements)
Last Name – Legal Last Name
Social Security Number – If the client does not know or refuses to provide their SSN, DO NOT under any
circumstance, enter a fake social security number such as 123-45-6789 or 999-99-9999. Select the data
quality option that best fits the situation. Please keep in mind a high rate of “Don’t Know or Refused”
may raise data quality concerns.
Birth Date – Month, day and year the client was born. Again, do not use a fake number. Choose the
appropriate data quality option that best fits the situation.
Ethnicity – Determines if a client is of Hispanic/Latino origin and includes individuals of Cuban, Mexican,
Puerto Rican, South or Central American origin. Generally, if a client identifies as Hispanic, they will
usually choose White as their race.
Race – This is a self-identified data element and a person can identify with multiple races. This is a
multi-select box that allows for multiple races to be checked.
Gender – Select gender with which client identifies.
IHOPE Number – This is an optional field but required for HPRP clients.
Family – Do NOT enter anything in the Family field. ClientTrack will create a family/household account.
Relationship to Head of Household – When entering the first client in the household, the system will
default to “Self”. It is imperative this information is entered correctly for ALL household members.
Otherwise, your reports will not accurately reflect the clients and family make-up.
Address – Add the address where client will be residing (emergency shelter, etc). This is NOT the
previous address of the client.

Add Family Members
Next, you will be prompted to add any additional family members. After you enter the name of the next
household member, the system will complete a search for that client name. If the client is found, select the
client from the list and edit as necessary. Select cancel if the client is not found in the system.
Please be sure to complete all information requested. For the race category, you must click on the blue line with
the three blue circles to access the race categories. Be sure to select a race and then click on the green circle
with the check mark. Be careful that you do not use the select all icon. Add lines for additional household
members as necessary.

Click the Save and Close button when all household members have been added. You will then be prompted to
create the enrollment. Please remember, the Save button will save the changes you made to the screen and
leave you on the same page. The Save & Close button will save the changes you have made to the screen and
move you to the next one. You will receive an error message if you are missing any required data fields.
Remember to change the Enrollment Date if you are back dating the information. You no longer have to request
back dating permission from IHCDA in order to edit/correct or back date information. However, IHCDA will
monitor time between user logins and your ClientTrack account will be deactivated after 30 days of inactivity. It
is vital that you continue to enter data the same day or within 3 days of a client enrollment, service, case note
and/or client exit.
You will be required to choose the HUD Grant and Program and click Next. If you do not find your specific grant
and/or program, please notify IHCDA immediately at [email protected] . Please include the name of
your grant and program along with specific contact information so that the issue can be resolved as soon as
possible.
Grant and program information must be set up in the system before you can begin to enroll clients. You must
give adequate time to IHCDA in order for the set up in ClientTrack to be completed.
You will now begin a series of required assessments that will finalize the household enrollment. Make sure to
properly check Yes or No for the Veteran Status and Disabling Condition.

Certain logic is built into the system that will provide for additional drop down menu options based on the way
in which certain client data is entered. Because this client is a veteran, additional questions are required to be
answered.
Residence Prior to Program Entry – Identify where the client was staying on the night before the client is
enrolled in your program.
Length of Stay – Identify the length of stay for the residence prior to program entry.
Prior Zip Code – Remember this is the zip code of the client’s last permanent residence of 90 days or more. The
system allows you to look up the zip code if the client knows the city, but not the specific zip code. Click on the
look up icon and type in the city and state and a list of potential matches will be displayed. Choose one of the
zip codes from list provided.

Housing Status – Choose the appropriate category for the housing status of the household. More extensive
definitions can be found by clicking the blue information circle next to the drop down box.
Chronic Homeless Assessment - In order for a client to be chronically homeless, they must be unaccompanied;
and continually homeless for a year or more or 4 episodes of homelessness in a 3 year period; and have a
substance abuse disorder, serious mental illness, developmental disability or a chronic physical illness or
disability. When the qualifying conditions are checked appropriately, the system will indicate the client’s status
of chronically homeless.
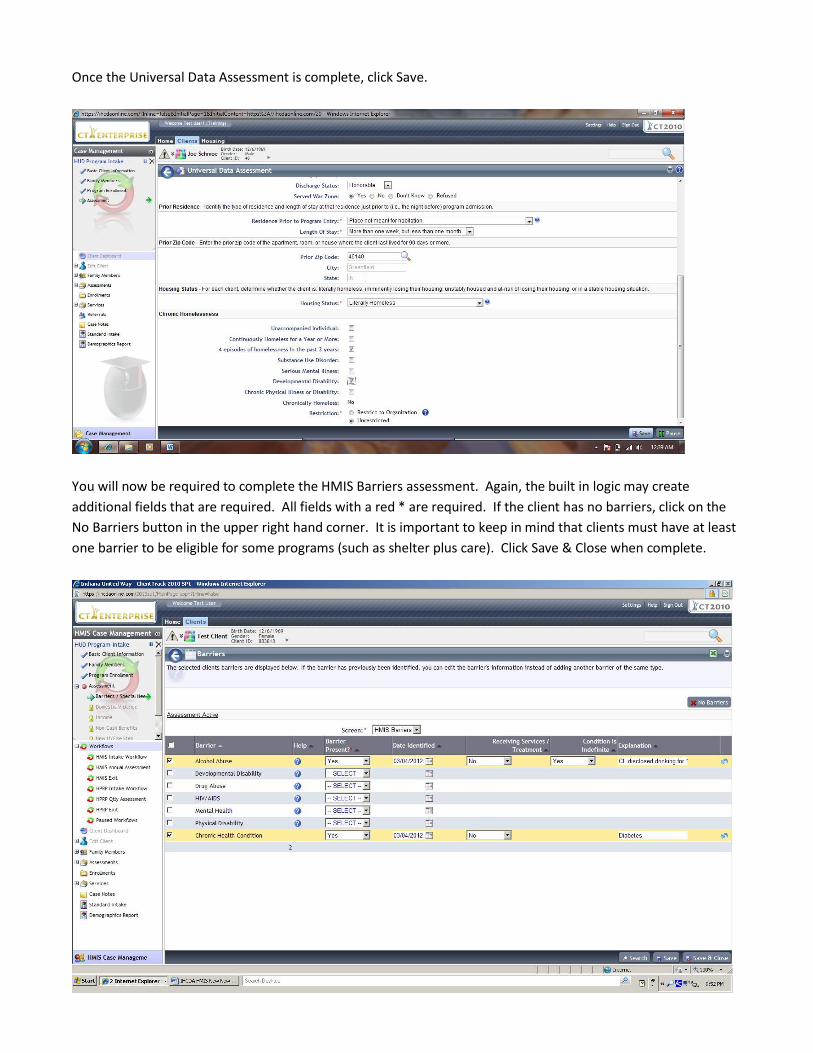
Once the Universal Data Assessment is complete, click Save.
You will now be required to complete the HMIS Barriers assessment. Again, the built in logic may create
additional fields that are required. All fields with a red * are required. If the client has no barriers, click on the
No Barriers button in the upper right hand corner. It is important to keep in mind that clients must have at least
one barrier to be eligible for some programs (such as shelter plus care). Click Save & Close when complete.

The Domestic Violence Assessment:
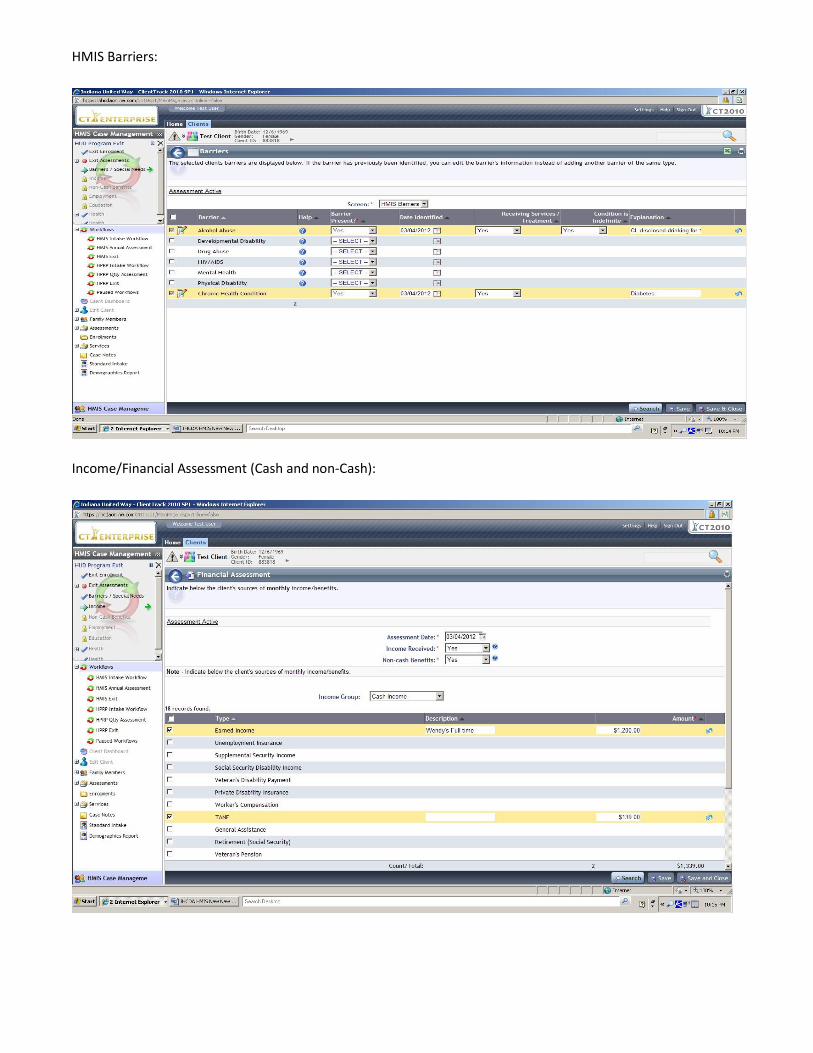
Income/Financial Assessment Case Income – An Income Assessment will be completed for EACH household
member. Income received by a household member such as child support, TANF, WIC and food stamps should be
designated on the assessment of the household member that directly receives payment. If an adult receives an
SSI or SSDI benefit on behalf of a child, that income should be designated on the income assessment of the child.
It is very important that income (cash or non-cash) is properly designated on the proper client assessment.

Earned Income – Employment income
Unemployment Insurance – Unemployment benefits from the State
Supplemental Security Income –
Veteran’s Disability Payment – Disability payment provided by the Department of Veteran’s Affairs
Private Disability Insurance – Non-government funded disability payments
Worker’s Compensation – Income for individual that has been injured on the job
TANF –Temporary Assistance for Needy Families
General Assistance – Cash from family or friends, trustee or church/non-profit
Retirement (Social Security) – Income payment provided by government for individuals that qualify
Veteran’s Pension – Cash payment made by the Department of Veteran’s Affairs
Other Pension – Cash payment made from a private employer
Child Support – Income received from one parent to another to care for children
Alimony –
Other Income –
Income/Financial Assessment Non-Cash Benefits - specific to individual – not the household in general. An
assessment for non-cash benefits will be completed for each household member.
Advanced Earned Income Tax Credit – Monthly payments provided to individual in advance in a tax refund,
Food Stamps (Snaps) –
Medicaid –
Medicare –
State Children’s Health Insurance Program (SCHIP) –
Special Supplemental Nutrition Program for Women, Infants and Children (WIC) –
TANF Child Care Services –
TANF Transportation Services –
Other TANF-funded Services –
Section 8, Public Housing or Other Rental Assistance –
Other Source –
Temporary Rental Assistance –

Employment Assessment
Adult Education Assessment:

Health Assessment:
Begin enrollment process for the child and/or other household members:

r Developmental Disability
6 r Drug Abuse 6 1 -SELECT -:::J r HIV/AIOS 6 1 -SELECT -:::J r Mental Health @ 1 -SELECT -:::J
F
Universal Data Assessment:
..,Pr<)&nam EnrC!Imeon t
,jjAswssmffit
e e Testms ctient
_.,Enrdl famly Moe'mbel"? Assessment D.!ate:• lo 3 04!2012 [:J
As smen t + Assessment Type:• i -;1 E'=,:.:,,------'=-----,:::J
Program: • IAurora- Shelter Plus Care Program (PH-R12-S2) iJ Assessor:* fTest User ().,
O HMJS I ntake-Workflow Oisaobling Condition:* IYes iJw>
C HMISAnnualAssessment Veteran Status:* INo iJ!t)
C HMIS E.l<it Prior Residence - Identify the type of residence and length of stay at that residence just prior to (i.e., the night before) program admsi sion.
0 HPRPIntake Workflow
0HPRP Qtly As sment
.()' HPRP Exit
.()' Pllu:sed Wor
" Client Dashboa
rd lli" Edlt Ciient
lliMhmly Members
lliAss.essmen b
Residence Prior to Program Entry:* IStaying or living in a family mem ber's room, apartment or house
Length Of Stay:* IMore than one week, but ess than one month iJ Prior Zip Code - Enter the prior zip code of the apartment,room,or house where the cl ent last lived for 90 days or more.
Prior Zip Code: "17'5"2;;01;-;--- - ,
City: D"""I••'"•'""----- State:
Housing Status For each client,determine whether the client is: iterally homeless;imminently losing their housing;unstably housed and at-risk oflosing their housing;or in a stable housing situation.
Housing Status: • IImminently losing theri housing
d_ startII2 lnteonet EKpkwer - IHCDA HMIS NewNew ,, Search Desktop
- -,,,,,, ..,.., p
I!I!!!J • • Pause
- - rr.-:-1... 100% -
.4.
(2) I« .,)))ll:z., !O:OOPM
HMIS Barriers:
8 •Assessment
c>S
.a
.r
.n
.e
,n I Special +
!) hc V
..1".- tloo<astl Benefits
:.il t+ew"lflfueSte-p
J Educat100
j Helllttl
s..., Worktlows
.()' liMIS AnnuaLAsse-ssment
,O iiMIS Exit
0 HPRPIntake workflow
0 HPRPQUyAsse-ssmrnt
0HPRP Exit
0 PausedWorldlows
eClient Dashboa rd
3
G
3
G r Physical Disability 6 I SELECT :::1 3
Chron ic Health Condition IYes :::1 0310412012 [3 IYes :::1 Cystic fibrosis
M}ij:fll.l@j
!li£ EihtCt!flt "' lt1Famty s
Ill
d StartIJ [112 nternet EKpkN'er • '!) IHCDA HMJS New New .. Sea ch0e$ktop
• Search • Save •.Save & Close
-111111 --fJ'&7 +.,. tOO% - .4,
llJ ,) )) 10:01 !)M

Income/Financial Assessment - Remember this is the financial assessment for the second household member
(and in this case, a child). Children are typically only going to have minimal options on this list such as SSI (death
benefits). TANF, Food Stamps and Child Support remain as income for the parent/guardian – not the child.
Income/Financial Assessment Non-Cash Benefits - specific to individual – not the household. An Income
Assessment will be completed for each household member. Again, there are limited selections that will pertain
to children (Medicaid, SCHIP).

Child Education Assessment:
All steps for the assessment and enrollment process have been completed.
Upon clicking the “Finish” button, you will be redirected to the Dashboard for the Head of Household. It is from
this screen you will begin to add services and case notes regarding the HMIS Program Enrollment.

The Client Dashboard provides you with a great deal of information regarding the client. You can verify the basic
client demographics, see the enrollment in a particular program, number of case members, enrollment date, the
associated organization and when their last Assessment has been completed. It will also provide you with an “at
a glance” look at the most services the client has received.
While you will have the option on many screens for a “Don’t Know or Refused” option – which may be valid at
time of intake – it is expected that as information is collected during the program enrollment the client
information/assessments will be updated. The screen shots that follow will help you access a previously
completed assessment should you need to make corrections.
Click on the Enrollment menu item on the left. Choose the enrollment that needs to be edited and click on the
blue circle to produce a drop down menu. You can either edit the enrollment (maybe the date needs to be
changed); View Case Members associated with the enrollment, Review Entry Assessments or Review Exit
Assessments. Do not use this screen to perform and Annual Assessment or Exit the Enrollment – These actions
should ONLY be performed by using a workflow.

As you can see when you select “Review Entry Assessments”, all required assessment have been completed.
For instance, if a client does not disclose at entry they are receiving food stamps but you find out soon after
their enrollment, you would want to EDIT the Financial Assessment. However, if the client BEGINS receiving
food stamps while enrolled in your program (1-2 months later); do NOT edit the entry assessment. This is a time
to complete an Annual Assessment (even though it may not be a true annual assessment).
Adding Services – You will have the option to Add Quick Services (for use when you are adding multiple services
for a client that were performed on the same day). For services that may require some additional information,
use the Add New button.

Case Notes
Timely and robust case notes assist you and other case managers at your organization in serving your
clients. It is extremely important that meetings, calls and other relevant information regarding your client is
properly documented in their case notes. In order to add case notes, click on the Case Notes Menu Item on the
left of the screen. Click on the Add New button on the upper right hand side of the screen. Remember, these
case notes will be restricted to case managers in your organization so if you are apt to use abbreviations, make
sure others in your agency will be able to decipher what you have written. While ClientTrack will eventually
provide a date in the body of the case note, it is also good practice to add the date in your case note.
Here is an example:
Annual Assessment – For clients that spend longer periods of time in your program, you now have access to an
“Annual Assessment”. This assessment is now required if you have clients in your program for a year or longer.
You may also want to complete this assessment if you have a new member (birth of a child) to the household or
if someone in the household departs (divorce) your program. You can also use this workflow to track and
maintain significant changes to a household income, etc. For your convenience, the assessment has been
developed as a workflow with the following steps:
1. Verify and make any necessary changes to basic client information
2. Verify and make any necessary changes to family information
3. Master Assessment – During Program Enrollment is completed
a. Review of HMIS Barriers
b. Income (Cash and Non-Cash)
c. Employment
d. Loop through household members
e. Review of HMIS Barriers

f. Income (Cash and Non-Cash)
g. Education
4. Click Finish and you will be redirected to the Client Dashboard
Exit Client from a HUD Program (non-HPRP)
Once a client has completed or otherwise left your program, you will need to complete an HMIS Exit Assessment
on all household members. Begin by clicking on the HMIS Exit Workflow in the upper left hand side of the
screen. When you get to this screen, click on the manila folder icon next to the enrollment. This will start the
process.
Complete the questions. Click Save.
HMIS Barriers:
Income/Financial Assessment (Cash and non-Cash):

Employment Assessment:
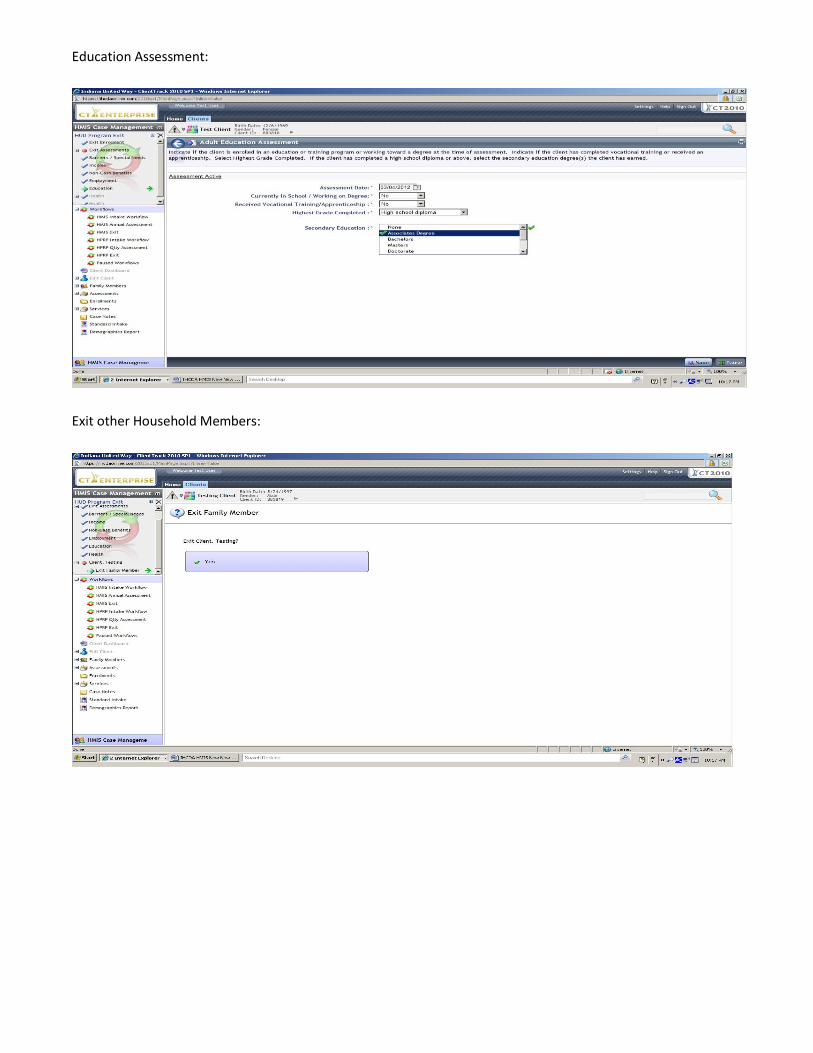
Education Assessment:
Exit other Household Members:

Se.,chOesktop
Female Disabling Yes
Condition: Veteran:
Yes Non-Hispanic/Latina Race: Asian, W hite
...
Follow the steps in the workflow untilyou get to the Finish Button. You will see the enrollment and exit dates
on the client dashboard.
Ind1ana Umted Way- ClientTrack 2010SPI - Wmdows Internet bcplorer
https ihc&online.com
,0 HMSI IntakeWOfkl\ow
0 liMIS Annual Ass-essment
O HMSI Exit
0HPRPIntake Workl\ow
0HPRPQtty Assessment
O HPRPExit
0 Paused Workftows
" Dashboard
liiEdit ctient
lil ll famiyrs
liiAss.essmeflh
[)Enrolme-nts
lil tJ ServicH
IIJCas.e Notes
liJStandardIntake
\m raphks Rrt
Test Chent s Information •
Name: Client, Test B rth Date: 12/6/1969 Age: 42
Gender:
Ethnicity:
Test's Enrollments •
:: ;:: MemC: Enroll Date • Exit 0<1te fn ro!IID Ex1t 10 Org4mzat10n : : sment
)r Aurora - SPC (R12) - Aurora - Shelter Pius Care Program (PH-R12-82) 03/0412012 03/04/2012 1430804 1430806Aurora Inc 03/04/2012
Date... End Date Serv ce Umts S Tottll Orgamzahon
tU HMIS Case Manageme
d.,s tart II 2 nternet EKpkN'er IHCDAif\1 S New New .. 1
========================
--rr.:-r-+:oo% T .,a
« ,)))!::] !0:21PM