Home brewing Caps Recipe eBookhomebrewingcaps.com.au/.../Home-brewing-Caps-Recipe-eBook-download...I...
21
Make your own great tasting alcoholic drinks Home brewing Caps Recipe eBook
Transcript of Home brewing Caps Recipe eBookhomebrewingcaps.com.au/.../Home-brewing-Caps-Recipe-eBook-download...I...

Make your own great tasting alcoholic drinks
Home brewing Caps Recipe eBook

Home brewing Caps Page 1
Home brewing Caps Recipe eBook
This is a short handbook on how to use Home brewing Caps and how they work, followed
by a comprehensive personal Home Brew Recipe Guide. I recommend taking a look at the
FAQ section of my website if you have any queries. If you have any questions that you think
may not have been answered then please do not hesitate to email me at
[email protected] and I will reply as soon as I can.
Home brewing Caps Page 2
Contents
Section 1
Front Page Page 1
Contents Page 2
How to use Home brewing Caps Page 3
Alcohol strengths Page 4
How to stop fermentation? Page 5
When the brewing is complete Page 5
What to do if your Home Brew is not fermenting? Page 6
How exactly do Home brewing Caps work? Page 6
Taking off the Cap when you’re ready to drink your home brew Page 7
Section 2
Home brewing Recipes Page 9
Turbo Cider Page 9
Sweet Honey Mead Page 9
Spicy Apple Cider Liquor Page 10
Elderflower Champagne Page 10
Ginger Beer Page 11
Elderberry Wine Page 11
Nettle Beer Page 12
Beer Page 12
Section 3
Advanced Long term Home brewing Recipes Page 14
Apricot Page 14
Carrot Whisky Page 15
Date & Grape Page 15
Fig & Banana Page 16
Pineapple, Orange & Apple Page 16
Ginger Page 17
Mint Page 17
Orange Page 18
Plum Page 18
Port-type Page 19
Rhubarb Page 19

Home brewing Caps Page 3
How to use Home brewing Caps
Using the Home brewing Caps is great fun. They’re easy to use and can be reused over and over
again as many times as you want. Simple steps can be found on my website at
www.homebrewingcaps.com.au/brewing-process but here are some more detailed ones:
Step 1) First of all you will need to find a suitable plastic bottle to use for brewing your
drink in. Any bottle will do really but obviously the larger the better. I personally use 3
litre emptied and cleaned plastic bottles. It is important to clean the bottles thoroughly
before you begin. Rinse them with hot water a couple of times. Do not use boiling water
though, as this will melt the plastic.
**Sanitation is very important when it comes to brewing. Even the slightest bit of dirt or bacteria
can ruin an entire batch. Although I have never personally found it absolutely necessary some
brewers like to use special sanitization products to make sure their bottles are clean. Star san seems
to be a popular one but I can’t comment as I have no experience with this particular product.**
Step 2) After cleaning the empty bottle it’s time to pick what liquid/juice you want to turn
into alcohol. You can choose anything, I mean literally anything, you could even turn water
into alcohol if you wanted to. However, it wouldn’t taste very nice! Using a measuring jug,
measure out a cup of sugar (or use a cup, it’s not incredibly important to be accurate with
measurements when first starting out as a home brewer). Now add the juice you’ve
chosen to the sugar and mix the two together with a fork (or use a blender if you have
one). I like to use cheap apple juice for cider and grape juice for brewing wine. Detailed
recipe ideas are included at the end of this guidebook. In my experience the quality of the
juice you use isn’t that important. I’ve turned £0.20 cartons of basics apple juice into great
tasting cider.
Step 3) Now we pour the mixture of sugar and juice into our clean bottle. We want to fill
the bottle up to a level about two finger widths (3cm) from the top. The reason for leaving
a gap at the top and not filling it to the brim is because during fermentation there may be
bubbling and expansion of the liquid. It’s wise to leave a little room for the brew to
breathe.
Step 4) Now it’s time to add a pinch of the Premium Home brewing yeast. When I say a
pinch I mean really put in as little as possible. The yeast is a living organism and will
multiply into large numbers as time passes. The yeast which I supply with the packs comes
as tiny balls so as a rough guide aim to put in about 15 -30 ‘yeast balls’. You really can
make this yeast last for years. You can even reuse yeast for new batches afterwards! If you
happen to add more yeast than this don’t worry, all that will happen is your home brew
will ferment more quickly and it may take a day or so off of the fermentation time.

Home brewing Caps Page 4
Step 5) After putting in the yeast I suggest putting on a regular bottle cap (not the home
brewing cap yet) and giving the bottle a good shake. We want all the sugar to be dissolved
in the liquid and we want to mix the yeast into the solution. After this is done we can take
off this cap and screw on one of the Home brewing Caps.
**The Home brewing cap will keep contaminants out of your drink and prevent it from
spoiling. It will also allow the precise measured amount of pressure out of the bottle to stop
it from exploding but allowing for your drink to remain fizzy and carbonated. If you want to
brew a non-carbonated drink such as red wine then you simply loosen the home brewing
cap a little to release some of the pressure.**
Step 6) Once the juice has been bottled and the home brewing cap has been screwed on
you will have to place the bottle somewhere out of direct sunlight and preferably
somewhere where it won’t get knocked over. All the work is done and It’s now just a
matter of waiting for fermentation to complete.
This is where it gets interesting. The longer you wait the stronger the drinks alcohol content will be.
Here’s a rough guideline:
Alcohol strengths
Day 1: 0.5% alcohol
Day 2: 2 % alcohol
Day 3: 3-4% alcohol
Day 4: 5-6% alcohol
Day 5: 7-8% alcohol
Day 6: 9% alcohol
Day 7: 10-12% alcohol
Day 8: 13-14% alcohol
Day 9: 15-16% alcohol
Day 10+: 17-22% alcohol
An important note to make is that in order to reach the higher alcohol %’s you must put in more
sugar at the initial brewing stage. I find that 2 cups of sugar will get the drink I’m making to a level of
up to 22%. If I use 1 cup of sugar then it might get to 13-14% but it will taste very dry. In these cases
it is often necessary to sweeten the drink by adding sugar after fermentation is complete. I will go
into more detail in the recipe section at the end of the document. This does however bring up a
good question.
How to stop fermentation? What if you wanted to make a very sweet cider and you wanted to put 2 cups of sugar in but only
want to make a drink that is 8% alcohol. If you left it for 10 days then the drink will ferment to a level
way beyond 8%. So you need to stop the drink from fermenting after around Day 5. This is easy to
do. There are a couple of ways in fact. One way is very easy; you simply put the bottle in a

Home brewing Caps Page 5
refrigerator. The liquid will cool down to a level where the yeast becomes dormant and stops
fermenting. If you take the drink out again then the yeast will wake up and start fermenting again.
The other way is to use something called a Camden tablet. It’s a chemical tablet that kills the yeast.
It’s harmless to humans so there are no worries in terms of whether it’s safe to use. Because I like to
reuse yeast I personally choose the first option. I refrigerate the brew for a day or two and then
carefully unscrew the home brewing cap (you must be careful because these bottles contain a lot of
pressure and the cap can shoot off violently causing the liquid to explode out). I then pour the drink
into another empty bottle trying not to disturb the yeast at the bottom.
It is then possible to reuse the yeast by simply adding another mixture of juice and sugar to the
original bottle. You can reuse yeast as many times as you like but people often suggest no more than
6 reuses.
In all there are 3 factors that will stop fermentation. The first one is if there is no more sugar for the
yeast to turn into alcohol. Remember yeast eats sugar and produces alcohol so no more sugar = no
more alcohol. The second way to stop yeast fermentation is the place the bottle in a fridge thus
essentially putting the yeast to sleep. The third way is to use chemicals to kill the yeast. There is a
fourth way but it’s not that common and that is to boil the liquid so that the heat kills the yeast. This
method is less commonly used because it also destroys the flavour and carbonation of the brew.
When the brewing is complete When the brewing is complete it is wise for you to put the bottle in the fridge for a day or two. This
is something known as the clarification process. During this process all the yeast in the brew will
collect at the bottom of the bottle and the drink will clarify (become clearer). The longer you
refrigerate the beverage the clearer is becomes. It is a personal choice about how long you clarify
your drink but some people feel that the longer it is clarified the better the final product tastes.
Separating the sediment from the finished product is known as Racking. More advanced brewer’s
like to perform racking by syphoning off the brew into another bottle before removing the sediment
and then going through another clarification process. This process can be repeated many times but it
is not essential, again it simply comes down to personal preference.
I usually only clarify my drinks for a day or two unless I’m performing a more advanced longer term
home brew.
The best advice I can give is for you to experiment with clarification time scales and racking
processes and see what it is you prefer.
What to do if your Home Brew is not fermenting? Sometimes you will find that one of your home brews may have stopped fermenting or it may have
not even started. Although this isn’t that common it does happen every now and then. It usually
occurs due to preservatives/additives found in the juice you’re using. These artificial chemicals can
sometimes get in the way of the yeast activating itself and beginning fermentation. A fermentation

Home brewing Caps Page 6
that hasn’t started or that has become ‘stuck’ can be given a little push in the right direction by
simply adding a little more yeast. Give the bottle a little shake and leave for another day to see if
things are back on track. To really get the brew going if it’s not responding to added dry yeast you
should add some yeast that is already active. Take some yeast from a brew that IS fermenting and
put it into the bottle that is struggling.
How Home brewing Caps work? As I mentioned previously the home brewing cap works by allowing a precise measured amount of
pressure out of a fermenting bottle through a specially designed pressure release valve in the top of
the cap. It prevents the bottle from exploding and also allows for the drink to be made fizzy through
carbonation. It also prevents bacteria and other contaminants from entering the brew and so stops
your home brew batches from spoiling.
The Caps are made from long lasting high quality materials which ensure that they will last a very
long time. They can be reused as many times as you want.
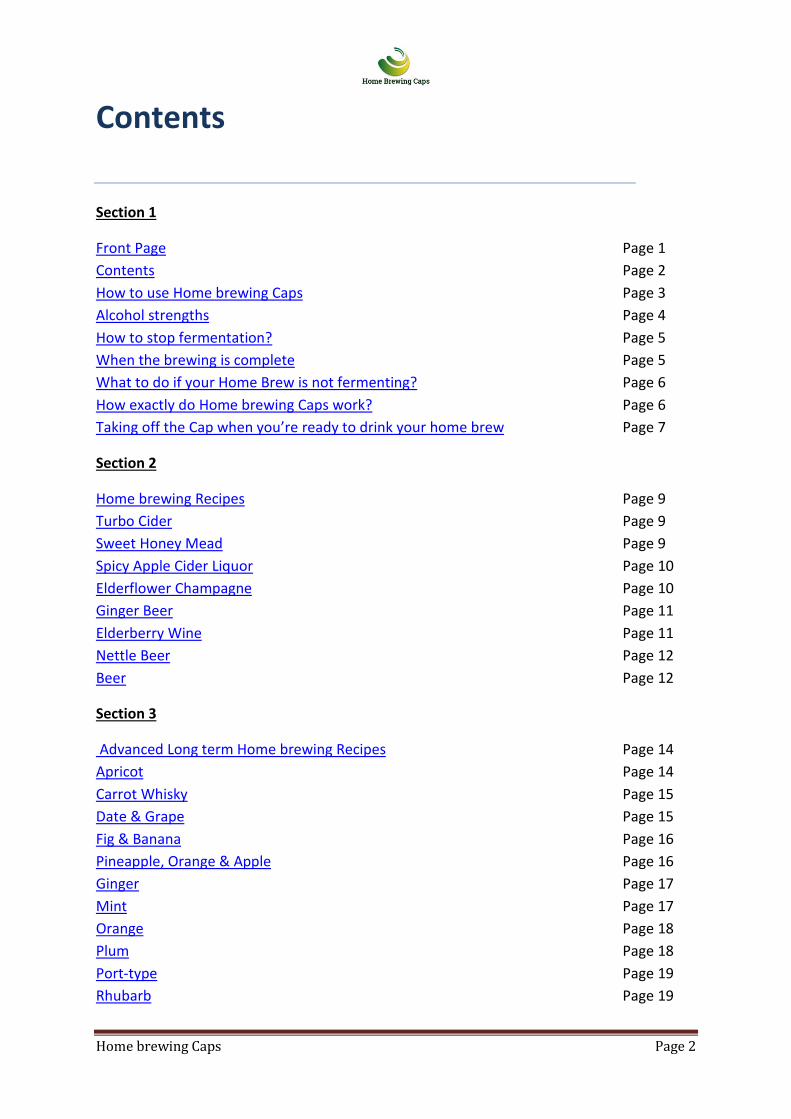
When you first use the home brewing cap the white rubber valve will be quite sturdy and flat. There
is a slit in the middle that allows the gas pressure to be let out. This slit can be seen more clearly
when the brew is in the middle of fermentation and the cap’s valve begins to bulge out. The bulging
is a good sign that fermentation has begun.
After a few uses you will notice that the bulge remains even when the cap is not on a bottle and that
the white rubber valve disk is not as flat as before. This is perfectly ok, the cap is still fully functioning
and has not lost any of its strength. Here is a before and after picture of what I mean.
Home brewing Caps Page 7
The cap will continue to work exactly as designed. It is advised that you keep the caps clean by giving
them a rinse in water after each use.
Taking off the Cap when you’re ready to drink your home brew After you have successfully brewed your drink and you have placed the bottles in the fridge for a day
or two it is time to enjoy your home brew. The bottle will still have a lot of pressure inside it so it is
very important to take care when unscrewing the home brew cap. If you open the cap too fast the
bottle will fizz up and your brew will explode out like champagne. You can also risk being hit by the
cap itself as it shoots off the bottle. This is why it is important to open the bottle slowly. I usually
take about 120 seconds to open a newly brewed bottle. It is done in small twists of the cap. You will
be able to tell if you’re opening the bottle too fast as the bubbles inside the bottle will start to rise
up violently. You want to keep everything inside the bottle calm. Release the pressure little by little.
Treat the bottle as if it was a bottle of fizzy lemonade that someone has just shaken very hard. You
have to be aware that the bottle could overflow as it bubbles up.
It is therefore recommended that you open the bottle slowly over a sink and remember always point
the bottle away from your face and away from other people.
When the cap is off you should pour the drink into another empty bottle or if you’re going to pour it
into glasses straight from the original bottle then be careful not to disturb the yeast sediment at the
Home brewing Caps Page 8
bottom of the bottle when pouring it. People don’t usually appreciate yeast in their drink, even
though it’s actually physically good for you.
Now that we know a bit more about brewing with Home brewing Caps we can move on to some
recipe ideas.

Home brewing Caps Page 9
Home Brewing Recipes
There are an infinite number of home brews that you can ferment with your home brewing caps but
to get you started I have selected some of my favourites. For some very basic recipes I suggest you
go to my Home Brew Recipes page on my website.
For some slightly more unique recipe ideas read this section.
Turbo Cider This is an easy brew to begin with. I always recommend starting off with an easy brew before moving
onto the more complicated recipes.
- Mix 2 cups of brown sugar with 2 litres of apple juice. Any apple juice will do. I find that the
cheaper the apple juice is the better my brew is, but that is purely personal preference.
- When the sugar has dissolved pour the mixture into your 3 litre clean, empty, plastic bottle.
Top up the bottle with clean water leaving a little bit of space at the top of the bottle (about
3cm).
- Add 30 “Yeast balls” or an eighth of a teaspoon of your premium yeast and mix well.
- Screw on your home brewing cap and leave the bottle somewhere warm and safe, out of
direct sunlight.
- Now wait 5 – 7 days and then place in the fridge for another day or two.
- Your brew is now ready to drink. You can either pour straight from this bottle into glasses
being careful not to disturb the sediment or you can pour into a new empty clean bottle and
drink the brew at a later date.
This is a great base recipe to which lots of other ingredients can be added to give interesting variety.
Experiment with different apple juices. Try adding Elderflowers, strawberries or ginger to give it a
unique twist.
Sweet Honey Mead This is a delicious honey based brew. This kind of drink can sometimes be a little bit difficult to
ferment but the following recipe will make it as likely as possible to succeed.
- Add 300grams of honey to a cup of apple juice and mix in half a cup of sugar. Mix well and
add warm water.
- Add the juice of 1 fresh lemon.
- Pour into a clean empty 3 litre plastic bottle. Add 15 – 30 “yeast balls” and mix well.
- Screw on your home brewing cap and leave the bottle somewhere warm and safe, out of
direct sunlight.
- Wait 6 days (or longer for a stronger drink) and then place in the fridge for 2 days.
- Once the mead is done, you can add fruits and/or spices if you are so inclined.
Home brewing Caps Page 10
- When ready to drink, carefully unscrew the homebrew cap and pour into glasses or pour
into a new clean bottle/jug.
Spicy Apple Cider Liquor This is a great drink to have as a shot or have with ice in a small glass tumbler. It was a recipe I
received from a Home brewing Caps user who sent their idea in to me. I was so happy with the
recipe I sent them some free brewing gifts. It’s actually a very simple brew, here is how to make it:
- Mix 2.5 litres of pressed apple juice with 2 cups of brown sugar. Make sure all sugar is
dissolved in the solution. I like to use a blender but you can use a fork if you don’t have one.
- Add 15 drops of Tabasco sauce and then pour into a 3 litre clean, empty plastic bottle.
- Add 30 “yeast balls” or about an eighth of a teaspoon of yeast to the bottle.
- Shake the bottle so that the yeast is thoroughly mixed into the juice.
- Put your home brewing cap onto the bottle and screw it on tight.
- Place the bottle somewhere safe and warm, out of direct sunlight.
- Wait 12 – 14 days. Then refrigerate for 2 days.
- Unscrew the home brewing cap slowly making sure not to let the brew fizz out of the top of
the bottle.
- You may need to pour the brew through a sieve now to remove any ‘bits’ that were in the
juice. If your brew doesn’t contain any pulp/bits then you don’t need to sieve it.
- You can now pour your brew into new empty bottles or you can pour it straight into glasses
to drink it immediately.
This brew should be at an alcohol content percentage of around 20% if you’ve left it for 14 days. It’s
very strong so be sure to drink it slowly.
Elderflower Champagne
This is an old favourite of mine and can be made very cheaply.
- Mix 2 cups of white sugar (dextrose if you have it) to 2 litres of warm water. Mix until the
sugar has dissolved.
- Add the juice of 2 lemons. Also add some of the lemon zest. What this means is that you
should grate some of the yellow, skin part of the lemon and add it to the mixture.
- Add 4 tablespoons of white vinegar and 30 elderflower heads and then stir the solution.
- Add a quarter of a teaspoon of yeast or about 45 – 60 “yeast balls”. Shake so the yeast is
mixed in.
- Leave the bottle somewhere safe and warm, out of direct sunlight.
- Wait 10 days and then after opening the bottle carefully pour the brew through a sieve into
a new empty clean bottle. Put this bottle somewhere safe and warm, out of direct sunlight
for another 3 or 4 days.
- Place in the fridge for one or two days.
- Unscrew the home brewing cap slowly making sure not to let the brew fizz out of the top of
the bottle.
- Your home brew is now ready to drink.

Home brewing Caps Page 11
This brew is great for celebrations and is probably one of the cheapest home brews you can make.
Which is another reason to celebrate.
Ginger Beer
This is great at any alcohol strength but this particular recipe will make a drink of about 6%.
- Boil 3 litres of water in a saucepan on the hob, peel 1 lemon (avoiding pith), then throw in
the peel and squeeze in the juice.
- Grate 50g of root ginger (skin too) and throw it in along with a teaspoon of cream of tarter.
- Add 1 cup of table sugar and reduce temperature to a simmer for about 30 mins.
- Put 30g of Sultanas into the bottle you will be using to brew in and then when the liquid
from the saucepan is cool enough pour it on top.
- Add an eighth of a teaspoon or 15 – 30 “yeast balls” to the bottle and mix well.
- Screw on your home brewing cap and leave it somewhere warm and dark to ferment for 2 -
3 days.
- Sieve the brew into a new empty bottle and recap leaving it for another 2 – 3 days.
- Place in the fridge for 1 day to clarify.
- Unscrew the home brewing cap slowly making sure not to let the brew fizz out of the top of
the bottle. This brew can be a little bit lively.
- Your home brew is now ready to drink.
If you wish to make smaller/larger batches then adjust the ingredients accordingly. This will make a
drink of approximately 6% ABV. Reduce the sugar if you want to lower the alcohol percentage and
increase the sugar and fermentation time if you want a stronger drink. You can also reduce the sugar
levels if the drink is too sweet for you.
Elderberry Wine This particular brew is for more advanced brewers and in particular those brewers with a good level
of patience. To really get the best from this brew you’re going to have to leave it for 6 months. It is
worth it if you have the space to leave a brew to mature for this long, although I personally prefer a
drink that can be made and drunk within a week or two. Here it is anyway for those who want to
know:
- Bring 3 litres of water to boil in a saucepan and add 1.5 cups of white table sugar allowing
the sugar to dissolve.
- Take 500 grams of elderberries, wash and remove all the berries from the stalks with a fork
and place in the saucepan.
- Add the juice from 1 orange and 1 lemon.
- Leave to cool for a while. When cool enough squeeze the fruit and add an eighth of a
teaspoon of premium brewer’s yeast and mix well.
- Leave for three days.
- Sieve the mixture and pour into your brewing bottle.
- Add half a cup of sugar to your bottle and screw on your home brewing caps.
Home brewing Caps Page 12
- Leave in a warm, dark place until bubbling has ceased and fermentation has stopped, then
pour into a clean empty bottle.
- Check the bottle again 6 weeks later and pour into a new clean empty bottle to remove any
more sediment from the bottom.
- Leave for 6 months before tasting. It will improve vastly after a year
This recipe is too long winded for most of us to deal with but for those that do give it a try it’s
definitely worth it.
Nettle Beer Before the introduction of using hops, most beers were made using nettles to flavour the brew. This
beer is best drunk young and is ready in a couple of weeks. Use young nettles and only the top part
of the plant. As with all hedgerow brew avoid picking near to roads or where dogs are likely to have
passed by (for obvious reasons).
- Bring 3 litres of water to the boil.
- Add the nettles and leave to infuse for about an hour
- Strain through the sieve.
- Dissolve 2 cups of white cane sugar and add the juice of 1 orange and 1 lemon and add 2
teaspoons of cream of tartar.
- When the mixture has cooled, add an eighth of a teaspoon of yeast and mix well.
- Pour mixture into your 3 litre brewing bottle and screw on your home brewing cap. Leave to
ferment in a warm place out of the sunlight for 4 or 5 days.
- Place in the fridge to clarify for a day or two.
- When it’s ready to drink you can pour into a new empty bottle or pour straight to glasses. It
is best served chilled.
This is another cheap brew and a fast one too!
Beer
Finally I have a simple beer recipe for you. This recipe will make two 2 litre bottles of beer.
- You will need two 2 litre empty clean plastic bottles for this. Using hopped malt extract
syrup which is available from any online home brew shop, pour about 250ml of the contents
into 2 litres of water. Gently heat to a boil and simmer for 20 minutes, stirring the mixture.
*The malt extract syrup usually comes in cans that can make up to 40 pints so using only 250ml
of a can is a good adjusted measurement to make 4 litres which is about 8 pints. You don’t have
to use precise measurements so just estimate.*
- Let it cool a little and then pour 1 litre into one bottle and the remaining litre into the other
bottle (You don’t want to pour boiling liquid into plastic bottles though so make sure it’s cool
enough). Fill the rest of the bottle up with cold water leaving about a 5cm gap at the top.

Home brewing Caps Page 13
*Beer brew will often be bubbly so you want to avoid the bubbles coming through the top of the
home brew cap. It’s not a great problem if some froth comes through the top but it is less messy
if you avoid this.*
- Now you can add an eighth of a teaspoon of yeast or about 15-20 ‘yeast balls’ from your vial
of premium brewer’s yeast to each bottle. Mix well.
- Screw on your Home brewing caps and leave the bottles somewhere safe out of direct
sunlight.
- Ferment for about 5 – 7 days and then refrigerate for 2 more days to clarify the brews.
Fermentation time will depend on how early your brews start brewing and how strong you
want your beer. 5 -7 days is just a guideline I like to use.
- After Clarification it is ready to drink. You can move the drink to another bottle or you can
drink from the bottle it’s already in. If you pour from the same bottle be careful not to
disturb the sediment at the bottom.

Home brewing Caps Page 14
Advanced Long Term Home Brewing
Recipes
My main objective with creating Home brewing Caps was to make home brewing as simple as
possible. I wanted to reduce the amount of effort necessary for producing good quality alcoholic
drinks. I think I’ve succeeded in doing this but I think it’s also important to make it known that more
complicated recipes can also be made with the very same equipment. Many of you may prefer the
short term quick recipes but I know there will be some home brewers who would be interested in
making some longer term brews. To give you an idea of how long I mean when I say longer term
some of these brews can take up to a year before they are ready for drinking. Anyway, on to the
recipes!
*Note that it is worth using these longer term recipes to brew in larger batch sizes due to the longer
time frames. Making the initial preparations in bulk and then separating them into a number of
different bottles is a good idea. All the drinks can be made to be either sparkling or still. Simply
reduce the tightness of the brewing cap to produce a non-sparkling still brew.*
Apricot: A Sweet Social Wine
Ingredients
Brewer’s Yeast
1.5kg fresh apricots
Campden tablets as per instructions
900g granulated sugar
½ pint white grape concentrate
2 tablespoons lemon juice
Wash and stone the apricots, mash them and place them in 2 litres of cold water. Add 1 Campden
tablet and leave overnight. After 24 hours add 2 litres of warm water and then add the sugar, stirring
until it has all dissolved. When the temperature has reached 21C (room temperature) add your
brewer’s yeast. Ferment for three days before stirring daily before straining the mixture into
separate plastic bottles for further fermentation. Continue to ferment in a warm place out of direct
sunlight, but watch carefully in case pulp sediment builds up. You may have to perform a process
known as racking which involves syphoning off the liquid away from the solid sediment into new
bottles. When you’re brew has reached your desired strength it is necessary to rack the ferment
again this time adding a Campden tablet afterwards. Store if possible for up to 12 months, sweeten
to taste a few days before bottling.
Note: this wine may also be made from dried fruit- If so use 340g of dried apricots washed and
chopped into small pieces.
Home brewing Caps Page 15
Carrot Whisky
Ingredients
Brewer’s Yeast
1.8kg Carrots
800g granulated sugar
2 teaspoons lemon juice
½ pint white grape concentrate
Campden tablet as per instructions
Scrub the carrots, cut them into slices and cook them in 5 pints of water until they are soft – do not
allow them to mash. Remove the carrots by straining the liquid into another container, then add the
sugar, stirring until it is dissolved. Add 4 litres of warm water and add the brewers yeast. Separate
the mixtures into separate bottles and ferment for 4 days, shaking them up daily. Add the grape
concentrate evenly between the separate bottles. Ferment them to a finish in a warm place. This
brew will often taste dry but it can be sweetened to your preference when racking at which time 1
Campden tablet should be added. This brew may be drunk young but it will greatly benefit from a
maturation time of up to a year.
Date & Grape: A sweet, heavy-bodied, sherry-type wine
Ingredients
Brewer’s Yeast
1.4kg dates
2 large lemons
2 oranges
450g granulated sugar
½ pint white grape concentrate
Chop and boil the dates in 2 litres of water for 30 minutes, together with the thinly pared rinds of
the lemons and oranges, carefully avoiding the pith. Add sugar and stir until dissolved. Add the juice
of the fruit and add 2 litres of cold water. Add your brewer’s yeast when the temperature is cool
enough. Ferment for 4 days, stirring daily before straining into separate plastic bottles. Add the
grape concentrate evenly to each bottle at this point. Rack when fermentation has ceased. This is
the only time a sherry-type wine is racked. This wine may be drunk after 6 months.
Home brewing Caps Page 16
Fig & Banana: A sweet, social wine
Ingredients
Brewer’s Yeast
900g Bananas
900g dried figs
1.1kg granulated sugar
Campden tablets as per instructions
Wash the bananas in their skins, then slice them (including their skins) and boil for 30 minutes in 2
litres of water. Wash the figs and liquidise them in a little water (or chop them). Add the sugar to the
figs mixture. Strain the liquid from the bananas and pour over the sugar and figs. Stir until the sugar
has dissolved, add 1 Campden tablet and allow to cool. After 24 hours add the brewer’s yeast. Add
2.5 litres of cold water and ferment for 5 days, stirring daily. Strain into separate bottles and ferment
to a finish in a warm place out of direct sunlight. Rack as soon as the brew has completed
fermentation and add 1 Campden tablet. Note that this brew will probably taste dry so it may be
sweetened to taste. This brew will be ready to drink after 3 months.
Pineapple, Orange and Apple: A light, medium-sweet table wine
Ingredients
Brewer’s Yeast
900g granulated sugar
½ litre orange juice
½ litre apple juice
½ litre pineapple juice
Note: Make sure the juices are free from preservatives.
Add the sugar to 1 litre of hot water and stir until dissolved, then add the juices. Add 2 litres of cold
water and when the mixture reaches room temperature add your brewer’s yeast. Ferment for 4
days, stirring daily, then transfer into separate individual plastic bottles. Ferment to a finish in a
warm place out of direct sunlight and rack as soon as the wine has fully fermented and become
stable. Sweeten to taste a few days before bottling. This wine can be drunk after 3 months.
Home brewing Caps Page 17
Ginger
Ingredients
Brewer’s Yeast
250g raisins
1kg granulated sugar
120g root ginger
2 oranges
2 lemons
Campden tablet as per instructions
Wash the raisins and liquidise them in a little water or chop them. Place them in a large saucepan
with 6 pints of water. Bring to a boil, add the sugar and the ginger (which should be well crushed),
stir well and simmer for 30 minutes. Add 2 litres of cold water and add the juice of the oranges and
lemons and the thinly peeled rinds, carefully avoiding the white pith. When the temperature has
cooled add your brewer’s yeast. Ferment for 5 days, stirring each day, before straining into separate
individual plastic bottles. Continue fermenting until finished and then rack as soon as the brew is
stable. Add 1 Campden tablet and sweeten to taste. This wine may be drunk after 2 months.
Mint: A light, dry table wine
Ingredients
Brewer’s Yeast
1 ½ pints mint leaves (lightly bruised and loosely packed)
250g sultanas
1kg granulated sugar
Campden tablets as per instructions
2 table spoons lemon juice
Wash the mint leaves thoroughly. Wash the sultanas and liquidise in a little water or chop them. Add
them to the mint leaves along with the sugar and 5 pints of boiling water. Add 1 Campden tablet and
then leave for 24 hours. Add a further 3 pints of hot water and let the mixture cool to room
temperature. Add the lemon juice and your brewer’s yeast. Allow to ferment for 3 days, stirring
twice a day and then strain the liquid into separate bottles. Leave to ferment completely in a warm
place out of the sunlight. Rack as soon as the brew has finished fermenting, adding a Campden
tablet. A second racking will probably be required within 28 days. This brew can be drunk within 3 to
4 months.

Home brewing Caps Page 18
Orange (Seville): A sweet aperitif wine
Ingredients
Brewer’s Yeast
8 small Seville oranges
1kg granulated sugar
Campden tablets as per instructions
250ml white grape concentrate
Wash the oranges and peel 4 of them very thinly taking care not to include any of the white pith. Boil
the peel for 20 minutes in a pint of water and leave it for 24 hours in order to extract the zest. Peel
the remaining 4 oranges. Extract the juice from all the oranges. Add the sugar to 2 pints of boiling
water, add the juice as well as the water with zest extract along with the thinly cut peel from the 4
oranges. Stir until the sugar is dissolved. Add 1 Campden tablet and then cover and leave for 24
hours. Add 3 litres of cold water and add your brewer’s yeast. Ferment for 4 days, stirring daily. Add
the grape concentrate and then separate the mixture into individual bottles. Ferment to a finish in a
warm place out of direct sunlight. Rack as soon as the brew has stopped fermenting and add 1
Campden tablet.
*Note: this brew will take some time to mature, for at first it will be inclined to be bitter. Time will
mellow this and when it is ready (probably 3 months) it can be sweetened to taste.
Plum: A sweet, white social wine
Ingredients
Brewer’s Yeast
Campden tablets as per instructions
1.8kg golden plums
1kg granulated sugar
250ml white grape concentrate
Add 1 Campden tablet to 3 pints of tepid water. Wash, stone the plums and discard the stones. Place
the plums immediately into the water and leave for 24 hours. Add 3 pints of hot water and the
sugar. Stir until the sugar has dissolved and add your brewer’s yeast when the mixture has cooled.
Ferment for 4 days, stirring daily, before adding the grape concentrate and straining off the mixture
into separate bottles. Continue the fermentation in a warm place. Rack as soon as the wine has
become stable and has stopped fermenting, and rack again after a further 3 weeks, adding a
Campden tablet at each racking. Mature for 6 months to obtain best results, sweetening to taste a
few days before bottling.
*Note: by substitution of damsons for the golden plums, and red concentrate for white, a rich sweet
red social wine can be made.

Home brewing Caps Page 19
Port-type: A full bodied, sweet dessert wine
Ingredients
Brewer’s Yeast
100g dried bananas
700g granulated sugar
1.5kg elderberries
900g blackberries
150g raspberries
Campden tablets as per instructions
500g bilberries (bottled – no preservatives)
½ pint red grape concentrate
Cut the washed, dried bananas into small pieces, put into a saucepan with 3 pints of water and bring
to a boil. Simmer for 25 minutes. Strain the mixture and add sugar, stirring until dissolved. Wash the
fresh fruit; liquidise or mash it. Add it to the mixture along with 1 litre of warm water and a
Campden tablet. After 24 hours add liquidised/mashed bilberries. Add 1 litre of warm water. When
the mixture is cool enough, add your brewer’s yeast. Ferment for 3 days stirring twice a day. Strain
the mixture, removing all the solids. Add grape concentrate and ferment for a further 2 days.
Separate into individual bottles and allow to ferment to finish in a warm place. At end of ferment,
rack, add 1 campden tablet and sweeten to a reading of 1026 (you will need a hydrometer for this).
Rack again after 28 days and again 2 months later. To be at its best, keep for at least 12 months.
Rhubarb: A light, dry table wine
Ingredients
Brewer’s Yeast
2kg rhubarb
1kg granulated sugar
2 pints grape juice
Wash the rhubarb well, slice it longways and then cut into 5cm lengths. Place into 4 litres of cold
water and then add all the ingredients. Keep in a warm place and ferment for 2 days stirring daily.
Strain, removing all solids and ferment for 5 days then separate into individual bottles. Ferment to a
finish in a warm place, rack as usual, but be weary of what is known as ‘malolactic ferment’. This
often occurs when ingredients contain large amounts of malic acid (such as rhubarb). The wine may
be drunk after 4 months.

Home brewing Caps Page 20
Now that you have instructions on how to use your Home brewing Caps and you have some good
recipe ideas you’re ready to get started.
If you visit my website www.homebrewingcaps.com.au you will find a FAQ section that seems to be
a great help to new home brewers who are just getting started.
If there is anything that you think hasn’t been fully explained or if you have any home brewing
questions please feel free to email me at [email protected] and I will do my best to
get back to you with an answer.
Thanks again for showing an interest in the Home brewing Caps products. Tell your friends about us
and help us spread the great hobby that is home brewing.
I hope you enjoy brewing the best drinks you’ve ever tasted.
Good luck,
Home Brewing Caps