
HeritaGe User manUal - Yolawwspas.synthasite.com/resources/User_Manual.pdf · Heritage swim spas...
6
Heritage swim spas and spas user manual POSITION SPA access in and out of your spa.Where you are going to place your cover when not in use and is there enough room to access all equipment for servicing of your swim spa. Your Heritage spa needs to be positioned so that you have clear access to all equipment. Which is located at the two short ends of the swim spa, this can be accessed by removing the doors of the cabinet, if you are unsure please contact Heritage spas for assistance. SITE PREPARATION Your Heritage spa has been designed to evenly support the weight of the spa water and the users.The swim spa requires a good solid level foundation to sit on if the foundation is not adequate the spa may stress and cause damage to the spa that will not be covered by war- ranty. Surface and slab requirements. It is recommended that all slabs or paving is at least 200 mm bigger than the swim spa base size, to allow for repositioning and foundation strength. Ensure that the concrete has cured for at least 1 week before placing your spa in place.A water filled spa can weigh as much as 8500kg. ELECTRICAL INFORMATION In all cases the electrical supply to your new swim spa will require a dedicated circuit with no other power appliance or socket sharing the power. The electrical supply must be installed by a qualified electrian to comply with all regulations and standards specified by the electrical authority. The Cyclone, Hurricane and Monsoon are all to be wired at a minimal of 32 amp single phase. The Hurricane and Monsoon can be upgraded to 45 amp single phase to disable the load shedding this will allow for all pumps to operate at the same time. For all swim spas out side of Australia please seek advice from your local dealer to ascertain what power requirements are required for your application. Please note that in Europe that a 3 phase connection may be available. VENTILATION If your Heritage spa is enclosed please ensure that there is adequate ventilation. Swim spas produce considerable amounts of condensation which could damage walls and ceilings. HERITAGE USER MANUAL When deciding where to position your Heritage spa conscider how you are going to get
Transcript of HeritaGe User manUal - Yolawwspas.synthasite.com/resources/User_Manual.pdf · Heritage swim spas...

Heritage swim spas and spas user manual �
Position sPa
accessinandoutofyourspa.Whereyouaregoingtoplaceyourcoverwhennotinuseandisthereenoughroomtoaccessallequipmentforservicingofyourswimspa.YourHeritagespaneedstobepositionedsothatyouhaveclearaccesstoallequipment.Whichislocatedatthetwoshortendsoftheswimspa,thiscanbeaccessedbyremovingthedoorsofthecabinet,ifyouareunsurepleasecontactHeritagespasforassistance.
site PreParation
YourHeritagespahasbeendesignedtoevenlysupporttheweightofthespawaterandtheusers.Theswimsparequiresagoodsolidlevelfoundationtositonifthefoundationisnotadequatethespamaystressandcausedamagetothespathatwillnotbecoveredbywar-ranty.Surfaceandslabrequirements.Itisrecommendedthatallslabsorpavingisatleast200mmbiggerthantheswimspabasesize,toallowforrepositioningandfoundationstrength.Ensurethattheconcretehascuredforatleast1weekbeforeplacingyourspainplace.Awater filled spa can weigh as much as 8500kg.
electrical information
Inallcasestheelectricalsupplytoyournewswimspawillrequireadedicatedcircuitwithnootherpowerapplianceorsocketsharingthepower.The electrical supply must be installed by a qualified electrian to comply with all regulations and standards specified by the electrical authority.TheCyclone,HurricaneandMonsoonarealltobewiredataminimalof32ampsinglephase.The Hurricane and Monsoon can be upgraded to 45 amp single phase to disable the load sheddingthiswillallowforallpumpstooperateatthesametime.ForallswimspasoutsideofAustraliapleaseseekadvicefromyourlocaldealertoascertainwhatpowerrequirementsarerequiredforyourapplication.PleasenotethatinEuropethata3phaseconnectionmaybeavailable.
Ventilation
IfyourHeritagespaisenclosedpleaseensurethatthereisadequateventilation.Swimspasproduceconsiderableamountsofcondensationwhichcoulddamagewallsandceilings.
HeritaGe User manUal
WhendecidingwheretopositionyourHeritagespaconsciderhowyouaregoingtoget

Heritage swim spas and spas user manual �
fillinG yoUr sPa
Before filling your spa please ensure that all barrel unions are tight. The barrel unions are twobigplumbingnutslocatedatthewetendofeachpump,thesecancomelooseduring
Pleaserefertopicturebelow
the housing. This could take sometime depending on water pressure. Start to fill until the water naturally flows in to the filter assembly, then refit the filters and fill to water line as marked on filter face plate this will push the air out of the pumps and reduce the need to bleedthepump. With heavy bather loads only fill to about 30mm below water line. This is to compensate for the amount of people in the spa. To remove filters first pull on locking clips and pull up to remove filter face, then pull up on front of leaf basket to remove. To remove filters simply feed up by hand and out threw the filter box opening.
Refer to picture below for filter assembly.Refer to picture below for filter assembly.
Water level Location lugs at rear Clips down at front
Locking clips Leaf basket Filters
Bleeding circ-pump. (Where appropriate) After filling your swim spa you may need to bleed the circ-pump. This is
done by turning the barrel union on top of pump. You should hear air escaping from the pump. When you see water draining thru the barrel union re-tighten the union being careful not to over tighten casing the nut to cross thread.
Bleeding jet pump When you have the power turned on press the pump button on the
touch pad. You should start to see water coming out of the jets with in a few seconds. If water is not present after 510 seconds turn pump off. Turn the barrel union anti-clockwise on pump and you should hear air then water come out of the barrel union. Re-tighten the barrel union being careful not to overtighten, press the pump button again, if there is no water coming from jets repeat till all air is released from pump and jets are all working.
.3
Filling your spa. Before filling your spa please ensure that all barrel unions are tight.
. Shut off valve Barrel unions
When filing your spa the best way to do this is to remove the filters and place the hose in the housing. This could take sometime depending on water pressure. Start to fill until the water naturally flows in to the filter assembly, then refit the filters and fill to water line as marked on filter face plate this will push the air out of the pumps and reduce the need to bleed the pump.
With heavy bather loads only fill to about 30mm below water line. This is to compensate for the amount of people in the spa. To remove filters first pull on locking clips and pull up to remove filter face, then pull up on front of leaf basket to remove. To remove filters simply feed up by hand and out threw the filter box opening.
.2
transport. Alsocheckthatallshutoffvalvestothepumpsarefullyopen.
When filing your spa the best way to do this is to remove the filters and place the hose in
Heritage swim spas and spas user manual �
BleedinG circ-PUmP (WHere aPProPriate)
thebarrelunionontopofpump.Youshouldhearairescapingfromthepump.Whenyouseewaterdrainingthruthebarrelunionre-tightentheunionbeingcarefulnottoovertightencasingthenuttocrossthread.
BleedinG jet PUmP
Whenyouhavethepowerturnedonpressthepumpbuttononthetouchpad.Youshouldstarttoseewatercomingoutofthejetswithinafewseconds.Ifwaterisnotpresentafter
hearairthenwatercomeoutofthebarrelunion.Re-tightenthebarrelunionbeingcarefulnottoovertighten,pressthepumpbuttonagain,ifthereisnowatercomingfromjetsrepeattillallairisreleasedfrompumpandjetsareallworking.
adjUstinG jet PressUre
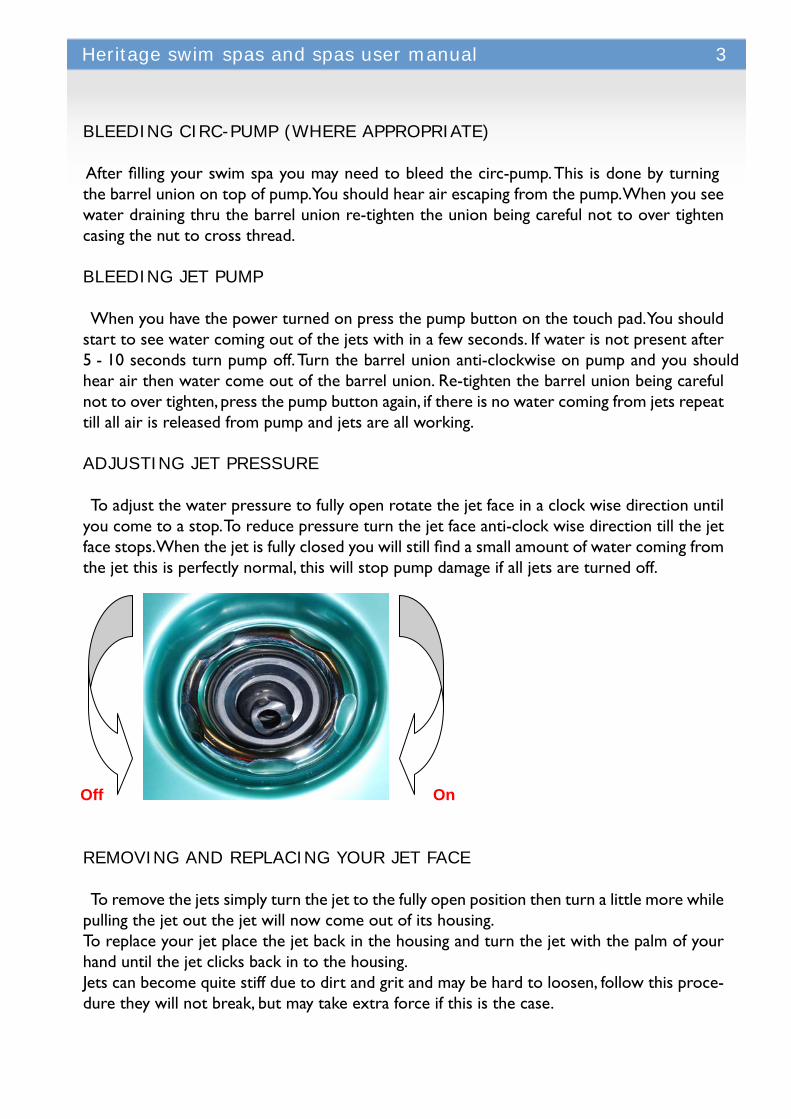
Toadjustthewaterpressuretofullyopenrotatethejetfaceinaclockwisedirectionuntilyoucometoastop.Toreducepressureturnthejetfaceanti-clockwisedirectiontillthejetface stops. When the jet is fully closed you will still find a small amount of water coming from thejetthisisperfectlynormal,thiswillstoppumpdamageifalljetsareturnedoff.
remoVinG and rePlacinG yoUr jet face
Toremovethejetssimplyturnthejettothefullyopenpositionthenturnalittlemorewhilepullingthejetoutthejetwillnowcomeoutofitshousing.Toreplaceyourjetplacethejetbackinthehousingandturnthejetwiththepalmofyourhanduntilthejetclicksbackintothehousing.Jetscanbecomequitestiffduetodirtandgritandmaybehardtoloosen,followthisproce-dure they will not break, but may take extra force if this is the case.
Adjusting jet pressure To adjust the water pressure to fully open rotate the jet face in a clock
wise direction until you come to a stop. To reduce pressure turn the jet faceanti-clock wise direction till the jet face stops. When the jet is fully closed you will still find a small amount of water coming from the jet this is perfectly normal, this will stop pump damage if all jets are turned off.
Off On
Removing and replacing your jet face. To remove the jets simply turn the jet to the fully open position then
turn a little more while pulling the jet out the jet will now come out of its housing.
To replace your jet place the jet back in the housing and turn the jet with the palm of your hand until the jet clicks back in to the housing.
Jets can become quite stiff due to dirt and grit and may be hard to loosen, follow this procedure they will not break, but may take extra force if this is the case.
.4
After filling your swim spa you may need to bleed the circ-pump. This is done by turning
5 - 10 seconds turn pump off. Turn the barrel union anti-clockwise on pump and you should
Heritage swim spas and spas user manual �
air controls
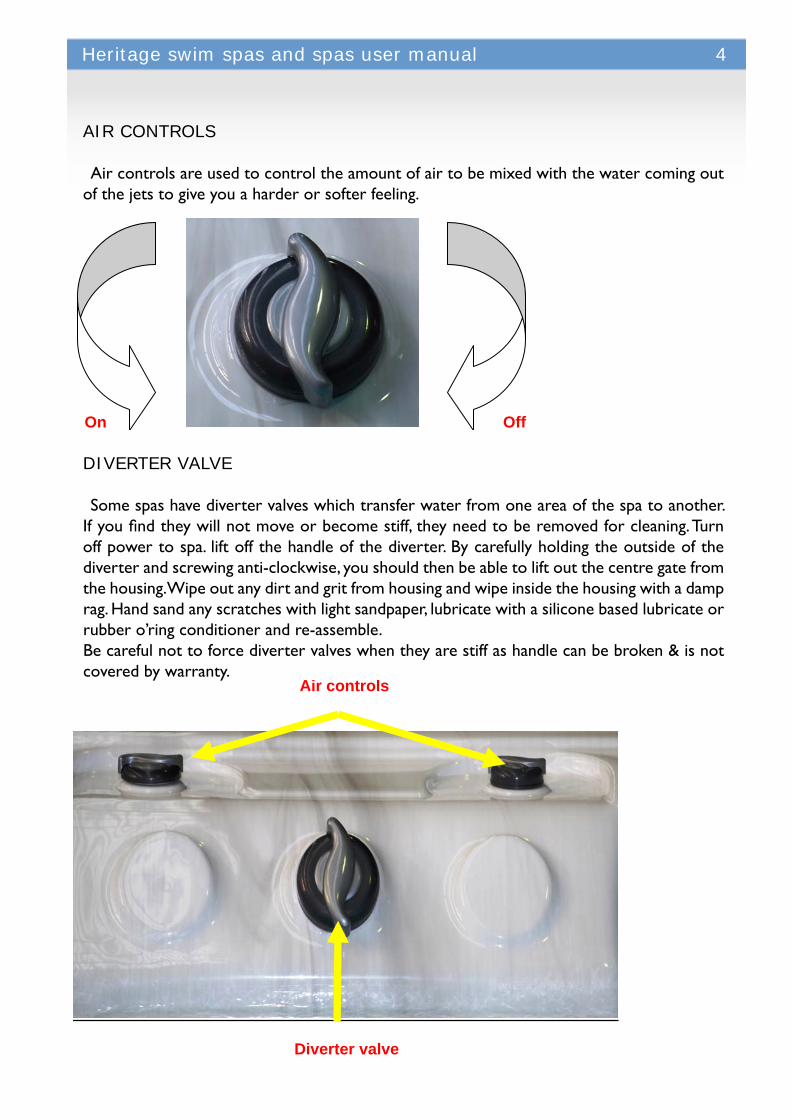
Air controls are used to control the amount of air to be mixed with the water coming out ofthejetstogiveyouaharderorsofterfeeling.
diVerter ValVe
Somespashavedivertervalveswhichtransferwaterfromoneareaofthespatoanother.If you find they will not move or become stiff, they need to be removed for cleaning. Turn offpowertospa.liftoffthehandleofthediverter.Bycarefullyholdingtheoutsideofthediverterandscrewinganti-clockwise,youshouldthenbeabletoliftoutthecentregatefromthehousing.Wipeoutanydirtandgritfromhousingandwipeinsidethehousingwithadamprag.Handsandanyscratcheswithlightsandpaper,lubricatewithasiliconebasedlubricateorrubbero’ringconditionerandre-assemble.Becarefulnottoforcedivertervalveswhentheyarestiffashandlecanbebroken&isnotcoveredbywarranty.
Air controls Air controls are used to control the amount of air to be mixed with the
water coming out of the jets to give you a harder or softer feeling.
On Off
Diverter valve Some spas have diverter valves which transfer water from one area of
the spa to another. If you find they will not move or become stiff, they need to be removed for cleaning. Turn off power to spa. lift off the handle of the diverter. By carefully holding the outside of the diverter and screwing anti-clockwise, you should then be able to lift out the centre gate from the housing.Wipe out any dirt and grit from housing and wipe inside the housing with a damp rag. Hand sand any scratches with light sandpaper, lubricate with a silicone based lubricate or rubber o’ring conditioner and re-assemble.
Be careful not to force diverter valves when they are stiff as handle can be broken & is not covered by warranty.
.5
Air controls
Diverter valve
CoverAlways take care of your spa cover. It is not designed for sitting,
walking or lying on. If your cover needs cleaning it can be removed from the spa, washed with warm soapy water then hosed off. Apply a vinyl protection that is readily available at any automotive store. This protects your cover and maintains its appearance. NOTE-There are 2 holes on the underside of your cover for condensation purposes, DO NOT cover these 2 holes, or use them as handles.
You will receive a warranty card with your cover this must be filled out and sent to the cover manufacturer for your cover warranty.
Timber cabinet You can maintain or rejuvenate the appearance of your cabinet by
giving it a coat of clear decking oil once a year. We recommend Cabot’s All-Purpose Clear Decking Oil or Wattyl western red cedar but there are other similar and equally good products on the market.
.6

Heritage swim spas and spas user manual �
air controls diVerter ValVe coVer
Alwaystakecareofyourspacover.Itisnotdesignedforsitting,walkingorlyingon.Ifyourcoverneedscleaningitcanberemovedfromthespa,washedwithwarmsoapywaterthenhosedoff.Applyavinylprotectionthatisreadilyavailableatanyautomotivestore.Thispro-tectsyourcoverandmaintainsitsappearance.NOTE-Thereare2holesontheundersideofyourcoverforcondensationpurposes,DONOTcoverthese2holes,orusethemashandles.You will receive a warranty card with your cover this must be filled out and sent to the cover manufacturerforyourcoverwarranty.TimbercabinetYoucanmaintainorrejuvenatetheappearanceofyourcabinetbygivingitacoatofcleardeckingoilonceayear.WerecommendCabot’sAll-PurposeClearDeckingOilorWattylwesternredcedarbutthereareothersimilarandequallygoodproductsonthemarket.
Headrests
Headrestscanberemovedquiteeasilyandcleanedwithwarmsoapywater.Ifyouhaveozo-ne fitted to your spa the headrests may become discoloured over time, this is quite natural duetothepresenceofozone.Tryandremoveheadrestsaslittleaspossible.Whenenteringthespadonotslideoverheadrestoruseasabodysupport.Thelugsarerated at over 10kg but the headrest is only foam and rips with excess pressure. Headrest will continuetolastiftreatedproperlyandareNOTCOvEREDBYWARRANTYIFTREATEDINCORRECTlY.
scUm lines
Scumlinesarecausedbyoilsandmineralsfromthebodiesofusers.TocleanthesescumlinesusePoolfastTile&vinylCleaneronaragtowipeclean.Anysimilarproductforpoolsorspasmaybeusedforthispurpose.WARNING:AlWAYSTURNPOWEROFFBEFOREREMOvINGFIlTERSANDDRAININGYOURSPA

Heritage swim spas and spas user manual �
drainaGe
YourHeritagespacomeswithadrainvalvewhichcanbeconnectedtoagardenhosethisislocatedundertherecliner.Orsimplydrainbysiphoningwateroutbyagardenhose.
drain ValVe filter cleaninG
For Clean water you should remove your filters every fortnight and wash under the garden hosewithfullpressureuntilalldirtandgritisremoved.Once a month soak filters in a cartridge filter cleaner degreaser. This will increase the life of your filters.
Drainage.Your Heritage spa comes with a drain valve which can be connected to
a garden hose this is located under the recliner. Or simply drain by siphoning water out by a garden hose.
Drain valve
Filter cleaning For Clean water you should remove your filters every fortnight and
wash under the garden hose with full pressure until all dirt and grit is removed.Once a month soak filters in a cartridge filter cleaner degreaser. This
will increase the life of your filters.
WARNING: ALWAYS TURN POWER OFF BEFORE REMOVINGFILTERS AND DRAINING YOUR SPA
.8
YOURSPAWARNING:AlWAYSTURNPOWEROFFBEFOREREMOvINGFIlTERSANDDRAINING
HERITAGESPASUK & EUROPE