HELIX MEDIA LIBRARY INSTALL GUIDE FOR WINDOWS SERVER 2008 Helix
65
HELIX MEDIA LIBRARY INSTALL GUIDE FOR WINDOWS SERVER 2008 Helix Media Library Version 2.5 Revision Date: March 2013
Transcript of HELIX MEDIA LIBRARY INSTALL GUIDE FOR WINDOWS SERVER 2008 Helix
HELIX MEDIA LIBRARY INSTALL GUIDE FOR WINDOWS SERVER 2008
Helix Media Library Version 2.5
Revision Date: March 2013
2
Summary of Contents
Summary of Contents ..................................................................................................................................................... 2
Pre Installation Checklist .............................................................................................................................................. 4
Prerequisites ...................................................................................................................................................................... 5
Install Windows 2008 Server ..................................................................................................................................... 5
Installation Types ............................................................................................................................................................. 6
Install Internet Information Services and .NET 3.5 .......................................................................................... 7
Pre-installation Software ........................................................................................................................................... 12
Download and Install third party browsers: ................................................................................................ 12
Install Java ................................................................................................................................................................... 12
Install Windows DirectShow Codecs ............................................................................................................... 12
Download Flash Player .......................................................................................................................................... 13
Install Apple QuickTime ........................................................................................................................................ 13
Adding an Additional IP Address to a Network Card ............................................................................... 14
Install Microsoft SQL 2008 Express Edition ...................................................................................................... 18
Configure SQL to allow connections ................................................................................................................ 28
Binding IP Addresses - IIS ......................................................................................................................................... 29
Install Helix Server ....................................................................................................................................................... 30
Install Helix Mobile Producer .................................................................................................................................. 33
IP Address and Domain Settings ........................................................................................................................... 34
Binding IP Addresses - Helix Server ..................................................................................................................... 35
Install Helix Media Library........................................................................................................................................ 37
Updating to Version 2.0 .............................................................................................................................................. 46
Create Mount Points for RealMedia and Flash Player Content ................................................................. 48
RealMedia Content ................................................................................................................................................... 48
Flash Player H.264 MP4 Content ....................................................................................................................... 49
Add HTTP Mount Point .......................................................................................................................................... 49
URL Aliasing................................................................................................................................................................ 50
Configure E-Mail Server Settings ........................................................................................................................... 51
Customize Helix Media Library Appearance ..................................................................................................... 52

Helix Media Library Install Guide
3
Enabling Segmentation ............................................................................................................................................... 53
Troubleshooting ............................................................................................................................................................ 56
Helix Server fails to start and the Administration pages cannot be reached. ............................... 56
The website reports a Service Unavailable application error. ............................................................. 56
IIS 32 App Support on 64 bit OS ............................................................................................................................. 57
Starting the Helix Server Administrator ............................................................................................................. 58
SQL Troubleshooting – Installing Windows PowerShell ............................................................................. 59
Uninstalling Helix Media Library ........................................................................................................................... 60
WMV’s Fail to Encode .................................................................................................................................................. 63

4
Pre Installation Checklist
Use this section to ensure you have all the required components to complete a successful
installation of the Media Library Server.
Windows 2008 Server / R2 (32/64Bit)?
Alternative Browser? [Links on Page 6]
.NET Framework v3.5 installer?
SQL Server Express installer?
Helix Server installer and license?
Helix Mobile Producer installer and license?
JAVA installer?
Windows Audio and Video Codecs?
Apple QuickTime installer?
2 available IP addresses?
3 available Host Names?
Media Library installer and license?
E-Mail server and administrator account (if required) available?
Logo and colors for Helix Media Library customization?

Helix Media Library Install Guide
5
Prerequisites
Install Windows 2008 Server
Microsoft Windows Server 2008 required. Versions supported:
Standard
Standard R2
Both 32Bit and 64bit are supported

6
Installation Types There are different ways that the Helix Media Library can be installed in terms of how the hardware used and how the services are spread. For the purposes of this document it is assumed that all of the components will be installed on a single piece of hardware which will also house both the Media Content and Database. As a first run of the Installation this set up is recommended. Different Configurations are possible but this is best implemented following a successful installation on a single piece of hardware, and with the advice of your System Supplier.
IMPORTANT Version 2.5 of the Helix Media Library is installed by using the version 1.1 installer, and is then updated using Updatemanager2_5.exe To install version 2.5, follow this guide through and then apply the update using the guidelines on Page 45
Helix Media Library Install Guide
7
Install Internet Information Services and .NET 3.5
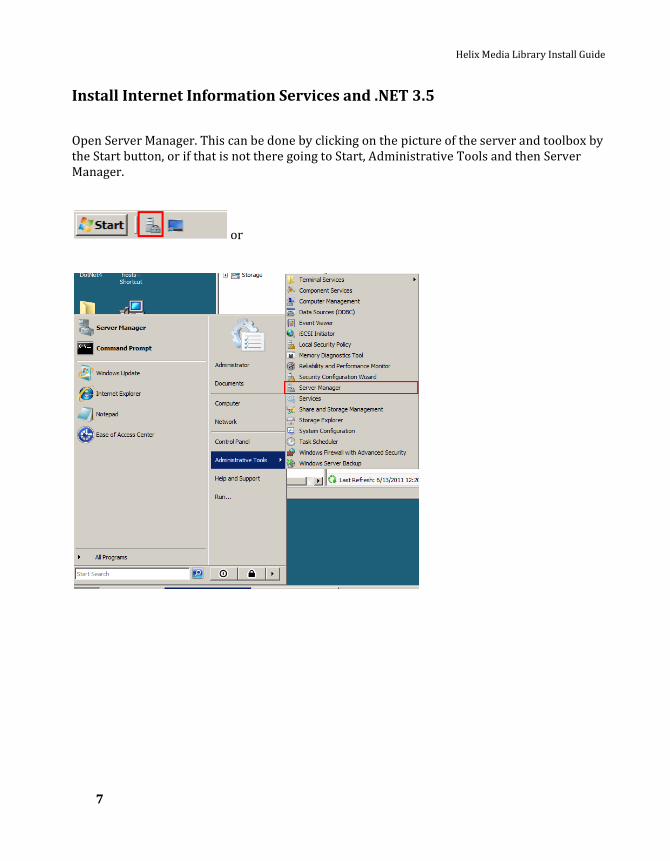
Open Server Manager. This can be done by clicking on the picture of the server and toolbox by the Start button, or if that is not there going to Start, Administrative Tools and then Server Manager.
or

8
Once in Server Manager click on Roles, and then Add Roles
Tick the box for Web Server (IIS). Click Next.
At the next screen there will be some information about IIS. Click Next.

Helix Media Library Install Guide
9
On the screen after this you will be shown the role services and you can choose to add additional ones. Select ASP.NET.
When you click on this an Add Roles Wizard window will appear. Click on Add Required Role Services.
Click install at the next screen to install IIS and ASP.NET.
10
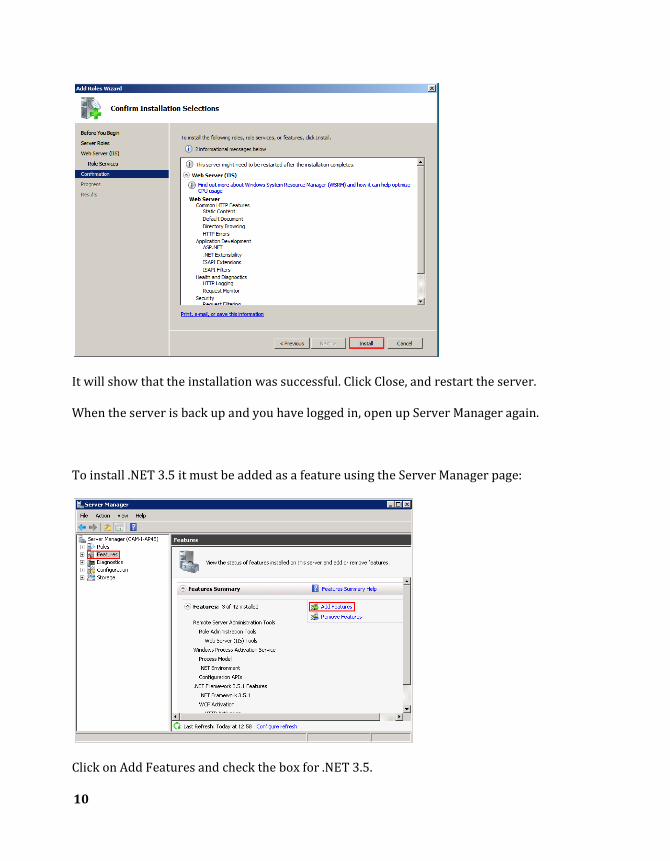
It will show that the installation was successful. Click Close, and restart the server. When the server is back up and you have logged in, open up Server Manager again. To install .NET 3.5 it must be added as a feature using the Server Manager page:
Click on Add Features and check the box for .NET 3.5.
Helix Media Library Install Guide
11
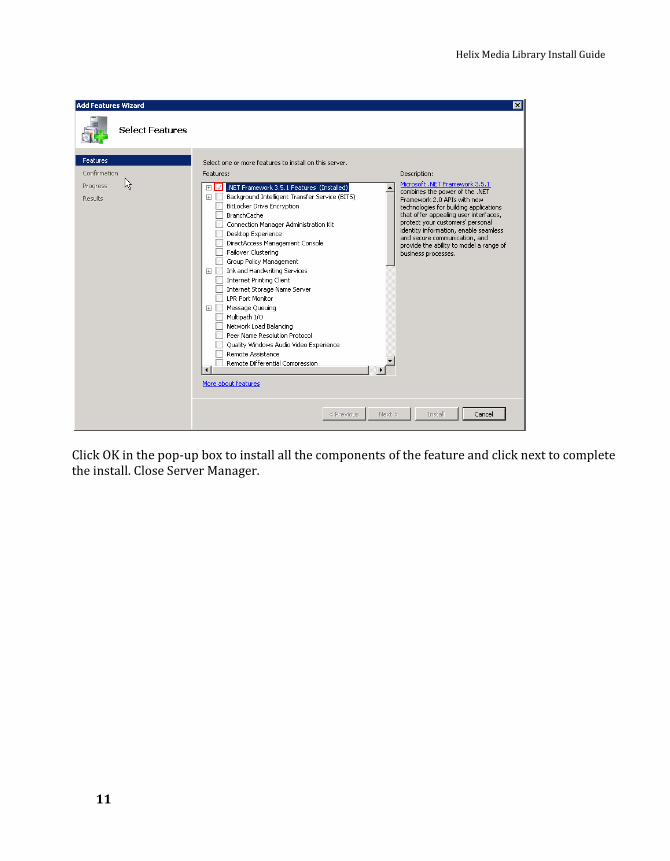
Click OK in the pop-up box to install all the components of the feature and click next to complete the install. Close Server Manager.
12
Pre-installation Software Before going on to install the main components of the Helix Media Library, there are is a list of software that should be installed first: Alternate Browsers – This is good for testing to check whether the software can be accessed from different browsers .NET 3.5 – Required for IIS Java (Optional) – Used for viewing the Helix Server monitor K-Lite Codec Pack – This installs the codecs to allow files to be encoded Flash – Required to test upload and playback functionality on the Server once HML is installed QuickTime – Installs additional codecs
Download and Install third party browsers:
Mozilla Firefox: http://www.getfirefox.com
Google Chrome: http://google.com/chrome
Opera: http://www.opera.com
Install Java
Obtain the latest copy of Java using the following link: http://java.com/en/download/index.jsp This is optional, but required if you want to view the Server Monitor on Helix Server which reports real-time statistics of streams being accessed.
Install Windows DirectShow Codecs
The K-Lite Codec packs are recommended (but not essential) for use with the Media Library
Server, and will allow it to encode a far greater number of audio and video formats.
Launch the K-Lite Mega Codec Pack installer. The second screen of the installer will be the Select
Components dialog. Choose Lots of stuff (without player).

Helix Media Library Install Guide
13
Manually select MPEG-2 DVD -> ffdshow (libmpeg2), as shown:
Select the defaults for all other screens until the installation is complete.
Download Flash Player Use the following URL to get the most current version of Flash player, and just run through the installer: http://get.adobe.com/flashplayer/
Install Apple QuickTime
Download and launch the installer. Accept all defaults apart from Automatically update
QuickTime and other Apple Software and decline the offer to Go Pro Now.

14
Installer available from: http://www.apple.com/quicktime/
Adding an Additional IP Address to a Network Card
As two IP addresses are required, one will need to be added to the network card.
Open you network card properties by clicking on Start, opening the Control Panel and opening
Network and Sharing Centre.
From the options on the left-hand side select Manage Network Connections
Right-click on your active network connection and click Properties.
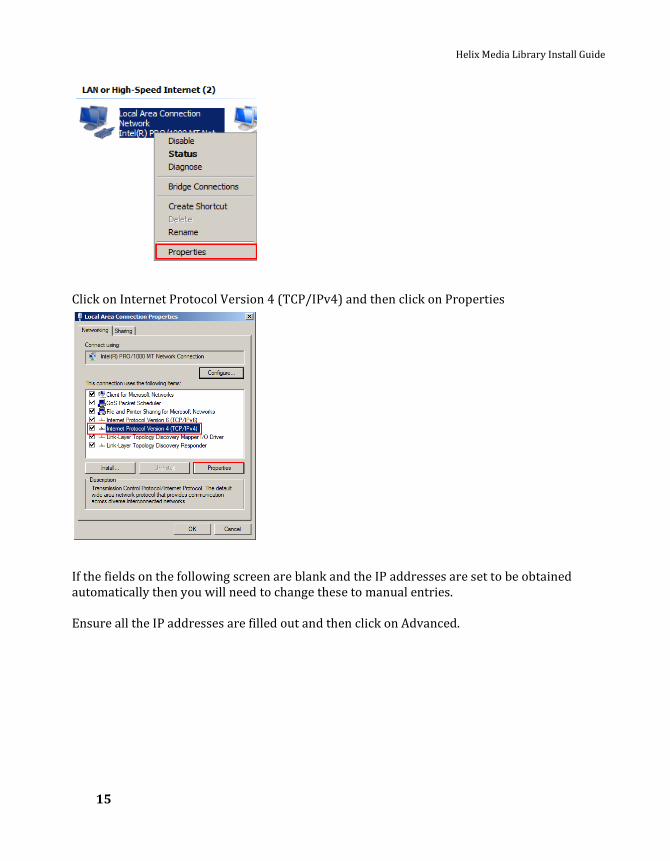
Helix Media Library Install Guide
15
Click on Internet Protocol Version 4 (TCP/IPv4) and then click on Properties
If the fields on the following screen are blank and the IP addresses are set to be obtained automatically then you will need to change these to manual entries. Ensure all the IP addresses are filled out and then click on Advanced.
16
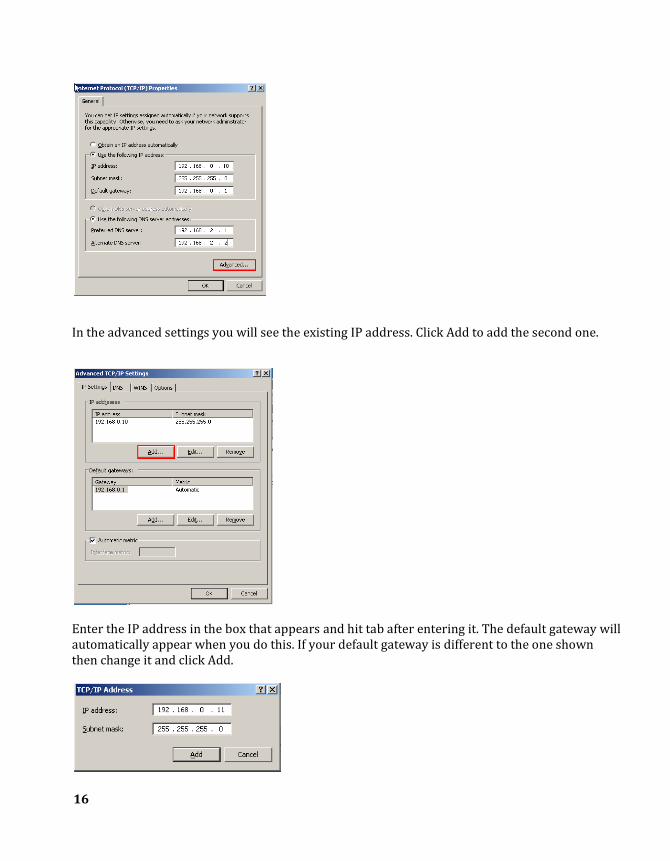
In the advanced settings you will see the existing IP address. Click Add to add the second one.
Enter the IP address in the box that appears and hit tab after entering it. The default gateway will automatically appear when you do this. If your default gateway is different to the one shown then change it and click Add.

Helix Media Library Install Guide
17
Click OK on the advanced settings window, then on the Internet Protocol Properties window to save the changes and exit.
18
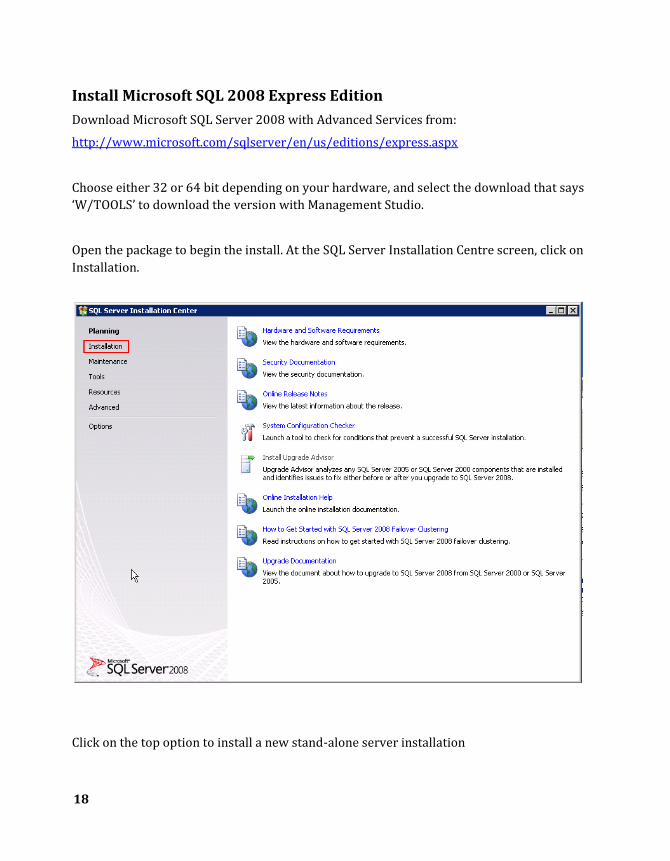
Install Microsoft SQL 2008 Express Edition
Download Microsoft SQL Server 2008 with Advanced Services from:
http://www.microsoft.com/sqlserver/en/us/editions/express.aspx
Choose either 32 or 64 bit depending on your hardware, and select the download that says
‘W/TOOLS’ to download the version with Management Studio.
Open the package to begin the install. At the SQL Server Installation Centre screen, click on
Installation.
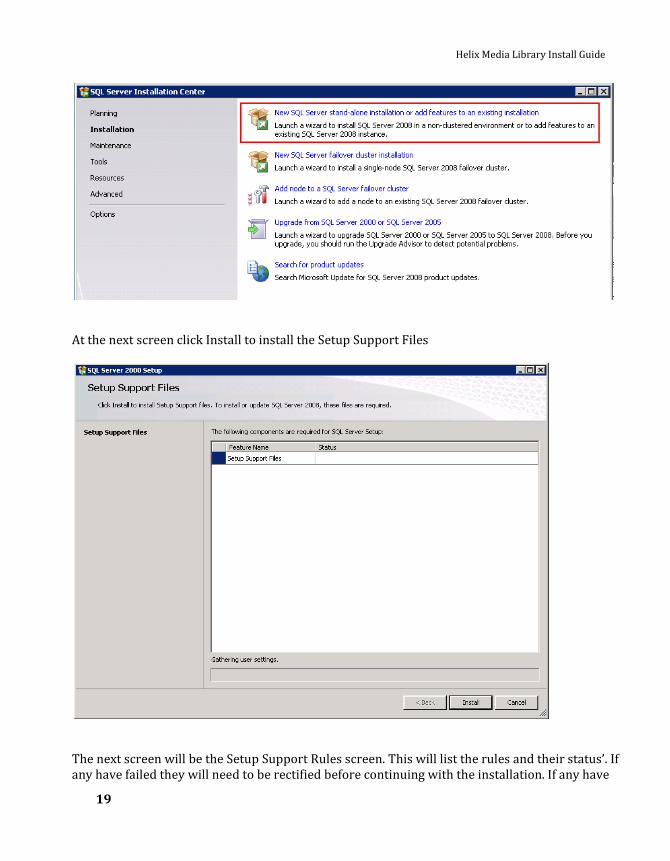
Click on the top option to install a new stand-alone server installation
Helix Media Library Install Guide
19
At the next screen click Install to install the Setup Support Files
The next screen will be the Setup Support Rules screen. This will list the rules and their status’. If any have failed they will need to be rectified before continuing with the installation. If any have

20
warnings these can be ignored for the installation and later rectified if they are going to cause a problem.
For more information on what the problem is for flagged status’ click on the status in blue. Click Next. If Windows PowerShell fails on the screen above, please see the troubleshooting section at the foot of this document for steps on how to rectify this. Once you have completed the steps, click on the Re-run button on the Setup Support Screen above and the warning will have cleared.
Helix Media Library Install Guide
21
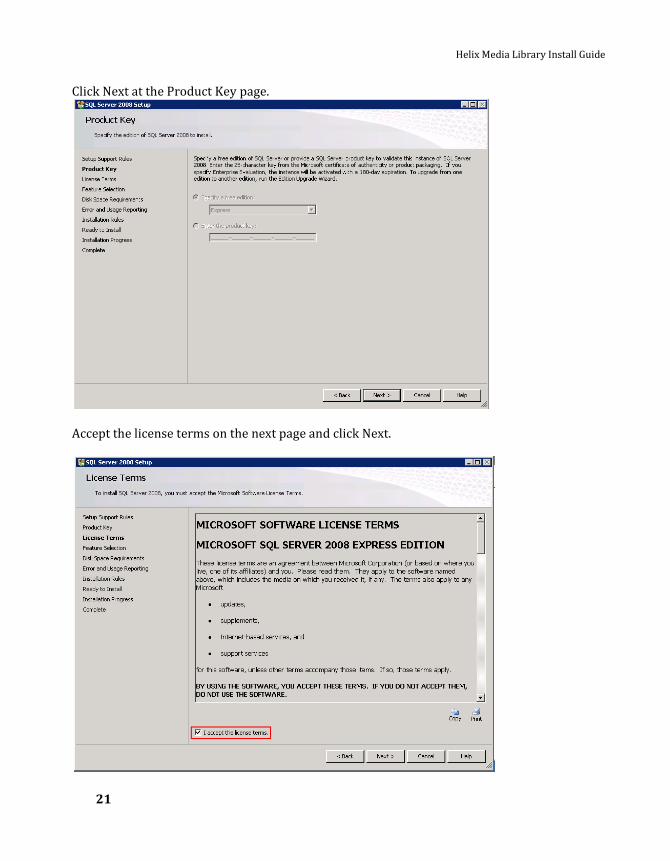
Click Next at the Product Key page.
Accept the license terms on the next page and click Next.

22
Select the features that you are going to install. Database Engine Services and Management Tools – Basic are required. Tick the boxes for them and click Next
* You may not have the option of installing the management tools at this point depending on the version of the SQL installer you are running. If there isn’t an option to install it, complete this process and once finished download it from the following link:
http://www.microsoft.com/downloads/en/details.aspx?FamilyID=08e52ac2-1d62-45f6-9a4a-
4b76a8564a2b
The installer is exactly the same as this one, but you will have the check box to install the management tools.

Helix Media Library Install Guide
23
Click Next if you are happy with the named instance and the root directory, or change them if you would like a different name or install location.
There will be a disk usage summary, click Next.
Figures in this image are an example only.
24
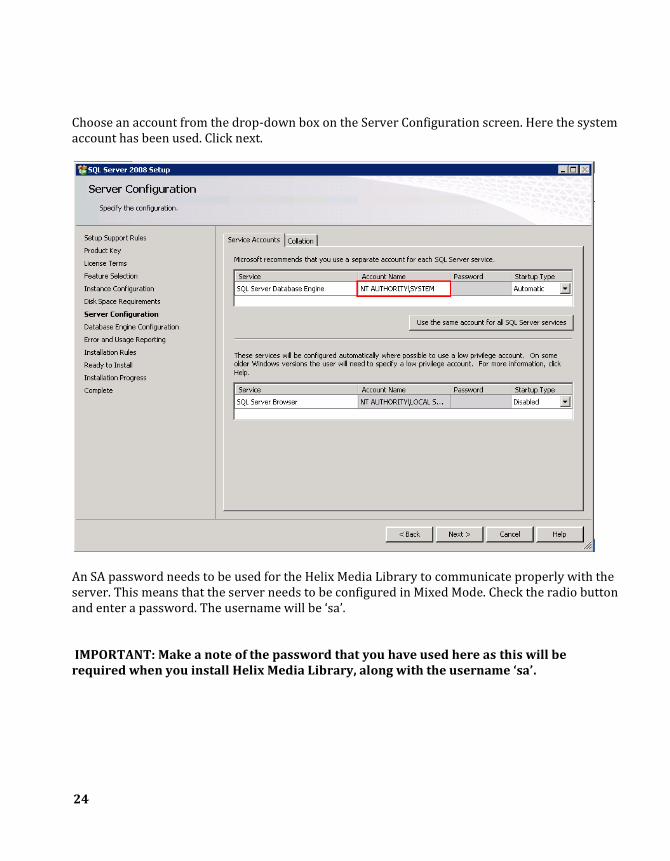
Choose an account from the drop-down box on the Server Configuration screen. Here the system account has been used. Click next.
An SA password needs to be used for the Helix Media Library to communicate properly with the server. This means that the server needs to be configured in Mixed Mode. Check the radio button and enter a password. The username will be ‘sa’. IMPORTANT: Make a note of the password that you have used here as this will be required when you install Helix Media Library, along with the username ‘sa’.

Helix Media Library Install Guide
25
Add a user to the SQL server administrators role, and click Next. Click Next at the Error and Usage Reporting screen. The Installation Rules screen is next and this should run fine. If there are any failed items click on the Show Details button to see what they are. Click Next.
The Ready to Install page will be a summary of the installation. Click Install to start the install.
26
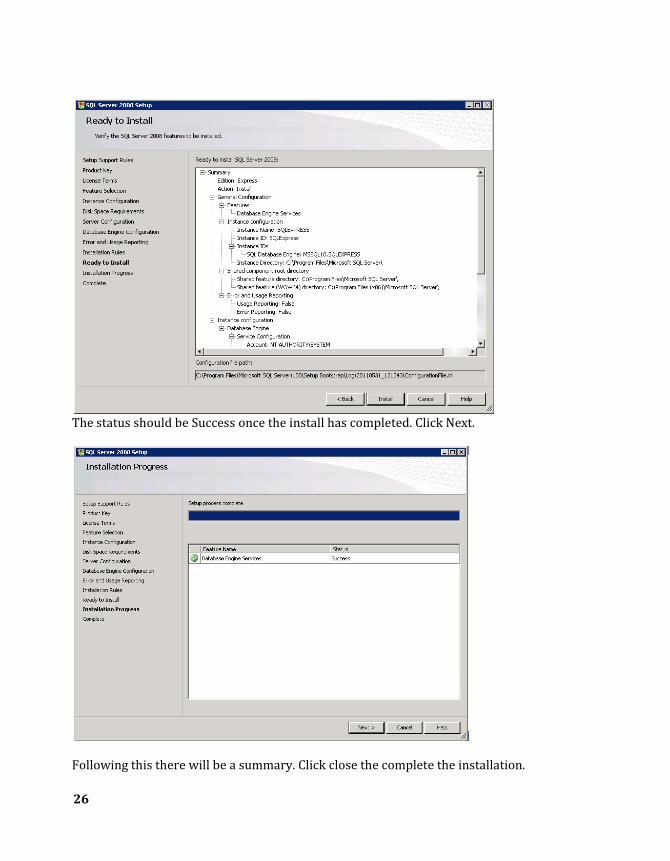
The status should be Success once the install has completed. Click Next.
Following this there will be a summary. Click close the complete the installation.

Helix Media Library Install Guide
27

28
Configure SQL to allow connections
Once installation has completed click Start -> All Programs -> Microsoft SQL Server 2008 ->
Configuration Tools -> SQL Server Configuration Manager. Expand the Protocols for
SQLEXPRESS tree in the new window that appears as below:
Right click on TCP/IP and select properties. In the pop-up dialogue change the Enabled
property to Yes:
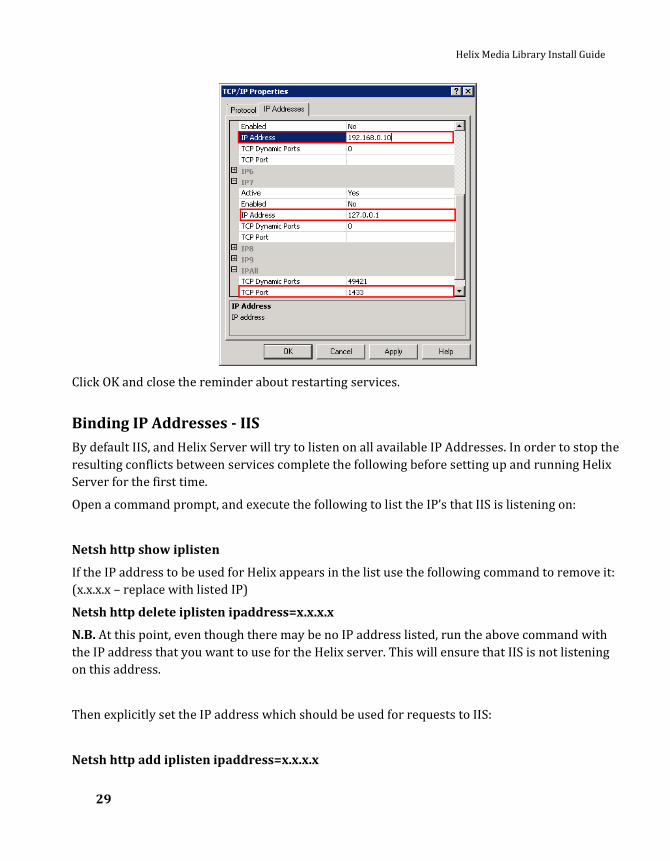
Click on the IP Addresses tab and change the Enabled property for the 127.0.0.1 address and
the IP address you are going to assign to the HML to Yes. Also update the TCP Port under IPAll to
1433 as shown:
Helix Media Library Install Guide
29
Click OK and close the reminder about restarting services.
Binding IP Addresses - IIS
By default IIS, and Helix Server will try to listen on all available IP Addresses. In order to stop the
resulting conflicts between services complete the following before setting up and running Helix
Server for the first time.
Open a command prompt, and execute the following to list the IP’s that IIS is listening on:
Netsh http show iplisten
If the IP address to be used for Helix appears in the list use the following command to remove it:
(x.x.x.x – replace with listed IP)
Netsh http delete iplisten ipaddress=x.x.x.x
N.B. At this point, even though there may be no IP address listed, run the above command with
the IP address that you want to use for the Helix server. This will ensure that IIS is not listening
on this address.
Then explicitly set the IP address which should be used for requests to IIS:
Netsh http add iplisten ipaddress=x.x.x.x

30
(Where x.x.x.x is the IP address to be used for IIS)
Now restart IIS by issuing the following commands:
net stop http /y
net start http /y
net start w3svc
Install Helix Server
Launch the Helix Server installation file and click next until you reach the dialogue requesting the
license key. At this point you will be required to select a license key file that matches the
machine ID displayed.
This can be obtained from http://pam.realnetworks.com/pam. Enter your credentials to access
the product and license key download section.

Helix Media Library Install Guide
31
Accept the license agreement and choose an installation location. The default in most cases.
The next screen requests details for your Administration user name and password plus the ports
required for administration access to the system. Enter your chosen credentials.
For the administration port settings, any appropriate port not already in use can be set. For this
example we have used Admin Port: 54321 and Secure Port: 12345 for ease.
The following screen will ask for a number of ports to be used:
-Control
[8008] . These are recommended.

32
This screen allows you to enter the details that will be used in your security certificate. This
certificate is employed during HTTPS connections to the server.
Here is an overview of some of the fields that may be unfamiliar:
Org. Unit: The organizational unit will correspond to your department, e.g. Accounts
Common Name: Your domain name. For large organizations, use a wildcard before the
domain name, e.g. *.myorganization.com.
CSR Name: The name for your encrypted certificate request, e.g. Helix.
The above screen is modified for reference only, and not indicative of the installer.

Helix Media Library Install Guide
33
On the next screen ensure that Helix Server will be installed as a service and proceed to the end
of the wizard. Upon clicking finish Helix Server will be installed, but not started.
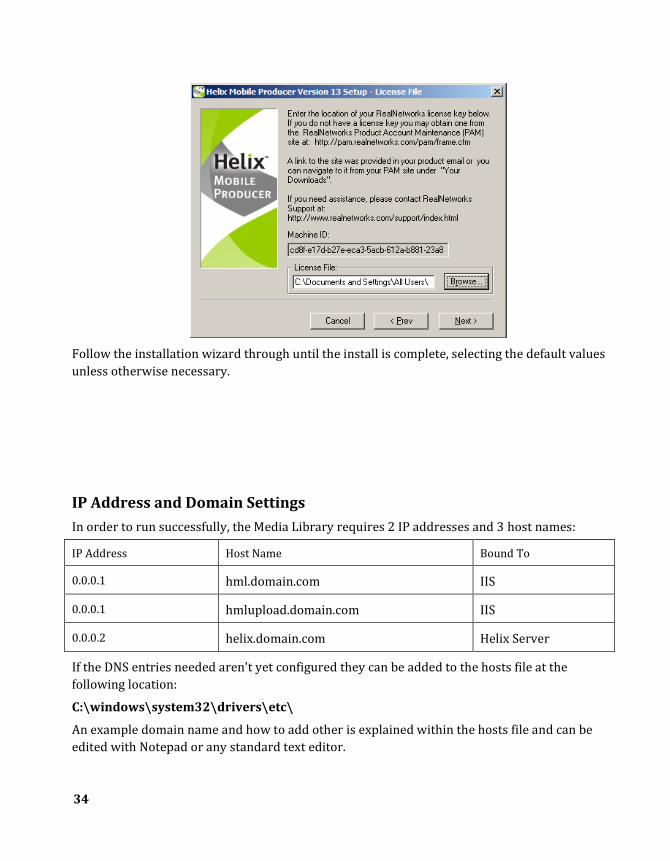
Install Helix Mobile Producer
Launch the Producer installer. You will be given the option of selecting Helix Mobile Producer or
RealProducer. Select Install Helix Mobile Producer.
Similar to the Helix Server installation, a key will need to be selected to license Helix Mobile
Producer and this must match the machine ID.
34
Follow the installation wizard through until the install is complete, selecting the default values
unless otherwise necessary.
IP Address and Domain Settings
In order to run successfully, the Media Library requires 2 IP addresses and 3 host names:
IP Address Host Name Bound To
0.0.0.1 hml.domain.com IIS
0.0.0.1 hmlupload.domain.com IIS
0.0.0.2 helix.domain.com Helix Server
If the DNS entries needed aren't yet configured they can be added to the hosts file at the
following location:
C:\windows\system32\drivers\etc\
An example domain name and how to add other is explained within the hosts file and can be
edited with Notepad or any standard text editor.
Helix Media Library Install Guide
35
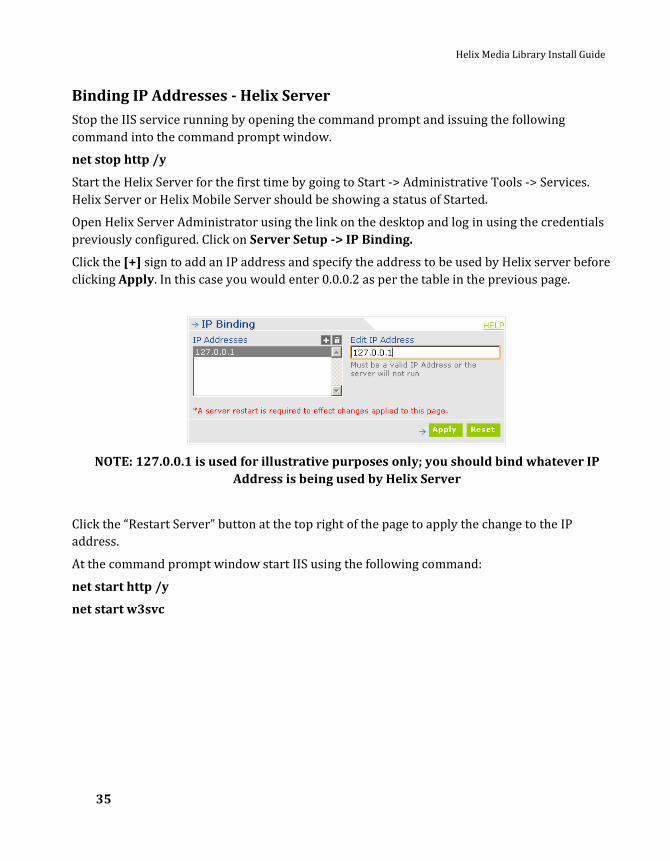
Binding IP Addresses - Helix Server
Stop the IIS service running by opening the command prompt and issuing the following
command into the command prompt window.
net stop http /y
Start the Helix Server for the first time by going to Start -> Administrative Tools -> Services.
Helix Server or Helix Mobile Server should be showing a status of Started.
Open Helix Server Administrator using the link on the desktop and log in using the credentials
previously configured. Click on Server Setup -> IP Binding.
Click the [+] sign to add an IP address and specify the address to be used by Helix server before
clicking Apply. In this case you would enter 0.0.0.2 as per the table in the previous page.
NOTE: 127.0.0.1 is used for illustrative purposes only; you should bind whatever IP
Address is being used by Helix Server
Click the “Restart Server” button at the top right of the page to apply the change to the IP
address.
At the command prompt window start IIS using the following command:
net start http /y
net start w3svc

36
Troubleshooting – At this point the Server Administrator Web Page might say “Internet
Explorer Cannot Display the Webpage”. If you do see this message then click the yellow bar at the
top of the page and click on “Enable Intranet Settings”.
Helix Media Library Install Guide
37
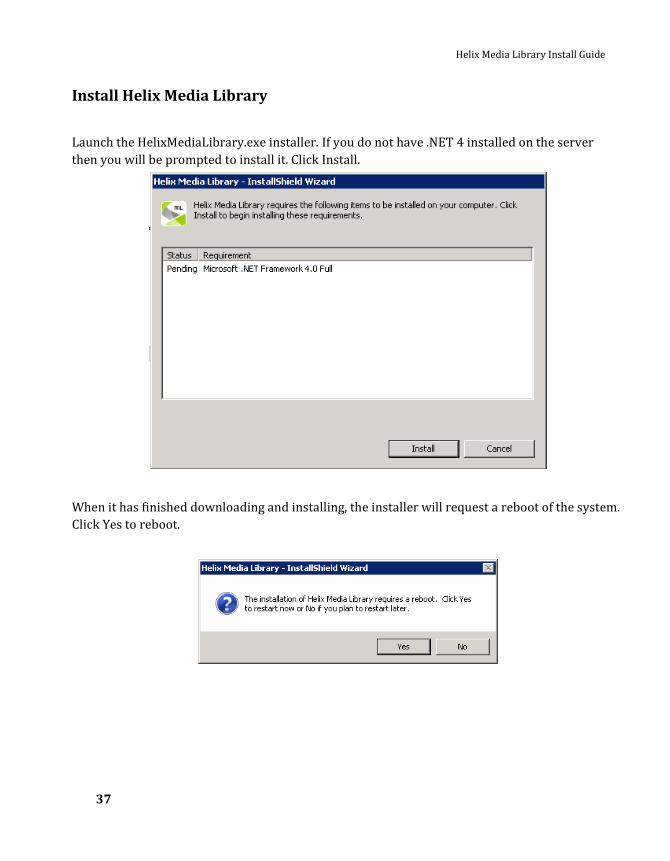
Install Helix Media Library
Launch the HelixMediaLibrary.exe installer. If you do not have .NET 4 installed on the server
then you will be prompted to install it. Click Install.
When it has finished downloading and installing, the installer will request a reboot of the system.
Click Yes to reboot.

38
When the server has restarted and you have logged in, you will see a message asking you if you
want to open a file. This is the Helix Media Library installer starting again. Click Run.
Click Next at the welcome screen.
Helix Media Library Install Guide
39
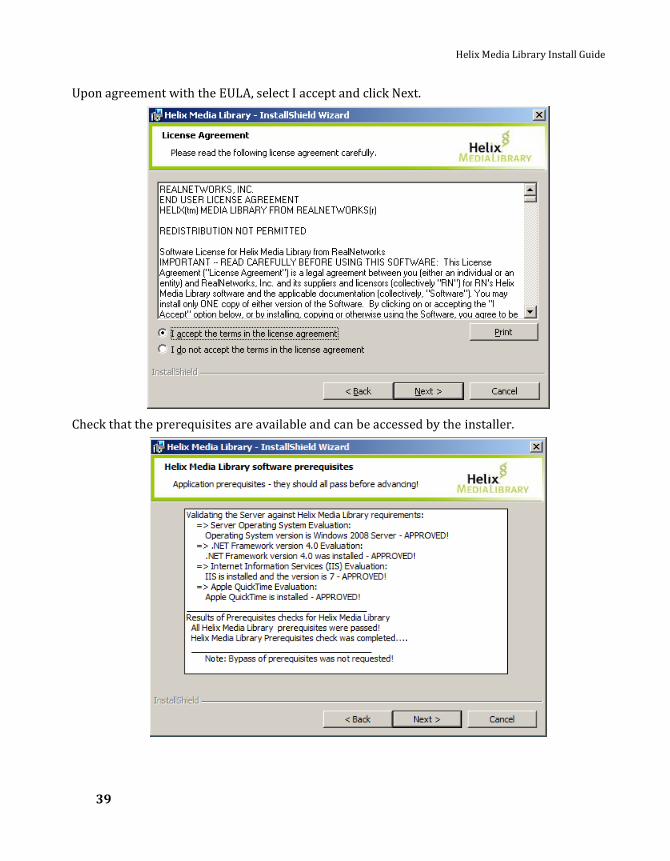
Upon agreement with the EULA, select I accept and click Next.
Check that the prerequisites are available and can be accessed by the installer.
40
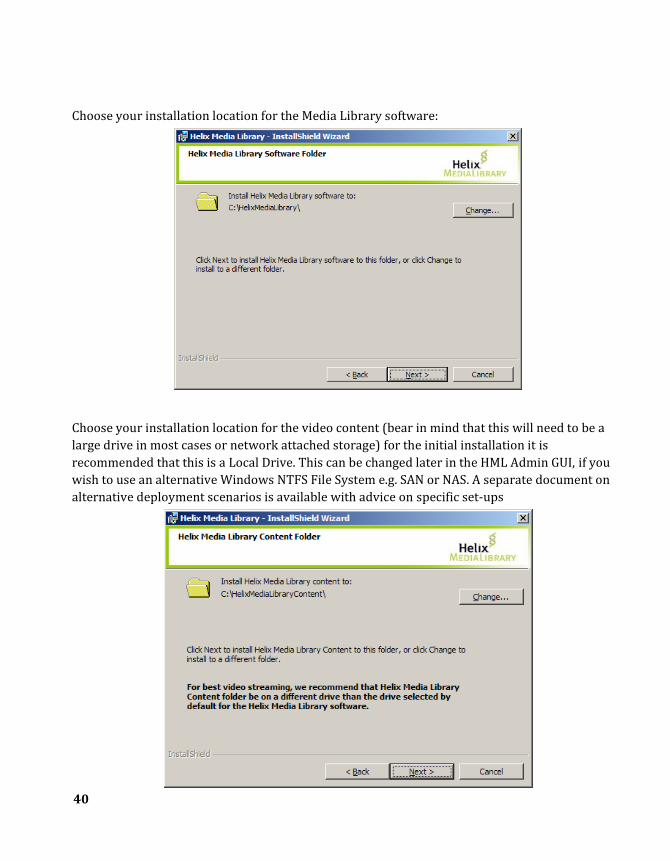
Choose your installation location for the Media Library software:
Choose your installation location for the video content (bear in mind that this will need to be a
large drive in most cases or network attached storage) for the initial installation it is
recommended that this is a Local Drive. This can be changed later in the HML Admin GUI, if you
wish to use an alternative Windows NTFS File System e.g. SAN or NAS. A separate document on
alternative deployment scenarios is available with advice on specific set-ups
Helix Media Library Install Guide
41
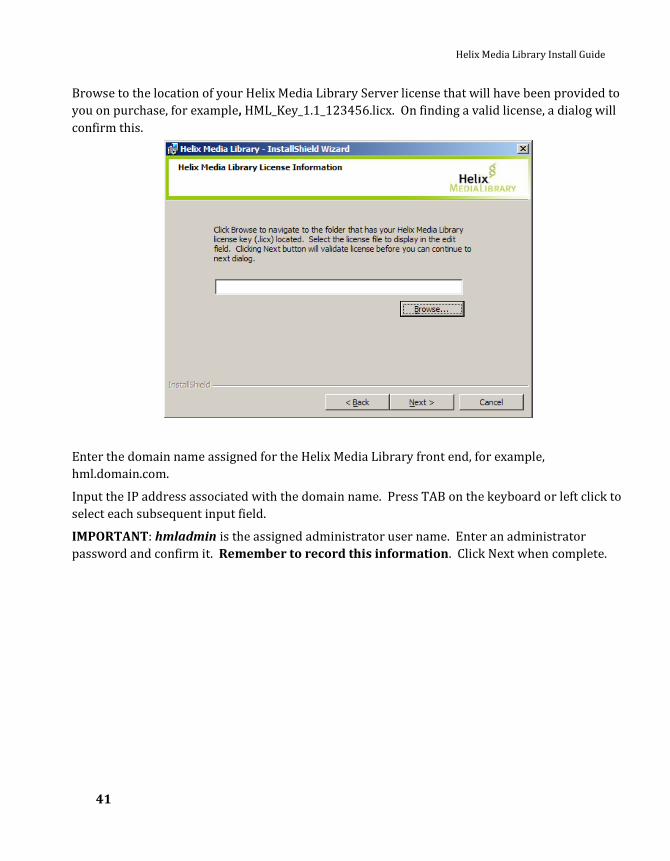
Browse to the location of your Helix Media Library Server license that will have been provided to
you on purchase, for example, HML_Key_1.1_123456.licx. On finding a valid license, a dialog will
confirm this.
Enter the domain name assigned for the Helix Media Library front end, for example,
hml.domain.com.
Input the IP address associated with the domain name. Press TAB on the keyboard or left click to
select each subsequent input field.
IMPORTANT: hmladmin is the assigned administrator user name. Enter an administrator
password and confirm it. Remember to record this information. Click Next when complete.
42
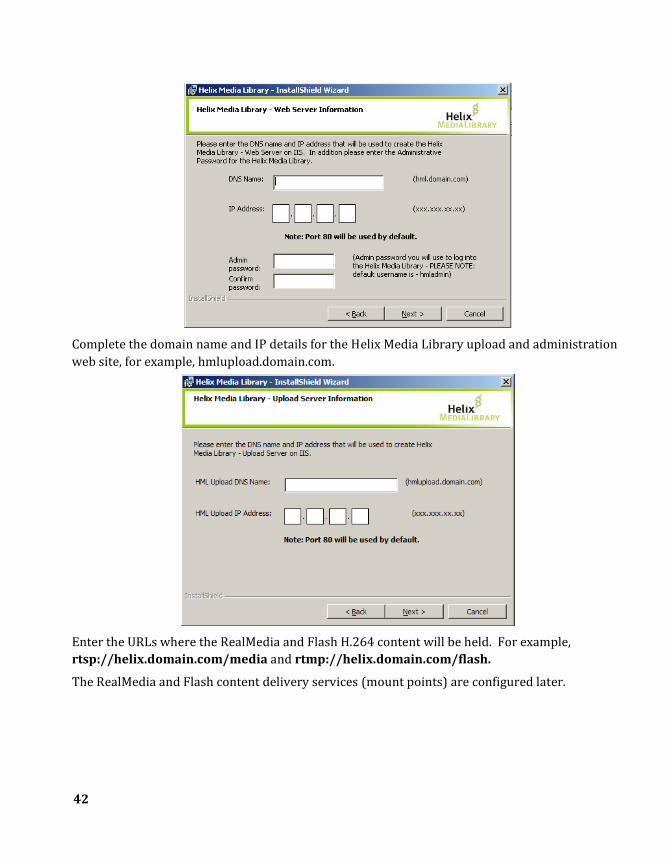
Complete the domain name and IP details for the Helix Media Library upload and administration
web site, for example, hmlupload.domain.com.
Enter the URLs where the RealMedia and Flash H.264 content will be held. For example,
rtsp://helix.domain.com/media and rtmp://helix.domain.com/flash.
The RealMedia and Flash content delivery services (mount points) are configured later.

Helix Media Library Install Guide
43
Confirm the installation location of Helix Mobile Producer.
44
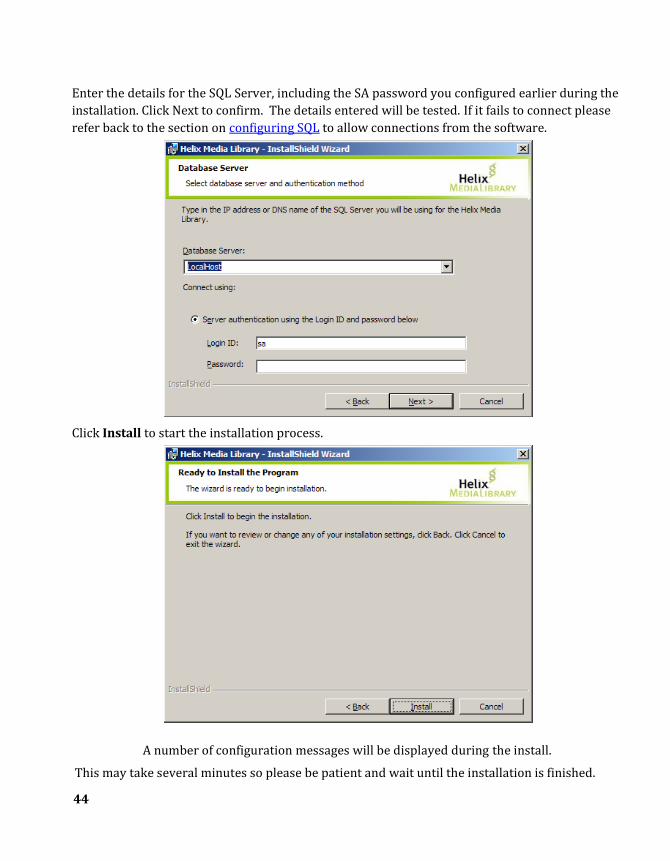
Enter the details for the SQL Server, including the SA password you configured earlier during the
installation. Click Next to confirm. The details entered will be tested. If it fails to connect please
refer back to the section on configuring SQL to allow connections from the software.
Click Install to start the installation process.
A number of configuration messages will be displayed during the install.
This may take several minutes so please be patient and wait until the installation is finished.

Helix Media Library Install Guide
45
Once the install is complete click Finish. Upon completion two desktop icons will be created,
Helix Media Library and Helix Media Library Administrator. These will provide access to the
web front end of the service.
Selecting the checkbox for detailed instructions in configuring the Windows Services will show
information for configuring IIS 7Service
46
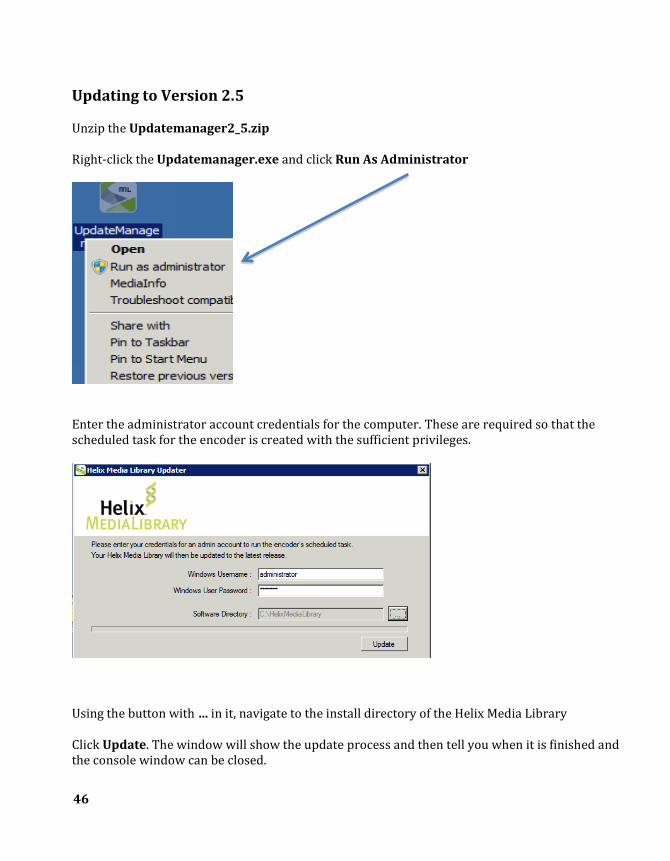
Updating to Version 2.5 Unzip the Updatemanager2_5.zip Right-click the Updatemanager.exe and click Run As Administrator
Enter the administrator account credentials for the computer. These are required so that the scheduled task for the encoder is created with the sufficient privileges.
Using the button with … in it, navigate to the install directory of the Helix Media Library Click Update. The window will show the update process and then tell you when it is finished and the console window can be closed.

Helix Media Library Install Guide
47
Click on Close to close the updater.

48
Create Mount Points for RealMedia and Flash Player Content
RealMedia Content
The Helix Media Library will look for the Real media content at the URL specified in the installer
wizard. For the purposes of this document this is rtsp://helix.domain.com/media, so we need
to create the media mount point.
This can be configured by logging into Helix Administrator and browsing to Server Setup ->
Mount Points and clicking [+] to add a new mount point. This should be configured to point to
the content folder specified in the installer, as shown in the example below: (add the correct
content directory to the Base Path, this was defined during the Media Library Installation).
Click Apply, confirm the changes and then select Restart Server from the top of the page.
Helix Media Library Install Guide
49
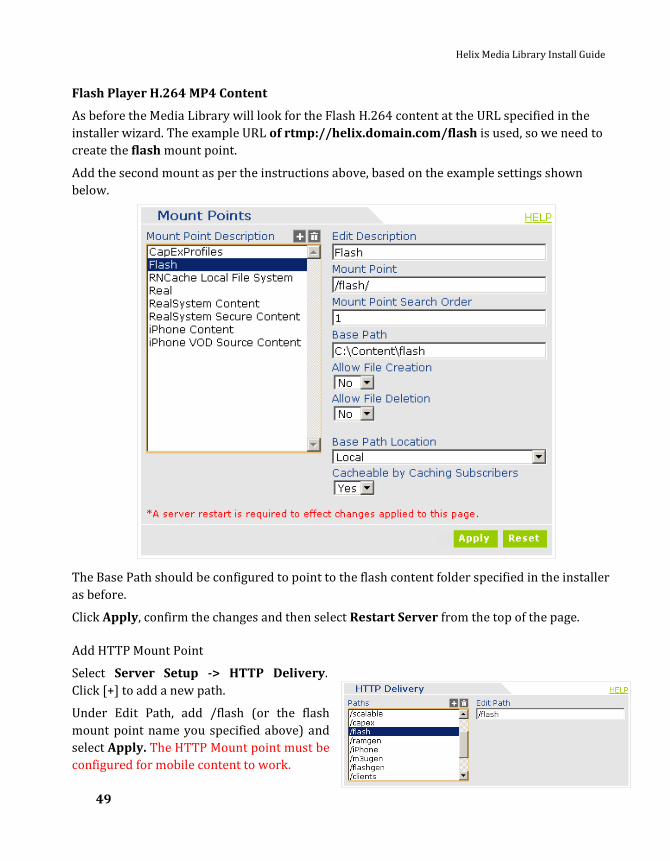
Flash Player H.264 MP4 Content
As before the Media Library will look for the Flash H.264 content at the URL specified in the
installer wizard. The example URL of rtmp://helix.domain.com/flash is used, so we need to
create the flash mount point.
Add the second mount as per the instructions above, based on the example settings shown
below.
The Base Path should be configured to point to the flash content folder specified in the installer
as before.
Click Apply, confirm the changes and then select Restart Server from the top of the page.
Add HTTP Mount Point
Select Server Setup -> HTTP Delivery.
Click [+] to add a new path.
Under Edit Path, add /flash (or the flash
mount point name you specified above) and
select Apply. The HTTP Mount point must be
configured for mobile content to work.

50
URL Aliasing In order to deliver content to Android and Blackberry the files need to be referenced as .3GP instead of .MP4. Instead of moving them to a different mount point and renaming the extensions they can be aliased by Helix Server. This means that when the request comes in from a device asking for a .3GP file the Helix Server will point it to the .MP4 file instead. To set this up log into the Helix Server Administrator and open up the Server Setup menu on the left, then click on URL Aliasing.
Enter in a description for the alias and then enter the alias of _lo.3pg, then the resource it will point to, _lo.mp4. Note: Only the _lo files are aliased, as high quality will not be viewed from mobile devices. IMPORTANT: The URL Aliasing must be configured for the Blackberry and Android streaming to work

Helix Media Library Install Guide
51
Configure E-Mail Server Settings
You will need to set the mail server settings within the Helix Media Library so that the relevant
parties are notified on:
Content encode success
Content encode failure
Reporting of inappropriate content to the administrator
Log onto the Upload site of the Helix Media Library, by double clicking on the Helix Media
Library Administrator icon on the desktop. Enter the hmladmin credentials you stored
earlier.
Go to Settings -> E-Mail Notifications as shown below and fill out the required details.
SMTP Server: For example post.domain.com with SMTP administrator user credentials if
authentication is required.
From e-mail address: e.g. [email protected]. This is the e-mail address that all
notifications of success or failure will come from.
Cc: address for all notifications to be copied to.
Allow reporting of offensive content: a user will have the ability to warn the administrators of
any content deemed inappropriate.

52
Customize Helix Media Library Appearance
In the administration area, selecting Settings -> Customization, the coloring, logos and text style
of the Media Library can be changed.
From here you will be able to:
Apply a new header image for the administration pages (800 pixels wide).
Apply a new header image for the user pages (800 pixels wide).
Change the navigation menu color (top) and the accompanying text.
Change the site wide font used for all body text and its color.
Change the text color, highlight and selected color of the side menu.
Apply an image to the bottom of the page (800 pixels wide).
Changes can also be made to the Mobile Web Site from this screen. Please see the user guide for
further information on this.
Helix Media Library Install Guide
53
Enabling Segmentation
You can enable segmentation for the iPhone and iPad which means that when you access clips
from these devices you will be accessing the file in segments to enable smoother delivery for long
form content. When it is enabled, the Helix Server needs to be configured to allow this to happen.
Segmentation is recommended when viewing clips over 2 MB in size from the iPhone/iPad. If it is
likely that there will be heavy mobile usage with the HML it is recommended that segmentation
is enabled.
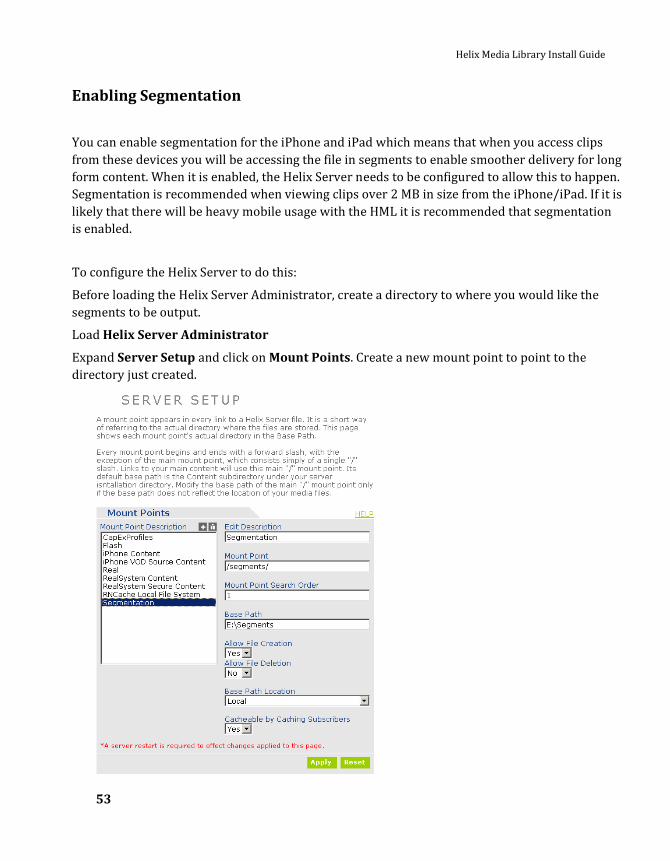
To configure the Helix Server to do this:
Before loading the Helix Server Administrator, create a directory to where you would like the
segments to be output.
Load Helix Server Administrator
Expand Server Setup and click on Mount Points. Create a new mount point to point to the
directory just created.
54
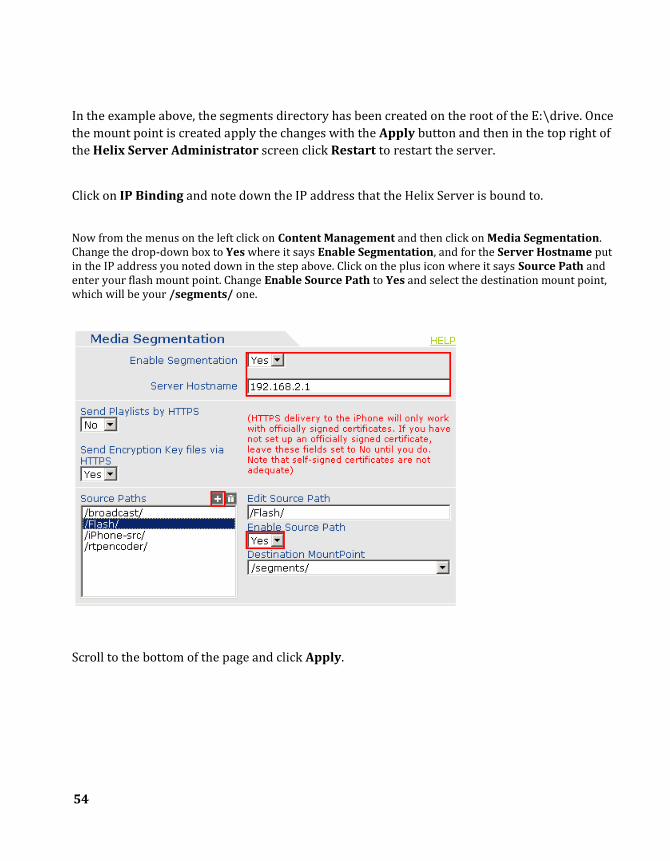
In the example above, the segments directory has been created on the root of the E:\drive. Once
the mount point is created apply the changes with the Apply button and then in the top right of
the Helix Server Administrator screen click Restart to restart the server.
Click on IP Binding and note down the IP address that the Helix Server is bound to.
Now from the menus on the left click on Content Management and then click on Media Segmentation. Change the drop-down box to Yes where it says Enable Segmentation, and for the Server Hostname put in the IP address you noted down in the step above. Click on the plus icon where it says Source Path and enter your flash mount point. Change Enable Source Path to Yes and select the destination mount point, which will be your /segments/ one.
Scroll to the bottom of the page and click Apply.
Helix Media Library Install Guide
55
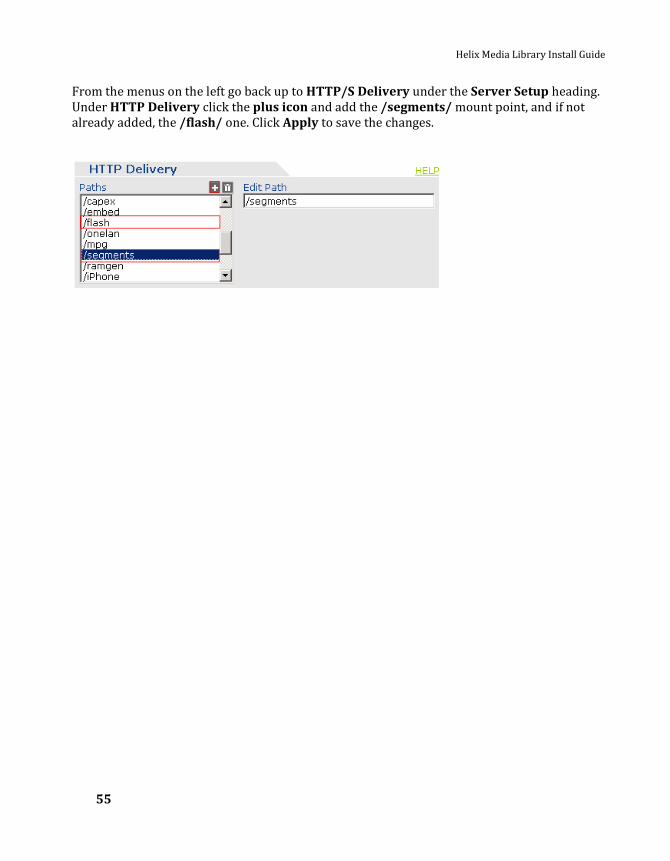
From the menus on the left go back up to HTTP/S Delivery under the Server Setup heading. Under HTTP Delivery click the plus icon and add the /segments/ mount point, and if not already added, the /flash/ one. Click Apply to save the changes.

56
The initial setup is now complete and ready for testing. Upload a number of clips with
varying codecs to test the upload, encoding, and email processes.
Troubleshooting
Helix Server fails to start and the Administration pages cannot be reached.
If due to existing IP conflicts you are unable to start the Helix Service, add the following lines to
the end of the rmserver.cfg file found in the Helix Server installation directory.
<!— I P B I N D I N G -->
<List Name=”IPBinding”>
<Var Address_1=”127.0.0.1”/>
</List>
Replace 127.0.0.1 with your Helix servers IP
The website reports a Service Unavailable application error.
This error normally arises from either a) conflicting versions of .NET on the system, or b) a failed
installation of .NET.
Solution:
Open a command prompt
Run: net stop w3svc
Run: net stop http /y
cd %windir%\Microsoft.Net\Framework\v4.0.30319
Run: aspnet_regiis.exe –ua
Run: aspnet_regiis.exe –i
Run: net start w3svc
Run: net start http /y
Go to Start Menu -> Administrative Tools -> Internet Information Service (IIS) Manager.
Select your server; highlight Web Service Extensions. In the right pane, make sure ASP.NET
version is set to v4.0.30319
Helix Media Library Install Guide
57
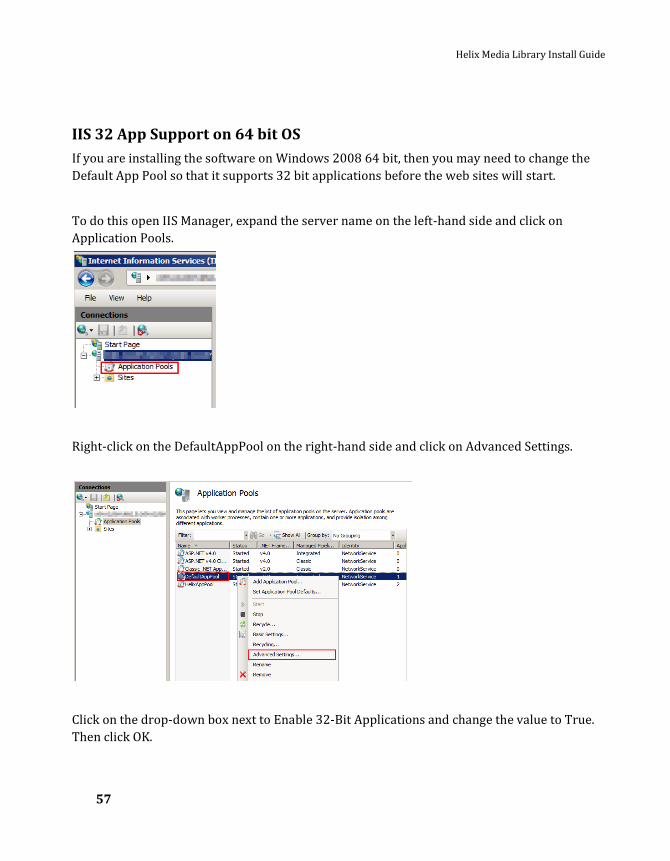
IIS 32 App Support on 64 bit OS
If you are installing the software on Windows 2008 64 bit, then you may need to change the
Default App Pool so that it supports 32 bit applications before the web sites will start.
To do this open IIS Manager, expand the server name on the left-hand side and click on
Application Pools.
Right-click on the DefaultAppPool on the right-hand side and click on Advanced Settings.
Click on the drop-down box next to Enable 32-Bit Applications and change the value to True.
Then click OK.

58
Back on the main IIS page, right-click on Application pools in the left menu and click refresh. Now
try accessing the sites again.
Starting the Helix Server Administrator If when you start the Helix Server administrator you see an “Internet Explorer cannot display the web page” message, then making a change to the URL could fix this. You can replace the name of your server in the URL of the administrator page with “localhost” and this should show you the logon screen. For example, if your Helix Server Administrator page URL is: http://servername:54321/admin/index.html Try changing it so that it reads: http://localhost:54321/admin/index.html
Helix Media Library Install Guide
59
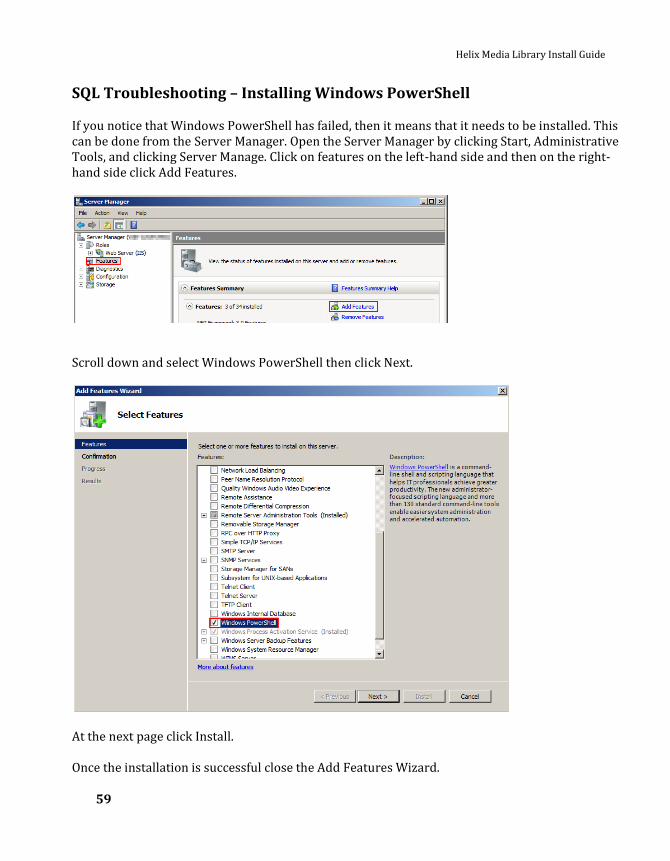
SQL Troubleshooting – Installing Windows PowerShell If you notice that Windows PowerShell has failed, then it means that it needs to be installed. This can be done from the Server Manager. Open the Server Manager by clicking Start, Administrative Tools, and clicking Server Manage. Click on features on the left-hand side and then on the right-hand side click Add Features.
Scroll down and select Windows PowerShell then click Next.
At the next page click Install. Once the installation is successful close the Add Features Wizard.
60
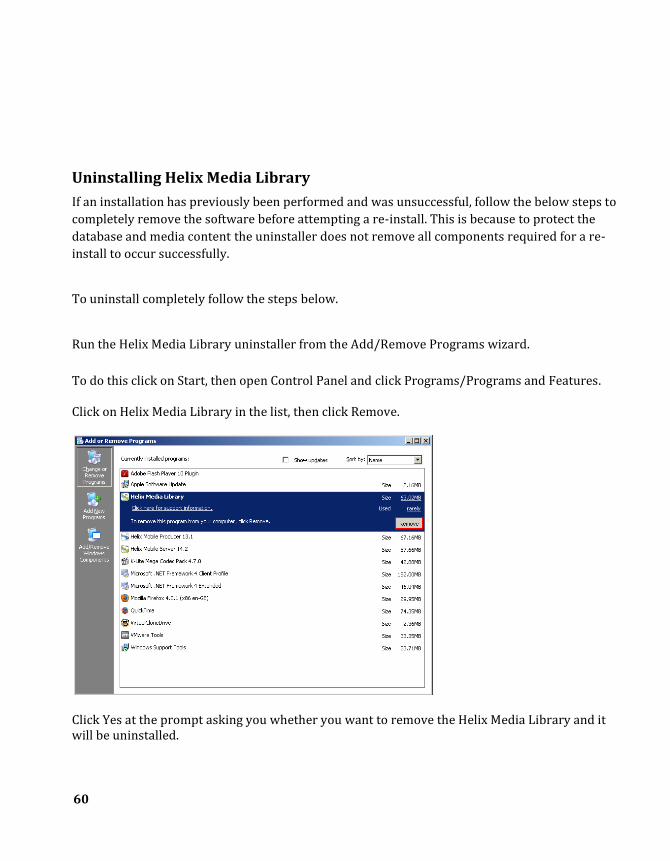
Uninstalling Helix Media Library
If an installation has previously been performed and was unsuccessful, follow the below steps to
completely remove the software before attempting a re-install. This is because to protect the
database and media content the uninstaller does not remove all components required for a re-
install to occur successfully.
To uninstall completely follow the steps below.
Run the Helix Media Library uninstaller from the Add/Remove Programs wizard.
To do this click on Start, then open Control Panel and click Programs/Programs and Features. Click on Helix Media Library in the list, then click Remove.
Click Yes at the prompt asking you whether you want to remove the Helix Media Library and it will be uninstalled.
Helix Media Library Install Guide
61
Open IIS by clicking on Start, then Administrative Tools and selecting IIS. Ensure that the sites have been deleted by the installer. If they haven’t then delete them by right-clicking them one at a time and clicking Delete. Click Yes to confirm the deletion.
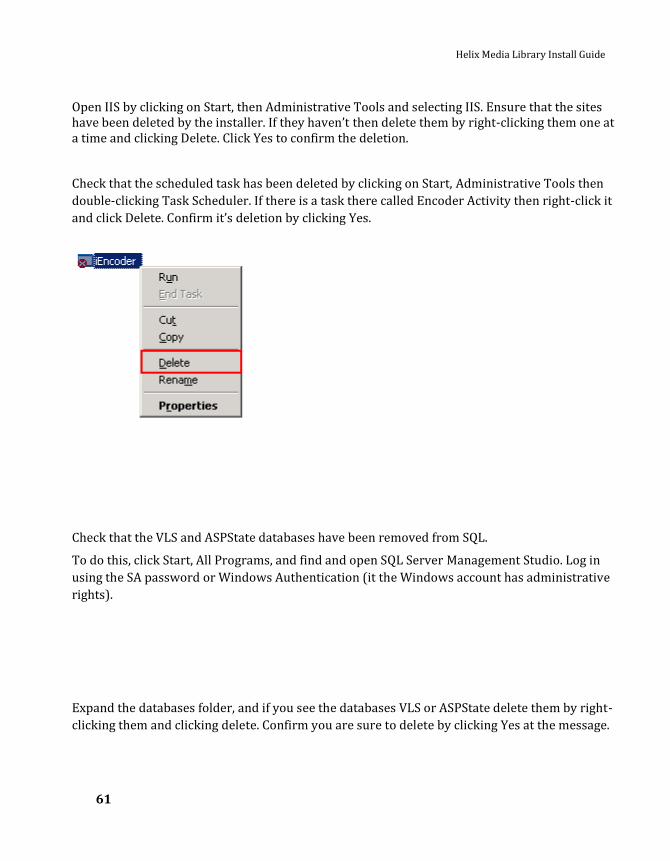
Check that the scheduled task has been deleted by clicking on Start, Administrative Tools then
double-clicking Task Scheduler. If there is a task there called Encoder Activity then right-click it
and click Delete. Confirm it’s deletion by clicking Yes.
Check that the VLS and ASPState databases have been removed from SQL.
To do this, click Start, All Programs, and find and open SQL Server Management Studio. Log in
using the SA password or Windows Authentication (it the Windows account has administrative
rights).
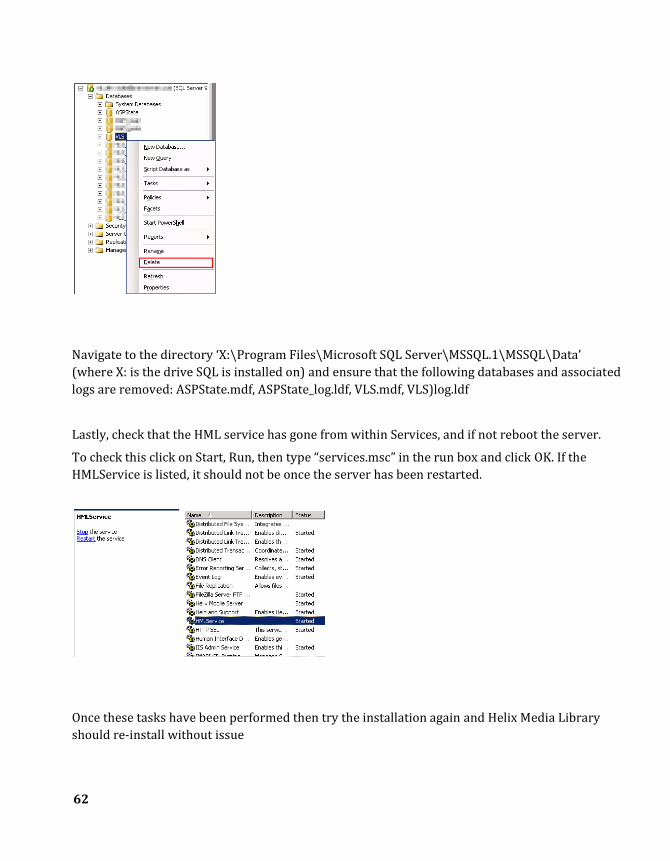
Expand the databases folder, and if you see the databases VLS or ASPState delete them by right-
clicking them and clicking delete. Confirm you are sure to delete by clicking Yes at the message.
62
Navigate to the directory ‘X:\Program Files\Microsoft SQL Server\MSSQL.1\MSSQL\Data’
(where X: is the drive SQL is installed on) and ensure that the following databases and associated
logs are removed: ASPState.mdf, ASPState_log.ldf, VLS.mdf, VLS)log.ldf
Lastly, check that the HML service has gone from within Services, and if not reboot the server.
To check this click on Start, Run, then type “services.msc” in the run box and click OK. If the
HMLService is listed, it should not be once the server has been restarted.
Once these tasks have been performed then try the installation again and Helix Media Library
should re-install without issue
Helix Media Library Install Guide
63
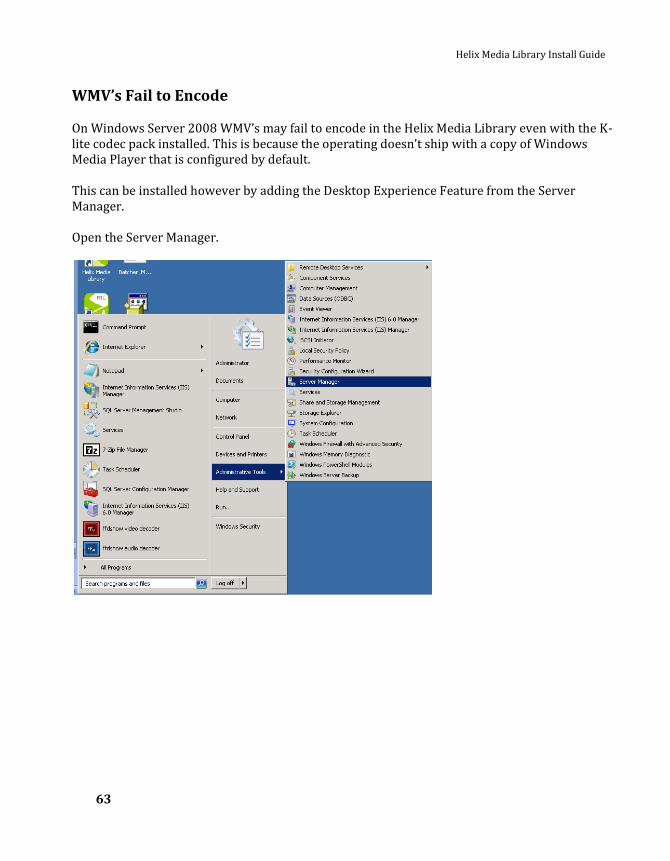
WMV’s Fail to Encode On Windows Server 2008 WMV’s may fail to encode in the Helix Media Library even with the K-lite codec pack installed. This is because the operating doesn’t ship with a copy of Windows Media Player that is configured by default. This can be installed however by adding the Desktop Experience Feature from the Server Manager. Open the Server Manager.

64
Click on Features and then click Add Features
Tick the box for Desktop Experience and then click Next

Helix Media Library Install Guide
65
At the next screen click Install
Once installation is complete click Close to close the wizard and then click Yes to restart the
server now.