Guidebook for Merchandise - University of Hawaii · Guidebook for Merchandise . ... Add Item to...
47
MBS Systems Training 1 ARC - Merchandise Guidebook.docx Advanced Retail Center Guidebook for Merchandise
Transcript of Guidebook for Merchandise - University of Hawaii · Guidebook for Merchandise . ... Add Item to...
MBS Systems Training 1 ARC - Merchandise Guidebook.docx
Advanced Retail Center
Guidebook for Merchandise
MBS Systems Training 2 ARC - Merchandise Guidebook.docx
Contents
Task 1: Navigating to Merchandise in Arc ............................................................................................................................... 4
Task 2: Add Vendor ............................................................................................................................................................... 10
Task 3: Add Item to Merchandise Items Menu ..................................................................................................................... 11
Task 4: Using UPC Translation for Standard Items ................................................................................................................ 13
Task 5: Create Logo, Color, Size Codes .................................................................................................................................. 14
Task 6: Using UPC Translation for Items with Logo, Color, Size ............................................................................................ 15
Task 7: Add Items with a Unit of Measure ............................................................................................................................ 16
Task 8: Set Up Kits ................................................................................................................................................................. 17
Task 9: Assemble and Post Kits ............................................................................................................................................. 18
Task 10: Kit SKU Disassembly ................................................................................................................................................ 18
Task 11: Creating a Purchase Order ...................................................................................................................................... 19
Task 11a: Printing Purchase Order ........................................................................................................................................ 20
Task 12: Send PLU to POS ...................................................................................................................................................... 21
Task 13: Set Up UPC Codes for POS Download ..................................................................................................................... 22
Task 14: Receiving Standard Items ........................................................................................................................................ 23
Task 15: Create Barcodes by Item ......................................................................................................................................... 26
Task 16: Printing Barcodes .................................................................................................................................................... 27
Task 17: Create Barcodes Batches *...................................................................................................................................... 28
Task 18: Create Class/Price Barcodes * ................................................................................................................................. 30
Task 19: Returns - Pending Chargebacks * ............................................................................................................................ 31
Task 20: Using The Management Report Generator (MRG) * .............................................................................................. 33
Task 21: Price Changes * ....................................................................................................................................................... 35
Task 21: Continued: Confirm Price Changes* ....................................................................................................................... 37
Task 22: Transfers (Shipping Store) ....................................................................................................................................... 39
Task 23: Transfers (Receiving Store) ..................................................................................................................................... 40
Task 24: Purchase Adjustments ............................................................................................................................................ 41

MBS Systems Training 3 ARC - Merchandise Guidebook.docx
Task 25: Shrinkage Adjustments ........................................................................................................................................... 43
Appendix A ............................................................................................................................................................................ 44
MBS POS Supported Barcode Formats ............................................................................................................................. 44
Appendix B ............................................................................................................................................................................ 47
Buyers Report Decision Tree ............................................................................................................................................. 47
MBS Systems Training 4 ARC - Merchandise Guidebook.docx
Task 1: Navigating to Merchandise in Arc Step# Step Reference
1 Using your user profile and password Sign In on to Arc – The Arc portal will appear
2 Click “Merchandise and Accounting” tile - the Merchandise section of Arc will appear
3 Click the desired menu option in the menu on the top of the screen
Task Complete
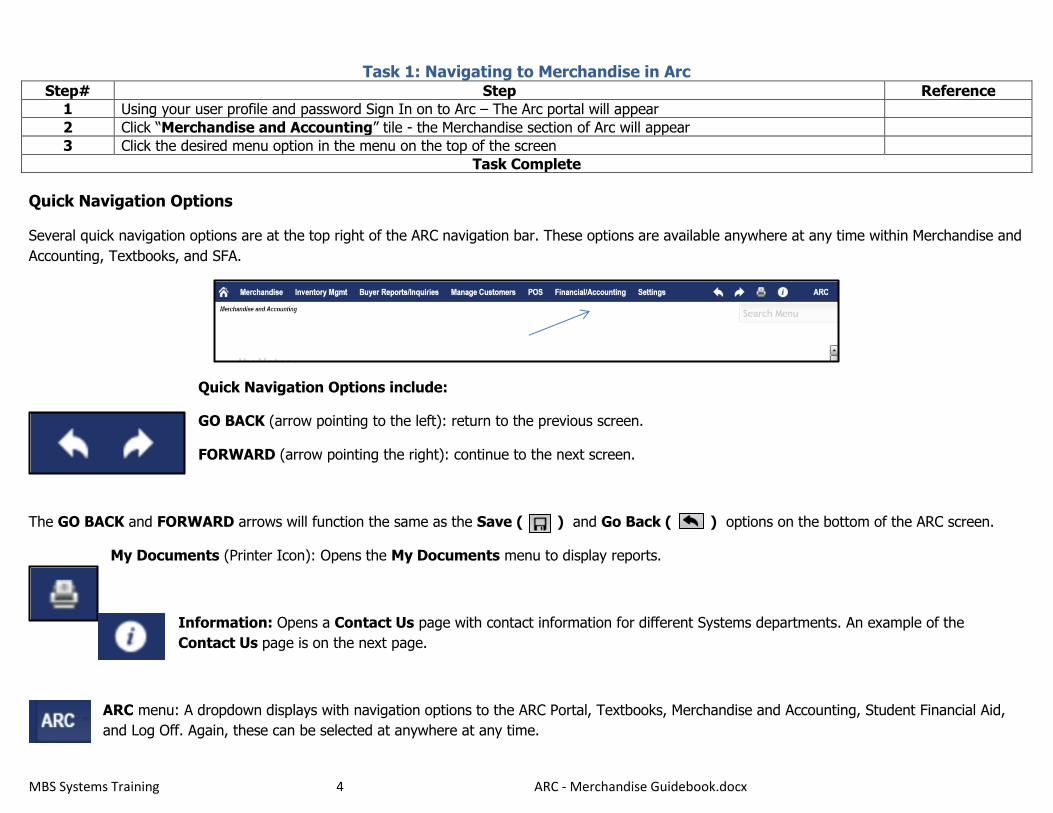
Quick Navigation Options
Several quick navigation options are at the top right of the ARC navigation bar. These options are available anywhere at any time within Merchandise and
Accounting, Textbooks, and SFA.
Quick Navigation Options include:
GO BACK (arrow pointing to the left): return to the previous screen.
FORWARD (arrow pointing the right): continue to the next screen.
The GO BACK and FORWARD arrows will function the same as the Save ( ) and Go Back ( ) options on the bottom of the ARC screen.
My Documents (Printer Icon): Opens the My Documents menu to display reports.
Information: Opens a Contact Us page with contact information for different Systems departments. An example of the
Contact Us page is on the next page.
ARC menu: A dropdown displays with navigation options to the ARC Portal, Textbooks, Merchandise and Accounting, Student Financial Aid,
and Log Off. Again, these can be selected at anywhere at any time.

MBS Systems Training 5 ARC - Merchandise Guidebook.docx

MBS Systems Training 6 ARC - Merchandise Guidebook.docx
Feature: Search Menu
The Search Menu option is available to quickly find and navigate to menu options. A suggestion feature is built into the search.
1. The Search Menu box is available on the top right of screen below the navigation bar.
2. Type the option you are looking for in the Search Menu box (i.e. Vendor). A dropdown appears with different menu options that contain the word
you searched.
3. The dropdown displays a suggested menu based on what was typed. Open the correct menu by clicking from the Search Menu dropdown.
MBS Systems Training 7 ARC - Merchandise Guidebook.docx
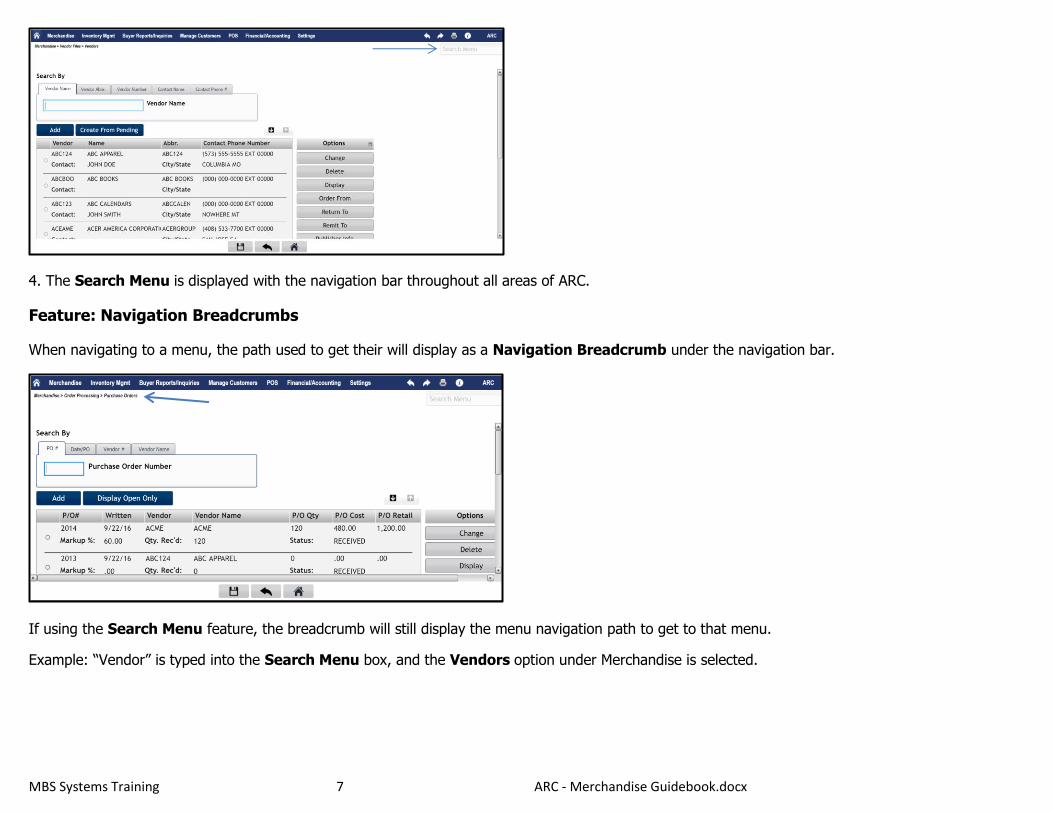
4. The Search Menu is displayed with the navigation bar throughout all areas of ARC.
Feature: Navigation Breadcrumbs
When navigating to a menu, the path used to get their will display as a Navigation Breadcrumb under the navigation bar.
If using the Search Menu feature, the breadcrumb will still display the menu navigation path to get to that menu.
Example: “Vendor” is typed into the Search Menu box, and the Vendors option under Merchandise is selected.

MBS Systems Training 8 ARC - Merchandise Guidebook.docx
The Vendors screen displays with the Navigation Breadcrumb showing the path to reach this option.

MBS Systems Training 9 ARC - Merchandise Guidebook.docx
Feature: My Notes
The home screen will display a My Notes box. Any notes typed in this box will display anytime the home screen is displayed in Merchandise and
Accounting, Textbooks, and SFA. These notes are user specific, and they will remain on the home screen until deleted.

MBS Systems Training 10 ARC - Merchandise Guidebook.docx
Task 2: Add Vendor Step# Step Reference
1 Click “Merchandise” in top menu.
2 Click “Vendor files”
3 Click “Vendors”
4 Click “Add”
5 Enter Vendor number (3 characters of the first name followed by 3 characters of the last name)
6 Enter Vendor Name, Address, City, State, Country, Zip code, Postal code (if applicable)
7 Enter Rep name Rep email, Rep phone number, Rep fax number (if available)
8 Enter Vendor phone an fax number (if available)
9 Select vendor type (B=books, M=merchandise, etc.)
10 Enter Vendor abbreviation
11 Select buyer (if applicable)
12 Select Prepaid “yes” or “no”
13 Click to Save/Update changes.
14 Enter Global discount %, Global freight % (if applicable)
15 Enter Vendor min ship amount, Vendor Min. ship Units
16 Enter Receiver EDI number (if applicable)
17 Enter Sender EDI ship to number (if applicable)
18 Enter Sender EDI Vill to number (if applicable)
19 Enter EDI Trading ID (if applicable)
20 Enter payment terms (if applicable)
21 Enter Vendor account number (Store’s account number with that vendor)
22 Enter ship via and freight (if applicable)
23 Enter FOB point and shipping point (optional)
24 Click to Save/Update changes.
25 Fill out “Return to” form
26 Click to Save/Update changes.
27 Fill out “Remit to” form
28 Click to Save/Update changes.
29 Fill out Textaid publisher with the Publisher/Vendor ID from TAonline
30 Click to Save/Update changes.
Task Complete
Task 2 Notes & Tips: General note: When creating a new vendor not all information is available at this moment. It is perfectly fine to add things like Rep Name, E-Mail, or Vendor Account number when that information becomes available.

MBS Systems Training 11 ARC - Merchandise Guidebook.docx
Task 3: Add Item to Merchandise Items Menu
Step# Step Reference
1 Click “Merchandise,” then click “Maintain Items”
2 Click “Merchandise Item”
3 Click “Add”
4 UPC/SKU entry
IF Then
Item has a barcode Type the barcode on the “Item” field [leave off the check digit (last digit on the right)]
Item does not have a barcode Leave the “Item” field blank
5 Type an Item Description
6 Select Class
7 Enter Primary UPC, if applicable (only for items with SKU number)
8 Select Primary Vendor
9 Enter Vendor Style (if available)
10 Select Buyer Code
11 Select Default UM (as necessary) See Task 5
12 Enter SKU Cost (three decimal places)
13 Serialized Item? – Click “Yes” if this item will require a serialized barcode (as necessary)
14 Enter Current Retail (two decimal places) (System will calculate Gross Margin %)
15 Select Non Merch Code for Fees (as necessary)
16 Logo, Color, Size – Select appropriate group codes (as necessary)
17 Enter Barcode Ticket Type (HY=Hang Tag w/ Retail, HN=Hang Tag w/o Retail, MY=Sticky Tag w/ Retail, MN=Sticky Tag w/o Retail, UY=UPC w/ Retail, UN=UPC w/o Retail, BM=Book Merchandise)
See Appendix A
18 Select Kit Item: Y(es) or N(o) (if this record is a KIT Header) See Task 6
19 Select Season Code (as necessary)
20 Select Event (as necessary)
21 Click “”, the second screen of Item Entry appears.
22 Exclude from Item Discount? – Click “Yes” to prevent cashiers from doing an “Item Discount” for this item
23 Exclude from Transaction Discount? –Click “Yes”, this item will be excluded from blanket Transaction Discounts at the register (as necessary)
Exclude from Loyalty Redemption? Click “Yes” or “No”
24 Require Customer Information at POS? – Automatically sets to “Yes” for Serialized Items
25 Enter Order Minimum/Maximum (used with Replenishment)
26 Minimum/Maximum Units –Enter Minimum and Maximum units to keep in stock (used with Suggested Order Report and Replenishment)
27 Enter Lead Time (as necessary)
28 Enter Vendor Minimum Order (as necessary)
29 Enter Item Weight Pounds/Oz, if applicable
30 Enter Discontinue Date, if applicable

MBS Systems Training 12 ARC - Merchandise Guidebook.docx
31 Click “”
Task Complete
Task 3 Notes & Tips: Step 4: UPC barcodes typically have 8, 12, or 13 digits. Regardless of the UPC barcode type, ALWAYS leave off the last digit on the right (check digit). Step 4: IF, you choose to scan the barcode on the item, rather than hand keying a barcode, make sure the scanner is programmed to leave off the check digit on the end! Step 4: When a record is created for an item with a 13 digit barcode, a System Assigned SKU will automatically generate for that item. The 12 digit barcode (13 less the check digit) will move to the “Primary UPC” line and a UPC Translation (Task 2) will be created for that item. Step 4: Some items you sell (batteries) will have barcodes that frequently change. In this case, consider creating a System Assigned SKU for the item and using UPC Translation (see Task 2) to input the new barcode each time it changes. This way, as the barcode changes for the item, the new barcodes will still scan and sales for the item will always point to the same record. Step 5: Be consistent with the descriptions you create. Creating a naming convention (Item: Model, ex. Batteries: D) that is easy to remember will keep you from creating double entries for a SKU. Also, be aware that the description will print on cash register receipts. Step 13 & 24: There are procedures for serializing an item. Make sure all the necessary steps are complete before you click “Yes.” Step 27: Lead Time is the number of weeks from the order date until the item is usually shipped
MBS Systems Training 13 ARC - Merchandise Guidebook.docx
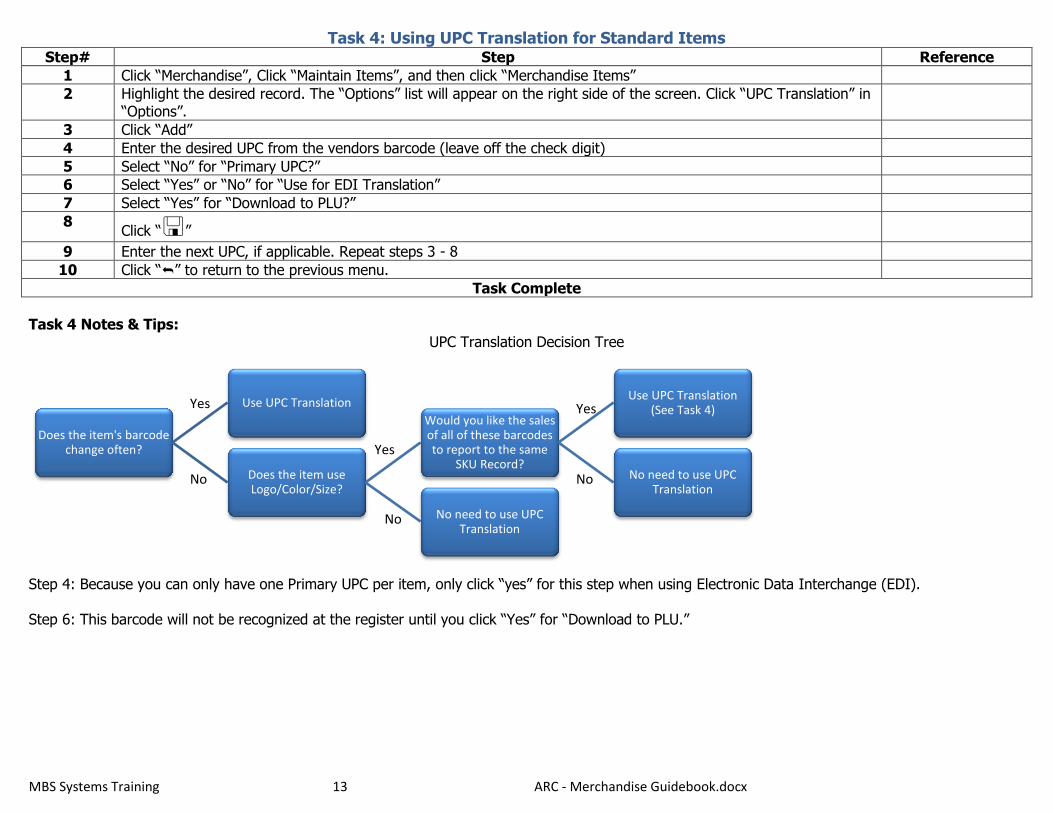
Task 4: Using UPC Translation for Standard Items Step# Step Reference
1 Click “Merchandise”, Click “Maintain Items”, and then click “Merchandise Items”
2 Highlight the desired record. The “Options” list will appear on the right side of the screen. Click “UPC Translation” in “Options”.
3 Click “Add”
4 Enter the desired UPC from the vendors barcode (leave off the check digit)
5 Select “No” for “Primary UPC?”
6 Select “Yes” or “No” for “Use for EDI Translation”
7 Select “Yes” for “Download to PLU?”
8 Click “”
9 Enter the next UPC, if applicable. Repeat steps 3 - 8
10 Click “” to return to the previous menu.
Task Complete
Task 4 Notes & Tips:
UPC Translation Decision Tree
Step 4: Because you can only have one Primary UPC per item, only click “yes” for this step when using Electronic Data Interchange (EDI). Step 6: This barcode will not be recognized at the register until you click “Yes” for “Download to PLU.”
Does the item's barcode change often?
Use UPC Translation
Does the item use Logo/Color/Size?
Would you like the sales of all of these barcodes to report to the same
SKU Record?
Use UPC Translation (See Task 4)
No need to use UPC Translation
No need to use UPC Translation
Yes
Yes
Yes
No
No
No
MBS Systems Training 14 ARC - Merchandise Guidebook.docx
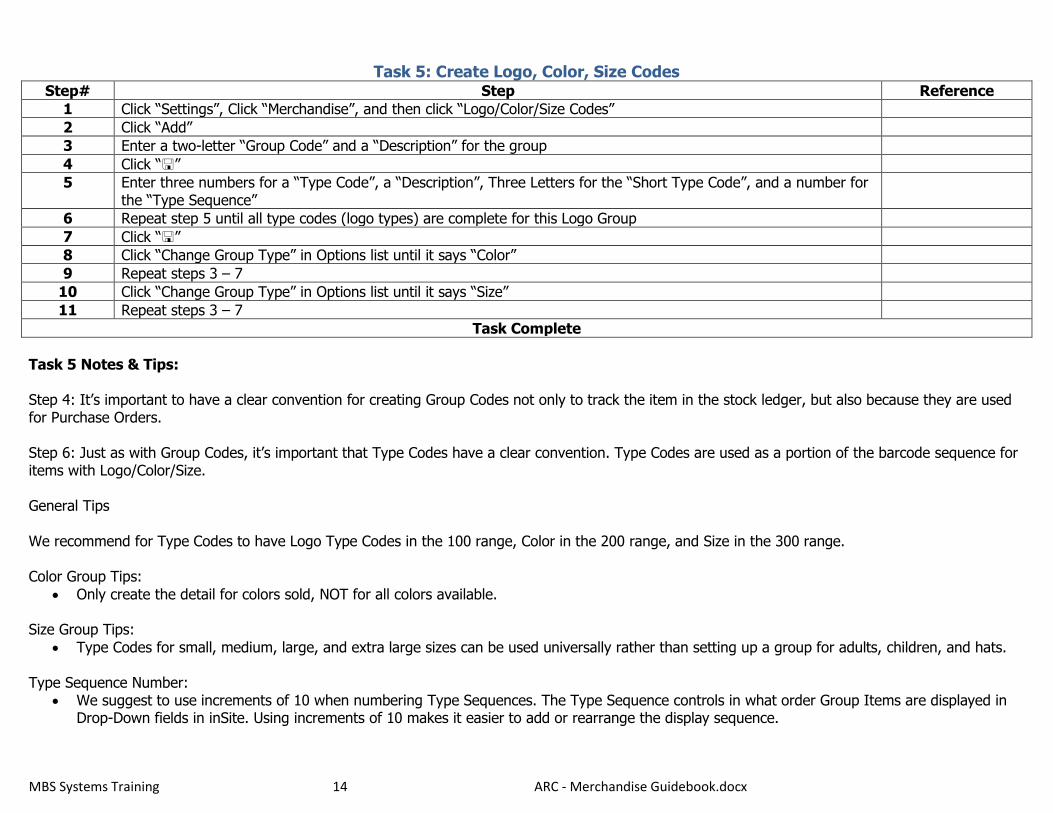
Task 5: Create Logo, Color, Size Codes Step# Step Reference
1 Click “Settings”, Click “Merchandise”, and then click “Logo/Color/Size Codes”
2 Click “Add”
3 Enter a two-letter “Group Code” and a “Description” for the group
4 Click “”
5 Enter three numbers for a “Type Code”, a “Description”, Three Letters for the “Short Type Code”, and a number for the “Type Sequence”
6 Repeat step 5 until all type codes (logo types) are complete for this Logo Group
7 Click “”
8 Click “Change Group Type” in Options list until it says “Color”
9 Repeat steps 3 – 7
10 Click “Change Group Type” in Options list until it says “Size”
11 Repeat steps 3 – 7
Task Complete
Task 5 Notes & Tips: Step 4: It’s important to have a clear convention for creating Group Codes not only to track the item in the stock ledger, but also because they are used for Purchase Orders. Step 6: Just as with Group Codes, it’s important that Type Codes have a clear convention. Type Codes are used as a portion of the barcode sequence for items with Logo/Color/Size. General Tips We recommend for Type Codes to have Logo Type Codes in the 100 range, Color in the 200 range, and Size in the 300 range. Color Group Tips:
Only create the detail for colors sold, NOT for all colors available. Size Group Tips:
Type Codes for small, medium, large, and extra large sizes can be used universally rather than setting up a group for adults, children, and hats. Type Sequence Number:
We suggest to use increments of 10 when numbering Type Sequences. The Type Sequence controls in what order Group Items are displayed in Drop-Down fields in inSite. Using increments of 10 makes it easier to add or rearrange the display sequence.

MBS Systems Training 15 ARC - Merchandise Guidebook.docx
Task 6: Using UPC Translation for Items with Logo, Color, Size Step# Step Reference
1 Click “Merchandise”, Click “Maintain Items”, and then click “Merchandise Items”
2 Highlight the desired record. The “Options” list will appear on the right side of the screen. Click “UPC Translation” in “Options”.
3 Click “Add”
4 Select a Logo, Color. and Size
5 Enter the desired UPC from the vendor’s barcode (leave off the check digit)
6 Select “No” for “Primary UPC?”
7 Select “Yes” or “No” for “Use for EDI Translation”
8 Select “Yes” for “Download to PLU?”
9 Click “”
10 Enter the next UPC, if applicable. Repeat steps 3 – 9.
11 Click “” to return to the previous menu.
Task Complete
Task 6 Notes & Tips: General Tips Using this option for items with Logo/Color/Size helps manage inventory in the following ways:
History for all combinations are on one base SKU Reports can be generated either by type codes or base SKU Min/Max levels can be established by type codes (if using replenishment)

MBS Systems Training 16 ARC - Merchandise Guidebook.docx
Task 7: Add Items with a Unit of Measure Step# Step Reference
Set up a U/M Code (Unit of Measure)
1 Click “Settings”, Click “Merchandise”, and then click “U/M Codes”
2 Click “Add”
3 Enter a two letter U/M Code and a U/M Code Description
4 Click “”
Create Item
5 Task 3 Task 3
Item Unit of Measure Assignment
6 Click “Settings”, Click “Merchandise”, and then click “Item/UM Assignment”
7 Click “Add”
8 Select “SKU Number”
9 Select “U/M Code”
10 Enter “Selling Units per a U/M”
11 Enter “U/M list cost”
12 Enter “U/M current retail”
13 Click “”
Add Unit of Measure to Item Record in Merchandise Items Menu
14 Task 3, Step 11 Task 3, Step 11
Task Complete
Task 7 Notes & Tips: Required fields “U/M Code”, “Selling Units per a U/M”, “U/M list cost” and “U/M current retail” are marked with an “*”. Step 11: When adding cost, enter cost for individual item (not the cost for the package/box, etc). Step 14: Only attach a U/M Code if you ALWAYS order this item by that Unit of Measure. As long as you’ve completed the Unit of Measure Assignment (Task 7, Steps 7-13), the U/M can still be assigned during Purchase Order creation.

MBS Systems Training 17 ARC - Merchandise Guidebook.docx
Task 8: Set Up Kits Step# Step Reference
1 Create all SKU Records (components) that will be included in the Kit first
Create the Kit SKU
2 Click “Merchandise,” then click “Maintain Item”, and then click “Merchandise Item”
3 Click “Add”
4 Create a SKU for the Kit (leave Item number field blank and click “”
5 Enter an Item (kit) description
6 Enter the SKU Cost and Current Retail (if known)
7 Select Kit item “yes” and click “” then click “”
8 Click “Kit Item Maint.” tab in the tab bar.
9 Enter “Comp. Qty.”
10 Select “Item #” for the first item
11 Repeat steps 9 & 10 for every item included in the kit
12 Note the Total Component Cost and Retail as well as the Kit Cost and Retail
13 Click “”
14 Change the Kit Cost and Current Retail (as needed) compared with step 12
15 Click “”
Task Complete
General Notes about Kits: Before completing an Inventory, review kits and disassemble (Task 8) any kits if necessary. Task 8 Notes & Tips: Assigning Class for Kit Items: Use the class of the components of the Kit. If not all items in the kit are part of the same class, it is suggested to use the
class with the most items in the Kit. Assigning Vendor for Kit Items: Use the vendor of the components of the Kit. If not all items in the kit are ordered from the same vendor, it is suggested
to use the vendor with the most items in the Kit. Step 5: It is suggested to use “Kit” as the first word as part of the item description. This will make it easier to locate Kit items in the future.

MBS Systems Training 18 ARC - Merchandise Guidebook.docx
Task 9: Assemble and Post Kits Step# Step Reference
Assemble a Kit
1 Click “Merchandise”, click “Maintain Item”, and then click “Kit Item Assembly”
2 Enter a Batch Number (any number) (batch number can be reused once the kit is posted)
3 Select the Batch Date
4 Click “”
5 Select the appropriate Store
6 Select the Kit SKU
7 Enter Kit Quantity (to create)
8 Click “”
9 Complete the Assembly
If Then
There are enough item quantities to assemble the desired kits
Click “” (Once Posted) Inventory for the items in that kit will be deducted from the SKU record)
There are not enough item quantities to assemble the desired kits
Click “” twice, a soft warning will display each time. Click “” (Inventory for kit items will be deducted from the SKU record and will have a negative balance until they are received and posted)
Post a Kit Assembly
10 Click ““ to return to the “Merchandise”/ “Maintain Item” menu
11 Click “Post Kit Assembly”
12 Verify Posting Month and Year
13 Click “”
Task Complete
Task 9 Notes & Tips:
Task 10: Kit SKU Disassembly Step# Step Reference
1 Begin Process for Kit SKU Assembly and Posting (Task 9) Task 9
2 Insert a negative quantity for “Task 9, Step 7 Enter Kit Quantity” (ex. -10) Task 9
3 Complete Task 9, Steps 8-13 Task 9
Task Complete
Task 10 Notes & Tips: General Note: Once posted, Kit Item quantities are removed from their Component Item Inventory.
MBS Systems Training 19 ARC - Merchandise Guidebook.docx
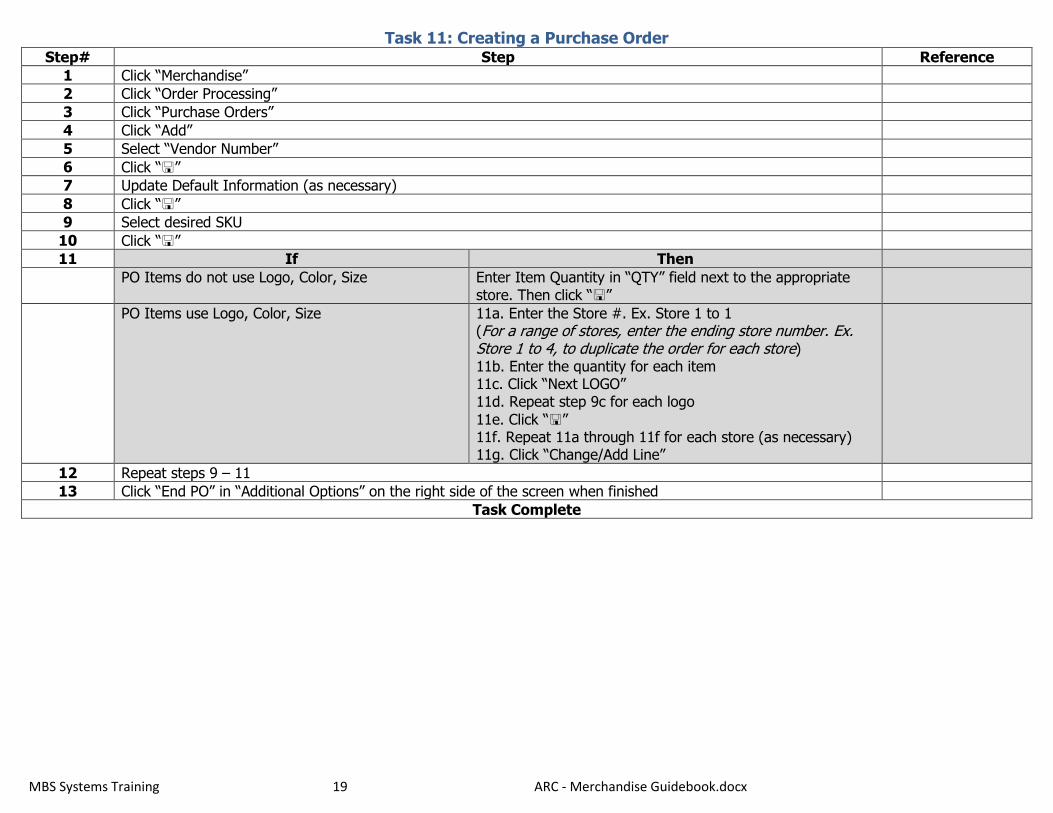
Task 11: Creating a Purchase Order Step# Step Reference
1 Click “Merchandise”
2 Click “Order Processing”
3 Click “Purchase Orders”
4 Click “Add”
5 Select “Vendor Number”
6 Click “”
7 Update Default Information (as necessary)
8 Click “”
9 Select desired SKU
10 Click “”
11 If Then
PO Items do not use Logo, Color, Size Enter Item Quantity in “QTY” field next to the appropriate store. Then click “”
PO Items use Logo, Color, Size 11a. Enter the Store #. Ex. Store 1 to 1 (For a range of stores, enter the ending store number. Ex. Store 1 to 4, to duplicate the order for each store) 11b. Enter the quantity for each item 11c. Click “Next LOGO” 11d. Repeat step 9c for each logo
11e. Click “” 11f. Repeat 11a through 11f for each store (as necessary) 11g. Click “Change/Add Line”
12 Repeat steps 9 – 11
13 Click “End PO” in “Additional Options” on the right side of the screen when finished
Task Complete

MBS Systems Training 20 ARC - Merchandise Guidebook.docx
Task 11a: Printing Purchase Order Step
1 Click “Merchandise”, click “Order Processing”
2 Click “Purchase Orders”
3 Select/Highlight Purchase Order
4 Click “Print P/O”
5 Select Range or individual P/O
6 Click “Select”
7 Click “”
8 Select one of the “Sort Sequence” Items
9 Click “Yes” or “No” to printing Retail prices and Cost
10 Click “Yes” or “No” to printing Vendor Style instead of ISBN
11 Click “Yes” or “No” to printing to print UPC instead of System Assigned SKU
12 Click “”
Task Complete
Task 11 Notes & Tips:
Step 12: Verify quantities and markup % for accuracy before clicking “.” General Tips: To view items on the Purchase Order, click the drop-down arrow on the “Line” field at Task 11 Step 9.

MBS Systems Training 21 ARC - Merchandise Guidebook.docx
Task 12: Send PLU to POS Step# Step Reference
1 Click “POS”, and click “Sales Processing”
2 Click “Transfer PLU Changes to POS”
3 Highlight desired store
4 Click “Send PLU”, “Send AR”, or “Send Rental” (as needed)in Options on the right.
5 If Then
In a Single Store Environment Select “All Items”, or “Updates Only” (as needed)
In a Multiple Store Environment 5a. Click “All Items” to send every item on file with this PLU 5b. Click “Updates Only (Save for Next Send)” to send new updates to your store and allow those updates to be sent to other stores 5c. Click “Updates Only (Final Send)” to send new updates to your store and clear the update file
6 Click “”
7 Select Items to send (Ta2, Merchandise, UPC, Non-Merchandise, Rental Serials, or Rental Customer)
8 Click “”
9 Click “” to return to the previous menu.
Task Complete
Task 12 Notes & Tips: Note: It may take up to 15 minutes until the changes reach the registers. Warning: Using ”All Items” option during store open hours might slow down registers. Do better after hours when store is closed

MBS Systems Training 22 ARC - Merchandise Guidebook.docx
Task 13: Set Up UPC Codes for POS Download
Step# Step Reference
1 Click “Settings”, then click “POS”
2 Click “UPC Codes for POS Download”
3 Click “Add”
4 Enter a UPC Code (leave off the check digit)
5 Enter a Description
6 Select a Class
7 Enter a Retail Price
8 Enter a Non-Merchandise Code for Fees (as necessary)
9 Click “”
Task Complete
Task 13 Notes & Tips: General Note: UPC codes entered here cannot be the same codes used in item entry in Task 3. UPC codes entered in “UPC codes for POS Download” only
track sales on class, not on item level. They are used to allow scanning of item barcodes for quicker sales at the register, but not intended for item sale tracking.
Note: To submit UPC Codes for POS Download to POS follow the instructions in Task 12.

MBS Systems Training 23 ARC - Merchandise Guidebook.docx
Task 14: Receiving Standard Items Step# Step Reference
Create Keyrec Header
1 Click “Merchandise”, click “Receiving”, and then click “Enter Receiving”
2 Click “Add” to create a new Keyrec.
3 Select Receiving Store via drop down.
4 Select “Print barcodes” yes/no (default is no).
5 Select “Collect” yes/no (default is no).
6 Confirm “Month/Year to post” (default is the current open month)
7 Select Vendor via drop down
8 Select Receiving Method (drop down)
If Then
If you are receiving trade books and you want the quantity of items ordered to default as the quantity received
Select #1 “Receive Books, Default QTY”
If you are receiving trade books and you DO NOT want the quantity of items ordered to default as the quantity received
Select #2 “Receive Books, Default QTY No”
If you are receiving Type Code Merchandise and you want the quantity of items ordered to default as the quantity received
Select #1 “Receive Type Merch, Default QTY”
If you are receiving Type Code Merchandise and you DO NOT want the quantity of items ordered to default as the quantity received
Select #2 “Receive Type Merch, Default QTY No”
You want the quantity of items ordered to default as the quantity received
Select #5 “Receive Merch, Default QTY”
You DO NOT want the quantity of items ordered to default as the quantity received
Select #6 “Receive Merch, Default QTY, No”
9 Click “”
Attach Purchase Order
10 If Then
A Purchase Order is listed that contains items on this shipment
Highlight the desired Purchase Order and click “Enter Receiving”
There are no Purchase Orders listed that contain items on this shipment
10a. Click “Add” 10b. Select the Purchase Order # (drop down). Highlight PO, Click “Select” 10c. Click “Yes” or “No” to Print Barcodes 10d. Select Receive Only for Store (as necessary) 10e. Enter other known information in available areas 10f. Click “”

MBS Systems Training 24 ARC - Merchandise Guidebook.docx
Task 14: Receiving Standard Items Continued Attach Invoice
11 If Then
The Invoice for this shipment is listed Select the Invoice and click “Assign to Keyrec”
You have the Invoice BUT it is not listed 11a. Click “Add” 11b. Enter the Invoice Information
11c. Click “”
You do not have the Invoice for this shipment Click “”
12 Edit “QTY Rec’d” (as necessary)
Edit Cost/Retail
13 If Then
The cost on the Invoice is different from the cost on the Purchase Order
13a. Click “Edit Cost/Retail” 13b. Edit Item Cost and Retail (as necessary)
13c. Click “”
Exceptions
14 If Then
Shipment does not include all quantities, or an item is damaged
11a. Click “Exceptions” 11b. Add Exception Quantity 11c. Select Exception Code
11d. Click “”
12 Click “”
High light Keyrec
13 Click “Print Edit” (as necessary)
14 Click “Print Barcodes (as necessary)
15 Click “Post” (required for finalizing receiving and updating stockledger)
Task Complete

MBS Systems Training 25 ARC - Merchandise Guidebook.docx
Task 14 Notes & Tips: Step 13: If the user can change cost and/or retail depends on store settings. Step 11: Attach invoice: If the user made a mistake entering the invoice, e.g. invoice amount wrong, do the following to correct invoice information:
Step# Step Reference
Attach invoice: Correct invoice mistakes
1 Click until you are back in the “Enter Receiving” screen
2 Highlight the Keyrec for editing
3 Click “Attach PO Information”
4 Highlight PO and click “Change”
5 Click “Invoicing” (button on upper right side)
6 Highlight invoice to edit and click “Change”
7 The screen brings up the invoice information and corrections can be made
8 Click “Continue” when done. Precede as normal with receiving.
Step 13: The system can be set up so that cost/retail is edited after, rather than during receiving. Step 14: Exception Codes are an advanced system feature. An alternate step to completing Exception Codes is to alter the quantity received (as necessary) and add a “Receiving Line Message” to annotate the discrepancy. General Notes IF an item is on the shipment that is not on the Purchase Order (demo items, etc), select “Non PO Merch” from the receiving menu to add the item to the receiving list.
MBS Systems Training 26 ARC - Merchandise Guidebook.docx
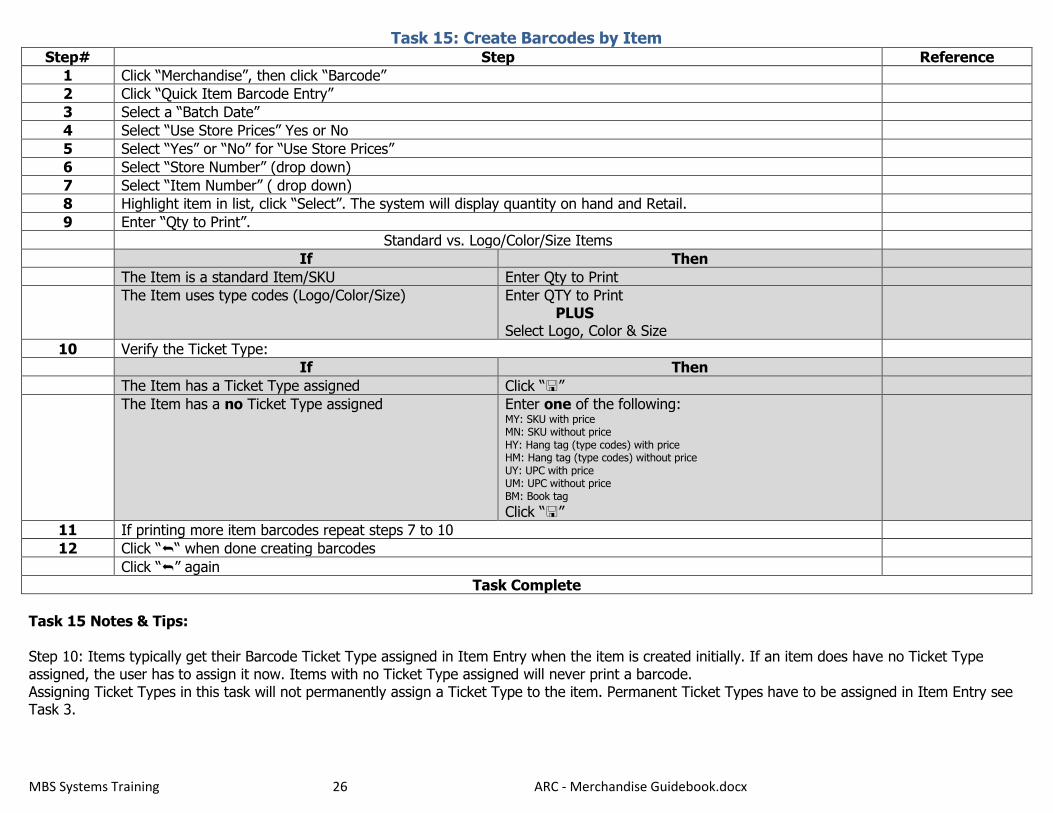
Task 15: Create Barcodes by Item Step# Step Reference
1 Click “Merchandise”, then click “Barcode”
2 Click “Quick Item Barcode Entry”
3 Select a “Batch Date”
4 Select “Use Store Prices” Yes or No
5 Select “Yes” or “No” for “Use Store Prices”
6 Select “Store Number” (drop down)
7 Select “Item Number” ( drop down)
8 Highlight item in list, click “Select”. The system will display quantity on hand and Retail.
9 Enter “Qty to Print”.
Standard vs. Logo/Color/Size Items
If Then
The Item is a standard Item/SKU Enter Qty to Print
The Item uses type codes (Logo/Color/Size) Enter QTY to Print PLUS Select Logo, Color & Size
10 Verify the Ticket Type:
If Then
The Item has a Ticket Type assigned Click “”
The Item has a no Ticket Type assigned Enter one of the following: MY: SKU with price MN: SKU without price HY: Hang tag (type codes) with price HM: Hang tag (type codes) without price UY: UPC with price UM: UPC without price BM: Book tag
Click “”
11 If printing more item barcodes repeat steps 7 to 10
12 Click ““ when done creating barcodes
Click “” again
Task Complete
Task 15 Notes & Tips: Step 10: Items typically get their Barcode Ticket Type assigned in Item Entry when the item is created initially. If an item does have no Ticket Type assigned, the user has to assign it now. Items with no Ticket Type assigned will never print a barcode. Assigning Ticket Types in this task will not permanently assign a Ticket Type to the item. Permanent Ticket Types have to be assigned in Item Entry see Task 3.
MBS Systems Training 27 ARC - Merchandise Guidebook.docx
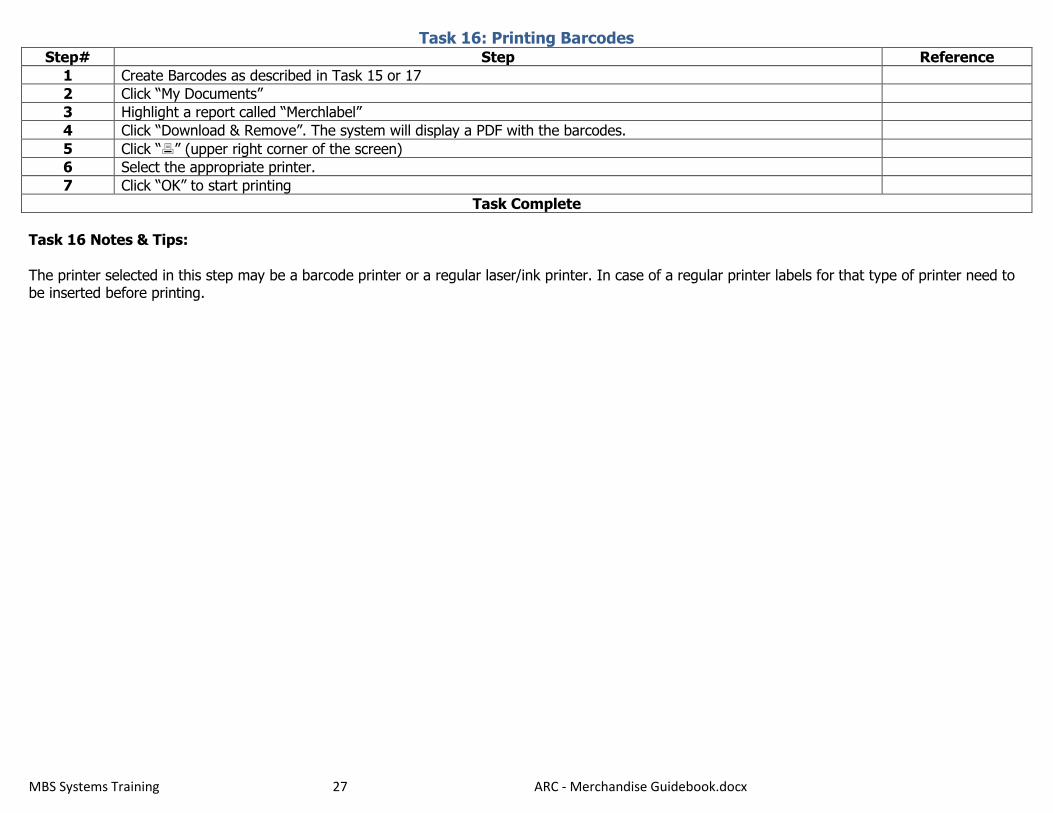
Task 16: Printing Barcodes Step# Step Reference
1 Create Barcodes as described in Task 15 or 17
2 Click “My Documents”
3 Highlight a report called “Merchlabel”
4 Click “Download & Remove”. The system will display a PDF with the barcodes.
5 Click “” (upper right corner of the screen)
6 Select the appropriate printer.
7 Click “OK” to start printing
Task Complete
Task 16 Notes & Tips: The printer selected in this step may be a barcode printer or a regular laser/ink printer. In case of a regular printer labels for that type of printer need to be inserted before printing.

MBS Systems Training 28 ARC - Merchandise Guidebook.docx
Task 17: Create Barcodes Batches * Step# Step Reference
1 Click “Merchandise”, then click “Barcode”
2 Click “Create Barcode Entry”
3 Click “Add”
4 Enter “Batch Date” (optional)
5 Enter “Batch Number” (optional)
6 Select “Use Store prices” Yes or No
7 Enter “Default Store for manual entry” (optional)
8 Select “Add items for selected P/O’s” Yes or No
9 Click “”
10 If Then
10a Add items for selected P/O’s was YES Select PO from list (drop down) or type PO number Verify items on PO. If item should not print barcodes, highlight item and click “Delete”
If list contains all items for barcode printing, click “” Continue with step 16
10b Add items for selected P/O’s was NO Continue with step 11
11 Select “Item Number” ( drop down)
12 Highlight item in list, click “Select”. The system will display quantity on hand and Retail.
13 Enter “Qty to Print”.
If Then
13a The Item is a standard Item/SKU Enter Qty to Print
13b The Item uses type codes (Logo/Color/Size) Enter QTY to Print PLUS Select Logo, Color & Size
14 Verify the Ticket Type:
If Then
14a The Item has a Ticket Type assigned Click “”
14b The Item has a no Ticket Type assigned Enter one of the following: MY: SKU with price MN: SKU without price HY: Hang tag (type codes) with price HM: Hang tag (type codes) without price UY: UPC with price UM: UPC without price BM: Book tag
Click “”
15 If printing more item barcodes repeat steps 7 to 10
16 Click ““ when done creating barcodes
17 Click “” again
18 Highlight Barcode Batch to print.
19 Click “Print Barcode Tags”
Task Complete

MBS Systems Training 29 ARC - Merchandise Guidebook.docx
Task 17 Notes & Tips: Step 10a & 14: The user has to verify that the item has a Ticket Type assigned. Items typically get their Barcode Ticket Type assigned in Item Entry when the item is created initially. If an item does have no Ticket Type assigned, the user has to assign it now. Items with no Ticket Type assigned will never print a barcode. Assigning Ticket Types in this task will not permanently assign a Ticket Type to the item. Permanent Ticket Types have to be assigned in Item Entry see Task 3.

MBS Systems Training 30 ARC - Merchandise Guidebook.docx
Task 18: Create Class/Price Barcodes * Step# Step Reference
1 Click “Merchandise”, then click “Barcode”
2 Click “Create Class/Price Barcodes”
3 Select “Class Number” (drop down or type)
4 Highlight class
5 Click “Select”
6 Enter “Retail Price”
7 Enter “# of Tickets to print”
Repeat steps 3 to 7 if applicable.
6 Click “”, Click “”
Task Complete
Task 18 Notes & Tips:

MBS Systems Training 31 ARC - Merchandise Guidebook.docx
Task 19: Returns - Pending Chargebacks * Step# Step Reference
1 Click “Merchandise”, click “Returns”, and then click “Pending Chargebacks”
2 Click “Add”
3 Select a Vendor
4 Select “Display Method” (drop down) 1=Books, 2=Merchandise
5 Select “Reason for Return Code”
6 Enter a Description
7 Enter Shipping Charges, Number of Cartons, and Shipping Method (as necessary)
8 Enter Comments (for the Vendor) (as necessary)
9 Enter Notes (as necessary)
10 Click “”, then click “”
11 Select the Chargeback Header, then click “Work with Returns”
12 Click “Add”
13 Select Store and SKU
14 Select a Logo/Color/Size (as necessary)
15 Enter a Quantity to Return
16 Click “”
17 If Then The correct invoice for the item is displayed AND it includes the
appropriate quantity of items to return Enter “Qty of Return” Click “”
If the correct invoice for the item is not displayed OR the invoices listed, do not cover the total number of items to return
17a. Click “Add” 17b. Enter the appropriate information 17c. Click “” 17d. Once all item quantities are accounted for, click “”, click “”.
18 Repeat step 17 (as necessary)
19 Once all items and matched invoices have been added, click “”
20 Select the Chargeback Header and click “Print Edit”
21 Pull up the report in “My Documents” and verify the list for accuracy
22 Make any changes to the Pending Chargeback (as necessary)
23 Highlight Chargeback Header
24 Click “Print Permission” (if applicable)
25 Click “Return Authorization” (if applicable)
26 Click “Print Pick Sheet” (if applicable)
27 Click “Print CB”
28 Select the Chargeback Header and click “Post”
Task Complete
Task 19 Notes & Tips: General Note: After Step 2, you do not need to select “Yes” or “No” for “Permission Letter Required.” The system will generate a letter based on how the vendor is set up in “Vendor Files.”
MBS Systems Training 32 ARC - Merchandise Guidebook.docx
Step 7: This information is informational only, but prints on the Edit List and Posting Journal. Step 9: Notes are for internal use only. Step 17: Even though the vendor may not require an invoice for a return, the system requires items to be matched to an invoice. Step 17: Invoices are displayed when:
The invoice has been posted in Accounts Payable or The invoice has been matched in “Enter/Match Invoices PO’s” on the Receiving Menu
MBS Systems Training 33 ARC - Merchandise Guidebook.docx
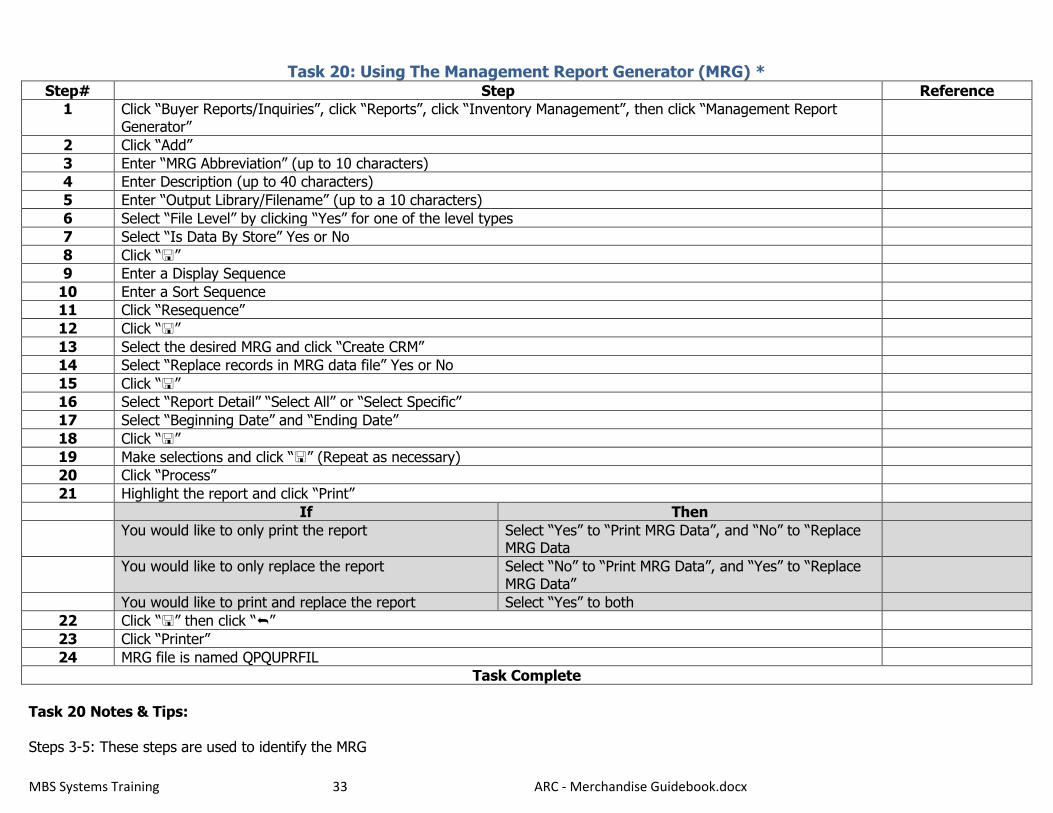
Task 20: Using The Management Report Generator (MRG) * Step# Step Reference
1 Click “Buyer Reports/Inquiries”, click “Reports”, click “Inventory Management”, then click “Management Report Generator”
2 Click “Add”
3 Enter “MRG Abbreviation” (up to 10 characters)
4 Enter Description (up to 40 characters)
5 Enter “Output Library/Filename” (up to a 10 characters)
6 Select “File Level” by clicking “Yes” for one of the level types
7 Select “Is Data By Store” Yes or No
8 Click “”
9 Enter a Display Sequence
10 Enter a Sort Sequence
11 Click “Resequence”
12 Click “”
13 Select the desired MRG and click “Create CRM”
14 Select “Replace records in MRG data file” Yes or No
15 Click “”
16 Select “Report Detail” “Select All” or “Select Specific”
17 Select “Beginning Date” and “Ending Date”
18 Click “”
19 Make selections and click “” (Repeat as necessary)
20 Click “Process”
21 Highlight the report and click “Print”
If Then
You would like to only print the report Select “Yes” to “Print MRG Data”, and “No” to “Replace MRG Data
You would like to only replace the report Select “No” to “Print MRG Data”, and “Yes” to “Replace MRG Data”
You would like to print and replace the report Select “Yes” to both
22 Click “” then click “”
23 Click “Printer”
24 MRG file is named QPQUPRFIL
Task Complete
Task 20 Notes & Tips: Steps 3-5: These steps are used to identify the MRG

MBS Systems Training 34 ARC - Merchandise Guidebook.docx
Step 6: This criterion determines how the data is displayed. Select “Yes” for the desired level. Step 7: When “No” is selected in a multi-store environment, a companywide report is generated. Step 9: Fields to be displayed are selected by entering a number in this column. The numerical assignment determines the order the fields appear on the report. A field can contain up to 3 digits. Step 10: Use this column to sequence the “Display Sequence” fields on the report - by entering a number in this column. A field can contain up to 3 digits. Step 14: This field determines whether data is added or replaced in the existing file. If “No” is selected, new data is added to the file. If “Yes” is selected, new data replaces the existing data. Step 16: The Select All criterion allows you to define each area more specifically. By selecting “No” to any of the levels, a specific range, non-sequential range or single item can be entered.
Step 18: When “No” is selected for any Select All criterion, click “” to enter the specific level selections. For a sequential range, use the “Beginning” and “Ending” fields. Single or non-sequential numbers are entered in the grid.

MBS Systems Training 35 ARC - Merchandise Guidebook.docx
Task 21: Price Changes * Step# Step Reference
1 Click “Merchandise” and then click “Price Changes”
Click “Enter Price Changes”
2 Click “Add”
3 Click Radio Buttons for selections
If Then
You want a Permanent Price Change Select “Yes” to Markdown or Markup Select “Yes” to Update Item Master Select “Yes” to Confirm Quantities
You want to record a Donation/ Store use Select “Yes” to Markdown
4 Select “Store Number”, leave blank for all stores
5 Click “”
6 Select “Effective date of price change”
7 Select “Month/year to update inventory” (current period defaults)
8 Select “Default quantity on hand to price change quantity: Yes or No
9 Select “Update Item retail on all open purchase orders” Yes or No; if yes select Vendor
10 Select “Update Item cost in master file” Yes or No; if yes select Vendor
11 Select “Buyer code” (if applicable)
12 Select “Default Reason Code”
13 Enter commend (recommended for audit purposes)
14 Click “”
15 Select “Default as Accepted” yes (defaults price changes as accepted in next screen so you don’t have to click and accept each item.)
16 Select “Accept if cost is greater than new retail?” Yes allows for sell out, No, will not accept change
17 Select Division, Department, Class if applicable
18 IF you selected “Yes” to “Item Selection”, an additional screen will appear. Enter as many SKU’s as necessary and edit the Retail price. Then click “.”
19 IF you selected “NO” to “Item Selection”, specify item.
20 Select Vendor, Season, Event, Buyer, Subject if applicable
22 Select “Include even if set to no item discounts in Item maintenance?” Yes or No
23 Select “Include even if set to no transaction discounts in Item maintenance?” Yes or No
24 Select Discount method (Dollar Change, Percent Change, Minimum Markup %) NOTE: If using the “Percent Change” option, enter with no decimal places. (ex. 20 = 20%,)
25 Click “”
26 Highlight items to accept price change and click “Accept” Delete Items that you don’t want included in the price change.
27 Highlight the Price Change Header and click “Edit Listing” and “Price Analysis Report” (as necessary) **Print Price Analysis Report before Posting Price Change Batches!
28 Select the Price Change Header and click “Create bar codes” (as necessary)
MBS Systems Training 36 ARC - Merchandise Guidebook.docx
29 Select the Price Change Header and click “Post / Create PC”
Task Complete
Note: Price Changes need to be confirmed to become effective. Please see next page for instructions.

MBS Systems Training 37 ARC - Merchandise Guidebook.docx
Task 21: Continued: Confirm Price Changes* Step# Step Reference
1 Click “Merchandise”, click “Price Changes” and then click “Confirm Price Changes”
2 Highlight the batch and click “Confirm Detail”
3 Enter the Quantity Amounts and click “”
Task Complete
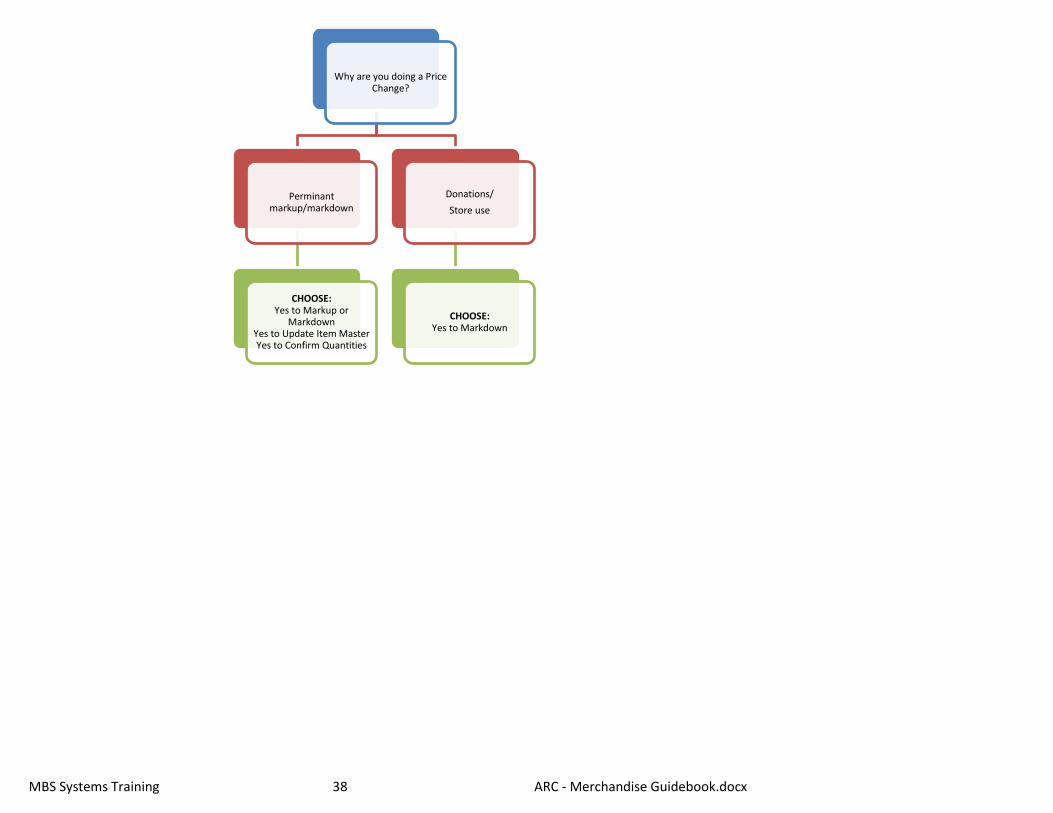
Task 21 Notes & Tips: Two types of price changes (1) Permanent Click “Yes” for Markup or Markdown Click “Yes” for “Update SKU Master” Select “Yes” or “No” for “Confirm Quantities”
Click “” For “Default quantity on hand to price change quantity? Click “Yes” will fill in quantity line when you confirm price change quantities. Say “Yes” to “Update SKU retail on all purchase orders” Saying “Yes” to “Update SKU cost in master file” allows you to update the cost in the price changes menu. If you select this option, you also have to select the Primary Vendor. Select Items for Price Change(s) Enter Price Change amount/% Click “” (2) Stockledger Adjustments CONFIRM Price Changes Highlight the batch and click “Confirm Detail” Enter the Quantity Amounts Click “Forward”
MBS Systems Training 38 ARC - Merchandise Guidebook.docx
Why are you doing a Price Change?
Perminant markup/markdown
CHOOSE: Yes to Markup or
Markdown Yes to Update Item Master Yes to Confirm Quantities
Donations/
Store use
CHOOSE: Yes to Markdown
MBS Systems Training 39 ARC - Merchandise Guidebook.docx
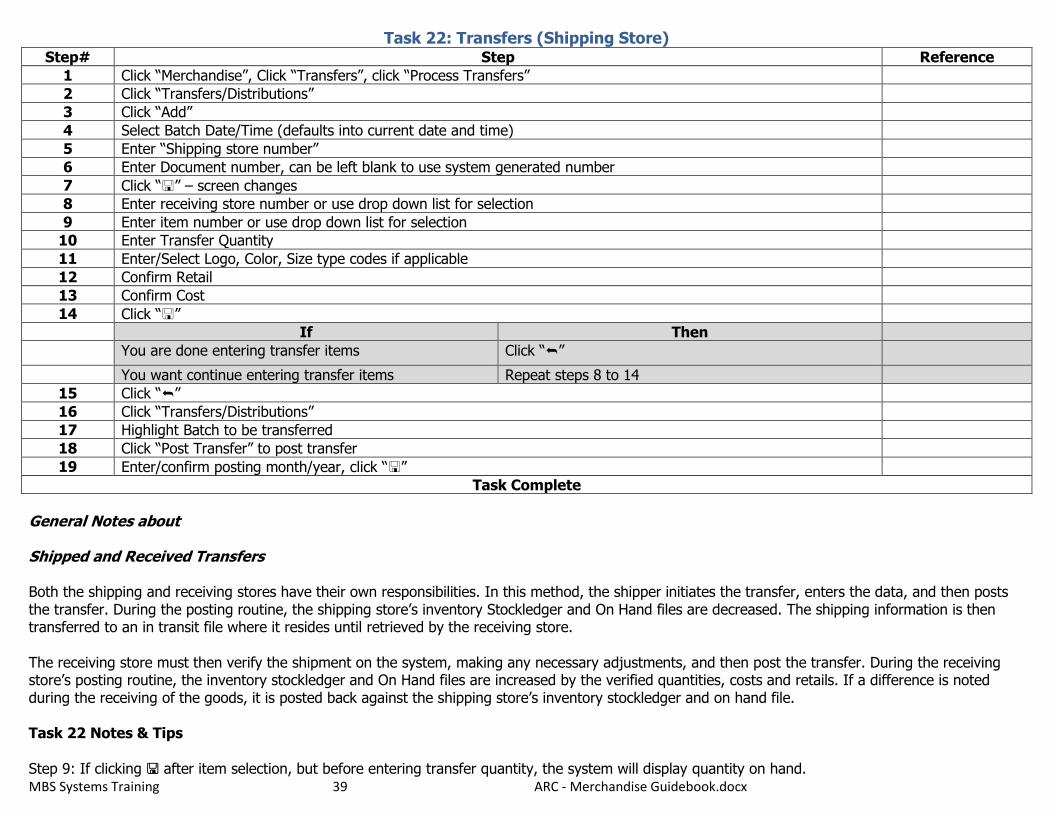
Task 22: Transfers (Shipping Store) Step# Step Reference
1 Click “Merchandise”, Click “Transfers”, click “Process Transfers”
2 Click “Transfers/Distributions”
3 Click “Add”
4 Select Batch Date/Time (defaults into current date and time)
5 Enter “Shipping store number”
6 Enter Document number, can be left blank to use system generated number
7 Click “” – screen changes
8 Enter receiving store number or use drop down list for selection
9 Enter item number or use drop down list for selection
10 Enter Transfer Quantity
11 Enter/Select Logo, Color, Size type codes if applicable
12 Confirm Retail
13 Confirm Cost
14 Click “”
If Then
You are done entering transfer items Click “”
You want continue entering transfer items Repeat steps 8 to 14
15 Click “”
16 Click “Transfers/Distributions”
17 Highlight Batch to be transferred
18 Click “Post Transfer” to post transfer
19 Enter/confirm posting month/year, click “”
Task Complete
General Notes about Shipped and Received Transfers Both the shipping and receiving stores have their own responsibilities. In this method, the shipper initiates the transfer, enters the data, and then posts the transfer. During the posting routine, the shipping store’s inventory Stockledger and On Hand files are decreased. The shipping information is then transferred to an in transit file where it resides until retrieved by the receiving store. The receiving store must then verify the shipment on the system, making any necessary adjustments, and then post the transfer. During the receiving store’s posting routine, the inventory stockledger and On Hand files are increased by the verified quantities, costs and retails. If a difference is noted during the receiving of the goods, it is posted back against the shipping store’s inventory stockledger and on hand file. Task 22 Notes & Tips
Step 9: If clicking after item selection, but before entering transfer quantity, the system will display quantity on hand.

MBS Systems Training 40 ARC - Merchandise Guidebook.docx
Task 23: Transfers (Receiving Store) Step# Step Reference
1 Click “Merchandise”, click “Transfers”, click “Process Transfers”
2 Click “Received Transfers”
3 Highlight transfer document, Click “Work with Details”
4 Verify transferred quantities
If Then
You quantiles are wrong Highlight item and click “Change” and adjust quantity.
Click “”
You quantities are correct Click “”
5 Highlight Transfer batch and click “Release no exceptions”
6 Enter/ confirm release date, click “”
7 Release status changes to “R”
8 Highlight Transfer batch and click “Post/Transfer”
9 Enter/ confirm posting month and year, Click “”
10 Posting status changes to “Y”
11 Click “”
Task Complete
General Notes: Shipped and Received Transfers Both the shipping and receiving stores have their own responsibilities. In this method, the shipper initiates the transfer, enters the data, and then posts the transfer. During the posting routine, the shipping store’s inventory stockledger and On Hand files are decreased. The shipping information is then transferred to an in transit file where it resides until retrieved by the receiving store. The receiving store must then verify the shipment on the system, making any necessary adjustments, and then post the transfer. During the receiving store’s posting routine, the inventory stock ledger and On Hand files are increased by the verified quantities, costs and retails. If a difference is noted during the receiving of the goods, it is posted back against the shipping store’s inventory stockledger and on hand file. Correcting Errors In the event of an error in quantities, the receiving store merely enters the correct quantity prior to releasing the transfer. During posting, the difference reverts back to the shipping store’s inventory and On Hand file. The stockledger detail shows the original quantity and the difference in the ship/receive quantities.
DO NOT delete a batch; quantities are not returned to the shipping store.
MBS Systems Training 41 ARC - Merchandise Guidebook.docx
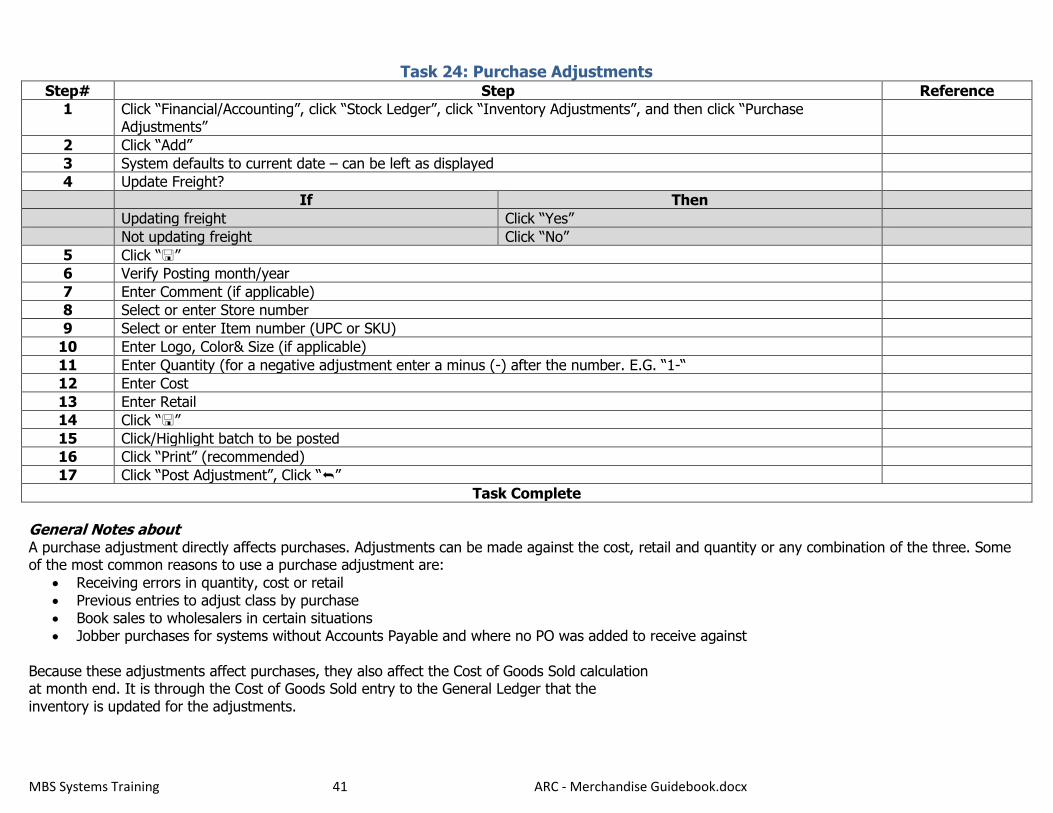
Task 24: Purchase Adjustments Step# Step Reference
1 Click “Financial/Accounting”, click “Stock Ledger”, click “Inventory Adjustments”, and then click “Purchase Adjustments”
2 Click “Add”
3 System defaults to current date – can be left as displayed
4 Update Freight?
If Then
Updating freight Click “Yes”
Not updating freight Click “No”
5 Click “”
6 Verify Posting month/year
7 Enter Comment (if applicable)
8 Select or enter Store number
9 Select or enter Item number (UPC or SKU)
10 Enter Logo, Color& Size (if applicable)
11 Enter Quantity (for a negative adjustment enter a minus (-) after the number. E.G. “1-“
12 Enter Cost
13 Enter Retail
14 Click “”
15 Click/Highlight batch to be posted
16 Click “Print” (recommended)
17 Click “Post Adjustment”, Click “”
Task Complete
General Notes about A purchase adjustment directly affects purchases. Adjustments can be made against the cost, retail and quantity or any combination of the three. Some of the most common reasons to use a purchase adjustment are:
Receiving errors in quantity, cost or retail Previous entries to adjust class by purchase Book sales to wholesalers in certain situations Jobber purchases for systems without Accounts Payable and where no PO was added to receive against
Because these adjustments affect purchases, they also affect the Cost of Goods Sold calculation at month end. It is through the Cost of Goods Sold entry to the General Ledger that the inventory is updated for the adjustments.
MBS Systems Training 42 ARC - Merchandise Guidebook.docx
Task 24 Notes & Tips Step 11, 12, 13: When making negative adjustments for quantity, cost and/or retail, ONLY the quantity is entered with the minus sign. If a minus sign is entered for both quantity and cost/retail, the adjustment will NOT reverse or reduce inventory.
MBS Systems Training 43 ARC - Merchandise Guidebook.docx
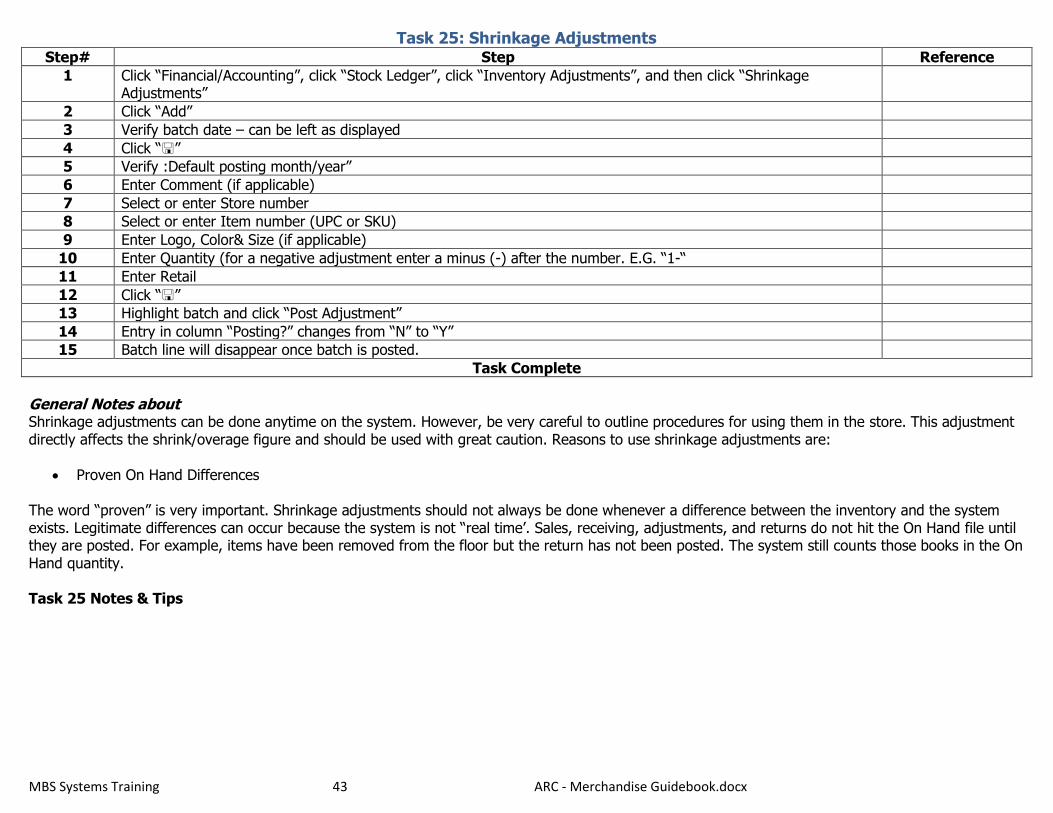
Task 25: Shrinkage Adjustments Step# Step Reference
1 Click “Financial/Accounting”, click “Stock Ledger”, click “Inventory Adjustments”, and then click “Shrinkage Adjustments”
2 Click “Add”
3 Verify batch date – can be left as displayed
4 Click “”
5 Verify :Default posting month/year”
6 Enter Comment (if applicable)
7 Select or enter Store number
8 Select or enter Item number (UPC or SKU)
9 Enter Logo, Color& Size (if applicable)
10 Enter Quantity (for a negative adjustment enter a minus (-) after the number. E.G. “1-“
11 Enter Retail
12 Click “”
13 Highlight batch and click “Post Adjustment”
14 Entry in column “Posting?” changes from “N” to “Y”
15 Batch line will disappear once batch is posted.
Task Complete
General Notes about Shrinkage adjustments can be done anytime on the system. However, be very careful to outline procedures for using them in the store. This adjustment directly affects the shrink/overage figure and should be used with great caution. Reasons to use shrinkage adjustments are:
Proven On Hand Differences The word “proven” is very important. Shrinkage adjustments should not always be done whenever a difference between the inventory and the system exists. Legitimate differences can occur because the system is not “real time’. Sales, receiving, adjustments, and returns do not hit the On Hand file until they are posted. For example, items have been removed from the floor but the return has not been posted. The system still counts those books in the On Hand quantity. Task 25 Notes & Tips
MBS Systems Training 44 ARC - Merchandise Guidebook.docx
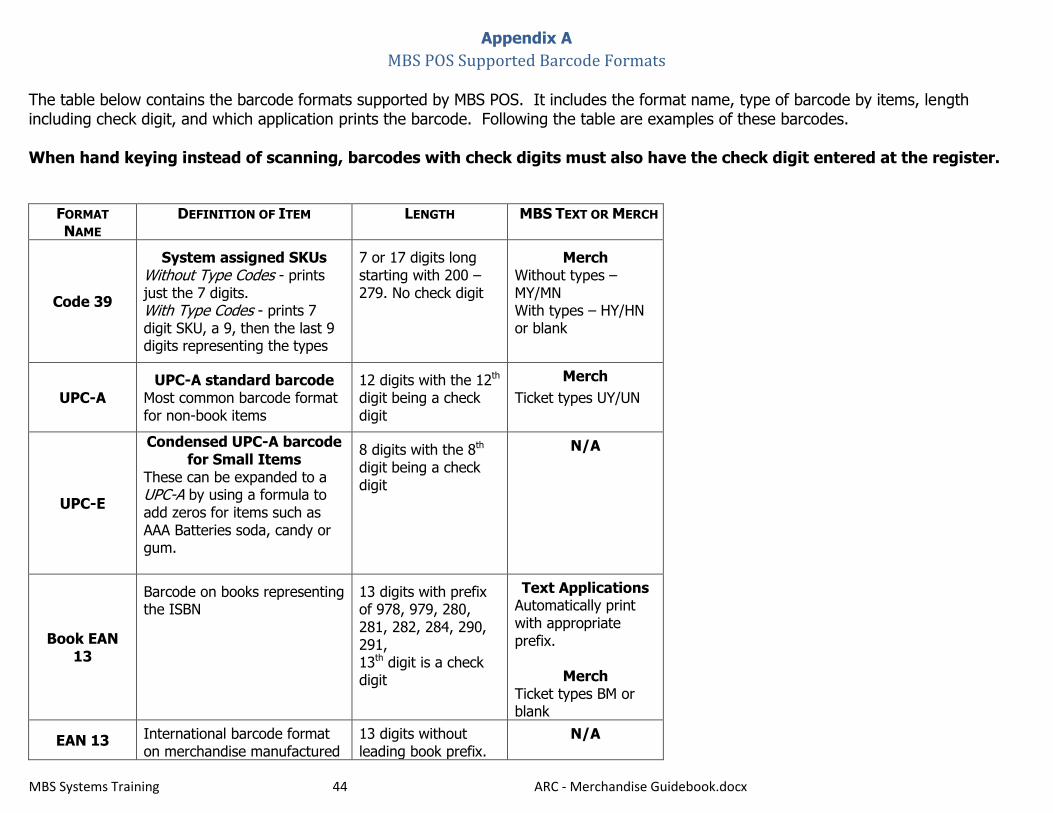
Appendix A
MBS POS Supported Barcode Formats
The table below contains the barcode formats supported by MBS POS. It includes the format name, type of barcode by items, length including check digit, and which application prints the barcode. Following the table are examples of these barcodes. When hand keying instead of scanning, barcodes with check digits must also have the check digit entered at the register.
FORMAT
NAME DEFINITION OF ITEM LENGTH MBS TEXT OR MERCH
Code 39
System assigned SKUs Without Type Codes - prints just the 7 digits. With Type Codes - prints 7 digit SKU, a 9, then the last 9 digits representing the types
7 or 17 digits long starting with 200 – 279. No check digit
Merch Without types – MY/MN With types – HY/HN or blank
UPC-A UPC-A standard barcode
Most common barcode format for non-book items
12 digits with the 12th digit being a check digit
Merch
Ticket types UY/UN
UPC-E
Condensed UPC-A barcode for Small Items
These can be expanded to a UPC-A by using a formula to add zeros for items such as AAA Batteries soda, candy or gum.
8 digits with the 8th digit being a check digit
N/A
Book EAN 13
Barcode on books representing the ISBN
13 digits with prefix of 978, 979, 280, 281, 282, 284, 290, 291, 13th digit is a check digit
Text Applications Automatically print with appropriate prefix.
Merch Ticket types BM or blank
EAN 13 International barcode format on merchandise manufactured
13 digits without leading book prefix.
N/A

MBS Systems Training 45 ARC - Merchandise Guidebook.docx
in a foreign company and not repackaged in US with a UPC-A barcode
13th digit is a check digit
EAN 8
International barcode format that is shorter than the EAN 13. Unlike the UPC-E format, it cannot be expanded out to a valid EAN 13.
8 digits with the 8th digit being a check digit
N/A
MBS Systems Training 46 ARC - Merchandise Guidebook.docx
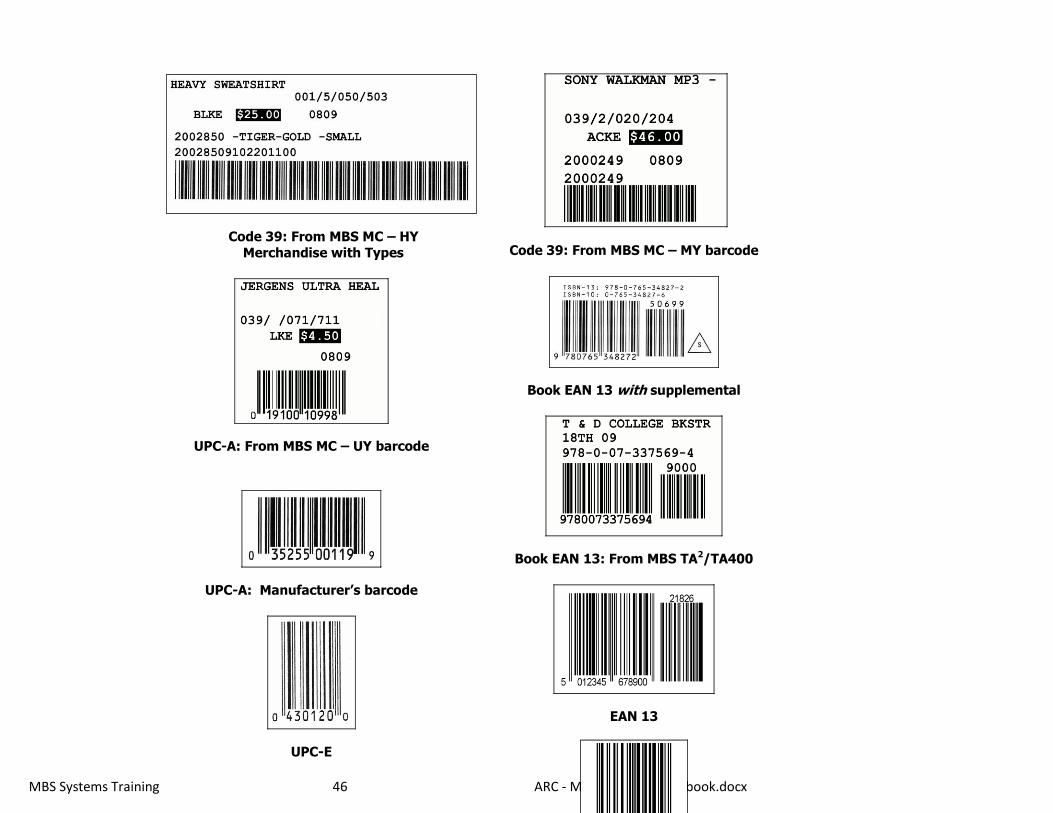
Barcode examples:
Code 39: From MBS MC – HY
Merchandise with Types
UPC-A: From MBS MC – UY barcode
UPC-A: Manufacturer’s barcode
UPC-E
Code 39: From MBS MC – MY barcode
Book EAN 13 with supplemental
Book EAN 13: From MBS TA2/TA400
EAN 13
EAN 8
MBS Systems Training 47 ARC - Merchandise Guidebook.docx
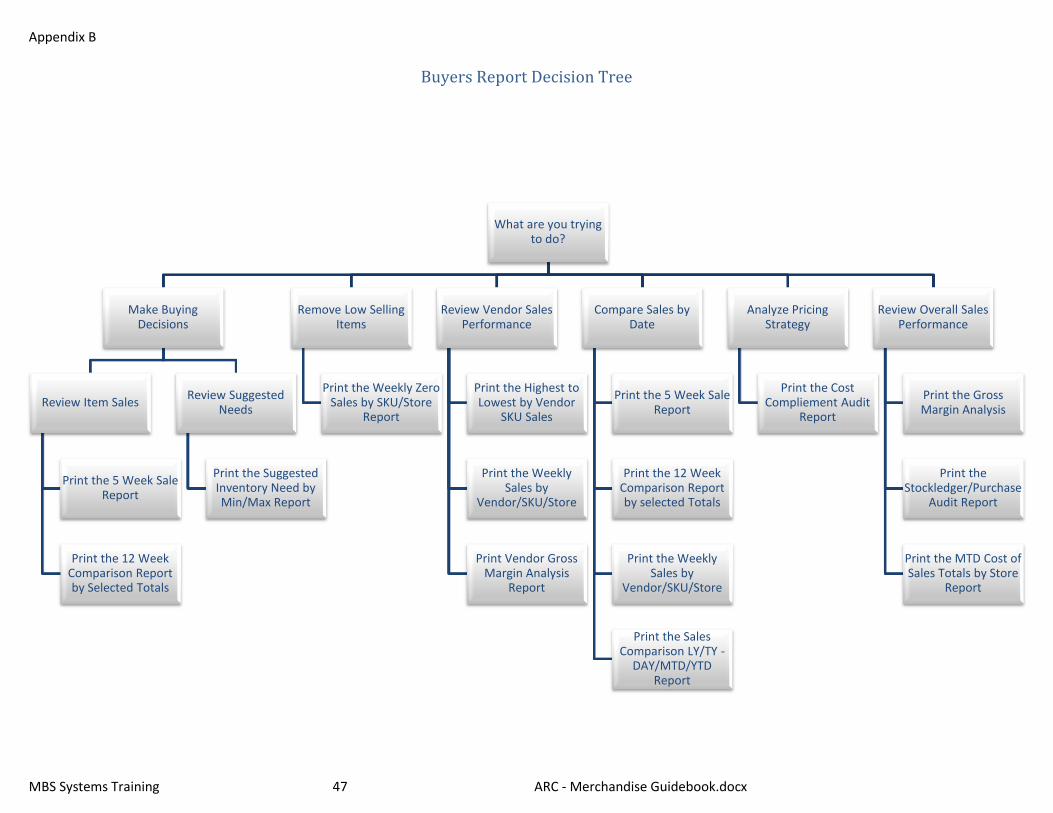
Appendix B
Buyers Report Decision Tree
What are you trying to do?
Make Buying Decisions
Review Item Sales
Print the 5 Week Sale Report
Print the 12 Week Comparison Report by Selected Totals
Review Suggested Needs
Print the Suggested Inventory Need by Min/Max Report
Remove Low Selling Items
Print the Weekly Zero Sales by SKU/Store
Report
Review Vendor Sales Performance
Print the Highest to Lowest by Vendor
SKU Sales
Print the Weekly Sales by
Vendor/SKU/Store
Print Vendor Gross Margin Analysis
Report
Compare Sales by Date
Print the 5 Week Sale Report
Print the 12 Week Comparison Report by selected Totals
Print the Weekly Sales by
Vendor/SKU/Store
Print the Sales Comparison LY/TY -
DAY/MTD/YTD Report
Analyze Pricing Strategy
Print the Cost Compliement Audit
Report
Review Overall Sales Performance
Print the Gross Margin Analysis
Print the Stockledger/Purchase
Audit Report
Print the MTD Cost of Sales Totals by Store
Report