GUIDE FOR INSTALLATION & USE Washing machine This washing machine comes with a manual containing...
52
GUIDE FOR INSTALLATION & USE Washing machine
Transcript of GUIDE FOR INSTALLATION & USE Washing machine This washing machine comes with a manual containing...

GUIDE FOR INSTALLATION & USE
Washing machine


Dear Costumer,
You have just acquired a BRANDT washing machine and we would like to thank you.
We have invested all our dedication and know-how in this appliance so that it wouldbest meet your needs. With innovation and performance, we designed it to be alwayseasy to use.
In the BRANDT product range, you will also find a wide choise of ovens, microwaves,cooking hobs, ventilation hoods, cookers, dishwashers, driers, fridges and freezers,that you can coordinate with your new BRANDT washing machine.
Visit our website www.brandt.com where you will find all of our products, as well asuseful and complementary information.
BRANDT
As part of our commitment to constantly improving our products, we reserve the rightto make changes to them based on technical advances to their technical and functionalfeatures and appearance.
Warning:Before installing and using your appliance, please carefully read this
Guide to Installation and Use, which will allow you to quickly familiarise youselfwith its operation.
www.brandt.com
3


6
7
8
12
21
23
26
WARNINGS
SPECIFICATIONS
INSTALLATION AND ASSEMBLY
USING THE APPLIANCE ANDPRACTICAL TIPS
MAINTENANCEAND CLEANING
SAFETY ANDTROUBLESHOOTING
ENVIRONMENTAL NOTICE
washing machinecontents

warnings
This washing machine comes with amanual containing operating, maintenanceand installation instructions. Please readthese instructions carefully before using theappliance.
Do not wash fabrics that have beenpreviously cleaned, washed, soaked ortreated with petrol, dry-cleaning solvents orother flammable or explosive substances,as they give off vapours that could catch fireor explode.
Do not pour petrol, dry-cleaning solventsor other flammable or explosive substancesinto the washing water, as they give offvapours that could catch fire or explode.
Do not repair or replace any parts of thewashing machine, and do not carry out anymaintenance operations on the applianceunless they are expressly authorised in themaintenance instructions provided in themanual.
Do not climb onto the appliance or leanon the open door.
Do not use extension leads or adaptersto plug the washing machine into the mains.
This washing machine must only be usedfor the purposes for which it has beendesigned.
Follow the washing instructionsrecommended by the manufacturer of thefabric to be washed.
Before starting up the washing machine,check the following:
• It has been installed in accordance withthe installation instructions.
• All the water, drainage, electrical and earthconnections comply with local regulationsand/or any other regulations in force.
This appliance is not designed to be usedby physically, sensorially or mentallyhandicapped people or people withoutexperience or knowledge of it (includingchildren), unless they are supervised orinstructed in the use of the appliance by aperson responsible for their safety.Children should be watched to ensure theydo not play with the appliance.
To prevent risk of fire, electric shock, personal injury or other damage when using thewashing machine, please take the following precautions:
6

7
washing machine
Water supply hose
specifications
ACCESSORIES
Electriccable
Controlpanel
Detergentdispenser
Drum
Accessible filter(behind the plinth)
Plinth
Drainhose
Loadingdoor
Levellingfeet
Top

8
washing machine
a Unscrew the screws holding the 3 plasticcover pieces in place, at the rear of thewashing machine.
b Unscrew and remove the 3 metal fixingflanges.
c Use the previously removed cover piecesto cover the holes.
installation and assembly
Keep the metal fixing flanges, as theywill be useful if you need to transportthe appliance at a later date.
Imp
ort
ant
a/c
a Remove the base, the corner pieces andthe top protection cover.
1 UNPACKING ANDUNBLOCKING THEWASHING MACHINE
UNBLOCKING
UNPACKING

9
CONNECTING THE WATER ANDDRAIN TUBES
The water supply hose is inside the drum.
a Connect the bent end of the tube to thegrooved input of the water valve on therear of the appliance.
b Connect the other end of the tube tothe water supply. Make sure you firmlytighten the locking nut.
installation and assembly
Make sure you connect the elbow ofthe water supply hose correctly, toavoid any risk of flooding.
If your washing machine allows forconnection to a hot water supplyintake, connect the red grooved tubeto the hot water tap and the watervalve to the red filter.
The washing machine must beconnected to the water supply usingthe new supply hoses provided withthe appliance. Do not use the oldsupply hoses. For the washingmachine to function correctly, thewater pressure should be between0.05 and 1 MPa (0.5 - 10 Kg/cm2).
a
a We recommend a drain hose fixed at adistance of 50 - 70 cm from the floor.Make sure the drain hose is not blocked,kinked or squashed.
2
CONNECTING THEWATER HOSE
CONNECTING THEDRAIN HOSE
Imp
ort
ant

Imp
ort
ant
Level the appliance using itsadjustable legs, to reduce noise andto stop the washing machine frommoving during washing.Do not pull the legs out too far, asthis will affect the stability of theappliance.For models with nuts, tighten the nutswith a spanner.
10
LEVELLING THE WASHING MACHINE ANDELECTRICAL CONNECTION
installation and assembly3
Consult the instruction plate on the washingmachine loading door before making theelectrical connection. Check the mains voltagecorresponds to the voltage indicated on theinstruction plate.Never remove the instruction plate, as itcontains important information.
ELECTRICAL CONNECTION
LEVELLING
Make sure your washing machine iscorrectly plugged into an earthed socket.
The electrical installation, plug, mainssocket and the fuses or automatic circuit-breaker and counter must withstand themaximum power indicated on theinstruction plate.
Never plug the washing machine into themains with wet or damp hands.
To unplug the appliance from the mains,pull on the plug. Never pull on the cable.
If the supply cable is damaged, it must bereplaced as soon as possible with a cableor special unit provided by themanufacturer or after-sales service.
For built-in washing machines, the mainsconnection plug must be accessible afterinstallation.
Imp
ort
ant
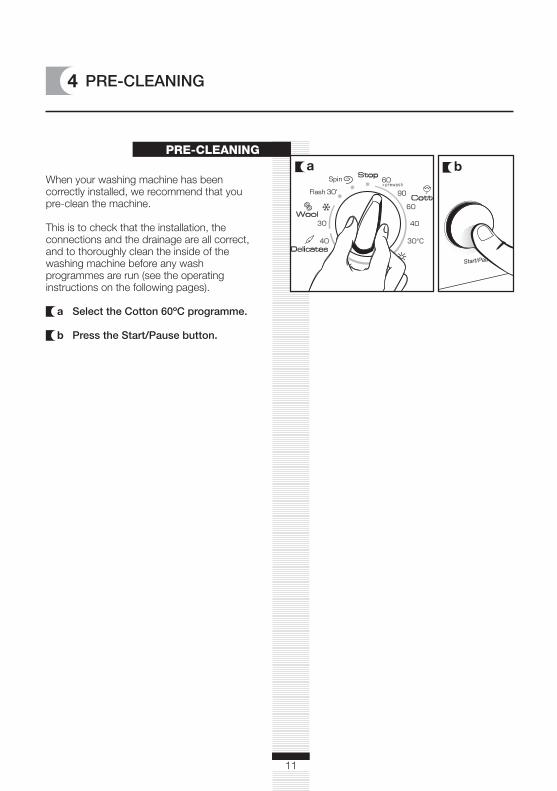
PRE-CLEANING
When your washing machine has beencorrectly installed, we recommend that youpre-clean the machine.
This is to check that the installation, theconnections and the drainage are all correct,and to thoroughly clean the inside of thewashing machine before any washprogrammes are run (see the operatinginstructions on the following pages).
a Select the Cotton 60ºC programme.
b Press the Start/Pause button.
11
4
PRE-CLEANING
Start/Pau
ba

12
washing machine
a Sort the clothes by fabric typeWe recommend using the delicateprogrammes for more fragile items. Usethe special wool wash programmes forwashing woollens.
b Sort the clothes by amount of soil• A short cold water programme is betterfor only slightly soiled clothes.• Use a programme without prewash ifthe clothes are not very soiled.• Only use the long programmes withprewash for very dirty items.
c Sort the clothes by colourWash whites and coloureds separately.
using the appliance and practical tips
Important
Make sure you empty the pockets ofthe clothes before you place them inthe drum.Small objects could block the drainpump.
PrewashWash
Wash
PREPARATION
1 PREPARINGGARNMENTS FORWASHING
30
60
90
40
Cold
Imp
ort
ant
We recommend you load yourwashing machine to the maximumlevel, to economise on water andpower.We advise washing items of differentsizes together whenever possible, asthis optimises the washing processand favours the distribution of theload inside the drum on spin-drying,reducing noise.Wash small delicate items in a netbag.
SORTING THE CLOTHES
If you wish to use thedrying programme, firstcheck that the fabric issuitable for machine-drying. Consult the label.
Check yourwoollens aremachine-washablebeforewashing them.
Imp
ort
ant

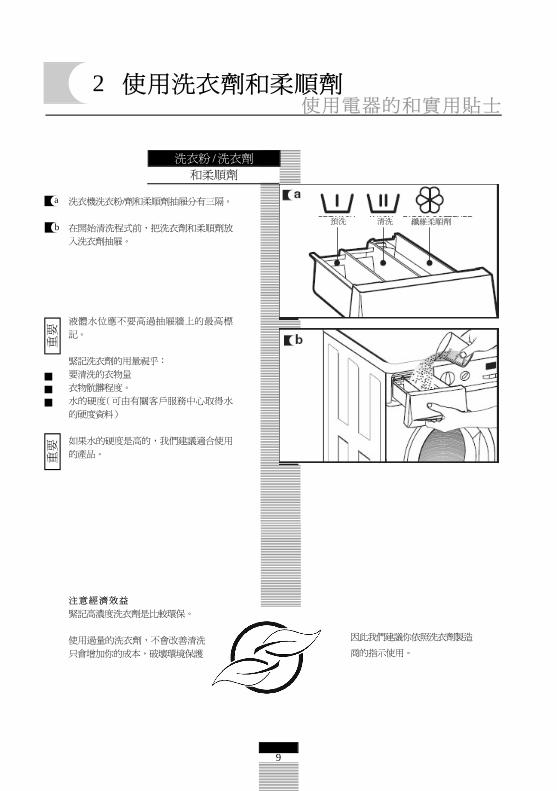
a The detergent drawer of your washingmachine is divided into 3 compartments.
b Before washing, place the detergent andadditives in their correspondingcompartments.
c You can also use liquid detergents in thewashing machine. To do this, use theoptional compartment, which you canacquire by contacting the TechnicalAssistance Service.
Install this optional compartment in placeof the wash compartment.
The compartments are marked witha MAX line to show the maximumlevel to which they can be filled.
Remember that the amount of detergent tobe used depends on:
The amount of clothes to be washed. How dirty the clothes are. The hardness of the water (to find out the
water hardness in your area, contact therelevant local authorities).
We recommend you use an anti-scaleproduct if you live in a hard waterarea.
13
2 USING DETERGENTS AND ADDITIVES
eco-note
using the appliance and practical tips
DETERGENTSAND ADDITIVES
Impo
rtan
tIm
port
ant
Remember you can buy concentrateddetergents which are more nature- andenvironment-friendly.
Using more detergent will not give youbetter wash results, and as well as
costing you money it will also have a negative effect on the environment.
We strongly recommend you follow thedetergent manufacturer’s instructions.
WASH FABRIC SOFTENERPREWASH
a
b
c

14
3 SELECTING THE WASHING AND DRYING PROGRAMMESusing the appliance and practical tips
To select a wash programme, proceed asfollows:
a Starting from the “Stop” position, thewashing machine will switch on whenyou select the desired wash programme(see programme chart).
b The “Stop” pilot light will start to flashon the control panel.
programmeselectordial
start/stopbutton
dryingtimebutton
spin dryselectorbutton
detergent compartment
complementary functions
intensivewashbutton
extrarinsebutton
easyironingbutton
b
a

15
using the appliance and practical tips
There are 6 programme types:
Cotton programmesSynthetic programmesDelicate programmesWool programmesDrying programmesAdditional programmes
eco-noteWe recommend you choose the programmebest adapted to the type of load, avoidingusing the prewash programme as far aspossible. You will save money andcontribute to protecting the environment.
To select the drying time, proceed asfollows:
a Select the drying time in minutes bypressing the drying time button.
The duration will appear on the display.Press this button several times toprogressively increase the drying time.
If you select a wash+dry function,make sure you do not exceed a loadof 4 Kg (or 1.5 Kg for delicate washprogrammes).
rying Time
a
Impo
rtan
t
Drying
P R O G R A M M E S
Cotton AdditionalSynthetic WoolDelicate
Synthetic 60ºCSynthetic 40ºC
78
Wool 30ºCWool cold
1213
Delicate 40ºCDelicate 30ºC
1011
Cotton-prewash 60ºCCotton 90ºCCotton 60ºCCotton 40ºCCotton 30ºC
12345
Normal dryDelicate dry
69
1415
Quick 30’Spin dry

ProgrammeRecommendedTemperature Fabric type
Extra
Rins
eIn
tens
ivewa
shEa
syirn
oning
Selec
tsp
in
Spin
supp
ress
Full t
ubsto
p
Cotton/Linenwhite/fast coloursheavy soil
Cotton/Linenwhiteheavy soil
Cotton/Linenfast coloursmedium soil
Cotton/Linenfast colourslight soil
Cotton/Linendelicate colourslight soil
Cotton/Linen
Synthetic/cotton mixwhite/fast coloursmedium soil
Synthetic/cotton mixdelicate coloursmedium soil
Synthetic/mix
Synthetic/cotton mixdelicate coloursmedium soil
Synthetic/cotton mixdelicate colourslight soil
Wool/wool mixwhite/colourlight soil
Wool/wool mixwhite/colourvery light soil
Cotton/linenwhite/colourvery light soil
Cotton/cotton mixsynthetic/Delicatewool/wool mix
(*) For wash and energy consumption programmes in accordance withregulation EN60456, press intensive wash button.
1
2
3
4
5 (*)
6
7
8
9
10
11
12
13
14
15
Cotton + Prewash 60ºC
Cotton 90ºC
Cotton 60ºC
Cotton 40ºC
Cotton 30ºC
Standard dry
Synthetic 60ºC
Synthetic 40ºC
Delicate dry
Delicate 40ºC
Delicate 30ºC
Wool 30ºC
Wool cold
Quick 30’
Spin dry
Cot
ton
pro
gram
mes
Woo
l P.
Del
icat
e P.
Dryin
g P.
Option buttons
WOOL 30
Cold
YES
YES
YES
NO
NO
NO
YES
YESI
YES
YES
YES
YES
YES
YES
YES
YES
YES
YES
YES
NO NO
Add
ition
al P
.Sy
nthe
tic P
.Dr
ying P
.
16
— – –
— – –

Detergentcompartment
ProgrammeDescription
Total consumption(kwh/litre)
Max.Load(kg)sto
p
Drain and long final spin
Prewash, standard wash, rinses,automatic additive absorptionif required and long final spin
Standard wash, rinses,automatic additiveabsorption if requiredand long final spin
SHORT wash, rinses,automatic additive absorptionif required and long final spin
17
NOTE: The consumptions in kW/h and litres and the programme durations may varydepending on the load type and size, water pressure, etc.
6
6
6
6
6
4
3
3
3
1,5
3
3
1
1
1,5
6
—
Approx.Duration(minutes)
1,45/60
1,90/55
1,02/49
0,65/49
0,40/49
2,8/48
1,8/27
1,00/55
0,60/55
1,2/26
0,60/55
0,35/55
0,50/60
1,00/55
0,20/30
0,05/0
105
120
91
87
82
160
100
70
55
95
65
60
40
30
30
10
Standard dry
Delicate wash, rinses,automatic additive absorptionif required and short final spin
— Delicate dry
Delicate wash, rinses,automatic additive absorptionif required and short final spin
WOOL wash, rinses,automatic additive absorptionif required and short final spin
—

18
4 SELECTING THE COMPLEMENTARY FUNCTIONSusing the appliance and practical tips
SPIN SPEED SELECTION
This option, specially recommended for heavilysoiled, stained clothes, achieves better resultsby extending the normal wash cycle.
The programme selected is associated witha certain spin speed.
a To change it, turn the spin speed selector.
b No spinTurn the spin speed selector to the “0”position to obtain a programme with nofinal spin, used to prevent particularlydelicate fabrics from creasing.
INTENSIVE WASH
The wash programme stops on the last rinse,with the clothes left in water. When the functionis deactivated, the washing machine continuesthe programme, draining and spin-drying.It is used, for example, when you are not athome and want to delay the spindrying untilyou get home, to prevent the clothes creasingafter spin-drying and being left in the drum tobe removed.To use it, turn the spin speed selector tothe full tub stop position.
FULL TUB STOP
a b

19
using the appliance and practical tips
Increases the level of the final rinse obtainedin the clothes; suitable for large loads andgarments belonging to people with sensitiveskin. Increases water consumption!
EXTRA RINSE
This option prevents garments from creasingby means of carrying out a special programmewith special turns to fluff out the garmentsafter spin-drying and make them easier to iron.
EASY IRONING
To start up your washing cycle, press theStart/Pause button.
START/PAUSE
Turn the programme selector dial to “Stop” toswitch off the washing machine.
SWITCH OFF
Start/Pau

20
5 WASH AND DRY PROGRAMME RUNNING ANDELECTRICITY CUTS
using the appliance and practical tipsPROGRAMME
RUNNING
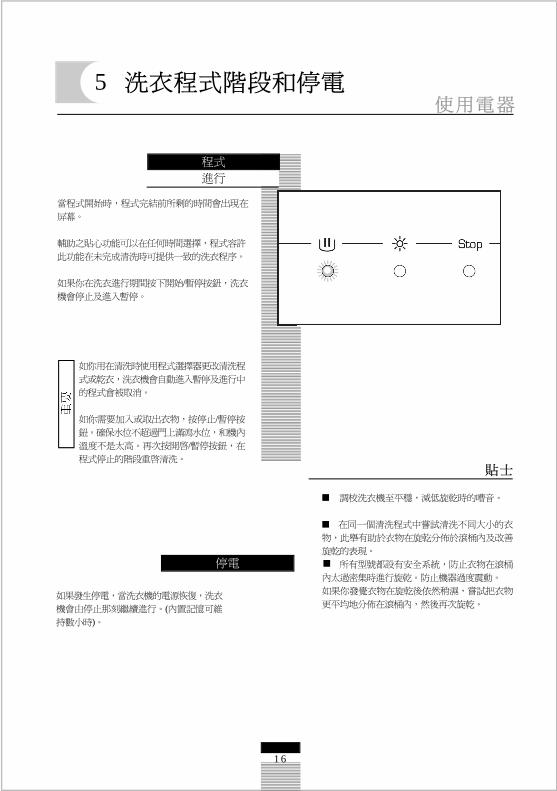
When the programme starts up, the remainingtime until it finishes will appear on the screen.
Complementary functions can be selected atany time, providing the corresponding washingcycle has not finished and the programmeadmits this function.
If you press the Start/Pause button during thewashing process, the washing machine willstop and go onto PAUSE.
POWERCUTS
If a power cut should occur, when the electricitycomes back on the washing machine willcontinue functioning from where it left off (ithas a memory of several hours).
tips To reduce noise on spin drying, level the
washing machine by regulating the adjustablefeet.
You should wash clothes of different sizeson the same wash programme wheneverpossible, as this helps distribute the clothesinside the drum on spin-drying and improvesspin performance.
All the models have a safety system toprevent spin-drying from starting up if theclothes are too concentrated inside the drum.This protects the washing machine fromvibrating excessively. If you notice that theclothes are still too damp after spin drying,distribute them evenly inside the drum andthen run the spin dry cycle again.
If you change the programme on theprogramme selector dial duringwashing and drying, the washer dryerwill automatically go onto PAUSE andthe programme running will becancelled.
If you need to add or remove an item,press the Stop/Pause button. Checkthere is no danger of the wateroverflowing when you open the doorand that the water temperature is nottoo high. To restart and continue thewashing cycle, press the Start/Pausebutton again.
Imp
ort
ant

21
washing machinemaintenance and cleaning
After each wash programme, leave theloading door open for a short time so thatair can circulate around the washingmachine.
From time to time, depending on the waterhardness in your area, it is recommendableto run a full wash cycle using an anti-scaleproduct. This will prolong the life of yourwashing machine.
MAINTENANCE
Unplug the washing machine fromthe mains before carrying out anycleaning or maintenance operations.
You should clean the detergent drawerregularly to remove any wash productresidue remaining inside it.
a Pull outwards on the detergentdrawer to remove it completely.
b Use warm water and a brush toclean the compartments.
c Also take out the additivecompartment siphons, clean themand replace them.Then fit the drawer back into itshousing.
If the syphon is dirty or has not beencorrectly fitted it will prevent theadditives from being used and waterwill be left in the compartment afterwashing.Im
port
ant
1 CLEANING THE DETERGENT DRAWER
c
a
Impo
rtan
t
b

CLEANING THE ACCESSIBLE FILTER AND THE OUTSIDEOF THE WASHING MACHINE
maintenance and cleaning
To prevent risk of burns, do not carryout this operation with washing watertemperatures of over 30ºC.
If any detergent or additives from thedetergent drawer are spilt onto theoutside of the washing machine, cleanthem off straight away as they arecorrosive.
The accessible filter should be cleaned ifthe drain pump has become blocked byany foreign objects.
a Remove the plinth by pulling gently onits sides and turning it downwards. Itcan then be unclipped.If you cannot access the sides, insert asmall screwdriver into the three groovesat the top of the plinth and exert leverage.It can then be unclipped.
b Place a dish or similar recipient underthe filter to collect the water that will runout of it when it is removed.
c Turn the filter a quarter of a turn or a halfturn to the left. The water will start torun out.
d When all the water has come out of thewashing machine, turn the filter severaltimes until it can be completely removedby gently pulling on it.
e Remove the objects or fluff trapped inthe filter.
f Replace the filter and the plinth.
22
2
Impo
rtan
t
CLEANING THE OUTSIDE
CLEANING THE FILTER
To clean the outside of the washing machine,use warm soapy water or a gentle cleaningproduct. Do not use abrasive products orsolvents.Then dry it with a soft cloth.
c
d
a
b
e
Impo
rtan
t

washing machinesafety and troubleshooting
23
Never open up theappliance yourself. Thereare no fuses or similarcomponents inside it whichcan be changed by theuser.Im
po
rtan
t
If you observe any problems withyour washing machine, consult theindications below.
If they do not help you to solve theproblem, unplug the appliance andcontact the TECHNICALASSISTANCE SERVICE.
Possible causes:
Check the door is properly closed.
The washing machine is not plugged into the mains, orthere is no electricity supply.
The Start/Pause button has not been pressed.
If the washing machine door is not properly closed,F04 will appear on the display.
Possible causes:
The drum blocking screws or transportation screwshave not been removed.
The washing machine is not correctly levelled or it isnot stable.
Indicator
FO1
FO2
CO3
FO4
FO5.....
F10
Problem
Water is not entering
The washing machine is not draining or spinning
It is not spinning
It will not start up
Contact the Technical Assistance Service
PROBLEMS
The washing machine willnot start up
The washing machine isvibrating or makingexcessive noise

safety and troubleshooting
24
The washing machine is notfilling
The washing machine is notdraining or spinning
The washing machine is notspinning
I cannot see any water in thedrum during washing
If F01 appears on the display: Check the water supplyis not cut off, the water tap is open and the washingmachine water entry filter is not blocked.
Solution: Wait until the water supply comes back on,turn on the water supply tap, remove the water inlethose and clean the filter.If this failure occurs, F01 will appear on the display.
If F02 appears on the display: Check that the pump orthe outlet pipe of the building are not blocked, and thatthe pump is properly connected.Solution: If the pump is blocked, follow the instructionsgiven in point 2 of Maintenance and Cleaning theappliance. If this failure occurs, F02 will appear on thedisplay.
Cause: The clothes are badly distributed in the drum,and there is a risk of excessive vibration.
Solution: Redistribute the clothes evenly and run a spindry programme.If this failure occurs, C3 will appear on the display.
The washing machine is provided with an environment-friendly system able to adapt to the load and type of fabrics,adjusting the levels of water and energy used. So, althoughthe water level you can see through the door may looklow, there is no cause for concern as washing and rinsingefficiency will still be optimum.

25
safety and troubleshooting
Check the detergent drawer is clean. To clean it, follow theinstructions in Maintenance and Cleaning of theappliance.
1- Cleaning the detergent drawer.
Today’s washing machines are equipped with user safetysystems. The washing machine door cannot be opened ifthe drum has not totally come to a halt. You therefore needto wait around 2 minutes before you can open the door.
The time is for information purposes and it can be affectedby the real conditions of the selected wash programme:the initial water temperature, the load of clothes, unbalancecaused by the load on spin drying, etc.
Other problems may affect the washing machine. In thiscase, the indications F05, F06 etc. through to F10 willappear on the display. Contact the Authorised TechnicalServices.
Why is there water left in thedetergent drawer?
Why can’t I open the dooras soon as the washprogramme ends?
Why doesn’t the timeremaining on the clockcoincide with the real end-of-cycle time selected?
Other indications

26
washing machineprotecting the environment
The packaging materials for this appliance can berecycled. If you recycle them, you will contributeto protecting the environment. Please place themin the municipal recycling bins provided for thispurpose.
Your appliance also contains alarge number of recyclablematerials. It is marked with thissymbol to show that in EuropeanUnion countries used appliancesmust not be disposed of withother waste.
This will help your manufacturer to correctly recycletheir appliances, in compliance with Europeandirective 2002/96/EC concerning waste electricaland electronic equipment.
Please contact either your town council or theshop where you bought the product to find outwhere the nearest collection points for usedappliances are.
Thank you for helping to protect the environment.


01/08 REFERENCIA

WFD711A
1
2
3
4
7
17
19
22

2
/

3
( )

4
a
1
a 3
3b
c

5
0.05 1MPa 0.05 10kgr/cm2
- 1MPa 10bars
a
:
a
b
50 70
50
70
2

6
3
a
b
c

7
(
)
a 60
b
/
4

8
( )
1
a
c
b
9
/
/
2
a
b

1 0
3
b
a
/ /
/

1 1
6
a
4 1.5
1
- 60
2
3
4
5
7 60
8 40
10 40
11 30
12 30
13
6
9
14 30
15 90
60
40
30

1 2
( * * )
+
60
90
60
40
30
60
40
40
1
2
3
4
5(*)
7
8
9
10
11
6
40
3 0
12
13
14
15
//
/
//
//
/ /
//
//
//
//
//
// /
/
/
/
/
30
40

1 3
( )
1,90/55
0,40/49
6
6
6
6
6
3
3
1,5
3
3
1
1
1,5
6
2,8/48
1,8/27
160
100
1,00/55
0,60/55
1,2/26
0,60/55
0,35/55
70
55
95
65
60
40
30
30
10
1,45/60
1,02/49
1,45/60
105
91
82
4
3
0,50/60
1,00/55
0,20/30
0,05/0
87
120
/( / ) / ( )

4
0b
a
1 4

1 5
/
/
/
1 6
/
/
(
)
5

1
b
a
1 7
c

1 8
2
b
a
3
90 180
30
d
c
e
f

1 9
?
?
" / "
F04

?
?
?
?
F02
2
F02
C03
F01
F01
2 0

2 1
?
?
1.
2
F05,F06...,
F10

2 2

232
2418 3246
8210 8210
2/F., Shing Dao Industrial Building,
232 Aberdeen Main Road, Hong Kong
Product Information 2418 3246
Service Hotline 8210 8210