GM Cadillac 1967-1989 Repair Guide Heater Core With Air...
20
GM Cadillac 1967-1989 Repair Guide Heater Core With Air Conditioning REMOVAL & INSTALLATION 1967-71 Full Size Cadillac Drain the cooling system. 1. Remove the carburetor air cleaner. 2. Disconnect the vacuum hose assembly connectors from the servo vacuum valve and the control valve on the power servo unit. 3. Disconnect the vacuum hose from the power servo unit. 4. Disconnect the electrical connector from the power servo unit. 5. Remove the vacuum hoses and electrical connections from the master switch. 6. Disconnect the small diameter vacuum hose from the center port of the vacuum check valve. 7. Remove the screw securing the vacuum check valve mounting bracket to the heater air selector assembly, then position the check valve and bracket out of the way. 8. Disconnect the vacuum hose from the heater door vacuum power unit. 9. Disconnect the cable from the control valve on the power servo unit. 10. Remove the hoses from the heater inlet and outlet fittings. 11. Remove the screws securing the heater air selector to the cowl and remove the assembly from the engine compartment. 12. Remove the screws securing the heater core frame to the heater-air selector case, then remove the gasket from the case. 13. Pull the core frame, with the core attached, away from the heater-air selector case. 14. Remove the grommets from the inlet and outlet fittings. 15. 1979 Cadillac Deville 7.0L 4BL 8cyl | 1 of 20
Transcript of GM Cadillac 1967-1989 Repair Guide Heater Core With Air...
GM Cadillac 1967-1989 Repair Guide
Heater Core With Air Conditioning
REMOVAL & INSTALLATION
1967-71 Full Size Cadillac
Drain the cooling system.1. Remove the carburetor air cleaner.2. Disconnect the vacuum hose assembly connectors from the servo vacuum valve and the control valveon the power servo unit.
3.
Disconnect the vacuum hose from the power servo unit.4. Disconnect the electrical connector from the power servo unit.5. Remove the vacuum hoses and electrical connections from the master switch.6. Disconnect the small diameter vacuum hose from the center port of the vacuum check valve.7. Remove the screw securing the vacuum check valve mounting bracket to the heater air selectorassembly, then position the check valve and bracket out of the way.
8.
Disconnect the vacuum hose from the heater door vacuum power unit.9. Disconnect the cable from the control valve on the power servo unit.10. Remove the hoses from the heater inlet and outlet fittings.11. Remove the screws securing the heater air selector to the cowl and remove the assembly from theengine compartment.
12.
Remove the screws securing the heater core frame to the heater-air selector case, then remove thegasket from the case.
13.
Pull the core frame, with the core attached, away from the heater-air selector case.14. Remove the grommets from the inlet and outlet fittings.15.
1979 Cadillac Deville 7.0L 4BL 8cyl |
1 of 20
Remove the corner screws securing the wire retaining clamps to the core frame.16. Remove the clamps and the heater core.17.
To install:
Reposition the heater core to the frame and install the clamps.18. Install the grommets to the inlet and outlet fittings.19. Install the core frame, with the core attached, to the heater-air selector case.20. Install the gasket to the case then install the screws securing the heater core frame to the heater-airselector case.
21.
Install the screws securing the heater air selector to the cowl.22. Install the hoses on the heater inlet and outlet fittings.23. Connect the cable to the control valve on the power servo unit.24. Connect the vacuum hose to the heater door vacuum power unit.25. Install the screw securing the vacuum check valve mounting bracket to the heater air selector assembly.26. Connect the small diameter vacuum hose to the center port of the vacuum check valve.27. Install the vacuum hoses and electrical connections to the master switch.28. Connect the electrical connector to the power servo unit.29. Connect the vacuum hose to the power servo unit.30. Connect the vacuum hose assembly connectors to the servo vacuum valve and the control valve on thepower servo unit.
31.
Install the carburetor air cleaner.32. Fill the cooling system.33.
CAUTIONWhen draining the coolant, keep in mind that cats and dogs are attracted by the ethylene glycol antifreeze,and are quite likely to drink any that is left in an uncovered container or in puddles on the ground. This willprove fatal in sufficient quantity. Always drain the coolant into a sealable container. Coolant should be reusedunless it is contaminated or several years old.
1979 Cadillac Deville 7.0L 4BL 8cyl | Repair Guides | Heating And Air ... http://www.autozone.com/autozone/repairinfo/repairguide/repairGuideCo...
2 of 20 2/8/2011 5:25 PM

1972-76 Full Size Cadillac
Air Cushion Restraint System (A.C.R.S.) is a driver restriant system. Before servicing any component turnignition switch to LOCK, then disconnect the negative battery cable and tape terminal end to avoidaccidental deployment.
Drain the cooling system.1. Remove the heater hoses from the core nipples. Plug the core nipples.2. Remove the instrument panel top cover.3. Remove the right and left air conditioner outlet hoses, along with the center outlet connector.4. Remove the screws securing the air conditioning distributor to the heater case and lift out thedistributor.
5.
Remove the defroster nozzle.6. Remove the glove box.7. Disconnect the vacuum hoses at the recirculator door, water valve, control head supply hose, and theprogramer (if so equipped).
8.
Disconnect the aspirator hose from the in-car sensor.9. Take off the instrument panel braces.10. On the engine side cowl, remove the nuts securing the heater case to the cowl.11. Work the heater case out from under the dash.12. Remove the rubber seals from around the core nipples.13. Remove the screw and clip from beneath the seal.14. Take out the screws and clip from the opposite end of the core, then remove the core.15.
To install:
Reposition the core in the case, then install the screws and clip.16. Install the rubber seals around the core nipples.17. Position the heater case under the dash.18. On the engine side cowl, install the nuts securing the heater case to the cowl.19. Install the instrument panel braces.20.
1979 Cadillac Deville 7.0L 4BL 8cyl | Repair Guides | Heating And Air ... http://www.autozone.com/autozone/repairinfo/repairguide/repairGuideCo...
3 of 20 2/8/2011 5:25 PM
Connect the aspirator hose to the in-car sensor.21. Connect the vacuum hoses to the recirculator door, water valve, control head supply hose, and theprogramer (if so equipped).
22.
Install the glove box.23. Install the defroster nozzle.24. Install the air conditioning distributor to the heater case with the retaining screws.25. Install the right and left air conditioner outlet hoses, along with the center outlet connector.26. Install the instrument panel top cover.27. Install the heater hoses to the core nipples.28. Fill the cooling system.29.
1977-89 Full Size Cadillac
See Figures 1 through 13
Disconnect the wiring from the blower, resistors, and thermostatic cycling switch.1. Remove the right windshield washer nozzle.2. Remove the right air inlet screen from the plenum.3. Remove the two screws securing the thermostatic cycling switch to the module and carefully repositionthe switch off the module cover.
4.
Remove the 16 fasteners securing the module cover and remove it.5. Remove the heater hoses from the core nipples. Plug the core nipples.6. Remove one screw and retainer holding the core to the frame at the top.7. Place the temperature door in the "MAX" hot position, then reach through the temperature housing andpush the lower forward corner of the heater core away from the housing. This causes the core to snapout of the lower clamp. The core may not be removed in the vertical position.
8.
To install, reverse the procedures above.9.
1979 Cadillac Deville 7.0L 4BL 8cyl | Repair Guides | Heating And Air ... http://www.autozone.com/autozone/repairinfo/repairguide/repairGuideCo...
4 of 20 2/8/2011 5:25 PM

Fig. Fig. 1: Air inlet screens - 1986-89 Fleetwood Brougham
Fig. Fig. 2: Heater assembly - 1979 full size models
1979 Cadillac Deville 7.0L 4BL 8cyl | Repair Guides | Heating And Air ... http://www.autozone.com/autozone/repairinfo/repairguide/repairGuideCo...
5 of 20 2/8/2011 5:25 PM
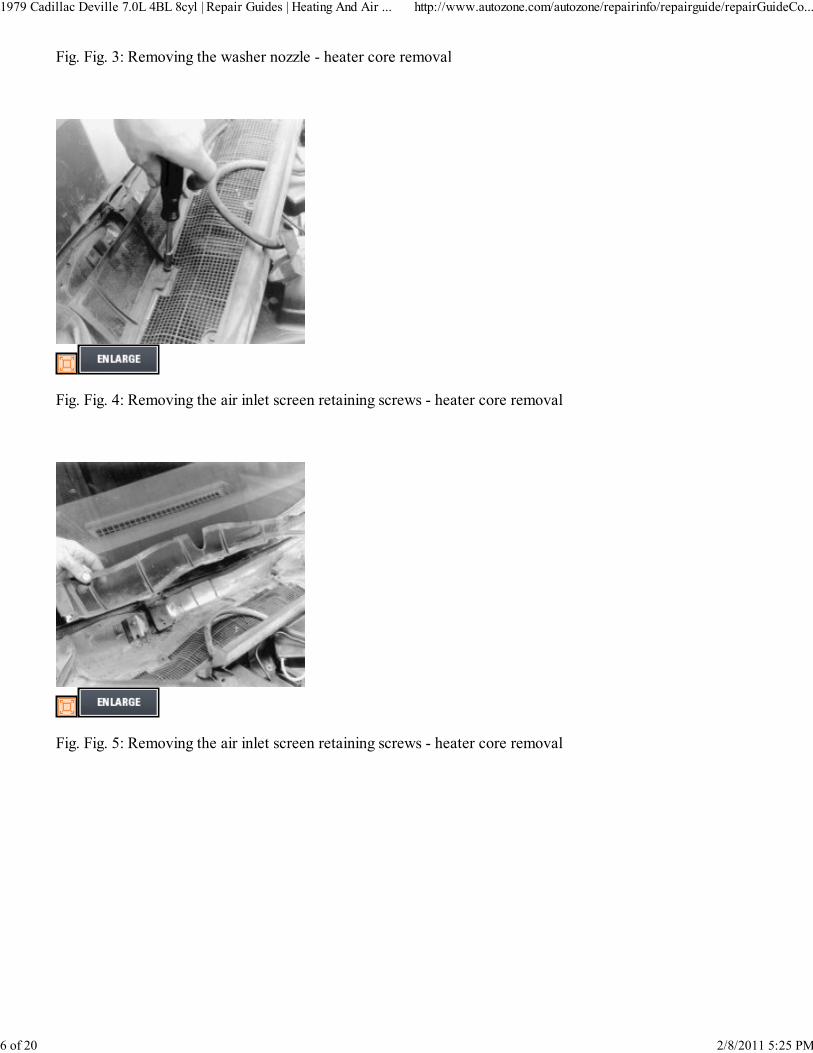
Fig. Fig. 3: Removing the washer nozzle - heater core removal
Fig. Fig. 4: Removing the air inlet screen retaining screws - heater core removal
Fig. Fig. 5: Removing the air inlet screen retaining screws - heater core removal
1979 Cadillac Deville 7.0L 4BL 8cyl | Repair Guides | Heating And Air ... http://www.autozone.com/autozone/repairinfo/repairguide/repairGuideCo...
6 of 20 2/8/2011 5:25 PM

Fig. Fig. 6: Removing the air inlet screen assembly - heater core removal
Fig. Fig. 7: Removing heater and A/C components from a common heater case
1979 Cadillac Deville 7.0L 4BL 8cyl | Repair Guides | Heating And Air ... http://www.autozone.com/autozone/repairinfo/repairguide/repairGuideCo...
7 of 20 2/8/2011 5:25 PM
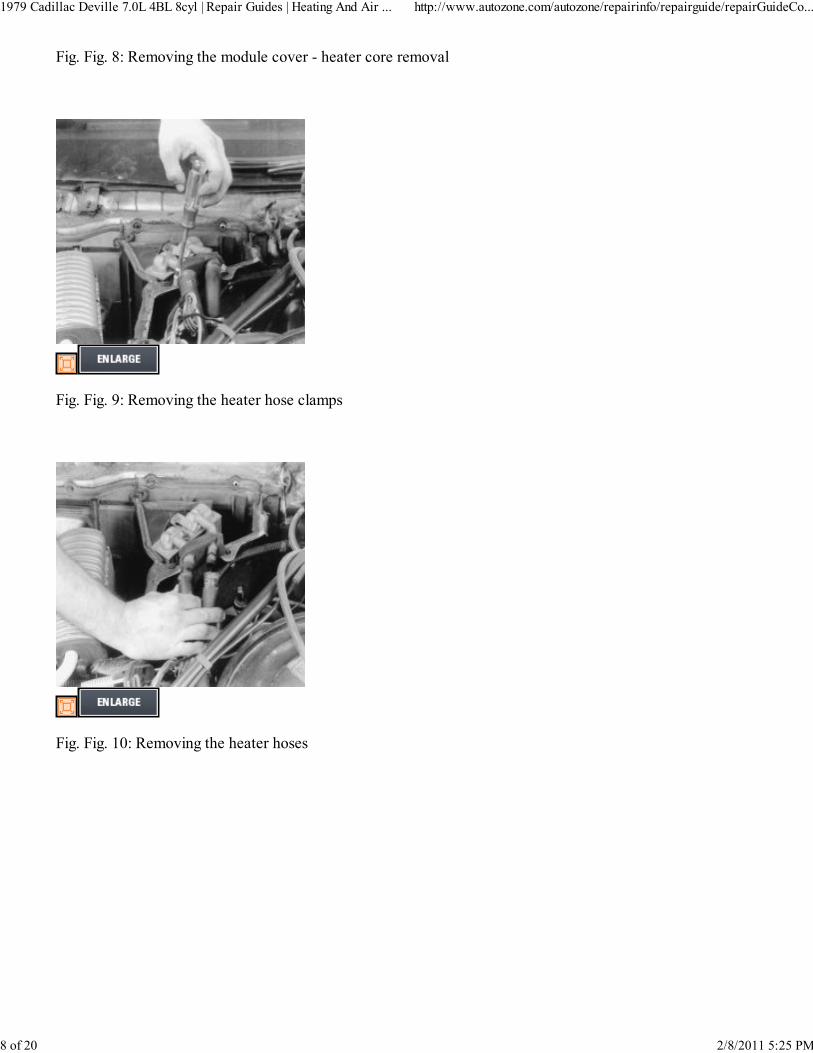
Fig. Fig. 8: Removing the module cover - heater core removal
Fig. Fig. 9: Removing the heater hose clamps
Fig. Fig. 10: Removing the heater hoses
1979 Cadillac Deville 7.0L 4BL 8cyl | Repair Guides | Heating And Air ... http://www.autozone.com/autozone/repairinfo/repairguide/repairGuideCo...
8 of 20 2/8/2011 5:25 PM
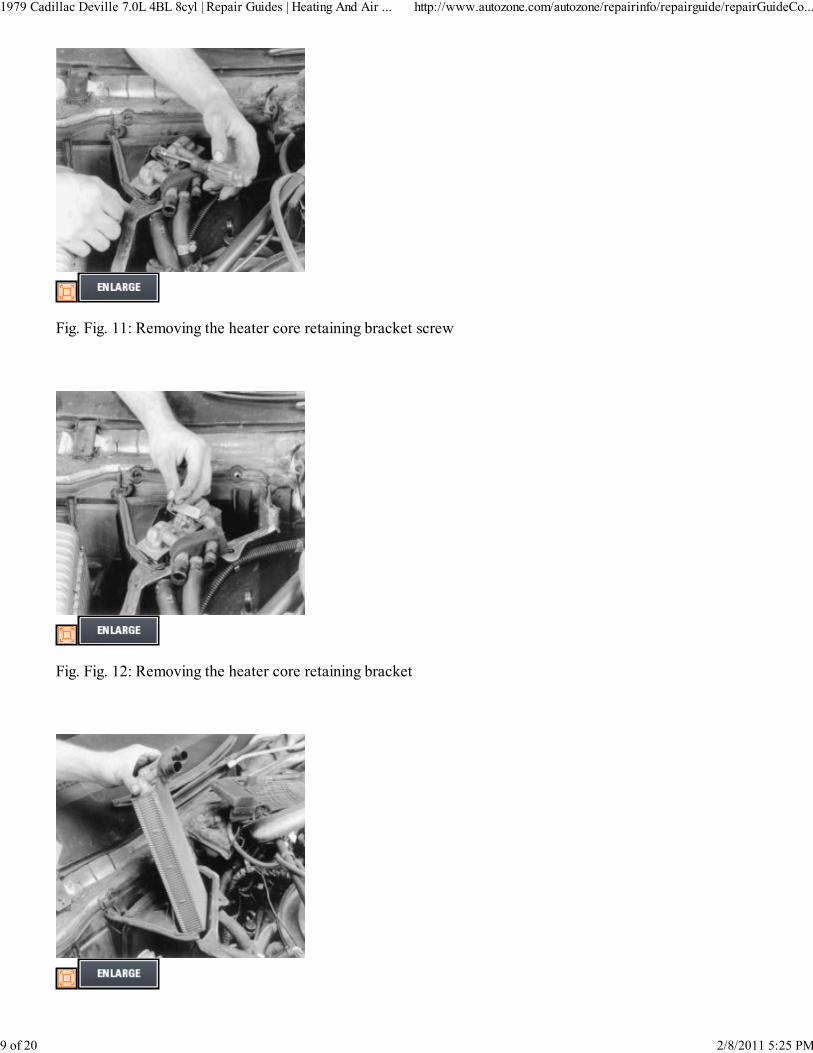
Fig. Fig. 11: Removing the heater core retaining bracket screw
Fig. Fig. 12: Removing the heater core retaining bracket
1979 Cadillac Deville 7.0L 4BL 8cyl | Repair Guides | Heating And Air ... http://www.autozone.com/autozone/repairinfo/repairguide/repairGuideCo...
9 of 20 2/8/2011 5:25 PM
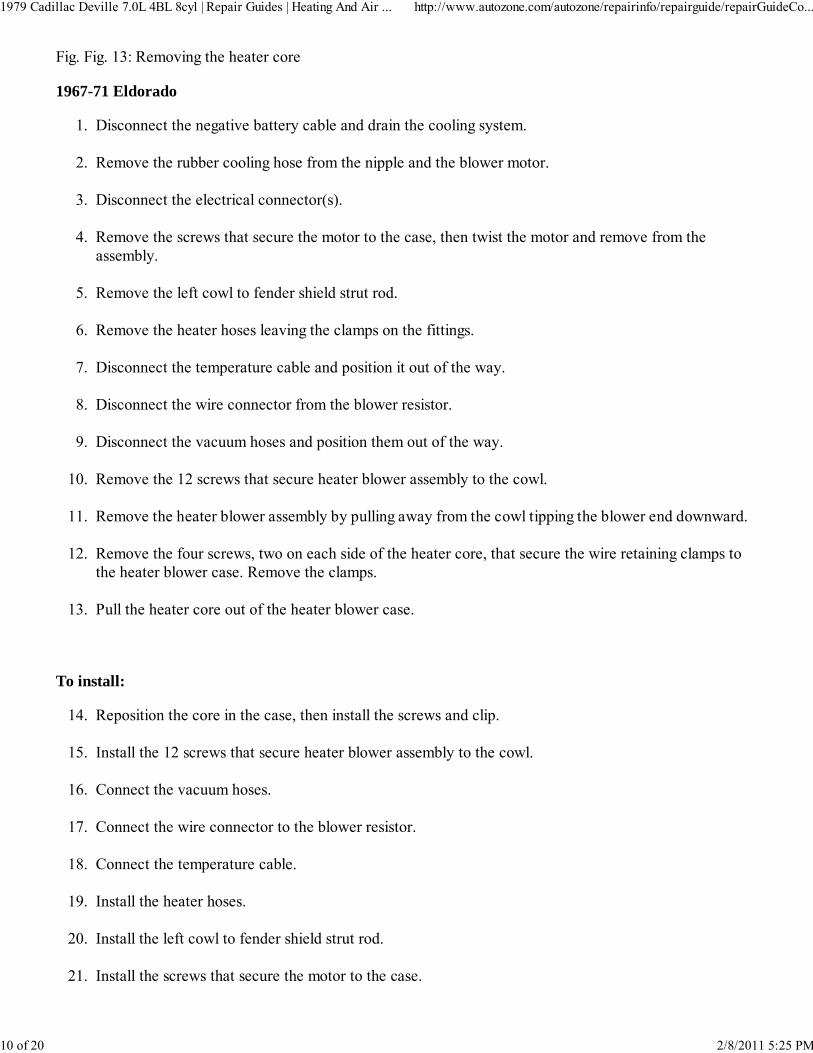
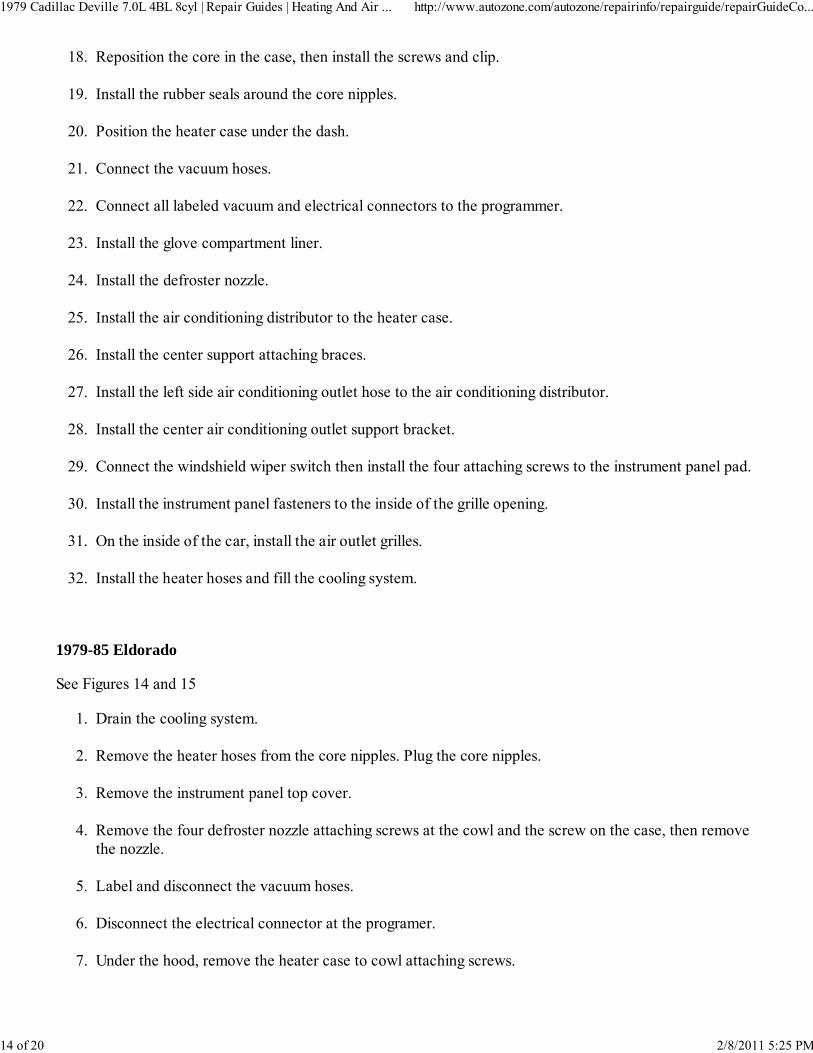
Fig. Fig. 13: Removing the heater core
1967-71 Eldorado
Disconnect the negative battery cable and drain the cooling system.1. Remove the rubber cooling hose from the nipple and the blower motor.2. Disconnect the electrical connector(s).3. Remove the screws that secure the motor to the case, then twist the motor and remove from theassembly.
4.
Remove the left cowl to fender shield strut rod.5. Remove the heater hoses leaving the clamps on the fittings.6. Disconnect the temperature cable and position it out of the way.7. Disconnect the wire connector from the blower resistor.8. Disconnect the vacuum hoses and position them out of the way.9. Remove the 12 screws that secure heater blower assembly to the cowl.10. Remove the heater blower assembly by pulling away from the cowl tipping the blower end downward.11. Remove the four screws, two on each side of the heater core, that secure the wire retaining clamps tothe heater blower case. Remove the clamps.
12.
Pull the heater core out of the heater blower case.13.
To install:
Reposition the core in the case, then install the screws and clip.14. Install the 12 screws that secure heater blower assembly to the cowl.15. Connect the vacuum hoses.16. Connect the wire connector to the blower resistor.17. Connect the temperature cable.18. Install the heater hoses.19. Install the left cowl to fender shield strut rod.20. Install the screws that secure the motor to the case.21.
1979 Cadillac Deville 7.0L 4BL 8cyl | Repair Guides | Heating And Air ... http://www.autozone.com/autozone/repairinfo/repairguide/repairGuideCo...
10 of 20 2/8/2011 5:25 PM

Connect the electrical connector(s).22. Install the rubber cooling hose to the nipple and the blower motor.23. Connect the negative battery cable.24. Fill the cooling system.25.
1972-76 Eldorado
Air Cushion Restraint System (A.C.R.S.) is a driver restriant system. Before servicing any component turnignition switch to LOCK then disconnect the negative battery cable and tape terminal end to avoidaccidental deployment.
Drain the cooling system.1. Remove the heater hoses from the core nipples. Plug the core nipples.2. Remove the instrument panel top cover.3. Remove the right and left air conditioner outlet hoses, along with the center outlet connector.4. Remove the screws securing the air conditioning distributor to the heater case and lift out thedistributor.
5.
Remove the defroster nozzle.6. Remove the glove box.7. Disconnect the vacuum hoses at the recirculator door, water valve, control head supply hose, and theprogramer (if so equipped).
8.
Disconnect the aspirator hose from the in-car sensor.9. Take off the instrument panel braces.10. On the engine side cowl, remove the nuts securing the heater case to the cowl.11. Work the heater case out from under the dash.12. Remove the rubber seals from around the core nipples.13. Remove the screw and clip from beneath the seal.14. Take out the screws and clip from the opposite end of the core and remove the core.15.
To install:
1979 Cadillac Deville 7.0L 4BL 8cyl | Repair Guides | Heating And Air ... http://www.autozone.com/autozone/repairinfo/repairguide/repairGuideCo...
11 of 20 2/8/2011 5:25 PM

Reposition the core in the case, then install the screws and clip.16. Install the rubber seals around the core nipples.17. Position the heater case under the dash.18. On the engine side cowl, install the nuts securing the heater case to the cowl.19. Install the instrument panel braces.20. Connect the aspirator hose to the in-car sensor.21. Connect the vacuum hoses to the recirculator door, water valve, control head supply hose, and theprogramer (if so equipped).
22.
Install the glove box.23. Install the defroster nozzle.24. Install the air conditioning distributor to the heater case with the retaining screws.25. Install the right and left air conditioner outlet hoses, along with the center outlet connector.26. Install the instrument panel top cover.27. Install the heater hoses to the core nipples.28. Fill the cooling system.29.
1977-78 Eldorado
Drain the cooling system.1. Remove the heater hoses from the core nipples. Plug the core nipples.2. On the inside of the car, remove the air outlet grilles.3. Remove the instrument panel fasteners from the inside of the grille opening.4. Remove the four attaching screws from the instrument panel cross support and pull the panel padoutward. Disconnect the windshield wiper switch.
5.
Remove the center air conditioning outlet support bracket.6. Remove the left side air conditioning outlet hose from the air conditioning distributor.7. Remove the center support attaching braces.8. Remove the air conditioning distributor from the heater case.9.
1979 Cadillac Deville 7.0L 4BL 8cyl | Repair Guides | Heating And Air ... http://www.autozone.com/autozone/repairinfo/repairguide/repairGuideCo...
12 of 20 2/8/2011 5:25 PM

Remove the defroster nozzle.10. Remove the glove compartment liner.11. Label and remove all vacuum and electrical connectors from the programmer.12. Disconnect the vacuum hoses and position them out of the way.13. Disconnect and remove the heater case.14. Remove the rubber seal from around the heater core nipples.15. Remove the screw and clip from beneath the seal.16. Remove the core retaining screws and the clips, then remove the core.17.
To install:
1979 Cadillac Deville 7.0L 4BL 8cyl | Repair Guides | Heating And Air ... http://www.autozone.com/autozone/repairinfo/repairguide/repairGuideCo...
13 of 20 2/8/2011 5:25 PM
Reposition the core in the case, then install the screws and clip.18. Install the rubber seals around the core nipples.19. Position the heater case under the dash.20. Connect the vacuum hoses.21. Connect all labeled vacuum and electrical connectors to the programmer.22. Install the glove compartment liner.23. Install the defroster nozzle.24. Install the air conditioning distributor to the heater case.25. Install the center support attaching braces.26. Install the left side air conditioning outlet hose to the air conditioning distributor.27. Install the center air conditioning outlet support bracket.28. Connect the windshield wiper switch then install the four attaching screws to the instrument panel pad.29. Install the instrument panel fasteners to the inside of the grille opening.30. On the inside of the car, install the air outlet grilles.31. Install the heater hoses and fill the cooling system.32.
1979-85 Eldorado
See Figures 14 and 15
Drain the cooling system.1. Remove the heater hoses from the core nipples. Plug the core nipples.2. Remove the instrument panel top cover.3. Remove the four defroster nozzle attaching screws at the cowl and the screw on the case, then removethe nozzle.
4.
Label and disconnect the vacuum hoses.5. Disconnect the electrical connector at the programer.6. Under the hood, remove the heater case to cowl attaching screws.7.
1979 Cadillac Deville 7.0L 4BL 8cyl | Repair Guides | Heating And Air ... http://www.autozone.com/autozone/repairinfo/repairguide/repairGuideCo...
14 of 20 2/8/2011 5:25 PM
Under the instrument panel, remove the heater case-to-cowl attaching screws.8. Remove the heater case.9. Remove the four case-to-core screws and remove the core.10. To install, reverse the procedures above.11.
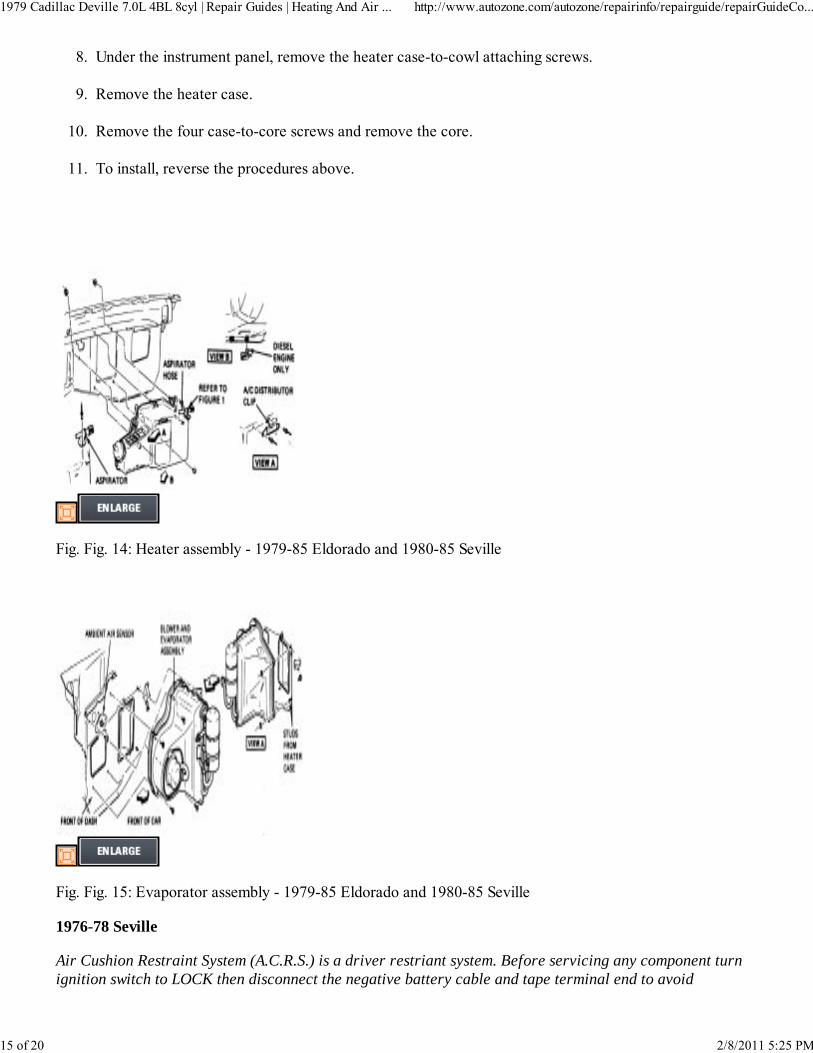
Fig. Fig. 14: Heater assembly - 1979-85 Eldorado and 1980-85 Seville
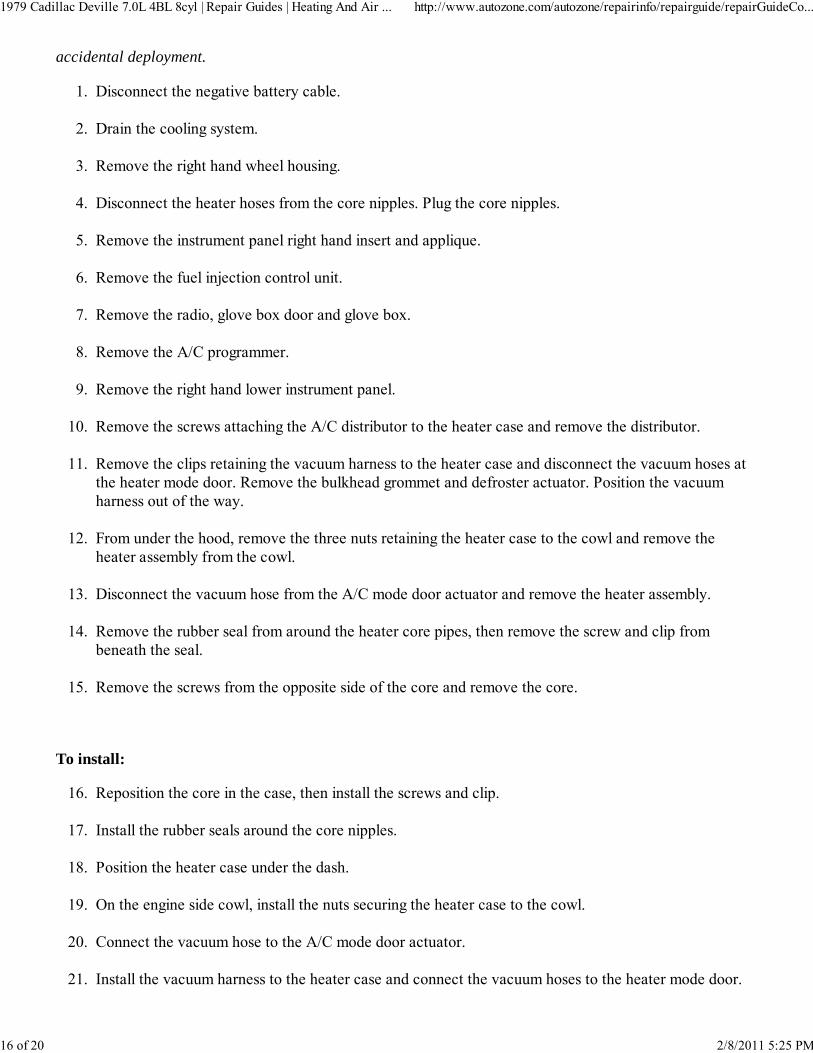
Fig. Fig. 15: Evaporator assembly - 1979-85 Eldorado and 1980-85 Seville
1976-78 Seville
Air Cushion Restraint System (A.C.R.S.) is a driver restriant system. Before servicing any component turnignition switch to LOCK then disconnect the negative battery cable and tape terminal end to avoid
1979 Cadillac Deville 7.0L 4BL 8cyl | Repair Guides | Heating And Air ... http://www.autozone.com/autozone/repairinfo/repairguide/repairGuideCo...
15 of 20 2/8/2011 5:25 PM
accidental deployment.
Disconnect the negative battery cable.1. Drain the cooling system.2. Remove the right hand wheel housing.3. Disconnect the heater hoses from the core nipples. Plug the core nipples.4. Remove the instrument panel right hand insert and applique.5. Remove the fuel injection control unit.6. Remove the radio, glove box door and glove box.7. Remove the A/C programmer.8. Remove the right hand lower instrument panel.9. Remove the screws attaching the A/C distributor to the heater case and remove the distributor.10. Remove the clips retaining the vacuum harness to the heater case and disconnect the vacuum hoses atthe heater mode door. Remove the bulkhead grommet and defroster actuator. Position the vacuumharness out of the way.
11.
From under the hood, remove the three nuts retaining the heater case to the cowl and remove theheater assembly from the cowl.
12.
Disconnect the vacuum hose from the A/C mode door actuator and remove the heater assembly.13. Remove the rubber seal from around the heater core pipes, then remove the screw and clip frombeneath the seal.
14.
Remove the screws from the opposite side of the core and remove the core.15.
To install:
Reposition the core in the case, then install the screws and clip.16. Install the rubber seals around the core nipples.17. Position the heater case under the dash.18. On the engine side cowl, install the nuts securing the heater case to the cowl.19. Connect the vacuum hose to the A/C mode door actuator.20. Install the vacuum harness to the heater case and connect the vacuum hoses to the heater mode door.21.
1979 Cadillac Deville 7.0L 4BL 8cyl | Repair Guides | Heating And Air ... http://www.autozone.com/autozone/repairinfo/repairguide/repairGuideCo...
16 of 20 2/8/2011 5:25 PM
Reconnect the bulkhead grommet and defroster actuator. Install the screws attaching the A/C distributor to the heater case and install the distributor.22. Install the right hand lower instrument panel.23. Install the A/C programmer.24. Install the radio, glove box door and glove box.25. Install the fuel injection control unit.26. Install the instrument panel right hand insert and applique.27. Connect the heater hoses to the core nipples.28. Install the right hand wheel housing.29. Fill the cooling system.30. Connect the negative battery cable.31.
CAUTIONWhen draining the coolant, keep in mind that cats and dogs are attracted by the ethylene glycol antifreeze,and are quite likely to drink any that is left in an uncovered container or in puddles on the ground. This willprove fatal in sufficient quantity. Always drain the coolant into a sealable container. Coolant should be reusedunless it is contaminated or several years old.
1979 Seville
Drain the cooling system.1. Remove the right side wheelhousing as outlined earlier in Blower Motor Removal for the 1979 Seville.2. Remove the heater hoses from the core nipples. Plug the core nipples.3. Remove the radio knobs, anti-rattle spring, control rings and both hex nuts.4. Remove the ash tray.5. Through the ash tray opening, remove the screw from behind the right side of the right hand instrumentpanel insert.
6.
Close the ash tray door and remove the three instrument panel insert attaching screws.7. Pull the insert out enough to disconnect the electrical connectors from the cigarette lighter and anyother accessory switches.
8.
1979 Cadillac Deville 7.0L 4BL 8cyl | Repair Guides | Heating And Air ... http://www.autozone.com/autozone/repairinfo/repairguide/repairGuideCo...
17 of 20 2/8/2011 5:25 PM

Remove the mirror control cable clip from the back and remove the insert.9. Remove the radio as outlined in Radio Removal & Installation.10. Remove the door and the inner liner of the glove compartment.11. Remove the litter receptacle.12. Remove the screws which secure the recirculating air door actuator shroud to the right kick panel.13. Disconnect the vacuum and electrical connectors from the air conditioning programer.14. Remove the attaching screws and remove the programer.15. Remove the right side lower instrument panel.16. Remove the air conditioning distributor from the heater case.17. Disconnect the vacuum harness at the heater case and disconnect the vacuum lines. Position theharness out of the way.
18.
Under the hood, remove the three heater case attaching nuts from the cowl.19. Inside the car, remove the heater case attaching screws.20. Disconnect the vacuum hose from the air conditioning door actuator and remove the heater assembly.21. Remove the seal around the water pipes along with the screw and the clip from beneath the seal.22. Remove the two screws at the opposite ends of the core and remove the core.23.
To install:
Reposition the core and the two screws at the opposite ends.24. Install the seal around the water pipes along with the screw and the clip from beneath the seal.25. Install the heater case attaching screws and connect the vacuum hose to the air conditioning dooractuator.
26.
Under the hood, install the three heater case attaching nuts to the cowl.27. Connect the vacuum harness at the heater case and connect the vacuum lines.28. Install the air conditioning distributor to the heater case.29. Install the right side lower instrument panel.30. Install the programer.31.
1979 Cadillac Deville 7.0L 4BL 8cyl | Repair Guides | Heating And Air ... http://www.autozone.com/autozone/repairinfo/repairguide/repairGuideCo...
18 of 20 2/8/2011 5:25 PM

Install the screws which secure the recirculating air door actuator shroud to the right kick panel.32. Install the litter receptacle.33. Install the door and the inner liner of the glove compartment.34. Install the radio.35. Install the mirror control cable clip to the back and install the insert.36. Connect the electrical connectors to the cigarette lighter and any other accessory switches.37. Install the three instrument panel attaching screws.38. Through the ash tray opening, install the screw behind the right side of the right hand instrument panelinsert.
39.
Install the ash tray.40. Install the radio knobs, anti-rattle spring, control rings and both hex nuts.41. Install the heater hoses.42. Install the right side wheelhousing as described in Blower Motor Removal for the 1979 Seville.43. Fill the cooling system.44.
1980-85 Seville
Drain the cooling system.1. Remove the heater hoses from the core nipples. Plug the core nipples.2. Remove the instrument panel top cover.3. Remove the four defroster nozzle attaching screws at the cowl and the screw on the case, then removethe nozzle.
4.
Label and disconnect the vacuum hoses.5. Disconnect the electrical connector at the programer.6. Under the hood, remove the heater case to cowl attaching screws.7. Under the instrument panel, remove the heater case-to-cowl attaching screws.8. Remove the heater case.9.
1979 Cadillac Deville 7.0L 4BL 8cyl | Repair Guides | Heating And Air ... http://www.autozone.com/autozone/repairinfo/repairguide/repairGuideCo...
19 of 20 2/8/2011 5:25 PM
Remove the four case-to-core screws and remove the core.10.
To install:
Install the four case-to-core screws and install the core.11. Under the instrument panel, install the heater case-to-cowl attaching screws and install the heater case.12. Under the hood, install the heater case to cowl attaching screws.13. Connect the electrical connector at the programer.14. Connect the vacuum hoses.15. Install the four defroster nozzle attaching screws at the cowl and the screw on the case, then removethe nozzle.
16.
Install the instrument panel top cover.17. Install the heater hoses and fill the cooling system.18.
1986-89 Eldorado and Seville
Disconnect the negative battery cable.1. Loosen the radiator drain plug and remove about half of the engine coolant.2. Remove the glove box.3. Remove the lower sound insulator from underneath the passenger side of the instrument panel.4. Remove the programmer, the electronic control module and their mounting bracket.5. Remove the module assembly heater core cover.6. Tag and disconnect the inlet and outlet coolant hoses at the heater core. Be careful to plug the openends of the hoses as coolant is likely to leak out.
7.
Remove the two heater core mounting screws and lift out the core.8. Installation is in the reverse order of removal.9.
Back to Top
1979 Cadillac Deville 7.0L 4BL 8cyl | Repair Guides | Heating And Air ... http://www.autozone.com/autozone/repairinfo/repairguide/repairGuideCo...
20 of 20 2/8/2011 5:25 PM