
Getting Started With Spectra - StudioPlus Software
64
Getting Started With Spectra COPYRIGHT © 1998-2013 STUDIOPLUS SOFTWARE, LLC ALL RIGHTS RESERVED
Transcript of Getting Started With Spectra - StudioPlus Software

Getting Started With
Spectra
COPYRIGHT © 1998-2013 STUDIOPLUS SOFTWARE, LLC ALL RIGHTS RESERVED

ii
Table of Contents Getting Started ........................................................................................................................ 4
Welcome ................................................................................................................................................... 4 Getting Help .............................................................................................................................................. 4
Within Spectra ....................................................................................................................................... 4 Online Tools ........................................................................................................................................... 5
Words to the Wise .................................................................................................................................... 7 Spectra Series Product Comparison .......................................................................................................... 7
1: Installing Spectra ............................................................................................................... 10
Installation Overview .............................................................................................................................. 10 Before You Begin... .................................................................................................................................. 10
Read the Installation Instructions ....................................................................................................... 10 Check the System Requirements ......................................................................................................... 10 Download the Spectra Installer ........................................................................................................... 10
Basic Installation ..................................................................................................................................... 11 Installing Spectra on a Network .............................................................................................................. 12
Set Up a Shared Folder ........................................................................................................................ 13 Install Spectra on the First Computer .................................................................................................. 14 Install Spectra on the Remaining Workstations .................................................................................. 14
Optimizing Spectra .................................................................................................................................. 14 Run the Internet Update Utility ........................................................................................................... 14 Manually Download Updates ............................................................................................................. 15
2: Protecting Your Data ......................................................................................................... 16 Spectra DataSafe ..................................................................................................................................... 16 The Database Utility ................................................................................................................................ 16
Back Up Your Data .............................................................................................................................. 17 Compact Your Data ............................................................................................................................. 17
3: Setting Up Your Preferences .............................................................................................. 18 The Preferences Wizard .......................................................................................................................... 18
4: Finding Your Way Around .................................................................................................. 21 Spectra Home Page ................................................................................................................................. 21 Getting Around ....................................................................................................................................... 21
Hub Menu ............................................................................................................................................ 22 Spectra Menu Bar ............................................................................................................................... 22 Shortcut List ........................................................................................................................................ 22
5: Working With Clients ......................................................................................................... 24 Creating New Clients ............................................................................................................................... 24 Importing a List of Clients ....................................................................................................................... 25 Finding Existing Clients ............................................................................................................................ 26
6: Scheduling ......................................................................................................................... 27 The Calendar ........................................................................................................................................... 27
Navigating the Calendar – Viewing Tips! ............................................................................................ 27 Scheduling an Appointment or Session .................................................................................................. 28

Table of Contents
iii
7: Basic Communication & Marketing .................................................................................... 30 Communication Overview ...................................................................................................................... 30 Using Phone Calls .................................................................................................................................... 30
Create Phone Calls .............................................................................................................................. 31 Find Phone Calls .................................................................................................................................. 31
Emailing from Spectra ............................................................................................................................. 32 Set up Basic Email ............................................................................................................................... 32 Send Email ........................................................................................................................................... 32
Sending SMS Text Messages ................................................................................................................... 32 Sign up for a Messaging Plan .............................................................................................................. 32 Set up Outgoing Text Messaging ........................................................................................................ 33 Send Text Messages ............................................................................................................................ 33
8: Financial Tracking .............................................................................................................. 35 Financial Tracking Overview ................................................................................................................... 35 Setting up your Price List ........................................................................................................................ 35 Setting up your Sales Tax ........................................................................................................................ 39 Invoicing in Spectra ................................................................................................................................. 40
Creating an Invoice ............................................................................................................................. 40 Processing Credit Cards ....................................................................................................................... 42
Accounting Integration ........................................................................................................................... 46 Setting up the Accounting Link ........................................................................................................... 46 End of Day Wizard ............................................................................................................................... 48
9: Digital Workflow................................................................................................................ 49 Digital Workflow Overview ..................................................................................................................... 49 Setting up the Digital Workflow .............................................................................................................. 50 Using Spectra's Digital Workflow ............................................................................................................ 52
Starting the Digital Workflow ............................................................................................................. 52 1 - Capturing Images ........................................................................................................................... 52 2 - Sales Presentation .......................................................................................................................... 54 3 - Retouching Images ......................................................................................................................... 56 4 - Producing Images ........................................................................................................................... 57 5 - Uploading Images to the Web ....................................................................................................... 59 6 - Archiving Images ............................................................................................................................ 60 7 - Deleting Images ............................................................................................................................. 61
Modifying the Digital Workflow for Your Studio .................................................................................... 62
Appendix ............................................................................................................................... 63 Printable Quick Reference ...................................................................................................................... 63 Spectra Data Model ................................................................................................................................ 64

4
Getting Started
Welcome
We're glad you've chosen StudioPlus Spectra for your business! We want to help you get up and running right away, so this "Getting Started" guide is geared to the basics, giving you the benefits of the program immediately. As with most software programs, there are several ways to accomplish many of the tasks in Spectra. To avoid confusion, we'll keep it simple. As you get more familiar with the software, we encourage you to explore the many ways you can customize and enhance Spectra to fit your unique business.
Getting Help
We want you to get the help you need! There are resources within Spectra and on the StudioPlus website. Take a look below.
Within Spectra
Help Menu - Check out the different ways to get help on Spectra Help menu. We've highlight a couple of the most-used items.
Dynamic Help - Find specific answers throughout Spectra by clicking F1 or one of the many Help buttons provided. Whether you're working with the calendar, importing clients, creating your price list, etc., the user guide should be opened to just the right spot!

Getting Started With Spectra
5
Online Tools
Finding the answers you need may be easier than you think! There are many self-help tools right on the StudioPlus website.
Online Chat - Help is just a click away with our online chat! You can chat with a live tech support person from either the Help menu in Spectra (shown above) or from the Technical Support contact page (http://studioplussoftware.com/help/tech_contact_us.aspx) on our website.
Blogs - The three StudioPlus blogs – Company, Support, and Learning – are the best way for you to get the most up-to-date information about the company, current releases, software tips, and more. Subscribe to them!
Search Tool - Search our entire website or narrow your search to just the support documents.
Training Videos - StudioPlus maintains a complete library of training videos designed to help you make the most of the features in Spectra.
Online Help - The web version of the Spectra User Guide, found on the Documentation page, is always the most current.
Knowledge Base - These helpful articles feature how-to's, troubleshooting tips, release notes, and FAQs.

Getting Started With Spectra
6
FOLLOW UP... Bookmark the Getting Help Overview page on the StudioPlus website (shown above).
Subscribe to the StudioPlus blogs.
Block out dedicated time in your busy schedule to getting Spectra up and running.
Getting Started With Spectra
7
Words to the Wise
Throughout this guide, you will see boxes (like those below) which contain important additional information. Please read them!
ATTENTION! Contains an important fact or warning.
HERE'S A FLASH FOR YOU! Provides helpful hints, definitions, and tips.
WHO KNEW? Voices the questions that may be in your mind.
PATHWAYS TO SUCCESS Offers tips on how to reach the full potential of Spectra to build up
your business and your reputation as a studio that exceeds customer expectations, along with
maximizing both studio and employee efficiency.
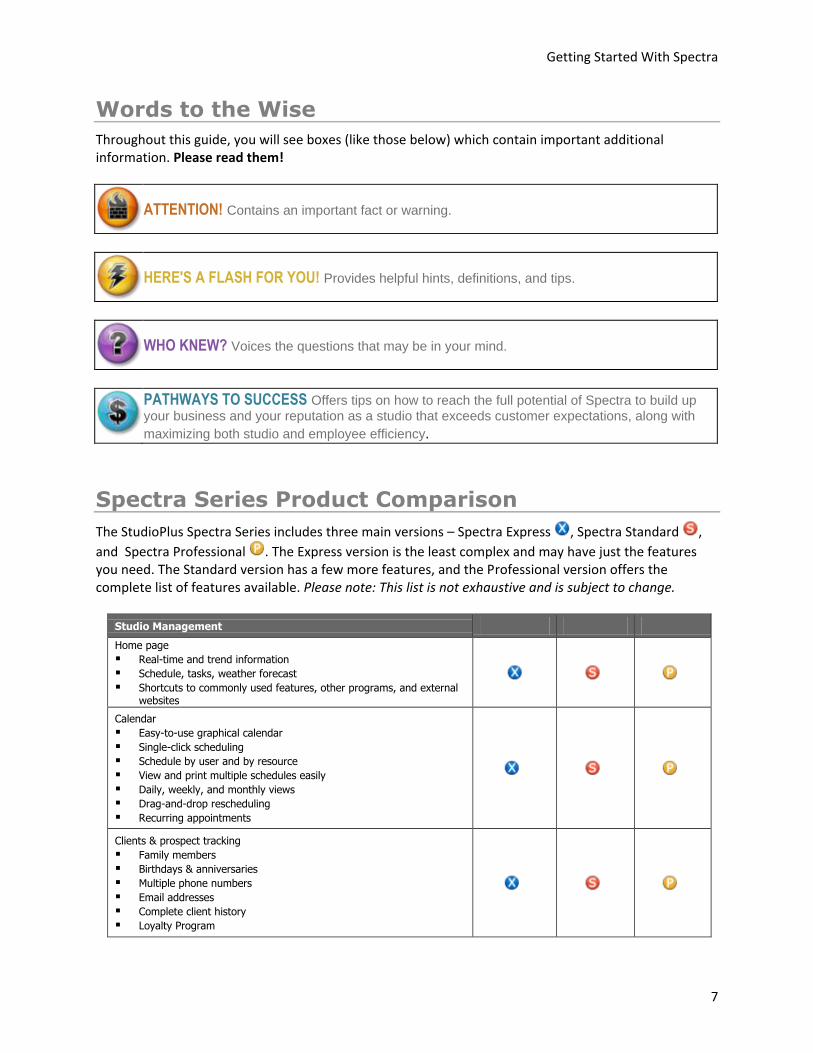
Spectra Series Product Comparison
The StudioPlus Spectra Series includes three main versions – Spectra Express , Spectra Standard ,
and Spectra Professional . The Express version is the least complex and may have just the features you need. The Standard version has a few more features, and the Professional version offers the complete list of features available. Please note: This list is not exhaustive and is subject to change.
Studio Management Home page Real-time and trend information
Schedule, tasks, weather forecast
Shortcuts to commonly used features, other programs, and external websites
Calendar Easy-to-use graphical calendar Single-click scheduling Schedule by user and by resource View and print multiple schedules easily Daily, weekly, and monthly views Drag-and-drop rescheduling
Recurring appointments
Clients & prospect tracking Family members Birthdays & anniversaries Multiple phone numbers Email addresses Complete client history Loyalty Program

Getting Started With Spectra
8
Session tracking
Social event tracking (weddings & bar mitzvahs)
Organization tracking (schools & high school seniors)
Invoices & estimates Invoice for fees, prints, albums, frames, etc Create estimates Sales tax VAT/GST tax support for Canada, Australia, and Europe Cash, check, and credit card payments PCI compliant credit card integration
Print session confirmations, invoices, and receipts
Reporting Client, session, invoice, and payment list reports Analysis and trend reports Accounts receivable aging report
Production tracking
Order status reporting
Digital Workflow
Sales presentation Rank, sort, group, and crop images Show images in black & white and sepia Side-by-side compares and project actual image sizes Slideshow with music Print contact sheets and proof sheets Print invoice image detail with thumbnails
Import images (download, re-number, auto-rotate, and archive)
Photoshop™ integration
Lightroom™ integration
Image archiving
FTP or burn images for ordering
Render images for proofing and printing (including layered PSD files)
Group capture (tethered capture)
Drag-and-drop digital composites
Composite template designer
Advanced Invoicing & Reporting
Item options, enhancements, quantity-based discounts
Multiple price lists
Customer deposit tracking
Employee commission tracking
Product line reporting
Gift certificate tracking
Payment plans
Sales tax reporting
Custom reports
Getting Started With Spectra
9
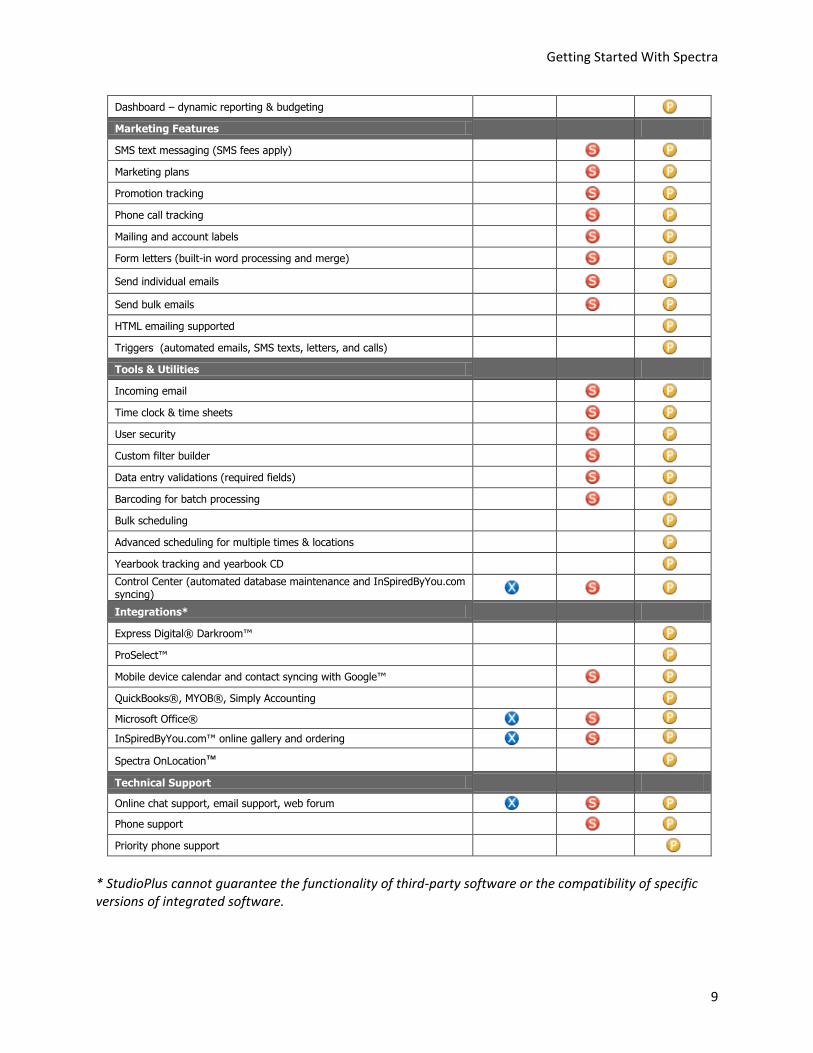
Dashboard – dynamic reporting & budgeting
Marketing Features
SMS text messaging (SMS fees apply)
Marketing plans
Promotion tracking
Phone call tracking
Mailing and account labels
Form letters (built-in word processing and merge)
Send individual emails
Send bulk emails
HTML emailing supported
Triggers (automated emails, SMS texts, letters, and calls)
Tools & Utilities
Incoming email
Time clock & time sheets
User security
Custom filter builder
Data entry validations (required fields)
Barcoding for batch processing
Bulk scheduling
Advanced scheduling for multiple times & locations
Yearbook tracking and yearbook CD
Control Center (automated database maintenance and InSpiredByYou.com syncing)
Integrations*
Express Digital® Darkroom™
ProSelect™
Mobile device calendar and contact syncing with Google™
QuickBooks®, MYOB®, Simply Accounting
Microsoft Office®
InSpiredByYou.com™ online gallery and ordering
Spectra OnLocation™
Technical Support
Online chat support, email support, web forum
Phone support
Priority phone support
* StudioPlus cannot guarantee the functionality of third-party software or the compatibility of specific versions of integrated software.

10
1: Installing Spectra
Installation Overview
Okay, let’s get started! Before you can use Spectra, it must be installed on each computer you plan to use it on. The installation process will copy files and create settings based on your particular needs.
Before You Begin...
Read the Installation Instructions
Please read this entire chapter FIRST! Having a basic understanding of the Spectra installation process before getting started can save time.
Check the System Requirements
Make sure your system meets the minimum system requirements to properly run Spectra:
Operating System Windows XP Pro, Vista Business or Ultimate, Windows 7 Pro or Ultimate, or Windows 8
Processor Pentium III
Minimum RAM 1 GB
Recommended RAM 2 GB
Hard Disk Space for Program Files 600 MB
Hard Disk Space for Data Files 5 - 20 MB
Monitor Resolution 1024 X 768 or better
ADDITIONAL REQUIREMENTS:
The Windows user must have local administrative rights on each computer Spectra is being installed on.
It is also a good idea to install with the User Account Control (UAC) turned on in Windows 7 and Vista.
Download the Spectra Installer
If you haven't done so, download the Spectra installer the StudioPlus website.
1. Open the StudioPlus Downloads page (http://www.studioplussoftware.com/help/downloads.aspx) in your Internet browser.

1: Installing Spectra
11
2. In the "Current Version" section, click Download the full installation.
3. Fill in your name and contact information and click Submit.
4. Click Start Download to begin the download.
5. Click Save File. Depending on your operating system and browser, you may have the option to choose where the file is saved. If not, it should automatically be saved in your "Downloads" folder.
Basic Installation
NOTE: If you are installing Spectra on a network, there are some additional installation steps. Follow the instructions in the "Network Installation" section below. Close any other programs you may have running before starting the installation process.
1. Find the Spectra installer you downloaded from our website and double-click to run it. The name of the file should start with "SPInstall."
2. During installation, follow the prompts of the Setup Wizard. We recommend you accept the defaults provided.
WHAT TYPE OF INSTALLATION SHOULD I CHOOSE?
To install the FREE single-user Express edition, choose the first option.
If you want to try out Spectra by evaluating more than one edition (Express, Standard, and Professional), choose Free 30-Day Evaluation.
If you have already purchased a Spectra software license, choose Paid Product and then make one of the following selections:
- If you plan to run Spectra on just this one computer, choose Single User. It's easy to add users later and you can then use the Database Utility to move your data to a shared location.
- If you already have a network set up and a shared folder prepared for the first computer, select Network – First Workstation.
- If this is a computer you are adding to your network that should use the already shared data files, choose Network – Workstation Add-On.

Getting Started With Spectra
12
3. When the installation is done, you will see a Start Spectra 20xx icon on your desktop, as well as in your Start menu > Programs > StudioPlus Spectra 20xx folder. Double-click Start Spectra 20xx.
4. When prompted, type in your studio name and other company information. Note: These fields can all be changed later EXCEPT your Company Name. Make sure to type in your studio name exactly as you want it to appear throughout Spectra, including reports, invoices, etc.!
ATTENTION! Your company name CANNOT be changed! Make sure it is spelled and punctuated correctly – this is how it will appear on your invoices, etc.
5. Next you'll be prompted to provide the user's full name and initials.
6. If you selected either the free Express edition or the 30-day trial, you will be done with installation wizard. If you're installing a paid product, you will be prompted to enter your product code(s) and you will be registered automatically.
7. The final screen asks whether you want to launch the Internet Update Utility. This utility will automatically search our website for the latest service release of Spectra. If you have an Internet connection on this computer, launch the Internet Update Utility now. Otherwise, just click Finish to complete your installation.
Installing Spectra on a Network
HERE'S A FLASH FOR YOU!
Network Assistance - StudioPlus does not provide technical support for networking. We recommend using a local network hardware provider to set up and maintain your network.
Wireless networking technology is advancing all of the time, but the farther a computer is located from the wireless access point (WAP), the slower the network connection will be. Wireless networking is also subject to interference from cell phones, wireless phones, microwaves, and other wireless devices. These can hamper (or even cut off) the network database connection, leading to poor performance at best and corruption of the database at
worst. It is best to use a "wired" network whenever possible.
HERE'S A FLASH FOR YOU!
Preferred Network Operating Systems - If you are using Spectra on a network, these are the optimal operating systems:
Workstations: Windows 7 Professional or Ultimate Editions / Windows 8 Professional Dedicated File Server*: Windows 2008 Server, or Server 2012
*A dedicated file server is not required to run any Spectra product.

1: Installing Spectra
13
ATTENTION! Spectra does NOT support the following operating systems and they should not be used:
Windows ME Windows 95 Windows 98 Windows NT Windows 2000
If you are using one of the following operating systems your Spectra data may become corrupt! In addition, for optimal performance you should avoid using the following operating systems:
Windows XP Home Windows Vista Home or Home Premium Windows 7 Home Basic or Home Premium
If you have a network and plan to use Spectra on your workstations, follow the steps in this section to install Spectra on your network. You will be installing the Spectra program on each computer and your data files only on your server. If you don't have a dedicated file server, you can use one of your network computers as your file server.
Set Up a Shared Folder
Before you install Spectra on any of your computers, you need to set up a shared folder, one that all your network computers can access and write data to. You will do this whether you have a dedicated file server or not. This shared folder is where you will store your Spectra data files, allowing each computer to connect to the same data files.
1. Decide which computer you will be using to store your data files. If you have a dedicated server for your network, use that. If not, choose one central workstation for your data storage.
ATTENTION!
Drive Mapping - For better administration we recommend you map to the same shared drive from all of your workstations. Use the same drive letter for the shared folder where the data files will be stored. Even the computer where the files reside should use a drive mapping of the same drive letter (not the "C:" drive; although the files may be on the "C:" drive, you will still need a separate mapping in order to be consistent on all the computers).
NOTE: If you are using the Spectra digital imaging features this is a system requirement.
2. Locate your shared folder on the server or create a shared folder on a networked drive of the computer you have chosen to store your data files.
3. Then create a sub-folder for Spectra called "SpectraData."
ATTENTION! If you're considering using a NAS device to store your Spectra data files, please read the "Network Attached Storage (NAS) and StudioPlus Spectra" knowledge base article before making any decisions. This type of storage could put your data at risk!

Getting Started With Spectra
14
Install Spectra on the First Computer
1. On your first computer, go through the normal installation process as described in the "Basic Installation" section of this chapter.
2. When choosing the type of installation, select the "Network – First Workstation" option for the software you have purchased.
3. Enter the multi-user product code(s) for the software you have purchased. Note: You cannot install Spectra on your network if you have not purchased multi-user codes. Then register your software.
4. You will be asked where you want to put the data files. Select the shared folder and the "SpectraData" sub-folder you created in step 1.
5. Complete the installation process.
Install Spectra on the Remaining Workstations
1. Go through the basic installation process on each of your workstations.
2. When choosing the type of installation, select the "Network – Workstation Add-On" option.
3. You will be asked where the data files are located. Find the shared folder and select the "SpectraData" sub-folder you created in step 1.
4. Complete the installation process on each workstation.
Optimizing Spectra
Once you've completed the installation process, it’s important to check for any available software updates. If you need help following these steps, please call StudioPlus technical support. There are two ways to install the latest service release. The preferred method is to use Spectra's Internet Update Utility. The other option is to manually download the latest update from the StudioPlus website. Both options are described below.
Run the Internet Update Utility
The Internet Update Utility will use your Internet connection to find the latest update for Spectra and then automatically download and install it.

1: Installing Spectra
15
You can launch Internet Update Utility from two places:
Inside Spectra - Open the Help menu and click Check For Updates.
Windows Start Menu - From the Windows Start menu, go to StudioPlus Spectra 20xx > Utilities and click Internet Update Utility.
Manually Download Updates
The other option is to manually download the latest service release from the Downloads page on the StudioPlus website (www.studioplussoftware.com/downloads.aspx). When downloading the update, save it to a sub-folder called "SPUpdates" inside your Spectra data folder. When an update is saved in this folder, Spectra will automatically install it the next time you run Spectra on each workstation.
HERE'S A FLASH FOR YOU! StudioPlus Software is committed to continually improving its family of software products. We encourage you to put “Revisit www.StudioPlusSoftware.com/Help/Index.aspx” on your task list to insure you have the latest update of Spectra installed.

16
2: Protecting Your Data
As you begin using Spectra, you will be collecting information that is critical to the success of your business. You will build your database by adding all your clients and prospects, as well as your daily schedule and your invoices. After a few weeks or months, your company will rely on this data for virtually every aspect of your business. That's why it is so critical to protect your data with regular backups and routine maintenance.
ATTENTION! Do you have a disaster recovery plan in place for your Spectra database? As you consider your options, read the "Spectra Database Backup Best Practices" knowledge base article for our recommendations for keeping your data safe!
Spectra DataSafe
Spectra DataSafe is a secure, off-site backup service that automatically backs up your Spectra database. Your data files are automatically compressed, encrypted, and uploaded to our secure servers – every night! Read the DataSafe product page (www.StudioPlusSoftware.com/Products/DataSafe.aspx) on our website for pricing and additional information.
1. Subscribe to DataSafe.
2. Enable the job in the Spectra Control Center.
3. Check your email and Control Center logs regularly to make sure your backups are working correctly.
For more information and setup instructions, read the "Control Center" and "DataSafe" topics in the Spectra User Guide. Contact StudioPlus tech support if you need assistance.
The Database Utility
Your Spectra software includes a Database Utility, which provides a variety of easy-to-use tools you can use to back up and maintain your data. In this section we'll look at two of these tools – Backup Data Files and Compact and Repair Data Files. For more information about the other Database Utility tools, read the "Database Utility" topic in the Spectra User Guide.

2: Protecting Your Data
17
To launch the Database Utility, open the Windows Start menu and make your way to All Programs > StudioPlus Spectra 20xx > Utilities. Then click Database Utility.
Back Up Your Data
Your Spectra data is stored in a database file called "SamDB.MDB." This file contains all your clients, invoices, and even your Spectra product code. Follow these steps to manually back up your data with the Database Utility:
1. Exit Spectra if you have it running.
2. Open the Database Utility and click Backup Data Files.
3. Verify the backup location and then click Backup.
4. The backup process will create a zip file of your SamDB.MDB, naming the file with the current date.
RECOMMENDATIONS:
Back up daily! Store a copy of the database on a different computer weekly and save a copy to a flash drive to take off-site weekly.
If you use any other automated backup utilities, make sure the Spectra SamDB.MDB is included in your automatic backups.
Compact Your Data
Good database maintenance includes performing a regular "Compact and Repair" on your data. Think of this as a tune-up for your database.
1. Exit Spectra if you have it running.
2. Open the Database Utility and click Compact and Repair Data Files.
3. You will be warned to make a backup first. Make sure you do!
4. Click Compact and Repair Now.
RECOMMENDATIONS:
If you run Spectra on just one computer, compact your database every other week or as needed. If you are on a network, use the compact utility weekly.

18
3: Setting Up Your Preferences
The Preferences Wizard
The Preferences Wizard will help you enter the most important settings in Spectra so you can get up and running quickly. However, don’t forget to go back later and set all your company and user preferences. There are many additional settings available to you in the Spectra Maintenance menu, allowing you to customize how Spectra works for your studio. Please refer to the "Spectra Maintenance" section of the Spectra User Guide for a complete list of the options available to you.
1. The Preferences Wizard should automatically start the first time you log into Spectra. If it doesn't, go to Maintenance > Preferences and click Preferences Wizard to start it.
2. Click Next on the introduction page to begin.
3. Company Information - Enter or modify your company information. This information will print at the top of your reports, invoices, and receipts. Note: Do NOT include your business name in the Report Header section! Spectra will automatically insert your company name on each invoice and report, using the name you provided when you registered your software. Along with your contact information, select a image file to be used as your company logo. We recommend a 300 dpi, 1x2 or 1x1 inch image. Click Next to continue.
4. Users - Type in the names and initials of each person that will use Spectra and then click Next to continue.
WHAT IS A USER? A user is anyone who uses your studio (or any other work area), such as a photographer or salesperson. A user is also any employee for whom you may need to schedule sessions or appointments.
5. Resources - Resources are areas within your studio or other resources and equipment that you want to maintain a schedule for. Think about your camera rooms, framing area, consultation rooms, special cameras, or even a van or trailer. In order to schedule these areas and equipment, you need to define them. Enter your resources and click Next.
6. Studio Hours - Use the drop-down lists to select your studio's Open and Close Hours for each day of the week. Note: These settings will simply determine the shading that appears on your calendar – you will still be able to schedule appointments “after hours.” For days that your studio is closed, enter the same time for both the open and close times. Click Next to continue.
7. Client Groups - Create groups to organize your clients. Think of all the ways you may want to categorize your clients for reporting or marketing, and remember, you can always add more later. When you begin using Spectra, you will be able to assign your clients to as many groups as you wish. For example, a client may belong to the "Portrait" group, the "Wedding" group, and also be a member of your "Newsletter" group. A high school student could fall into the "Jefferson High" group, the "Class of 2013" group, and so on. Click Next to continue.

3: Setting Up Your Preferences
19
PATHWAYS TO SUCCESS Client groups help you manage information, analyze profitability, and market your services. Be creative! Think about your clients in various ways. Set up a group labeled "Prospect" for people who might only require a phone call or a couple mailings to become loyal clients. How about “Animal Lover” for people who would like to have a portrait taken with their pet? Or a group titled “No Contact” for clients who don’t want to receive marketing materials or phone calls.
8. Lead Sources - Enter the various ways people find out about your studio, such as advertisements, the yellow pages, Facebook, blog ads, Pinterest, partner businesses, or even client referrals. Click Next to continue.
9. Session Types - Enter the types of sessions you offer, such as “Portrait” or “Senior Deluxe.” Set the default amount of time (in minutes) each type of session takes. From the drop-down list, choose a calendar color for each session type. Click Next to continue.
WHY DO I NEED DIFFERENT SESSION TYPES? Here are several reasons you may want to set up multiple session types in Spectra: 1. Each session type can be a different color on the calendar. 2. Each session type can have a unique default duration/length. 3. Each session type can display a different price list (not available in the Express version).
10. Appointment Types - Now enter the different types of appointments you schedule, the duration (in minutes), and the color they should appear on the calendar. Click Next to continue.
WHAT IS THE DIFFERENCE BETWEEN A SESSION AND AN APPOINTMENT?
SESSION: Any time you will actually be TAKING photos, such as a client portrait session or a commercial shoot.
APPOINTMENT: Anything else placed on the calendar, such as a wedding consultation or a staff meeting.
11. Digital Paths - To use Spectra's digital workflow features, enter the path of the Photoshop EXE (or other photo editing software). Click on the browse (...) button to search for it. You will also need to enter the path of the folder where you want your digital images stored. For more information on using Spectra to track your digital workflow, see the “Digital Workflow” chapter of this guide. Click Next to continue.
ATTENTION!
Storing Digital Images - Think through how you currently store (or how you want to start storing) your image files. Here’s our recommendation: 1) Create a folder for your images and label it "Images." 2) Link that folder to Spectra by entering the path in the Preferences Wizard.
For each session, Spectra will automatically create a sub-folder in the "Images" folder, naming it to match the session. Spectra will also create five sub-folders in each session folder – one for raw images, one for hi-res images, one for preview images, one for retouched images, and one for rendered images. Note: These sub-folders can be renamed if desired.
Note: If you are using a network, make sure your digital image folder is on your shared drive and the drive is mapped to the same letter on every computer.
12. Organizations (Spectra Professional) - If you are using Spectra Professional, the next page of the wizard will ask about your organizations. Enter the names of the schools, churches, or other organizations that your clients belong to. Click Next to continue.

Getting Started With Spectra
20
13. Default Sales Tax - Select the state from the drop-down list and type in the rate (7½% should be entered as 7.5) for your default sales tax. If your default sales tax is a state sales tax, leave the city blank. If it is a city sales tax, enter the city name. To find out how to add more sales tax rates and more locations, refer to the "Spectra Maintenance" chapter of the Spectra User Guide. Click Next.

21
4: Finding Your Way Around
Spectra Home Page
Important daily information is summarized on the Spectra Home page, including your upcoming schedule, tasks, phone calls, weather forecast, and a variety of other information. Each Spectra user can customize their home page to display the information that is critical for them to view. Click Customize Page to set individual home page preferences. This choice also allows you to add panels that may not appear by default, such as the Web Services panel, or turn panels off.
Getting Around
In addition to the home page, Spectra has multiple work areas (called "hubs") for Workflow, Calendar, Clients, Sessions, Invoices, Calls*, Messages*, Tasks, Production*, and the Dashboard*. * Depending on the product you own, some of these hubs may not be available.

Getting Started With Spectra
22
Hub Menu
The Spectra hub menu is the main way to get around in Spectra. Click a menu item to open a different hub. You can also get to the different hubs by using the Go menu (right above the hub menu) or the corresponding keyboard shortcuts (listed on the Go menu).
HERE'S A FLASH FOR YOU! The Spectra hubs provide quick lists of your data and also allow you to easily view
individual records. Double-clicking any entry in a list will open the record.
You can easily sort the records by clicking on the column headings. Click once to sort by the column in ascending order. Click again to sort in descending order. You can also resize the column headers. Place the cursor on the line between two columns until it turns into a two-way arrow and drag to desired width.
You can print a list from any hub by clicking Print on the ribbon. Most lists will print as displayed or you will be given options to get the desired output.
Most of the hubs have an Export to Excel tool to create a Microsoft Excel spreadsheet of the current view.
To select multiple records for deleting, click on the first record, hold down the Shift key and click on the last record. Those two records and the records between them will be selected. To select multiple, non-consecutive records, click on one record, then hold down the Ctrl key and click on the rest of the desired records. Once the records have been selected, click Delete to get rid of the selected records. Note: A warning will likely be displayed indicating that any child records will be deleted as well. This means any related sessions, invoices, or production orders will also be deleted.
Spectra Menu Bar
The Spectra menu bar is a great tool to go behind the scenes. You can customize almost anything from the Maintenance menu, get around quickly from the Go menu, or do your reporting from the Reports menu. You can use the File menu to change users and access the time clock.
Shortcut List
Spectra's customizable shortcuts are very handy! They can be set up to quickly bring you to commonly used areas within Spectra, launch external applications, or open websites. Open the shortcut list by clicking the small arrow just to the right of the Dashboard menu item (see the graphic above).
1. To create personal shortcuts, open the shortcut list and select Add User Shortcut. Or, go to Maintenance > Preferences > User Preferences and click Define User Shortcuts.
2. Click Add to add a new shortcut.
3. Choose whether the shortcut is Internal or External. Internal shortcuts are shortcuts to another screen in Spectra. External shortcuts will open another program or website.
4. Enter a Description for the shortcut. This is what it will be called on the shortcut list in Spectra. For internal shortcuts there is a list of available shortcuts you can choose from.

4: Finding Your Way Around Spectra
23
5. For external shortcuts you must also select the path. If you are creating a shortcut to another program, browse to that program's EXE file. If the shortcut is for a website, enter the web address (i.e., http://www.StudioPlusSoftware.com).
6. To create shortcuts that are available to every user, go to Maintenance > Studio > Studio Shortcuts.
FOLLOW UP... Set up some shortcuts in Spectra.
- Make an external shortcut for the Getting Help Overview page on the StudioPlus website.
- Set up another one for your studio's website.
- Set up an external shortcut to your photo editing software (i.e., Photoshop).

24
5: Working With Clients
Creating New Clients
To enter a new client, click File > New Client (or Ctrl+N) from any hub. This launches the Client Wizard, which will take you step-by-step through entering a new client into your database.
The Client Wizard
1. Type the client's last name, press Tab, and then type the client's first name. Spectra will automatically capitalize the first letters. Spectra will also format the phone number for you. Simply type 5551212 and press Tab.
2. Enter in the zip code information and press Tab. Spectra will enter in the city and state automatically. If not, you can add the city manually in Maintenance > Studio > Postal Codes.
PATHWAYS TO SUCCESS The more client information you fill in, such as birthday, anniversary, etc., the more data is available for marketing and client analysis. Don‘t forget to ask your new clients where they heard about you so you can complete the Lead Source section.
3. Call Warning - This can be an extremely helpful feature to help you avoid stepping on client toes by informing employees of important client information right away.
HERE'S A FLASH FOR YOU! Have you ever wished that you or another employee knew a key piece of information about five minutes earlier than they did? Spectra's Call Warning feature is a great way to keep you and your staff informed of key information as soon as a client record is opened. Any time Spectra displays a client‘s name and phone number, it will also display the call warning in bright red letters. Here are some sample call warnings: "Works nights, call after 5:00 pm!" or "Don’t talk to husband, it’s a surprise!" or "Great client, take good care of!" or even "Difficult client, don’t schedule anything!"
4. Continue entering client information through the remaining pages of the Client Wizard. Click Finish to save this new client.

5: Working With Clients
25
Importing a List of Clients
Do you have a list of clients in another program, such as MS Excel, QuickBooks, or even another business management program?
1. Use that software's export feature to export your clients' names, addresses, emails, and phone numbers to an Excel spreadsheet or text file (CSV). Refer to your software's user manual for instructions.
2. In StudioPlus Spectra, go to Utilities > Import Clients to start the Client Import Wizard.
3. Find the file you want to import and click Next.
4. On the left you'll see a spreadsheet containing the list you're importing. On the right you'll see a list of Spectra fields.
5. Your job on this page is to assign a Spectra field to each column of information you want to import. Note: You don't need to import every column, just the ones that contain information you want in Spectra. Just drag a field name from the right and drop it on the appropriate column. The column header will turn green when it has been "assigned." Do this for each column you want to import. When finished, click Next.
6. You'll be given several options for dealing with duplicates. Accept the defaults and click Next.
7. The next page asks you to choose from a list of things Spectra can automatically perform on this set of clients during the import process, such as assigning them a client number, adding them to a client group, and so on. Accept the defaults and click Next.
8. On the final screen, click Finish to complete the import process.
For more details about importing and exporting clients, read the "Client Records" topic in the Spectra User Guide, or watch the "Client Import & Export" training video.

Getting Started With Spectra
26
Finding Existing Clients
Open the Clients hub using the hub menu (or F5).
Clients Hub
1. Set the Search By criteria in the Search group of the ribbon and press Enter. All clients matching your criteria will be shown.
HERE'S A FLASH FOR YOU! Just type in the first couple of characters and Spectra will display all clients with names beginning with those characters. For example, typing in "Jo" will list all your clients with the name of Johnson, Jones, Jordan, etc.
2. Click one of the column headers and Spectra will sort the list in ascending order by that column. Click again to sort in descending order.
3. Select the client you wish to view and double-click to open the client record. You can then view, modify, or delete information as needed.
PATHWAYS TO SUCCESS Have you noticed any red and yellow notification lights? Throughout Spectra, you may see a small red or yellow spotlight. These lights let you know when there is important information about a client that you should pay attention to. Maybe they have an outstanding invoice and owe you money, there is an overdue phone call waiting, or some notes should be looked at on the notes tab. Allow Spectra to make sure you and your staff don‘t overlook key pieces of information when working with your clients.
FOLLOW UP... Create a client.
Import a sample list.
Find the clients you imported and delete them.

27
6: Scheduling
The Calendar
Click Calendar on the hub menu to open the Spectra calendar. This is the best way to view the schedules of the users and locations you defined in the Preferences Wizard. By default, the calendar displays the schedule for the current user and today's date. Use the mini-calendars on the right to select the days you wish to view. You can also choose to view by users and resources.
HERE'S A FLASH FOR YOU! Schedules for multiple users and locations can be viewed simultaneously in an easy-to-read, graphical layout, making it easy to compare schedules or search for session or appointment availability. Double-click any available time slot to launch the user-friendly Scheduling Wizard which will automatically create a session or appointment for a new or existing client, along with the invoice and receipt of payment, if necessary. Double-click an existing appointment or session to see the details or make changes.
Calendar
Navigating the Calendar – Viewing Tips!
To view the schedules of multiple users or resources, click and drag to highlight their names.
To de-select any user or resource, press the Ctrl key and click their name.
To view multiple dates, press the Ctrl key and click the desired dates.
To view a range of dates, click on the first date, then press the Shift key and click the last date in desired range.

Getting Started With Spectra
28
To view today's calendar, click Go To Today on the ribbon.
Use the Work Week, Week, and Month buttons on the ribbon to change the calendar view.
Use the mini-calendars to quickly see which days have appointments or sessions – the days will appear in bold.
To view the calendar for the previous month or next month, click the appropriate arrow button above the top mini-calendar.
To quickly scroll through the months, click the name of the month above the top mini calendar and hold the mouse button down. Move your cursor up to scroll backward and down to scroll forward. The farther away from the center month that you move the cursor, the faster you'll scroll. This action is especially useful in scrolling to previous or future years.
When viewing multiple calendars in the day or work week view, you can use the Group By option on the toolbar. You can group by date or by owner.
Scheduling an Appointment or Session
You're ready to schedule that first session. Double-click an empty time slot on the calendar to launch the Scheduling Wizard. Choose whether to create a session, a linked appointment (with a client), or an unlinked appointment.
HERE'S A FLASH FOR YOU! It's important to understand that Spectra makes an important distinction between sessions and appointments. Here's an easy way to understand the terms used in Spectra:
SESSION - Any time you will be actually TAKING photos, such as a portrait session or commercial shoot.
APPOINTMENT - Anything else placed on the calendar, such as a wedding consultation or staff meeting. o Linked Appointment - Any type of appointment that involves a client, such as a
wedding consultation. o Unlinked Appointment - Any appointment that does not involve a client, such as a
staff meeting.
If the client has never been entered into your Spectra database, you'll enter the client information now.
1. Type the client's last name, press Tab, and then type the client's first name. Spectra will automatically capitalize the first letters. Spectra will also format the phone number for you. Simply type "5551212" and press Tab.
2. Call Warning - This is a very helpful feature that can keep you from stepping on client toes and inform employees of important client information right away.
3. If you've chosen to create a session, enter the session information next. The description section isn't critical, but can be used for information purposes. The end time will change automatically, based on the session type. Make sure you select the correct photographer and assistant!

6: Scheduling
29
4. You'll be asked if you want to create an invoice now to cover the session fees. At this point, the answer is "No." We haven't set up pricing or invoicing yet! We'll get to that soon!
5. Click Finish to complete the Scheduling Wizard. At this point, a new client record has been created and the session/appointment is displayed on the calendar. If a session needs to be postponed or rescheduled, you can use the calendar's drag-and-drop feature to move it to a new time slot. Change the length of the session by re-sizing the session box.
FOLLOW UP... Open the Sessions hub and find a session you've scheduled.
You can also create a session right from a client. Try it by opening a client and clicking New Session
on the ribbon.

30
7: Basic Communication & Marketing
Communication Overview
One of the most powerful ways Spectra can enhance your business is by helping you communicate with your clients. Spectra does that not only by providing a variety of ways to communicate, but also by tracking every communication you make, recording exactly what was communicated and when. Spectra's communication tools include:
Phone Calls - Create phone calls to record what you said to a client and to remind you to follow up. Schedule new phone calls to remind you or a staff member to contact a client in the future.
Email - Send emails to your clients, receive incoming email, and even copy and paste external emails into Spectra in order to keep your client's communication history all in one place.
SMS Text Messages - Send SMS text messages and receive replies.
Letters - Sometimes a printed letter is still just what you need! You can create form letters and then print them from Spectra, either individually or in bulk.
Messages Hub - This is your "inbox" for email and SMS text messages. You can sort the messages by user, department, due date, and more.
Communication Wizard - This is your tool to send bulk emails and text messages, create multiple call records, or print a whole group of letters. You can select a specific group of clients or build a sophisticated filter to find just the right set of clients.
Triggers - Triggers give you a powerful tool to automate your client communications. For example, set them up to automatically send an email or text message to remind your clients of their session or to follow-up with a thank you.
Form Letter and HTML Email builders - The Form Letter Builder gives you the power to create your own form letters to print or send as an email or text message. Design letters and contracts that include your text and branding and then merge fields from your Spectra data to personalize each one with specific client information, session information, etc.! The HTML Email Builder helps you to create a library of HTML emails that you can use for marketing and newsletters.
To get you started using Spectra to communicate with your clients, in the section we'll cover phone calls, basic email, and SMS text messages, showing you how to set these features up in Spectra and then how to use them.
Using Phone Calls
Spectra's phone call records help you keep track of your communication history with your clients. You can use phone calls to "take notes," either during or following a conversation with a client. Then you can set a date to remind you (or another staff member) to follow up. Or, you can schedule new phone calls to remind you to contact a client in the future. You can easily view a client's phone call history by opening up the client and looking at their Communication tab.

7: Basic Communication and Marketing
31
Create Phone Calls
1. Open a client.
2. Open the Communication tab on the ribbon.
3. Click New Call to schedule a call that needs to be made. Enter a description, choose the due date for the call, and use the Notes tab to type in any additional notes. You can even assign the call to another user if you want! Click Save & Close when done. The call will appear on the Calls hub, the assigned user's home page, and the client's Communication tab.
4. Or click Completed Call to enter your notes from a conversation that has taken place. Open the Notes tab and type in your notes. This call will already be marked as "complete." It will appear on the client's Communication tab but not on any call lists. Tip: To easily create a follow-up call, click Save & New on the call ribbon to schedule a new call for the same client.
Find Phone Calls
You'll find phone calls in the following places in Spectra:
Home Page - The Phone Calls panel displays calls for the currently logged in user that are scheduled for the next several days, along with any that are overdue.
Calls Hub - The hub displays all calls that have not been completed and can be filtered by user, department, or custom filter.
Communication Tab - On individual clients, sessions, and invoices, the Communication tab displays the entire communication history associated with that record.

Getting Started With Spectra
32
Emailing from Spectra
There are a variety of ways to use the emailing features in Spectra. You can send emails to your clients directly through Spectra, receive incoming email into your Spectra inbox, and even copy and paste external emails into Spectra in order to keep a client's communication history all in one place.
Set up Basic Email
To keep things simple, at this point we'll set up just outgoing email in Spectra. In order to send email, your email settings must be entered in your Studio Preferences.
1. Go to Maintenance > Preferences > Studio Preferences and open the Email tab.
2. Enter your SMTP settings. These are the same settings you would use in another software, such as Outlook. If you're not sure about these settings, ask your Internet service provider.
3. If you would like to use unique email settings for a specific user, go to Maintenance > Preferences > User Preferences and enter the appropriate settings on the Email Override tab. Note: For this specific user, Spectra will use these settings instead of the email settings in Studio Preferences.
Send Email
1. Open a client.
2. Open the Communication tab on the ribbon (up at the top).
3. Click New Email to create a new blank email. Note: If you click the little arrow instead, you'll see a list of any form letters, HTML emails, and custom reports that may be available. All the common email tools are available in Spectra. When the email is ready, click Send on the ribbon. The sent email will be displayed on the client's Communication tab, as well as on the Messages hub.
4. Or click Completed Email to create a blank email to use if you want to copy and paste an email from another program. This give you a way to consolidate the client's communication history in Spectra.
Sending SMS Text Messages
HERE'S A FLASH FOR YOU! Wondering if text messaging is right for your business? The
"Getting Started with SMS Text Messaging" knowledge base article will give you a great overview of the powerful SMS text messaging features in Spectra. You can find it in the "Knowledge Base" section of our website.
Sign up for a Messaging Plan
Before you can use the SMS text messaging features in Spectra, you will need to enroll in an SMS text messaging plan with StudioPlus. Find out more at

7: Basic Communication and Marketing
33
www.StudioPlusSoftware.com/Products/SMSmessages.aspx. You'll receive an email from StudioPlus with the information you'll need to set up the text messaging features in Spectra.
Set up Outgoing Text Messaging
Just like with the email setup, we'll get you started by setting up just outgoing text messaging at this point.
1. Go to Maintenance > Preferences > Studio Preferences and open the Studio Info page.
2. In the StudioPlus Account Information section, enter the Account Name and Account Password you received from StudioPlus.
3. Click OK to save your preferences.
Send Text Messages
1. Open a client.
2. Open the Communication tab on the ribbon (up at the top).
3. Click New SMS to create a new text message. Text messages are limited to 160 characters. As you type your message, the counter on the left will let you know how many characters you have remaining. When the text is ready, click Send on the ribbon. The sent text message will be displayed on the client's Communication tab, as well as on the Messages hub.

Getting Started With Spectra
34
HERE'S A FLASH FOR YOU! Spectra's Communication Wizard makes it easy to send bulk emails and text messages, create multiple call records, and print a whole group of letters. When combined with the Form Letter Builder, you have a powerful way to connect with your clients regularly and professionally. We highly recommend taking a look at these features as soon as you feel comfortable using Spectra!
FOLLOW UP... Set up incoming email by referring to the "Setting up Incoming Email" topic in the Spectra User
Guide.
Receive SMS text replies by enabling incoming text messages. For instructions, read the "Setting up
SMS Text Messaging" and "Control Center" topics in the Spectra User Guide.
Find out more about automating your communications by watching the "Triggers" training video.

35
8: Financial Tracking
Financial Tracking Overview
This chapter will show you how to create a simple price list in Spectra, set up your sales tax, guide you through creating your first invoice, and introduce you to the accounting link.
Setting Up Your Price List
You can use Spectra to set up very sophisticated pricing schemes, including multiple price lists, standard and unit-based packages, multiple pricing levels, and option and enhancement levels that automatically adjust the price of each product on-the-fly. For now, we'll just introduce you to the basic price list features you'll need to start invoicing quickly. At the end of this section you'll find resources you can use to explore the additional features available in the price list.
1. Click Maintenance > Price List > Price Lists to set up your price lists.
Price List Maintenance
2. By default, Spectra has one price list called "Portrait." However, if you are using Spectra Standard or Professional you may want to set up a different price list for each session type, such as weddings and seniors.

Getting Started With Spectra
36
WHY WOULD I NEED MULTIPLE PRICE LISTS?
( only) The best way to determine whether you should consider multiple price lists is to answer these questions:
Do you charge the same price for an 8X10 a la carte color print, regardless of the session type?
Or, do you charge one price if the print is for a wedding and a different price if the print is for a high school senior?
If your a la carte prices are different for each session type, you'll probably want to set up multiple price lists. Spectra will then automatically display the appropriate price list, depending on the session type. For items that are the same price regardless of the session type (e.g., frames, albums, or gift certificates), you can use a special, generic price list that Spectra can display in addition to the session-specific price list.
3. To add a new price list, click New Price List on the ribbon.
4. To remove a price list, select the price list and click Delete on the ribbon.
5. Before you begin entering your products, you must set up some item groups to organize the products within your price list. First, select the price list you want to set up. Then click New Group on the ribbon. Enter a group name and click OK. Repeat this process to create as many groups as you need.
WHAT ARE ITEM GROUPS? Item groups give you the flexibility to organize your products into convenient folders, making them easier to find when creating an order.
ATTENTION! Don‘t confuse an item group with an item type (session fees, prints, packages, composites, services, and miscellaneous)! Item types allow Spectra to differentiate between items. Because they each have unique functionality within Spectra, item types CANNOT be redefined. Groups, on the other hand, can be defined and redefined as needed. You can create as many groups as you need and drag-and-drop to display them in the desired order.
6. Now you're ready to set up your first item. Select the group you want to add the item to and click New Item on the ribbon. You will see the Price List Item maintenance page (as shown below). Don't be overwhelmed by the amount of information on this screen! You only need to set up two or three pieces of information for each item. The process will go pretty quickly once you've done a few.

8: Financial Tracking
37
Price List Item Maintenance
7. Item Identifier - If your studio uses unique item codes to represent individual items, enter that code as the item identifier (e.g., 810CP for an 8X10 color print). This field is optional but using it will help you quickly add items to an invoice and report on product sales down the road.
8. Item Description - The description should be what you want to appear on the client's invoice. This field is required.
9. Item Type - Select the appropriate type from the six item types available in Spectra - Composite, Miscellaneous, Package, Print, Service, Session Fee. This field is required.
HOW DO I CHOOSE THE ITEM TYPE? Each item type has a unique function in Spectra, so it's important to choose the right one for each of your products. Here's a brief description of each:
Composite - This type is used for composite products that have been created with
Spectra's composite template feature. Miscellaneous - Examples of miscellaneous could include digital media and albums. Package - A package is simply an item that contains multiple products. When you select
this item type, several additional features will be available, including a place for you to
select the package components. Print - A printed product with specific dimensions. Service - Examples of a service include: copy & restoration, add-on pose fee, basic
retouch, extended travel, and so on. Session Fee - Fees related to a photo shoot.
10. Item Group - By default, the item group will be the one you had highlighted when you created the item. If you change the item group, the item will be moved to whatever group you select. This field cannot be left blank.

Getting Started With Spectra
38
11. Standard Price - Enter the amount you charge your clients for this product. Although not actually required, the standard price is critical for invoicing and reporting.
12. Non-Taxable - Check this box if sales tax should never be charged for the item.
13. This concludes the required (and highly recommended) fields you should complete when setting up a new item. Click Save and New on the ribbon to save the item and start creating another one.
14. Repeat steps 7-13 for each item you need to set up.
15. Close the Price List Item maintenance screen when finished.
WHAT IF I HAVE MY PRODUCTS AND PRICES IN EXCEL? Spectra provides an easy way for you to import your price list! The Price List Import Wizard will walk you through importing a price list from either an Excel file or a text file (CSV). For more information, read the "Price List Import" topic in the "Spectra Utilities" chapter of the Spectra User Guide.

8: Financial Tracking
39
Setting Up Your Sales Tax
During the Preferences Wizard you entered one sales tax rate to be used as your default rate. If you didn't set that up, or if you need additional sales tax rates, you'll need to do some additional setup before you begin invoicing. Note: Even if you completed the sales tax page in the Preferences Wizard, it's a good idea to walk through the following steps. You'll be more confident about making adjustments later if you see how things are set up.
1. Go to Maintenance > Preferences > Studio Preferences and open the Invoicing page.
2. Click Sales Tax Maintenance to add and modify your individual sales tax rates.
3. You should see the sales tax you entered during the Preferences Wizard already in the list. Use the Add, Remove, and Modify buttons in the lower portion of the window to adjust your rates as needed.
4. When you're finished, click the red "X" to close the list.
5. Now just verify the Default Sales Tax (right under the Sales Tax Maintenance button). Click the down arrow to select the rate you want Spectra to automatically use when you create a new invoice. Note: You will be able to select a different rate on individual invoices when needed.
FOLLOW UP... To find out more about setting up your price list and invoicing options, watch the following videos:
o "Invoicing Setup 1 - The Price List"
o "Invoicing Setup 2 - Advanced Pricing"
o "Invoicing Setup 3 - Invoice Options"

Getting Started With Spectra
40
Invoicing in Spectra
You can create invoices from multiple places in Spectra. However, no matter where you create the invoice from, the process and the screens are generally the same. An invoice can be created directly from the calendar using the Scheduling Wizard, from a client record, or from a session record.
THERE ARE THREE WAYS TO CREATE AN INVOICE - WHAT'S THE DIFFERENCE? Creating an invoice during the Scheduling Wizard is a common way to record session fees that may be charged to a client during the scheduling process. A payment can either be recorded at the time of scheduling or later, on the day of the session. Invoices for product orders should usually be created from the session record. The only time an invoice should be created from a client record is when the client does not have a session but still wants to purchase a product, such as a frame.
ATTENTION! Session-based invoices will comprise 90% or more of your invoices. Whenever a customer is purchasing an item related to a session – even if that session was for a different client – you should create the invoice from the session. Only create client-based invoices for items purchased when there is no session, such as retail items.
Invoice Record
Creating an Invoice
To create an invoice during the Scheduling Wizard check "Create an invoice now to cover session fees" when prompted.

8: Financial Tracking
41
To create an invoice from a client or session:
1. Click Invoice in the New group of the ribbon. Note: The following instructions assume that the Invoice Wizard has not been turned off. If you've disabled the wizard, these instructions should still be helpful, with a little intuition from you.
2. The first page of the Invoice Wizard asks you to verify the Session Client and the Bill-To Client. Click Next.
3. In the Invoice Information section, you'll notice the invoice number is blank. The invoice number will automatically be created when the invoice is saved. Enter any notes that you want to appear on the invoice. Click Next.
4. To add items to an invoice, simply double-click items on the list at the left and they'll be added to the invoice. If you use item codes (or item identifiers), you can enter the code in the Item No column and the rest of the line will automatically be completed. Enter the quantity and repeat the process until all items have been added. Click Next.
5. When prompted to choose whether to "Create a Payment Record Now," check or uncheck the option depending on whether the client is making a payment at this time. If so, enter the payment information as prompted.
6. At the end of the wizard, an invoice will be printed unless you uncheck the Print Invoice checkbox.

Getting Started With Spectra
42
Processing Credit Cards
In the USA, StudioPlus has chosen to integrate Spectra with Merchant Warehouse, an industry-leading credit card processing company. The integration does not require any additional software. The only requirement is that the computer you’re using for Spectra has an Internet connection and you have a Merchant Warehouse account.
HERE'S A FLASH FOR YOU! In addition to making credit card processing extremely easy,
StudioPlus and Merchant Warehouse take much of the hassle out of the requirements necessary for your business to become PCI compliant. Read more about PCI compliance and Spectra in the "Credit Card Processing" topic in the Spectra User Guide.
SET UP A MERCHANT WAREHOUSE ACCOUNT
1. Start the process by getting a no-obligation quote from Merchant Warehouse (http://www.MerchantWarehouse.com). Read more about Merchant Warehouse on our website (www.StudioPlusSoftware.com/help/credit_cards.aspx).
2. Once your account is established, Merchant Warehouse will email you your unique account credentials.
3. Test your account by logging in to the Merchant Warehouse gateway and processing a payment for $1. If everything looks good, void the test transaction.
SET UP CREDIT CARD PROCESSING IN SPECTRA
To get started processing credit cards with your Spectra software, follow these steps:
1. Make sure you've set up your Merchant Warehouse account and received your account credentials (see above).

8: Financial Tracking
43
2. Go to Maintenance > Preferences > Studio Preferences and open the Credit Card page.
3. Enter the Site ID, Key, Name, User Name, and Password on both the Keyed and Swiped tabs. Note: You may or may not have received two sets of credentials, one for processing keyed transactions and once for processing swiped transactions. If you only received one set of credentials, use them for both Keyed and Swiped transactions. You must have credentials entered on both tabs.
4. Spectra provides two validation options for an added level of security. These are optional features within Spectra that are available in addition to the security already provided by Merchant Warehouse. Check one or both of the options to have Spectra automatically validate the cardholders Address and/or Security Code (from the back of the card). Note: Using these features does not lower your rates with Merchant Warehouse.
5. In the PCI Compliance section, make sure the option to "Do not store credit card numbers..." is checked.
6. Set up a data entry validation in Spectra to make sure all credit card payments are successfully authorized before saving.
a. Go to Maintenance > Studio > Data Entry Validations.
b. Scroll down to Payment - Credit Card Auth Code.
c. Make this a Required field so users will not be allowed to save a credit card payment without an authorization code.

Getting Started With Spectra
44
7. Create test client and invoice, and then process a test payment in Spectra.
PROCESS CREDIT CARDS
To process a credit card in Spectra using Merchant Warehouse:
1. From a Spectra invoice, create a payment and select one of your credit card payment methods.
2. Two additional buttons will be displayed – Get Swiped Card and Get Keyed Card. Click the option you want to use.

8: Financial Tracking
45
Get Swiped Card - A Merchant Warehouse window will open and you can swipe the client's card using a card reader purchased from Merchant Warehouse (either encrypted or non-encrypted).
Get Keyed Card - Manually enter the credit card details on the Merchant Warehouse window provided.
3. After you swipe or key in the card, a message will let you know if the transaction was approved or declined. If approved, Spectra will automatically save the payment.
FOLLOW UP... Read about PCI compliance and Spectra in the "Credit Card Processing" topic in the Spectra User
Guide.

Getting Started With Spectra
46
Accounting Integration
Spectra gives you the accounting tools you need to link with accounting software like QuickBooks, Simply Accounting, or MYOB and to generate your financial reports. The accounting process starts by performing a “posting” – a process where financial transactions like invoices, payments, credit memos, and refunds are locked into Spectra. Reports are generated and you can export your sales and receivables data to your accounting software. The benefit of this system is that Spectra is designed specifically for the photography industry, to track your clients and your sales. Your accounting software is specifically designed to track your expenses, payroll, and general financial reports, like your balance sheet and income statement. Linking the two gives you the best of both. Spectra will export your sales information to your accounting software so you get consolidated financial information without requiring you to enter your data twice.
DO I NEED TO USE THE ACCOUNTING FEATURES AND PERFORM POSTING? You are not required to post in Spectra. However, if you answer "yes" to any of the following questions, you should regularly post your financial transactions.
Do you want to export your financial transaction to external accounting software like
QuickBooks, Simply Accounting, or MYOB? Do you want to print a daily report of your cash receipts that matches your deposits? Do you want to lock financial transactions so they cannot be modified after a certain date? Do you want to generate a sales tax/VAT report?
If you answered "yes" to any of these questions, you should use Spectra's posting procedures.
Setting up the Accounting Link
ACCOUNTING PREFERENCES
Note: If you're not sure which options are right for your business, we recommend you consult with your accountant to set up these preferences accurately.
1. Go to Maintenance > Preferences > Studio Preferences and open the Accounting page.
2. Accounting Method - Choose the accounting method your company uses.
3. Accounting Link - Select how you want Spectra to export to your accounting software. If you select QuickBooks Direct, Spectra will send the general ledger entries into QuickBooks directly without creating a file you need to import. If you use the entries that say just QuickBooks, Simply Accounting, or MYOB, Spectra will create an export file that you need to import into the program you are using. If you're not using external financial software, select None.
4. Export Path - Select the folder where you want Spectra to export your data. For QuickBooks Direct, this must be the location of those data files.

8: Financial Tracking
47
ATTENTION! Spectra will NOT create a new QuickBooks, Simply Accounting, or MYOB file each time you export your data. Instead, Spectra will add each posting to the same file. Each time you import your data into QuickBooks or Simply Accounting, remove the export file from the folder. Spectra will then create a new export file each time. If you do not move, change, or delete this file, duplicate entries will be created when importing into your accounting software.
5. Tax Agency - Fill in the name of the tax agency, if needed. Otherwise, Spectra will use a generic "Sales Tax" entry.
6. General Ledger Account Numbers - Enter your account numbers or names for each line item. The accounts Spectra will be posting to are described below:
ATTENTION! Once an account is created in QuickBooks, it cannot be deleted. Be sure your account names or numbers match before importing into QuickBooks. It would be a good idea to perform a backup in QuickBooks before attempting your first import from Spectra. That way, if things do not go as expected, you can simply restore the backup.
Customer Deposits/Accounts Receivable - The liability account that income from unposted invoices is credited to and then debited from once the invoices are posted.
Sales Tax Payable - An Accounts Payable or Current Liability account for sales tax that is credited when invoices are posted.
Shipping & Handling - The income account for shipping and handling that is credited when invoices are posted.
General Sales - The income account that is credited when invoices are posted for the sale of any items that do not have a GL sales account specified either in the price list or on the session type.
Discounts - The income account for discounts that is debited when invoices are posted. Line Item Discounts are debited from the Price List Item Discount GL Account. If this is blank, they are debited from the Session Type GL Discount Account. If this is blank, they are debited from the discount account listed in Studio Preferences.
Cash Back - The account you would use for items like petty cash. When you make a deposit, there is a space for cash back. If you deposit checks and want to get some cash back, it is this account that will be debited the amount of that cash.
Loyalty - A sales account used to track the amount of loyalty rewards that have been redeemed. When a loyalty reward is redeemed, it will be debited to this account, and will therefore show as a negative sale, like a discount.
8. Accounting Link Options - Enter the Class Code. Check Export Automatically During Posting if you want Spectra to create the export file as part of the posting process. If you do not check this option, you will have to go to Re-Export Posting Reports in order to create the QuickBooks file later.

Getting Started With Spectra
48
DEPOSIT ACCOUNTS
To complete the accounting link setup, enter the general ledger deposit account for the payments you record in Spectra.
1. Go to Maintenance > Invoice > Payment Methods.
2. Click Modify to open each payment method and then enter the appropriate GL Deposit Account.
3. Click OK to save each change before modifying another payment method.
End of Day Wizard
The easiest way to do perform your end-of-day close out is to use Spectra's End of Day Wizard. This wizard will walk you through processing your bank deposit(s) and posting your invoices.
ATTENTION!
Once you post records you cannot change them unless you have enabled User Security in Spectra and have set the appropriate security.
To unlock a posted invoice or payment you must log in with the proper security permissions. Then go to the invoice or payment you need to unlock and select Unlock Invoice/Payment from the Invoice/Payment menu. You can then make the necessary changes.
These changes will NOT be reflected in any posting or in your accounting software.
You can unlock and change records, but you cannot un-post them. Once a record has been posted, the posting date cannot be changed or removed.
1. To start the wizard, go to Tools > Accounting Link > End of Day Wizard.
2. Deposits - By default, there are two deposit pages in the wizard. The first deposit page processes your credit card payment methods and the second one processes your other payment methods (i.e., cash , checks, gift certificates, etc.).
3. Invoice Posting - This page contains a list of all invoices that are eligible for posting based on the accounting method you've set up in your preferences (see the "Accounting Preferences" section above).
4. Pay special attention to the Posting Date on the last page of the wizard! This date will default to today's date, however you may need to change it (i.e., you were gone or had a holiday and are now in a different week or month). Once a posting has been processed for a certain date, the posting date cannot be changed. The sales tax report is based on this date, so be sure it is correct.
HERE'S A FLASH FOR YOU! You can easily customize the End of Day Wizard using Spectra's Wizard Builder (found under the Tools menu). The wizard can be customized to include up to six deposit pages, an invoice posting page, and the final page.

49
9: Digital Workflow
Digital Workflow Overview
Workflow Hub
Spectra is more than just a great studio management tool – it's also a great digital workflow tool. You can benefit from Spectra's digital sales presentation, digital workflow management, and image management capabilities. Here's an overview of how to use the exciting digital tools in Spectra.
1. Schedule and shoot a photo session.
2. Capture the images from the digital camera.
3. Import the images into Spectra. This one-step process copies images from your camera card, creates JPEG previews, and burns the images to an archive CD.
4. Open your original images in Lightroom (right from Spectra) for organization and pre-touch. Then export the images back to Spectra, creating new previews in the process.
5. Prepare and present the images to the client using Spectra's sales presentation and slideshow.
6. Rank and group images, eliminating images the client does not want to order.
7. Compare images side-by-side to help the client in their decision-making process.

Getting Started With Spectra
50
8. Record the customer's order and any special notes for retouching. This process automatically creates an invoice in Spectra.
9. Confirm the order with the client and save it.
10. Print an invoice and an image detail sheet for the client to take with them.
11. Print an optional contact sheet of all the images for the client.
12. After the client leaves, complete your digital retouching in your photo editing software.
13. Use Spectra to create a lab CD or use Spectra to FTP image files directly to the lab for printing.
14. Use Spectra to create an archive CD and a catalog of archived images for future retrieval.
15. Delete your image files to free up disk space.
Setting up the Digital Workflow
1. You should have already set up your image path in the Preferences Wizard. For more advanced settings you can go to Maintenance > Preferences > Studio Preferences, and then click Digital.
Studio Preferences – Digital

9: Digital Workflow
51
2. For more information on the options available on the Digital preferences page, including specific information for setting up image paths on a network, read the "Setting up your Digital Workflow in Spectra" topic in the Spectra User Guide.
3. Open the Slideshow tab to set up any title slides you want to show at the beginning or end of your slideshows. The slides need to be JPGs, can be any size, and should have a black background. You can have up to four title slides at the beginning of the show and one or two slides at the end of the show.
Studio Preferences – Slide Show
4. Click OK to save and close the Studio Preferences window.
FOLLOW UP... To dig deeper into the digital workflow features in Spectra, read the "Setting up your
Digital Workflow in Spectra" topic in the Spectra User Guide.

Getting Started With Spectra
52
Using Spectra's Digital Workflow
Digital Workflow Stages The Workflow hub is set up so that you can manage your digital workflow as effectively as possible. On the Workflow hub are seven stages, representing the typical digital workflow: Capture, Present, Retouch, Produce, Upload, Archive, and Delete. The Digital Workflow is integrated with session, invoice, and production order records.
Starting the Digital Workflow
1. Create a session, either by double-clicking on the calendar or by clicking New Session/Appointment on the ribbon.
2. The new session will start out at the "Session Pending" status until the day of the session. On the day of the session, open the session record and change the session status to "Capture Images Pending."
3. The session should now appear at the Capture stage in the digital workflow.
1 - Capturing Images
The first step in the Digital Workflow is to capture your images and create preview files to be used in Spectra. Once you have completed your session you will want to import the images into your computer.
1. Spectra can copy the images off your camera card onto your server, create preview JPGs, and archive all the images right from the Capture stage of the Workflow hub. Select the session
from the list and click Import Images .

9: Digital Workflow
53
2. On the Copy tab of the Import Images screen, select the Copy From location (your camera card drive). The Copy To location can be either the raw or hi-res folder that Spectra created for this session. Select your renaming options.
3. Select the Create Previews tab and choose your resize options (our recommendation is 1000 pixels, 100 JPEG quality and 72 DPI).
4. Select the Archive tab and choose which images you want Spectra to burn to an archive CD for you – raw, hi-res and/or previews.
5. Click Import.
6. Now that you have captured the images for this session, click Session Status to advance the session to the next status (Spectra may have already prompted you to advance the session status).
Import Images - Create Previews Tab

Getting Started With Spectra
54
2 - Sales Presentation
The Present Images stage of the digital workflow is set up for you to prepare and present a slide show of the images to your client with a professional look and feel. You can set up and run slideshows from the Workflow hub or from the Session record.
Sales Presentation
PREPARING TO PRESENT IMAGES
1. Start out by setting up your presentation.
2. Open the Present Images stage in the drop-down list on the Workflow hub. Select the session from the session list. Your session images will appear to the left of the session list.
3. Click on an image. Then right-click the image to rotate the image, permanently delete the preview, colorize or crop the image, or view the image properties. Several additional options may be available.
4. To select multiple images, click on an image and press Ctrl and click on another image. To select a series of images, click on an image and press Shift and click on the last image in the series. Then make changes to all of the images that you've selected.
5. You can add image groups. Click Image Groups in the Show group of the ribbon. The image groups will appear on the right. Right-click in this section to add a new group. Drag images into your groups.

9: Digital Workflow
55
6. Use the drop-down boxes in the Options group of the ribbon to change the size of the previews and to view images with a certain ranking or those is a specific group.
7. Click on an image thumbnail and then drag it to a new location to rearrange the order of the images.
8. To change the slideshow settings for an individual slideshow, click Change Slide Show
Settings in the Sales Presentation group of the ribbon. See the "Setting up Spectra for Digital Imaging" section of this chapter to change the default options.
9. You can use MP3 or WAV files in your slideshow. Select between zero and five songs for each slideshow. After the last song is played, the sequence is repeated. Click OK to save and close the slideshow settings.
10. Now that you have prepared the slideshow for this session, click Start Presentation .
GIVING THE SALES PRESENTATION
When you are ready, you can sit down with your client and give your sales presentation. During the presentation you will show your slideshow, create a new invoice, and record your client's order.
1. From the Present Images stage of the Workflow hub, select the session and click Start
Presentation .
2. A new Sales Presentation screen will open. You will see the preview images on the left portion of the screen and the image viewer in the center of the screen. Move your mouse to the top of the screen to access the toolbar.
3. Use the toolbar to adjust the size of your previews, to hide the image viewer, to display your image groups, or start a slideshow.
4. Click Start Slideshow to begin your slideshow. A black screen will appear.
5. Press the spacebar to start the show and the music. Use the Sales Presentation Hot Keys (shown below) during the slideshow.
6. Press Esc to end the show. Click Stop Music if you wish to stop the music.
7. Now go through your images one-by-one and rank them using the red, yellow, and green buttons below the image viewer (red for "Not Selected," yellow for "Undecided" and green for "Selected" -- or simply tell your client "Yes," "No," or "Maybe").
8. To compare multiple images use Ctrl-click to select multiple previews on the left side, or use Shift-click to select a range. The image viewer can display up to 6 images at a time.
9. Once you have ranked all the images as either "Not Selected," "Undecided," or "Selected," open the toolbar and View Your Undecided Images. Then go back through these images one-by-one and rank them as "Not Selected" or "Selected."

Getting Started With Spectra
56
SALES PRESENTATION HOT KEYS
1, 2, 3 Rank images -- 1 = Selected, 2 = Undecided, 3 = Not Selected
Left Arrow, Right Arrow Next image, previous image
Control-click Select multiple images
Shift-click Select a range of images
Control (in cropping mode) Inverts the crop
Shift (in cropping mode) Allows for a free crop
Alt-1, Alt-2, Alt-3, etc. Assigns the selected image to the corresponding image group (i.e., Alt-1 assigns the image to the first image group).
RECORDING THE CLIENT’S ORDER
1. On the Sales Presentation toolbar, click Order Information. The order information will appear on the right.
2. On the toolbar you may want to select View Selected Images only.
3. To order products, select the image so that it appears in the image viewer. Then select the products from the price list. For packages, double-click in the image number column to assign the selected image to that package line item.
4. Click Save to save the invoice. Click New Payment to record the client's down payment.
5. After recording the client's payment, click Print to print an invoice and image detail sheet for the client.
6. See the "Working with Invoices" chapter of the "Spectra User Guide" for more information.
3 - Retouching Images
Now that you have captured your images and completed your sale, you may need to retouch your images. Set your session to the "Retouch Images Pending" status and it will appear in the Retouch Images stage of the workflow.
1. Highlight the session in the session list.
2. Choose Show Ordered Images Only to display your ordered images.
3. Hover over the images to view what products and services have been purchased for each image.
4. Click Edit Image to edit the image. Spectra will create a copy of your original hi-res image, save it in the session's "Retouched Images" folder, and then open that image in Photoshop (or your preferred photo editor) for retouching. See the "Working With Digital Imaging" chapter of the "Spectra User Guide" for more information.
5. Complete your retouching in your photo editing software.
6. Save the image in the session's "Retouched Images" folder.

9: Digital Workflow
57
7. To update your preview images in Spectra, right-click on the image and select Make New Preview.
8. Repeat steps for all remaining images.
9. Change the status of the session to the next status when your retouching is complete for each image in the order.
4 - Producing Images
The next step in the Digital Workflow process is to produce images. Spectra gives you multiple options to send your image files to your lab (via CD, DVD, or FTP) or allows you to print them internally using your own imaging software. You may move your sessions through different statuses at this stage (e.g., "Order Entered," "Sent to Lab," "Order Received from Lab," etc.).
1. When you have completed your retouching, you are ready to send your images to a lab.
2. Determine if your vendor prefers a CD or an FTP. Spectra has the ability to create either one.
SENDING OPTIONS
Use this feature to send your images to lab by either burning a lab CD or FTP'ing your images to a lab. In addition to including all necessary image files, an Adobe PDF or an XML file of the order can also be sent to the lab. Check with Spectra support or your lab to see which labs currently accept the StudioPlus Spectra XML order export.
CD Burning
To burn to a CD you can either use a third-party CD burning software, such as Roxio's Easy CD Creator software, or the integrated CD burning in Windows XP and Vista. See the "Workstation Preferences – Miscellaneous" chapter in the Spectra User Guide for more information about setting up your options. If you are using a CD creation program like Roxio's Easy CD Creator, then you must enable the CD to be writable before making the lab CD in Spectra. See the documentation on your program for information.
DVD Burning
To burn to a DVD you can either use a third-party DVD burning software, such as Roxio's DirectDVD software, or the integrated DVD burning in Windows Vista (Windows XP does not have integrated DVD burning.) See the "Workstation Preferences – Miscellaneous" chapter in the Spectra User Guide for more information about setting up your options. If you are using a DVD creation program like Roxio's Easy DVD Creator, then you must enable the DVD to be writable before making the lab DVD in Spectra. See the documentation on your program for information.
FTP Images to the Lab
You can also use Spectra to FTP an order to your lab over the Internet. To set up the FTP process, complete the FTP information in Maintenance > Production > Vendors with your lab's FTP information.

Getting Started With Spectra
58
SENDING IMAGES TO THE LAB
1. Insert your blank CD/DVD and prepare for writing, if necessary.
2. From the Produce Images stage of the Workflow hub, highlight a session that has images ready to be sent to the lab and click Send Images to Lab. Or, from a session, invoice, or production order, open the Action tab of the ribbon and click Send Images to Lab.
Send Images to Lab
3. On the Send Images to Lab screen, select the files that you want to send. Use the Image Selector menu on the toolbar to choose which images to send, or check the images individually. The ordered images will be selected by default. Click on an image file to view a preview on the right side. In the lower left side you'll see the number and size of files selected.
4. Use the Add Folder or Add File buttons to add additional files that are not in the session image folders.
5. Use the Advance Status button if you want the session status to be automatically advanced to the next status upon completion.
6. To burn a lab CD/DVD, click Create Lab CD/DVD. Select the drive and include a Purchase Order PDF file and/or a Purchase Order XML file to send with your images.

9: Digital Workflow
59
7. To send images via FTP, click Export to Lab FTP Site. Select the vendor that you are sending the images to, enter the vendor's order number, and select Include an Order XML file to send with your images.
8. Click the Start Export button to begin the export to the lab.
9. If you are burning to CD and there is not enough room on the disk you will be prompted to insert another disk after the first disk is done burning.
5 - Uploading Images to the Web
Spectra can upload your images to the web so that your clients can view their images and place an online order. You will need to have an InSpiredByYou.com account with StudioPlus in order to upload images. Go to www.StudioPlusSoftware.com for more information. For complete setup instructions go to the "InSpiredByYou" section of the Spectra User Guide.
1. To upload images to the web, open the Upload Images stage on the Workflow hub and highlight a session that has images you want to upload.
2. Click Upload to InSpired to launch the session uploader.
InSpiredByYou Session Uploader
3. Select the images you want to upload.
4. Set any Online Groups you would like displayed.
5. On the Session Info tab, verify the client's User Name and Password, Days Active, and Price List.
6. Click Upload.
7. Once you have completed the upload, update the status of your session.

Getting Started With Spectra
60
6 - Archiving Images
StudioPlus recommends that you archive your images to ensure you have a safe backup in case of a server or hard drive failure. You can archive to a CD/DVD, a folder on your computer or network, or both. To archive to a CD/DVD, you must have a CD/DVD writer installed on your computer and you must have enabled the CD/DVD to be written if using a program like Roxio‘s Direct CD.
1. If your archive will include a CD/DVD, insert your blank CD/DVD and prepare it for writing (using software such as Roxio's Direct CD).
2. Open the Archive Images stage on the Workflow hub and highlight a session that has images ready to be archived.
3. Click Archive Images to open the Archive Images screen.
Archive Images
4. On the Archive Images screen, select the files that you want to archive.
5. Click Archive to CD/DVD and/or Archive to Folder to open new groups on the toolbar where you can select specific options such as CD/DVD Drive, CD/DVD Number, and Folder Options.
6. Click Start Archive to begin the archiving process.
7. You can add multiple files to your archive, just use the same CD/DVD number or folder for each session archived.
8. Once you have finished adding files to your archive, use your CD/DVD writing software to burn the CD/DVD, if you're using that option.
9. When you have completed archiving your images, update the status of your session.

9: Digital Workflow
61
7 - Deleting Images
When you're sure you no longer need to work with your images and after you have archived them, you can delete the images off your server. We recommend that you wait several weeks after the client has completed their order, in case you have reorders. However, you can retrieve the images from your archive if you need to.
1. Open the Delete Images stage on the Workflow hub and highlight a session that has been archived and is ready to be deleted.
HERE'S A FLASH FOR YOU! Don't delete your preview images so that you can continue to view them in Spectra.
2. Click Delete Images to open the Delete Images window.
Delete Images
3. Select the images you want to delete.
ATTENTION! Warning! All the images will be permanently deleted!
4. Click Delete Images. Spectra will ask if you are sure you want to permanently delete the files. Click Yes to delete them or No to cancel.

Getting Started With Spectra
62
Modifying the Digital Workflow for Your Studio
Remember that with Spectra you can set up status types and workflows to suit your studio – there isn't one right way to do it. Work with Spectra to find the best way to make the digital workflow work for your studio. Here are some different ways to set up the digital workflow.
ARCHIVE IMAGES AFTER CAPTURE
If you want to archive your images immediately after you capture your hi-res images, enter a session status of "Archive Images Pending" after "Session Previews Pending" and associate it with the Archive Images stage of the digital workflow.
PRE-SALES RETOUCHING
If your studio does retouching before you present the images to the client then set up a session status of "Pre-Sales Retouching Pending" after "Create Previews Pending" and associate it with the Retouch Images stage of the digital workflow.
NO RETOUCHING
If your studio doesn't do retouching in-studio you can remove the production status of "Retouching." However, you may still want to include a step where you make production notes about the retouching the lab needs to do.
PRINTING INTERNALLY
If your studio prints images internally, we recommend that you set up a new production status called "Image Printing Pending."
NO SLIDESHOW OR PRESENTATION
You may not use Spectra's slideshow and presentation features as part of your sales presentation. Remove the "Prepare Slideshow Pending" and "Sales Presentation Pending" statuses in the session status maintenance. Replace them with the sales process that you use. These may not be associated with a digital workflow stage.
NO WEB UPLOAD
If you do not upload images to the web, you will not need to use this digital workflow stage. You can remove the "Upload to Web" session status and then simply skip this workflow stage.

63
Appendix
Printable Quick Reference

Getting Started With Spectra
64
Spectra Data Model


![Skaffold - storage.googleapis.com · [getting-started getting-started] Hello world! [getting-started getting-started] Hello world! [getting-started getting-started] Hello world! 5.](https://static.fdocuments.net/doc/165x107/5ec939f2a76a033f091c5ac7/skaffold-getting-started-getting-started-hello-world-getting-started-getting-started.jpg)


