Get Start
36
A guide to getting started A 32 page guide to setting up and using your router and cutters ROUTING BOOK/SS3 BOOKLET IN A SERIES
-
Upload
steven-hendry -
Category
Documents
-
view
5 -
download
3
description
get started
Transcript of Get Start

A guide togetting started
A 32 page guide to setting up and using your router and cutters
RROOUUTTIINNGG
BO
OK
/SS
3
BOOKLET
IN A SERIES

CONT
ENTS
CONTENTS
© 1997 Published by Trend Machinery and Cutting Tools Ltd. All rights reserved. No part of this publication may be reproduced, stored ortransmitted in any form without prior permission. Our policy of continuous improvement means that specifications may change without notice.
Trend Machinery and Cutting Tools Ltd. cannot be held liable for any material rendered unusable, or for any form of consequential loss.
1. HEALTH AND SAFETY . . . . . . . . . . . . . . . . . . 1
2. ROUTING BASICS
The electric plunge router . . . . . . . . . . . . . . . . . 4
Standard accessories . . . . . . . . . . . . . . . . . . . . 6
Router cutters . . . . . . . . . . . . . . . . . . . . . . . . . 7
Fitting cutters . . . . . . . . . . . . . . . . . . . . . . . . . 8
Cutter types . . . . . . . . . . . . . . . . . . . . . . . . . . 9
Safe routing procedure . . . . . . . . . . . . . . . . . . 10
Holding the work . . . . . . . . . . . . . . . . . . . . . . 11
3. GUIDING THE ROUTER
Freehand routing . . . . . . . . . . . . . . . . . . . . . . 13
Using the side-fence. . . . . . . . . . . . . . . . . . . . 14
Using batten guides . . . . . . . . . . . . . . . . . . . . 16
Using bearing guided cutters . . . . . . . . . . . . . . 18
Using the beam trammel . . . . . . . . . . . . . . . . . 19
Using guide bushes and templates . . . . . . . . . . 20
4. SETTING THE DEPTH OF CUT . . . . . . . . . . . . 22
5. CUTTER SELECTION
Straight cutters . . . . . . . . . . . . . . . . . . . . . . . 24
Rebate cutter . . . . . . . . . . . . . . . . . . . . . . . . 26
Ogee moulding cutter . . . . . . . . . . . . . . . . . . . 27
Rounding over cutters . . . . . . . . . . . . . . . . . . 27
Cove cutters . . . . . . . . . . . . . . . . . . . . . . . . . 28
Dovetail cutter . . . . . . . . . . . . . . . . . . . . . . . . 29
Chamfer cutter . . . . . . . . . . . . . . . . . . . . . . . 30
V cutter . . . . . . . . . . . . . . . . . . . . . . . . . . . . 30
Trimming and template profiling cutter . . . . . . . . 31
6. CUTTER AND COLLET CARE . . . . . . . . . . . . 32

1
HE
ALT
H&
SA
FE
TY
trend routing technology
The router:
A Always switch off the router andisolate from mains the supply whenchanging cutters or makingadjustments to the router.
B Remove loose items such aslocking bars and allen keys from therouter and adjacent working surfaces.
C Before re-connecting to themains supply, make sure the powerswitch is in the ‘off’ position.
D Ensure that the power cable iskept well away from the cutter andcannot tangle or catch on theworkpiece, jig or fittings.
E Check before starting to cut thatclamps will not obstruct the path ofthe router. When cutting through thefull thickness of the material, ensurethat the cutter cannot foul the vice,bench edge or other obstacles beneaththe workpiece.
Although routers, as with all power tools, can be dangerous if mishandled, by following these basic safety instructions youwill help ensure your own health and safety and protect the well-being of those around you.
HEALTH AND SAFETY 1

The operator:
F Always wear eye protection suchas goggles or a full face visor.
G Always wear ear defenders ifrouting for a lengthy period.
H Do not allow objects to dangleover the work area, i.e. do not wearloose clothing such as a tie. Rollsleeves back and ensure long hair istied back.
I Keep fingers clear of the cutterand never try to slow or stop the cutterby hand.
J Always keep other people awayfrom the work area to avoid beingstartled by sudden interruptions.
K Practice the procedure firstbefore starting to cut and concentratecarefully on what you are doingthroughout the operation.
L For prolonged routing operationsuse dust extraction equipment,particularly with materials such asMedium Density Fibreboard (MDF).Alternatively use a ventilated filteredvisor, which also acts as an eyeprotector.
M Never leave cutters lying wherethey can cause injury or be damagedagainst other tools. Always returncutters safely to a storage rack, walletor case.
HEALTH AND SAFETY - continued
2
1H
EA
LT
H&
SA
FE
TY
trend routing technology

When routing:
N Before switching on, and betweeneach operation, check that all lockingknobs, nuts and screws are fullytightened. Check that anti-vibration
springs are fitted to each locking nutas original specification and considerfitting them to those machines notsupplied with them as standard.
O When cutting circles, do not allowthe cable to twist excessively.Regularly switch off and unwind thecable in the reverse direction.
P Before making any adjustments,make sure the router has come to acomplete stop and remove the plug.Never leave the router runningunattended.
Q Always feed the cutter into thematerial against the rotation of thecutter when using the router portably.
R If the cutter is protruding fromthe base of the router, i.e. fixed at a setcutting depth, do not switch the routeron with the cutter in contact with theworkpiece. When the operation hasbeen completed, a simple stand can beused to avoid accidents while thecutter is still revolving.
3
HE
ALT
H&
SA
FE
TY
trend routing technology
1

4
2R
OU
TIN
GB
AS
ICS
trend routing technology
THE PLUNGE ROUTER
Plunge columns
Fixed side handle
On/off switch
Motor housing
Router base plate
Collet & lock nut
Spindle lock
Cutter depth gauge
Plunge lock/release handle
Three positionturret stop
Depth stop
Side-fence locking knob
Speed control

5
RO
UT
ING
BA
SIC
S
trend routing technology
The modern plunge router is a precision tool that canperform a wide range of wood machining operations. Witha powerful motor revolving the cutter at high speed, themachining quality is extremely precise, and often requiresno further finishing.
The router consists of the motor and its housing, sliding onsprung columns fitted to a rigid base plate. The routercutter is fitted into a fixed diameter collet, directly mountedon the motor shaft. This arrangement allows the cutter tobe plunged into the work at a precise 90° to the surface andhaving performed the machining operation, withdrawnsafely above the base plate.
With cylindrical type routers, the body of the motor can beremoved by releasing a body clamp. This allows the motorto be used portably for grinding and shaping with rasps, orfor fitting it into an overhead stand. Larger, professionalrouters are not suitable for this purpose, but include a rangeof other important features.
Collet capacityThe shank of the cutter fits into a tapered collet and issecured by a collet nut. Routers sold in the UK either accepta 6.35mm (1/4”) collet or, with larger routers, a colletcapacity of 6.35mm, 8mm, 12mm or 12.7mm (1/2”).
Hand gripsThese allow the router to be guided with both hands alongits intended path. On some routers, one grip handle has adual role as it will release the plunging mechanism with aquarter turn. On others, a separate lever is provided for thispurpose.
On/Off switchThis is usually positioned so that it is within easy reachwithout releasing your grip on the handles.
Depth of cutA depth stop of varying designs is fitted to all plungingrouters and limits the downward movement of the cutter,thus controlling the depth of cut. Certain routers have athree stage turret stop, allowing three depths of cut to bepreset. The depth of cut can always be set by locking theplunge mechanism at any point along its travel. Moreprofessional routers have a fine adjuster included oravailable as an accessory. This can be used for very precisedepth control.
Speed ControlCertain models of router are available with variable speedcontrol, which allows a wide range of cutters to be used, onwood, plastics and soft-metals. All the cutters in the StarterSet should be used at maximum router speed.Having purchased a new router, read the instruction book inorder to fully understand your router’s specific features.
2

6
2R
OU
TIN
GB
AS
ICS
trend routing technology
STANDARD ACCESSORIES
Beam Trammel
This is used for cutting arcs andcircles and generally consists of aseparate point that either screwsbeneath the base plate or a bar whichis inserted into the router base inplace of one of the fence rods.
Side-fenceFor routing parallel to any straightedge of the workpiece. This isattached by using two rods secured tothe router base-plate. The width of arebate or the distance in from theedge of the workpiece, can beadjusted by sliding and clamping thefence along the rods. Better qualityfences are fitted with a fine adjusterfor precision setting.
Guide BushFor guiding the cutter around theedge of a pre-cut template or along aslot of similar width as the guide bushdiameter. The guide bush itself, fittedflush into the base of the router, has ashort flange concentric to the cutter.One size of bush is usually suppliedwith the router. Always allow a 2-3mm gap between the cutter and theinside of the guide bush.
With your new router you are likely to get several standard accessories. This may include:-

7
RO
UT
ING
BA
SIC
S
trend routing technology
2
Feeddirection
Clearanceangle
Cuttingangle
Rake angleor hook
Reliefof tip
Radial reliefof body
Gulletor flute
Rotationof cutter
Material (woodchip, swarf or wooddust) removed byeach cutting edge per revolution
Shankdiameter
Cutterdiameter
Shank chamfer for easy insertion into collet
Shank web
Cut length
Shankmachinedto precisetolerances
Carbidetip
Bottom relieffor grooving
ROUTER CUTTERS
Feed DirectionWhen using the router, the directionthat the cutter is fed into the woodmust always be against the rotationof the cutter. This also ensures thatthe cutting action pulls the side-fenceor guide bearing into the wood ratherthan allowing it to wander away.
GeometryThe twelve cutters in the set have tungstencarbide tips brazed onto a steel body andare designed to cut natural timbers,plywood, MDF and chipboard. Theclearance and cutting angles have beendesigned to leave a perfect finish. Cuttersover 16mm diameter have been made toconform to the European Holz-BG safetystandard.
Feed SpeedThe optimum speed at which thecutter is fed into the wood must notbe too fast that the motor slowsdown or too slow that the cutterleaves burn marks on the face of thewood. Practice judging the speedby listening to the sound of themotor.
Routercutter feeddirection

FITTING CUTTERS
When fitting the cutter alwaysensure that at least 3/4 of the shanklength is held in the collet. Do nottry to grip the cutter by the end ofthe shank to gain extra cuttingdepth, as this can damage the shankand distort the collet itself. Workingwith the cutter held in this way canalso prove dangerous to theoperator as well as causing damageto the workpiece.
Do not push the cutter completely intothe collet but allow 4mm between thecollet and web where the body of thecutter meets the shank. Also ensurethat when fitting cutters that the endof the shank is not in contact with theinternal face of the collet recess in thespindle.
Check that the collet nut thread isclean and ensure that they tightenwithout binding. Fit the collet and nutassembly before fitting the cutter andinitially screw the collet nut up byhand. Finally, tighten using thespanner and spindle lock (or separatetommy bar or second spannerprovided with the router), but do notover tighten.
On some routers a spindle lock allows thecollet nut to be tightened with only onespanner.
8
2R
OU
TIN
GB
AS
ICS
trend routing technology
On other types a tommy bar is fittedthrough the spindle and a spanner used totighten the collet nut
Collet NutCollet

9
RO
UT
ING
BA
SIC
S2CUTTER TYPES
Groove forming cutters
These require the use of a side-fence, batten, guide bush orother method of guiding the router. To minimise heat build-up, side deflection, and allow waste material to clear easily,always cut in a series of shallow steps rather than to the fulldepth in one pass. With shaped cutters increasing depthsof cut will often produce a different shape.
Self-guiding cutters
These cutters have a bearing guidethat follows the edge of theworkpiece or a template fittedbeneath it. Self-guiding cutters canbe used on both straight and curvededge work, for example onrectangular or circular tables. Thebearing is fitted with an allen screwon a spigot machined into the noseof the cutter. The width of the cut isthus controlled by the edge of thebearing running along the workpiece.
trend routing technology
Bearing Washer
Allen Screw

A. Fit the cutter into thecollet of the router. Seepage 8.
B. Set the depth of cut. Seepages 22 & 23.
C. Set-up guiding method.See pages 12.
D. Check that the workpieceis secure & there are noobstacles.
E. Make sure router is notswitched on and cutter isfree to rotate. Only thenconnect to the mains andswitch on.
F. Allow motor to reach fullrunning speed.
G. Perform the routingoperation.
H. Retract the router cutterby releasing the plungemechanism.
I. Switch off and let thecutter come to a completestop.
J. Put the machine downand isolate from mains.
10
2R
OU
TIN
GB
AS
ICS
trend routing technology
SAFE ROUTING PROCEDURESequence for Plunge Routing
Step OnePlunge downand lock the
motor carriage.
Step TwoCarry out
the routingoperation.
Step ThreeRelease lock &motor carriage
returns to normalposition.

11
RO
UT
ING
BA
SIC
S
trend routing technology
2Traditional G-cramps are now beingreplaced by ‘quick action’ clamps tohold the workpiece or jig etc inposition. They are less likely toimpede the path of the router and canbe positioned in seconds.
Sliding jaw benches fittedwith adjustable benchstops are also ideal for thispurpose, but ensure thatthe cutter does not touchthe metal stops, or cut intothe bench surface. If thereis any risk of cutting downthrough the workpiece, or ifthis is intentional, lay apiece of thin waste material(i.e. hardboard) beneaththe work to protect thebench.
In situations where clampsor other mechanicaldevices are impractical,pins, double sided tape or ahot melt glue gun can beused. When using eithertape or glue, do ensure thatthe surfaces are first free ofdust and grease.
HOLDING THE WORK
12
3G
UID
ING
TH
ER
OU
TE
R
trend routing technology
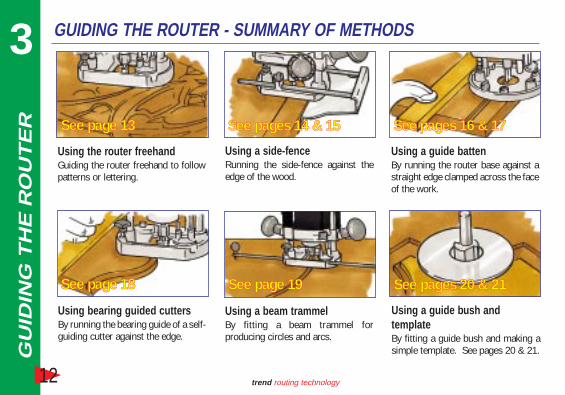
GUIDING THE ROUTER - SUMMARY OF METHODS
Using a side-fenceRunning the side-fence against theedge of the wood.
Using a guide battenBy running the router base against astraight edge clamped across the faceof the work.
Using a beam trammelBy fitting a beam trammel forproducing circles and arcs.
Using a guide bush andtemplateBy fitting a guide bush and making asimple template. See pages 20 & 21.
Using the router freehandGuiding the router freehand to followpatterns or lettering.
Using bearing guided cuttersBy running the bearing guide of a self-guiding cutter against the edge.
See page 13See page 13 See pages 14 & 15See pages 14 & 15 See pages 16 & 17See pages 16 & 17
See page 18See page 18 See page 19See page 19 See pages 20 & 21See pages 20 & 21

13
GU
IDIN
GT
HE
RO
UT
ER
trend routing technology
3FREE HAND ROUTING
The small portable router is ideal for carrying out free-handrouting. First mark out on the material the pattern required.Engraving can be done with a ‘V’ groove, 1/4” straight or smallradiused cutter. Taking shallow passes will ensure there iscomplete control of the router. For increased control, guidance ofthe router can be made by holding the base of the router, witharms resting on the workpiece.
Relief carving canbe carried out bytaking light cuts withthe 1/4” straight flutecutter.
For a selection ofpatterns andshapes there aretwo booksavailable whichprovide shapes totrace and use forfree hand routing.

14
3G
UID
ING
TH
ER
OU
TE
R
trend routing technology
USING THE SIDE-FENCE
Adjusting the side-fence
The side fence is mounted by sliding it into the router base.Mount it against a parallel edge of the workpiece to rout arebate or central groove. Adjust its position in from theedge of the workpiece, by sliding the rods through the baseof the router. Position the router and side-fence onto theworkpiece, and adjust the fence until the edge of the cutteraligns with the correct position of the cut. Tighten up all theclamping knobs.
Routing with the side-fence
Turn the router on and position the router up to the edge ofthe workpiece. Then plunge the router in and cut thegroove or the rebate.When using the side-fence, keep it firmly against the edgeof the workpiece and take care that it does not turn in at thestart and finish of the edge. This can be achieved by puttingextra pressure on the inside cheek of the side-fence.
Position the outeredge of the cutterto the pencil line
Cutting edge

15
GU
IDIN
GT
HE
RO
UT
ER
trend routing technology
When rebating narrow sections, thematerial should be well secured. Forrouter stability fix a piece of wastematerial, the same thickness,alongside the workpiece. This willprevent the router tipping. Alwaysfeed in the correct direction to ensurethat the pull of the cutter keeps theside-fence pressing against theworkpiece and not pulling away fromit.
For very narrow sections, clamp extramaterial on both sides to give supportto the router and prevent it fromtipping. Often the use of a secondside-fence on the opposite side willgive extra support.
Although pressure on the inside cheekof the side-fence will prevent therouter ‘turning in’, extra long woodencheeks can be screwed to the face ofthe side-fence. Ideally clamp wastematerial at either end of the workpieceand carry the cut into them.
3

16
3G
UID
ING
TH
ER
OU
TE
R
trend routing technology
Using a batten to guide the router is very useful when:
A. The edge of the workpiece is not parallel to the grooverequired.
B. The edge of the workpiece is not suitable for guidance,e.g. has a poor finish.
C. The groove is too far in from the edge and therefore theguide rods of the side-fence will not be long enough.
The battens should be the same length or longer than thegroove required.
Guide battens should be clamped at each end, but ensurethe clamps do not obstruct the router base. Always rout inthe correct direction so that the cutter will pull against thebatten. Always use the same point on the base to slide upagainst the batten, as often the base is not uniform in shape.To cut a housing wider than the cutter, clamp two guidebattens parallel with each other and position them to give thewidth of the groove required. Where stopped grooves arerequired such as for shelf supports, clamp a block at eachend to prevent the router from over cutting.
USING BATTEN GUIDES

17
GU
IDIN
GT
HE
RO
UT
ER
trend routing technology
Stub Mortise & Tenon joints
The Mortise: This is no more thana short groove and is routed with astraight flute cutter. The procedureis to mark the width and length of themortise. Then set the side fenceworking from one edge. Makeseveral passes until the depthrequired is achieved. For each depthsetting make two cuts working fromboth sides of the timber in turn. Thiswill ensure that the mortise isperfectly central. The corners of the
mortise will need to be squared offwith a sharp chisel.
The Tenon: To make matchingtenons, lay the timber sections sideby side and cut all the shoulderssimultaneously, using a clampedbatten to guide the router.
Now, remove the rest of the waste, byworking with the router freehand.Rout the waste from the end of thetenons towards the initial groove.This will ensure there is adequate
support for the base of the router andwill prevent tipping. Turn all thecomponents over, butt the cutshoulders against a batten secured tothe bench and repeat the process tocomplete the tenons.
Short shoulders on the tenon are bestcut with a hand-saw.
3

18
3G
UID
ING
TH
ER
OU
TE
R
trend routing technology
USING BEARING GUIDED CUTTERS
With bearing guided cutters, settingup is a much simpler operation. Nofence or batten is required as thebearing on the cutter acts as theguide. A bearing guide also enablesthe edge of curved workpieces to bemoulded. The edge of the workpiecemust be free from imperfections asthese will be reflected in the finish ofthe mould. Where the materialthickness leaves insufficient room forthe bearing to make contact, a secondpiece of material can be fixed beneathit for the bearing to follow.
First set the depth of cut to give therequired moulding.
When routing maintain constant feedspeed against the rotation of the cutterthroughout the pass and always feedagainst the rotation of the cutter, e.g.for external moulding, in an anti-clockwise direction.
With bearing guided cutters such asthe rebater supplied in the set, takeseveral passes by adjusting the depthbetween cuts by 2-3mm.
1stcut
3rdcut
2nd cut
4th cut
When moulding natural timbers alwaysmould the end grain first, followed bythe long grain. This ensures that ifthere is breakout, this will be removedwhen the long grain is routed.
When reaching the end of theworkpiece, the cutter will have atendency to ‘rout around the corner’.To prevent this, either fit the side-fencein line with the bearing (if routingstraight edges), or rout into a wastepiece of material. Once more, fittingelongated fence strips to the fence willbe helpful.

The beam trammel is used for cuttingarcs and circles and generally consistsof a separate point that screwsbeneath the base plate, or a bar that isheld in the side fence rod clamps.When cutting arcs into the edge of theworkpiece, locate a centre block toraise the centre point and positionsupport strips close to the edge, onwhich to balance the router.
The point of the trammel is located inthe centre of the circle by pressing thepoint into the workpiece. If you wishto avoid marking the work, fix a smallpad of timber, with double sided tapeat the centre on which to position thecentre point.
To give extra security to prevent thepoint slipping out of the pivoting point,recess the tapered bolt deeper into thepad or workpiece.
When cutting completely through thematerial, the centre piece will comeloose as the last pass is made. Toprevent it from contacting the cutter,secure it with double sided tape, aswell as clamping the outer sectionbefore starting the operation.
19
GU
IDIN
GT
HE
RO
UT
ER
trend routing technology
3USING THE BEAM TRAMMEL

20
3G
UID
ING
TH
ER
OU
TE
R
trend routing technology
When drawing out the templateshape, remember that the differencebetween the cutter and outside guidebush diameter needs to be allowedfor. This margin (E) is calculated bydeducting the cutter diameter (d)from the outer guide bush diameter(D) and dividing the remainder bytwo. (E = (D-d) ÷ 2). For externaltemplates deduct this amount fromeach edge of the template or guide.For internal templates add thisamount to each edge.
Guide bushes are available in differentdiameters to allow various diametercutters to be accommodated. Choosea guide bush that allows at least 2 to3mm clearance around the cutter toallow waste to clear. Templatesshould be cut from MDF or a hardmaterial of a thickness slightly greaterthan the guide bush depth (i.e. for
5mm bush flange projection, allowminimum 6mm thickness). Whencutting out templates, ensure that theedges are smooth otherwise anyirregularities will be repeated on theworkpiece.
USING GUIDE BUSHES AND TEMPLATES
Guide Bushfitted to router
Template
EdD

21
GU
IDIN
GT
HE
RO
UT
ER
trend routing technology
3A guide bush is primarily used for guiding the cutteraround the edge of a pre-cut template or along apurpose made slotted panel with slot width to matchthe bush flange diameter. The guide bush itself,fitted flush into the base of the router, has a bushflange concentric to the cutter. This runs against theedge of the template or guide. When routing, followthe correct feed direction, depending on whether it isan internal or external template. Keep the bushflange tight up against the template and do not liftthe router as it will cut into the template edge.
A simple slot templatecut into a tee-square
can be used forcutting cross
housings.
A simple templatecan be used forrecessing hinges
An external template used to give a decorativepanel shape.
Cut anti-clockwise
Template
Cut clockwise
Door

4S
ET
TIN
G D
EP
TH
OF
CU
T
trend routing technology
SETTING THE DEPTH OF CUT
To set the required depth of cut (thatis the full depth of the groove orrebate), most routers are fitted with adepth stop. On light duty routers, thisis likely to be a simple graduated rodheld in a clamp.
To set the depth of cut, fit the cutterand rest the router over the work.Release the plunge lock and lower thecutter until the tip rests on the work.Re-tighten the plunge lock.
Drop the depth stop rod until it restson the stop (usually the head of one ofthe turret stop screws). Raise the rodby an equal amount to achieve thedepth of cut.
Alternatively if you are recessing for afitting such as a hinge, use the hingeflap itself, as a gauge to set the gap.
Many routers are also fitted with athree position turret stop. When
cutting in several steps, this allowseach depth to be pre-set and andquickly selected on each consecutivepass.
When using the turret stop, set thedepth of cut for the final pass (i.e. fulldepth) on the lowest screw, and setthe others at equal steps for the firsttwo passes.
22

23
SE
TT
ING
DE
PT
H O
F C
UT
trend routing technology
6mm
3mm
Graduatedscale onrouter
Routerdepth rod
Turret stop
Router base
Workpiece
Cutter
9mm
Step 1Set the turret stops toequal steps (i.e. 3mm or asrequired). Lower the tip ofcutter onto workface andset the depth rod to equal adistance of 3mm abovehighest stop.
Step 2Plunge cut to the first stop(3mm) and rout tocomplete cut to that depth.
Step 3Rotate turret to the centrestop and cut the work tothat depth (i.e. 6mm totaldepth of cut.
Step 4 Rotate turret to the loweststop and cut the work tothat depth (i.e. 9mm totaldepth of cut).
Step 5To cut a further depth, setthe cutter to the bottom ofthe cut, and retract thedepth stop rod. Rotate theturret back to highest stopand set the rod to therequired depth (i.e. 3mm).Repeat steps 2 to 4 untilrequired depth of cut isreached.
Using a three position turret stopOnce the turret stops are set up, the procedure for usingthem is as follows:
4

Straight cutters are generally used fortrimming and cutting straight edges,cutting straight rebates, slots andgrooves. For these operations therouter is guided by the side fence oragainst a batten edge. Using atemplate or guide bush, they can alsobe used for similar operations onregular or irregular curved work.
They are also valuable for producing arange of joints.
Two straight cutters are provided inthe Trend Starter Set. These are
6.3mm and 12.7mmdiameter. Both aresuitable for grooving andrebating. The 1/4”(6.35mm) cutter can beplunged in centrally
away from the board edge. The 1/2”(12.7mm) cutter must enter from the
edge of the board.
Please note the 8mmshank set is suppliedwith a 12mm diameterstraight two flute cutter.
Tongue & groove joint Lap joint Barefaced tongue & groove joint
Halving joint Housing joint
24
5C
UT
TE
R S
EL
EC
TIO
N
trend routing technology
STRAIGHT CUTTERS
19.0
12.7
19.0
6.3

Tongue and groove joints
Use a straight cutter to rout a squaretongue on the edge of a board. Cut amatching groove down the centre ofthe other component, using a woodenstrip clamped to both sides to providea wide flush surface to support thebase of the router. See ‘Using theside-fence’ on page 14 for furtherinformation.
Rebated and grooved joints
Lap joints, barefaced housings andhalving joints are all variations on abasic theme. By clamping severalcomponents together flat on a benchyou can cut any one of these jointsusing a straight cutter in a router runagainst a guide batten.
Helpful tips
Always resist the temptation to routgrooves and joints in one pass of therouter, so take several shallow cuts.This will ensure a better finish isobtained and it will reduce the load onthe router. Mounting a waste piece atthe end of the components clampedready for machining, will ensure theend panel does not split out (the cut iscarried through into the waste piece).
25
CU
TT
ER
SE
LE
CT
ION
trend routing technology
5
Stopped housing joint Cross halving joint Rebated joint Stub mortise & tenon joint Comb joint

26
5C
UT
TE
R S
EL
EC
TIO
N
trend routing technology
12.0
28.0
Self guiding rebate cutters can be usedon straight as well as curved edges.Although the width of the rebate is setby the guide bearing diameter, differentdiameter bearings can be fitted to varythe rebate size.
Profiles shown 75%BearingRef.
B95B
BearingDia.
9.5mm(3/8”)
RebateWidth
9.25mm
REBATE CUTTER
B127B
B16B
B19B
12.7mm(1/2”)
15.9mm(5/8”)
19.1mm(3/4”)
7.6mm
6.0mm
4.5mm
Standard
Alternative bearings
The internal edge of acurved picture framebeing rebated to acceptthe glass and back.
N.B. Applicable to rebate cutter in Starter Set only
27
CU
TT
ER
SE
LE
CT
ION
trend routing technology
5
16.0
25.0
4.0
4.0
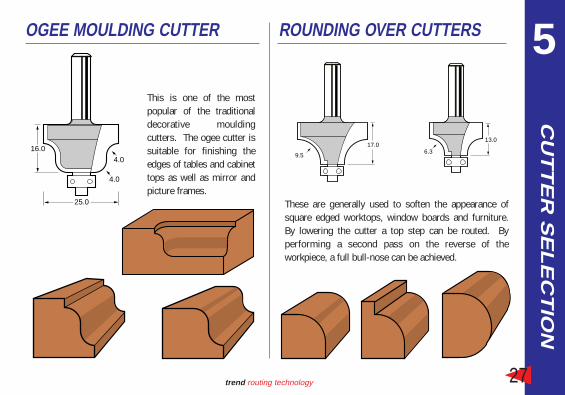
This is one of the mostpopular of the traditionaldecorative mouldingcutters. The ogee cutter issuitable for finishing theedges of tables and cabinettops as well as mirror andpicture frames.
17.0
9.5
13.0
6.3
These are generally used to soften the appearance ofsquare edged worktops, window boards and furniture.By lowering the cutter a top step can be routed. Byperforming a second pass on the reverse of theworkpiece, a full bull-nose can be achieved.
OGEE MOULDING CUTTER ROUNDING OVER CUTTERS

28
5C
UT
TE
R S
EL
EC
TIO
N
trend routing technology
12.722.0
6.3
Generally used as decorativecutters, cove cutters can be usedto rout a decorative edge finish,for fluting, or produce pipe andcable ducts. When producingsmall section cove beading,initially cut the moulding on bothedges of a wide piece of timberprior to separating them bysawing along the centre. Thisallows the workpiece to be heldsafely.
COVE CUTTERS

29
CU
TT
ER
SE
LE
CT
ION
trend routing technology
5
12.0
12.7
104°
Although used for cutting housings for shelf ends, unlikestraight cutters, the dovetail profile must be cut in one passonly. Always cut the housing before the dovetail tongue andadjust the tongue width to suit. For ease and safety, it isworthwhile considering using the router mounted in aninverted router table for cutting the tongues.If a router below 750 watts is to be used, the load can bereduced by routing a relief cut with a straight cutter first inthe centre of the area to receive the dovetail cut. Thisreduces the amount of material to be removed, reducingload on the router.
DOVETAIL CUTTER
The batten isadjusted tomake a widerdovetail groove.
Clamp support sectionseither side to preventthe router from tipping.

30
5C
UT
TE
R S
EL
EC
TIO
N
trend routing technology
12.745°
The main uses of the v-cutter are fordecorative grooves, fluting, imitationmatchlining on panel materials, andfree-hand or template letter carving.
Light edge chamfering can also becarried out using this cutter, on bothtimber and laminates.
Chamfers can be used as a decorative edge on timber worktops, furniture legsand rails. They can also be used for removing the arris on posts and railstructures, such as fences, gates and garden furniture. When joining boardsedge to edge, abutting edges can be chamfered to produce a vee-groove todisguise the glue joint.
Chamfers can be run thefull length of the workpieceor ‘stopped’ a shortdistance from the end. Forthe latter, a stop can befitted to limit the routertravel.
CHAMFER CUTTER V-GROOVE CUTTER
45°
32.0

31
CU
TT
ER
SE
LE
CT
ION
trend routing technology
5Bearing guided trimming cutters allow veneers andlaminates to be trimmed flush with the edge of the basematerial, leaving a perfect chip free square edge. They canalso be used to trim a thin workpiece flush to the edgecontour of a pre-cut template.
To retain cutter life alwaysrestrict overlap of material to
a maximum of 3mm.
12.7
12.7
TRIMMING & TEMPLATE PROFILING CUTTER
Note: When using plasticlaminate always allow laminateadhesive to dry beforetrimming, to avoid clogging theguide bearing
Workpiece
Template

32
6C
UT
TE
R &
CO
LL
ET
CA
RE
trend routing technology
It is essential to regularly maintainyour cutters and collets in order tokeep them in a safe and useablecondition.
It will also help to maintain the life ofyour router by keeping the loadsimposed upon it to a minimum.
Keeping your cutters sharp is a verysimple operation requiring little skilland remembering a few basic rules.
Clean all resin deposits from the cutterwith Rustbuster® or by scraping with apiece of stiff plastic before applying adry lubricant spray such as Trendicote®.
Use a diamond sharpening stone toregularly hone your cutters, but onlyever hone a router cutter on the flatunderface of the cutting edge.
When honing bearing guided cuttersalways remove guide bearings to avoidflattening the rim.
Brass brushes should be used toremove deposits from the inside of thecollet.
Regular application of a dry lubricantspray will prevent resin build up.
Rustbuster® is used to lubricate thepillars of the router and to preventsurface corrosion.
CUTTER & COLLET CARE

These products are available from your local Trend stockist.
4 PIECE CUTTER SET
A set of four TCT cutters aimed st thosenew to routing is now available.
• 10mm straight flute cutter.• 60° V-groove cutter.• 8mm bearing guided rounding over
cutter.• 12.7mm decorative panelling cutter.• Sets are available with 1/4” or 8mm
shanks.
Order Ref: SET/SS6
SIX PIECE CUTTER SET
Developed from the highlysuccessful SS3 set this economicalset contains six popular TCT cutterssupplied in a wooden box.
• Set comprises a 45° V-groove, a bearing guided ogee, two straights and two bearing guided rounding over cutters.
• Sets are available with 1/4” or8mm shanks.
Order Ref: SET/SS7
CUTTER & COLLET CARE KITThis kit contains all the essential accessories tomaximise the life of your cutters, collets and router.The kit comprises:
• A DMT mini-diamond sharpening stone and water bottle.
• Rustbuster® anti-corrosion agent spray.
• Trendicote® PTFE dry lubricant spray.
• Four sizes of brass brushes for cleaning collets.
Order Ref: CCC/KIT
12 PIECE CUTTER SET FOR
DOLLS HOUSES
This range of miniature cutters is designedto suit dolls house requirements at 1:12scale and for all types of miniature or smallscale work supplied in a wooden box.
• Router Cutters are TCT & 1:12scale.
• Sets are available with 1/4” or8mm shanks.
Order Ref: SET/DH1

BOOK/SS3 v3.0
TREND BOOK/SS3Trend Machinery & Cutting Tools Ltd
Watford EnglandLiterature Hotline: 0800 4 TREND (0800 487363)
Technical: 01923 224681 Fax: 01923 236879
Email: [email protected]: http://www.trendm.co.uk
Available from your local Trend stockist.
12 PIECE STARTER SET
For those new to routing, this is the ideal firstpurchase with your router. This set contains 12essential cutters for your basic projects and issupplied in a wooden box.
• Router cutters are tungsten carbide tipped.
• Suitable for grooving, profiling & moulding
softwoods, hardwoods, MDF & plywood.
• Sets are available with 1/4” or 8mm shanks.
Order Ref: SET/SS3